Ribbon-adorned ponytails have quietly become one of the most versatile and charming ways to elevate your everyday hairstyle. Whether you’re dressing up for a special occasion or adding a touch of refined elegance to your routine, ribbons transform a simple ponytail from casual to intentional in seconds. The beauty of this approach lies in its remarkable versatility—ribbons work with virtually every hair texture, length, and face shape, and they add a softness that rigid accessories like metal clips and plastic bands simply cannot achieve.
The real magic of incorporating ribbon into your ponytail isn’t just aesthetic; it’s psychological. Ribbons signal intention and care without demanding high-maintenance styling skills. You can achieve salon-quality results at home, whether you’re working with fine, delicate hair or thick, coarse strands. The soft texture of quality ribbon sits gently against your scalp and doesn’t tug or pinch the way elastic-only ponytails sometimes do, making these styles both beautiful and genuinely comfortable to wear for extended periods.
What makes ribbon ponytails particularly special is how they bridge the gap between playful and polished. You can choose delicate pastels and lace ribbons for romantic occasions, bold jewel tones for drama, classic neutrals for professional settings, or fun prints for everyday wear. The ribbon becomes an extension of your personal style rather than an afterthought, and unlike temporary hair trends that come and go, ribbon-embellished ponytails have remained consistently elegant across decades.
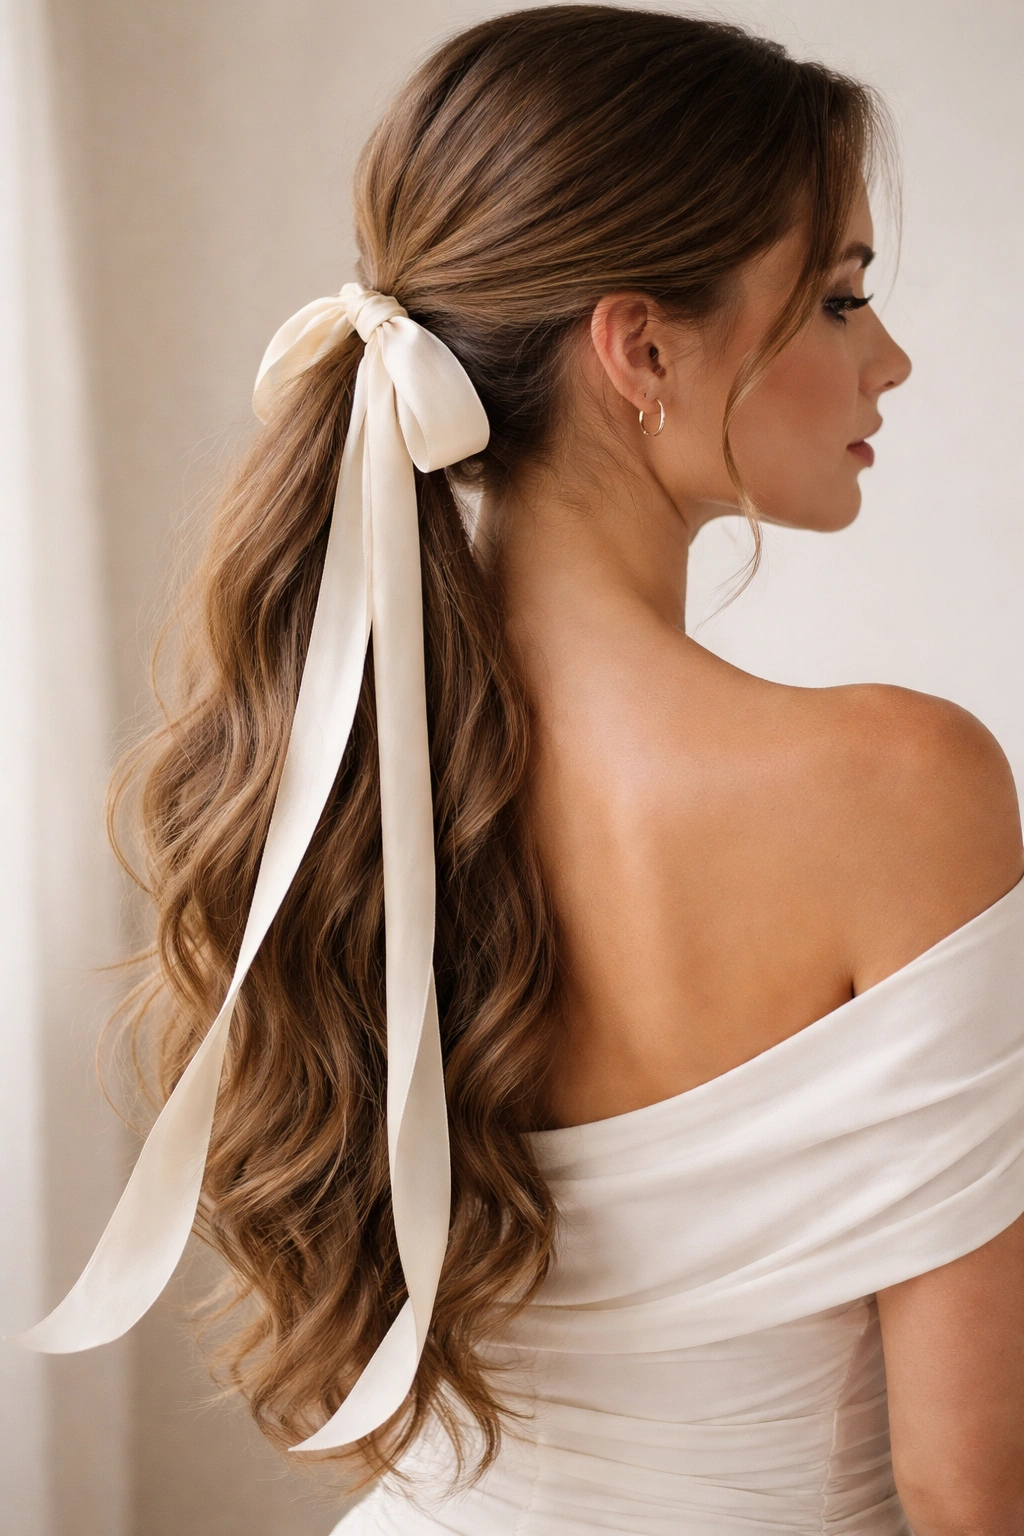
1. Classic High Ponytail with Silk Ribbon
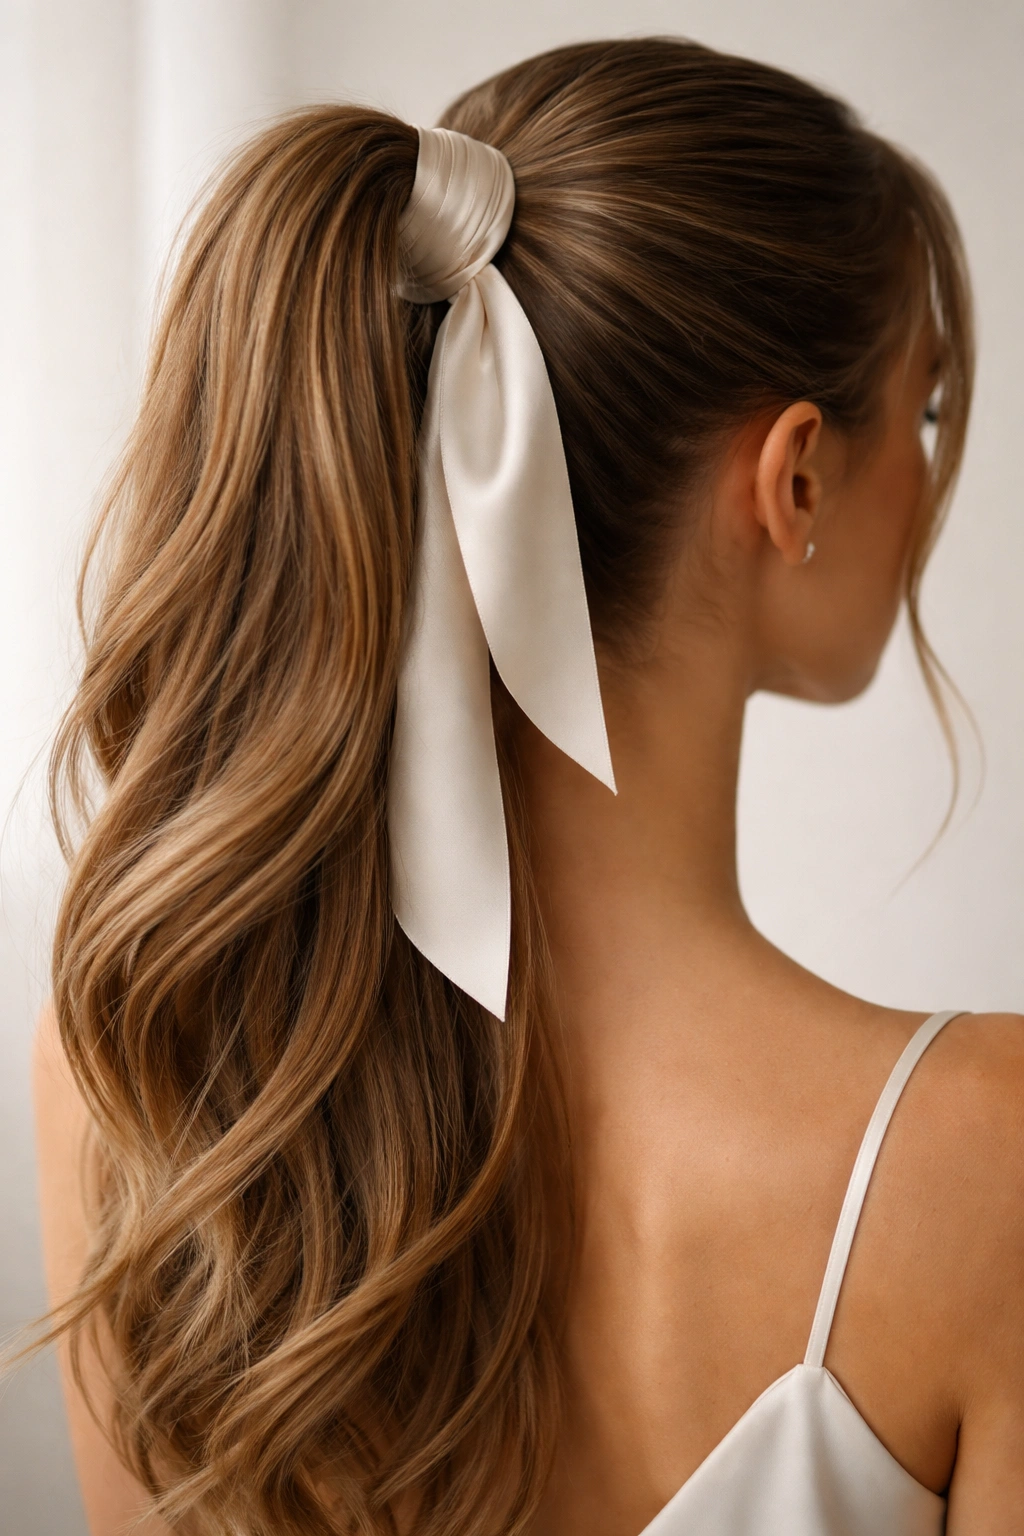
The high ponytail with silk ribbon is your foundation—the style that proves how dramatically one simple addition can transform the entire look. Start by gathering your hair into a high, tight ponytail at the crown, using a clear elastic or a thin hair tie that won’t show. Once secured, wrap your chosen ribbon around the base of the ponytail several times, covering the elastic completely. The wrapping motion is what creates that polished, intentional appearance.
Why Silk Makes the Difference
Silk ribbon is genuinely worth seeking out because it sits smoothly against your hair without snagging or creating friction the way synthetic ribbons do. Silk won’t leave creases in your hair like elastic does, and it catches light beautifully, adding dimension to your overall look. The material feels luxurious and stays in place longer without shifting throughout the day. If you wear your ponytail for hours, silk’s gentle texture means your hair will look fresher and less bent-out-of-shape when you take it down.
How to Secure It Properly
Thread your ribbon through the ponytail tie’s loop by wrapping it underneath and then bringing the ends around to the front where you can tie a neat bow. For extra security that won’t slip, use a small bobby pin or two hidden beneath the bow. Make sure the pin goes through the ribbon itself and into the hair underneath—this anchors everything without being visible. For a softer look, don’t tie the bow too tightly; let it have some volume and movement rather than pulling it flat against your hair.
Styling Tips for Maximum Impact
Keep the ponytail itself smooth and sleek by using a fine-tooth comb or paddle brush to gather your hair, working from the front hairline back. Apply a light smoothing serum or anti-frizz cream to tame flyaways before securing the tie. Choose ribbon colors that complement your skin tone—cooler skin tones generally look stunning with silvers, blush pinks, and jewel tones, while warmer skin tones shine with gold, coral, and warm metallics. This single high ponytail style works beautifully on its own or as a base for other ribbon styles you can build upon.
2. Wrapped Ribbon Ponytail with Soft Curls
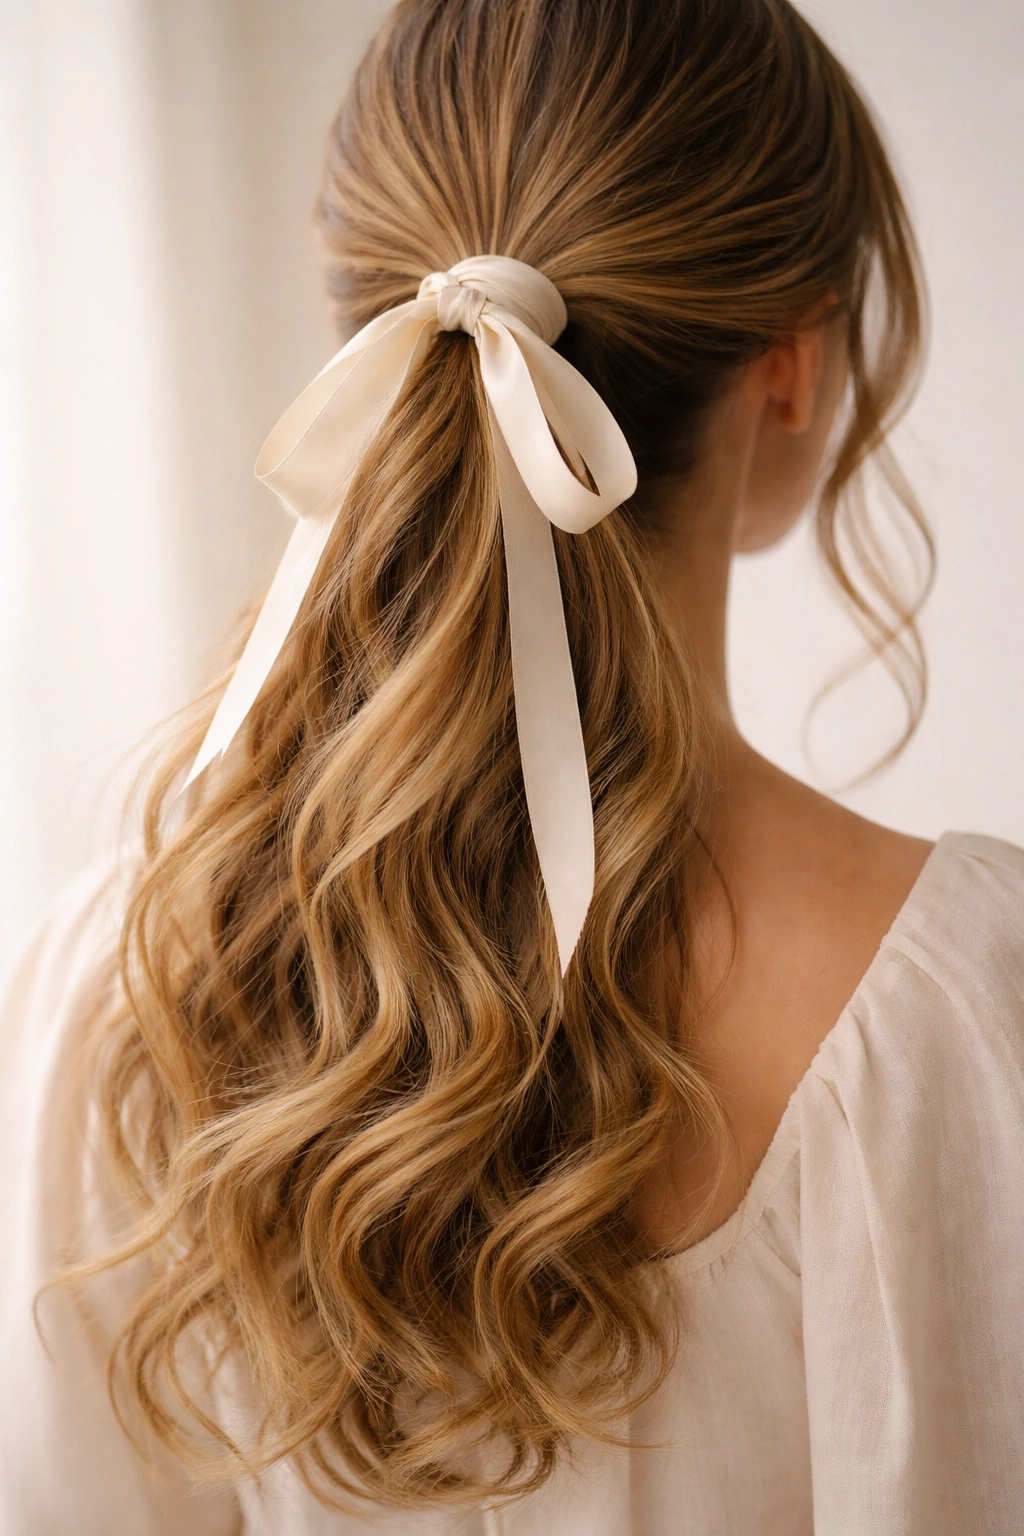
This style takes the classic ponytail and transforms it into something romantic and dimensional by combining the structure of a wrapped ribbon with flowing waves. Create your ponytail as before, then wrap your ribbon around the base tightly enough to secure the hair but loosely enough that you can still see the texture beneath. The key difference here is what happens to the ponytail itself—rather than leaving it straight, you’ll be adding texture and movement.
Creating the Curl Pattern
After securing your ribbon wrapping, take sections of your ponytail and gently curl them using a 1.5-inch curling iron, working downward in waves rather than tight spirals. The goal is soft, undone curls that move rather than clunky ringlets. For lasting curls, curl away from your face on both the left and right sides of the ponytail, following the natural direction your hair wants to go. Allow each curl to cool completely before running your fingers through them—this sets the wave pattern and creates that effortless, romantic texture.
The Ribbon as Visual Anchor
With soft curls creating movement throughout your ponytail, the ribbon becomes the visual anchor that grounds and organizes everything. Choose a ribbon with some substance to it—satin or grosgrain work beautifully—so it stands out against the waves without getting lost in the texture. Wrap the ribbon at least twice around the base to ensure it’s prominent enough to be the focal point rather than disappearing into the curls. If you want extra softness, use a pale pink, cream, ivory, or dusty rose ribbon that complements the romantic aesthetic of the waves.
Maintaining the Style Throughout the Day
These waves hold best when you’ve prepared your hair with a heat protectant spray before curling. The combination of ribbon and curls means the ponytail itself is doing a lot of visual work, so keeping everything looking fresh is important. Carry a small bobby pin or two in your bag in case you need to re-tuck any escaping strands, and consider a light hairspray to hold the wave pattern—not enough to make hair stiff, just enough to extend the lifespan of your curls. This style typically looks even better after a few hours as the curls relax slightly into softer waves.
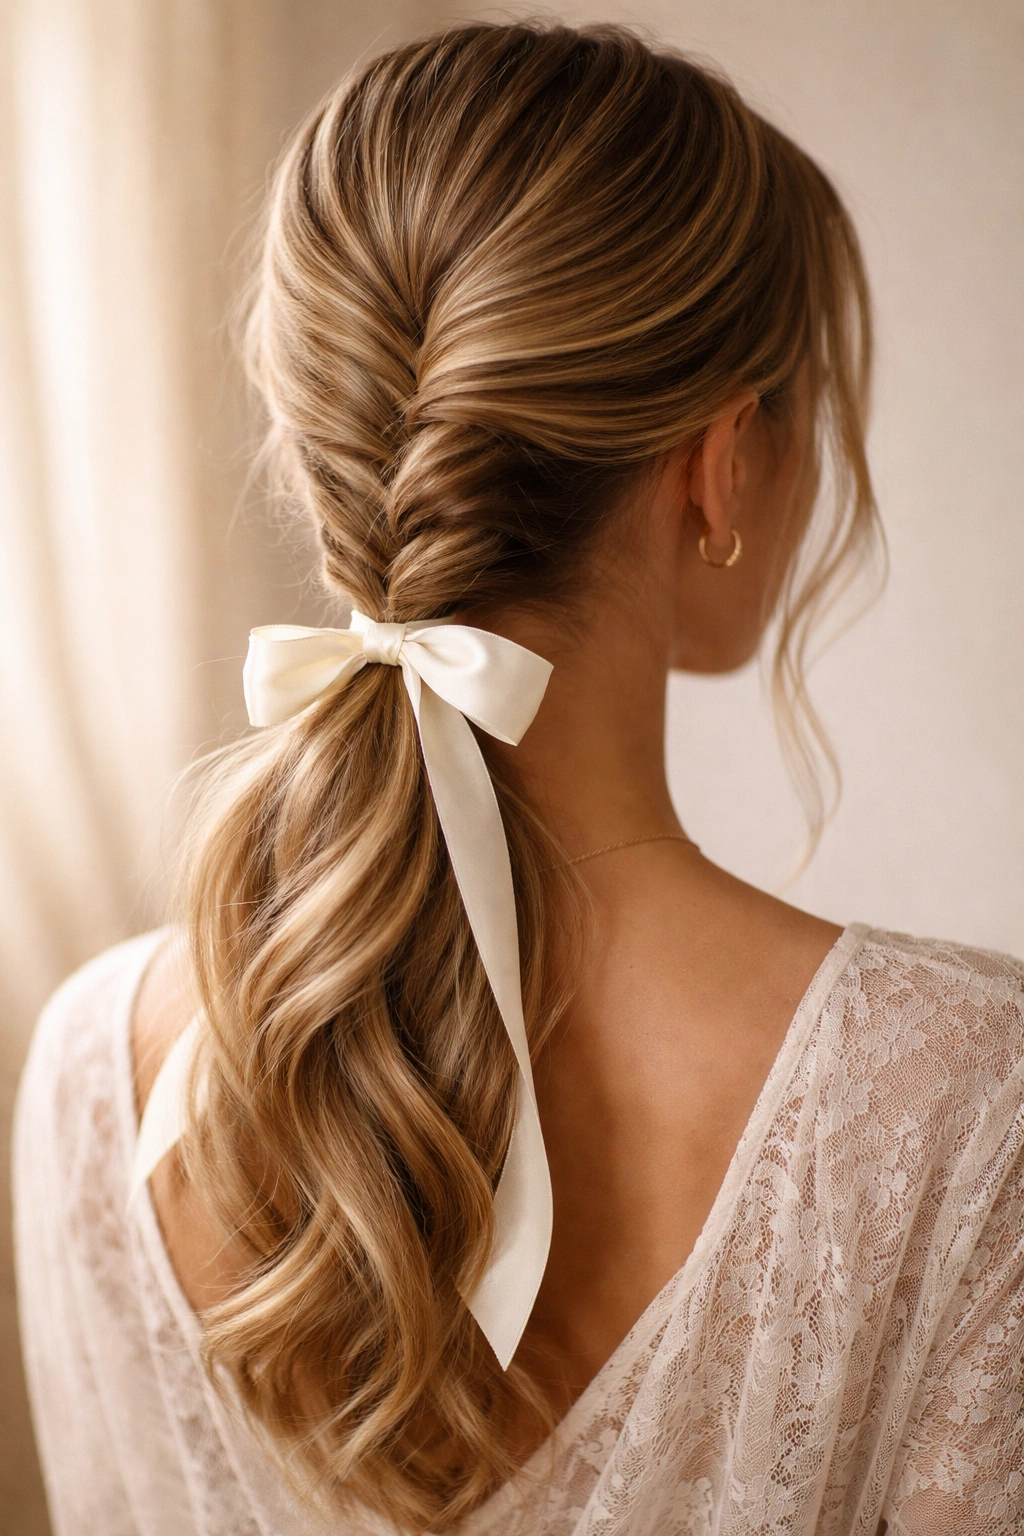
3. Side Ponytail with Cascading Ribbon
The side ponytail with cascading ribbon is pure elegance—it creates an elongated line that’s flattering to most face shapes while the ribbon adds a graceful, flowing element. To create this style, gather your hair to one side of your head, positioning the ponytail slightly lower than a traditional high ponytail—imagine it sitting about 2-3 inches below your ear. The sideways placement naturally draws attention to your cheekbones and creates an asymmetrical look that feels more contemporary and interesting than centered styles.
Creating the Cascade Effect
Rather than wrapping the ribbon tightly around the base, secure your ponytail with an elastic, then allow your ribbon to flow downward alongside the ponytail itself instead of being confined to a knot at the base. This cascading ribbon technique requires a longer ribbon than other styles—aim for at least 36-48 inches so you have enough length to let it drape. Tuck one end of the ribbon beneath the elastic at the ponytail base, then let the other end flow freely down the side of the ponytail, either straight or gently woven through sections of hair as it falls.
Choosing the Right Ribbon Length and Texture
Lightweight ribbons like organza, chiffon, or thin silk work best for cascading because they don’t weigh your hair down and they move gracefully with your head. Heavier ribbons can look stiff and awkward when allowed to hang freely. The cascading ribbon should be long enough that it reaches at least to mid-chest, or even down to the end of your ponytail, creating an unbroken line from your head. For this style, consider ribbon colors that create contrast with your hair color—if you have dark hair, pale ribbons create drama; if you have light hair, jewel-tone or deep ribbons pop against the background.
Securing the Cascade Without It Sliding Out
The trick to keeping cascading ribbon in place is making sure it’s anchored at the base and at strategic points along the ponytail itself. Weave the ribbon through your hair so it’s partially secured by the strands themselves, not just held by the elastic at the top. You can also use tiny clear bobby pins clipped horizontally through the ribbon and into the ponytail hair to keep it from slipping down. Just one or two well-placed pins every few inches is usually enough to keep the cascade from shifting throughout the day while remaining completely invisible.
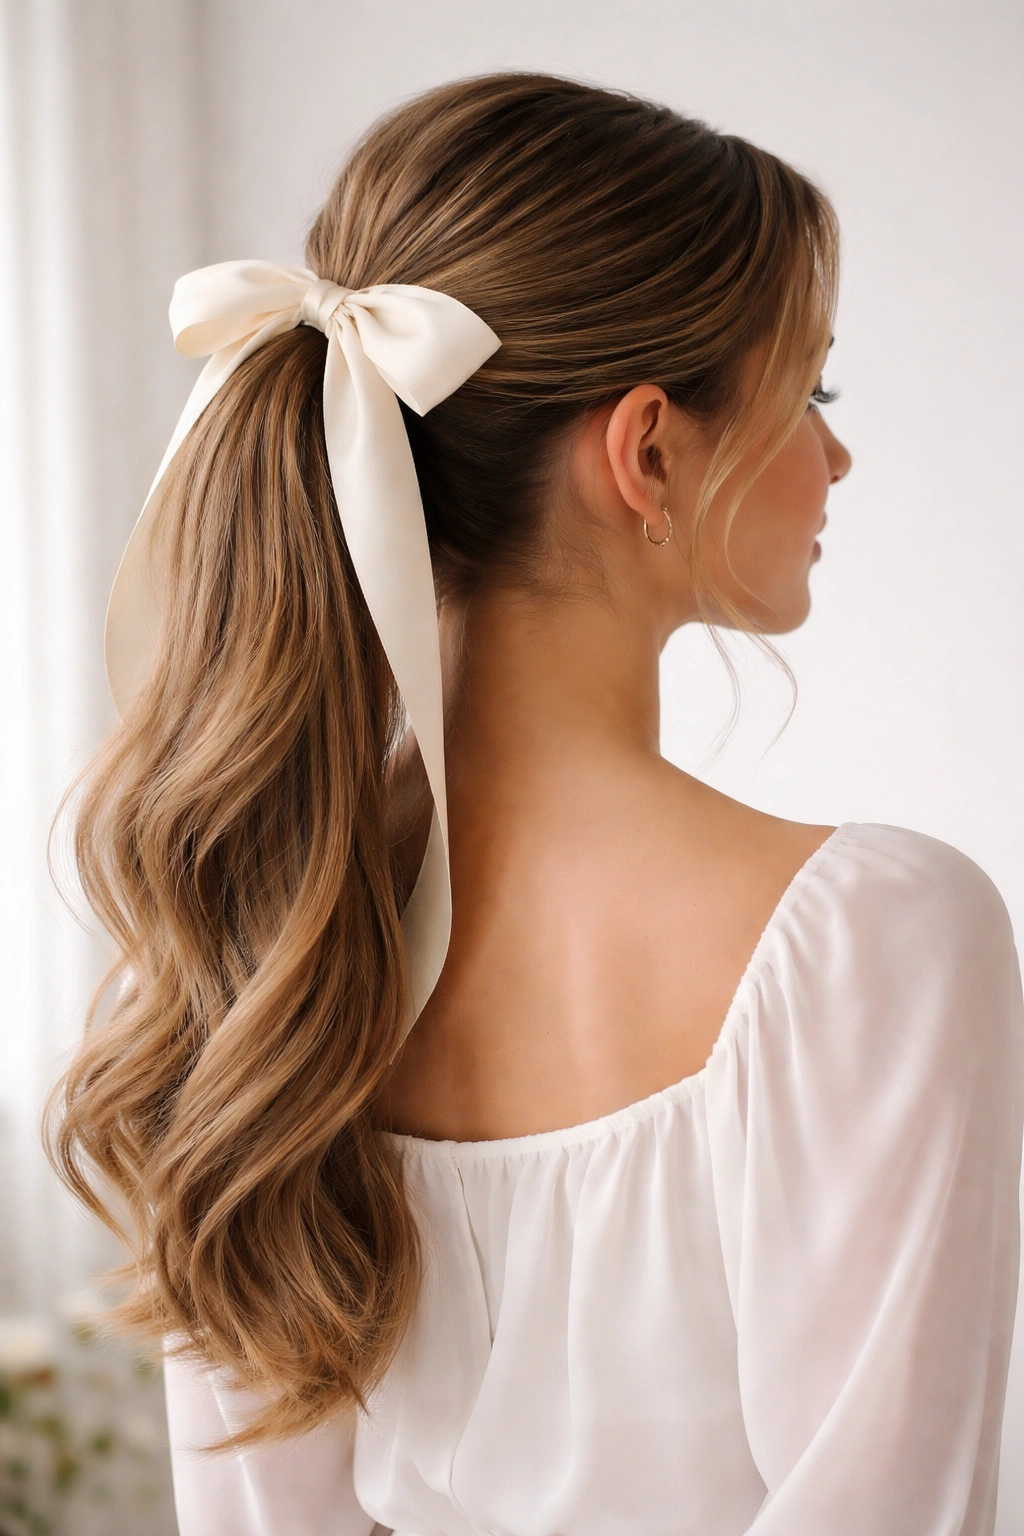
4. Low Ponytail with Oversized Ribbon Bow
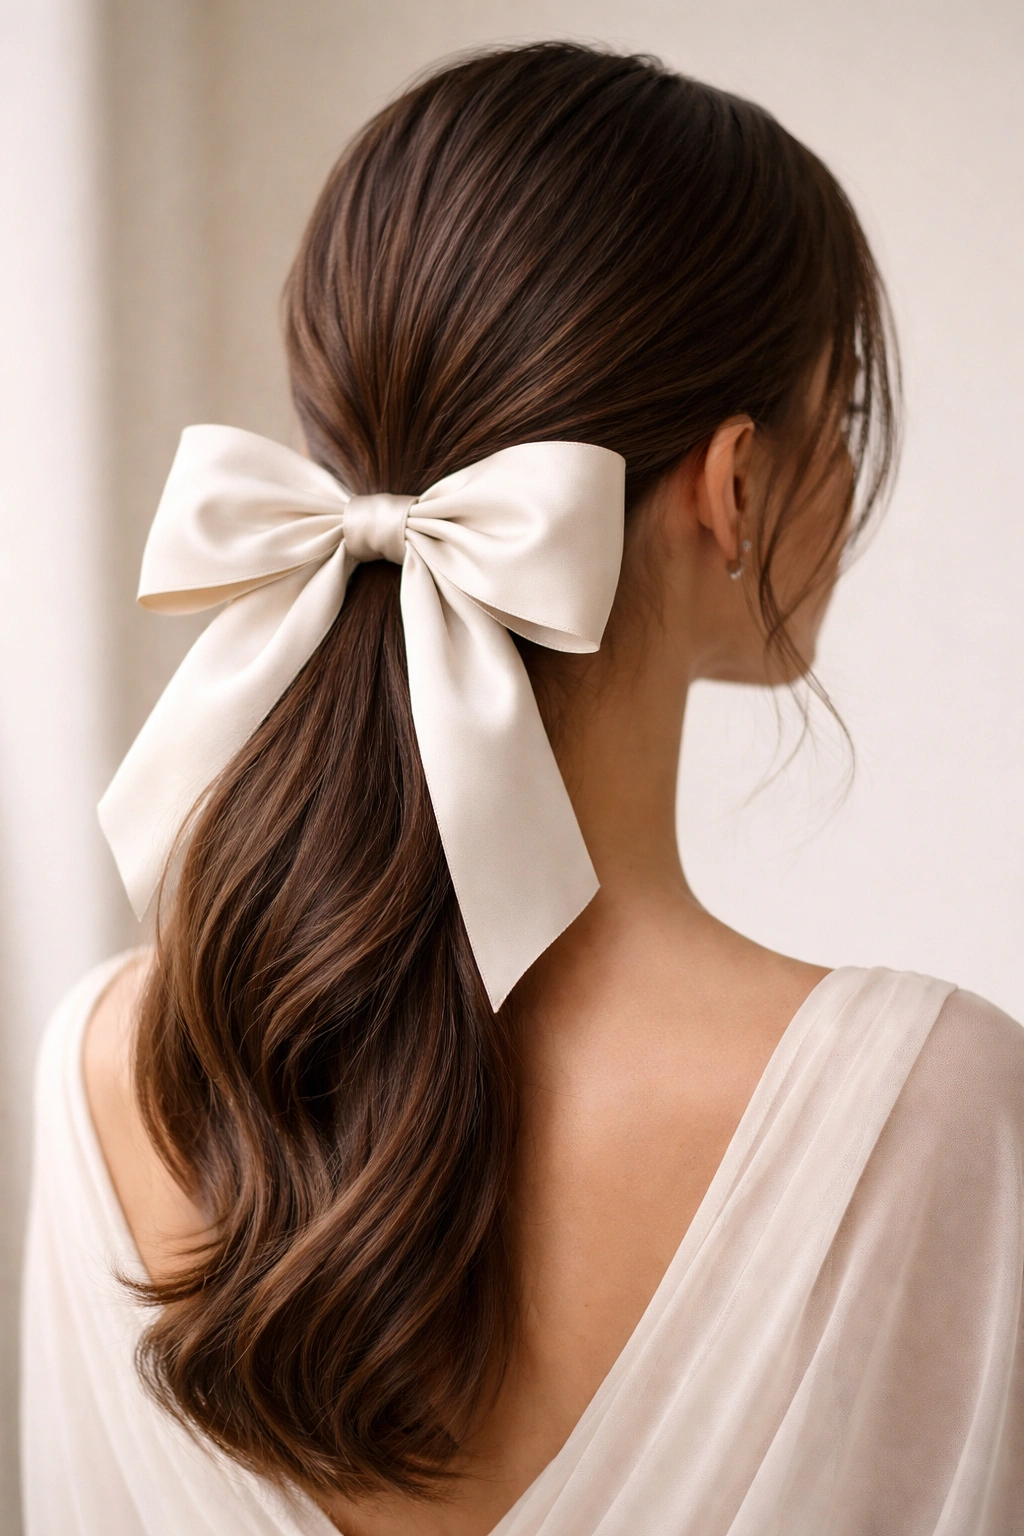
This timeless classic pairs a low ponytail positioned at the nape of your neck with a substantial, attention-grabbing ribbon bow. The low placement creates an instantly sophisticated and polished impression while the generous bow adds personality and texture. Gather your hair at the nape of your neck, roughly where the base of your skull meets your neck, and secure it with an elastic. The ponytail should feel smooth and intentional rather than scraggly—use a brush to smooth any flyaways and perhaps apply a light styling cream to create a sleek base.
Crafting a Statement Bow
The bow itself is where this style shines. Use a ribbon that’s at least 1.5-2 inches wide so the bow has presence and visual weight. Wide satin or grosgrain ribbons hold their shape beautifully when tied into a bow, creating defined loops that look polished and intentional. To make the bow, wrap the ribbon around the ponytail base and tie a double knot, then create two loops of equal size by pulling each end through the knot like you’re tying your shoes. Adjust the loops until they’re symmetrical and the bow sits properly against the base of the ponytail.
Adapting the Bow Size to Your Hair Texture
Thick, full hair can carry a larger, more dramatic bow without looking out of proportion, so consider using extra-wide ribbon or even a pre-made bow accessory for maximum impact. Finer hair often looks better with a more delicate bow—use narrower ribbon or tie a smaller bow that doesn’t overpower your hair’s natural volume. The bow should complement your hair texture rather than compete with it. For a softer bow rather than a crisp one, choose satin or silk ribbon instead of stiff grosgrain, and deliberately crumple and arrange the loops so they look slightly undone rather than perfectly geometric.
Styling Variations Within This Framework
Add softness by creating gentle waves or loose curls throughout the ponytail itself—this creates visual interest below the bow and prevents the entire style from looking too formal. You can also position the bow off-center slightly, tying it so it sits more toward one side of the ponytail rather than directly in the middle, which creates a more contemporary, editorial feel. For professional settings, keep the bow streamlined and the ponytail sleek; for casual occasions, let the bow be fuller and the ponytail more textured.
5. Braided Ponytail with Woven Ribbon
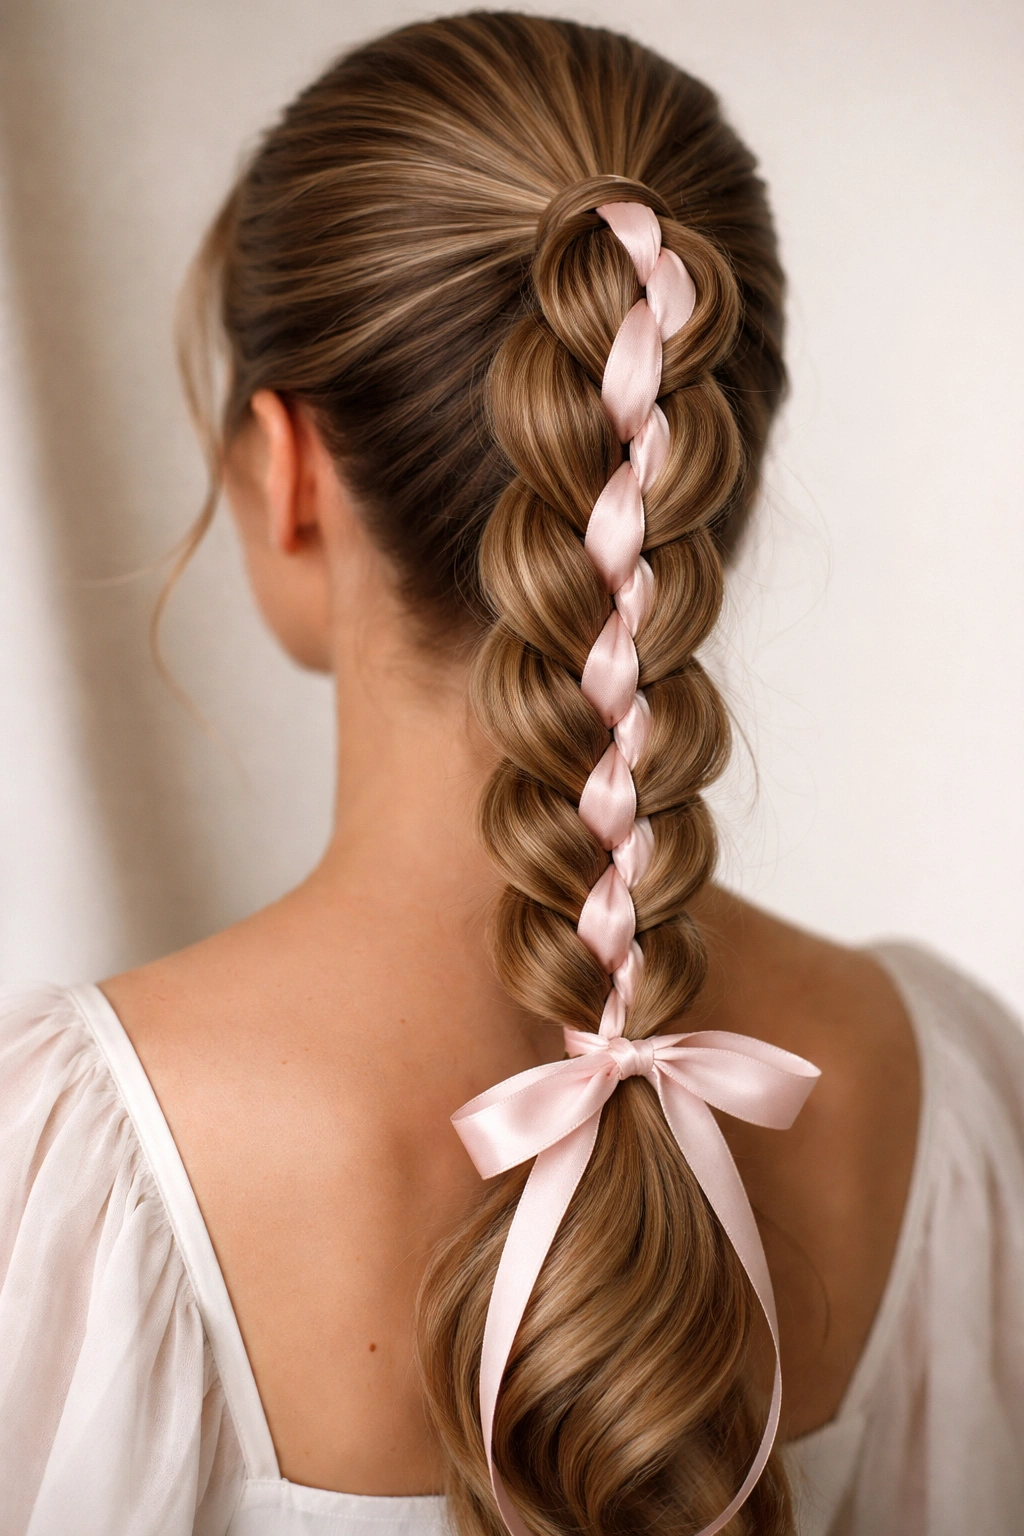
This style merges three different techniques—braiding, ribbon weaving, and ponytail construction—into one cohesive, intricate-looking style that’s actually simpler to achieve than it appears. Begin by creating a standard ponytail at your desired height, but don’t secure it tightly yet. Instead, gather your hair loosely, then divide it into three sections for braiding. Before you start braiding, tuck your ribbon into one of the three sections so it becomes part of the braid pattern itself rather than something added afterward.
Incorporating the Ribbon into the Braid
As you braid, the ribbon becomes another “strand” that weaves in and out alongside your hair strands. The visual effect is of your ribbon running through the braid in an elegant, integrated way rather than being wrapped around the outside. Choose a ribbon in a contrasting color to your hair so the woven pattern is clearly visible—this is what makes the style striking. Work slowly and deliberately, ensuring the ribbon stays parallel to your hair sections as you braid, and pull each section snug so the braid is tight and well-defined.
Securing the Finished Braid
Once you’ve braided all the way down to the end, secure both your hair and the ribbon with a small elastic. This braid becomes your actual ponytail, so the structure and hold are dependent on the braid’s tightness. If you want extra security, use a bobby pin or two clipped through the braid itself at the base. You can leave the braid as-is for a sleek, structured look, or gently pull at the edges of the braid to loosen it slightly, which adds volume and a more romantic, textured appearance. This second approach—where you deliberately pancake the braid by pulling—creates a softer aesthetic while maintaining the ribbon’s visible presence.
Creating Texture Without Losing Structure
Pull gently at the outer edges of your braid sections rather than pulling the entire braid apart, which keeps the ribbon woven correctly while adding dimension and softness. Start at the top of the braid where it emerges from your head and work downward, using your fingers to coax the braid outward. The result is a braid that looks fuller, more romantic, and less rigid while still showcasing the beautiful ribbon weaving. This technique works particularly well with satin or silk ribbons that have natural sheen and light-catching properties.
6. Sleek Ponytail with Delicate Ribbon Weave
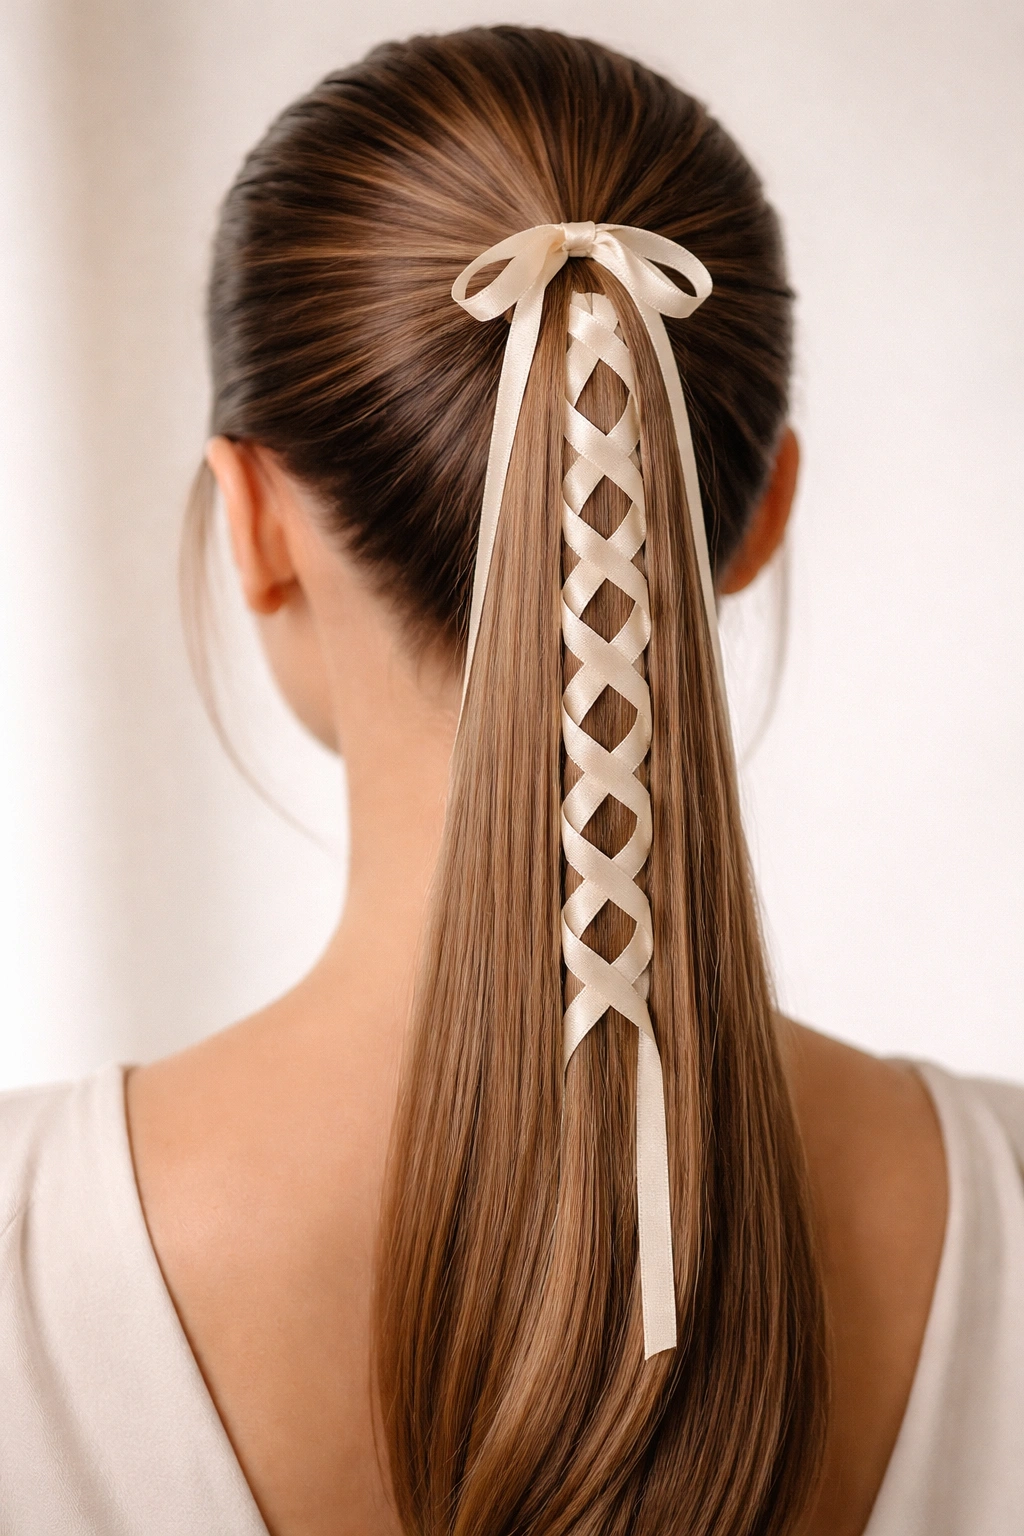
For a refined, understated approach to ribbon ponytails, the sleek ponytail with delicate ribbon weave creates visual interest without overwhelming your hair. This style emphasizes smoothness and precision—your hair should be blow-dried straight and smoothed with a serum or polish that creates shine. Gather your hair into a high, tight ponytail and secure it firmly so there’s absolutely no movement. The sleekness is half the style here; if your ponytail is bumpy or textured, the ribbon weave will look haphazard rather than intentional.
The Art of Weaving Ribbon Through Sleek Hair
Rather than wrapping the ribbon around the base, this style incorporates the ribbon by weaving it directly through the ponytail itself. Divide your ponytail into several vertical sections—typically 4-6 depending on how thick your hair is—and weave a thin ribbon in and out of these sections as if you’re doing an over-and-under pattern. The ribbon creates a visual pathway through the ponytail that’s elegant and architectural. Start at the top of the ponytail, near the base, and weave downward, keeping the ribbon pulled snug so it sits cleanly against the hair.
Choosing Ribbon for Maximum Definition
Thin, delicate ribbons work best for this technique because wider ribbons become bulky and difficult to weave smoothly. Aim for ribbon that’s between ⅜ and ¾ inch wide, and choose colors that contrast subtly with your hair—not so much contrast that it looks costume-like, but enough that the weave pattern is clearly visible. Metallic ribbons catch light beautifully in this style, as do ribbons with subtle sheen. If your hair is very thick, you can use two thin ribbons weaving in opposite directions for added complexity and visual interest.
Securing the Weave Throughout the Day
The weave will naturally stay in place because it’s integrated into the ponytail structure, but you want to ensure it doesn’t slip downward as you move throughout the day. Tuck the ends of your ribbon beneath the elastic at the base of the ponytail, and if needed, use a single bobby pin clipped horizontally through the ribbon and into the ponytail itself at about the midpoint. This prevents slippage without being visible from the front. The sleekness of this style means any disruption becomes obvious, so taking a few extra moments to secure everything properly is worthwhile.
7. Textured Ponytail with Ribbon and Bobby Pins
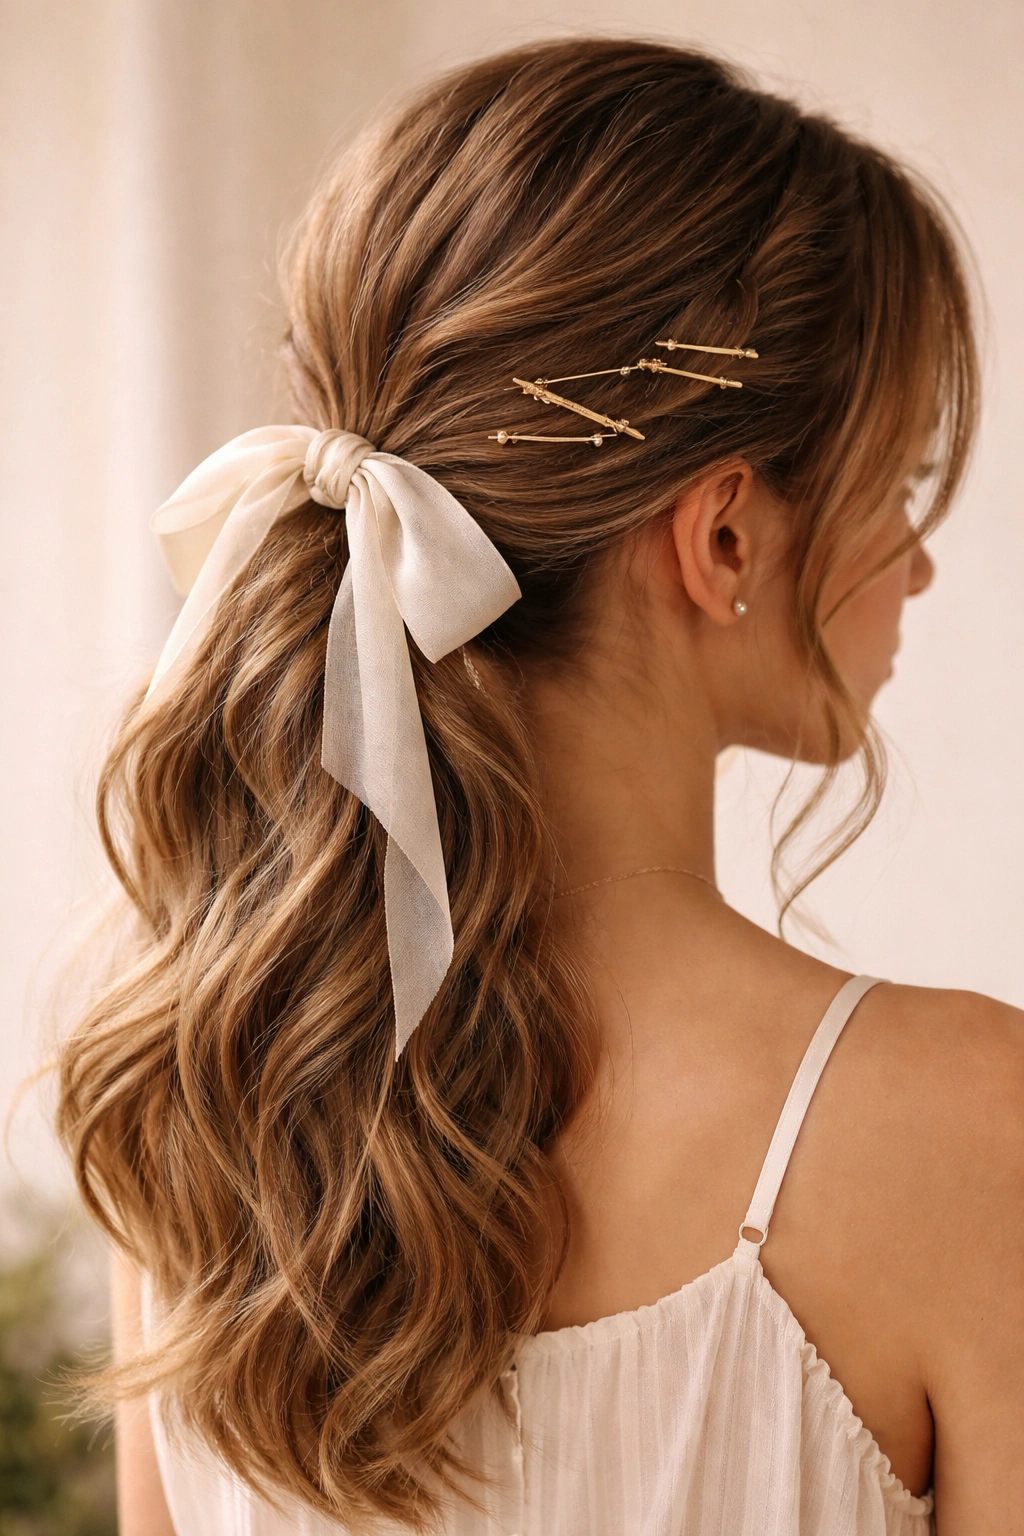
This style combines visible texture—from waves or braids—with ribbon and deliberately exposed bobby pins for an editorial, fashion-forward aesthetic. Begin with soft waves or braids throughout your hair, then gather everything into a ponytail at your chosen height. Rather than hiding your bobby pins, this style celebrates them as design elements. Use gold-toned, rose gold, or tortoiseshell bobby pins that complement your hair color and become part of the visual design rather than something to conceal.
Creating Intentional Texture as the Foundation
The texture here shouldn’t look accidental—it should be deliberate and beautiful. If using waves, create them with a curling iron and allow them to cool completely so they hold. If using braids, create two or more small braids and weave them in with your other hair before gathering into the ponytail. The texture creates dimension and prevents the style from looking flat. This approach works best on second-day hair or hair that’s been prepped with a texturizing spray, as brand-new waves tend to be too uniform and slippery to work with.
Arranging Bobby Pins as Design Elements
Once your ponytail is secured with an elastic, arrange 3-5 bobby pins across the base of the ponytail in a visible, intentional pattern—perhaps in a diagonal line, or clustered together on one side. Make sure the pins are actually clipped through the hair and the elastic, anchoring them solidly so they don’t shift. The pins become jewelry; think of them as you would think about the placement of a pin on clothing. Choose bobby pin colors that coordinate with your ribbon, or use a different metallic tone for contrast. This technique works especially well when you’re weaving a coordinating ribbon around the base alongside your bobby pins.
Styling Confidence and Attitude
This look requires confidence in its styling choices—it’s unapologetically intentional and shouldn’t look accidental. The combination of visible texture, a ribbon element, and exposed bobby pins all working together signals that this is a styled look, not a casual ponytail. Pair it with polished makeup and a composed outfit for maximum impact. This style photographs beautifully and looks particularly striking in editorial or special-occasion settings where fashion-forward styling is appreciated and expected.
8. Half-Up Ponytail with Ribbon Detail
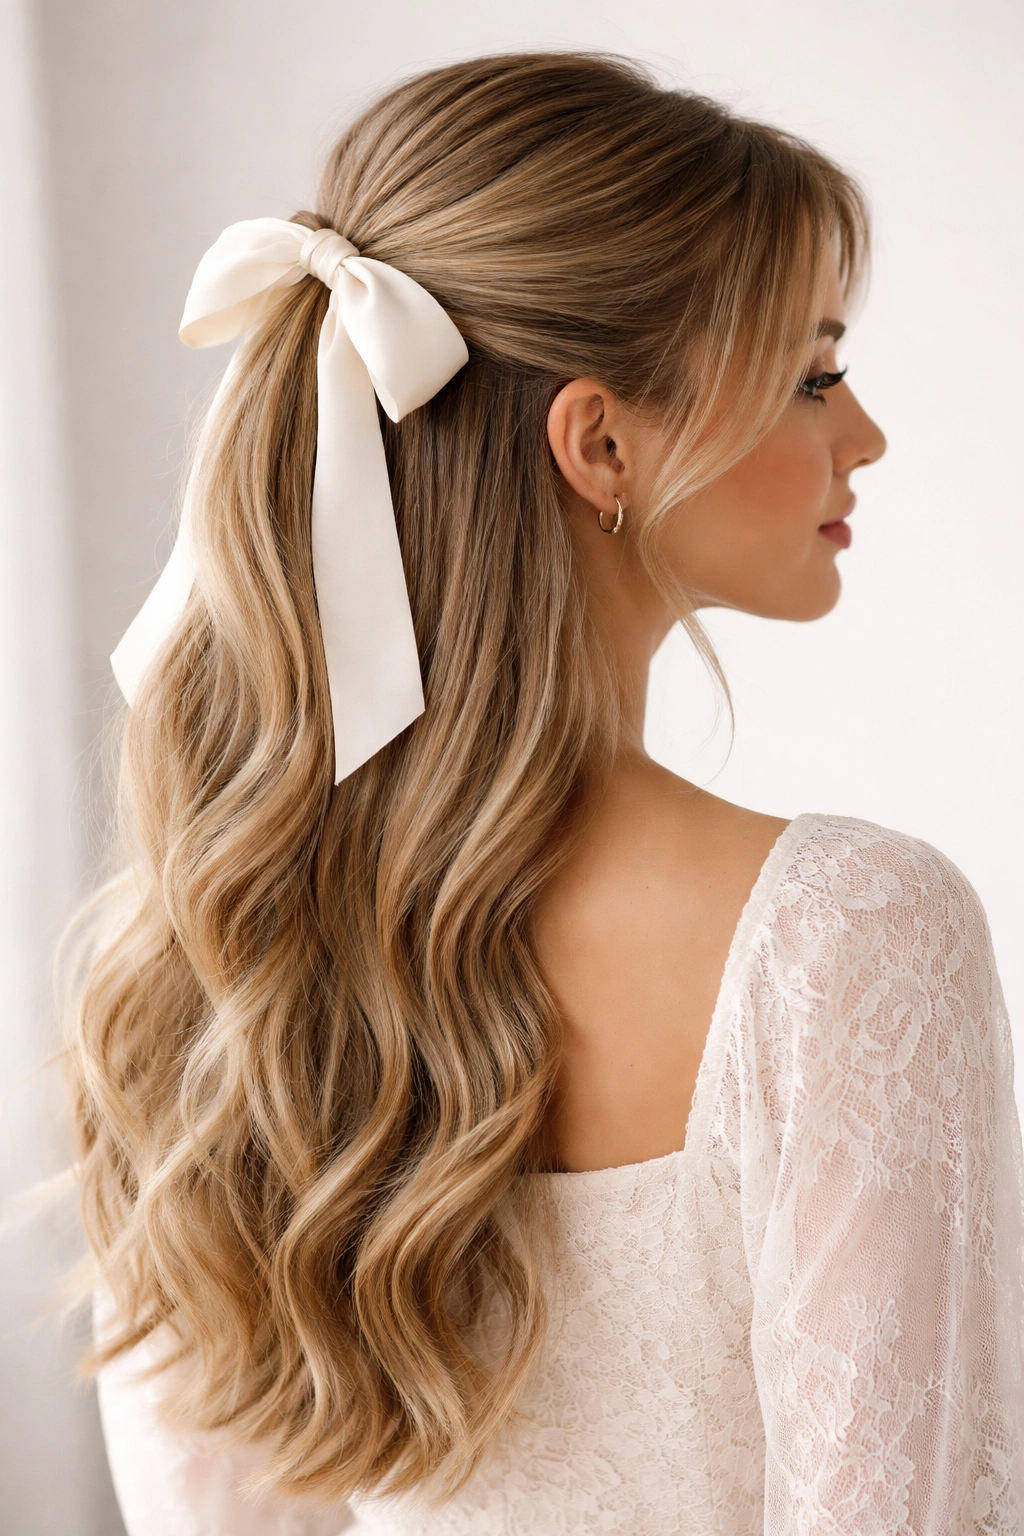
The half-up ponytail bridges the gap between loose hair and full ponytails, and adding ribbon to this already romantic silhouette elevates it further. Gather the upper half of your hair—roughly everything above your ears—and secure it at the crown with an elastic or clip. Leave the bottom half of your hair down, ideally with some waves or curls added for softness and movement. This style works beautifully on hair of any length and requires less volume commitment than a full ponytail.
Coordinating Ribbon With the Half-Up Structure
The ribbon works best when it’s wrapped around the base of the half-up section, covering the elastic and creating a polished transition between the gathered and loose hair. Choose a ribbon that’s wide enough to make a statement—this style can handle substantial ribbons because the gathered section is relatively compact. Wrap the ribbon around the base and tie it into a bow, letting the ends hang down alongside the loose hair below, or tie the bow and tuck the ends into the gathered section for a cleaner look.
Adding Movement Below the Gather
The loose hair beneath the half-up section is where movement and softness come in. Add waves to this hair for a romantic aesthetic, or leave it straight for a more modern look. If you’ve curled your hair, consider leaving some smaller, face-framing sections loose in front for a softening effect. This contrast—between the structured, organized gathered section and the soft, flowing loose hair—is what makes this style visually interesting. The ribbon becomes the focal point of the gathered section, pulling the eye upward while the loose hair creates balance.
Styling for Different Occasions
For casual wear, use a softer ribbon in a pale shade and let the half-up bow sit loosely without perfect symmetry. For more formal occasions, choose a ribbon in a rich jewel tone and tie the bow more crisply so it looks polished and intentional. The beauty of this style is its adaptability—you can create anything from soft and romantic to sleek and sophisticated depending on how you approach the texture and the ribbon choice. This works particularly well for events where you want to feel polished without the formality of a full updo.
9. Twisted Ponytail with Ribbon Accent
Twists add elegance and visual interest without requiring braiding skills, making this style accessible even to those who find braiding intimidating. Begin by gathering your hair into a ponytail at your desired height, but instead of leaving it straight, divide the ponytail into two sections. Twist these sections around each other—not tightly, but loosely enough that the texture remains soft and romantic. The twists interlock as you spiral them, creating a pattern that’s visually interesting from all angles.
Creating Soft, Romantic Twists
The key to beautiful twists is not pulling them too tightly. You want a loose, undone appearance rather than something that looks structured and formal. Begin twisting the two sections together from the top of the ponytail and continue down to the ends, creating a twisted rope effect. Once you’ve twisted all the way down, secure the ends with a clear elastic. For extra softness, gently pull at the twisted sections to loosen them slightly, creating more volume and a more relaxed appearance.
Positioning the Ribbon for Visual Impact
Wrap your ribbon around the base of the twisted ponytail, covering the elastic and creating a visual anchor for the twists below. You can wrap it multiple times for a more substantial look, or wrap it once for something delicate. The ribbon frames and highlights the twisted texture beneath it, so choose a ribbon that either complements your hair color subtly or creates contrast. Tie the ribbon in a bow, or weave it through the twists themselves if you want a more integrated look.
Customizing the Twist Pattern
For added interest, create two or more separate twists within your ponytail rather than one large twisted section. Divide your ponytail into three sections and twist two of them together while leaving one section loose, then gather all three together at the bottom with another small elastic. This creates a mixed-texture look that’s more intricate. Alternatively, create mini twists throughout your ponytail before gathering it, which adds texture and dimension that makes even a simple ribbon accent feel more intentional and special.
10. Bubble Ponytail with Ribbon Ties
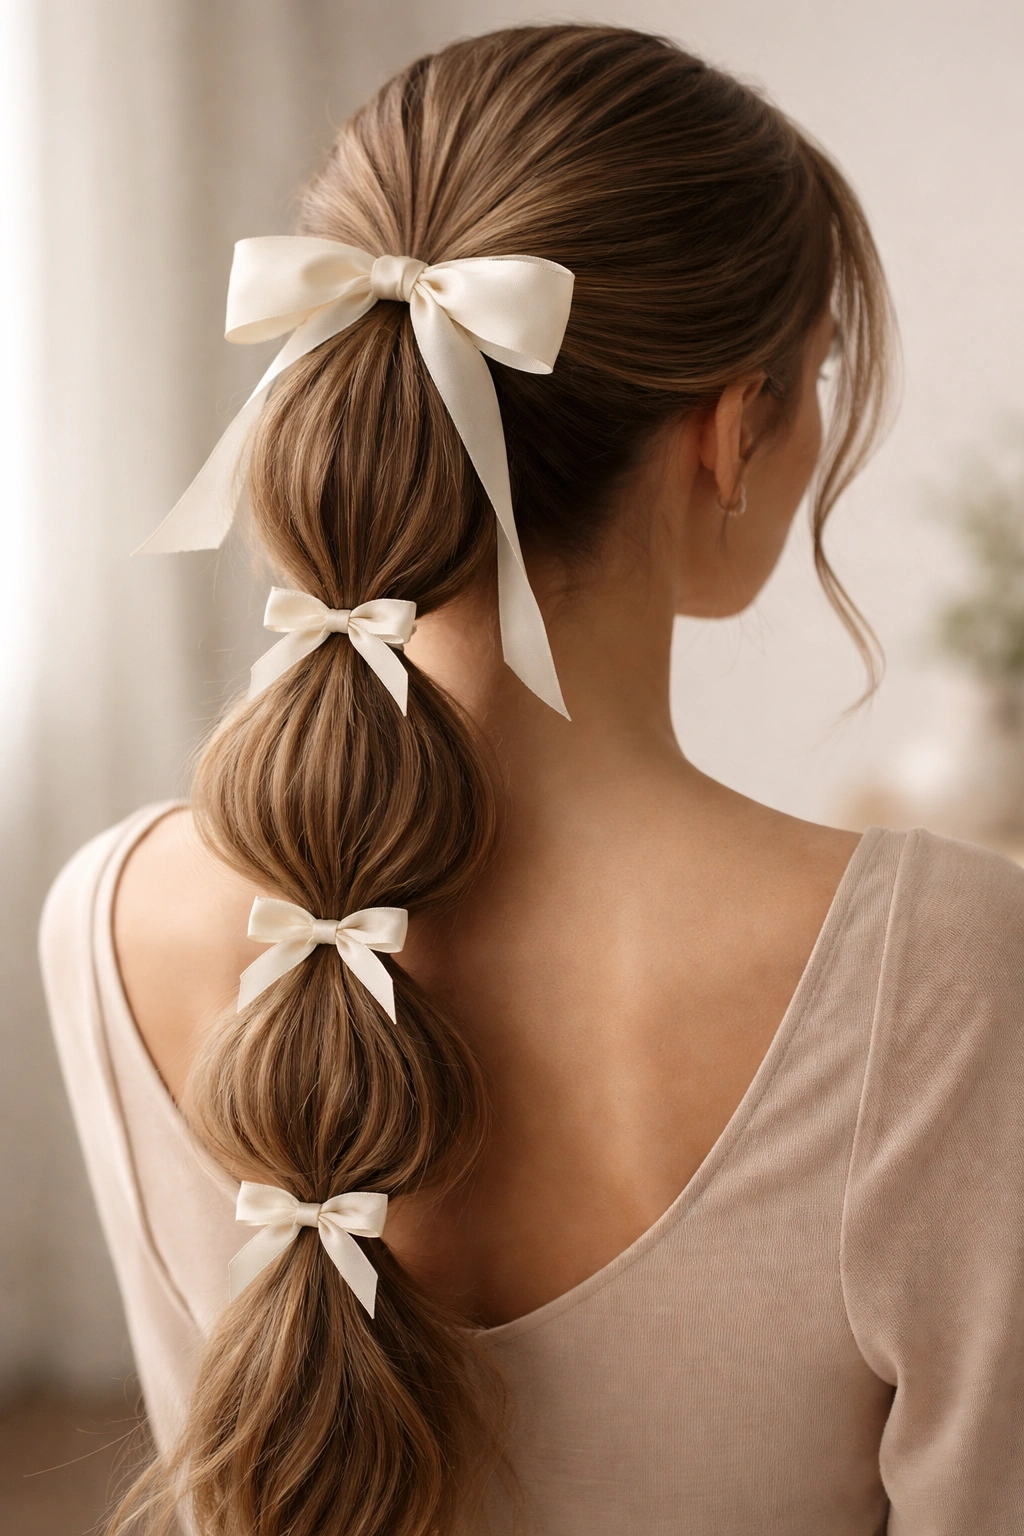
The bubble ponytail creates a whimsical, segmented silhouette that’s both playful and surprisingly sophisticated, and incorporating ribbon transforms it from casual to intentional. Create a standard ponytail at your chosen height, then use small elastics to create sections throughout the ponytail itself. Space these elastics about 2-3 inches apart along the length of the ponytail, pulling the elastic tight enough that it creates a distinct separation between each bubble section. Between each elastic, gently pull at the hair to create volume and puffiness.
Creating Defined Bubble Sections
The bubbles are what make this style distinctive, so take time to make them even and well-defined. After placing each elastic, use your fingers to gently loosen and expand the hair between that elastic and the one above it, creating a rounded, puffy shape. Each bubble should be roughly similar in size and fullness for a coordinated appearance. The more deliberate and even you make these bubbles, the more intentional and polished the overall style looks. This style works beautifully with slightly textured hair—waves or curls create more dimension in each bubble.
Incorporating Ribbon Into the Bubble Structure
Rather than using simple elastics, wrap a thin ribbon around each elastic to cover it and create a visual emphasis point. Choose a coordinating ribbon color and wrap it tightly around each elastic two or three times, tying it off with a small knot. The ribbon creates visual checkpoints as you move down the ponytail, making the bubble segments look intentional rather than accidental. You can use the same color ribbon throughout for a streamlined look, or alternate between two coordinating ribbon colors for added visual interest.
Making Bubbles Work for Your Hair Type
Thin, fine hair creates more delicate bubbles and may require fewer segmentation points to maintain an attractive proportion—aim for 3-4 bubbles rather than 5-6. Thick, voluminous hair can support more bubbles and creates impressively full segments that look dramatic and interesting. The hair length matters too; this style works best on hair that’s at least shoulder-length or longer, as shorter hair creates bubbles that may look too small and condensed. Consider your face shape when choosing the ponytail height—a high ponytail works well on longer faces and elongated face shapes, while a mid-height ponytail is generally more flattering on most proportions.
Final Thoughts
Ribbon-adorned ponytails represent an elegant intersection between simplicity and sophistication—they require minimal additional skill beyond what you already use to create a standard ponytail, yet they transform your entire look. The softness that ribbon brings, both literally in terms of comfort against your scalp and figuratively in the aesthetic it creates, makes these styles feel more refined and intentional than ponytails secured only with traditional elastics. What makes ribbon styling so special is that it’s endlessly customizable to your personal aesthetic and the occasion.
The beauty of these ten styles lies in their variety and accessibility. Whether you gravitate toward the timeless elegance of a classic high ponytail with silk ribbon, the editorial sophistication of the textured ponytail with exposed bobby pins, or the playful charm of bubble ponytails with ribbon ties, there’s an option that perfectly matches your personality and skill level. Each style builds on the same foundational techniques, so once you’ve mastered one or two, the others become increasingly easy to execute.
Quality matters when you’re working with ribbon—invest in natural fiber ribbons like silk or grosgrain that feel beautiful against your hair and hold their shape throughout the day. The small investment in better materials pays dividends in how your style looks and feels. Experimentation is encouraged; try different ribbon colors, widths, and textures until you discover what makes you feel most confident and beautiful. Your ponytail becomes a canvas for expressing your style, and ribbon is the perfect tool for that self-expression.