Double braided ponytails represent the perfect intersection of polished sophistication and playful texture. While a single braid can feel casual or youthful, pairing two braids together creates immediate visual impact—they frame the face, add dimension to your silhouette, and deliver that coveted sleek-yet-textured aesthetic that works for everything from office days to weekend outings. The beauty of this style lies in its versatility: depending on how you position the braids, which braiding technique you choose, and where you secure them, you can create looks that range from corporate-ready to casual-cool.
What makes double braided ponytails so appealing isn’t just the finished look—it’s the strategic way braids control and compress hair while creating visual interest. Unlike a sleek, straight ponytail that requires product and blow-drying precision, braids naturally anchor flyaways and create a polished finish without feeling stiff or over-done. You’re also getting the best of both worlds: structured enough to look intentional and professional, textured enough to feel modern and creative. Whether you’re dealing with fine, thin hair or thick, coarse strands, there’s a double braid ponytail variation that’ll work for your hair type and lifestyle.
The following ten styles showcase the range and flexibility of this approach. Each one builds on the same foundational concept—two braids meeting in a ponytail—but delivers distinctly different visual results and styling requirements. Whether you have thirty minutes or five, whether you’re aiming for gym-ready or date-night-ready, you’ll find a version here that fits your needs.
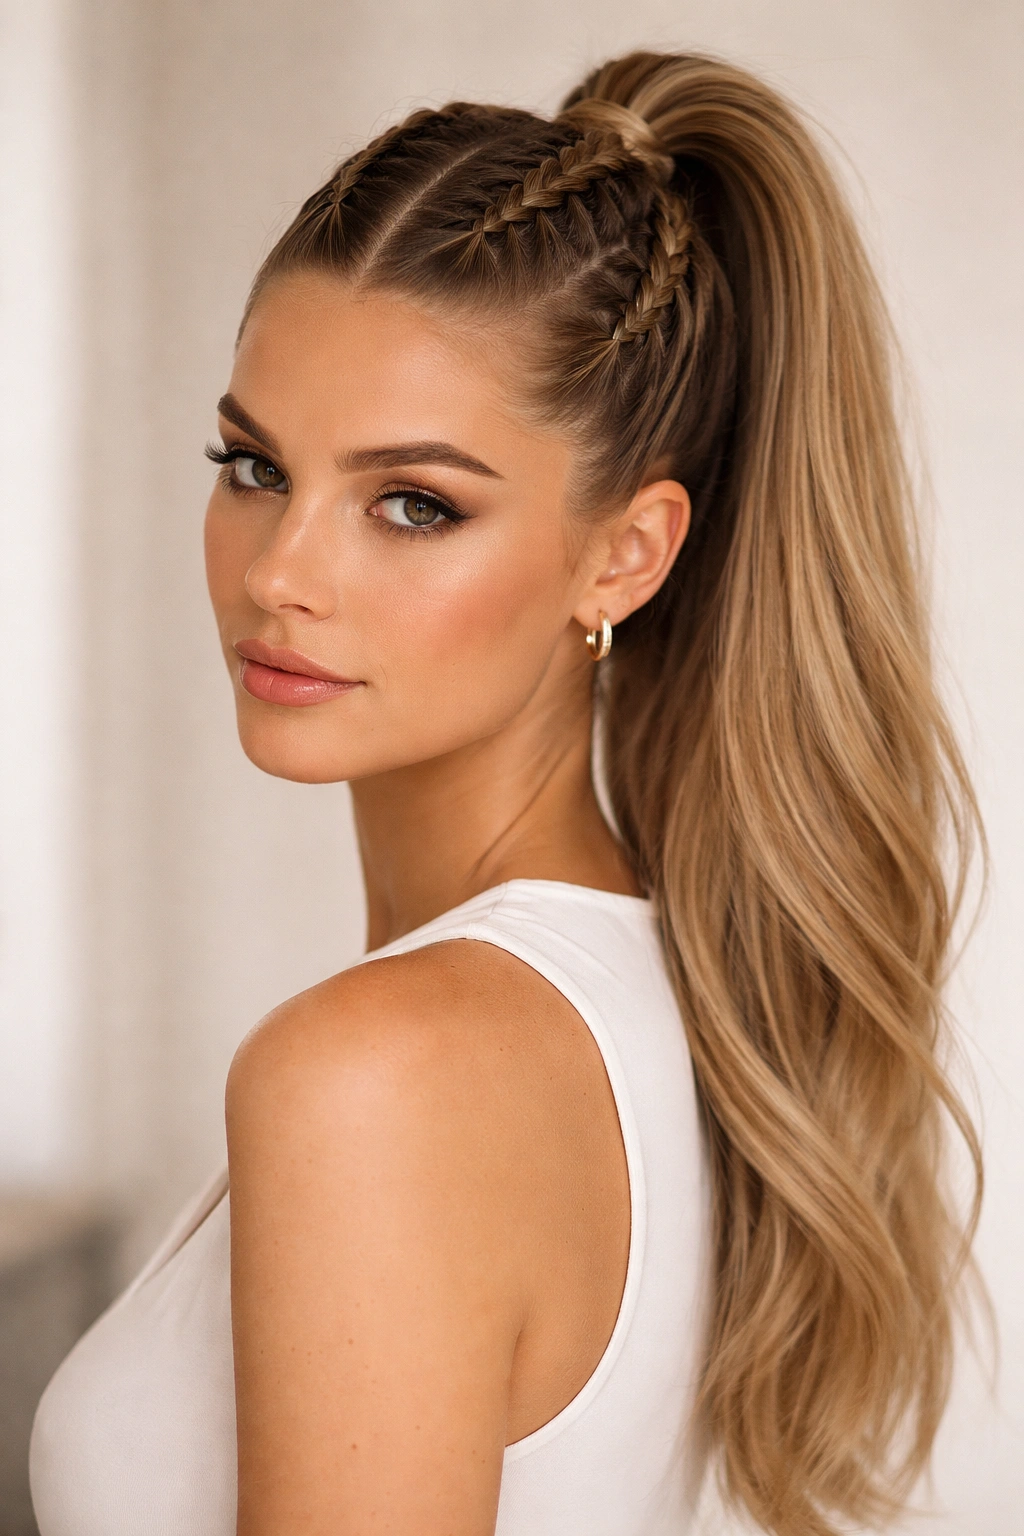
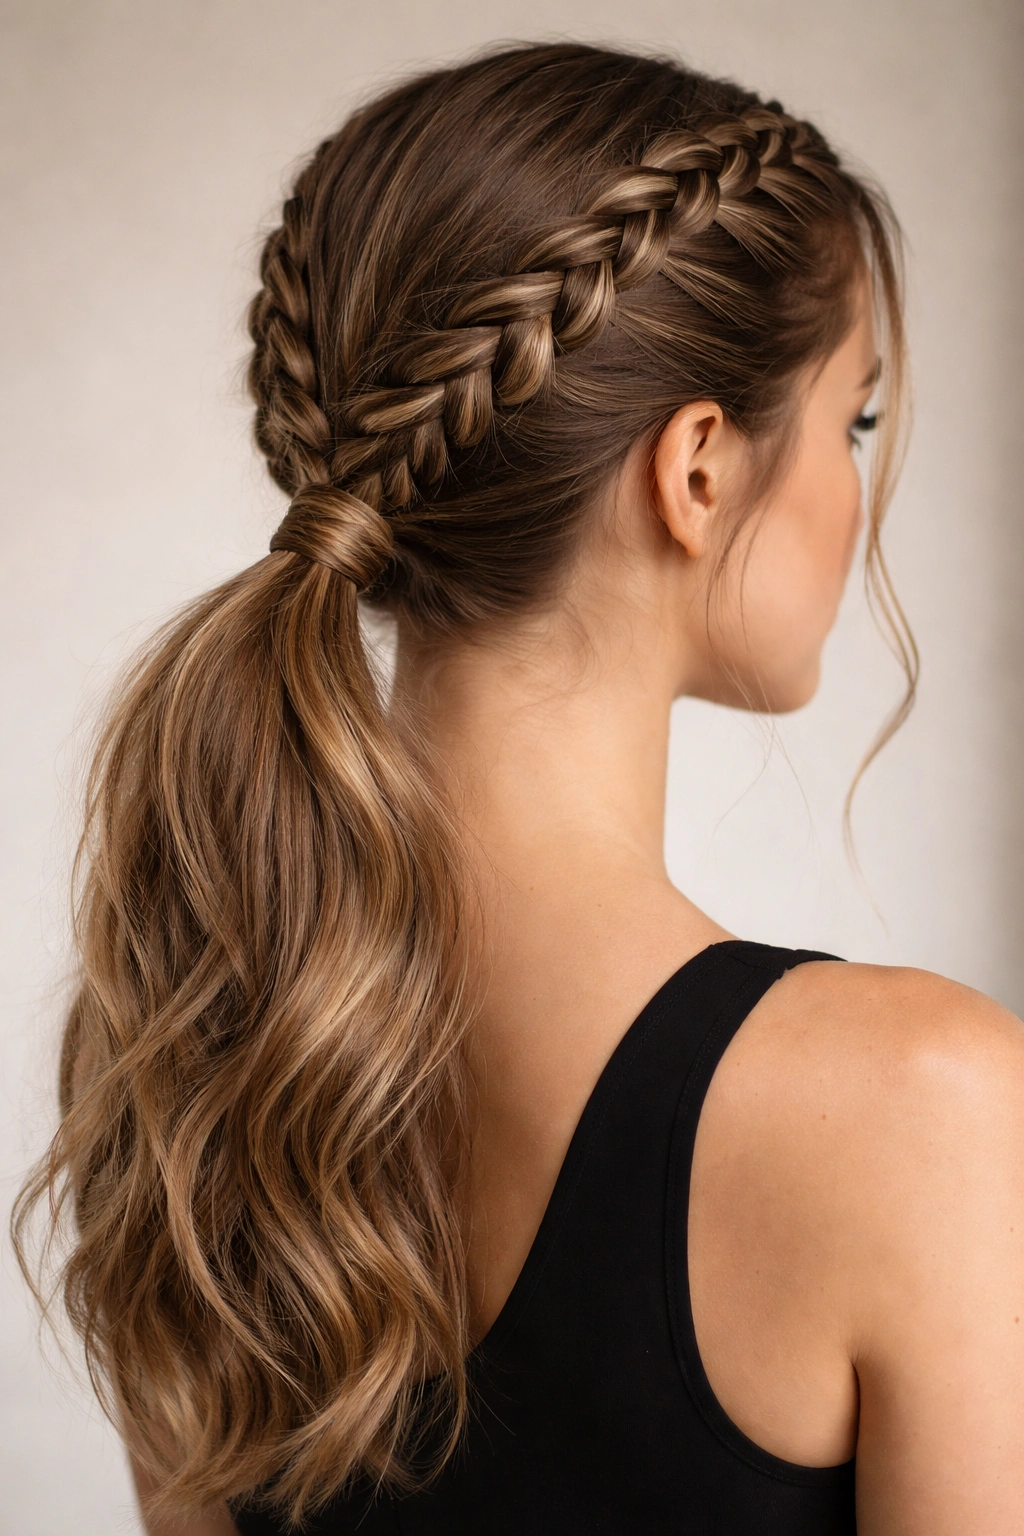
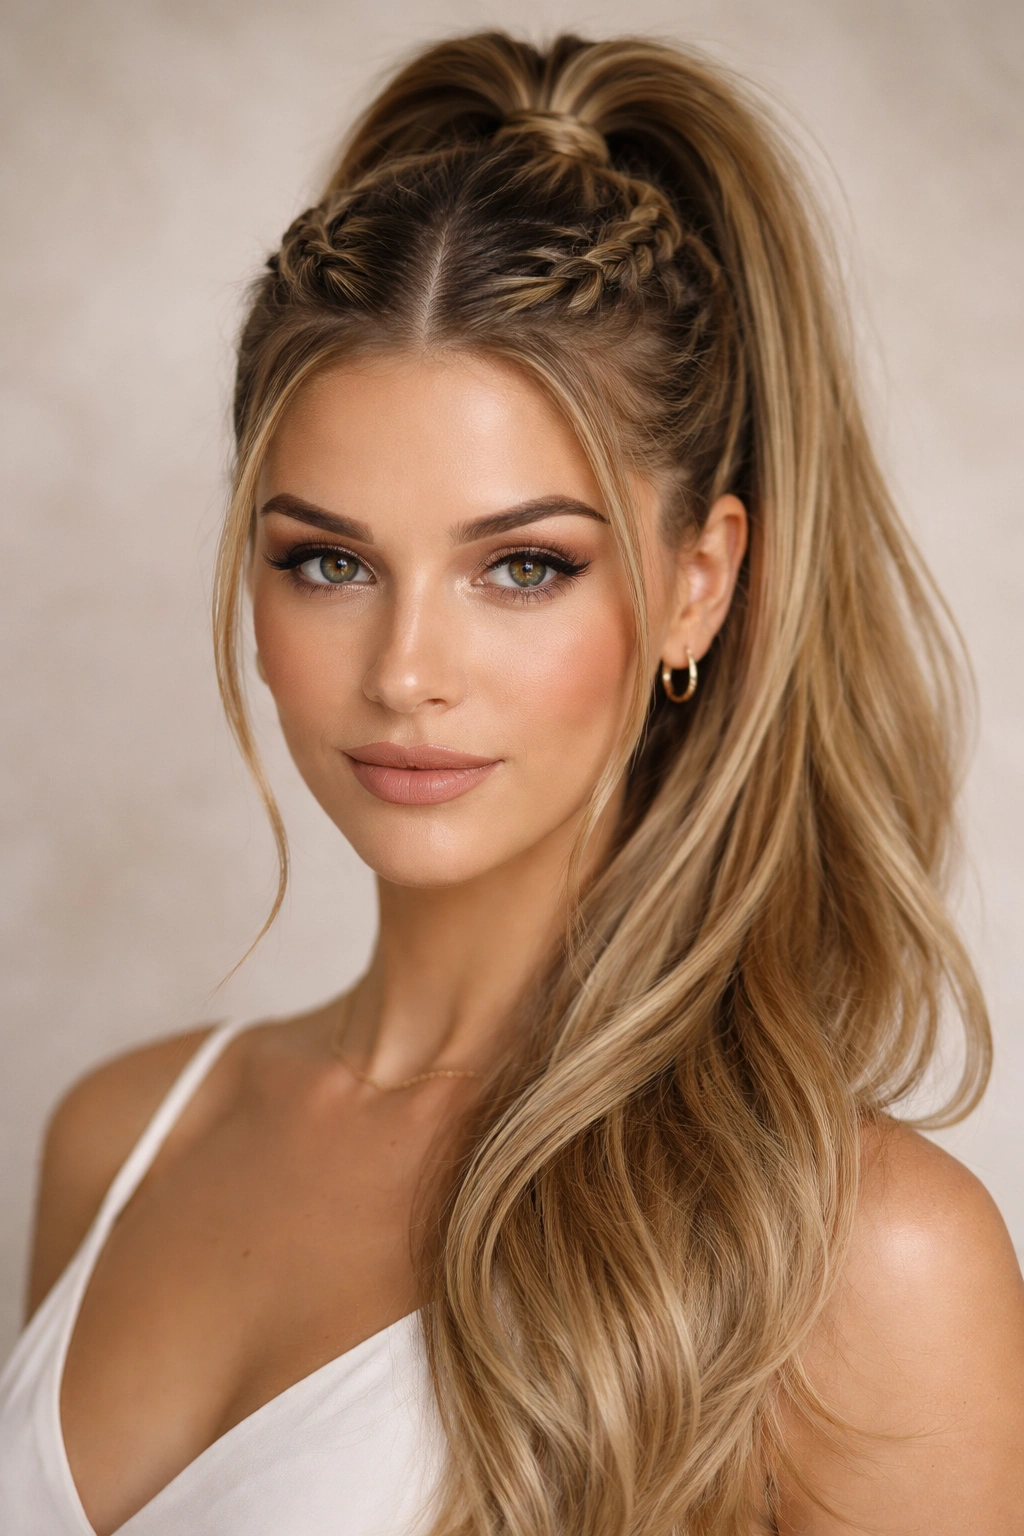
1. Classic Double Dutch Braid Ponytail
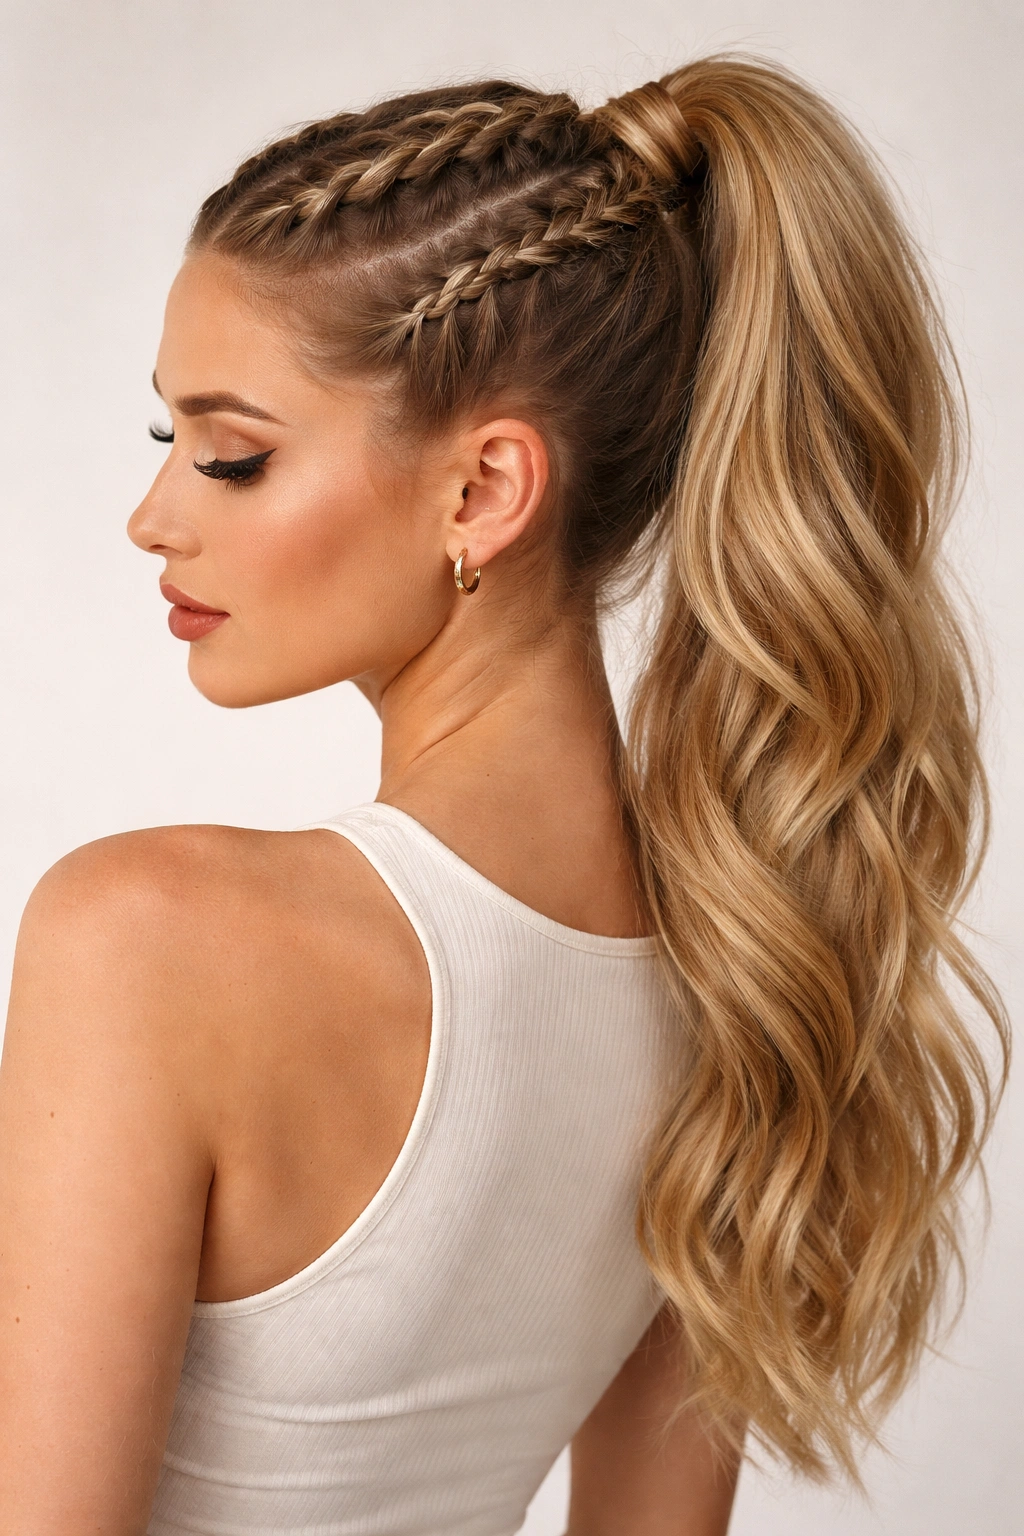
The double Dutch braid ponytail is the foundational style—the one that introduced most people to the concept of pairing braids together. Two Dutch braids (also called inside-out braids) create a raised, three-dimensional effect as they travel from your crown down toward a high or mid-height ponytail. The braids sit on top of the head rather than tucked underneath, making them visually prominent and creating an optical illusion of extra volume.
How to Create This Look
Start with clean, dry or slightly damp hair—damp hair holds braids more securely throughout the day. Divide your hair down the middle from your forehead to the back of your neck, creating two equal sections. Secure one section with a clip so it doesn’t interfere. Beginning at your hairline on the unclipped side, start a Dutch braid by taking a small section of hair and braiding it inward (pulling strands under rather than over each other). As you braid downward, incorporate hair from the sides, always weaving new sections underneath the existing braid. Continue until you reach the middle back of your head, roughly at ear level, then secure with a small elastic. Repeat on the other side, making sure both braids are equally tight and follow the same path down your head.
Once both braids are complete and secured, flip your head forward and gather all your hair—both braided and unbraided sections—into a high ponytail at the crown. Smooth any flyaways with a fine-tooth comb and a light hairspray. The braids should frame your face symmetrically, with the bulk of the ponytail sitting directly behind them.
Why This Style Works
Dutch braids create immediate dimension because they sit elevated on the scalp. Even if your hair is naturally flat or fine, the raised braid architecture makes your head appear fuller and your hairstyle more intentional. The style reads as pulled-together without requiring blow-drying or smoothing products. It works equally well on second-day hair (which actually braids better than freshly washed hair) and looks professional enough for work while remaining playful enough for casual settings.
Pro tip: Tease gently at the crown before creating your ponytail—this extra texture helps the style hold all day and prevents the tight elastic from slipping downward by afternoon.
2. Double Fishtail Braid Ponytail
Fishtail braids deliver an intricate, almost lace-like texture that immediately elevates the sleekness factor. Rather than the three-strand structure of a traditional braid, fishtails use only two strands of hair, crossed over and under each other in a specific pattern that creates a narrow, delicate-looking braid with tons of visual detail. Double fishtails are especially stunning on longer hair and work beautifully on wavy or textured hair types.
How to Create This Look
Divide your hair into two equal sections with a center part. Start your first fishtail braid by taking your first section and dividing it into two halves. Take a small piece of hair from the outer edge of the right section, cross it over, and add it to the left section. Then take a small piece from the outer edge of the left section, cross it over, and add it to the right section. Continue this alternating pattern all the way down. The smaller the outer pieces you grab, the more intricate and lacey your braid will appear—grab larger sections if you want a quicker braid or a bolder texture.
Secure the first fishtail with an elastic about halfway down your hair length. Repeat the process on the second section. Once both braids are complete, gather everything into a low or mid-height ponytail. You can leave the fishtails as-is for a delicate look, or gently pull the loops of each braid outward to create a wider, more textured appearance—this “pancaking” technique is especially effective with fishtail braids and takes about thirty seconds per braid.
Why This Style Works
Fishtails photograph beautifully and create an impression of complexity even though the technique is actually simpler than a standard three-strand braid. The narrow profile of a fishtail makes them ideal if you’re trying to add texture without bulk, or if you have finer hair that gets overwhelmed by thicker braids. They’re also forgiving on slightly greasy hair because the texture camouflages the lack of freshness. Many people find fishtails faster to create than Dutch or French braids once they get the hand motion down.
Worth knowing: Fishtail braids loosen slightly throughout the day as you move, which actually works in your favor—they look increasingly textured and romantic as hours pass, rather than progressively messier.
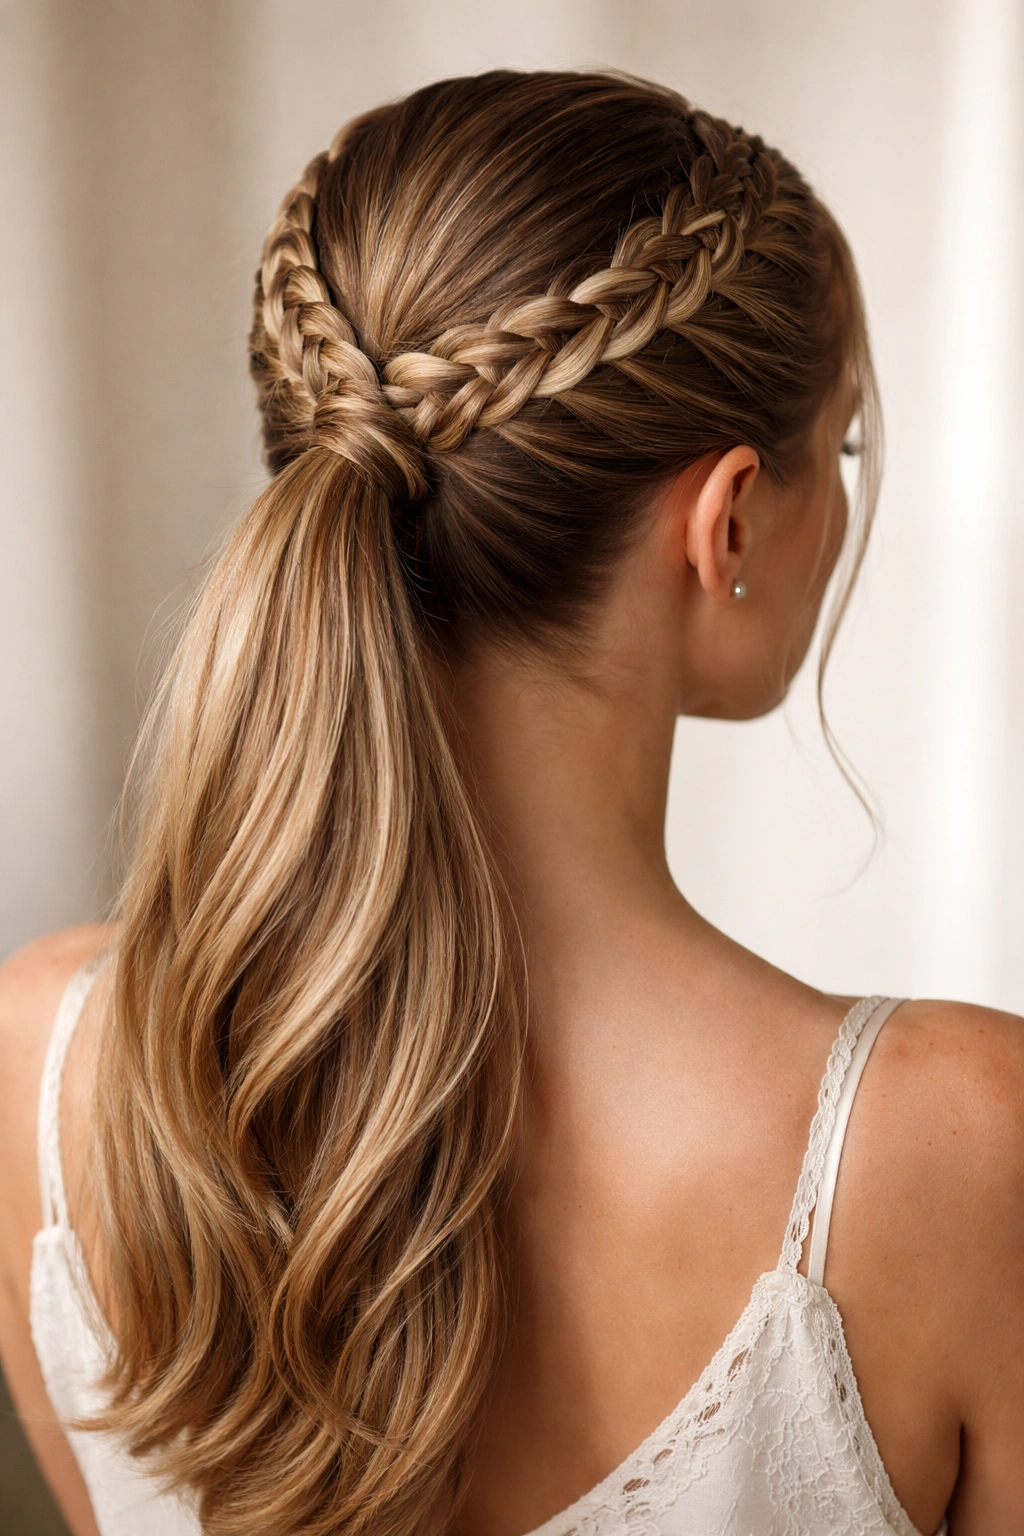
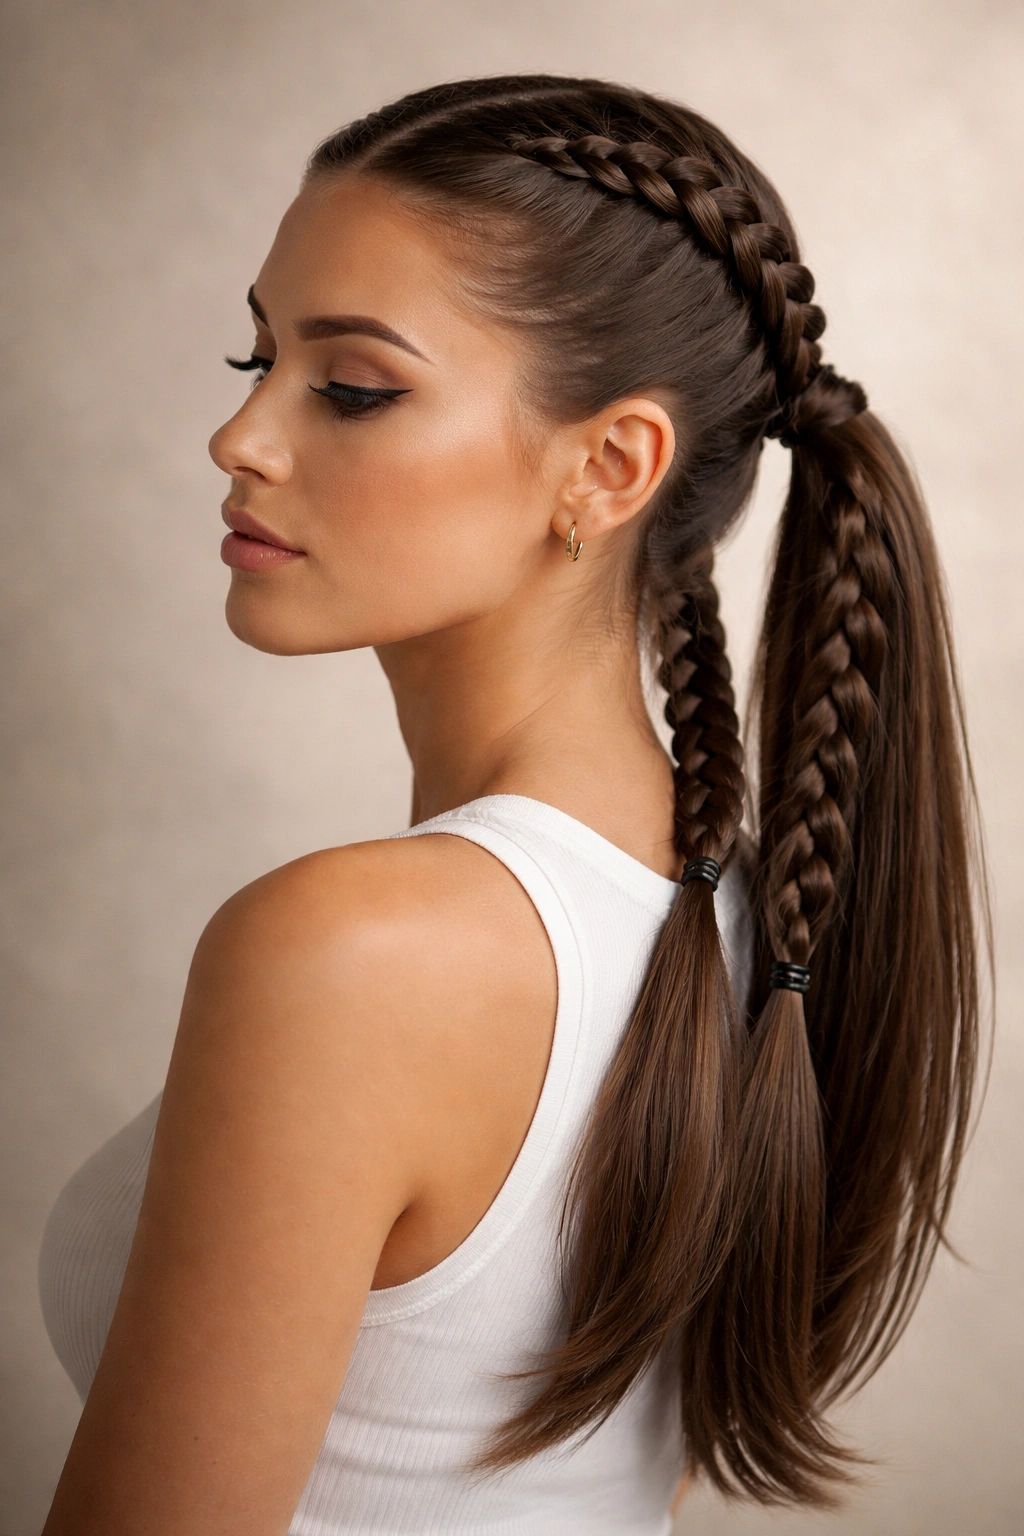
3. Double French Braid High Ponytail
French braids are the mother of all braid styles—clean, controlled, and timelessly elegant. Unlike Dutch braids that sit on top of the scalp, French braids integrate smoothly into the hair and create a seamless transition from braid to ponytail. Double French braids meeting in a high ponytail create a sophisticated, almost regal silhouette that works beautifully for events, professional settings, or any time you want to look intentionally polished.
How to Create This Look
Part your hair down the center. On one side, begin your French braid at the hairline by taking three small sections of hair and braiding them together. As you move downward, incorporate new hair from the sides of your head—always braiding over the existing braid, never under. This creates a braid that sits on top of the hair rather than being tucked underneath. Continue down to about ear level, then secure with a small elastic. Repeat on the other side.
Gather all your hair—braided sections and loose hair below the braid elastic—into a high ponytail at the crown. Smooth the front pieces and secure the ponytail with a sturdy elastic. You should see two French braids framing your face, meeting at the back of your head and flowing into a unified ponytail. Pancake the braids gently if desired, or leave them tight and sleek for a more formal look.
Why This Style Works
French braids are the gold standard for looking polished and intentional. They stay put better than other braids because they’re woven tightly and integrated throughout the head, not just along the crown. French braids work beautifully on all hair textures and densities—they just require a steady hand and a little practice. The high ponytail position keeps them secure and prominent, perfect for situations where you need your hair entirely off your face.
Quick facts:
- French braids hold better in damp hair, so apply a light water spray before styling
- Tight French braids look more formal; slightly looser braids feel more contemporary
- This style works beautifully with an elegant hair cuff or metallic elastic
4. Side-Swept Double Braid Ponytail
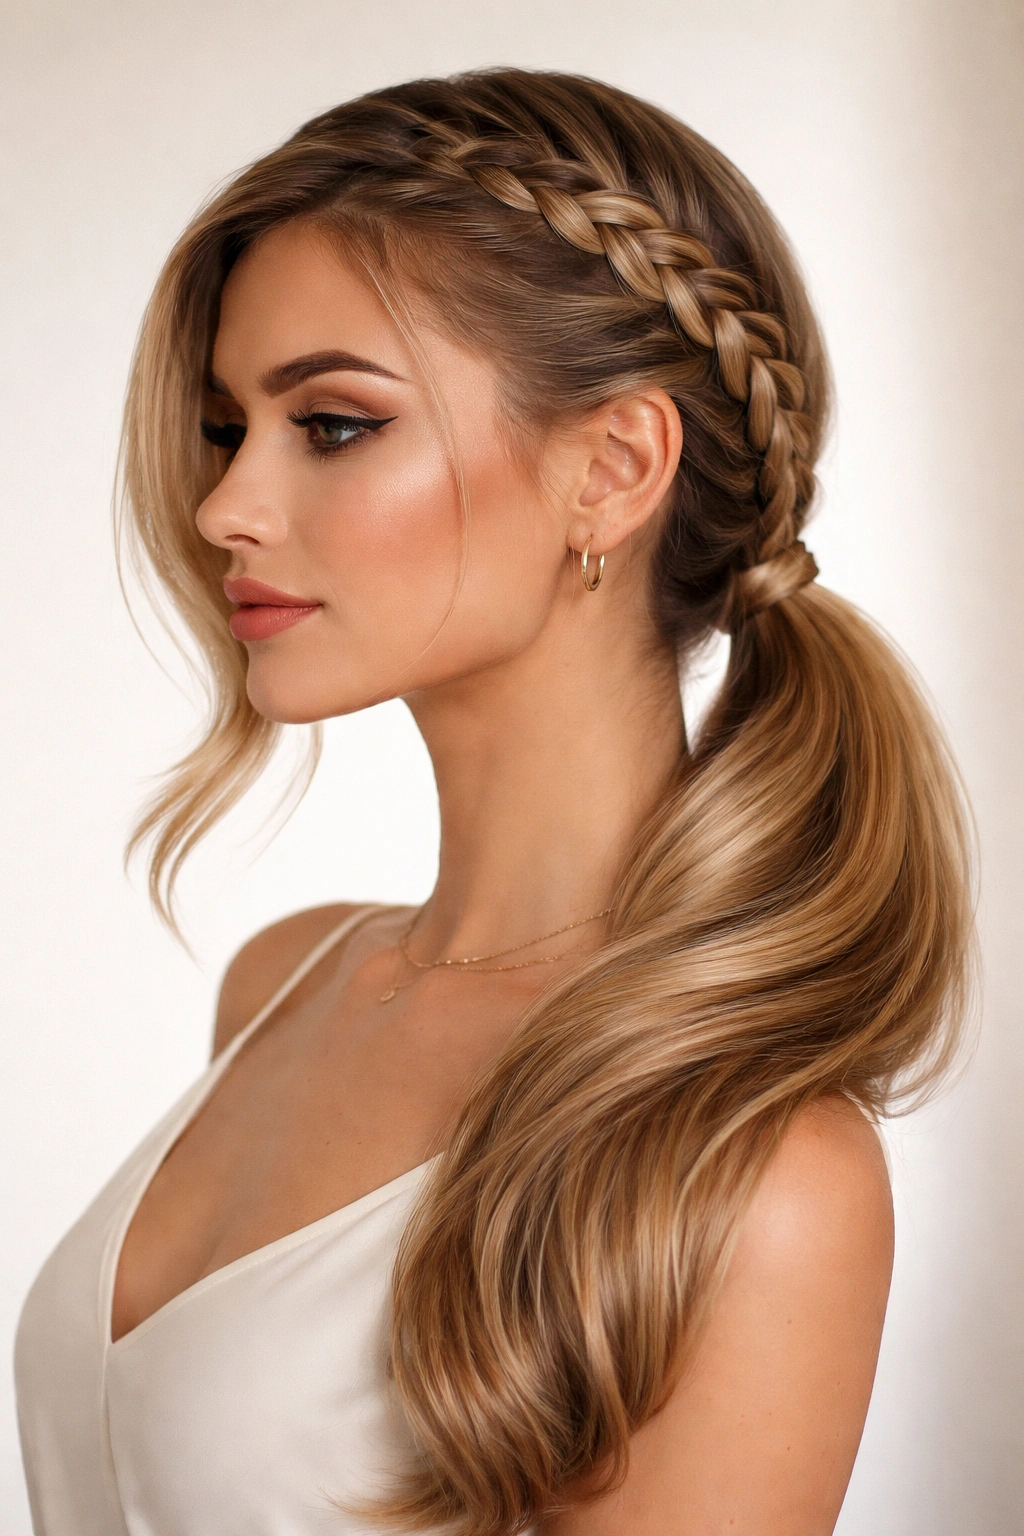
Instead of two braids framing your face symmetrically, the side-swept version positions both braids on one side of your head before gathering them into a low ponytail at the nape of your neck. This creates a dramatic, asymmetrical silhouette—ideal when you want to show off the side of your face or create a softer, more romantic aesthetic than centered braids deliver.
How to Create This Look
Create a deep side part, starting from one temple and extending toward the back of your ear. On the fuller side of the part, create two separate braids—you can use Dutch, French, fishtail, or standard three-strand braids depending on your preference and the texture you want. Position one braid slightly closer to the scalp and the second braid lower, creating a layered effect. Secure each braid with a small elastic as you work, spacing them about an inch apart.
Gather both braids and the remaining loose hair into a low ponytail at the nape of your neck, toward the back. You want the ponytail positioned off-center, nestled where both braids naturally lead. Secure everything with a sturdy elastic. Smooth any flyaways on the non-braided side of your head with a flat iron or smoothing serum for maximum contrast between the braided and smooth sides.
Why This Style Works
Side-swept braids feel inherently romantic and softer than front-facing braids, even when they’re executed with the same tightness and precision. This style is excellent for showing off a face shape you’re proud of—it puts one side on display while creating visual interest on the other side. The asymmetrical positioning also makes this style stand out in a crowd, perfect if you want to feel special without going over-the-top.
Styling tip: Add a delicate hairpin or small clip at the base where both braids meet the ponytail—it anchors the style and adds a touch of intentionality.
5. Double Rope Braid Ponytail
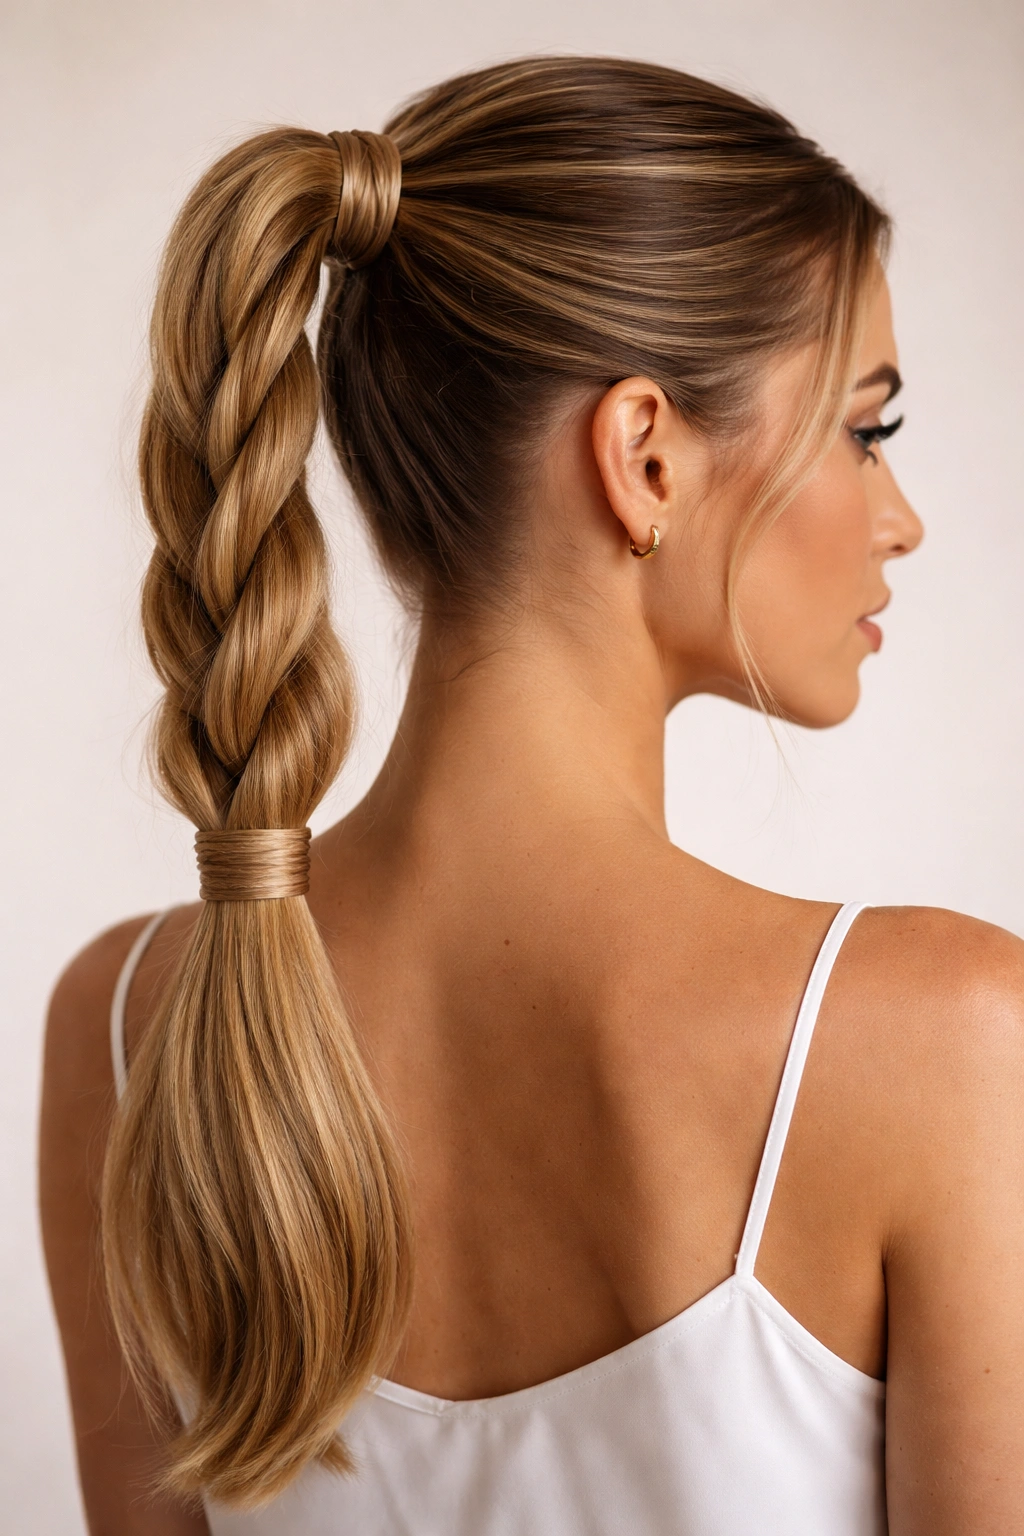
Rope braids are technically twisted rather than braided, but they deliver a similar sleek effect with a different texture and often require less time to create. Two rope braids meeting in a ponytail create a smooth, almost sculptural look that’s particularly striking on straight or wavy hair. This style falls somewhere between a traditional braid’s texture and the smooth sleekness of a twisted updo.
How to Create This Look
Divide your hair into two equal sections with a center part. Take the first section and divide it into two halves. Twist one half clockwise and the other half counterclockwise, then wrap them around each other—this creates the rope effect. As you twist and wrap, incorporate small sections of hair from the sides of your head, just as you would with a traditional braid. Continue down to about ear level, then secure with a small elastic. Repeat on the other side.
Once both rope braids are secured, gather everything into a high or mid-height ponytail. Rope braids benefit less from pancaking than traditional braids (they’re already twisted rather than looped), but you can gently pull them outward to add subtle width and texture. The finished effect should be two sleek twisted ropes flowing into a unified ponytail.
Why This Style Works
Rope braids are deceptively elegant and photograph beautifully because of their smooth, almost glossy appearance. They’re faster to create than traditional braids once you get the hand motion down, and they hold extremely well throughout the day. Rope braids work on all hair textures, though they’re particularly stunning on straight or wavy hair where the twisted structure is most visible. This style feels modern and architectural rather than traditionally feminine.
Pro tip: Rope braids show product buildup more visibly than traditional braids, so use dry shampoo the day before styling if your hair tends toward greasiness.
6. Double Crown Braid Ponytail
Crown braids wrap around the back of your head like a halo, creating the illusion of a braided crown even though the braids are actually meeting in a ponytail at the back. This style is exceptionally striking and works beautifully for special occasions, date nights, or any time you want to feel like you’re wearing a crown—literally.
How to Create This Look
Begin with damp or textured hair for better grip. Start on one side of your head just above your ear. Create a French or Dutch braid that follows the contour of your head, angling upward and backward toward the crown. As you braid, incorporate small sections from the front and top of your head, allowing the braid to curve naturally around your skull. Continue braiding until you reach the center back of your head, then secure with a small clip. Repeat on the other side, starting just above the opposite ear and angling the same direction.
Once both braids have curved around the back of your head, remove the clips and gather both braids along with all remaining loose hair into a ponytail at the nape or slightly higher, depending on where your braids naturally converge. Secure everything with a sturdy elastic. The final effect should resemble a crown, with braids framing the sides and back of your head and meeting in a central ponytail.
Why This Style Works
Crown braids create an instantly special, intentional look—you can’t accidentally fall into this hairstyle, which means it immediately signals that you made effort. The style flatters all face shapes by framing the face softly without fully covering it. Crown braids are particularly striking on longer hair where the braids have room to curve gracefully, and they work beautifully with updos, leaving your neck and shoulders exposed.
Real-world application: This is an excellent wedding guest hairstyle or a statement style for a night out. It’s also surprisingly practical for warm weather because it keeps hair completely off your face and neck while maintaining visual interest.
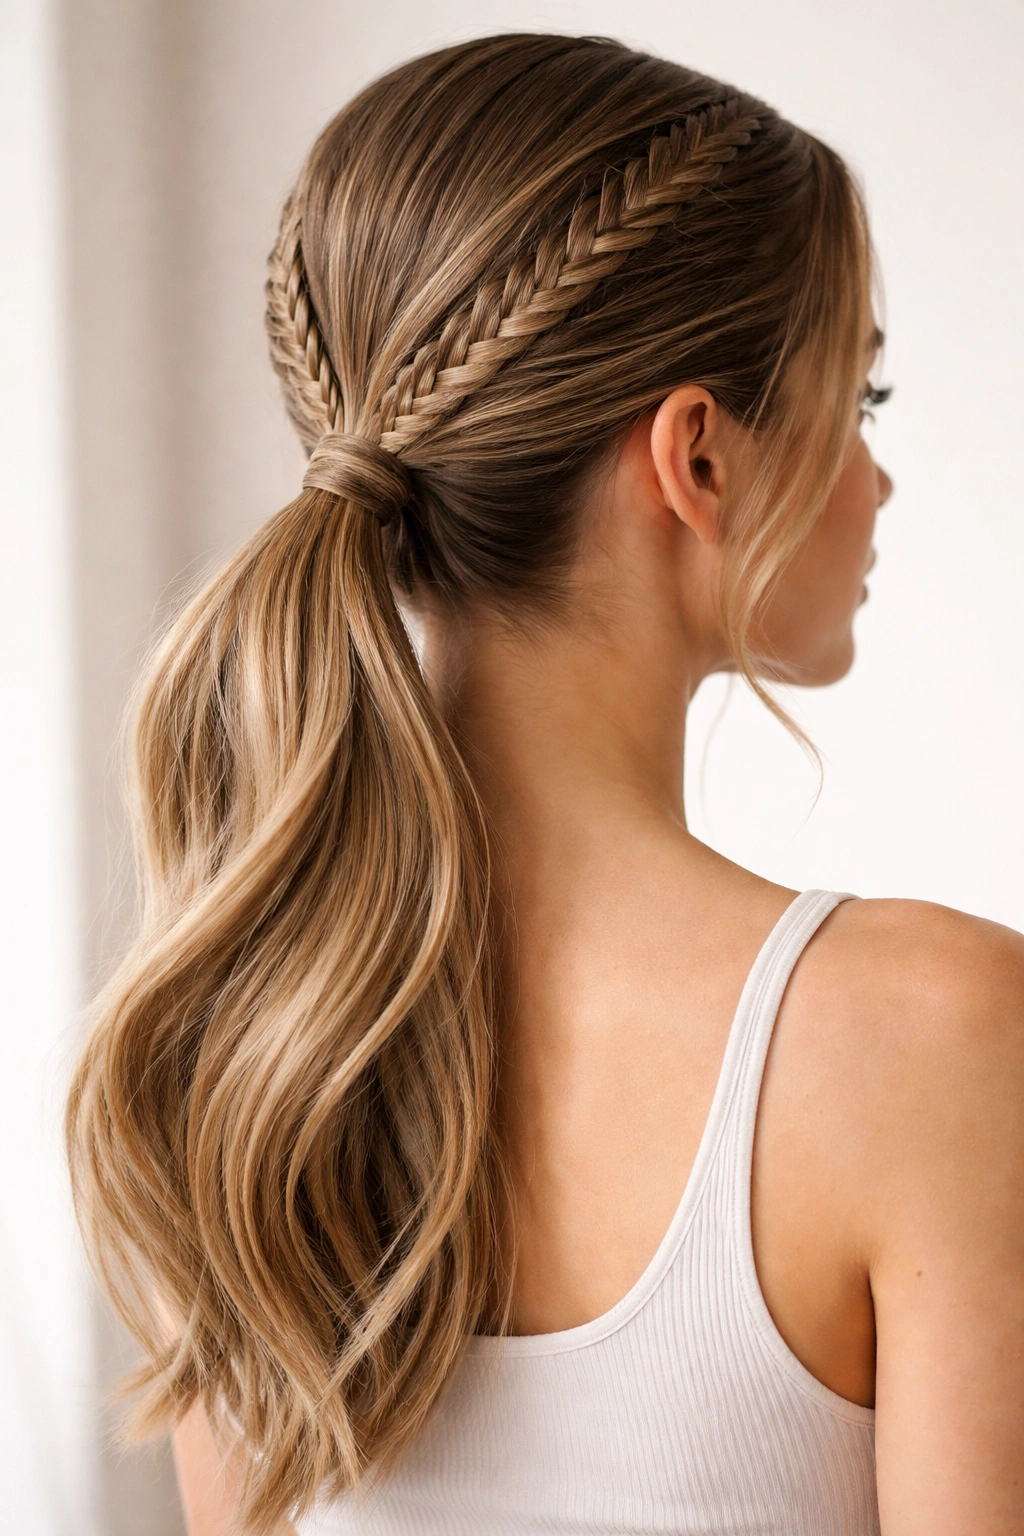
7. Double Dutch Braid Low Ponytail
Lower the ponytail position and you’ve transformed the classic double Dutch braid into something different—more casual, more modern, more effortlessly cool. A low ponytail positioned at the nape of your neck creates a draping effect where the loose ponytail hair falls past the braids, creating layers of texture and movement.
How to Create This Look
Follow the same double Dutch braid technique as the classic version, but instead of gathering everything into a high ponytail, bring your hair down to a low position at the nape of your neck. The braids should end well above the ponytail base—aim for your braids to reach about mid-ear level before you secure them, leaving plenty of loose hair below to gather into the low ponytail.
Once the braids are secured, flip your head forward and gather all hair into a low, centered ponytail. This position feels less formal than a high ponytail and creates a more relaxed aesthetic. The contrast between the structured braids and the flowing ponytail tail is what makes this version work—the loose hair provides movement and softness against the rigid braid structure.
Why This Style Works
Low ponytails feel more contemporary and less “done up” than high ponytails, even when they’re executed with precision. The lower position also works beautifully for different face shapes—it doesn’t emphasize the crown the way high ponytails do, and it creates a longer line from shoulder to ponytail base. This version works beautifully for casual outings, gym sessions, or any time you want structure without formality.
Styling note: A low double Dutch braid ponytail works equally well with sleek, straight hair or textured, curly hair—the braids anchor everything regardless of your natural texture.
8. Double Twisted Rope Braid Ponytail
This is a hybrid approach combining twisted rope sections with braiding elements, creating a textured, dimensional style that’s more complex than simple rope braids but achieves a different effect than traditional braids. The combination of twisted and braided sections creates visual complexity and movement.
How to Create This Look
Divide your hair into two equal sections. In the first section, create a Dutch braid that starts at your hairline and travels downward about halfway. At the midpoint, transition from braiding to twisting: separate the braided section into two halves and twist them together as a rope, continuing downward and incorporating new hair sections as you twist. Secure at ear level. Repeat on the other side with the same pattern.
The transition from braid to twist creates a unique visual effect—the structured braid gives way to a smoother twisted section, creating a sense of flow and evolution down your head. Gather both sections into a mid-height ponytail. You can pancake both the braided and twisted sections for added texture and visual impact, or leave them sleek depending on the occasion.
Why This Style Works
This hybrid approach appeals to people who love the structure of braids but want something slightly different from the traditional braid-only look. The combination of techniques creates visual interest without requiring significantly more time or skill. The transition point between braid and twist is a subtle but sophisticated design element that catches the eye.
Maintenance tip: Hybrid braid-twist styles benefit from light hairspray applied section by section as you work—this helps the style hold throughout the day and prevents unraveling.
9. Double Lace Braid Ponytail
Lace braids are a specialized technique where you braid down the center of each section while gradually incorporating smaller and smaller pieces of hair from only one side, creating an effect that looks like lace. Double lace braids are visually delicate and romantic, perfect for creating an ethereal, intentional aesthetic.
How to Create This Look
Divide your hair down the center. On one side, create your lace braid by starting at the hairline and performing a standard three-strand braid while incorporating new hair only from the outer edge—not from both sides as you would in a traditional braid. This creates a braid that becomes progressively more delicate as it travels downward, with loops and details visible only on one side.
Continue down to ear level and secure with a small elastic. Repeat on the other side, making sure the lace detail is visible on the outer edge of each braid. Gather both braids and remaining hair into a high ponytail. The lace braids should frame your face beautifully, with the intricate lacework visible and showcased.
Why This Style Works
Lace braids are exceptionally photogenic and create an impression of complexity and elegance. They work beautifully on all hair types and are particularly striking on longer, thicker hair where the lace detail is most visible. This style feels special and intentional, perfect for occasions where you want to feel beautiful and unique.
Quick facts:
- Lace braids require slightly more precision than standard braids, so practice on damp hair first
- The lace detail shows up best on straight or slightly wavy hair
- These braids pancake beautifully and should be gently widened for maximum visual impact
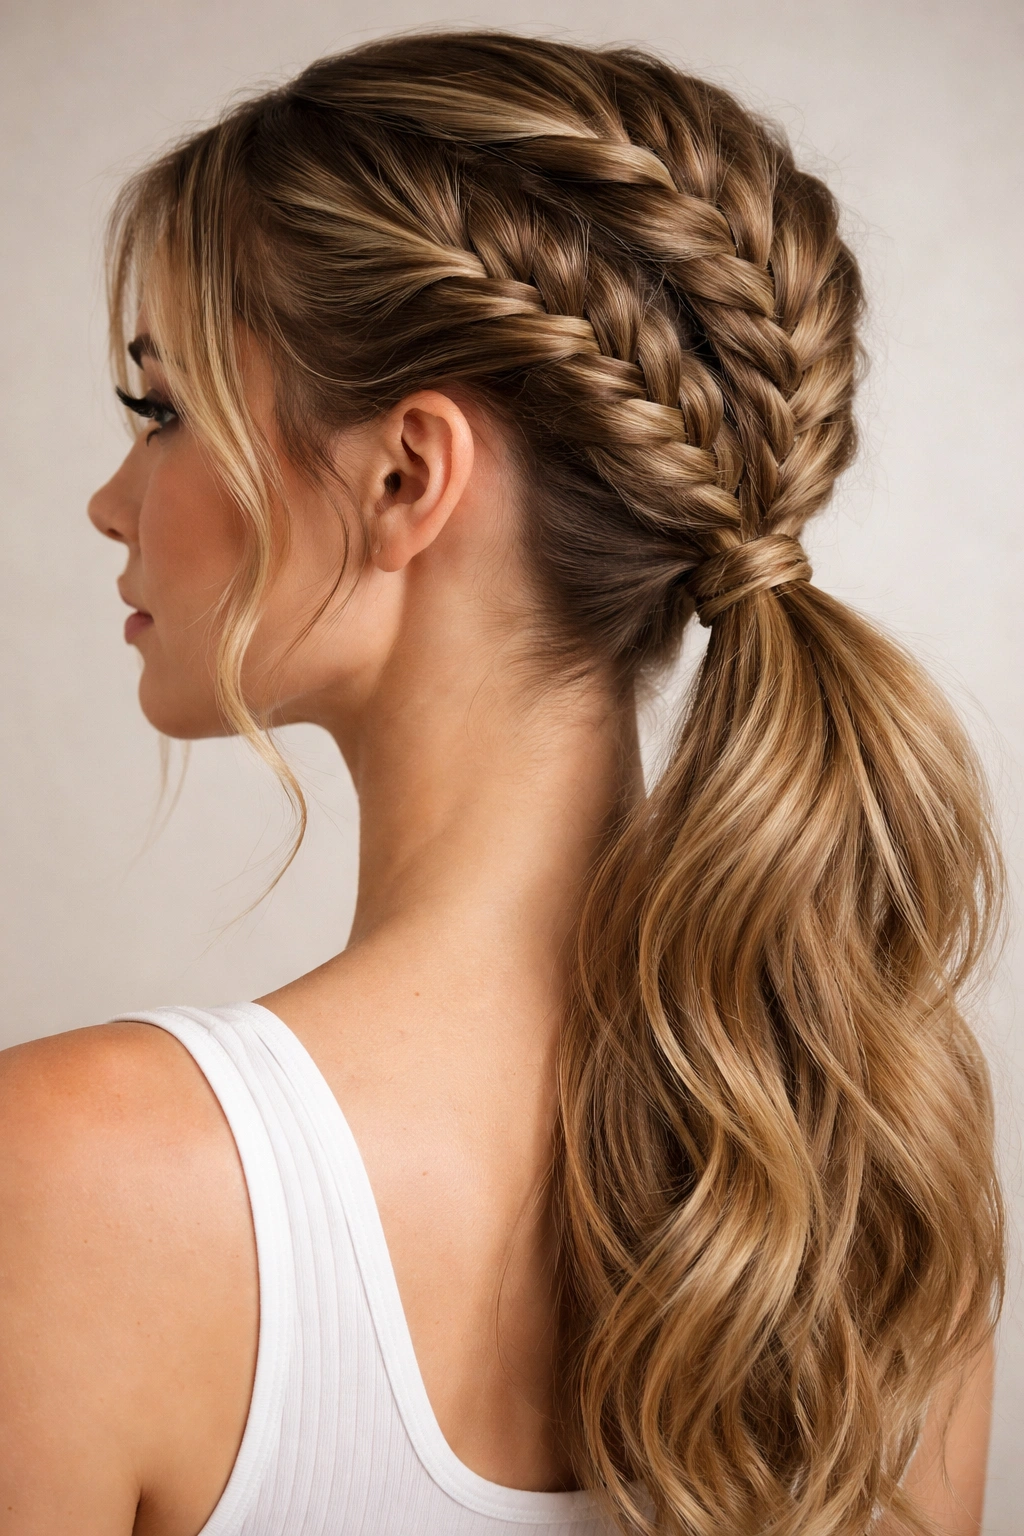
10. Double Boxer Braid Ponytail
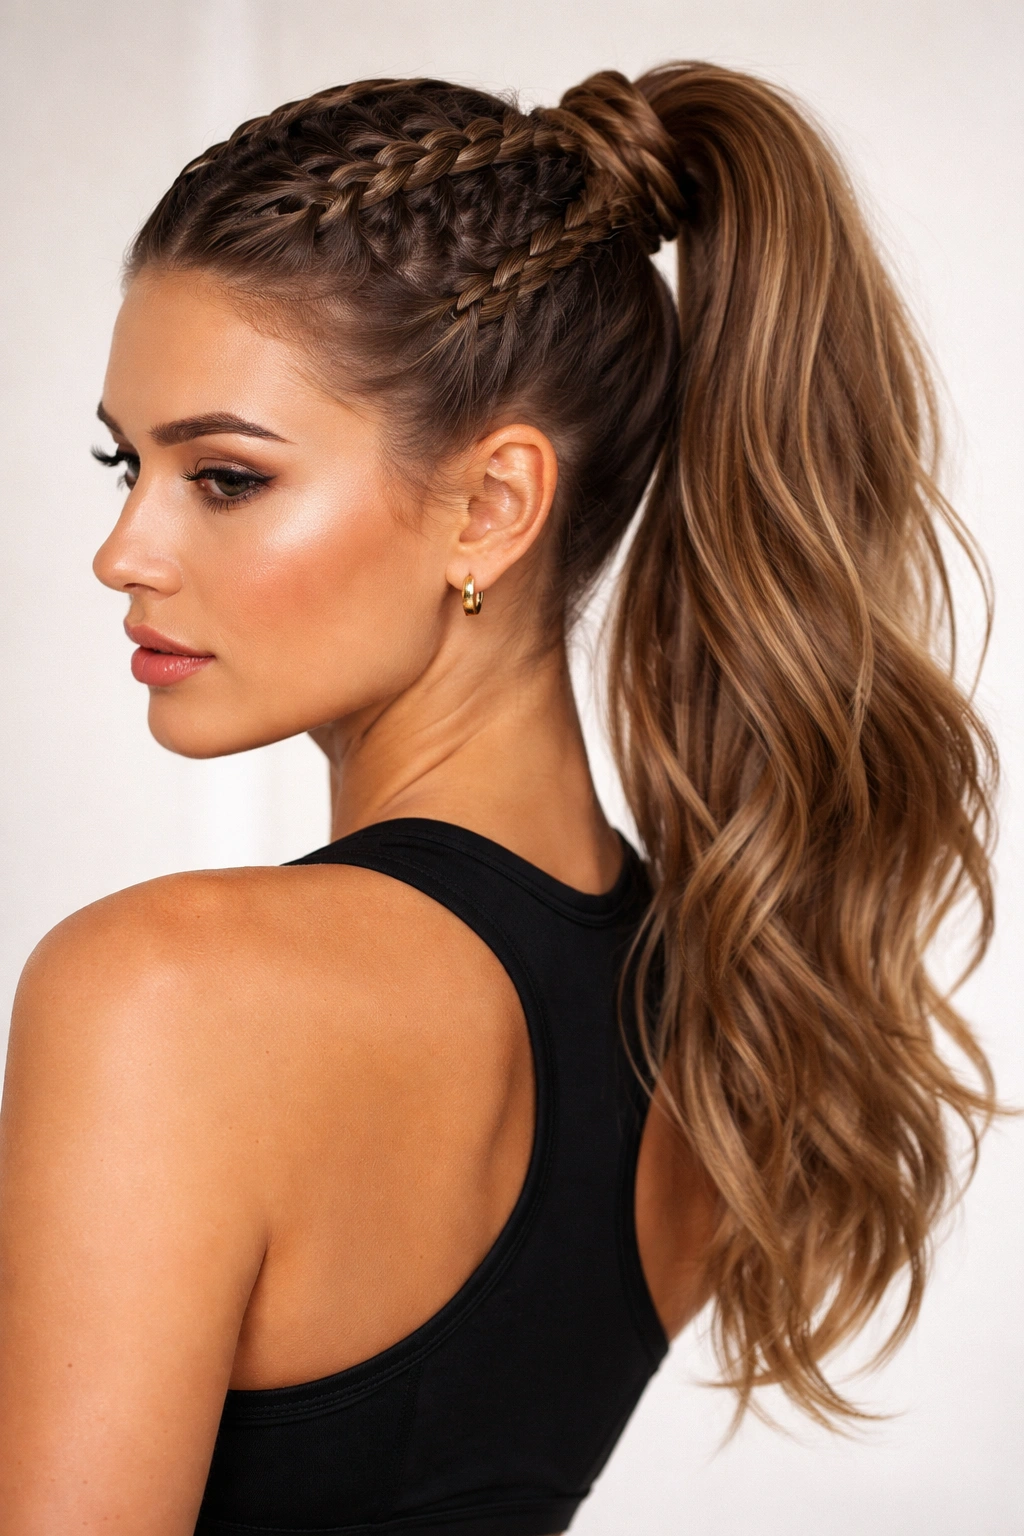
Boxer braids are essentially double Dutch braids that sit close to the scalp and run straight back, historically popular with athletes because they stay secure during movement. In this ponytail version, the braids are thick, prominent, and unapologetically sporty—creating a look that’s bold, modern, and undeniably sleek.
How to Create This Look
Starting at your hairline, divide your hair into two equal sections. Create a thick Dutch braid on each side, starting at your forehead and running straight back toward the crown. These braids should be noticeably fuller than delicate braids—grab larger sections as you incorporate hair from the sides. The goal is braids that look strong and athletic, sitting raised on the scalp and clearly visible. Continue both braids all the way back to the crown area, roughly where your crown and nape meet.
Gather both braids and remaining hair into a high or mid-height ponytail. Boxer braids benefit significantly from pancaking—gently pull each loop of the braid outward to create width and texture. This adds visual impact and creates a bolder silhouette than tight braids. The finished look should feel sporty, modern, and confident.
Why This Style Works
Boxer braids are bold and unapologetic—they announce themselves and don’t try to blend in. This style is perfect when you want to feel strong and capable rather than soft or delicate. Boxer braids stay secure through workouts, sports, and active days, making them practical as well as aesthetically striking. They work beautifully on all hair types and densities, and they photograph incredibly well because of their prominent, sculptural appearance.
Real-world application: Boxer braids are your go-to for gym days, sports events, outdoor activities, or any time you need your hair completely secured and out of your face. They’re also surprisingly appropriate for casual social settings and have become mainstream enough to wear anywhere.
Final Thoughts
Double braided ponytails deliver sleekness through structure and visual interest through texture—a combination that’s genuinely difficult to achieve with other hairstyles. Whether you choose the classic symmetry of double Dutch braids, the romantic asymmetry of side-swept braids, or the athletic confidence of boxer braids, you’re working with a foundation that simply works. These styles hold throughout the day, photograph beautifully, and require nothing more than basic braiding skills and a willingness to practice.
The real power of double braided ponytails lies in their versatility. The same fundamental technique shifts in feel depending on whether you tighten or loosen the braids, position your ponytail high or low, pancake for texture or leave sleek, and pair with different accessories or face-framing products. A style you wear to the gym on Tuesday can become your going-out look on Friday with minor adjustments and better products.
Start with whichever style resonates most strongly with you—don’t feel obligated to master all ten. Pick one, practice it three or four times until your hands know the motion without conscious effort, and then expand to another style once you’re confident. Within a few weeks of regular practice, you’ll have multiple double braid variations in your rotation, ready to deploy depending on the occasion, your mood, and how much time you have. That’s when these styles become truly powerful—not as novelty hairstyles, but as reliable, everyday options you can execute with confidence.