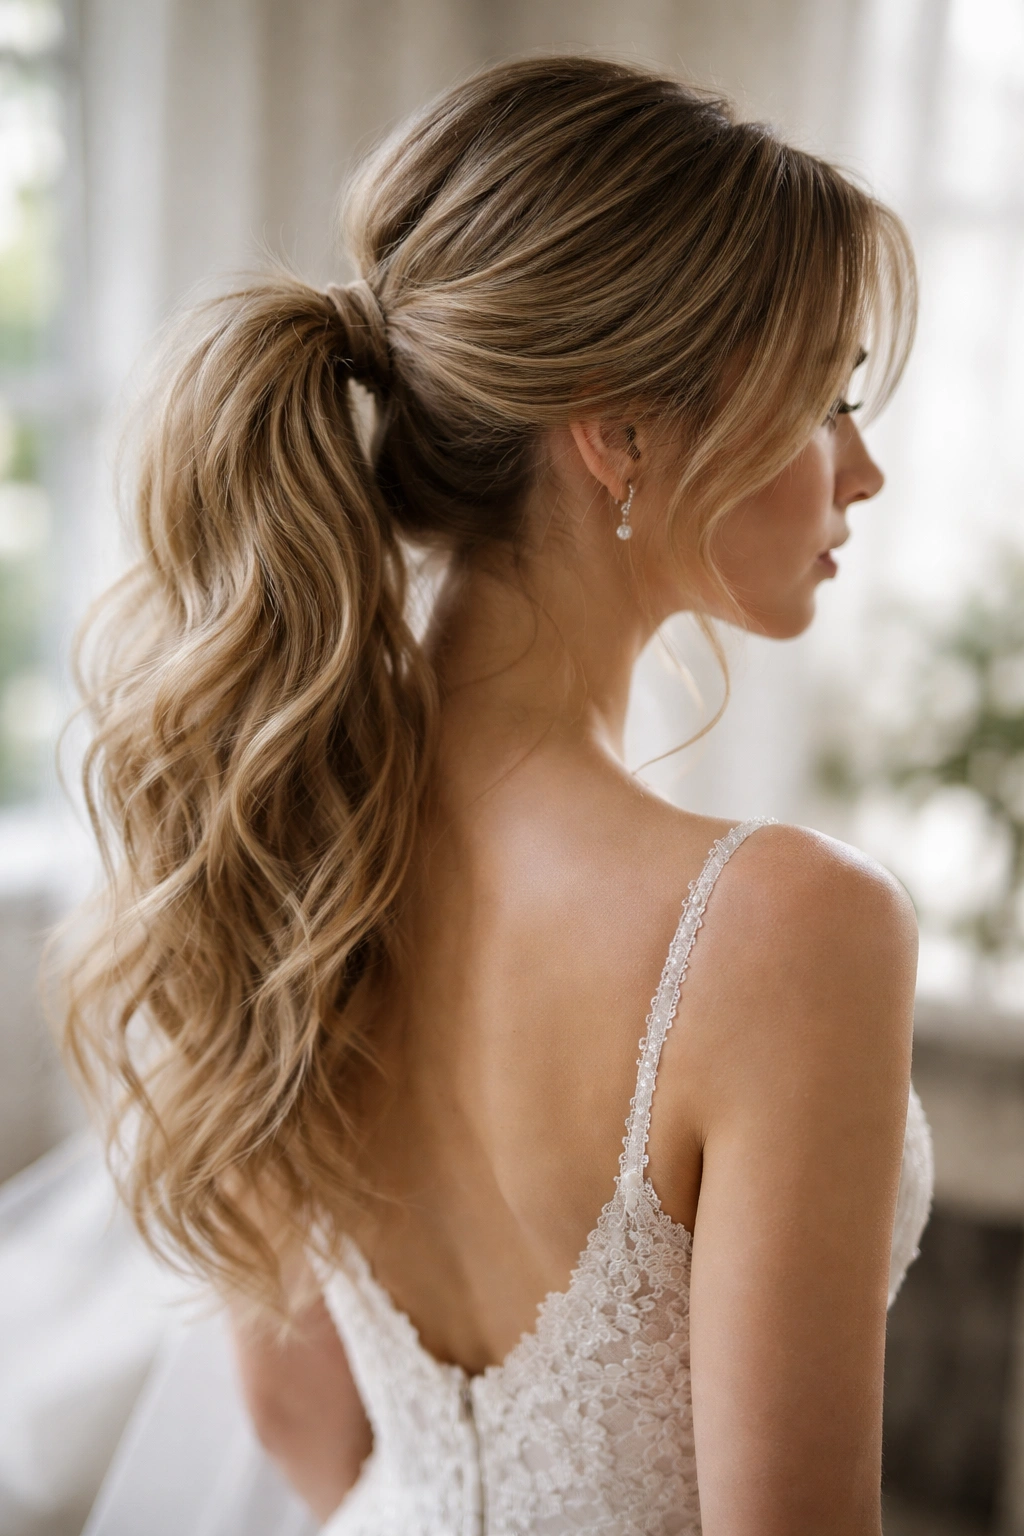
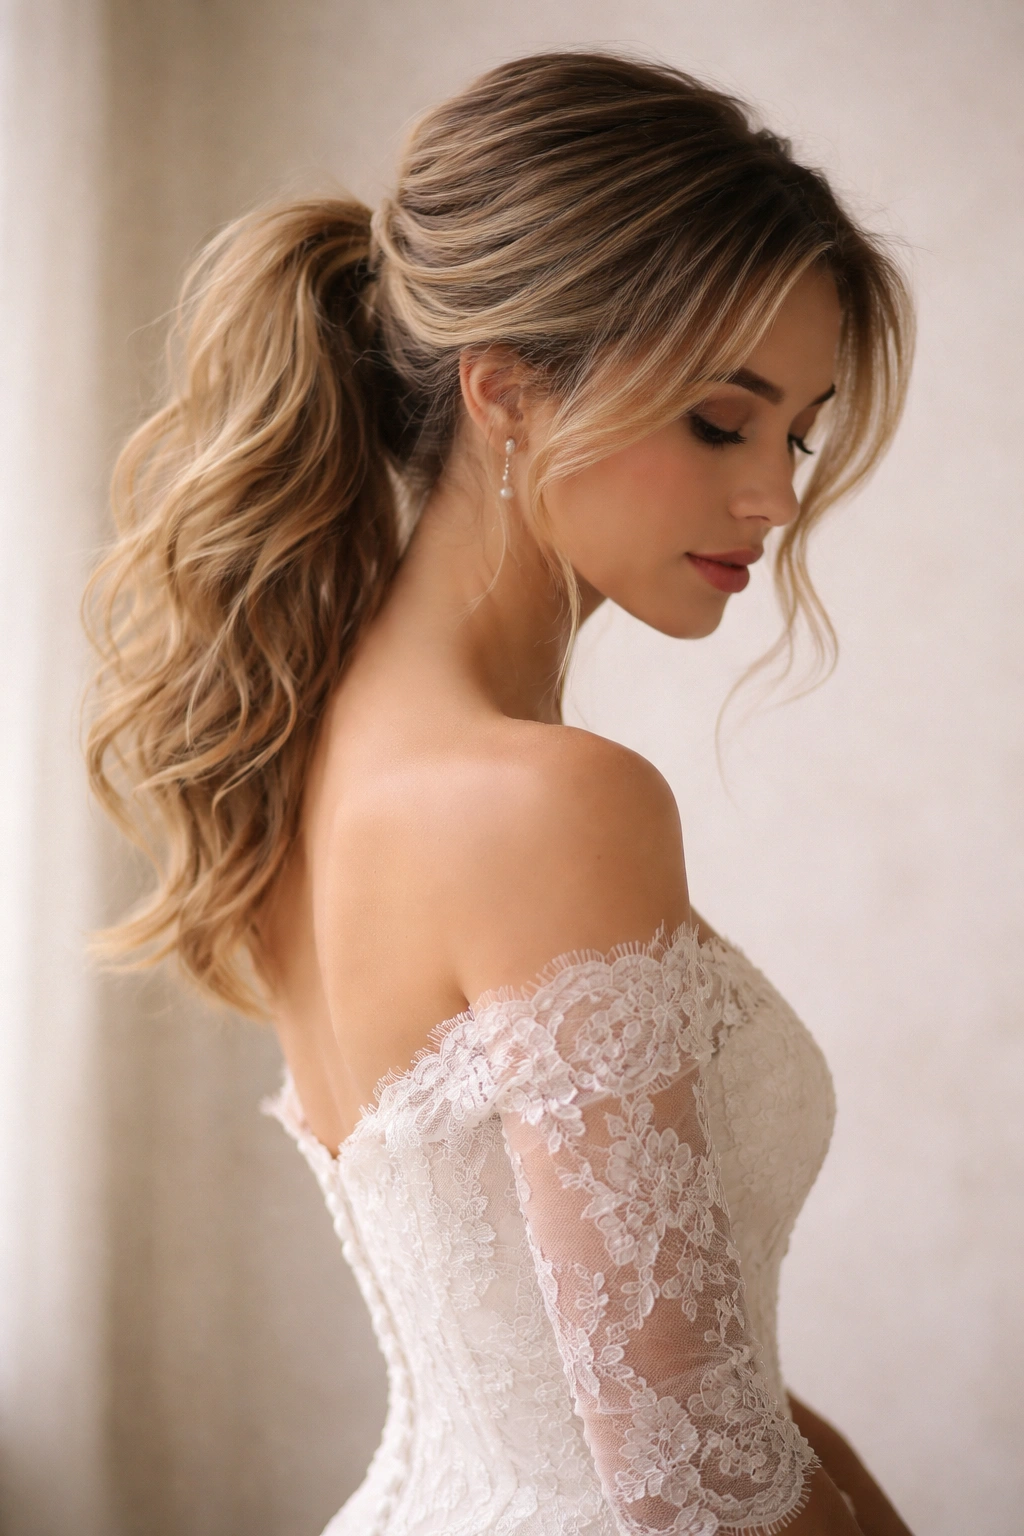
A messy ponytail might seem like the opposite of wedding-appropriate at first glance — but the truth is that effortlessly undone styles have become the gold standard for modern bridal and guest hair. The appeal is obvious: they’re elegant enough for formal occasions, comfortable enough to wear all day and into the evening, and they look intentionally polished rather than fussy or overdone. Whether you’re the bride, a bridesmaid, or a wedding guest, a well-executed messy ponytail strikes the perfect balance between sophistication and approachable femininity.
What makes a messy ponytail work for weddings is the precision that goes into creating the right kind of “messy.” This isn’t actually about being careless or lazy with your hair — it’s about strategic texture, intentional placement, and the kind of effortless elegance that takes real skill to achieve. A messy wedding ponytail needs volume in the right places, soft pieces that frame the face, and a secure foundation that will last through ceremony, photos, dancing, and mingling. The best versions combine clean, polished elements with undone texture, creating visual interest without looking unkempt.
The versatility of messy ponytails for weddings is one of their biggest strengths. You can style them for morning ceremonies or evening receptions, pair them with veils or floral crowns, and adapt them to any dress code or wedding aesthetic — from intimate garden celebrations to grand ballroom affairs. The styles here range from romantic and whimsical to sleek and modern, giving you plenty of options regardless of your hair texture, length, or personal style.
1. The Textured High Ponytail
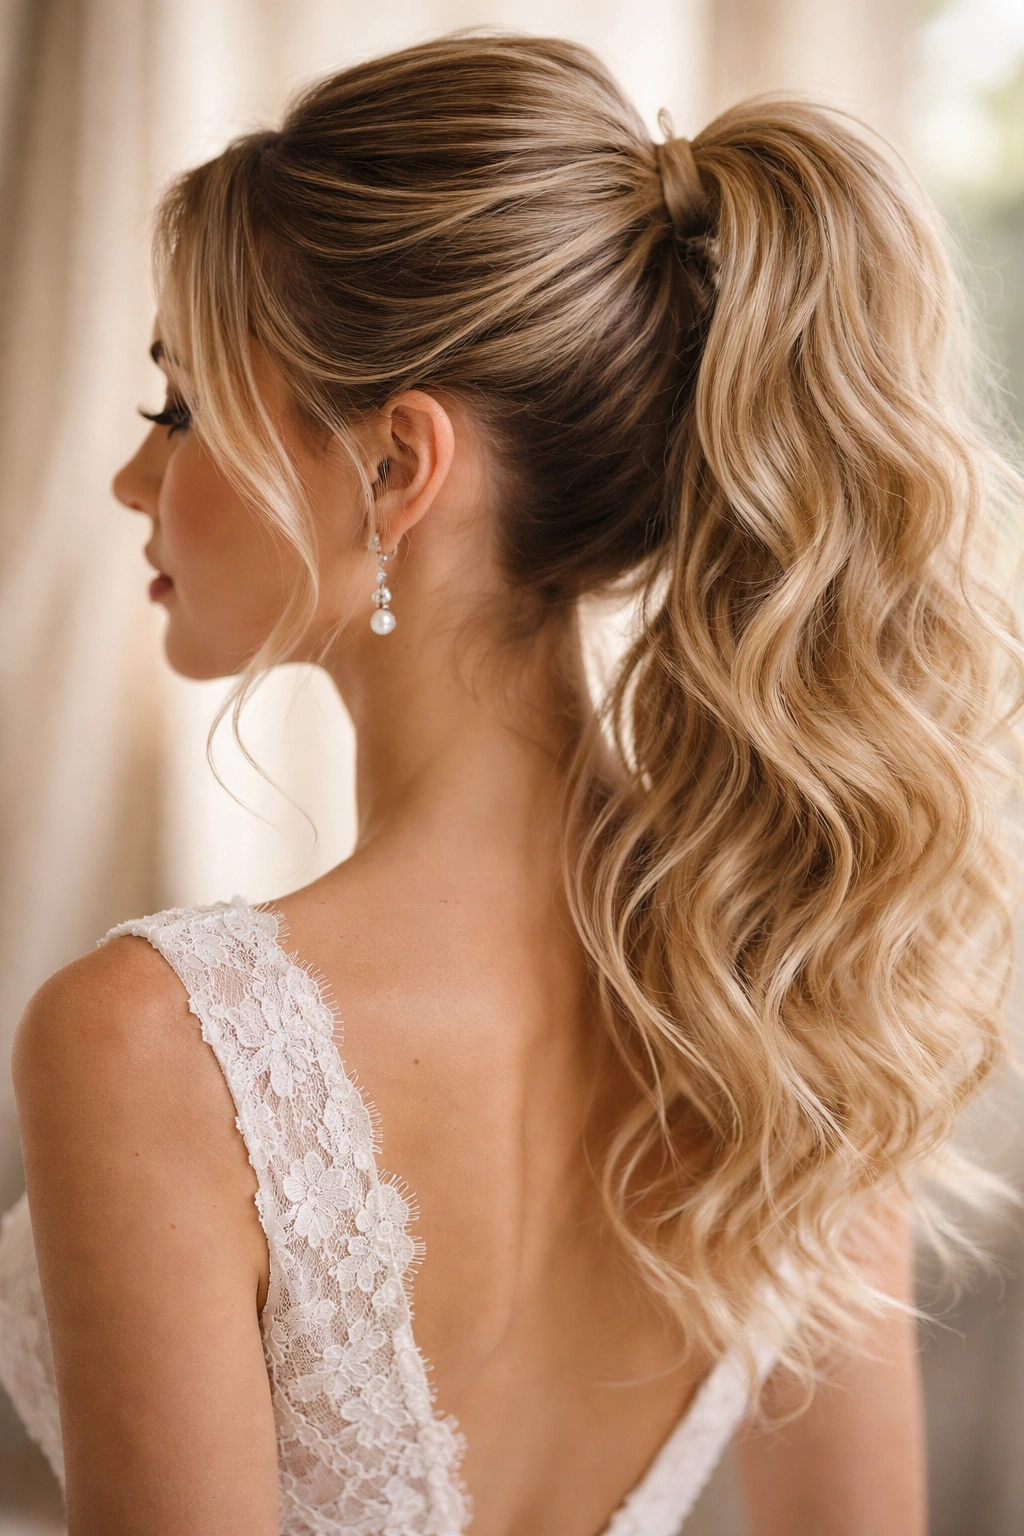
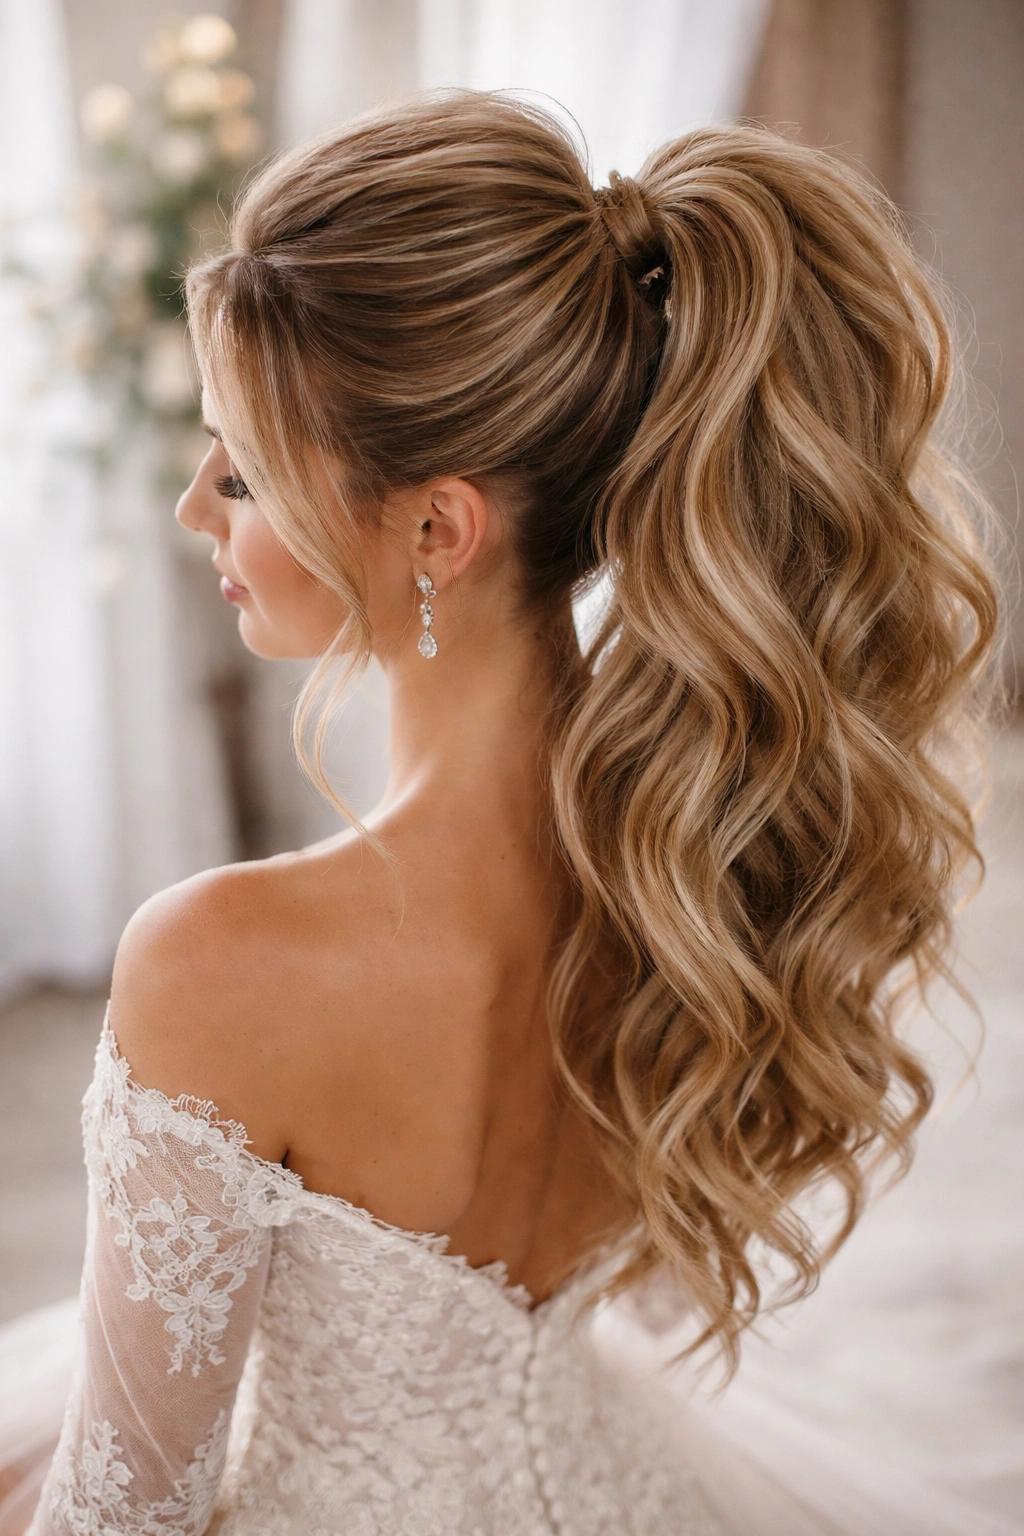
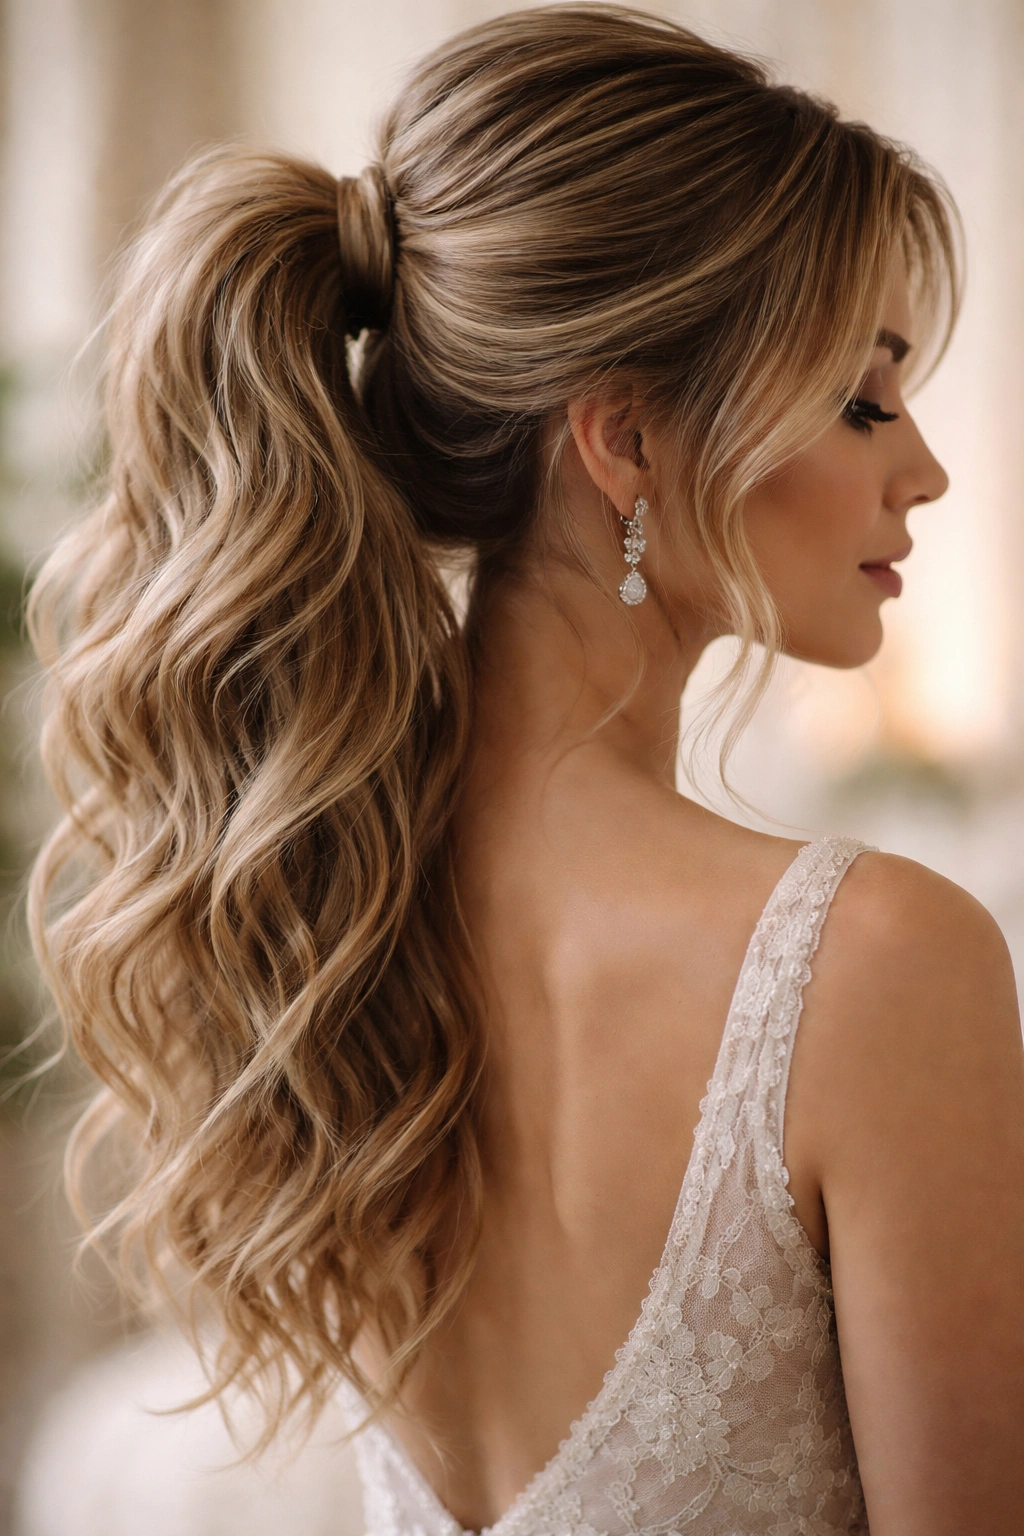
A high messy ponytail positioned near the crown works beautifully for brides and bridesmaids because it’s formal, shows off your face and neck, and frames the shoulders in a flattering way. The key to making this work for weddings is building genuine texture throughout your hair before gathering it — this isn’t a simple pulled-back ponytail, it’s a strategically textured one. You want your hair to have movement, volume, and a slightly undone quality even though it’s positioned quite high on the head.
How to Build the Texture First
Start with second-day hair or apply a volumizing dry shampoo to clean hair about 30 minutes before styling. Blow-dry your hair with your head flipped upside down to create natural volume at the roots, then flip back over and use a medium-barrel curling iron to add loose waves throughout your hair. The goal isn’t tight curls — think soft, lazy waves that give your hair dimension and movement. Don’t worry about making the waves uniform; variation actually helps the final messy effect look more organic.
Securing and Finishing
Gather your hair into a ponytail at the crown, but don’t pull it tight. Leave some softness and allow strands to come loose around your face and neck. Use a clear elastic or a small hair tie wrapped in your own hair to blend it in. Once secured, take small sections and gently backcomb them or use a fine-tooth comb to create texture throughout the ponytail itself. This transforms a simple ponytail into something with real depth and visual interest. Finish with a light hairspray that holds without feeling stiff.
Pro tip: For weddings where you’ll be photographed extensively, this style photographs beautifully because the height and texture create flattering shadows and dimensions on camera.
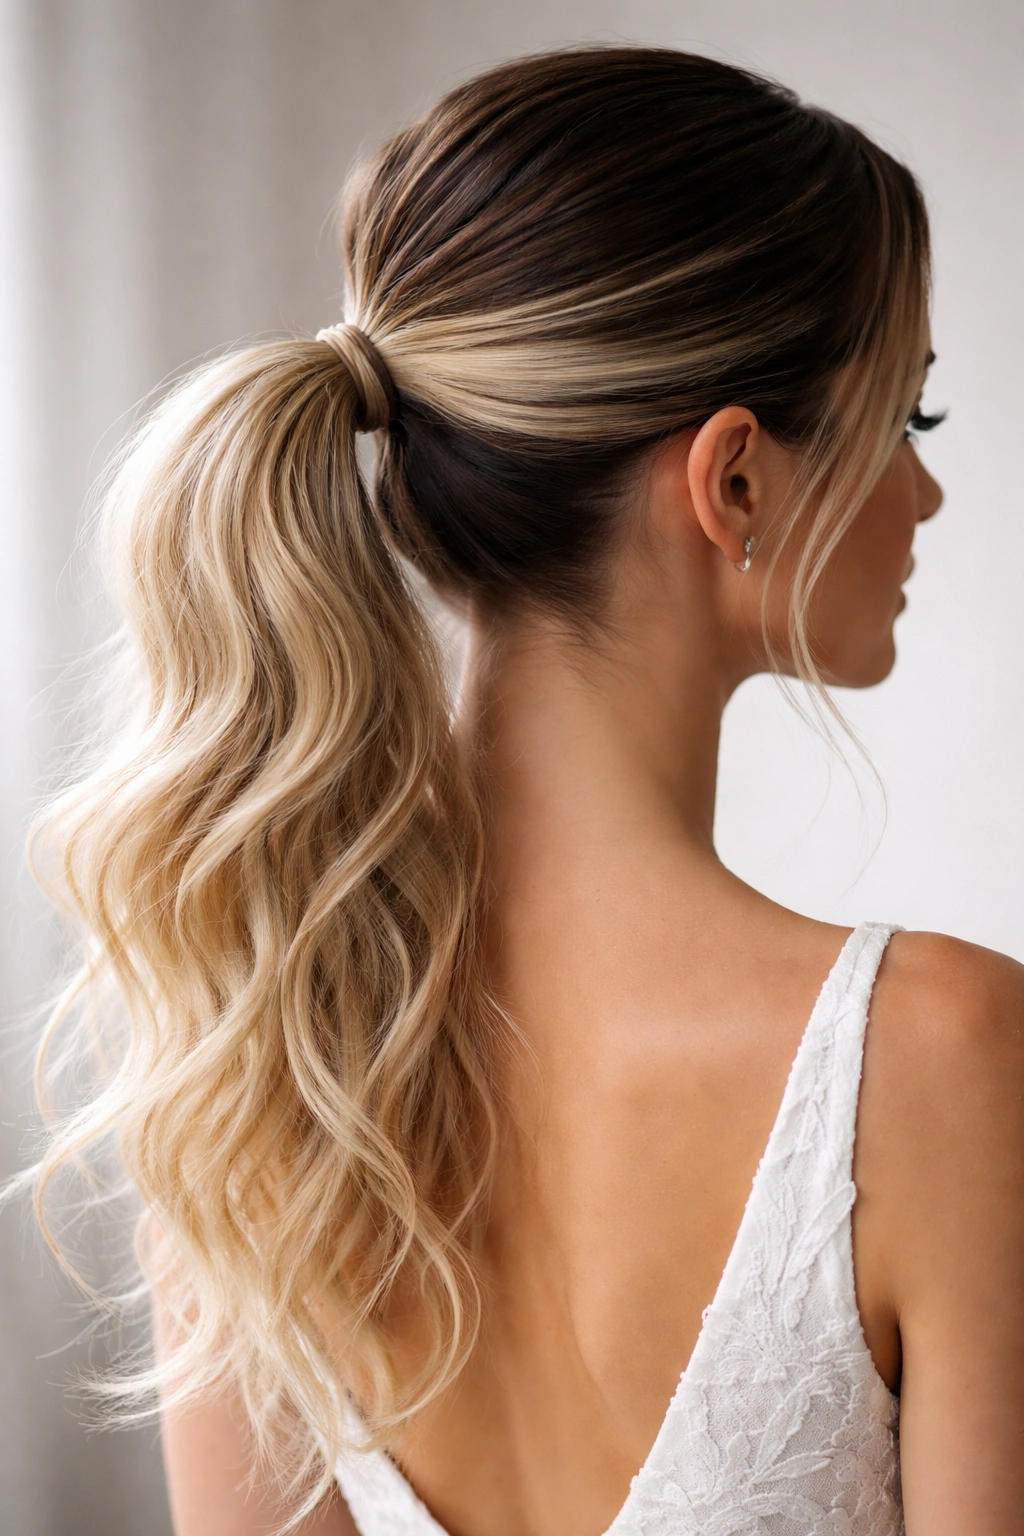
2. The Undone Side Ponytail
A side ponytail that sits at your ear or just below creates an asymmetrical, romantic silhouette that’s perfect for weddings with a bohemian or vintage aesthetic. The undone quality comes from loose waves, softly pulled texture, and face-framing pieces that you intentionally leave out. This style works exceptionally well for wedding guests because it feels special without appearing overly formal, and it suits almost every face shape.
The Sectioning Strategy
Part your hair deeply to one side — exaggerated is better than subtle for this look. Blow-dry with that deep side part in place to train the hair and create natural volume. Curl your hair loosely with a large-barrel curling iron, working in sections and allowing the curls to cool before brushing them out into waves. The waves should feel lived-in and soft, not defined ringlets.
Gathering With Intention
Gather the hair at the level where your side part naturally creates a low ponytail, usually at ear level or slightly lower. Don’t pull the ponytail tight — you want wisps and pieces to fall around your face and neck naturally. Use bobby pins underneath to secure loose pieces rather than pulling everything back tightly with a single elastic. This gives you more control over the undone effect and allows you to position pieces exactly where they’ll frame your face most beautifully.
Worth knowing: This style pairs beautifully with delicate drop earrings or statement earrings, depending on your wedding aesthetic and dress code.
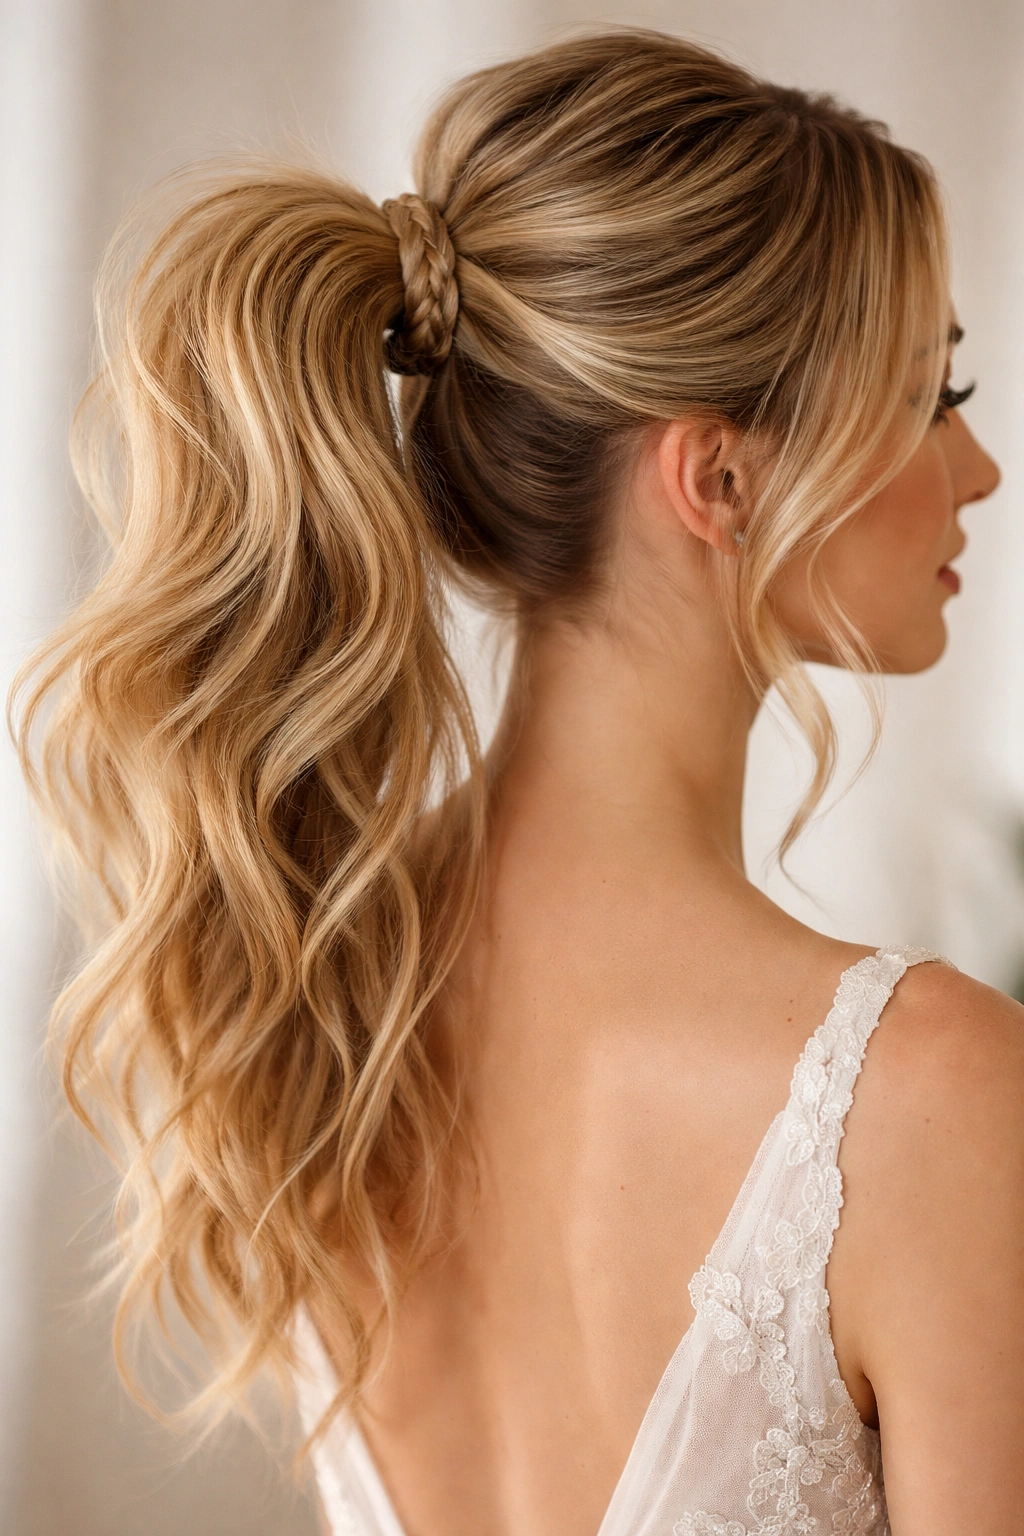
3. The Braided Messy Pony
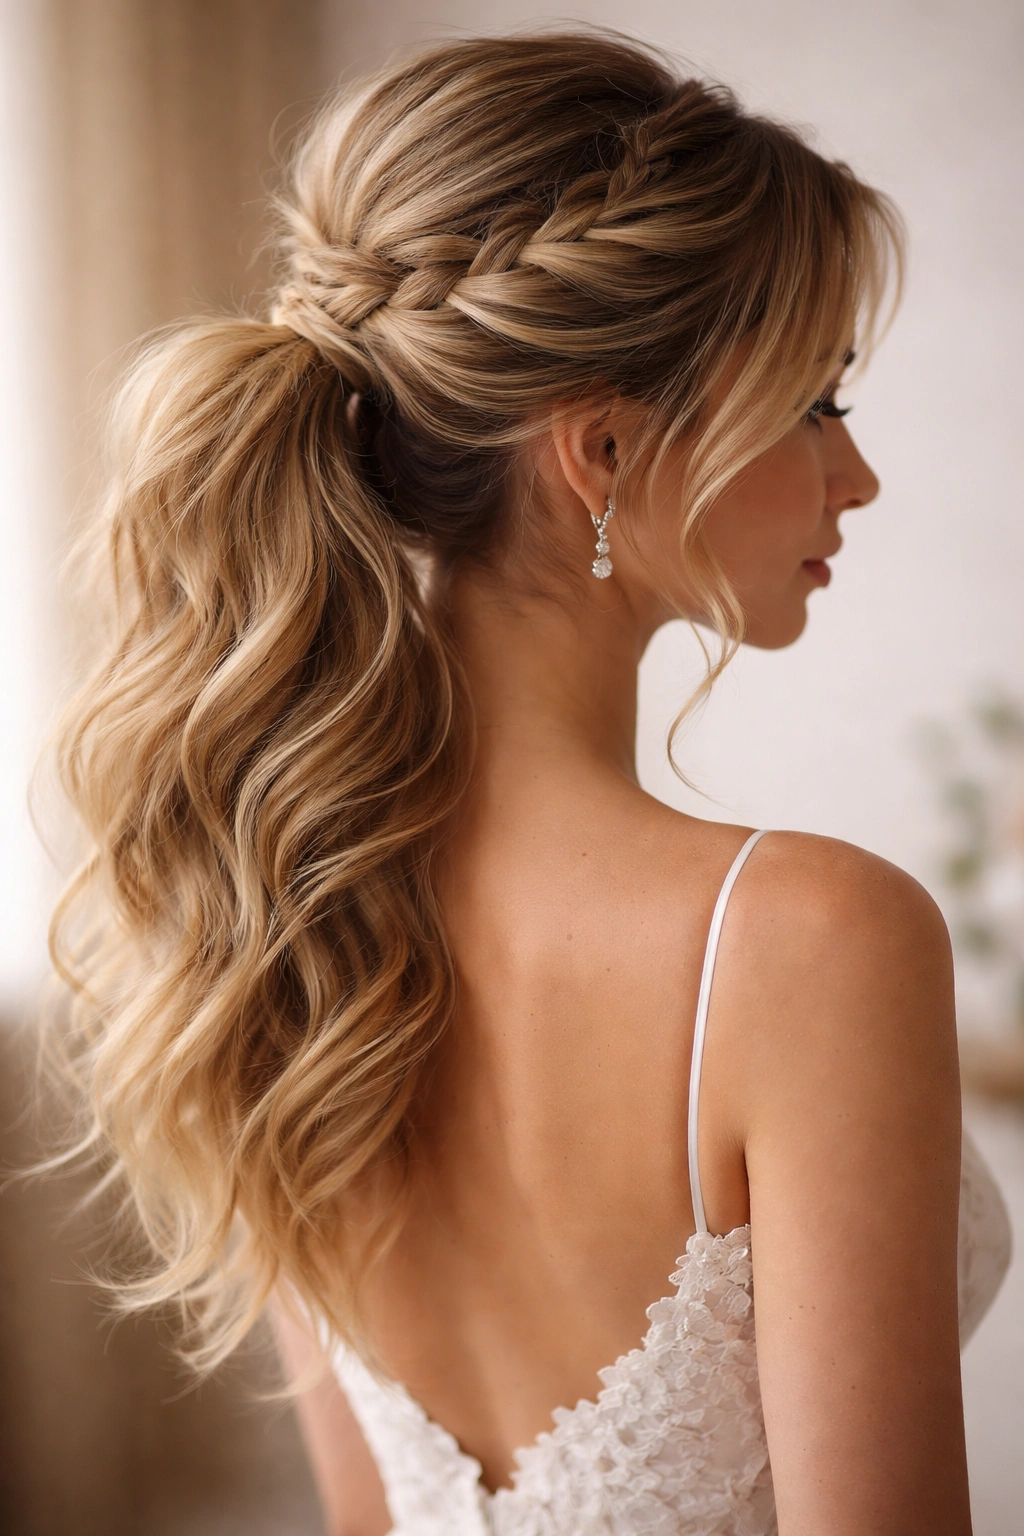
Adding a braid to a messy ponytail introduces texture and visual interest while still maintaining the relaxed, effortless vibe that makes messy styles so appealing for weddings. The braid can be woven through the ponytail itself, wrapped around the base, or incorporated into the hair before gathering — each approach creates a slightly different final look. A braided messy pony works beautifully for bridesmaids or as a bride’s style if you’re going for romantic rather than ultra-formal.
Braid Placement Options
One approach is to create a French braid or Dutch braid starting at the crown and braiding only a few inches down, then releasing the braid and pulling all your hair into a messy ponytail at that point. The braid becomes a band that defines where your ponytail sits. Another option is to gather your ponytail first, then braid the actual ponytail, pulling the braid slightly loose as you go to create a softened, undone version of a braided ponytail. A third option is to create a thin braid at one side of your head and wrap it around the base of your ponytail, securing it with bobby pins.
Texture and Finishing
Whichever braid approach you choose, you’ll want looseness throughout — this isn’t about precision braiding. Gently pull the braid sections slightly to widen them and create a softer, more relaxed appearance. Incorporate face-framing wisps by leaving a few small sections free before gathering your ponytail. Use a flexible hairspray that holds without stiffening so the braided elements and loose waves maintain their softness.
Pro tip: If you’re incorporating flowers or small hair accessories for the wedding, they look especially romantic threaded through a braided section of your ponytail.
4. The Bubble Ponytail
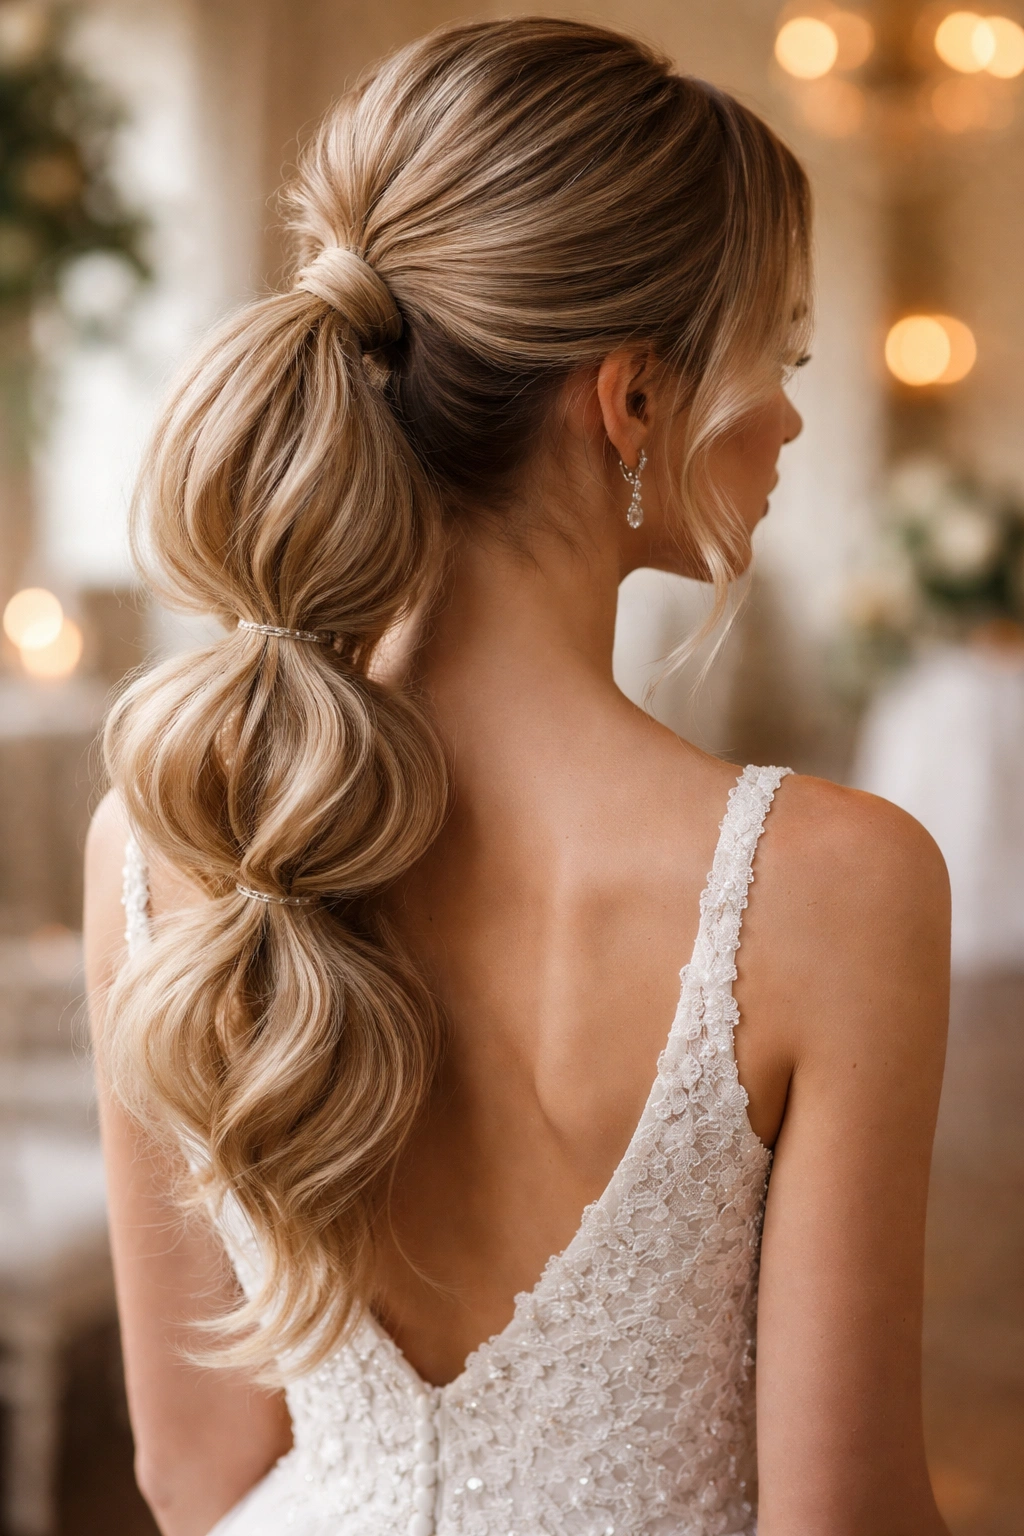
A bubble ponytail, also called a stacked ponytail, creates visual drama and playful texture by dividing a ponytail into sections and securing each section with its own small elastic, creating bubble-like stacked segments. For a wedding version, you keep the bubbles soft and loose rather than tight and defined, which prevents it from feeling too trendy or casual. This style is particularly effective for evening weddings and receptions where you want something that stands out but still reads as elegant.
Creating the Bubble Structure
Start by gathering hair into a high or mid-height ponytail, securing it with a clear elastic. About an inch down from that elastic, add a second elastic. About an inch below that, add a third elastic, and continue for as many bubbles as you’d like — typically three to five creates a balanced look. The distance between elastics determines the bubble size; larger spacing creates bigger, more dramatic bubbles. Once your elastics are in place, gently pull each section out and away from the center to expand the bubble and create that soft, rounded shape.
Softening the Look
To prevent the bubbles from looking too structured or youthful, create texture and softness throughout. Loosely curl your hair before creating the ponytail, so each bubble segment has natural wave and movement. After securing all your elastics, take small sections of each bubble and gently backcomb or tease them slightly to add texture. The key is making the structure feel intentional but soft rather than geometric and precise.
Worth knowing: This style holds exceptionally well for full-day events and dancing because the multiple elastics distribute tension throughout the ponytail rather than pulling on the roots from a single point.
5. The Twisted Low Ponytail
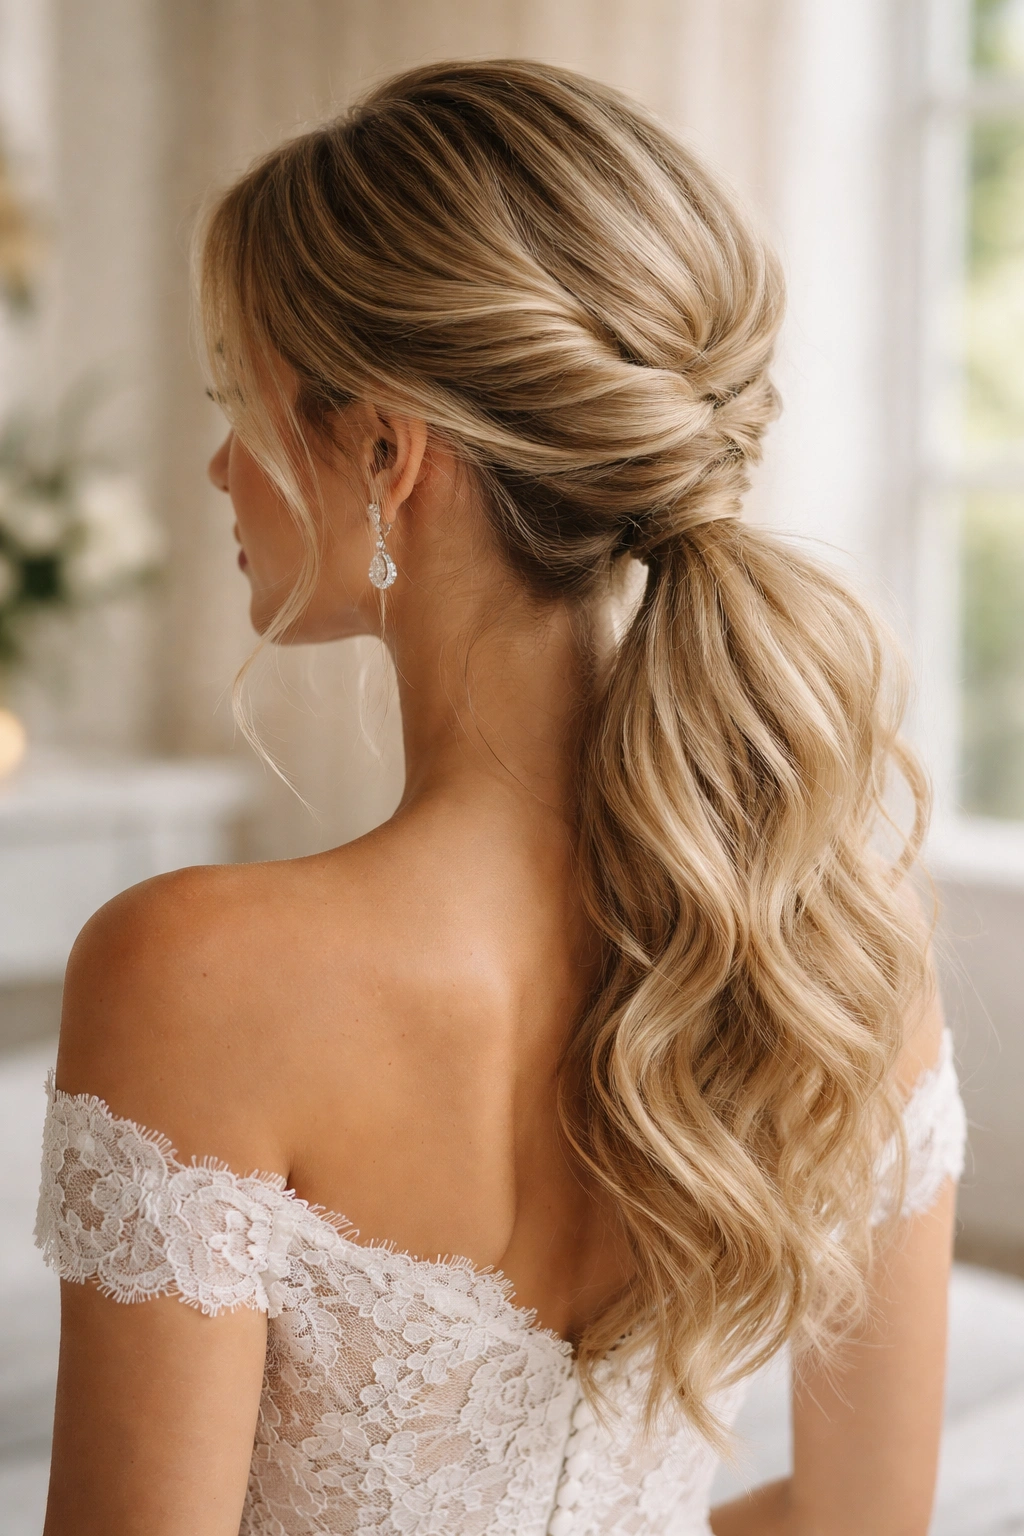
A low twisted ponytail combines the understated elegance of a low ponytail with the visual interest and texture of twists, creating something that’s both modern and timeless. The twists can run through the entire length of your hair from the crown to the ponytail, they can be positioned around the base of the ponytail, or they can frame the face before you gather your hair back — each creates a different final effect. This style is especially flattering for formal weddings where you want something sophisticated and refined.
The Twisting Technique
Divide your hair into sections and twist each section loosely — not tightly, but with enough tension that the twist holds without looking stiff. You can create two face-framing twists and let the rest of your hair fall loose, or create multiple twists throughout your hair and gather everything into a low ponytail. The twists should look relaxed and slightly undone, not perfect or geometric. Loosely curl your hair with a large-barrel iron before twisting to give yourself natural texture and wave to work with.
Securing and Styling
Gather everything into a low ponytail, positioning it slightly to one side for asymmetry and interest. Leave some face-framing wisps loose rather than pulling every strand back tightly. You can wrap one of your twists around the base of the ponytail and secure it with bobby pins for additional texture at the base. Finish with hairspray that’s flexible enough to allow the twists and waves to move naturally.
Pro tip: Twisted ponytails are exceptionally photogenic because the twists create beautiful shadow and dimension that photographs beautifully, especially in natural or golden-hour lighting.
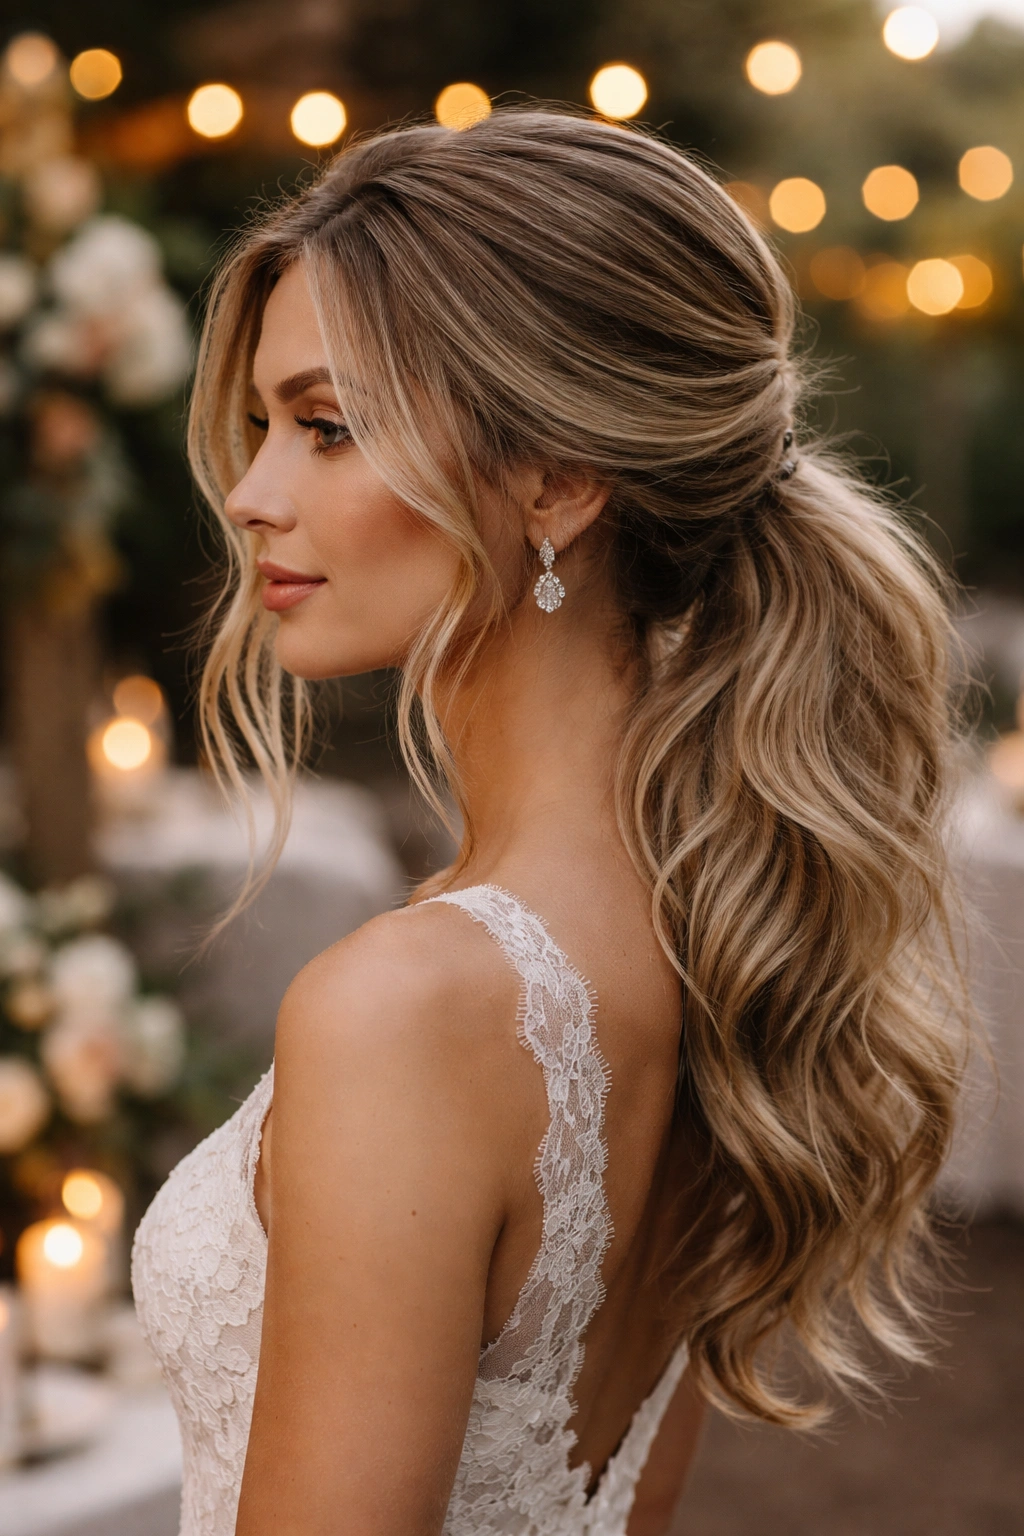
6. The Romantic Wispy Ponytail
A romantic wispy ponytail prioritizes soft, delicate wisps and face-framing pieces over a clean, pulled-back aesthetic — it’s the opposite of a severe ponytail. This approach works beautifully for brides who want their style to feel ethereal and soft, and it’s equally perfect for guests wanting something that feels special and intentional without being overly formal. The key is strategic placement of loose pieces that appear delicate rather than accidentally escaped.
Creating the Wisp Effect
Loosely curl your entire head of hair with a large-barrel curling iron, creating soft waves rather than tight curls. Don’t brush these out completely — you want defined waves that will maintain their texture. When you gather your ponytail, intentionally leave small sections free around your hairline, ears, and the nape of your neck. These pieces should be thin enough to feel wispy and delicate rather than like full sections of hair. Use bobby pins to secure and position them rather than relying only on the elastic.
Securing Softly
Gather the bulk of your hair into a ponytail, but keep it loose and allow substantial volume at the crown. The ponytail itself should have softness and texture — create this through loose waves, gentle teasing, or by not pulling the elastic too tight. Use a clear elastic or a hair tie wrapped in your own hair so the fastening is invisible. Finish with a light hairspray that holds without stiffening the wisps.
Worth knowing: This style is particularly beautiful with small floral elements like baby’s breath or delicate flowers woven through the wisps or positioned near the ponytail base.
7. The Two-Tone Sleek Messy Pony
Incorporating contrast — whether through color, texture, or both — creates visual interest and makes a simple messy ponytail feel more editorial and refined. A two-tone approach might mean contrasting the sleek, polished top section with a textured, undone ponytail, or pairing a slicked base with a voluminous, tousled ponytail. This style works beautifully for modern weddings or for guests wanting something that feels contemporary and striking.
The Sleek Base
Use a strong-hold gel or pomade to smooth the top section of your hair — typically from your part or front hairline back to where you’ll gather your ponytail. You want this section completely sleek and polished, without any flyaways or texture. Use a fine-tooth comb and a blow-dryer on cool to set this smooth section. The contrast between this polished top and an undone ponytail creates visual drama.
The Textured Ponytail
Once you’ve secured your sleek base section into a ponytail, the ponytail itself should be the opposite — textured, voluminous, and intentionally undone. Loosely curl your hair before styling so the ponytail has natural wave. Once secured, gently tease sections throughout the ponytail and loosen the sections slightly to create texture and fullness. You can also leave a few face-framing pieces loose before gathering the ponytail, allowing them to contrast with the sleek crown.
Pro tip: This style photographs extraordinarily well because the contrast creates visual interest and depth, and the sleek-to-textured transition is a strong design element.
8. The Half-Up Messy Bun Hybrid
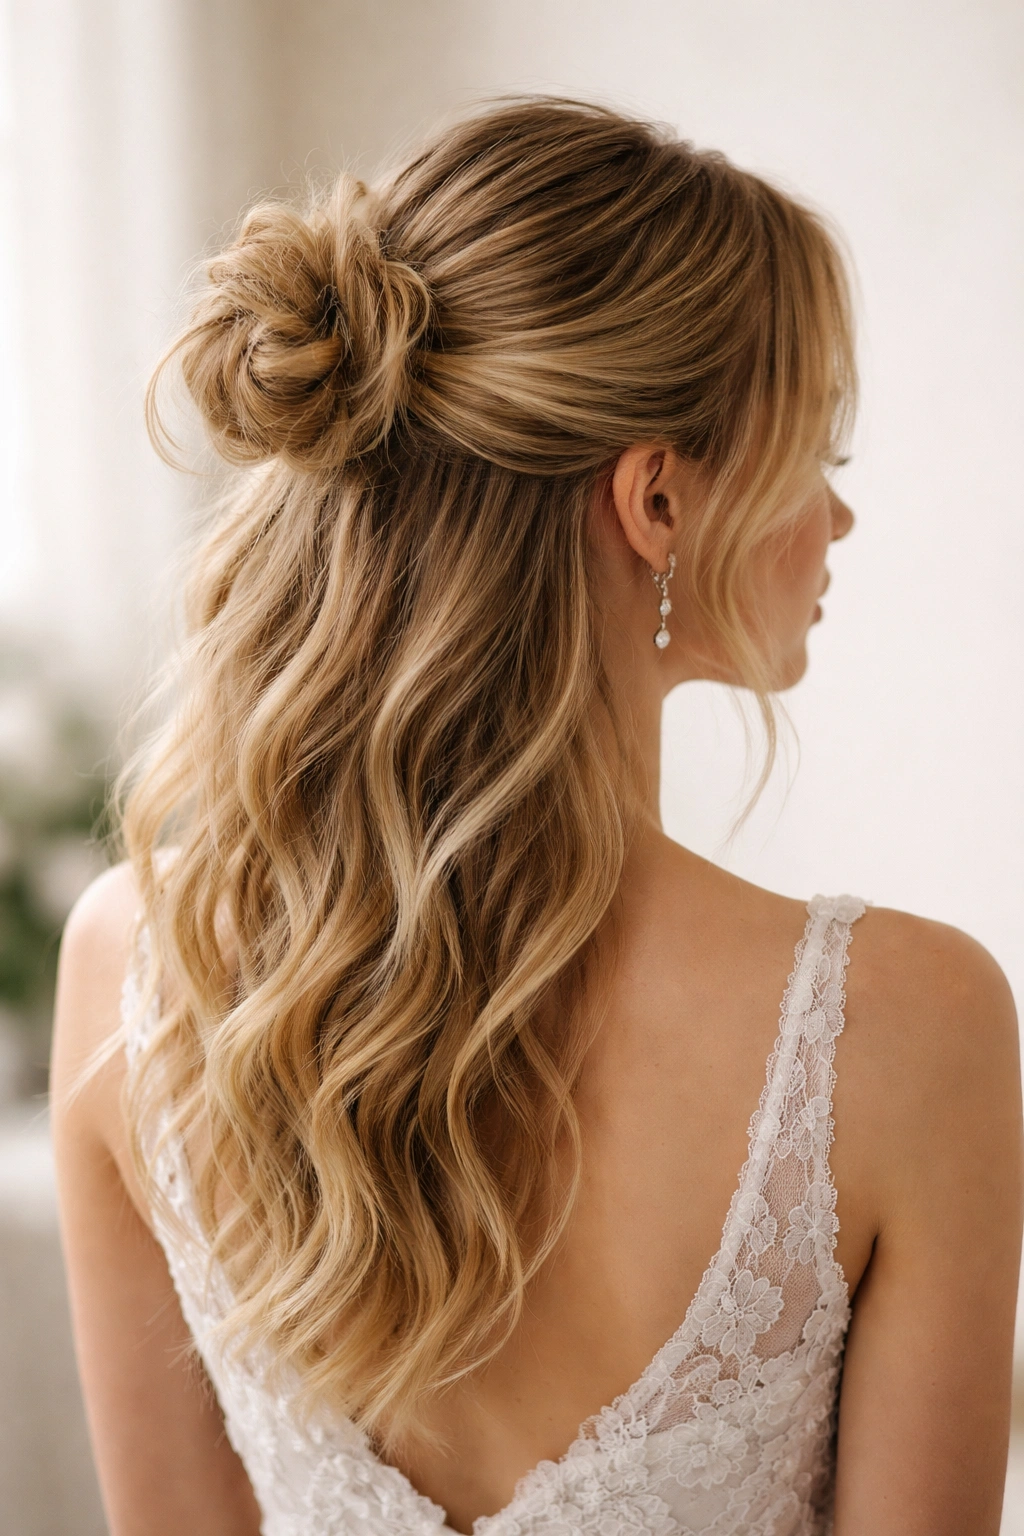
Blending a half-up style with a messy ponytail or bun creates a playful, youthful aesthetic that’s still completely appropriate for weddings. This hybrid works beautifully for bridesmaids or younger wedding participants because it feels special and intentional without being severe or overly formal. The half-up-down approach also flatters almost every face shape and hair texture while keeping hair partially off your face.
Gathering the Top Section
Take a section of hair from one side of your head, starting near your temple, and gather it toward the back of your head. You want this section to feel loose and casual rather than pulled tight. Secure it with a small elastic or bobby pins. Then take a section from the opposite side and repeat. These two sections should meet at the back of your head, and you can gather them together into a small bun or leave them as a loose knot.
Building the Bottom Ponytail
Leave the bottom half of your hair down and loose, creating soft waves throughout with a curling iron. You can create an additional low ponytail beneath your half-up gathering if you want more definition, or simply allow the bottom section to flow loose with texture and movement. The key is that the overall look feels soft and playful rather than structured.
Worth knowing: This style is especially practical for outdoor weddings because the partial updo keeps hair off your face and neck while the loose bottom section creates a soft, romantic silhouette.
9. The Braided Wrap Ponytail
A braided wrap ponytail takes a standard messy ponytail and elevates it by creating a decorative braid element wrapped around the base — this small detail transforms a simple style into something that looks intentional and editorial. The braid can be thin and delicate or thicker and more substantial depending on the overall aesthetic you’re going for. This approach works beautifully for weddings where you want something that reads as elevated and thoughtful.
Creating the Base Ponytail
Gather your hair into a high, mid-height, or low ponytail depending on your preference — all three work equally well for this style. Create texture throughout your hair before gathering by loosely curling it. Leave the ponytail loose rather than pulling it tight; you want volume and softness. Use a clear elastic or a hair tie wrapped in your own hair so the fastening is invisible.
Adding the Decorative Braid
Take a thin section of hair from your ponytail (you can also use a thin braid from the crown if you prefer) and braid it. Keep the braid loose and slightly loose by gently pulling the sections to widen them. Wrap this braid around the base of your ponytail, covering where the elastic sits, and secure it with bobby pins. The braid should spiral around the base rather than sitting flat. Finish the entire style with flexible hairspray.
Pro tip: You can thread small flowers, ribbons, or delicate hair accessories through the braid wrap for additional wedding-appropriate detail and personalization.
10. The Voluminous Crown Ponytail
A voluminous crown ponytail positioned high on the head but with significant lift and texture throughout creates a statement style that’s both modern and romantic. This approach works beautifully for brides wanting a style with presence and impact, or for guests wanting something that photographs beautifully and stands out. The voluminous quality comes from strategic teasing, layering, and intentional texture throughout.
Building the Volume Foundation
Blow-dry your hair with your head upside down to create natural root lift, then flip back over. Use a medium-barrel curling iron to add loose waves throughout your hair, working in sections. You’re aiming for soft texture, not tight curls. Once your curls are set, gently brush them out into waves. Now use a fine-tooth comb or teasing brush to gently backcomb the crown section, creating lift at the roots.
Gathering With Fullness
Gather your hair into a high ponytail, but don’t pull it tight. You want softness and release throughout. Position your fingers so your ponytail has space underneath, allowing your crown section to maintain its lift and volume. Use bobby pins to position wisps and pieces around your hairline and face rather than forcing every strand into a tight ponytail. The final effect should look like your ponytail has enormous, natural volume rather than a clean, pulled-back look.
Worth knowing: Voluminous crown ponytails are exceptionally flattering for long faces because the width and fullness at the crown creates beautiful proportions and balance.
11. The Tousled Velvet Ponytail
A tousled velvet ponytail combines the sleek sophistication of a structured style with the soft, tactile quality of heavily textured, tousled hair — it’s modern, slightly undone, and thoroughly elegant. This style works beautifully for contemporary weddings or for guests wanting something that feels more fashion-forward than traditional. The tousled texture is achieved through curling, teasing, and strategic loosening.
Creating Maximum Texture
Using a large-barrel curling iron, curl your hair in large sections, allowing the curls to cool before releasing them. Once cooled, gently run your fingers through the curls to break them up into waves and texture rather than defined curls. Use a teasing brush to gently backcomb the crown and mid-lengths of your hair, creating a softly tousled texture throughout. You want the texture to look intentional but undone, like you’ve spent the day doing active things and your hair has naturally developed beautiful texture.
Ponytail Placement and Finish
Gather your tousled, heavily textured hair into a ponytail — high, mid-height, or low depending on your preference. The ponytail should maintain its tousled quality throughout; use bobby pins to position loose pieces rather than forcing everything smooth into a tight elastic. Leave face-framing wisps and pieces loose so they contrast with the gathered ponytail. Finish with a flexible hairspray that holds without stiffening the texture.
Pro tip: This style pairs beautifully with statement jewelry and bold lip color, as the soft, undone hair balances more dramatic makeup or accessory choices.
12. The Bohemian Loose Weave Ponytail
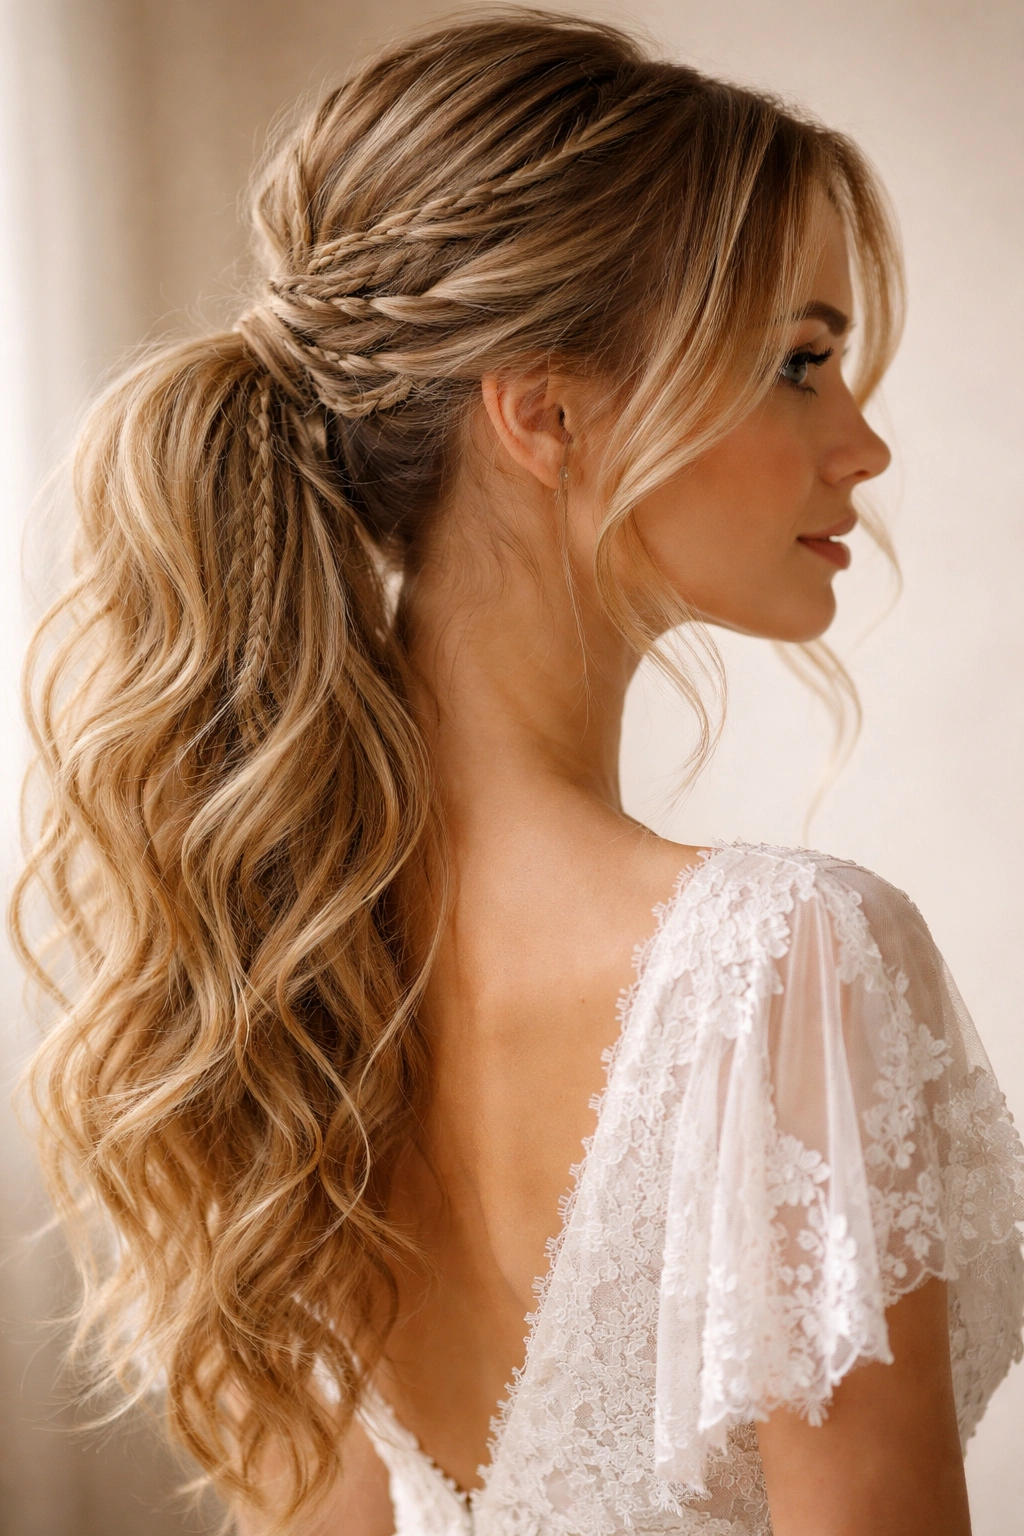
A bohemian loose weave ponytail incorporates multiple thin braids or woven sections throughout your hair before gathering it into a ponytail — the braids create visual interest and add to the romantic, free-spirited aesthetic that makes this style so appealing for weddings with bohemian or garden themes. Each braid should be loose and slightly undone, contributing to the overall soft, romantic feeling.
Creating the Braided Sections
Rather than creating one structured braid, create multiple thin braids throughout your hair — you might have two or three face-framing braids and several throughout the back and sides. Each braid should be loose and slightly pulled to soften it; you’re aiming for an undone, bohemian effect rather than neat, structured braiding. Vary the thickness of the braids for a more organic appearance.
Gathering Everything
Gather all your hair, including the loose braids, into a ponytail at your preferred height. The braids weave through the ponytail, creating visual texture and interest. Leave some wisps and pieces loose around your face and neck to maintain the soft, bohemian aesthetic. You can also incorporate small flowers, greenery, or ribbon woven through the braids and ponytail for additional wedding-appropriate texture and personalization.
Worth knowing: This style is exceptionally beautiful for outdoor or garden weddings because it feels natural and organic — the loose braids and wispy pieces create a soft silhouette that enhances rather than competes with natural surroundings.
Final Thoughts
The beauty of messy ponytails for weddings is their incredible versatility — you can style them to match virtually any wedding aesthetic, from ultra-formal ballroom affairs to casual garden celebrations. The common thread through all these styles is intentionality: the softness, texture, and undone quality all need to be created deliberately rather than happening by accident. This means starting with textured, curled hair; leaving wisps and pieces positioned strategically; and using flexible products that hold without stiffening.
When choosing your messy ponytail for a wedding, consider the dress code and overall aesthetic of the event, the formality level you want your hair to convey, and what feels comfortable and confident for you to wear all day. A style that makes you feel beautiful and secure will photograph better and feel better than one you’re constantly adjusting or worrying about.
If you’re styling your own hair, consider practicing your chosen style at least twice before the wedding day. This gives you confidence with the techniques and allows you to identify what works best for your specific hair texture and length. If you’re booking a stylist, bring clear photos of your preferred style and discuss how soft or structured you want the final effect to be — this prevents miscommunication and ensures you get the look you’re envisioning.