French braids have remained a timeless hairstyle for decades, and they’re having a major resurgence as people rediscover how versatile and genuinely flattering they are. But here’s what’s changed: the way we finish and secure them. Claw clips have become the go-to accessory for anchoring French braids, and for good reason—they’re practical, they hold hair securely without breaking it, and they add an intentional finishing touch that looks polished rather than utilitarian. Whether you’re working with thick hair, fine texture, waves, or curls, the combination of a French braid with a claw clip opens up a universe of styling possibilities that work from the office to casual weekends to date nights.
The beauty of pairing French braids with claw clips lies in how forgiving the combination is. A French braid tightens and shapes your hair as you braid, giving you control and structure, while the claw clip finishes the look with style and holds everything in place without the weight or tension of traditional elastics. You’re not limited to one rigid style, either—you can braid loosely for a romantic, undone vibe, braid tightly for a polished look, weave in texture by gently pulling sections, or position the clip at different depths for completely different effects.
What makes this combination so practical is that claw clips work beautifully on different hair lengths and types. Whether your hair is shoulder-length, mid-back, or longer, you have options. The clip can be hidden entirely within the braid, used as a statement accent, or positioned to catch just the bottom section of braided hair. Understanding these seven approaches will give you the flexibility to match your braid style to your hair texture, the occasion, and the look you’re trying to achieve.
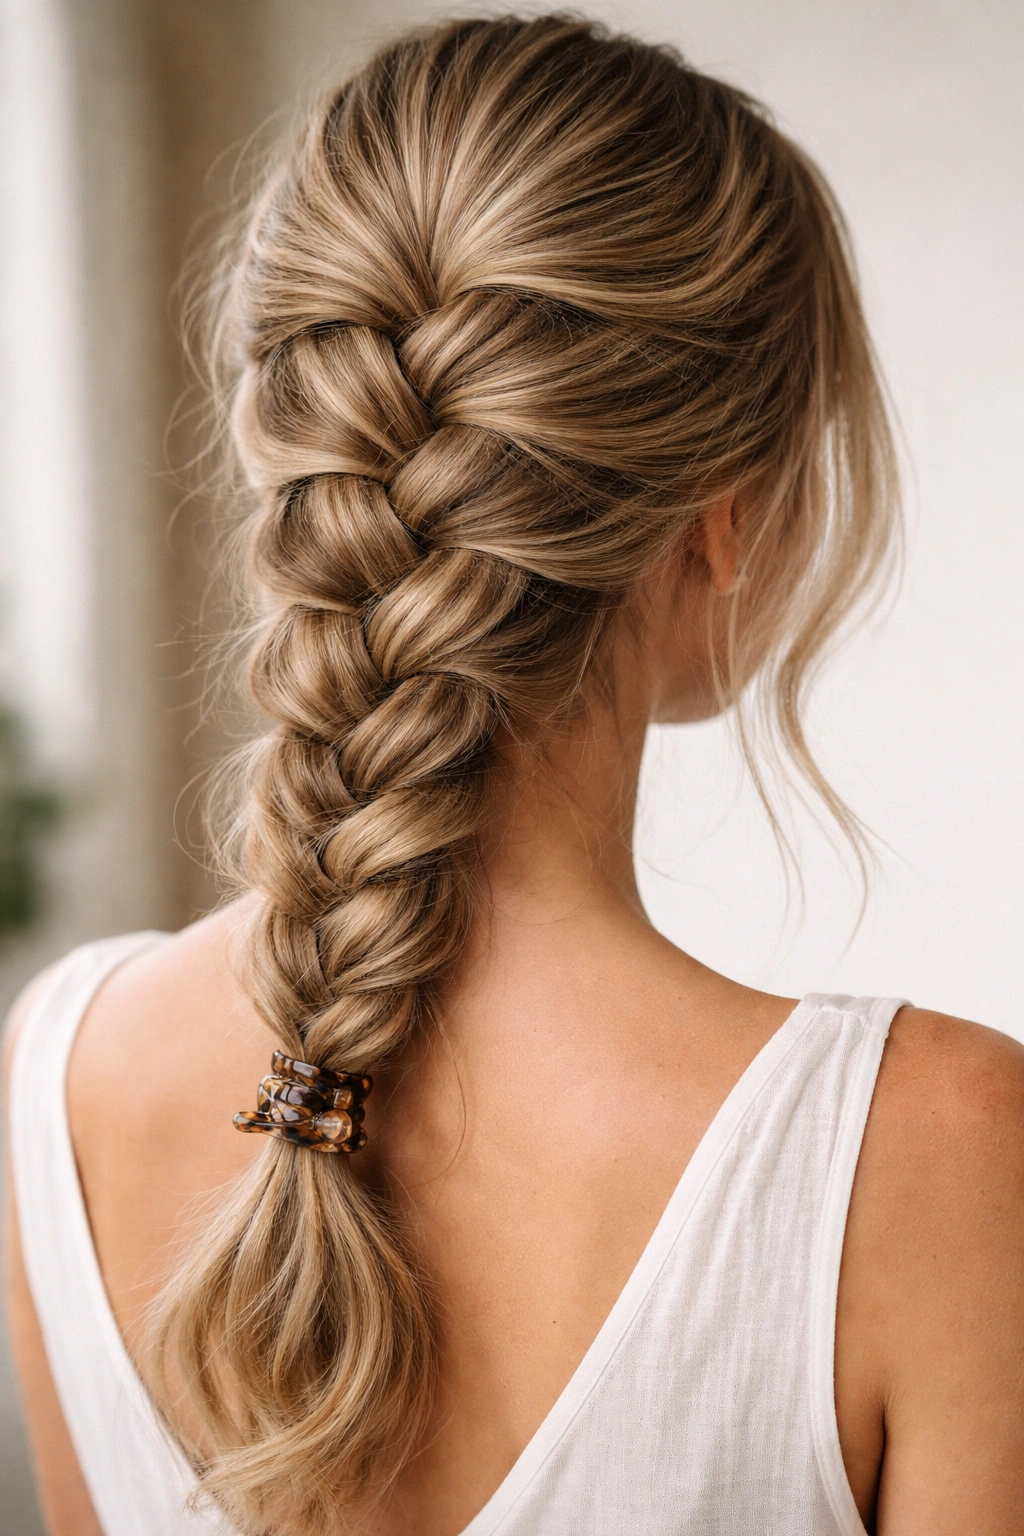
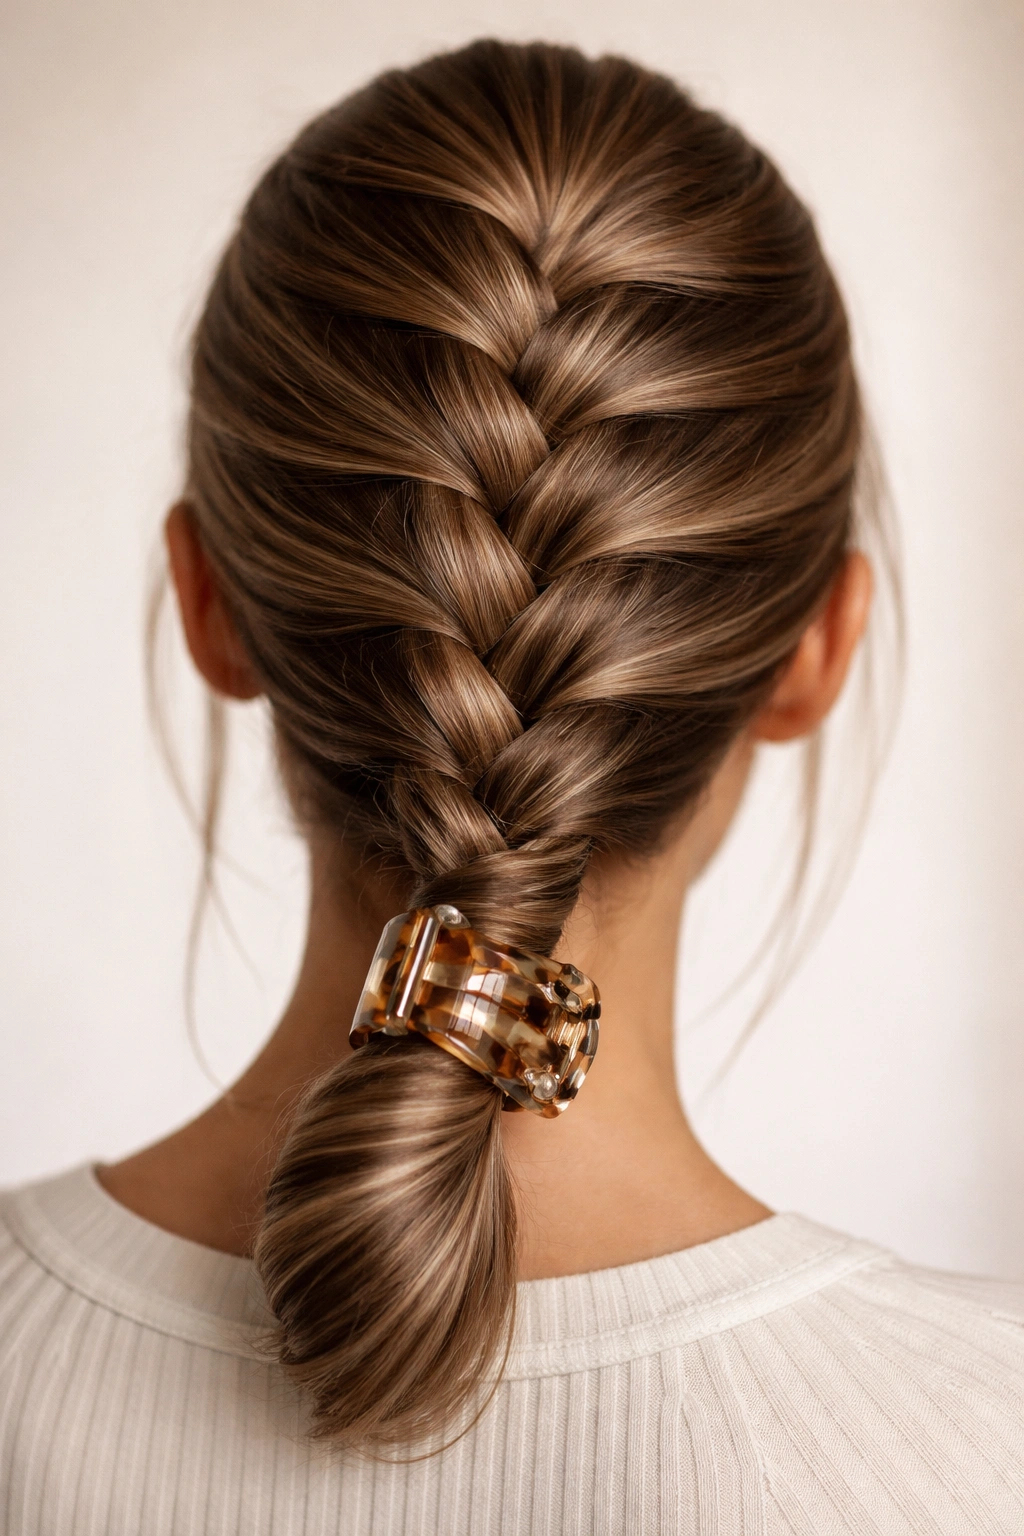
1. Classic French Braid With Claw Clip

The classic French braid is the foundation of all French braiding—and when you finish it with a claw clip instead of a traditional elastic, you get a look that’s both polished and modern. This is the style to master first if you’re new to French braiding, because once you understand the basic mechanics, every other variation becomes intuitive.
Start by combing your hair thoroughly and separating a triangular section at the crown. Divide that section into three even strands of equal thickness. Cross the right strand over the middle strand, then the left strand over the new middle. As you continue braiding downward, add a small section of loose hair from the right side into the right strand before crossing it over the middle, then add hair from the left side into the left strand before crossing it over.
How to Execute It Smoothly
The key to a neat classic braid is keeping consistent tension throughout. Your hands should move at an even pace—not so tight that you’re creating tension headaches or breaking hair, but snug enough that the braid holds its shape and doesn’t look messy. If you find yourself struggling with hand position, practice the basic three-strand braid motion first on dry hair before adding the French braid complexity. Many people make the mistake of adding too much hair with each pass; add just a thin section each time so the braid doesn’t become so thick it’s hard to manage.
Once you’ve braided all the way down to the ends of your hair, you’ll secure the braid with your claw clip. Gather the braid tail and slide the clip up the braid until it sits snugly where you want it—whether that’s about two inches from the end or further up. For a polished finish, you can fold the tail of the braid under itself slightly before clipping, which creates a neater appearance and makes the clip feel more intentional rather than functional.
Styling Tips and Variations
Make it romantic: After clipping, gently pull sections of the braid outward with your fingers to create a deliberately loose, textured appearance. This takes the structured look and softens it into something more relaxed and romantic—perfect for casual dates or weekend gatherings.
Make it sleek: Keep the braid tight and smooth, and position a tortoiseshell or black claw clip low on the braid, near the end. This reads as intentional and fashion-forward rather than functional.
Make it voluminous: Backcomb the sections of hair before you start braiding. The texture gives you more volume within the braid structure itself, which translates to a fuller-looking, more interesting braid even from the front.
2. Half-Up French Braid Secured With Claw Clip
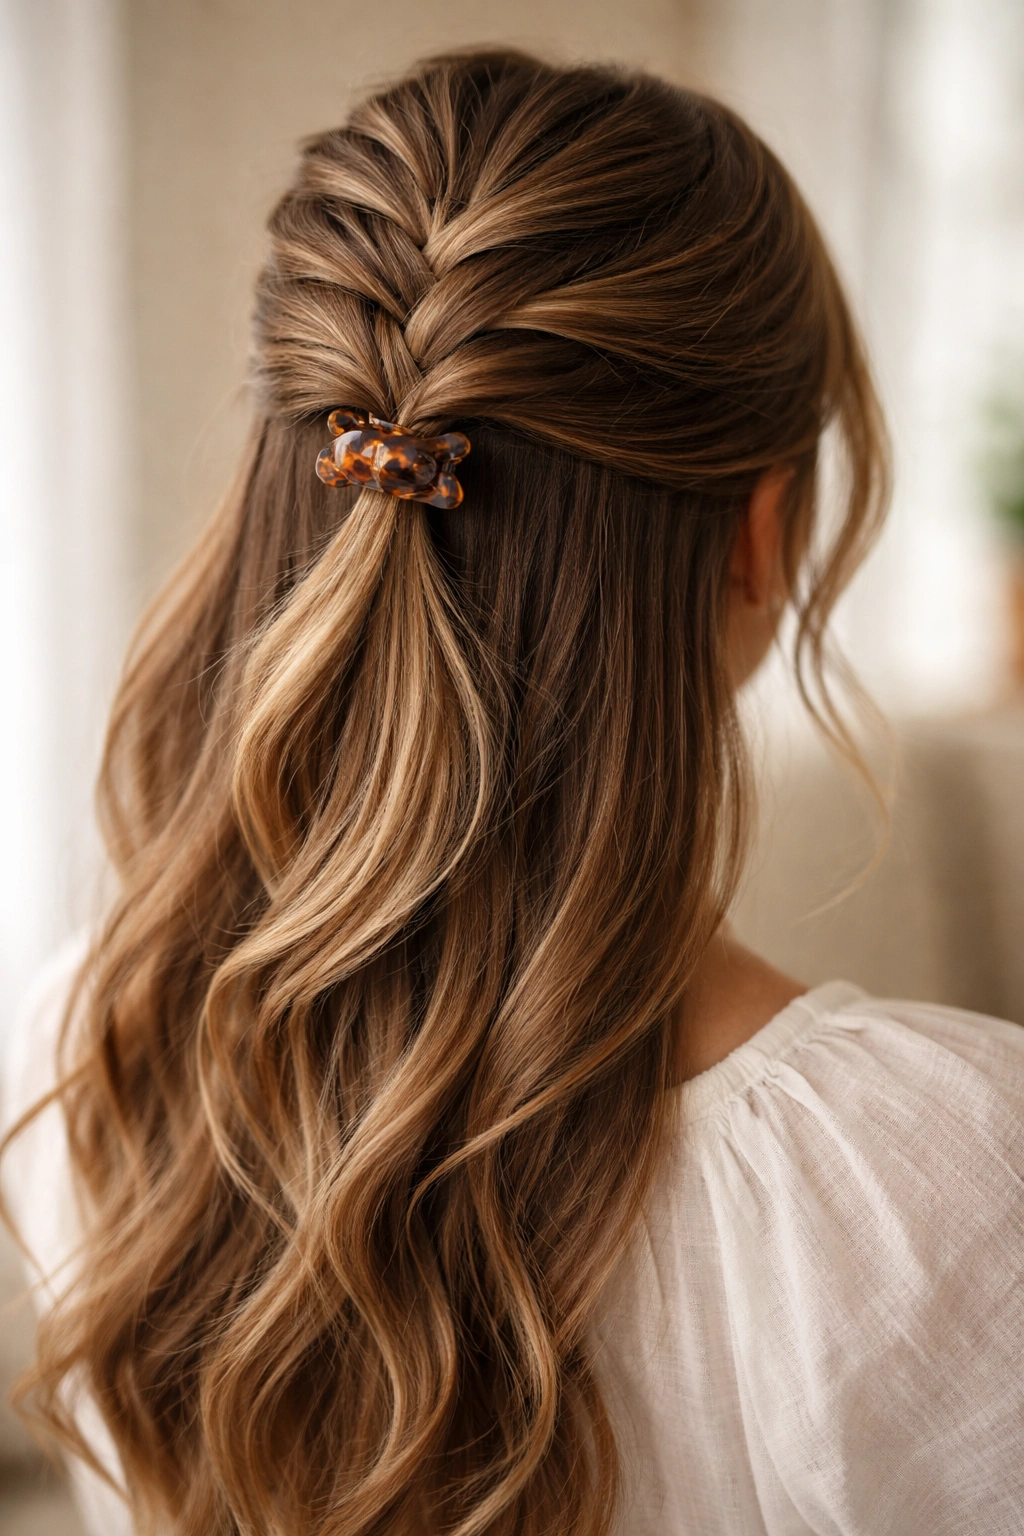
The half-up French braid combines the elegance of a braided style with the ease of wearing your hair partially down—it’s practical enough for a busy workday and polished enough for dinner out. This style works beautifully on most hair lengths and textures, and it’s significantly easier than a full braid because you’re only working with the top portion of your hair.
Begin at the crown and section off just the hair from your temples across the top of your head—roughly the top third of your hair. You don’t need to be precise with this, but aiming for the area above your ears is a reliable guide. Divide this section into three strands and begin a French braid, but here’s the key difference: instead of adding hair from the entire head, you’re only adding hair from within that top section.
Creating the Right Depth and Proportion
The depth at which you stop your braid determines how finished the style looks. If you braid down to about the middle of the back of your head and then clip, you create a neat, put-together appearance. If you braid closer to the bottom of the back of your head, you get a style that feels more playful and less formal. There’s no wrong choice—it entirely depends on the occasion and your personal preference.
Once you’ve braided to your desired depth, gather the braid end and clip it securely with your claw clip. The clip should grip the braid firmly without slipping. You’ll likely have hair falling around it, which is exactly the point—the braid is anchored, but the rest of your hair flows freely, creating that coveted half-up look without the tight, pulled-back feeling of some updos.
Pairing With Your Hair Down
The beauty of the half-up approach is what you do with the rest of your hair. If your hair is naturally straight, you can leave it as is for a contrasting sleek-and-braided look. If you have waves or curls, consider adding texture to the down portion by curling it or wave-setting it so the half-up section and the half-down section feel coordinated rather than disconnected.
Pro tip: Smooth the crown area where the braid begins using a fine-tooth comb and a light smoothing serum before you start braiding. This prevents flyaways from disrupting the clean appearance of your braid while allowing the freedom of your down hair to remain textured and natural-looking.
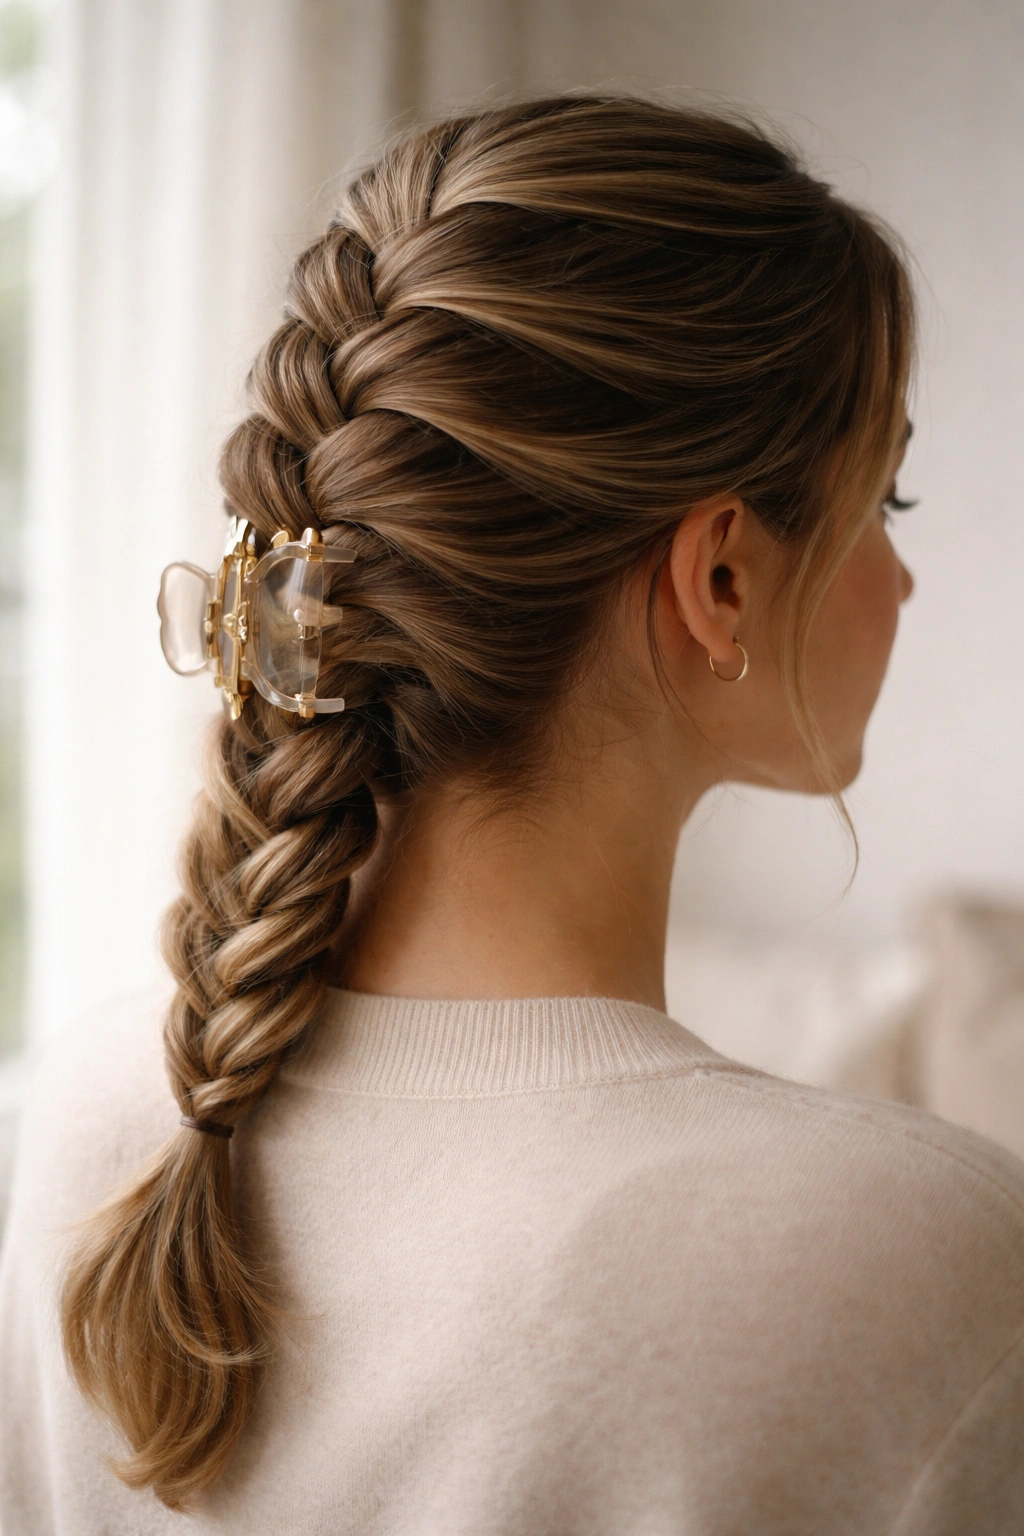
3. Side French Braid With Decorative Claw Clip
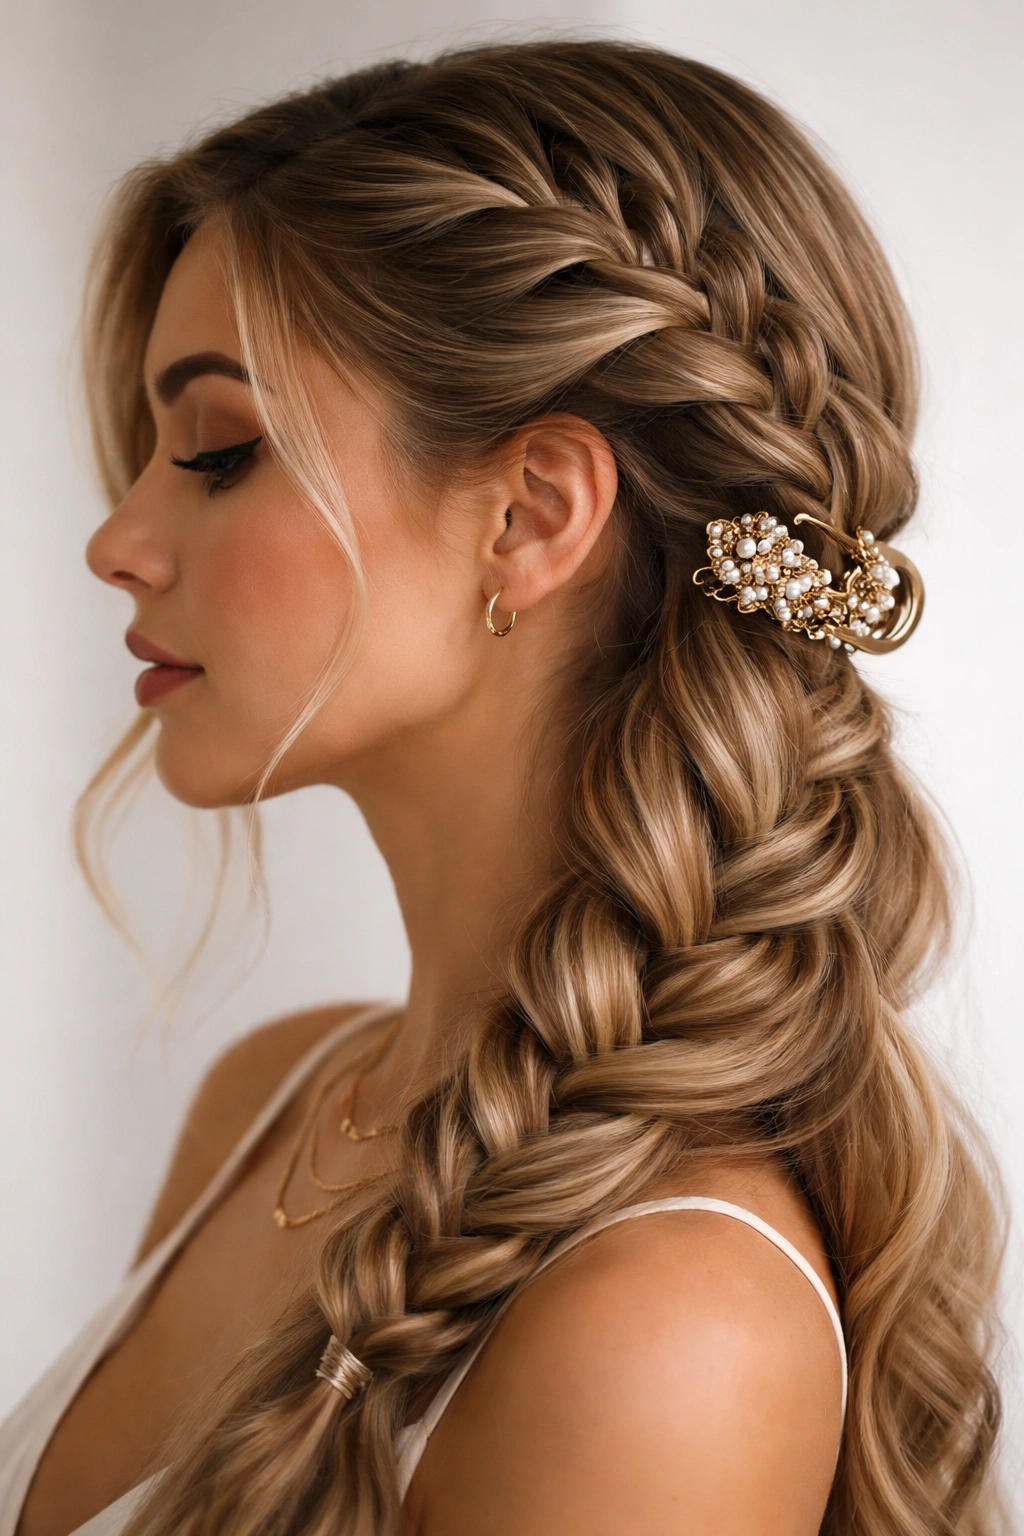
A side French braid is instantly more fashion-forward and interesting than a center braid, and it creates flattering movement around your face. When you add a decorative claw clip as the finishing touch, this style becomes something people will ask about—it’s the kind of styling that reads as effortlessly put-together.
Begin at the temple on one side of your head. Section off hair from that temple back toward the side of your head, and divide it into three strands. Start your French braid, adding hair as you go, but angle the braid diagonally across the back of your head rather than straight down. Think of creating a path from one temple around toward the opposite ear or the nape of your neck.
Positioning and Angle
The angle you choose dramatically affects the final look. A braid that travels more steeply down the back reads as more playful and youthful, while a braid that traverses the back more gently and gradually, almost wrapping around your head, reads as more sophisticated and elegant. There’s no rule here—experiment with different angles on different days to see what resonates with your face shape and personal style.
Once you’ve braided across the back of your head to your intended endpoint, secure it with a decorative claw clip. This is where you can have real fun: a tortoiseshell clip looks effortlessly chic, a metallic gold or silver clip feels modern, a pastel or jewel-toned clip adds personality, or a clear clip keeps the focus on the braid itself. The clip becomes part of the styling statement, not just a fastener.
Styling for Different Face Shapes
If you have a rounder face: A side braid that angles downward and back creates vertical lines that are generally flattering, and positioning the clip lower (toward the nape) elongates the look further.
If you have a longer face: A side braid that’s positioned higher and wraps more gradually around the head can help balance your proportions. You might even try clipping it to one side rather than in the center-back, which creates horizontal interest.
If you have an angular face: Side braids are universally flattering, so you have freedom to choose the angle and clip position based purely on what you like aesthetically rather than what you think you “should” do.
4. Double French Braids With Matching Claw Clips
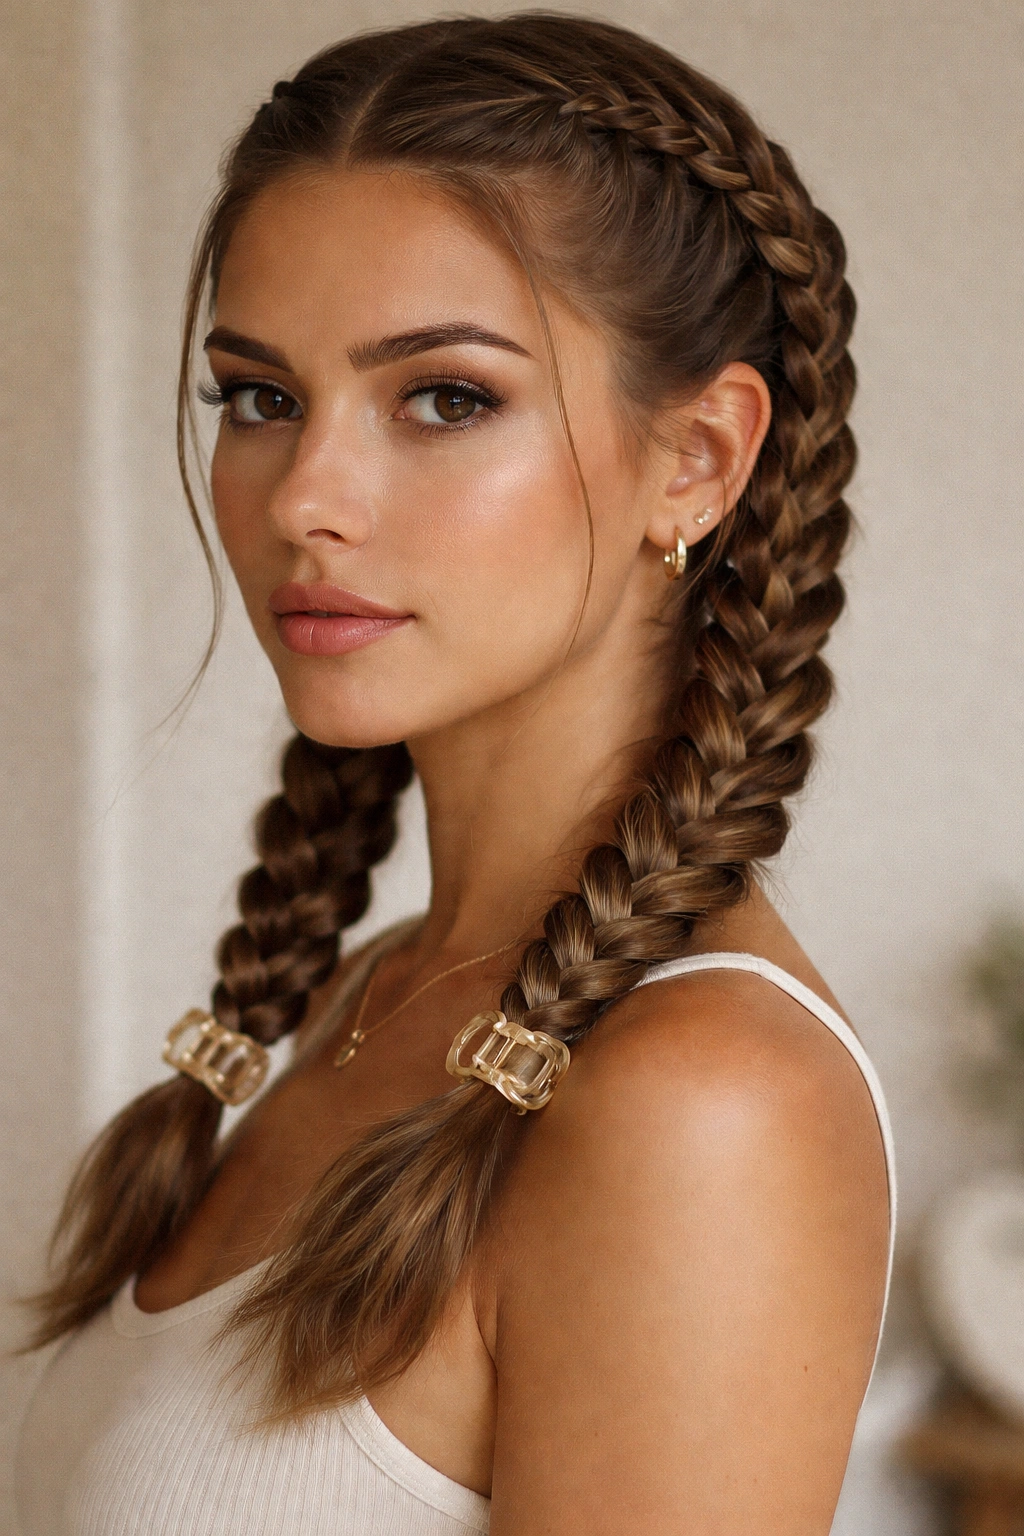
Double French braids are a playful, graphic styling choice that works beautifully with claw clips because you get that satisfying visual of two clips perfectly mirroring each other. This style is forgiving of less-than-perfect braiding technique because any slight irregularities are balanced by the symmetry of having two braids happening simultaneously.
Start by creating a center part from your forehead to the nape of your neck, dividing your hair into two equal sections. On one side, begin a French braid at the temple, braiding down toward the nape. Then on the other side, mirror that braid exactly. The two braids should travel down roughly parallel to each other, one on each side of your head.
Execution and Symmetry
The challenge with double braids is maintaining even tension on both sides so neither one looks significantly tighter or looser than the other. A helpful trick: braid one side completely first, then braid the second side immediately after, so the tension and texture of your hands is fresh and consistent. Alternatively, braid both sides partially, braid them both a bit more, and continue alternating—this helps you maintain symmetry as you go.
Secure each braid tail with a matching claw clip. The visual impact of two identical clips is what elevates this style—whether you choose sleek minimalist clips, patterned clips, or decorative ones, the fact that they match creates a deliberate, intentional look. You could also choose two different clips if you’re feeling more playful, but matching is usually the move for this style.
When and Where to Wear It
Double French braids work wonderfully for casual contexts—weekend errands, casual work environments, date nights where you want to look put-together but not formal. They’re also fantastic for active days; the double-braid structure holds extremely well even when you’re moving around. Parents often choose this style for kids, but don’t overlook it as an adult style—it’s having a real moment in fashion because it’s youthful without being immature.
Insider note: If you find that double braids make your head look too narrow or that the side-by-side positioning doesn’t suit your face shape, try braiding them at slightly different angles—one more down the back, one more to the side—which creates visual interest and can be more flattering depending on your proportions.
5. Textured French Braid With Small Claw Clip
A textured French braid has an intentionally undone, romantic quality that works for people who love the idea of a French braid but find perfectly neat braids feel too structured or formal for their aesthetic. The texture comes from deliberately pulling strands of the braid outward after it’s braided, creating a fuller, more ethereal look. A small claw clip finishes this style without fighting against the deliberately relaxed vibe.
Start with a classic French braid, but instead of keeping every section tight, aim for an even, medium tension—not loose enough that the braid is falling apart, but not so tight that it looks rigid. Once you’ve braided all the way down, the real styling begins: gently pull each “wing” of the braid outward with your fingers, working from the top of the braid down toward the bottom.
Creating the Texture Deliberately
Pull a little bit of hair from each crossover point, then pull a little more from the next point down, varying how much you pull so the texture looks organic and natural rather than perfectly uniform. Some people pull more dramatically; others pull just slightly. The amount of pulling determines whether your braid looks lightly textured or deliberately undone—both are correct; it’s about your personal preference.
Once you’ve textured the entire braid to your liking, secure the tail with a small claw clip. A small clip works better than a large one here because the deliberately messy texture is the point—a large clip fighting against that vibe doesn’t match the styling intention. A small tortoiseshell clip, a delicate gold clip, or even a tiny clear clip all work beautifully.
Hair Texture Considerations
For fine hair: Pull the sections more gently and less dramatically. Fine hair has less volume to work with, so aggressive pulling can make sections look thinner rather than fuller. Your textured braid will look elegant and romantic even with minimal pulling.
For thick hair: You can be more aggressive with pulling because you have plenty of hair to work with. Pull enough that the texture becomes a real visual feature rather than just a subtle softening.
For curly or wavy hair: Start with a slightly looser braid and pull less, because your natural texture will already create movement and volume. You’re enhancing what’s already there rather than creating texture from scratch.
6. Wrap-Around French Braid With Claw Clip
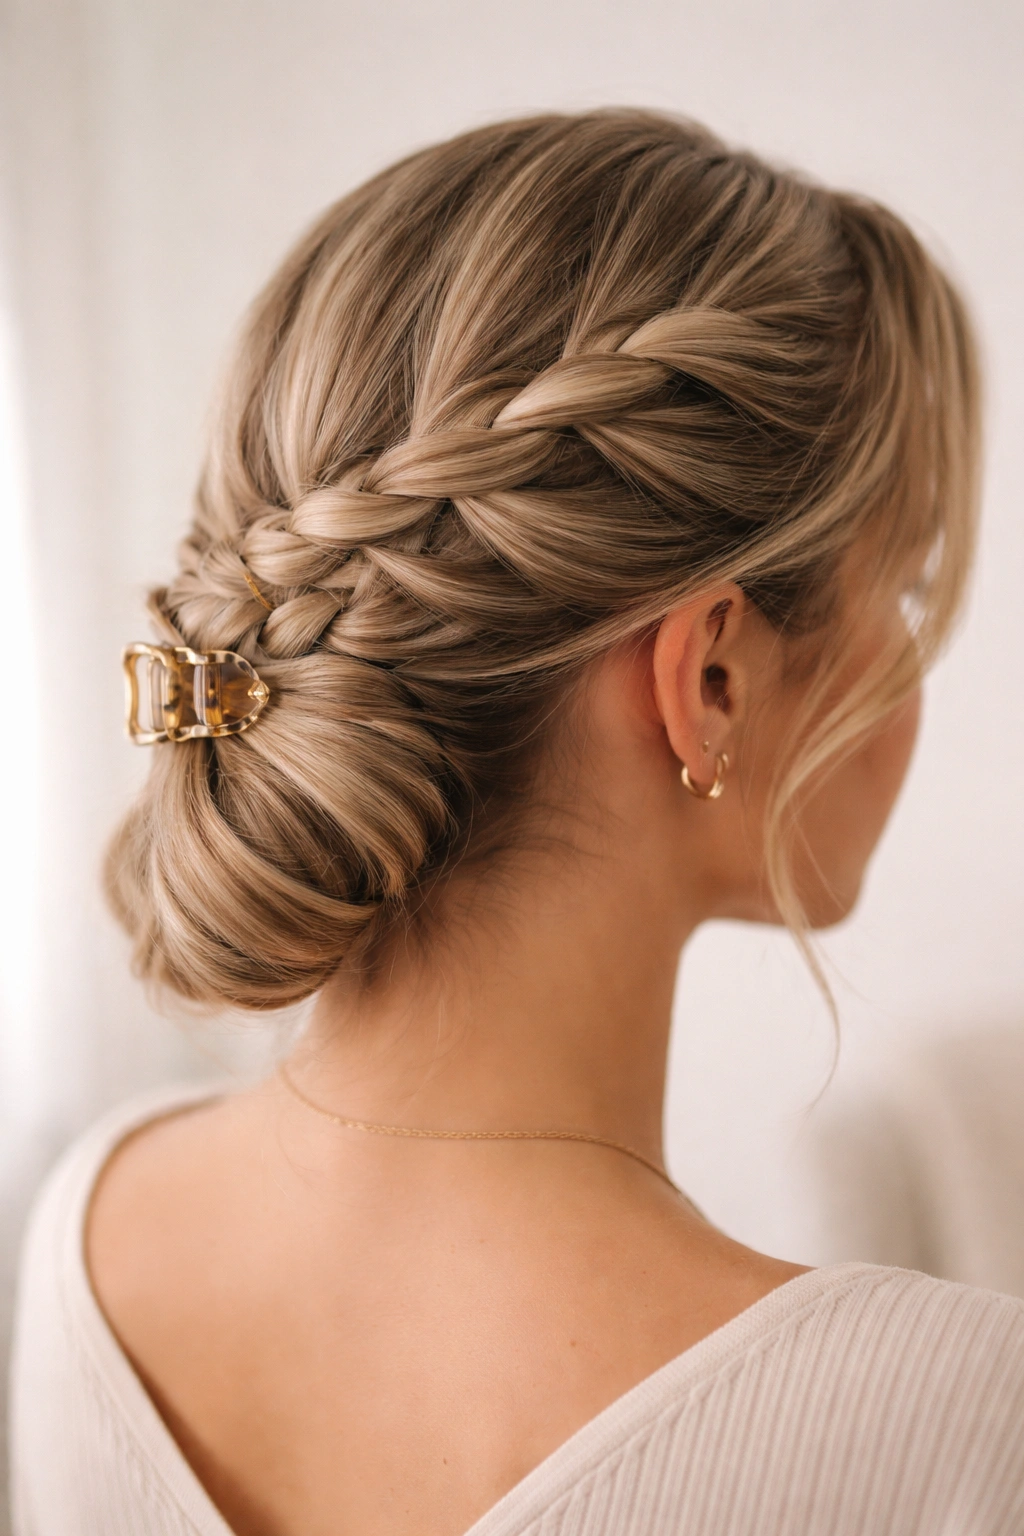
A wrap-around French braid creates the illusion of a more complex updo while still being manageable enough for regular styling. The braid wraps around the back of your head and curves forward, with the clip serving as both a functional anchor and a visual accent piece. This is an excellent style if you want something more formal or put-together than a basic braid but simpler than a full updo.
Begin your French braid on one side of your head, perhaps near the temple on the left. Braid across the back of your head, angling gradually toward the opposite side (the right side). The braid should travel across the entire back of your head, curving slightly as it goes, so by the time you reach the far side, the braid is on a path toward the right ear or temple area.
Achieving the Wrap
The gradient of adding hair to your braid as you travel across the back means you’re incorporating hair from all directions as you go, which naturally creates the curved, wrapping appearance. You’re not fighting the braid to make it wrap; the nature of a French braid that spans the entire head creates this effect naturally.
Once you’ve braided all the way across and are at the target location (perhaps near your right temple or ear), secure it with a claw clip. Positioned here, the clip finishes the wrap and completes the look. Some people position the braid so it ends at the nape of the neck, which also works beautifully. Experiment with where you want the braid to end based on your hair length and the occasion.
Styling for Formality
For formal occasions: Keep the braid tight and neat, position the clip where it will be visible and slightly decorative, and smooth any flyaways around the edges. This reads as elegant and intentional.
For casual occasions: Texture the braid deliberately after braiding, position a fun-colored or patterned clip, and let a few pieces fall naturally around your face. This reads as put-together but relaxed.
Pro tip: If you have shorter hair or it’s hard to reach around your entire head, you can stop the braid halfway across the back and clip it there, creating a wrap effect that’s easier to execute and still visually interesting.
7. Sleek French Braid Into Claw Clip Twist
This style takes the French braid and adds one final twisting element before clipping, which creates visual interest and a slightly more intricate look than a straightforward braid. It’s perfect for days when you want to look polished and put-together but don’t have much time, and it works on most hair lengths and textures.
Begin with a classic French braid down the center of your head, keeping the braid tight and neat. Once you’ve braided all the way down to the ends, don’t clip immediately. Instead, take the tail of the braid (the unbraided section at the very bottom) and twist it tightly. The twist wraps around your braid tail and creates a spiral effect that’s more visually interesting than a straight braid tail.
Creating the Twist Detail
The twist should be snug and tight so it holds its shape. Twist just the loose tail section, or you can incorporate a small section of the braid itself into the twist if you want an even more integrated effect. Once the twist is tight and even, wrap it around the base of the braid (where the braid ends and the twist begins) to create a coiled effect, or just leave it twisted and straight.
Clip the twisted tail securely with your claw clip. Position the clip so it grips both the braid and the twisted section, anchoring everything in place. The clip becomes part of the visual design here—the twist into the clip reads as a deliberate styling choice rather than just a functional fastener, so choosing a decorative clip enhances the overall look.
When to Use This Style
This style works beautifully for professional settings because it reads as polished and intentional. It’s also great for special occasions where you want something more refined than a simple braid but you’re not doing a full updo. The twist detail is enough to elevate the look without requiring complex styling skills or tons of time.
Real talk: If your hair is very fine or slippery, the twist might not hold as firmly as you’d like without some texture or grip. Spraying the twist lightly with dry shampoo or texturizing spray before twisting it gives you more grip and helps everything hold securely throughout the day.
Final Thoughts
French braids with claw clips represent the perfect intersection of classic elegance and modern practicality—you get a timeless hairstyle that’s genuinely flattering, paired with a functional accessory that’s also a styling statement. What’s wonderful about these seven approaches is that they work across different hair types, lengths, occasions, and personal aesthetics. You’re not locked into one rigid look; you have the flexibility to braid tightly or textured, position your clip visibly or hidden, and choose whether you want your style to read as playful, polished, romantic, or professional.
The confidence to try these styles comes from understanding that French braiding is a learnable skill, not an inborn talent. Your first braid might be uneven or imperfect, and that’s genuinely fine. The texture you pull into it afterward softens any irregularities, and the claw clip finishes the look decisively. Even an imperfectly braided style reads as intentional once you’ve added texture and a thoughtfully chosen clip.
Start with whichever style appeals to you most—whether that’s the classic braid, the side braid, the half-up version, or one of the more involved styles. Practice it a few times to build muscle memory, and then experiment with the other variations. You’ll quickly discover which styles suit your hair texture, which ones work best for your lifestyle, and which ones make you feel most confident. That’s when these seven options transform from ideas you’ve read about into actual hairstyles you can create whenever you want.