French braids are a professional styling powerhouse — they look polished enough for client meetings and video calls, they keep your hair off your face during a busy workday, and they hold up through everything from morning commutes to afternoon deadlines. The beauty of a French braid for work is that it signals intentionality and put-togetherness without requiring hours at a salon or complicated styling tools. Whether you’re running between back-to-back meetings, sitting at a desk all day, or presenting to a room full of people, a well-executed French braid does the heavy lifting for you.
The challenge for many professionals is figuring out which French braid style actually works for their hair type, face shape, schedule, and workplace culture. A sleek, tight braid reads differently than a textured, voluminous one. A crown braid makes a different statement than a low, tucked-away braid. Some versions take five minutes in the morning; others require a few extra steps but reward you with all-day hold and visual interest. This guide breaks down eight proven French braid styles that work beautifully in professional settings, with clear instructions on how to create each one and real-world advice on when to reach for each style.
Each braid style here works across different hair textures, lengths, and professional environments. You’ll find options for minimalist elegance, textured dimension, and everything in between. The point isn’t to master all eight — it’s to find the two or three that become your reliable go-to styles, the ones you can execute in five minutes on a morning when time is tight, and the ones that make you feel confident and polished walking into any room.
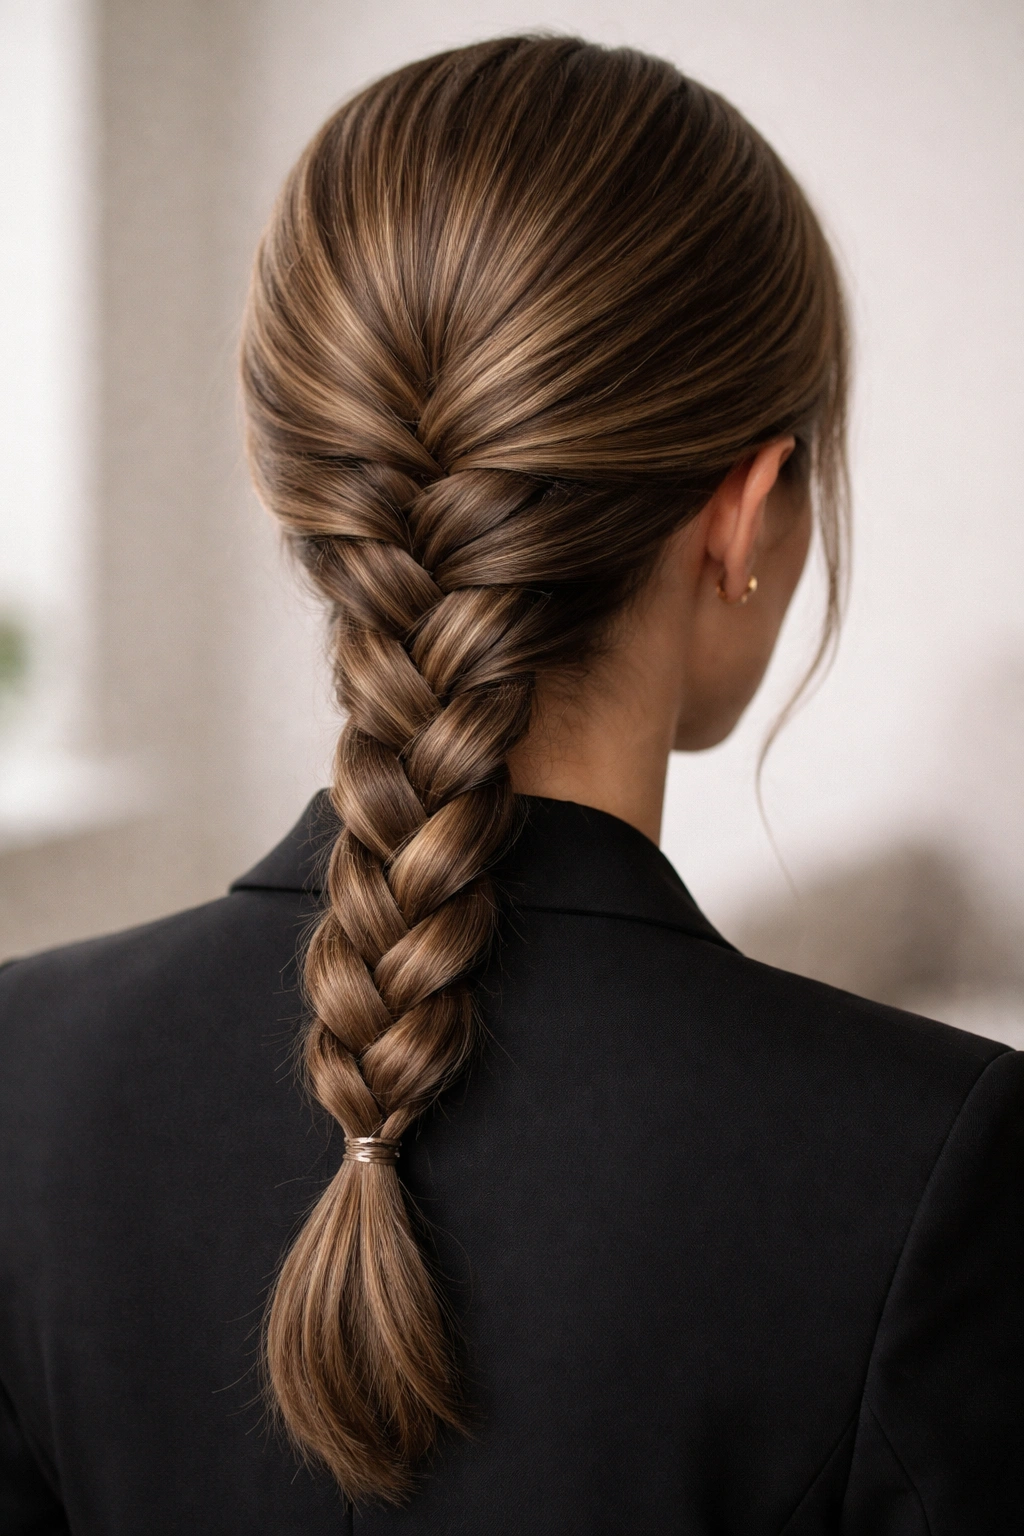
1. Classic Side French Braid
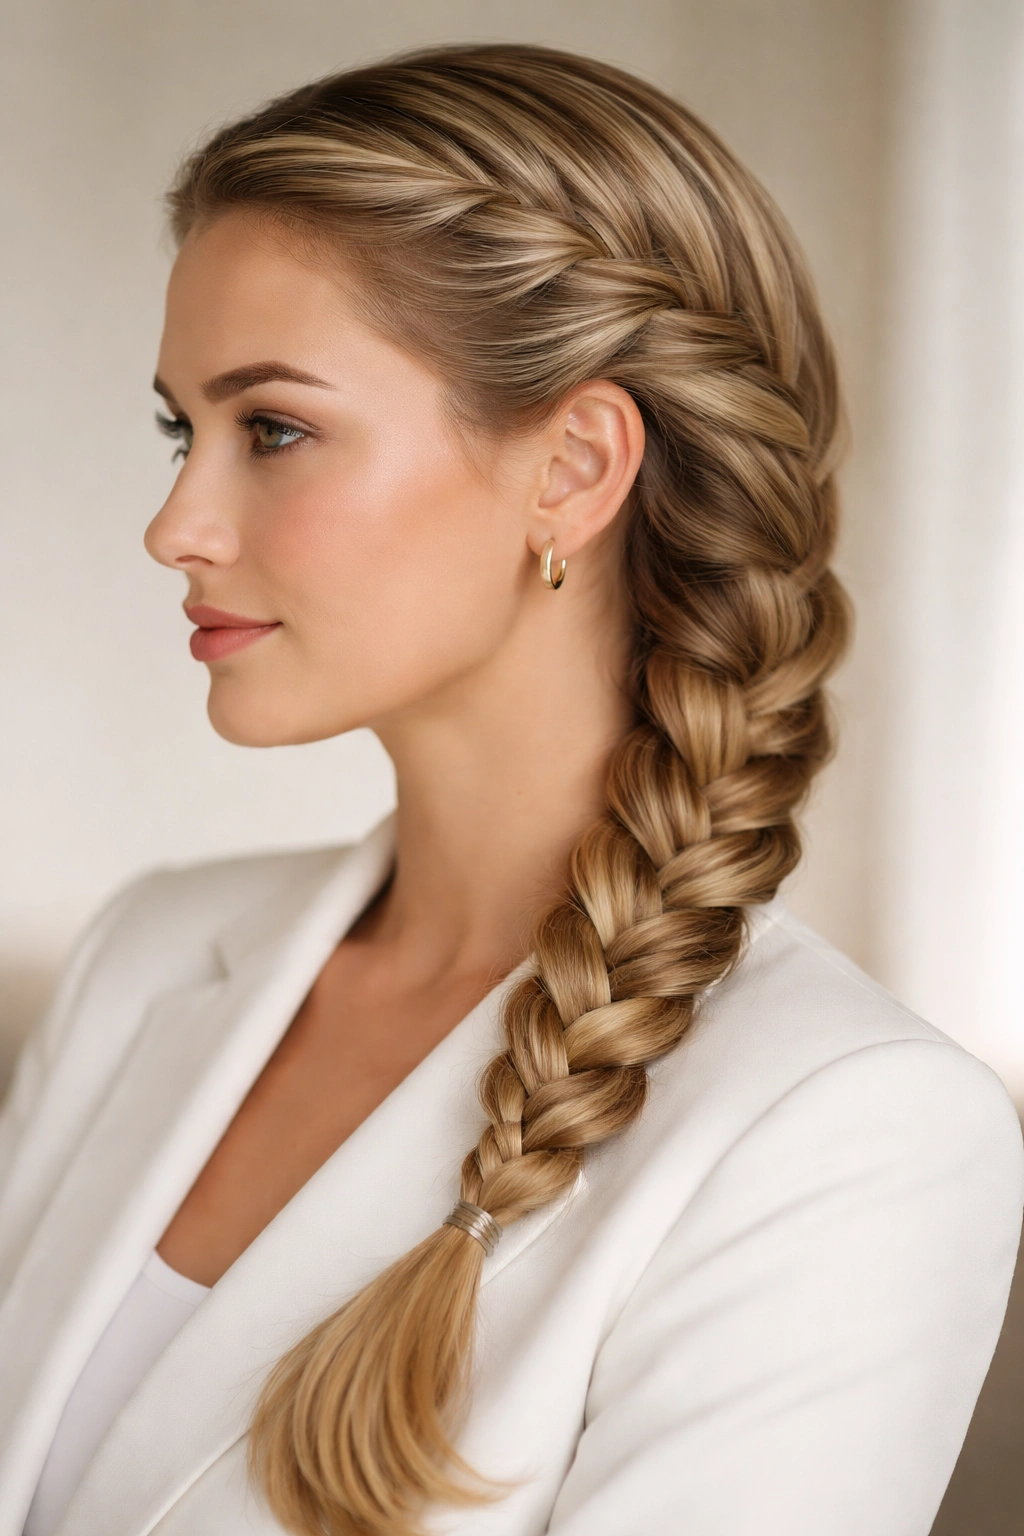
The classic side French braid is the workhorse of professional braiding. It sits at an angle across one side of your head, starting at the temple or crown and flowing down toward the opposite shoulder. This style works for nearly every hair type, face shape, and professional setting because it’s elegant without being fussy, and it genuinely keeps your hair secure and off your face throughout a full workday.
Why It Works for Work
A side French braid reads as intentional and polished without looking overdone. It frames your face naturally, which means you look put-together on video calls without having pulled your hair back so tightly that it reads as severe. The angle of the braid also has a flattering optical effect — it lengthens your face and draws attention upward. In corporate environments, this braid conveys competence and professionalism. In creative workplaces, it feels artistic and intentional. It’s genuinely the braid that works everywhere.
How to Create the Perfect Side French Braid
- Start by brushing your hair thoroughly to remove all tangles, then lightly mist it with a texturizing spray or dry shampoo — this gives your braid grip and prevents slipping throughout the day
- Create a deep side part on whichever side you prefer, then begin the braid at your temple on the fuller side, taking a small section about the width of your thumb
- Divide that section into three equal strands and begin a standard three-strand braid, crossing the right strand over the middle, then the left over the middle
- As you braid downward and across, add new sections of hair from the fuller side of your head — this is the defining move of a French braid, and it’s what creates that distinctive interwoven look
- Continue adding hair and braiding until you reach the nape of your neck, then switch to a regular three-strand braid for the remaining length
- Secure the braid with a small elastic, then gently pull and loosen each section of the braid to create dimension and volume — this takes 30 seconds but transforms the braid from tight and sculptural to soft and textured
- Finish with a light hairspray to set everything in place
Pro tip: If your braid feels too tight or you’re worried it’ll loosen throughout the day, do the pulling-and-loosening step right before you leave the house, then spritz with hairspray. The texture holds better than a sleek, tight braid, and it actually looks more modern and intentional.
2. Double French Braids

Double French braids — one on each side of your head — create a striking, symmetrical look that’s both playful and professional. This style works especially well if you have medium to thick hair, and it distributes the weight of your hair more evenly than a single braid, which can feel heavy or pull on your scalp if your hair is very long or dense.
Why Double Braids Work in Professional Settings
Double French braids read as creative and confident. They signal that you’re not afraid to take a styling risk, which can be a real asset in creative industries, tech, design, or any field where individual expression is valued. In more conservative workplaces, this style might be better reserved for casual Fridays or remote work days — but in most modern professional environments, double French braids are absolutely appropriate. The key is keeping them neat and well-executed; the style itself isn’t the question, the precision of the braid is.
How to Create Perfectly Balanced Double French Braids
- Part your hair down the middle from your forehead all the way to your nape, using a fine-tooth comb or the tail of a rattail comb to create a clean, straight line
- Clip one side of your hair away temporarily so you can focus entirely on one braid without interference
- On the unclipped side, begin a French braid at your temple, taking a small section and dividing it into three strands
- Add hair as you braid downward, pulling new sections from that side of your head only — keep your additions consistent in width so the braid looks even and intentional
- Braid all the way down to the nape, then switch to a regular three-strand braid for any remaining length below the nape
- Secure with an elastic, then gently pull and loosen the braid sections to create texture and dimension
- Unclip the other side and repeat the exact same process on that side, trying to match the tightness and texture of the first braid as closely as possible
- Once both braids are complete and loosened, make sure they’re symmetrical by checking that they start at the same height on each temple and follow the same angle down your head
Pro tip: Do a practice run on a day when you don’t have anywhere important to be. Double braids require slightly more precision than a single braid, and you’ll get faster and more confident with practice. The second and third time you do this style, it’ll come together in under ten minutes.
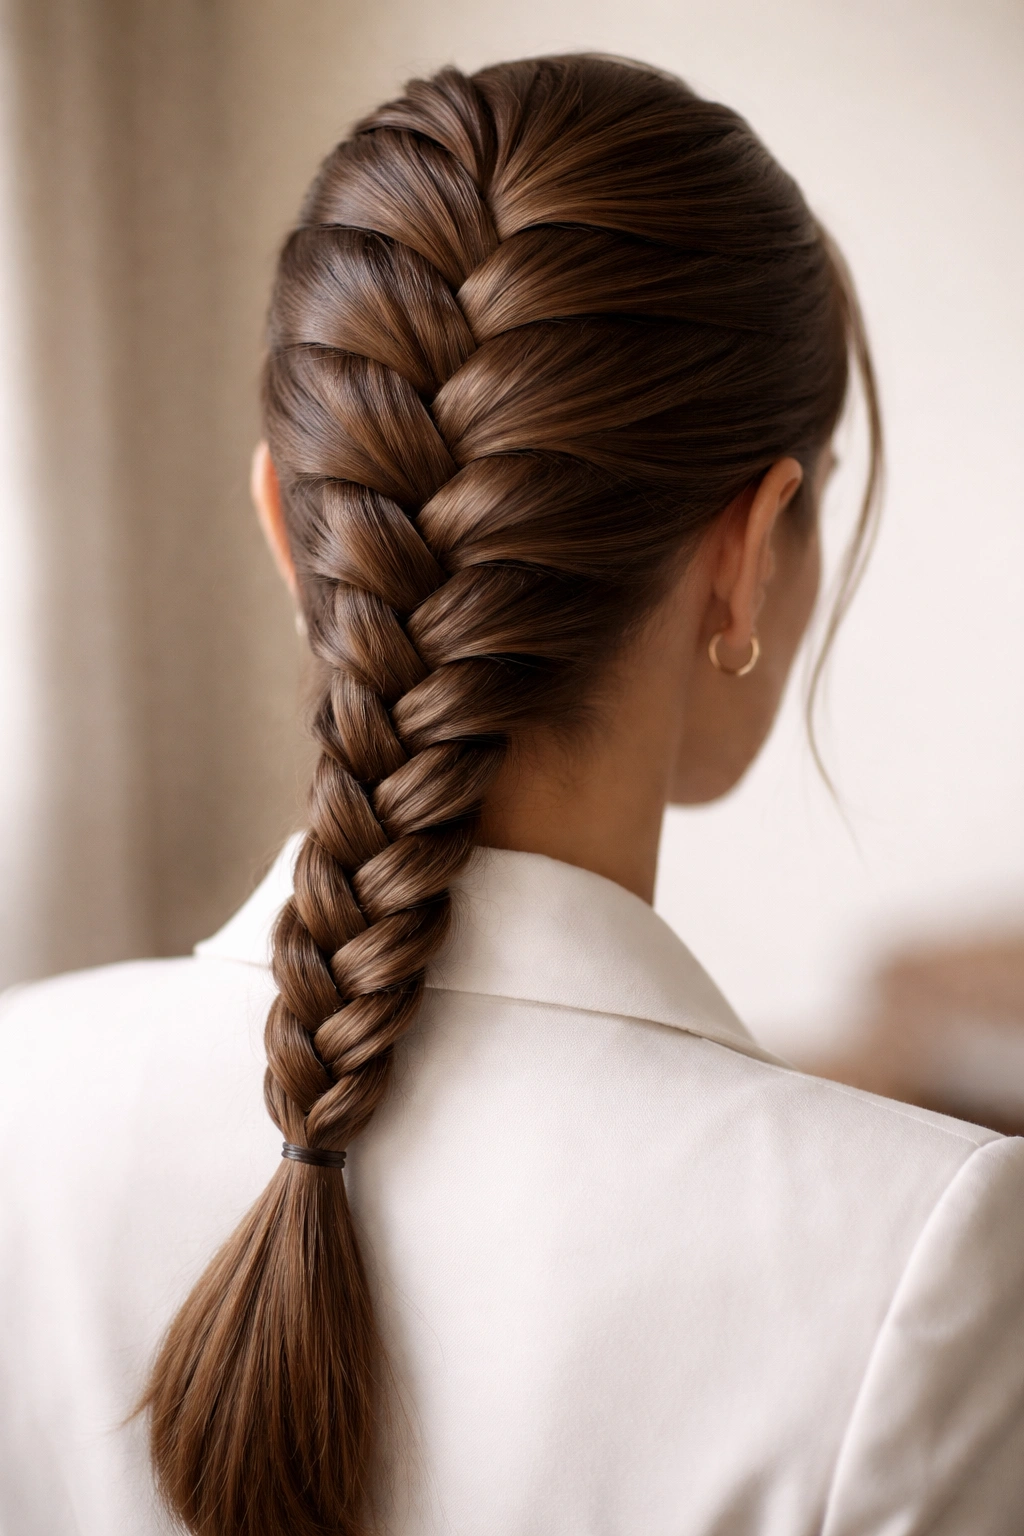
3. Sleek Center-Part French Braid
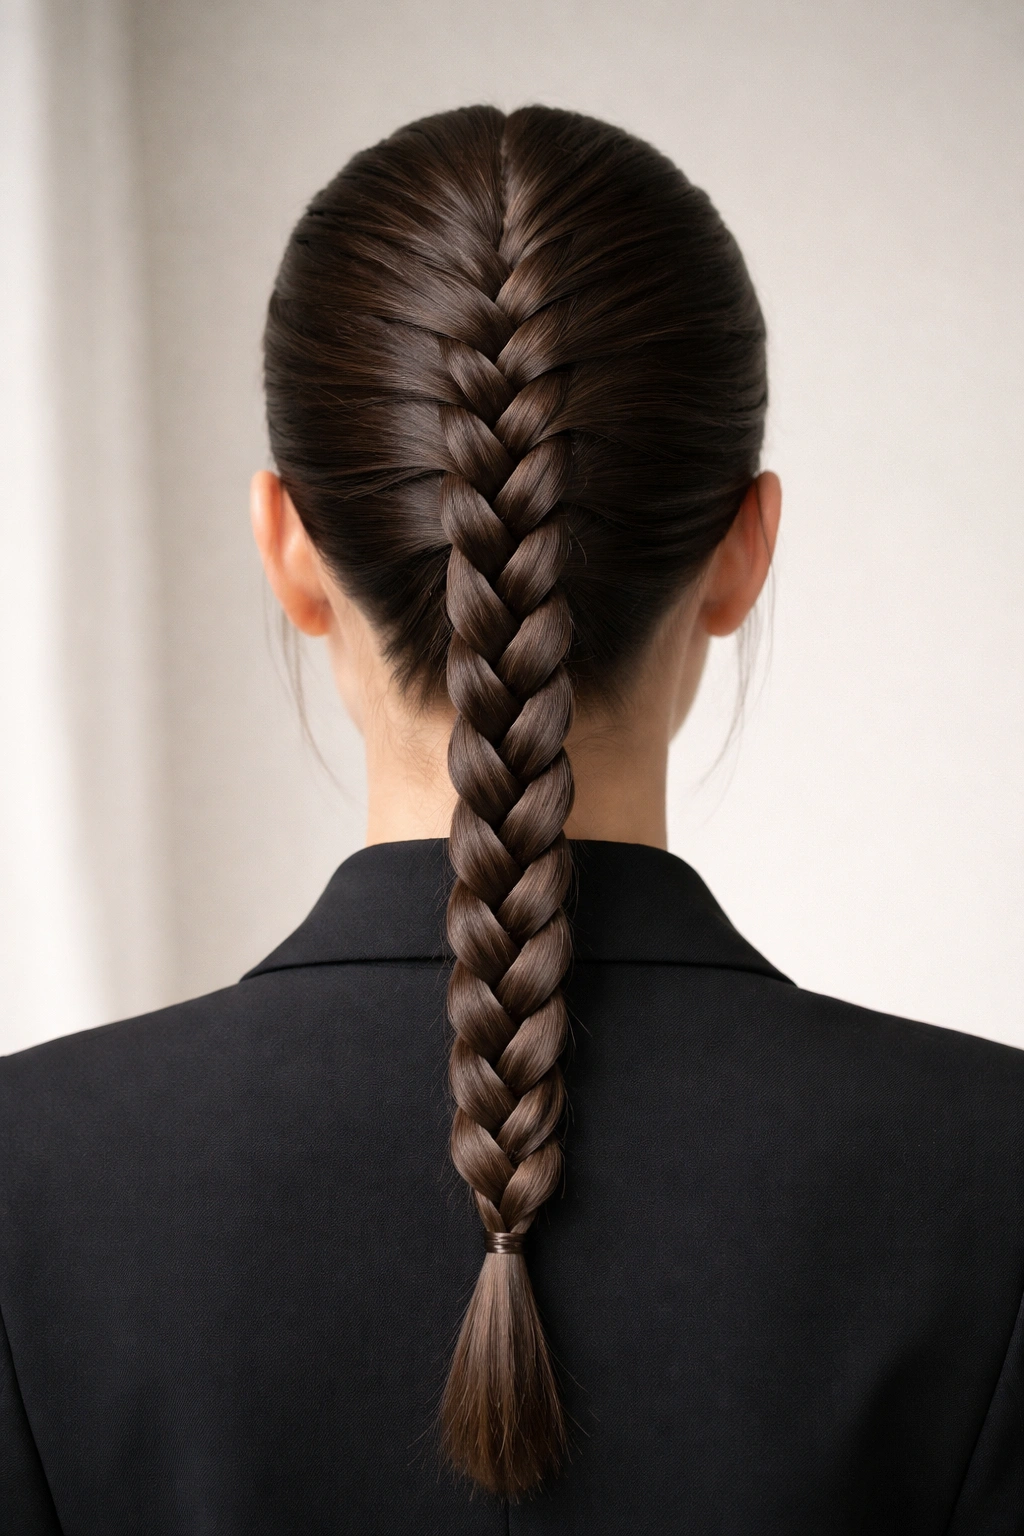
This is the most formal, polished version of a French braid — a single braid running straight down the center of your head from your crown to your nape. Because it follows the center of your head rather than angling to the side, it creates a visually balanced, almost architectural look that reads as serious and intentional.
Why This Braid Commands Authority
A center-part French braid is the braid equivalent of a tailored blazer. It’s structured, symmetrical, and requires precision — which means it reads as someone who has their act together. This style works beautifully in law, finance, medicine, academic settings, or any environment where formal professionalism is an asset. It’s also the braid that photographs best on video calls and in professional headshots, because the center-line geometry frames your face perfectly and photographs as crisp and intentional.
How to Create a Sleek Center French Braid
- Start with completely dry hair or hair that’s been dried and smoothed — any texture or moisture will affect how sleek this braid looks
- Create a clean center part by using a rattail comb to section your hair precisely down the middle from your forehead to your nape
- Begin the braid at your crown (not your hairline, but slightly back at the crown of your head where the braid naturally sits), dividing your hair into three equal sections
- Begin a standard three-strand braid, but immediately start adding new sections of hair from both sides equally — take small sections from the left side, add them to the braid, then take equally small sections from the right side and add those as well
- This symmetrical adding-from-both-sides motion is what keeps the braid centered and balanced
- Continue all the way down to your nape, then complete the braid with the remaining hair length using a regular three-strand technique
- For this style specifically, skip the pulling-and-loosening step — the power of a center-part French braid is its sleekness and structure, so keep it tight and defined
- Smooth any flyaways with a small amount of smoothing serum or gel on your fingertips, and secure the braid with a sleek elastic (preferably one that matches your hair color)
- Finish with a flexible hold hairspray that creates structure without crunchiness
Pro tip: If you have layers or shorter pieces around your face, use a tiny bit of styling cream on those pieces before you braid, so they lay flat rather than creating a halo of flyaways. This braid is all about precision, and those small details make a big difference.
4. Textured Messy French Braid
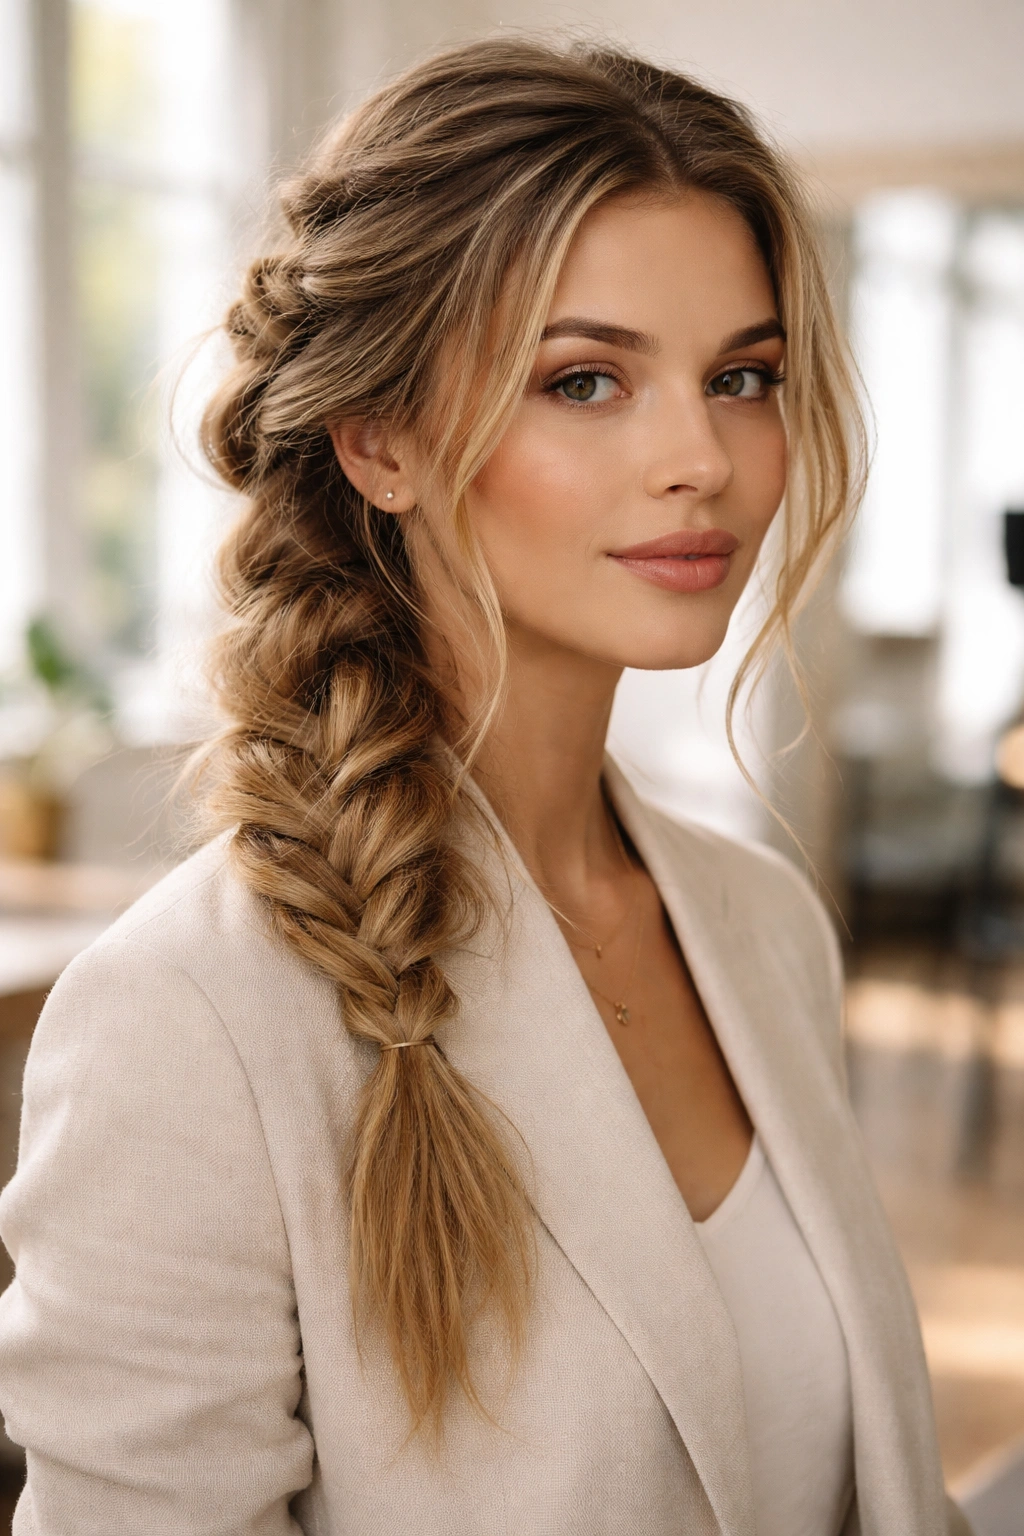
A textured or “messy” French braid is the opposite of the sleek center braid — it’s intentionally voluminous, with sections pulled loose and loosened throughout, creating a romantic, effortless-looking style that somehow feels more approachable and less severe than a tight braid.
Why Messy French Braids Work in Creative Fields
Despite the name, this braid is actually quite polished — it’s just polished in a different way. A textured French braid reads as creative, confident, and comfortable with visual interest. It works beautifully in fashion, design, marketing, tech, media, and any field where a bit of personality in your appearance is actually an asset. The textured style also has a practical advantage: it’s more forgiving if your braid isn’t absolutely perfect, and it photographs beautifully in natural light.
How to Create a Textured, Voluminous French Braid
- Start with day-old or second-day hair — freshly washed hair can be slippery and hard to work with, while older hair has natural grip and texture
- If your hair is freshly washed, use a dry shampoo or texturizing spray as a base to give the braid something to hold onto
- Create a deep side part and begin your French braid at the temple on the fuller side, taking a section and dividing it into three strands
- Braid loosely rather than pulling tightly — think of the braid as a container that will expand, not something you’re cinching down
- Add hair as you work downward, being generous with the sections you add; larger sections create more dimension and texture than tiny, precise additions
- When you reach the nape, finish with a loose three-strand braid using the remaining length
- Here’s the key step: immediately begin pulling and loosening each section of the braid, working from the bottom upward — gently stretch each loop of the braid outward and upward so it gains width and volume
- Pull sections unevenly and in different directions rather than creating a uniform texture; this is what makes the braid look intentionally textured rather than just sloppy
- Secure loosely with an elastic, then spritz with a light, flexible-hold hairspray to set the shape
Pro tip: Do the loosening-and-stretching step right before you need the braid to look its best, not first thing in the morning. If you do it too early, gravity and movement will compress it back down by midday. Redo it at lunchtime if you need a refresh.
5. Half-Up French Braid
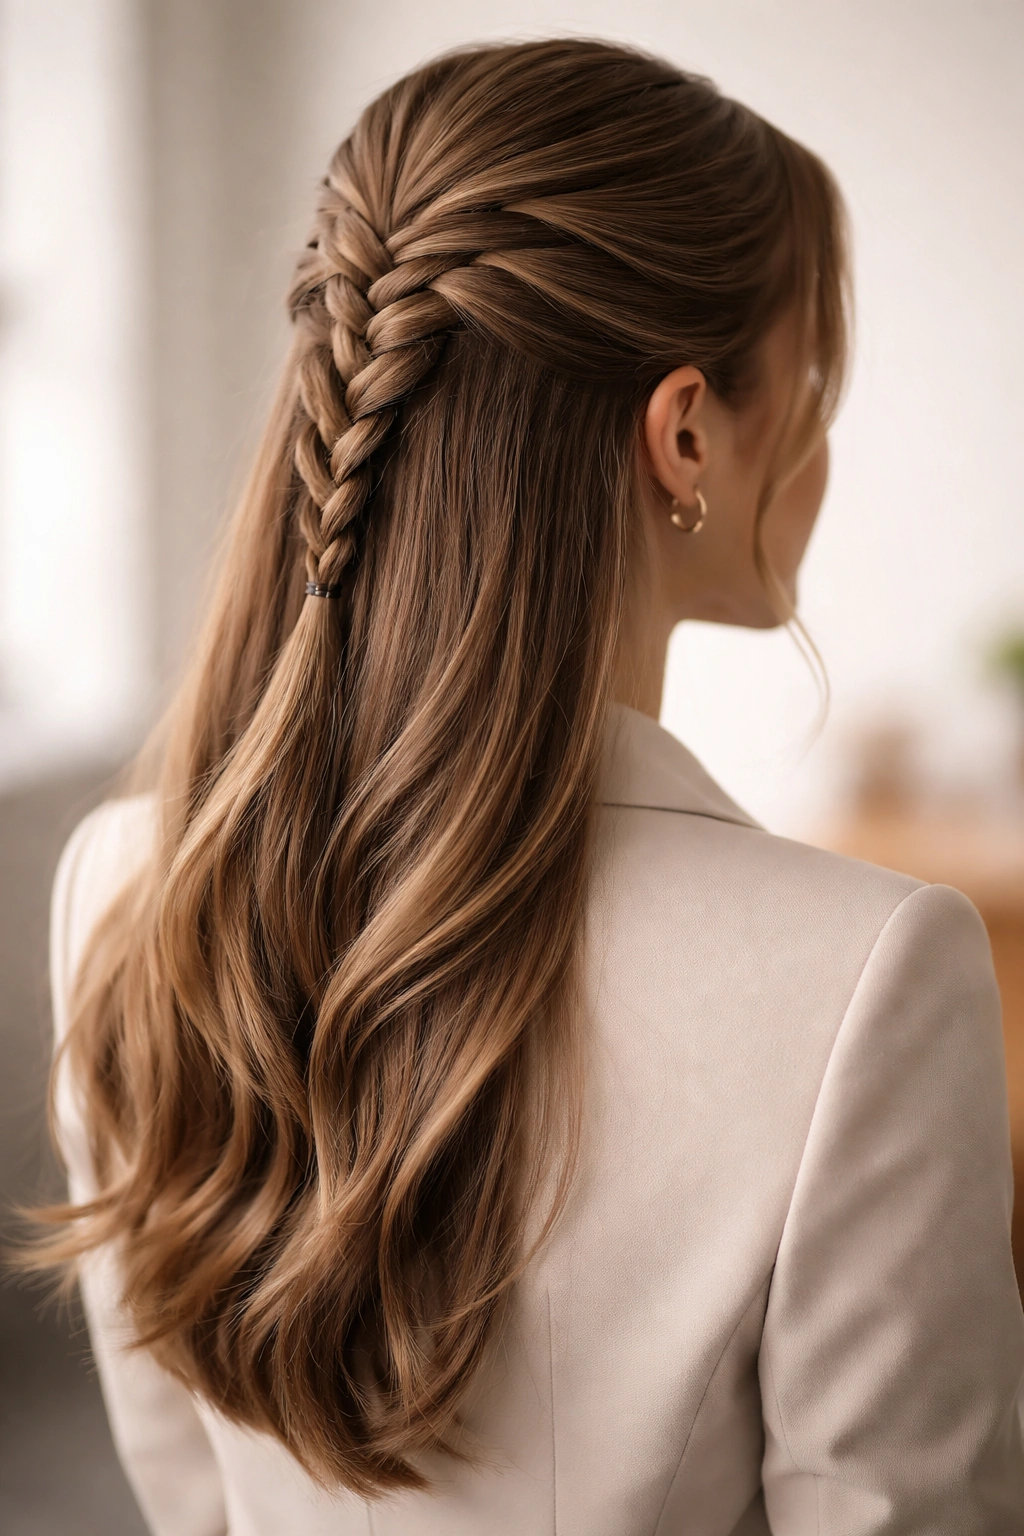
A half-up French braid takes the structure of a French braid but incorporates only the top half of your hair, leaving the bottom half down. This is the perfect middle ground if you want the polished, pulled-together look of a braid without committing to fully braided hair.
Why Half-Up Braids Suit Fast-Paced Work Days
Half-up French braids are genuinely one of the smartest professional styles because they look intentional and styled without requiring much actual styling work. You get the benefit of hair off your face and a polished appearance, but you’re not dealing with a braid that needs to be secure for eight hours straight. This style also works beautifully on days when your hair isn’t cooperating — if the bottom half is a bit flat or limp, nobody notices because it’s not part of the style.
How to Create a Half-Up French Braid
- Brush your hair and add texture with dry shampoo or a texturizing spray
- Create a deep side part and begin the French braid at your temple, just as you would for a full braid
- Add hair from the top half of your head only — don’t add sections from below your ears
- Continue braiding toward the back of your head, stopping when you reach a point roughly even with your ears (at the widest part of your head)
- Switch to a regular three-strand braid for just 2 to 3 more inches, then stop
- Take the end of the braid and fold it back gently, then secure it with bobby pins at the back of your head, tucking the elastic under your loose hair so it’s not visible
- You can also use a small decorative clip or a twist if you prefer that to bobby pins
- Leave the bottom half of your hair completely down and unstyled, or add gentle waves with a curling iron if you want texture
- Loosen and pull the braid sections to create volume and texture, then set with hairspray
Pro tip: This is the easiest French braid style to do in a moving car or at your desk if you forgot to style your hair before leaving the house. The time investment is minimal, and the payoff in polished appearance is huge.
6. Crown French Braid

A crown French braid wraps around your head like a halo, starting at one temple and ending at the opposite temple, with the bulk of the braid looping around the back and sides of your head. It’s a showstopper style that nonetheless reads as professional and intentional.
Why Crown Braids Are Perfect for Important Days
A crown braid is your choice when you want to look exceptionally polished and put-together. It works beautifully for client presentations, interviews, industry events, or any situation where you want to make a strong visual impression. The style is also wonderfully flattering — it frames your entire face, and the elevation of hair on top of your head creates the optical effect of an elongated, balanced face shape.
How to Create a Crown French Braid
- Start with textured or slightly dirty hair — this braid requires grip to stay in place
- Begin at one temple (let’s say the right side), taking a small section and dividing it into three strands
- Begin braiding and adding hair as you work, but instead of moving straight down the back, angle the braid toward the left side of your head
- Your goal is for the braid to curve around the back of your head in a gentle arc
- Think of the braid path as following the natural curve from one ear, around the back, to the opposite ear
- Continue adding hair as you braid, keeping the braid positioned close to your scalp and following that curved path
- When you reach approximately the left temple (roughly where you’d be if you’d drawn an arc from right temple to left temple across the back of your head), stop adding new hair and finish with a regular three-strand braid for the last few inches
- Secure the end of the braid at the left temple with bobby pins, tucking the elastic so it’s hidden
- Loosen and pull the braid sections to create texture and dimension
- Use bobby pins to anchor any sections that feel loose or that might slip throughout the day
- Set everything with a firm-hold hairspray
Pro tip: Practice this braid on a weekend before you need it for something important. The curved path is slightly less intuitive than a straight-back braid, and you’ll feel much more confident if you’ve done a trial run. Once you’ve done it twice, it becomes second nature.
7. Low French Braid
A low French braid begins at the nape of your neck and travels downward, creating a compact, tucked-away style that looks sophisticated and is perfect for days when you want your hair secured but don’t want the braid to be the focal point of your look.
Why Low Braids Work for Subtle Professionalism
A low French braid is ideal if your workplace skews very traditional or conservative, or if you simply prefer a more understated hairstyle. It’s also brilliant for days when you’re wearing your hair down overall but just want the bottom section secured — it creates visual interest and intentionality without being loud or statement-making.
How to Create a Low French Braid
- Brush your hair smooth and add a light texture spray if your hair is very silky
- Flip your head upside down and brush the hair at your nape — this gives you a clear section to work with
- Flip back right-side up, then use a comb to section off the hair at your nape, roughly from ear to ear
- Divide that section into three strands and begin a French braid
- Add hair only from the nape section — do not add hair from above, which would pull the braid upward and defeat the purpose of a low braid
- Braid straight down the center line of that nape section, creating a tight, controlled braid
- Once you run out of hair to add (usually after an inch or two of adding sections), switch to a regular three-strand braid for the remaining length of your hair
- Secure with a small elastic at the very bottom, ideally one that matches your hair color
- This braid intentionally stays tight and sleek, so don’t pull and loosen it the way you might with other styles
- Finish with hairspray
Pro tip: This braid looks especially polished when paired with the top half of your hair left completely down and smooth, or with very gentle waves. The contrast between the unstyled top section and the intentional braid at the bottom is very sophisticated.
8. Dutch Braid (Reverse French Braid)
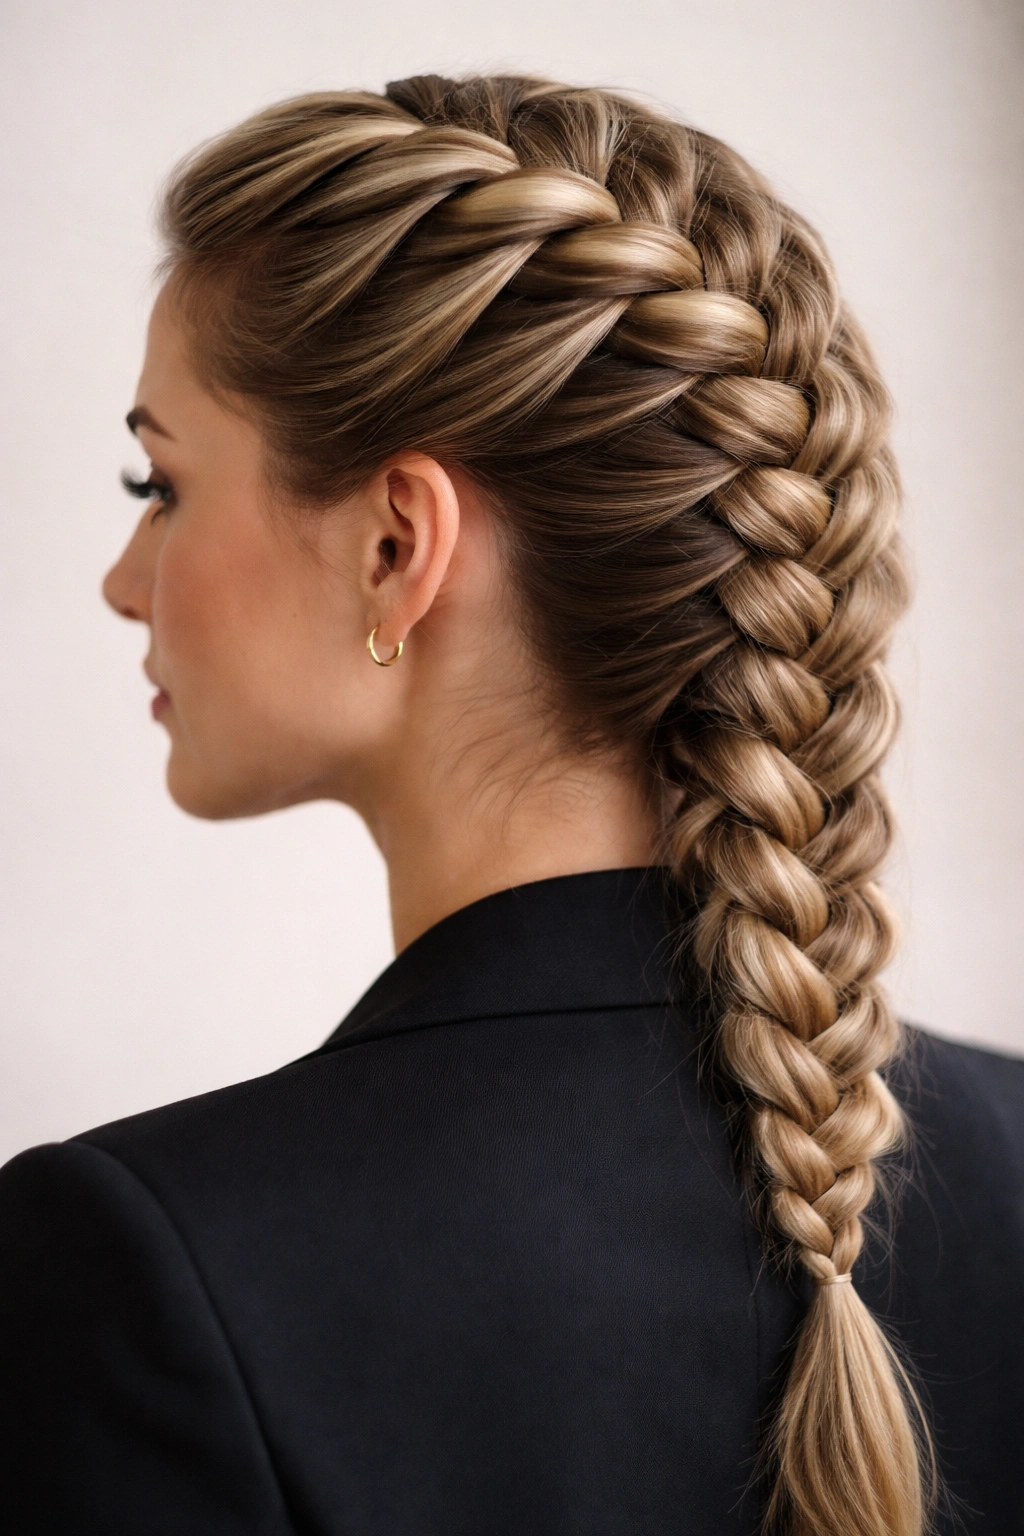
A Dutch braid is technically a reverse French braid — instead of crossing the outer strands over the middle strand, you cross them under, which creates a braid that sits more prominently on top of the scalp and has a more three-dimensional, textured appearance than a traditional French braid.
Why Dutch Braids Command Visual Interest
Dutch braids look thicker and more visually complex than French braids, which makes them ideal if you have fine or thin hair and want your braid to appear fuller. The reverse technique also creates a braid that sits higher and more noticeably on your head, so if you want your hairstyle to be a feature rather than a supportive element, a Dutch braid is your answer. In creative and fashion-forward workplaces, Dutch braids read as intentional and stylistically sophisticated.
How to Create a Dutch Braid
- Begin exactly as you would for a French braid — brush your hair, add texture with dry shampoo or texturizing spray, and create a side part
- Start your braid at the temple on the fuller side, dividing a section into three equal strands
- Here’s where the Dutch braid differs: instead of crossing the right strand over the middle (as in a French braid), cross it under the middle, then cross the left strand under the middle
- This under-under motion, repeated consistently, creates the reverse braid pattern
- As you braid, add hair from the fuller side of your head, just as you would in a French braid, but remember to add sections under rather than over
- Continue all the way down to the nape, then finish with a regular three-strand braid using the under-under motion for the remaining length
- Secure with an elastic
- Pull and loosen the braid sections to create volume and texture — Dutch braids actually benefit even more from this step than French braids do, because the loosening makes the braid appear even thicker and more complex
- Set with flexible-hold hairspray
Pro tip: Dutch braids actually hold better throughout a long day than French braids because the under-crossing technique creates more tension and grip. If you’ve ever had a French braid loosen by 3 p.m., try a Dutch braid — it’ll likely stay tight and defined until bedtime.
Conclusion
The best French braid for work isn’t about which one is objectively the “best” — it’s about which style makes you feel confident and polished while fitting your hair type, your face shape, and your workplace culture. A sleek center-part braid communicates authority and precision. A textured side braid reads as creative and approachable. A crown braid says you’re willing to put in effort for an important day. A low braid whispers intentionality without shouting it.
Start by picking one style and actually practicing it a few times when you don’t have anywhere critical to be. You’ll be shocked how much faster and easier it gets after just two or three tries. Once you’ve mastered one, add a second style to your rotation — most people find they rely on two or three braids they’ve genuinely gotten comfortable with, rather than constantly switching between all eight.
The real magic of a French braid for work isn’t the technique itself — it’s the fact that you can create a polished, intentional look that holds secure through a full day of work, makes you feel put-together on video calls, and somehow manages to look effortless even though you clearly took time to create it. That combination is genuinely rare, and it’s exactly why French braids remain the professional go-to.