A good kids’ bantu knot style has to do three jobs at once. It should look neat, stay put through a school day or a long car ride, and not turn the scalp into a battlefield.
That balance matters more than people admit. A style can be cute and still be a bad idea if the parts are too tight, the sections are uneven, or the hair is dry before you even start. On a child’s head, the best bantu knots are the ones that move with the hair instead of fighting it.
The easiest place to start is simple: clean, moisturized hair, a spray bottle, a rat-tail comb, a light leave-in, and a patient hand. That’s the whole game. If the hair feels soft and slightly damp, not dripping and not crunchy, the knots form more cleanly and the style lasts longer without frizzing into a puff halfway through the day.
Bantu knots also give you room to play. Some versions are quick and chunky. Some look dressy enough for a family photo. Some work better on short hair, and some are smarter for thick hair that needs to be divided into smaller, calmer sections. The styles below cover all of that, and they stay on the easy side so you are not wrestling with a five-hour hair session.
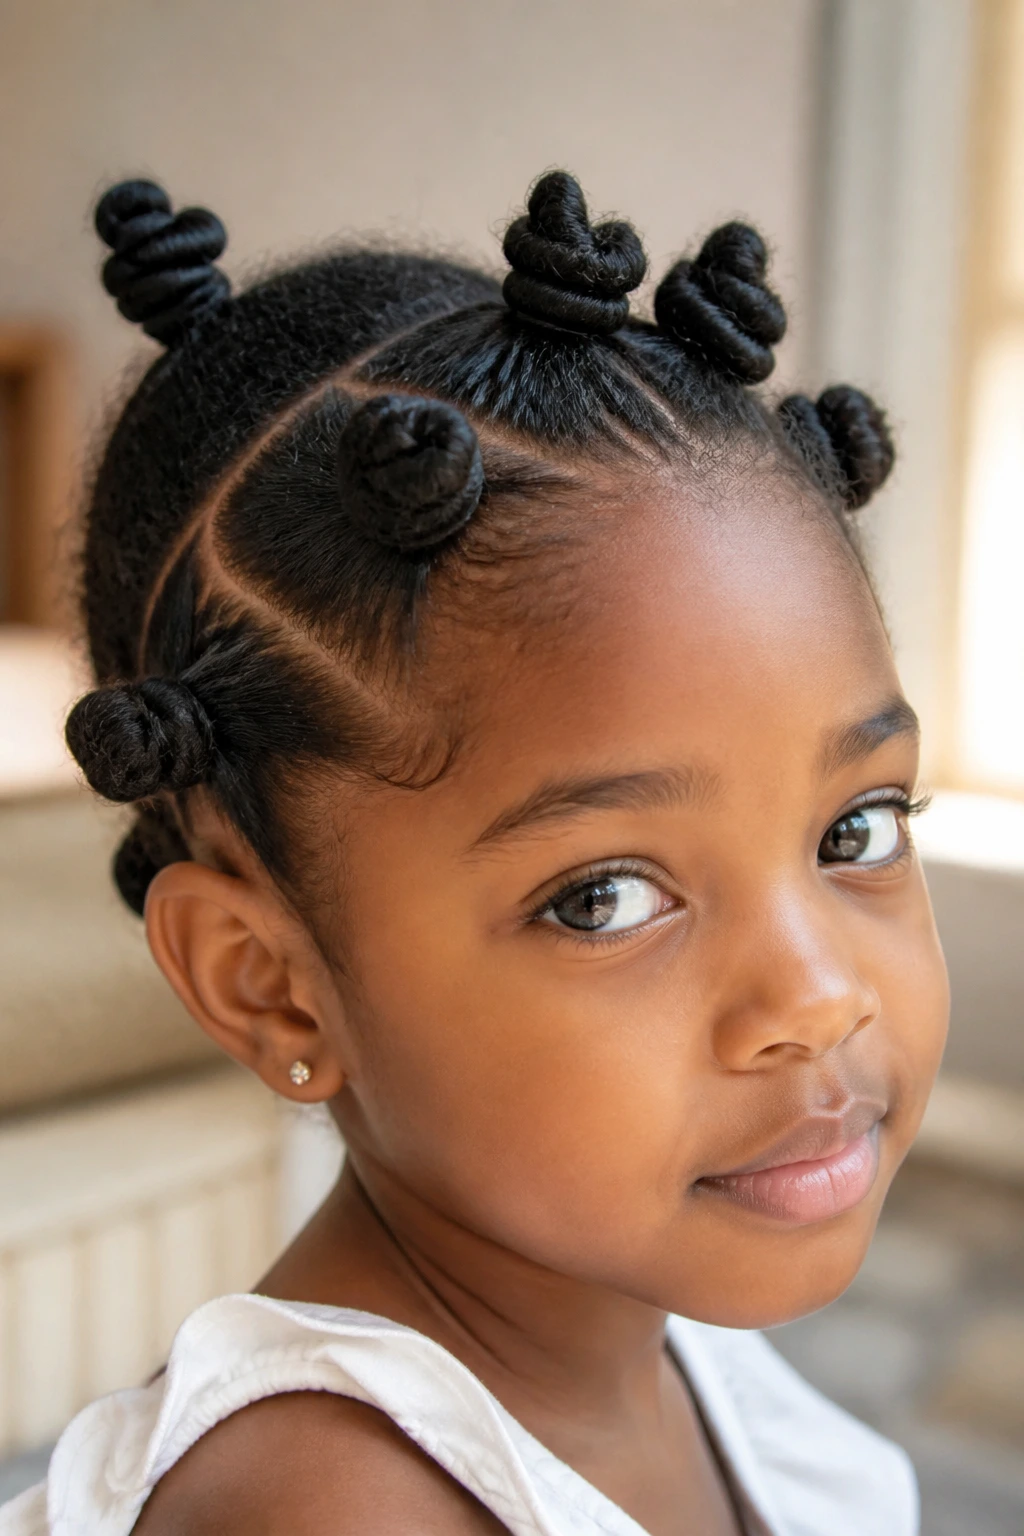
1. Classic Center-Part Bantu Knots for Kids
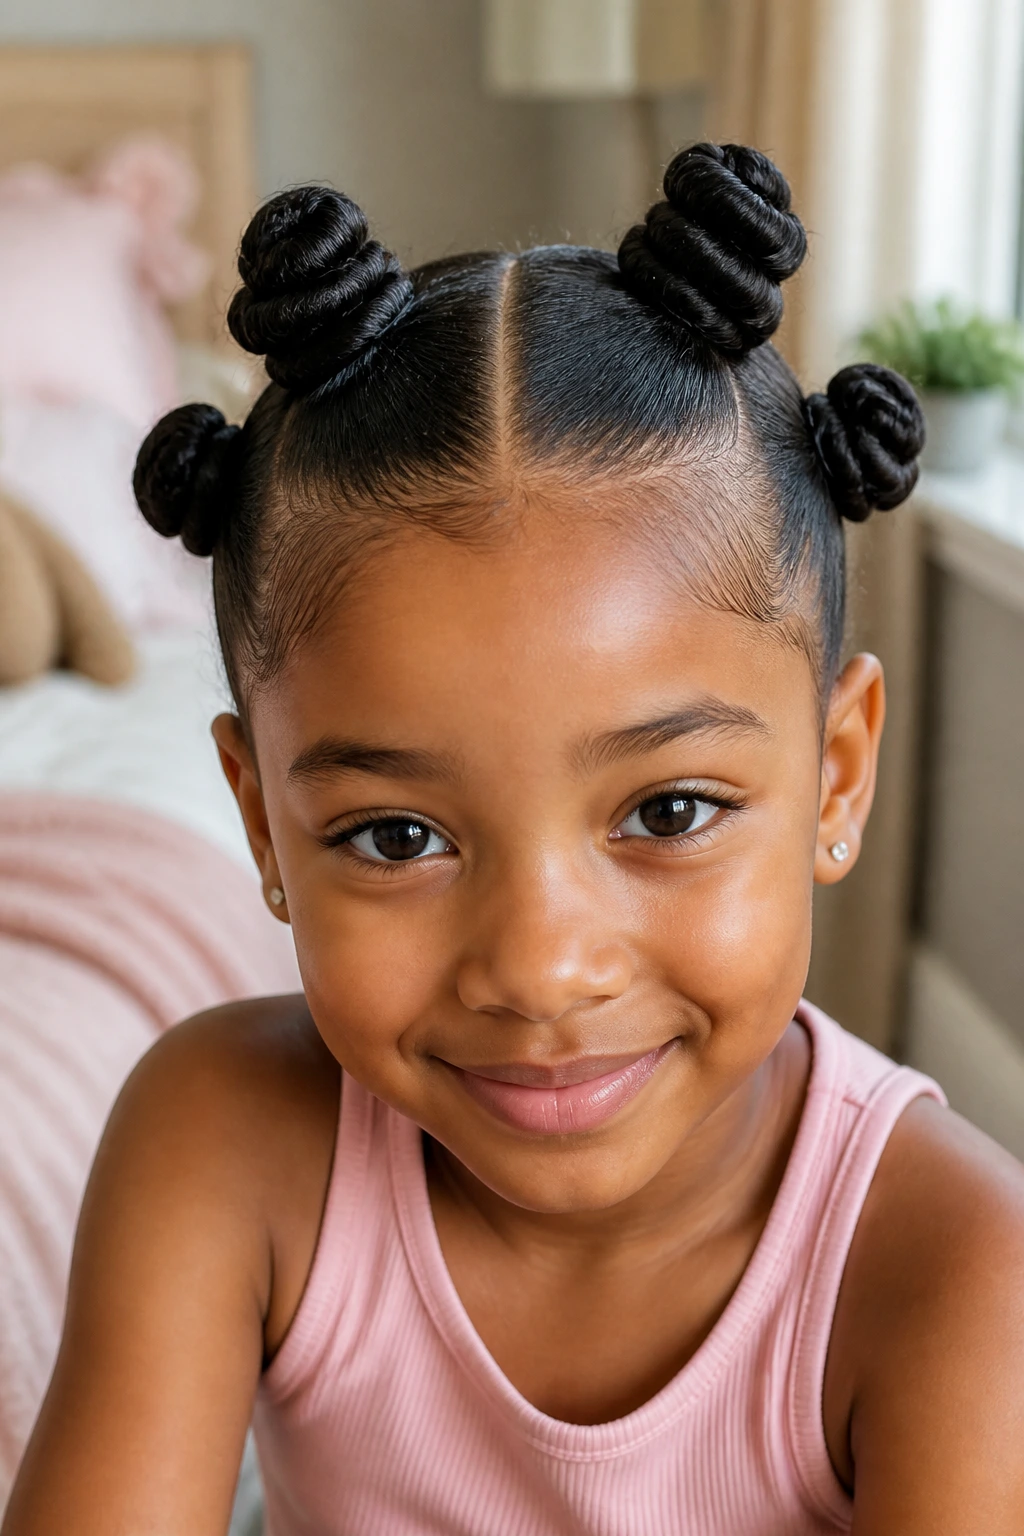
A clean center part is the easiest place to begin, and it gives the whole style a balanced look even when the knots themselves are chunky. This is the version I’d hand to a beginner first. It is tidy, readable, and forgiving if one side ends up a little fuller than the other.
Why the Center Part Helps
A center part gives you two clear lanes, which makes sectioning less stressful. That matters on a moving child. You can work one side at a time, clip the other side away, and keep the mood calm.
Start with detangled hair and a light leave-in. Then make two even halves from forehead to nape, and split each half into three or four sections depending on thickness. Twist each section until it coils around itself, then tuck the ends under the knot. If the hair is a little damp, the coil holds better and the part lines stay sharper.
- Use a rat-tail comb for the part.
- Keep the sections about the same size.
- Mist any dry spots before twisting.
- Use a soft gel only on the part, not all over the scalp.
Best tip: if the sections are even, the style looks polished even when the knots are not identical.
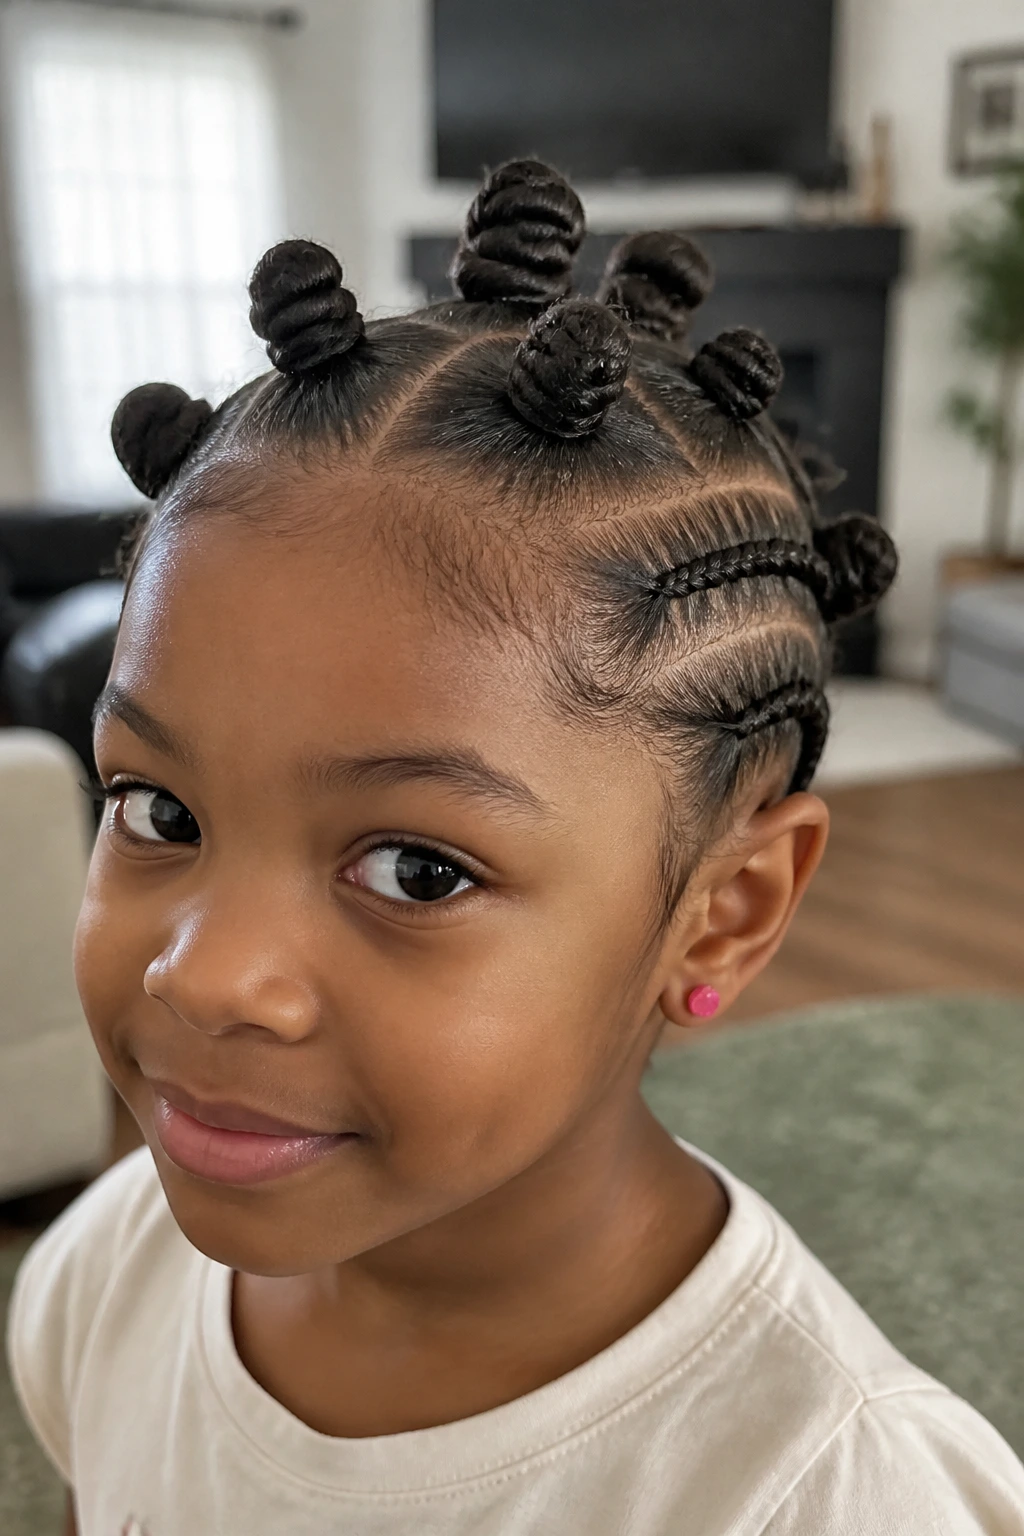
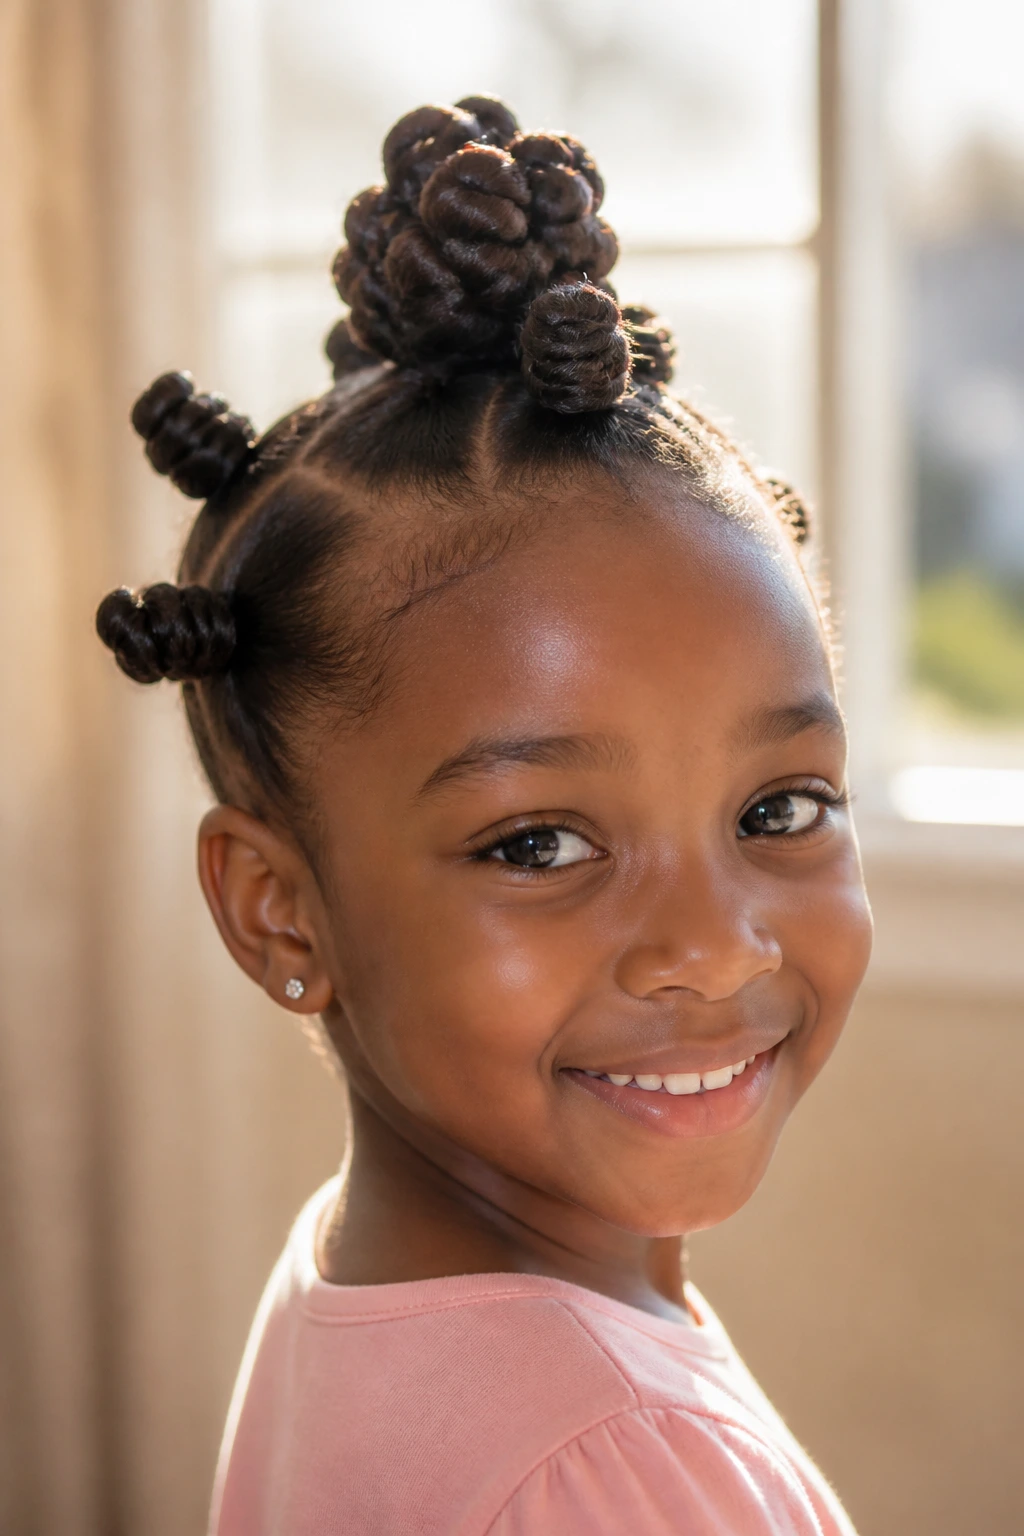
2. Four Oversized Bantu Knots for Busy Mornings
Four knots can look cleaner than ten. Seriously. When the hair is thick, short, or a little stubborn, fewer sections often give you a neater result and a faster finish.
That is why this version works so well for kids who do not have the patience for a long styling session. You make a front-left, front-right, back-left, and back-right section, then coil each one into a knot. Done well, it reads as intentional, not rushed. And because each section is larger, the knots usually hold their shape longer without getting fuzzy at the roots by lunchtime.
This style is especially kind to younger children. Less parting means less tugging. Less tugging means fewer complaints. That part is worth its weight in gold on a school morning.
Use a little extra moisture on the ends so they tuck smoothly under the knot instead of sticking out. If the child’s hair is very dense, a fingertip’s worth of cream per section is enough. Too much product makes the knots soft and slippery, which is not what you want.
3. Side-Swept Bantu Knots for Kids
Why do side-swept bantu knots feel softer than straight rows? Because the eye follows the line across the head, and that little shift changes the whole mood of the style. It looks playful without looking fussy.
This version is nice for children who do not want hair sitting right in the middle of the face. You can sweep the part from one temple down toward the opposite ear, then continue in a diagonal path across the head. The knots fall slightly to one side, which frames the face in a gentler way than a strict center part.
How to Use It
Work with small, neat sections near the front and slightly larger ones near the back if the hair is dense. Keep the front pieces smooth at the scalp, because that is what people see first. A light mist of water and a pea-sized amount of leave-in is usually enough.
The style also plays nicely with accessories. A soft bow near the heavier side can make the whole look feel finished without adding weight. Just skip anything stiff or sharp. Kids notice that stuff fast.
4. Half-Up Half-Down Bantu Knots
Picture a child who wants hair off the face but still wants to keep some length hanging down. That is where the half-up half-down version makes sense. It gives you the neatness of knots at the top and the softness of loose hair below.
The mechanism is simple. You section off the front or top half, turn that into bantu knots, and leave the bottom half loose, braided, twisted, or curled. On mixed textures, this can be a smart compromise because the loose section softens the whole style and keeps it from looking too rigid.
- Best for medium-length hair.
- Good for picture days or family events.
- Works well with a puff, twist-out, or loose curls underneath.
- Keep the top sections small enough to lie flat.
A lot of people overcomplicate this one. They do not need to. If the top looks clean and the bottom is moisturized, the contrast does the work for you. The style feels light, not overloaded.
5. Mohawk Bantu Knots Down the Middle

A mohawk line of bantu knots is one of those styles that looks more dramatic than it is hard. The sides are smoothed down, and the knots run in a single strip from the front hairline to the nape. That center lane gives the style its shape.
It is a good choice when you want the hair away from the sides of the face. The child can still wear the style comfortably, and the finished look has enough structure to stay neat for a full day of moving around. If the hair is thick, keep the side sections gently brushed or lightly gelled so they do not puff up and steal the shape.
One thing I like about this version: it makes parting easier. You are only building one row, which means fewer decisions and less back-and-forth. That saves time. And time matters.
Keep the knots medium-sized so they do not pull on the center strip. If the hair at the crown is short, start with a tiny two-strand twist before coiling it into the knot. That extra grip helps a lot.
6. Crown Bantu Knots Around the Hairline
Unlike a full-head set, crown bantu knots focus on the outer edge of the head and leave the center open or softly puffed. That makes the style feel lighter on the scalp and a little dressier without becoming complicated.
This is the version I reach for when I want the hair to sit like a frame. The knots around the hairline pull the eye outward, which can be flattering on round or oval faces, and the open center gives room for a puff, a bun, or just a smooth top section. It also helps if the child does not want a lot of knots packed across the whole scalp.
The trick is tension. Keep the perimeter parts neat, but do not drag the hair backward too hard. That can make the crown look flat in an unkind way. A soft brush and a light hand do more than aggressive slicking ever will.
If the hairline is sensitive, this is not the place to get stubborn. Leave a little slack. The style still looks clean.
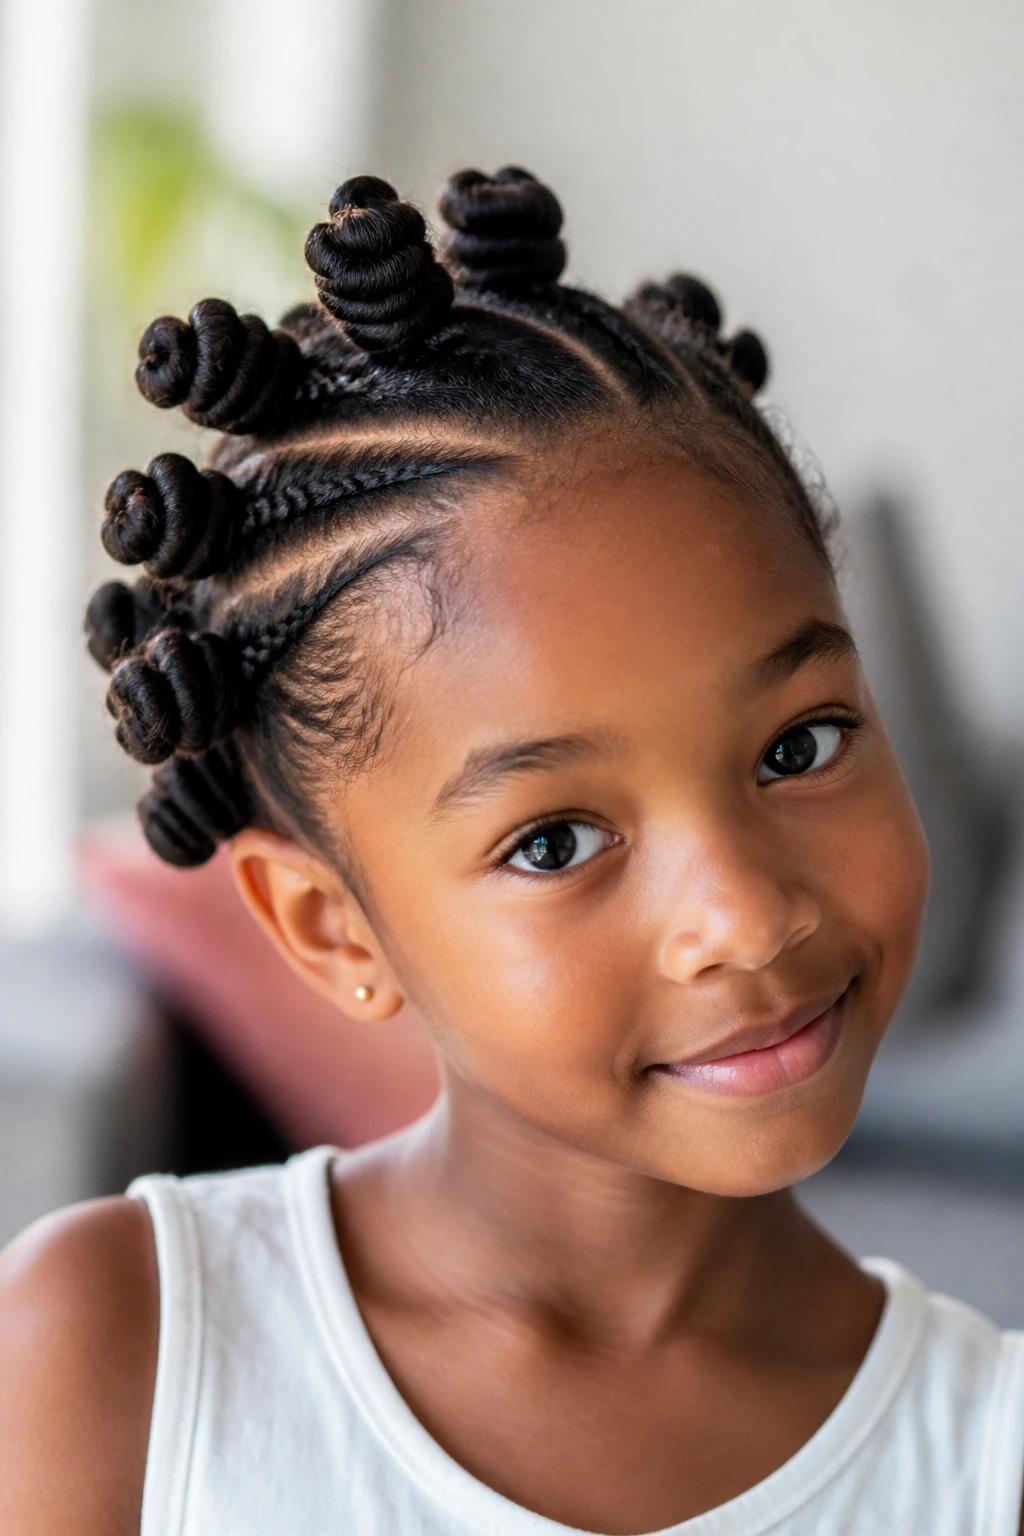
7. Triangle-Part Bantu Knots
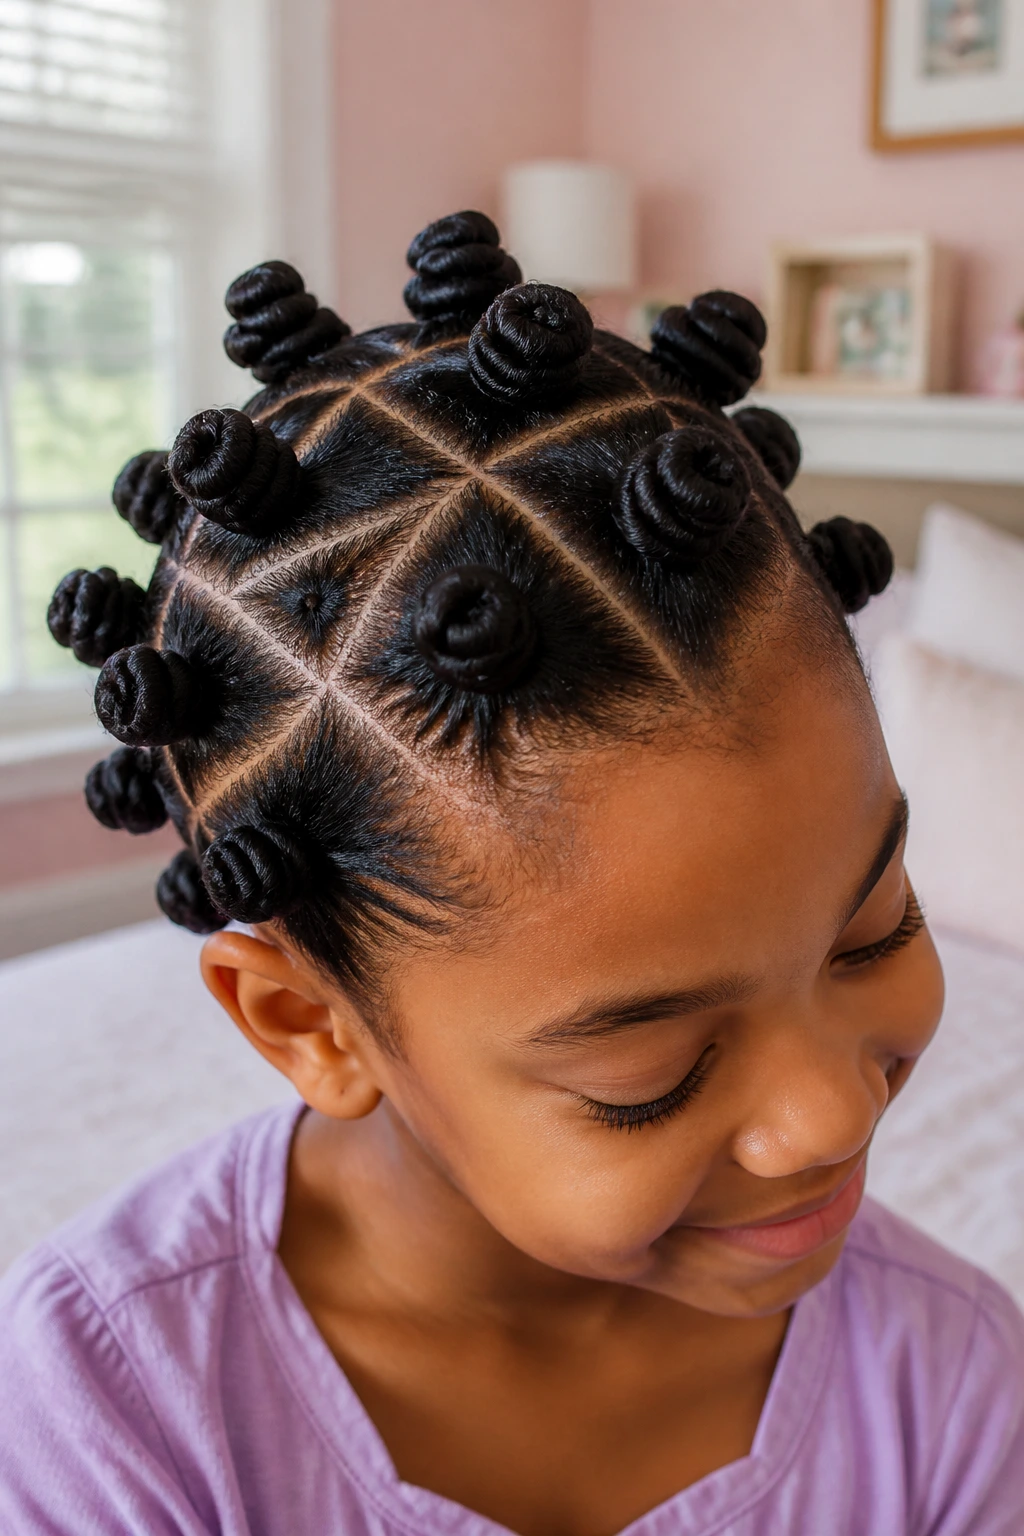
Triangle parts bring more shape than square sections, and they make the head look less boxy. That matters on kids’ hair, especially when you want something playful instead of stiff.
Why Triangles Matter
Triangle parts help the knots sit in a staggered pattern, so the scalp does not show straight, obvious rows. The result is softer and a little more lively. It also works nicely on thick hair because each section fans out from the base before it is twisted.
You do not need a perfect geometry lesson here. Just use the rat-tail comb to carve small triangles across the head, keeping the bases clean and the points neat. Once the parts are done, twist each section until it wraps into itself. A tiny bit of gel on the roots can help the triangles stay crisp.
- Great on medium to long natural hair.
- Good for kids who like seeing the parts as much as the knots.
- Use clips to hold finished sections out of the way.
- Mist any dry ends before folding them under.
Best tip: triangle parts look best when the sections are consistent, not when the shapes are ruler-perfect.
8. Bantu Knots with Beads on the Ends
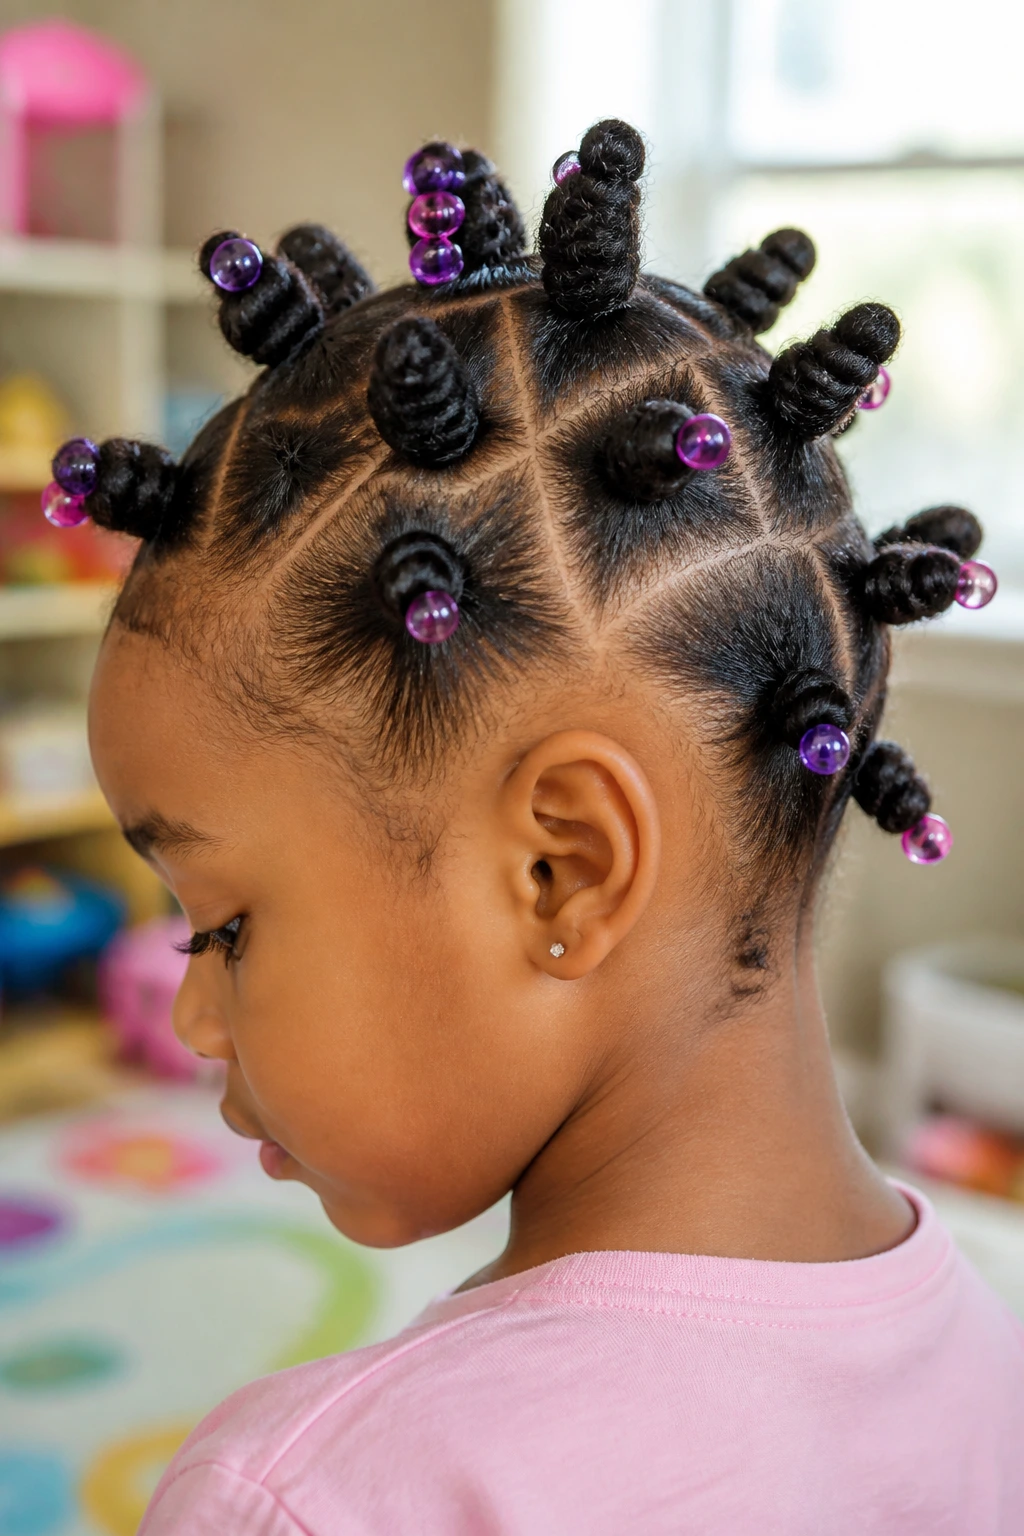
Beads belong at the ends, not stuffed near the scalp. That is the part people sometimes get wrong. If the knot is already sitting close to the head, loading the base with heavy beads can make the style droop and feel awkward.
A better move is to finish the knot first, then add a small elastic or a secure strand of thread to the tail before placing a lightweight bead at the end. That keeps the scalp comfortable and lets the decoration do its job without dragging the knot down. For kids, this matters a lot. They notice weight fast.
Choose smooth, kid-safe beads with a hole that does not snag the hair. One or two per knot is plenty. More can look noisy and can make the hair swing too much during play. I’m not a fan of overloading this look. The bead should be a detail, not the whole story.
If the child has fine hair, keep the beads small and light. If the hair is thick, the knots can carry a little more decoration without losing shape.
9. Zigzag-Part Bantu Knots
Why do zigzag parts feel so fresh? Because they break the grid. Straight lines are neat, sure, but a zigzag part adds movement before the first knot even goes in.
This is a smart option when the hairline shows a lot or when you want the style to look more playful without adding extra steps. Use the rat-tail comb to draw short angled lines from front to back, then work each little pocket into a knot. The pattern does the decorative work for you, so the knots themselves can stay simple.
How to Use It
Keep the zigzags shallow. Deep, dramatic angles can get messy fast on a squirmy head. Small shifts in direction are enough. Once the parts are set, smooth the roots with a damp brush or your fingers, then coil the sections one by one.
A zigzag pattern works well on shorter hair because it gives the eye something to follow. It also hides tiny unevenness in the sections, which is handy if you are styling without a second pair of hands.
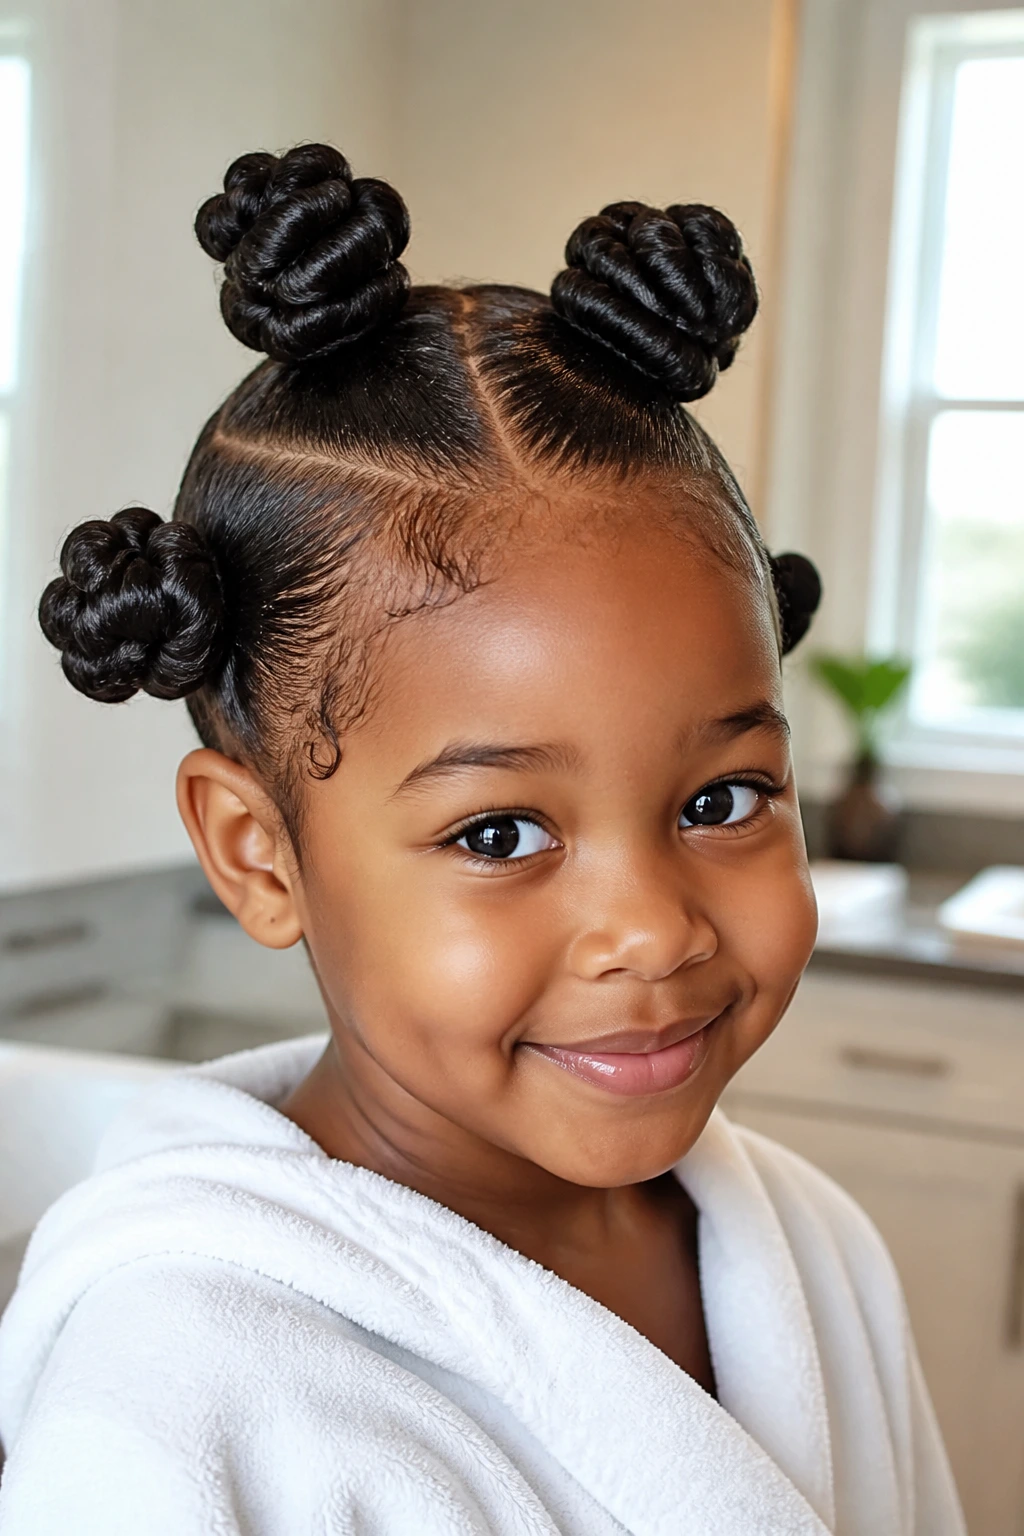
10. Two-Layer Bantu Knots for Thick Hair
Thick hair can make one giant row feel endless. A two-layer setup fixes that problem. You build a lower row first, then a second row above it, and the whole style becomes easier to manage.
This works because it reduces the amount of hair you are handling at one time. Instead of trying to corral the whole head into a single pattern, you divide the hair into a bottom layer and a top layer, clip one away, and finish each layer in turn. The style ends up sitting flatter, too, which helps on children whose hair has a lot of volume.
- Start with the nape area first.
- Keep the bottom knots slightly smaller than the top ones.
- Clip finished knots away from the next section.
- Use a soft brush to smooth the seam between layers.
The result is neat without looking stiff. And that’s the sweet spot. If the child has a lot of density, this style is often the difference between a calm session and a messy one.
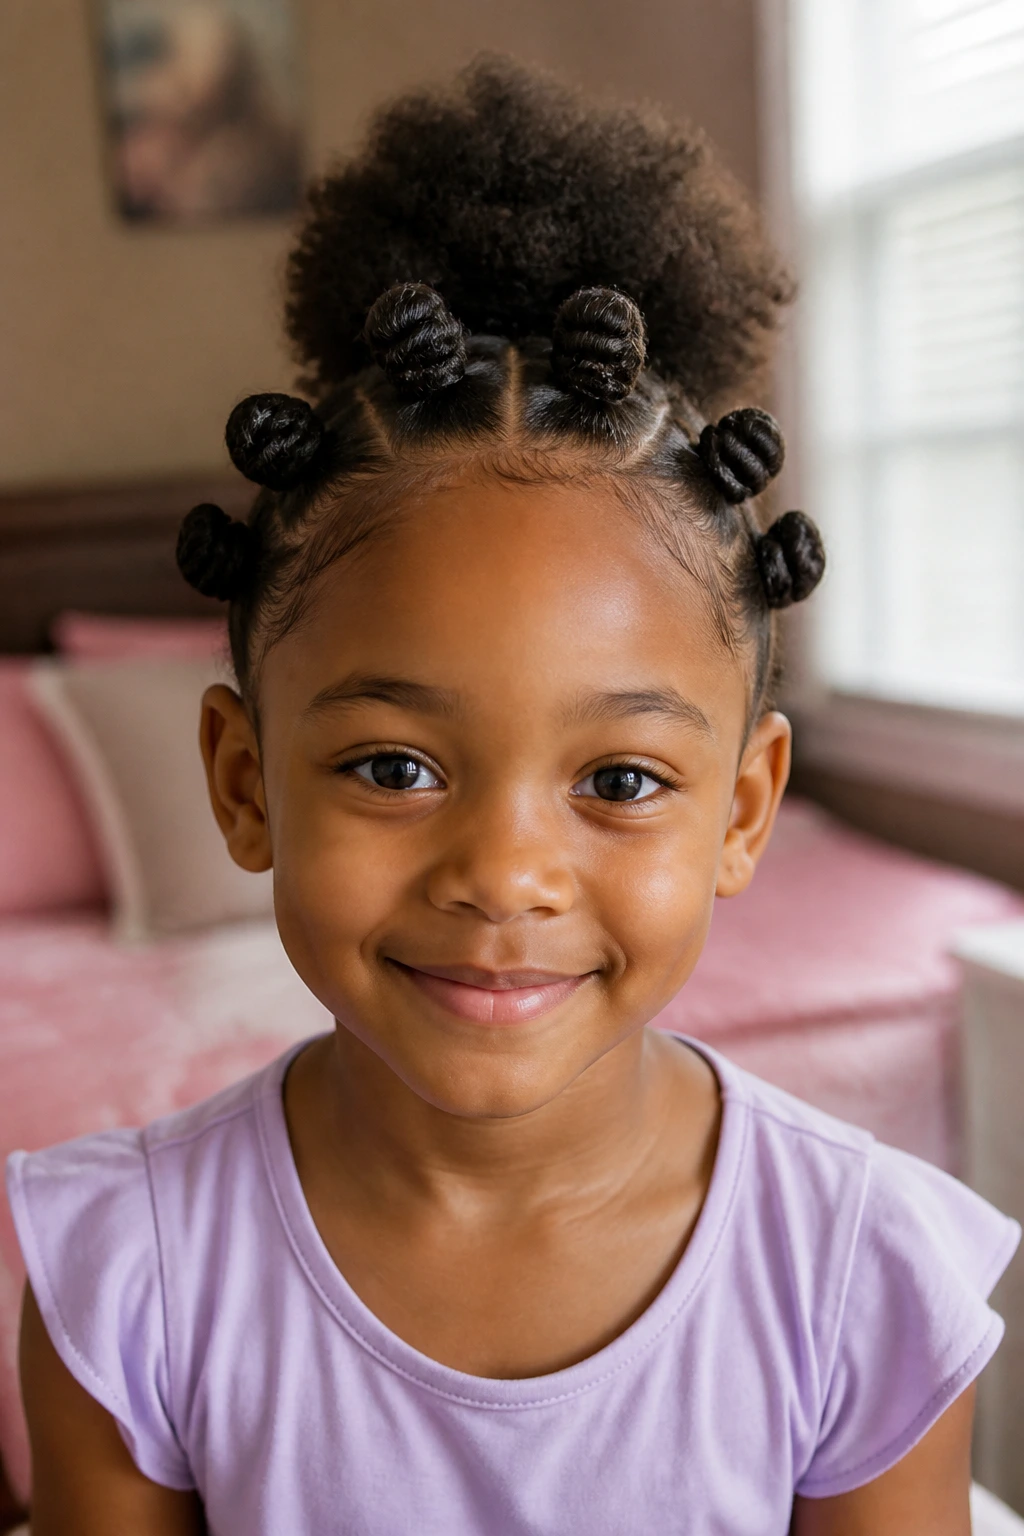
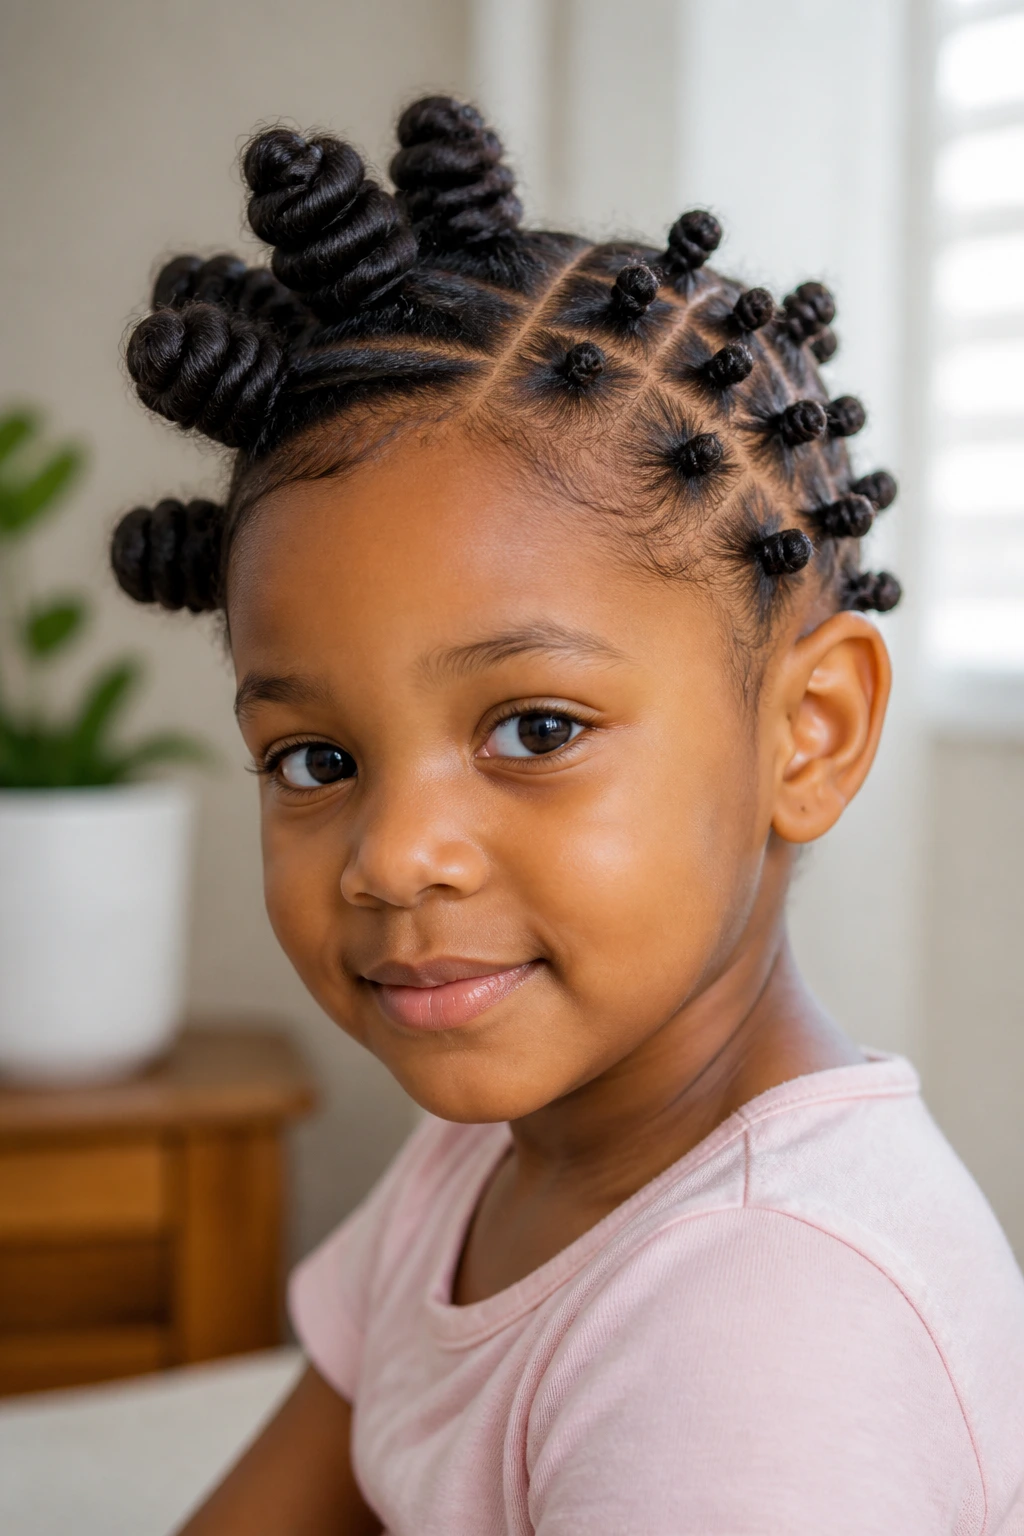
11. Mini Bantu Knots with an Afro Puff Back
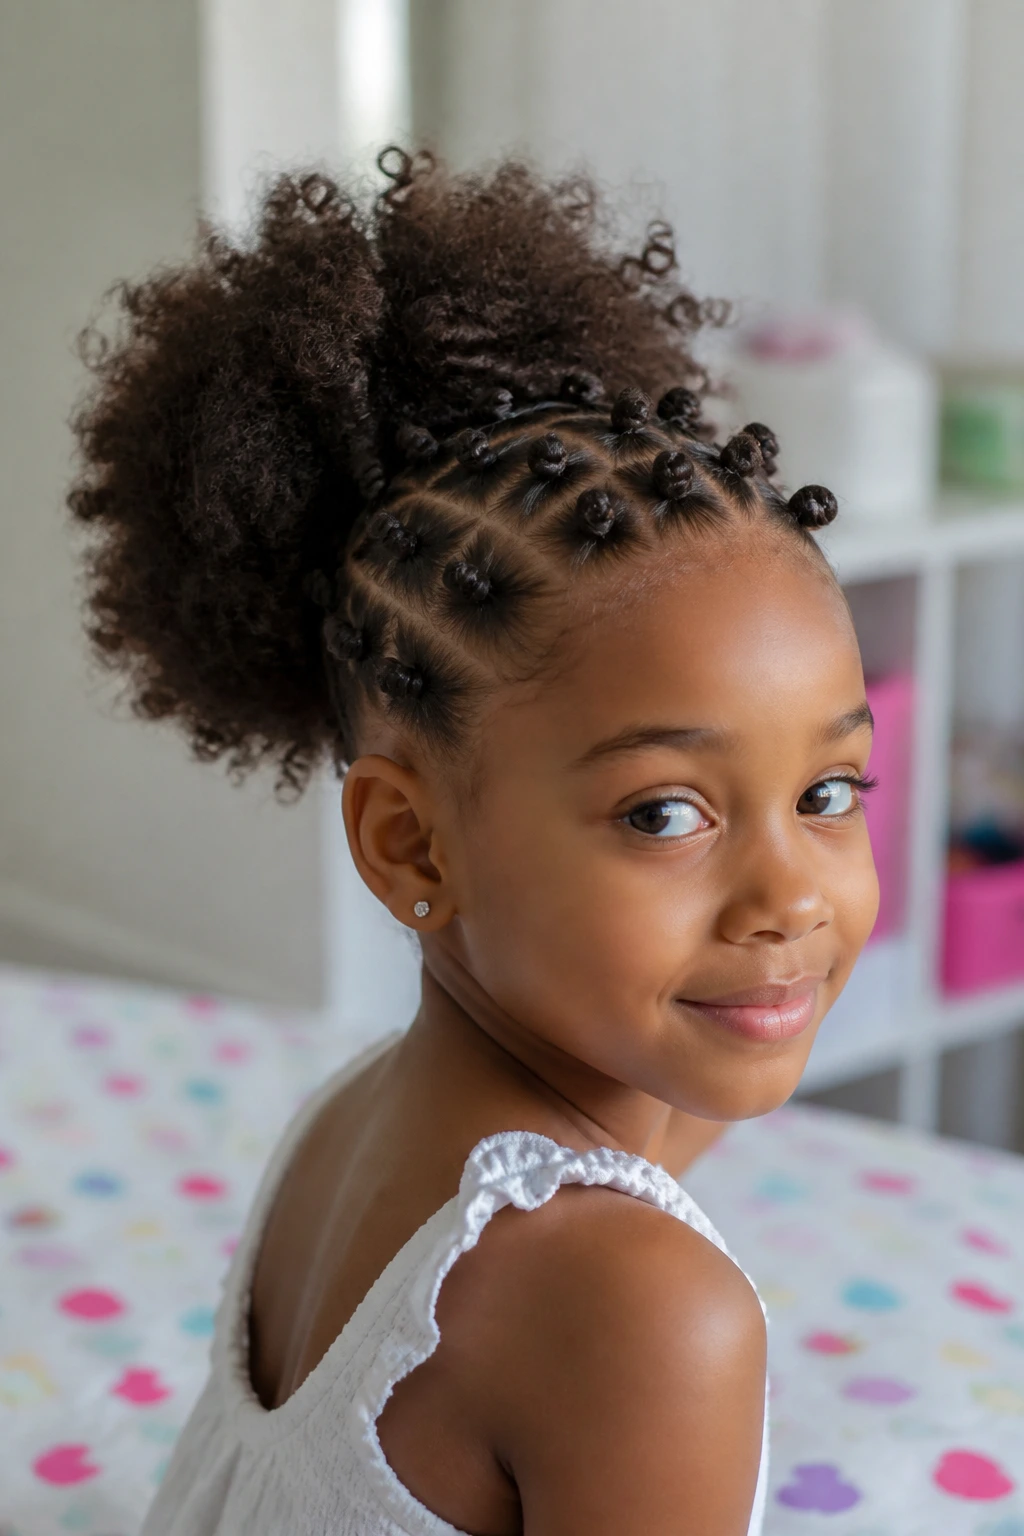
Mini knots in the front and a puff in the back make a great compromise for kids who do not want their whole head covered. The front stays tidy, the back stays full, and the shape feels lively rather than overly controlled.
This style is especially useful when the hair is a little shorter on top than it is in the back. You can make tiny knots along the hairline or crown, then gather the rest into a puff at the nape or middle back. That way, you are not forcing every strand into the same shape. The hair gets to work with its own length.
I like this one for active kids. The puff keeps the style soft at the neck, and the knots at the front keep hair out of the face. It is practical, but it still has personality. Those two things do not always live together.
Use a satin scrunchie for the puff. Ordinary elastics can tug when the child takes the style down, and nobody needs that. Keep the front knots neat and the back puff fluffy.
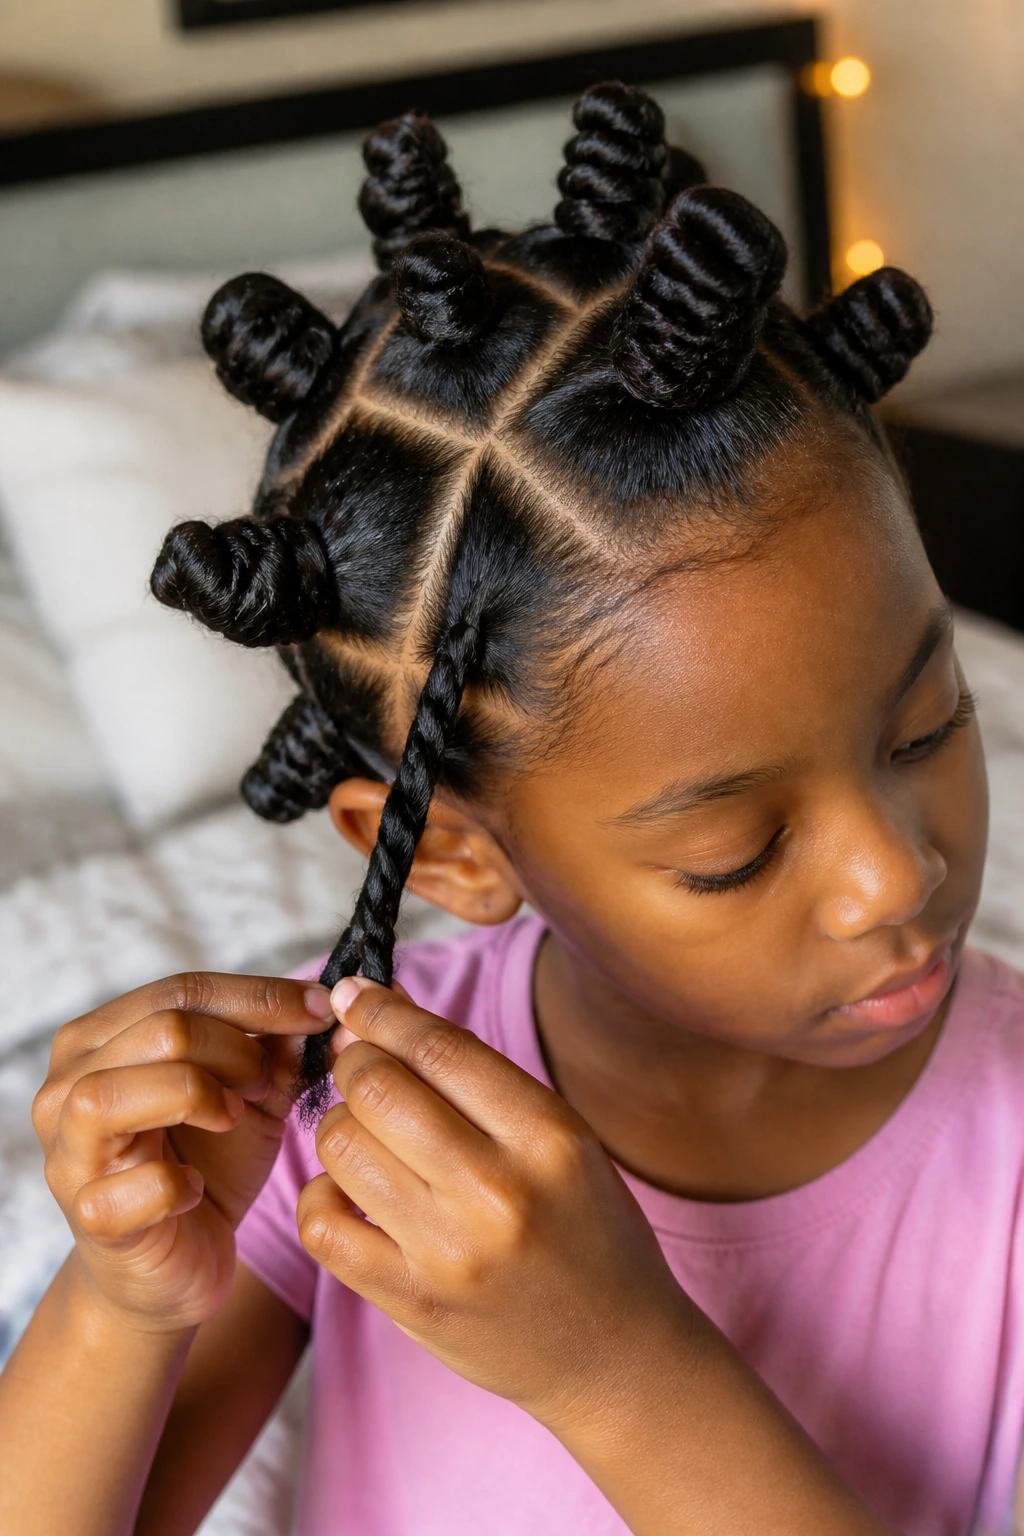
12. Braided-Base Bantu Knots
A tiny braid at the base gives slippery hair more grip, and that is the whole reason this version works so well. Unlike a plain twist, the braid anchors the knot before it has a chance to unravel.
This is especially useful on freshly washed hair or on textures that feel very soft after moisturizing. The braid creates a firm base, then the ends can be wrapped into the knot with less chance of slipping out. It does take a few extra seconds per section, but those seconds save you from redoing half the head later.
The look is still easy. You do not need a full braiding session. A three-strand braid of two or three passes is enough. After that, coil the braid into a knot and tuck the end under. The section should feel secure, not hard.
Best for kids with fine, silky coils or hair that tends to stretch and slide. If the hair is very dry, add a tiny bit of cream first so the braid has some softness to work with.
13. Space-Bun Bantu Knots with Two Rows
Two rows of knots can look playful in a way that kids usually love. The style borrows a little from space buns, but the knots stay distinct and shaped, which gives the whole thing a cleaner finish.
What Makes the Two-Row Layout Easy
The top row and bottom row split the styling job into smaller pieces. That makes the head easier to map, especially if the hair is thick or if the child has a lot of crown volume. Start with the top row, clip it out of the way, then finish the lower row in the space beneath it.
A center line works well here, but it does not need to be perfect. Slightly staggered sections often look better on real hair anyway. The head is round. The parts can be, too.
- Keep the rows evenly spaced.
- Use small knots on the top row if the crown is flat.
- Leave a little room between rows so they do not crowd each other.
- Smooth the scalp lightly, then stop.
One good rule: if the rows look too crowded, make the knots bigger instead of adding more of them.
14. Mini Bantu Knots with Colorful Elastics
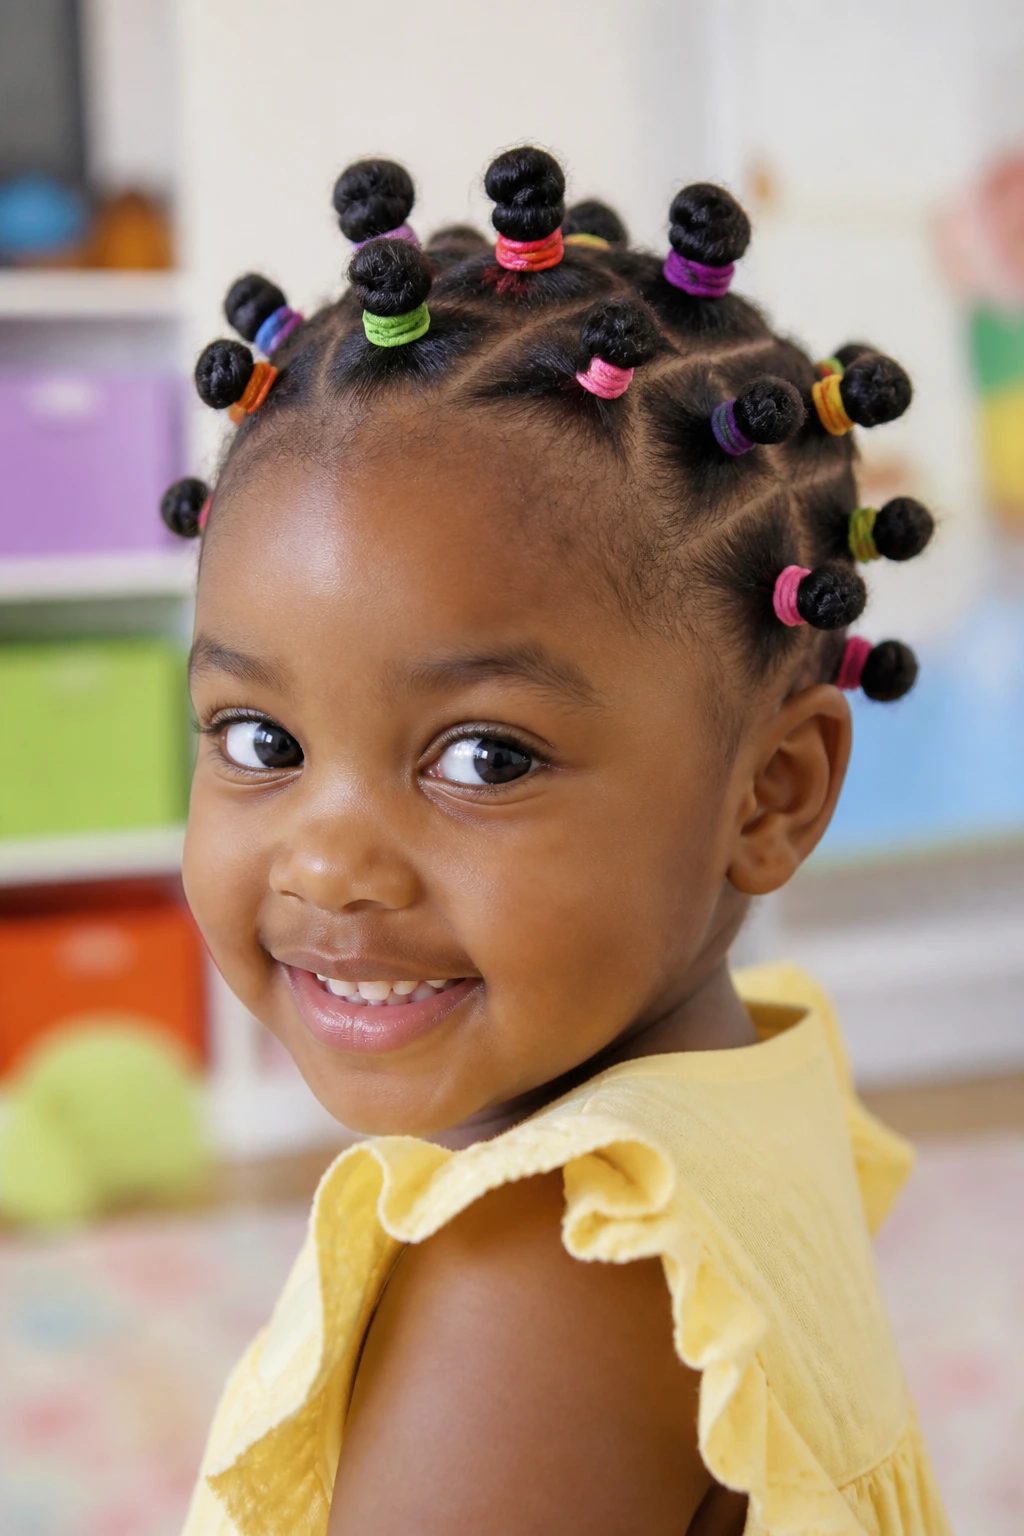
A tiny elastic at the base can turn a simple knot into something a child actually wants to wear. That matters. If the accessories feel fun, the whole styling process gets easier.
This version works best when the knots are small and neat. You can secure each section with a soft, snag-free elastic in a bright color, then coil the hair into a knot above or around it. The elastic acts like a little anchor and a little decoration at once. Just keep it lightweight. Thick elastics and hard rubber bands are a bad trade on young scalps.
What I like here is the flexibility. You can match school colors, pick one bright shade, or use a mix of two colors without changing the structure of the style. The knots stay simple. The accessories carry the personality.
If the child has fine hair, choose elastics that stretch without snapping. If the hair is thick, make sure the band sits snug enough to hold but not so snug that it dents the root. That line is thin. Do not cross it.
15. Heart-Part Bantu Knots for Special Days
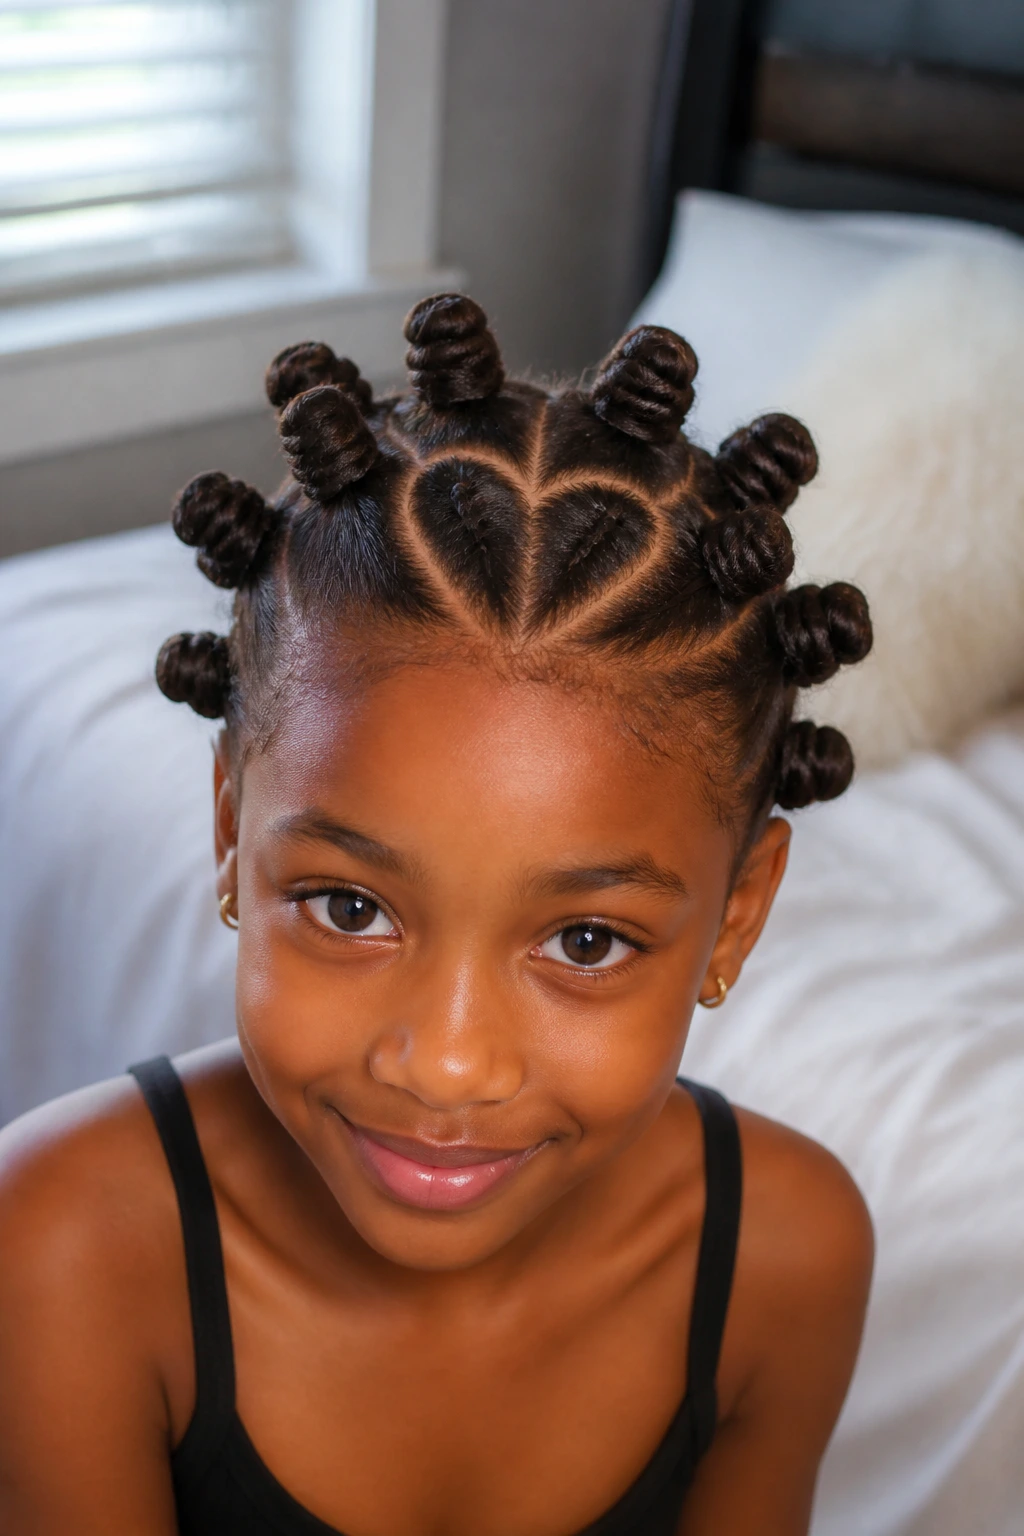
Can a heart part be easy? Yes, if you sketch it cleanly with the comb before you start twisting. The shape sounds fancier than it is. A good heart part mostly depends on patience for the first two lines.
This style is a nice choice for birthdays, church, photos, or any day when the child wants the hair to feel special without adding heavy accessories. You can place the heart at the crown and build smaller knots around it, or make the heart itself the center feature with a few simple knots radiating outward. Either way, the parting does the decorative work.
How to Use It
Trace two curved lines with the end of the comb, letting them meet in a point. Clean the edges with a little water or gel so the heart shape reads clearly. After that, keep the knots simple. If the parts are detailed, the knots do not need to be.
A heart part works best on medium to long hair because there is enough length for the shape to show. On short hair, the curves can disappear into shrinkage.
16. Diagonal-Row Bantu Knots
A diagonal row changes the whole feel of the style. Instead of moving straight back from the forehead, the parts sweep across the head at an angle, which makes the style look softer and a little more dynamic.
This is a smart choice when the head shape feels round and you do not want the parts to emphasize that too much. The diagonal pattern adds motion. It also helps when one side of the hair is denser than the other, since you can adjust the section sizes as you go across the head.
- Start at one temple and move toward the opposite nape.
- Keep the angles shallow for cleaner sections.
- Clip each finished knot before making the next one.
- Smooth the roots before twisting the section.
The style is easy to do once you commit to the angle. The hardest part is not changing your mind halfway through. Pick a direction and stay with it.
17. Twist-and-Knot Combo Bantu Knots
A twist-and-knot combo is one of my favorites for frizz-prone hair. You twist the section first, then coil that twist into the knot. The extra step gives the hair more control and a slightly smoother finish.
This is especially useful on hair that puffs up fast when left loose. The twist helps the strands sit together, and the knot closes the ends in place. It is not fancy. It just works. On children with a mix of curl sizes, that matters because the texture can be stubborn in some spots and softer in others.
The style also tends to hold well overnight. If the child needs the look to last past one day, this version gives you a better shot at waking up with the knots still intact. They may not be perfect after sleep, but they usually stay recognizable.
Use a light cream before twisting, then add a touch more to the ends if they are dry. The hair should feel supple between your fingers, not sticky.
18. Pigtail Bantu Knots for Little Kids
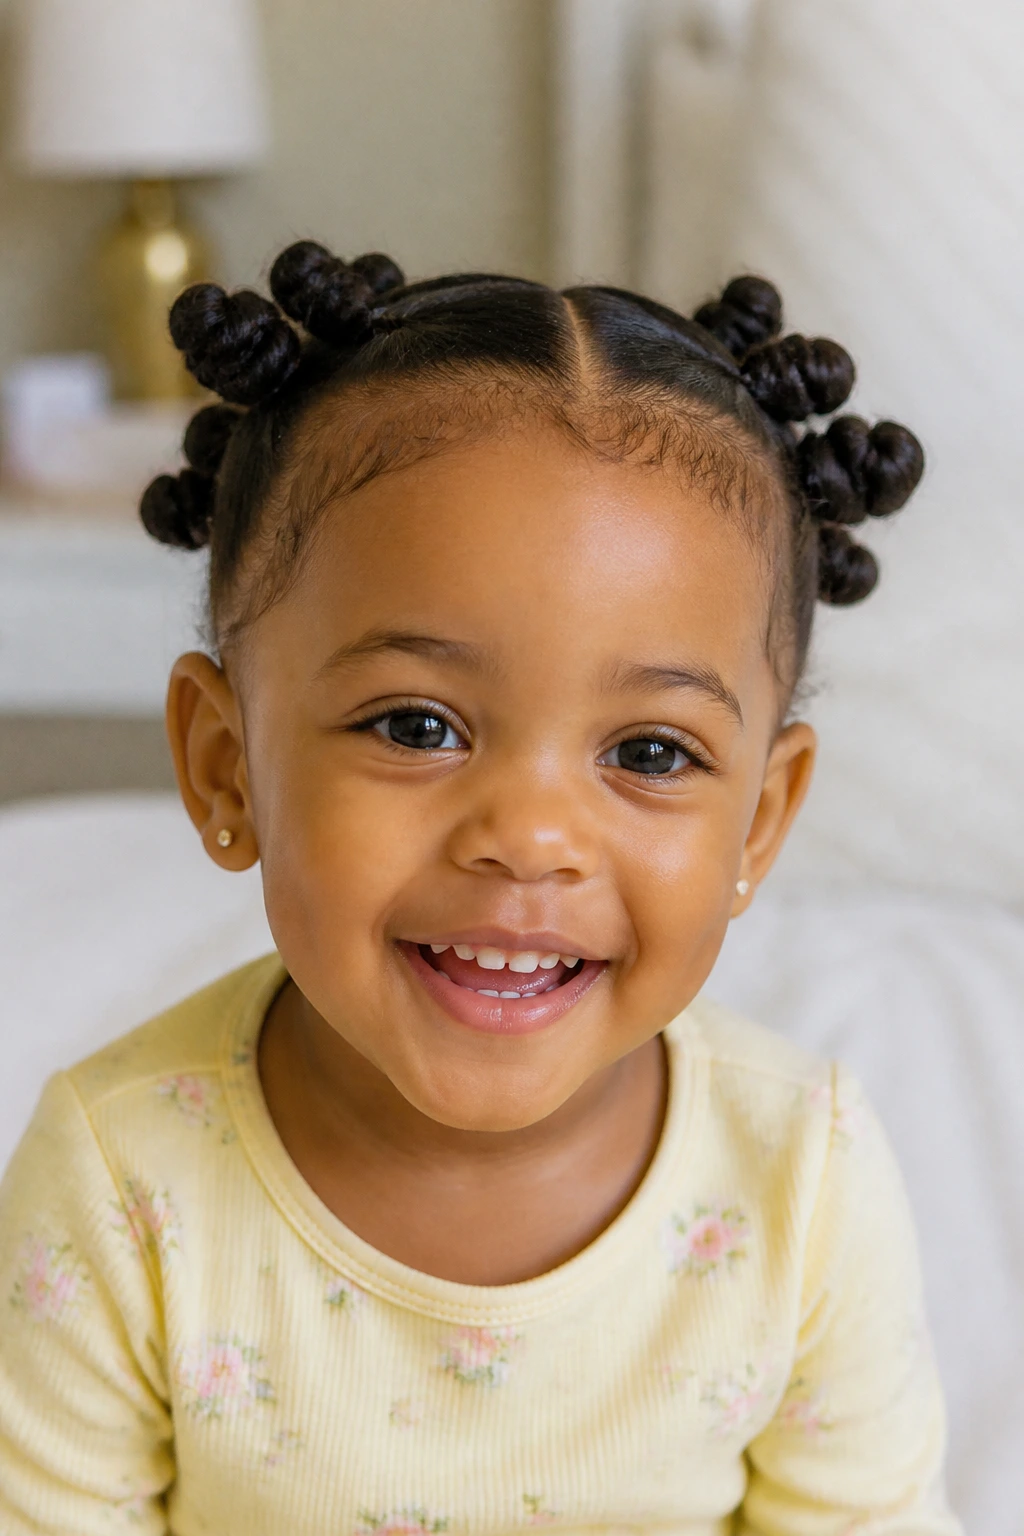
Unlike a full-head set, pigtail bantu knots keep the style simple by splitting the hair into two easy halves. That makes the process feel less crowded, which is a gift on a toddler or a child who does not sit still for long.
You can do two rows of knots, one on each side, and let the middle part stay clean. The result is sweet and easy to read. It also lets you finish quickly, which is a bigger deal than people think when you are styling a small child who is already over it before the second section is done.
This version is one of the most forgiving because you do not need to make the whole head look elaborate. You need two neat sides. That is all. If one side ends up slightly fuller, it still looks cute.
Keep the sections medium-sized so the knots do not look tiny and overworked. Tiny sections on little kids can turn into a long, miserable session for everyone involved. Save yourself the trouble.
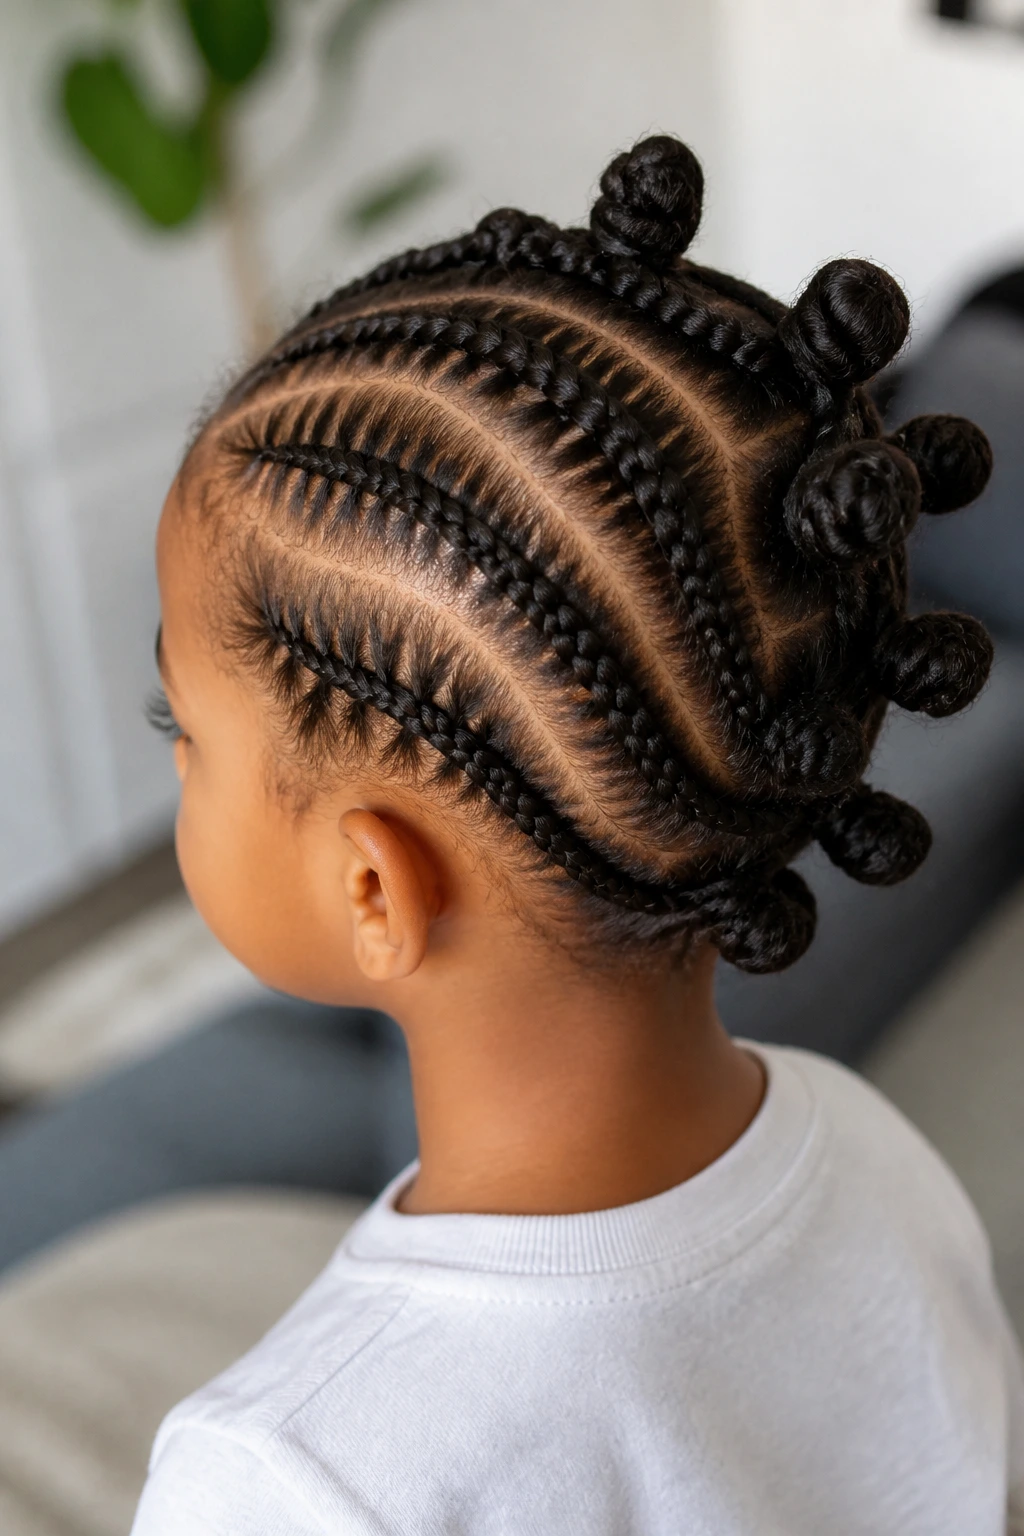
19. Cornrow-Assist Bantu Knots
A few small cornrows can make the knot set behave better, especially on thick or slippery hair. The cornrows act like little rails that guide the rest of the style into place.
Why a Few Cornrows Help
Cornrows reduce loose hair at the roots, which means the bantu knots sit cleaner and last longer. They also help if the child’s hairline is fuller than the crown or if the sides tend to puff out faster than the top. You do not need a full head of braids here. Two to four simple rows are enough.
After the cornrows are in, coil the remaining sections into knots. The braid base gives the whole style more grip, so the knots do not loosen as fast. That makes this version useful for weekends, travel, or any day when the hair needs to stay neat for more than a few hours.
- Use small cornrows on the sides.
- Keep the center sections loose enough to knot easily.
- Avoid pulling the braids too tight at the edges.
- Add moisture before braiding so the hair bends smoothly.
If you like styles that last, this one earns its keep.
20. Bantu Knots with Loose Curly Ends
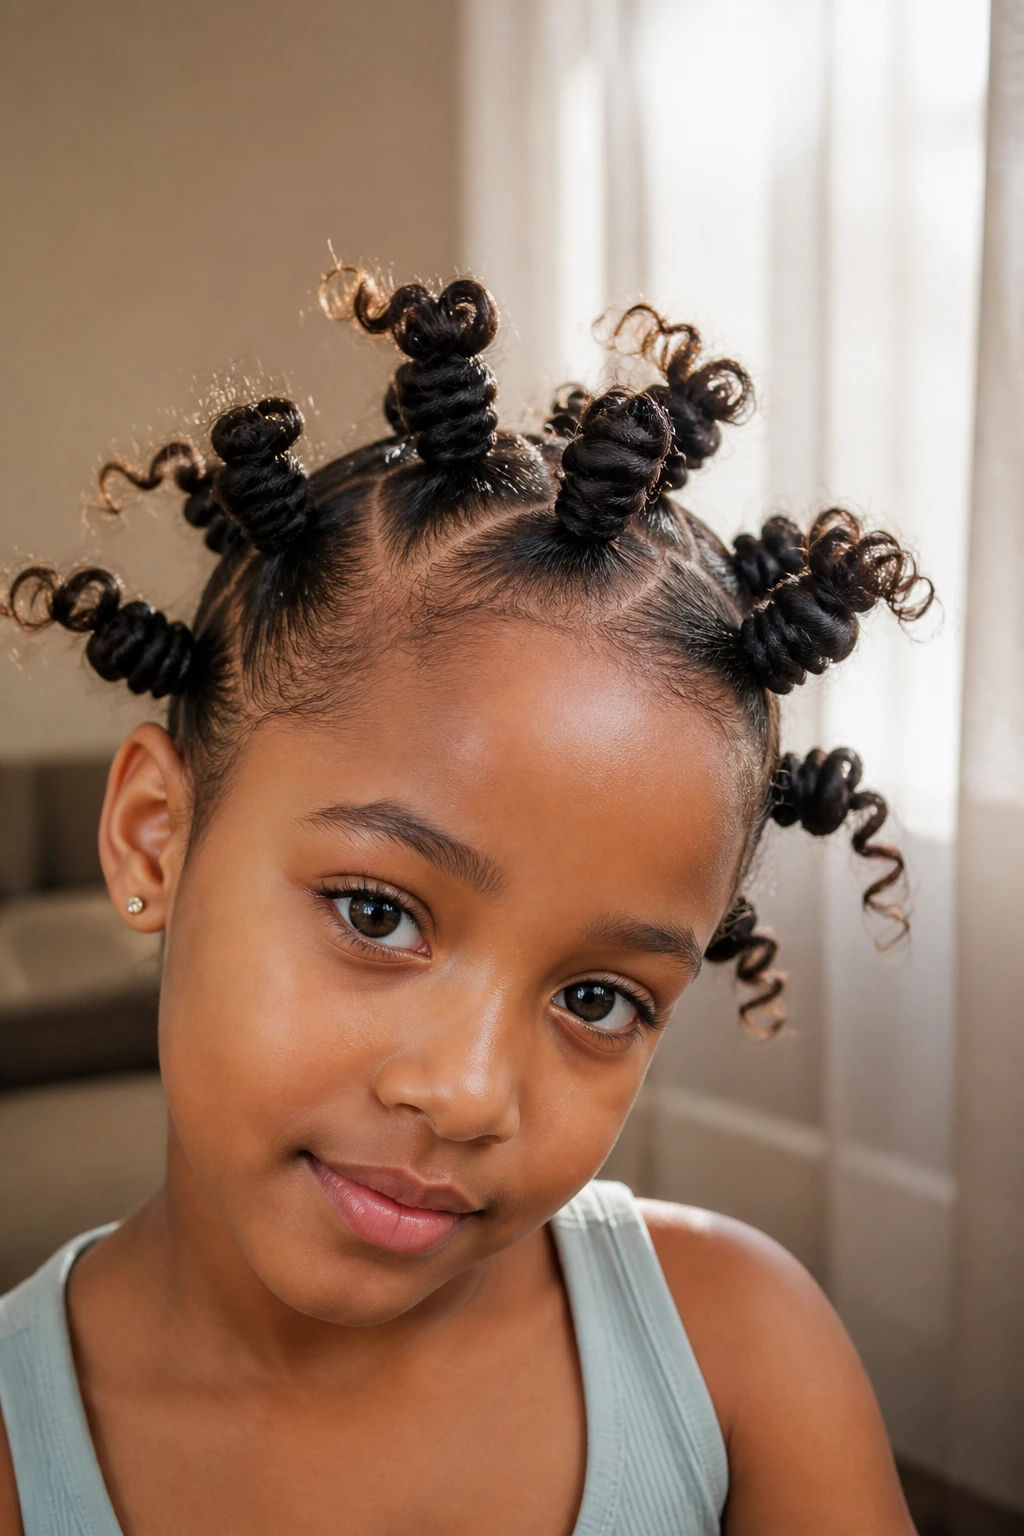
Letting the ends stay out gives the style a softer finish and a little more movement. It is a practical choice when the hair is short, springy, or likely to shrink too much if fully tucked.
This version is not about perfect symmetry. It is about shape and comfort. You coil most of the section into a knot, but leave the very tips free so they curl or coil on their own. That keeps the style from looking too tight and can make the hair feel less pressed down at the ends.
The look is nice on children whose hair likes to bounce. It also gives the style a gentler edge, which is helpful if the goal is a playful everyday look rather than a formal one. Some people worry it looks unfinished. I do not agree. If the ends are clean and moisturized, it looks deliberate.
Use this on hair that needs a little stretch but not a full tucked finish. It works. That’s the point.
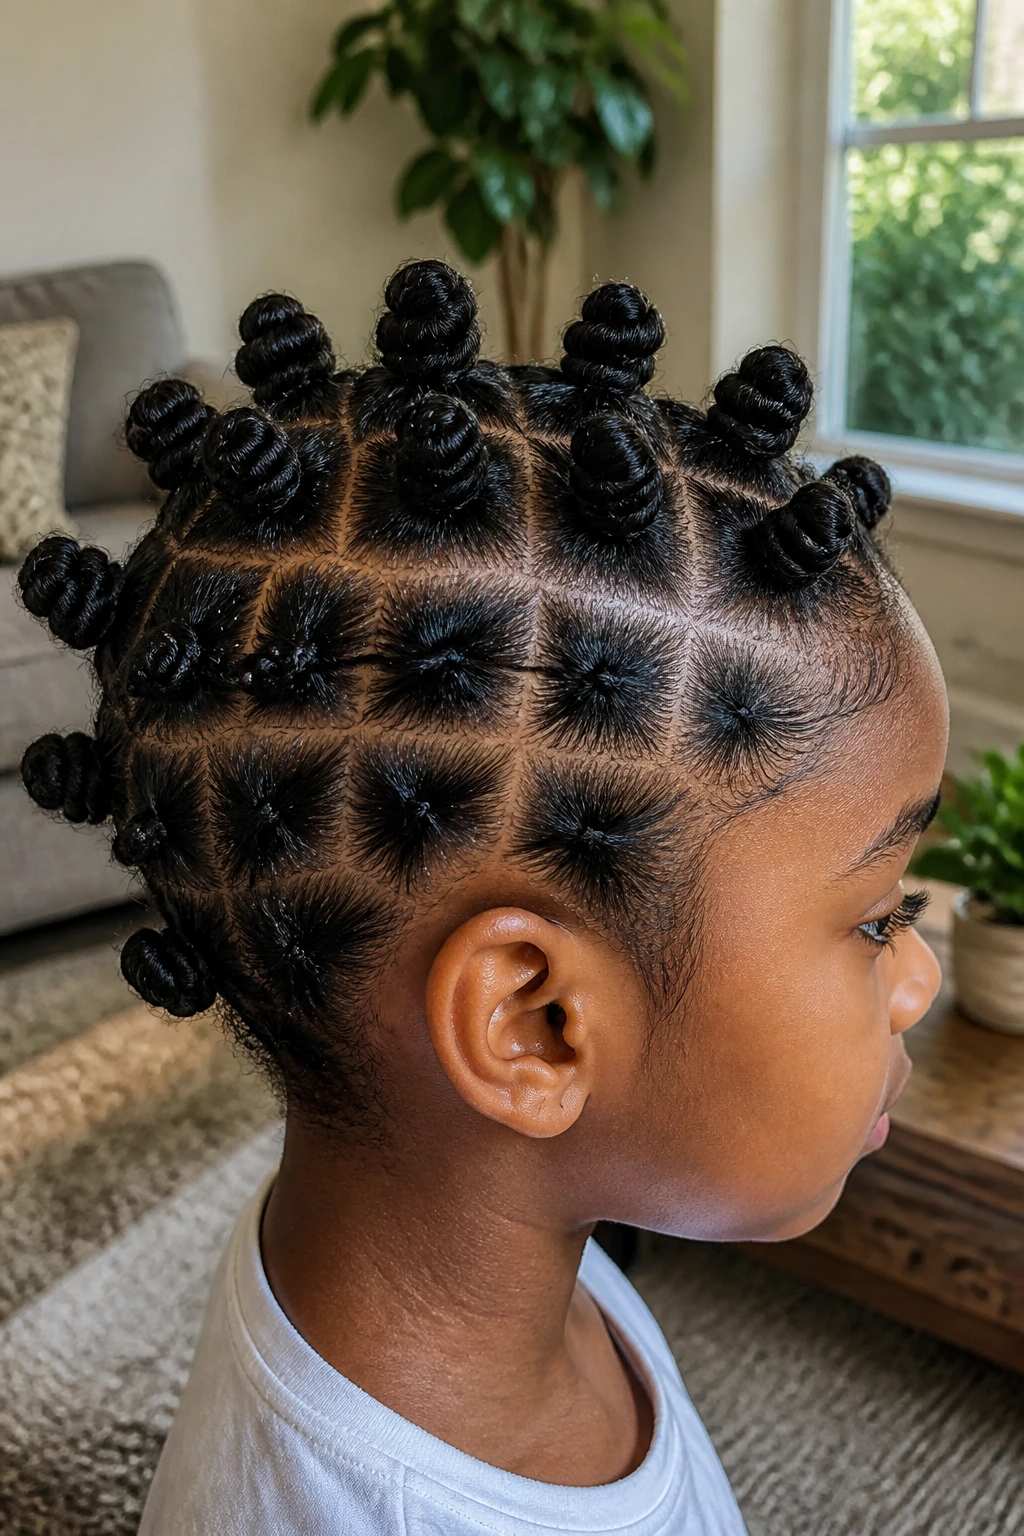
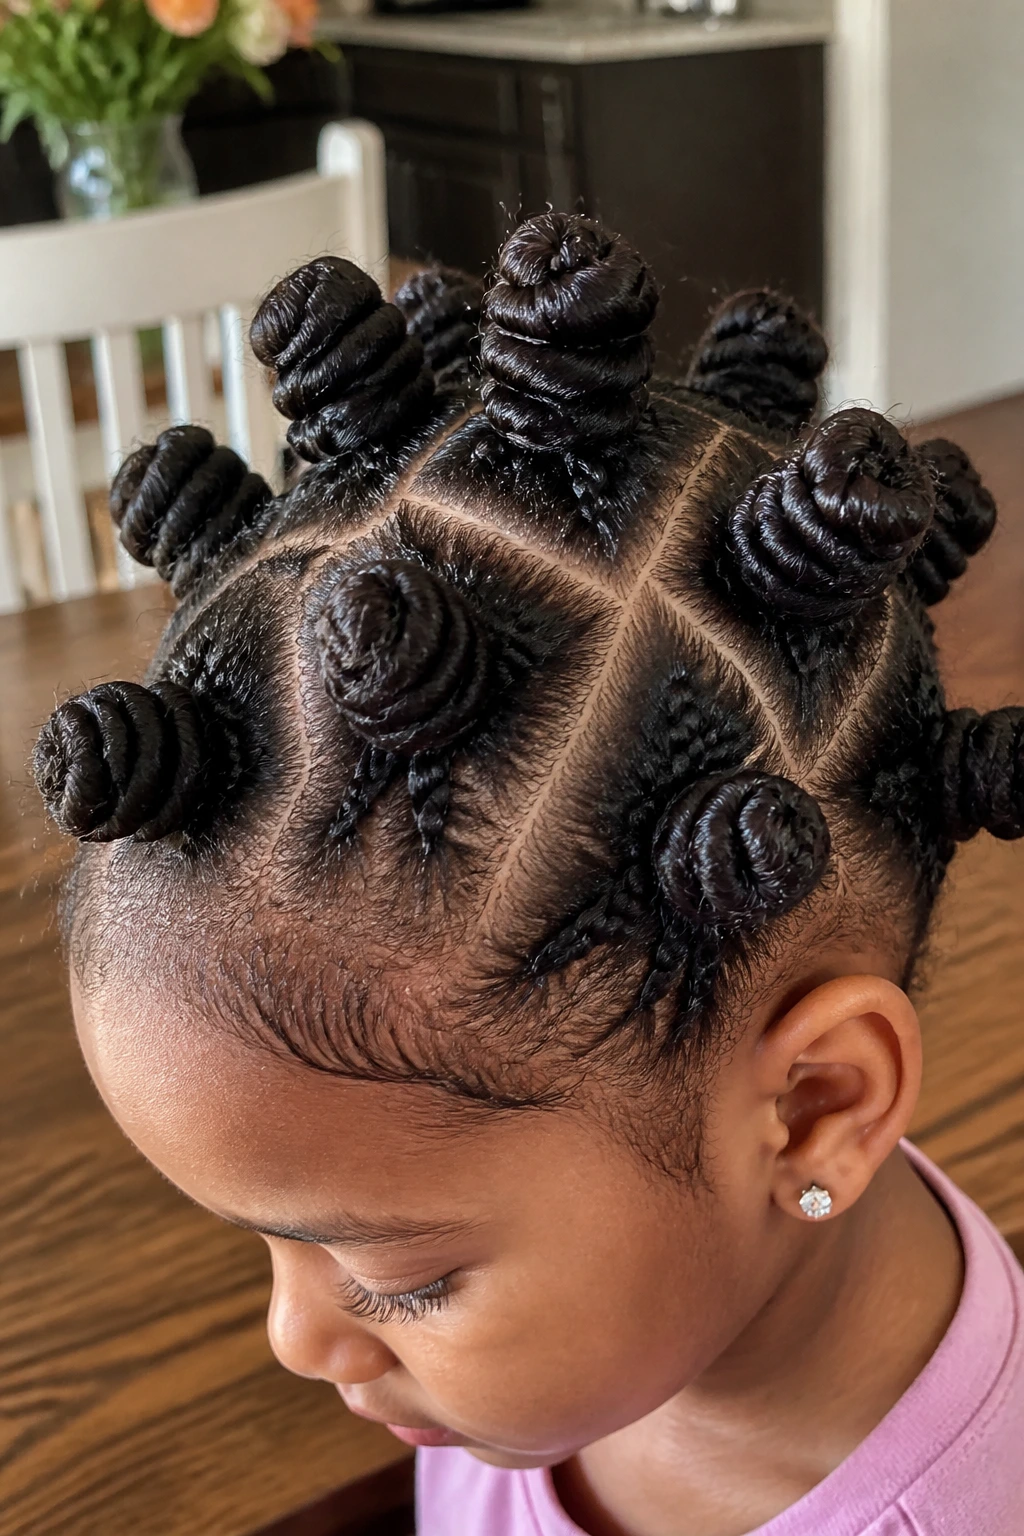
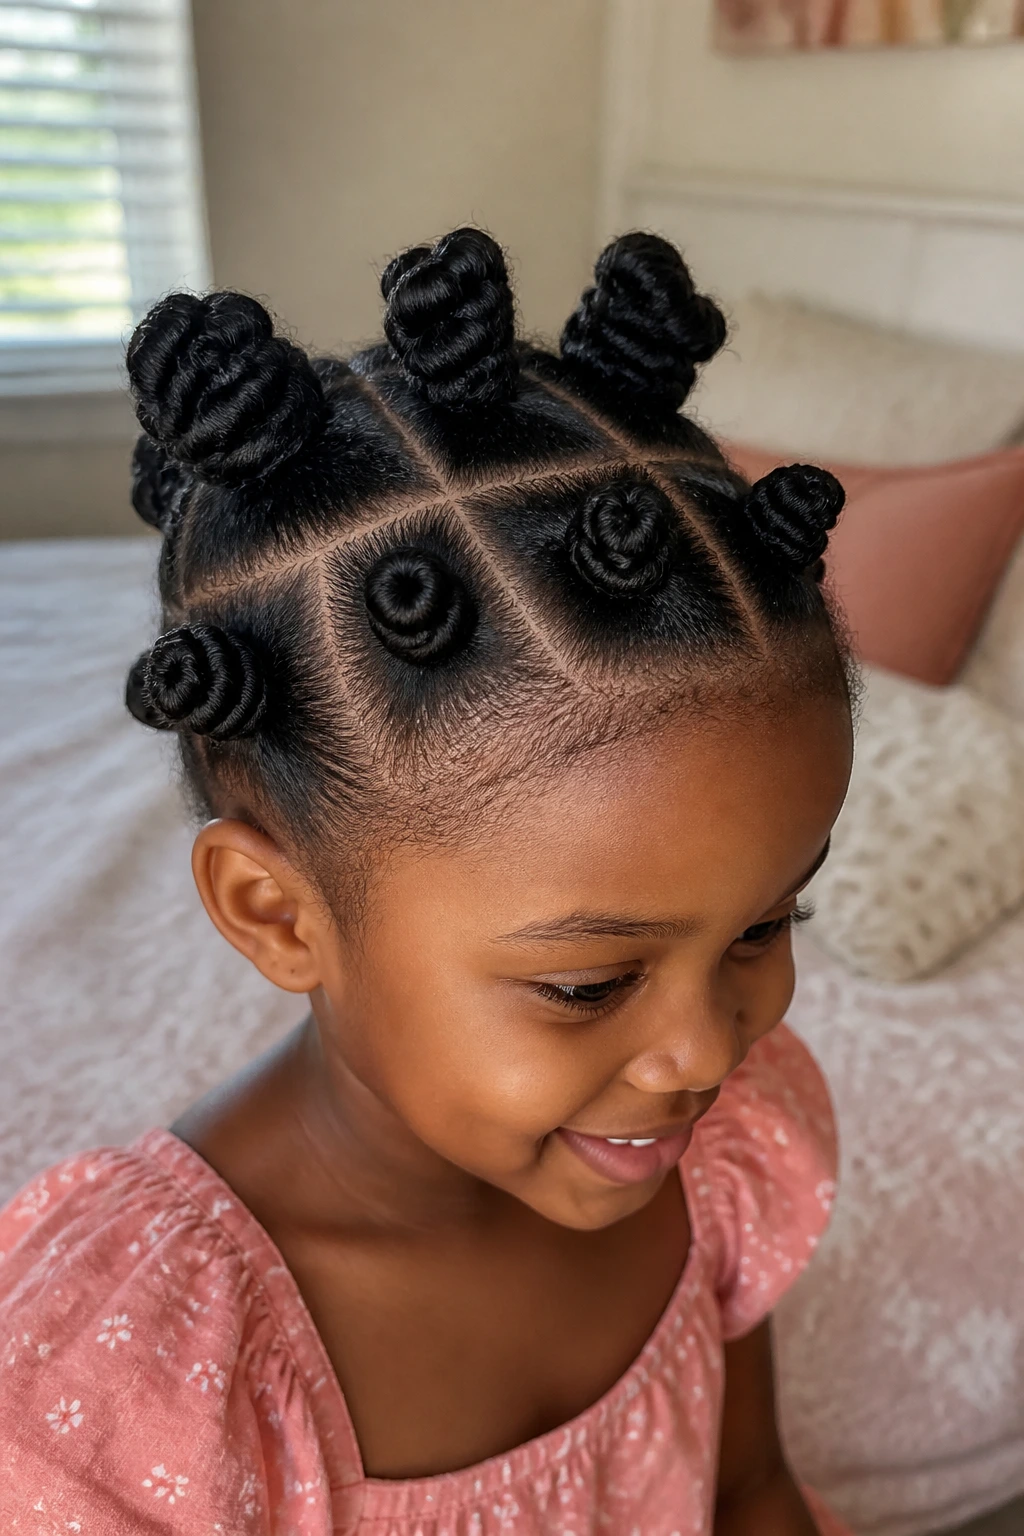
21. Grid-Part Bantu Knots
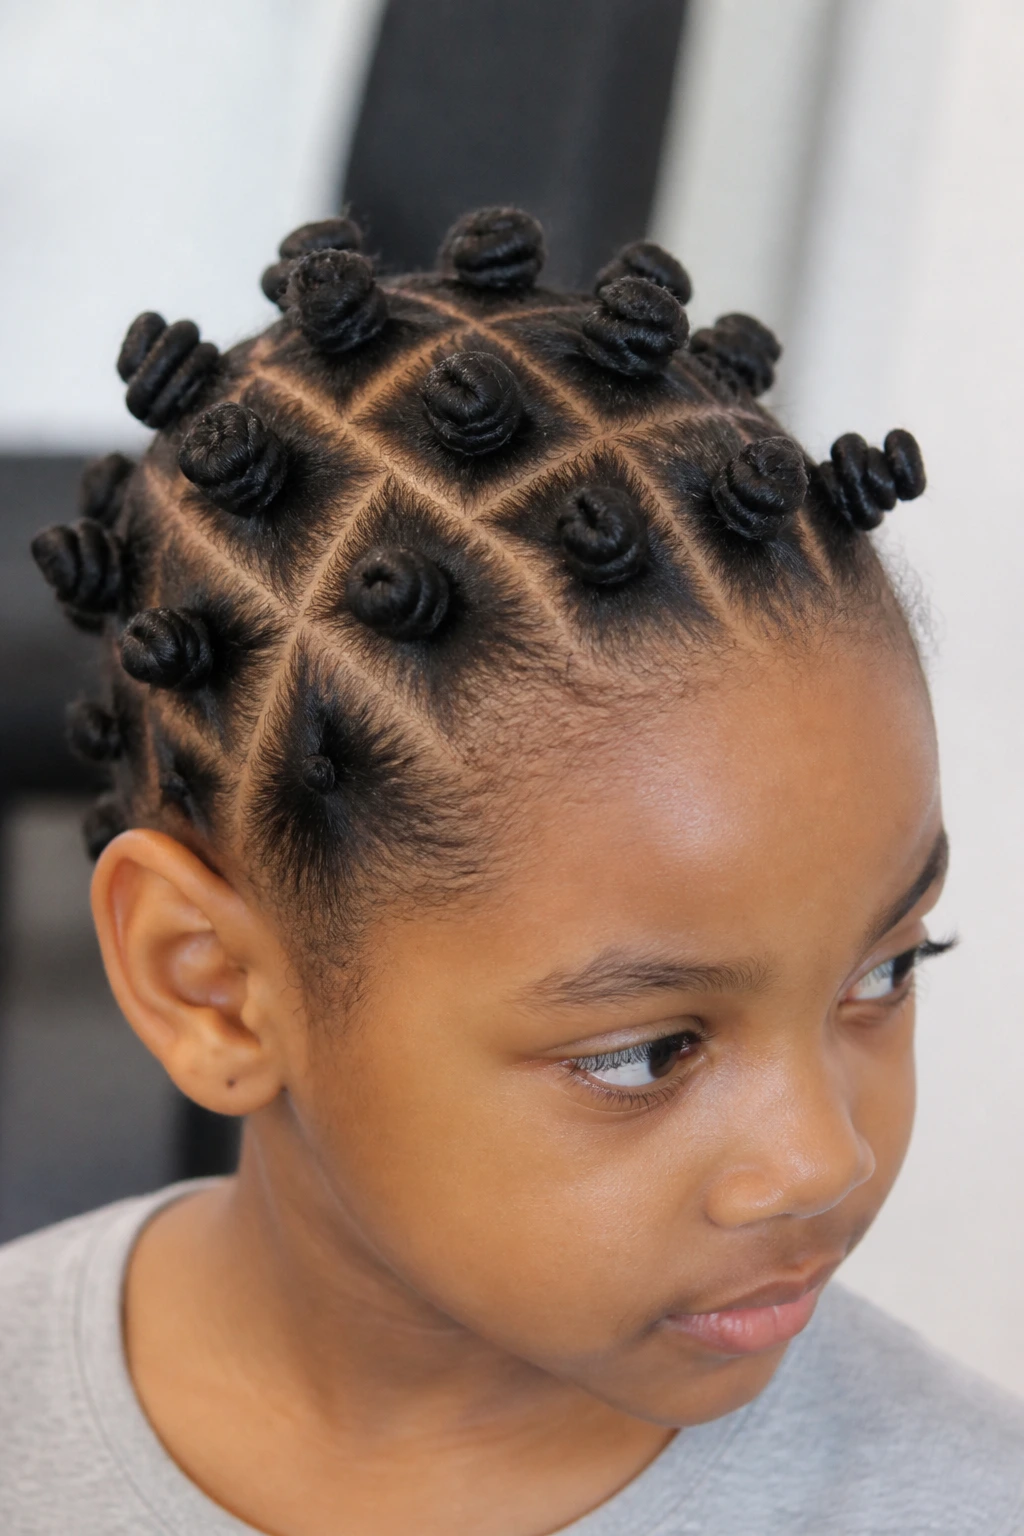
Why do grid parts stay so popular? Because they make the whole head easy to map. Once the squares are drawn, the knots almost place themselves.
This version is especially useful if you like neat, repeatable sections. The scalp shows clear rows, and each knot sits in its own box. That can be handy for kids with thicker hair because the structure stays visible even after a long day. It also makes takedown simpler if you want defined curls later.
How to Use It
Use the rat-tail comb to make small squares across the scalp, keeping the rows straight from front to back. If the hair is very dense, the squares can be slightly larger than a postage stamp. That gives the knots enough room to sit without crowding each other.
A grid works best when the part lines are clean and the sections are similar. If one square is too big, the knot will look tired beside the others. Keep an eye on that as you go.
The style has a calm, orderly look that suits school uniforms and dressy clothes alike.
22. Ribbon-Tied Bantu Knots
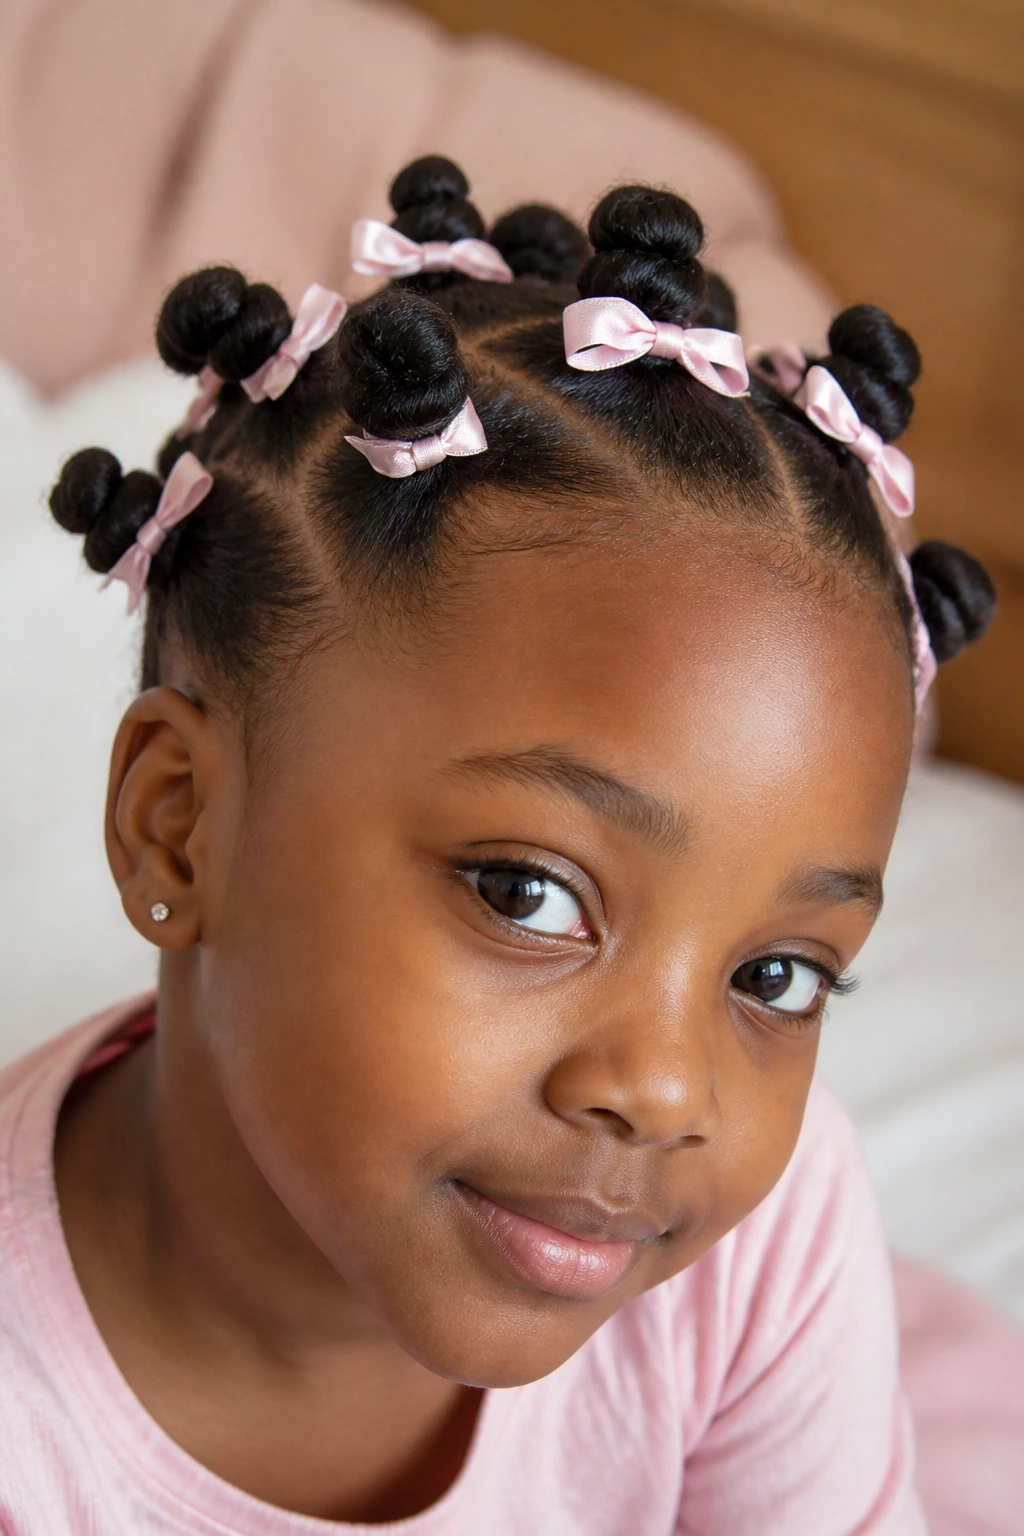
A satin ribbon can change the tone of the style in seconds. It softens the edges and gives the knots a playful finish without needing a lot of extra work.
This is a good pick for birthdays, holiday photos, or any day when the child wants the hair to feel a little special. Tie the ribbon after the knot is secure, not before. That way the knot stays tight enough to hold its shape. Keep the bow small and the ribbon soft. Stiff ribbon can dig into the hair or snag when the child takes the style down.
- Satin or grosgrain ribbon works best.
- Keep the bow light and compact.
- Match the ribbon to one outfit color, not all of them.
- Tie it around the base, not around the scalp itself.
I prefer this look when the knots are medium-sized. Tiny knots can disappear under big bows, and giant bows can overwhelm small heads. Balance matters.
23. Side-Halo Bantu Knots with One Accent Knot
A side-halo layout can be surprisingly flattering because it keeps the knots near the hairline and leaves the center free for one larger accent knot or puff. That mix of small and large shapes gives the style some movement.
This version works well when you want something a little different but still easy to manage. The halo section wraps around one side of the head, almost like a curved frame. Then one focal knot sits higher or farther back, which keeps the style from looking flat. The shape feels playful, but it is still practical enough for an ordinary day.
The best part is the asymmetry. Not everything needs to be even to look intentional. In fact, a slight imbalance often makes the style feel more interesting. Just make sure the halo parts are neat and the accent knot is clean, or the style can start to look accidental.
Keep the halo knots small. Let the accent knot do the talking.
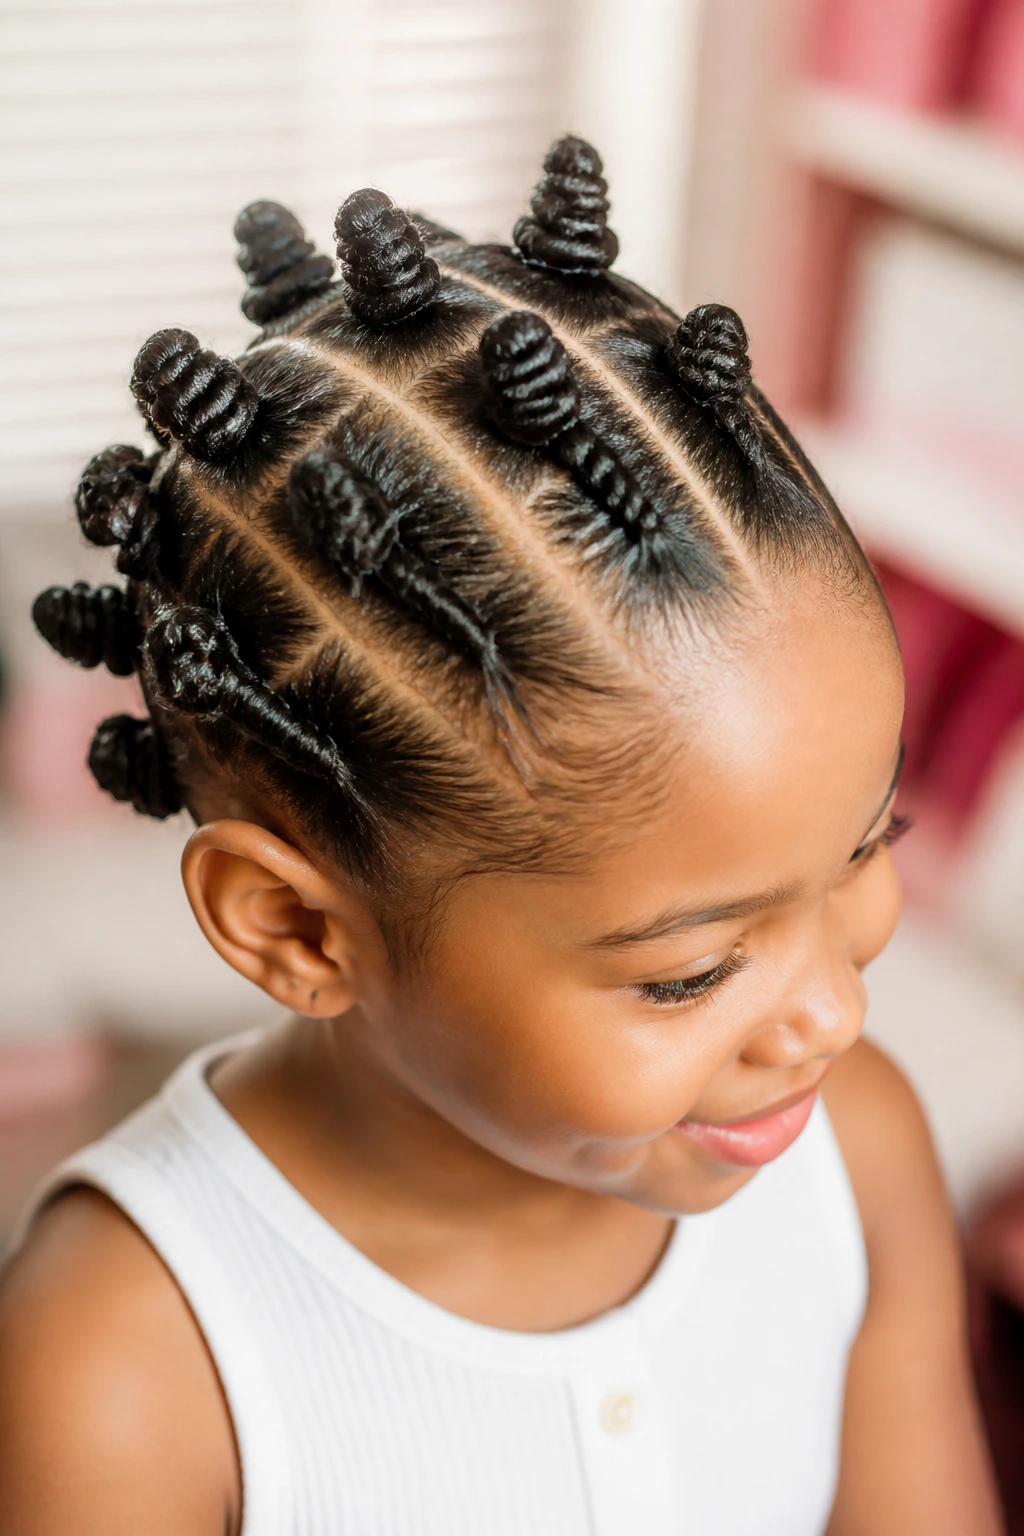
24. Tiny Bantu Knots for Short Natural Hair
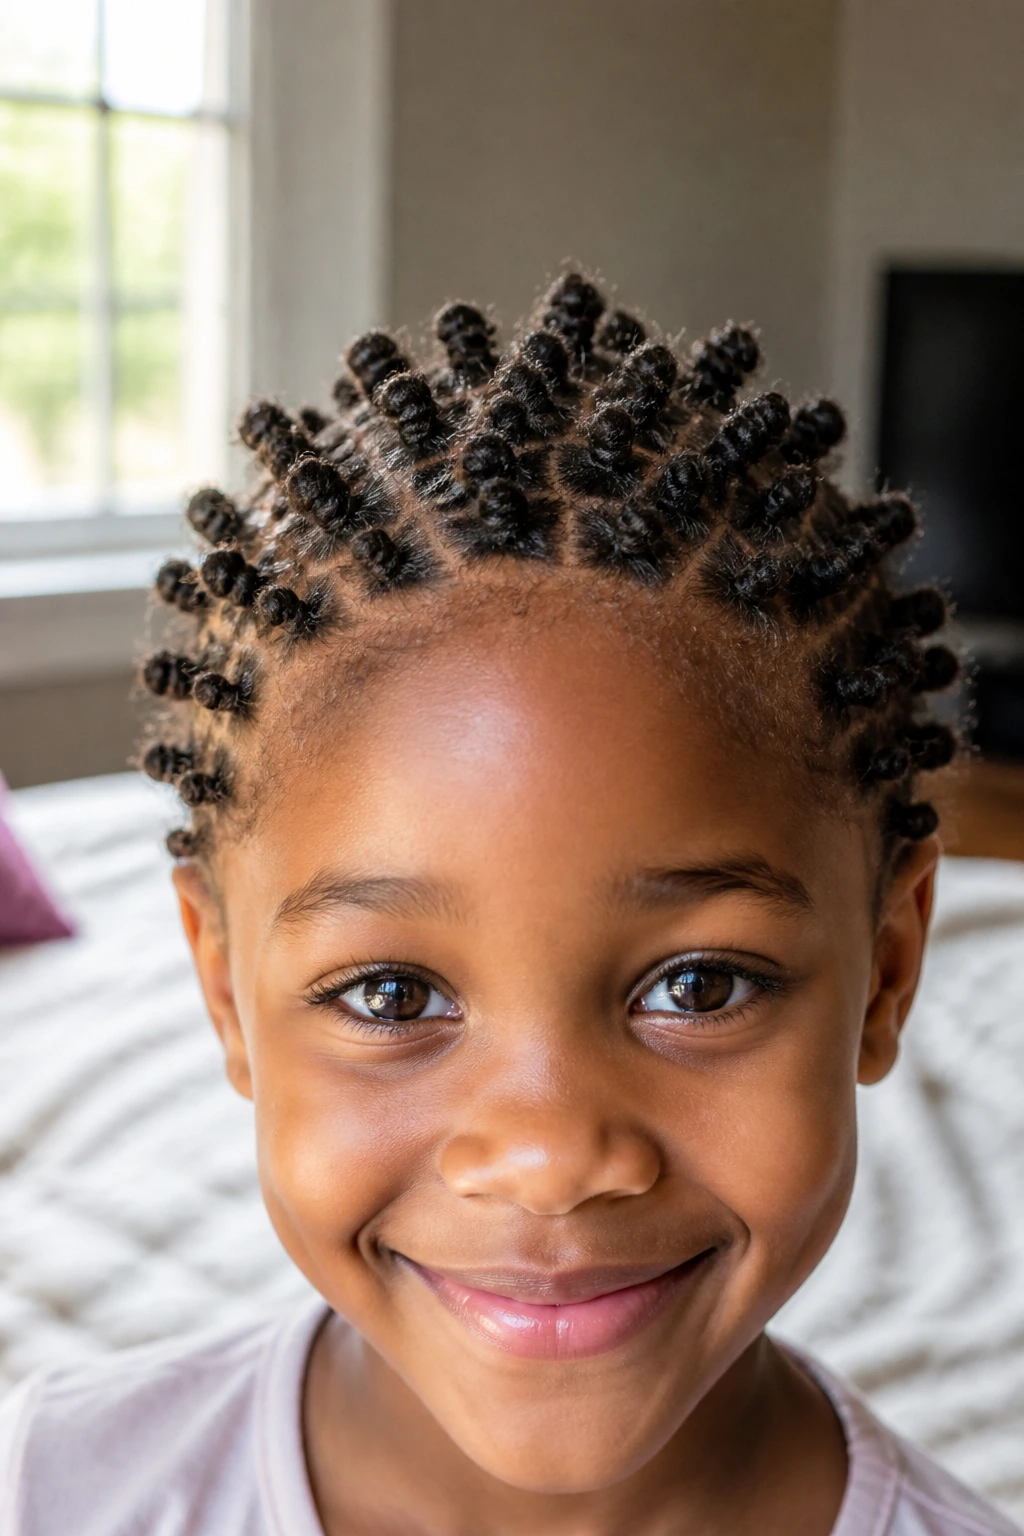
Tiny knots work best when the hair is short, springy, and full of shrinkage. Unlike jumbo knots, small sections let short hair stay controlled without forcing it into a shape it cannot hold.
This is the style to reach for when the child has a TWA or a very short crop. The sections can be tiny, but they should not be tight. That is the part people get wrong. A short style still needs gentle handling, maybe even more so because the hairline is often more exposed and the scalp feels every tug.
The look is neat and crisp when it is done well. Tiny knots sit close to the head and give you a lot of visual texture. They also make the hair feel protected, which is useful when you want a low-fuss style that can last through play, naps, and the usual daily chaos.
Use a light cream and a soft brush. Heavy product can flatten the little knots and make the roots greasy fast. Keep it clean and small.
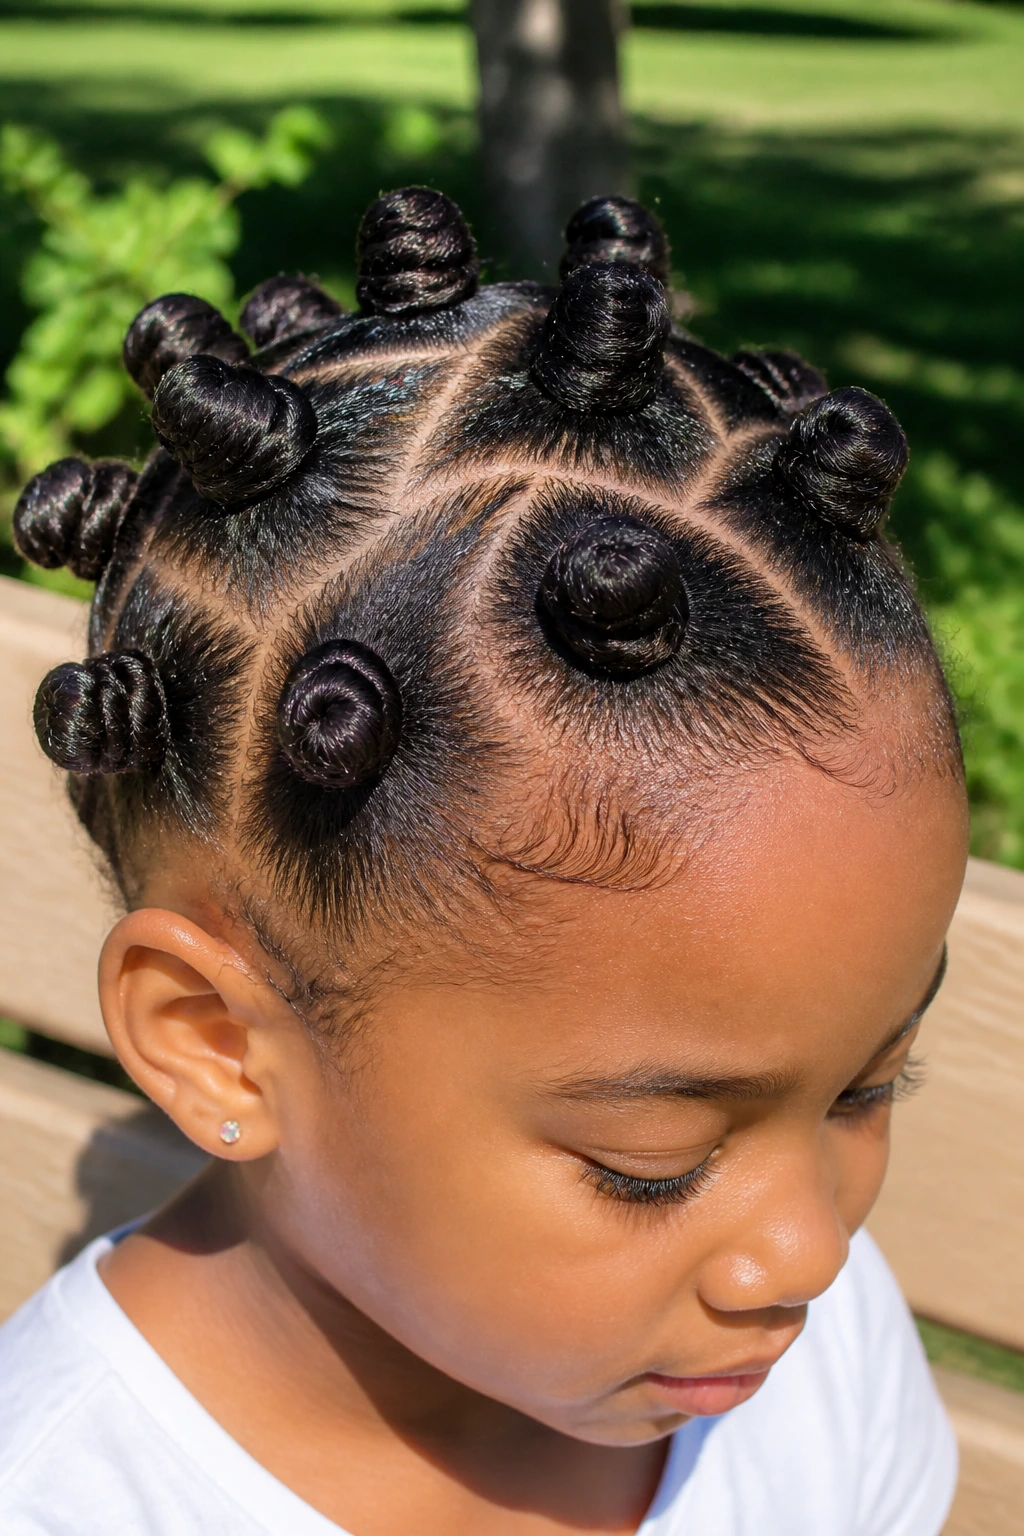
25. Jumbo Bantu Knots for Fast Styling
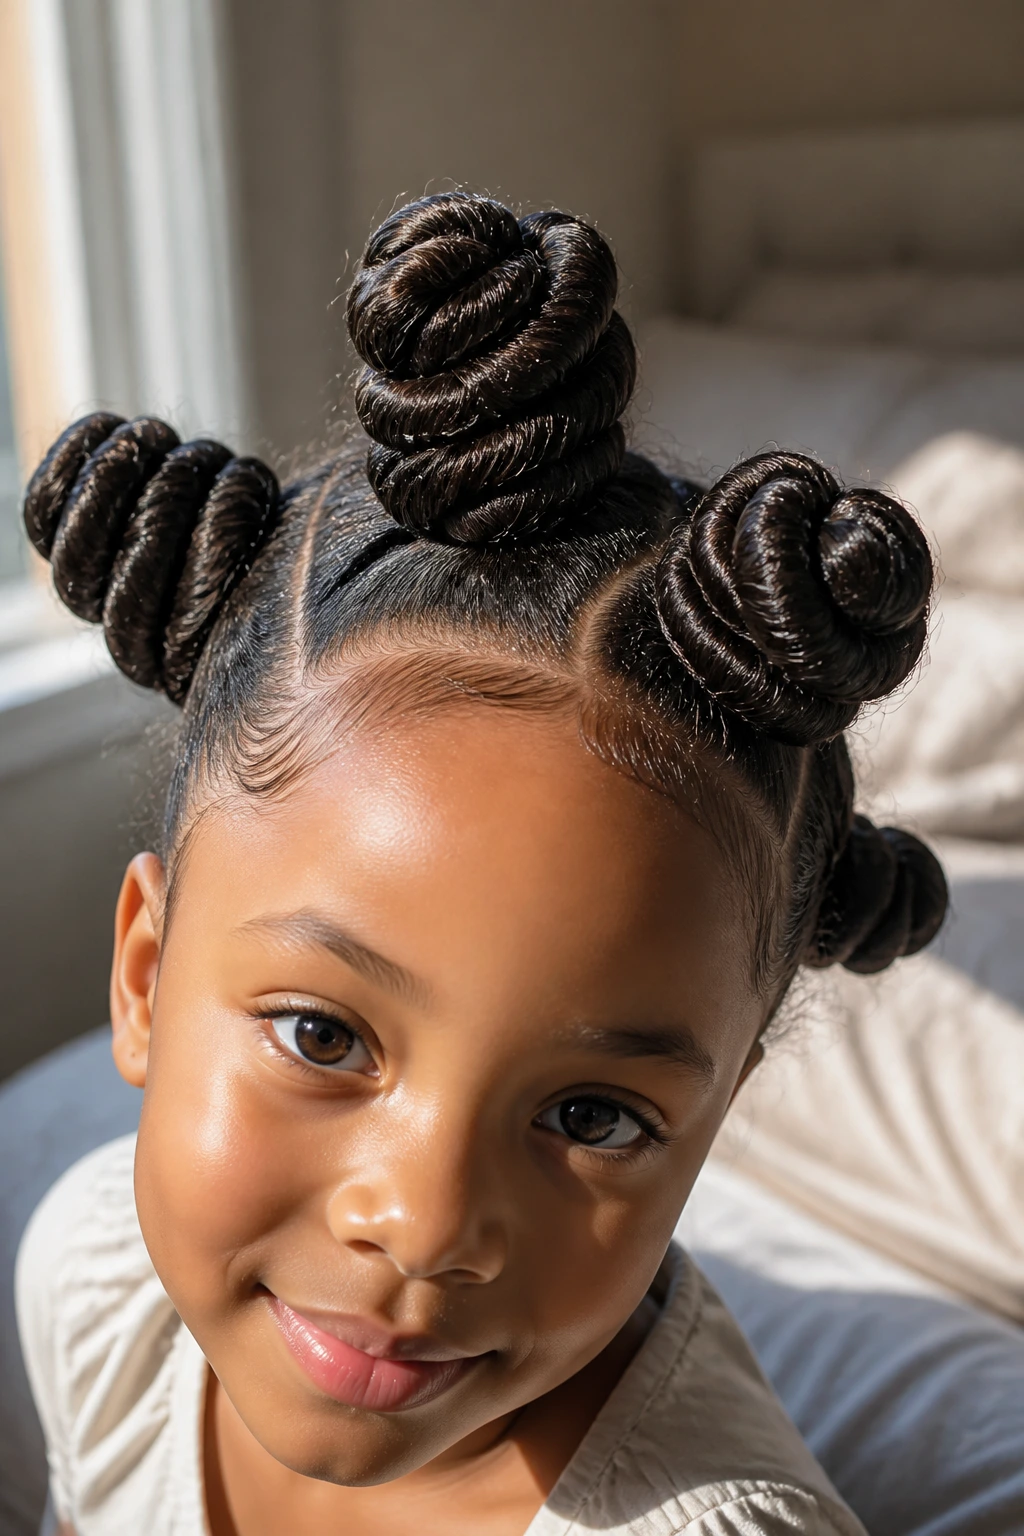
Big sections save time. That is the whole reason jumbo bantu knots make sense on kids with thicker or longer hair.
Why Big Sections Save Time
A jumbo knot means fewer parts, fewer twists, and fewer chances for the child to get tired of sitting still. It also gives the hair more room to coil naturally, which can look lovely on dense curls that like volume. The finished style is bold, easy to spot, and faster to put in than a full head of tiny knots.
Start by dividing the hair into large, even sections. Work one knot at a time and keep the part lines clean. If the ends feel bulky, twist them once before tucking them under the knot. That helps the shape sit flatter.
- Best for thick, long, or very full hair.
- Use clips to keep the remaining sections out of the way.
- Smooth the roots lightly, then stop.
- Do not overload with gel or cream.
My take: jumbo knots are one of the best options when time is short and you still want the style to look deliberate.
26. Asymmetrical Bantu Knots
A style does not need perfect balance to look good. In fact, a slightly uneven layout can look more modern and more natural on a child’s head.
This version puts more knots on one side, or uses larger knots on one side and smaller ones on the other. That shift changes the silhouette in a nice way. It also helps if one side of the hair is denser or if the child has a stronger parting preference on one side of the head. You work with the hair instead of forcing a mirror image.
The key is to make the difference look intentional. Keep the parting clean, keep the knots neat, and let the size difference be the feature. If the child has a favorite side, this style gives it room to show.
It is a good pick for kids who like styles with personality but do not want extra hair accessories. The shape does enough on its own.
27. Top-Knot Bantu Knot Bun
Why make the whole head busy when the top can carry the style? A top-knot bantu knot bun puts the focus high, keeping the neck clear and the face open.
This version starts with a section at the crown or upper middle of the head. You gather that section, coil it into a large knot or bun-like knot, and leave the rest smooth, loose, or lightly braided. It is a nice middle ground between a full updo and a single decorative knot.
How to Use It
Keep the top section high enough to show off the shape, but not so high that it feels tight. If the child has thick hair, split the crown into two or three sections and form a small cluster instead of one heavy knot. That keeps the style lighter and easier to wear.
A top-knot bun is useful on warm days, after sports, or on any morning when the child wants hair off the neck fast. It does not need much decoration. The shape itself does the work.
28. Cornrow-to-Knot Hybrid Bantu Knots
A few cornrows feeding into knots can make the style last longer and look more organized. The braids keep the roots controlled, and the knots finish the look with a softer touch.
This hybrid works well when the hair is thick around the edges or when you want the front to stay neat for a while. The cornrows can lead into small knots at the back or top, depending on where you want the focus. It is a good in-between style for kids who outgrow simpler knot sets but are not ready for a more complex braided style.
- Cornrows should be shallow and comfortable.
- Keep the knot sections small enough to sit smoothly.
- Use moisturized hair so the braids do not feel dry.
- Stop if the scalp starts to feel tender.
The finished style has a tidy feel, but it still moves well. That combination is hard to beat.
29. Bantu Knots with Clips and Cuffs
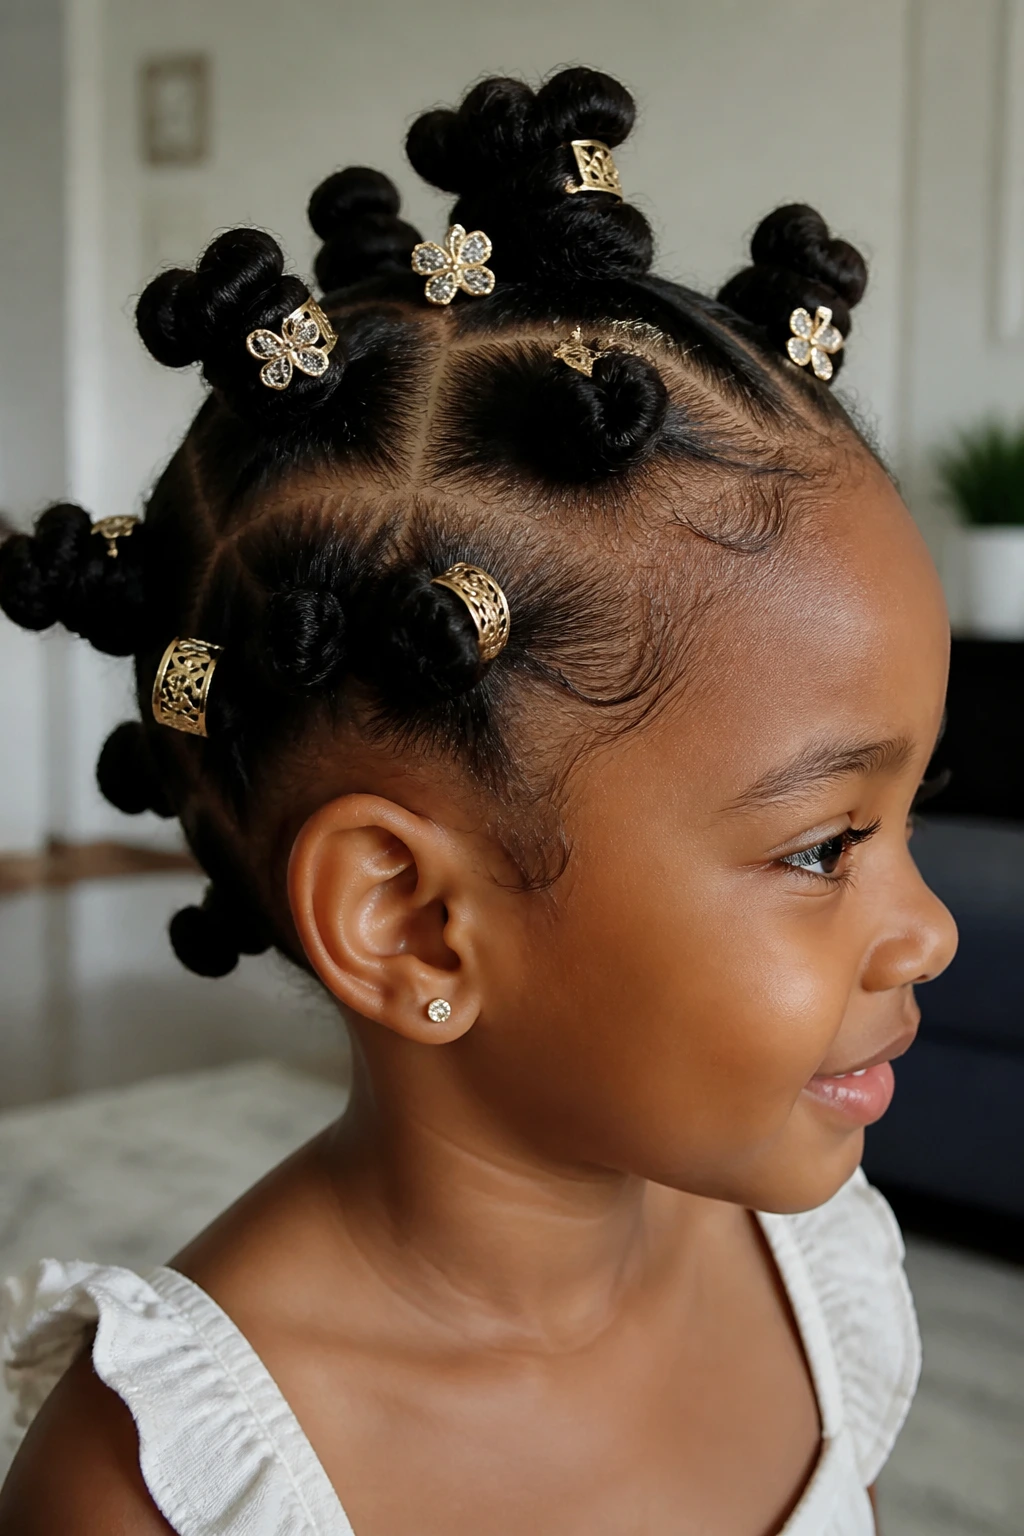
Small clips and cuffs can give a basic knot set a polished finish without changing the structure of the style. That is the nice part. The knots stay easy, and the accessories carry the sparkle.
This works best when the clips are tiny, smooth, and light. You can place one cuff at the base of a knot, or clip a small decorative piece on the side of a front knot where it will be seen. The goal is not to cover the hair. It is to give the style a little detail. If the accessories are too heavy, the knots start to lean and the child feels them every time they move.
I like this option for older kids who want some say in how their hair looks. They can pick the color or metal finish, and the actual styling stays simple. That makes the whole process less of a negotiation.
If you use cuffs, check that they open and close smoothly. Snaggy metal is not worth it.
30. Low-Tension Bedtime Bantu Knots
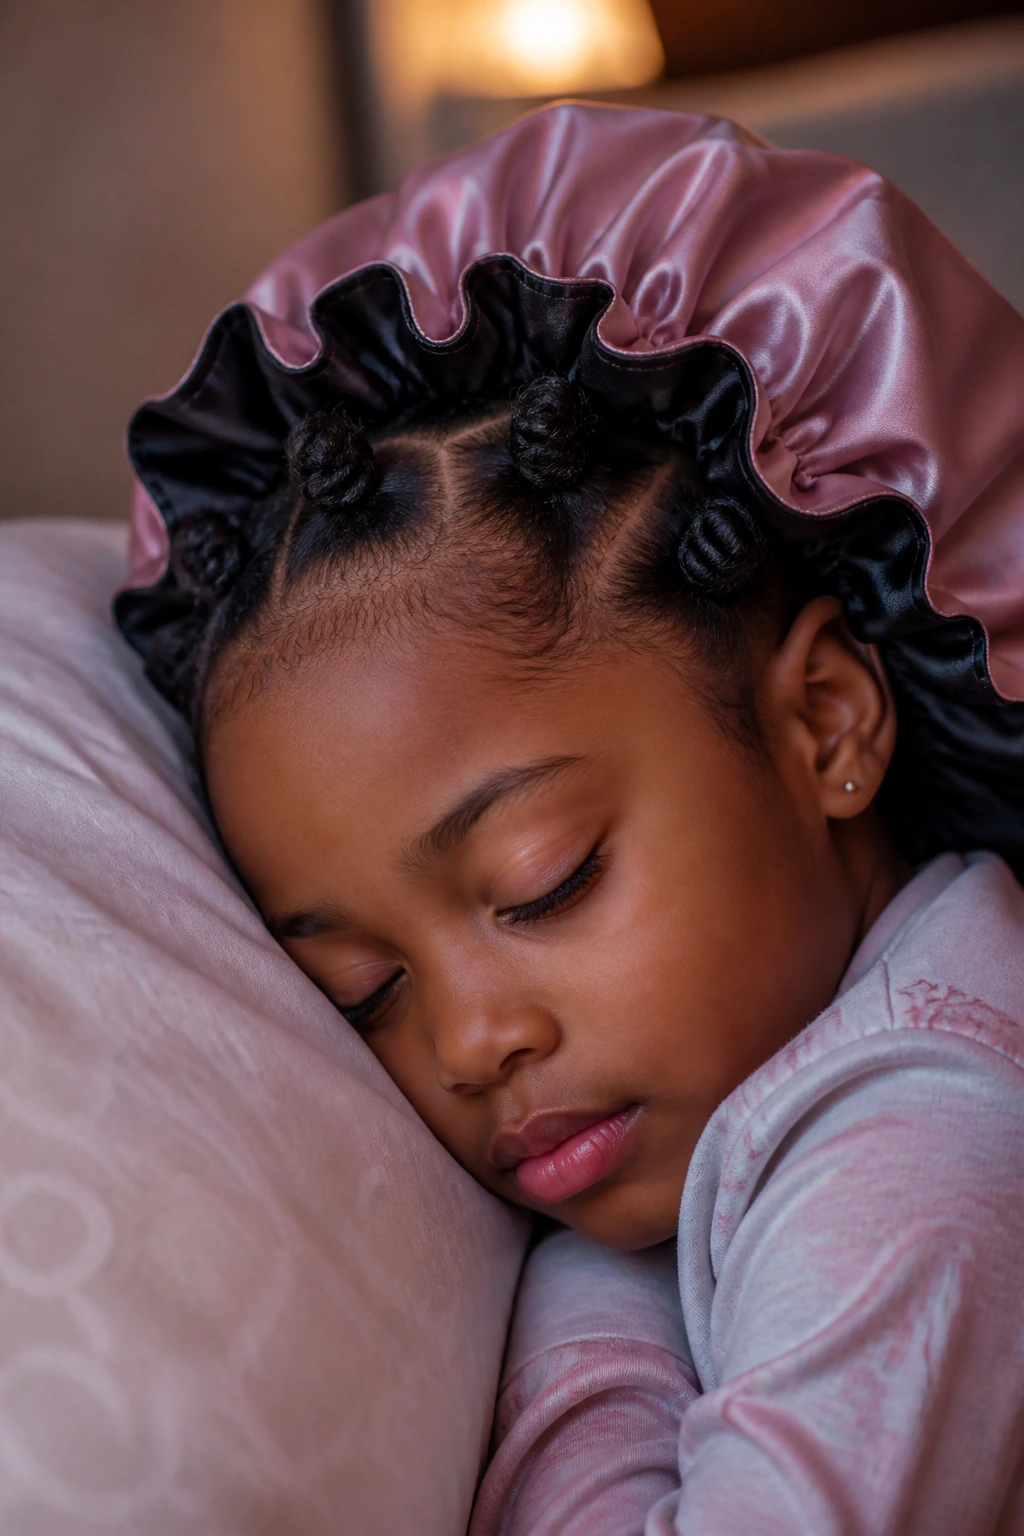
A bedtime version should feel soft, not stiff. Unlike a polished daytime set, this one focuses on comfort first and shape second.
That makes it useful when you want the hair stretched overnight or when you are trying to protect a twist-out pattern for the next day. The sections should be loose enough to sleep in without pulling at the scalp, and the knots should sit low and soft rather than high and rigid. On a child, this matters a lot. Nobody sleeps well with a style that feels like a helmet.
The best trick is to keep the parts neat but the tension light. Mist the hair just enough to make it pliable, add a small amount of leave-in, and stop when the section is smooth. If the hair is too wet, it will feel cold and take too long to dry. If it is too dry, the knots puff up before morning.
Use a satin bonnet or scarf over the style. That keeps the frizz down and helps the knots hold their shape until morning.
A good kids’ bantu knot style is never about perfection. It is about comfort, neat parts, and a shape the child can actually live in. If you keep the tension soft and the sections even, the style stops feeling like work and starts feeling easy.