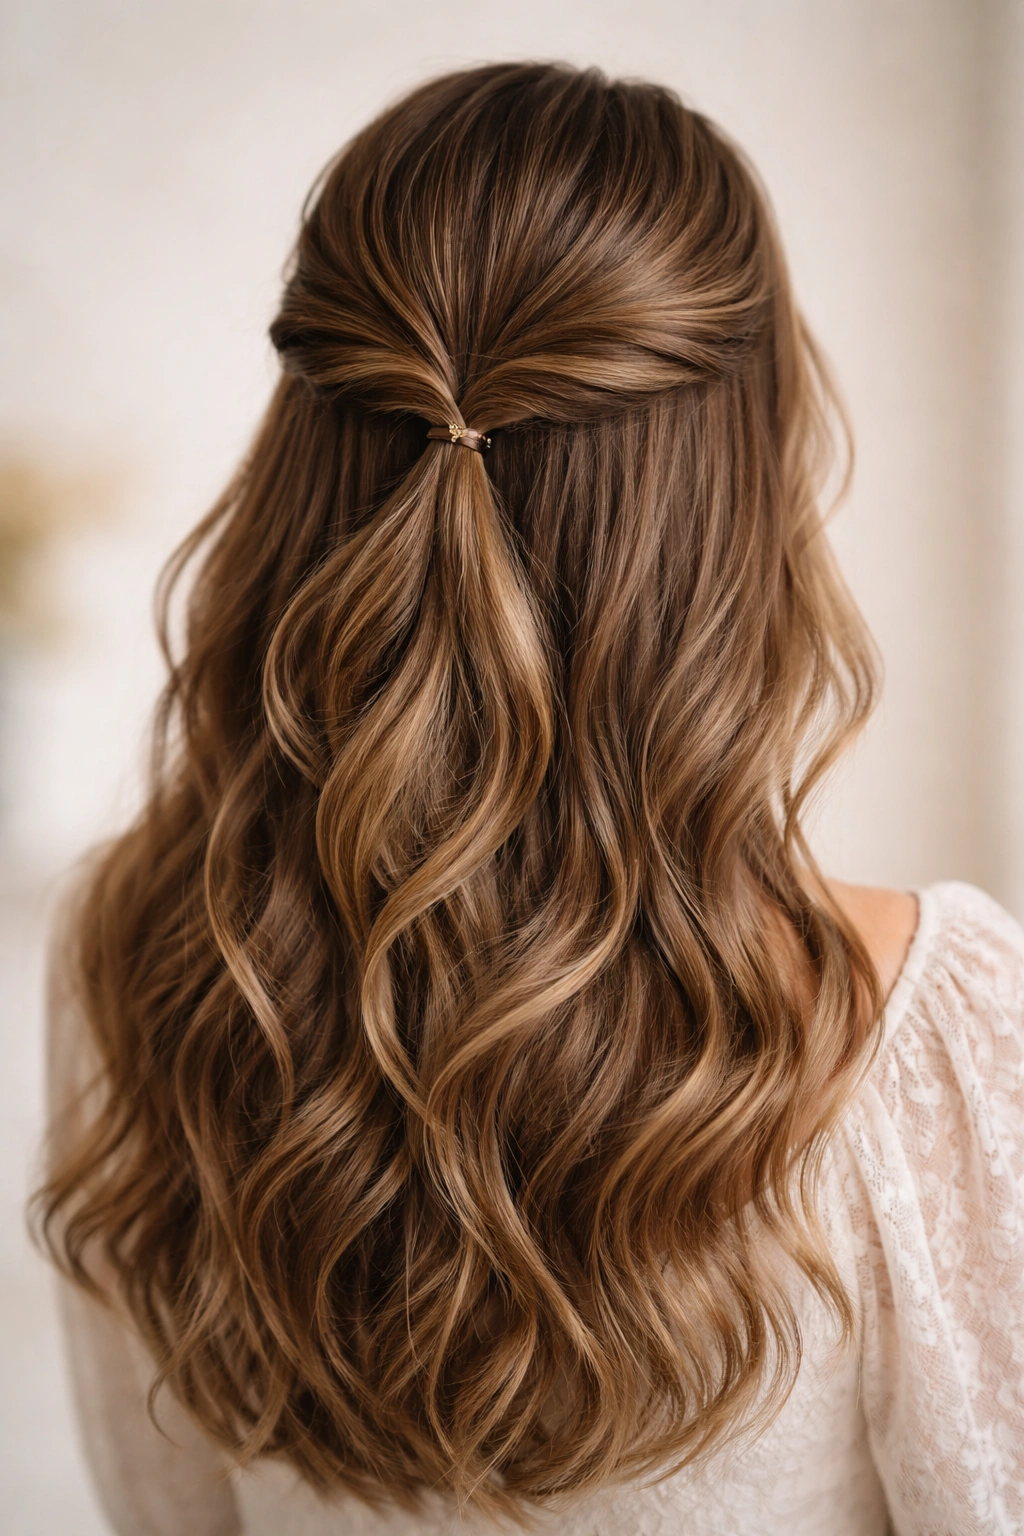
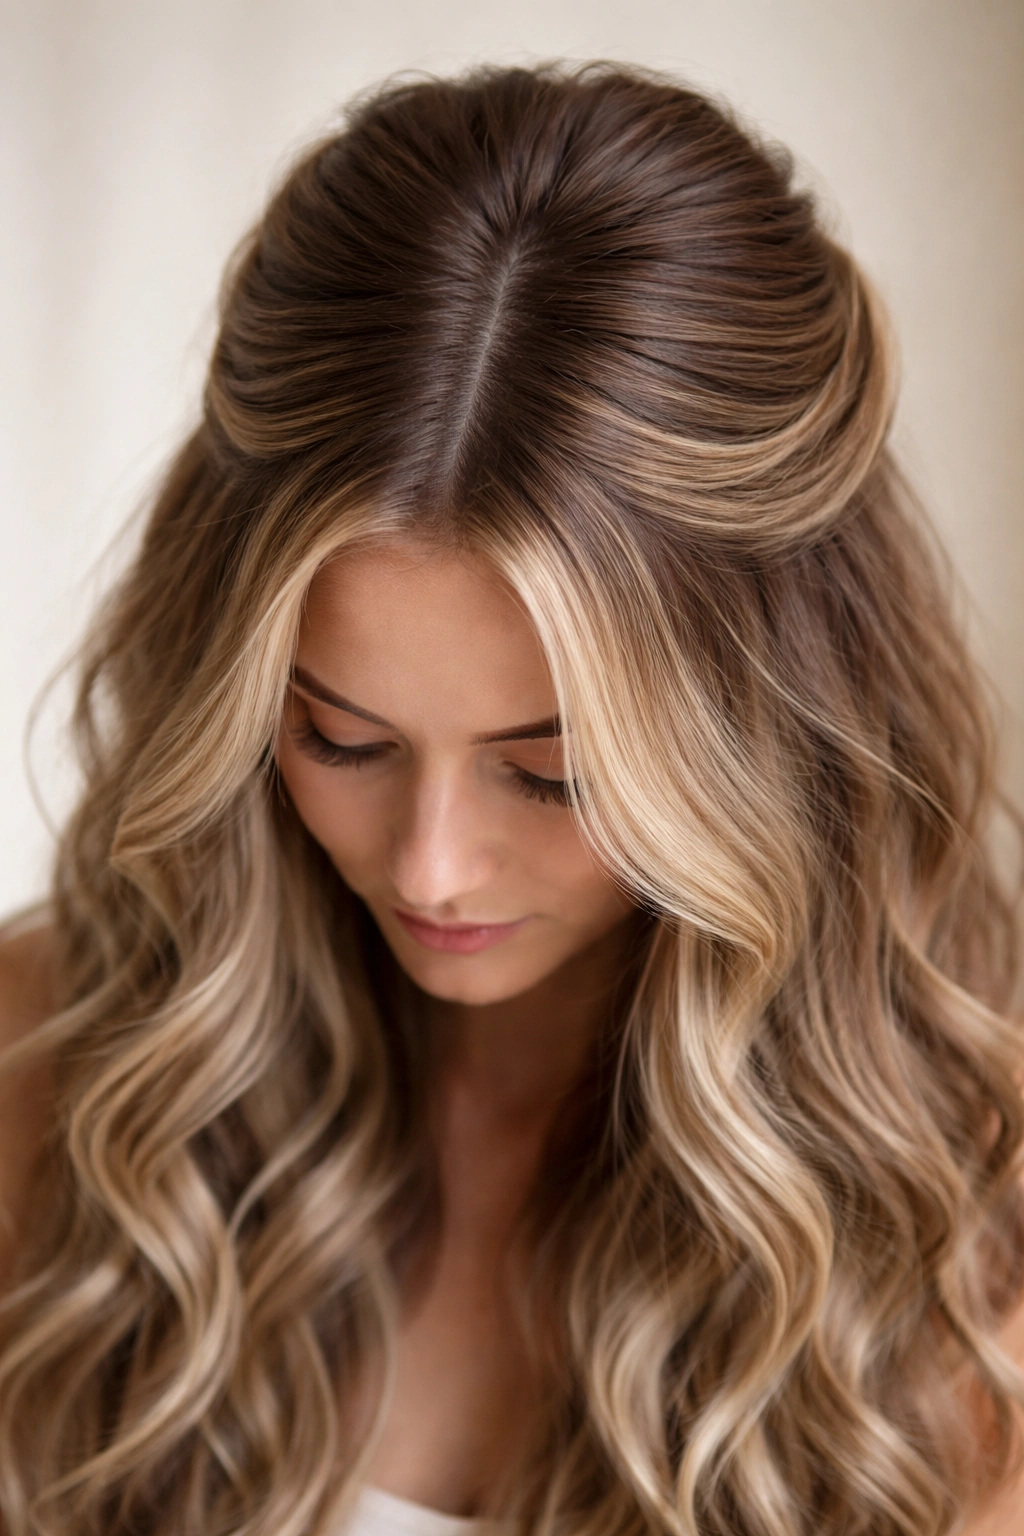
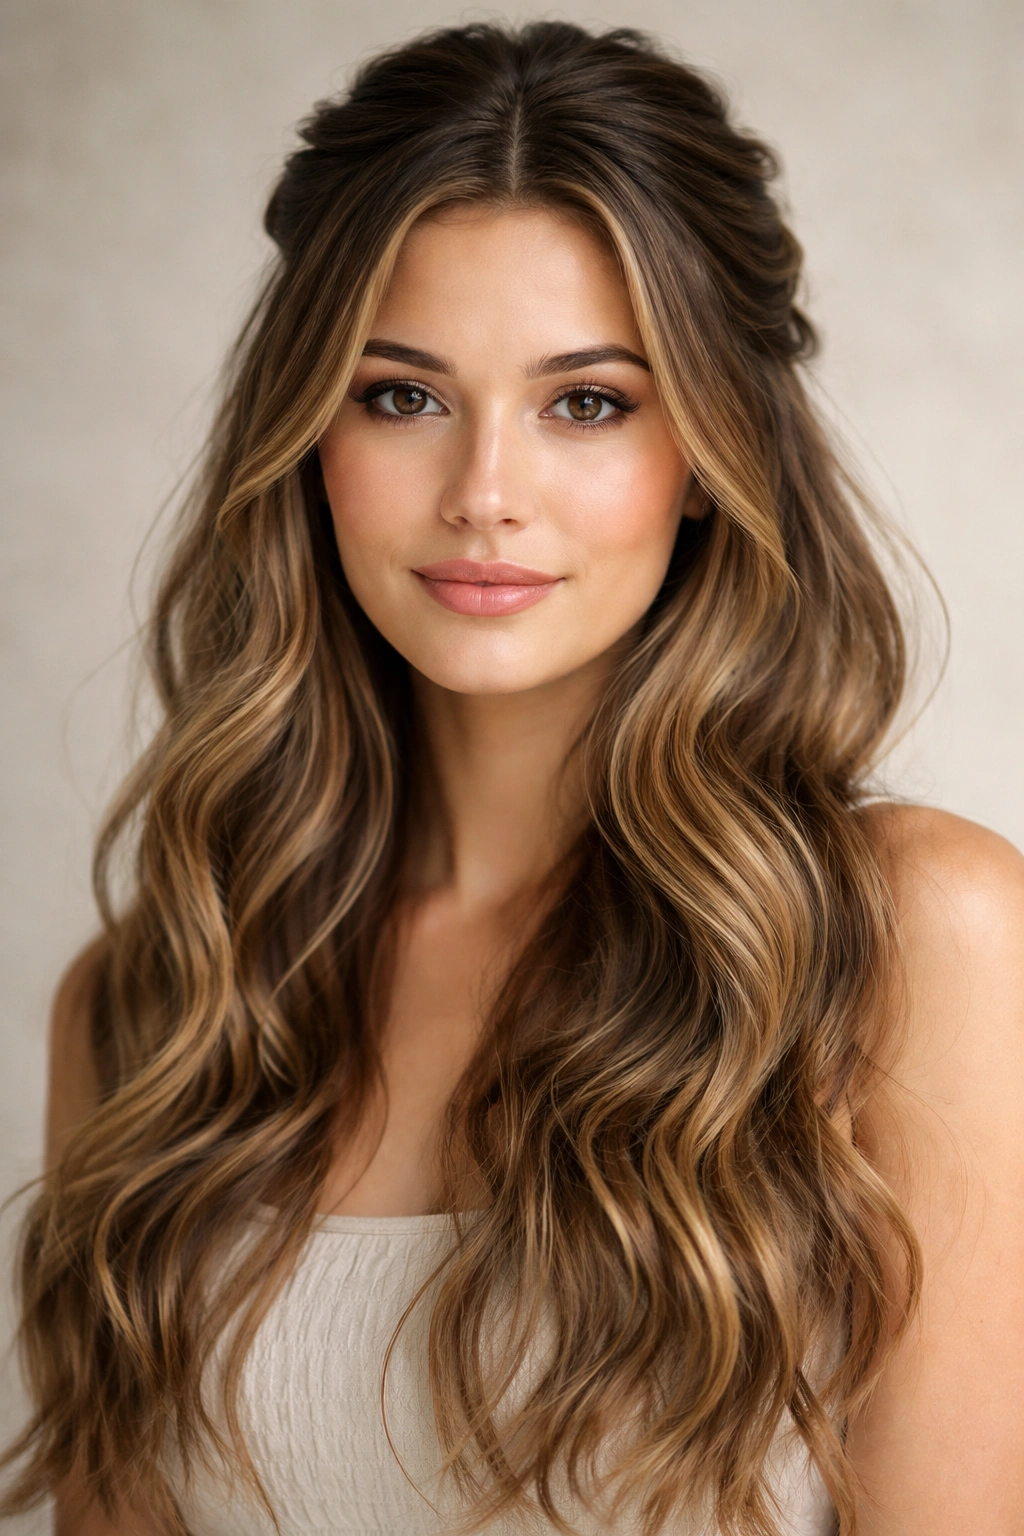
Long wavy hair is a canvas for some of the most versatile and flattering hairstyles out there. The half up half down style sits right in that sweet spot between “I put effort in” and “I woke up like this”—which is exactly why it’s become such a go-to for everyone from everyday wear to special occasions. When you’ve got waves working in your favor, the right half-up look can frame your face beautifully, keep hair from getting in your way without sacrificing length, and show off the texture you’ve worked so hard to achieve.
The beauty of half up half down styles for wavy hair is that they work with your natural texture instead of fighting against it. Waves catch light differently when they’re gathered and anchored at the crown, creating dimension and depth that straight hair sometimes struggles to deliver. Plus, the technical skill level varies wildly—some of these styles take thirty seconds with a hair clip, while others involve intricate twists and strategic layering that take a few minutes of practice to master.
This isn’t just a list of random hairstyles thrown together. Each look here has been chosen because it genuinely suits long wavy hair, works with real-world timing and skill levels, and actually looks intentional rather than like you forgot to style the bottom half. Whether you’re getting ready for work, heading to a wedding, or just tired of your waves falling in your face, you’ll find something here that clicks.
1. The Twisted Knot
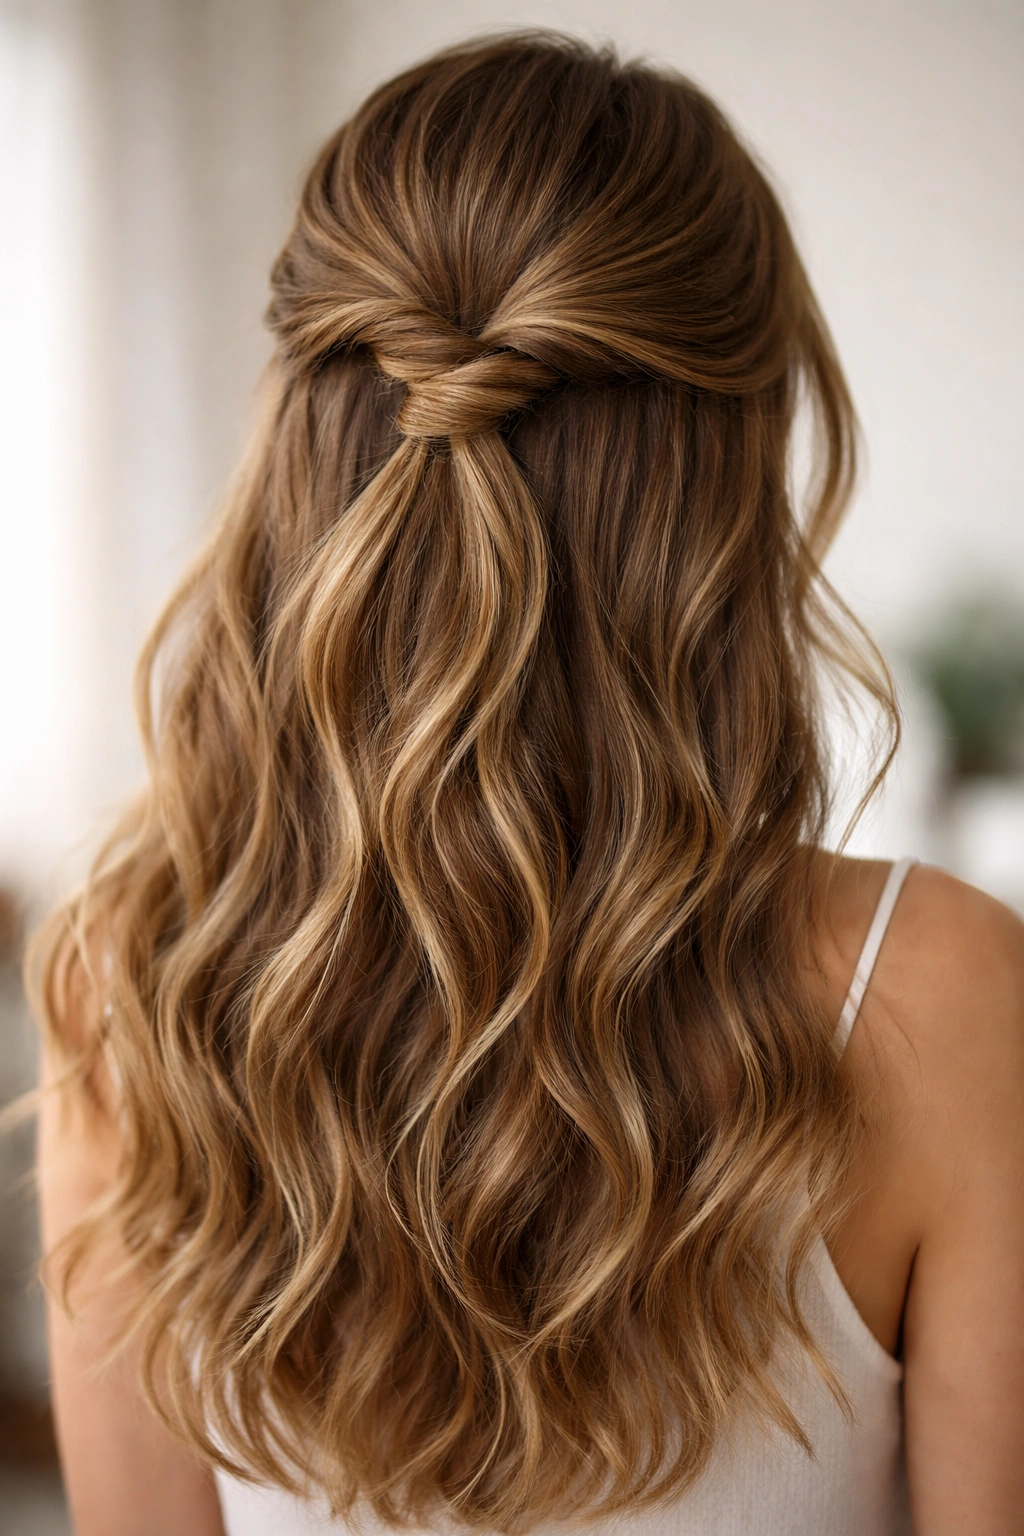
A twisted knot is essentially two sections of hair twisted together and then knotted at the crown—it sounds fancy but honestly requires almost no styling skill. Take two sections from either side of your head at about ear level, twist each one individually while working toward the back, then tie them together in a simple knot. The waves naturally add visual interest to the twisted sections, so even though the knot itself is minimal, the whole thing reads as intentional and polished.
Why This Works for Wavy Hair
The twist pulls hair back enough to be functional while leaving the waves at the front completely soft and face-framing. The texture of your waves becomes a feature rather than something fighting against your styling. Because waves have built-in dimension, a simple knot at the back doesn’t look boring the way it might with straighter hair—there’s plenty of visual movement in the top section.
How to Make It Last All Day
- Use a small elastic that matches your hair color to secure the knot
- Backcomb slightly at the crown before twisting to add grip and prevent slipping
- Spritz the twisted sections with a lightweight texture spray before knotting for extra hold
- Gently pull a few small sections loose around your face for that effortless, lived-in look
Pro tip: Do this styling on second-day hair rather than freshly washed waves—the texture holds better and the twist won’t feel too tight or structured.
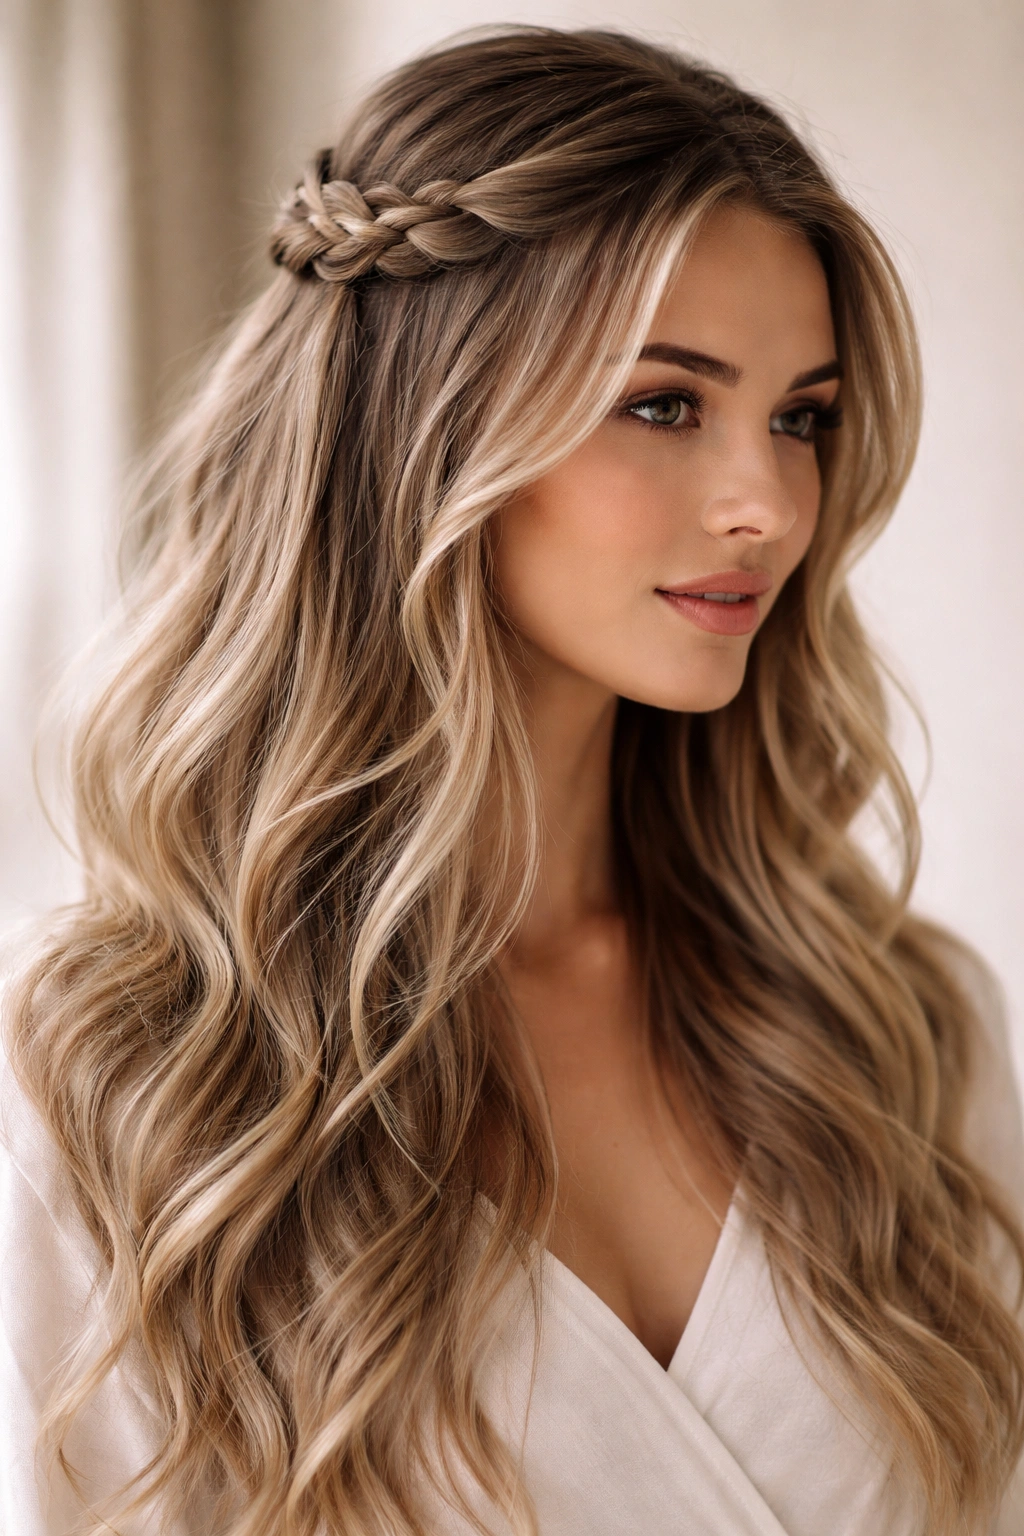
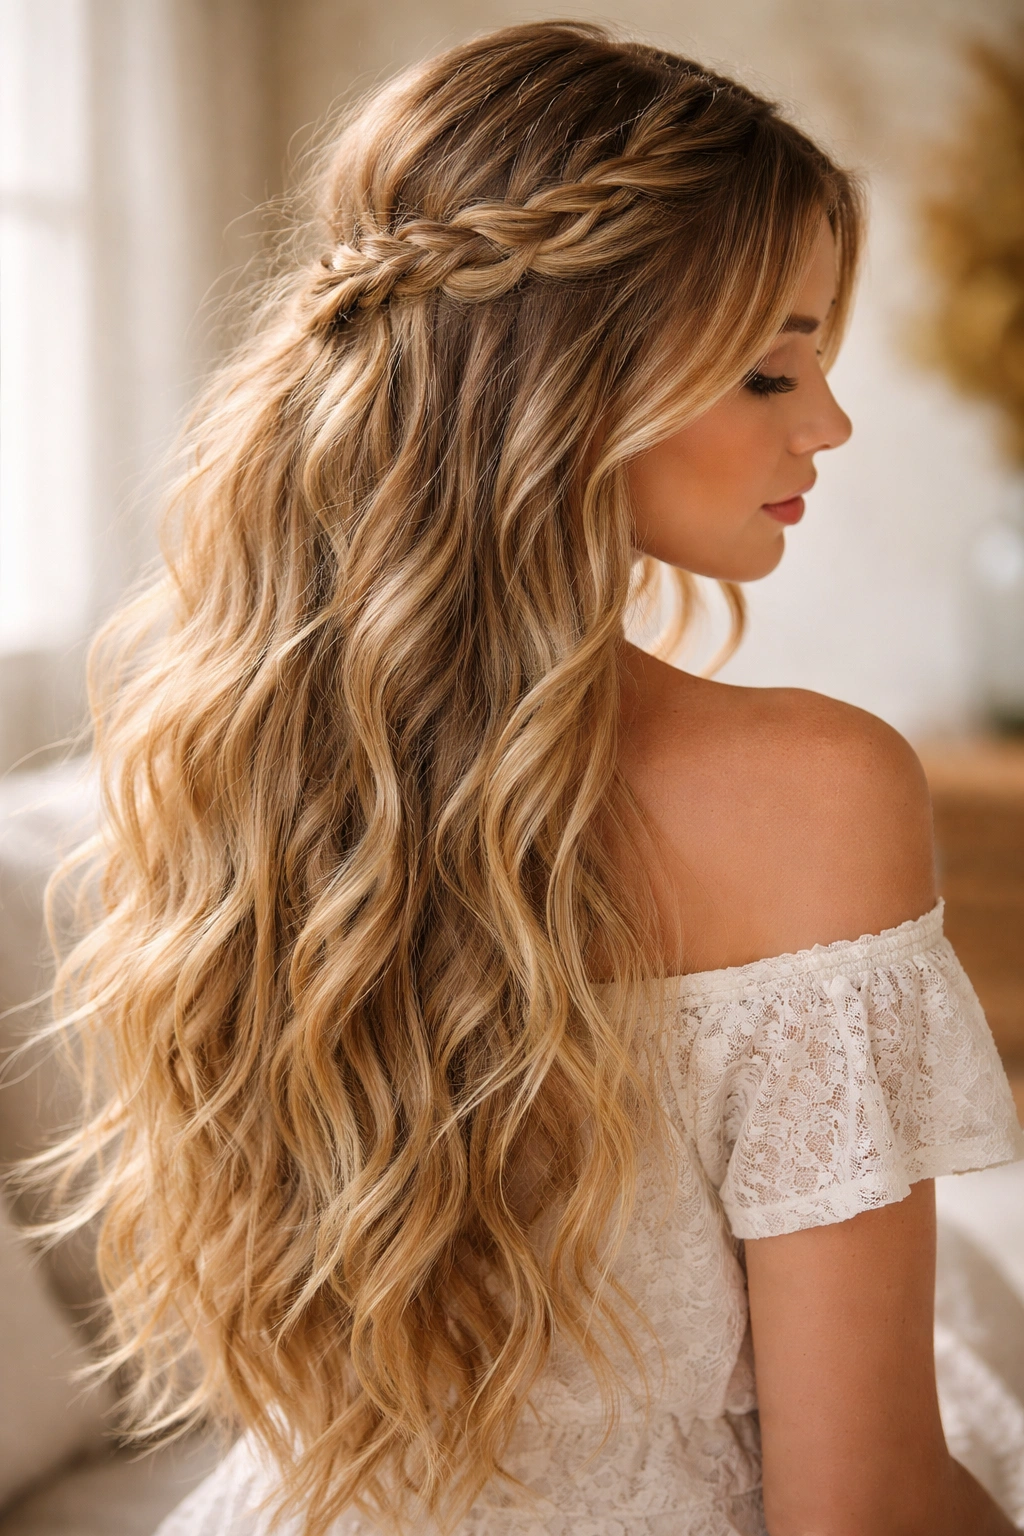
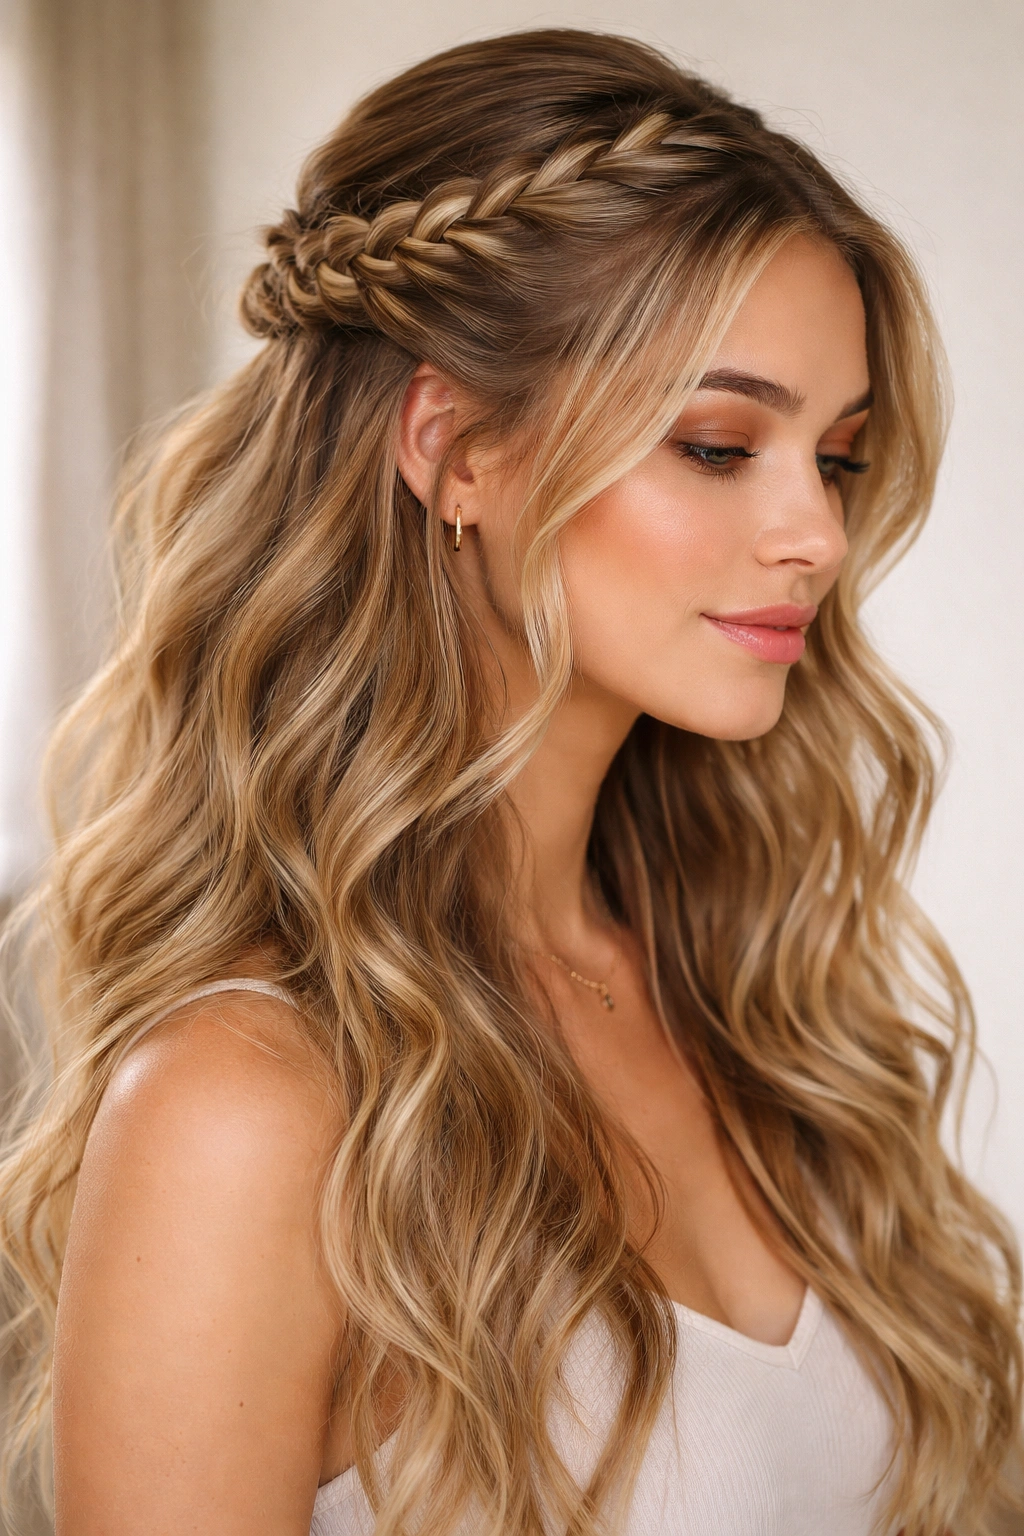
2. The Braided Crown
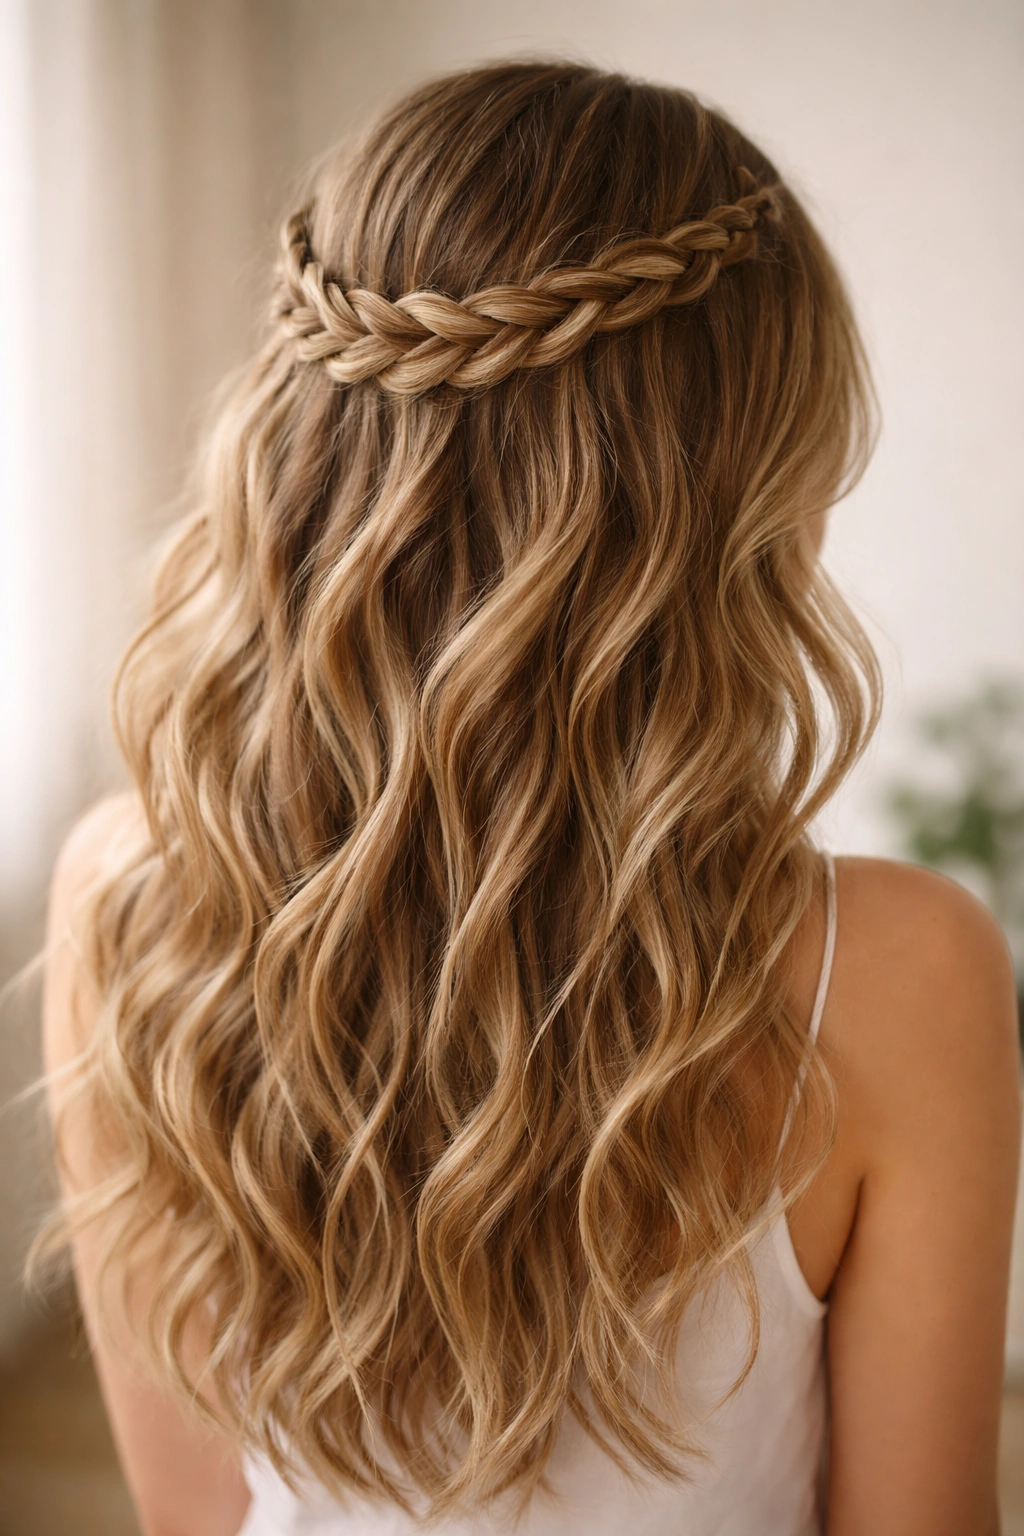
A braided crown runs around the top of your head like a halo, gathering the top layers while leaving the bulk of your waves down. Start one Dutch or regular braid at one temple, weave it back and around toward the opposite temple, then pin it or tuck the end into remaining hair. The braid itself becomes the anchor point, and the waves cascade underneath and around it.
The Real Advantage of a Crown Braid
This style solves a common problem: wanting hair off your face without creating a tight, severe look. The braid runs along your hairline so it’s doing all the functional work, while the loose waves below do all the aesthetic heavy lifting. For wavy hair specifically, this creates the effect of having way more texture and movement because everything below the braid is essentially untouched.
Making This Crown-Worthy
- Practice your braid path before actually braiding—start at one temple, braid back toward the crown area, then angle toward the opposite temple
- Use a flexible braid style (Dutch or regular three-strand) rather than a tight French braid—you want it to sit gracefully, not pull
- Leave a section of face-framing hair unbraided on each side if you want to soften the look further
- Secure with bobby pins that match your hair color, or tuck the braid’s tail into a clip for cleaner finishing
Worth knowing: This style looks even better on the second day when your waves have settled and calmed slightly from fresh product application.
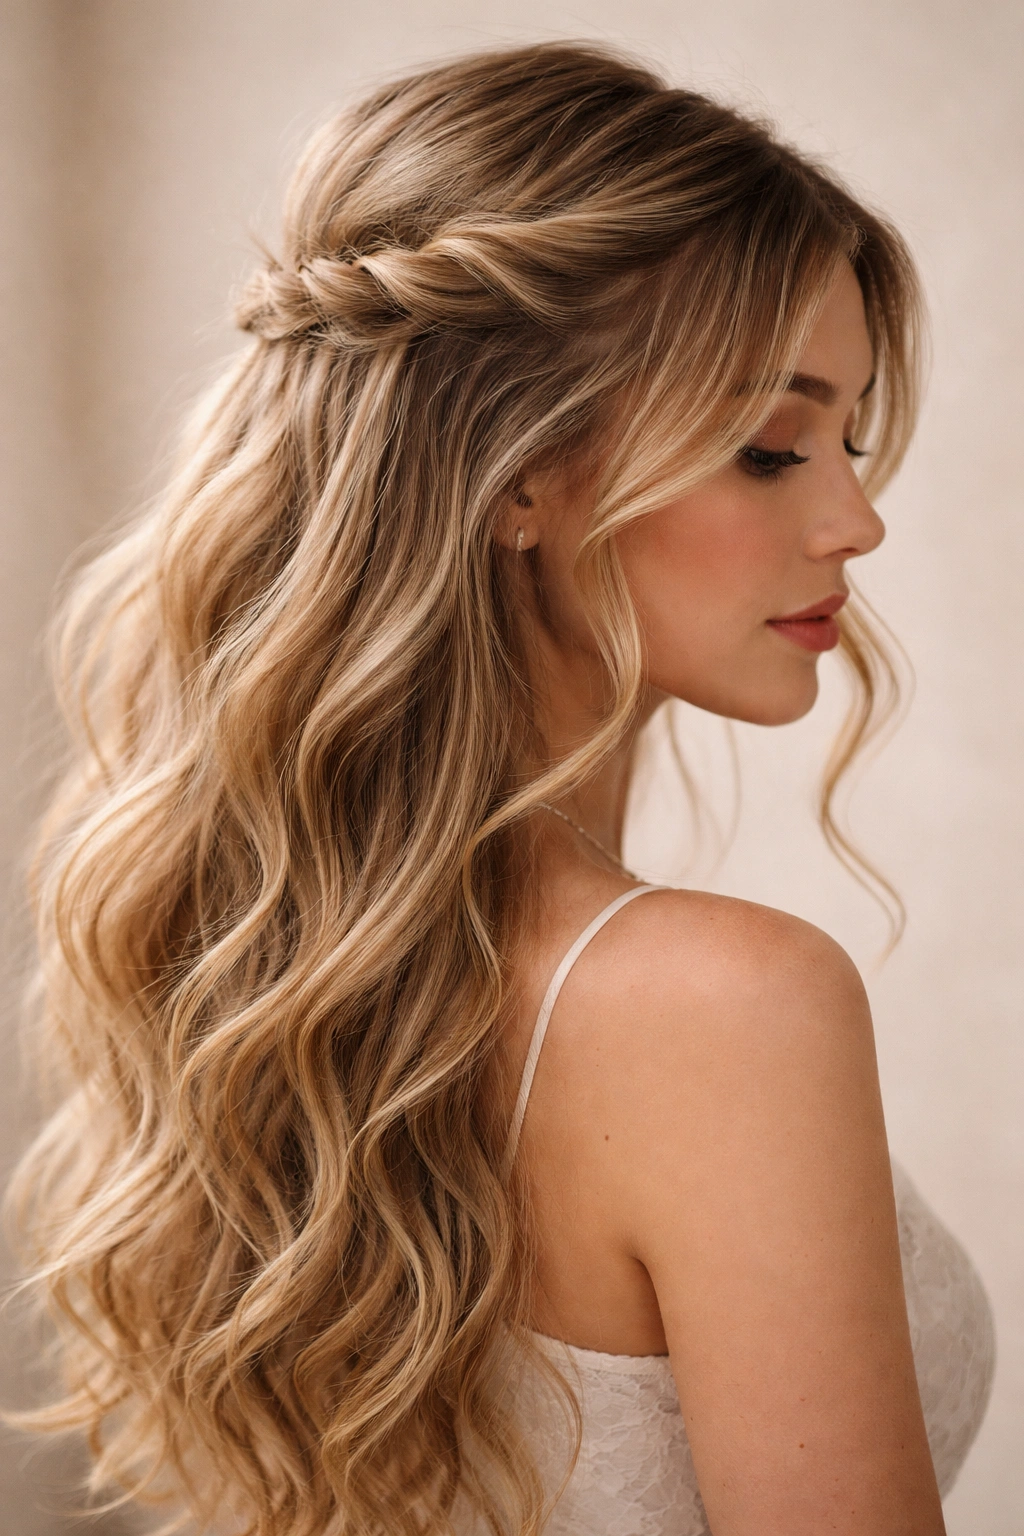
3. The Soft Romantic

The soft romantic is all about controlled looseness—you’re gathering enough hair to define a “half up” moment, but you’re doing it with a gentle hand so everything still feels effortless and, well, romantic. Use a padded hair claw or a silk scrunchie, grab the top section loosely, and stop before it feels tight. Let face-framing pieces fall free, and let some smaller waves escape from the secured section.
Why This Feels Different from Just “Half Up”
Most half-up styles have a clear anchor point and intentional structure. This one is intentionally soft. You’re not securing super-tightly, and you’re not worrying about whether every piece is in place. The slight messiness is the whole point. Wavy hair naturally wants to be touchable and loose, so this approach honors that instead of fighting it.
The Technique That Matters
- Start with a velvet scrunchie or padded claw clip rather than a metal elastic—metal can catch and bend your waves
- Gather only the top two inches or so of your crown area—think crown level, not the top third of your head
- Twist the section once before securing rather than creating a smooth pull-back—the twist adds volume
- Leave a piece of hair loose on each side of your face, going all the way down
Insider note: Apply a light texturizing spray to the gathered section only, not the loose waves below—this adds grip where you need it without weighing down the beautiful waves you want to showcase.
4. The Claw Clip Collection
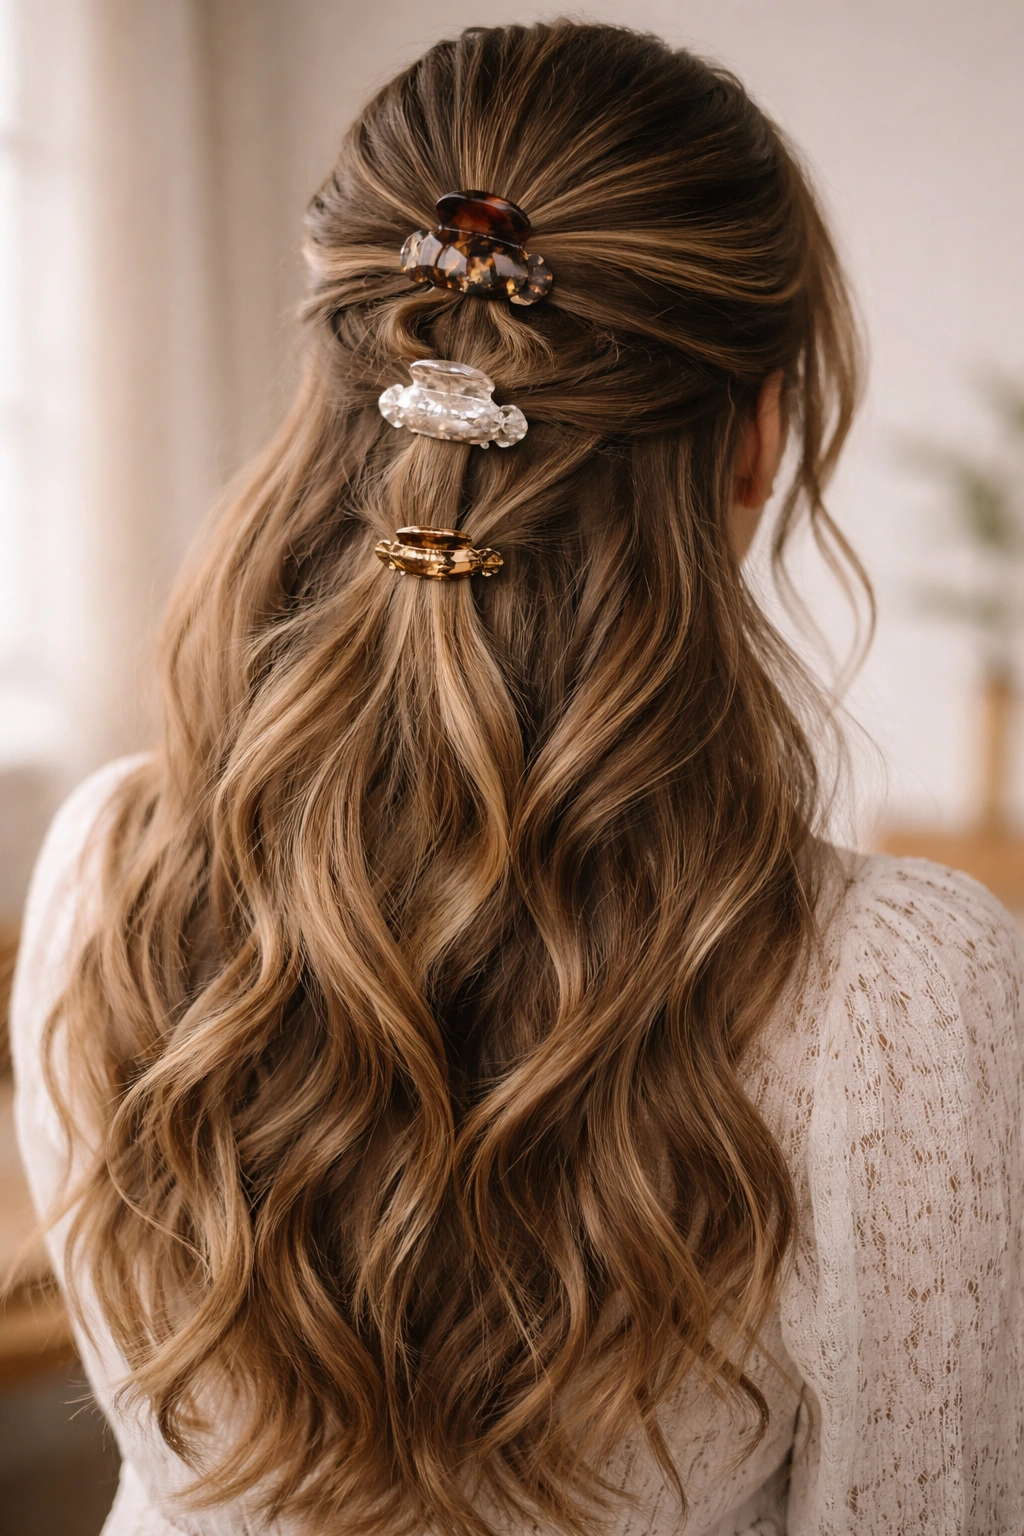
This is the approach of using multiple smaller clips arranged together rather than one central anchor point. You might use two or three claw clips of varying sizes, clustered in the back-crown area, each grabbing a different section of hair. It’s more editorial and modern than a traditional ponytail, and it looks especially intentional on wavy hair because each clip highlights a different wave section.
The Styling Logic Here
Instead of centralizing everything into one pull-back, you’re creating zones of control. A large tortoiseshell claw might grab the very back section, while a smaller gold claw grabs a layer above it, and maybe a tiny clear claw clips a smaller section. The effect is sophisticated without being fussy, and it’s genuinely practical for keeping hair somewhat contained while looking like a styling choice rather than a hair-management necessity.
How to Arrange for Maximum Impact
- Position your largest clip in the very back of the crown area, almost at the nape
- Place a medium clip slightly higher and forward from the large one, slightly offset to one side
- Add a smaller decorative clip at the front-crown area if you want three clips, or skip this step for a two-clip approach
- Let waves fall naturally around and between each clip—don’t worry about a seamless blend
Pro tip: Mix metallics deliberately—gold with rose gold, silver with gold—rather than trying to match everything. The intentional mismatch reads as more modern than matching sets.
5. The Half Braid with Face Frames
This is a half-up style where you’re literally braiding only the back section of your half-up gather, while leaving the front-crown sections completely loose. Gather your top section loosely, take out two small pieces from the very front for face framing, and then braid the remaining gathered section before securing with a clip or small elastic.
What Makes This Technically Different
You’re braiding only part of what you’ve gathered, which means the braiding itself isn’t structural—it’s purely decorative. The actual hold comes from your clip or elastic around the whole gathered section. The braid is the visual element. This matters because it means you can braid more loosely and the whole thing holds together better. Tight braids on loose waves sometimes look restrictive, but a loose braid on a secured gather looks intentional and pretty.
Execution Details That Matter
- Take your face-framing pieces out before you braid, not after—this prevents them from being too thin or broken
- Braid only about two-thirds of the way down your gathered section, then secure everything together at the end
- Use a slightly loose braid tension so the waves visually breathe within the braid structure
- Pull gently on the braid edges after securing to loosen it further—this is called “pancaking” and it adds volume
Worth knowing: This works beautifully on both first-day and second-day hair, though second-day waves hold the braid shape slightly better.
6. The Double Twist
Instead of twisting one section, you’re twisting two—one from each side of your head—and then combining them at the back. Take a section from above your right ear, twist it back toward the center. Do the same with a section from your left ear. Combine the two twisted sections at the crown-back with a clip, elastic, or by twisting them together into a knot.
Why Double Twists Feel More Sophisticated
A single twisted knot can read as simple or casual. Two twisted sections come together at the back read as intentional and polished because you’ve clearly put thought into the asymmetry and balance. The two twists create a visual narrative—they’re working together toward a goal rather than being one quick fix. On wavy hair, each individual twist showcases the wave pattern differently depending on the angle, so there’s a lot more visual interest.
Getting the Balance Right
- Take your sections from roughly the same level on each side—ear height or slightly above
- Twist each section with the same tension so they match in appearance
- Bring them together at the back-crown area rather than the very back of your neck
- Secure with a clip that’s visible and intentional rather than trying to hide it
Pro tip: Do this style slightly off-center rather than perfectly symmetrical—gather your twists slightly toward one side of the back. It’s more modern and interesting than dead-center styling.
7. The Sleek Pulled-Back

For days when you want a more polished, less touchable vibe, a sleek pulled-back half-up uses smoothing serum and a firmer gathering method to create a cleaner look. Apply smoothing serum to the top section, brush it back firmly, and secure with a sleek elastic or clip. The key is that you’re actually using products to smooth the section, not just gathering your natural waves.
When to Reach for This Version
Smoothing your top section works when you want the visual of “I styled my hair” more than “I have effortless waves.” This is the version for professional settings, formal occasions, or days when your waves are extra-frizzy and you want to tame the top while leaving the bottom textured. It’s a contrast play—smooth top, textured bottom.
The Product Application That Changes Everything
- Use a lightweight smoothing serum on damp hair before it fully dries—this is easier than trying to smooth dry, set waves
- Brush the top section straight back from your hairline, not at an angle—angle comes from your clip placement, not your brush direction
- Use a fine-tooth comb or paddle brush to smooth, not a round brush
- Secure with a metal elastic rather than a fabric one—metal holds smoother styles more reliably
Insider note: A sleek pulled-back looks best with a visible clip or decorative elastic—don’t try to hide it. The contrast between the slicked section and the element holding it is part of the style’s appeal.
8. The Boho Weave
A boho weave uses braiding techniques more loosely and incorporates texture spray and looser sectioning for that undone, bohemian vibe. You might do a loose, partial braid in the top section, leave lots of pieces out, weave a small strand through the braid, or simply gather loosely with texture spray and let the waves do most of the work. It’s less about technical execution and more about vibe.
The Philosophy Behind Boho Styling
Boho isn’t about perfection or precise technique—it’s about intention combined with relaxation. You’re styling, but you’re not fighting your hair’s nature. This is where wavy hair actually has an advantage over straighter hair because your natural texture is the boho aesthetic. You don’t have to create texture; you just have to showcase it and add some intentional gathering.
How to Get That Effortless Boho Feel
- Start with a texturizing spray or sea salt spray applied to damp hair—this is your base layer
- Gather loosely, pulling out pieces as you go rather than creating a clean line
- Incorporate small, loose braids or twisted sections if you want, but don’t worry about them being neat
- Use an ornate clip, pearl hair pins, or woven claw clips rather than basic elastics
- Leave wispy pieces falling around your face and neck—this is the whole aesthetic
Pro tip: Boho styles actually look better slightly undone and slightly imperfect. If it feels too neat or controlled, loosen it up by pulling a few more pieces out.
9. The Velvet Ribbon Accent
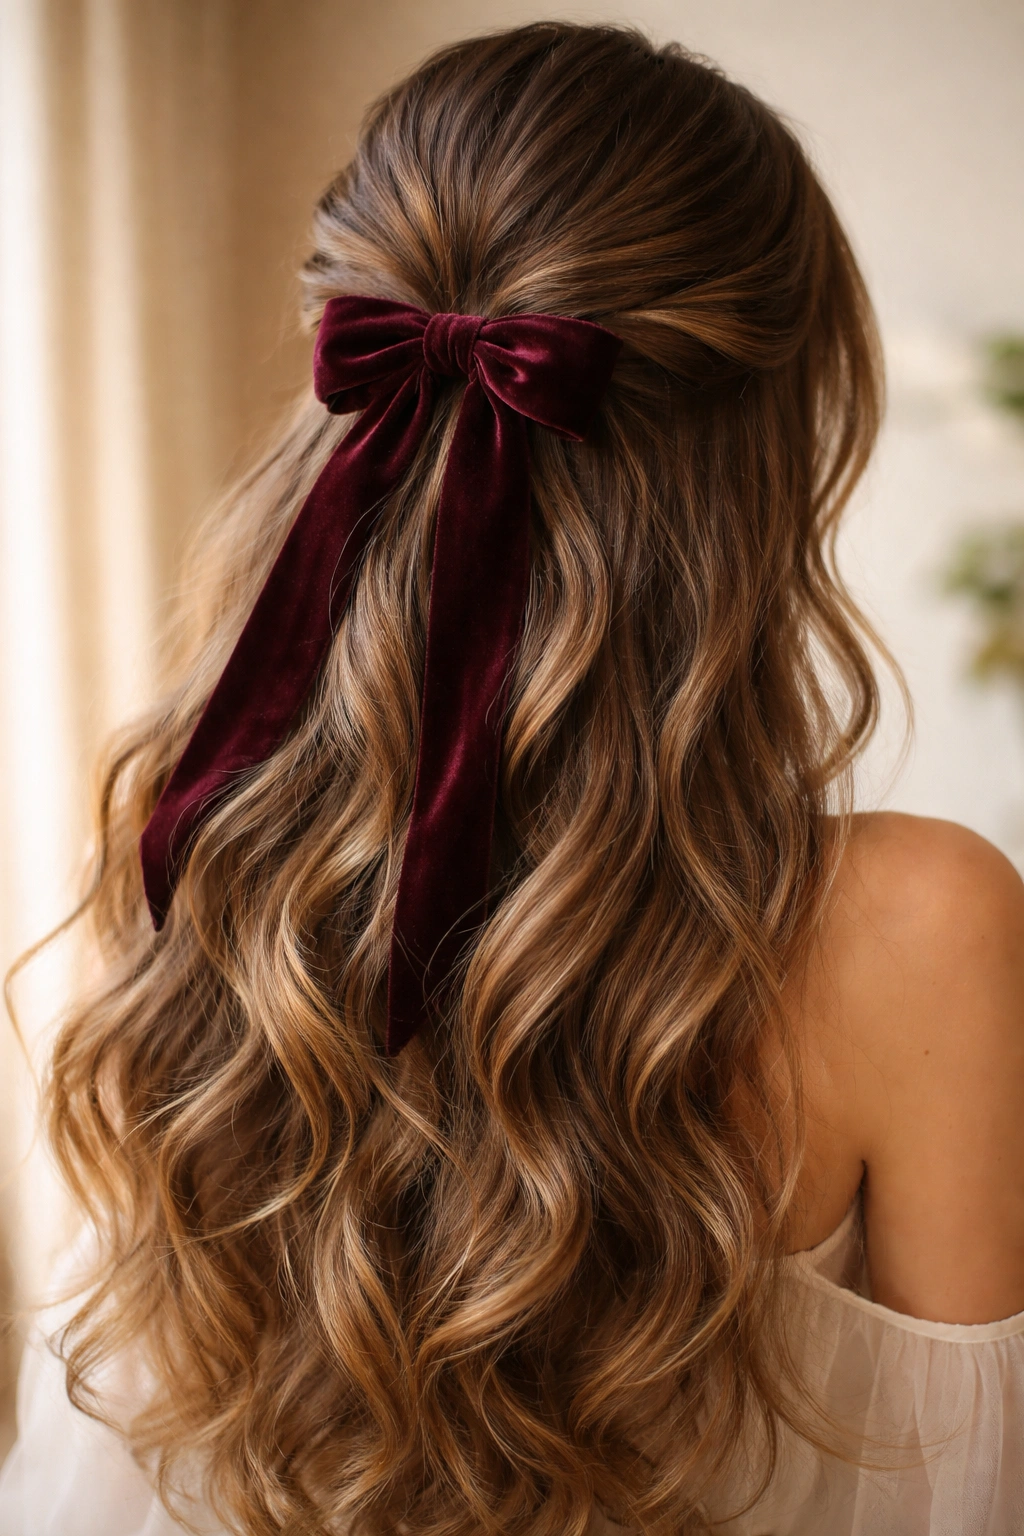
Using a velvet ribbon as your gathering element instead of a traditional elastic completely changes the vibe. Thread a silk or velvet ribbon through your hair as you would a braid, or simply tie it around your secured half-up section as a decorative element. The ribbon does double duty—it’s functional and beautiful.
Why Ribbon Changes the Whole Look
An elastic is invisible or neutral. A ribbon is a statement. Choosing a jewel-tone velvet ribbon, a metallic ribbon, or a patterned silk ribbon means your half-up instantly reads as more special and intentional. On long wavy hair, the ribbon’s texture plays beautifully against the waves. A navy velvet ribbon against golden waves creates a sophisticated contrast.
Ribbon Techniques That Actually Work
- Use 1- to 1.5-inch-wide ribbon rather than anything thinner—thin ribbons can slip and disappear
- Either wrap the ribbon around your gathered section and tie it in a bow, or weave it loosely through a braid section
- Velvet, silk, and grosgrain ribbons work best—avoid shiny polyester that doesn’t grip
- If the ribbon is slipping, secure it with a clear elastic underneath first, then wrap the ribbon over it
Worth knowing: This style reads as elevated instantly, even if the actual gathering is loose and casual. The ribbon does a lot of the heavy lifting visually.
10. The Curved Pins
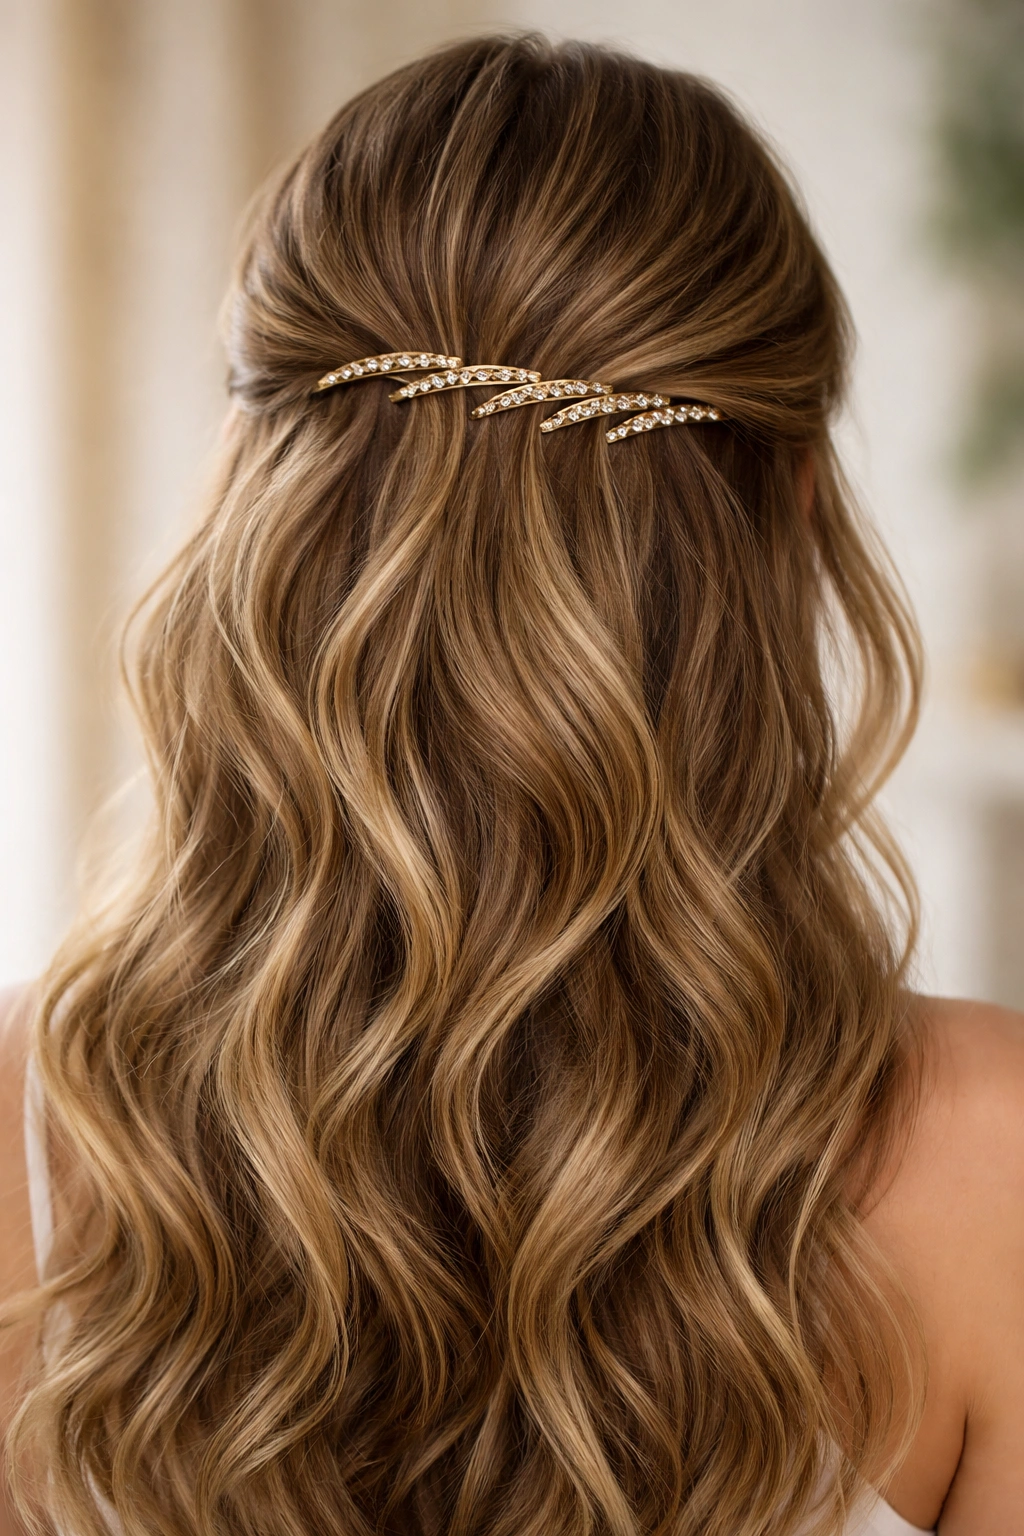
Instead of a central gathering point, use decorative bobby pins or hair pins curved in an arc across the back-crown area to anchor your top section. You might use three to five pins, positioned in a gentle curve from one side of your crown to the other. It’s a less obvious anchoring method than a clip, and it creates a different visual effect.
The Visual Effect of Curved Pin Placement
Pins create a softer line than a single clip because there’s no single focal point—instead, there’s a distributed anchor. This works especially well on wavy hair because the waves between and around each pin are all visible and can move independently. It’s more editorial and less “practical hair management” than other methods.
Positioning and Selection
- Choose pins that either match your hair color or are intentionally metallic and visible
- Space them roughly evenly along a curved line from temple to temple, at crown height
- Anchor different sections of your gathered hair with each pin rather than having one pin hold everything
- Use at least three pins so the weight is distributed and nothing slips
Pro tip: Pearl-topped pins, gold geometric pins, or tortoiseshell clips all work beautifully here. The decorative element of the pins becomes part of the style rather than trying to hide them.
11. The Half Dutch Braid
A Dutch braid (where you braid under rather than over) done only partway creates an interesting visual because it sits differently on your head than a regular braid. Start a Dutch braid at one temple and take it back toward the crown, then stop and secure what you’ve done. The under-braiding creates a raised, dimensional look that regular braids sometimes don’t achieve.
Why Dutch Braids Are Worth Learning
Dutch braids photograph better, sit higher on the head, and look more dimensional than regular braids. For wavy hair specifically, the under-braiding technique catches different angles of your waves as you’re braiding, so the braid itself showcases more of your hair’s natural texture and pattern. It’s technically slightly more involved than a regular braid, but not by much.
The Step-by-Step Reality
- Start at one temple with three small sections
- Braid by taking each outer section under the middle section (instead of over)
- Braid back toward the center-back of your head rather than along your hairline
- Stop after about 4-6 braid inches and secure with a small elastic that matches your hair
- Leave the rest of your top section gathered loosely around the braid anchor point
Insider note: Backcomb your starting section lightly before braiding—this gives the braid something to grip and prevents it from being too slippery on wavy hair.
12. The Layered Knot
Instead of one knot, create multiple small knots stacked vertically down the back of your head. Start with a knot at the very crown, then create another knot slightly lower using fresh sections, then perhaps a third knot lower still. Each knot uses different hair, creating a vertical line of gathered texture down your back.
The Visual Impact of Stacked Knots
Multiple knots create a playful, intentional look that feels different from traditional half-up styles. It’s especially effective on long hair where you have enough length to create several distinct knots without the bottom section looking too sparse. The stacking creates a visual focal point that travels down the back of your head rather than sitting in one place.
How to Execute Without It Being Chaotic
- Keep each knot relatively small and neat—you’re not creating bulky knots but precise, intentional ones
- Space them about one to two inches apart vertically
- Use small elastics or clips that match your hair color—you want the knots to be visible, not the holding mechanism
- Make sure the bottom section has enough body and wave pattern to look intentional rather than neglected
Pro tip: This works best with three knots maximum unless you have very thick hair. Two is also perfectly sophisticated.
13. The Side-Swept Cascade
Instead of gathering your top section straight back, sweep it all to one side—preferably to the side opposite your hair’s natural wave pattern. This asymmetrical approach feels more modern and interesting than centered half-ups. Gather at the side of your head rather than the back-center, letting the remaining waves cascade down the opposite side.
Why Side Asymmetry Works on Wavy Hair
Symmetry reads as formal. Asymmetry reads as modern and interesting. When you’re working with waves that already have inherent movement and direction, adding asymmetrical gathering enhances that sense of motion rather than fighting it. This is the approach for when you want your style to read as intentionally modern rather than traditionally pretty.
Technical Execution
- Gather your top section toward one side of the back of your head, not the center
- Pull slightly more hair from the side you’re gathering toward
- Secure with a clip or elastic on that side rather than at the back-center
- Leave the opposite side completely alone—no face-framing pieces, just the natural cascade
Worth knowing: This style actually solves a common problem where one side of the back of your head looks flat or underdone. By gathering to the side, you’re actually creating more fullness and dimension on the opposite side.
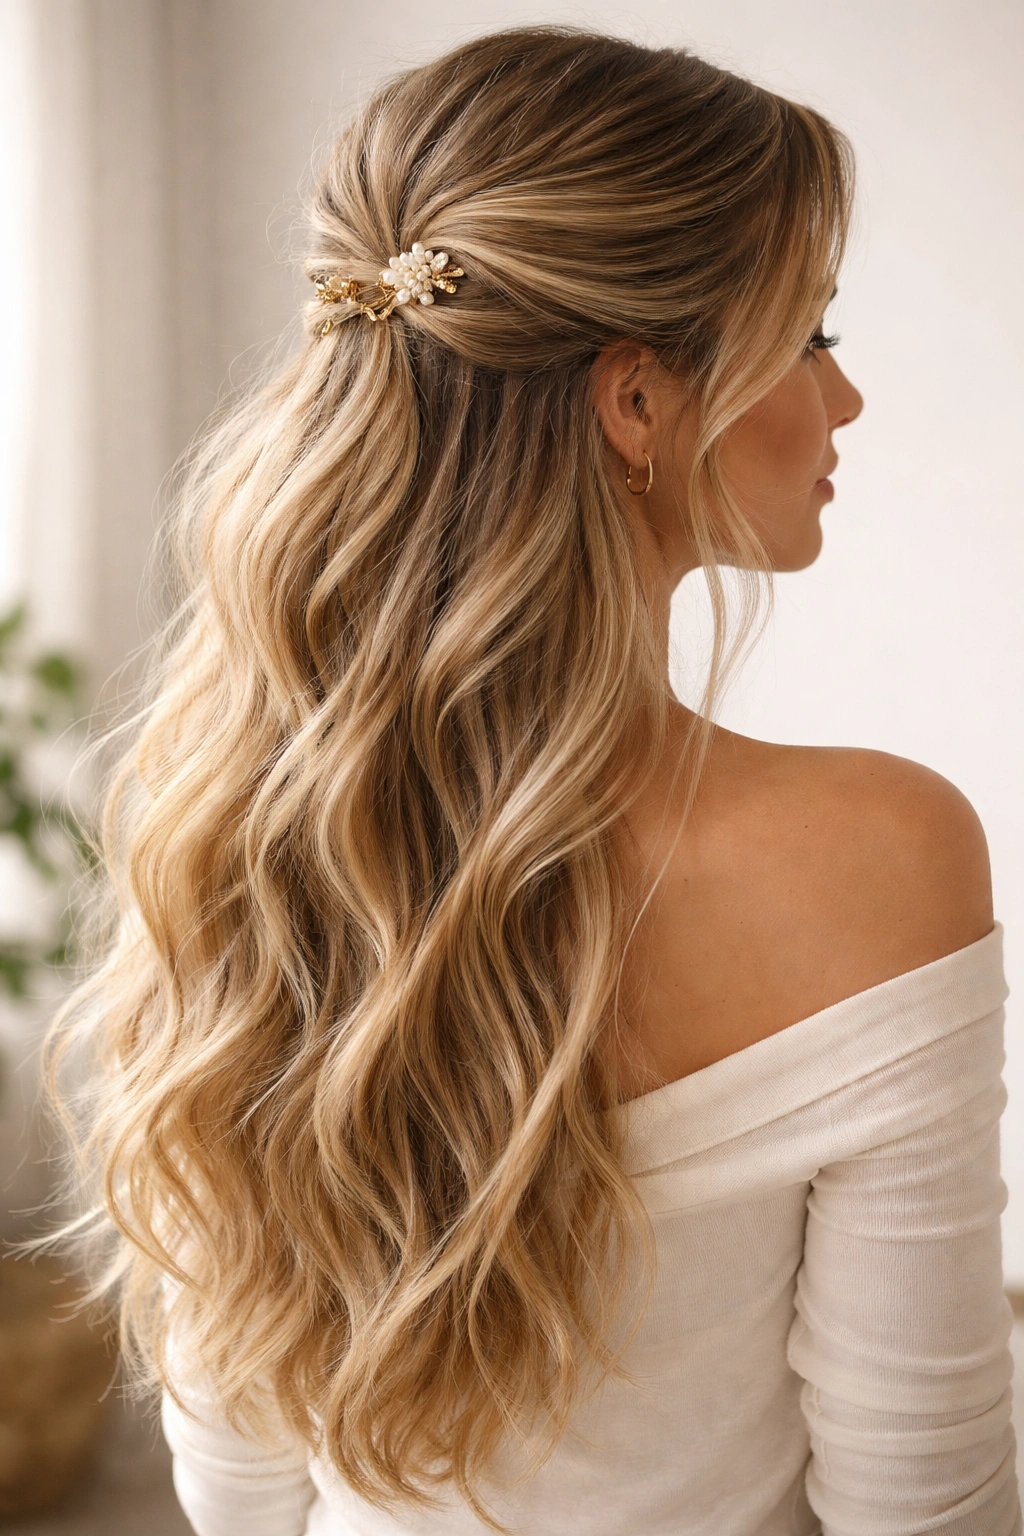
14. The Pearlescent Clips
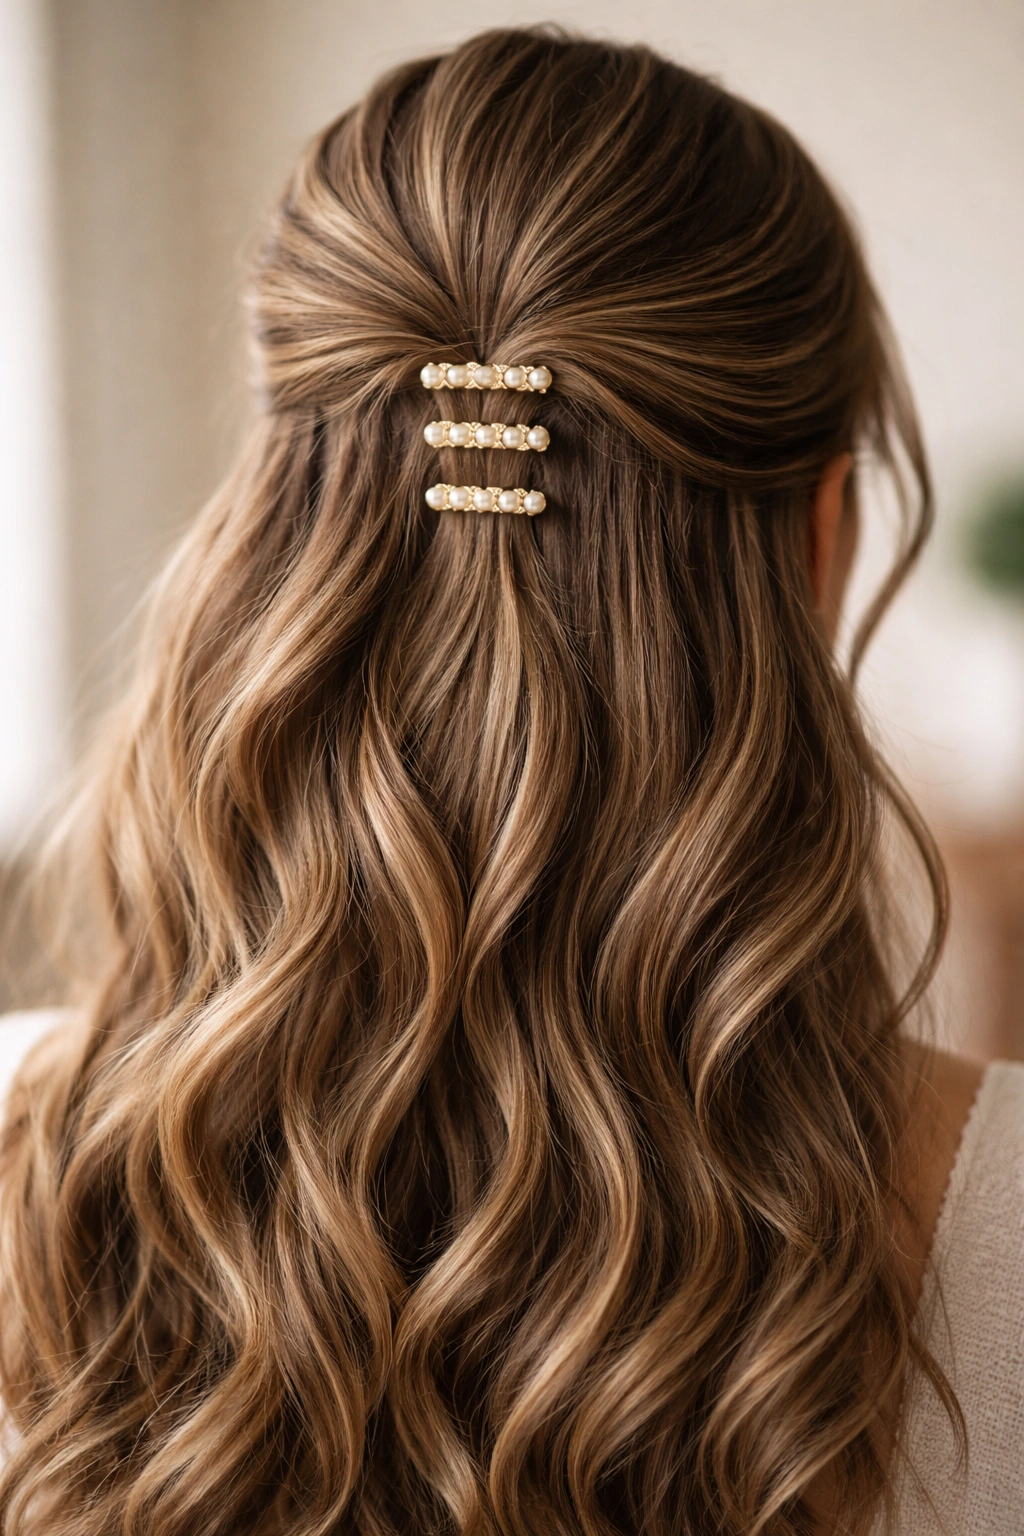
Use small pearl hair clips, pearl-topped bobby pins, or pearlescent claw clips as your primary styling element. Whether you’re doing a traditional half-up or using multiple clips scattered across the back-crown area, the pearl element elevates the entire look instantly. Pearls have a way of reading as more luxe and intentional than standard clips.
Why Pearls Specifically
Pearl has visual softness and shimmer without being flashy. On wavy hair, this subtle shine bounces off your waves beautifully, creating a cohesive, elegant look. You’re not adding a contrasting color or bold statement—you’re adding a refined, delicate element that works with your natural hair colors rather than against them.
Using Pearl Clips Effectively
- Use actual pearls or high-quality pearl-imitation clips—cheap plastic pearls read as costume-y rather than elevated
- Use smaller pearls rather than large ones—delicate always reads as more refined
- You can use one statement pearl clip or multiple small pearl clips—both work
- Pair pearl clips with soft, loose gathering rather than super-tight, structured pulls
Pro tip: Pearl clips work gorgeously on second-day waves when your waves are slightly more settled and have a subtle shine from natural oils. The pearls complement that natural sheen perfectly.
15. The Half Moon Part
Create an intentional half-moon shaped part where you’re dividing your crown section from the rest of your hair. Use a fine-tooth comb to create a curved part that runs from one temple, curves gently back and around the crown area, and ends at the opposite temple. Then gather the section above the part and secure it, leaving the section below the part loose.
The Geometry That Makes This Interesting
Most half-up styles don’t have a visible part—the gathering is where the division happens. By creating an intentional curved part, you’re making the division visual and intentional. On wavy hair, the part line actually showcases the wave pattern because the parted sections fall in slightly different directions.
Getting the Part Right
- Use a fine-tooth comb and actual hair spray or a pointed stylus to create your part line
- Make it curved rather than straight—curves are more flattering and interesting
- Gather the section above the part loosely—you want the wave pattern of the parted sections to be visible
- Let the wave pattern beneath the part fall naturally without trying to smooth or manipulate it
Insider note: This works best on clean, dry hair where your waves have set into their natural pattern. Trying to create this part on very freshly washed hair is frustrating.
16. The Twisted Strand with Tendrils
Take a single section of hair from your crown and twist it loosely, then wrap it around your gathered half-up section like you’re creating a decorative element rather than a functional one. Let small pieces and tendrils escape from the twist as you work, so the final look is soft and intentionally undone rather than precise.
The Difference Between Braiding and Twisting
A twist is simpler than a braid but creates a similar visual effect. For this style, a loose twist is actually superior to a braid because the looseness is part of the point. You’re creating a decorative element that sits on top of your half-up rather than replacing your half-up structure. The tendrils—the small pieces falling out—are what makes this feel intentional and pretty rather than just messy.
Technique for Graceful Tendrils
- Start your twist slightly to one side of center rather than dead-center
- Twist loosely enough that small pieces naturally want to escape
- Wrap the twisted strand around the base of your half-up section or along the top, securing with a small pin
- Deliberately pull a few small pieces loose as the final step to add the tendril effect
Pro tip: Do this after your half-up is already secured—it’s a decorative layer added on top, not structural. This means you can adjust it and perfect it without worrying about your whole gather coming loose.
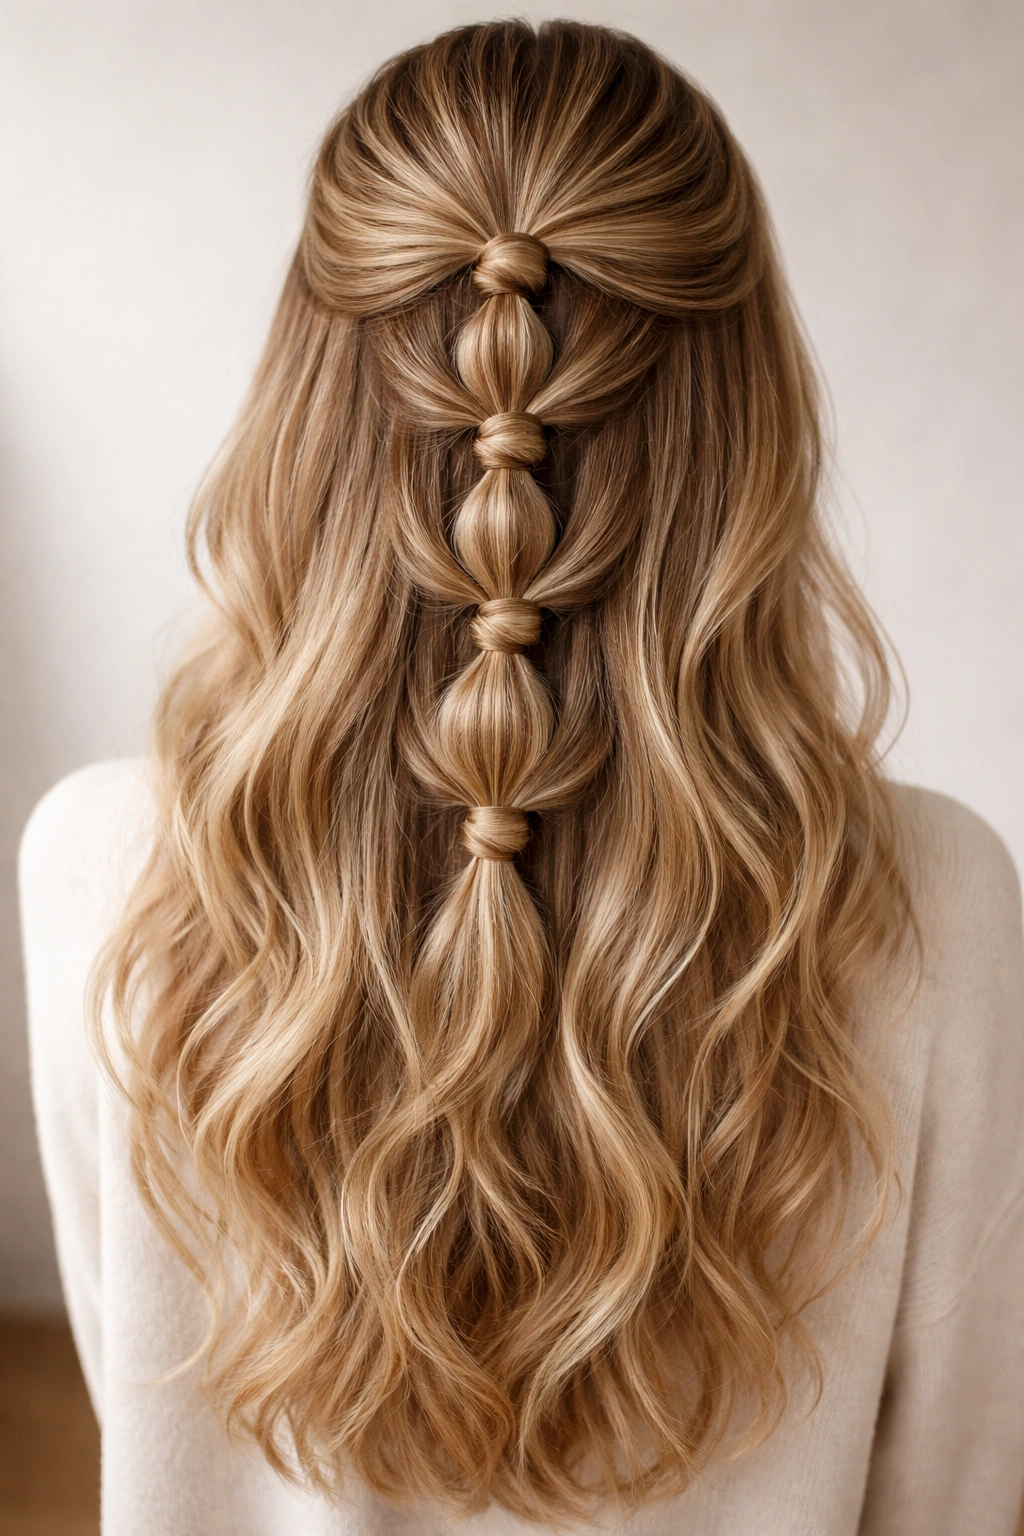
17. The Bubble Ponytail Half-Up

Create small sections of your half-up gather and secure them with tiny elastics spaced down the length, creating a series of “bubbles.” This adds texture and dimension to what might otherwise be a simple gathered section. Each bubble is a separate unit, and the sections between the elastics poof outward slightly, creating the bubble effect.
Why Bubbles Add Visual Interest
A standard half-up gather can sometimes read as one flat section. Bubbles break that up by creating multiple distinct sections with space between them. On wavy hair, the bubbles actually showcase your wave pattern in each section differently, so there’s a lot more visual complexity and movement.
Execution Without It Looking Costume-y
- Use small elastics rather than large ones—delicate is always more sophisticated
- Space the bubbles evenly, about one to two inches apart
- Don’t make them too many or too tight—three to four bubbles is usually perfect
- Gently pull on each section to make the bubbles slightly poofy, but not dramatically so
- Use clear or colored elastics that match your hair—the point is texture, not the elastics themselves
Worth knowing: This style works best on slightly textured hair rather than perfectly smooth waves. If your hair is very silky and smooth, the bubbles can look a bit flat. Spray some texture spray before creating bubbles for better effect.
18. The Vintage Wave Pin
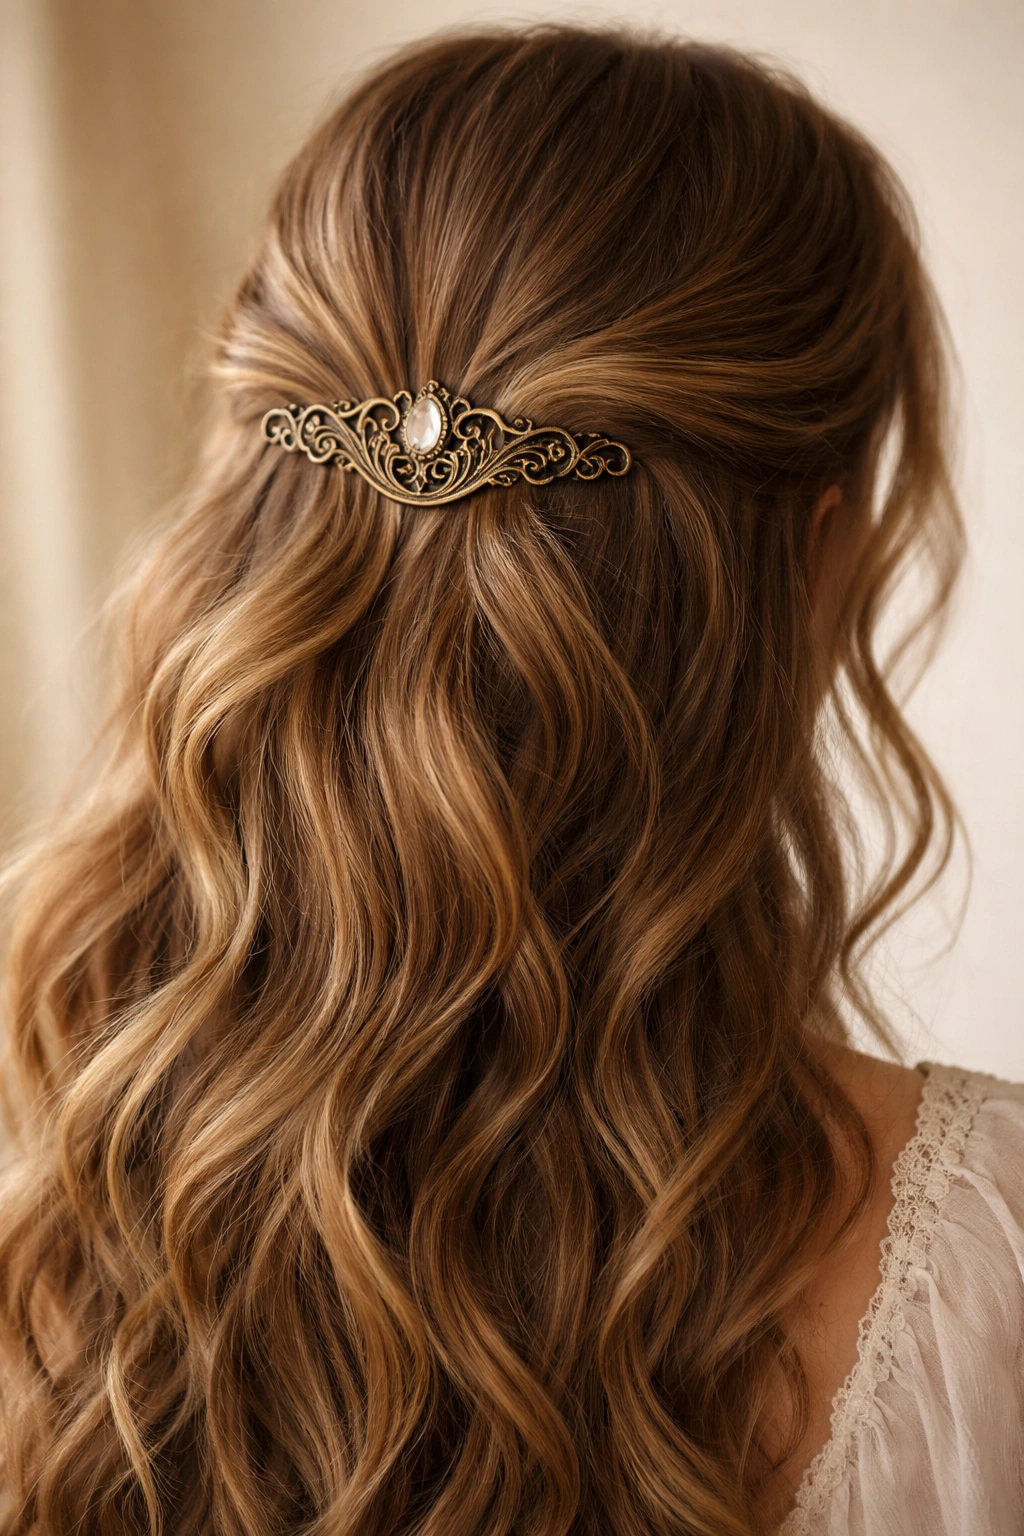
Use a decorative vintage-style pin or hair stick woven through your gathered half-up section to both secure and style it. Instead of relying on an elastic, the pin becomes the structural element. You weave it horizontally through your gathered section so it sits visibly on top, securing everything while looking intentionally retro or bohemian.
The Functional and Aesthetic Role of the Pin
A good vintage pin is both functional and beautiful. It holds your hair while also being a jewelry element. On long wavy hair, a decorative vintage pin reads as especially intentional because you’re clearly making a style choice rather than just grabbing whatever’s handy. The pin acts as a focal point that draws attention to your gathered section.
Selecting and Using the Right Pin
- Look for pins with some weight and substance—delicate filigree pins are pretty but may not hold reliably
- Position it horizontally rather than vertically—this is more secure and looks more intentional
- Weave it through the gathered section so part of the pin is visible on top
- Make sure the pin is actually secure before you stop adjusting—pulling gently on your gathered section to test
Pro tip: If the pin alone isn’t holding as securely as you’d like, use a clear elastic underneath the pin and then position the pin on top. The elastic does the actual work, and the pin gets the visual credit.
19. The Rope Twist Variation
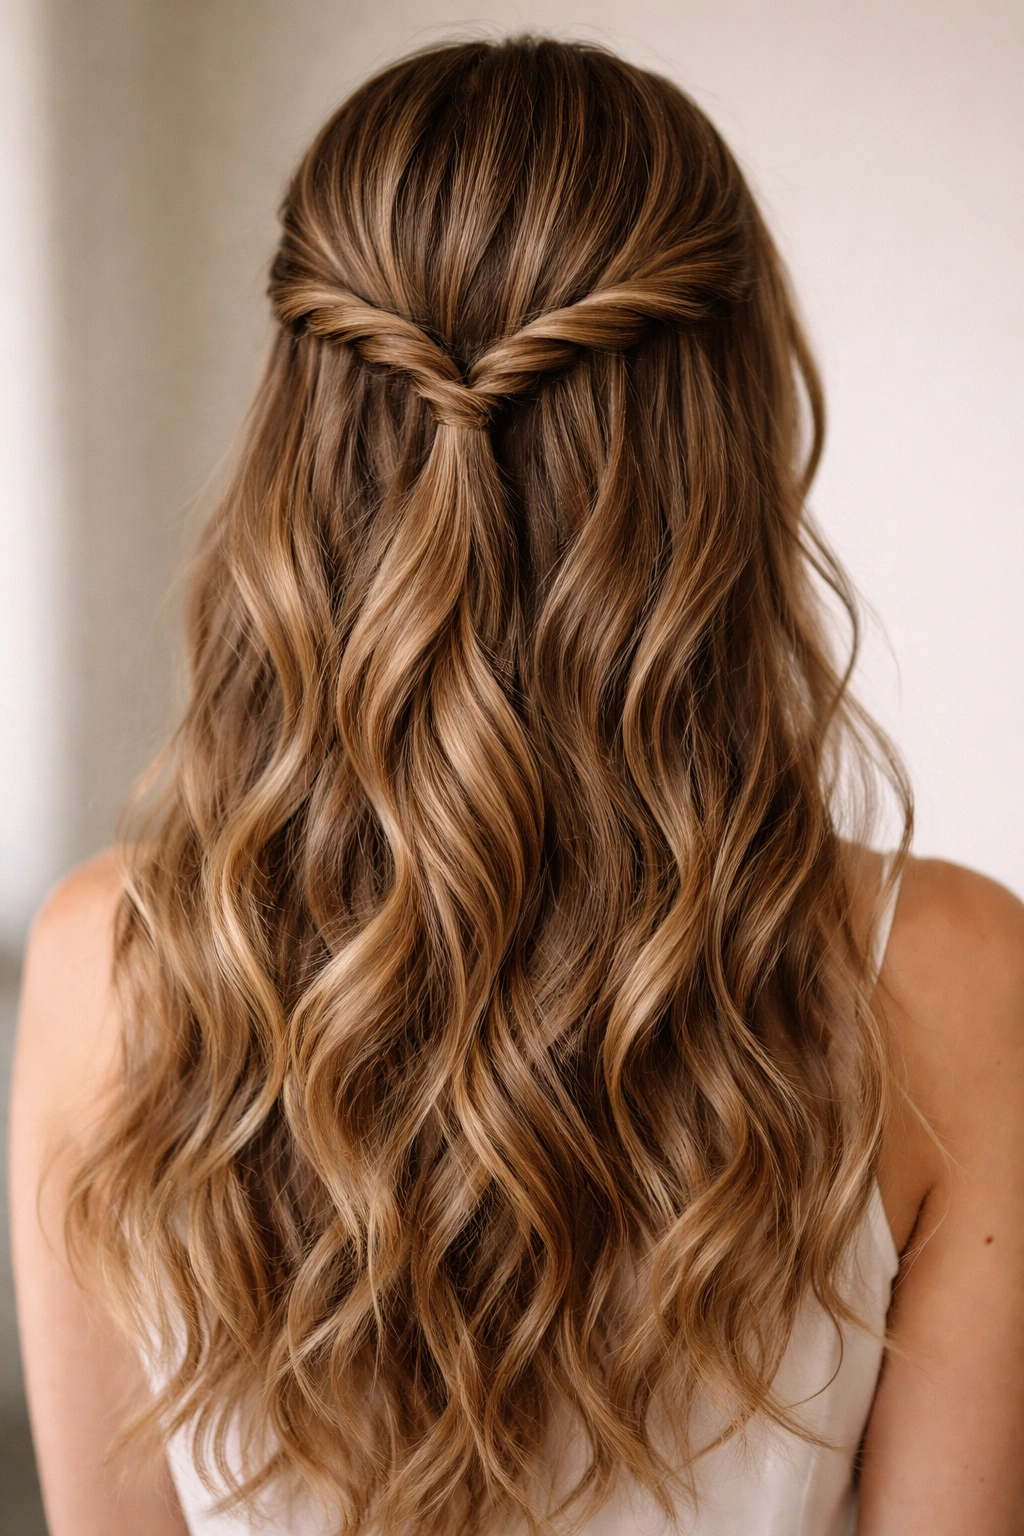
A rope twist is two strands of hair twisted together (rather than three sections braided). For a half-up variation, you might do one or two rope twists that combine at the back, creating a texture that’s different from a standard braid. The twisted strands create visible spiral lines that are especially dimensional on wavy hair.
Why Rope Twists Are Underused
Most people know how to braid but fewer people do rope twists, even though rope twists are actually simpler. Two strands twisted together are easier to control than three sections braided, especially on wavy hair where the texture can sometimes fight with a braid structure. Rope twists work with the wave pattern rather than imposing structure over it.
The Simple Rope Twist Process
- Take two sections of hair from the top of your head
- Twist each section individually while bringing them together
- Once both are individually twisted, twist them around each other toward the back of your head
- Secure at the back with a clip or elastic
- Gently pull the rope strands to loosen them and add texture
Insider note: You can do a single rope twist down the center-back, or two rope twists that meet at a clip in the back. Both versions work beautifully on long wavy hair.
20. The Effortless Hybrid
This is less a specific technique and more a philosophy: combine two or three elements you like from the other styles into one hybrid look that feels uniquely you. Maybe you do the twisted knot from style 1, but you add the pearlescent clips from style 14 and leave the tendrils from style 16. You’re borrowing from multiple techniques to create something personalized rather than following one formula exactly.
Why Hybrid Styling Is Actually the Skill
Once you’re comfortable with the foundational techniques—twisting, braiding, gathering, pinning—the real styling skill is knowing how to layer them together. A hybrid look reads as more sophisticated and intentional than a standard version of any one style because you’ve made conscious choices about what elements you want.
How to Create a Hybrid That Works
- Start with one base technique (gather, twist, braid, or hybrid gathering)
- Add one decorative element (ribbon, pins, clip style)
- Add one texture or detail element (tendrils, looseness, bubbles)
- Make sure the whole thing works together visually rather than feeling like too many things at once
- Trust your eye—if it looks good and feels balanced, it is
Pro tip: The most important part of hybrid styling is making sure you’re not overcomplicating something simple. One base technique plus one or two additional elements is usually the sweet spot. Three base techniques plus three decorative elements is probably too much.
Final Thoughts
Half up half down styles on long wavy hair work because they honor both the texture you’ve naturally got and the practical reality that you don’t always want all your hair down. The twenty styles here cover the full range—from five-second twists to more involved braiding, from casual to elevated, from bohemian to polished.
The real skill isn’t memorizing exact techniques for each style; it’s understanding the principles underneath them. Once you know how twisting works, you can create infinite variations. Once you understand how gathering and securing work, you can combine different methods. Once you’re comfortable with your waves, you start styling with them instead of against them.
Long wavy hair doesn’t need to be complicated to look beautiful. Sometimes the simplest gathered section with a good clip is exactly right. Sometimes you want to layer in twists and texture and decorative elements. The point is that you have options, and most of them take fewer than five minutes once you’ve done them once or twice. Your waves are already doing the heavy lifting visually—you’re just organizing them in ways that work for you.