A good prom hairstyle does triple duty: it should flatter your face, keep your hair in place through dancing and photos, and make you feel like the most confident version of yourself. Half up half down styles do all of this beautifully, which is exactly why they’ve become a prom favorite.
The genius of half-up half-down hair is the balance it creates. The top half is secured and elegant, so you get that intentional, polished look—but the bottom half flows freely, giving you movement, softness, and drama all at once. You get the best of both worlds: the sophistication of an updо without losing the length and shine of your hair down. Plus, these styles work whether your hair is straight, wavy, or curly, fine or thick, shoulder-length or floor-length.
Here’s what makes these styles particularly prom-friendly: they’re versatile enough to pair with any dress style, from classic ballgowns to sleek modern silhouettes. They photograph beautifully from every angle. They hold up through hours of movement without needing constant touch-ups. And because they’re not extremely complex, you can either create them yourself with patience, or bring reference photos to a stylist who can bring your vision to life quickly and affordably.
Whether you want something romantic and soft, modern and sleek, glamorous and dramatic, or intricate and show-stopping, there’s a half-up half-down style here that will make you feel like yourself—just the absolute best version on your prom night.
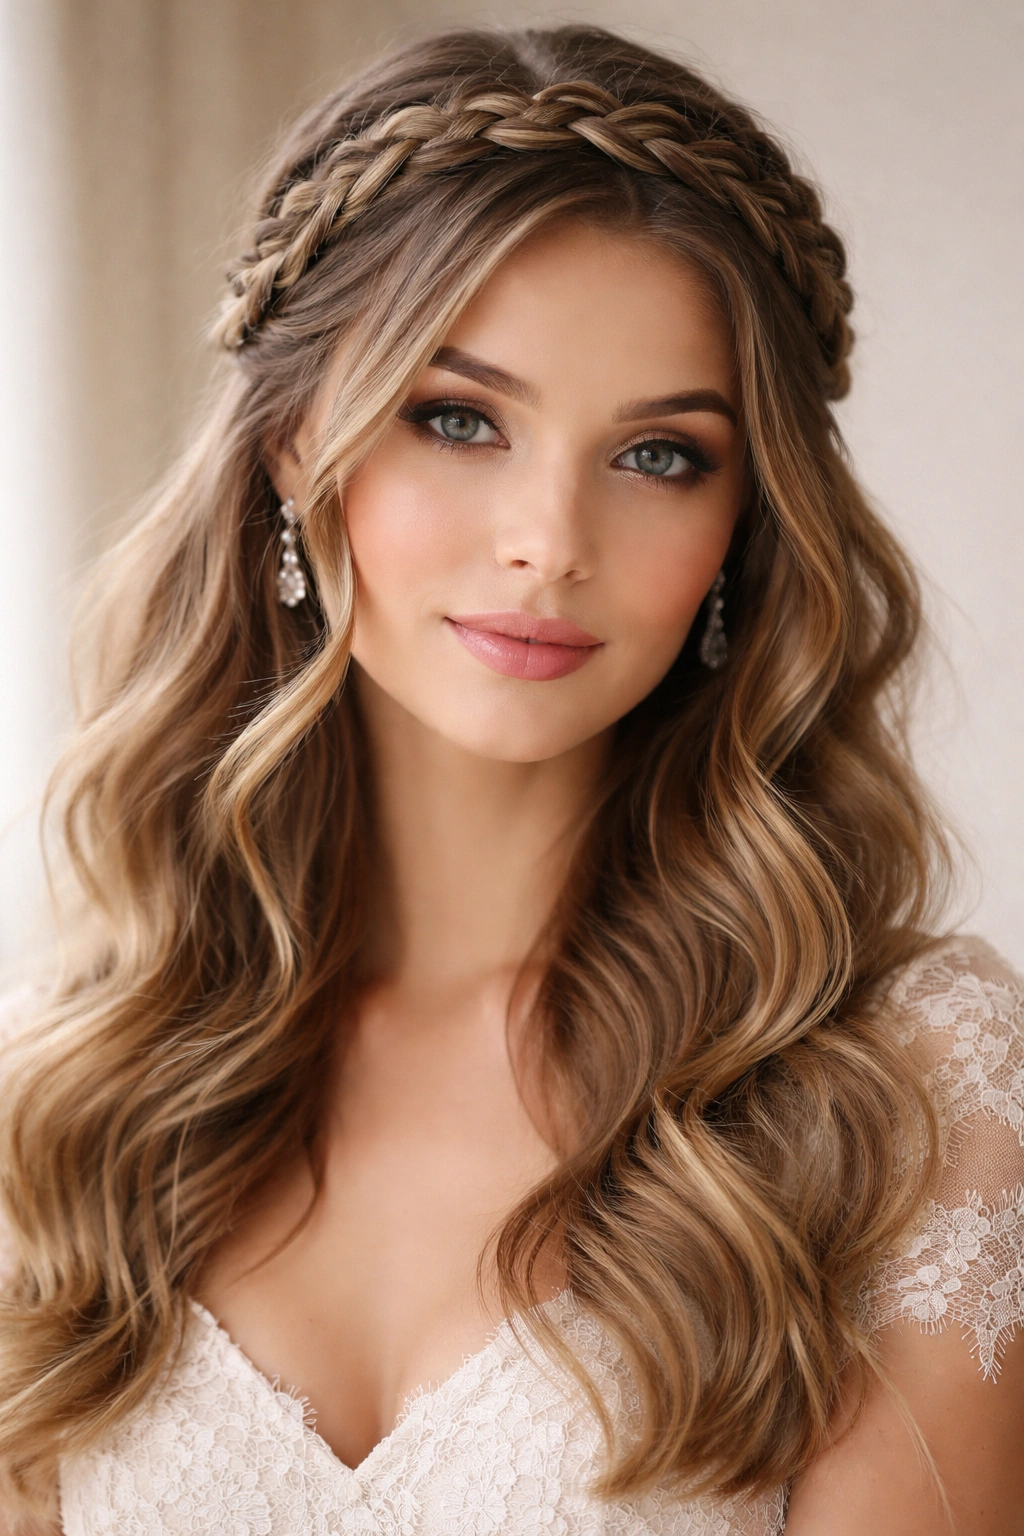
1. The Classic Twisted Crown
This is the prom hairstyle that works for absolutely everyone. Start by sectioning off hair from temple to temple across the crown—roughly the top third of your head. Divide this section into two equal parts and gently twist each side away from your face, letting the twists wind loosely around your head like a crown.
Why This Works for Prom
The twisted crown sits at the sweet spot between effortless and elegant. It looks intentional and special, but you don’t need advanced styling skills to pull it off. The twists catch light beautifully in photos, creating dimension and movement even though the hair is secured. Because the twists are loose rather than tight, the style feels romantic and soft—perfect if your dress is sleek and you want the hair to provide the texture.
Quick Facts and Tips
- Prep your hair: Slightly damp hair or hair with a light texturizing spray creates twists that grip better and hold longer through the night.
- Tease gently: Add a tiny amount of volume at the crown with a light teasing brush before you start twisting—this prevents the style from looking flat.
- Pin strategically: Use bobby pins in a color that matches your hair, inserting them through both twists at the back where they’ll be hidden.
- Finishing spray: A light hold spray keeps flyaways at bay without making the twists look stiff or unnatural.
The beauty of this style is that you can adjust the tightness of the twist to match your hair type and personal preference. Finer hair benefits from slightly tighter twists that won’t loosen throughout the night, while thicker hair can carry looser, more romantic twists.
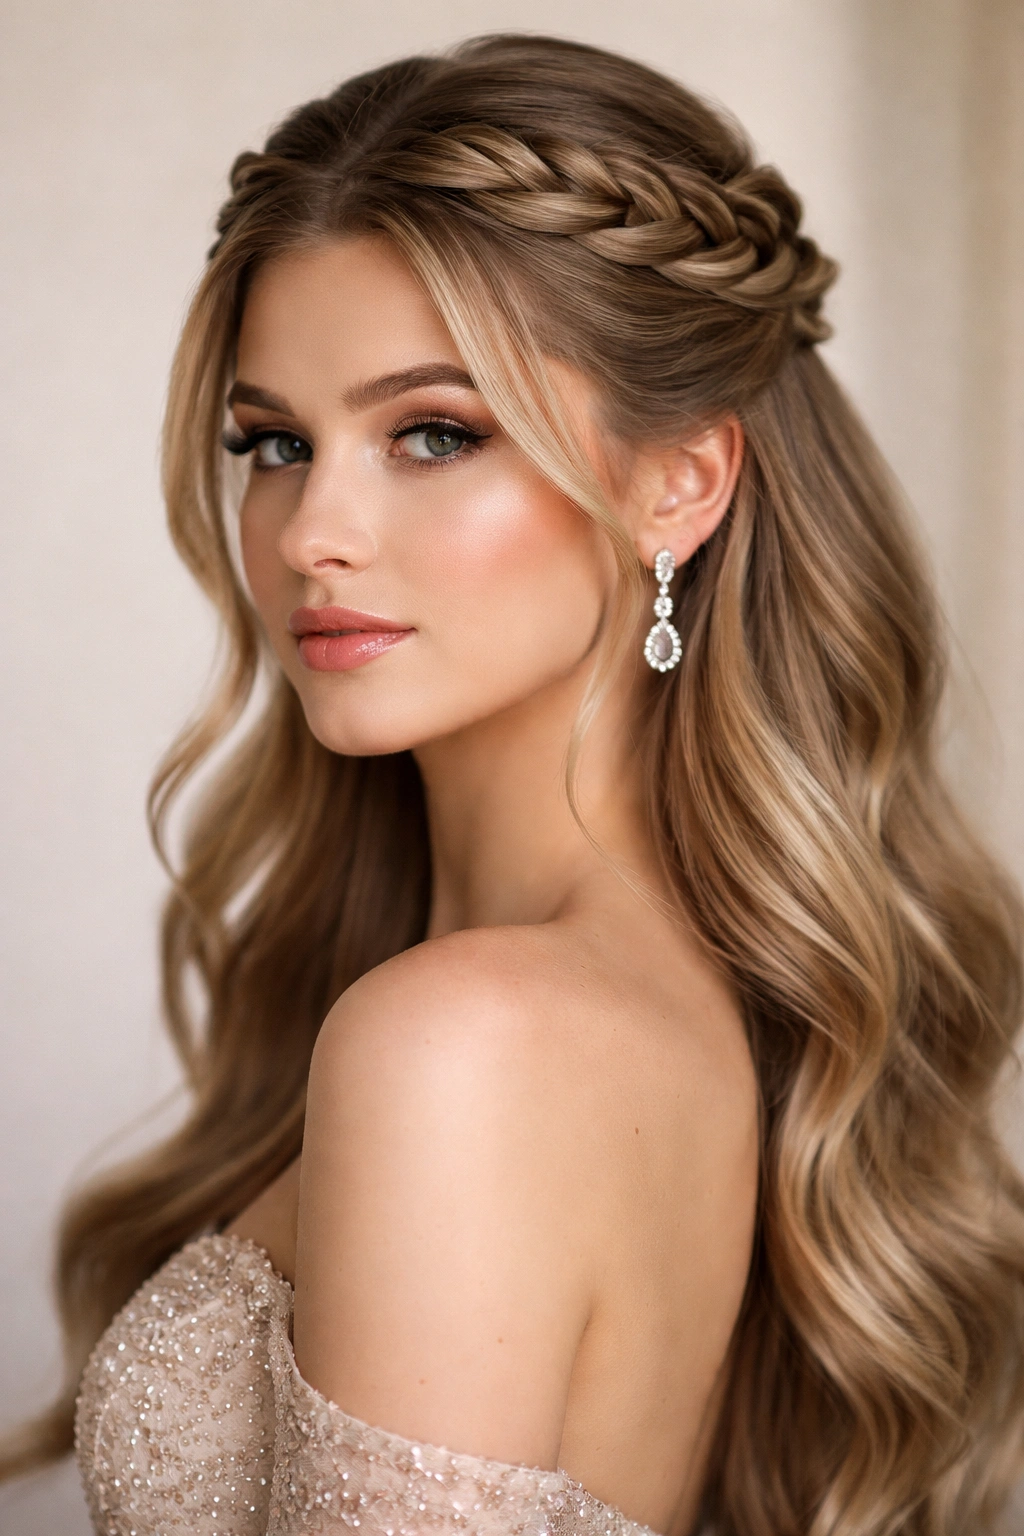
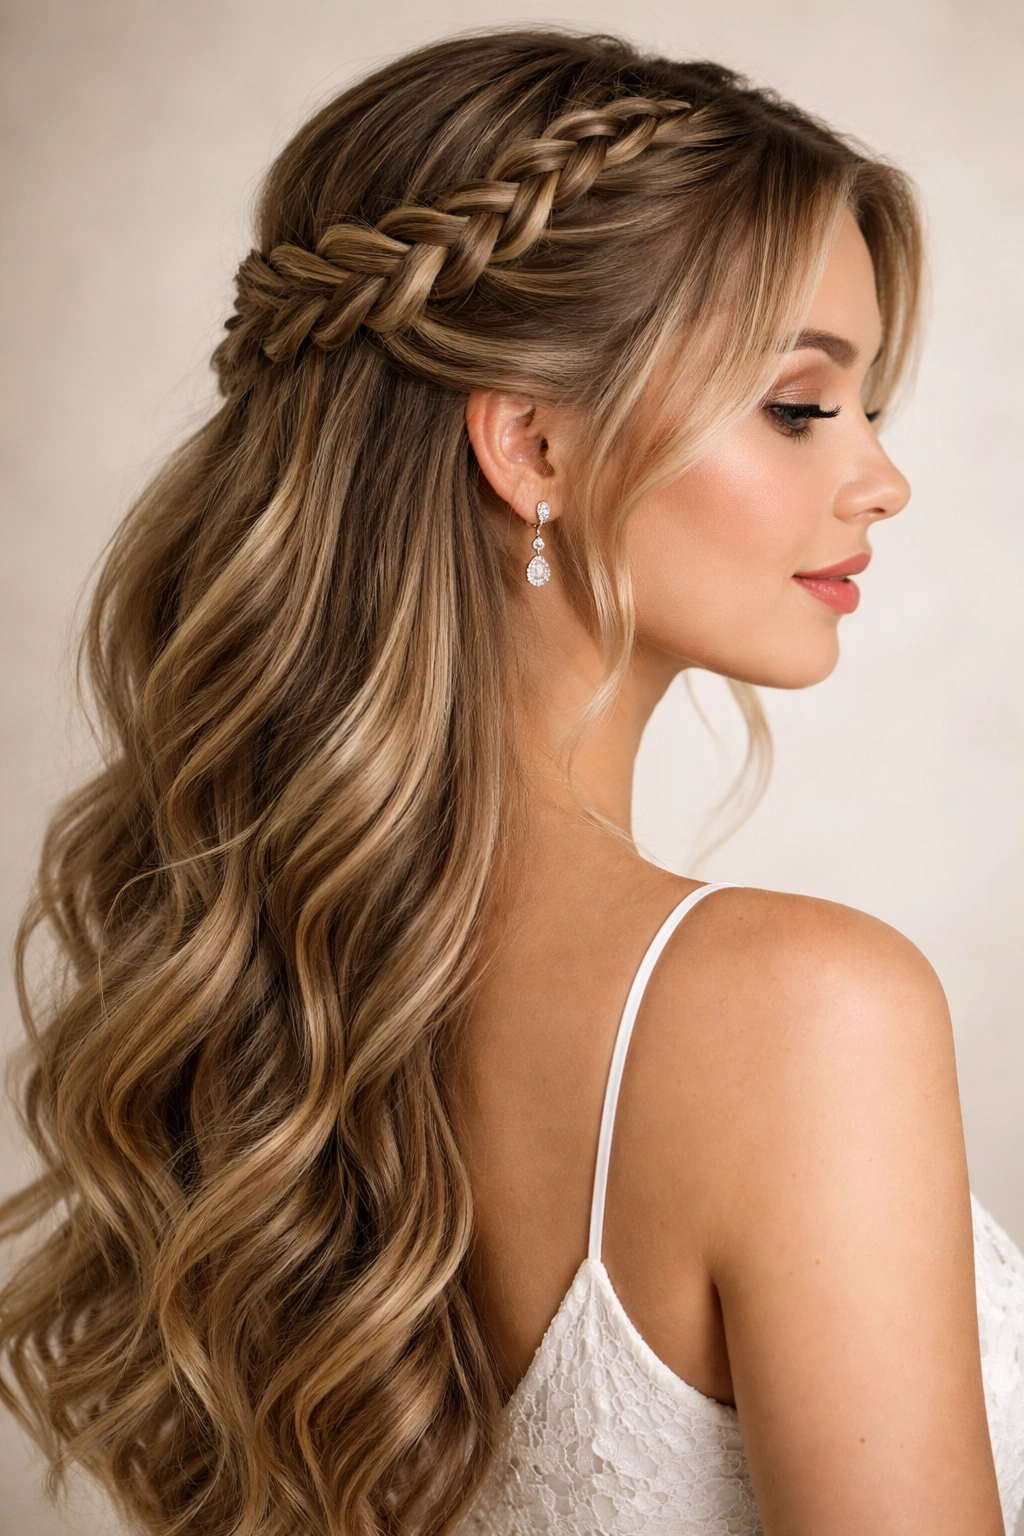
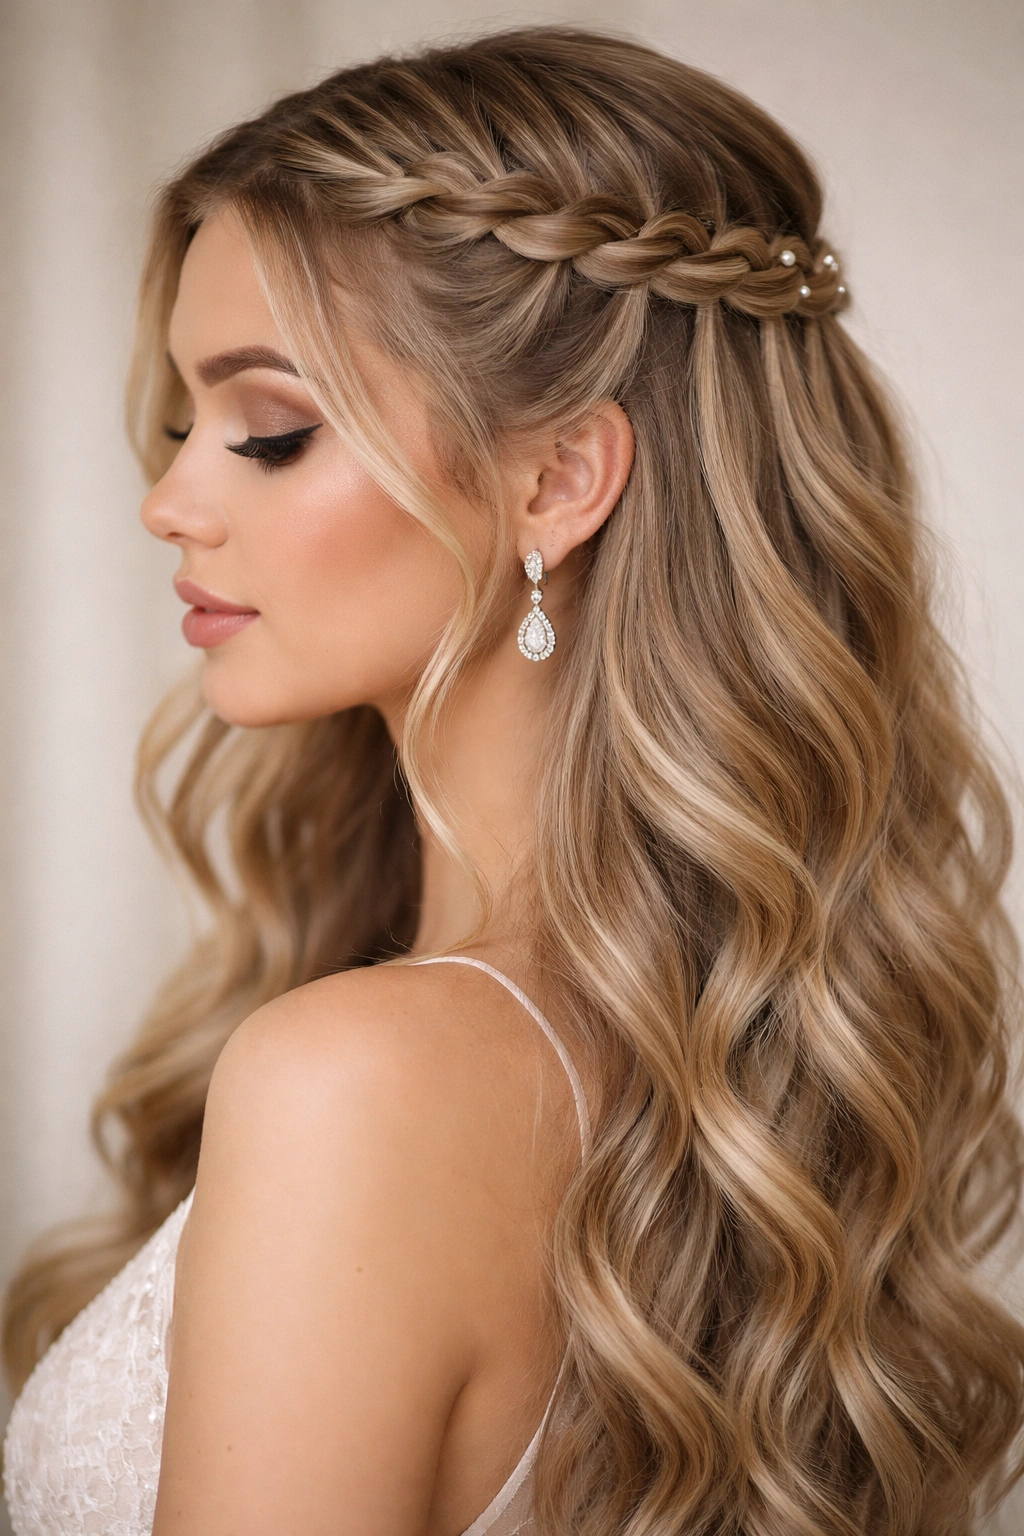
2. The Romantic Braid Crown
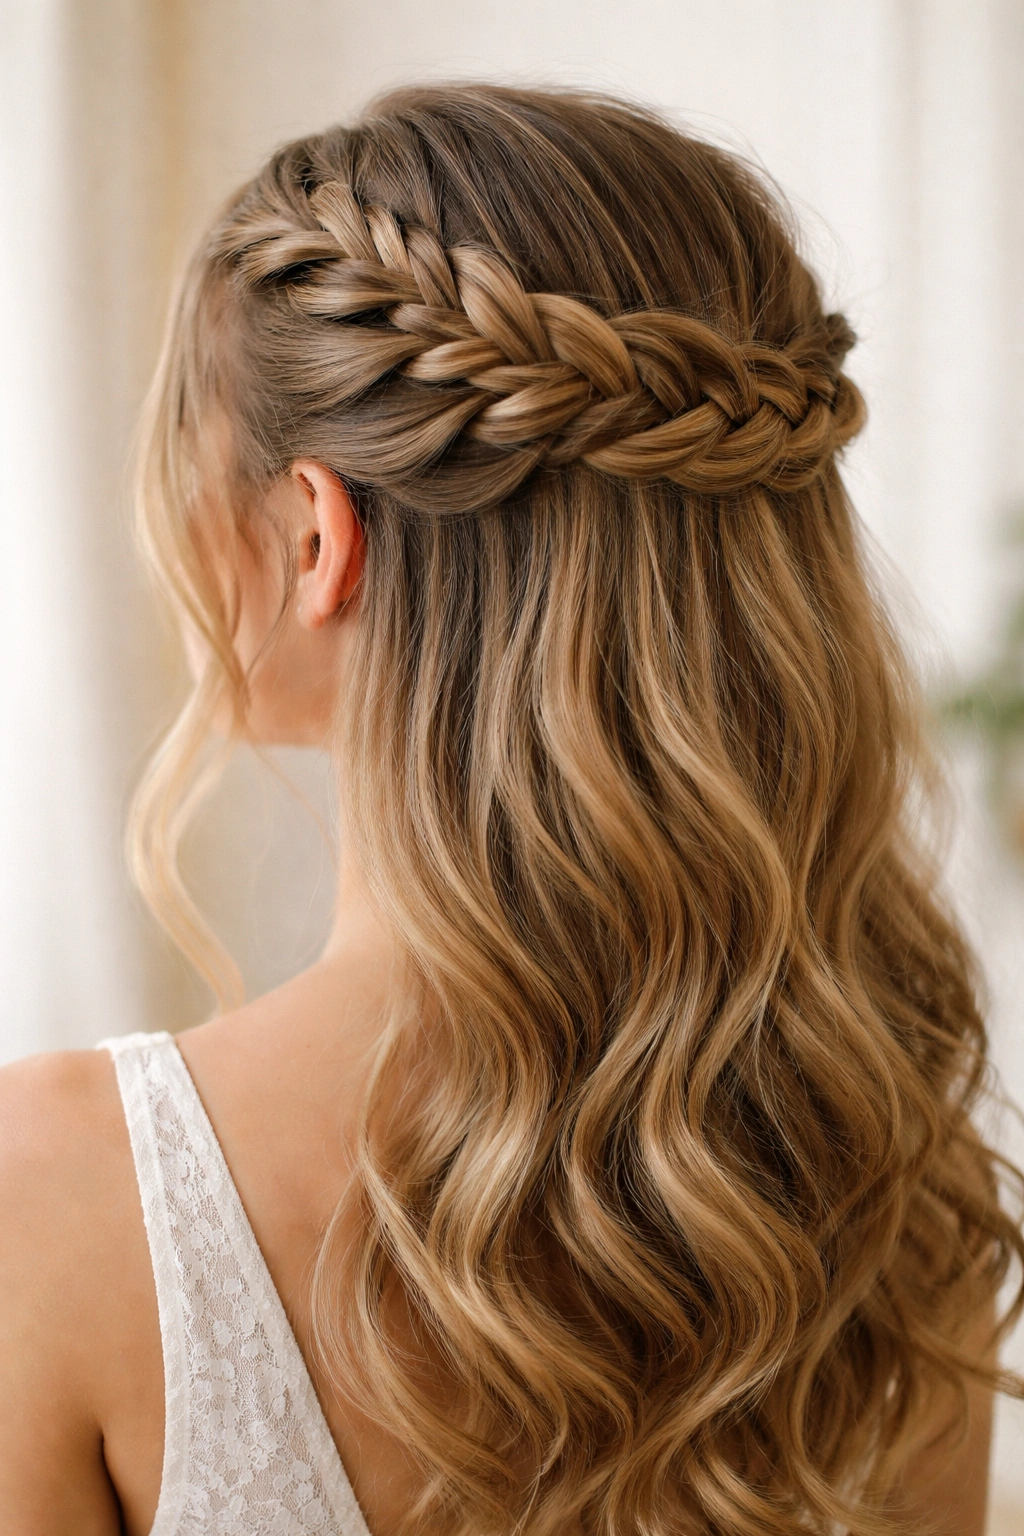
This is a half-up style that photographs like a dream and feels genuinely special without being overly complicated. French braid from one side of your head, starting above your ear and weaving the braid diagonally across the back of your crown to the opposite side. Secure it with bobby pins at the end, then gently pull the sides of the braid to make it look fuller and more romantic.
Why This Works for Prom
A braid crown reads as more intricate and special than it actually is—which is perfect for prom. The braid creates height and dimension at the crown without requiring you to pin up your entire head. The three-strand structure of a French braid is forgiving; if a few pieces slip out, it actually adds to the romantic, not-too-perfect aesthetic. This style pairs beautifully with both sleek and vintage-inspired dresses.
Quick Facts and Tips
- Width matters: A thicker braid (about 1.5 to 2 inches wide) looks more intentional and dramatic for prom than a skinny braid.
- Practice first: French braiding takes muscle memory. Run through this once or twice before prom night so your hands know what to do when it counts.
- Anchor with texture: If your hair is very straight and slippery, use a texturizing spray or braid on hair that’s a day or two old (slightly dirty hair grips better).
- Pull and fluff: After securing, gently tug on the loops of the braid to make it look fuller and less tight.
Vary this by incorporating ribbon through the braid, tucking baby’s breath or small flowers into the braid loops, or even dusting the braid lightly with shimmer or glitter spray for added sparkle.
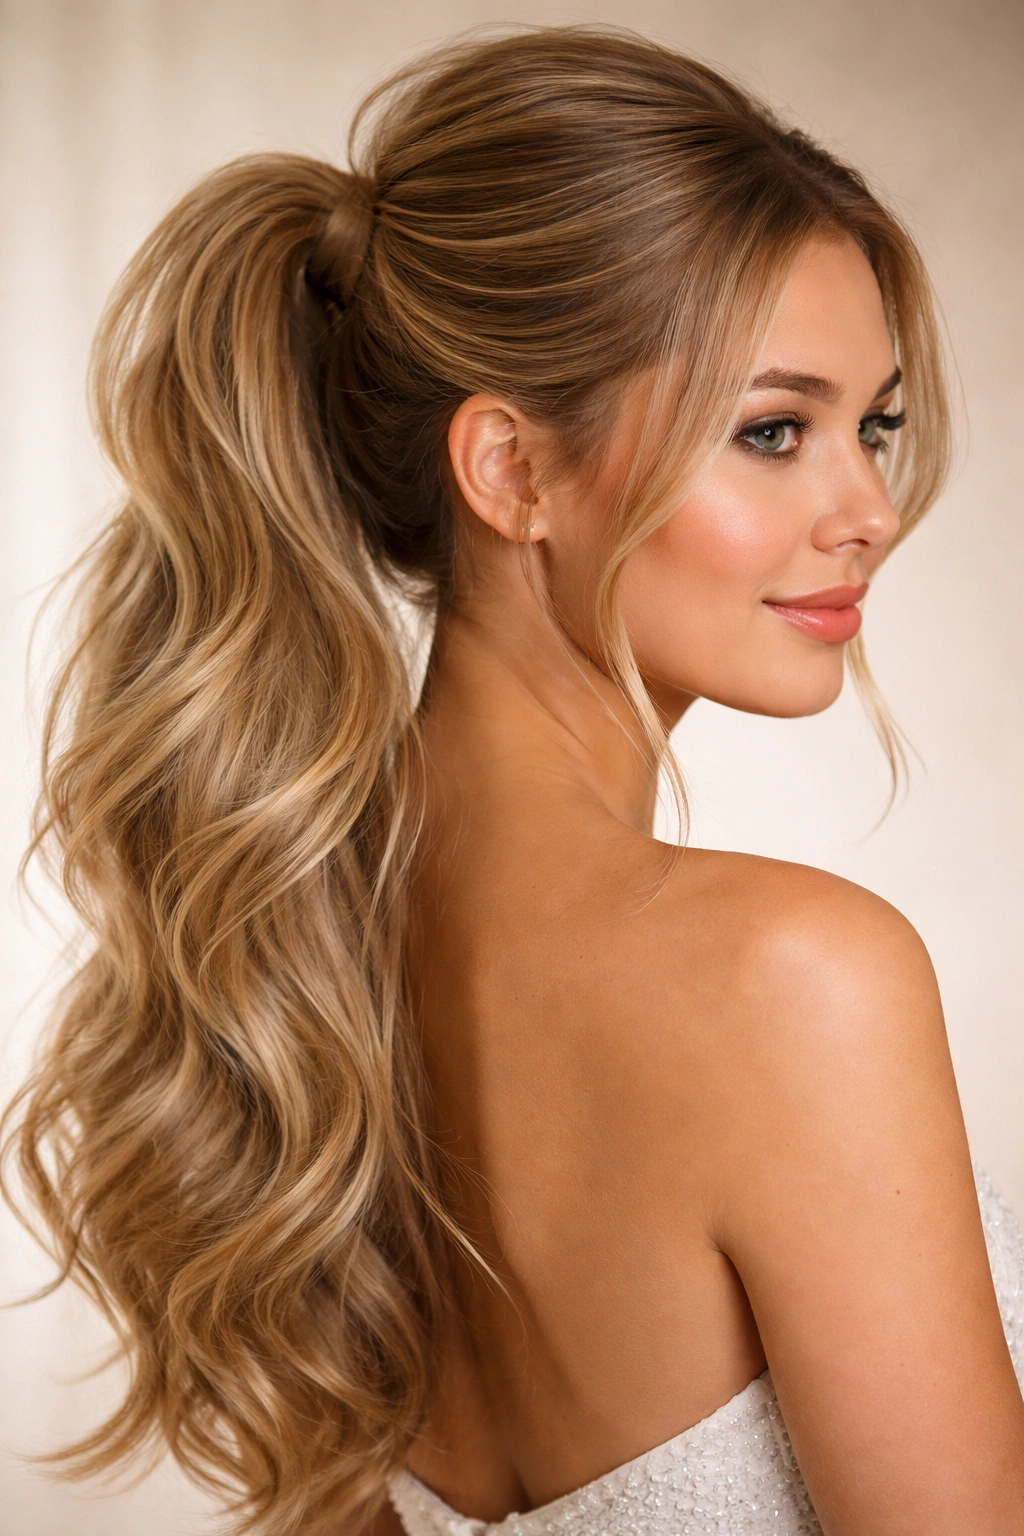
3. The Sleek Ponytail with Face-Framing Pieces
Sometimes the most striking half-up half-down style is almost minimalist. Slick back the top half of your hair into a smooth, tight ponytail positioned at the crown, then use a fine-tooth comb and smoothing cream to eliminate every flyaway from the front and sides. Leave two thin sections of hair loose on either side of your face to soften the look and add dimension.
Why This Works for Prom
This style is pure modern elegance—it’s what you’d see on a red carpet. The sleekness emphasizes your face and dress, and keeps hair completely off your shoulders and face for a sophisticated silhouette. It photographs incredibly well because there’s no visual clutter; the camera captures your face, your dress, and a clean, polished hairstyle that complements both. This is the perfect choice if you’re wearing statement earrings or an off-shoulder dress.
Quick Facts and Tips
- Use proper products: A smoothing cream or serum applied to a fine-tooth comb gives you control that styling gel alone can’t match.
- The gel trick: For extreme sleekness, apply a small amount of clear gel to your hairline and gently smooth it with your fingers or a clean, damp toothbrush.
- Secure firmly: The ponytail needs to be tight and secure so it doesn’t shift during the night. Use an elastic that matches your hair color, then cover it with a small section of hair wrapped around the base.
- Face-framing pieces: Make these pieces intentional—they should be about half an inch thick and fall naturally at your cheekbones, softening what might otherwise feel too severe.
This style looks stunning with a middle part or a deep side part. A deep side part adds drama and asymmetry, while a middle part creates a clean, editorial feel.
4. The Soft Curled Half-Up with Ribbon
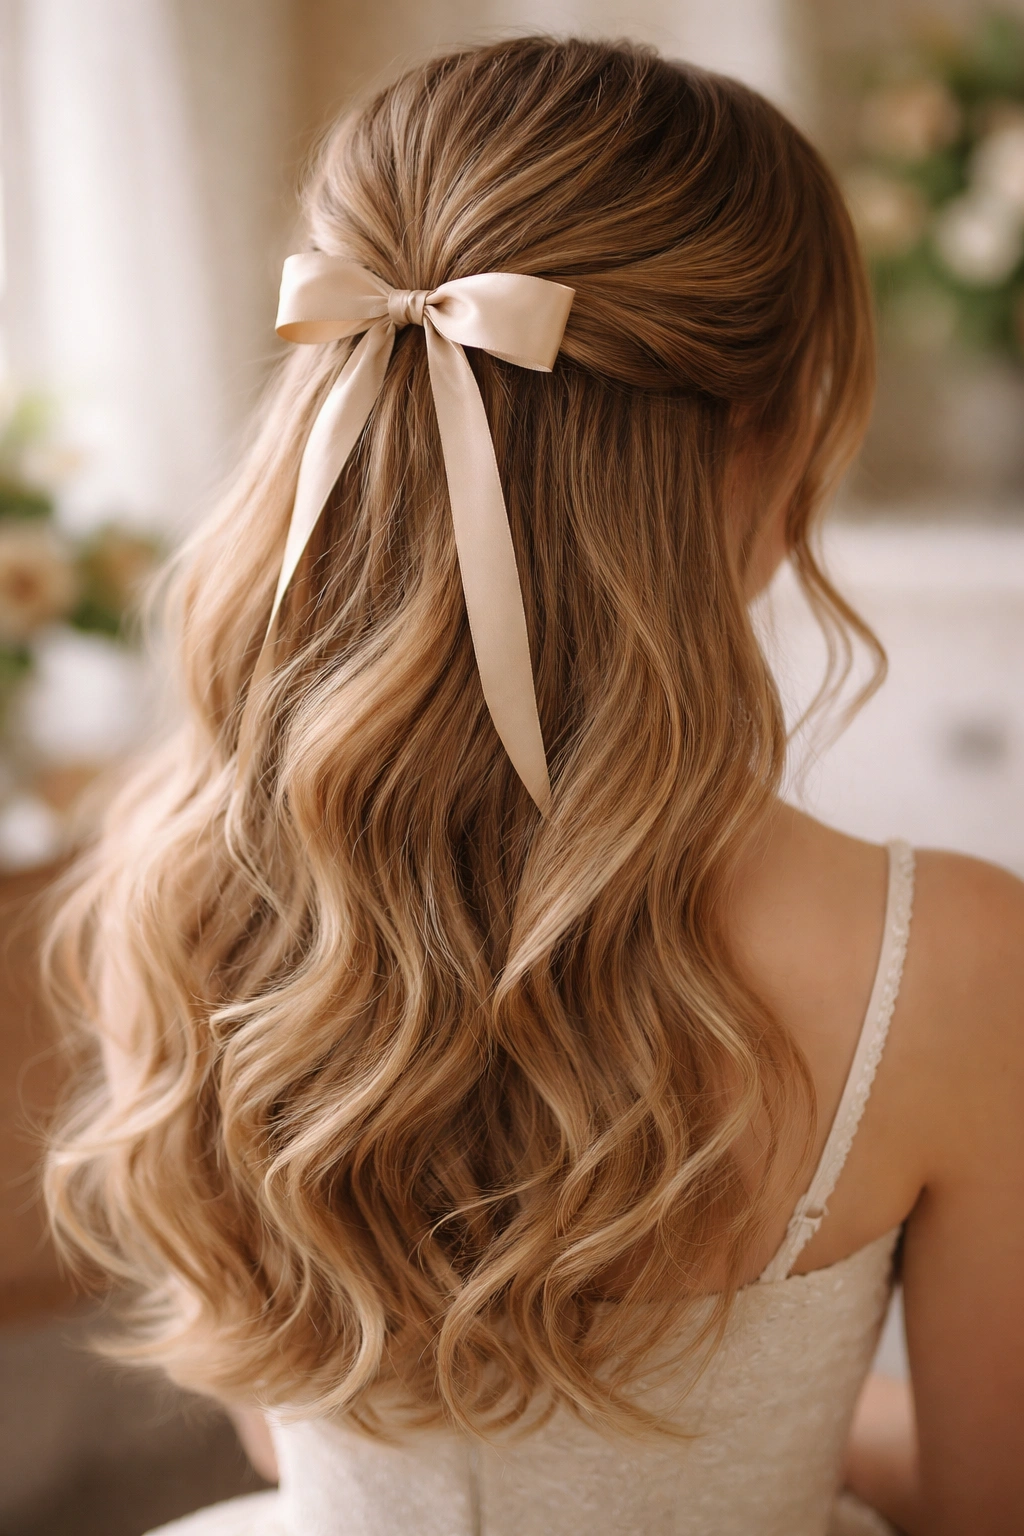
For something romantic and timeless, gather the top half of your hair into a ponytail at the crown, but don’t secure it with a traditional elastic. Instead, weave a satin ribbon through the hair just above where you’d normally place the elastic, then tie the ribbon into a bow. Curl the bottom half of your hair into loose waves, and let a few pieces fall free around your face.
Why This Works for Prom
Ribbon-tied hair feels vintage and feminine without looking costume-y. The softness of the curls paired with the delicate ribbon creates a look that’s both powerful and romantic—you look special without looking like you tried too hard. This style is forgiving because soft curls hide imperfections and work with all hair types. The ribbon adds color and interest without requiring you to do anything complicated with your hair itself.
Quick Facts and Tips
- Ribbon selection: Choose a satin or silk ribbon rather than a flimsy nylon one—it drapes beautifully and feels luxurious. Match it to your dress or your skin tone.
- Weaving technique: Part your hair into two sections horizontally at your crown. Lay the ribbon in the part, then twist or braid each section around the ribbon to secure it.
- Curl your ends: Curling the bottom half makes this style feel cohesive and intentional. Use a curling iron to create waves, or curl your entire hair before you section it up.
- Face-framing pieces: Pull out one or two thin pieces on each side of your face and curl them slightly forward—this softens everything.
You can tie the ribbon in a simple bow, a more elaborate looped bow, or let the ribbon tails flow down the back of your hair for extra romance.
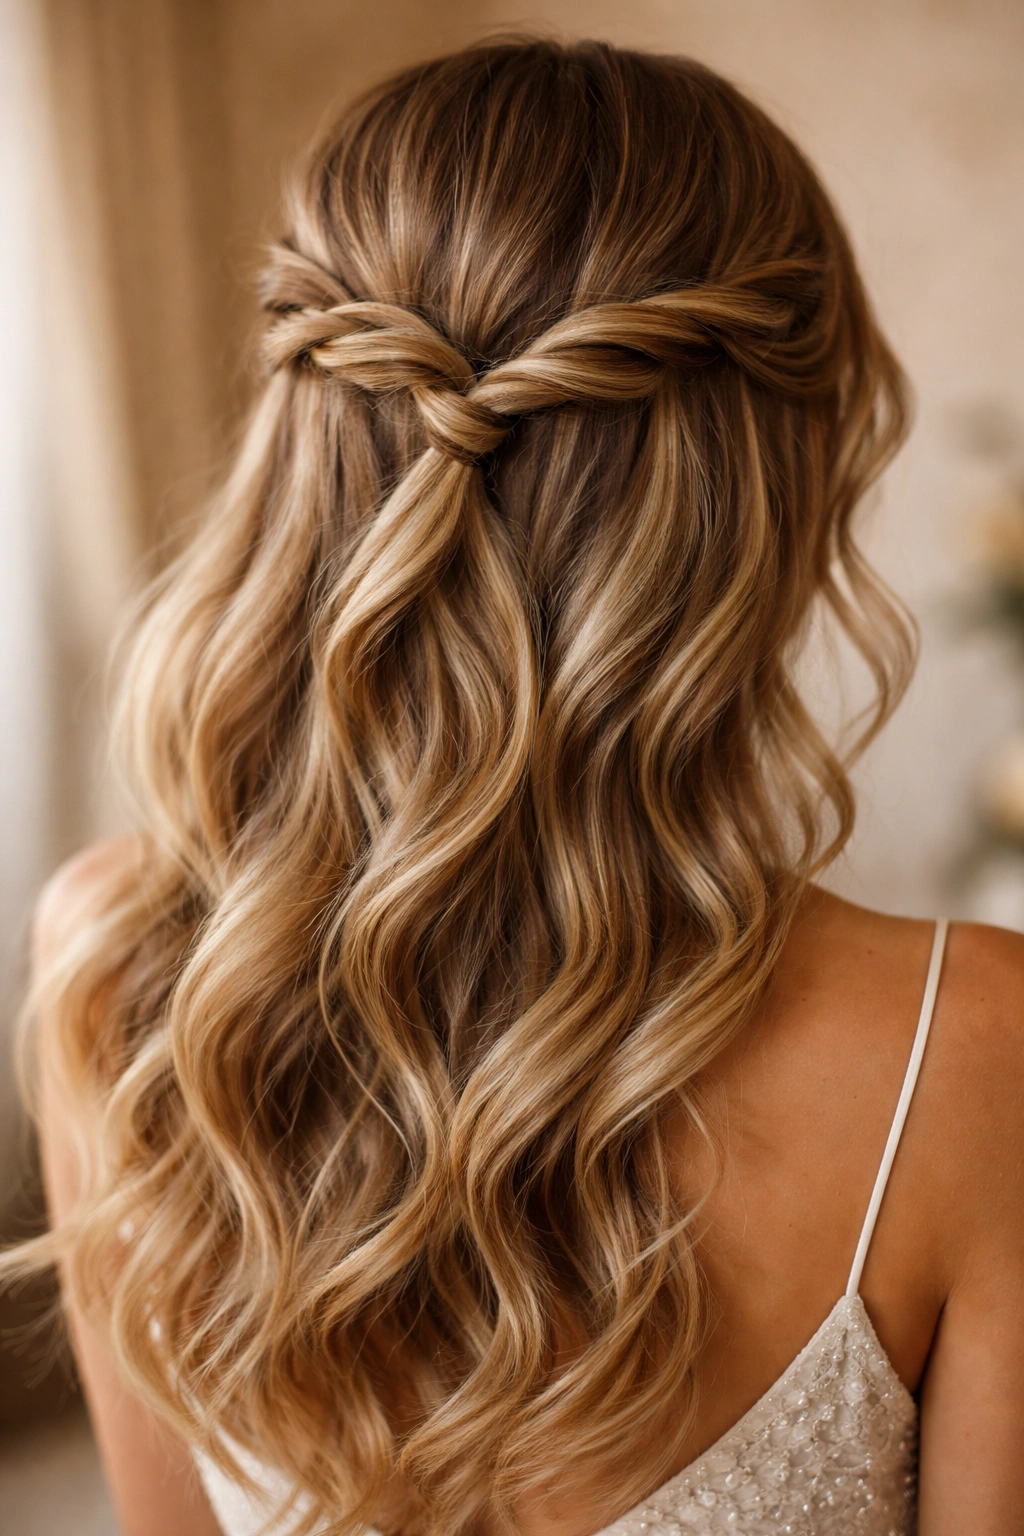
5. The Double Twist with Center Part
Divide your hair down the middle into two equal sections. On each side, take a thick section of hair from the temple area, twist it loosely back toward the center of your head, and pin both twists together at the back of your crown. Leave the rest of your hair down and wavy, with the twists creating a decorative frame around your face.
Why This Works for Prom
This style is more sculptural and interesting than a single twisted crown, but just as easy to execute. The two twists create symmetry and balance, which feels intentional and special. Because the twists meet at the back rather than going all the way around your head, this style works beautifully with strapless or off-shoulder dresses—nothing competes with your neckline and shoulders. The center part adds a modern, editorial edge.
Quick Facts and Tips
- Twist thickness: The twists should be about 1 to 1.5 inches thick to look substantial and photogenic. Thinner twists can look wispy and get lost.
- Start higher: Begin each twist slightly higher than your temple (more toward the arch of your eyebrow) so the twists are more visible and frame your face better.
- Pin at an angle: Cross the two twists at the back of your crown and pin them where they intersect. This creates a more interesting silhouette than pinning them straight across.
- Keep it textured: Wavy or curly hair shows off the contrast between the neat twists and the free-flowing waves beautifully.
This works especially well if your hair is naturally straight and you want the half-up section to provide structure and interest against flowing waves below.
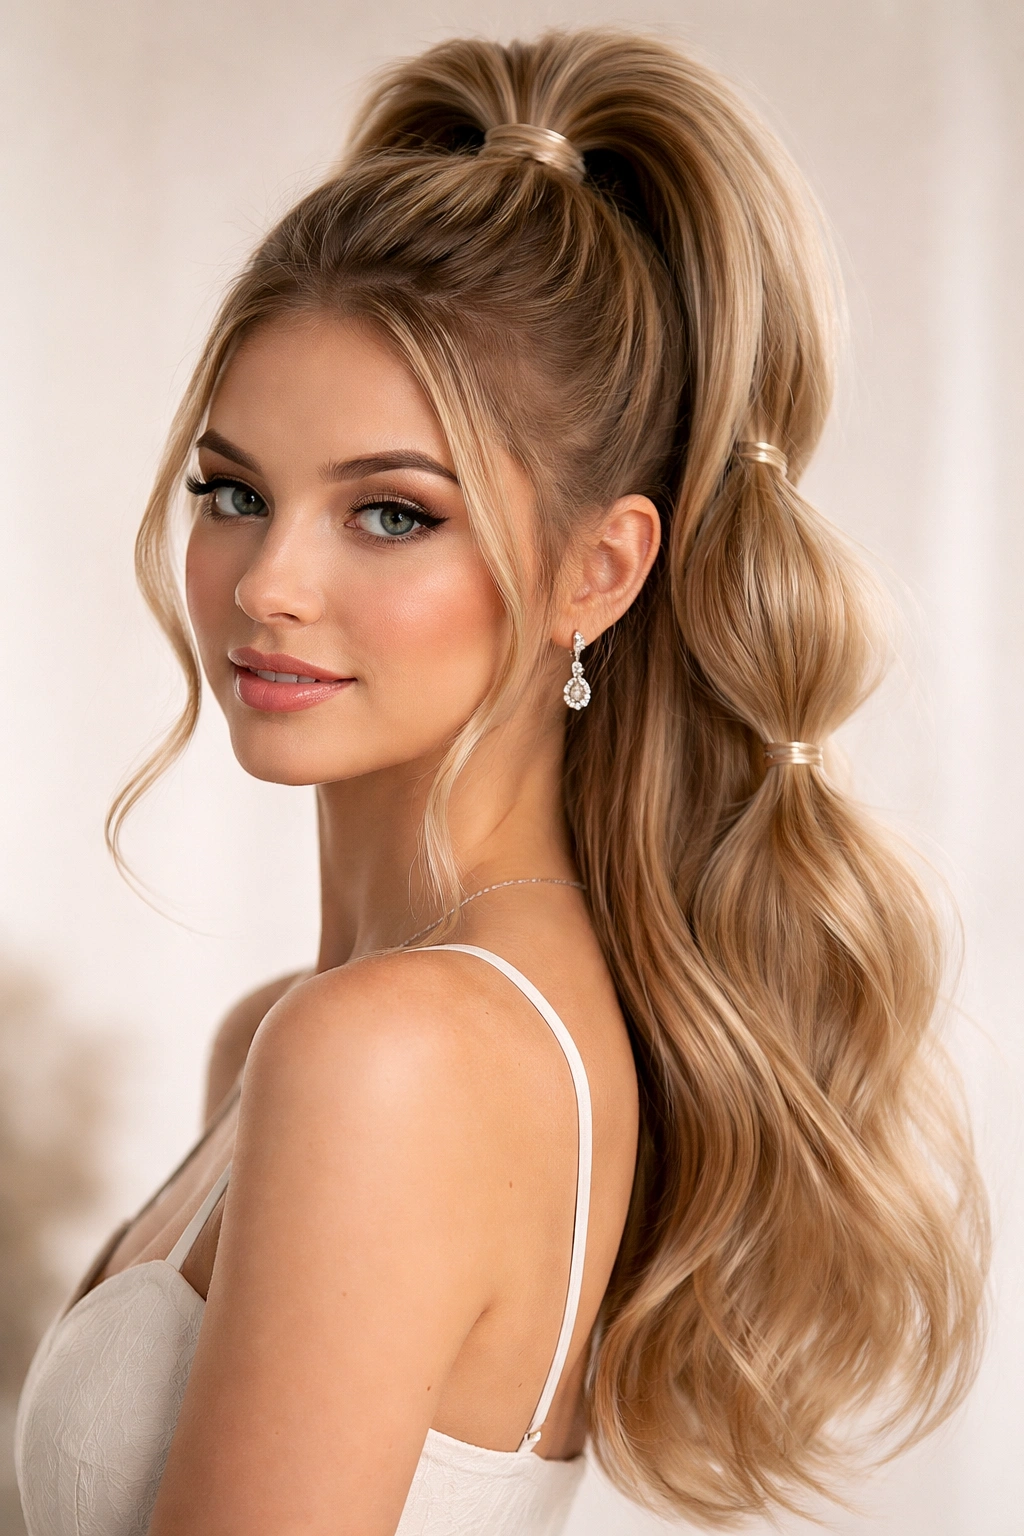
6. The Low Twisted Ponytail
Gather the top half of your hair into a low ponytail positioned at the nape of your neck rather than at the crown. Before securing the ponytail, gently twist the entire gathered section so it spirals, then secure the twist with an elastic. The bottom half of your hair flows freely below the twist.
Why This Works for Prom
The low positioning of this style creates an elegant, elongated silhouette—perfect for prom photos. The twist adds visual interest and texture without requiring you to section and pin anything. Because it’s low rather than high, it doesn’t fight with updos or cause unwanted volume at the crown. This style works beautifully with formal, classic, or vintage-inspired dresses. It’s also perfect if you have length you want to show off—the bottom half of your hair is completely visible and can be styled dramatically.
Quick Facts and Tips
- Tease the base: Before twisting, add a tiny amount of texture at the crown with a light teasing brush. This prevents the top of your head from looking flat.
- Twist generously: Don’t twist so tightly that you cut off your own circulation, but twist enough that the spiral is clearly visible.
- Hide the elastic: Wrap a small section of hair from the ponytail around the elastic and pin it underneath to hide the elastic completely.
- Curve the twist: As you twist, gently curve the gathered hair so the twist follows the contour of the back of your head rather than going straight down.
Curling the bottom half of your hair into waves creates beautiful contrast with the spiral twist and adds drama to the overall look.
7. The Braided Waterfall
This style looks complicated but is actually quite manageable. Start a regular three-strand braid at the side of your head, but as you braid, let small sections of hair fall out of the braid as you work toward the back of your head—this creates the “waterfall” effect. Secure the braid at the back of your crown with bobby pins.
Why This Works for Prom
A waterfall braid is visually striking without looking overdone. It’s the kind of style that makes people stop and ask how you did it—which is always a confidence boost. The braid pulls hair off your face while still leaving most of it down, so you get the best of both worlds. This style works beautifully with romantic dresses, vintage styles, and even modern sleek gowns as a contrast element.
Quick Facts and Tips
- Practice this one: A waterfall braid requires more coordination than some styles. Practice at least twice before prom night to get the rhythm down.
- Section size matters: The sections of hair you’re braiding should be about half an inch thick. Any thicker and the braid looks loose and unrefined; any thinner and it disappears.
- Consistency in the drops: Drop sections of hair at regular intervals (roughly every inch or so) as you move the braid back. This makes the waterfall look intentional rather than accidental.
- Secure thoroughly: Use bobby pins in a color matching your hair, and pin multiple times along the braid to prevent it from sliding out.
Combine this with baby’s breath or small flowers threaded through the braid, or add a light shimmer spray for extra prom-night magic.
8. The Textured Knot Half-Up
Gather the top half of your hair at the crown and, instead of twisting or braiding, tie it into a loose knot (the kind you’d tie in a rope). Before pulling it tight, gently pull the loops of the knot to make them look fuller and more textured. Secure the knot with bobby pins, leaving the bottom half flowing.
Why This Works for Prom
A knotted half-up is genuinely unique—most people won’t have seen it at prom before. It looks more artistic and intentional than a simple twist, but takes less time than a braid. The texture created by pulling the knot loops open adds dimension and catches light beautifully in photos. This style signals that you put thought into your look without looking like you spent three hours on your hair.
Quick Facts and Tips
- Knot tightness: Pull the knot only loosely tight—if you cinch it down too much, it looks harsh and flattens out. The goal is for the knot to look soft and almost like an accident of elegance.
- Pull and fluff: After tying the knot, spend 30 seconds gently pulling on each loop to open them up and create volume and texture.
- Textured hair base: This works especially well with wavy or curly hair, which already has dimension. On straight hair, add texture with a texturizing spray or crimping tool before you tie the knot.
- Pin from underneath: Insert bobby pins from underneath the knot, through the loops, so they’re completely hidden.
Vary this by pulling the knot tighter for a more structured look, or leaving it very loose for a romantic, undone feel.
9. The Elaborate Crown Braid with Accessories
French braid from one side of your head to the other, wrapping around the back to create a crown effect. Instead of securing with a simple elastic, add a decorative comb, jeweled clip, or fresh flower arrangement at the end of the braid. The bottom half of your hair flows freely.
Why This Works for Prom
A crown braid is the ultimate romantic, special-occasion style. It’s what princesses wear, which automatically makes you feel transformed on prom night. The elaborate appearance (which, again, isn’t as difficult as it looks) makes this feel like a serious styling moment. Adding a decorative element—a jeweled comb, a pearl clip, a spray of baby’s breath—elevates it from nice to memorable. This is perfect if you want to feel like the most elegantly styled person in the room.
Quick Facts and Tips
- Start high, end low: Begin your braid at the temple on one side and curve it around the back of your head, ending at the opposite temple or slightly below. This distributes the braid evenly and creates a balanced crown effect.
- Thickness and texture: Make your braid about 1.5 to 2 inches thick. Before you begin, consider texturizing your hair so the braid has something to grip.
- Accessory choice: The accessory you choose should coordinate with your dress and jewelry. A jeweled comb works for sparkly dresses; baby’s breath or greenery works for romantic looks; a pearl clip works for classic elegance.
- Secure everything: Use bobby pins to secure the braid, then position your accessory so it sits at the lowest point of the crown. Pin the accessory in place separately so it won’t shift.
This style looks especially stunning in photos because the braid frames your face beautifully from every angle.
10. The Half-Up Bubble Ponytail
Gather the top portion of your hair into a high ponytail at the crown. Instead of leaving it as a single ponytail, divide it into three or four sections from top to bottom and secure each section tightly with a small elastic. The result looks like a series of “bubbles” cascading down from your crown, with the bottom half of your hair remaining free and flowing.
Why This Works for Prom
The bubble ponytail is playful, modern, and unexpectedly sophisticated. Each bubble catches light and creates visual interest, making the hairstyle itself a statement. Because it’s positioned high and uses your own hair rather than requiring complicated braiding, it’s actually quite comfortable to wear all night—the elastics distribute the weight of your hair naturally. This works beautifully with trendy, fashion-forward, or unconventional prom dresses.
Quick Facts and Tips
- Bubble size: Make each section roughly 2 to 3 inches of ponytail length. Consistent sizing makes the bubbles look intentional rather than uneven.
- Elastic selection: Use small elastics that match your hair color. If you want them to be visible and add to the design, use decorative elastics or colored ones that coordinate with your dress.
- Tightness balance: Each elastic should be tight enough that the bubble holds its shape but loose enough that it doesn’t look strangled. You’re aiming for a slightly puffy effect.
- Curl the bottom half: Curling the loose bottom half creates better contrast with the structured bubbles and adds volume and drama.
You can make this as playful or as elegant as you want by adjusting tightness, bubble size, and the texture of the bottom half.
11. The Side-Swept Half-Up
Gather the hair from the top and back of your head into a ponytail, but position it dramatically to one side rather than at center back. The ponytail should sit at the back of your head but angled toward one shoulder. Sweep the bottom half of your hair to the opposite side so it cascades over one shoulder.
Why This Works for Prom
A side-swept half-up is undeniably dramatic and asymmetrical—it photographs like a dream and creates an elongated, flattering silhouette. The off-center positioning gives this style a fashion-editorial quality. It’s especially flattering if you have an off-shoulder dress, because the sweep of hair on one side balances the exposed shoulder on the other. This style also works beautifully if you’re wearing your hair with side-swept bangs or longer pieces around your face.
Quick Facts and Tips
- Positioning is everything: Gather your ponytail slightly to one side of center, not all the way to the edge. This creates sweep without looking lopsided.
- Smooth and sleek: Use a smoothing serum and fine-tooth comb to smooth the top section and create a polished look. This isn’t a casual, textured style—sleekness is key.
- Anchor the sweep: You can curl the bottom half into waves that naturally fall to one side, or use a light texturizing spray to encourage the hair to cascade rather than hang straight.
- Hide the elastic: Position the elastic at the back, and wrap a small section of hair around it to hide the elastic completely.
This style is perfect paired with a deep side part and looks stunning from the side profile—important for prom photos that often capture you in profile as you walk into the venue.
12. The Twisted Tiara
Gather the top third of your hair at the crown and divide it into two thick sections. Twist each section and bring the twists together at the back of your head. Instead of securing them into a ponytail, wrap the twisted sections around each other to create a tiara-like crown effect, pinning the result so it sits at the very top of your head. The bottom portion of your hair flows freely, either straight or wavy.
Why This Works for Prom
This style is regal and intentional without being overly complicated. The twisted tiara creates a focal point at the crown that’s both striking and elegant. It draws eyes upward, creating a flattering frame for your face. Because the twisted sections wrap around each other, the style feels more intricate and special than a simple twist, but it’s still achievable without advanced styling skills. This pairs beautifully with any dress style.
Quick Facts and Tips
- Section thickness: Make each twisted section about 1.5 inches thick at its widest point. This creates a substantial, visible tiara effect rather than something wispy.
- Tightness of twist: Twist loosely enough that the twists look soft and romantic, not so loose that they unravel. Think “firm but gentle.”
- Intertwining technique: As you bring the twists together at the back, wrap them around each other once or twice before pinning. This creates a more interesting effect than simply crossing them.
- Pin strategically: Use multiple bobby pins in a color matching your hair, anchoring the tiara crown at several points so it doesn’t shift.
Lightly tease the top of your head before you start this style for subtle volume and dimension at the crown.
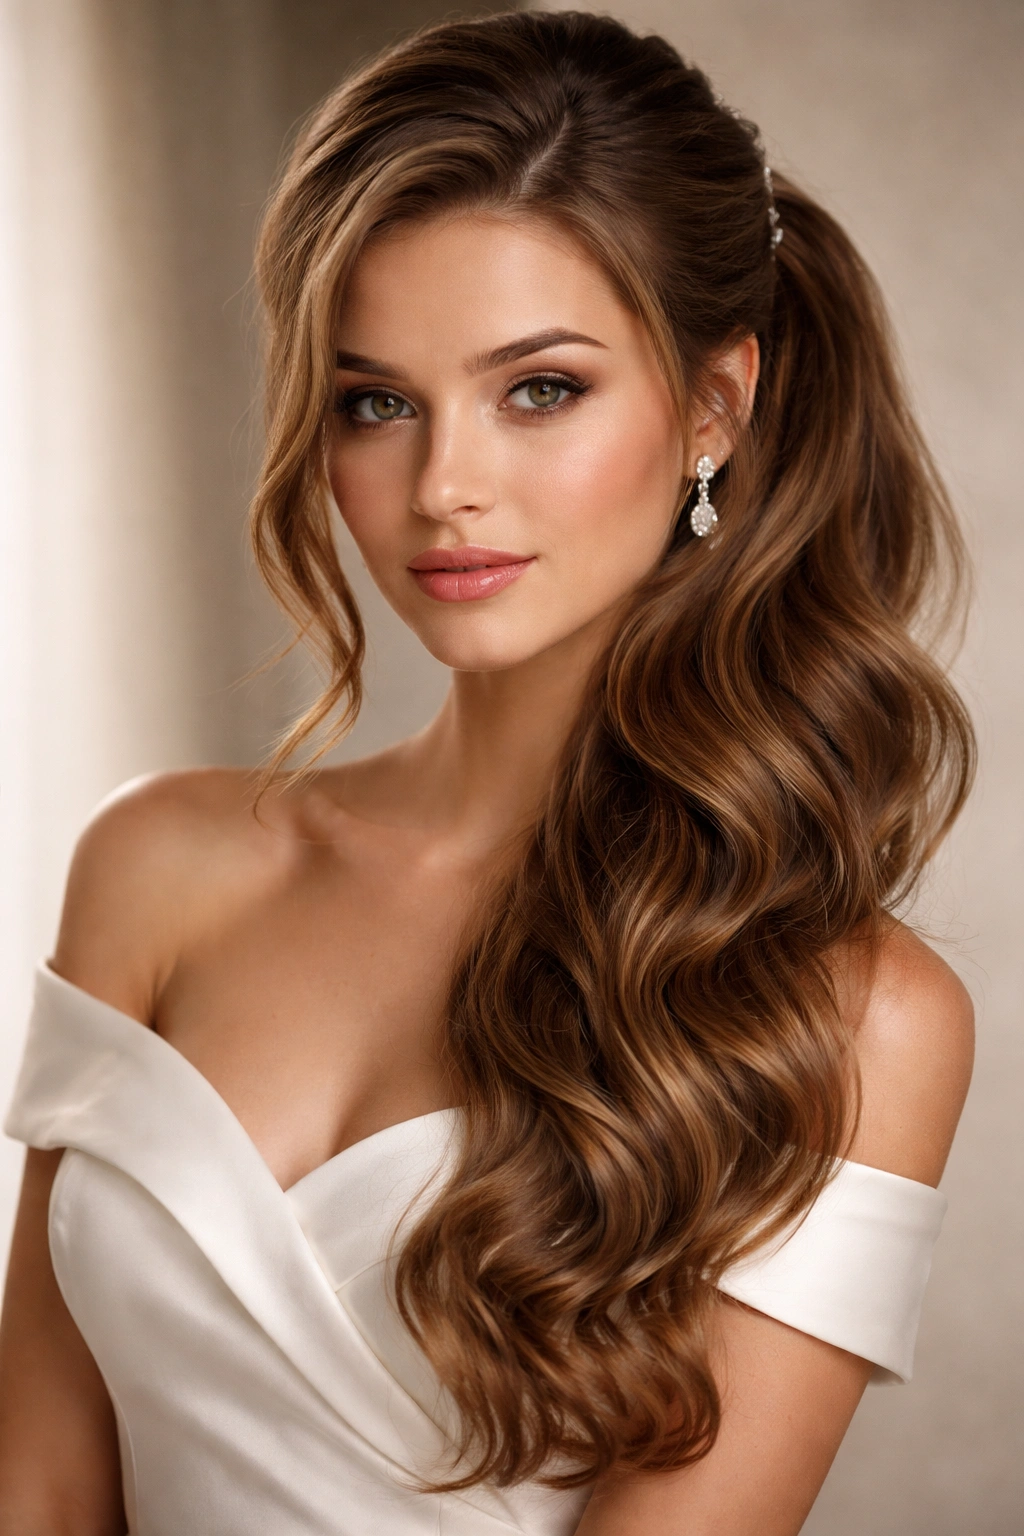
13. The Half-Up with Cascading Waves
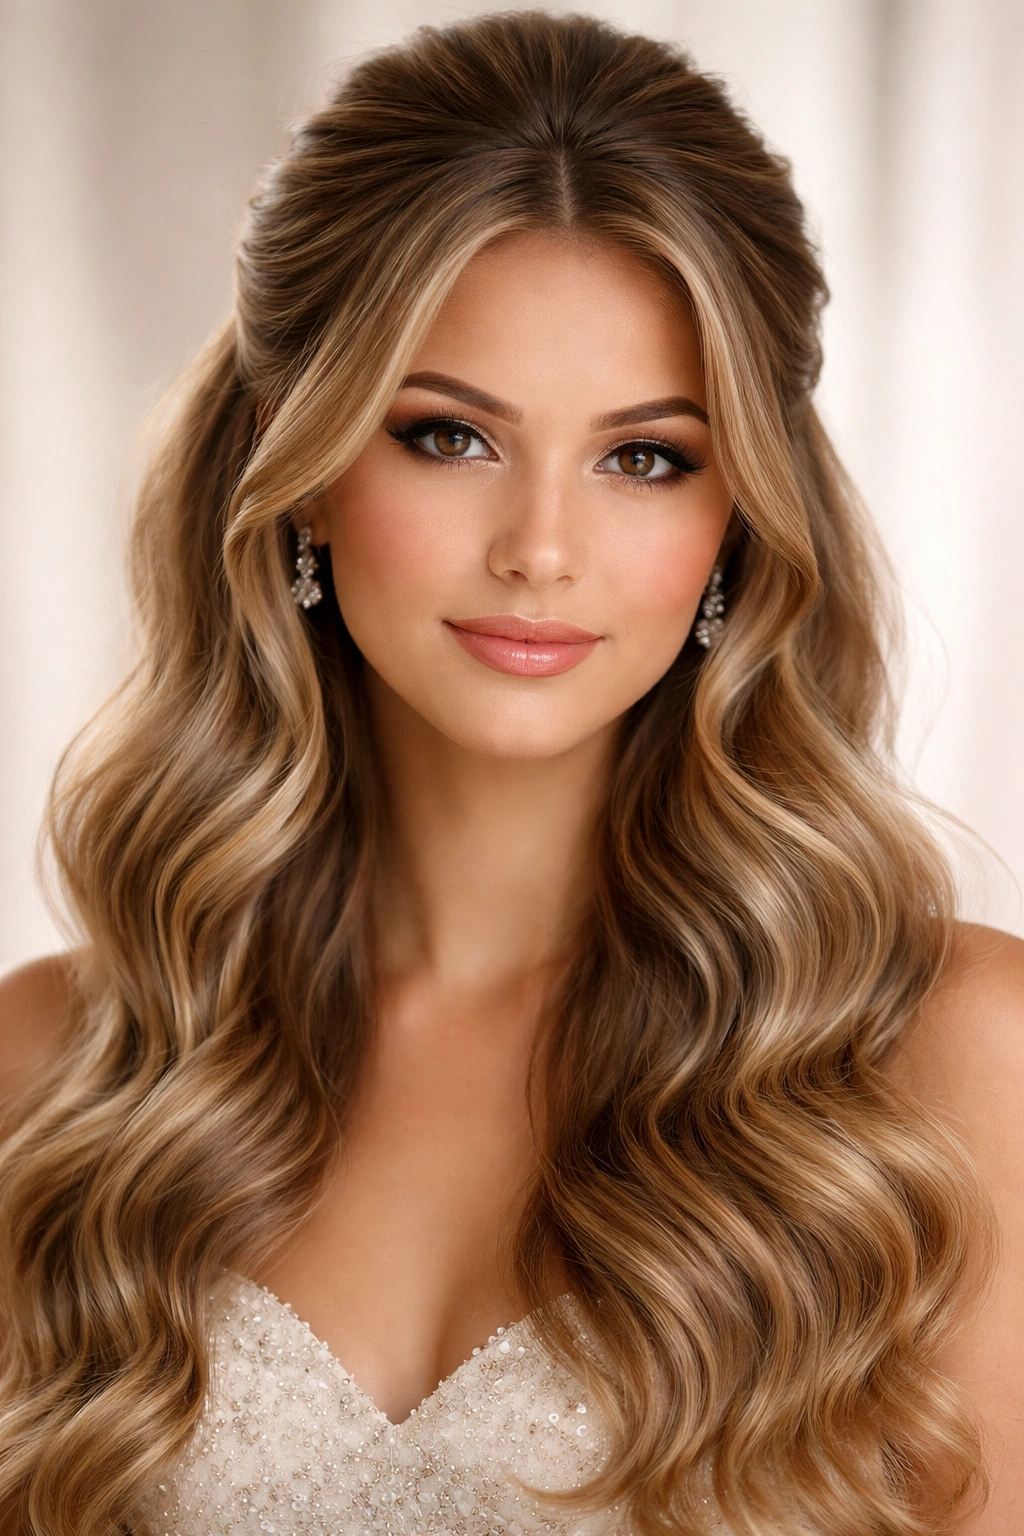
Gather the top third of your hair into a half-up ponytail at the crown, but instead of keeping it in a simple ponytail, gently tease the base and sides of the ponytail to create volume and texture. Smooth the front carefully so your face-framing pieces look intentional. Curl the entire bottom half of your hair into loose, cascading waves that tumble over your shoulders.
Why This Works for Prom
This is the quintessential romantic prom hairstyle—there’s a reason it’s so popular. The voluminous crown makes you look like you belong in a romantic comedy, while the cascading waves add drama and movement. The combination of structure (the secured top half) and flow (the wavy bottom half) is inherently flattering and photogenic. It works with princess ballgowns, ethereal lace dresses, and sleek modern gowns as a romantic contrast.
Quick Facts and Tips
- Curl technique: Use a 1.25-inch or 1.5-inch curling iron for the waves. Curl sections away from your face on the front sections, and alternate curl directions as you move toward the back for natural-looking, undulating waves.
- Cool the curls: After curling, let the curls cool for a few minutes before you release them. This helps them hold their shape longer.
- Tease for volume: Use a fine-tooth teasing brush at the base of your ponytail and gently tease to create volume. Smooth the outer layer with the brush so it looks refined rather than tangled.
- Finishing spray: Light hold finishing spray helps the waves maintain their shape through dancing and movement.
Keep the front of your hair smooth and intentional—this frames your face and looks polished, while the rest of the curls can be full and romantic.
14. The Asymmetrical Braid Half-Up
Create a Dutch braid (an inverted French braid that sits on top of the hair rather than weaving underneath) on one side of your head, starting at the temple and running it diagonally toward the back of your crown. Secure the braid at the back with bobby pins. Leave the other side of your head completely smooth and free-flowing. The bottom half of your hair stays down in waves or curls.
Why This Works for Prom
An asymmetrical braid is the perfect balance between special-occasion worthy and wearable. It’s intricate enough to show you put effort into your hair, but not so complicated that it’s uncomfortable to wear all evening. The asymmetry gives it a modern, fashion-forward feel. This style especially flatters oval and heart-shaped faces because the braid draws attention to one side of your face. It also works beautifully with side-part makeup and complements upswept or side-swept eye makeup.
Quick Facts and Tips
- Braid placement: Start the braid slightly above your temple, not directly at your hairline. This makes it more visible and intentional.
- Braid thickness: A Dutch braid that’s about 1 to 1.5 inches wide looks substantial and intentional. Thinner braids can get lost.
- Secure thoroughly: Use multiple bobby pins to anchor the braid at the back where it meets the crown. The braid needs to stay in place through all of prom night.
- Pull and fluff: After securing, gently pull the loops of the braid to make it look fuller and more romantic. This transforms a tight braid into a styled, intentional look.
The smooth, unbraided side of your head creates beautiful contrast and emphasizes the artistry of the braid. You can add a small jeweled clip or flower at the end of the braid for extra detail.
15. The Wrapped Ponytail with Texture
Gather the top half of your hair into a high ponytail at the crown. Tease the ponytail generously to create volume and texture throughout. Then, take a thin section of hair from the ponytail, wrap it around the base of the elastic to hide it, and pin it underneath. Curl the bottom half of your hair into voluminous waves or leave it wavy and tousled.
Why This Works for Prom
The wrapped ponytail is supremely elegant and hides the mechanics of the hairstyle beautifully. The teased texture in the ponytail makes it look fuller and more voluminous, which reads as more glamorous and special. Because the wrapping section hides the elastic, the entire style looks seamlessly pulled together. This is perfect for prom because it’s both romantic and polished—you look intentionally styled without looking overdone.
Quick Facts and Tips
- Teasing technique: Section the ponytail into three or four vertical sections and tease each section from the root to the tip. This distributes volume throughout the ponytail rather than just at the base.
- Light smoothing: After teasing, smooth the outer layer slightly with your brush so the ponytail doesn’t look ratty or tangled—you want texture, not a mess.
- Wrapping section: The section you use to wrap around the elastic should be thin (about half an inch) and taken from the ponytail itself. This keeps the wrapping matched to your hair color and texture.
- Pin securely: Use bobby pins that match your hair color and pin underneath where they won’t be visible.
This style pairs beautifully with face-framing pieces on either side, which soften the look and add dimension to your face.
16. The Half-Up Space Buns
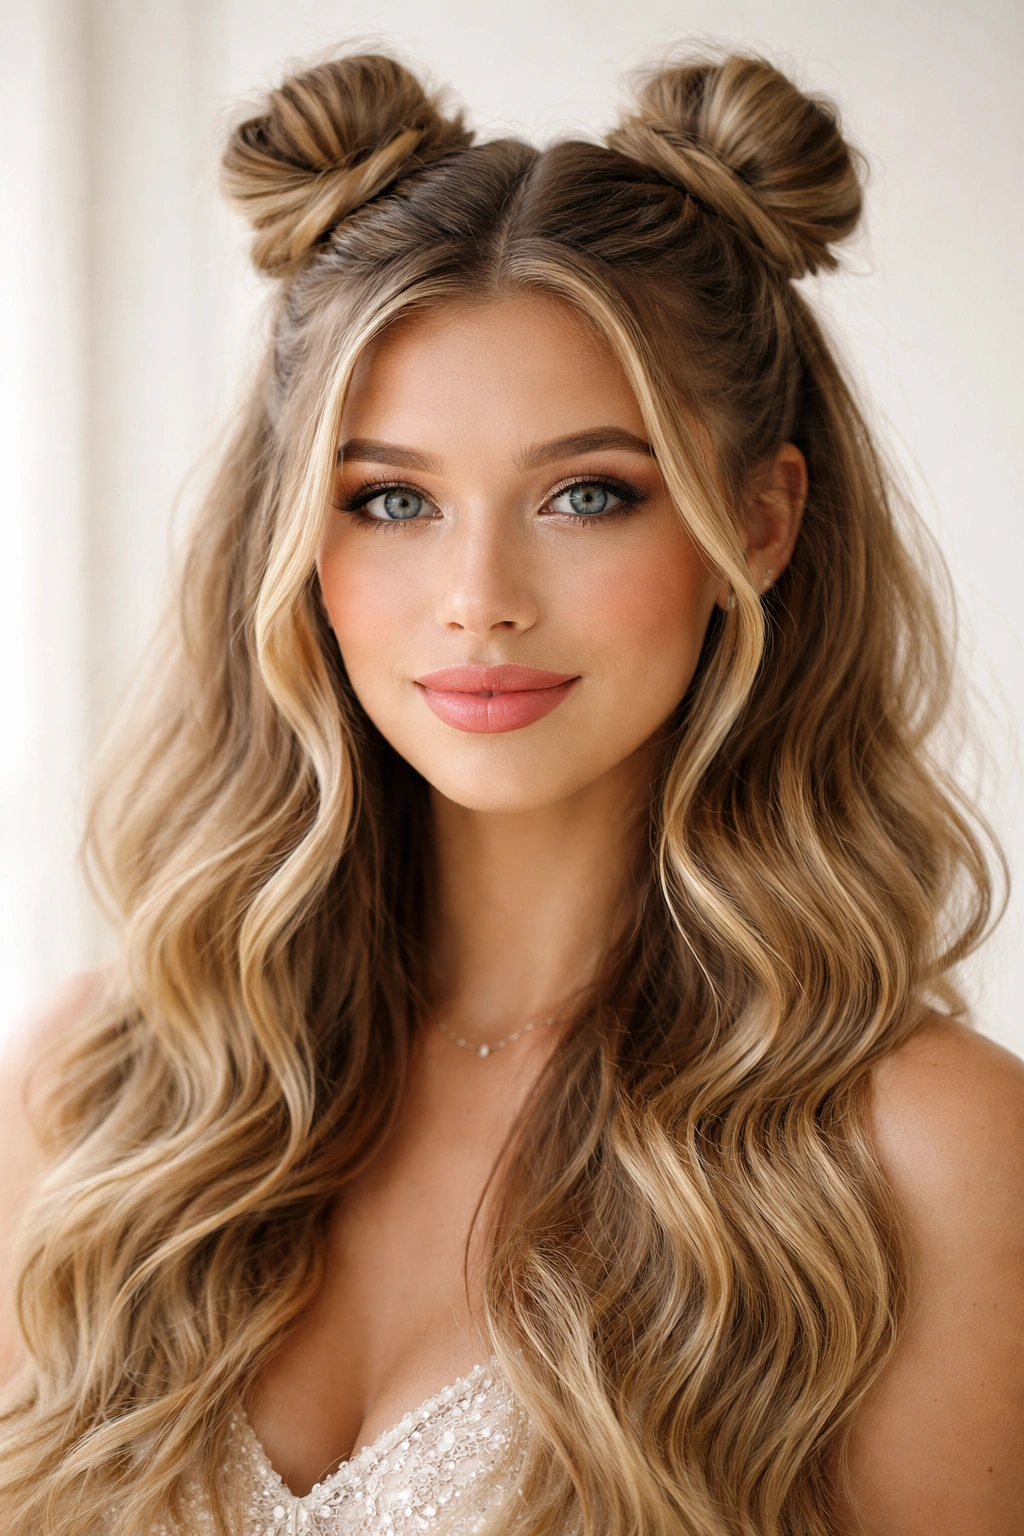
Divide the top third of your hair into two equal sections down the center. Twist each section loosely and wrap it into a bun on the top of your head, creating two small buns positioned side-by-side or slightly back from your temples. Leave the bottom half of your hair down and wavy. Secure each bun with bobby pins and tease gently to create volume and texture.
Why This Works for Prom
Half-up space buns are unexpectedly sophisticated—they’re playful and fashion-forward while still being special-occasion appropriate. The two buns create symmetry and intentionality, and they photograph beautifully. This style is particularly flattering if you have a narrower face, because the buns create width and interest at the crown. It works especially well with unconventional, trendy, or modern prom dresses, and pairs beautifully with bold makeup or unique jewelry.
Quick Facts and Tips
- Bun size: Each bun should be about the size of a golf ball or slightly larger. Too small and they look skimpy; too large and they can look unbalanced.
- Placement: Position the buns directly on top of your head (toward the back of the crown) rather than on the very sides. This looks more balanced and intentional.
- Tease for fullness: Before wrapping each twisted section into a bun, gently tease it. Then, as you wrap it into a bun, pull the loops open to create volume and texture rather than a tight, smooth ball.
- Security: Use multiple bobby pins to anchor each bun. You need them to stay in place through all of prom night.
Pair this with loose waves in the bottom half for maximum contrast—the structured buns above and the flowing waves below create an interesting visual balance.
17. The Scarf-Wrapped Half-Up
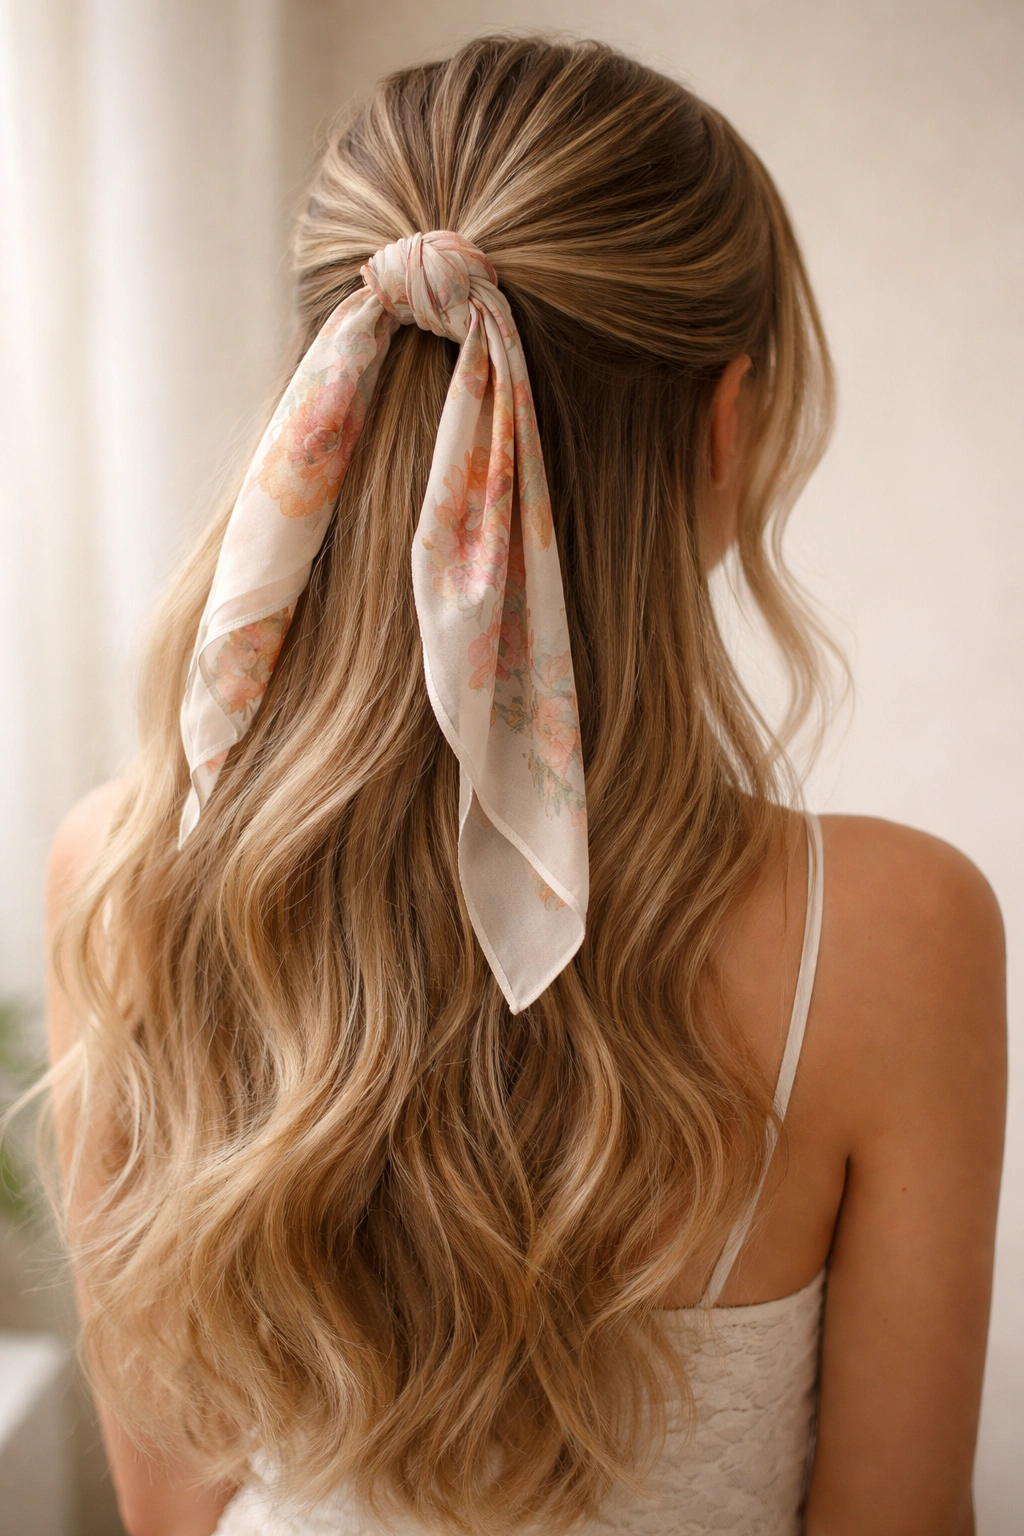
Gather the top half of your hair into a high ponytail at the crown. Instead of wrapping the elastic with hair, wrap it with a delicate scarf, ribbon, or fabric strip that coordinates with your dress. Tie the ends of the fabric into a bow or let them flow down the back of your hair. The bottom half of your hair flows freely, either straight or with waves.
Why This Works for Prom
A scarf or fabric-wrapped ponytail adds instant color and interest to an otherwise simple hairstyle. It’s a quick way to add a fashion-forward detail without requiring complicated styling skills. The fabric draws attention to your ponytail and the back of your head, which photographs beautifully from behind—important for grand march and other prom moments when photographers capture you from multiple angles. This style works beautifully if your dress needs a pop of coordinating color or pattern.
Quick Facts and Tips
- Fabric choice: Choose a silk, satin, or lightweight cotton scrap rather than a heavy or stiff material. Delicate fabrics drape beautifully and feel luxurious.
- Length and width: A scarf about 2 to 3 inches wide and 12 to 18 inches long works perfectly. Long enough to wrap around the elastic and tie a bow, but not so long that it becomes unwieldy.
- Coordinating colors: Match the scarf to your dress, your jewelry, or your makeup. A coordinated fabric wrap looks intentional and polished.
- Bow placement: You can tie the bow at the back of your head where it’s visible, or let the fabric tails flow down the back of your hair mixing with your loose bottom half.
If you’re worried about the scarf shifting, secure it with a bobby pin or two underneath where it won’t be visible.
18. The Romantic Halo Braid with Waves
Create a delicate Dutch braid that starts at one temple, curves around the crown of your head (like a halo), and ends at the opposite temple. Secure the braid with bobby pins. The entire bottom half of your hair—both in front and in back—flows freely. Curl the bottom half into soft, romantic waves that frame your face and cascade over your shoulders.
Why This Works for Prom
A halo braid is pure romance—it literally creates a halo effect around your face. This is the kind of style that makes you look ethereal and special in every single photo. The braid pulls hair off your face to show off your makeup and features, while the flowing waves below maintain the romantic, free-spirited feeling. This style works beautifully with any dress style but pairs especially well with princess ballgowns, vintage-inspired dresses, and bohemian styles.
Quick Facts and Tips
- Braid type: A Dutch braid (raised braid sitting on top of the hair) works better than a French braid (sunken braid) for a halo effect because it’s more visible and creates more visual interest.
- Braid thickness: Make your braid about 1.5 inches wide so it’s substantial and clearly visible. Too thin and it disappears; too thick and it can look overwhelming.
- Curve and shape: As you braid from one temple to the other, gently curve the braid to follow the shape of your head. This creates the halo effect rather than a straight line across.
- Pin thoroughly: Use multiple bobby pins in a color matching your hair to secure the braid at multiple points along the curve. The braid needs to stay in place all night.
Gently pull on the loops of the braid after securing it to create softness and volume. The combination of a structured braid and romantic waves below is quintessentially prom.
Final Thoughts
The right half-up half-down hairstyle makes you feel like the best version of yourself on prom night—confident, beautiful, and ready to celebrate. Whether you choose a simple twisted crown or an elaborate halo braid, the key is picking a style that matches your hair type, complements your dress, and feels comfortable enough to wear for hours without constant adjustment.
The good news is that most of these styles can be created at home with patience and practice, or brought to life by a stylist who knows what you’re aiming for. If you’re planning to have a stylist do your hair, bring clear photos of the style you want—not just descriptions, but actual images showing the details, the angle, and the overall effect. Walk through the steps of the style with your stylist so you both understand exactly what you’re creating.
Remember that your prom hair doesn’t have to be perfect to be beautiful. A little texture, a wayward wave, or a piece that slips out often adds to the romantic, real-person quality that photographs best. You’re aiming for intentional and elegant, not flawless and frozen. Trust that you’ll look stunning, have an unforgettable night, and create memories that will last far beyond prom.