Long hair opens up a world of styling possibilities, and one of the most versatile and flattering approaches is the half-up half-down bun. This style gives you the best of both worlds—the elegance and practicality of an updo paired with the softness and volume of flowing hair. Whether you’re heading to a casual day out, a professional meeting, or a special event, there’s a half-up half-down bun variation that’ll work perfectly for your hair type, face shape, and personal style.
What makes these styles so appealing is their remarkable adaptability. You can dress them up with accessories and careful styling, or keep them intentionally messy and undone for a relaxed vibe. They work on straight hair, curls, waves, and everything in between. Best of all, they’re surprisingly quick to create once you’ve practiced the technique a few times—most take just five to ten minutes from start to finish.
The key to mastering half-up half-down buns is understanding the core technique while knowing how to adapt it with different textures, tension levels, and finishing touches. Some versions prioritize sleekness and polish, while others embrace texture and movement. Some sit high on the crown, others nestle lower. Throughout this guide, you’ll discover specific techniques for each style, along with honest tips about which hair types they work best on and how to troubleshoot common challenges.
1. The Classic Half-Up Bun
This is the foundational style that serves as a jumping-off point for nearly every other half-up half-down variation you’ll encounter. The classic version is characterized by clean, smooth lines from the front, with hair gathered into a neat, compact bun at the back of the crown, leaving the bottom half completely loose and flowing.
How to Create This Timeless Style
Start by brushing your hair thoroughly to eliminate tangles, then use a fine-tooth comb to section off the top half of your hair at about ear level. You can find your natural part or create a center part depending on your preference—this becomes the dividing line between the section that goes up and the section that stays down. Gather the top section into a ponytail at the crown, securing it with a clear elastic band. Twist the ponytail loosely around itself and wrap it around the elastic to form a bun, then secure it with bobby pins tucked underneath so they’re hidden from view. Smooth any flyaways with a lightweight hairspray or smoothing serum.
Best For and Key Details
- Works beautifully on straight hair, wavy hair, and most curl patterns when you start with well-prepped hair
- Requires minimal styling products for a polished everyday look
- Takes about 5 minutes once you’ve practiced the technique
- Pairs well with natural makeup, business casual outfits, and casual-to-dressy occasions
- For extra hold and polish, use a shine spray after securing the bun to make the style look intentional and finished
Pro tip: If your bun feels too tight and gives you a headache, loosen the initial ponytail slightly—the bun will still be secure but much more comfortable to wear all day.
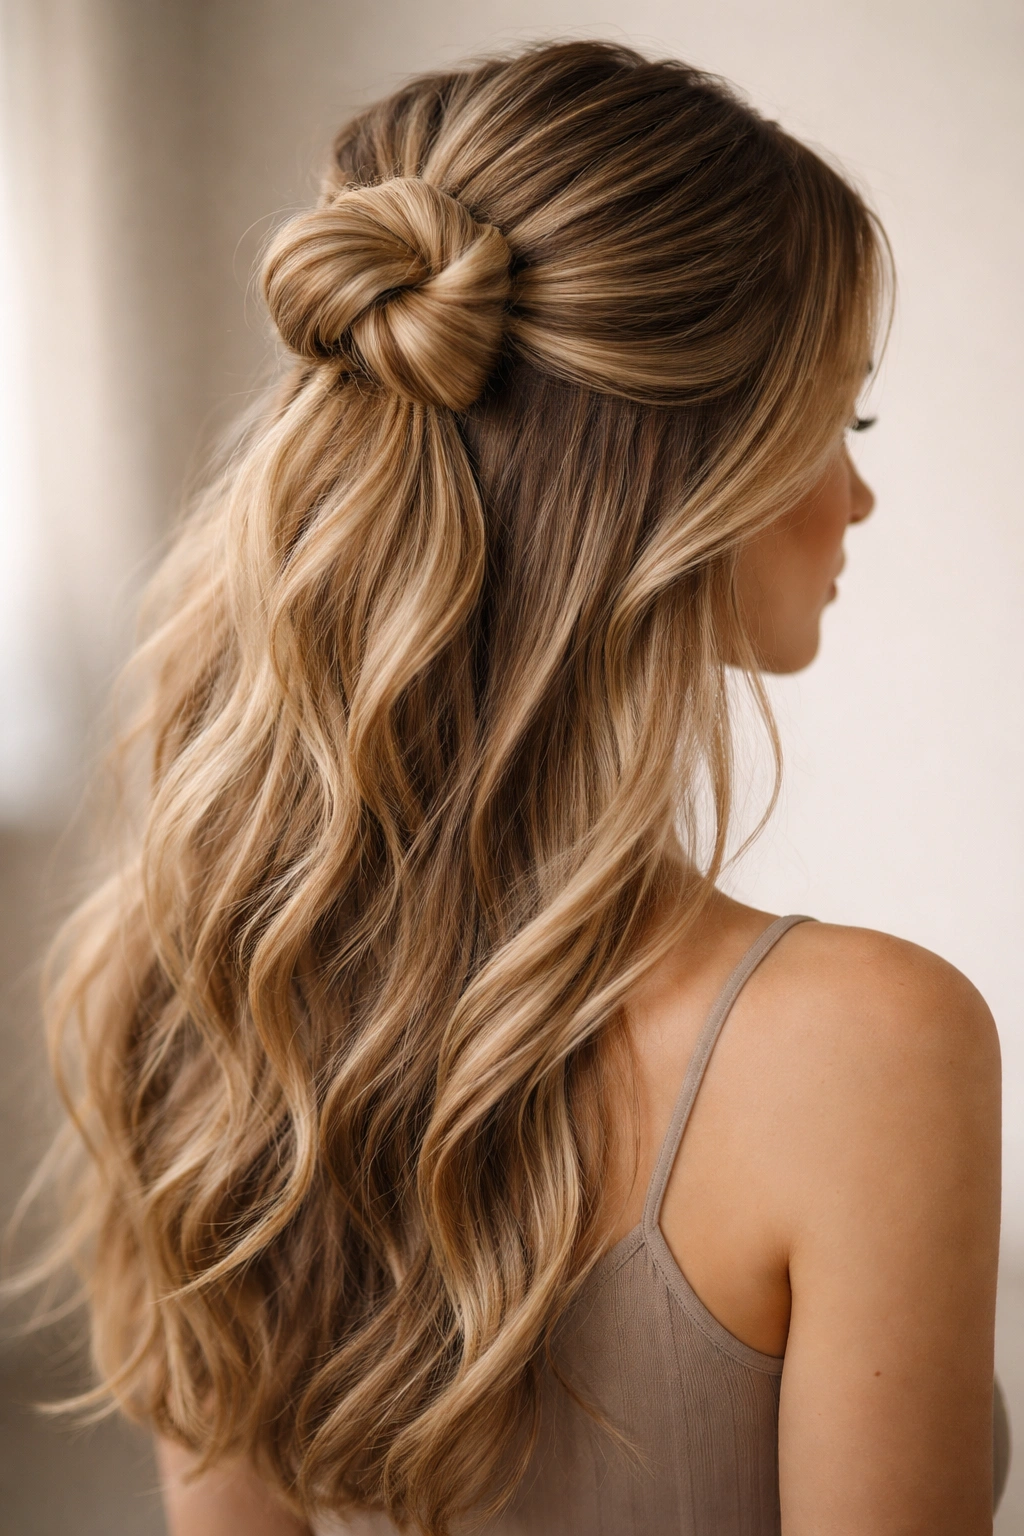
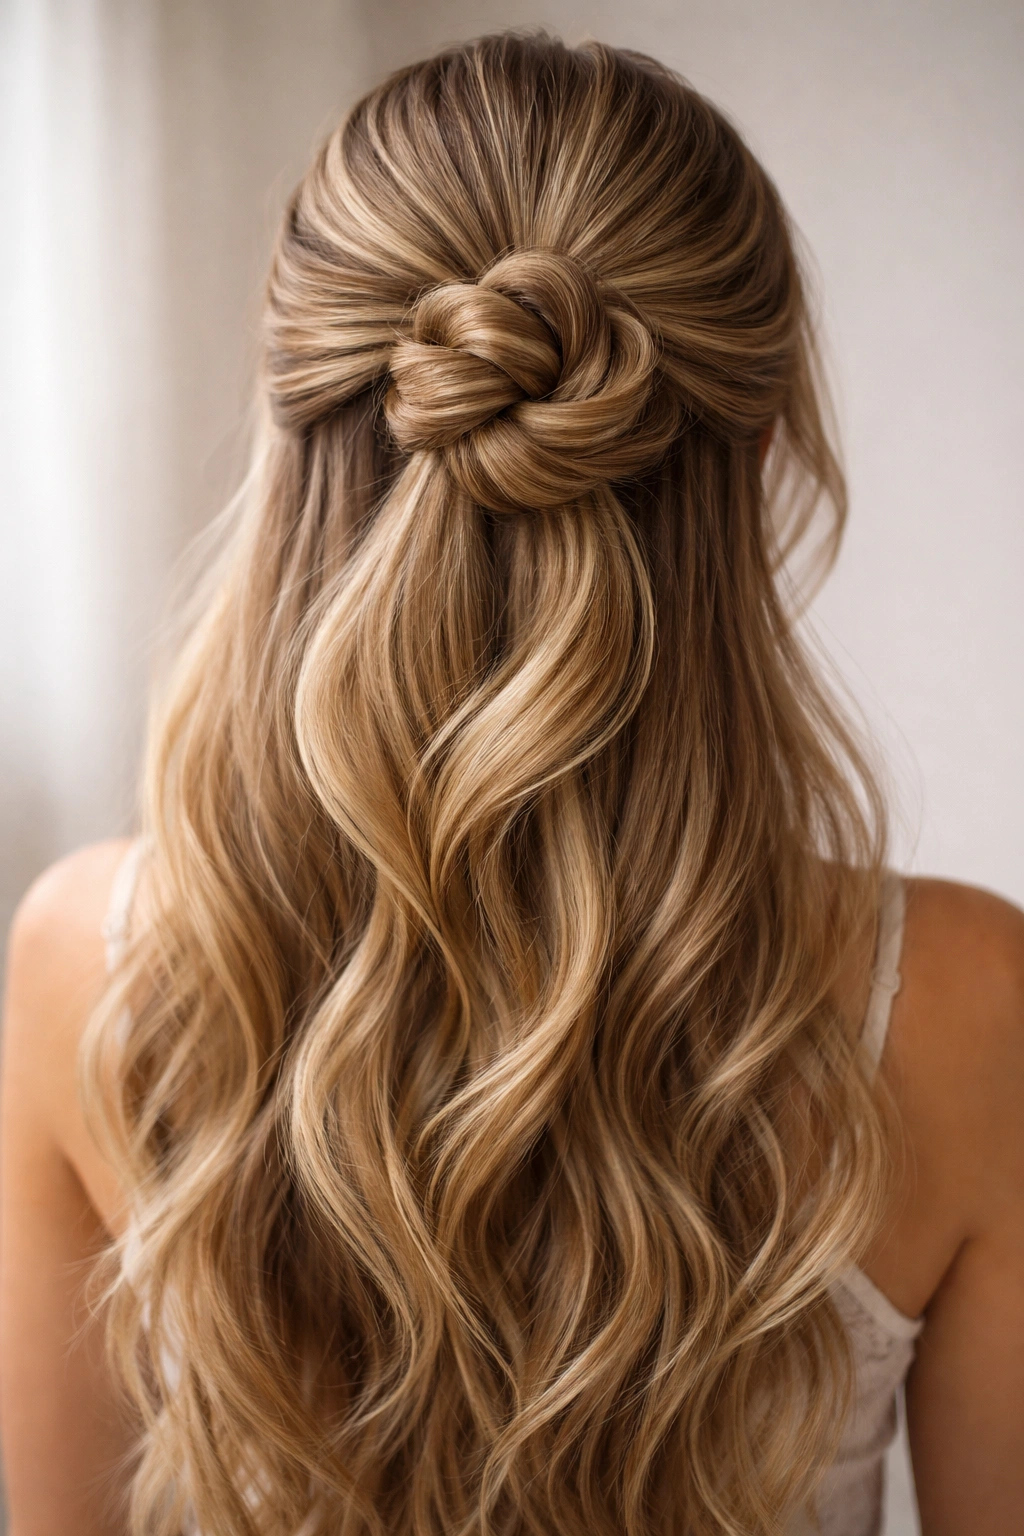
2. The Twisted Half-Up Bun
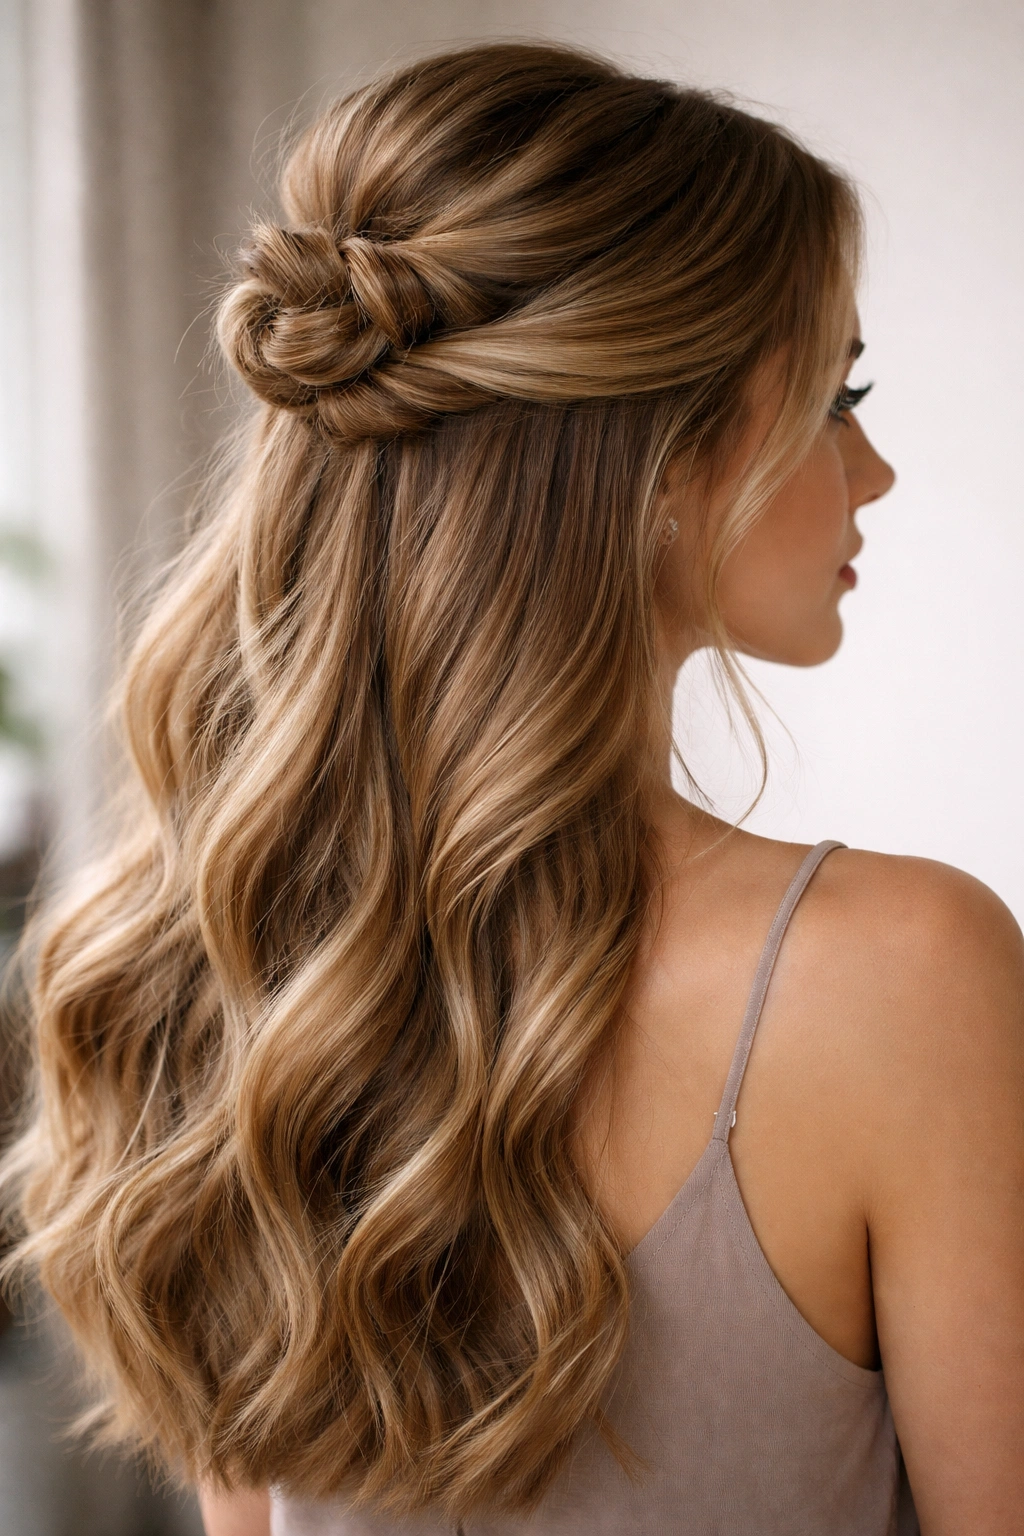
The twisted variation adds visual interest and a subtle dose of sophistication that the classic version doesn’t quite achieve. Instead of simply gathering and twisting the ponytail, you twist the section of hair before creating the ponytail, which creates a beautiful spiral effect that frames the face and looks more intentional and refined.
The Technique Behind the Twist
Divide your hair at ear level and brush the top section smooth. Rather than gathering it directly into a ponytail, split it into two equal sections and twist each section away from your face in a clockwise direction. Cross one twisted section over the other to create an intertwined effect, then secure both twisted sections together at the crown with an elastic band. Gather these twisted sections into a bun by wrapping them around each other and pinning them securely. The result is a textured, dimensional bun that catches the light beautifully.
When and How to Wear It
- Perfect for dates, dinner outings, or any occasion where you want to look put-together without appearing overly formal
- Works wonderfully on hair with natural texture or waves—the twists enhance existing movement
- Can be made sleeker with a smoothing serum or kept more textured for a relaxed vibe
- Takes about 7–8 minutes to execute but looks more complex than it actually is
- Pairs beautifully with gold or rose gold hair accessories if you want to elevate the look
The twisted structure is forgiving—if your twists aren’t perfectly even, it actually adds to the charm rather than detracting from it.
3. The Dutch Braid Half-Up Bun
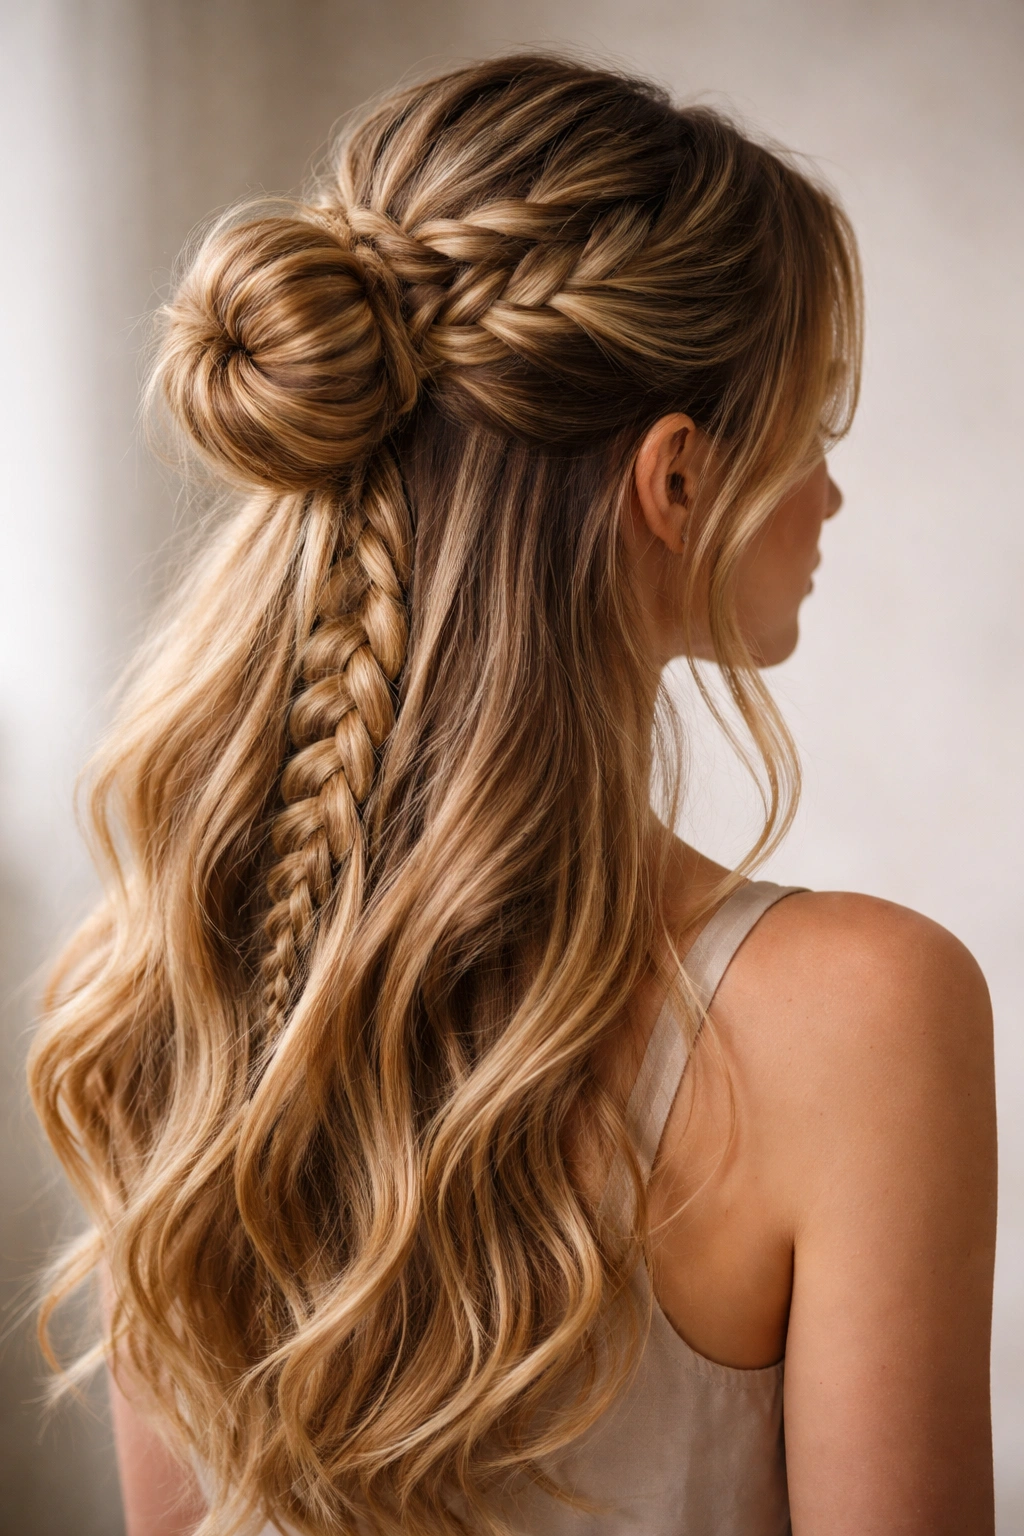
For those who love the intricate look of braids, combining a Dutch braid with a half-up bun creates a style that’s visually striking and actually quite structured. A Dutch braid runs from the front of your hair backward, creating a raised pattern (the reverse of a standard French braid), and when you secure the end into a bun, you get an eye-catching textured look.
Executing the Dutch Braid Into a Bun
Start by sectioning the top half of your hair at ear level. Taking a small section from the crown, begin a Dutch braid by dividing the small section into three strands and crossing each outer strand under the center strand (rather than over, as in a French braid). Continue adding hair from the sides as you braid backward toward the nape of your neck, keeping the tension even and the braid close to the scalp. When you reach the back, gather the remaining hair and the braided section together into a ponytail, then twist and secure it into a bun.
Making It Work for Different Hair Types
- Requires at least a light texture or natural waves to show off the braid definition—very fine, silky hair can look slightly thin in a Dutch braid
- Works beautifully on shoulder-length and longer hair where you have enough volume to make the braid visually substantial
- Takes 10–12 minutes, so it’s better for days when you have a bit of extra time
- Holds extremely well throughout the day, making it ideal for work, school, or active days
- Can be left relatively neat or loosened slightly after completion for a softer, more romantic appearance
Prep your hair with a light texturizing spray before braiding if it’s very straight—this gives the Dutch braid more grip and definition.
4. The Messy Textured Half-Up Bun
If polished and precise feels too formal for your lifestyle, the messy textured half-up bun embraces intentional imperfection. This style celebrates texture, volume, and a just-finished-a-casual-day aesthetic while still looking intentionally styled rather than accidentally undone.
Building Texture and Controlled Messiness
The secret to a beautiful messy bun is starting with pre-textured hair. Use a texturizing spray, sea salt spray, or dry shampoo on damp hair before blow-drying, or work with hair that’s had at least a few hours to develop natural texture after washing. Section the top half at ear level and gather it into a high ponytail, but don’t make the ponytail too tight—you want some dimension and loose pieces to frame your face. Twist the ponytail gently, wrap it around the elastic, and pin it loosely so it has a soft, undone appearance. Use your fingers to gently pull and tease some strands loose around the face and sides.
Making This Style Work
- This is the most forgiving style for different hair types, textures, and skill levels—imperfection is literally the goal
- Works beautifully with waves, curls, and textured hair patterns
- Requires 5–7 minutes, including texturizing time
- Perfect for casual days, creative work, social outings, or any situation where you want polished-yet-relaxed
- Complements naturally textured hair, especially curls—just gather and secure with minimal manipulation
Worth knowing: A light hairspray keeps flyaways in place without making the style look stiff or overly done.
5. The Sleek Low Half-Up Bun
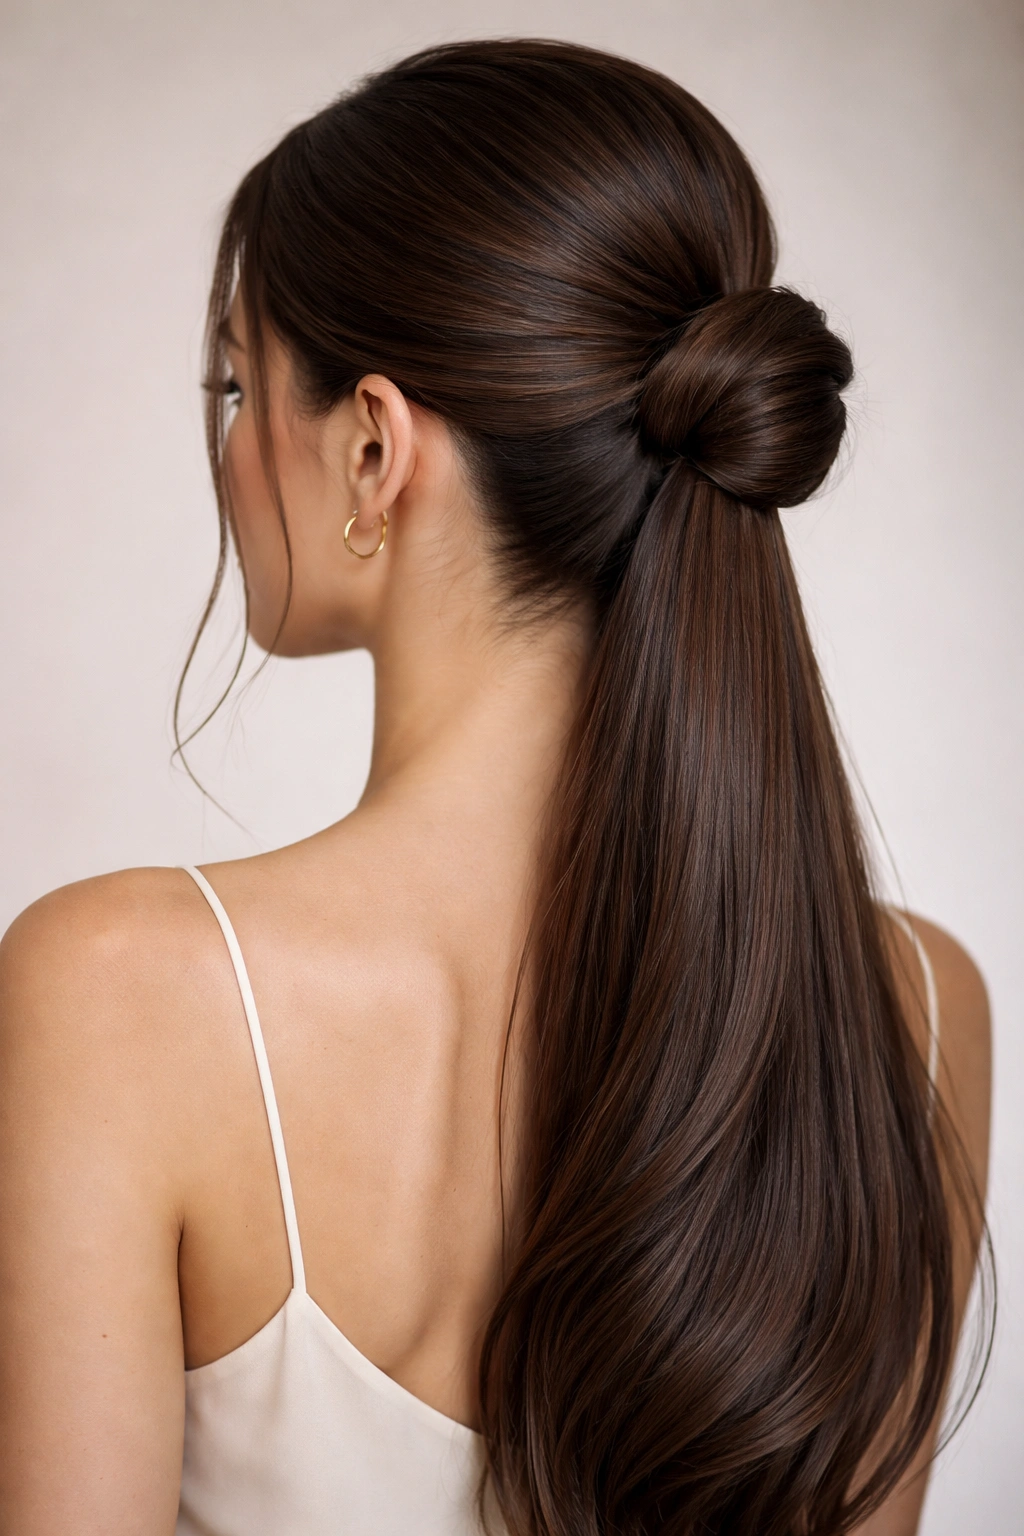
This variation sits lower on the head, closer to the nape of your neck, creating an entirely different visual effect than crown-height buns. The lower positioning makes it feel more sophisticated and elongates the neck, which is why it’s a favorite for formal events and professional settings.
Creating the Low Placement
Rather than gathering hair at the crown, identify a line about one-third of the way down the back of your head—roughly aligned with the bottom of your ears when viewed from the side. Section the hair above this line, brush it smooth, and gather it into a ponytail at your designated lower point. Use a fine-tooth comb to smooth any flyaways and create ultra-sleek lines, then spray with hairspray before twisting the ponytail and securing it into a bun. The lower the bun sits, the more elongated and elegant the overall effect becomes.
When Low Positioning Works Best
- Creates the most flattering effect for round face shapes and shorter necks, as the low bun creates vertical length
- Requires hair to be extremely smooth and sleek to look intentional rather than accidentally messy
- Works best on straight or naturally smooth hair—curls and texture can look disheveled when placed this low
- Takes about 6–8 minutes with the extra attention needed for smoothness
- Perfect for weddings, formal dinners, professional presentations, or any black-tie event
- Pairs beautifully with statement earrings or an elegant updo comb
Smooth the lower section of loose hair with your fingers as a final step—any visible texture in the down portion will draw the eye away from the sculptural quality of the bun.
6. The Double Knot Half-Up Bun
This clever variation uses two knots stacked vertically to create visual interest and a more voluminous appearance than a standard single bun. It’s slightly more complex but absolutely worth learning because it looks significantly more intricate than it is to create.
The Stacked Knot Technique
Start by dividing your hair at ear level and brushing the top section smooth. Gather it into a ponytail at the crown, but instead of twisting and wrapping, use your fingers to tie a simple overhand knot with the ponytail—literally tying the hair in a knot as if it were a string. Tighten this knot gently and secure it with a bobby pin or two. Then, gather a small subsection of hair from just below the first knot (from the still-loose upper section), tie a second knot, and secure it with pins. The two knots stack visually, creating a knotted bun effect that’s more three-dimensional than a traditional twisted bun.
Making Double Knots Look Polished
- Works best on hair with some natural texture or waves—very straight hair can look thin and wispy in knotted styles
- Creates the illusion of significantly more volume than you might actually have
- Takes about 8–10 minutes because you’re creating two separate knots
- Perfect for people who want visual complexity without the commitment of braiding
- Looks especially striking on longer hair where the loose bottom section has plenty of movement
- Can be dressed up with delicate bobby pins or kept casual by leaving some strands loose
Pro tip: Gently pull on each knot after tying to loosen it slightly—this creates a softer, fuller appearance than a tight, compact knot would give you.
7. The Braided Crown Half-Up Bun
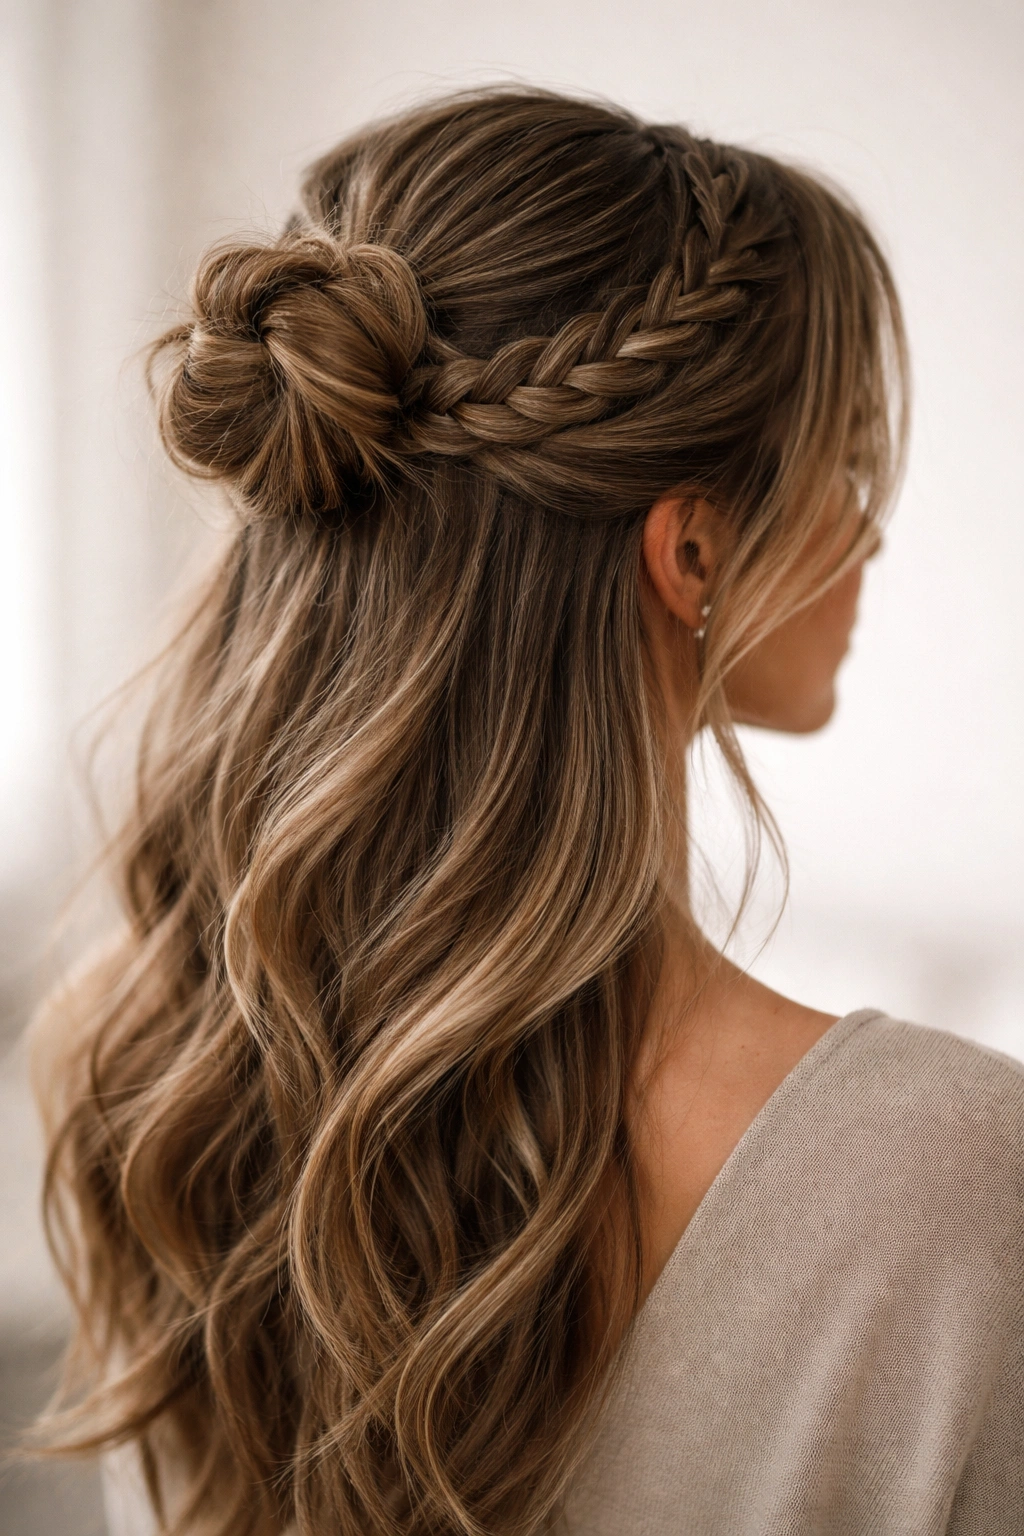
This style creates the effect of a crown by incorporating a braid that curves around the back of the head before gathering into a bun. It’s more involved than some other options, but the result is so visually stunning that it’s worth the extra effort.
Executing the Crown Effect
Begin by creating a Dutch braid or French braid that starts at one temple and curves along the back of your head toward the opposite side (rather than going straight back like a traditional braid). Continue the braid until you reach the level where you want your bun to sit. At that point, add any remaining loose hair to the end of the braid and secure the entire section into a bun. The braid itself becomes a decorative frame that leads the eye from the face toward the bun.
Best Occasions and Hair Considerations
- This style works beautifully on straight, wavy, and curly hair—the braid shows definition on all textures
- Takes 12–15 minutes, making it suitable for occasions where you have time to style
- Creates a romantic, feminine aesthetic perfect for weddings, engagement parties, or special celebrations
- Works equally well on hair with significant length or shoulder-length hair as long as you have enough volume to make the braid substantial
- Can incorporate hair accessories like small flowers, pearls, or decorative bobby pins threaded through the braid
The curved positioning of the braid naturally flatters most face shapes by creating soft, curved lines rather than harsh ones.
8. The Romantic Wavy Half-Up Bun
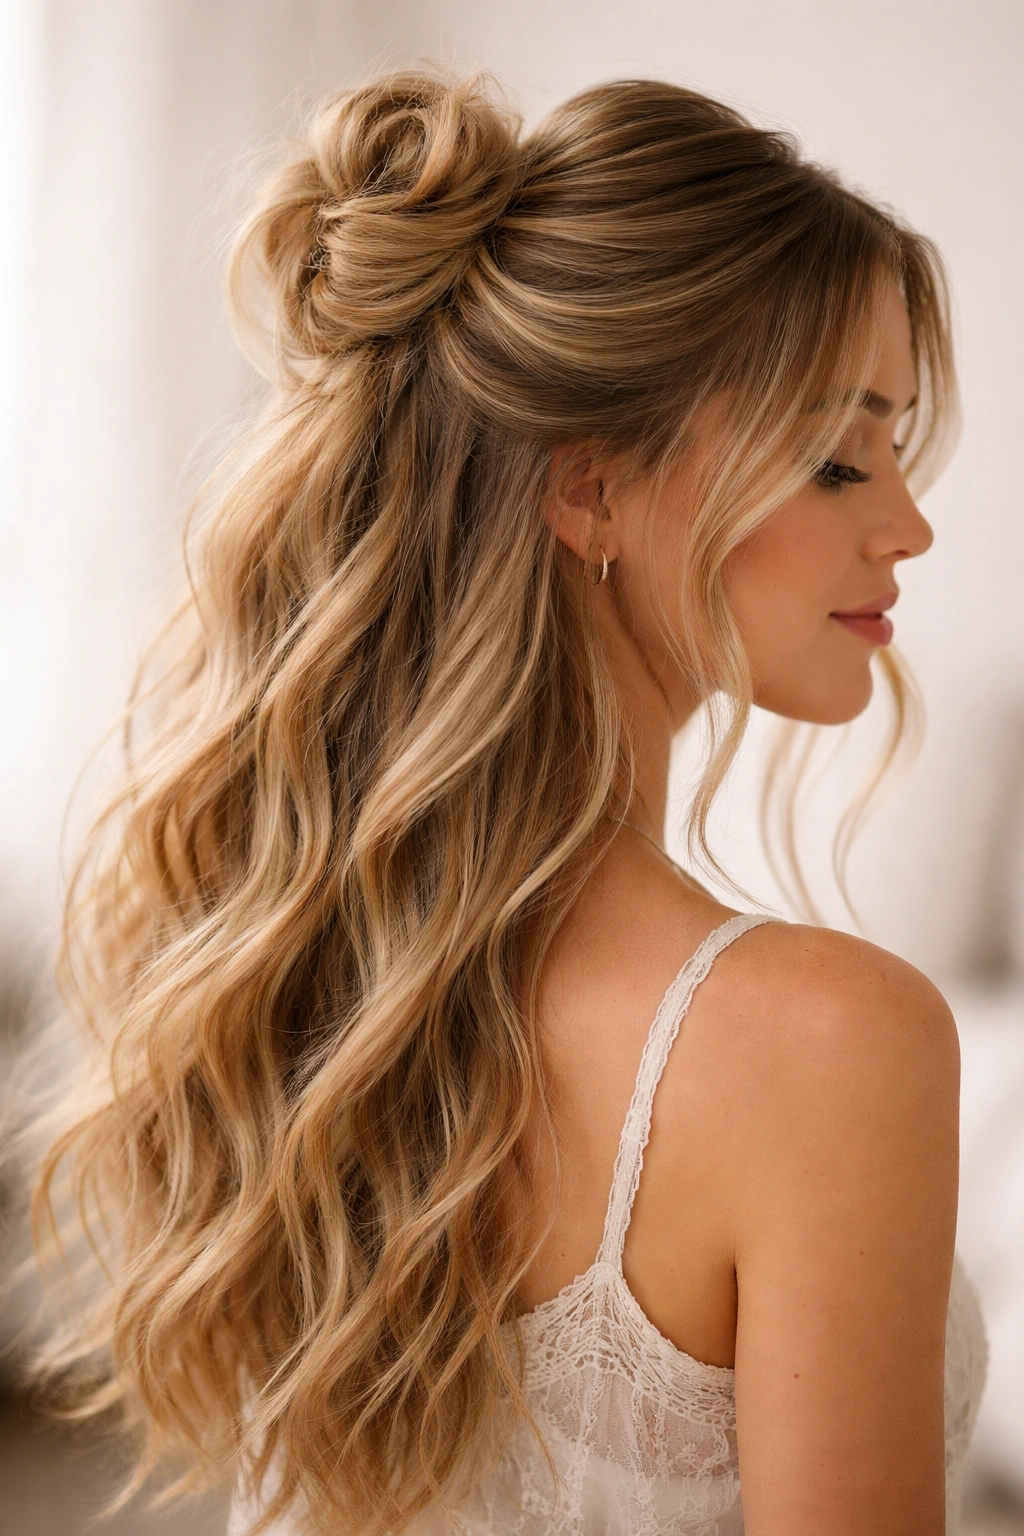
This style prioritizes softness and movement, emphasizing the flowing waves of the lower section while using the bun as an elegant anchor point. It’s the go-to style for anyone who wants femininity and romance without formality.
Creating Wave-Focused Volume
Start with hair that has been curled with a curling iron or naturally wavy from prior styling. Section the top half at ear level and gather it into a high ponytail, but keep the tension medium rather than ultra-tight—you want the bun to look soft and integrated with the rest of the style. Twist the ponytail loosely and secure it into a bun, then use your fingers to gently pull some strands loose around the face and along the sides, creating a soft halo effect. The key is leaving plenty of movement and dimension in the bun itself, not creating a tight, compact ball.
Styling for Maximum Romance
- Works beautifully on naturally wavy or curly hair, as well as on hair that’s been curled beforehand
- Requires hair to be curled or textured to show the romantic effect—straight hair reads more casual than romantic in this style
- Takes about 7–8 minutes if your hair is already curled
- Perfect for dates, romantic dinners, engagement photos, or any setting where you want to feel soft and feminine
- Pairs beautifully with delicate jewelry, soft makeup, and flowing fabrics
- Complements most face shapes because the soft framing pieces are universally flattering
Insider note: A light-hold hairspray keeps the waves in place without making them feel crispy or overly set.
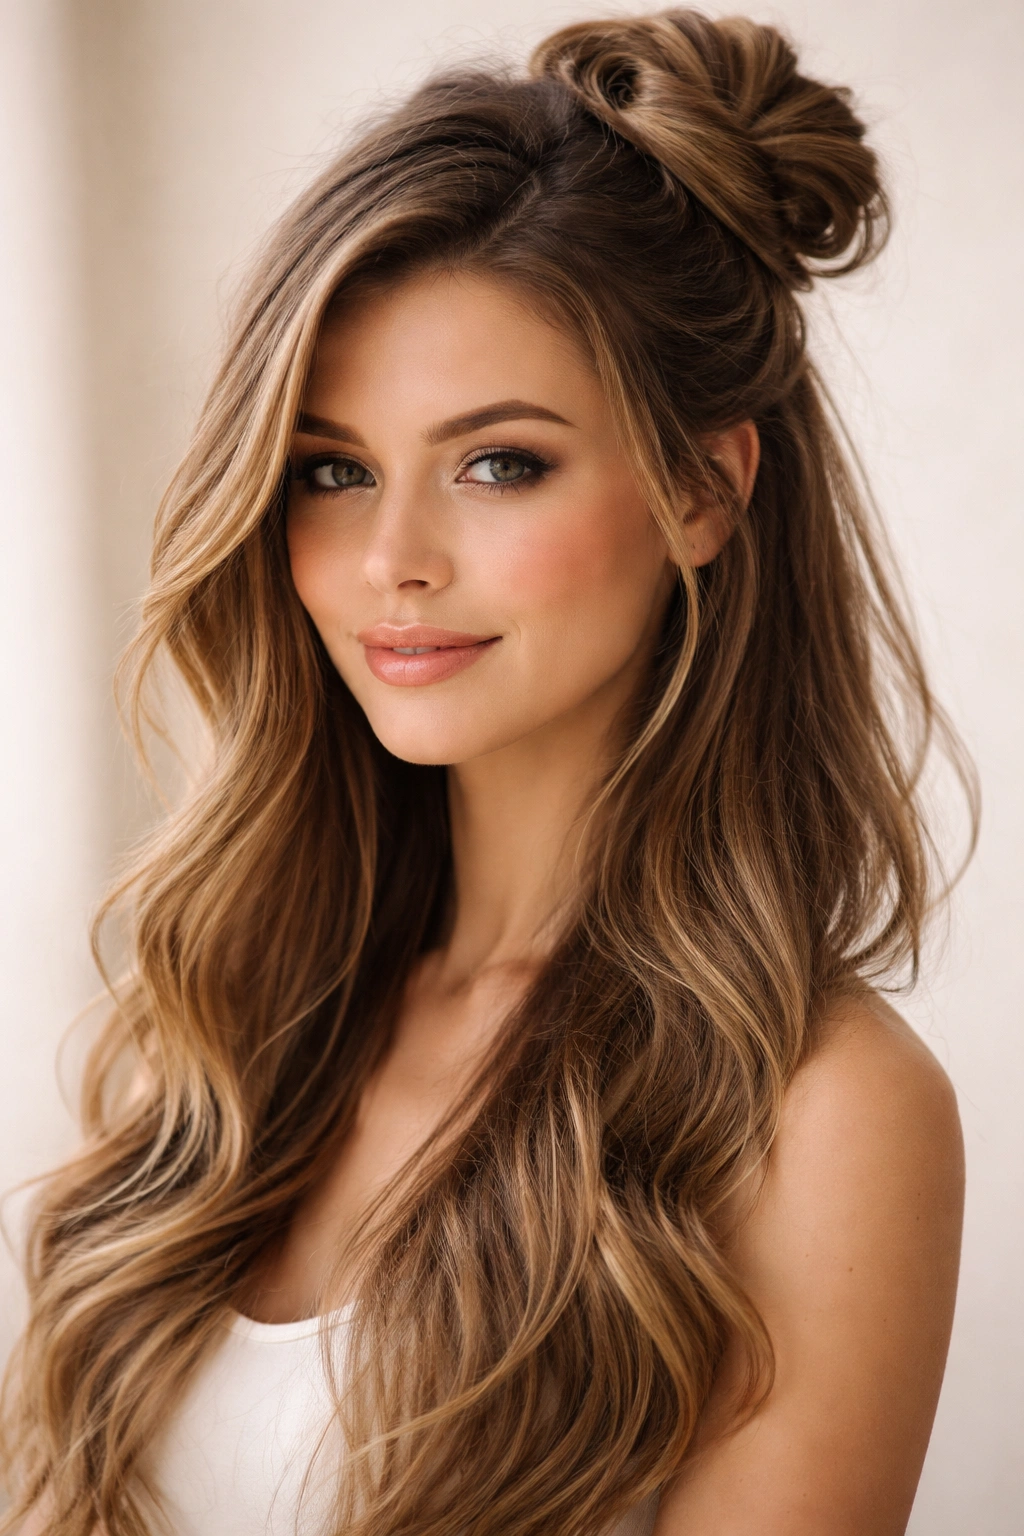
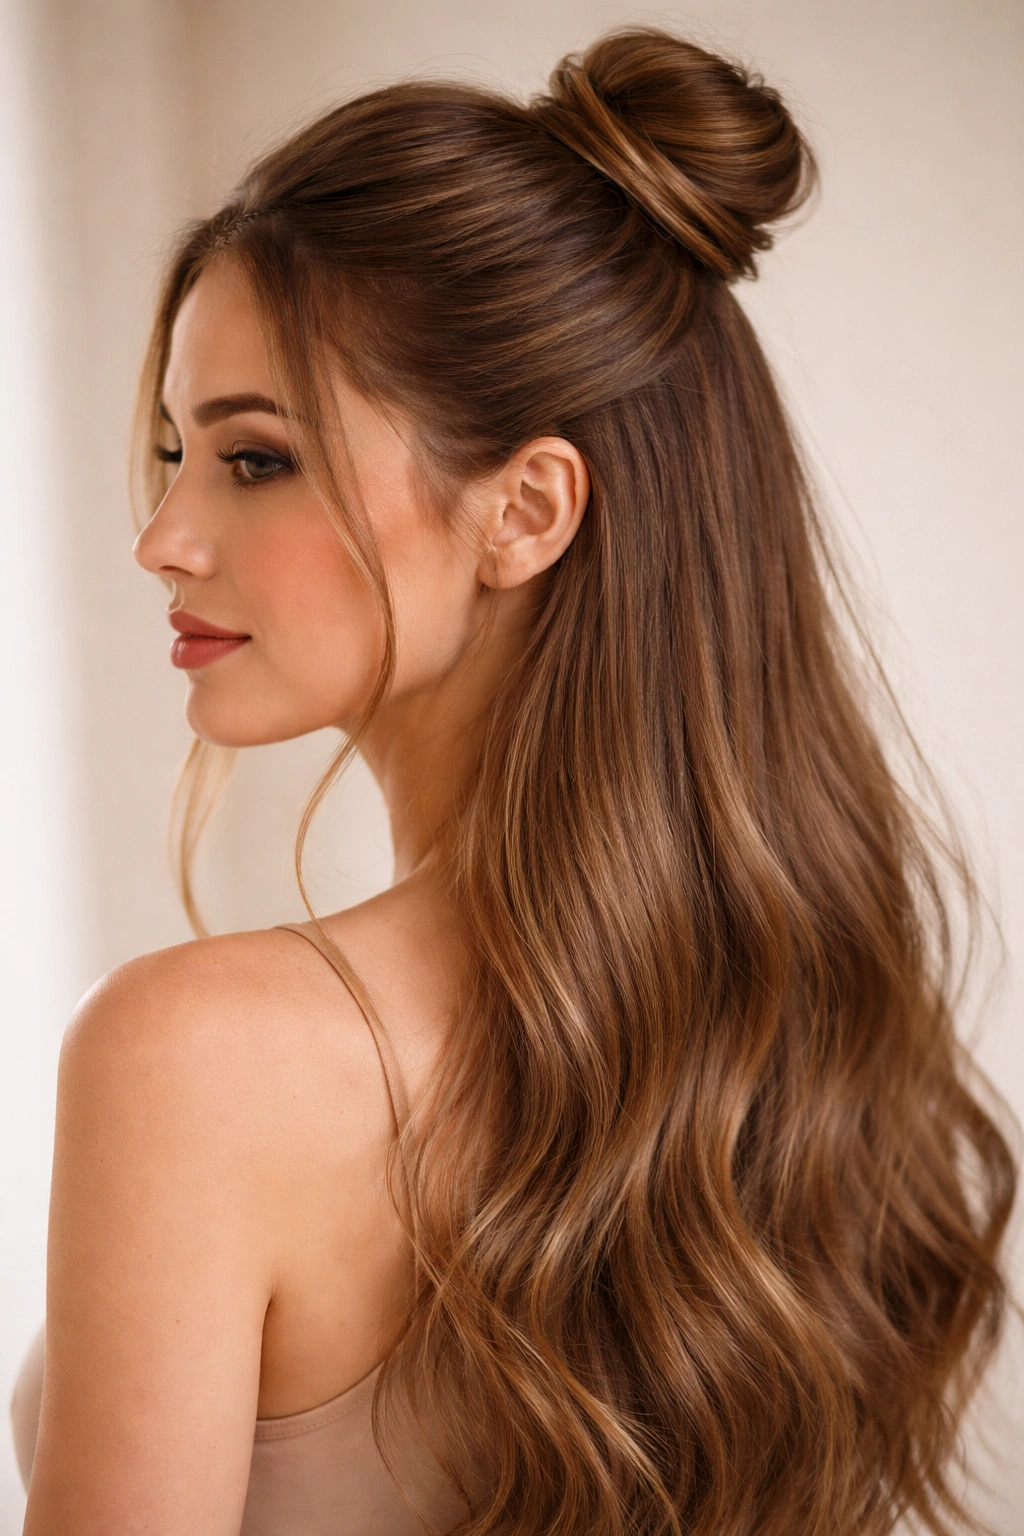
9. The Sleek High Half-Up Bun

Positioned at the very crown and created with polished precision, the sleek high bun projects confidence and polish. This is the style that says you have your life together, and it’s a go-to for professional settings and important meetings.
Achieving Maximum Sleekness at the Crown
Brush your hair back severely from your face, using a fine-tooth comb and smoothing gel or serum to eliminate every flyaway. Create a sharp, clean part if desired—a center part emphasizes symmetry and formality, while a side part adds a touch of softness. Gather the top half of your hair into an extremely tight ponytail at the very crown, using a clear elastic band. Apply smoothing serum or gel around your hairline and throughout the ponytail. Twist the ponytail tightly and wrap it around the elastic, securing it with multiple bobby pins underneath. Use the fine-tooth comb to smooth any texture on top of the bun, then set everything with a strong-hold hairspray.
Professional and Formal Applications
- This is the only half-up bun style appropriate for very formal events, business meetings, or conservative professional environments
- Requires straight or naturally smooth hair to look polished—curls and texture can undermine the sleekness
- Takes about 8–10 minutes with the attention needed for smoothness and precision
- Works best on longer hair where the bottom section has significant length and movement
- Can be elevated with a delicate hair comb, pearl bobby pins, or a small decorative hair clip for special occasions
- Elongates the face and opens up the features, making it flattering for most face shapes
A gel specifically designed for flyaways gives you control over individual hairs without creating a sticky, product-heavy appearance.
10. The Side Swept Half-Up Bun
This variation moves away from center-positioned buns, instead gathering the top section to one side. The asymmetrical positioning creates visual interest and a slightly more casual, creative feel than centered versions.
Positioning and Asymmetrical Gathering
Brush your hair and decide which side feels more natural—some people look better with the bun on the left, others on the right, depending on which way their hair naturally falls and their face shape. Section the top half of your hair and gather it to one side, approximately over your ear on one side, creating an off-center ponytail. Twist the ponytail and secure it into a bun positioned slightly to one side of the back of your head. Leave longer pieces of hair loose around the opposite side of your face, framing it asymmetrically. You can smooth the hair on the bun side and leave it slightly looser on the opposite side for a balanced, intentional asymmetrical look.
When Side-Swept Works Best
- Creates a more creative, artistic aesthetic than centered buns
- Works beautifully on hair with layers, as the varying lengths add to the asymmetrical feel
- Takes about 6–7 minutes
- Perfect for creative fields, casual social events, and any time you want to express personality
- Especially flattering on longer faces, as the asymmetry creates visual width
- Works on most hair types and textures
- Pairs well with statement jewelry on the opposite side of the bun for intentional balance
The asymmetrical approach makes this style feel intentionally creative rather than like something you threw together in a hurry.
11. The Looped Half-Up Bun
Instead of twisting the ponytail and wrapping it around itself, this version creates the bun by looping the ponytail through itself multiple times, resulting in a bun that has visible loops and dimension.
The Looping Technique
Section the top half of your hair and gather it into a ponytail at the crown, making it slightly looser than you would for a traditional bun—you need the elasticity to loop through. Take the end of the ponytail and create a small loop by folding it back against itself, then thread it through the ponytail near the elastic. Create a second loop by folding another section of the ponytail and threading it through, continuing this pattern until the entire ponytail is incorporated into looped sections. Secure everything with bobby pins tucked underneath. The result looks like a flower blossom or crown of loops, which is incredibly photogenic.
Creating Dimension and Movement
- Works beautifully on hair with thickness and volume—finer hair can look thin when looped
- Creates the most visually interesting three-dimensional bun style available
- Takes about 10–12 minutes because you’re creating multiple loops
- Perfect for photos, special occasions, and any time you want people to comment on your hair
- Looks best when the loops are slightly loose and pulled gently to show definition
- Works on most hair types, but especially stunning on curly or textured hair where the texture adds to the visual interest
Worth knowing: If a loop doesn’t stay in place, a small bobby pin tucked underneath will secure it invisibly while maintaining the looped effect.
12. The Curved Bobby Pin Half-Up Bun
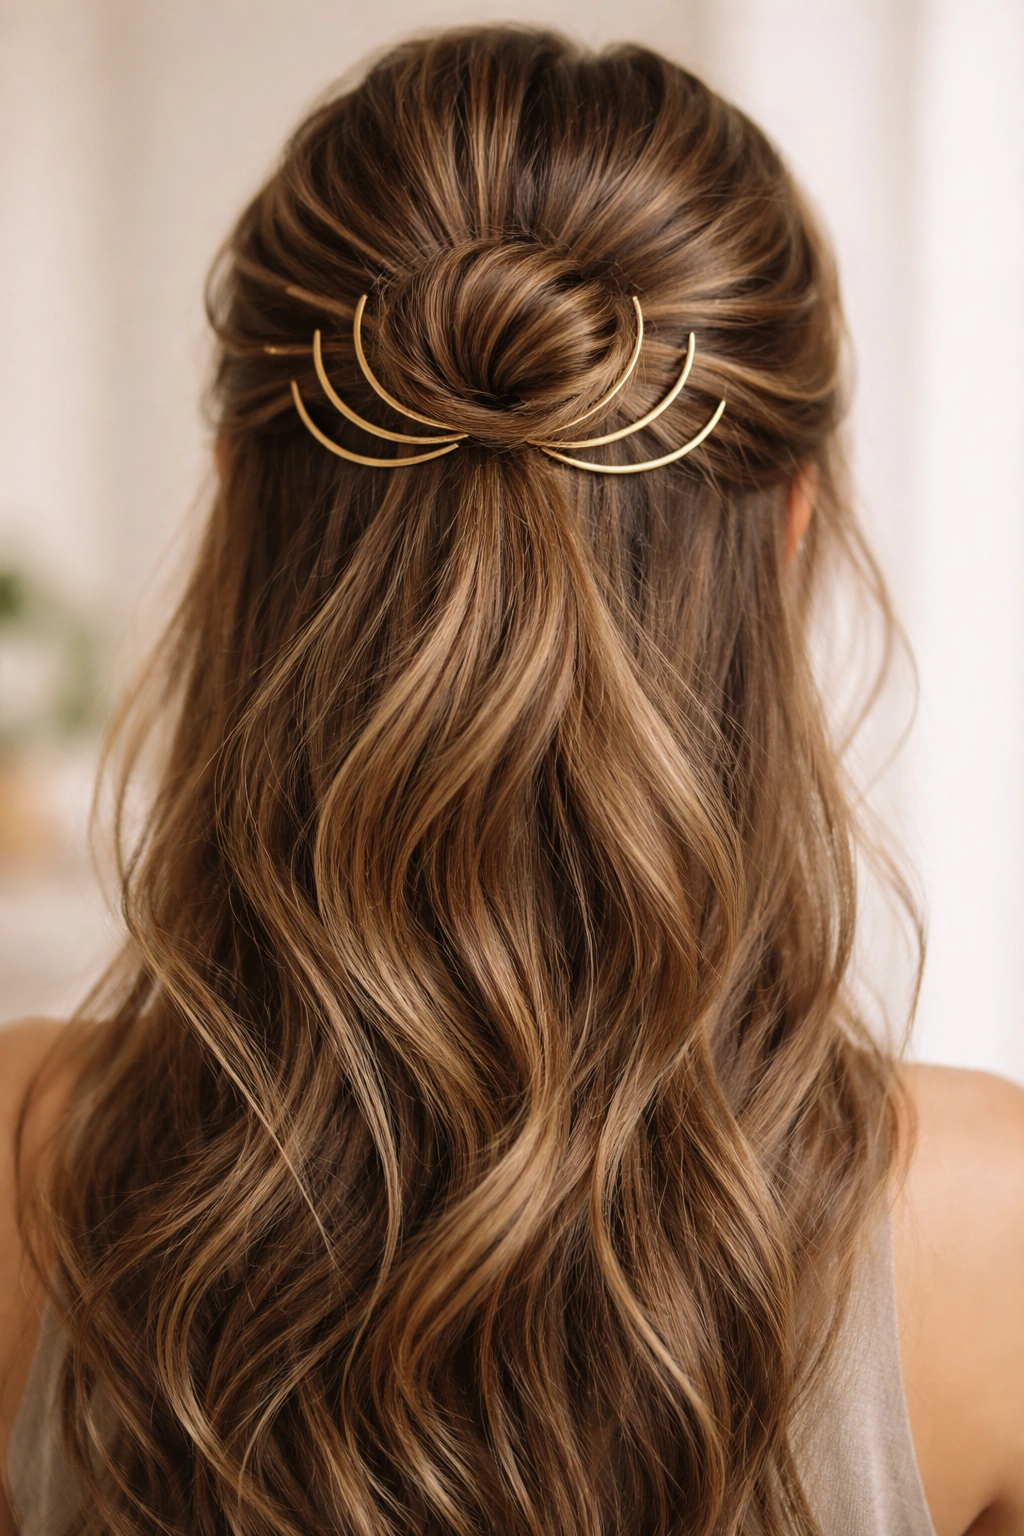
This technique uses decorative curved bobby pins to create the bun shape rather than twisting, resulting in a style that looks intricate and intentional while being surprisingly straightforward to execute.
The Bobby Pin Bun Method
Section the top half of your hair and gather it into a ponytail at the crown without twisting. Hold the ponytail in one hand and slide curved bobby pins (the kind with decorative coatings or metallic finishes work beautifully) underneath and through the ponytail in a circular pattern, creating a round bun shape as you go. Start with one pin, then add additional pins all the way around in a circle until the entire ponytail is contained and shaped into a bun. You can leave the ends of the ponytail slightly loose for a romantic look, or tuck them in and secure with additional pins for a neater appearance.
Why Curved Pins Work So Well
- Creates a bun that looks professionally done without requiring the skill of traditional bun creation
- The decorative bobby pins become part of the design, adding visual interest
- Works on all hair types and textures
- Takes about 7–8 minutes
- Perfect if you find twisting awkward or if you want the pins to be visible elements of the style
- Looks especially striking when you coordinate pin colors or finishes with your outfit or accessories
- More forgiving than traditional bun methods if your tension isn’t perfectly even
This method is particularly helpful for anyone with longer nails or dexterity challenges, as you don’t need to twist the ponytail with your hands.
13. The Accessories-Adorned Half-Up Bun
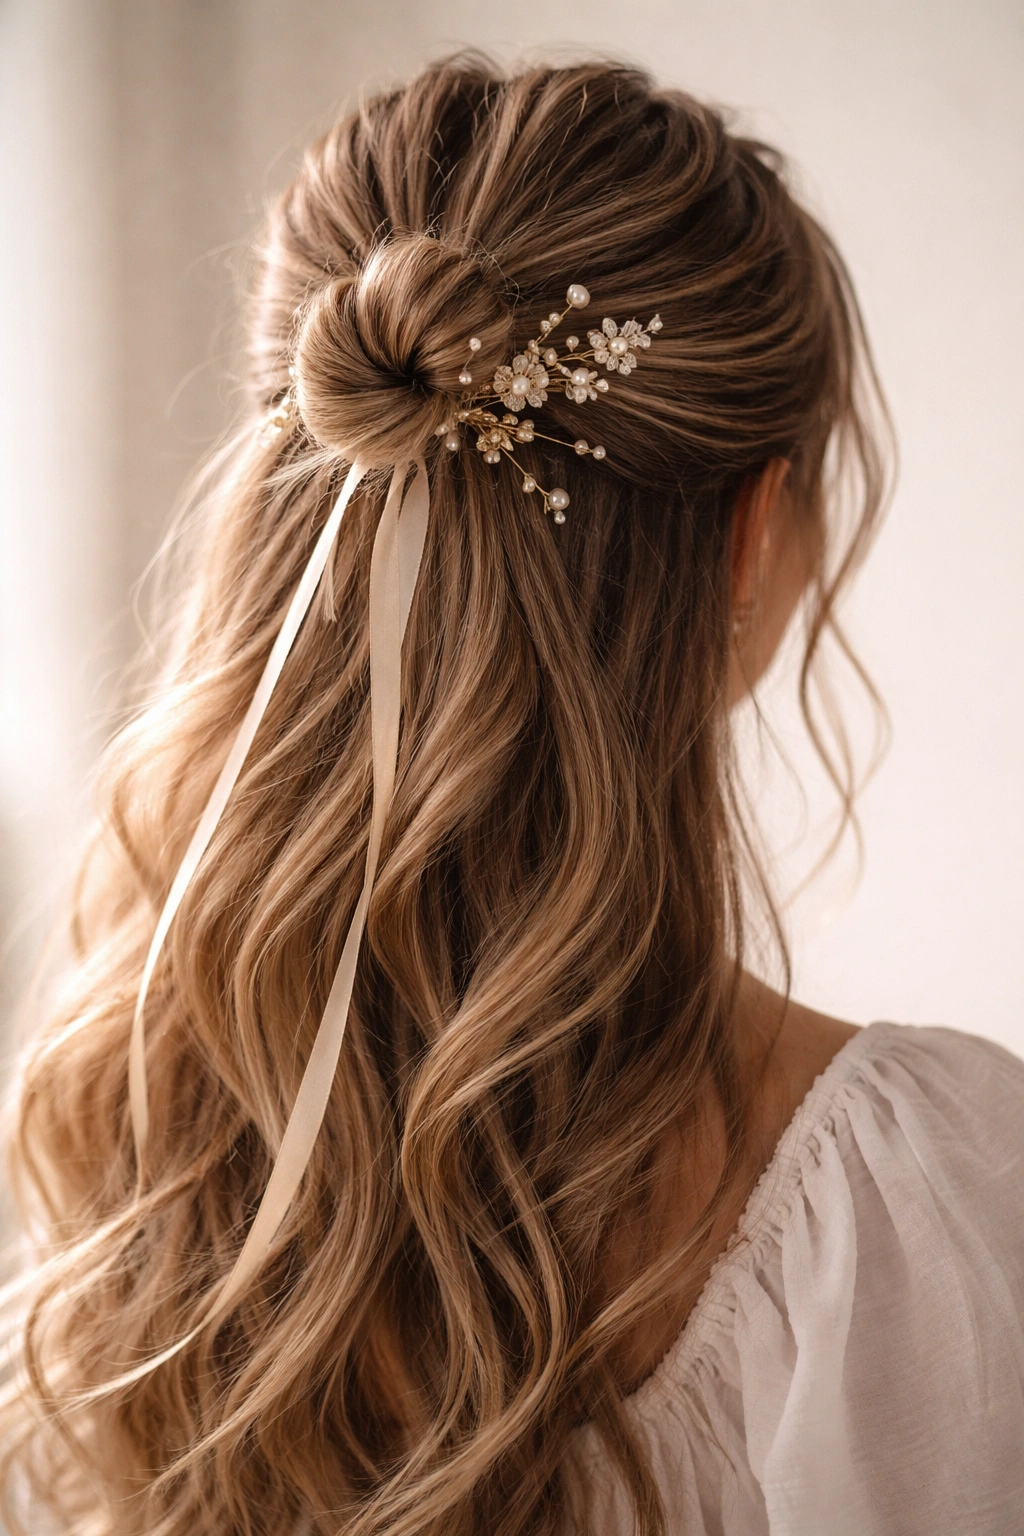
This is more of a styling approach than a specific technique—taking any basic half-up bun and elevating it dramatically through the strategic addition of hair accessories like clips, combs, ribbons, or decorative pins.
Choosing and Positioning Accessories
Start with any of the half-up bun styles above, but before finalizing, decide on your accessory approach. You can thread a delicate ribbon or silk cord through the bun itself for a romantic touch. You can position a decorative hair comb vertically through the bun for elegance. You can scatter small clips or pins around the bun’s perimeter. You can even wrap a strand of pearls or beads around the base. The accessories should either match your outfit, your skin tone, or create an intentional contrast—random accessory choices can look chaotic rather than intentional.
When and How to Accessorize
- Works on any base half-up bun style, making it incredibly versatile
- Transforms a casual everyday style into something appropriate for special events
- Takes an additional 2–3 minutes when adding accessories to a completed bun
- Perfect for weddings, proms, holiday parties, or any occasion where you want obvious polish and intention
- Allows you to express personal style and creativity in ways a plain bun doesn’t permit
- Consider your hair color and skin tone when choosing metallic finishes—gold is universally flattering, rose gold works beautifully on warm skin tones, and silver shines on cool undertones
Quality matters significantly with hair accessories—cheap, flimsy clips and combs slip out or leave crease marks, while well-made accessories stay in place and look intentional.
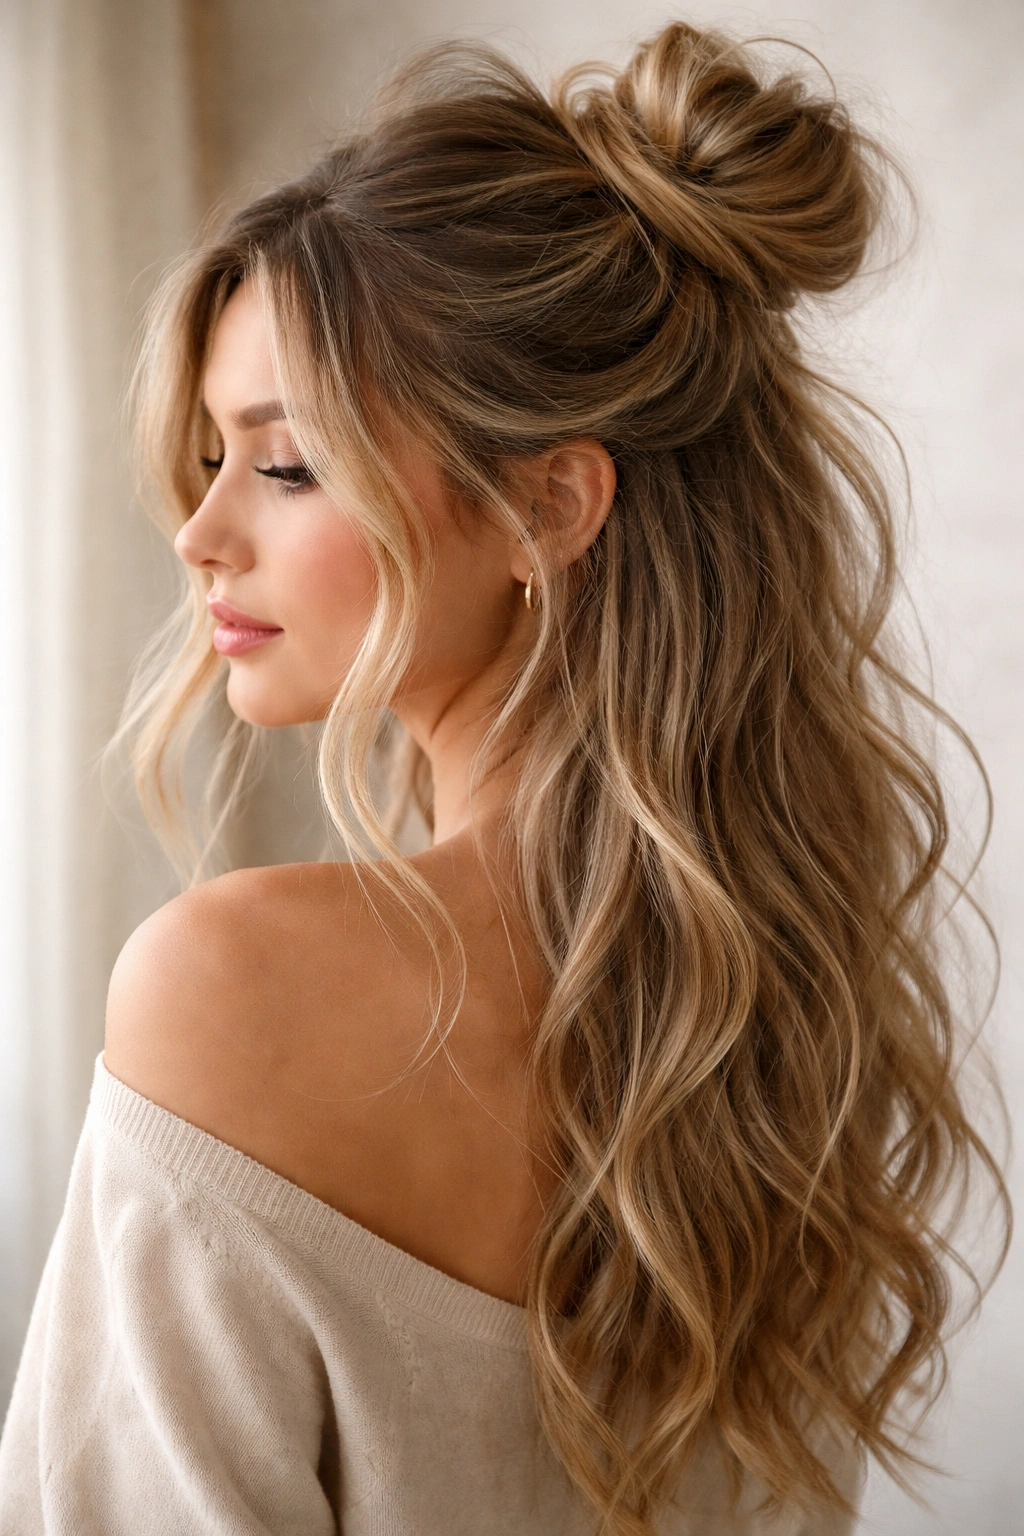
14. The Voluminous Teased Half-Up Bun
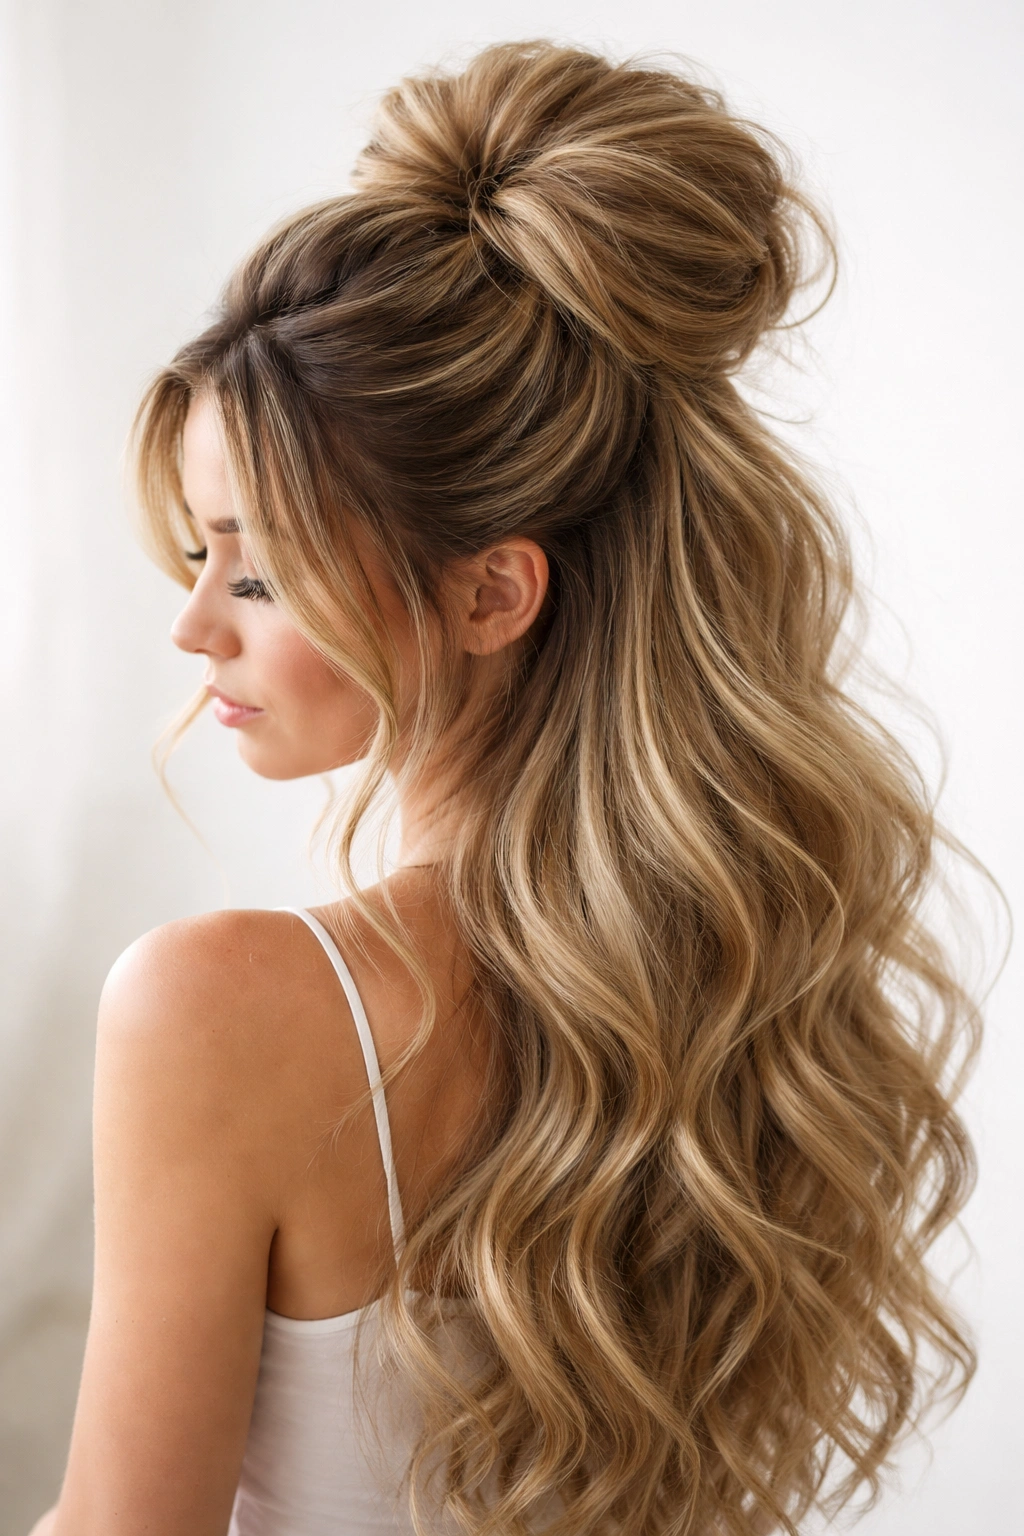
This style prioritizes maximum volume and dimension, creating a bun that looks substantial and impressive. If you have thin hair and want to create the illusion of more thickness, this technique will become your new favorite.
Teasing for Volume
Start by blow-drying your hair with a volumizing mousse applied to damp roots—this creates the foundation for teasing. Section the top half of your hair and, starting at the crown, use a teasing brush or fine-tooth comb to backcomb small sections of hair at the roots, creating texture and grip. Work through the entire top section, lifting as you go to create height and volume. Once you’ve teased, smooth the outer layer of each section with the same brush to create a polished surface while keeping the teased interior. Gather all of these teased sections into a high ponytail and secure it with an elastic band, being careful not to compress the volume you’ve created.
Creating Bun Height and Dimension
- Twist the ponytail loosely and wrap it around the elastic, leaving it slightly puffy rather than compact
- Gently pull on sections of the bun to increase its apparent size
- Secure everything with multiple bobby pins, tucking them underneath so they’re hidden
- Use a light hairspray to set the teasing without weighing it down
- Takes about 10–12 minutes when including teasing time
- Works beautifully on all hair types, but especially transforms fine or thin hair
- Perfect when you want to feel confident and put-together on days when your hair isn’t cooperating
Pro tip: Tease at the roots rather than midshaft—this creates height and volume without creating a tangled, matted appearance that’s difficult to brush out later.
15. The Half-Up Space Bun Style
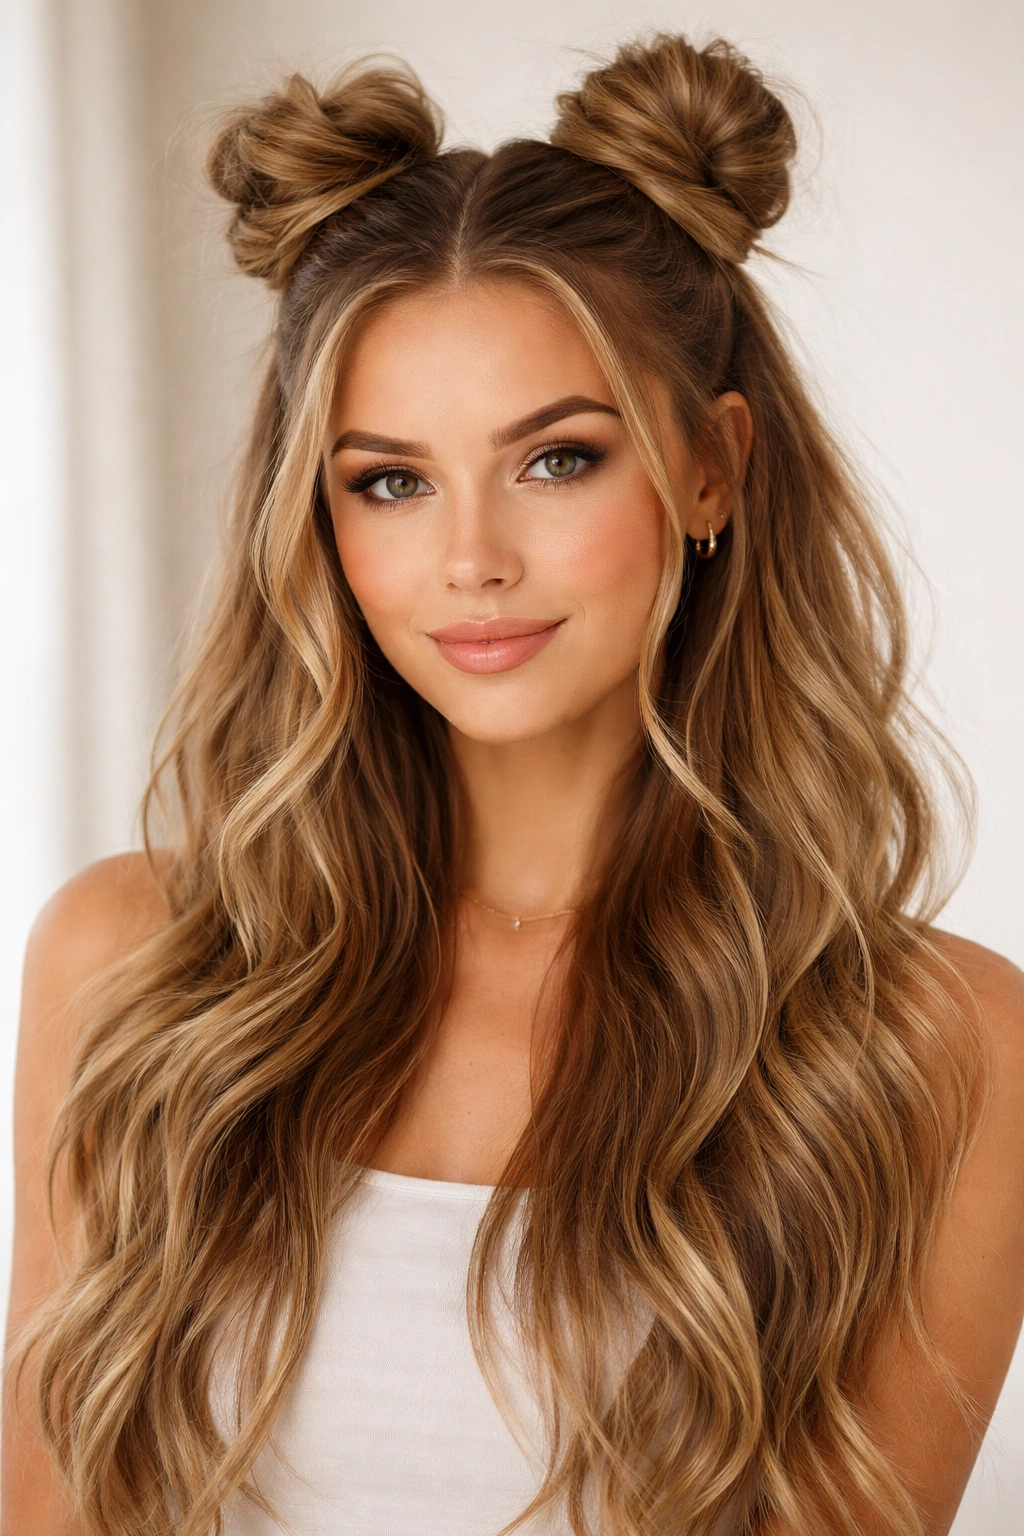
This modern, playful variation creates two buns instead of one, positioned symmetrically on either side of the back of your head. It’s fun, youthful, and requires a slightly different approach than traditional single-bun methods.
Creating Symmetrical Twin Buns
Section the top half of your hair down the center, creating two equal sections. Gather the hair on the right side into a ponytail positioned slightly to the right of center at the back of your head. Twist this ponytail and form it into a bun, securing it with bobby pins. Repeat on the left side, creating a mirror-image bun positioned to the left of center. Both buns should sit at approximately the same height and distance from the centerline for a balanced, intentional look. Leave the bottom half of your hair completely loose and flowing down your back.
Making Space Buns Work for You
- Creates a younger, more playful aesthetic than traditional half-up buns
- Works beautifully on all hair types, though texture and waves add visual interest
- Takes about 8–10 minutes
- Perfect for casual days, creative workplaces, or any time you want to express personality and have fun with your hair
- More forgiving than single buns if your buns aren’t perfectly symmetrical—slight variations add to the charm
- Pairs beautifully with casual outfits, athleisure, or bold makeup looks
- Works equally well on shoulder-length and long hair
You can make space buns look more polished by keeping them neat and symmetrical, or more playful by leaving some strands loose and allowing the buns to look slightly undone. Either approach works depending on your vibe.
Final Thoughts
The beauty of half-up half-down bun styles is that they’re endlessly customizable to match your lifestyle, hair type, and personal aesthetic. Whether you prefer sleek polish or intentional messiness, crown height or low positioning, minimal styling or decorative accessories, there’s a version here that’ll become a go-to in your styling rotation.
The techniques you’ve learned in this guide all build on the same core foundation: sectioning your hair, gathering it, securing it, and adding your personal touches. Once you’ve practiced a few of these styles, you’ll develop the muscle memory to create them in just a few minutes, making them practical for everyday wear as well as special occasions.
The most important step now is actually trying these styles. Pick one that appeals to you, gather your bobby pins and a clear elastic band, and give it a shot. Your first attempt probably won’t be perfect, and that’s completely normal—every beautiful hairstyle looks a little awkward the first time. But by your third or fourth attempt, your hands will know what they’re doing, and you’ll discover which variations feel most natural and most flattering on you. From there, you can confidently rotate these styles throughout your week, knowing you have a complete arsenal of options for every situation.