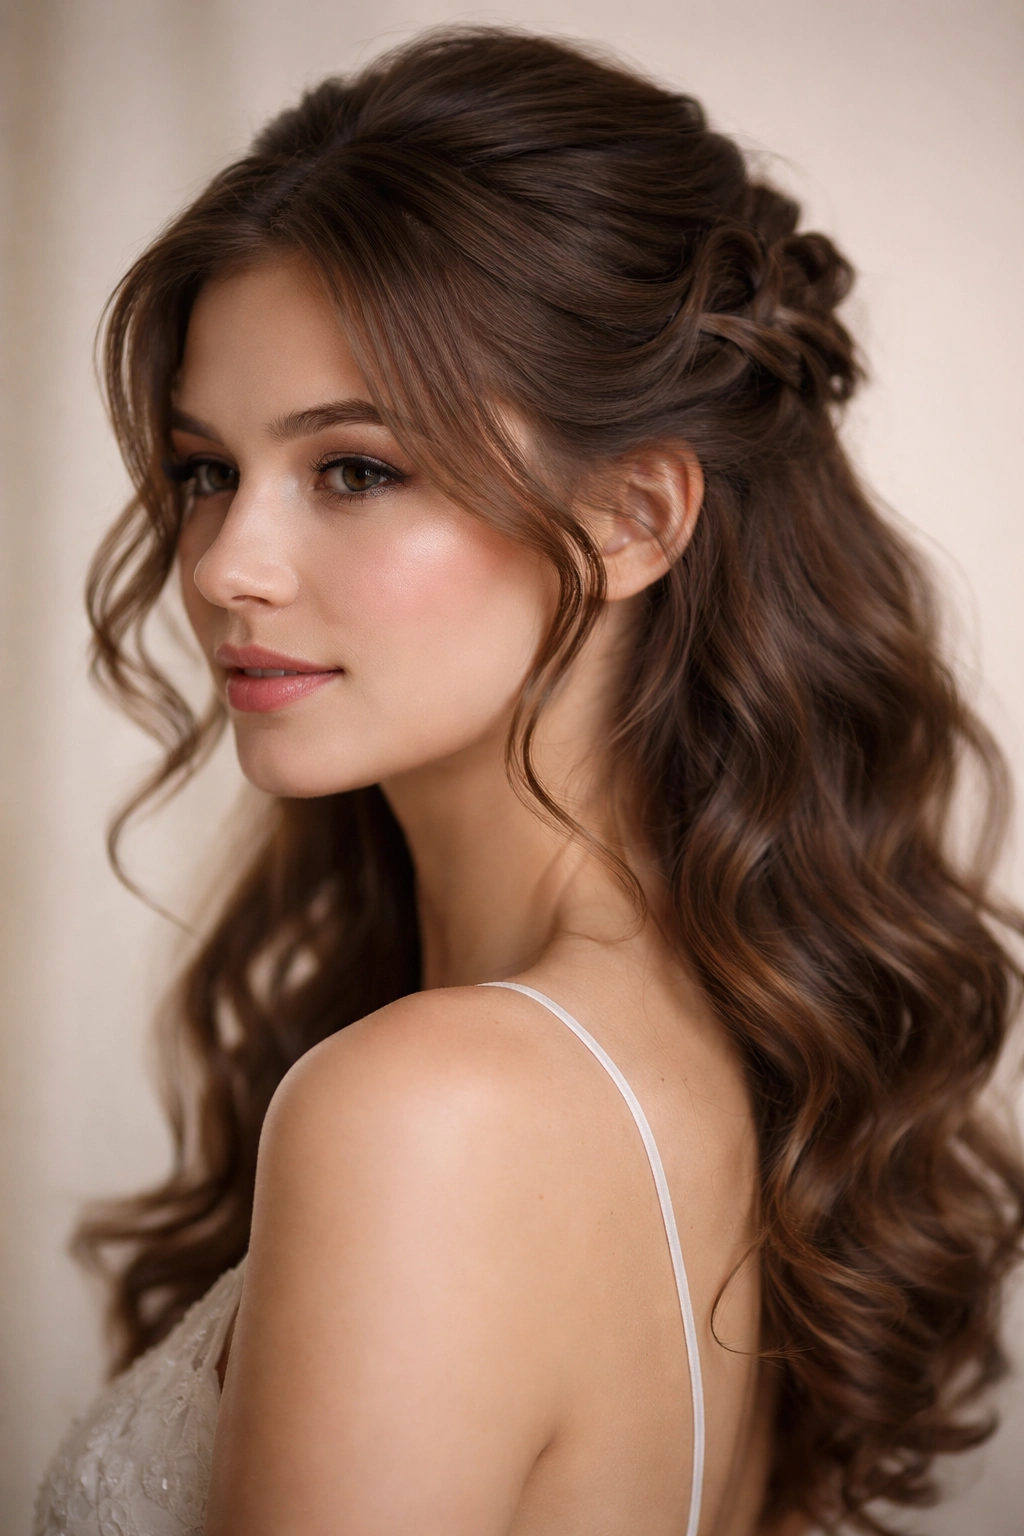
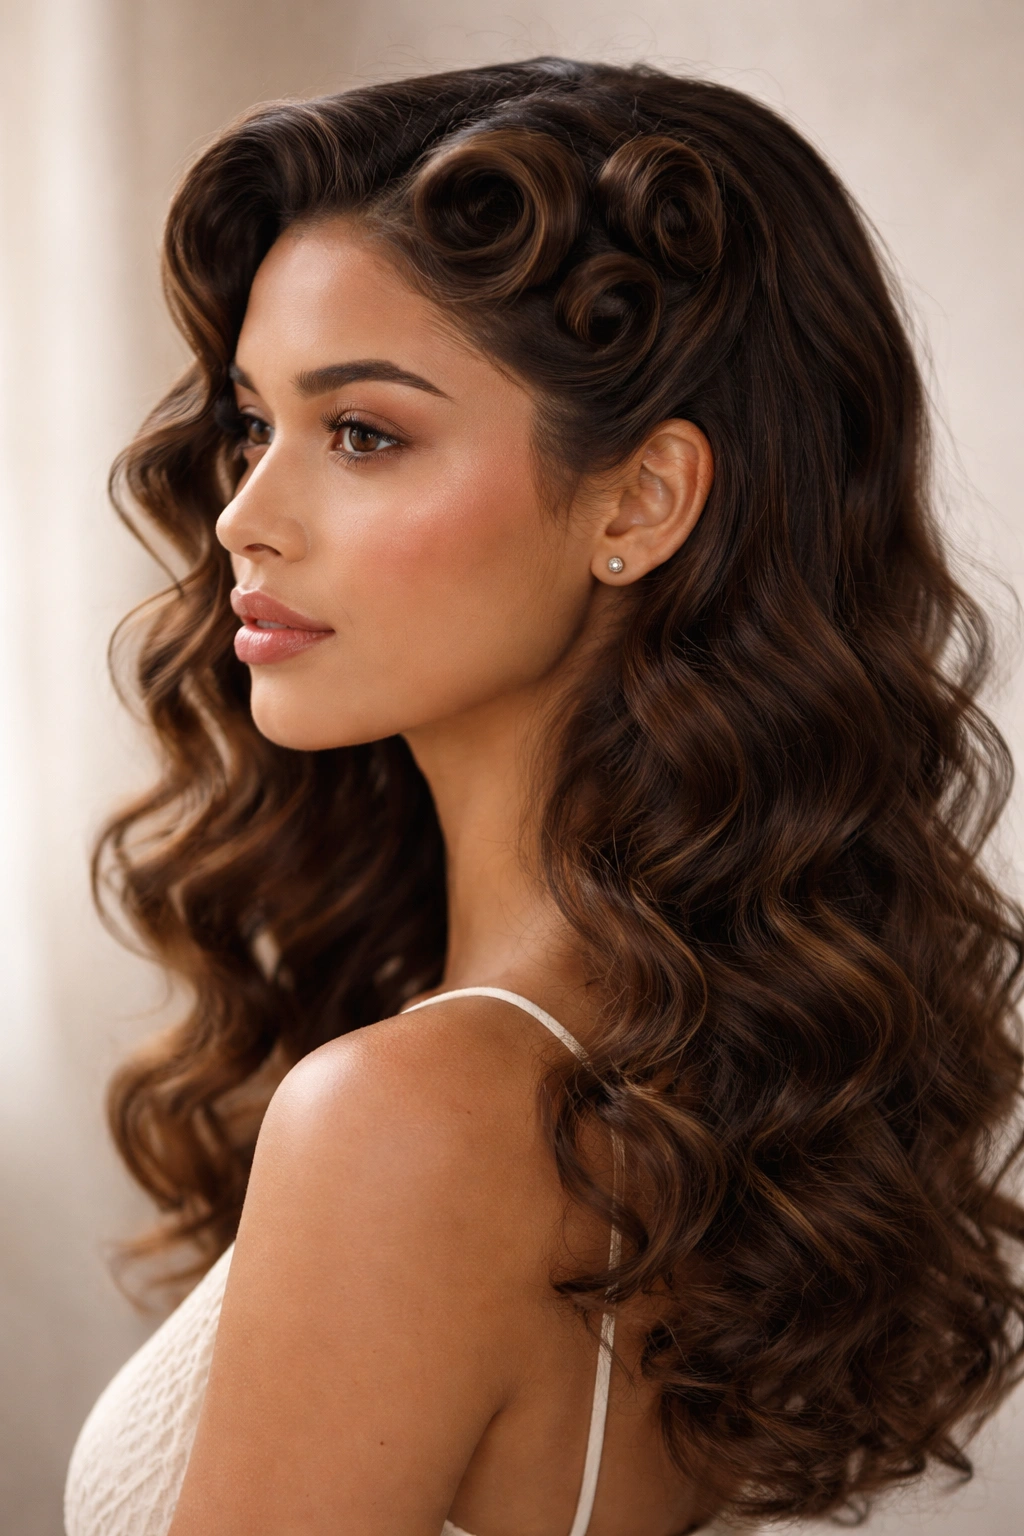
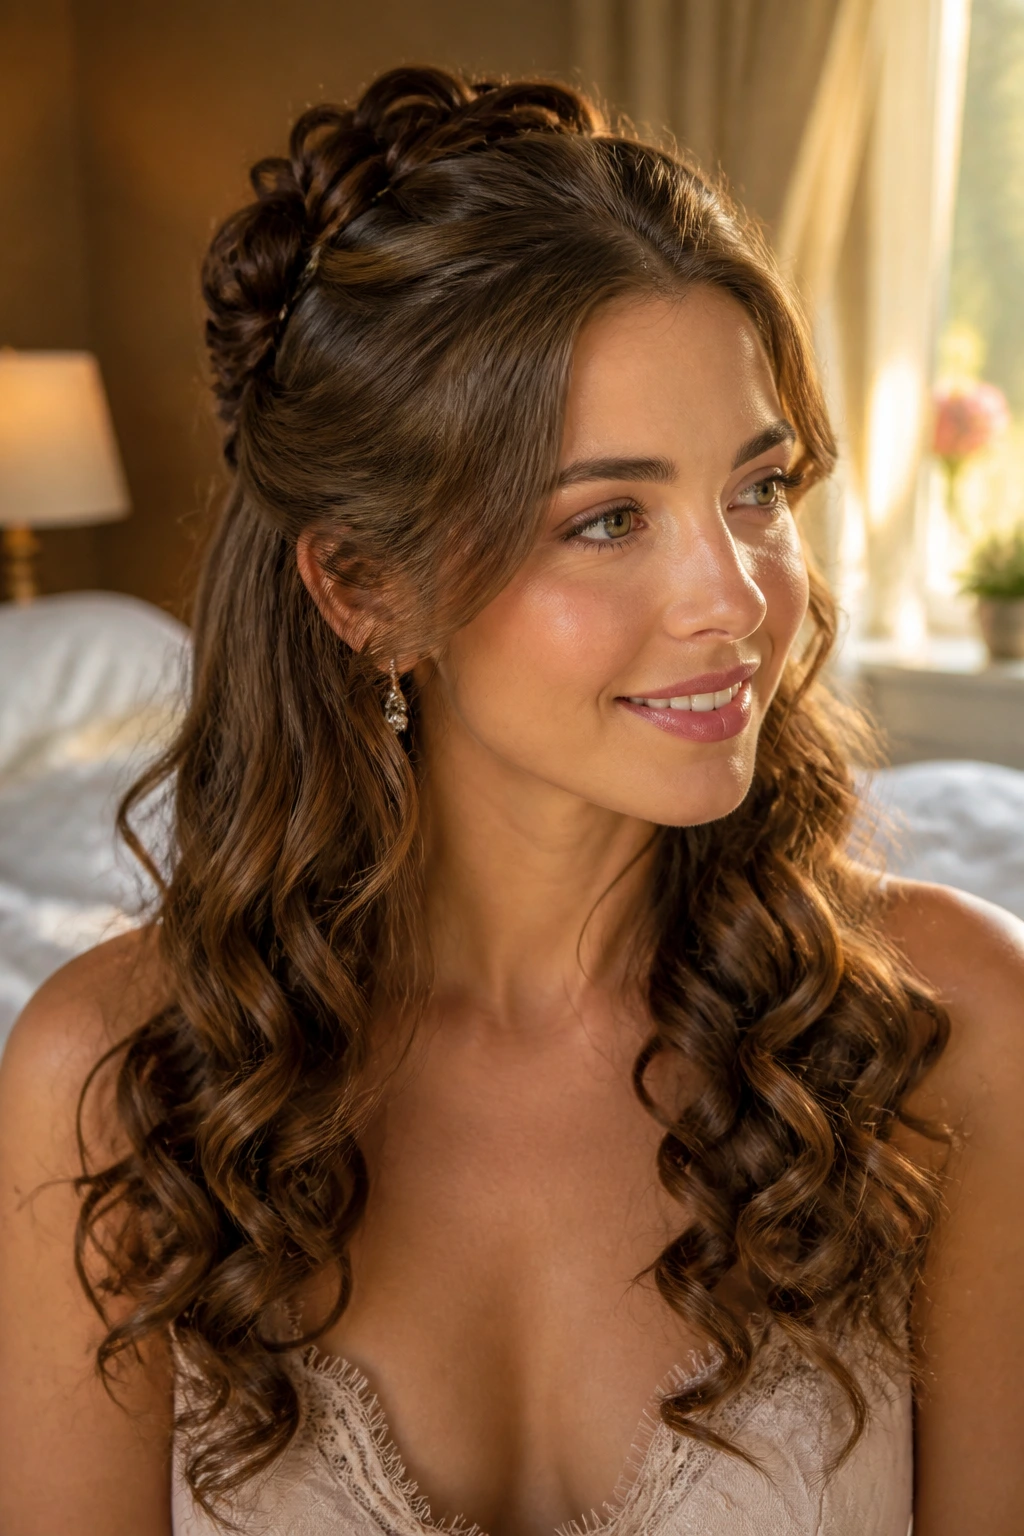
There’s something inherently romantic about a half-up, half-down hairstyle—it strikes that perfect balance between polished and effortlessly undone. Now pair that with the textured, vintage charm of pin curls, and you’ve got a hairstyle that works equally well for a date night, a wedding, or just a day when you want to feel put-together without committing to a full updo. Pin curls have made a serious comeback, and when you style them in a half-up configuration, you get all the dimension and movement of curls without the heat damage of hot tools—plus the benefit of sleek control on top. The beauty of this technique is that it’s incredibly customizable: you can go soft and romantic, bold and sculptural, or even edgy and modern, all depending on how you roll, place, and pin your curls.
The half-up half-down pin curl style works on nearly every hair type and length, from fine hair that needs strategic volume placement to thick, textured hair that holds curls beautifully. Whether you’re aiming for Old Hollywood glamour, a modern boho vibe, or something entirely unique, pin curls in a half-up format give you endless creative options. The technique has been refined over decades, and with the right approach—and a good collection of bobby pins—you can achieve salon-quality waves and curls that last all day and night without a single pass of a curling iron.
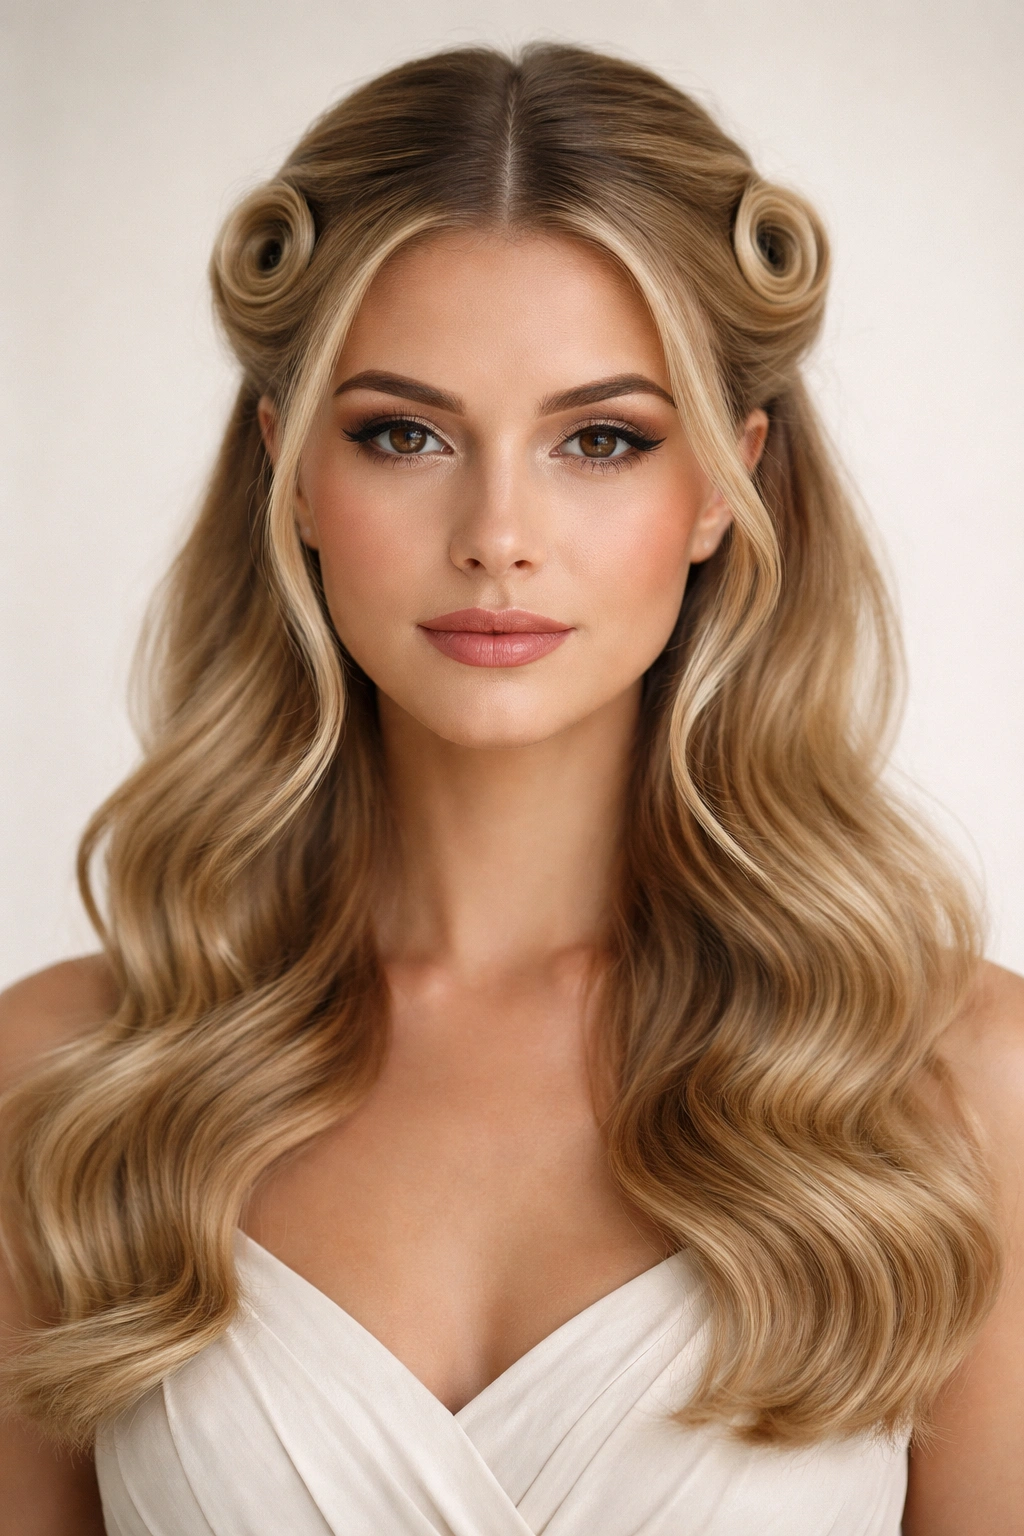
1. The Classic Rolled Half-Up Pin Curl Style
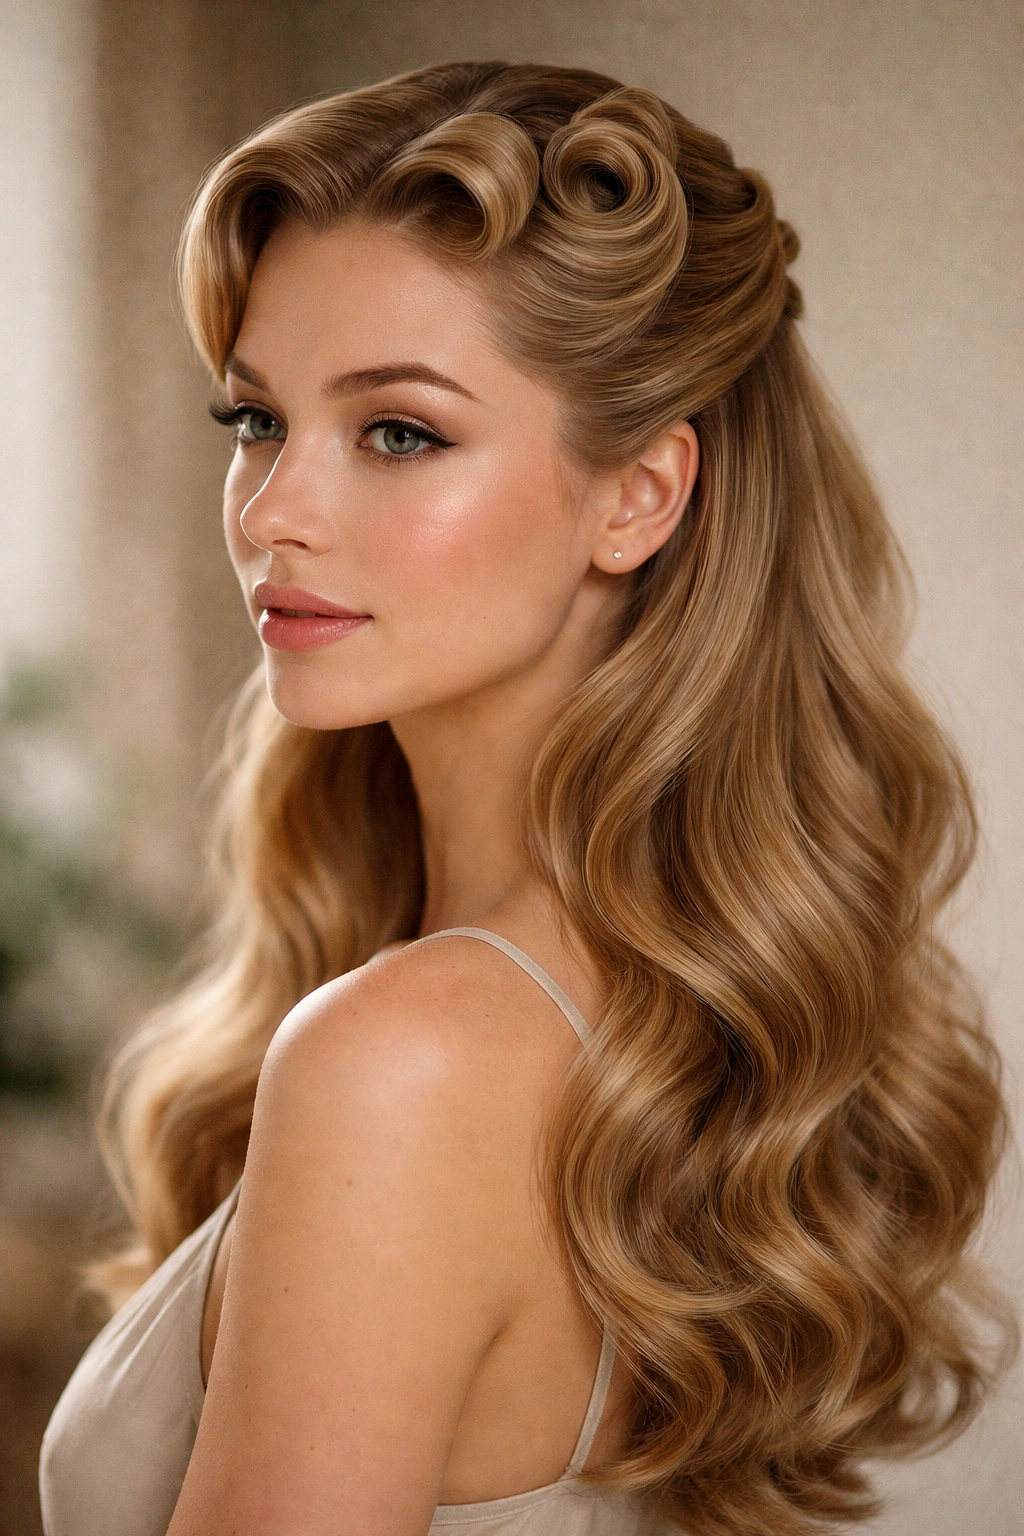
The classic rolled pin curl is where most people start, and there’s a reason it never goes out of style. This approach involves rolling sections of hair around your fingers or a pin curl setter, securing them with bobby pins, and letting them set either naturally or with heat. For the half-up format, you’ll be pinning the upper sections of hair—roughly from the temples and crown area—while leaving the bottom half to fall naturally with waves.
Why This Works as Your Foundation
The rolled pin curl creates uniform, bouncy waves that look intentional and polished. This style is particularly effective if you’re starting with damp hair, as moisture helps set the curl shape. The curls hold their shape throughout the day, and you can refresh them the next morning with a light mist of water and a few hours of air-drying. One major advantage is that there’s zero heat involved during the rolling and setting process, which means your hair stays healthier while you still get gorgeous texture.
Step-by-Step Technique for Half-Up Placement
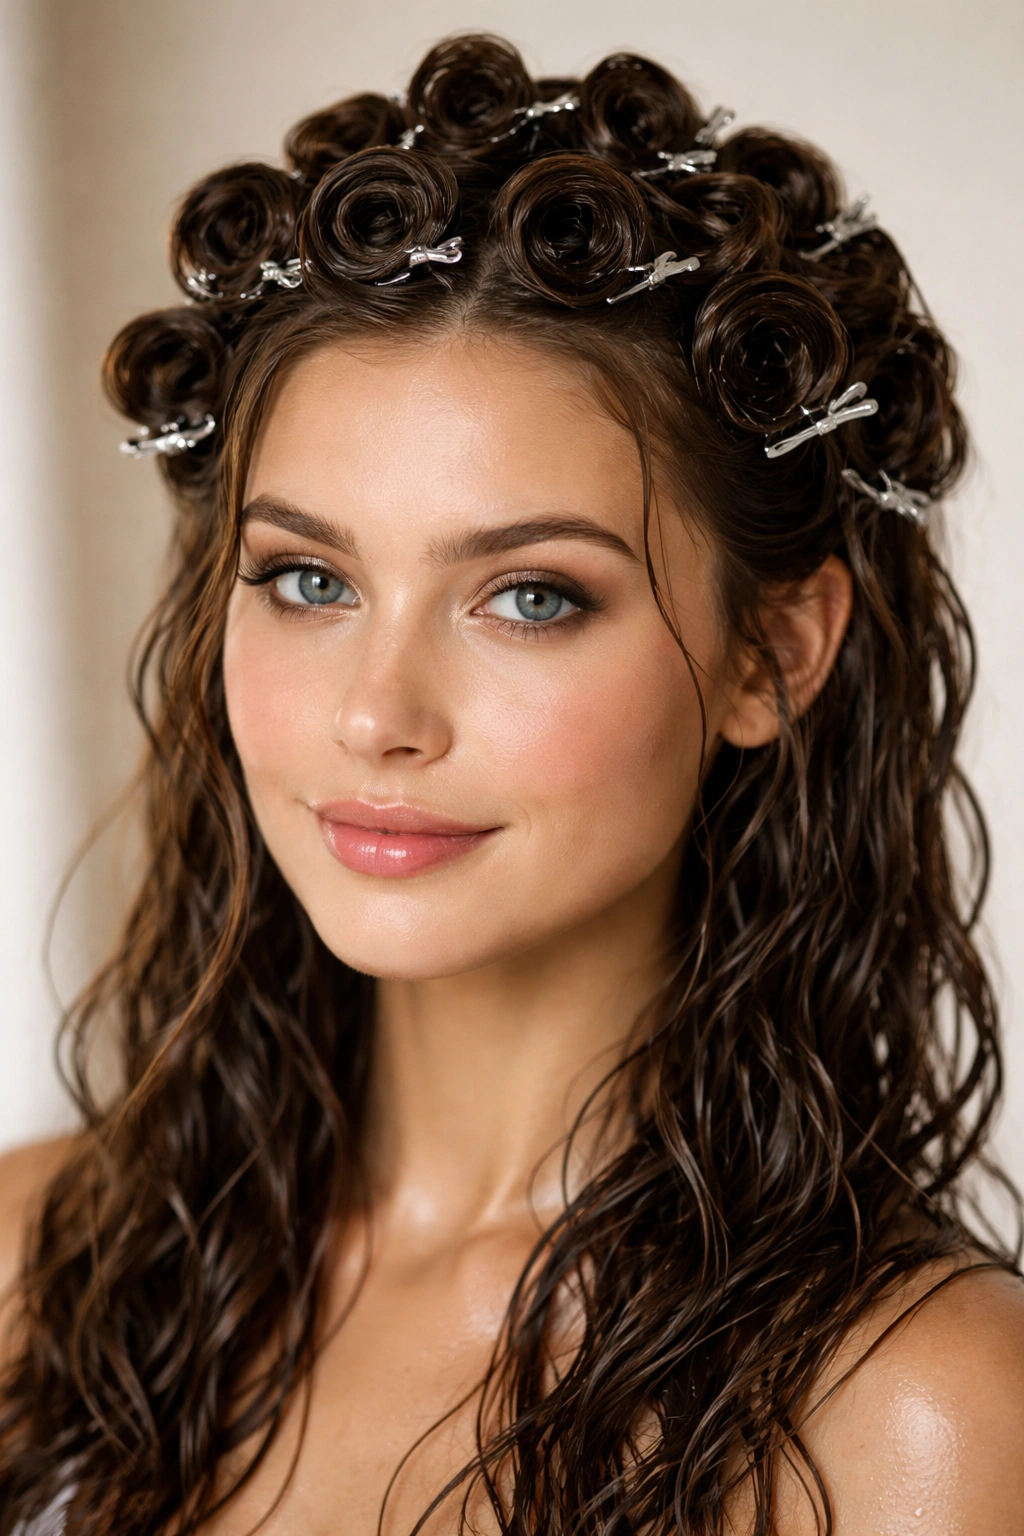
Start with damp hair—about 60-70% dry, not dripping wet but not fully dry either. Section off your half-up portion by creating an invisible line from ear to ear across the back of your head. Take vertical sections about an inch to an inch-and-a-half wide, lightly mist each section with a curl-setting spray, then roll the hair away from your face and toward the crown. Secure each rolled section with two bobby pins in an X formation—one pin anchoring from above, one from below. Work methodically from one side to the other, then allow the curls to set for at least four hours (overnight is ideal). When you unroll, you’ll have soft, voluminous waves that you can finger-comb into a half-up style by gently pulling the bottom layers straight and leaving the curled sections to frame your face.
Pro tip: If your hair is fine or tends to fall flat, apply a light volumizing mousse to your roots before rolling—it adds grip and helps curls hold their shape longer.
2. The Spiral Pin Curl for Maximum Definition
Spiral pin curls create tighter, more defined curls than the classic rolled version, and they’re perfect if you want dramatic, sculpted waves rather than soft, loose ones. Instead of rolling the hair straight up, you spiral it in a continuous coil, creating a shape that holds much more tension and produces more structured waves when released.
Creating That Coveted Spiral Shape
The spiral pin curl requires a bit more precision than the rolled version, but the results are stunning. You’ll work with the same damp hair and setting spray, but instead of rolling straight up, you’ll wrap the hair around itself in a continuous spiral motion, almost like you’re creating a pinwheel. Start at the ends of your section and spiral inward toward your scalp, letting the curl naturally coil and stack on top of itself. Once you reach the base, pin the entire coil against your head with bobby pins, using the spiral’s natural shape to guide the pin placement. The key is keeping tension consistent throughout the spiral—loose tension equals loose curls, while firm, even tension creates those magazine-worthy defined waves.
Half-Up Application and Styling
For the half-up half-down look with spirals, reserve the spiral technique for the upper crown and sides, where you want maximum definition and drama. Let the lower back section remain un-curled, or apply a gentler rolling method. This creates a visual hierarchy—the defined spirals frame your face and add height at the crown, while the straight or loosely waved bottom section provides balance. Once the spirals are set and you unroll them, brush gently through the curls with a wide-tooth comb or soft paddle brush to blend them slightly, then sweep the half-up section back and secure with bobby pins hidden beneath the curled layers.
Insider note: Spiral curls hold best on hair that’s naturally textured or curly—if you have very straight hair, consider using larger spirals and applying more setting spray for longer-lasting definition.
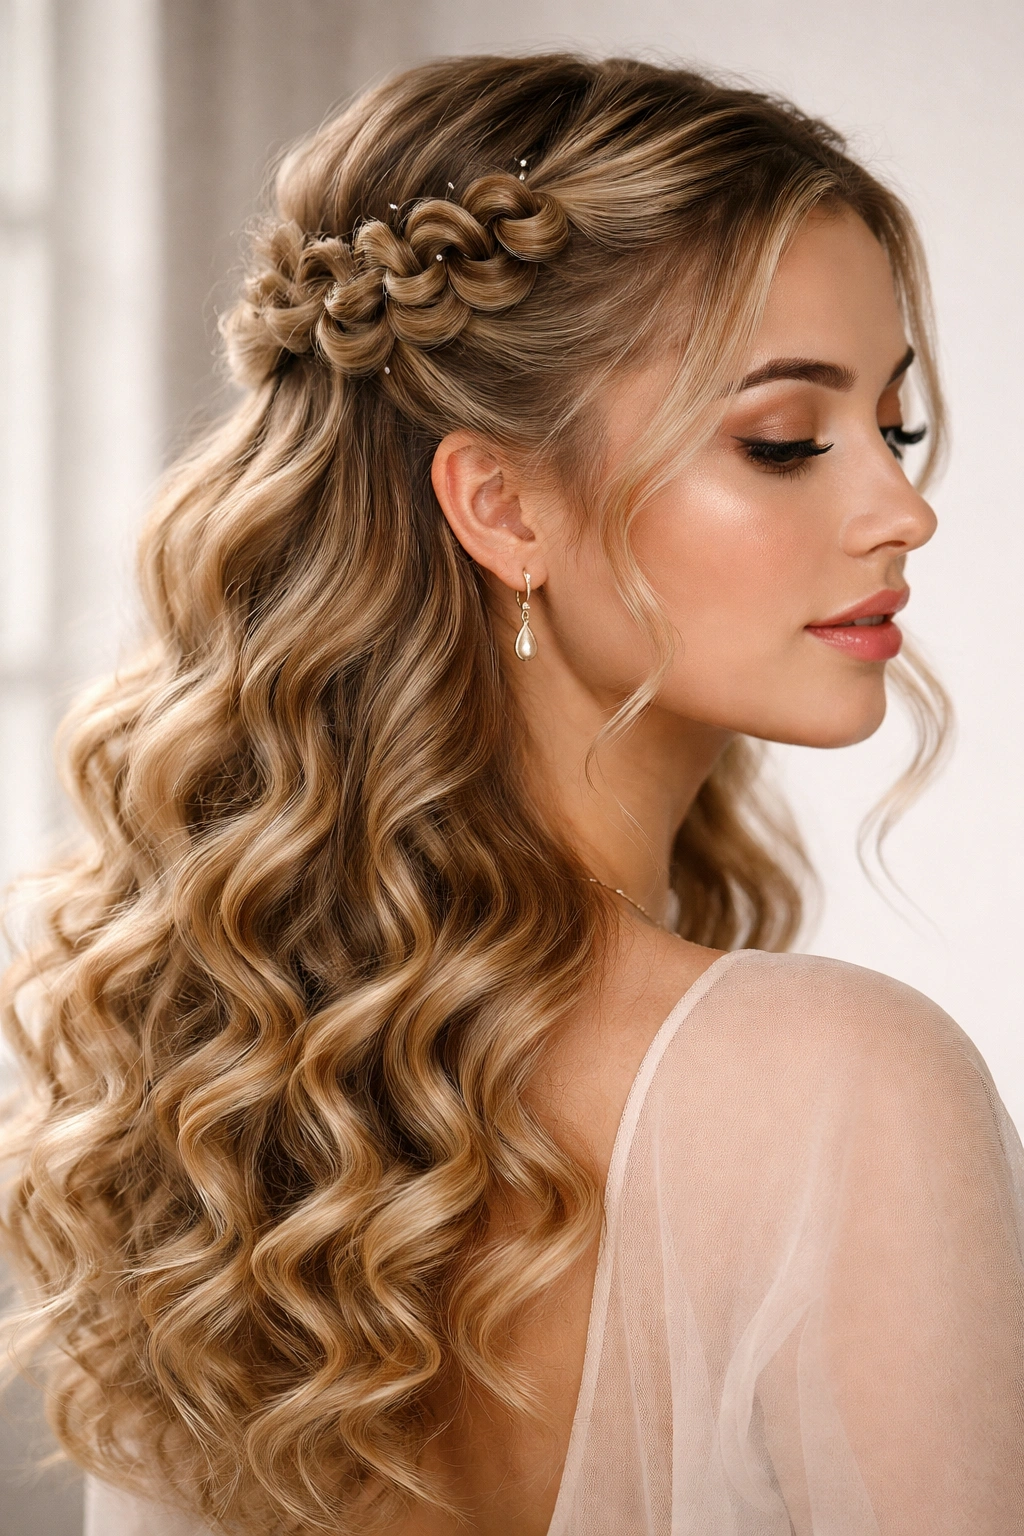
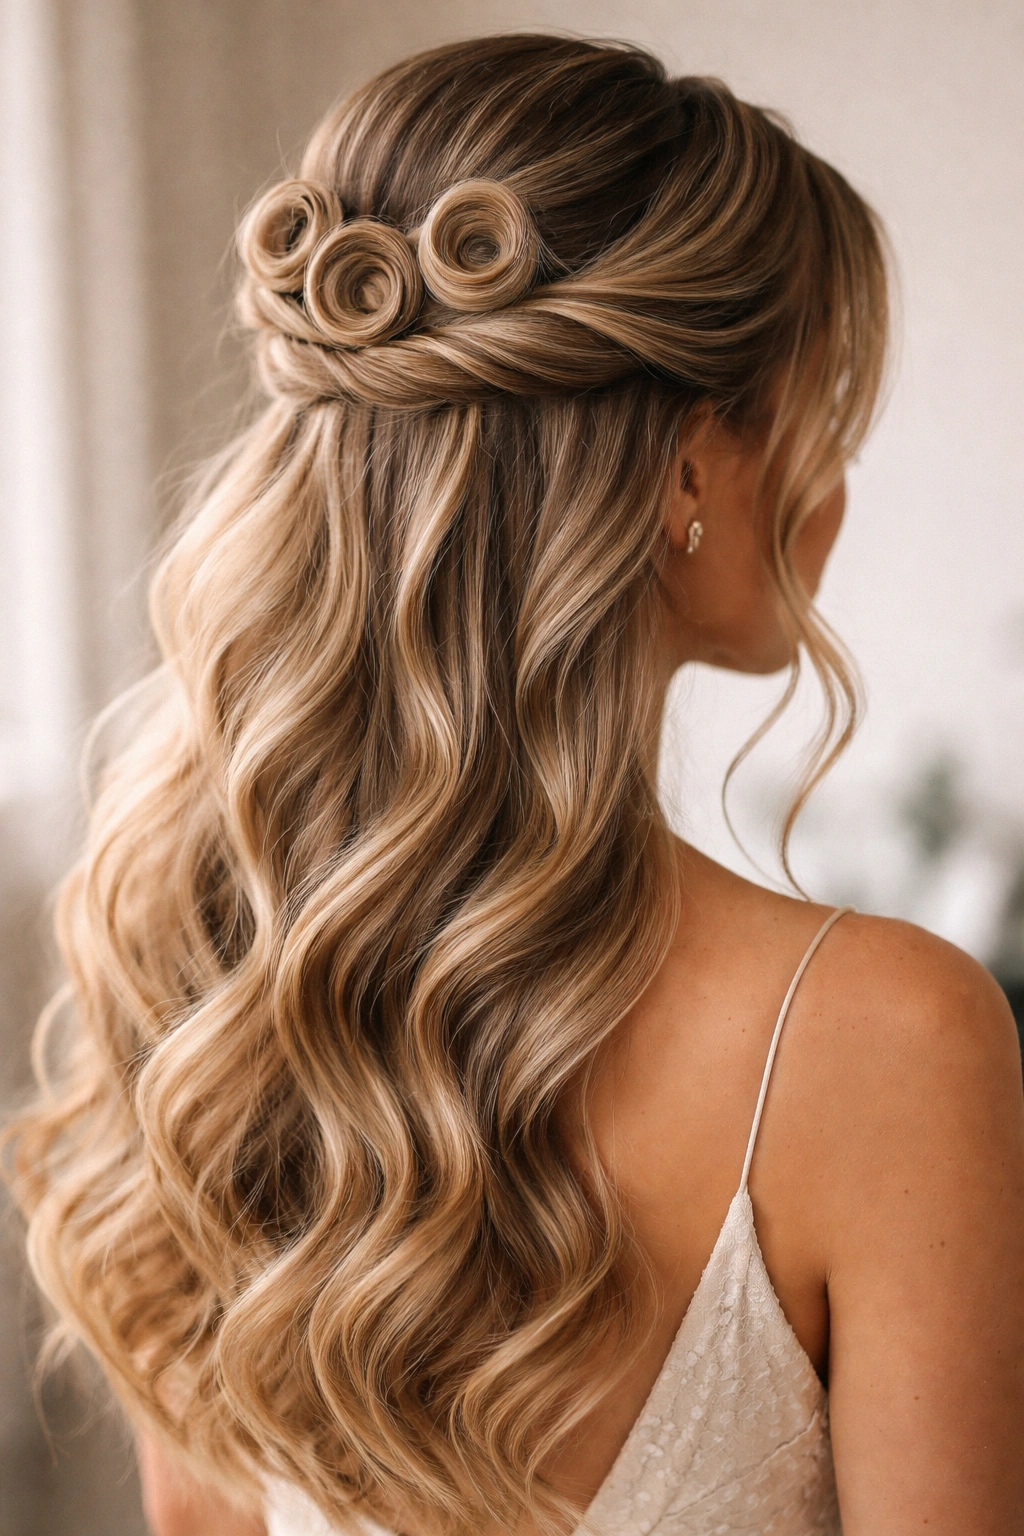
3. The Pin Curl with Center Part for Symmetrical Elegance
A center-parted half-up pin curl style creates a symmetrical, balanced look that feels both modern and timeless. The center part draws attention to your features and creates a structured frame that works beautifully with pin curls, since the curls on each side mirror each other.
Creating the Perfect Center Part
Part your hair down the very center of your scalp from your forehead to the nape of your neck—take time to make it as straight and even as possible, as any waviness in the part will be visible in the finished style. Once your part is set, divide each side into sections for pin curling. For the half-up format, you’ll pin curl only the sections from the part to roughly ear level on each side, creating a frame that starts at the center and curves around toward the back of your head.
Styling for Maximum Symmetry
Roll your pin curls identically on each side—same size sections, same rolling direction, same pin placement. This consistency creates visual symmetry that’s incredibly satisfying. After your curls have set, unroll gently and smooth each curled section with your fingers, then gather the half-up portion at the crown and secure with bobby pins. The straight center part acts as an anchor for the curled sections, and because the curls are symmetrical, the entire style looks intentional and carefully crafted. You can leave the back section straight, create matching pin curls there as well, or add a few loose waves with a curling iron for contrast.
Worth knowing: A center part is high-commitment—it works best with hair that cooperates, so use a strong-hold hairspray and make sure your hair is completely dry before parting.
4. The Side-Swept Half-Up Pin Curl with Asymmetrical Balance
The side-swept version flips the script on symmetry, creating an asymmetrical, romantic vibe that feels softer and more effortless than a center part. Pin curls on one side are fuller and more prominent, while the other side provides balance with fewer, lighter curls or a straight section.
Building the Asymmetrical Framework
Start with a deep side part—the part should run from one temple, curve slightly toward the back of your head, and end near the nape of your neck on the opposite side. This creates two very different sections: a larger section on one side (where your main pin curls will live) and a smaller section on the other side. Roll pin curls on the larger side using the classic rolled or spiral technique, working from the part toward the ear and creating volume and texture. The smaller side can remain mostly straight, with perhaps one or two gentle pin curls near the face for softness.
Achieving That Effortless Sweep
Once your curls have set, unroll them and lightly finger-comb the curled side to soften the waves slightly—you want them to look intentional but not stiff. Gather the half-up section and sweep it toward the back of your head, securing with bobby pins on the opposite side from where the curls are heaviest. This creates a beautiful asymmetry: the curled side flows over the pins, camouflaging them, while the straighter side provides clean lines. The overall effect feels romantic and a bit art-directed without looking overdone.
Pro tip: If you find the swept side looks too flat, add texture to that side with a texturizing spray or a light salt spray—it catches light and balances the volume on the curled side.
5. The Double-Stack Pin Curl Half-Up for Extra Dimension

A double-stack pin curl creates two layers of curls stacked on top of each other, building serious dimension and volume while maintaining that half-up silhouette. This technique is perfect if you want maximum impact or if you’re working with finer hair that needs strategic layering for fullness.
Understanding the Stacking Technique
Double-stacking means creating pin curls at two different levels—one set closer to the scalp for height and structure, and another set slightly lower for additional dimension and wave. You’ll work with sections just as you would for single pin curls, but instead of rolling the entire section from end to root, you’ll roll the bottom two-thirds first, pin it, then take the remaining top third and roll it in the same direction, creating a smaller curl that sits on top of the first. Both curls stay pinned while they set, creating a stacked effect that produces incredibly voluminous waves when released.
Half-Up Application for Maximum Impact
For the half-up half-down look, reserve the double-stacking technique for the crown and upper sides where you want the most height and drama. The lower back section can have single pin curls or remain straight, depending on your vision. Once everything is set and unrolled, the double-stacked sections will have substantial volume and a beautiful cascading wave pattern. Gather these curled sections into your half-up section and secure at the crown—the stacked curls create a natural poof and dimension that makes even fine hair look thick and luxurious.
Key consideration: Double-stacking takes longer to set than single curls—plan for at least six to eight hours of setting time, preferably overnight. If you’re impatient, you can use a cool blow dryer to speed the process slightly, though air-drying produces the most durable curls.
6. The Pin Curl with Twisted Half-Up Sections for Modern Detail
Combining pin curls with twisted sections in your half-up creates a hybrid style that blends the vintage charm of curls with a more contemporary feel. The twisted sections add structure, visual interest, and a modern edge to what might otherwise feel purely retro.
Integrating Twists Into Your Pin Curl Design
Begin with your pin curls set as usual in the crown and upper side sections. Once they’re fully set and unrolled, instead of simply sweeping all the curled hair straight back into a half-up, take sections of the curled hair and twist them before pinning them back. You might take a section from each side temple, twist it toward the back of your head, and pin it where it meets the center back section. Or twist just the front-facing pieces while leaving the crown curls loose and voluminous. The twist adds a refined architectural element while still showcasing the beautiful texture of your pin curls.
Creating Visual Interest Through Contrast
The interplay between the soft, rounded curves of pin curls and the sleek, controlled lines of twists creates visual dynamism. Your eye travels from the voluminous curled sections to the smooth, intentional twists, then to the straight hair of the half-down portion. This creates a style that feels curated and thoughtful without appearing overly complicated. Use bobby pins that match your hair color to keep twists inconspicuous, and leave a few loose face-framing curls untwisted for softness.
Styling note: This technique works particularly well for events where you want to look polished and modern—think cocktail parties, professional events, or creative industry gatherings where you want to avoid looking purely vintage.
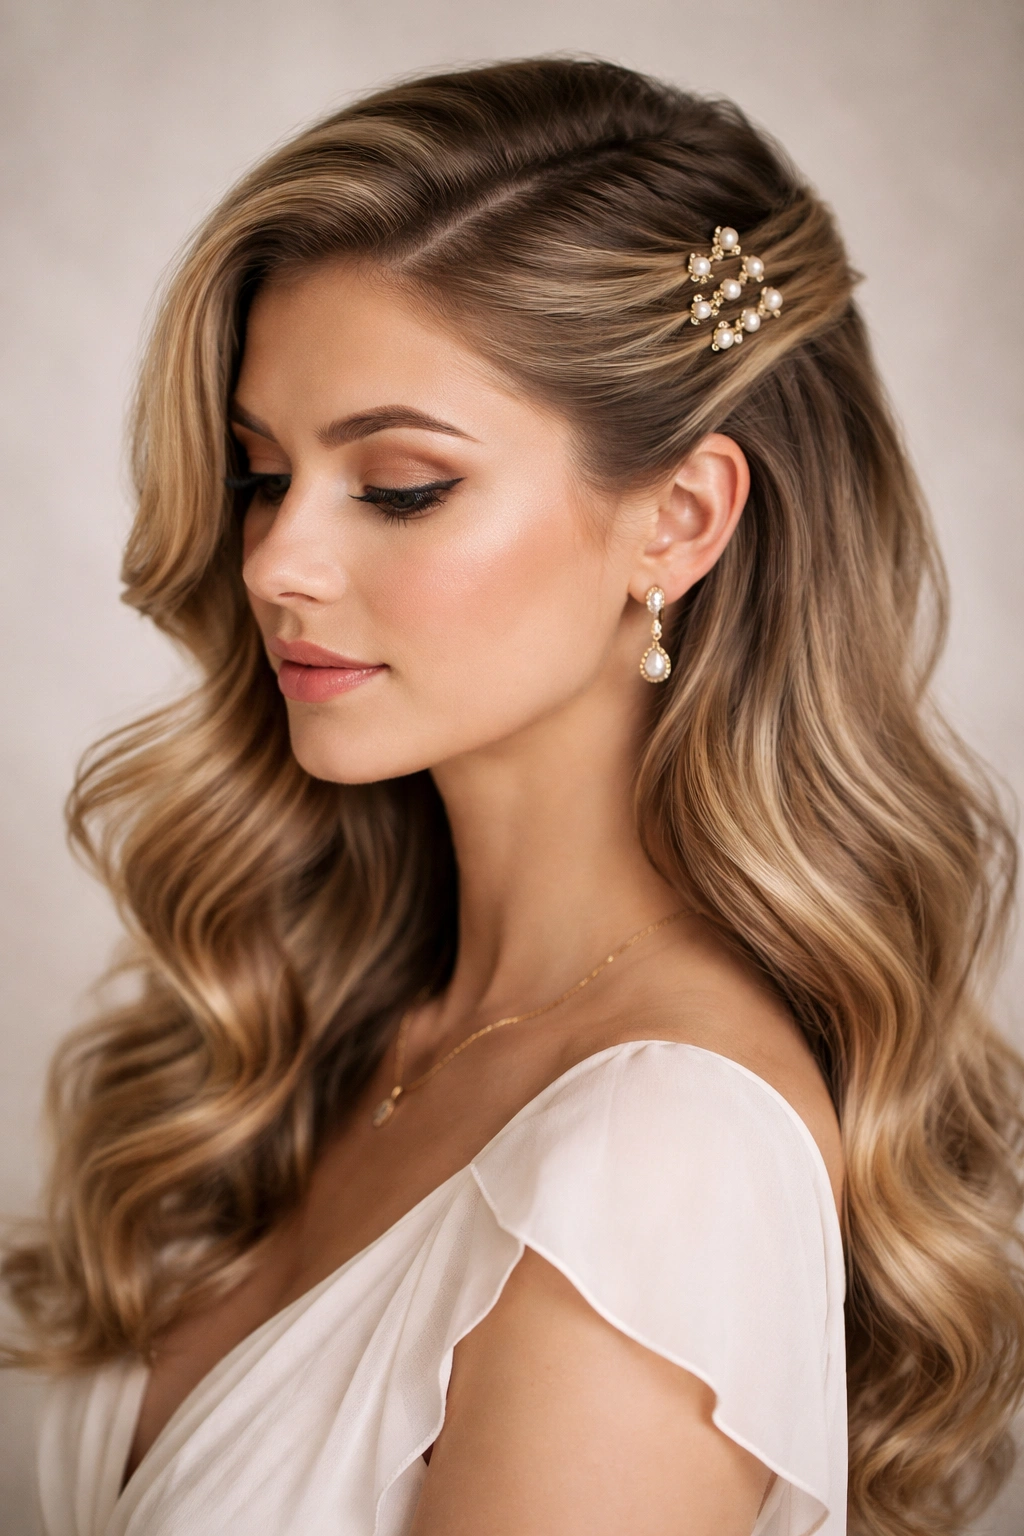
7. The Romantic Low Half-Up Pin Curl Style for Delicate Femininity
A low half-up pin curl style keeps the curls lower on your head, creating a romantic, gentle look that’s all about delicate movement and subtle texture rather than drama and volume. This version works beautifully for softer aesthetics, romantic occasions, or when you prefer understated elegance.
Placing Curls Lower on the Head
Instead of starting your pin curls at the crown, begin them at approximately ear level, rolling sections that sit just above that imaginary ear-to-ear line. Work your pin curls in this lower zone, perhaps adding one or two gentle curls at the very crown for minimal height but maximum romance. The result is curls that frame your face and neck rather than adding lift to your crown.
Building a Soft, Flowing Half-Up
Once your lower pin curls have set and been released, you’ll have beautiful waves concentrated in the area just below where your half-up section begins. Gather the hair above these waves—mostly straight or very gently waved—into your half-up at the crown or just slightly lower. This creates a look where the curled waves flow from the halfway point downward, creating a waterfall effect. The unstyled upper section provides clean lines and balance, while the lower curls create romance and movement.
Pro tip: For maximum romance, add a delicate hair accessory—a small clip, a subtle hair comb, or a silk ribbon—where you pin your half-up section. This draws attention to the transition between your straight upper hair and your curled lower waves.
8. The Oversized Pin Curl Half-Up for Glamorous Waves
Oversized pin curls create the biggest, most luxurious waves possible—perfect for when you want full-on glamour without heat styling. These are created using larger sections and looser rolling techniques, producing waves that are soft, touchable, and incredibly voluminous.
Rolling Larger Sections for Bigger Waves
Instead of working with one-inch sections, use sections that are one-and-a-half to two inches wide. Roll these larger sections more loosely—the tension should be gentle rather than tight, allowing the hair to create flowing waves rather than tight curls. Use larger-diameter pin curl setters or your fingers to create the larger shape. Because you’re working with bigger sections, you’ll need fewer of them, which actually speeds up the setting process while giving you more dramatic results.
Half-Up Styling With Glamorous Drama
Once your oversized curls have set—usually four to six hours—unroll them carefully and let them fall into their natural wave pattern. Finger-comb them gently, starting at the ends and working toward the roots, to blend the waves and create movement. Gather your half-up section at the crown, but don’t smooth it too much—let the natural wave and volume speak for itself. The result is Old Hollywood glamour: touchable waves with tons of movement and dimension, a style that photographs beautifully and lasts through an entire evening.
Worth knowing: Oversized curls work best on hair that’s at least shoulder-length and has some natural texture or willingness to hold shape. Very fine, silky straight hair may struggle to hold oversized waves for extended periods.
How to Set Your Pin Curls Successfully Every Time
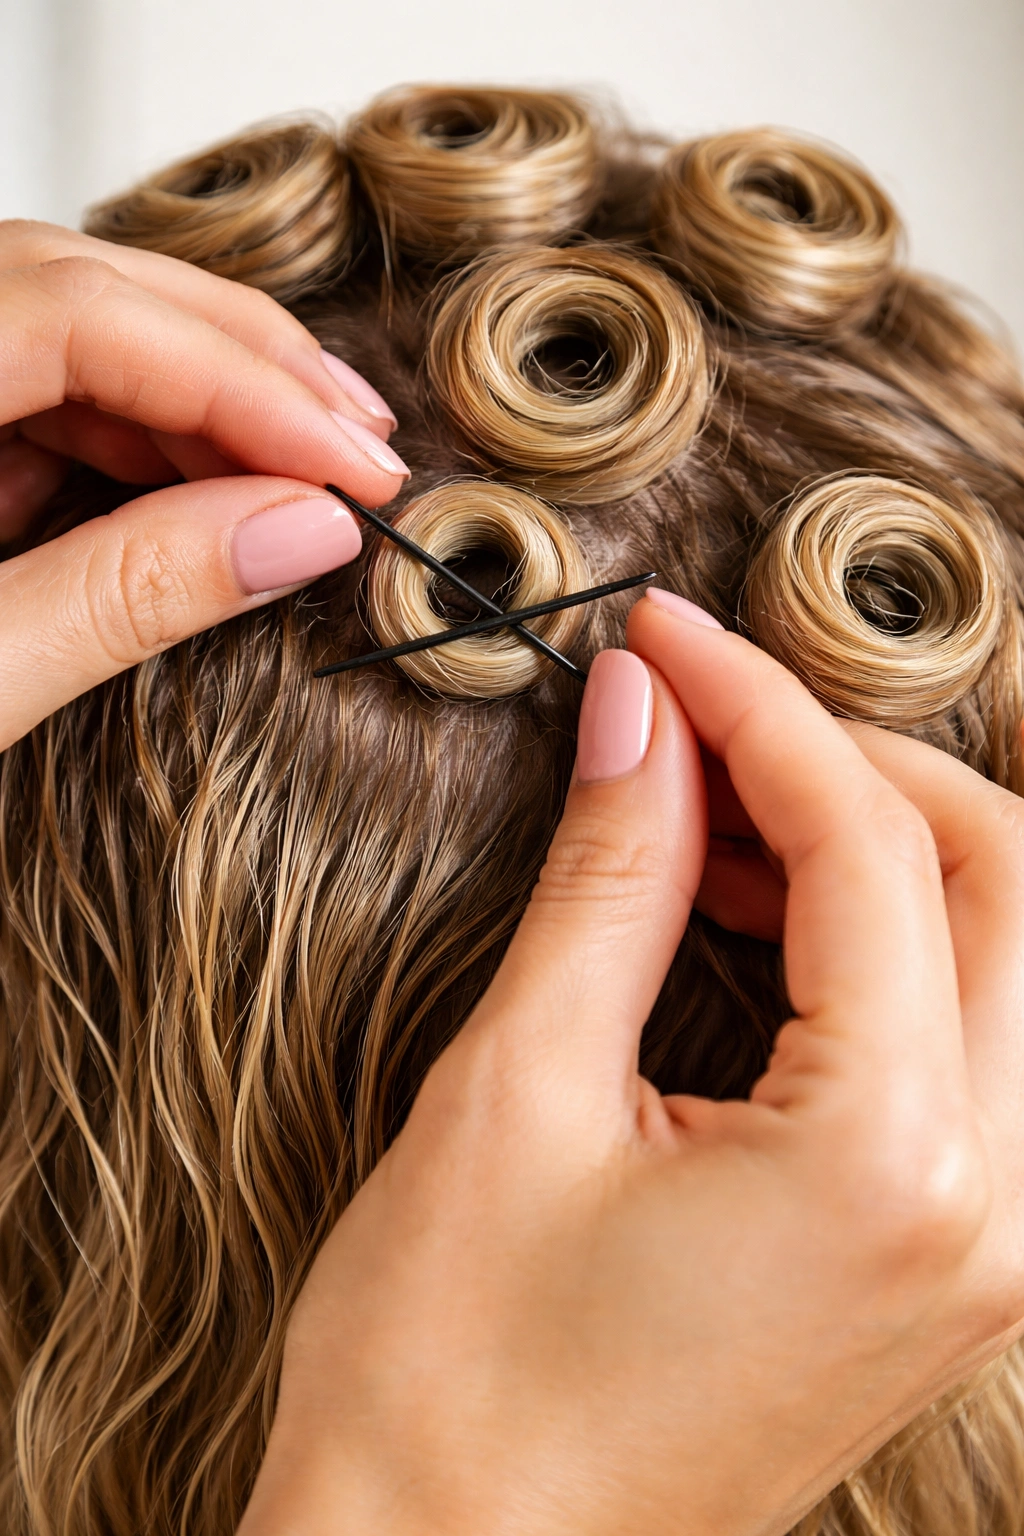
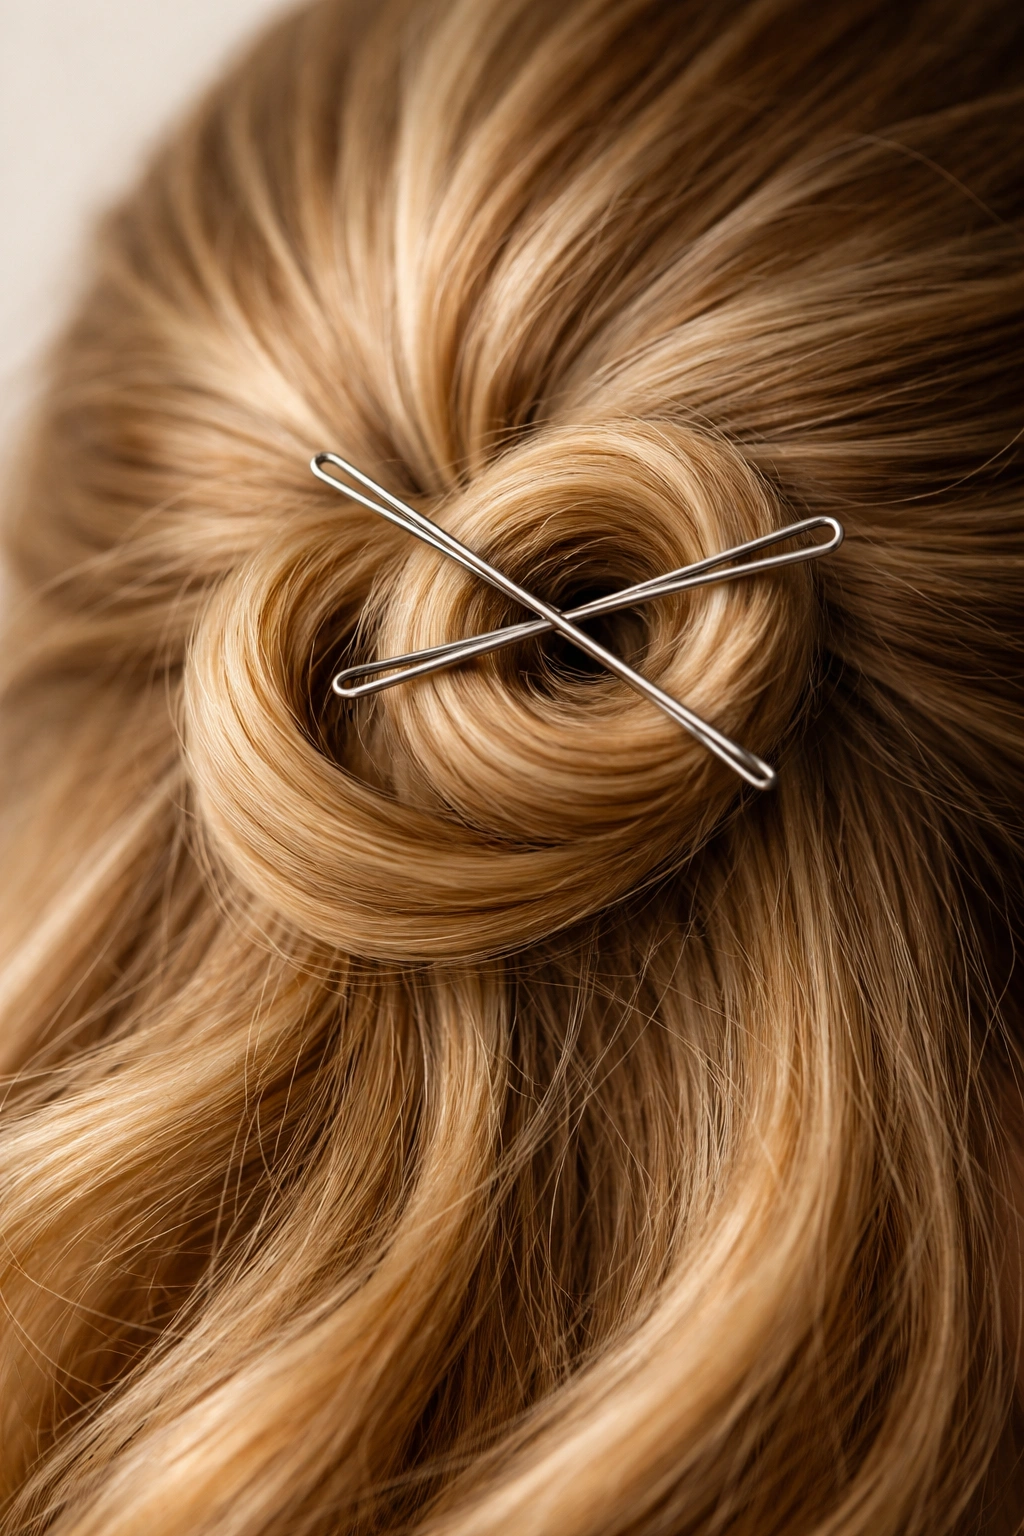
Understanding the mechanics of setting is crucial to pin curl success. Your hair needs to be damp enough to hold a curl shape but not dripping wet—ideally 60-70% dry. Apply a setting spray, mousse, or light gel to damp hair before rolling; these products help lock in moisture and provide grip that holds your curls as they dry. Roll each section firmly and evenly, and secure with bobby pins in an X formation—one pin from above, one from below, positioned as close to your scalp as possible. The tighter and more secure your pin placement, the better your curls will hold.
Setting time varies depending on hair thickness, humidity, and how wet your hair was when you began. Fine or thin hair typically sets in four to five hours, while thick hair may need six to eight hours or even overnight. Air-drying produces the most durable curls, though you can use a cool blow dryer to speed things up. Never try to unpin before your curls are completely dry—wet or damp curls will lose their shape immediately. If you’re in a rush, sleep on your pin curls overnight, and unpin them in the morning when they’re fully set.
What Hair Types Benefit Most From Pin Curls
Pin curls work across all hair types, but the level of drama and longevity varies. Naturally wavy or curly hair holds pin curls beautifully, often for multiple days even after unpinning. Straight hair requires slightly more setting product and longer setting times, but absolutely can achieve gorgeous waves. Fine hair benefits from strategic pin curl placement—use them to build volume where you naturally lack it, and skip them in areas that don’t need height. Thick hair is actually ideal for pin curls because it holds the curl shape so reliably; if anything, you may want to use fewer curls per section to avoid your waves looking too tight or sculptural.
Texture also matters. Hair with some existing wave or frizz holds pin curls more easily than perfectly straight hair, and coily or curly hair can be styled into pin curls for a different effect than its natural texture. If you have very fragile hair or hair prone to breakage, use satin-finish bobby pins rather than standard ones—they slide in and out more smoothly without snagging. Always remove pins gently, sliding them straight out rather than tugging or wiggling them.
Product Recommendations for Lasting Pin Curls
Your product choices dramatically affect how long your pin curls last and how attractive your finished waves look. A good curl-setting spray is essential—it keeps moisture in your hair as it dries, helping lock the curl shape. Look for formulas that aren’t too sticky or heavy; they should feel like a light mist, not a glue. Volumizing mousse applied to damp hair before rolling helps fine hair hold curls and adds bounce to all hair types. A light gel or curl-defining cream can help if you want more defined waves versus soft, loose ones.
After your curls are set and unpinned, a light hairspray keeps everything in place without making your waves feel stiff or crunchy. Avoid heavy pomades or oils immediately after unpinning; these can weigh down your fresh waves and make them fall faster. If you want to add shine or define waves further, wait a few hours after unpinning, then apply products sparingly to the mid-lengths and ends only. For refreshing pin curls the next day, a light mist of water plus a spritz of setting spray can revive the waves without requiring a full reset.
Common Pin Curl Mistakes and How to Avoid Them
The most common mistake is unpinning too early, before curls are completely dry. No matter how perfect your rolls are, wet curls will drop immediately upon unpinning. Resist the urge—let them dry fully. Another frequent error is rolling too loosely or with inconsistent tension; varying tension creates uneven waves that don’t look cohesive. Roll each section with the same gentle-but-firm pressure throughout, and you’ll get uniform results.
Over-processing with products is another pitfall. You don’t need a ton of setting spray, mousse, or gel—a light application does the job better than heavy dousing. Too much product weighs curls down and can create crunchy texture when dry. Also avoid pinning too close to the ends of your hair; pins should grip the rolled section at roughly the midpoint, anchoring the coil without crushing the ends.
Finally, don’t skip the securing step or use just one pin per curl. Two pins in an X formation keep your coils completely secure and prevent them from unraveling mid-set. If you’re working with thick hair, you might need three pins per curl for maximum security. Taking these extra seconds for proper pinning pays off enormously in the longevity of your curls.
Final Thoughts
Pin curl half-up half-down styles offer remarkable versatility, allowing you to create everything from soft, romantic waves to glamorous, sculpted curls—all without heat damage. The technique requires patience and planning, but the results justify the effort: beautiful, long-lasting curls that you can refresh multiple times and adapt to different occasions and moods. Whether you choose classic rolled curls, structured spirals, double-stacked volume, or oversized waves, the half-up half-down format strikes that perfect balance between put-together and effortless that makes these styles so endlessly appealing.
Start with one technique that resonates with you—the classic rolled curl is an excellent entry point—and practice until you feel confident rolling, placing, and pinning smoothly. Invest in good bobby pins and a reliable setting spray, give yourself enough time for proper setting, and resist the urge to unpin early. Once you’ve mastered the basics, experiment with the other seven styles, mixing and matching techniques and placements to create your own signature look. Pin curls are a skill that improves with repetition, and your reward is a hairstyle that photographs beautifully, lasts all day and night, and demonstrates that you’ve put genuine care into your appearance—all without touching a single heat tool.