The messy half up half down ponytail represents one of the most versatile and flattering hairstyles in modern fashion. It sits at the perfect intersection of effort and effortlessness, offering enough structure to feel intentional while maintaining the relaxed, lived-in quality that works for casual outings, professional settings, and special occasions alike. This particular style has remained popular because it genuinely flatters almost every face shape, works with various hair textures and lengths, and adapts seamlessly to your personal style—whether you’re aiming for romantic, edgy, polished, or undeniably laid-back.
What makes this category of hairstyles so compelling is the endless customization potential. You’re not locked into a single look. The same basic concept—gathering a portion of your hair while leaving the rest down—becomes completely different depending on whether you add twists, braids, texture, volume, or decorative elements. A sleek version reads professional and modern. A heavily textured version with deliberately messy sections feels bohemian and carefree. The styling that matters most happens in how you handle the details: the tension in your twists, the deliberate placement of flyaways, how much you backcomb the crown, and which pieces you allow to fall loose around your face.
This guide walks through 15 distinct variations of the messy half up half down ponytail, each with its own character and technique. Some require barely any styling skill, while others benefit from practice and specific tools. But all of them share the core philosophy that perfection is actually the opposite of what makes this style work—a little undone always looks better than a little overdone.
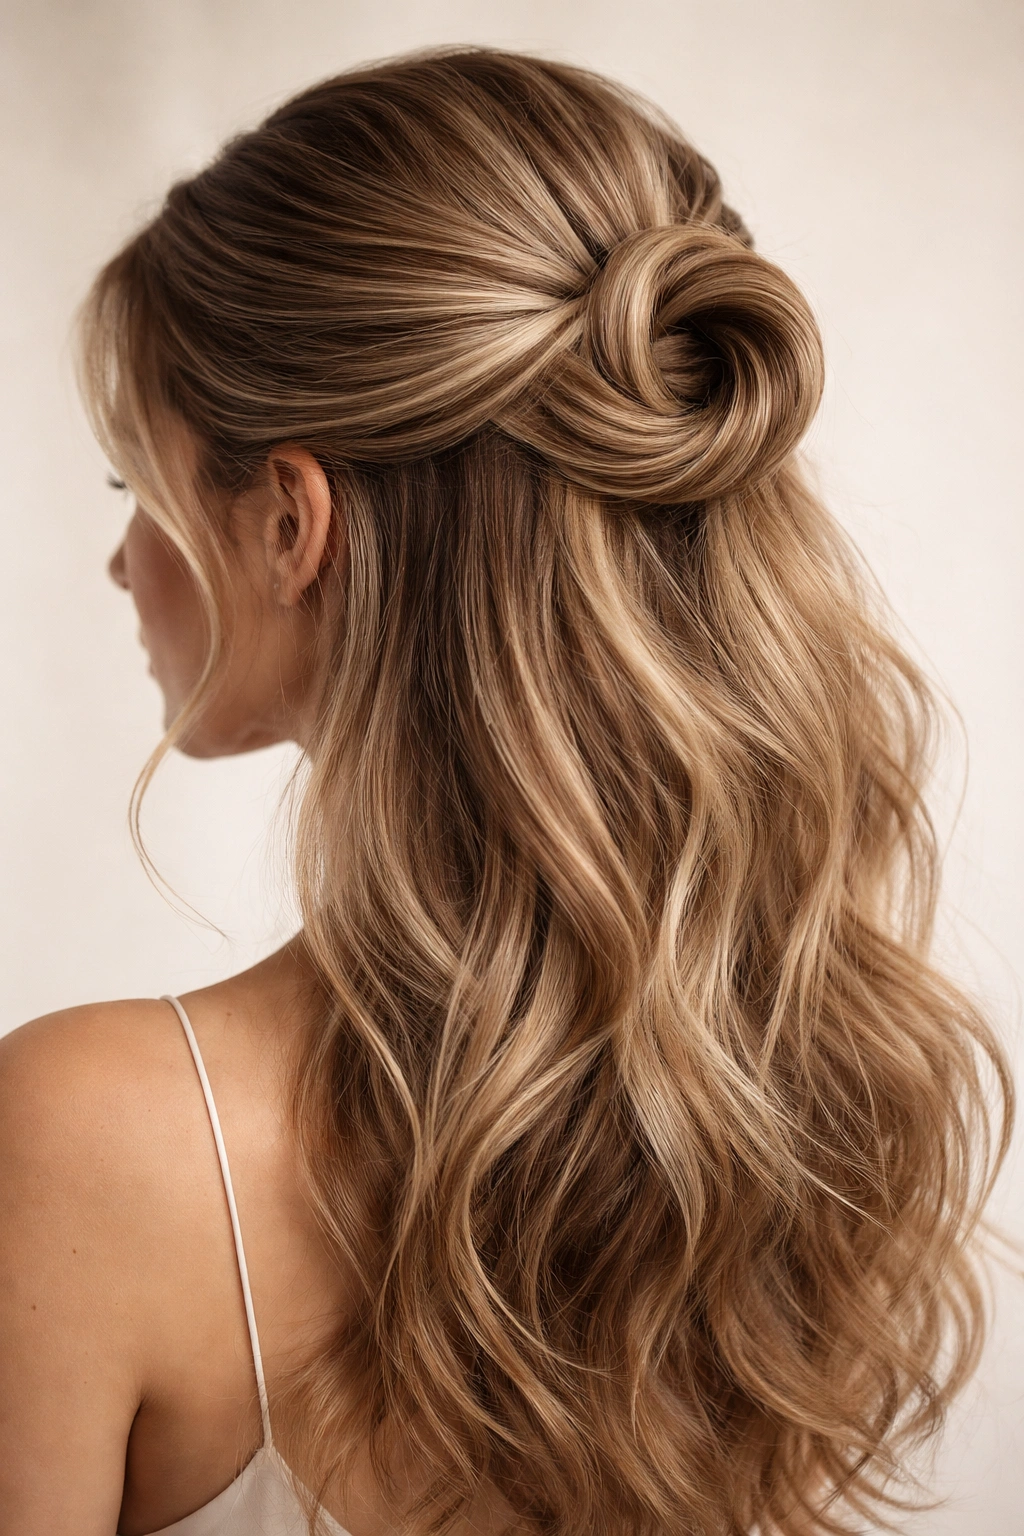
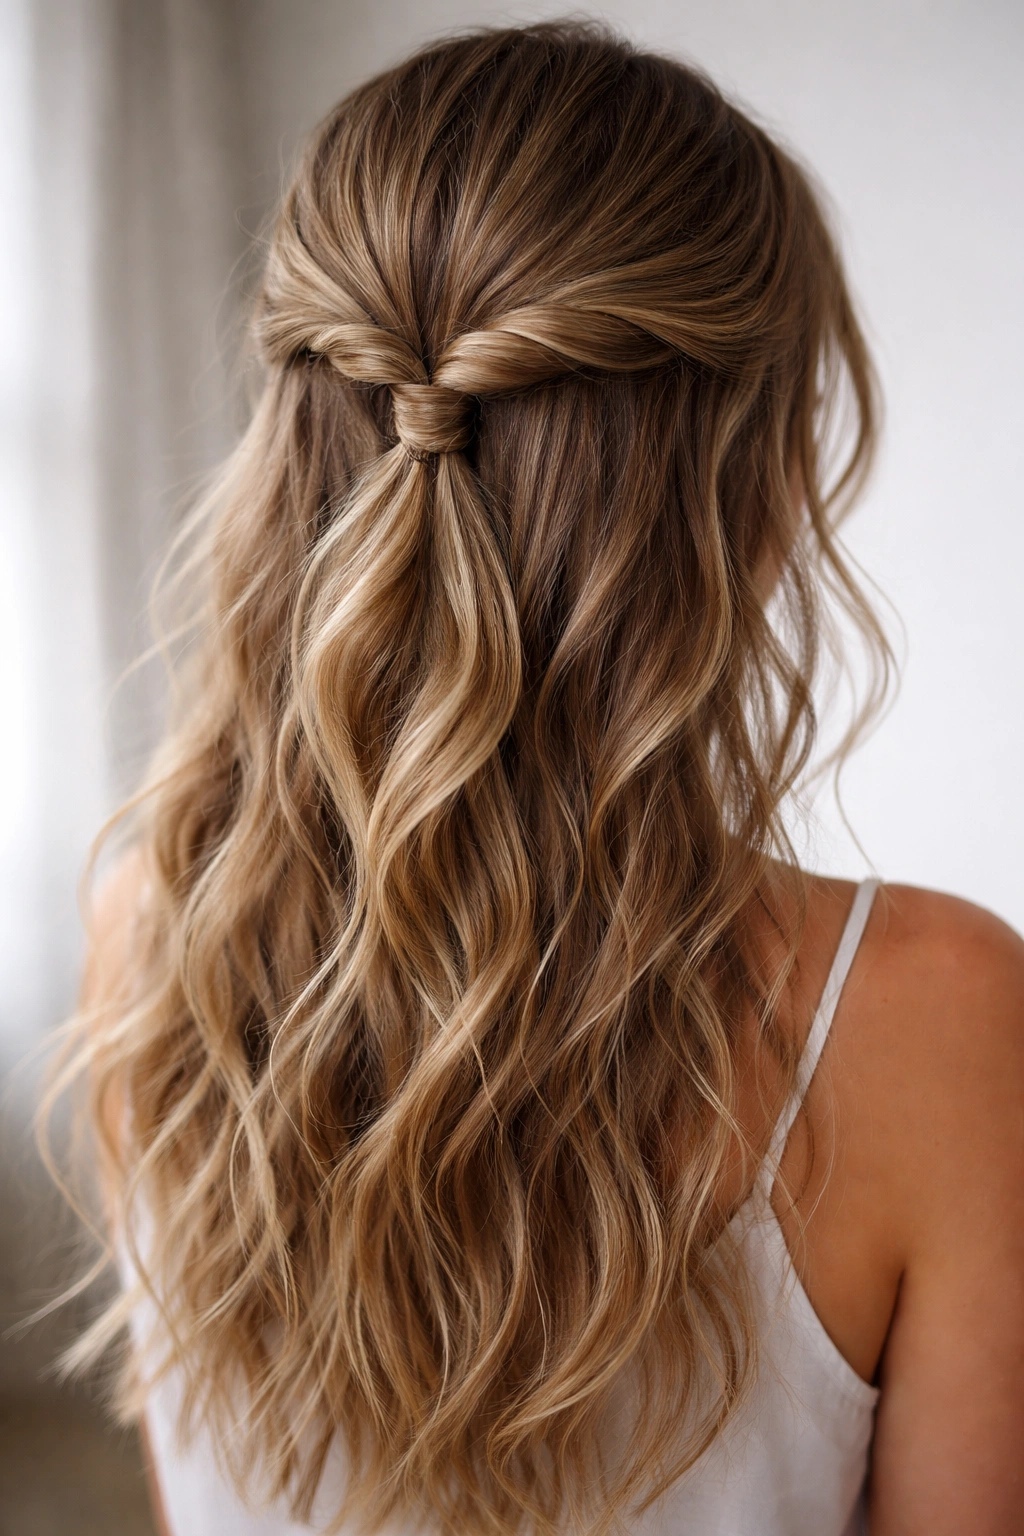
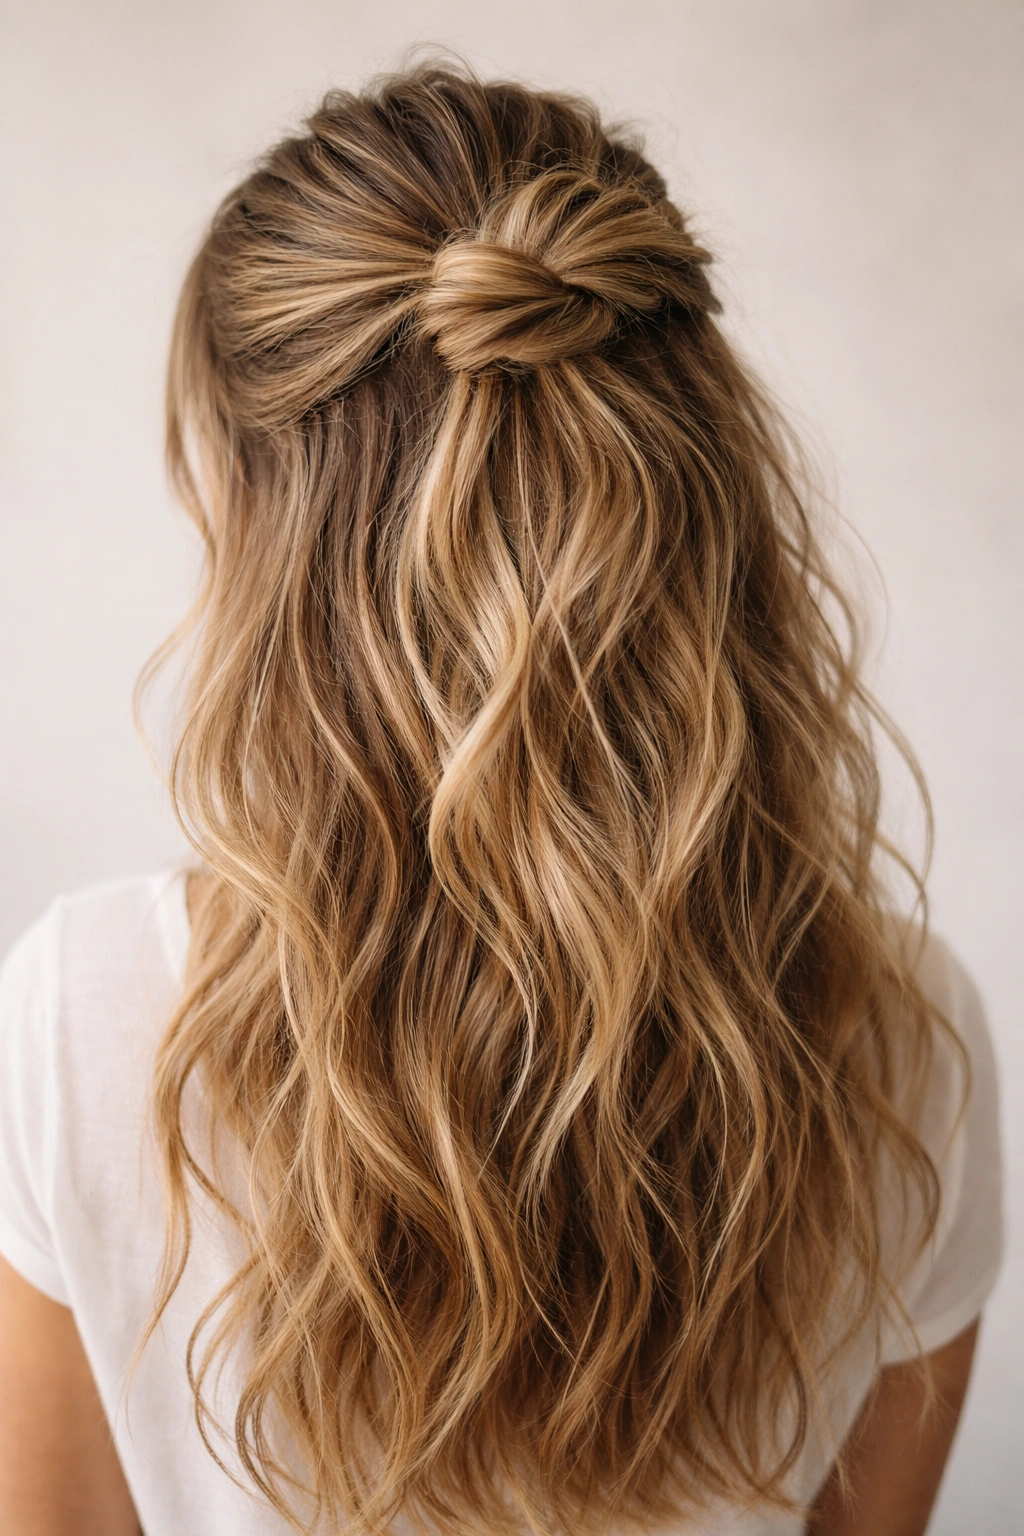
1. Effortless Textured Crown Knot
The crown knot starts with a section of hair gathered at the very top of your head, twisted into a loose knot formation, and then secured while the remaining hair flows down the back and sides. The magic happens when you intentionally leave this knot slightly loose and tousled rather than twisting it so tightly that it looks controlled and formal. This version works beautifully because it creates visible dimension and texture at the crown without requiring intricate braiding skills.
How to Build Volume and Texture First
The foundation of this style requires hair that has some texture to grip. If you’re starting with freshly washed, slippery hair, you’ll need to create grip first using dry shampoo, texturizing spray, or a light mousse applied to damp hair before blow-drying. Blow-dry your hair with your head tilted forward and your fingers lifting at the roots to maximize natural volume, then flip your head back and run your fingers through to redistribute that lift throughout. The backcombing step is optional but genuinely helpful—use a fine-tooth comb to gently backcomb just the crown section (about 2-3 inches square at the very top) to create a cushion that holds the knot securely and adds visible texture.
Creating the Knot and Securing It Perfectly
Start with a small to medium section of hair directly at your crown, pulling it away from your face slightly toward the back. Twist this section gently around itself 2-3 times, then coil it into a soft knot shape and secure it with 2-3 bobby pins inserted horizontally through the knot. The pins should be completely hidden inside the knot formation. Pull the edges of the knot gently to create a deliberately undone, textured appearance—you want visible loops and wisps, not a perfectly tight spiral. Leave 1-2 small pieces of hair loose around your face for framing, and allow the remaining hair to cascade naturally down your back.
Pro tip: Mist the finished knot lightly with texture spray to lock the tousled shape in place without making it feel stiff or product-heavy.
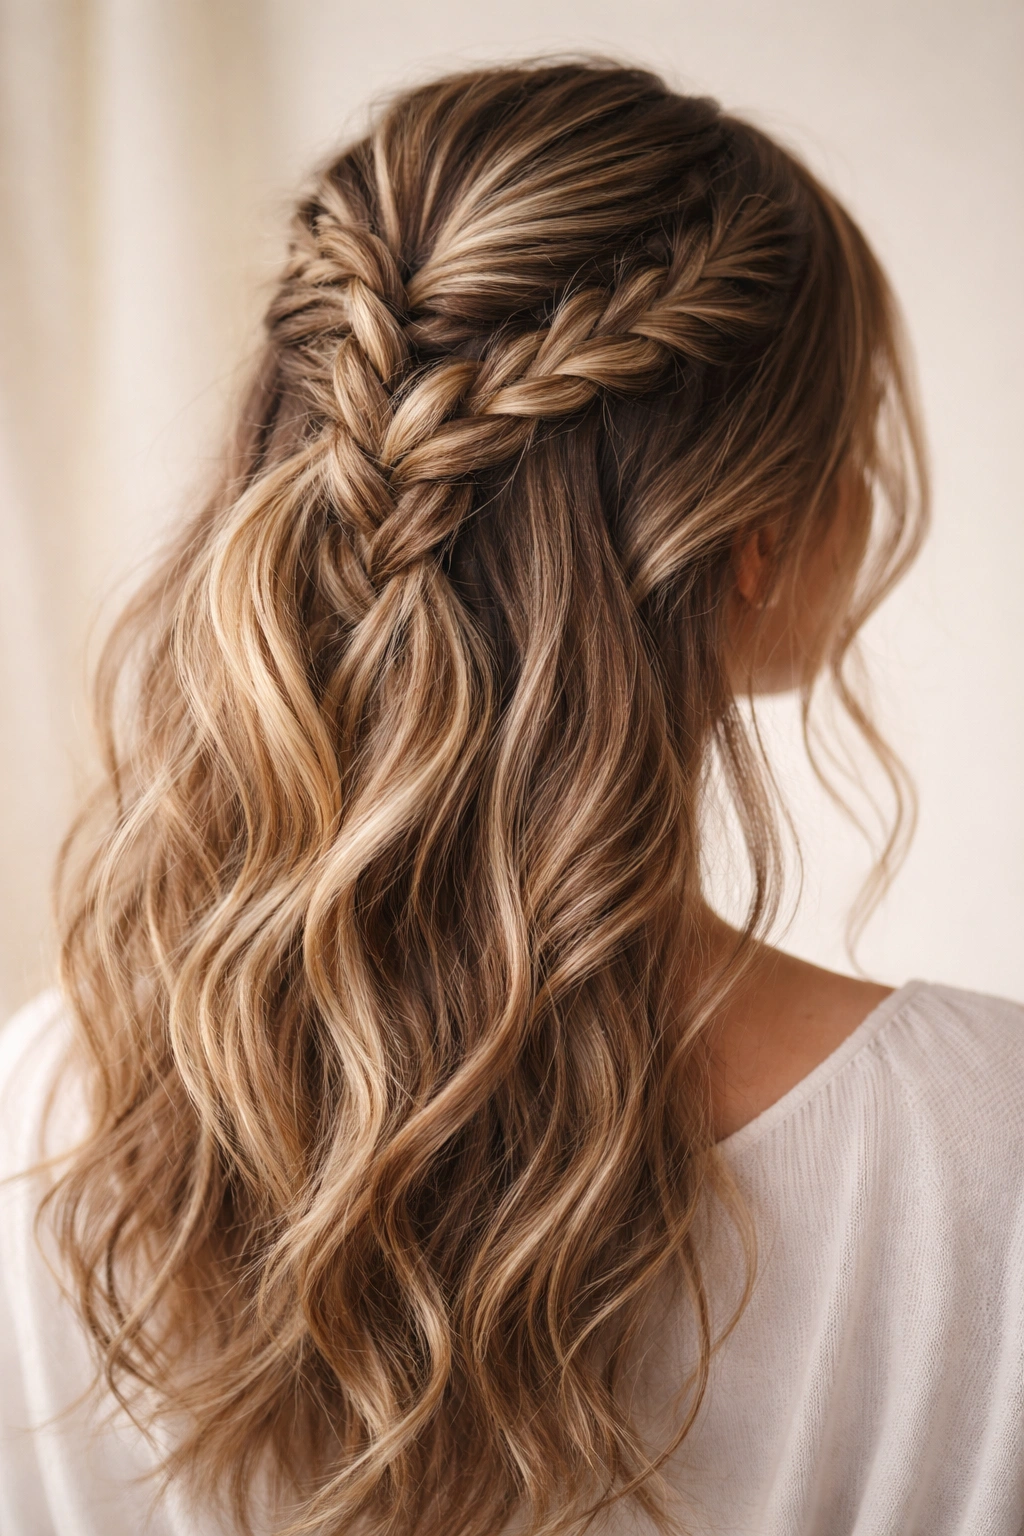
2. Romantic Twisted Braid Half-Up
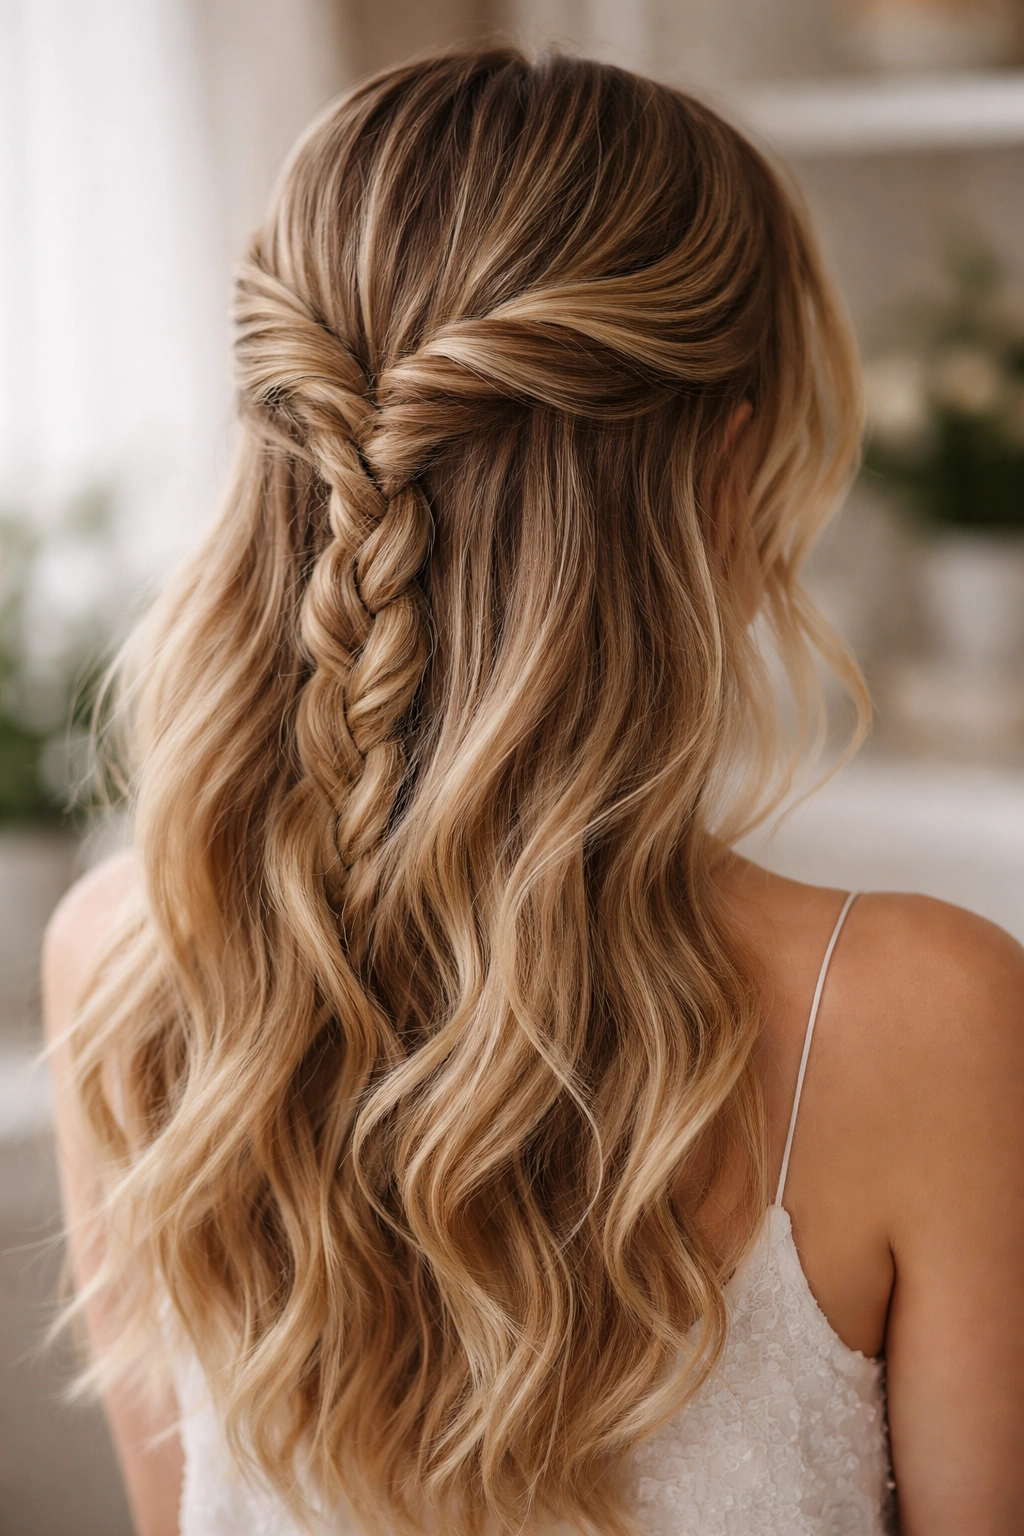
This version combines two techniques—twisted sections and a loose, dimensional braid—to create a style that feels intentionally romantic without veering into costume territory. You’re gathering hair from both sides of your head in twisted sections that meet at the back, then braiding those sections together before letting the rest of your hair fall free. The effect is elegant, moves beautifully when you walk, and looks completely different from the front versus the back.
Creating Symmetrical Twisted Sections
Start by parting your hair naturally—wherever your part already falls is where you should begin. Take a 2-inch section of hair from just behind your ear on one side, then twist it gently as you move backward toward the back of your head, collecting additional hair as you go (this is a twist-and-add technique, similar to a French braid but twisted instead of braided). Stop when you reach the back-center area, about midway between your ears. Repeat on the opposite side, twisting a matching section and collecting hair as you work backward until it meets the first twisted section at the center back.
Braiding and Releasing the Remaining Length
Once both twisted sections meet in the center, gather them together along with a 2-inch section of hair from the center back, and loosely three-strand braid these three sections together for about 3-4 inches. Secure with a small elastic, then gently pull and loosen the braid, especially the outer edges, to create a fuller, more romantic texture. The remaining hair below the braid point falls completely free, creating length, movement, and visual interest. Tease the braid slightly at the base where it attaches to the crown for added dimension.
Pro tip: Curl or wave the bottom half of your hair (the portion that remains completely down) before styling the twisted sections and braid to create a cohesive, romantic aesthetic that reads intentional and polished.
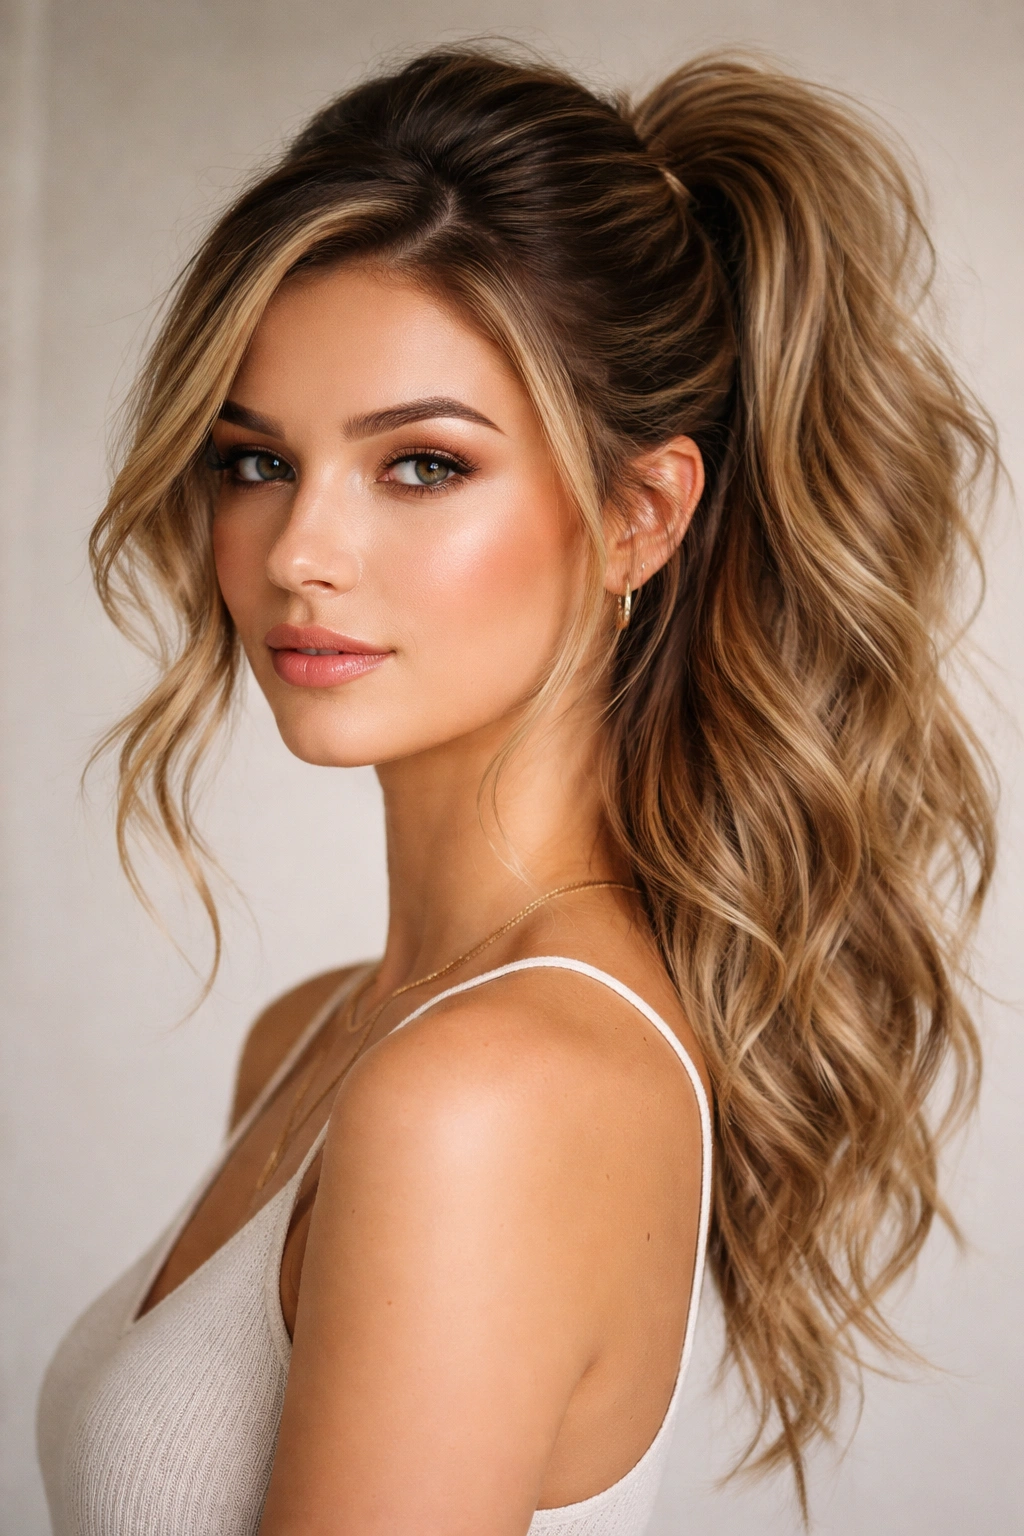
3. Modern Sleek High Ponytail
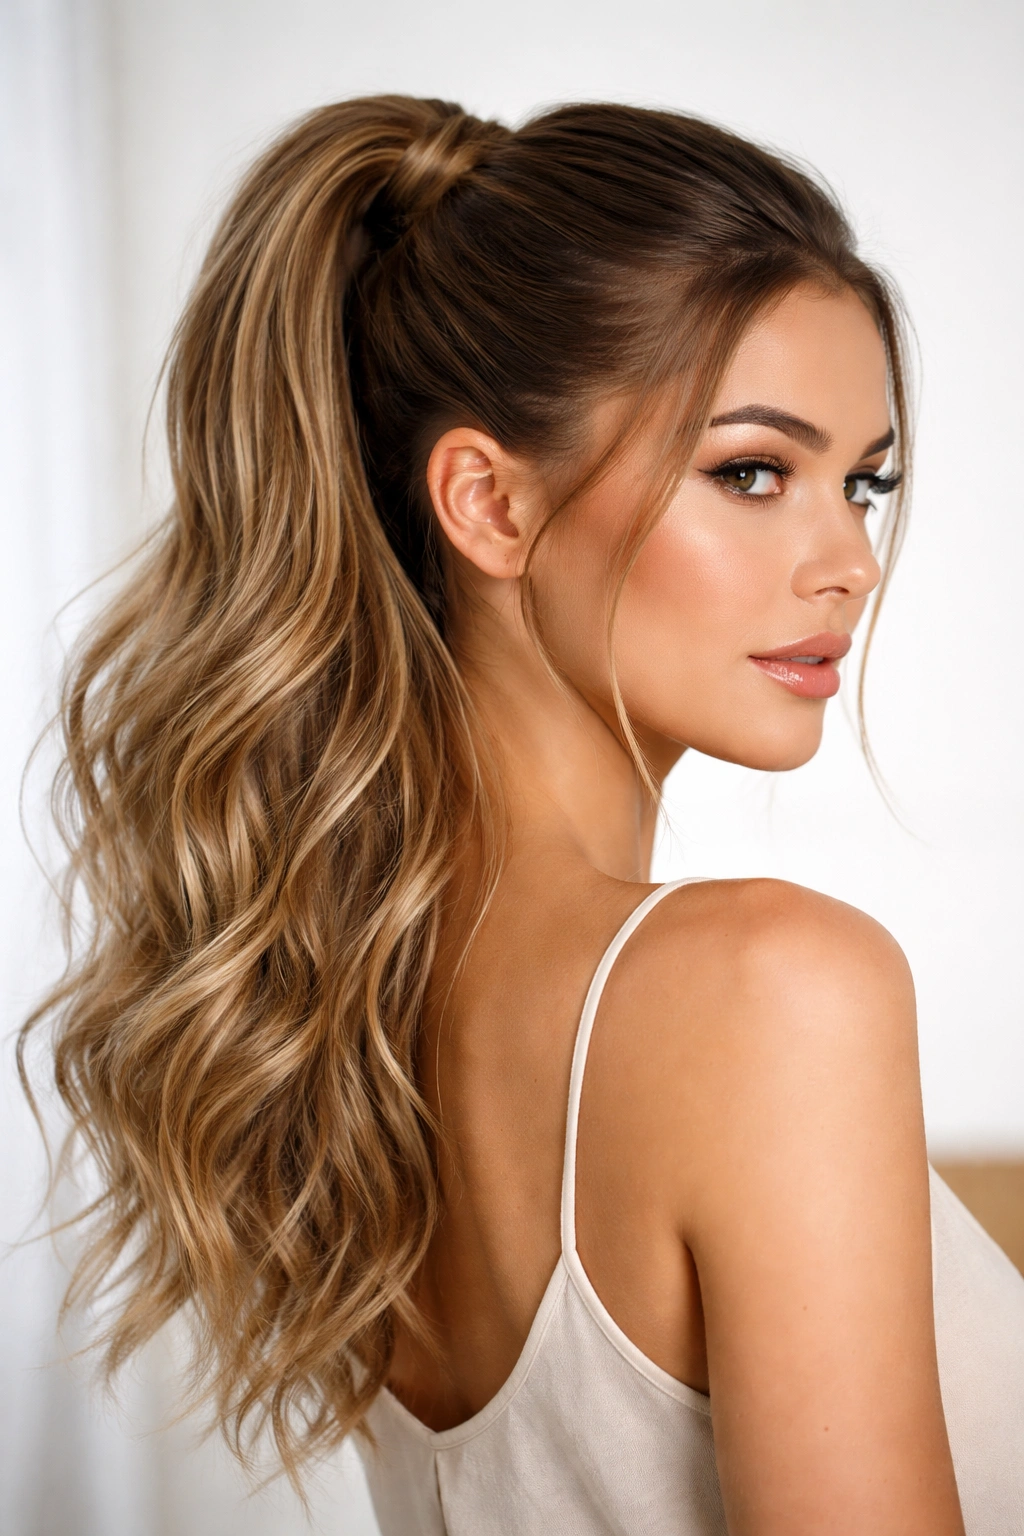
The sleek half-up variation deliberately plays against the “messy” expectation by going ultra-refined and polished in the gathered portion while keeping the lower section textured or waved. This contrast—clean, precise lines at the top meeting tousled waves below—reads as contemporary and editorial rather than casual. It’s the version you’d choose for a dinner out or a professional setting where you still want softness and femininity.
Smoothing and Securing the Top Section
Begin with completely smooth hair from root to tip, which might require a smoothing serum, anti-frizz cream, or a light hairspray. Brush your hair straight back, using a fine-tooth comb or a paddle brush to eliminate bumps and texture in the portion you’re about to gather. At the crown, gather a clean section of hair (about 2-3 inches from your part to the back), pulling it straight back into a tight gathering point. Secure with a small elastic that matches your hair color, then wrap a small 1-inch piece of hair around the elastic to hide it completely—secure that wrapping piece with a bobby pin underneath.
Creating Dimension Without the Mess
Unlike heavily textured variations, this version relies on the contrast between sleekness and the wave or curl pattern in the bottom half. Blow-dry the bottom half of your hair with a curling iron or on a round brush to create soft waves, curls, or ringlets depending on your preference. The deliberate polishing of the top section makes the texture of the bottom half feel like a styled choice rather than an accident. Smooth any flyaways around your face with a small amount of gel and a fine-tooth comb, creating a refined frame for your features.
Pro tip: This style photographs exceptionally well because the contrast between smooth and textured creates visual depth and prevents the entire look from reading as flat or boring.
4. Undone Barrel Curl Accent

This variation focuses on a single, loose barrel curl or loop that sits at the back of your head, incorporating a section of the half-up portion while the rest flows freely. It’s simpler than a full braid or knot but creates more intentional styling than a basic ponytail, and the curl formation adds sculptural interest visible from every angle. This works particularly well if you have medium to thick hair with some natural texture to grip.
Gathering and Curling the Accent Section
Gather a 2-3 inch section of hair from each side of your head, pulling it back toward the crown area. These two sections should meet at the back center. Take both sections together and curl them loosely—you can use a 1.5-inch barrel curling iron, wrap them around your finger to form a loop, or simply twist them together and coil them into a circular shape. Secure this curl shape with bobby pins inserted underneath to remain invisible, then gently pull and tease the curl to create a soft, undone appearance rather than a tight ringlet.
Balancing Volume and Flow
The remaining hair should fall completely loose, creating a stark contrast between the deliberately styled curl at the back and the natural drape of the bottom section. Tease the crown area just above where your barrel curl sits to add lift and prevent the top of your head from looking flat. Curl the bottom half of your hair gently with a large-barrel curling iron or by blow-drying with a round brush to create waves that complement the curl detail at the back, or leave it completely straight for a modern contrast.
Pro tip: After curling your barrel curl, spritz it lightly with hairspray before securing with pins—this prevents the heat from the iron from relaxing too quickly and losing its shape throughout the day.
5. Braided Crown with Wispy Layers
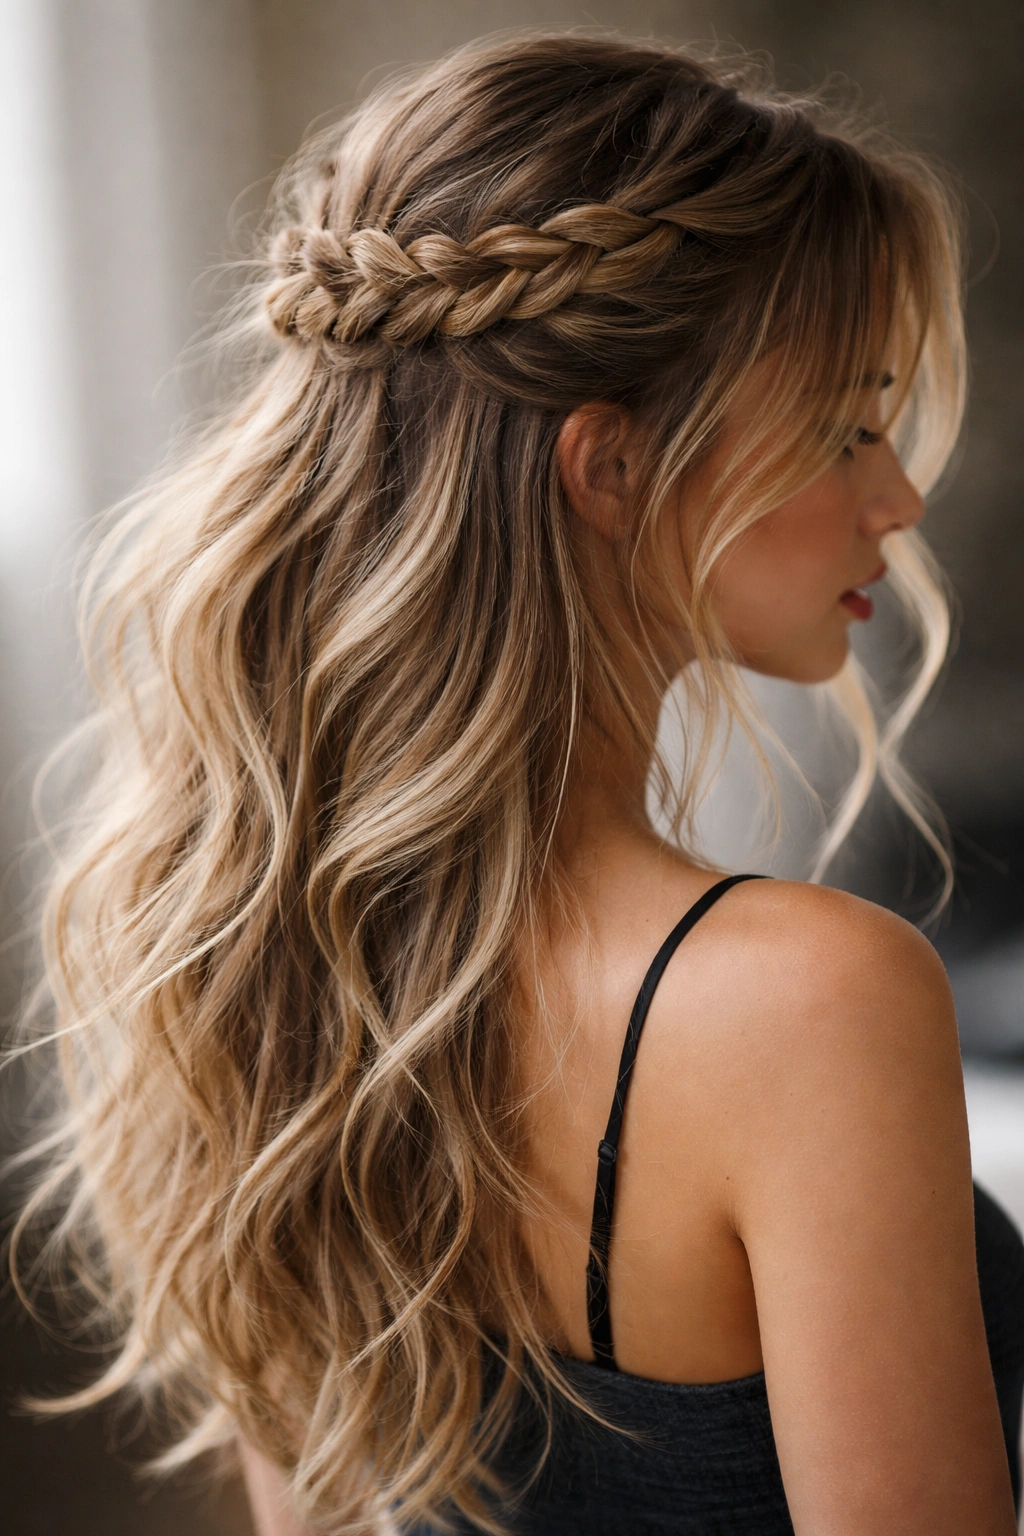
This style creates a braided band around the crown area that sits like a halo, with deliberately wispy, loose strands left out to frame the face. It combines structure (the braid) with softness (the loose pieces), creating visual movement and a relaxed elegance. This variation requires a bit more technical skill with braiding but is absolutely achievable with practice.
Creating the Crown Braid Framework
Start at one side of your head near your temple with a 1-inch section of hair. Three-strand braid this section loosely as you move diagonally backward across the crown toward the opposite side of your head, collecting additional hair as you go (this is essentially a Dutch braid or inside-out braid that travels across the crown). Continue this braid all the way to approximately where your opposite ear sits. Secure the end with a small elastic.
Layering and Loosening for Softness
Once your crown braid is complete, go back and deliberately pull on the outer edges of every segment of the braid to loosen it and increase its width and volume. This creates a fuller, softer appearance and prevents the braid from looking tight or overly controlled. Leave 2-4 small sections of hair completely unbraided and loose around your face—these pieces should frame your cheekbones and temples, creating movement and softness. The remaining hair below the braid falls completely free, either straight or gently waved.
Pro tip: If you struggle with braiding at odd angles or in the back of your head, practice this style while standing in front of a mirror with a smaller handheld mirror positioned to show you the back view—this makes it dramatically easier to see what you’re doing.
6. Tousled Half-Up with Face-Framing Strands
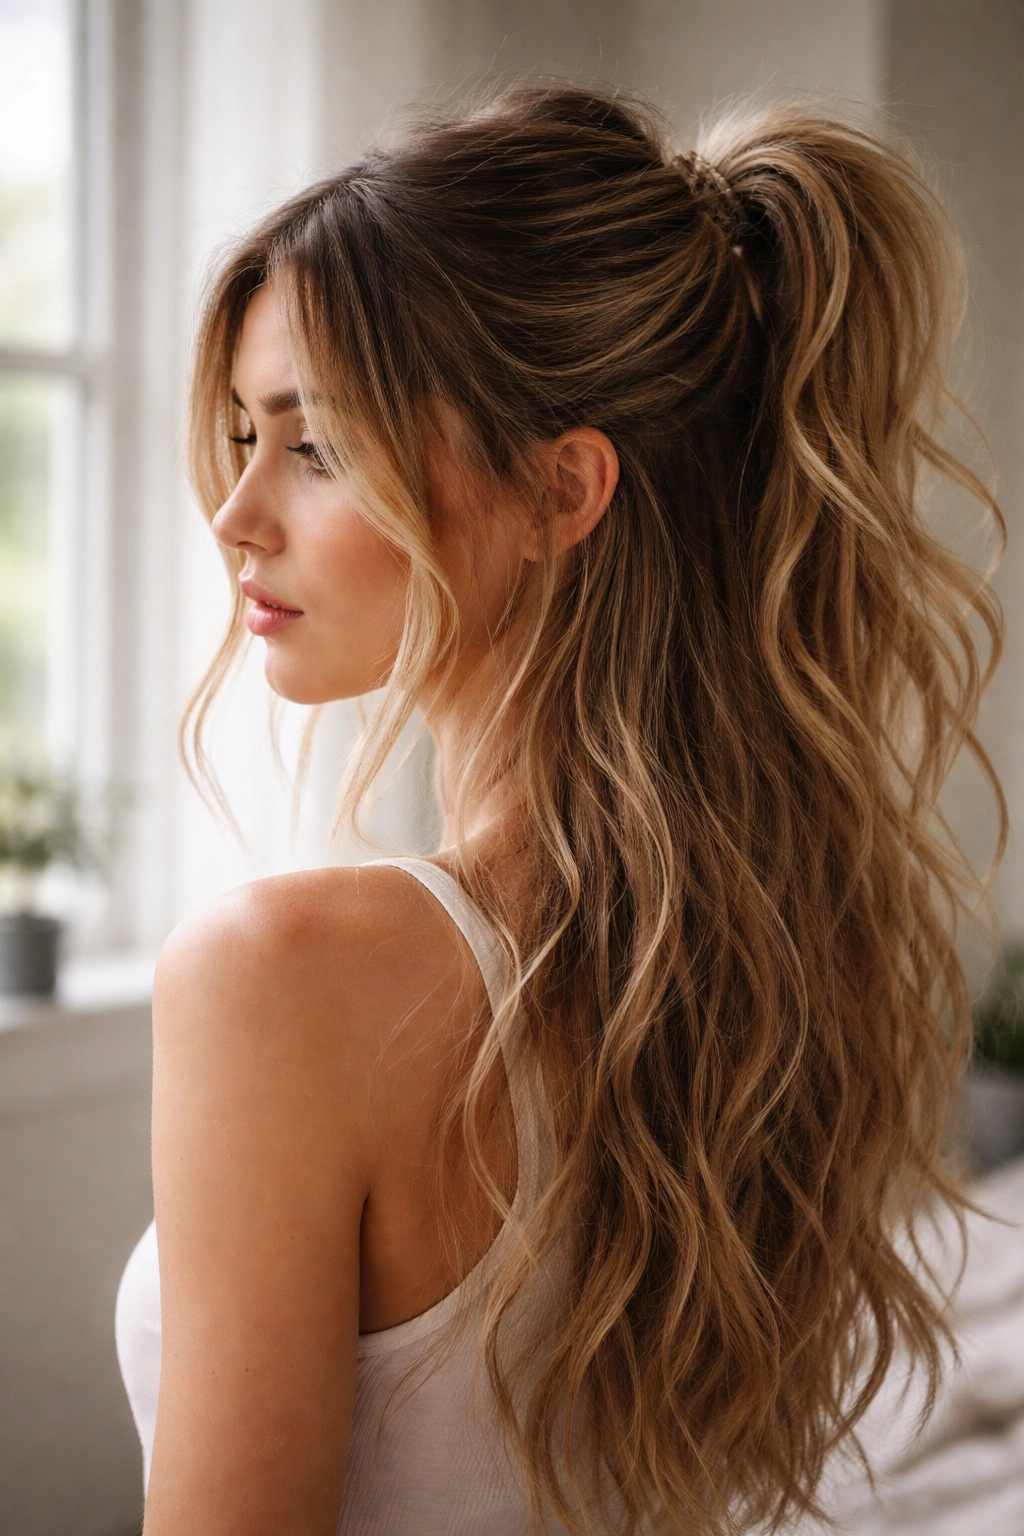
This is the version that looks so effortless it could pass as accidental, though it actually requires intentional styling to get the tousle and frame just right. You’re gathering the upper portion of your hair loosely while strategically placing wisps and strands around your face that appear loose but are actually positioned with purpose. It’s the style that reads as “I didn’t try very hard” while actually involving deliberate choices about which pieces to leave out and how to position them.
Building Strategic Texture Throughout
Start by creating overall texture in your hair using dry shampoo, texturizing spray, or by blow-drying with texture products. Use a curling iron to add loose waves or curls throughout your entire head, or work in sections with a round brush if you prefer waves over curls. The texture should feel organic and varied, not uniform—some waves tighter, some looser, some pieces more voluminous than others. This variation prevents the final style from looking too styled or artificial.
Gathering and Positioning the Face Framing
At your crown, loosely gather the hair that’s above eye level, pulling it back gently but not tightly. Secure with a small elastic or use bobby pins to hold the section in place without creating visible tension. Now comes the important part: deliberately pull out 4-6 small pieces of hair from around your face—from your temples, around your ears, and along your jawline. These pieces should be pulled out individually, not as large sections, and they should sit at different lengths so the frame looks organic rather than symmetrical or geometric.
Pro tip: After securing your half-up section, use a fine-tooth comb or even your fingers to gently tease the crown area just above your elastic to create a subtle cushion of volume—this prevents the top of your head from looking flat while maintaining the undone aesthetic.
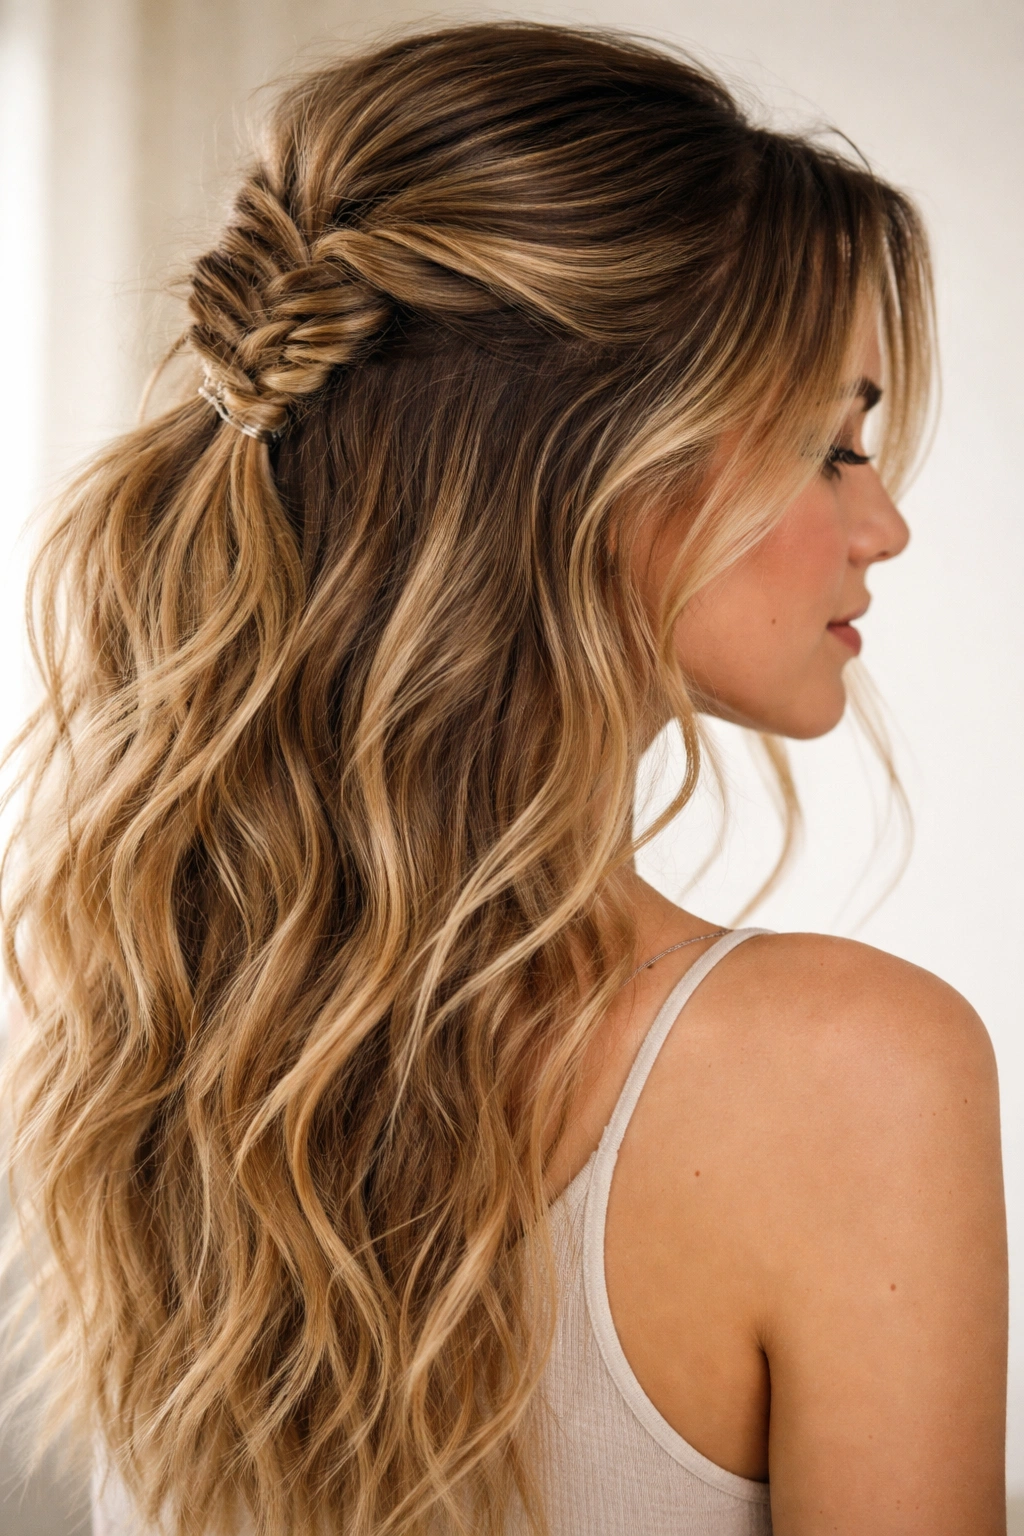
7. Vintage-Inspired Twisted Loop
This style recalls 1960s and 1970s styling with its elegant simplicity. You’re creating a twisted section that loops back on itself, creating a sculptural element at the crown that’s both structured and soft. It requires fewer bobby pins than some styles and works well for events where you want a polished, retro-inspired look without veering into costume territory.
Creating the Foundation Twist
Starting at one side near your temple, take a small to medium section of hair and begin twisting it as you move toward the back of your head, collecting additional hair as you go. This twist should be fairly tight—tighter than some of the other variations—because it needs to hold its shape in a loop formation. Continue twisting until you’ve reached approximately the center back of your head, gathering hair as you travel. You should have collected hair from about one side of your head entirely.
Looping and Securing for Impact
Once your twisted section reaches the back center, instead of securing it straight down, loop it back toward the crown and secure it there with bobby pins, creating a circular or oval formation. The loop should sit at the back of your crown, creating a defined, sculptural shape. Gently pull the sections of the twist to add dimension and prevent it from looking too tight or perfectly smooth. The remaining hair falls completely free below this looped twist, creating length and movement.
Pro tip: This style works best on hair with some natural thickness—finer hair may need texture spray or backcombing at the crown to create enough volume to make the twist and loop appear substantial and intentional rather than wispy.
8. Messy Dutch Braid Details
Dutch braids (braids that go under rather than over, creating a raised, sculptural appearance) lend themselves beautifully to messy styling because the structural nature of the braid can support more tousle and looseness than other techniques. This version incorporates one or two Dutch braid sections into a half-up style, then deliberately loosens and textures the braid for a soft, romantic effect.
Executing the Dutch Braid Technique
Start at the crown with a 2-3 inch section of hair. Instead of a traditional three-strand braid, cross the outer strands under the center strand rather than over it—this creates the distinctive raised appearance of a Dutch braid. As you move backward with this braid, collect additional hair from each side, continuing to braid with the underhand motion. If you’re creating two Dutch braids, repeat this process on the opposite side of your head with a matching section, working both braids toward the back center.
Tousling and Blending for Softness
Once your Dutch braid(s) reach the back center, secure with a small elastic. Now, using your fingers (not a comb, which can disrupt the texture), gently pull on the edges and segments of the braid to loosen it and increase its volume. You want the braid to appear fuller and more textured, with visible loops and dimension, rather than tight and controlled. Pull out several small pieces of hair from around your face for framing, and allow the remaining hair to fall freely below the braid.
Pro tip: Dutch braids photograph beautifully because the raised texture catches light and creates dimension, so this is the version to choose if you’re styling your hair for photos or video.
9. Asymmetrical Side-Swept Half Pony
This variation deliberately pulls your half-up section to one side rather than gathering it at the center back, creating asymmetry that reads as modern and fashion-forward. It works beautifully for side-parted hair and is especially flattering if you want to emphasize one side of your face or create a more dramatic, editorial aesthetic.
Gathering to the Side for Impact
Instead of pulling your gathered section straight back to the center, gather your upper hair and pull it toward one side—typically the side with your deeper part. Position your elastic on one side of the back of your head rather than in the center, creating a defined asymmetry. The gathering should feel deliberate, not accidental, so ensure the section you’re pulling back is substantial enough to read as intentional rather than messy.
Creating Dimension on Both Sides
Even though your gathered section is to one side, you still want to build texture and movement throughout the entire head. Curl or wave all of your hair, including the side you’re gathering up, so that both sides read as equally styled and intentional. Tease the crown area slightly to add lift, and pull out a few wispy pieces around your face for softness. The key to making asymmetry work is ensuring that the rest of the style feels balanced and intentional, so meticulous texture and face framing are essential.
Pro tip: This style is particularly striking with a side part that’s dramatically deep—if you normally wear a center or near-center part, try repositioning your part much further to one side for full asymmetrical impact.
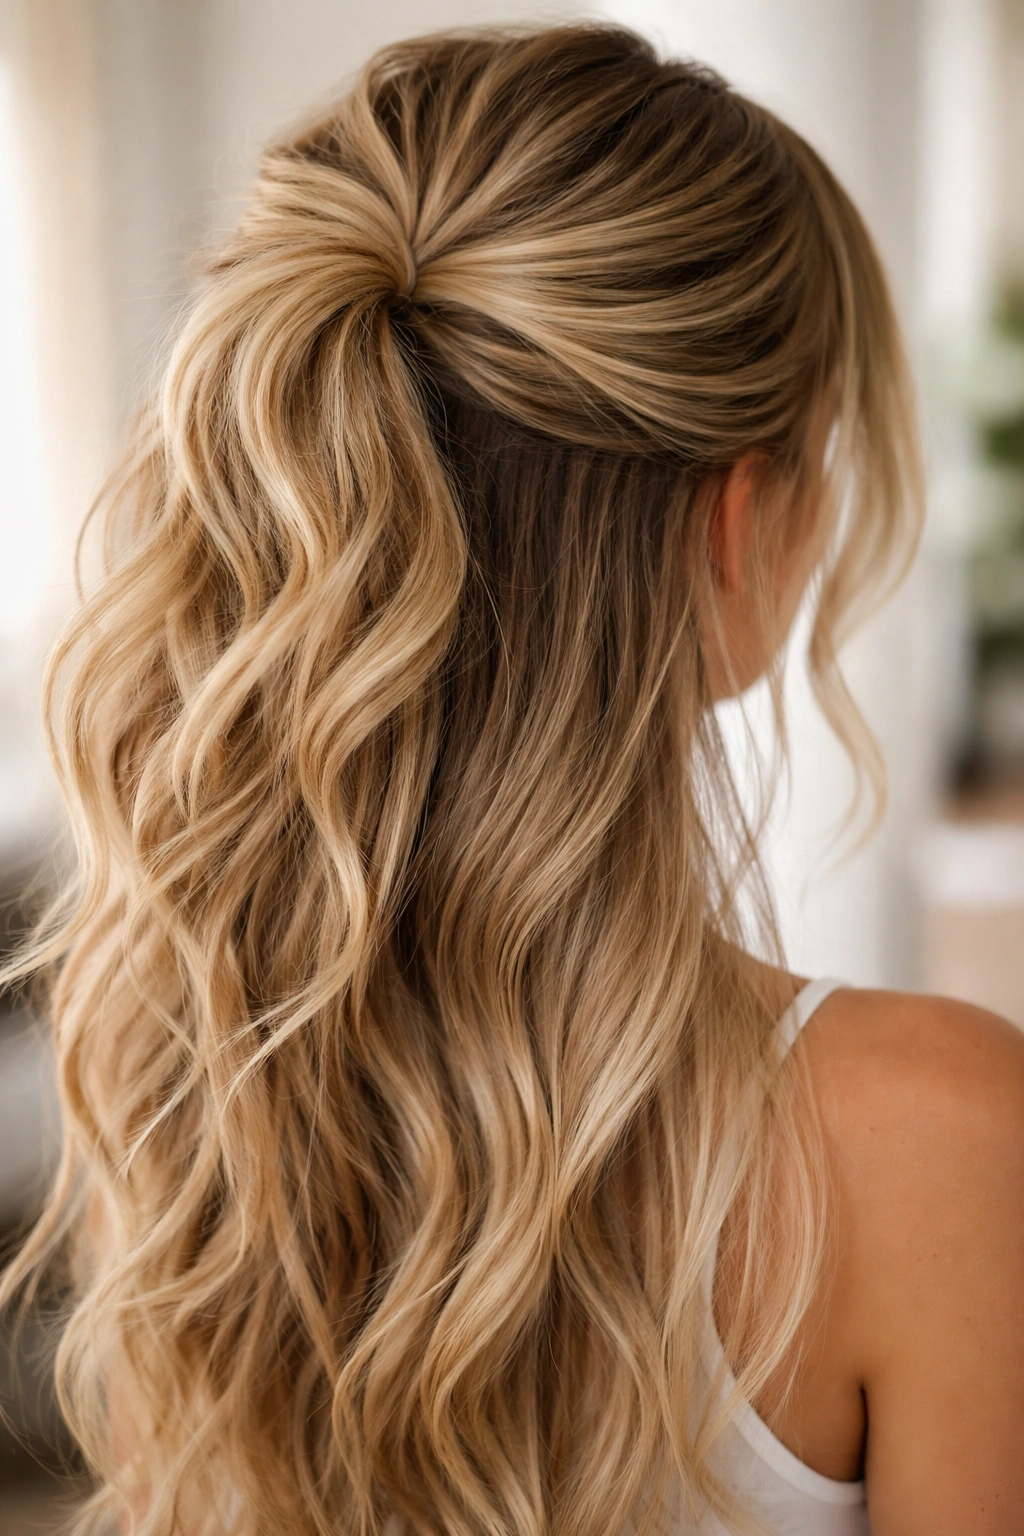
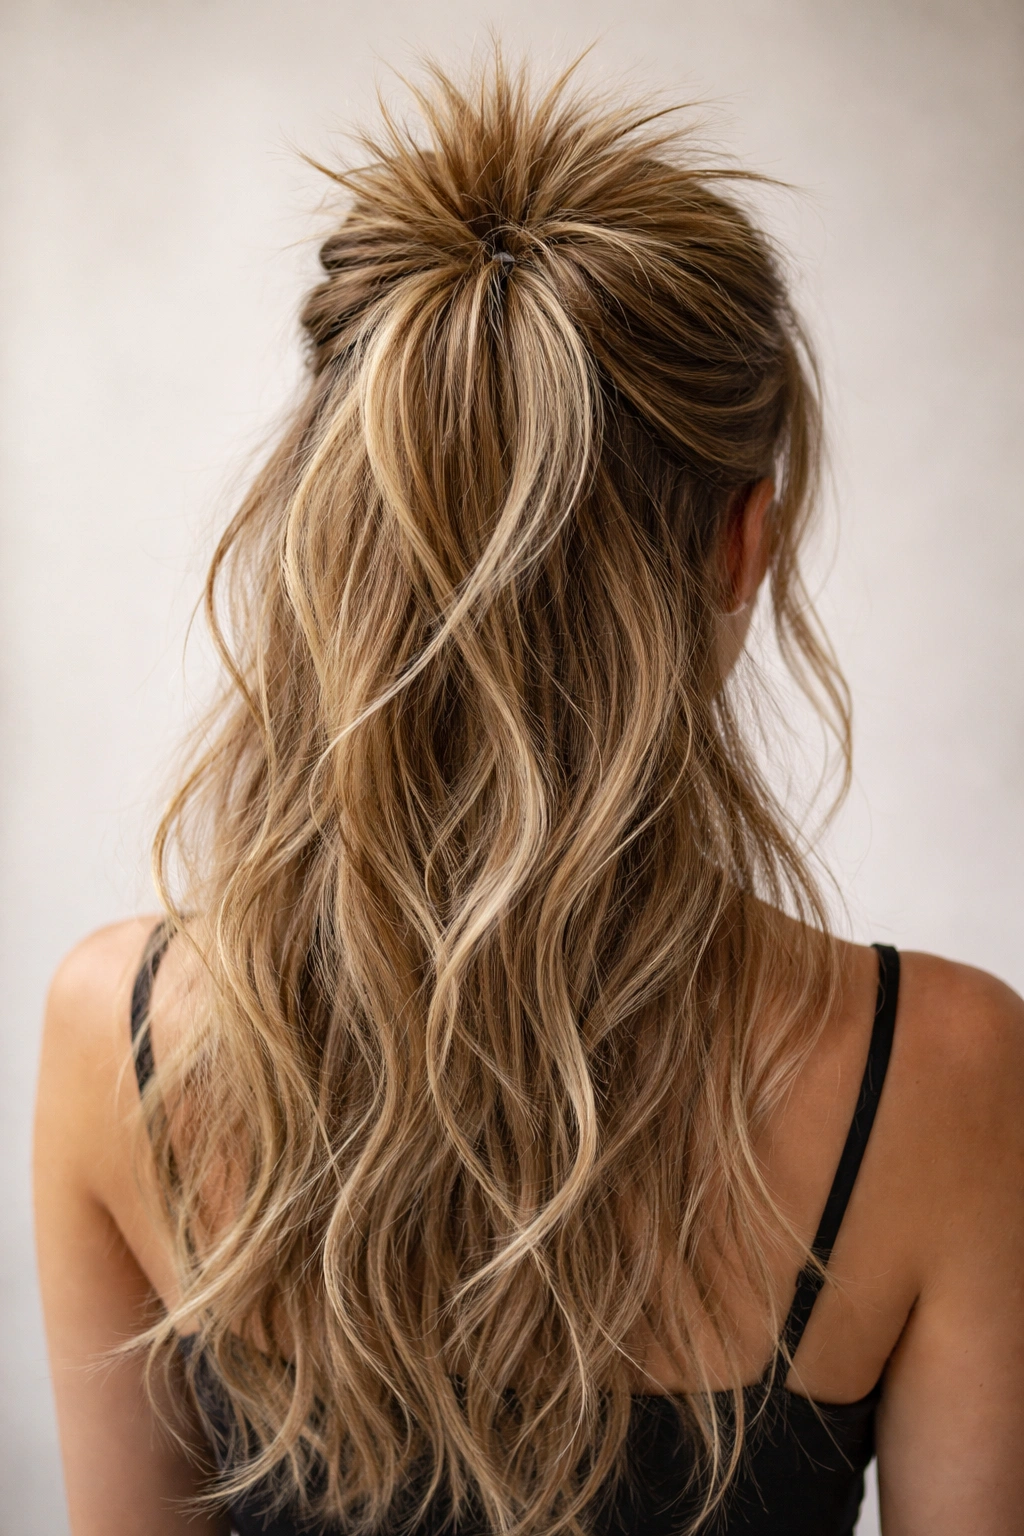
10. Textured Top Knot Fusion
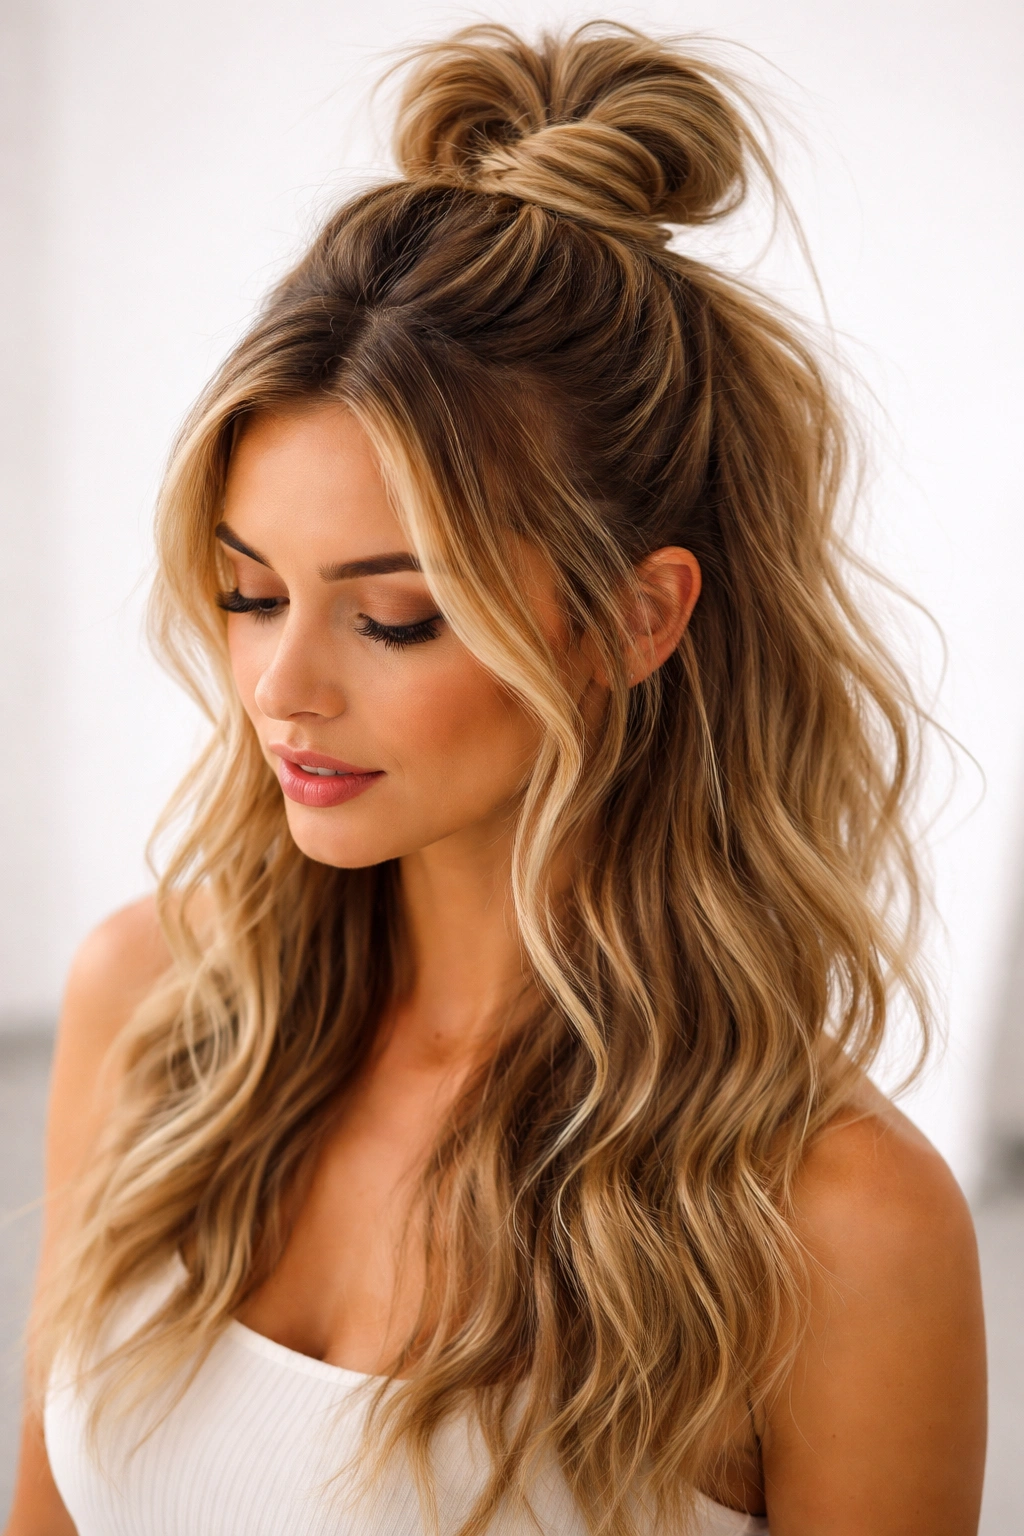
This version combines elements of a top knot with a half-up structure, creating a knot that sits higher than a traditional half-up but incorporates more hair than a full top knot. It’s a bold choice that works beautifully for active days, warm weather, or situations where you want your hair completely off your face and neck but don’t want to commit to a full high pony.
Building the Base and Creating Height
Start by backcombing the crown area generously to create a textured cushion that will support the knot. Gather a large section of hair from your crown area—roughly a 4-5 inch square of the top of your head—and pull it upward and slightly back. This section should be substantial enough to create a visible, sculptural knot shape. Tease this gathered section lightly to add even more texture and volume, then coil it loosely into a knot shape and secure with multiple bobby pins.
Styling the Remaining Half-Down Section
The hair that remains below your knot is your half-down component—this should be textured, waved, or curled to contrast with the knot at the top. Curl or wave all of this remaining hair, creating visible movement and dimension. Strategically pull out a few pieces around your face for softness, and ensure your crown knot sits higher and more dramatically than a standard half-up knot to create visual distinction and height.
Pro tip: If you find your knot looks too tight or controlled, use a fine-tooth comb to very gently backcomb the outer sections of the knot slightly—this adds softness and prevents it from reading as overly polished.
11. Twisted Rope Half-Up Hybrid
This style combines twisted sections (easier than braids for many people) with a rope-like aesthetic, creating a style that looks more intricate than it actually is. You’re creating two twisted sections that spiral around each other or sit side by side, offering dimension and visual interest without the technical difficulty of traditional braiding.
Creating Matching Twisted Sections
Take a 2-3 inch section of hair from each temple area and twist each section tightly as you move backward toward the center back of your head, collecting additional hair as you progress. These two twists should meet at the center back. The tightness of these twists—as opposed to loose, casual twists—creates the “rope” effect and allows them to hold their shape throughout the day without constant tousling.
Combining and Finishing
Once both twisted sections reach the center back, you have options for how to combine them: braid the two twists together for an additional texture layer, wrap one around the other for a sculptural effect, or simply secure them together at the same point with bobby pins. Pull gently on the twists to add dimension and prevent them from looking overly controlled. The remaining hair falls freely, either textured or left smooth depending on your preference and the occasion.
Pro tip: Twisted sections hold their shape better throughout the day than loose braids because the tension created by twisting is inherently more secure, making this version ideal if you need your style to last 8+ hours without touch-ups.
12. Curled Section with Loose Ends
This variation features a specific curled or crimped section incorporated into your half-up style, creating textural contrast between the curl detail and the rest of your hair. You’re using a curling iron on just the gathered section to add dimension and hold, while the remaining hair flows loose below.
Selecting and Curling Your Detail Section
Gather your upper hair for the half-up in your usual way, but before securing it permanently, section off the very top 2-3 inches of this gathered portion. Use a 1.25-inch barrel curling iron to curl this top section, wrapping it around the barrel and holding for 10-15 seconds. The direction of the curl (away from or toward your face) is less important than creating a visible, dimensional curl that contrasts with the rest of your style.
Securing and Building Contrast
Once your detail section is curled, secure your entire gathered portion with an elastic, positioning it so that your curled detail section sits at the very top and is visible rather than hidden beneath other hair. Gently pull and tousle the curl to prevent it from looking too perfectly ringlet-shaped. The remaining hair below should be completely straight or have waves that are softer and less defined than your detail curl, creating a clear textural distinction between the two sections.
Pro tip: The key to making this style work is ensuring that the textural contrast is obvious and intentional—the curled detail should be substantially curlier or more textured than anything else in the style so it reads as a deliberate styling choice rather than inconsistent texture.
13. Bubble Ponytail Half-Up Variation
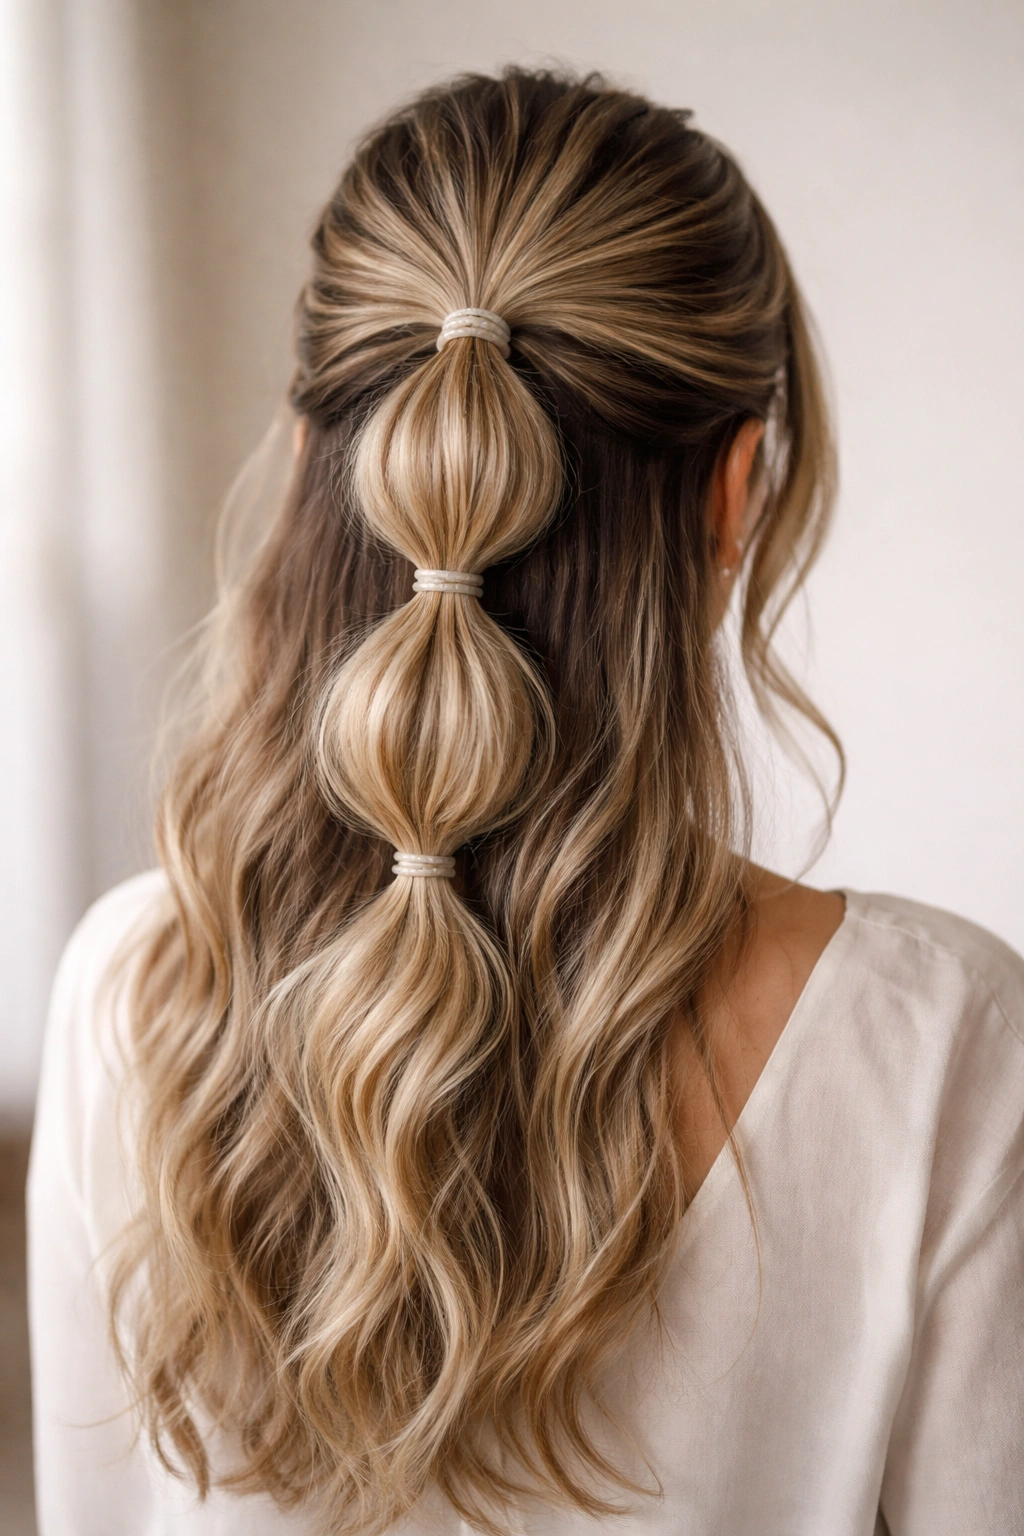
The bubble ponytail technique—creating distinct, separated sections within a ponytail using strategically placed elastics—works beautifully translated into a half-up format. You’re gathering your upper hair and then creating 2-4 “bubbles” or segments within that gathered section, each separated and slightly pulled outward for dimension and visual movement.
Creating the Base Ponytail and Initial Sections
Gather your upper hair and secure it with an elastic at the crown area. Now, measure down approximately 2-3 inches from your elastic and place a second elastic around the ponytail, creating a defined section above and below. Pull the upper section (between the crown elastic and the second elastic) slightly outward and upward to create a bubble shape—pull it away from your head slightly, not just outward.
Building the Bubble Train
Measure down another 2-3 inches and place a third elastic, creating another bubble segment. Pull this section outward as well, matching the lift and direction of your first bubble. Repeat this process 1-2 more times depending on how long your gathered section is and how many bubble segments you want to create. The result should be a series of defined, puffy segments stacked vertically, creating movement and dimension that reads far more interesting than a standard ponytail.
Pro tip: This style works best with thick, textured hair—finer hair may need texture spray or light backcombing within each bubble section to create the fullness that makes the bubble technique actually visible and impactful.
14. Messy Fishtail Accent Braid
The fishtail braid—created by taking tiny pieces from alternating outer sides of two sections rather than traditional three-strand braiding—creates an intricate-looking texture that’s actually quite beginner-friendly once you understand the technique. Incorporating a fishtail into a half-up style adds sophisticated visual interest and works beautifully with tousling and looseness.
Setting Up Your Two-Section Base
Gather your upper half-up hair and divide it into two equal sections. Hold these sections apart with your hands—one in each hand—maintaining gentle tension. Now, working from the outer edge of the left section, take a small piece of hair (about the thickness of a pencil) and cross it over to the right section. Take a matching small piece from the outer edge of the right section and cross it over to the left section.
Building the Braid and Creating Texture
Continue alternating small pieces from each section, crossing them over to the opposite section, creating the distinctive interwoven appearance of a fishtail braid. Work your way down your gathered section for 3-5 inches, then secure with a small elastic. Once complete, gently pull on the edges and center of the braid to loosen and expand it, creating a fuller, more textured appearance. This loosening step is essential—the fishtail’s beauty comes from this soft, dimensional texture, not a tight, controlled form.
Pro tip: Fishtail braids photograph beautifully because the interwoven texture creates visual complexity and catches light differently than traditional braids, making them ideal for special occasions or photos.
15. Spiky Texture with Lifted Crown
This final variation uses deliberate backcombing and teasing throughout the crown and half-up sections to create a spiky, textured aesthetic that reads as edgy, fashion-forward, and distinctly modern. It’s the version for days when you want to command attention and aren’t aiming for soft or romantic—you’re aiming for bold.
Strategic Backcombing for Maximum Impact
Using a fine-tooth comb, heavily backcomb the crown area, the sides of your head just above ear level, and the section of hair you plan to gather for your half-up. The backcombing should create a noticeably textured, tousled appearance, not just gentle lift. This backcombing creates volume and edge throughout your entire head, setting the foundation for the spiky aesthetic. Brush over the surface layer of your backcombed sections lightly to smooth them slightly while maintaining the texture underneath.
Gathering and Tousling Dramatically
Gather your upper hair loosely, allowing some of the backcombed texture to remain visible rather than smoothing everything together. Secure with an elastic, then pull and tease the sections around this gathering point to create additional visible texture and spike. Pull out several pieces around your face, and leave some backcombed sections slightly separated rather than neatly integrated. The goal is an intentionally tousled, lived-in, textured appearance that reads as edgy rather than messy.
Pro tip: This style benefits enormously from texture spray or dry shampoo applied before styling—these products grip backcombed hair and help the spiky texture last throughout the day without gradually relaxing into smoothness.
Final Thoughts
The beauty of messy half up half down ponytails lies in their absolute adaptability to your mood, occasion, and personal style. Whether you’re drawn to the romantic complexity of twisted braids, the editorial precision of a sleek version, the effortless tousle of the casual styles, or the bold statement of heavily textured variations, this fundamental style offers endless possibility for self-expression. The techniques span from incredibly simple (a basic twisted section) to more advanced (fishtail braiding), but even the more challenging variations become intuitive with practice.
The unifying principle across all these variations is that attempting perfection actually works against you. The styles that photograph best, feel most comfortable, and actually last throughout the day are the ones where you’ve left room for texture, movement, and a touch of intentional imperfection. Your flyaways aren’t failures—they’re part of the aesthetic. The wisps around your face aren’t sloppy—they’re intentional framing. A slightly loosened braid isn’t undone styling—it’s a deliberate choice that creates softness and dimension.
The best approach is to experiment with different techniques, paying attention to which ones feel most natural to your hand and which ones suit your daily lifestyle. Build a routine with your top two or three favorites so you can execute them quickly without thinking, then branch out on days when you have more time or want to try something new. Your hair will thank you for the variety, and you’ll find yourself reaching for this versatile style far more often than you might expect.