Red hair has a natural radiance that commands attention, and a half-up half-down hairstyle is one of the smartest ways to showcase it on your wedding day. This romantic silhouette hits the sweet spot between polished and free-flowing—your hair is partially styled up to keep your face framed and your features visible, while the length cascades down your back with movement and drama. For brides with red hair, this style choice offers something particularly special: it allows you to display the depth, dimension, and luminosity of your color while maintaining the structured elegance a wedding demands.
The magic of half-up half-down styles is their incredible versatility. Whether your red hair is fiery copper, deep burgundy, rich auburn, or strawberry blonde, there’s a version of this look that will complement your specific shade and make it the focal point of your bridal look. You can dress it up with intricate braids, romantic waves, delicate accessories, or keep it simple and organic. You can work with your hair’s natural texture or create something more sculpted. The half-up half-down format gives you freedom without sacrificing sophistication—exactly what most brides want on their wedding day.
What makes red hair particularly striking in a half-up half-down style is how the upswept portion can showcase your face, skin tone, and the details of your dress, while the flowing bottom half demonstrates the gorgeous color from multiple angles. Your guests will get the full impact of your red hair throughout the ceremony and reception. The key is choosing a style that feels authentically you—whether that’s something intricate and detailed or effortlessly loose and romantic.
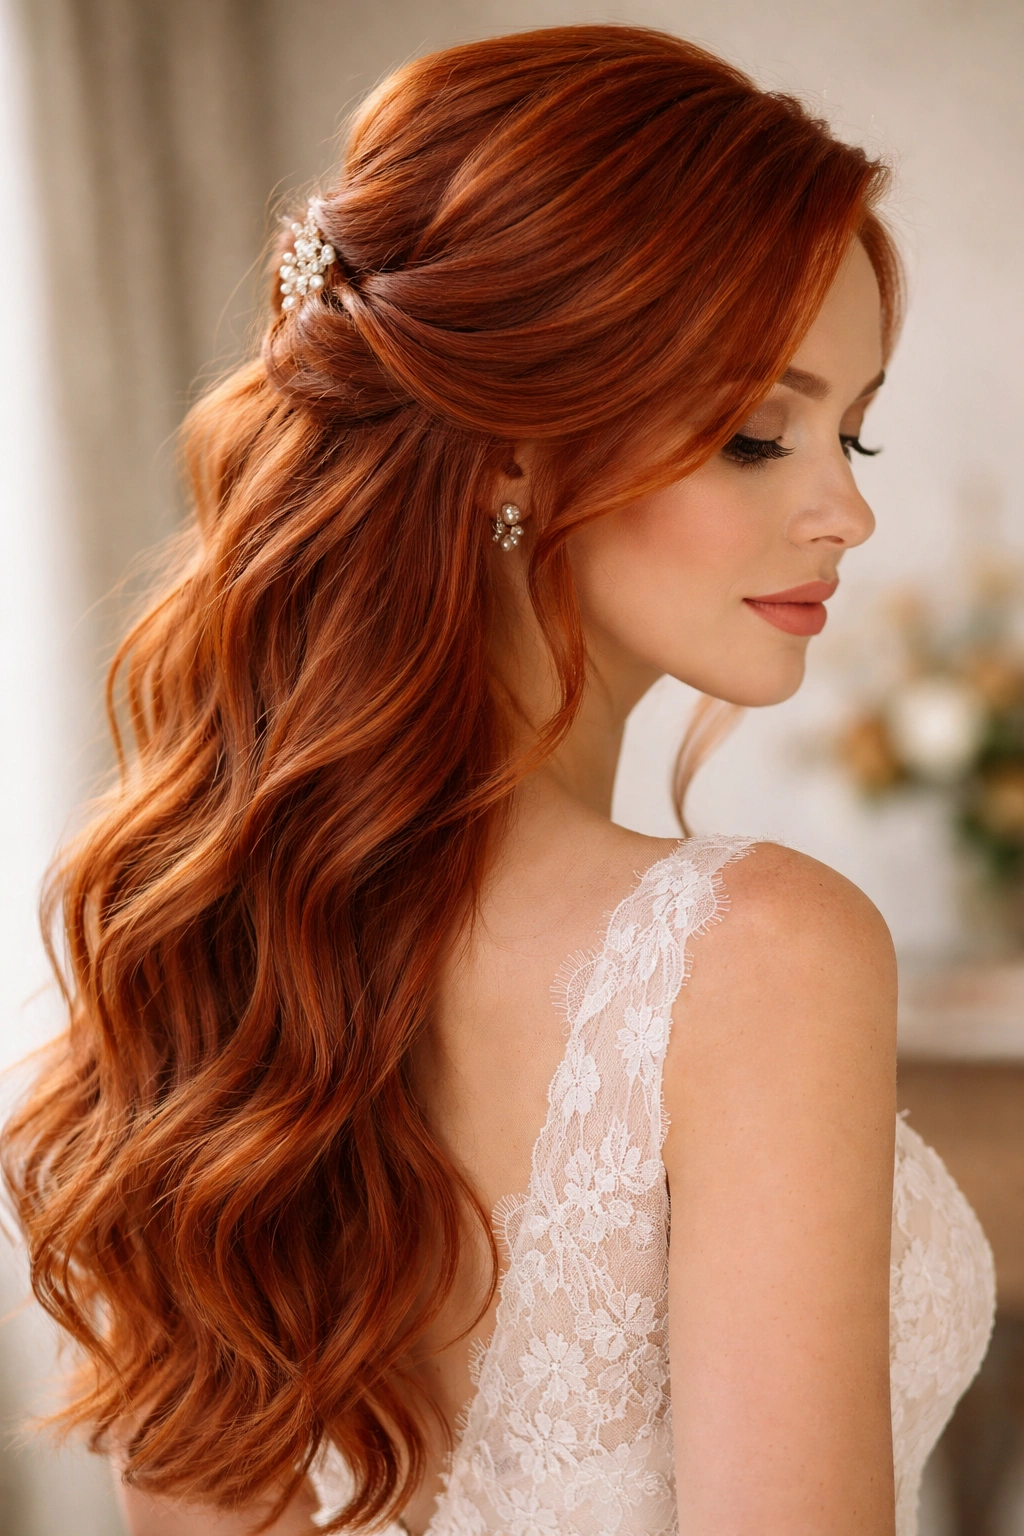
1. Classic Twisted Crown
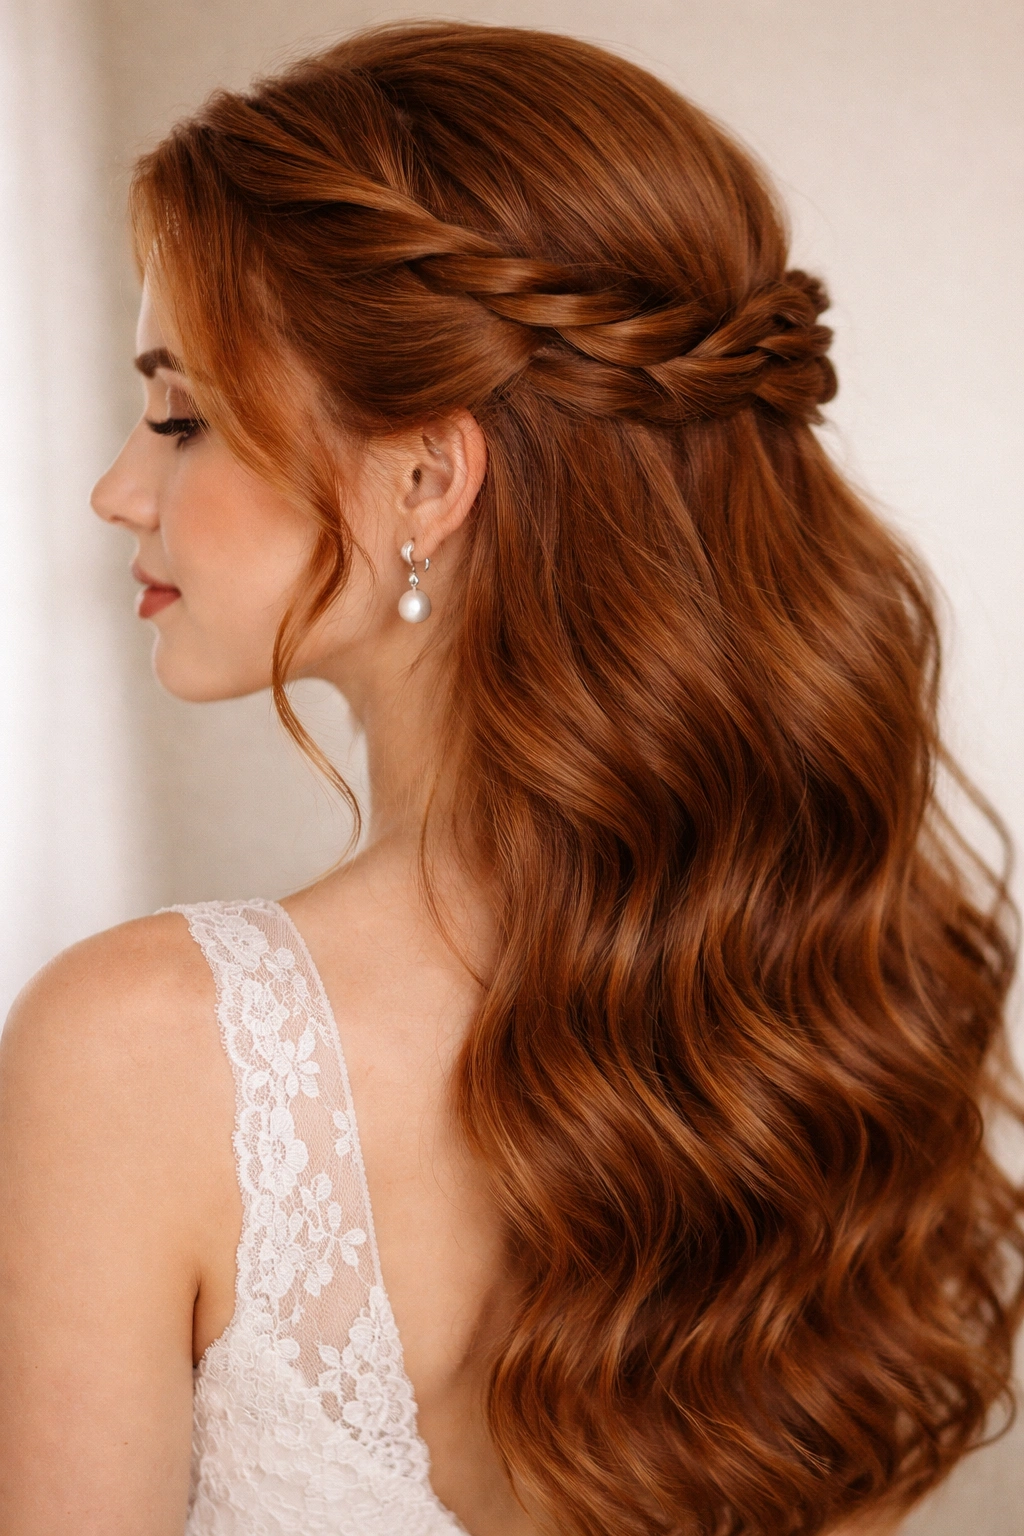
This timeless half-up half-down style twists sections of hair from both sides of your head toward the back, where they meet and are pinned together. The result is an elegant crown effect that frames your face beautifully while keeping the bulk of your red hair down. What makes this style work so well with red hair is its simplicity—twisted sections showcase the natural shine and dimension of your color without competing details.
Why This Works for Red Hair
The twisted crown draws the eye upward to your face and allows the color to shine through the twisted sections. This style works for every skin tone and complements the vibrant undertones in red hair, whether you’re warm, cool, or neutral-toned. The twisted sections catch light differently than loose hair, adding dimension and movement to your updo portion.
How to Achieve It
- Start with soft waves throughout your hair (curl your hair the night before for the most romantic texture)
- Take a section from the left side of your head near your temple and twist it loosely toward the back
- Take a corresponding section from the right side and twist it back to meet the first twist
- Pin both twists together at the base of your crown using bobby pins that match your hair color
- Pull the pinned twists slightly to create a fuller, more romantic appearance
- Smooth any flyaways with a light hairspray (not too much, or it’ll look stiff)
Pro tip: Practice this style at least twice before your wedding day so your hands know exactly where to start the twists and how much tension creates the look you want.
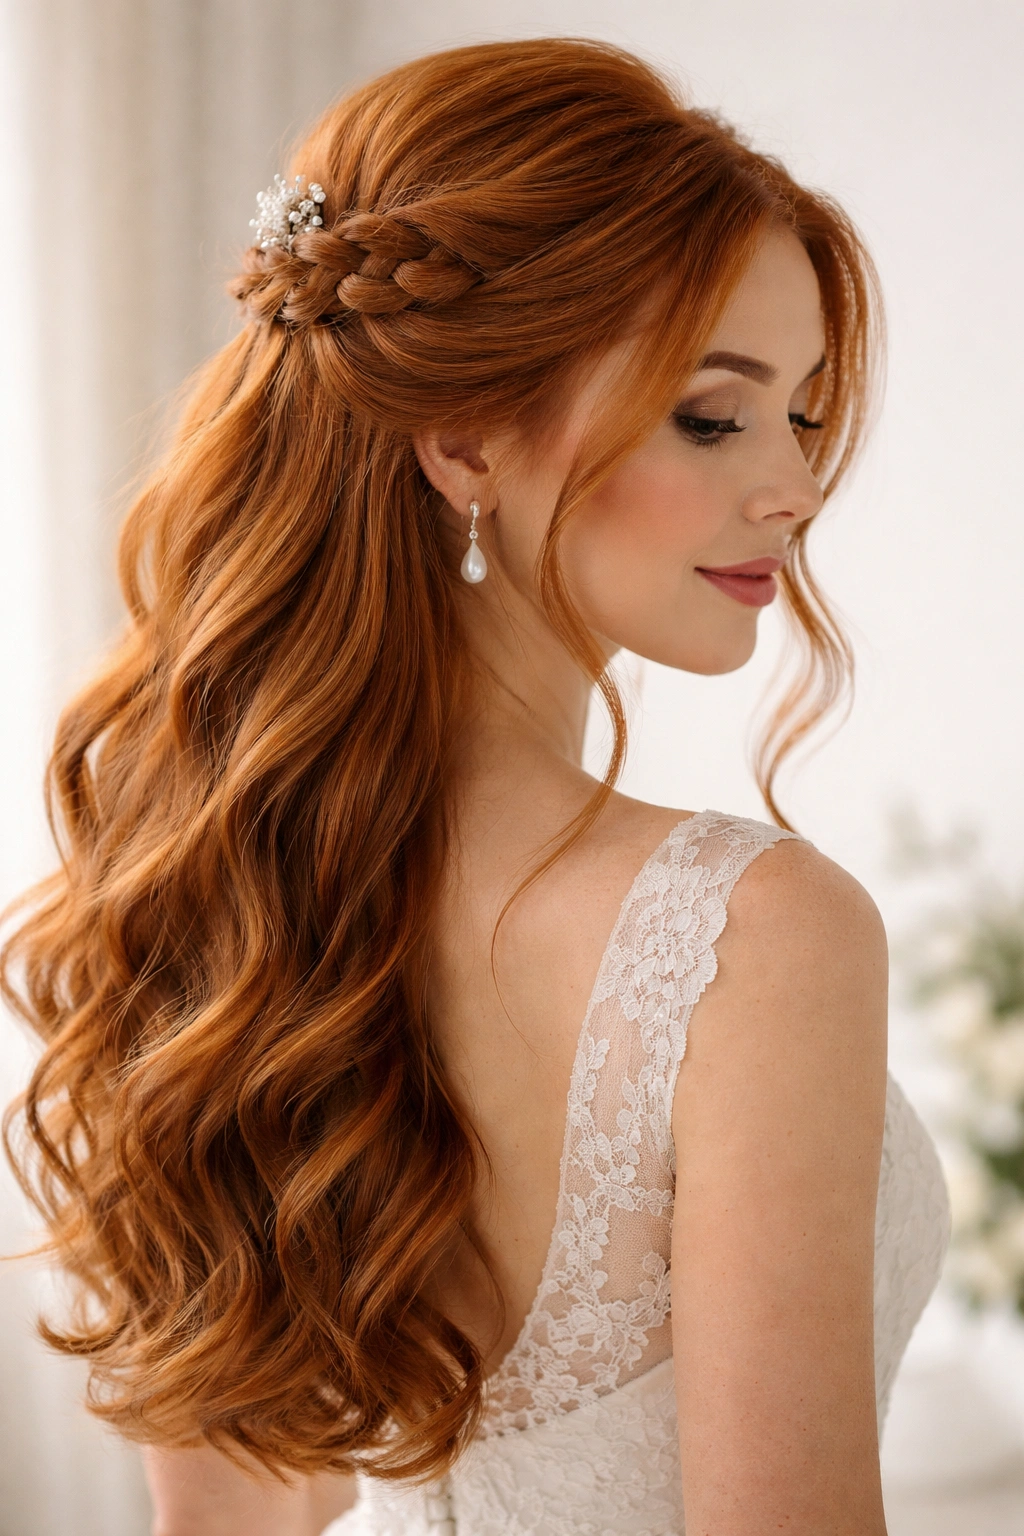
2. Romantic Braided Half-Up with Flower Crown
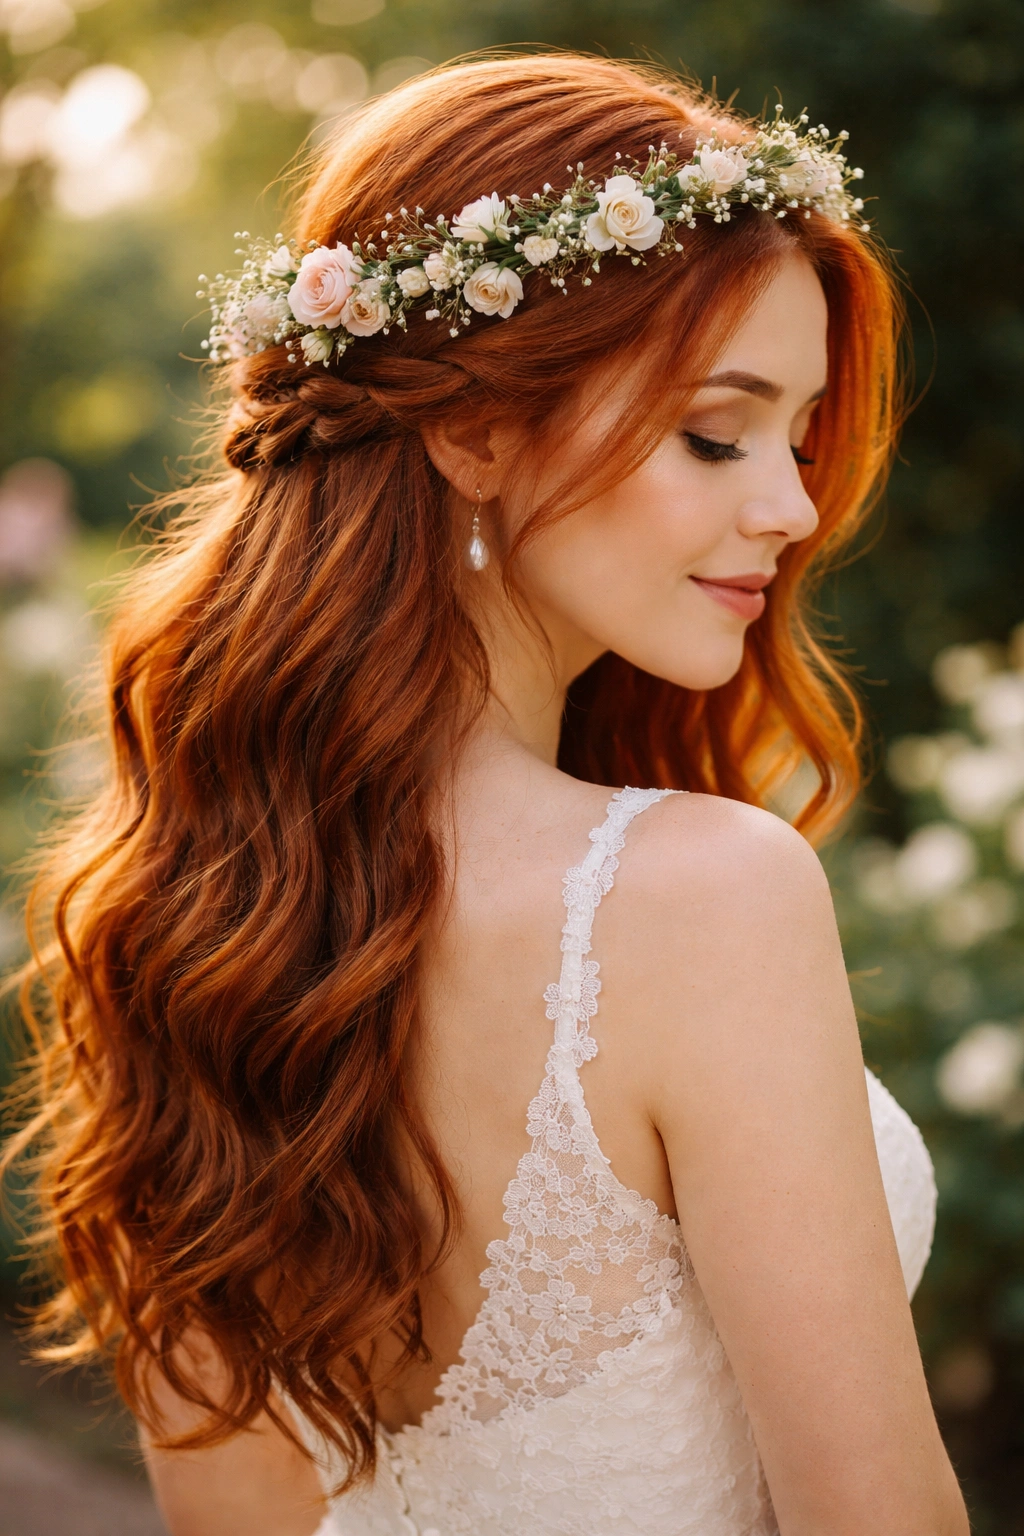
This look incorporates a loose Dutch braid or regular braid on each side of your head, twisted back and secured, with a delicate flower crown woven into the pinned sections. The red hair flowing underneath creates a stunning frame for the floral elements, and the braids add texture and interest to the updo portion. This style feels both bohemian and bridal, making it perfect for outdoor or garden weddings.
The Braiding Technique
A Dutch braid (which creates an appearance of a braid sitting on top of the hair) or a regular three-strand braid works equally well here. The key is making your braid loose enough that it feels romantic rather than tight and schoolgirl-ish. You want some of your red hair to escape the braid naturally for a softer look.
Implementation Steps
- Begin with your hair in soft waves or slightly curled
- Create a braid on the left side starting near your temple, braiding loosely and incorporating hair as you go back
- Create a matching braid on the right side
- Bring both braids to the center back of your head
- Intertwine fresh flowers (like white roses, garden roses, or spray roses) into the braids as you pin them
- Secure everything with bobby pins and a light hairspray
- Leave the lower half of your hair down in loose waves
Worth knowing: Speak with your florist about which flowers will hold up through your entire wedding day and which ones might wilt. Some delicate flowers look stunning but may not last if you’re having a long reception.
3. Sleek Half-Up Ponytail with Metallic Accessory
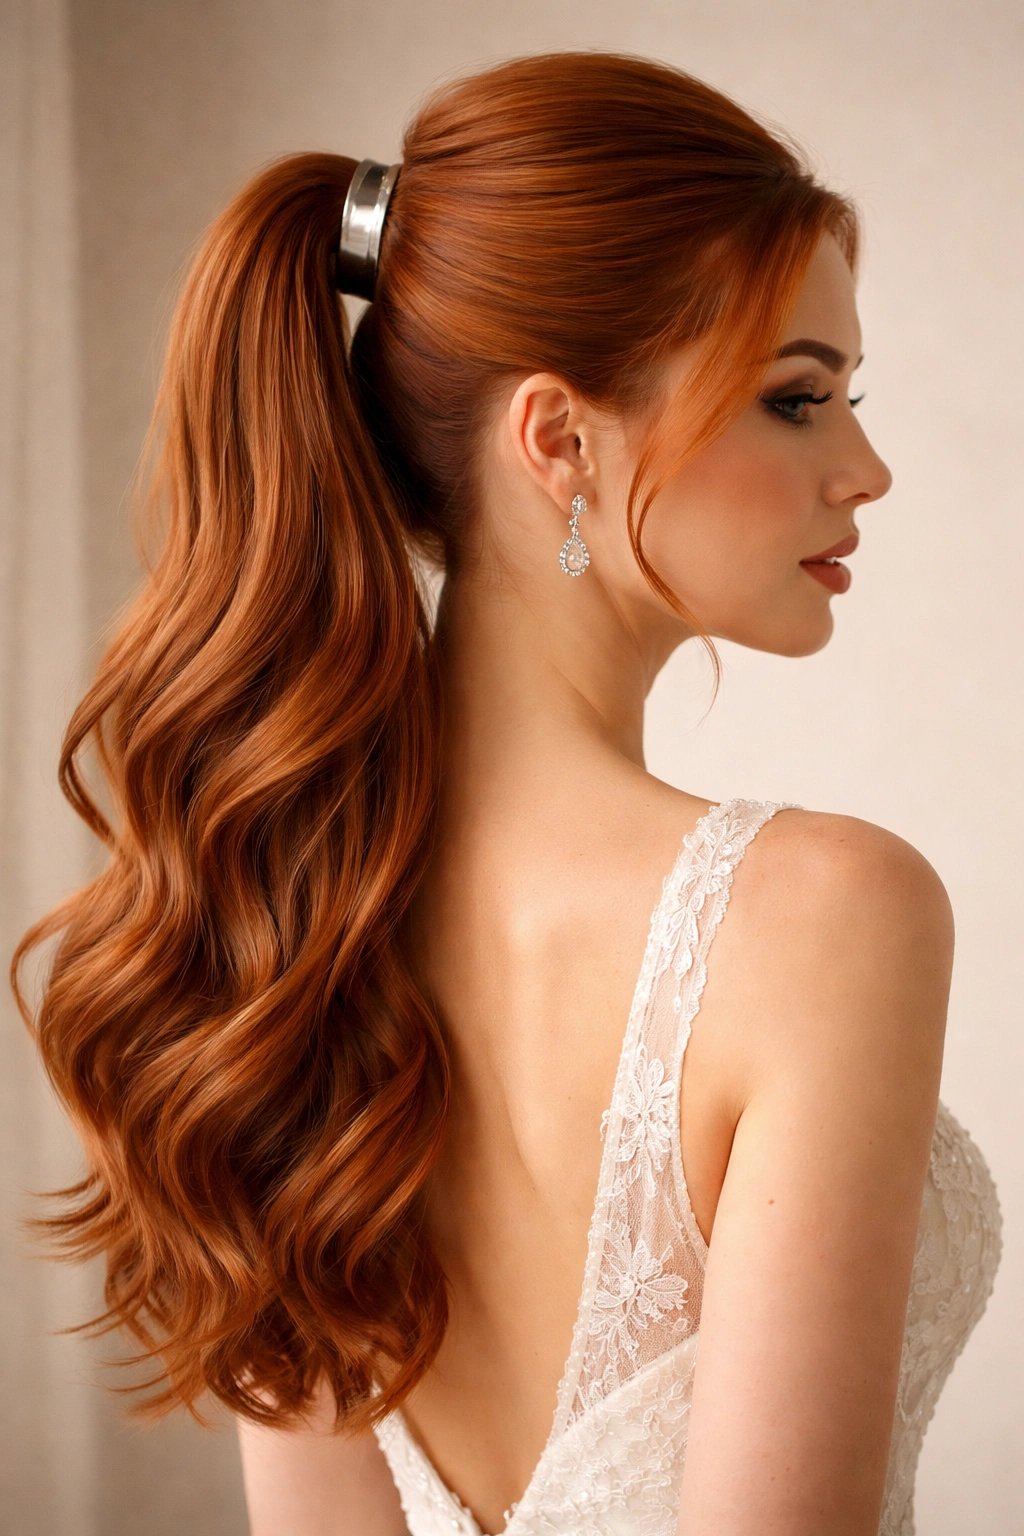
For a more modern, polished wedding look, try a sleek half-up ponytail secured with a gorgeous metallic hair cuff or decorative clip. The upper portion is pulled back smoothly and tightly, creating clean lines that contrast beautifully with the soft waves of your red hair flowing below. This works especially well if you have a dress with intricate beadwork or detailed neckline—it keeps the focus exactly where you want it.
Achieving the Sleek Look
Sleekness comes from using the right products and technique. You’ll want a smoothing serum or gel that tames flyaways without creating a wet, plastered appearance. Brush your hair back smoothly and gather it at a point roughly at ear level—higher for a more dramatic effect, or slightly lower for a subtler version.
Product and Styling Tips
- Use a fine-tooth comb to brush your upper hair section back smoothly, eliminating any bumps
- Apply a small amount of smoothing serum to your hands before gathering the hair to reduce frizz
- Secure the ponytail with an elastic that matches your hair color
- Hide the elastic by wrapping a small section of hair around it and pinning it underneath
- Choose a metallic cuff or clip that complements your dress—rose gold, gold, or silver all look stunning against red hair
- Keep the lower portion in soft, touchable waves (not too tight or curled, which can look severe against the sleek top)
Insider note: The contrast between the sleek, controlled upper section and the loose waves below is what makes this look feel polished rather than two-toned. Don’t go too severe on top or too casual on bottom.
4. Soft Romantic Half-Up with Loose Curls and Pearl Pins
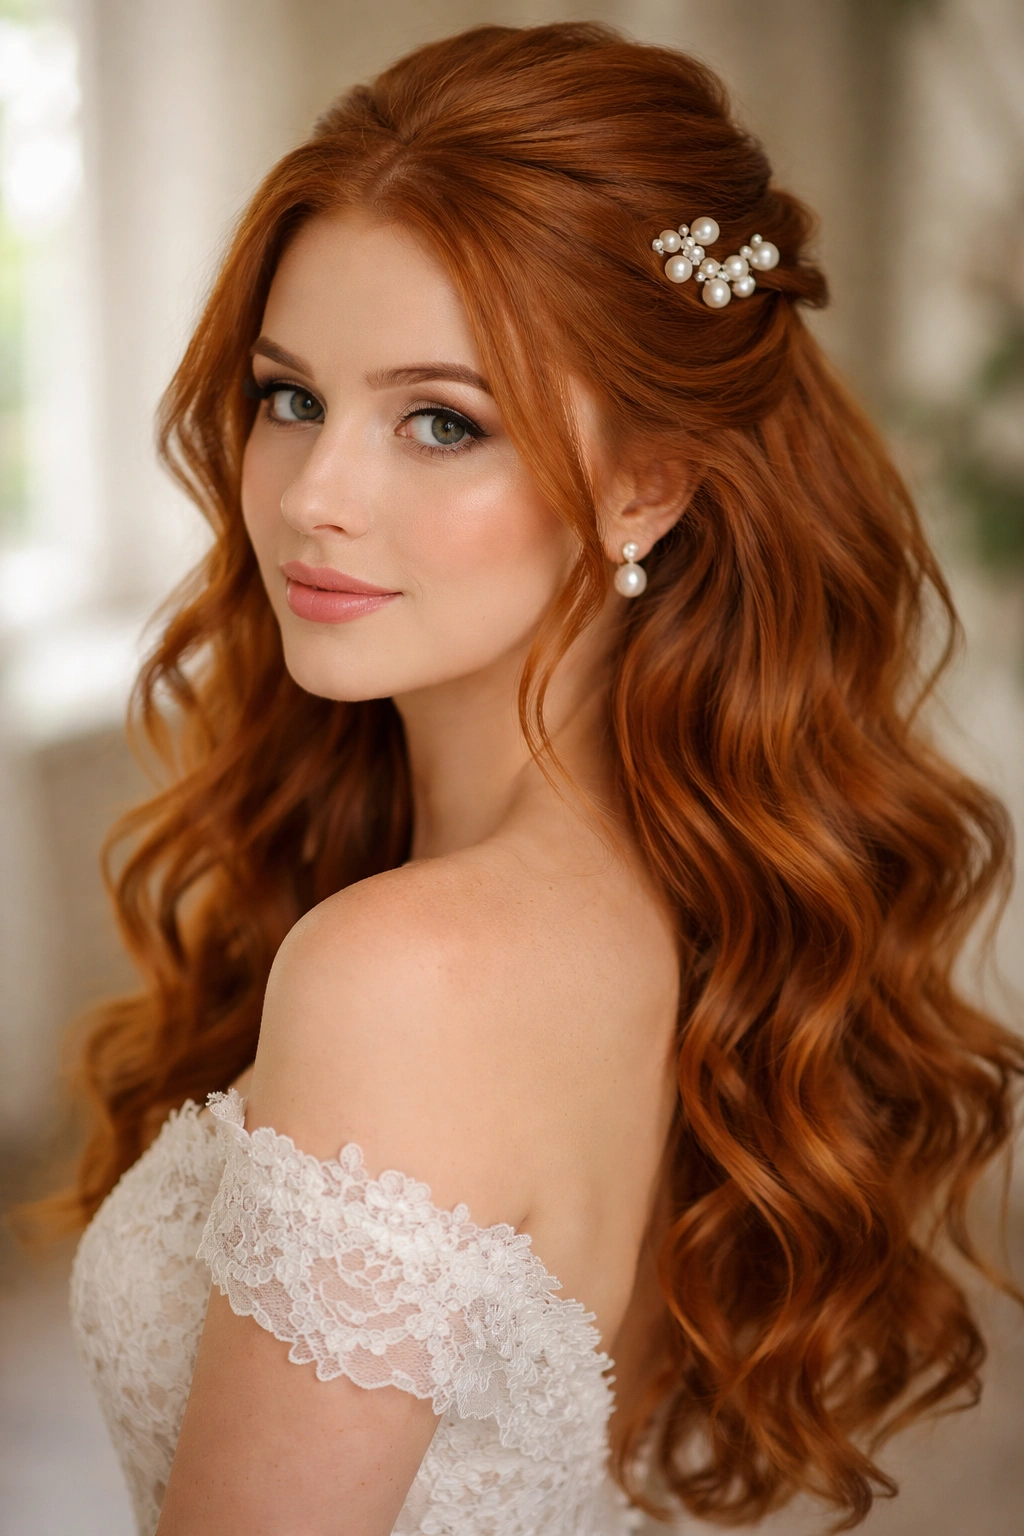
This is the quintessential romantic bridal look—loose, flowing curls throughout, with the upper portion gently gathered back and secured with delicate pearl pins or decorative bobby pins. The red hair shines beautifully in this style because the curls catch the light and showcase dimension, while the upswept portion keeps the look intentional and styled rather than just “hair down.”
Creating the Curl Pattern
The most romantic curls are created the night before your wedding or the morning of, depending on your hair type. Use a 1.5-inch curling iron or wand, curling sections loosely and letting them cool before you run your fingers through them. You want waves rather than tight ringlets—the key is not brushing the curls out completely, just gently separating them with your fingers.
Assembly and Securing
- Curl your entire head in sections, allowing the curls to cool completely
- Gently separate the curls with your fingers rather than a brush to maintain texture
- Take the upper portion of your hair (from about ear level up) and gather it loosely at the back crown
- Secure with a clear elastic or one that matches your hair color
- Hide the elastic by wrapping a thin section of hair around it and pinning with pearl pins or jeweled bobby pins
- Gently pull the curls to create a fuller, more romantic appearance
- Set with hairspray that has flexible hold so the curls move naturally
Pro tip: The volume and movement in this look makes your red hair look thicker and fuller, and the pearl pins add an instant bridal element without being too precious or costume-y.
5. Low Half-Up with Face-Framing Layers
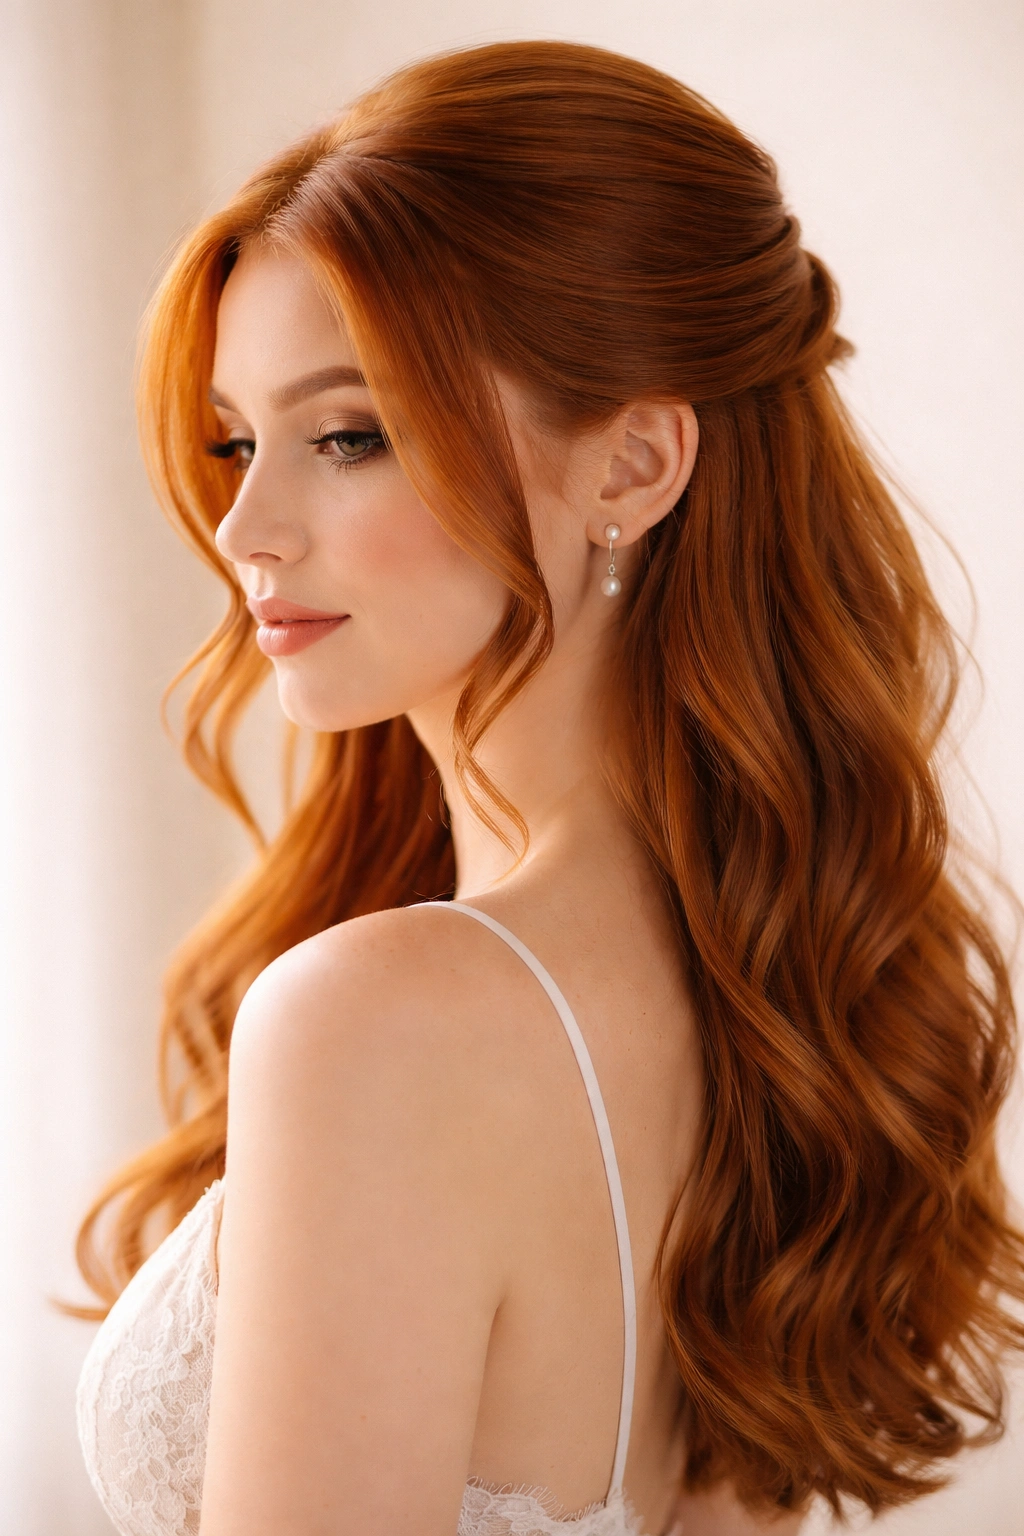
This sophisticated style pulls the upper portion of hair back and down at a lower point on the back of your head, creating an elegant half-up that feels more understated than crown-level versions. The beauty of this approach is that it leaves longer face-framing pieces around your cheeks and jawline, which is incredibly flattering and draws attention to your face rather than competing with your red hair.
Why Lower Works Better for Some Faces
A lower half-up is ideal if you have a longer face, want to showcase your neckline and dress, or prefer a style that feels less “done up” and more naturally beautiful. It’s also perfect if you’re wearing a high-necked or detailed dress neckline—the lower gathering won’t interfere.
Styling Instructions
- Start with soft waves throughout your hair
- Leave a section of hair in front of each ear unclipped—these will frame your face
- Gather the remaining upper hair at approximately ear level or slightly lower, toward the back center
- Use bobby pins or a small, decorative clip to secure the gathering
- Pin the face-framing pieces behind your ears rather than pulling them back, so they stay near your face
- Consider twisting or braiding the face-framing pieces slightly for an intentional (rather than accidental) look
- Set everything with flexible-hold hairspray so the style moves naturally as you move throughout the day
Worth knowing: This style works beautifully with delicate, dangly earrings because the face-framing design showcases your jewelry without the side hair getting in the way.
6. Half-Up with Braided Halo
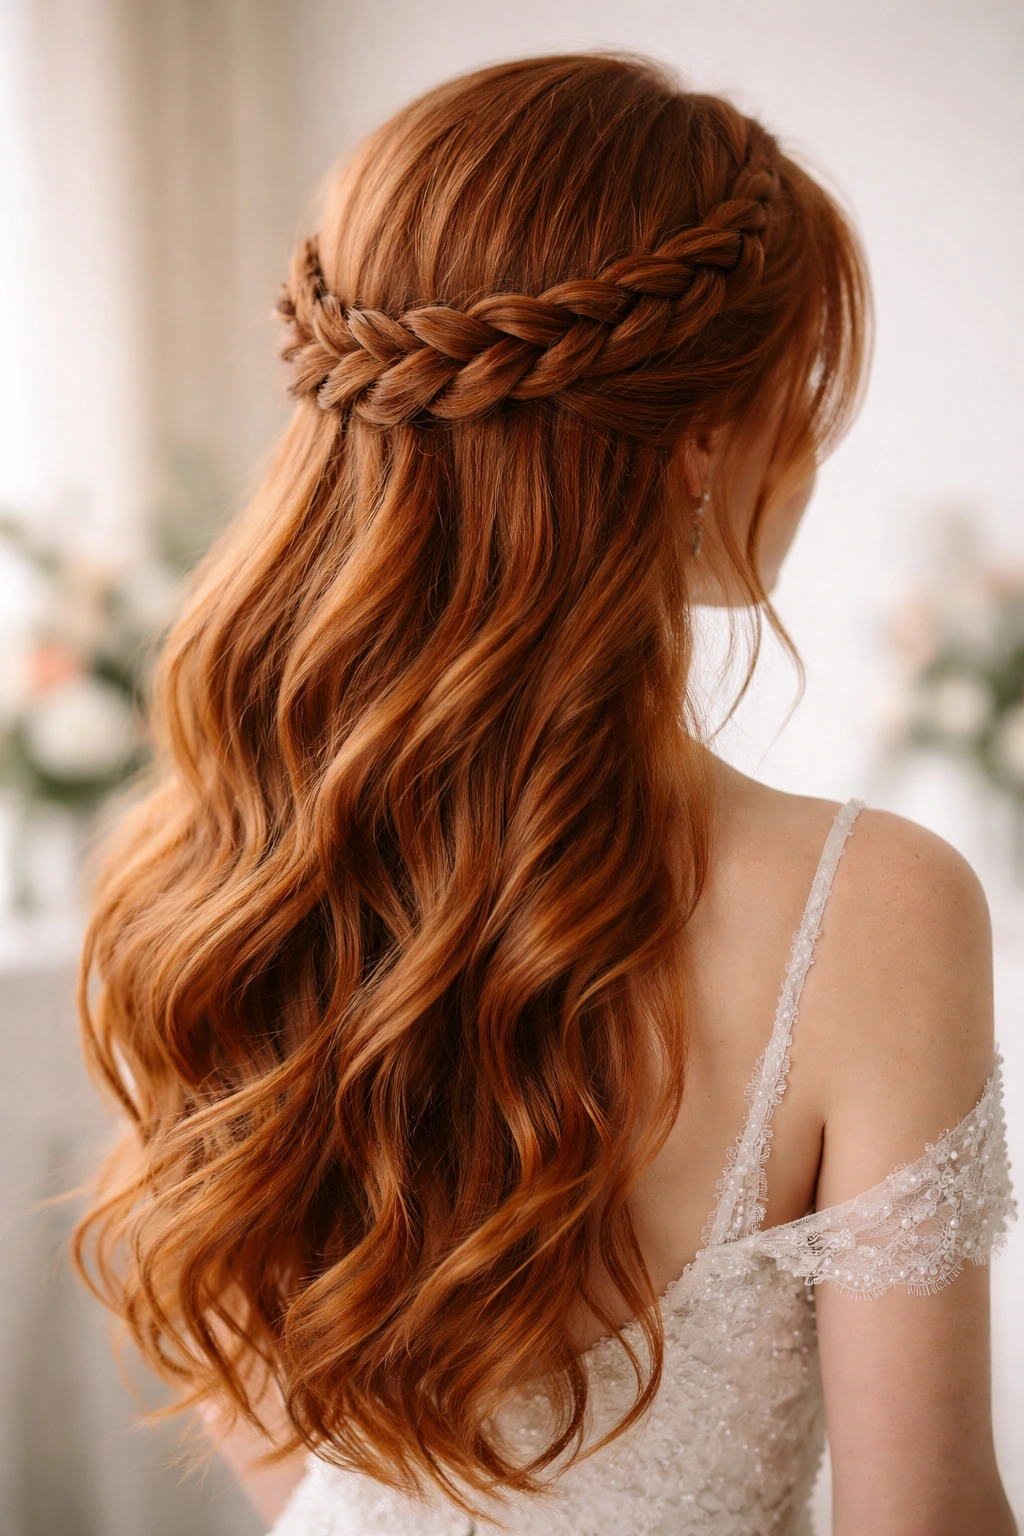
A braided halo takes your half-up to the next level with a more formal, intricate appearance. This style involves creating a braid that starts at one side of your head, travels across the back, and ends on the opposite side, creating a halo or crown effect. The upper portion of your hair is then gathered underneath this braid and pinned, with the red hair flowing freely below. It’s elaborate enough for a formal wedding but feels romantic rather than severe.
Creating the Halo Braid
A three-strand Dutch braid (braid on top of the hair rather than underneath) is most flattering because it sits visibly and creates definition. You can also use a fishtail braid for a more delicate, intricate appearance. The braid should be loose enough to feel romantic and show off your red hair’s texture and dimension.
Step-by-Step Assembly
- Brush through your hair to remove tangles and create soft waves
- Start a loose braid at ear level on one side of your head
- Braid loosely toward the back and across, ending at ear level on the opposite side
- The braid travels around the back like a crown or halo
- Gather the upper portion of hair that sits in the center back (underneath the braid) and secure with bobby pins
- The braid sits on top of and pins down this gathered section
- Leave the lower portion of your hair in soft waves that flow freely
- Tuck the braided ends behind your ear and secure with bobby pins
Pro tip: This style works beautifully with baby’s breath, small white flowers, or eucalyptus woven into the braid for a romantic touch.
7. Half-Up with Twisted Sections and Statement Clip
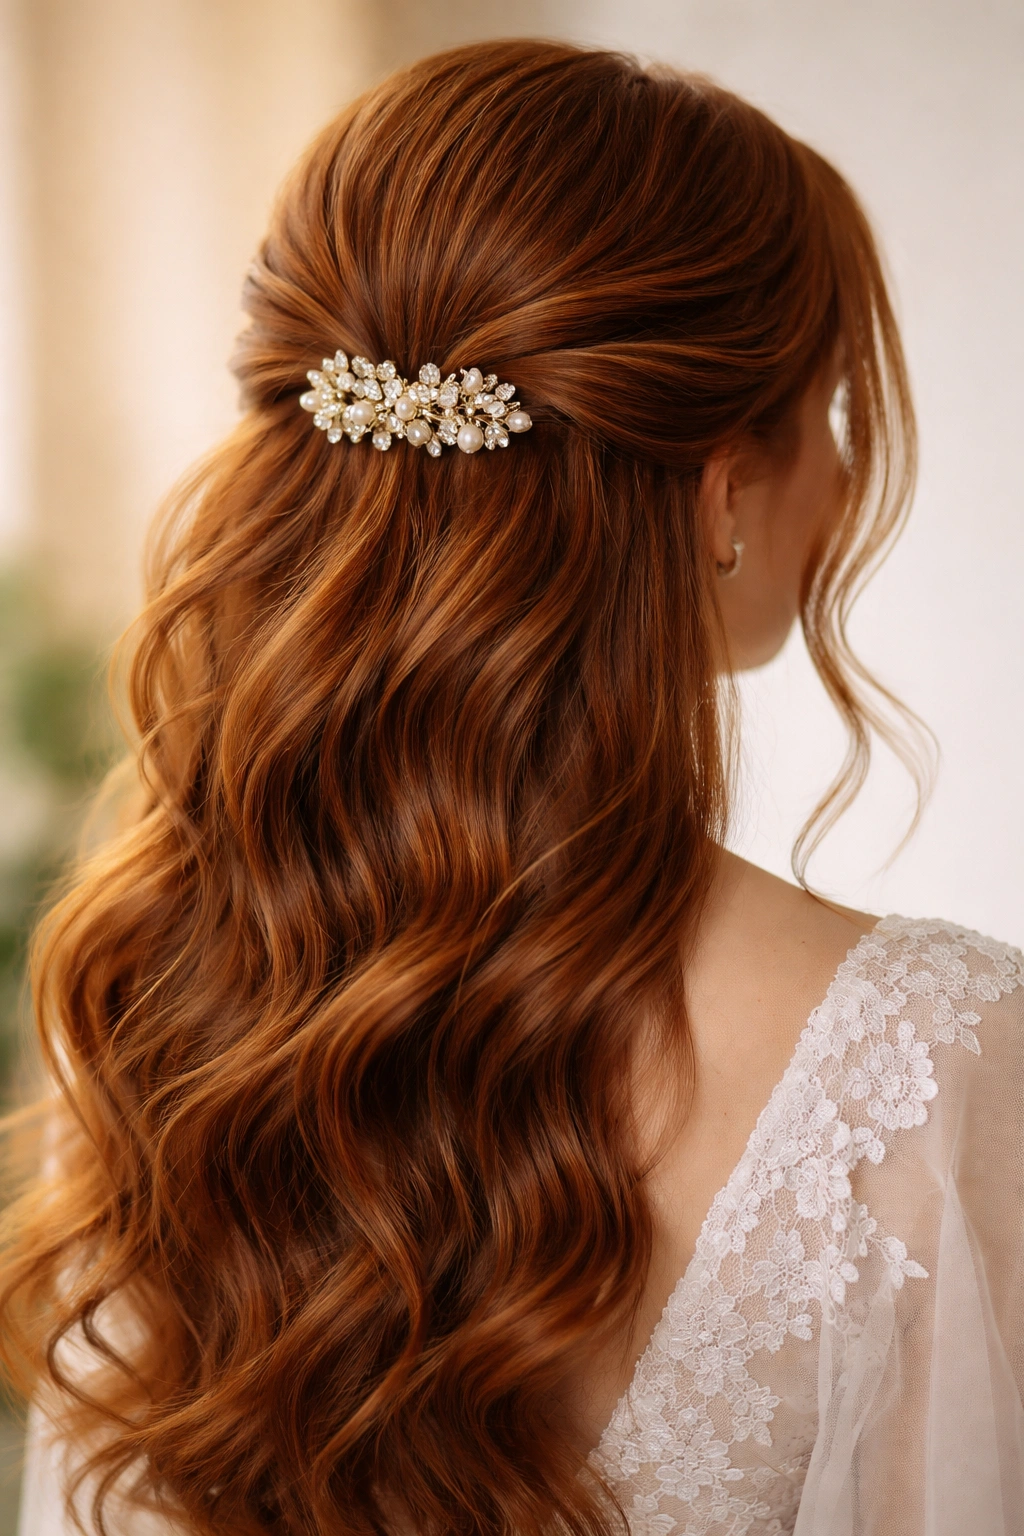
This modern take on the half-up style uses twisted sections of hair pinned back with an eye-catching statement clip or barrette that becomes part of your bridal jewelry. The twisted sections add movement and texture while keeping things off your face, and the statement clip transforms the hairstyle from classic to contemporary. With red hair, the twists showcase color dimension while the clip adds personality.
Choosing Your Statement Clip
Your clip can be anything from an oversized metallic or tortoiseshell design to something with crystals, pearls, or even custom-made to coordinate with your bridal vision. The clip should be substantial enough to actually hold the twisted sections securely while looking intentional and beautiful. Consider whether you want your clip to match your dress details or provide contrast.
Creating the Twisted Details
- Begin with your hair in soft waves
- Take a section from above your left ear and twist it loosely (not tightly braided, just twisted)
- Take a corresponding section from above your right ear and twist it
- Bring both twisted sections to the back center of your head where they meet
- Secure them at the meeting point with a bobby pin or two, then cover the pins with your statement clip
- Make sure the clip is positioned where it’s visible and beautiful, not hidden under hair
- Leave the lower half of your hair in loose waves
Insider note: A tortoiseshell or rose-gold statement clip looks particularly stunning against red hair and ties in beautifully with warm-toned makeup and jewelry.
8. Voluminous Half-Up with Teased Crown Section
This look creates maximum volume at the crown of the half-up portion by gently teasing the hair before gathering it. The result is a fuller, more dramatic updo section that pairs beautifully with loose waves below. With red hair, the added volume showcases more of your color and creates a very bridal, elevated appearance. This style works especially well if you have fine hair, as the teasing adds fullness without looking unnatural.
Teasing Technique for Natural Volume
Proper teasing creates volume without damage or an obvious “ratted” appearance. Use a teasing brush or fine-tooth comb and gently backcomb small sections at the crown. The goal is to create texture and grip, not to create a large knot of hair.
Building the Voluminous Style
- Create soft waves throughout your hair and allow them to cool completely
- At the crown area (roughly the top third of your head), use a teasing brush to gently tease small sections
- Tease only enough to create grip and volume, not so much that it looks messy or overdone
- Smooth the outer layer of the teased section gently with your brush to keep it polished
- Gather the upper portion of your hair (including the teased crown) and secure with bobby pins at the back
- The teased section creates natural fullness that makes the gathered portion appear larger
- Leave the lower hair in soft waves, and use hairspray with flexible hold so everything moves together
Pro tip: This is one of the best styles for making fine or thin hair appear fuller and more voluminous without resorting to hair extensions or dramatic measures.
9. Half-Up with Ribbon Woven Through
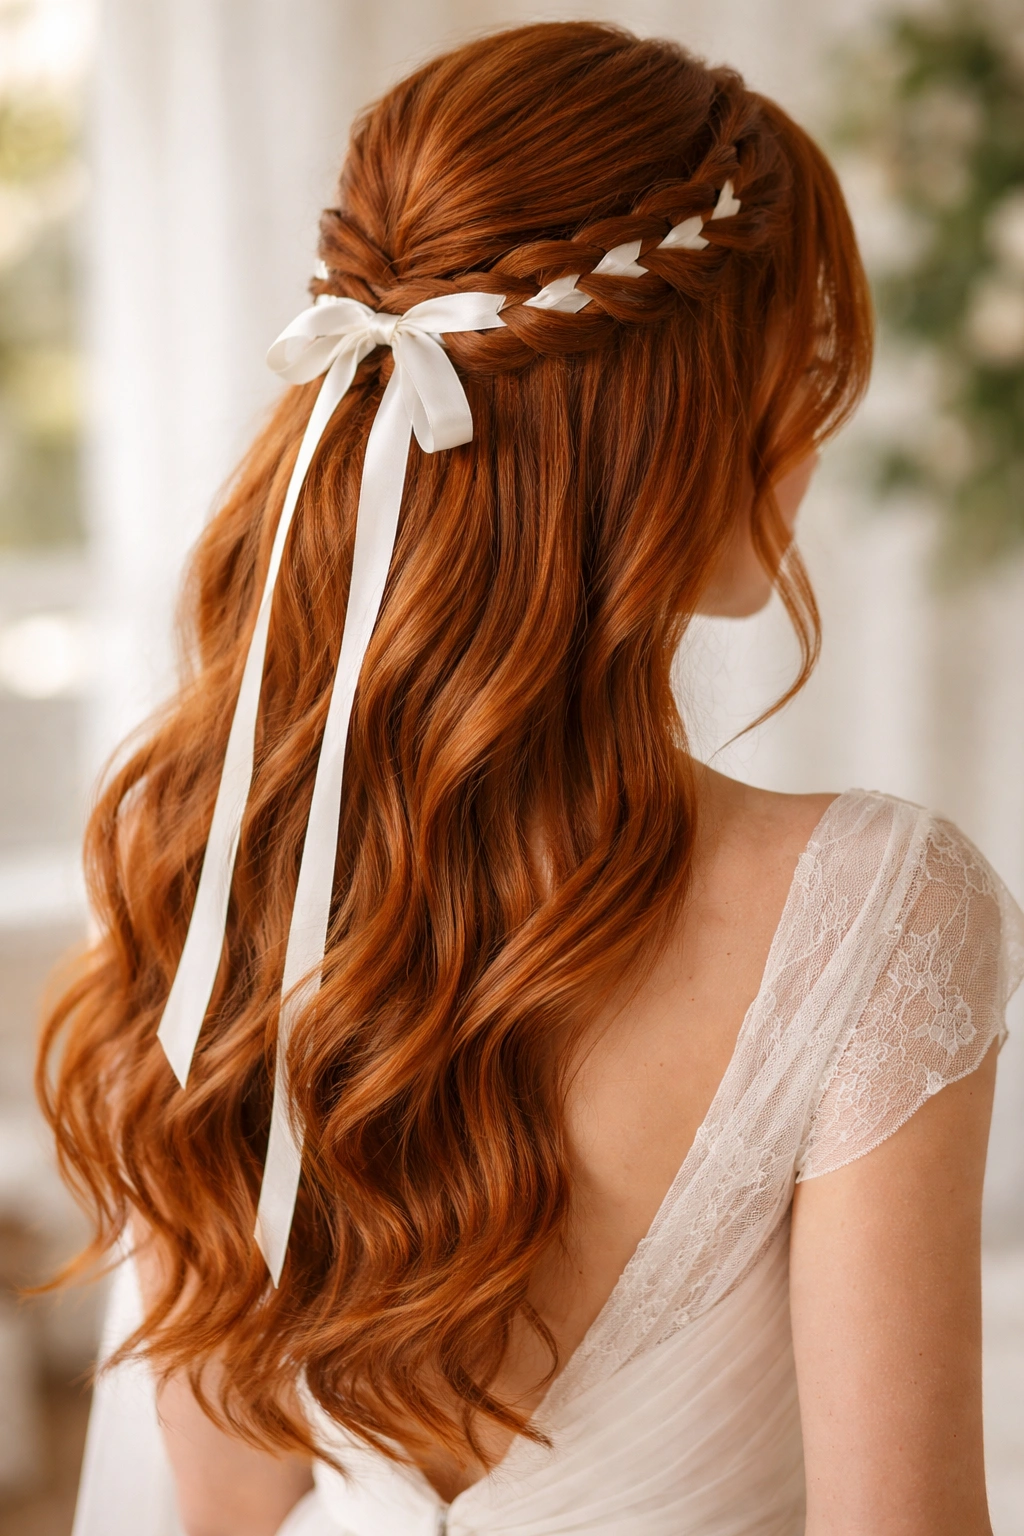
This charming, romantic style weaves a ribbon through the upper gathered portion of your hair, creating a beautiful linear detail that draws the eye. The ribbon can coordinate with your dress color, add contrast, or feature a pattern or texture that reflects your style. With red hair, a white, cream, blush, or gold ribbon creates a stunning contrast that makes the ribbon pop while showcasing your hair color.
Ribbon Selection and Placement
Choose a ribbon that’s approximately 1 inch wide for good visibility and ease of weaving. Silk or velvet ribbons look more luxurious than basic satin, though any smooth ribbon works. You can weave the ribbon through a braid, weave it through the gathered section itself, or wrap it around the base of the gathered hair like a bow.
Weaving the Ribbon Through
- Create your desired half-up style (braided, twisted, or simple gathered)
- Cut a length of ribbon long enough to weave through and have tails hanging (or bow ends if you’re wrapping it)
- Weave the ribbon through your braid or gathered section, in and out, creating a visible, intentional pattern
- If you’re wrapping rather than weaving, position the ribbon around the base of your gathered hair and tie it in a bow
- Secure the ribbon ends with bobby pins so they don’t come loose during the day
- Let the ribbon tails flow down with your hair or arrange them as a decorative element
Worth knowing: Pearl-gray, champagne, or pale gold ribbons look particularly elegant against red hair, while white or ivory ribbons provide crisp contrast.
10. Half-Up with Soft Braided Sections and Volume
This style creates two loose braids starting from each side of your head, then combines them at the back center into a gathered half-up style. The result is a braided frame around your face with gathered volume at the back. With red hair, the braids showcase texture and the gathered portion behind them displays color and fullness. It’s detailed enough to feel intentional but loose enough to feel romantic.
Creating Matched Braids
Both braids should be identically loose and romantic-looking to create balance. Start each braid at roughly the same point on each side of your head (above your ear or slightly higher). Braid loosely, incorporating small sections of hair as you go, and don’t worry about the braid being perfectly neat—some texture and irregularity makes it look more beautiful and less severe.
Assembly Process
- Create a loose, romantic braid on the left side of your head starting near your temple
- Create a matching braid on the right side
- Bring both braids toward the center back of your head
- Gather the upper portion of your hair (including the braids) at a central point and secure with bobby pins
- The braids become part of the gathered portion, creating a decorative frame
- Leave the lower half in soft waves that flow freely
- Use hairspray to set everything in place, but not so much that the braids feel stiff
Pro tip: This style is ideal for weddings with a romantic, garden-party, or rustic aesthetic—the braids add a sweet, thoughtful element without being overly formal.
11. Half-Up with Pearl-Beaded Pins Scattered Throughout
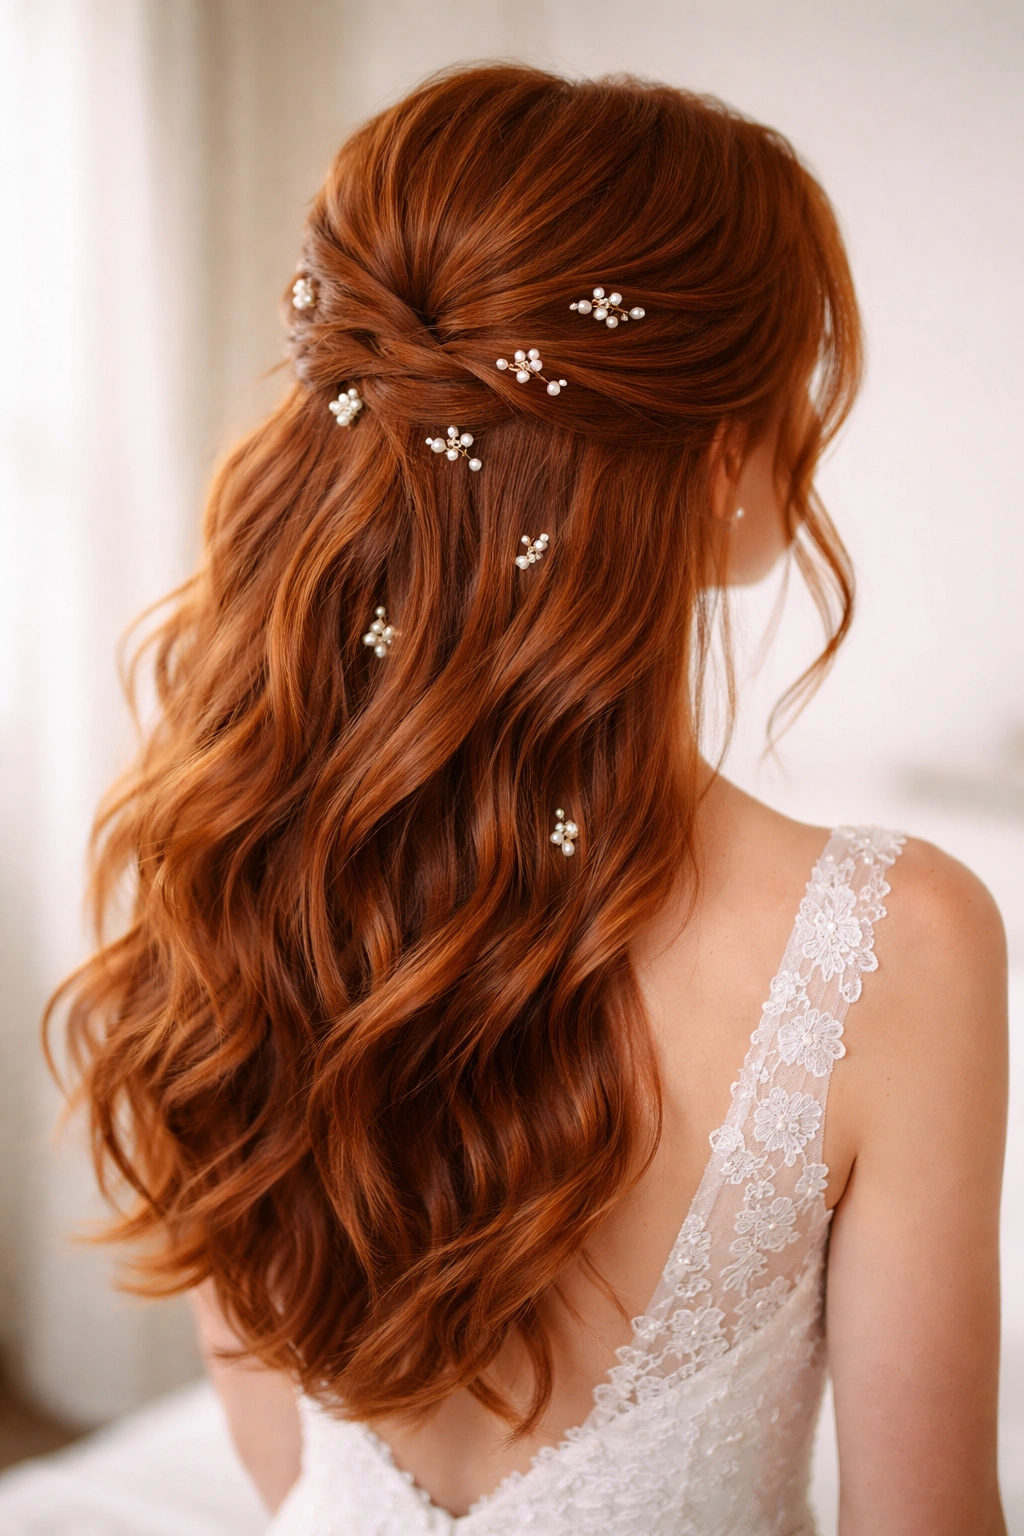
This elegant style creates a half-up by gathering the upper portion simply, then decorates the entire upswept area with delicate pearl-beaded bobby pins scattered throughout. The pins catch the light and create a subtle sparkle without looking costume-y or over-the-top. With red hair, these pearl pins create a beautiful contrast that adds a bridal, jewel-like quality to your updo.
Selecting and Positioning Pins
Pearl-beaded bobby pins are available in various styles—some have multiple pearls, some have a single larger pearl, and some have small clusters. Choose a style that feels cohesive with your overall bridal jewelry and dress details. You’ll typically need 8-12 pins to create enough visual impact without looking overdone.
Creating the Pin-Detailed Updo
- Start with soft waves throughout your hair
- Gather the upper portion of your hair at the back of your head (crown level or slightly lower, depending on your preference)
- Secure the gathered portion with clear bobby pins first, hidden underneath
- Then take your pearl-beaded pins and insert them throughout the gathered section, spacing them for visual balance
- Some pins should be facing forward (so you see the pearls clearly), while others can go backward
- Leave the lower portion of hair in loose, touchable waves
- Step back and look at your reflection—the pins should feel like a design detail, not an afterthought
Insider note: Don’t try to make the pins symmetrical or perfectly placed—a slightly scattered, organic arrangement looks more beautiful and intentional than rigid geometry.
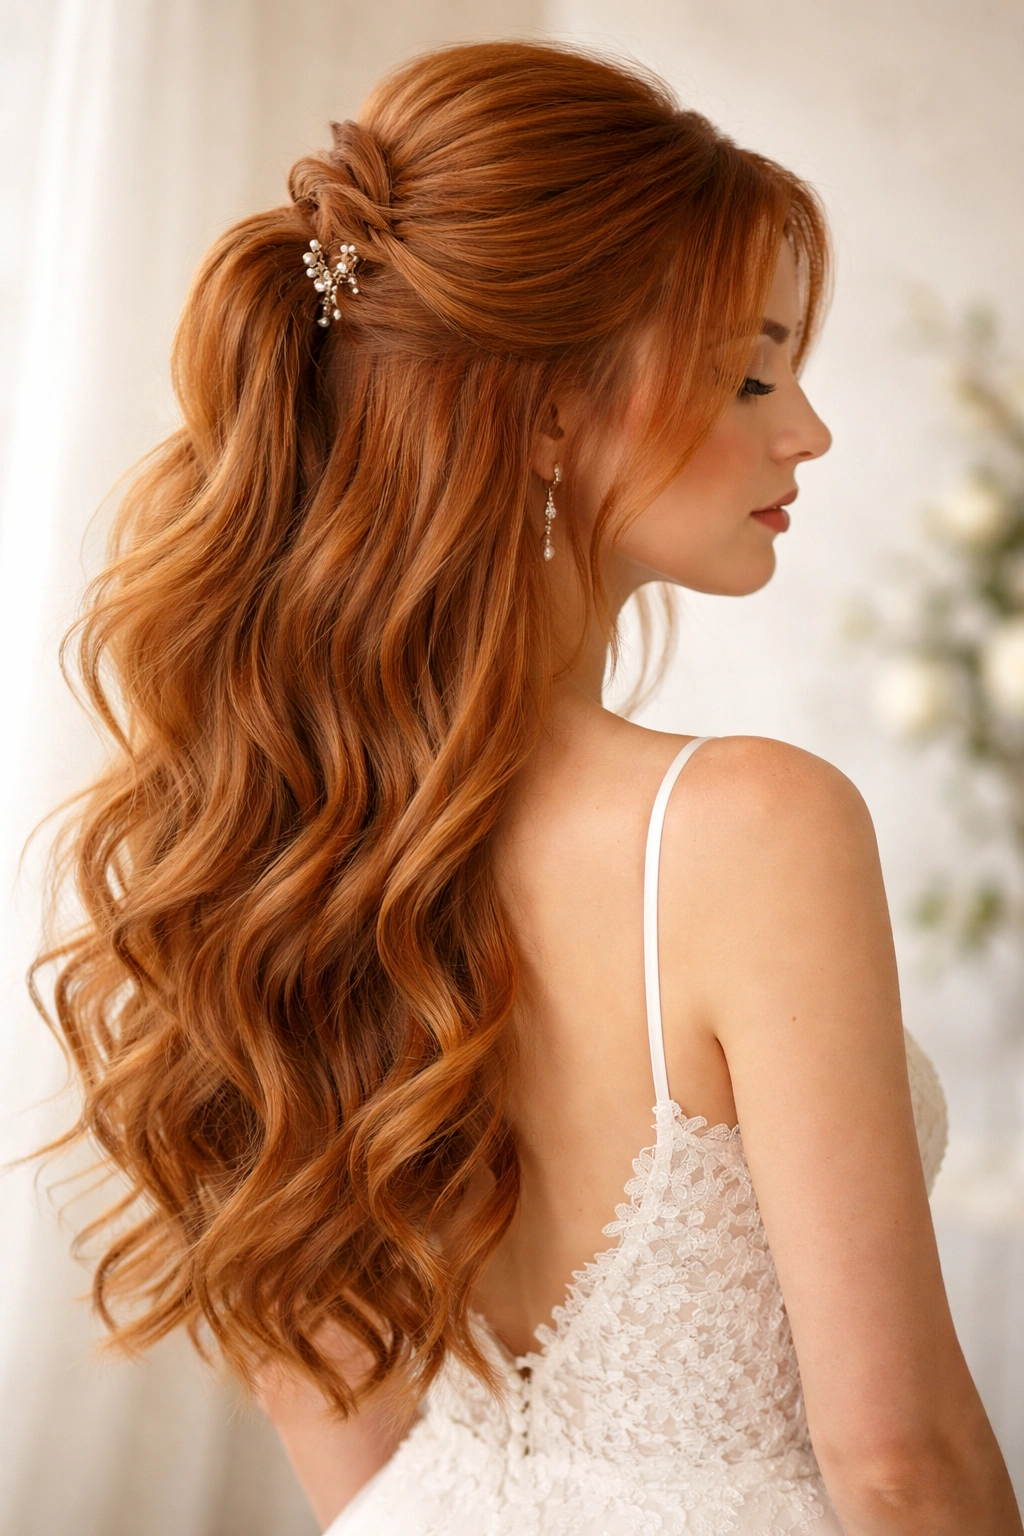
12. High Half-Up with Volume and Subtle Waves
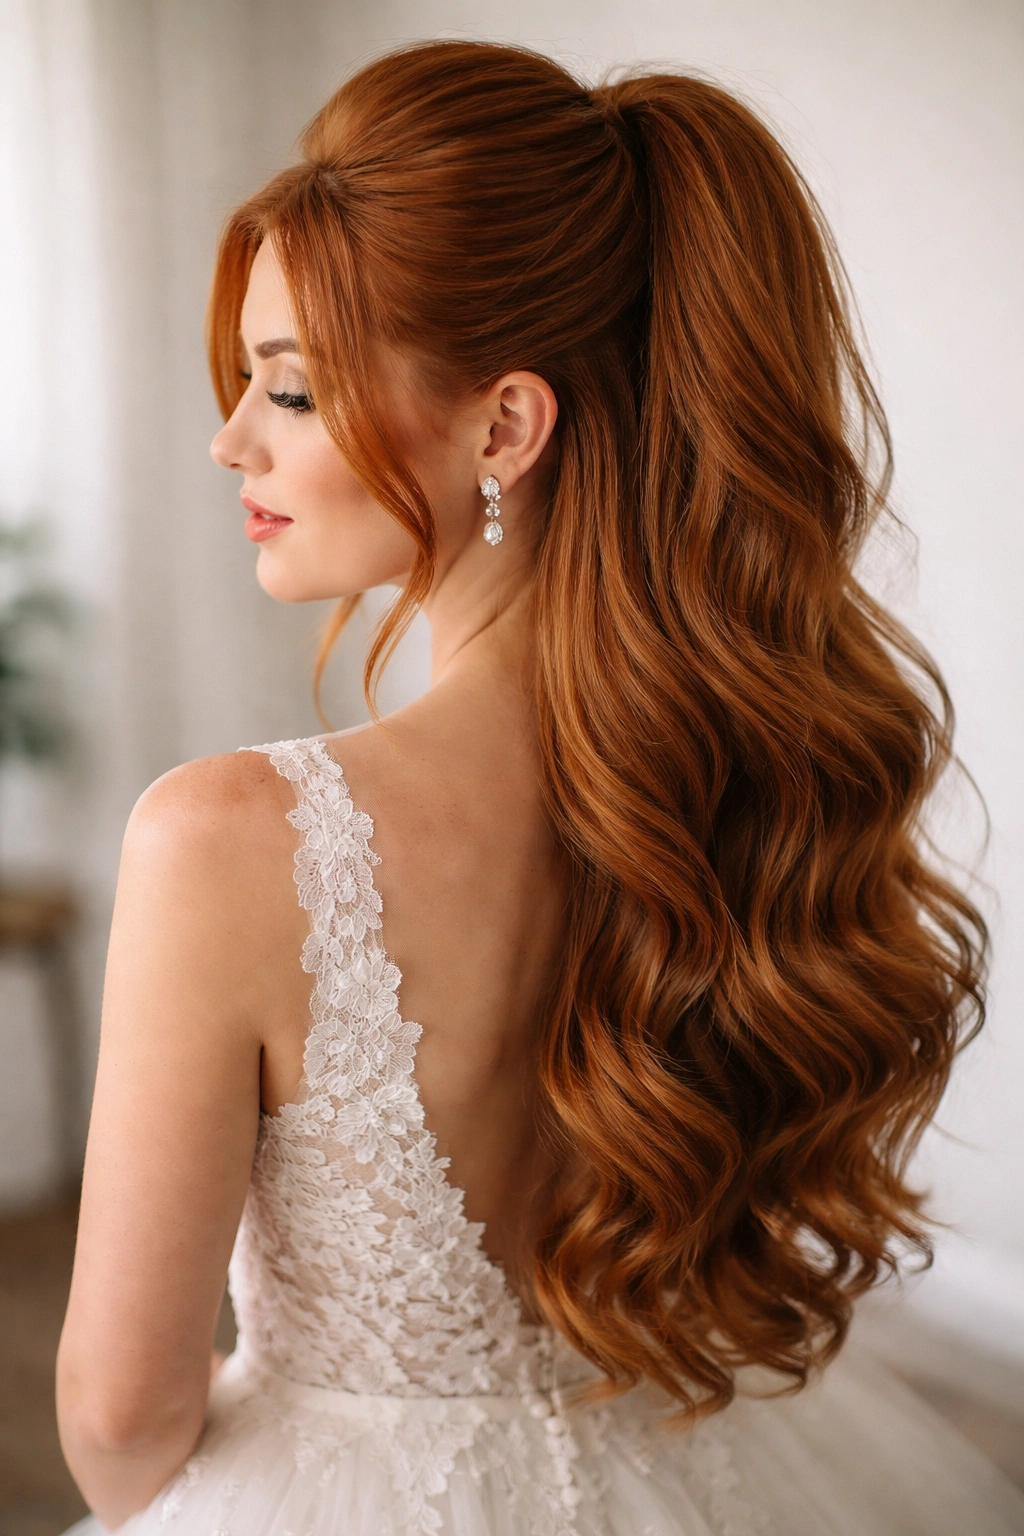
This style pulls the upper portion back at a high point on your crown, creating an elevated, statement-making half-up. The upper section is gathered tightly and smoothly, while the lower portion flows in soft, subtle waves. This look works beautifully if you have a longer face, want to showcase your neckline and shoulders, or prefer a style that feels more structured and polished than loose and romantic. With red hair, the elevated gathering showcases more scalp (in a good way) and allows the length and color to be fully visible.
Achieving the High Gathering
The key to this style is gathering at the right point on your crown and securing it tightly enough that it stays put all day. You’ll typically gather at the highest point where you still have enough hair to work with—usually about 2-3 inches back from your hairline.
Styling Steps
- Create soft waves throughout your hair
- Brush the upper portion of your hair back smoothly
- Gather at the crown point and secure very tightly with an elastic that matches your hair color
- Wrap a thin section of hair around the elastic to hide it
- Pin the wrapped section in place with bobby pins
- Leave the lower portion in soft, subtle waves (don’t overdo the curl—you want elegance rather than drama)
- Use flexible-hold hairspray so everything moves naturally with you
Worth knowing: This style is ideal for showing off a beautiful neckline, shoulders, and dress details because nothing’s competing with those elements.
13. Half-Up with Romantic Side Sweep
This style gathers the upper portion of your hair slightly off-center, creating an asymmetrical, swept-to-one-side effect that feels romantic and slightly editorial. Rather than gathering perfectly at the center back, you gather slightly to the left or right, creating a subtle asymmetry that’s visually interesting. With red hair, this off-center gathering creates movement and shows off your color from unexpected angles.
Creating the Asymmetrical Gather
Start by deciding which side you want the sweep to favor. Take the upper portion of your hair and sweep it slightly toward that side as you gather. The gathered portion should sit closer to one side of your head rather than directly at center back.
Styling the Swept Effect
- Start with soft waves throughout your hair
- Gather the upper portion, sweeping it slightly to one side (your choice of left or right)
- The gathered portion sits closer to that side, creating a visual weight on one side of your head
- Secure with bobby pins that match your hair color
- Leave more hair on the opposite side to create the swept effect
- The lower hair flows in soft waves, with the asymmetry creating movement and visual interest
- Pin the face-framing pieces behind your ears to keep them neat
Pro tip: If you have a face shape that’s wider on one side or want to draw attention to one side of your face, choose your sweep direction accordingly.
14. Half-Up with Delicate Chain or Hair Jewelry

This modern, sophisticated style gathers the upper portion of hair simply, then decorates it with delicate chain jewelry, hair jewelry, or even a fine chain necklace positioned as a hair accessory. The chain creates a linear detail that’s contemporary and unexpected, making this style work beautifully for modern, non-traditional, or minimalist bridal aesthetics. With red hair, precious metal chains (gold, rose gold, or silver) create stunning contrast and add a touch of unconventional elegance.
Selecting Hair-Appropriate Jewelry
Make sure any jewelry you use is actually designed for use in hair or is lightweight enough that it won’t pull or create discomfort. Delicate chains, beaded strands, or dedicated hair jewelry pieces all work well. The piece should be long enough to drape or wrap around your gathered section without being so long it looks accidental.
Positioning the Jewelry
- Gather your upper hair at your preferred height (crown, slightly lower, or wherever feels right for your face)
- Secure the gathered portion with bobby pins
- Position your chain or hair jewelry around or through the gathered section
- You can wrap it around the base of your gathered hair, thread it through the gathered section, or let it drape and anchor it with bobby pins
- Make sure the jewelry sits securely so it won’t shift throughout the day
- Leave the lower hair in soft waves that showcase your red hair’s length and color
Insider note: This styling choice works especially well if you’re wearing modern, geometric, or unconventional bridal jewelry or a dress with contemporary details.
15. Half-Up with Twisted Sections and Fresh Flowers

This romantic, garden-party style creates twisted sections from both sides of your head, brings them to the center back where they meet and are secured, and then tucks fresh flowers (like spray roses, baby’s breath, astilbe, or eucalyptus) into and around the twisted sections. The result is a soft, romantic, nature-inspired half-up that feels effortless while being intentional and bridal. With red hair, the fresh flowers provide stunning contrast while the twists add texture and showcase your color’s dimension.
Selecting Your Flowers
Work with your florist to choose flowers that will actually stay fresh through your entire wedding day. Delicate flowers like baby’s breath or astilbe are beautiful but may wilt. Sturdier options like spray roses, hypericum berries, or eucalyptus hold up better while still being romantic. Consider color—white and cream flowers provide contrast; blush and peach tones create a softer, warmer palette.
Creating the Twisted Flower Style
- Start with your hair in soft waves or curls
- Create a loose twist on the left side of your head, starting near your temple
- Create a matching twist on the right side
- Bring both twists to the center back of your head where they meet
- Secure with bobby pins that match your hair color
- Tuck fresh flowers into the twisted sections and around the pinned area, using bobby pins to secure them
- Have your florist or hair stylist attach the flowers as close to start time as possible so they stay fresh
- Leave the lower portion of your hair in soft waves
- Use hairspray with flexible hold so everything moves naturally
Worth knowing: Have backup flowers on hand in case any wilts during the day, and plan to have someone (your stylist, mother, or bridesmaid) do a quick flower check a couple hours into your reception.
Final Thoughts
Every one of these half-up half-down styles offers something unique, whether you’re drawn to romantic braids, modern accessories, or the timeless elegance of twisted sections and soft waves. The beauty of working with red hair is that your color does so much of the work for you—it’s naturally luminous, dimensional, and eye-catching. The right half-up half-down style amplifies these qualities while keeping your face framed and your features visible.
Your hair choice on your wedding day should make you feel like the most beautiful version of yourself. That means selecting a style that feels authentic to who you are, suits your face shape and features, and coordinates beautifully with your dress, veil, and overall vision. Don’t feel pressured to choose the most intricate style if you love simplicity, and don’t shy away from something more detailed if that’s genuinely your aesthetic. The confidence you feel wearing your chosen style is what will make it truly beautiful.
Schedule a trial run with your stylist well before your wedding day so you can see exactly how the style looks, lasts, and photographs. Bring pictures of all your favorite half-up half-down options and be honest about what adjustments might make the style feel more like you. Red hair is a gift on a wedding day—it’s the jewelry itself, the focal point, the thing people remember. Choose a half-up half-down style that honors that gift and lets your red hair shine.