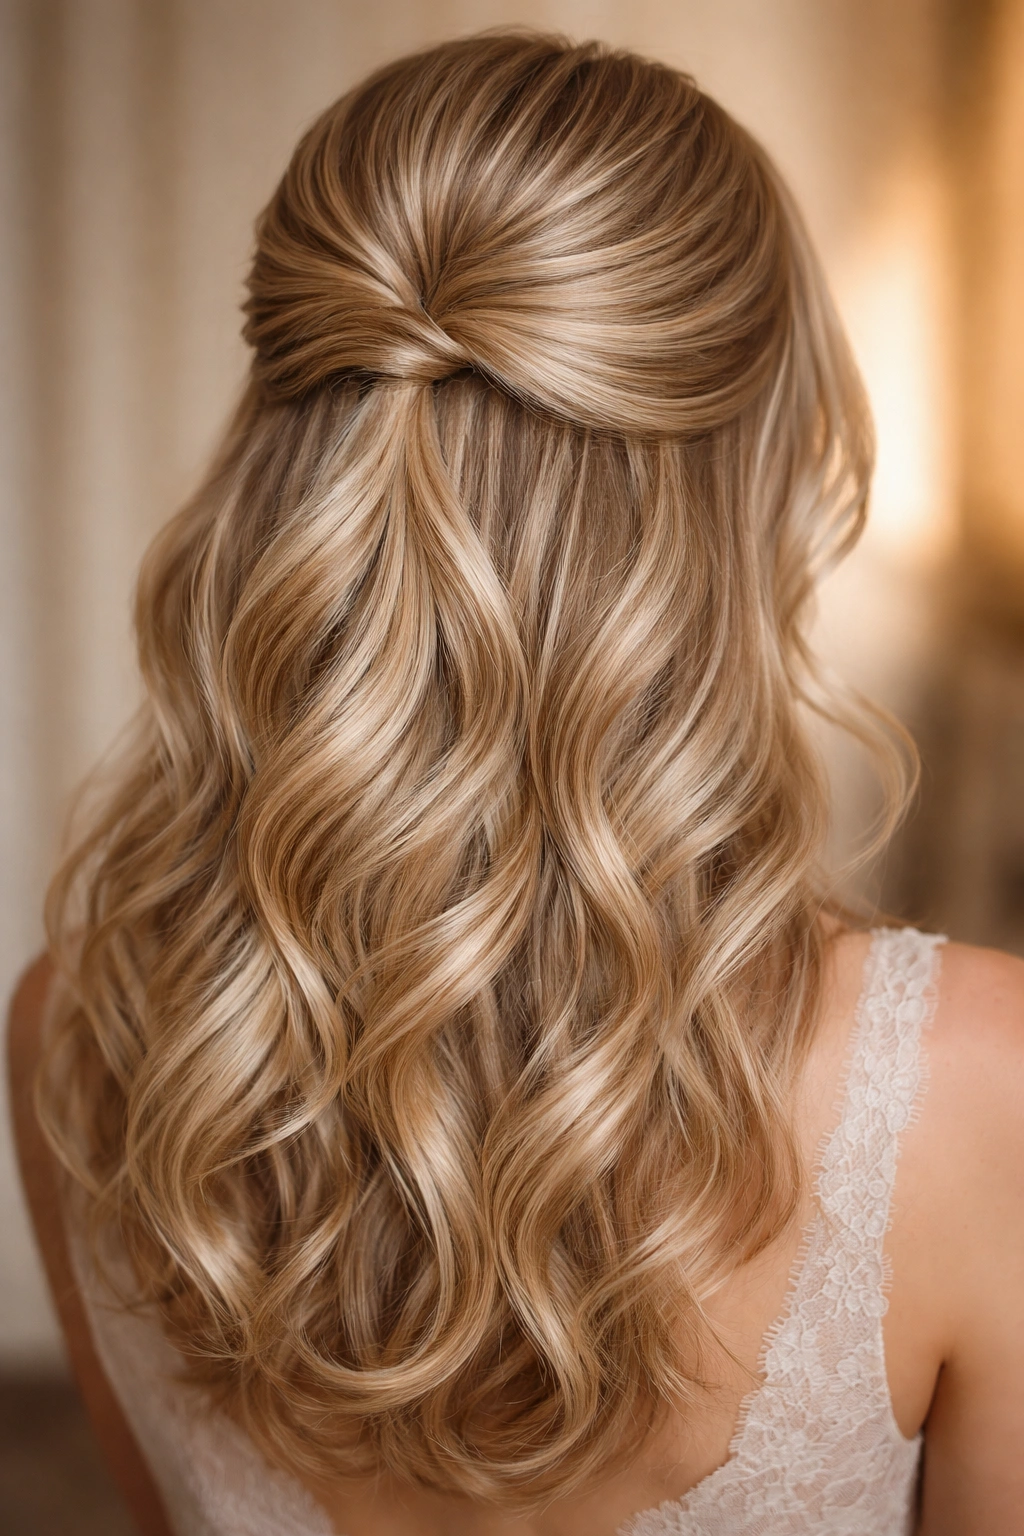
Half up half down hairstyles have become the go-to choice for prom because they strike that perfect balance between elegance and relaxed romance. But if you’ve got fine hair, you know that thin strands come with their own unique challenges—volume tends to fall flat, pins slip out, and even carefully curled hair can look limp by the end of the night. The good news? Half up half down styles are actually ideal for fine hair because they work with your natural texture instead of against it, distributing weight strategically to create the illusion of fullness while keeping the overall look light and wearable.
The key to making any half up half down style work beautifully on fine hair is using the right techniques and products to create texture, anchor your pins securely, and add dimension without bulk. Backcombing, texturizing products, and strategic use of smaller sections all help you build the volume your look needs without weighing everything down. When you combine these techniques with the right style choice, you’ll walk into prom with hair that looks thick, polished, and absolutely camera-ready.
Here’s what makes these 15 styles different from generic half up half down tutorials you’ll find online—each one is specifically designed with fine hair in mind, built with techniques that grip smaller strands, hold curls longer, and create believable dimension. You’ll find styles ranging from soft, romantic waves to intricate braids, bouffant crowns to vintage-inspired updos, all adapted for hair that needs a little extra help creating the impact you want.
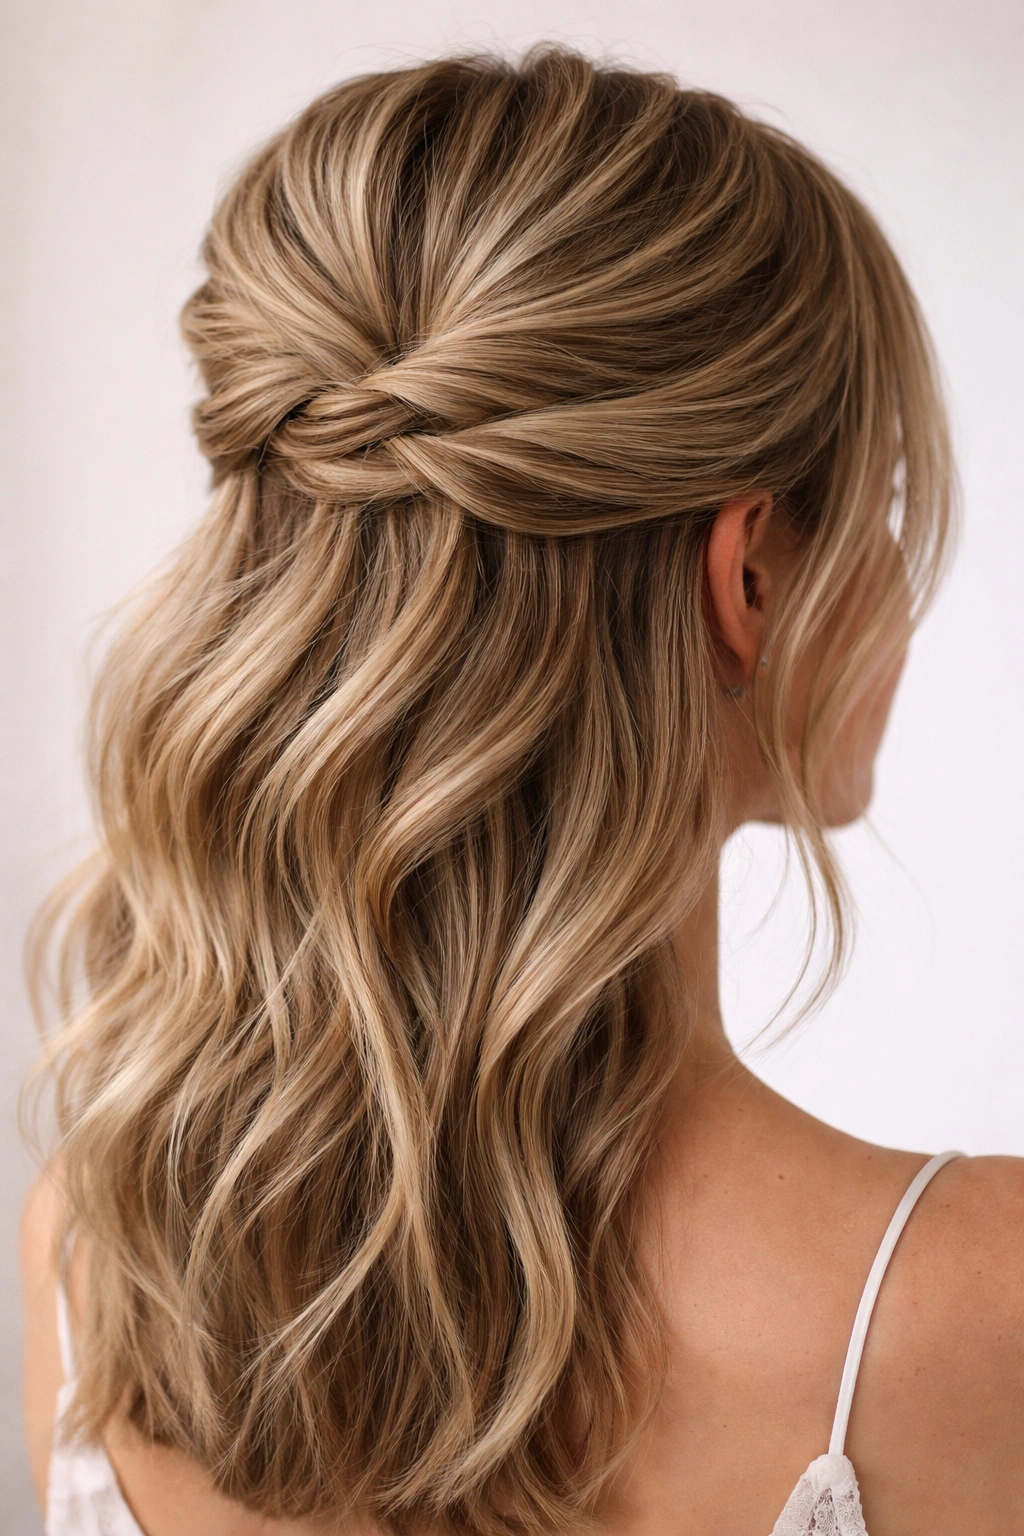
1. The Twisted Crown Elegance
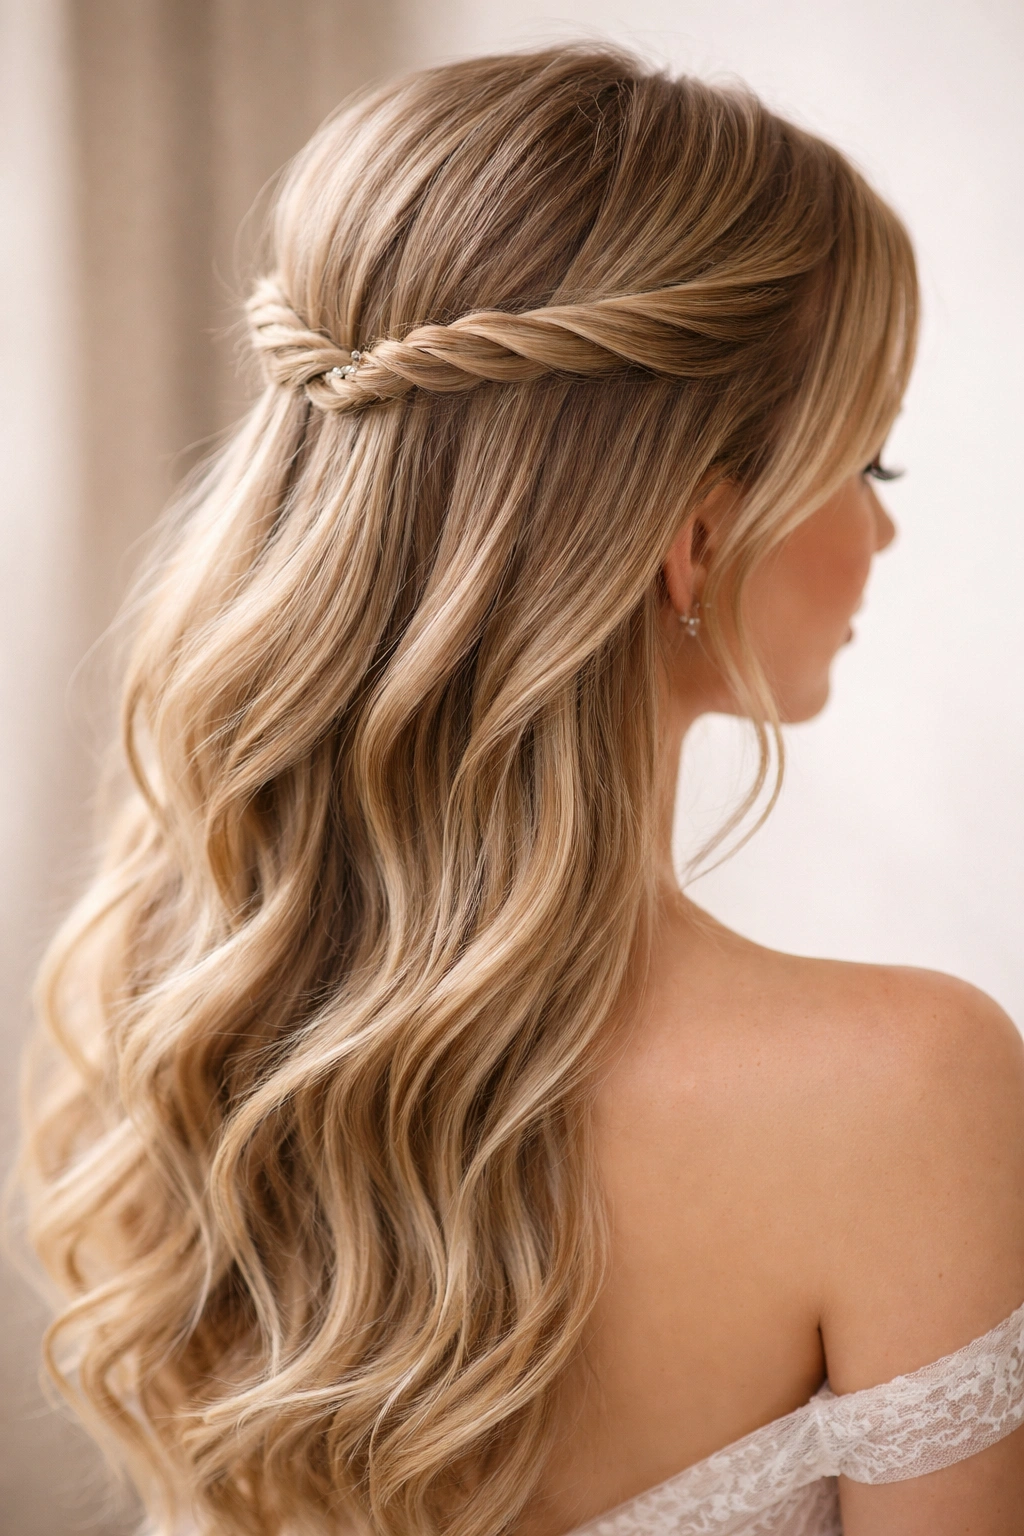
This style uses two twisted sections wound around the crown of your head before pinning, creating a sophisticated, almost Grecian-inspired look that feels formal but still soft. Twists are actually better for fine hair than tighter braids because they don’t pull as severely and create more visible texture and dimension with less density. The beauty of this style is that it works at any curl level—straight, wavy, or curly hair all look equally polished because the visual interest comes from the twist itself, not from dense ringlets.
Why This Works Beautifully for Fine Hair
Twists distribute your hair evenly across the top of your head rather than concentrating it all in one section, which means the overall look stays light and elegant. The twisted sections also grip better than smooth, straight sections would, which means your half up stays secure throughout dancing and movement. Because twists naturally create the illusion of texture, you don’t need to backcomb aggressively—just some gentle finger-teasing at the base creates enough grip for pins to hold.
How to Build the Look
- Start with damp hair and apply a lightweight texturizing spray to the roots for grip
- Create a deep side part for a more romantic vibe
- Take a 2-inch wide section from one temple and twist it loosely, keeping it slightly loose rather than tight (loose twists look fuller and more romantic on fine hair)
- Pin the first twist at the back of the crown, using 2-3 bobby pins in a crisscross pattern for security
- Repeat on the other side, twisting in the same direction so both sections spiral the same way
- Use the remaining half-down hair to disguise where the pins meet the twisted sections—pin your curled pieces strategically to cover any visible clips
Pro tip: Fine hair twists stay put best when you use small, thin bobby pins (not thick ones) that actually grip individual strands, and when you pin through the twist itself rather than just at the base.
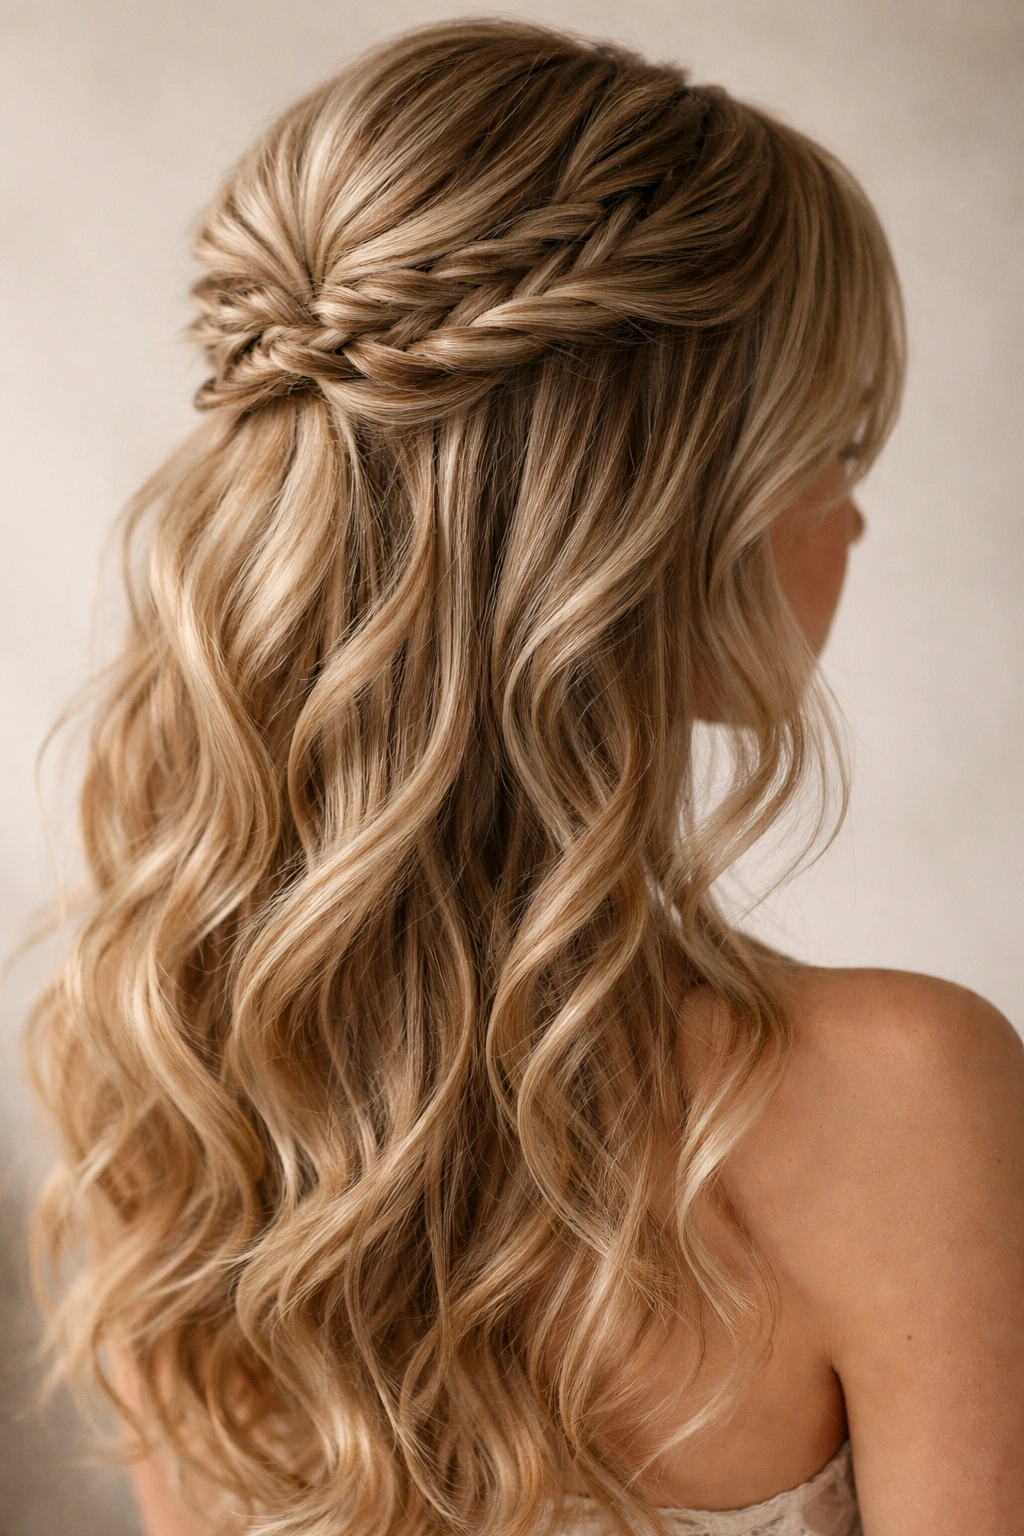
2. The Braided Halo with Layers
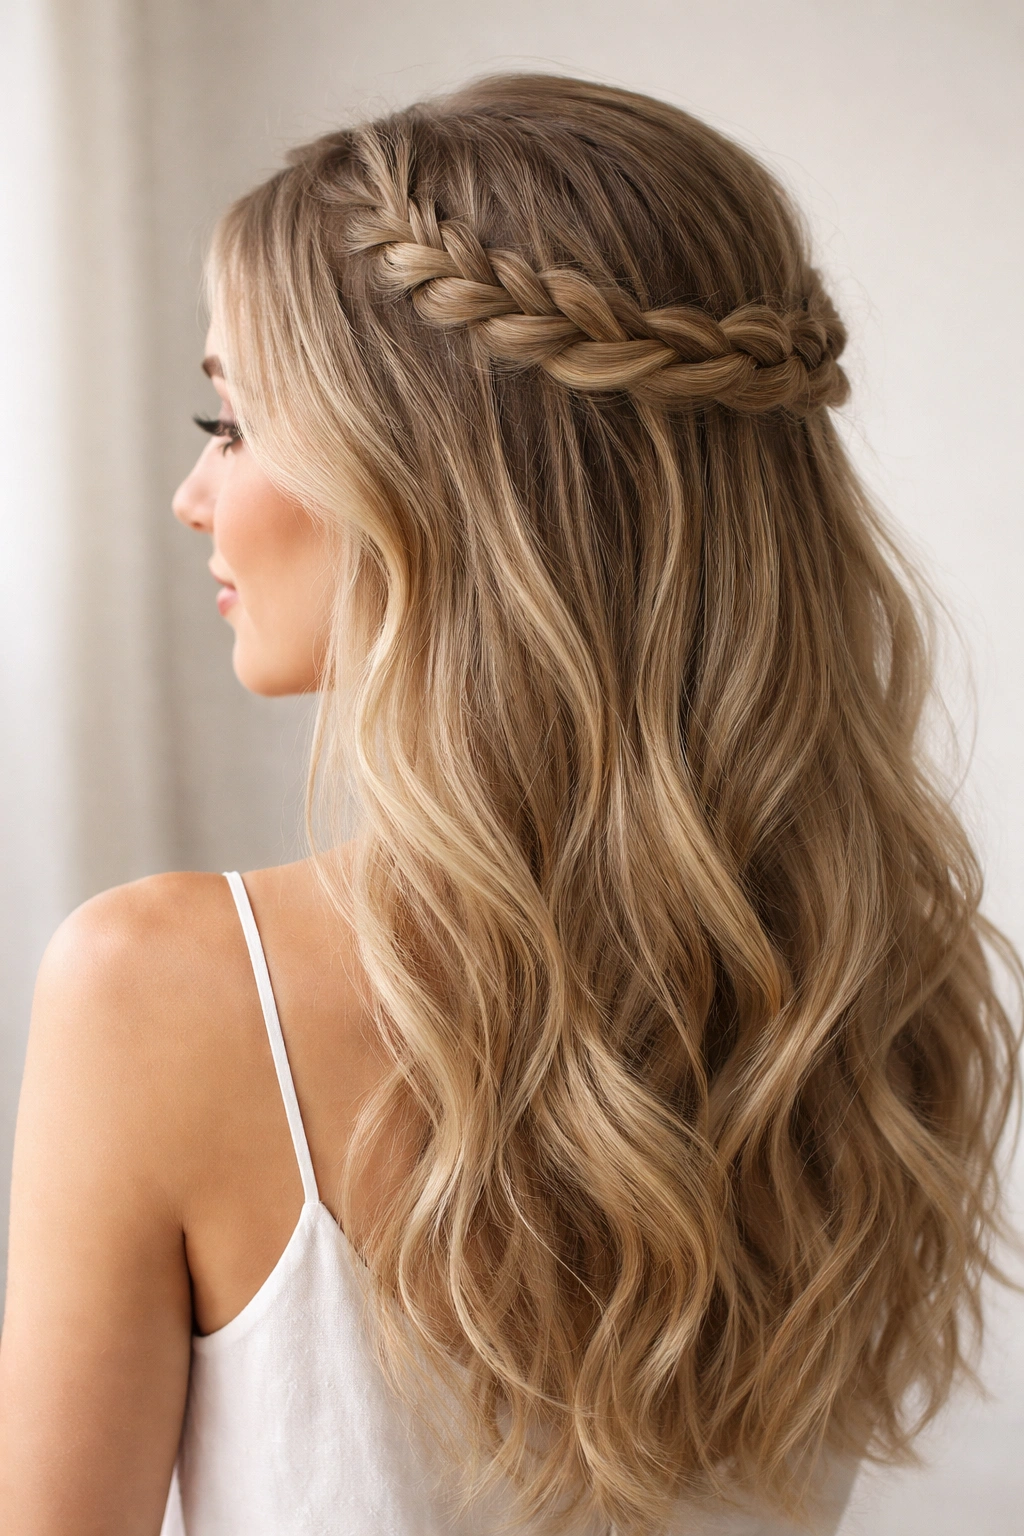
A braided halo works exceptionally well for fine hair because braiding creates the illusion of density—thin strands twisted together look thicker and fuller than they would loose. This style frames your face beautifully with a soft halo braid that sits close to the head, while the rest of your hair stays down and loose, keeping the overall look from feeling heavy. The halo effect is inherently romantic for prom, and the braid itself becomes a decorative element rather than just a functional anchor.
How to Create Maximum Volume with a Thin Braid
The secret is using only 3-4 inches of hair for your braid rather than grabbing a huge section—this creates a delicate, intricate-looking braid that feels ethereal rather than chunky. A thinner braid also sits more naturally against the head when pinned, and it’s easier to tease and fluff to create fuller-looking dimensions. Start your braid from one side temple, braid loosely (never tight), and end it at the other side temple, pinning as you go.
Building the Halo Effect
- Apply lightweight mousse to damp roots and blow-dry upside down for lift at the crown
- Create a soft wave throughout the bottom half using a 1.25-inch curling iron
- Take a thin, 2-inch section from your left temple and begin your braid
- Use a barely-there tension—too-tight braids look thin and harsh on fine hair
- Gently tease between each braid section as you go, using a fine-tooth comb to fluff the braid slightly wider
- Pin the braid at your right temple, using bobby pins that match your hair color
- Curl the half-down hair in large waves and gently separate curls with fingers for a soft, full look
Worth knowing: Layering your hair (even just subtle long layers) works wonders for this style because it allows the half-down section to flow more gracefully and creates the illusion of more movement and volume.
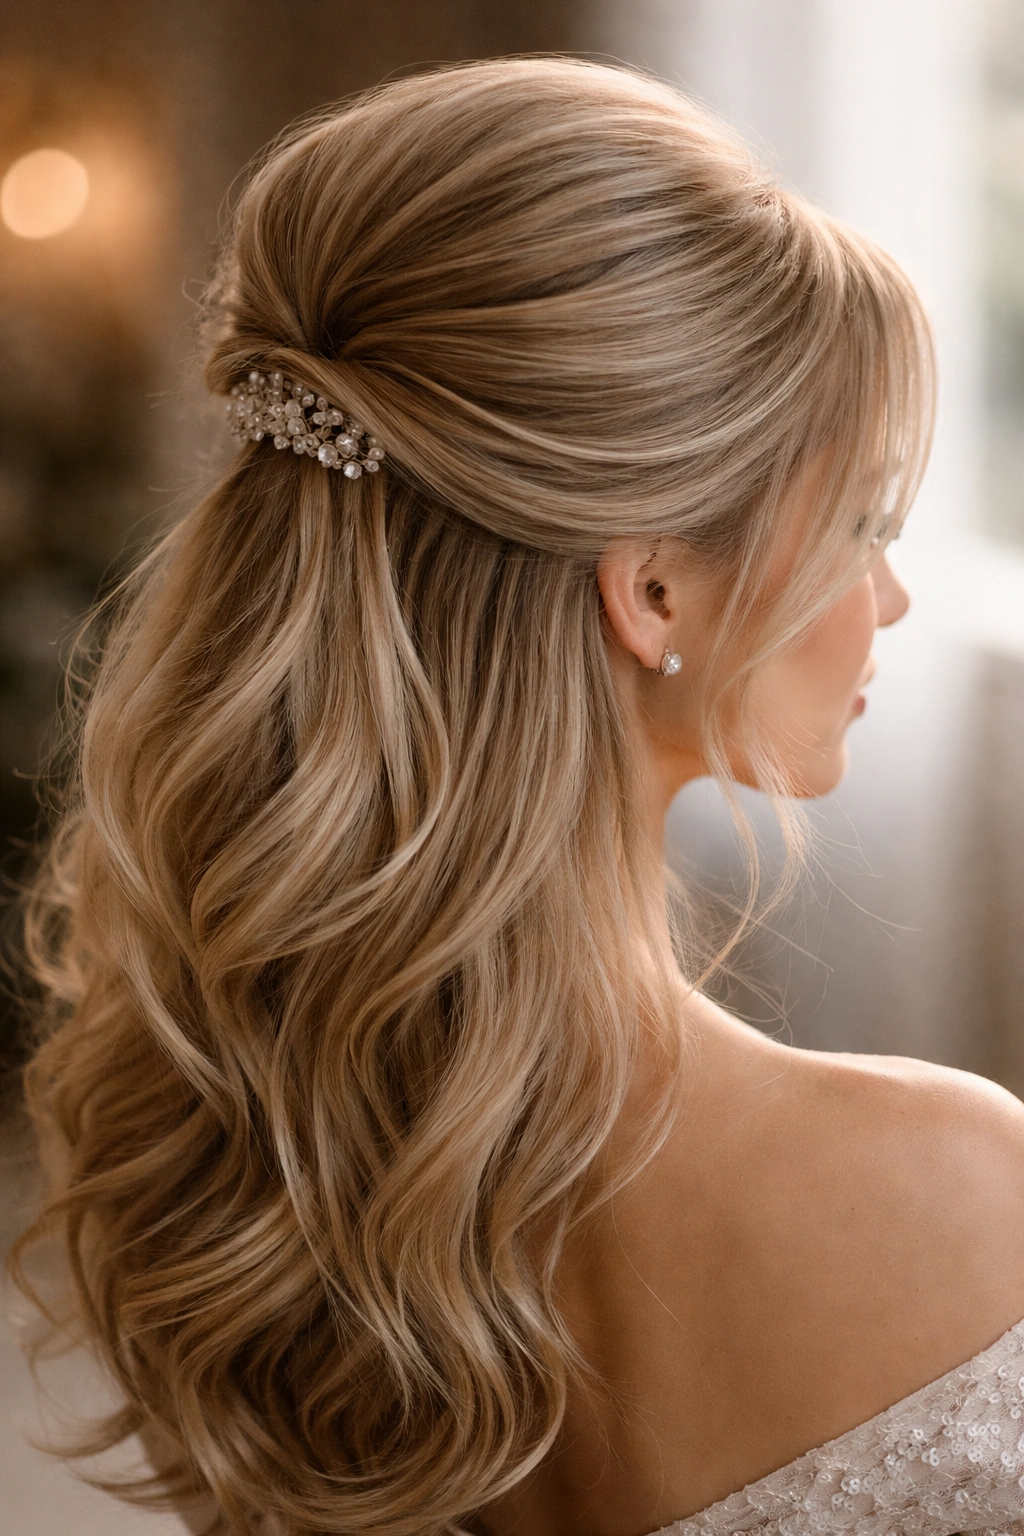
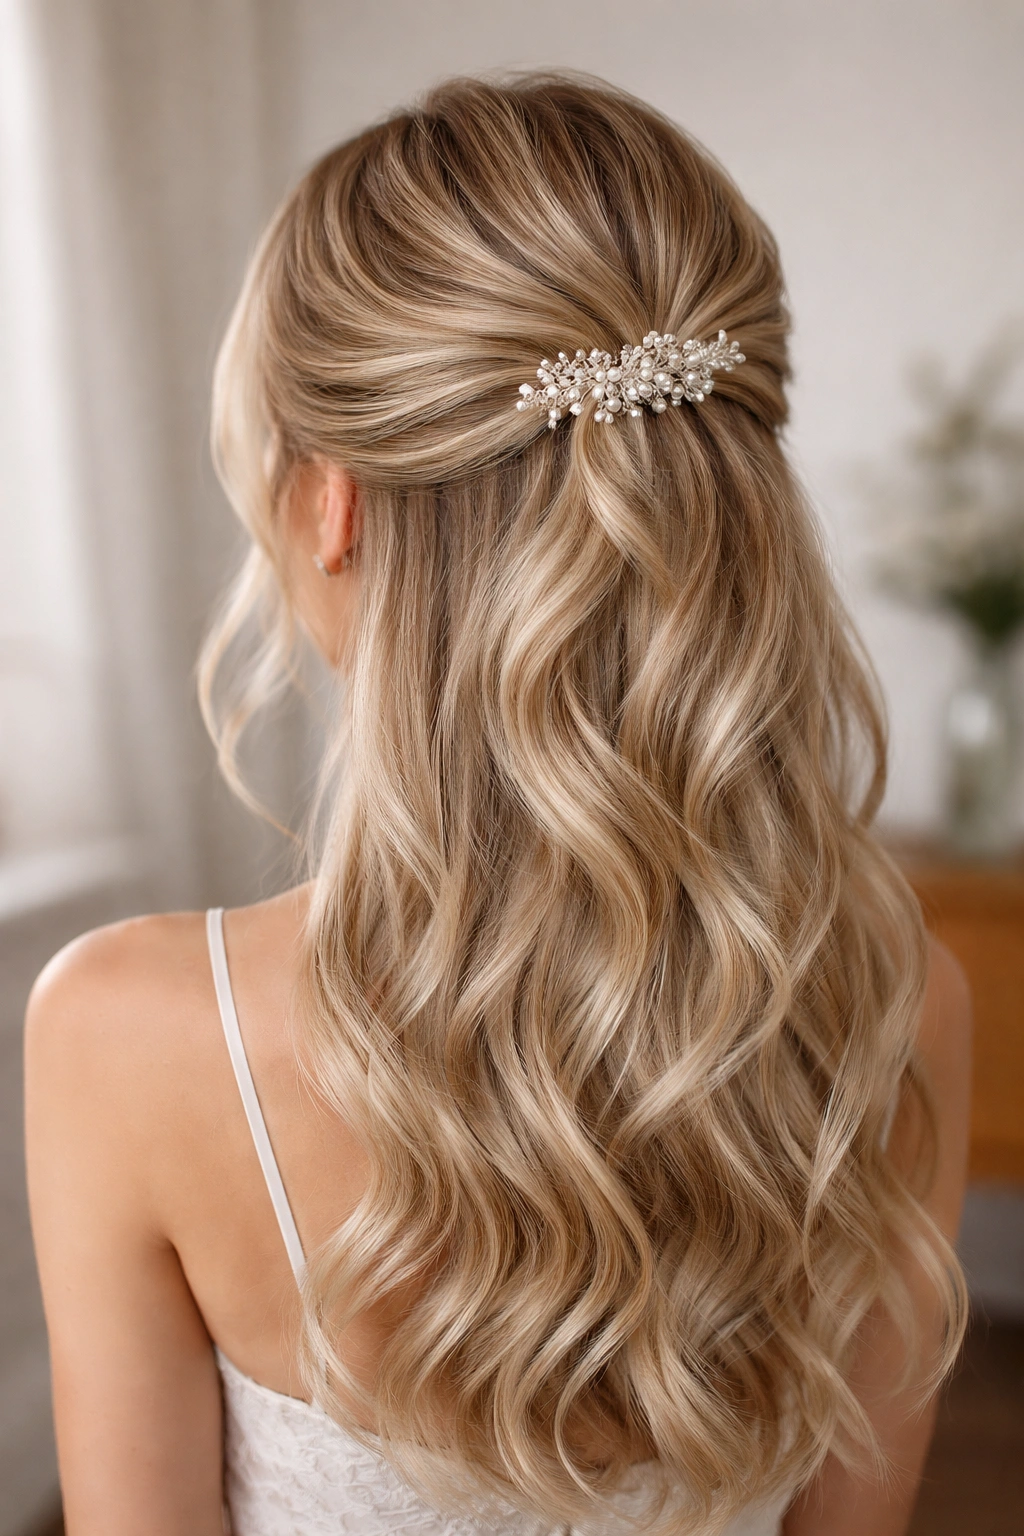
3. The Voluminous Pearl-Pinned Half Up
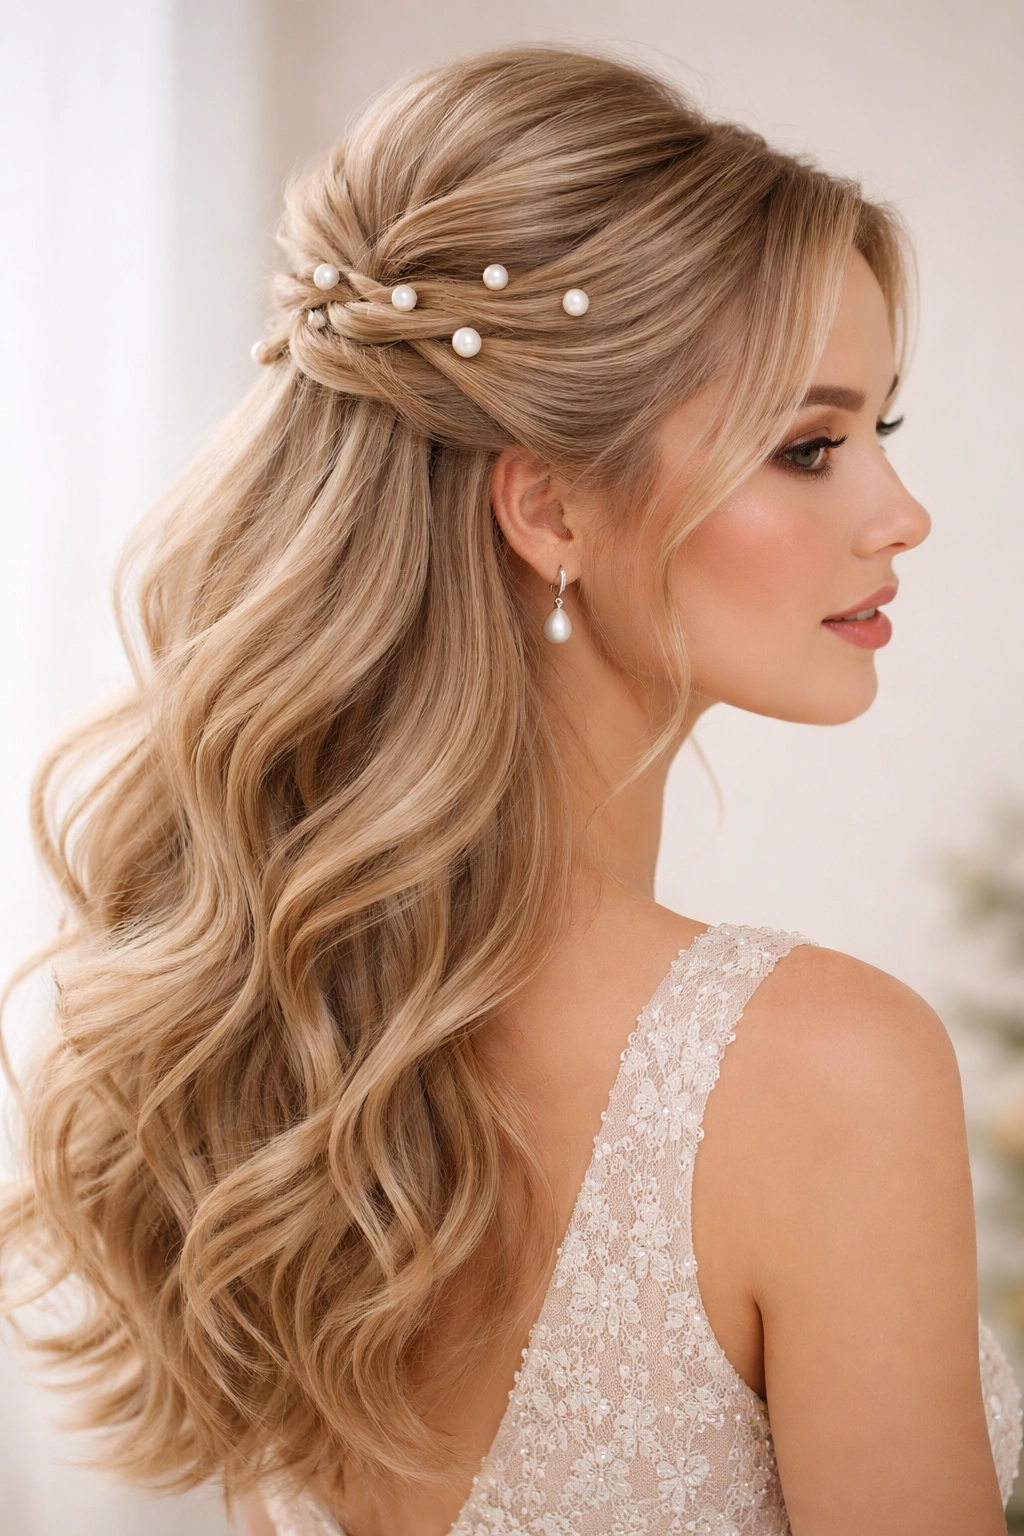
Decorative elements like pearls aren’t just beautiful—they serve a practical purpose on fine hair. Pearl hairpins and delicate clips give you multiple anchor points, distributing the weight of the half up across several small pins rather than relying on one or two heavy clips. This style pairs a full, teased half-up section with pearl accents that cascade down through the pinned section, creating a romantic, wedding-adjacent vibe that feels special for prom without being over the top.
Why Pearl Accents Matter on Fine Hair
Pearl pins are lighter than traditional metal clips and their smaller size means they grip better into thin strands. They also serve a visual purpose—the pearls draw the eye upward and make the half-up section look intentionally styled rather than just pinned back. The weight is distributed across 5-7 small pins instead of 2 large ones, which keeps your hair from sliding out throughout the night.
Creating the Voluminous Section
- Blow-dry with your head tilted back to create natural crown volume
- Use a lightweight volumizing spray at the roots while hair is still damp
- Take the half-up section and gently backcomb from roots to mid-shaft, being careful to use gentle strokes (not aggressive ones) that won’t damage fine strands
- Smooth the top layer of the teased section with a fine comb so it looks polished, not messy
- Insert 2-3 pearl pins horizontally through the teased section to anchor it
- Allow the rest of your hair to flow down in soft curls, with a few face-framing pieces left loose
- Add 2-3 additional small pearl pins throughout the half-up section for both security and visual interest
Pro tip: Use pearl hairpins that come in sets of multiple small pins rather than one large barrette—the small pins grip SO much better in fine hair and you’ll actually keep your style intact through dinner and dancing.
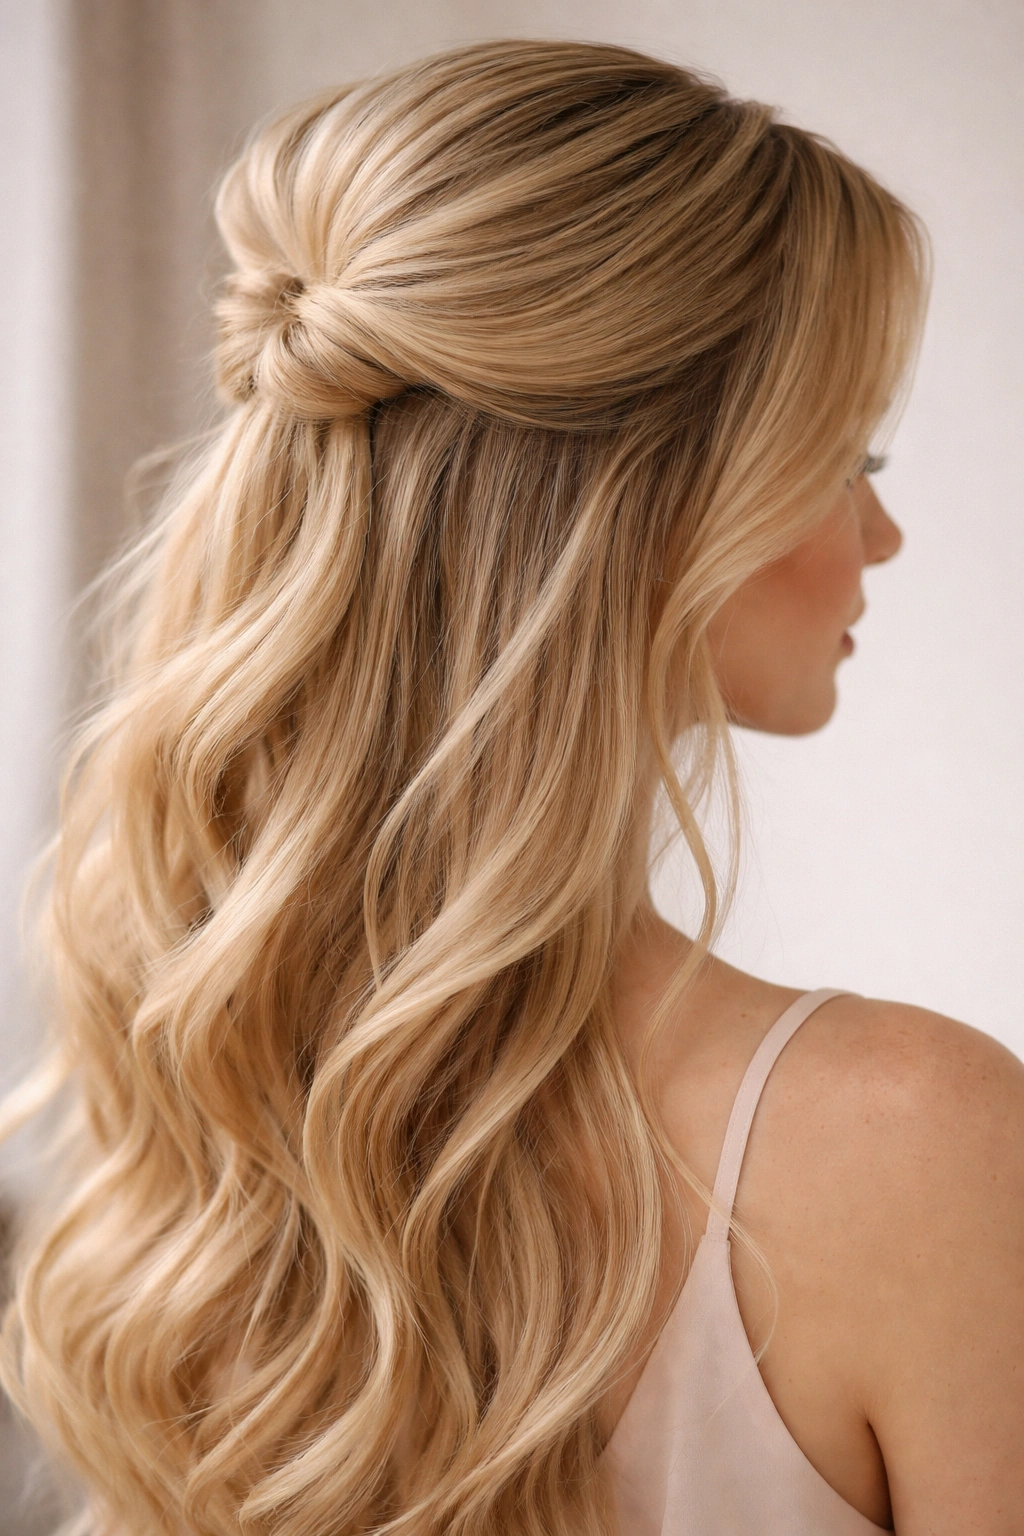
4. The Cascading Curls Half Down
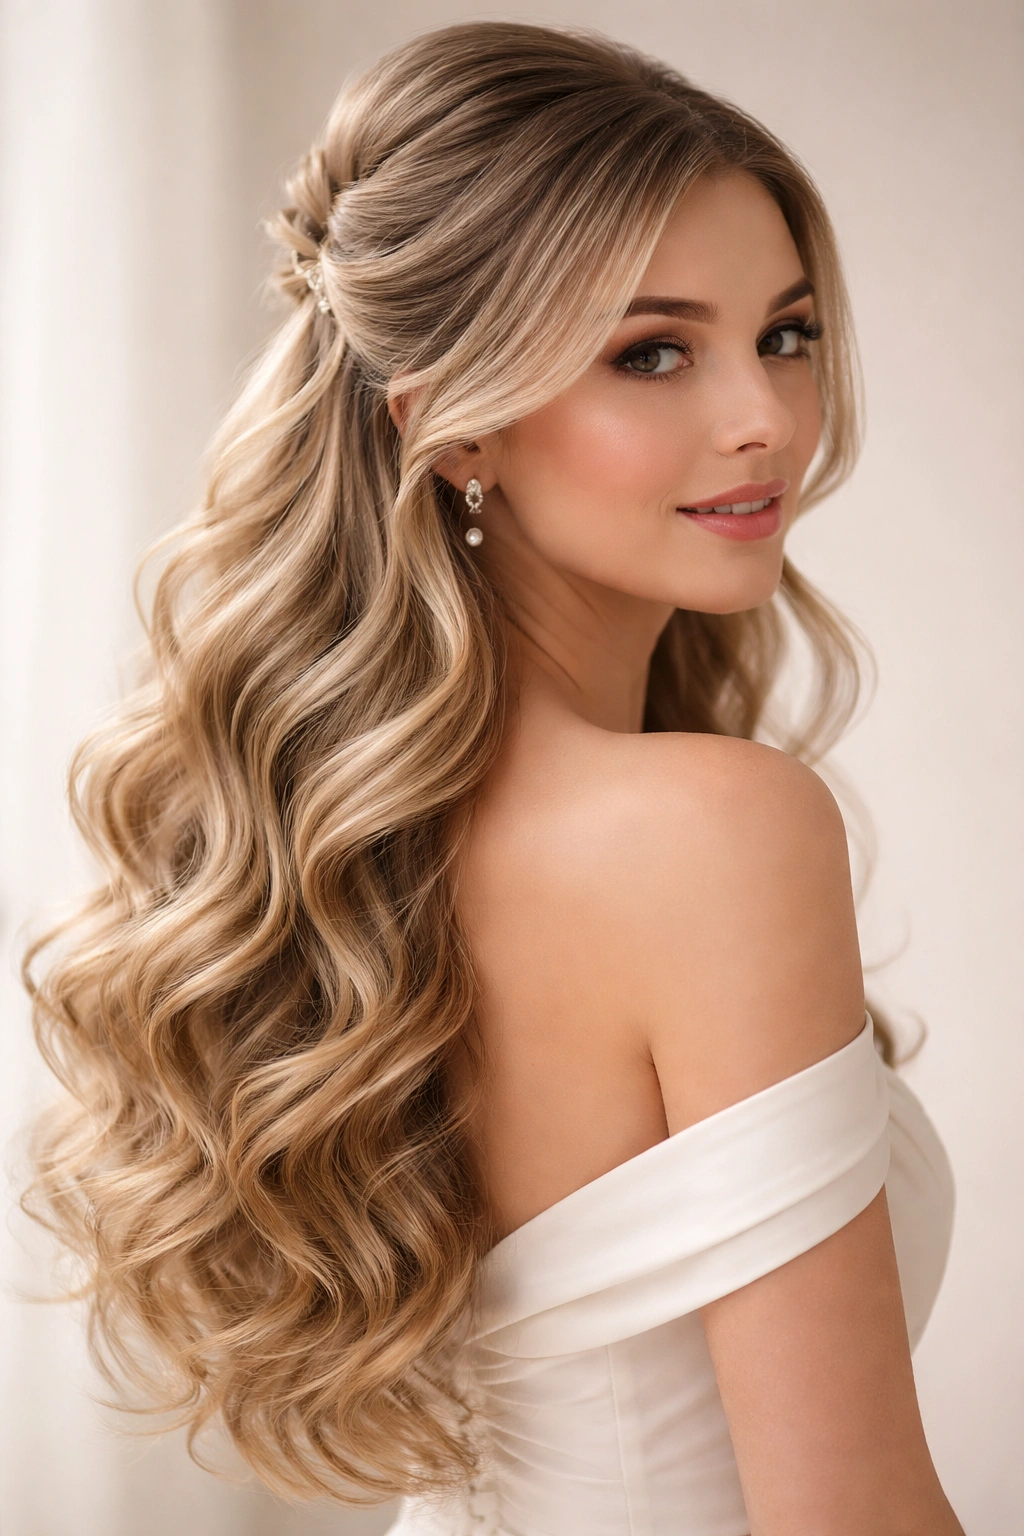
This is the style that looks deceptively simple but actually requires the most technique on fine hair. Large, bouncy curls that cascade from a secured half-up section create the illusion of incredibly full, thick hair because each curl takes up more visual space. The key is using the right tools and techniques to build curls that actually hold on fine hair rather than drooping by the time you’re halfway through prom.
The Curl-Holding Formula for Fine Hair
Fine hair curls often fall out because the waves don’t have enough weight and texture to maintain their shape. Combat this by using a curling iron with a slightly smaller barrel (1-1.25 inches rather than 1.5 inches), wrapping smaller sections of hair around the barrel, and using a medium to medium-high heat setting. The smaller sections curl tighter and hold longer, and the medium heat prevents damage that can make fine hair look even thinner and more fragile.
Step-by-Step Curl and Pin Process
- Apply heat-protectant mousse to damp hair and blow-dry with product throughout
- Create a clean half-up section, pinning it with 3-4 bobby pins in a crisscross pattern for security
- Working in 1-inch sections, curl the bottom half away from the face using a 1.25-inch barrel curling iron
- Hold each curl in the barrel for a full 15 seconds, then gently release and let cool before moving to the next section
- Once all curls are created, allow them to cool completely (at least 5 minutes) before touching them
- Spritz with flexible-hold hairspray before gently running your fingers through to separate curls into waves
- Use a comb to tease underneath the curls slightly to add texture and help them hold their shape
Insider note: The cooling time is non-negotiable for fine hair—curls that are released while still warm will fall out within hours, but cooled curls have much better longevity.
5. The Textured Undercut Half Up
An undercut half-up is a subtle, modern take on the style that works exceptionally well for fine hair because it strategically uses shorter layers underneath to create dimension and fullness. The longer layers stay down in the half-down section, while shorter layers underneath get pinned up, creating a clever visual trick that makes hair look thicker overall. This style has a slight edge to it—still very much prom-appropriate, but with a contemporary feel that stands out from the typical soft-and-romantic options.
How Undercuts Create Fullness on Fine Hair
By pinning shorter layers that sit underneath longer ones, you’re essentially creating hidden volume that pushes the longer layers outward. This is especially effective on fine hair because it’s a visual trick—you’re not actually adding hair density, but you’re using shorter pieces to create lift and dimension for the longer pieces. It’s also practical because shorter layers are easier to control and pin securely.
Building the Modern Undercut Half Up
- This style requires some layers in your hair—if you’re completely blunt, ask your stylist for subtle shorter layers underneath before prom
- Blow-dry with texture, using a texturizing spray on damp roots for grip
- Create a smooth, slightly off-center half-up section with the longer layers
- Tease the shorter layers underneath slightly before pinning, creating a subtle cushion
- Pin the half-up section with 3-4 bobby pins, focusing on pinning through the shorter layers underneath for the most secure hold
- Allow the longer layers to flow down and cover the pins, creating a seamless look
- Use a texture spray in the half-down section and gently tousle with fingers for a deliberately undone, effortlessly cool vibe
- Keep the half-down section relatively straight or in soft waves—the texture comes from the undercut and the styling product, not heavy curls
Worth knowing: This style photos beautifully from the back, so it’s ideal if you’ll be taking those Instagram photos with your friends after the dance.
6. The Romantic Rose-Adorned Style
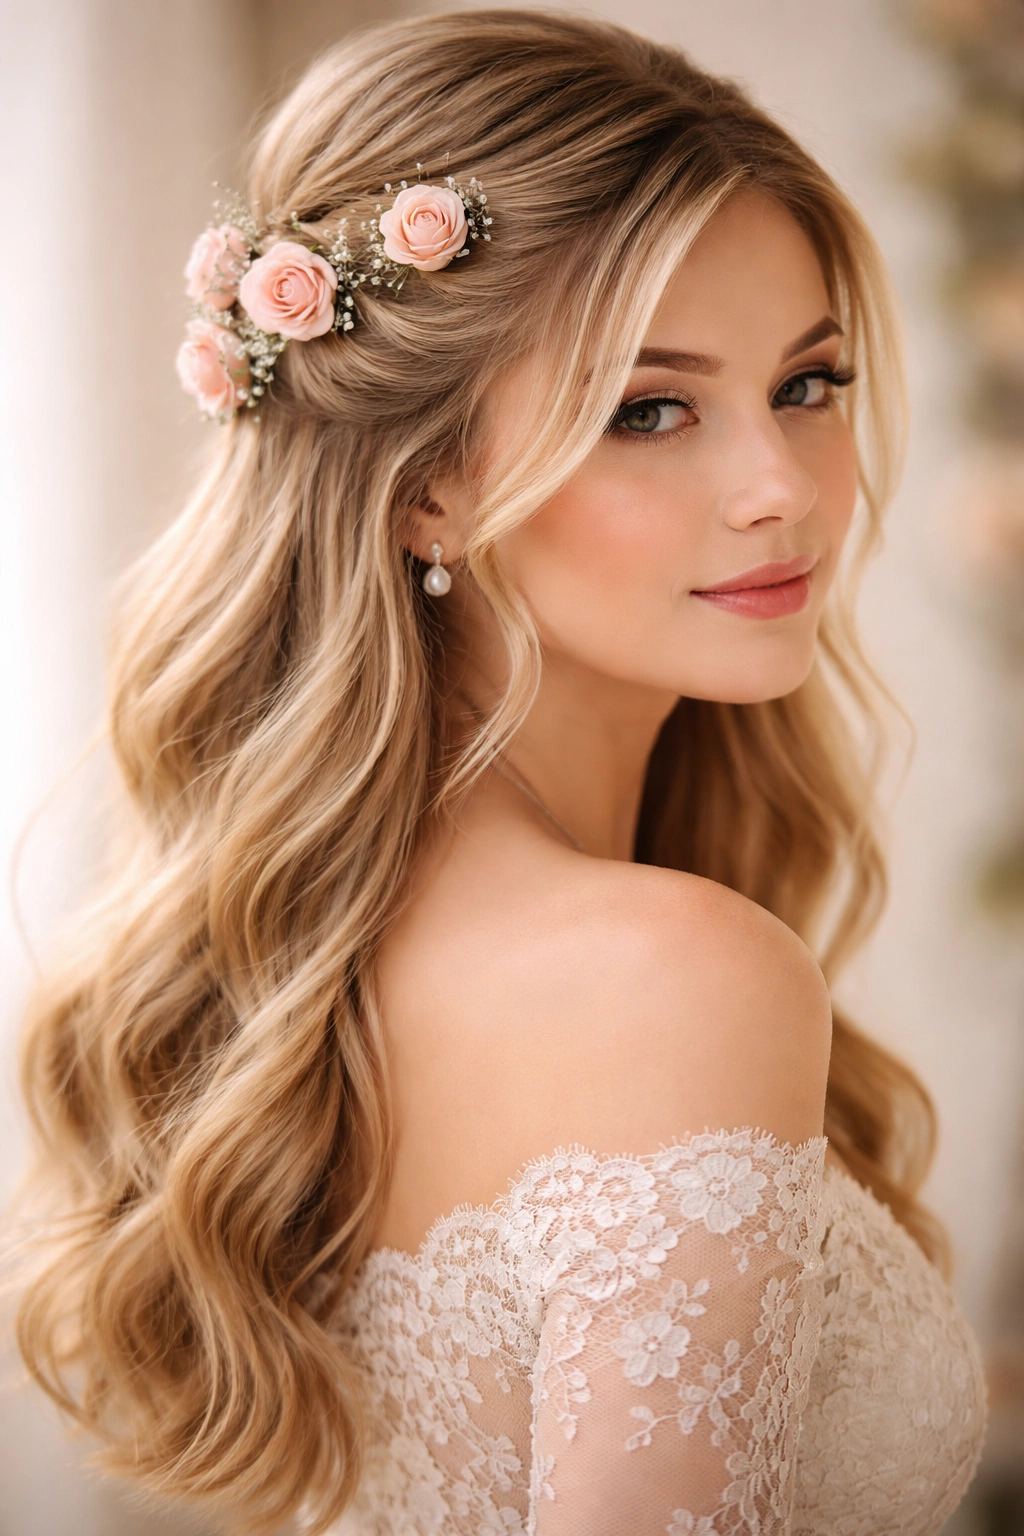
Flower accessories have major impact on prom hair because they immediately elevate any style and create a focal point that draws attention to your updo rather than fine details that might reveal hair density. Small silk roses pinned throughout the half-up section create a romantic, vintage-inspired look that feels intentional and special. This style pairs beautifully with delicate curls and face-framing pieces, and the flowers themselves add visual interest that distracts from any areas where you’d like more fullness.
Using Flowers as a Strategic Tool on Fine Hair
Flowers serve multiple purposes on fine hair: they’re lightweight anchors that help distribute the weight of the half-up, they add color and visual interest, and they create the impression of a more intricate style than what might actually be there. A single large rose or 3-5 smaller roses pinned strategically through the half-up section transforms a simple pinned-back section into something special and intentional.
Creating the Flower-Adorned Half Up
- Create soft waves throughout all your hair using a 1.25-inch curling iron
- Take your half-up section and tease gently at the crown for lift
- Pin the half-up section with bobby pins, leaving a bit of texture visible rather than smoothing it completely
- Select 3-5 small silk roses (real flowers are beautiful but heavier and wilt) in a color that complements your dress
- Pin the first rose at the center of your half-up, where it will be most visible
- Pin additional roses scattered through the half-up section, angling them so they face slightly upward and outward
- Use bobby pins that match both the roses and your hair color for a seamless look
- Leave 2-3 face-framing pieces loose and gently curl them individually for softness
- Allow the half-down curls to cascade over and partially cover the pinned section, creating a soft, full effect
Pro tip: If real flowers are your preference, have them pinned by your stylist the day of prom rather than trying to keep them fresh overnight—fresh flowers stay looking beautiful much longer when pinned closer to the actual event.
7. The Feathered Waves Half Up Half Down
Feathered waves are essentially layers of curls that are teased and separated into a softer, more textured look rather than tight ringlets. This technique works beautifully on fine hair because it distributes the curls across more surface area, making hair look fuller and thicker than a solid wave pattern would. The “feathered” effect comes from teasing between curls and separating them strategically, which is exactly what fine hair needs to look its best.
Why Feathering Technique Works for Fine Hair
Rather than relying on dense, tightly-wound curls that can look sparse on fine hair, feathered waves use texture and separation to create visual fullness. The technique involves curling in sections, then gently teasing and combing out those curls into a softer, more dispersed wave pattern. This creates the illusion of more hair because the waves are wider and cover more territory.
Achieving Feathered Waves on Fine Hair
- Apply volumizing spray to damp hair and blow-dry with product for texture
- Create your half-up section and pin it loosely—don’t make it too tight or it will look thin
- Working in 1-inch sections, curl all the half-down hair with a 1.25-inch barrel curling iron
- Once all curls are cool, use a comb to gently tease underneath each curl, creating a subtle cushion
- Run your fingers through the curls to break them up, separating them into waves rather than ringlets
- Spritz with flexible-hold hairspray and tousle again with your fingers for a soft, touchable texture
- Add face-framing waves by curling 2-3 pieces individually and allowing them to frame your face softly
- The feathered effect should look soft and romantic, not frizzy—if it looks too separated, you may have teased too aggressively
Worth knowing: Feathered waves photograph beautifully in soft lighting (like prom venues typically have), so this is a great choice if you want a style that looks amazing in photos.
8. The Intricate Fishtail Braid Hybrid
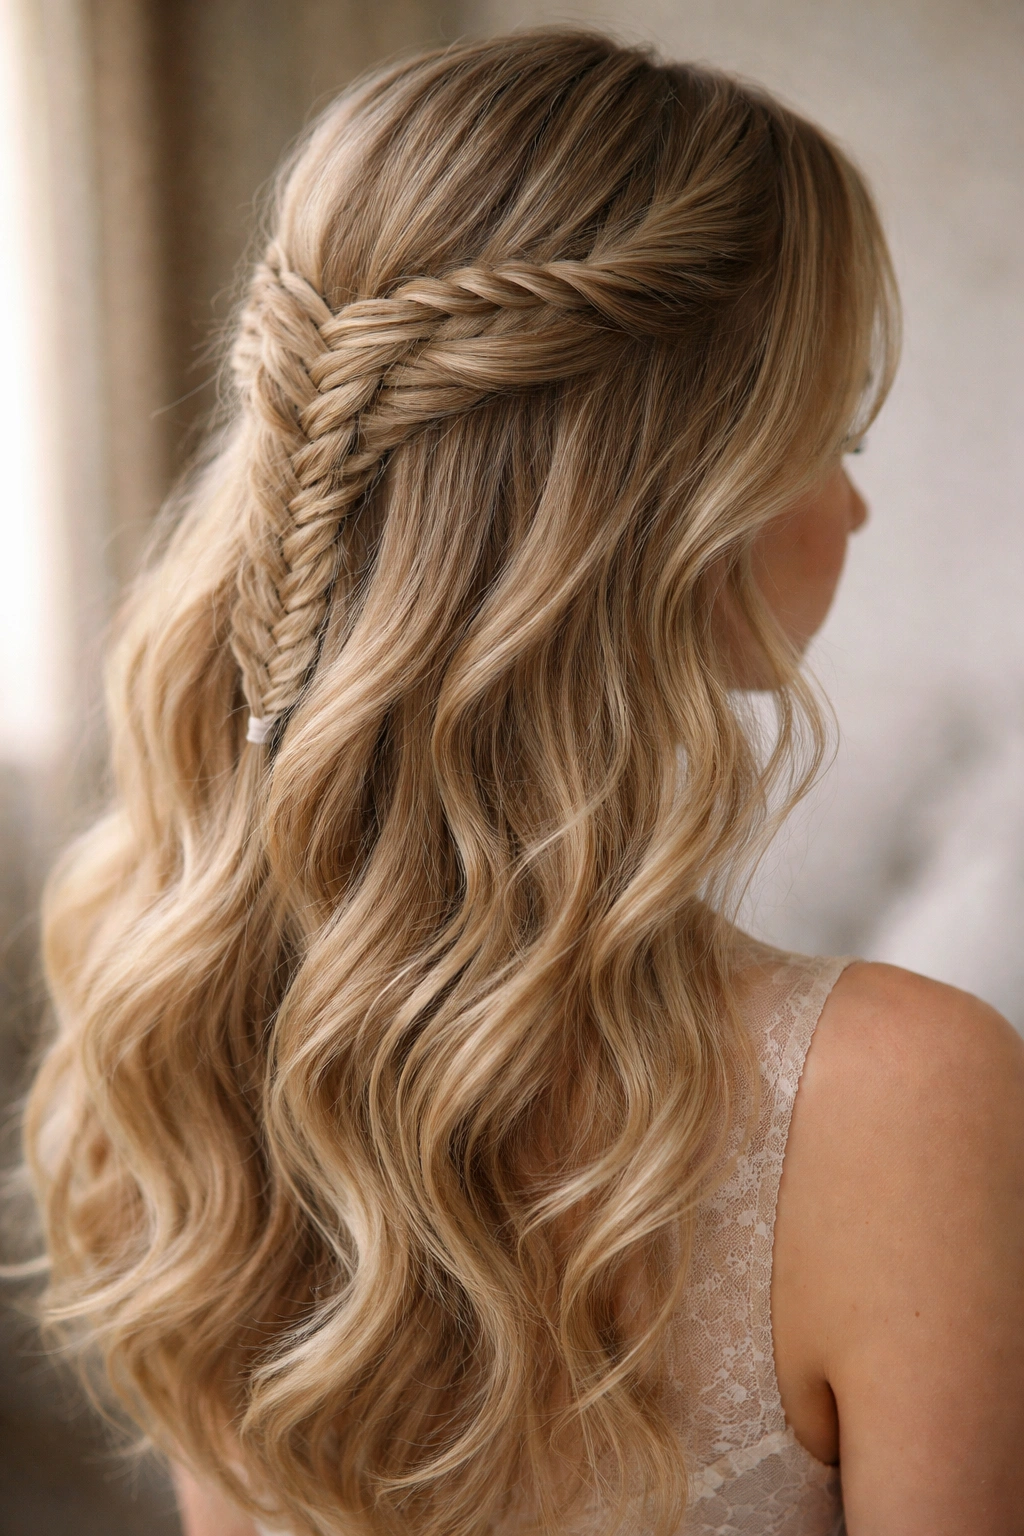
A fishtail braid that transitions into a half-up, half-down style creates an intricate-looking hairdo that’s actually easier to manage on fine hair than a traditional tight braid. Fishtail braids naturally look more delicate and textured than French or Dutch braids, so they’re especially flattering on thinner hair. This style pairs a fishtail braid that starts at one temple and winds toward the crown with loose, curled hair below, creating a look that’s romantic without being overly complicated.
Why Fishtail Braids Suit Fine Hair
Fishtail braids use smaller sections of hair and create a more lacy, open texture than traditional braids. This is ideal for fine hair because the braid looks fuller and more intricate without requiring dense strands. The lighter visual weight of a fishtail also pairs well with the half-down section, creating balance between the styled top and the loose bottom.
Building the Fishtail Half-Up Hybrid
- Start with textured hair—use a texturizing spray on damp roots and blow-dry with product
- Create a deep side part and take a 2-inch section from one temple
- Begin a fishtail braid, keeping it slightly loose and taking tiny sections (this makes it look more delicate)
- Braid toward the back of the head, ending at the crown area
- Pin the fishtail braid at the back of the crown using 2-3 bobby pins that match your hair color
- Tease gently underneath the pinned section to create a soft cushion
- Gently pull and tease the fishtail braid slightly to make it look fuller and more textured
- Curl all the half-down hair in soft waves using a 1.25-inch curling iron
- Allow the curled hair to cascade down and partially cover where the braid is pinned
- Leave a few face-framing pieces unbraided and loose, curling them individually for softness
Pro tip: If your fishtail braid looks too thin or delicate, gently pull the edges of the braid outward as you go—this makes it look thicker and fuller without adding more hair.
9. The Bouffant Crown Half Up
A bouffant is a classic teasing technique that creates a voluminous, textured crown, and it’s one of the best styling methods for fine hair because it builds height and fullness that fine hair often lacks naturally. A bouffant half-up takes this technique and applies it specifically to the half-up section, creating a pillowy, romantic look that has major impact. This style feels retro-inspired and sophisticated, perfect for prom.
The Art of Bouffant Teasing on Fine Hair
Bouffant teasing requires a light hand—you’re creating texture and grip, not matting down fine strands. Use a fine-tooth teasing brush and work in small sections, teasing from the roots up with short, gentle strokes. The goal is to create a textured layer underneath that supports the smoother top layer, giving you visible volume without damage.
Creating a Picture-Perfect Bouffant Half Up
- Blow-dry hair upside down to create natural crown volume
- Apply volumizing mousse to damp roots before blow-drying
- Take your half-up section and divide it into 2-3 subsections
- Work on one subsection at a time, gently teasing from the roots upward with a fine-tooth brush
- Use short, gentle strokes rather than aggressive ones—fine hair breaks easily with harsh teasing
- Smooth the top layer of each section with your comb so the teasing is hidden underneath
- Pin each subsection as you go, using 2-3 bobby pins per section for security
- Gently tease the entire pinned section slightly to add texture and dimension
- Allow the half-down hair to flow in soft curls, with some pieces left loose to frame the face
- The bouffant should look smooth on top but noticeably full and textured—never ratty or messy
Worth knowing: A bouffant half-up works best when paired with simple, elegant curls on the bottom—let the volume at the crown be the star rather than competing with too much texture below.
10. The Softer Halo Braid Wrap
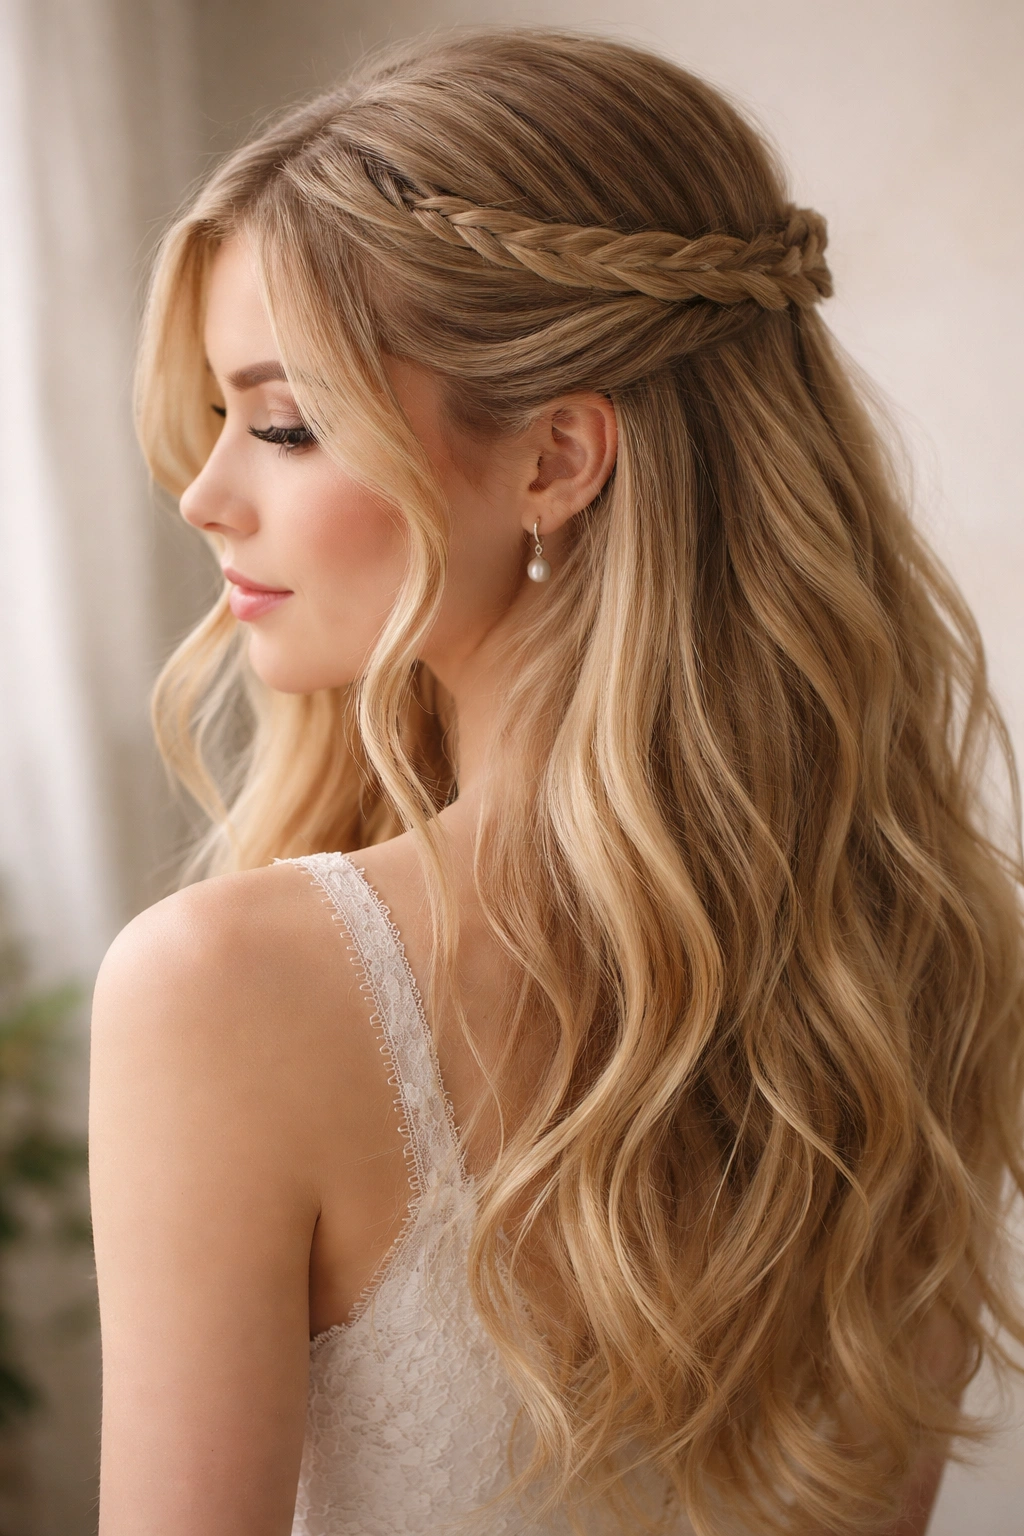
This style uses a delicate braid that wraps around the head like a crown or halo, with the remaining hair flowing down loosely. It’s similar to the halo braid mentioned earlier but with a slightly different execution—this version uses two thinner braids that wrap around the head and meet at the back, creating a more intricate frame for the face. On fine hair, this style is elegant because the braids are delicate and don’t overpower thin strands.
Why Halo Braids Create Elegant Dimension on Fine Hair
A halo braid frames the face beautifully and draws attention upward, which is especially flattering on fine hair because it creates proportion and focus. The braid itself becomes a design element rather than a functional anchor, and the wrap-around effect creates the illusion of more hair volume by framing the head.
Creating the Halo Braid Wrap
- Apply texturizing spray to damp hair for grip
- Blow-dry with product and create soft waves throughout
- Take a thin (2-inch) section from one temple and begin a loose three-strand braid
- Braid loosely, keeping tension minimal so the braid looks delicate
- As you braid, gently tease and fluff between each section to make the braid look fuller
- Continue braiding toward the back of the head, angling toward the nape
- Pin the first braid at the back of the head with 2-3 bobby pins
- Create a second identical braid starting from the opposite temple
- Pin the second braid so it crosses over and meets the first braid at the back of the head
- Gently tease and fluff both braids to make them look fuller and more textured
- Allow all the hair below the braid to flow down in soft waves
- Leave 2-3 face-framing pieces loose and unbr with the braid—these pieces frame your face softly
Insider note: This style looks particularly striking with a simple, elegant dress because the intricate braid work provides visual interest without competing with other design elements.
11. The Pin-Curled Vintage Half Up
Pin curls are a classic vintage technique where you curl hair and pin it while wet, allowing it to dry into long-lasting waves. For a half-up style, you can pin curl just the half-up section, creating a polished, retro-inspired look that feels special and intentional. Pin curls last longer than other curl methods on fine hair and create very defined, beautiful waves that hold throughout the night.
Why Pin Curls Hold Better on Fine Hair
Pin curls work by allowing hair to dry completely around a curl form, which creates a set that’s more durable than heat-set curls. For fine hair, this is incredibly valuable because the waves will last much longer than curls created with a curling iron alone. Plus, pin curls naturally create dimension and texture—exactly what fine hair needs.
Setting Pin Curls for Your Half-Up
- Wash your hair the morning of prom (or even the night before) and apply a lightweight setting lotion while damp
- Take your half-up section and divide it into 4-6 subsections
- For each subsection, roll the hair around your finger or a small roller, creating a loop
- Pin the loop to your head using bobby pins, keeping the pins as hidden as possible
- Allow the pin curls to dry completely—at least 2-3 hours, or ideally overnight
- Once completely dry, carefully unpin each curl and gently shape the waves with your fingers
- Spritz with flexible-hold hairspray and allow to cool before arranging
- Pin the half-up section in place, using the natural pin curl waves as anchor points
- Allow the half-down hair to flow in soft waves—you can either pin curl this section too or use a curling iron for waves
Pro tip: If you don’t have time to pin curl overnight, you can pin curl in the morning and allow curls to set while you shower, do makeup, and get ready—by the time you’re putting on your dress, the curls will be set and ready to arrange.
12. The Wispy Side-Swept Style
A side-swept half-up creates an asymmetrical, romantic look that’s particularly flattering for fine hair because the side-sweep creates the illusion of volume on one side of the head. Rather than pulling hair straight back, this style sweeps it to one side and pins it low, allowing longer pieces to frame the face. The asymmetry is flattering and modern while still feeling very prom-appropriate.
How Side-Swept Styles Flatter Fine Hair
By sweeping hair to one side rather than centering it, you’re creating the visual illusion of more volume and fullness on that side. The face-framing pieces add dimension, and the overall asymmetrical composition feels more dynamic than a centered half-up. This style works beautifully for fine hair because it’s about clever positioning and styling rather than relying on density.
Executing the Perfect Side-Swept Half Up
- Create soft waves throughout all your hair using a 1.25-inch curling iron
- Blow-dry with texturizing spray for grip and movement
- Leave 2-3 pieces loose from your face on one side—these will frame your face throughout the night
- Take the half-up section and sweep it toward the opposite side, keeping it slightly low (at the nape or just above)
- Pin the swept section using 3-4 bobby pins in a diagonal pattern, creating a secure foundation
- Gently tease underneath the pinned section to create a soft cushion
- Allow the half-down curls to cascade over and partially cover the pins
- The side-swept effect should be noticeable but not extreme—aim for a 45-degree angle rather than a dramatic 90-degree sweep
- Gently separate and fluff the curls with your fingers to create a soft, touchable texture
- Leave longer face-framing pieces loose and curl them individually for extra softness
Worth knowing: This style is especially flattering if you have a strong side part—the side-swept half-up enhances rather than fights against a natural part.
13. The Multi-Layered Texture Stack
This style uses multiple layers of texture—a combination of teasing, braiding, twisted sections, and curls—all stacked together in the half-up area to create maximum visual dimension and fullness. Rather than relying on one technique, this style layers multiple texture-building methods to create a look that’s impossibly full on fine hair. It’s more intricate than other options but incredibly rewarding for the special occasion.
Building Maximum Texture Without Weight
The key to this style is using lightweight techniques—teasing, thin braids, small twists—rather than heavy clips and extensions. By layering multiple small texture-building methods, you create the illusion of major volume without actually adding weight that would flatten fine hair. It’s a visual illusion created through clever technique.
Creating the Multi-Layered Texture Stack
- Apply volumizing spray to damp hair and blow-dry with product
- Create a base layer by gently backcombing the crown area
- Create a thin (2-inch) twisted or braided section and pin it over the teased section
- Create a second thin braided section and pin it slightly overlapping the first
- The sections should layer on top of each other, creating dimension and visual fullness
- Gently tease and fluff between each section to make them look fuller
- Pin everything securely using 4-5 bobby pins distributed throughout the layers
- Curl all the half-down hair and allow it to flow down, partially covering the layered sections
- The effect should be textured, dimensional, and noticeably full without looking messy
Pro tip: Practice this style at least once before prom—it requires more pinning and layering than simpler styles, but the end result is so worth the extra effort.
14. The Delicate Pearl-Threaded Braid
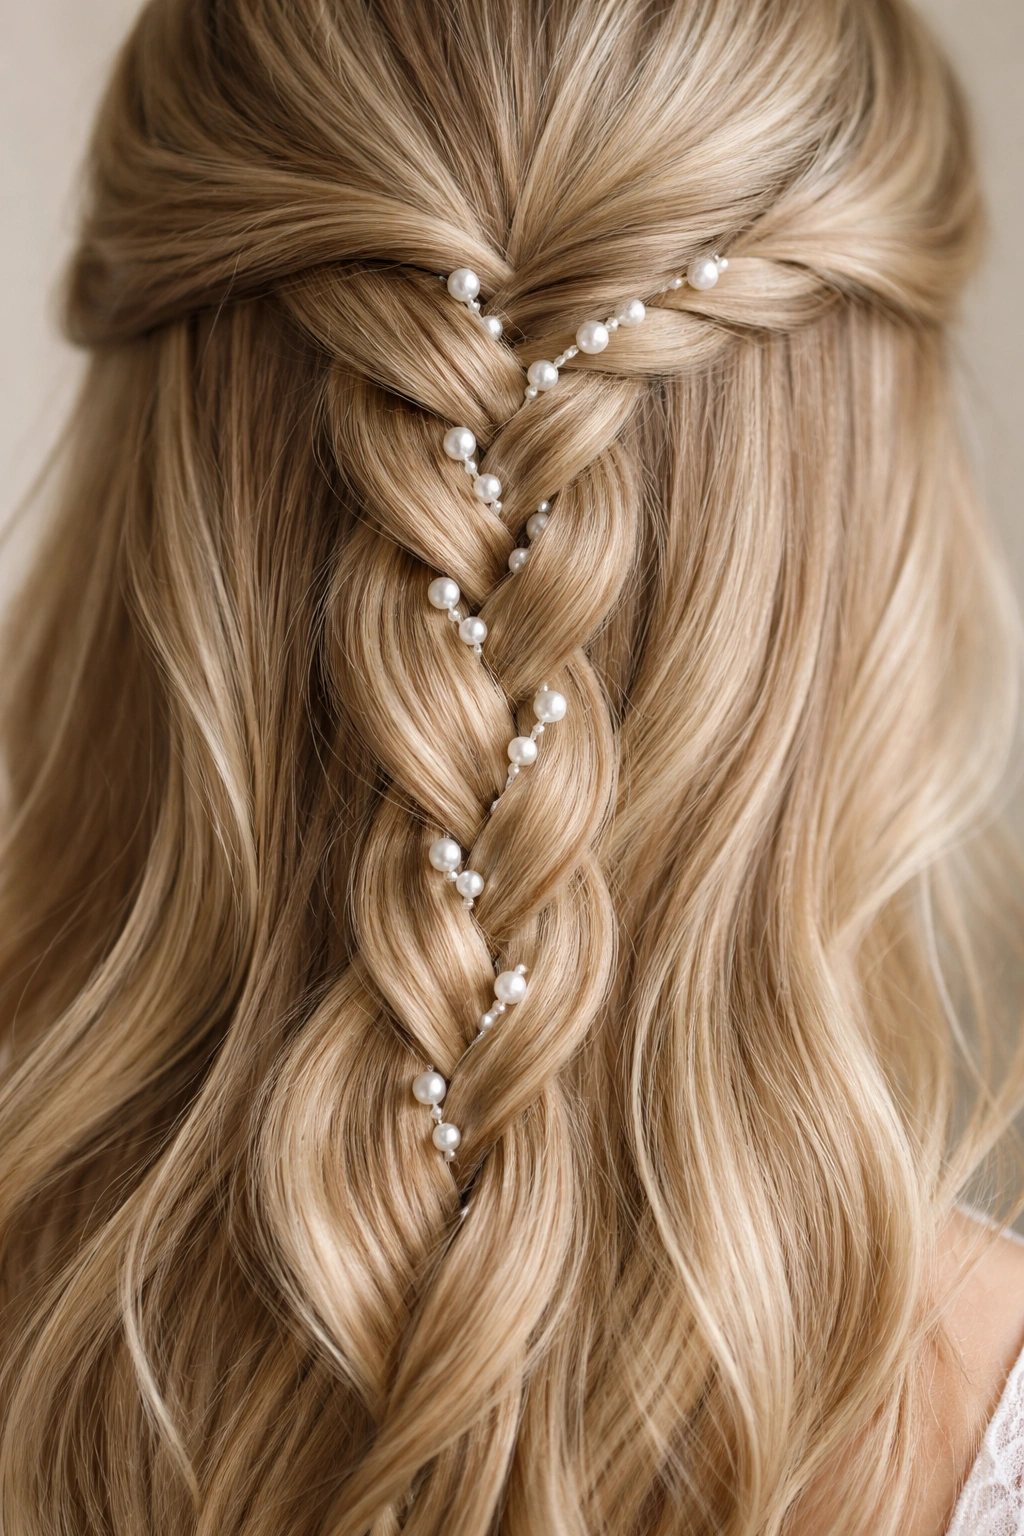
This style combines a soft braid with delicate pearl or bead threading woven through the braid itself, creating an intricate, jewelry-like detail that’s especially elegant for prom. Rather than using pearl pins, this style actually threads pearls or small beads through the braid, creating a subtle sparkle and dimension. This technique works beautifully on fine hair because the pearls add visual interest without adding weight.
Threading Pearls Through a Braid for Fine Hair
Pearl threading requires a braid that’s delicate but secure—fine hair naturally creates the perfect texture for this. You’ll work small pearl beads or strings of pearls through the braid as you go, creating a threaded effect. This technique requires patience but creates something that looks incredibly special and custom-made.
Executing the Pearl-Threaded Braid
- Start with damp hair and apply a lightweight texturizing spray
- Blow-dry with product and create soft texture throughout
- Select delicate pearl beads or a thin strand of costume jewelry pearls
- Take a thin section from one temple and begin a loose three-strand braid
- As you braid, thread the pearls under and over each braid section, weaving them through the braid
- Continue braiding and threading toward the crown or the side of the head
- Pin the finished braid using 2-3 bobby pins, allowing the threaded pearls to be visible
- Allow the rest of the hair to flow down in soft curls
- The pearl threading should be subtle but visible—the detail is what makes this style special
- Pair this style with a simple dress that lets the intricate braid work shine
Worth knowing: You can find pearl strands at craft stores or online—choose delicate, lightweight options that won’t pull on fine hair strands.
15. The Volumizing Teasing Half Up
This final style is all about strategic teasing to create maximum volume where fine hair typically lacks it most—at the crown and at the half-up section. This isn’t about creating a heavily teased, ratty texture; instead, it’s about smart, minimal teasing that builds a soft foundation and creates noticeable fullness. This is a great style when you want simplicity but with serious volume impact.
The Fine-Hair Teasing Method
Fine hair teasing requires restraint and gentleness. You’re using a fine-tooth brush and short, gentle strokes to create texture underneath, not aggressively matting hair. The teasing should be completely hidden underneath a smooth top layer, creating an invisible foundation that supports volume. This method works beautifully on fine hair because it doesn’t damage strands while still building noticeable lift.
Creating Volume Through Strategic Teasing
- Blow-dry hair upside down to create natural crown volume
- Apply volumizing mousse to damp roots before blow-drying
- Use a small paddle brush to blow-dry the crown area in the opposite direction to build lift
- Take your half-up section and identify 2-3 areas where you want maximum volume
- Using a fine-tooth teasing brush, gently tease from the roots upward in short strokes
- Focus on the crown and the center section of your half-up for the most impactful volume
- Smooth the top layer with a fine comb so the teasing is hidden and the style looks polished
- Pin the half-up section using 3-4 bobby pins, distributing them throughout for security
- Gentle tease the entire half-up section slightly to add overall texture and dimension
- Allow the half-down hair to flow in soft waves or stay slightly wavy
- The final look should be noticeably full at the crown but smooth and polished overall
Pro tip: If you’re worried about your teasing looking obvious or damage to fine strands, do a test run a week or two before prom—this gives you time to perfect the technique without the pressure of the actual event.
Final Thoughts
Every single one of these styles is specifically designed for fine hair, which means you’re working with your hair’s natural qualities rather than against them. Fine hair has its own strengths—it typically holds curls beautifully, responds well to texture and teasing, and photographs gorgeously with the right lighting and styling. The styles that work best are the ones that build dimension through technique rather than relying on density alone.
The most important thing you can do before prom is practice your chosen style at least once, ideally twice. This gives you the chance to figure out which bobby pins hold best in your hair, how long your curls actually last, and whether you need adjustments to timing or products. Don’t wait until prom night to try something new—muscle memory and confidence make a huge difference in how polished your style looks.
On the day of prom, use lightweight products that won’t weigh fine hair down, apply them sparingly, and prioritize texture-building techniques over heavy styling tools. A light texturizing spray, volumizing mousse, and flexible-hold hairspray are your best friends. And remember—the goal isn’t to hide your fine hair or pretend it’s thick; it’s to style it in a way that makes it look as full and beautiful as possible while still being you. You’ve got this.