Fine hair demands a hairstyle strategy that’s completely different from what works for thicker textures. The challenge isn’t creating drama — it’s creating the illusion of fullness and movement while keeping everything secure enough to last through a full wedding day. Half up half down styles are surprisingly perfect for fine hair because they solve multiple problems at once: they lift hair away from the face to avoid flatness against the skin, they create the perception of volume through strategic pinning and texture, and they let you keep your hair down (which most people prefer) while still showing off your features and headpiece clearly.
The real secret to making a half up half down style work with fine hair isn’t about choosing a complicated updo — it’s about understanding which techniques create the illusion of fullness, how to secure everything so it doesn’t slip or fall flat by the end of the reception, and which styling methods give fine hair the grip it needs to hold a shape. Layering, texture-building, strategic backcombing, and the right type of pins make an enormous difference. You’re not fighting your hair type; you’re working with it intelligently.
Wedding hairstyles for fine hair should prioritize softness and movement over rigid perfection. The goal is that lived-in, effortlessly romantic look where hair falls in just the right way — which, paradoxically, takes more technical skill and the right products than it does to create that effect with thicker hair. The styles in this guide are all designed specifically to work with fine hair’s natural qualities: the way it catches light, how it responds to texture and dimension, and what keeps it looking full rather than wispy throughout an entire wedding day.
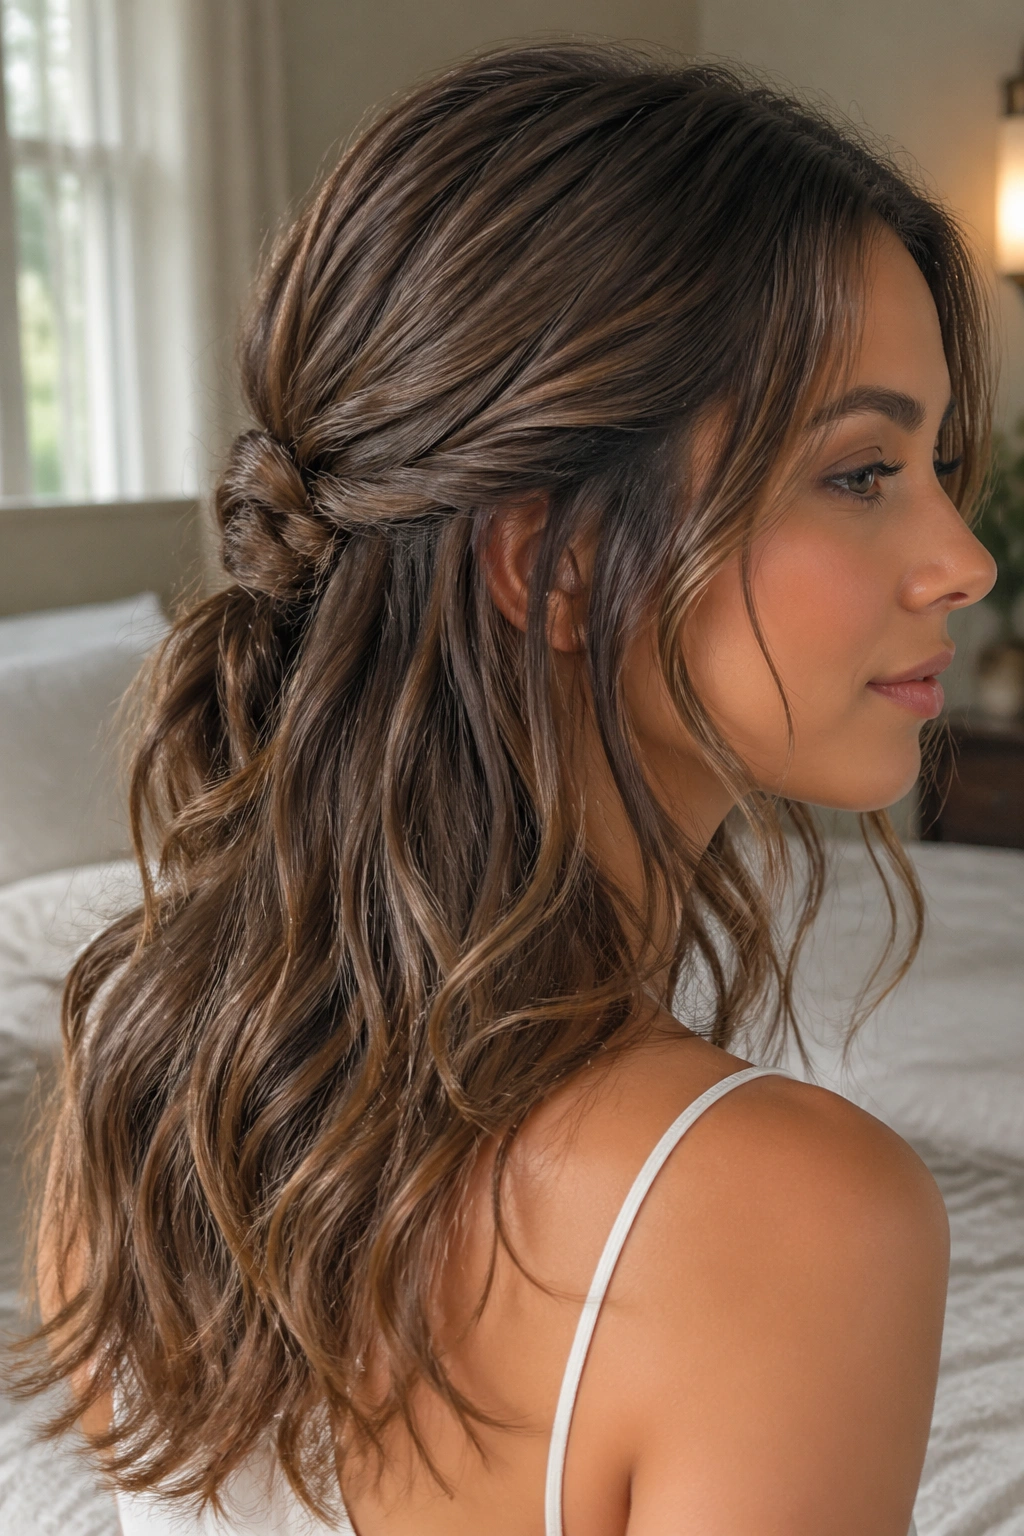
1. Classic Half-Up Bow
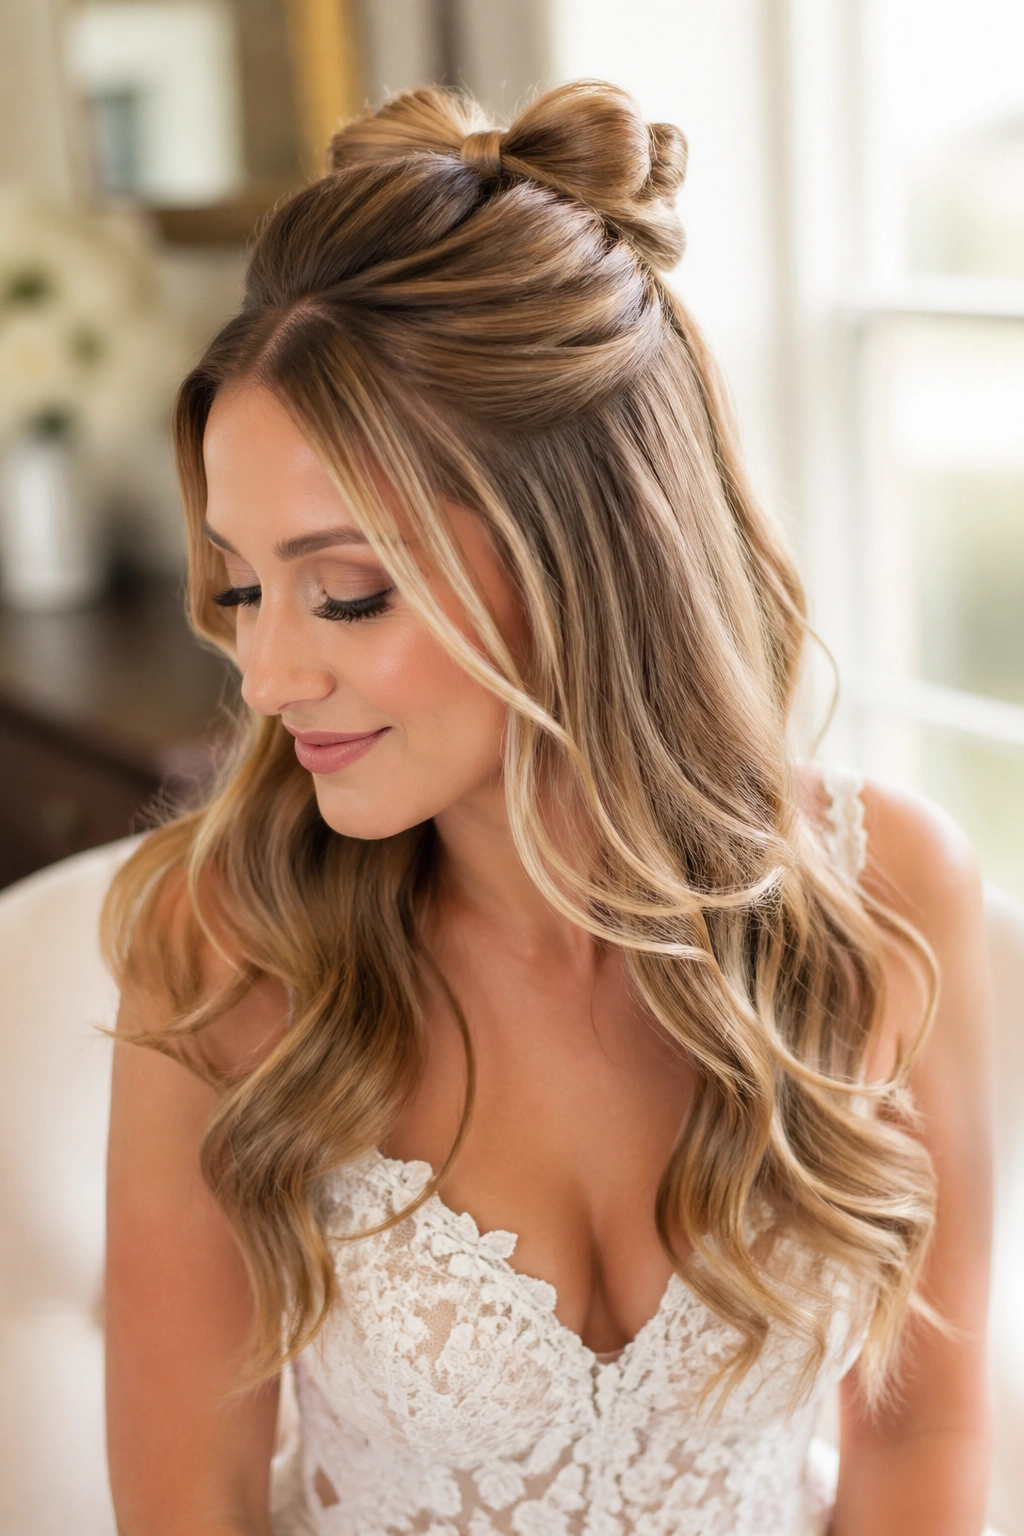
This timeless style brings understated elegance to fine hair by creating a structured anchor point that prevents flatness. The key is keeping the gathered section small and tight so it reads as intentional rather than sparse. Start with hair that has texture — either soft waves or a gentle perm can transform this style from basic to bridal.
Why This Works for Fine Hair
A classic bow creates immediate visual interest and draws the eye upward, automatically making hair appear fuller. By keeping the gathered section at mid-crown height, you avoid that top-of-the-head flatness that plagues fine hair in high ponytails. The bow itself becomes the focal point, so the hair behind it gets to be soft and romantic rather than needing to carry all the visual weight.
How to Style This Look
Start with clean, dry hair and apply a volumizing mousse to damp roots before blow-drying with a round brush, concentrating on lifting the crown section. Once dry, create soft waves throughout using a 1.25-inch curling iron, wrapping sections away from the face. Take a small section from each temple and twist gently toward the back, then gather both twists plus the crown hair into a low ponytail secured with a clear elastic. The gathering point should sit about 2-3 inches below where your part peaks — this positioning prevents stress on fine roots while keeping everything visible and photogenic.
Pro Styling Tips
Use a fine-tooth comb to gently backcomb the gathered section before wrapping it — this micro-texture holds the style better on fine hair than a smooth gather would. Apply a light texturizing spray or dry shampoo to the ponytail section only, not throughout your hair, so you add grip without dulling shine. Wrap a 1.5 to 2-inch ribbon or fabric bow around the elastic and secure it with bobby pins that match your hair color. For fine hair, a softer, narrower bow reads more appropriate than an oversized statement bow, which can overwhelm delicate features.
Worth knowing: Test this style the week before your wedding and sleep in a loose braid to see how it holds overnight — fine hair often relaxes after being pinned, so knowing how your specific hair behaves helps you plan whether you need styling adjustments on the actual day.
2. Twisted Half-Up with Pearl Pins
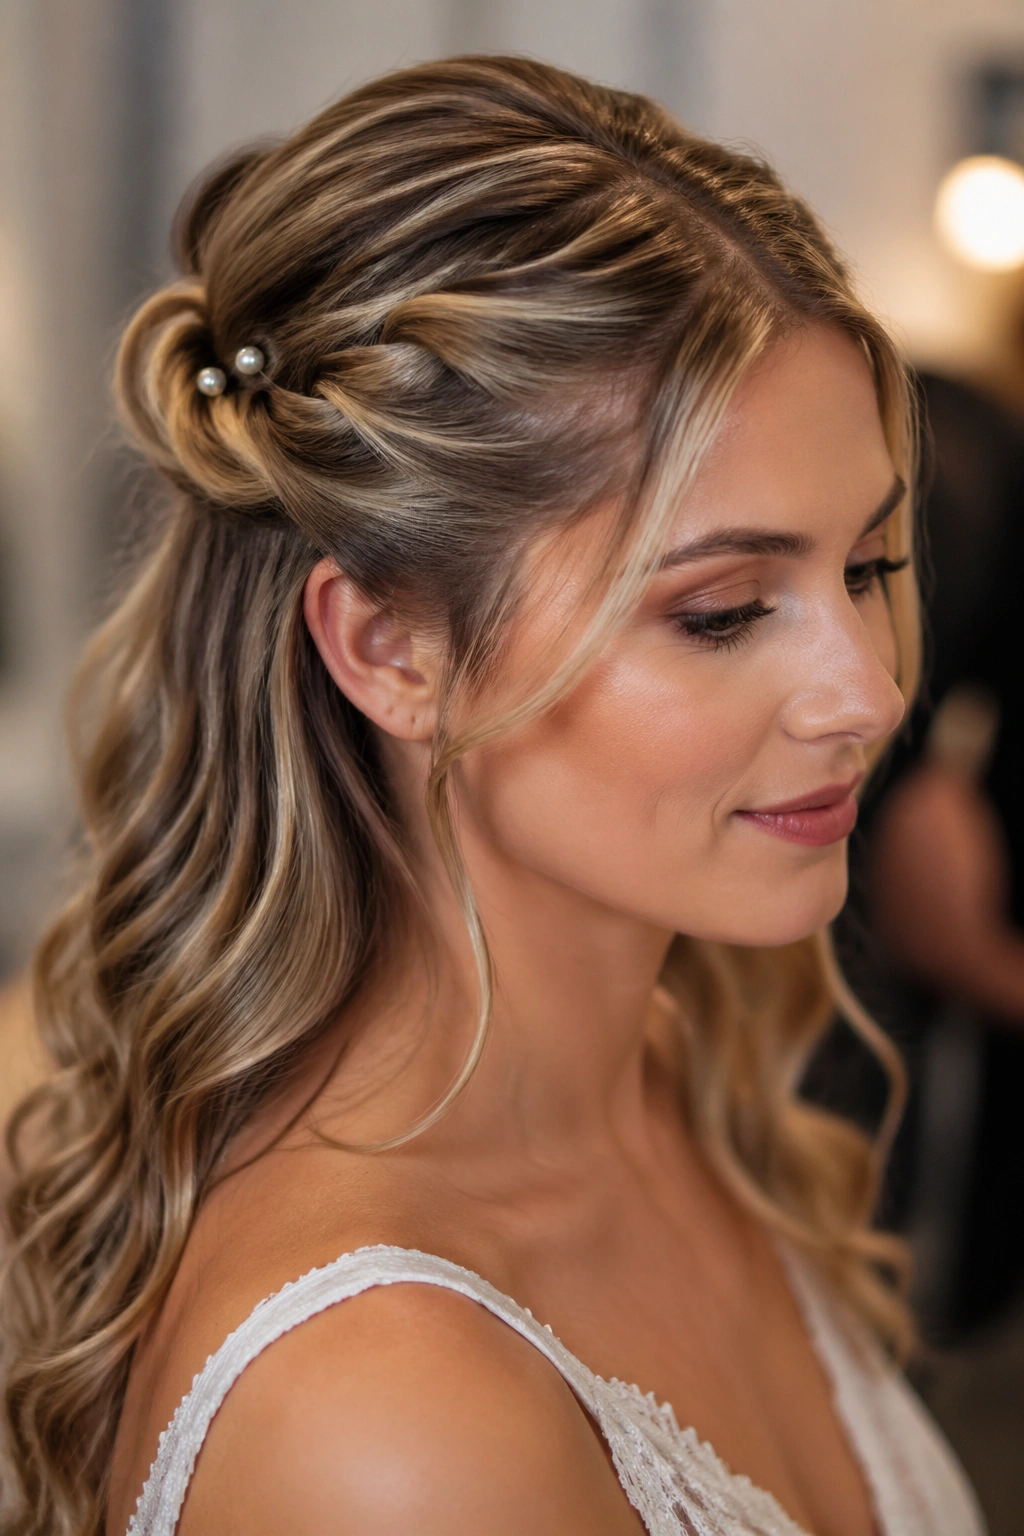
Twisting is the most fine-hair-friendly technique for creating dimension and texture without adding bulk, and pearl pins transform a simple twist into wedding-appropriate glamour. This style works beautifully because twists naturally grip fine hair better than straight sections do, and the pearls catch light in a way that adds visual fullness.
What Makes Pearl Pins Perfect for Fine Hair
Pearl bobby pins scatter light across the gathered section, creating the optical illusion of thicker, shinier hair. Unlike a chunky claw clip or thick elastic, pearl pins are practically invisible from a distance but visually register as intentional styling detail. They also distribute the weight of the gathered hair across multiple anchor points rather than concentrating it in one spot, which reduces stress on fine roots.
Step-by-Step Styling Method
Create soft waves throughout your hair using a 1.5-inch curling iron, then lightly brush them out for an undone texture. From one temple, take a 1-inch section of hair and twist it gently away from the face, keeping the twist loose so it doesn’t pull and thin out. Do the same from the other side. Bring both twists to the back center and cross them over each other, then secure with 3-4 pearl bobby pins arranged in a staggered pattern. Leave some face-framing pieces loose around your temples and cheekbones — these soft strands break up any severity and add to the romantic feel.
Critical Tips for Long-Lasting Hold
Apply a lightweight hairspray with flexible hold to each twisted section before you pin it — this gives the twist something to grip onto and prevents the twist from unwinding under the weight of the gathering pins. Fine hair benefits enormously from this extra step. Angle your pins slightly upward as you slide them in, working against the direction of the twist; this creates more friction and a more secure hold. If you’re worried about slippage, use 5 pins instead of 4 — that distribution matters more for fine hair than for any other texture.
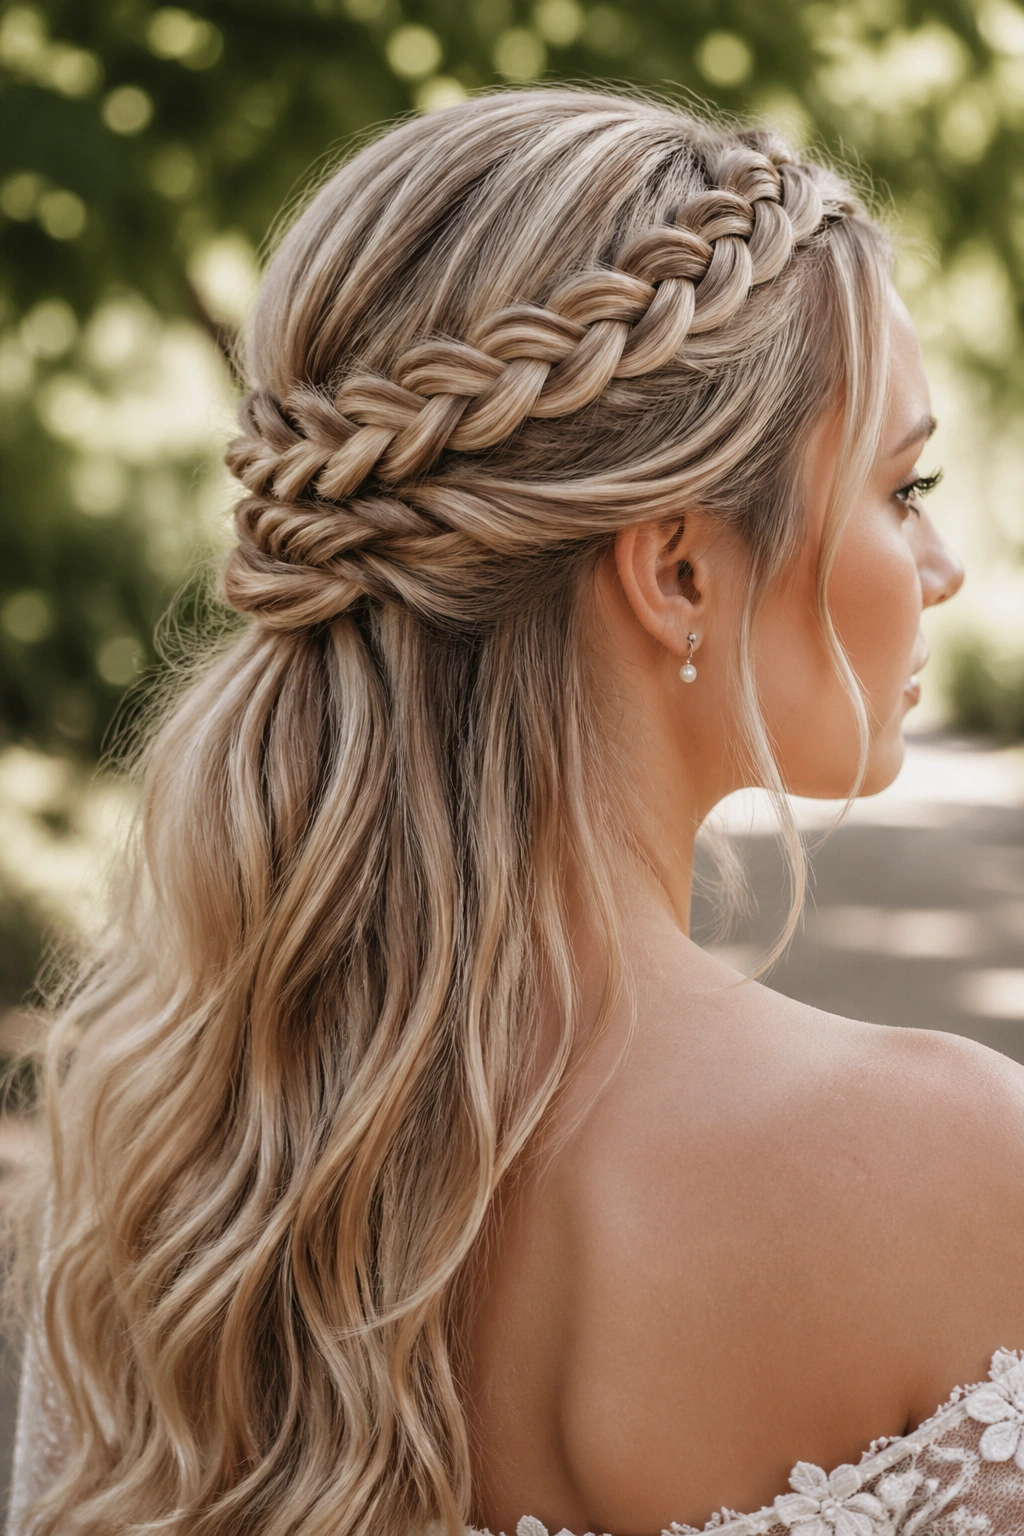
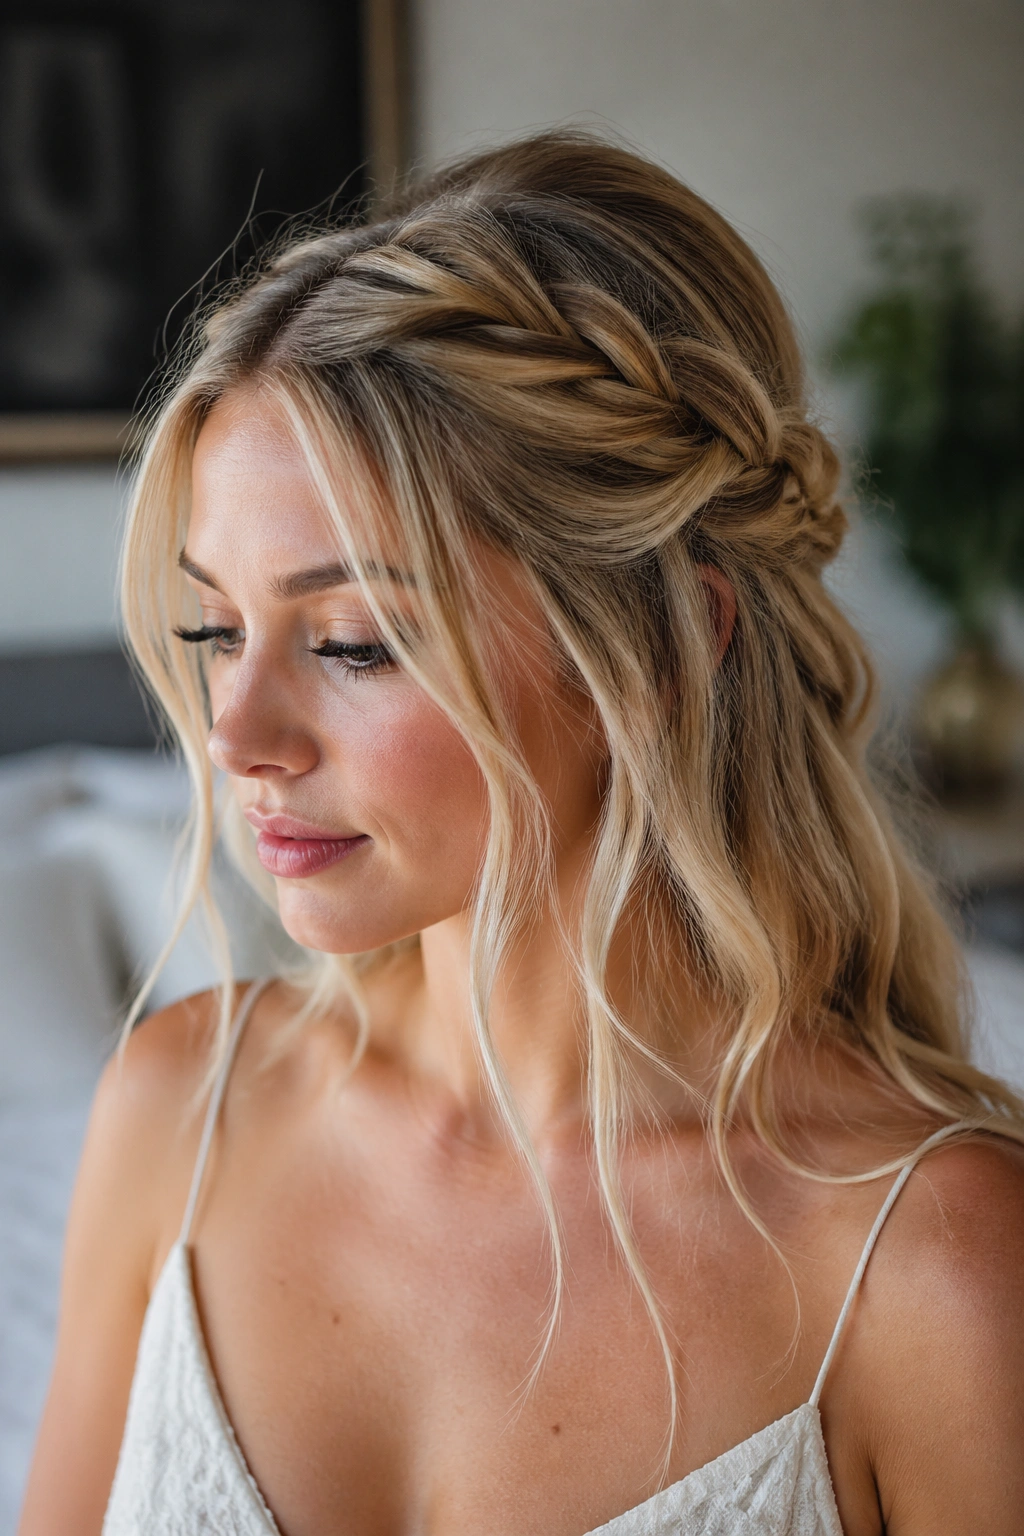
3. Delicate Braid Crown Half-Up
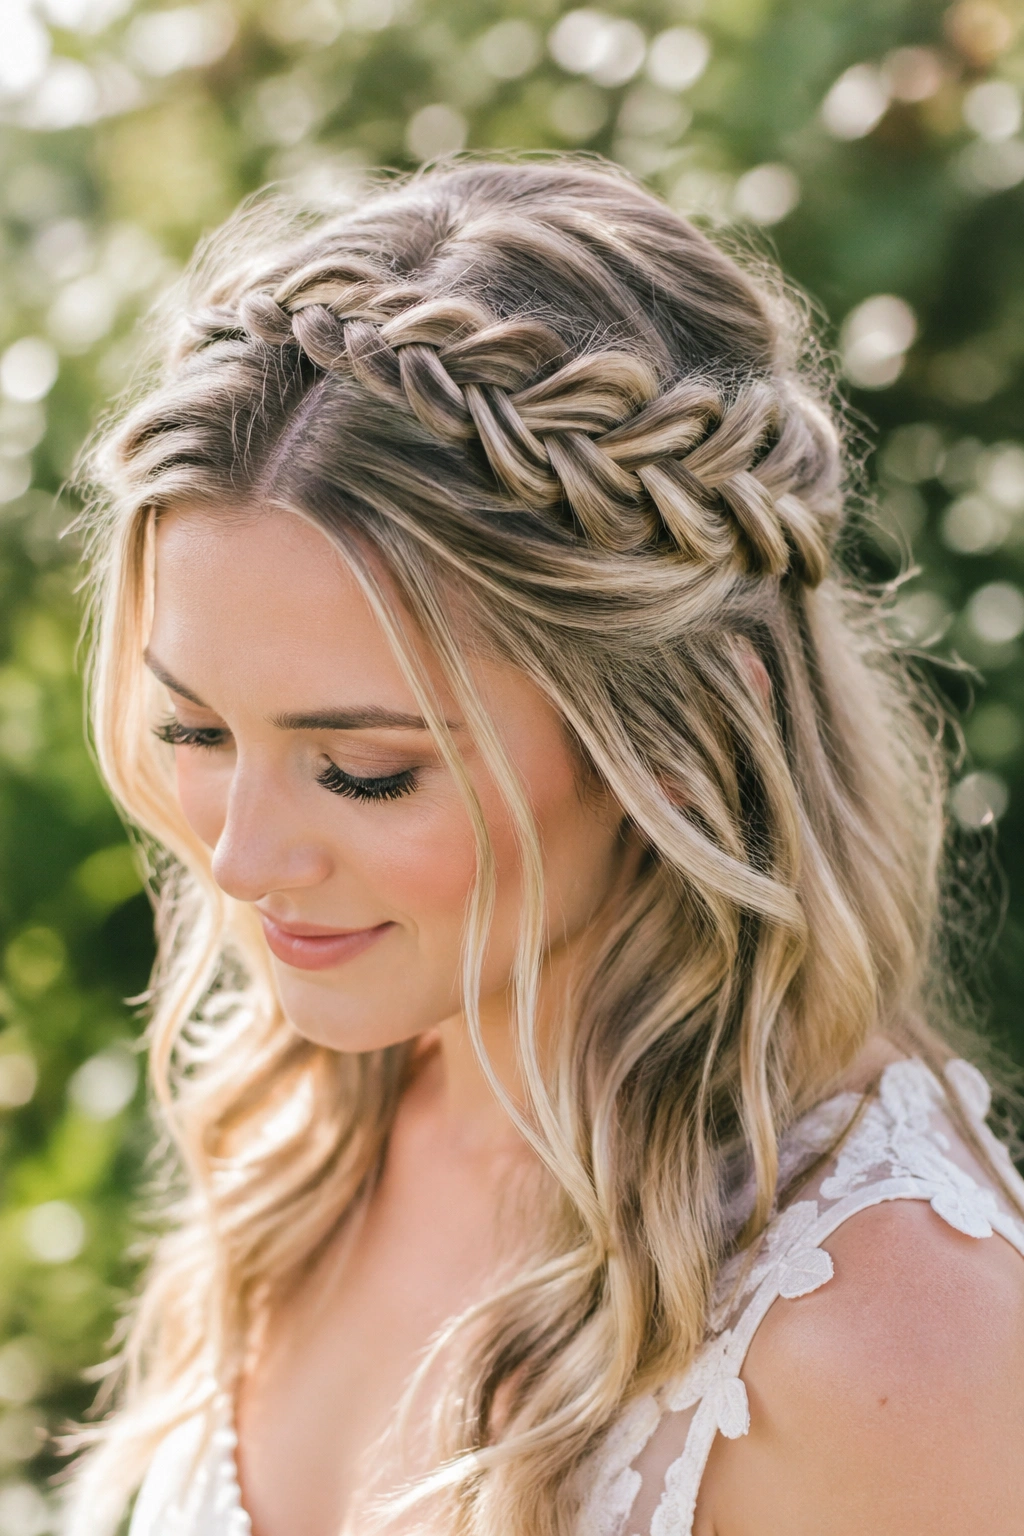
A braid that starts at one temple, wraps partway around the back of your head, and anchors at the opposite temple creates a natural crown effect. For fine hair, a Dutch braid (woven underneath rather than over) creates more texture and appears fuller than a regular three-strand braid would.
Why This Style Solves Fine Hair Challenges
A braid crown instantly adds perceived dimension by creating visual texture across the back of the head. Even a loose, delicate braid catches light and creates shadow play that makes hair look thicker. The braid also serves as a secure anchor point for any hair you gather into the half-up section, so everything stays in place without needing tight, hair-damaging elastic pressure.
Braiding Technique for Fine Hair
Take a 1-inch section at your temple and begin a Dutch braid (diving under rather than over), starting tight at the roots and gradually loosening the braid as you move back. This creates more volume and texture than keeping it consistently tight. Braid only about halfway around your head — from temple to a point behind your opposite ear. Secure the end of the braid with a small clear elastic. Gather the braid plus additional hair from both sides of your head, bring it all together at the back, and secure with another elastic. The braid becomes the visual foundation, while the additional gathered hair completes the half-up structure.
Finishing Details
Use a fine-tooth comb to gently tease the underside of the braid after you’ve completed it, then smooth the top layer back down — this creates a softer, fuller appearance than a perfectly neat braid. Add 2-3 delicate pearl or crystal hairpins along the edge of the braid for a bridal touch. Leave wisps of hair loose around your face, especially at the temple where the braid began, to frame your features and soften the style.
4. Romantic Waterfall Half-Up
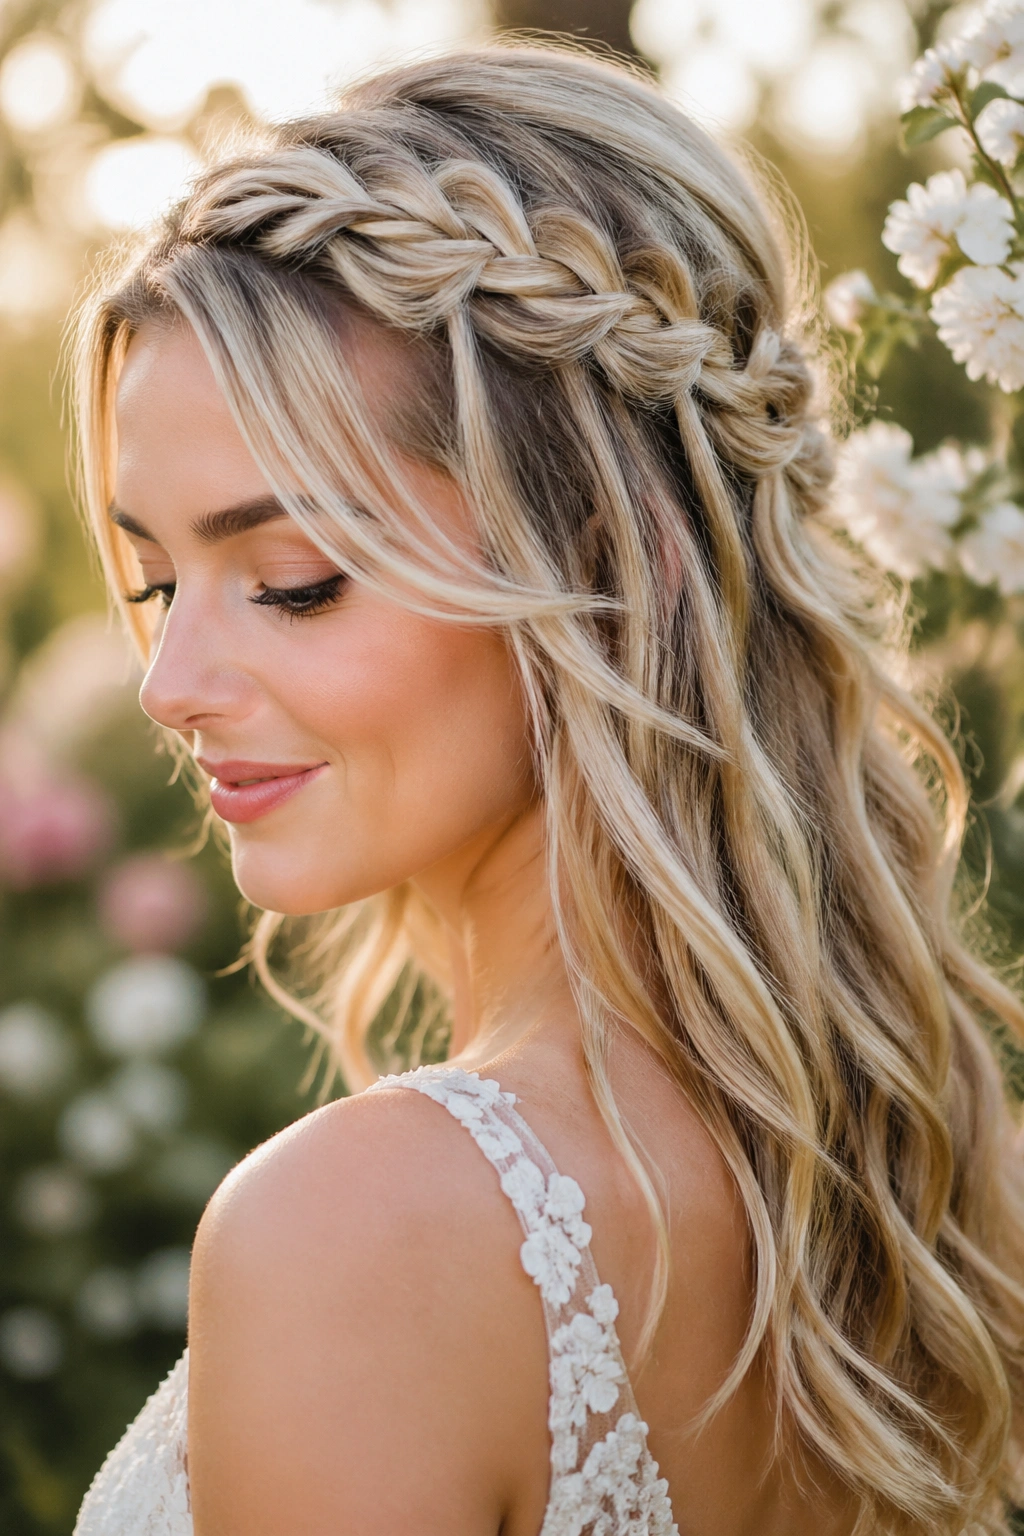
A waterfall style creates cascading sections that flow through the half-up gather, giving the impression of intricate detail while actually using a super-simple technique that works beautifully on fine hair. The waterfall sections catch light beautifully and add movement.
The Magic of Waterfall Styling on Fine Hair
Waterfall braid sections create the visual effect of a much more elaborate style than what’s actually required. Each small cascade adds perceived volume and dimension, making fine hair look textured and romantic rather than sparse. The technique is also very gentle on hair because you’re not twisting or pulling heavily — you’re creating loose, flowing sections that practically float through the style.
How to Create the Waterfall Effect
Start with soft, loose waves throughout your hair. On one side of your head, take a 1-inch section at your temple and begin a Dutch braid, but instead of adding new hair to both sides of the braid consistently, you’re going to “drop” each new section. Braid for three passes, then release the bottom strand of that braid so it falls freely down the side of your head — this is your first waterfall section. Pick up a new strand of hair from below where the first one fell and continue braiding, repeating this drop-and-pick-up pattern until you reach the back of your head. Do the same from the opposite side. Gather all the hair (including the waterfall sections and the loose pieces in between) into a low ponytail or into a gathered half-up section, securing with a clear elastic.
Styling Tips for Maximum Dimension
Apply a light texturizing spray to the waterfall sections only, which adds grip without affecting your face-framing pieces. Gently pull on the outer edges of each waterfall section to loosen them slightly — this creates a softer, fuller appearance than keeping them neat and defined. Leave several pieces completely loose in front of your ears and around your face to create a romantic, undone feel.
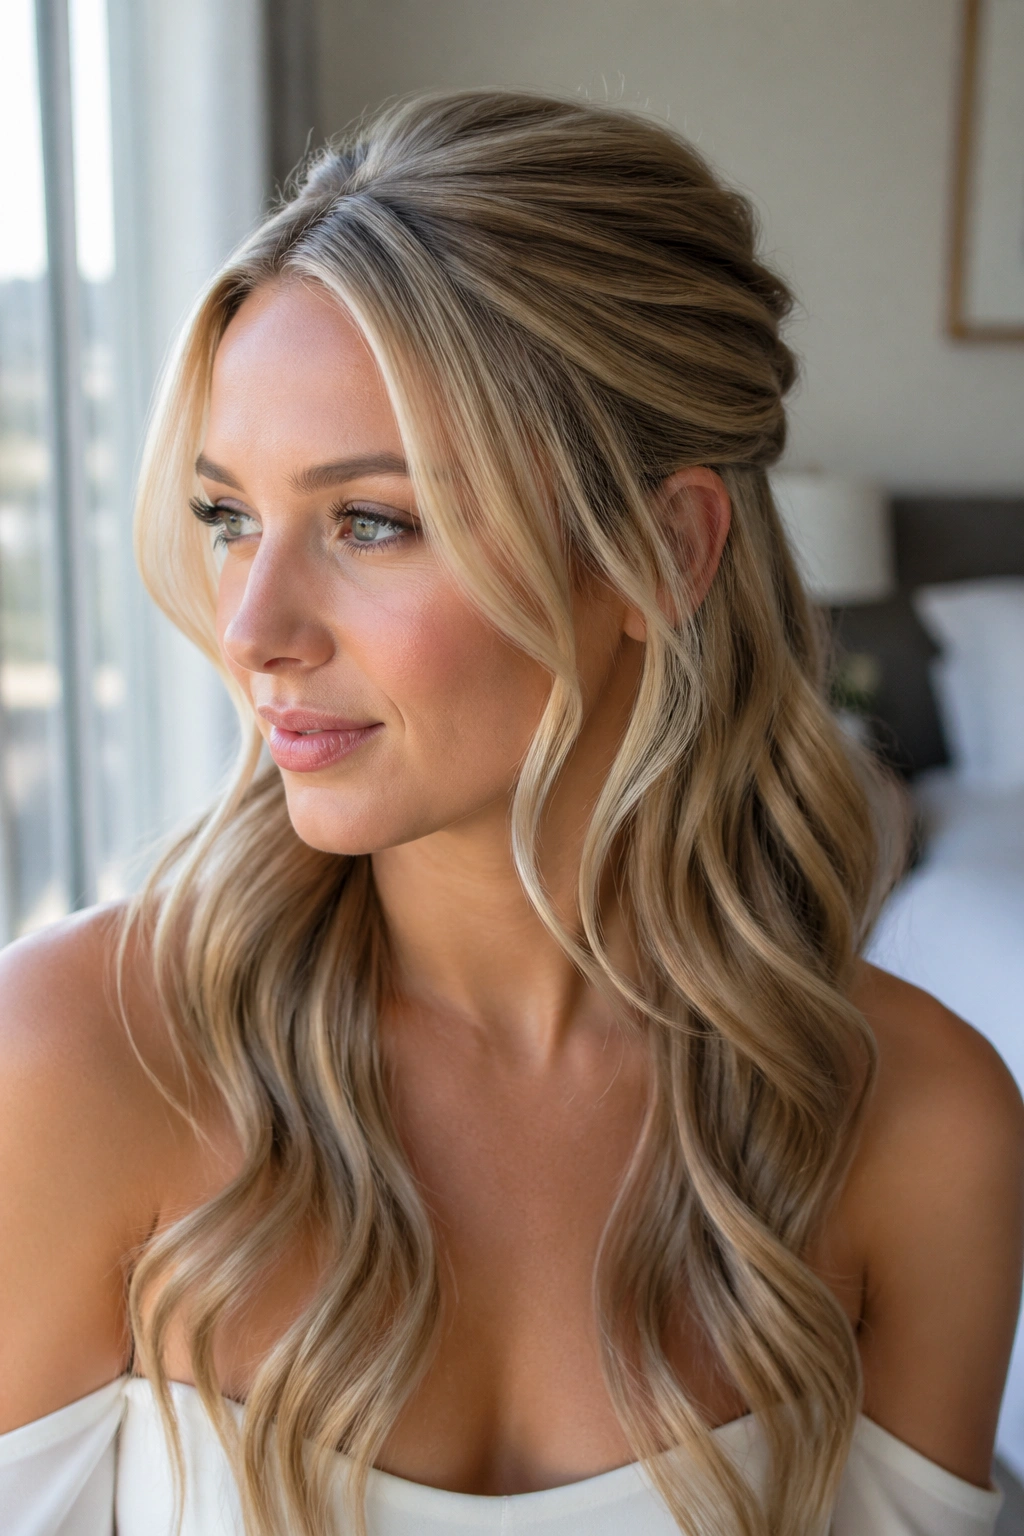
5. Low Half-Up with Textured Waves
Sometimes the simplest approach is the most powerful. A low half-up with emphasis on textured, moved waves throughout makes fine hair look romantic and full without requiring complicated techniques. This style works for any wedding aesthetic, from classic to modern to bohemian.
Why Texture Is Your Secret Weapon for Fine Hair
Textured waves scattered throughout your hair create the illusion of volume because they catch light from multiple angles. A smooth, straight style emphasizes any fineness or sparseness, but waves — even subtle ones — immediately add perceived density. The key is creating texture throughout, not just in the half-up section.
Creating Texture That Lasts Through Your Reception
Start with clean, dry hair and apply a volumizing mousse to damp roots before blow-drying. Once dry, use a 1.25-inch curling iron to create waves throughout, wrapping each section away from your face and leaving the curl in the iron for 8-10 seconds for longevity. After you’ve curled the entire head, apply a flexible-hold hairspray while the curls are still warm — this helps them set. Once the hairspray dries, gently brush through the curls with a paddle brush to break them up and create a softer, wavy texture rather than defined ringlets.
Gathering the Half-Up Section
Take a small section from each temple (about 1.5 inches wide) and gently twist or lightly braid each section toward the back. Gather these twisted sections plus some hair from your crown and secure at the back of your head with 3-4 bobby pins arranged in a small cluster. The key is keeping the gathered section small and lightweight so it doesn’t pull down on fine hair. Leave most of your hair down and loose, with the waves doing the visual work.
Pro Tips for a Polished Look
Mist your finished waves with a light hairspray that won’t make them feel stiff or crunchy. Fine hair is sensitive to heavy products, so use a flexible-hold formula designed for fine or delicate hair. If any pieces slip out of your pins throughout the day, that’s actually okay with this style — falling pieces add to the romantic, undone aesthetic.
6. Sleek High Half-Up Ponytail
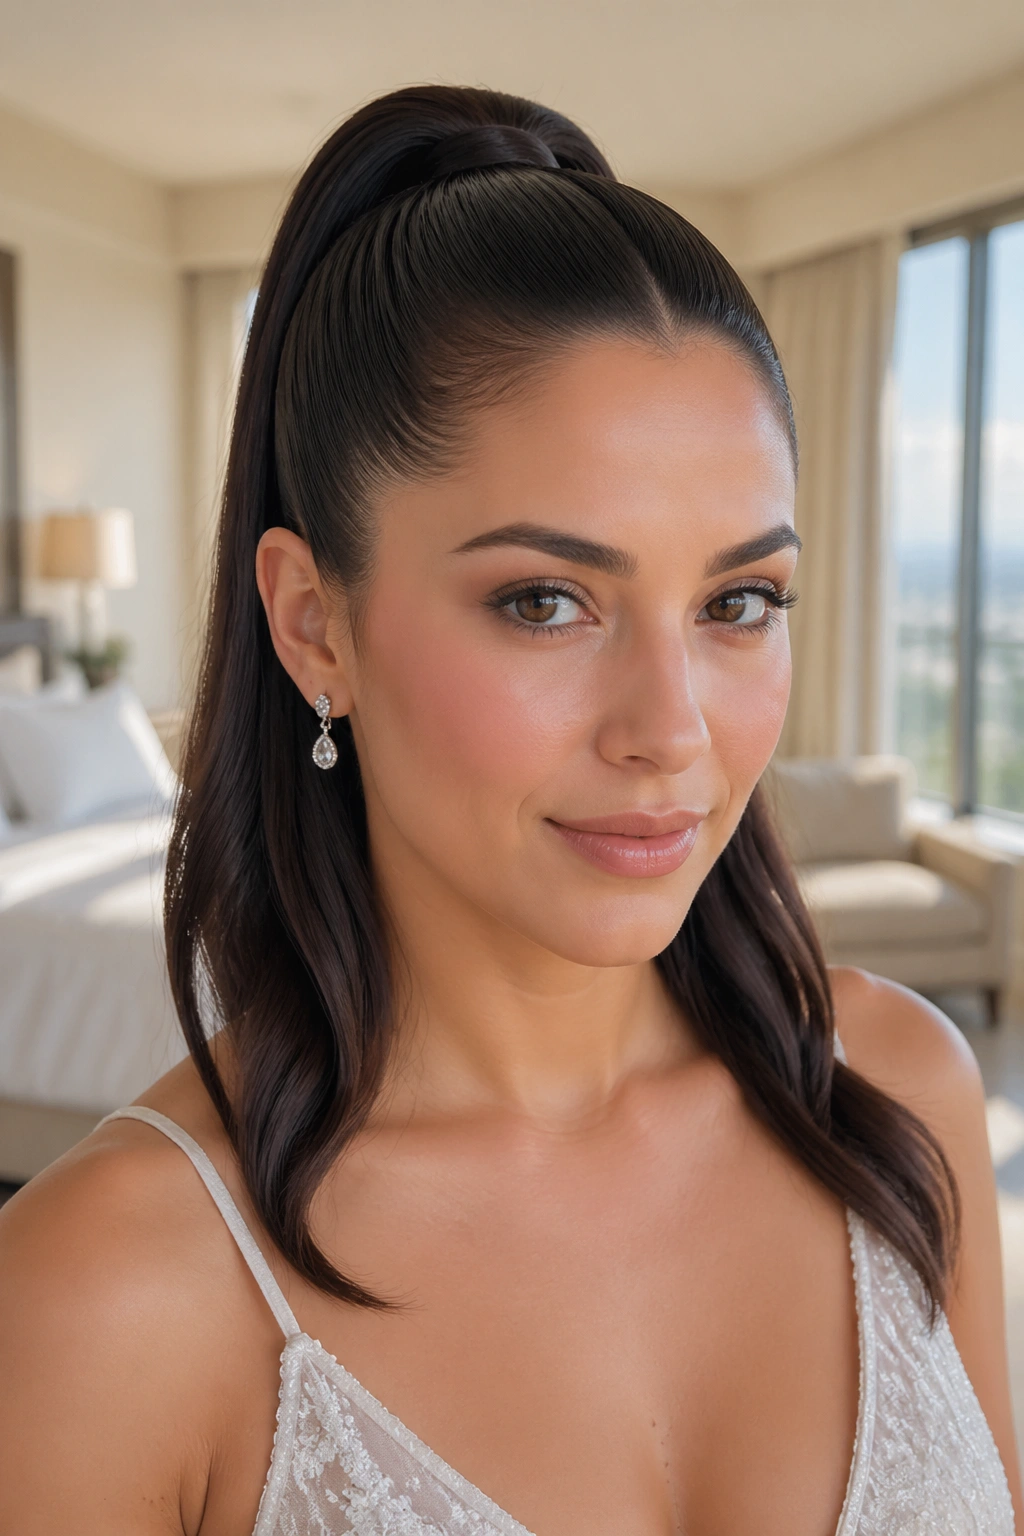
For a modern, polished wedding vibe, a sleek high half-up ponytail with carefully maintained smoothness looks sophisticated on fine hair. The key is treating the smooth, sleek sections with the right products and techniques so they don’t look thin or limp.
Making Sleek Work for Fine Hair
Fine hair can actually look more refined and elegant in a sleek style than in a super-textured one, as long as you take steps to add shine and smoothness. A slicked-back, polished look reads as intentional and bridal rather than as a consequence of thin hair. The trick is using the right products and blow-dry technique to create density, then maintaining that smoothness with strategic styling.
Blow-Drying for Sleek Volume
Start by applying a volumizing mousse to damp roots before blow-drying — this creates micro-texture at the roots that adds fullness without visible waviness. Blow-dry your entire head with a round brush, lifting the crown section as you dry to create height. Once completely dry, use a flat iron on a low heat setting to smooth the outer layer of your hair, creating that polished finish while maintaining the internal volume you created with the round brush.
Creating the High Half-Up Gather
Take a section from each side of your head (about 2-3 inches wide from temple to ear level) and smooth each section firmly with a fine-tooth comb. Gather these sections plus some crown hair into a high ponytail at the back of your head, securing very tightly with a clear elastic — sleek styles require a very secure gather, otherwise they look messy rather than polished on fine hair. Wrap a thin piece of your own hair (or a thin metallic ribbon) around the elastic to conceal it.
Finishing for a High-Fashion Look
Apply a lightweight smoothing serum to your fingers and smooth any flyaways down against the head, working from the base of the ponytail outward. Add a delicate hair comb or decorative clip at the base of the ponytail if desired. Consider adding a few crystal bobby pins placed vertically down the center of the ponytail section for a contemporary bridal touch.
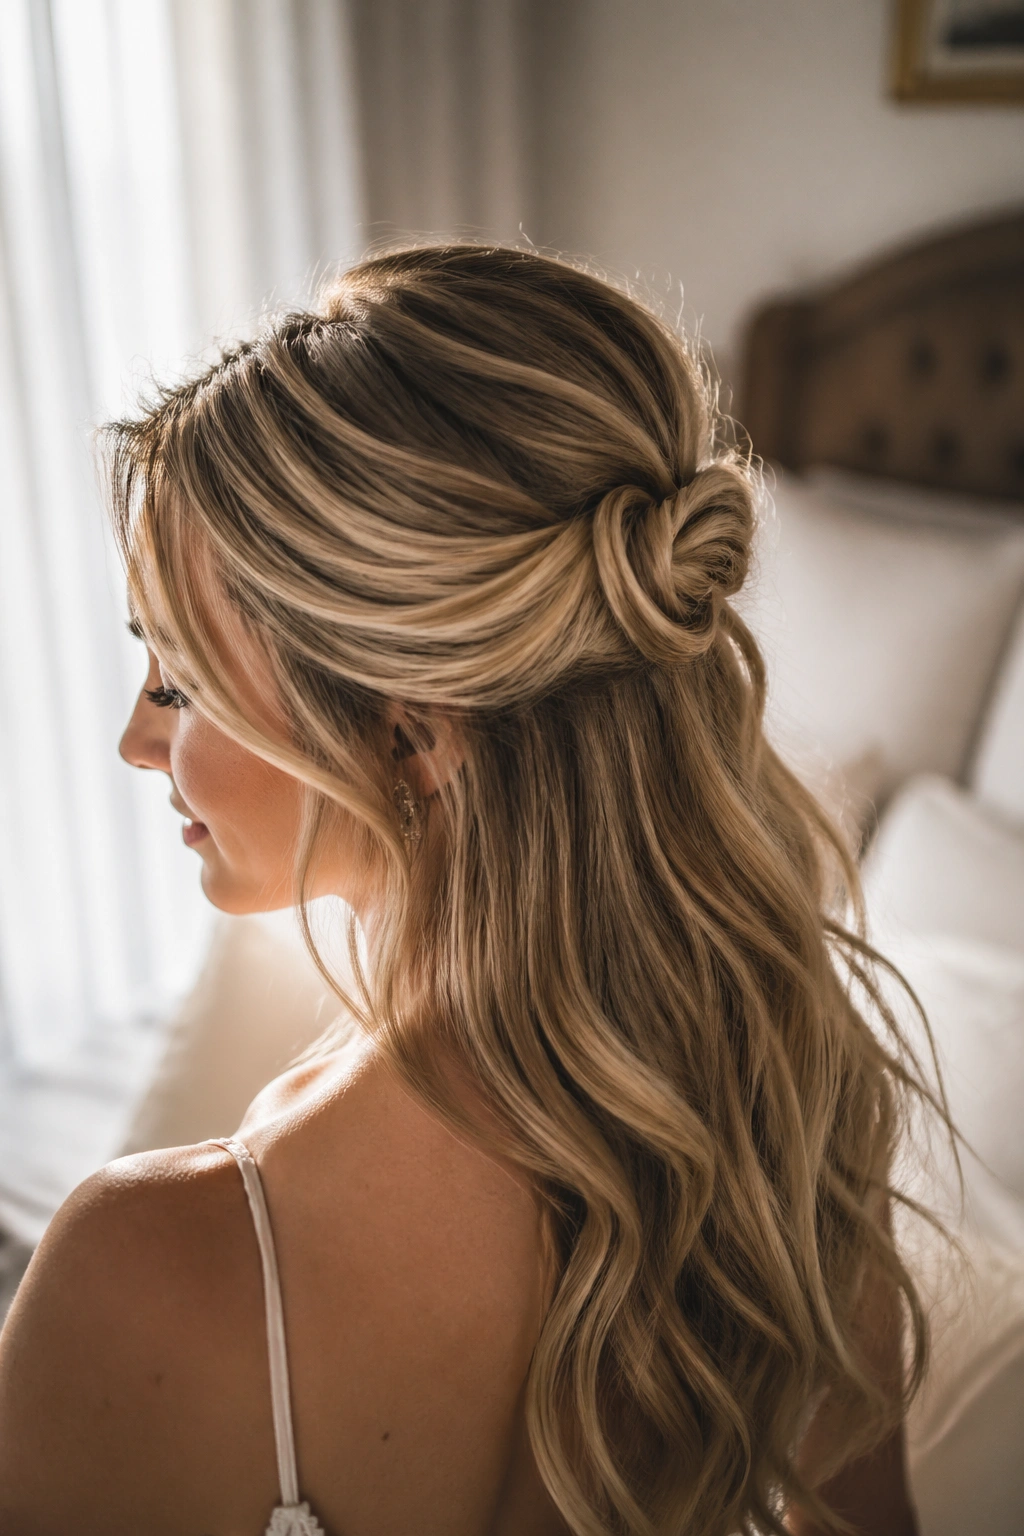
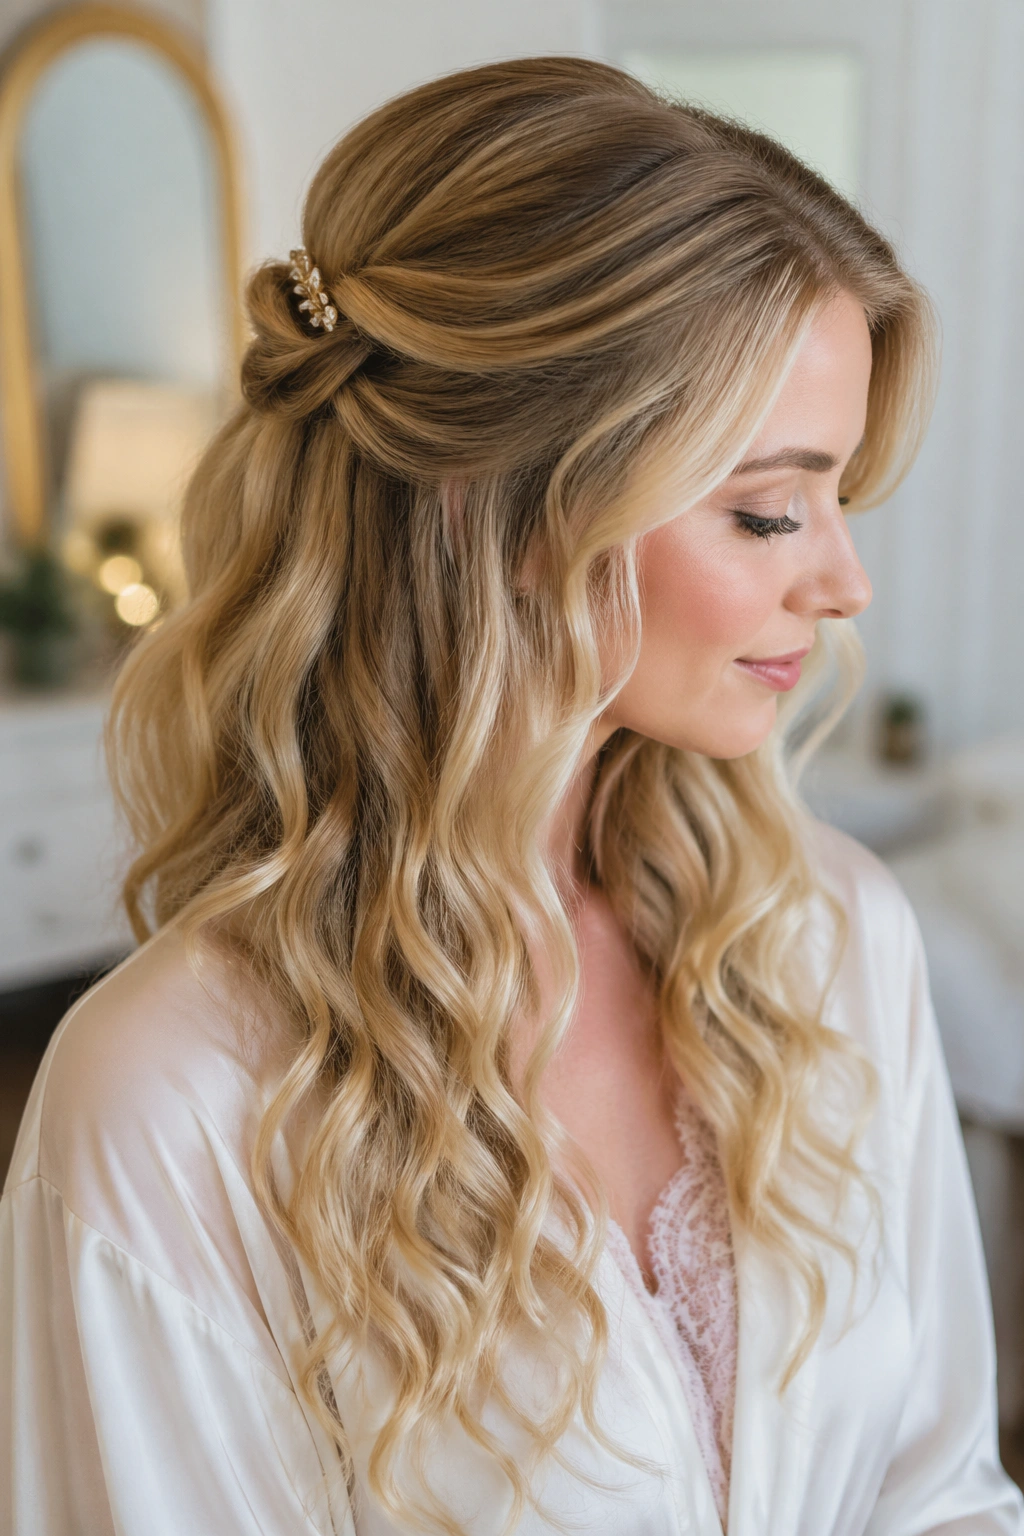
7. Soft Loop Half-Up Style
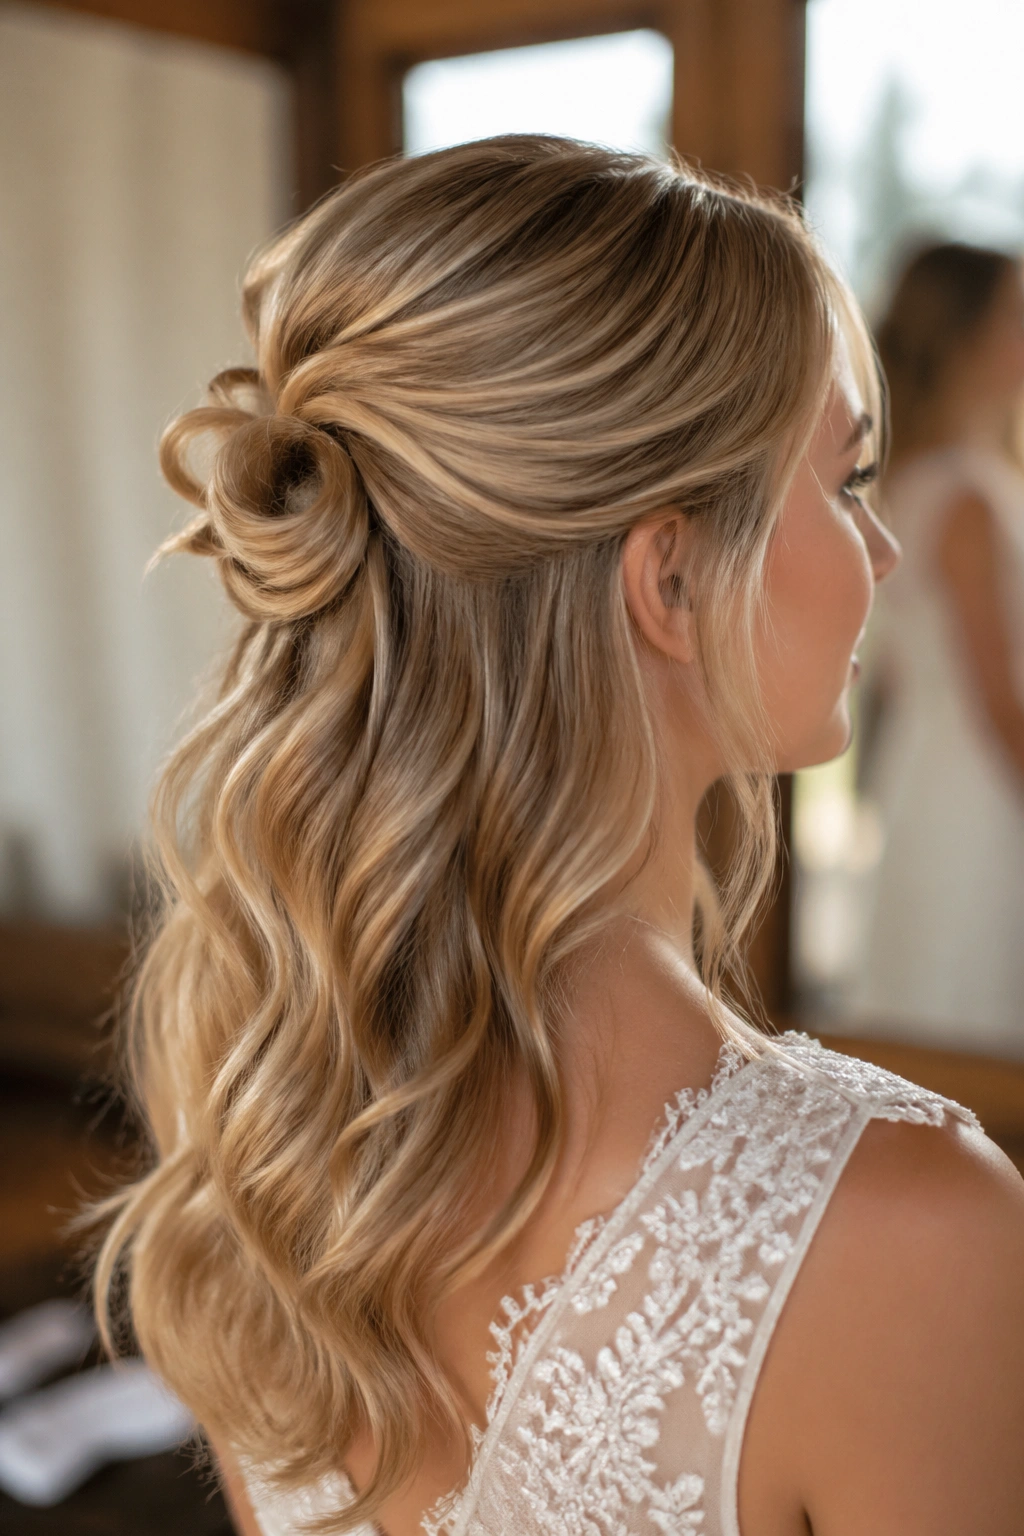
A soft loop — where hair gathered into the half-up section is folded back on itself and pinned to create an elegant loop shape — adds dimension and visual fullness without requiring tight, damaging tension on fine hair roots.
The Visual Magic of Looped Hair
A loop creates a 3D shape that photographs beautifully and reads as intentional bridal styling rather than a simple ponytail. Because the gathered hair is folded and pinned rather than tied tightly, fine hair doesn’t get stressed or flattened. The loop itself catches light and creates shadow, adding visual fullness and texture.
How to Create a Soft Loop
Start with soft, textured waves throughout your hair. Take a small section from each temple and bring both sections to the back of your head, gathering them loosely with a clear elastic positioned about 2-3 inches below your crown. Don’t make the gather too tight — you want to maintain the wave texture and softness. Now, instead of leaving the ponytail hanging, fold it upward so the ends touch the base of the gather (or come close to it), creating a loop shape. Secure the loop in place by pinning the ends of the ponytail to the base of the gather using 3-4 bobby pins that match your hair color, positioning them underneath the loop where they won’t show.
Enhancing the Looped Section
Gently pull on the outer edges of the loop to soften and enlarge it — this creates a fuller, more romantic appearance. Leave several face-framing pieces loose and in their natural wave state. Add a delicate crystal hairpin or pearl clip at the base of the loop, positioning it where the pins are gathered, to create a bridal focal point.
Why This Works So Well for Fine Hair
The loop distributes the weight of your gathered hair across multiple pins rather than concentrating it in one spot, so there’s less stress on fine roots. The folded structure also means the gathered section appears much fuller than it actually is — the loop creates bulk through shape rather than requiring thick, heavy hair.
8. Asymmetrical Half-Up with Volume
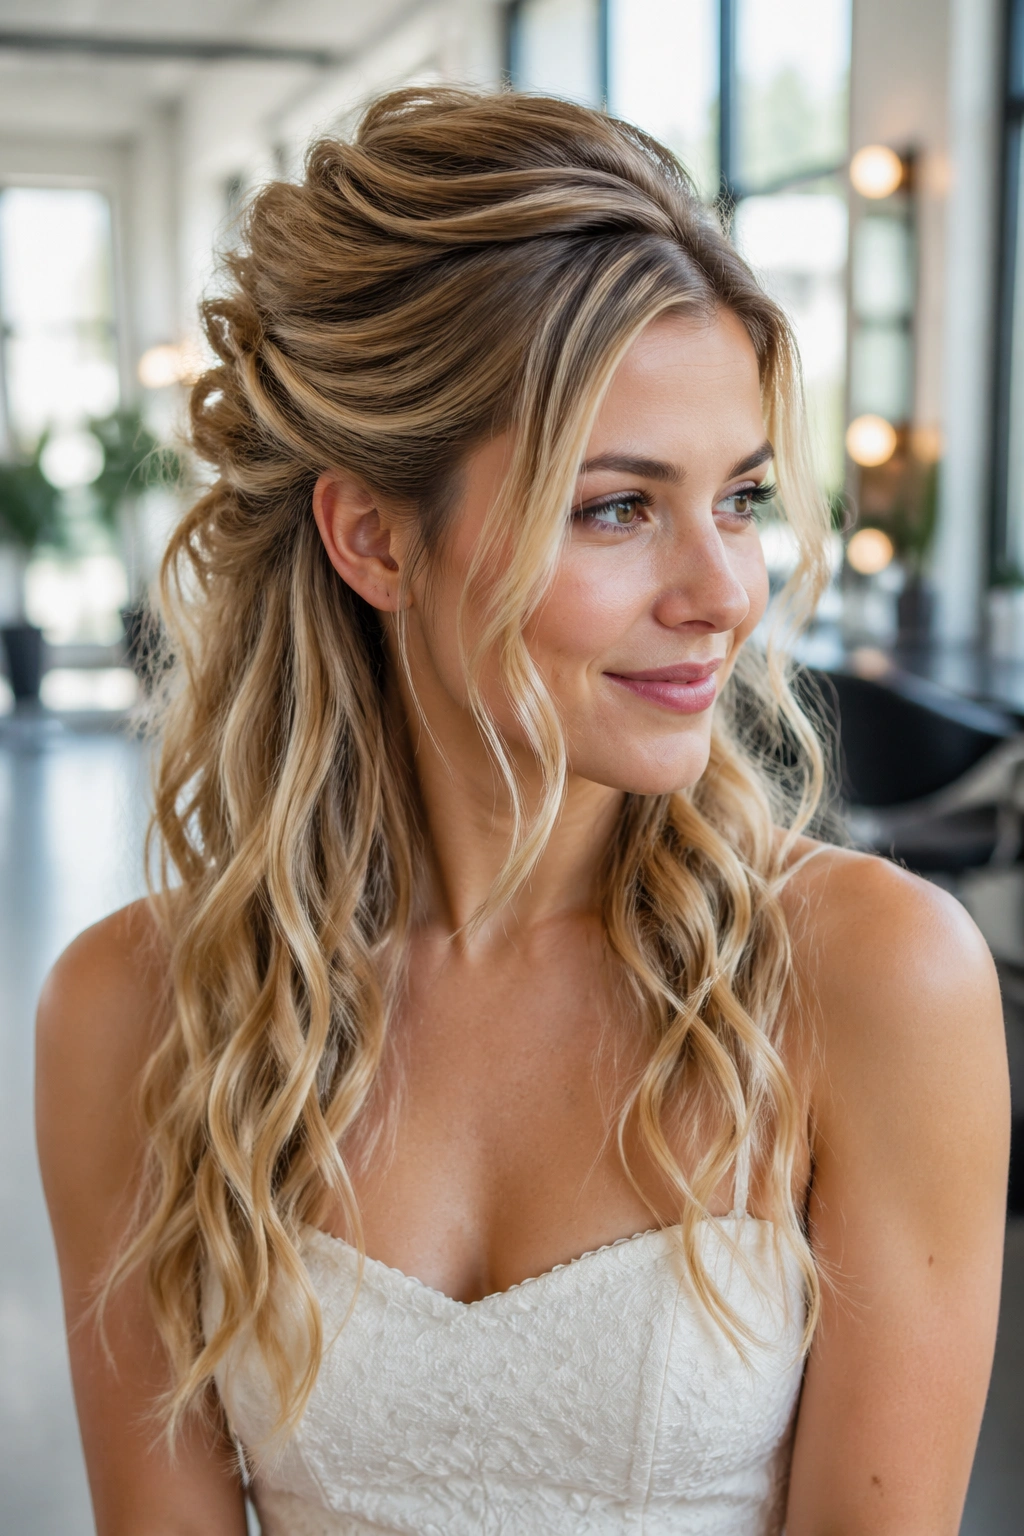
An asymmetrical gather — where one side of your hair is swept back further than the other — creates visual interest and movement while allowing you to play with how much hair you gather on each side. This works beautifully on fine hair because you can customize how much gather feels right for your hair’s density.
Why Asymmetry Adds Visual Fullness
Asymmetrical styles naturally draw the eye around the face rather than letting it settle on any one flat area. The movement and imbalance create visual interest that distracts from any fineness in the hair texture. It’s also inherently more modern and artistic than a perfectly symmetrical style.
Creating the Asymmetrical Gather
Blow-dry your hair for volume, concentrating on lifting the crown and creating height through the texture. Create soft waves throughout, then take a larger section of hair from one side of your head and a smaller section from the opposite side. Bring both toward the back, but position the larger section slightly higher and the smaller section lower, creating an offset gather point. Secure with bobby pins that match your hair color, using 4-5 pins arranged in a cluster to distribute weight.
Styling the Loose Side
The side with less gathered hair should remain full and wavy, with several strands left completely loose to frame that side of your face. The asymmetry means one side of your hair stays fuller and more visible than the other, which actually works in fine hair’s favor because it emphasizes softness and movement rather than requiring all of your hair to carry visual weight.
Adding Drama Thoughtfully
Consider adding a single decorative comb or pearl hairpin on the asymmetrical gather point — this draws the eye to that focal point and makes the style feel intentional rather than accidental. Make sure the placement is off-center to enhance the asymmetrical effect.
9. Half-Up with Decorative Clips
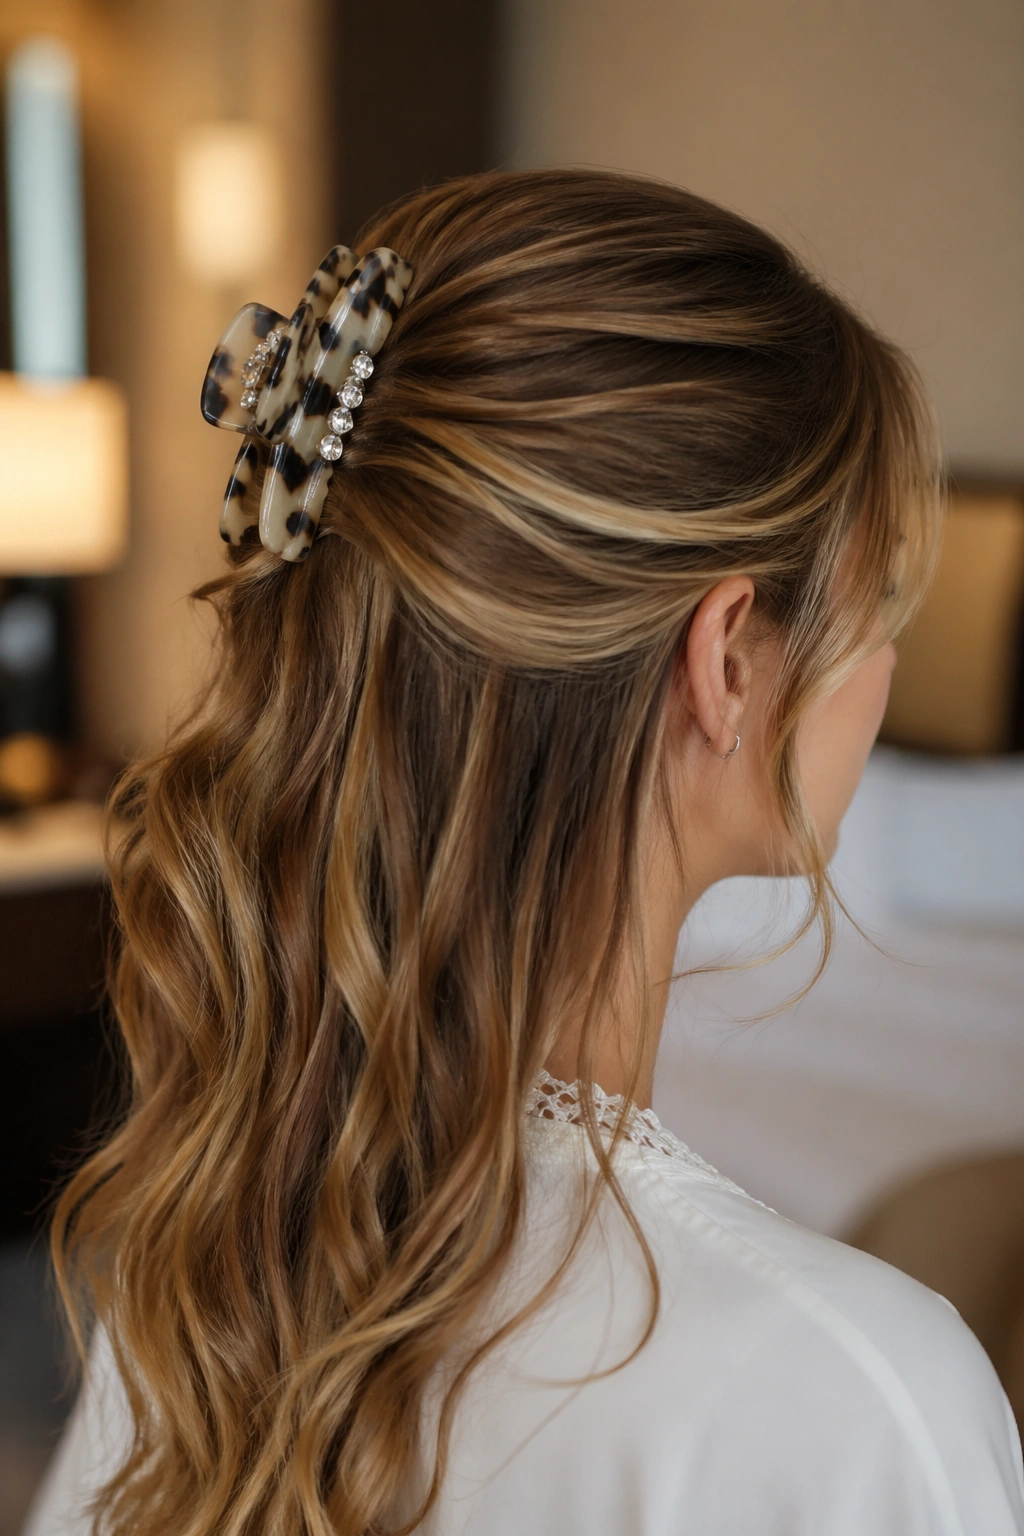
Using decorative clips — vintage-style tortoiseshell, pearl-studded, or crystal-encrusted — instead of traditional elastic and bobby pins instantly elevates a half-up style. The clips themselves become part of the design, adding visual interest and texture without requiring extra hair density.
How Clips Create Optical Fullness
Decorative clips catch light and create visual interruption, which draws the eye away from evaluating hair density. A pretty clip placed at a gather point is a design element, not a hair-holding device, so any fineness in the actual hair becomes secondary to the jewelry-like clip itself. This is especially effective for fine hair because the clip does some of the visual heavy lifting.
Gather and Clip Placement
Create soft waves throughout your hair and add a light texturizing spray for grip. Take sections from both temples and gently twist or braid them toward the back of your head, bringing them together at a point slightly below your crown. Instead of securing with elastic, use a decorative clip to gather everything at that point. The clip should be substantial enough (about 2-3 inches wide) that it looks like an intentional design choice rather than a practical necessity.
Styling the Gathered Section
Gently backcomb the gathered section lightly before clamping the clip down — this creates micro-texture that grips the clip and prevents slipping. You can also lightly mist the gathered section with hairspray before applying the clip. Make sure your clip is tight enough that it won’t slip throughout the day, especially if you’re moving around during a ceremony or reception.
Mixing Metals and Materials
Consider using multiple smaller clips arranged in a cluster rather than one large clip — this distributes weight and looks more intentional. Mix finishes if you like (rose gold and pearl, for example) to create visual interest. The clips themselves tell the story of the style, so make them count.
10. Textured Knot Half-Up
A soft knot — where sections of hair are literally tied together rather than twisted or braided — creates a romantic, undone-looking style that actually holds beautifully on fine hair because the knot structure grips the hair strands.
Why a Knot Works Better Than You’d Expect
A knot naturally creates grip and texture, especially if you backcomb the sections before tying them. The knot structure distributes tension across multiple strands rather than concentrating it in one point, so fine hair roots don’t get stressed. A textured knot also reads as romantic and bridal rather than undone or messy.
Tying a Hair Knot
Take a section of hair from your left temple (about 1.5-2 inches wide) and a section from your right temple of similar width. Bring both sections to the back of your head and literally tie them together in a simple knot — literally cross right over left, pull tight, then cross right over left again. You’re creating an actual knot shape with your hair, the same way you’d tie a ribbon. Adjust the knot so it sits prettily at the back, and secure the ends with a bobby pin positioned underneath where it won’t show.
Adding Texture and Softness
Before you tie the knot, lightly backcomb each section with a fine-tooth comb — this adds grip so the knot doesn’t slip, and it creates subtle texture that makes the style feel intentional rather than accidentally simple. After you’ve tied the knot, gently pull on the outer edges to loosen it slightly, creating a softer, fuller appearance. Leave face-framing pieces completely loose and wavy around your temples and cheekbones.
Styling Variations
You can tie multiple knots if you want a more elaborate style — two small knots side by side, or one knot on top of another. Each knot adds visual interest without requiring thick hair. Just make sure each knot is individually secured so nothing slips during dancing or movement.
11. Half-Up with Wispy Front Pieces
Sometimes the most elegant approach is the simplest: a clean, small half-up gather paired with intentionally loose, wispy pieces around the face. The wispy pieces frame your features and add softness while the gathered section stays clean and organized.
The Power of Intentional Wispy Pieces
Wispy, face-framing pieces are especially flattering on fine hair because they soften the face and create movement right where people look — at your features and expression. By making these pieces intentional rather than accidental, you transform fine hair’s natural tendency to fall softly into a deliberate styling choice. It’s romantic, bridal, and incredibly flattering.
Creating the Wispy Effect
Before you begin any styling, identify 1-2 inches of hair on each side of your face that you’ll leave completely loose and out of any gather. Blow-dry your entire head for volume, then create soft waves throughout. Now, take a section from your crown area (not your face-framing pieces — these must stay separate and loose) and bring it back to gather with a small section from behind each ear. Secure very gently with a clear elastic, creating a small gather point low on the back of your head.
Styling the Loose Pieces
Your intentionally loose face-framing pieces should fall naturally from about temple height or slightly above, framing your cheekbones and jawline. You can encourage them to wave by curling them with a small curling iron, but you want them to feel soft and natural, not rigidly waved. Some pieces falling out of the gather as the day goes on is actually perfect with this style — it adds to the romantic, undone feeling.
Why This Is Ideal for Fine Hair
This style puts visual emphasis on your face and features rather than on hair density. The simple gather at the back doesn’t require thick, substantial hair to look polished. The wispy pieces do the design work, and they’re naturally flattering on fine hair because they’re supposed to be delicate.
12. Braided Halo Half-Up
A braid that wraps partway around your head like a crown, with additional hair gathered into a half-up section underneath, creates a romantic, ethereal style. The halo braid adds perceived fullness across the back of the head while the half-up gather keeps everything secure.
Building a Halo Structure
Start with soft, textured waves throughout your hair. On one side of your head, take a 1-inch section at temple level and begin a loose braid heading toward the back. As you braid, add small sections of hair from the side of your head, pulling them into the braid as you go — this creates the halo effect, with the braid appearing to float around the back of your head. Braid only to a point slightly behind your opposite ear, then secure the end with a small clear elastic. Do the same from the opposite temple, braiding toward the back and meeting the first braid at approximately the same point.
Adding the Half-Up Gather
Once both halo braids are in place, gather additional hair from your crown and sides, bringing it together where your braids end. Secure with bobby pins arranged underneath where they won’t show. The two braids serve as the visual focal point, while the additional gathered hair completes the half-up structure and prevents a sparse appearance.
Enhancing the Halo Effect
Gently pull on the outer edges of both braids to loosen and widen them. This creates a fuller, softer halo that photographs beautifully and adds perceived volume. Leave several pieces loose around your face, especially at the temples where the braids began, to create a romantic, undone feel.
13. Half-Up Twisted Crown with Face-Framing Pieces
A style where two twists spiral up and around the back of your head, creating a crown-like effect while additional hair falls loose below, is romantic and sophisticated. This works beautifully on fine hair because the twists create visual texture while the loose hair below maintains the soft, romantic feeling.
Creating the Twisted Crown
Start with textured waves throughout your hair. Take a 1-inch section at one temple and twist gently toward the back of your head, moving slightly upward as you go — you’re creating a gentle spiral that moves toward the crown rather than straight back. Secure the end of this twist with a bobby pin positioned at the back of your head. Do the same from the opposite temple. The two twists should meet at the back center, creating a crown effect.
Securing Without Heaviness
Use 2-3 bobby pins per twist rather than one, spacing them along the length of the twist to distribute weight. This prevents stress on fine hair roots and keeps the twists in place without needing tension. The twists themselves should feel loose and soft, not tight and pulled, to maintain that romantic aesthetic.
Face-Framing and the Loose Section
Leave several pieces completely loose at your temples and along your hairline — these wispy pieces frame your face and add to the romantic effect. All of your hair below the twisted crown remains down and loose, cascading from where the twists end. This combination of structure (the twisted crown) with softness (the loose hair below) is especially flattering on fine hair.
Adding Bridal Details
Consider threading a thin ribbon or adding a delicate pearl comb where the two twists meet at the center back. This creates a focal point and adds a bridal touch without requiring additional hair density.
14. Soft Pinned Half-Up with Curls
A style where a small amount of hair is gathered and secured with decorative pins, while the rest of your hair is curled and left loose, creates a romantic, vintage-inspired look. The emphasis is on beautiful curls rather than a large gathered section, which works perfectly for fine hair.
Creating the Curl Foundation
Start with clean, dry hair and apply a volumizing mousse to damp roots before blow-drying. Once completely dry, use a 1.25-inch curling iron to curl your entire head, wrapping sections away from your face and leaving each curl in the iron for 8-10 seconds. Work systematically through all of your hair, creating ringlets throughout. Allow the curls to cool for a few minutes, then gently brush through them with a paddle brush to transform the ringlets into soft waves.
The Half-Up Gather
Once your waves are established, take a small section from each temple and gently twist each toward the back. Bring both twists together at a point mid-way down the back of your head and secure with 2-3 decorative hairpins that match your hair color or complement your aesthetic. The gather should be small and delicate — the star of the show is the curls, not the gather.
Why This Works for Fine Hair
By emphasizing curls throughout and keeping the gathered section small, you ensure that the overall style reads as full and romantic rather than sparse. The curls catch light and create perceived volume, while the small gather keeps everything organized without requiring thick hair to look polished. This approach celebrates fine hair’s natural ability to hold curl beautifully.
Maintaining Curls Through the Day
Use a flexible-hold hairspray immediately after curling, while the curls are still warm. Fine hair benefits from this extra setting step. Avoid touching or running your fingers through the curls repeatedly throughout the day, as this causes them to break down faster. A light hairspray mist before your reception can refresh curls that have started to relax.
15. Half-Up Ribbon Weave Style
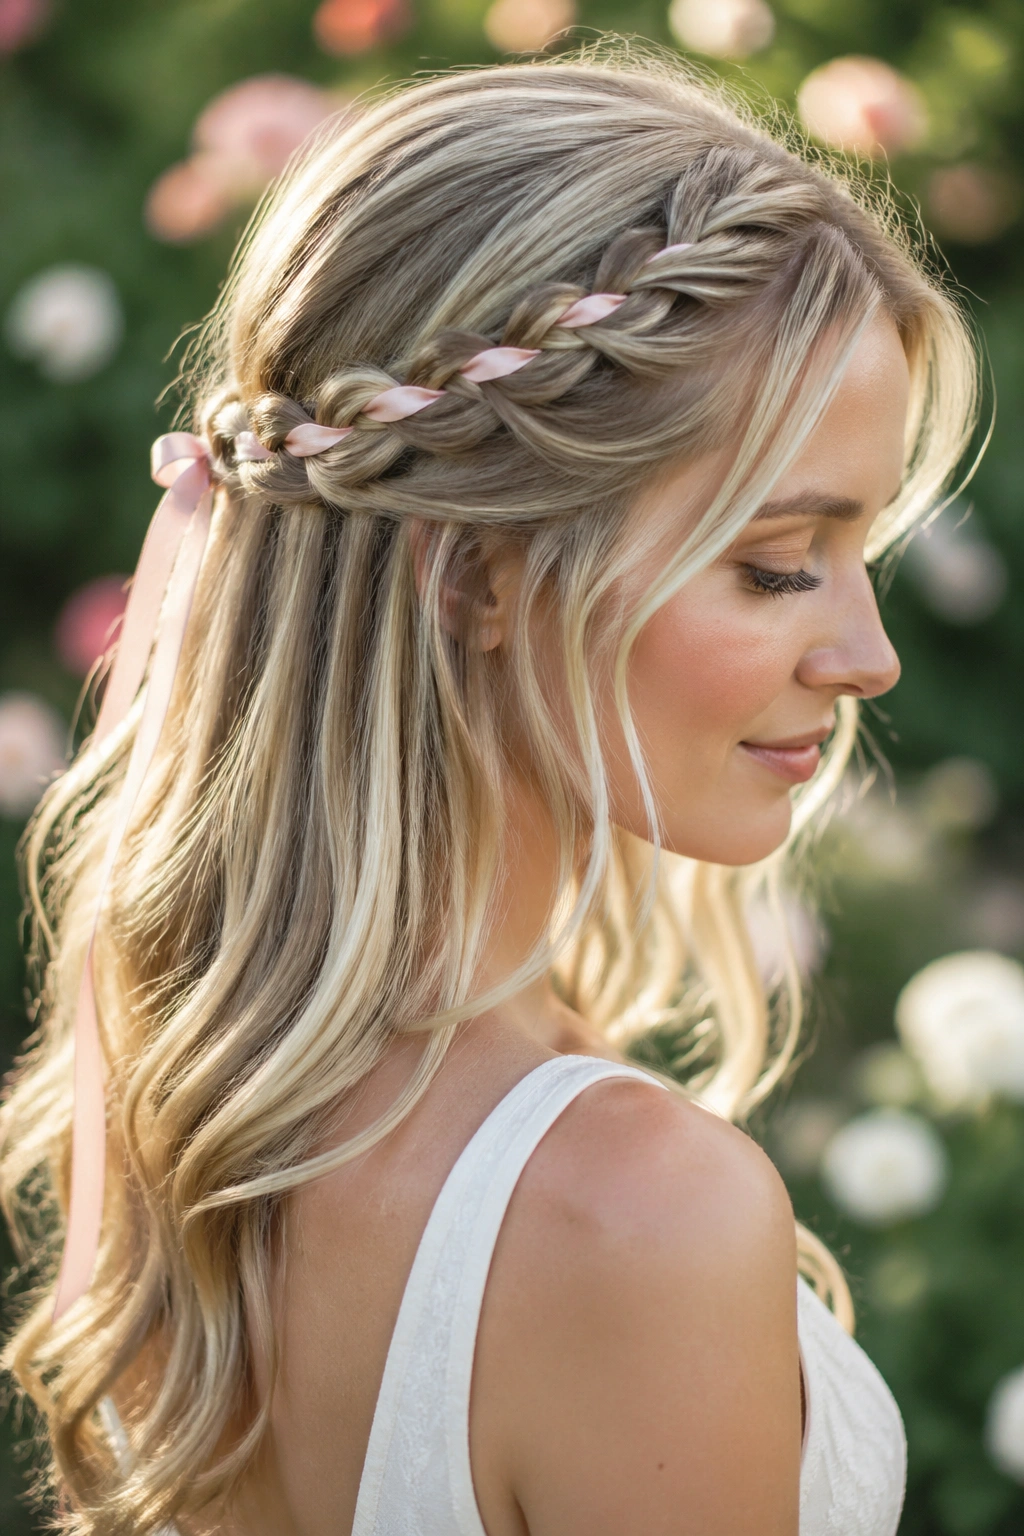
A romantic style where a thin ribbon is woven through a small braid or through the hair in the half-up section, creating an intricately detailed look that actually requires less hair volume than you’d think. The ribbon does much of the visual work.
Incorporating Ribbon Into Your Style
Start with soft, textured waves throughout your hair. Take a small section from your crown and create a loose, three-strand braid. As you braid, gently weave a thin ribbon (silk or satin works best and won’t damage fine hair) through the braid, threading it over and under as you go. You’re literally incorporating the ribbon into the braid structure so it becomes part of the styling.
Gathering with Ribbon Integration
Bring your ribbon-woven braid to the back of your head along with additional hair from your sides and crown. Gather everything into a small half-up section and secure with bobby pins. The ribbon serves as both a design element and a functional component that helps hold everything in place. You can let the ribbon ends fall loose from the gathered section for a romantic trailing effect.
Choosing the Right Ribbon
Select a ribbon in a color that complements your dress and overall aesthetic — ivory, blush, gold, or silver all work beautifully for weddings. A narrow ribbon (about 0.5 inches wide) works better on fine hair than a wider one, which can look overwhelming. Silk ribbons are superior to synthetic ones because they don’t snag fine hair strands.
Creating Visual Depth
The woven ribbon creates immediate visual interest and texture, so fine hair reads as intentionally designed rather than sparse or thin. The ribbon also adds a luxe, heirloom feel to the style. Consider adding a few small pearl or crystal pins where the ribbon meets the gathered section for extra bridal polish.
Final Thoughts
Fine hair looks its absolute best when styling choices emphasize movement, texture, and romantic softness rather than trying to create volume or heaviness. The styles above work because they celebrate fine hair’s natural qualities — the way it catches light, how beautifully it holds curls and waves, and how elegantly it frames the face — while using strategic techniques like gentle backcombing, flexible-hold products, and multiple small pins to create security without stress.
The most important step you can take is booking a trial run with your wedding day stylist at least a month before your wedding. Fine hair can behave differently from person to person, and your stylist needs to understand your specific hair’s texture, thickness, and how it responds to heat styling and products. What works beautifully for one fine-haired bride might need tweaking for another.
Remember that a half-up style is supposed to feel romantic and soft, especially on fine hair. Some pieces falling out, some waves relaxing as the day goes on, and overall softness in the gathering are all completely intentional and beautiful. You’re not aiming for a style that looks freshly done at midnight — you’re aiming for a style that looks effortlessly gorgeous in every photograph and feels comfortable and confidence-building to wear all day long.