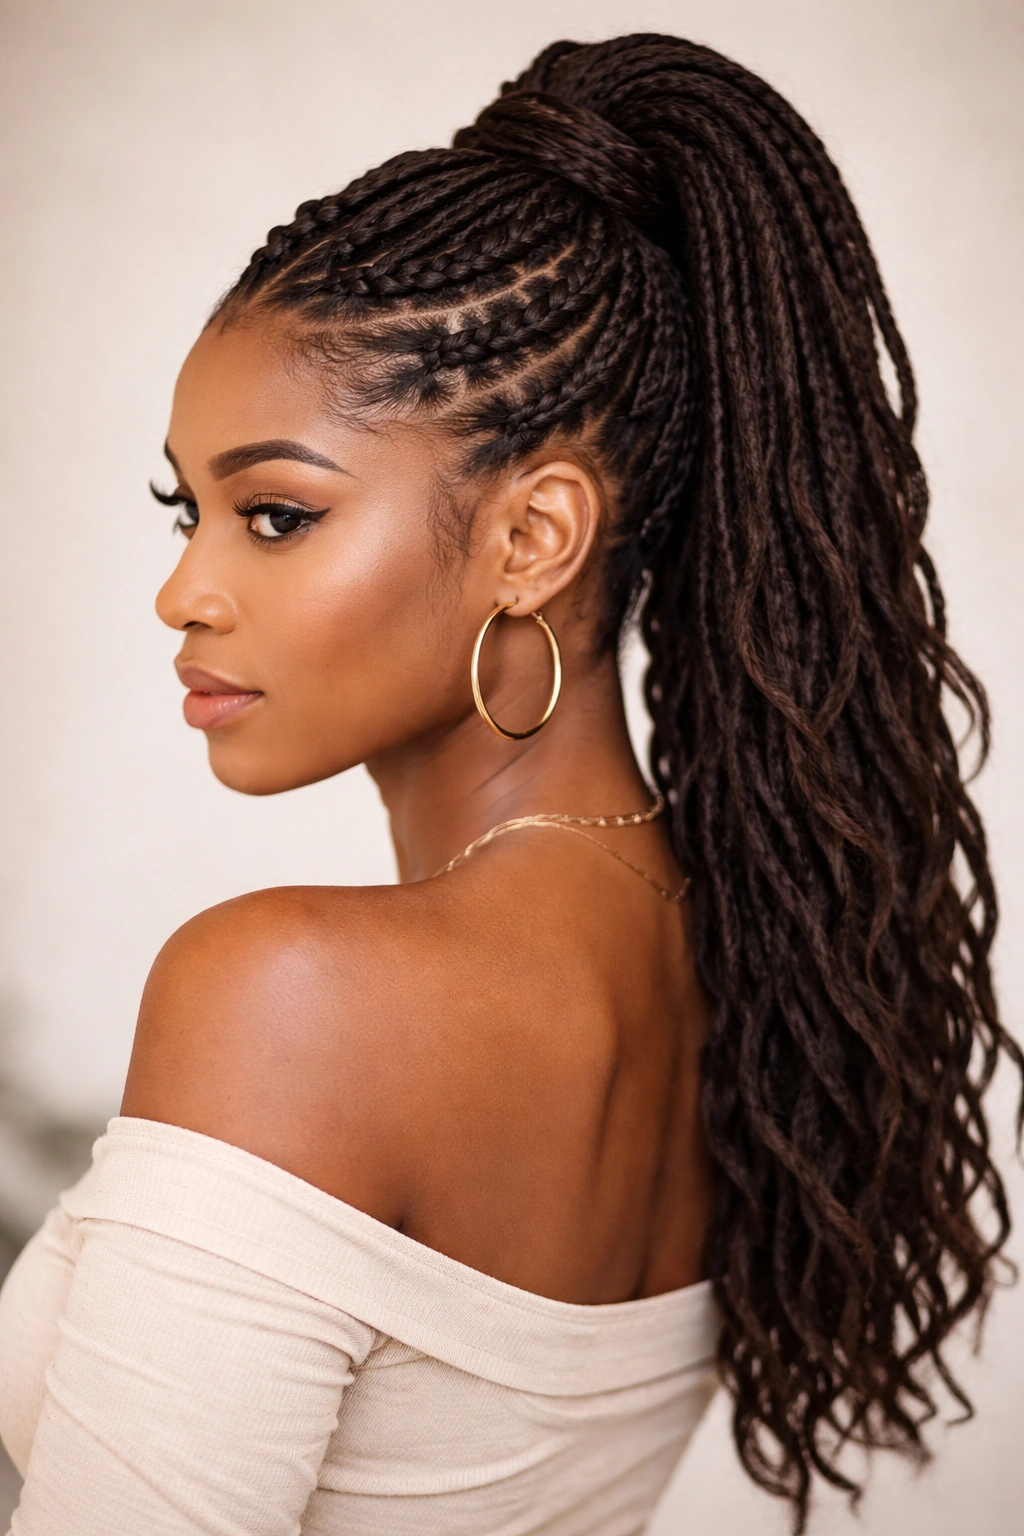
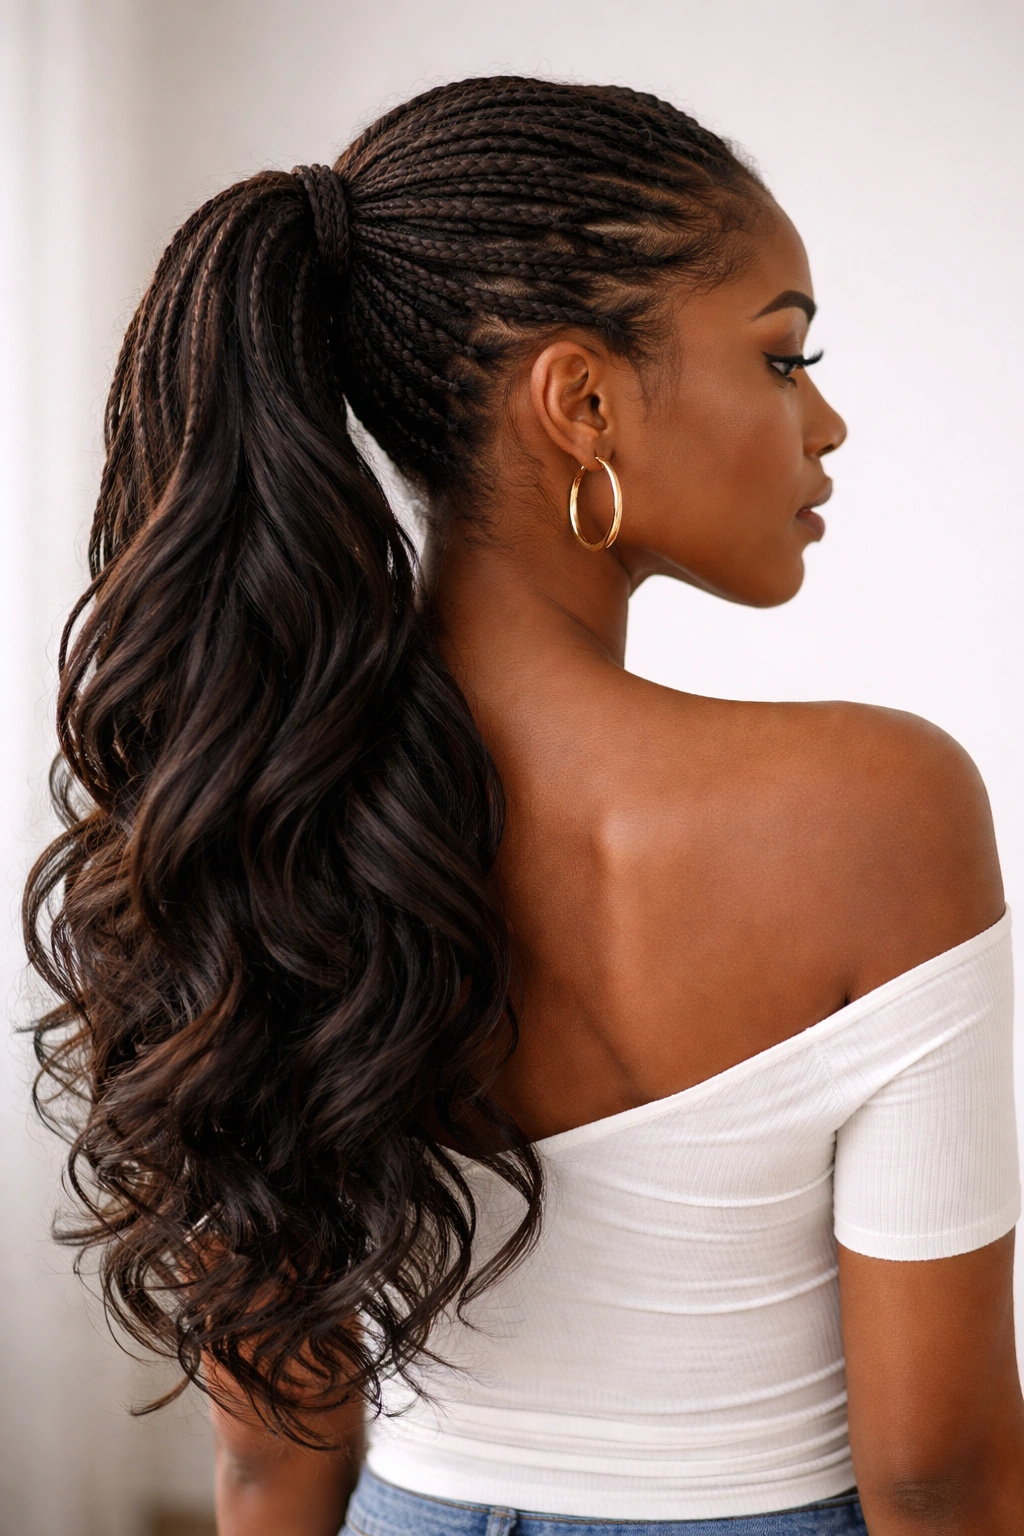
Locs offer incredible versatility when it comes to styling, and one of the most transformative ways to switch up your look is with a weave ponytail. Whether you’re looking for a sleek, polished style or something with more texture and dimension, weave ponytails designed specifically for locs can give you a fresh aesthetic without requiring a long-term commitment to a completely different hairstyle. The beauty of this approach lies in how the added hair blends seamlessly with your natural locs, creating styles that look intentional and elevated rather than temporary.
The technique of incorporating weave into loc ponytails has become increasingly refined over the years. Stylists have learned exactly how to anchor synthetic or human hair extensions to locs in ways that don’t cause damage, don’t slip out, and create stunning visual impact. Unlike traditional box braids or twists where the weave becomes part of the protective style’s structure, weave ponytails give you the freedom to experiment with different heights, textures, and shapes while keeping your locs protected underneath. This means you can go bold one week and minimal the next without constantly manipulating your natural hair.
What makes weave ponytails specifically great for locs is that you’re not trying to blend two entirely different hair textures in a way that looks unnatural. Your locs have structure, weight, and their own unique aesthetic. When you add quality weave that complements rather than fights against that character, the result feels cohesive. The ponytails in this collection range from ultra-sleek and professional to playful and expressive — each one offers a different way to style your locs depending on your mood, the occasion, or simply what you want to see in the mirror.
1. The Sleek High Weave Ponytail
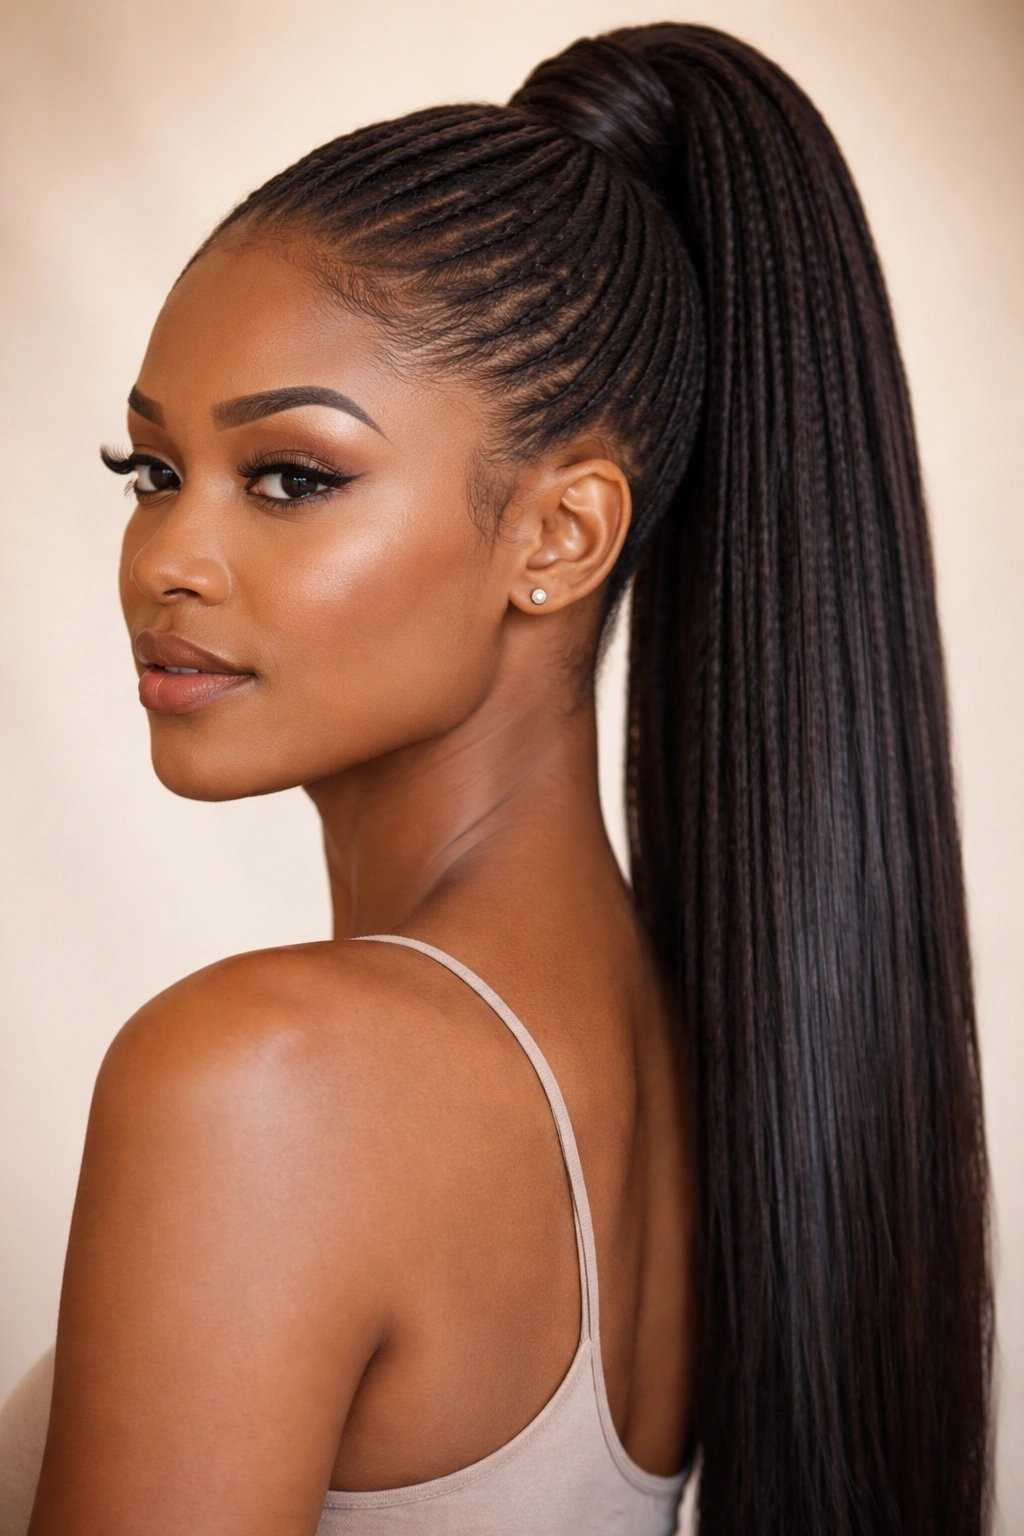
A sleek high weave ponytail is the go-to style when you need to look polished and put-together without spending hours on your styling routine. This look works by gathering your locs at the crown and securing them tightly, then adding a smooth weave layer that extends from the base of the ponytail downward. The key to nailing this style is making sure the weave sits flush against your locs and has a shiny, smooth finish that catches light beautifully.
How to Achieve the Look
Start by creating a smooth parting at the crown where you want the ponytail to sit, using a fine-tooth comb or edge control to smooth your edges. Gather your locs into a high ponytail at that point, securing them with a elastic band that matches your hair color. Next, create thin feed-in braids using your loose locs and the weave hair, wrapping these braids around the base of the ponytail to conceal the elastic and create a finished appearance. Continue adding weave down the length of the ponytail, creating that signature sleek texture by smoothing it as you go and using light hold products to maintain shine.
What Makes It Work
- Precision matters: The tighter and smoother your initial ponytail base, the better the final result looks
- Hair texture: Straight or lightly wavy weave works best for this style; curly textures won’t give you that polished finish
- Maintenance: This style holds up beautifully for 5-7 days with minimal upkeep if you pineapple it at night (using a silk or satin pillowcase)
- Occasion-ready: Perfect for work environments, formal events, or whenever you want an intentional, refined appearance
Pro tip: Use a fine spray of lightweight hairspray over the smooth weave sections to keep them looking fresh between washes without creating a heavy product buildup.
2. The Voluminous Bubble Ponytail
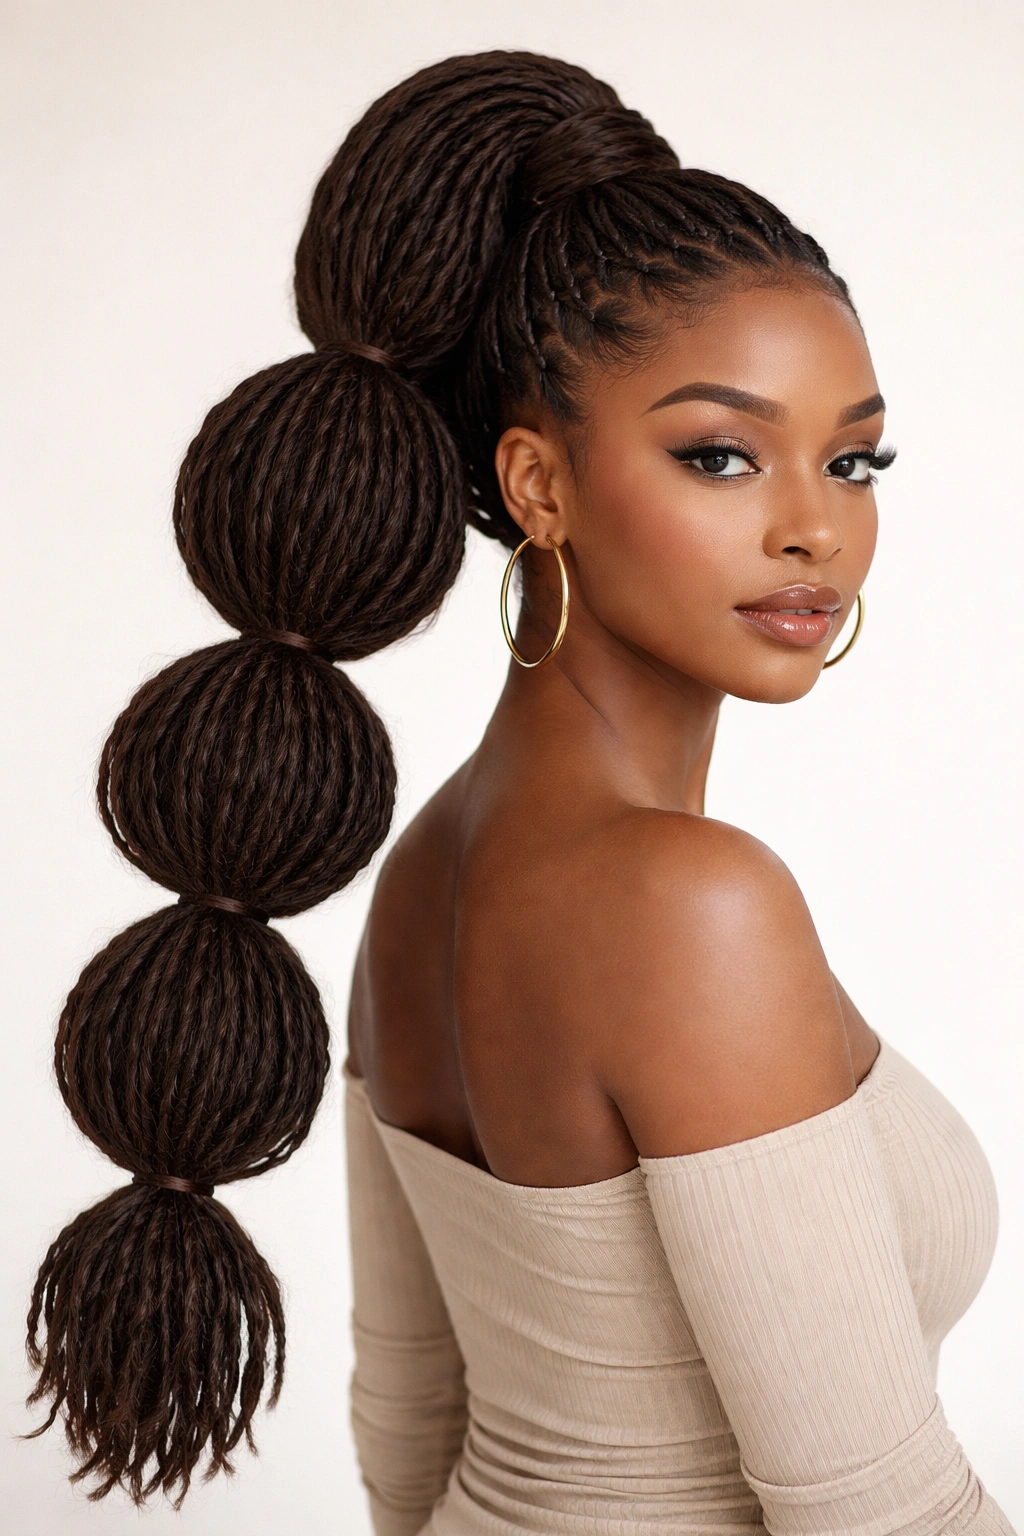
If you’re craving maximum impact and personality, the bubble ponytail is where the magic happens. This style takes a high ponytail and breaks it into distinct, rounded sections separated by small elastic bands, creating that signature bubble effect. With weave added, you’re amplifying the volume and creating a really eye-catching silhouette that moves and bounces as you walk.
Building the Bubble Effect
Secure your locs into a high ponytail first, making sure it’s tight enough at the base to support the structure you’re about to create. Take a section of weave (roughly 2-3 inches wide) and incorporate it into the ponytail right at the base, beginning to braid or twist it in with your locs. About 3-4 inches down from the elastic, place another small elastic band around both your locs and the weave, creating your first bubble. Repeat this process down the entire length of the ponytail, spacing each band roughly 3-4 inches apart. As you place each band, gently pull upward on the section above it to create that puffed, rounded bubble shape.
Pro Styling Moves
- Texture variation: Curly or kinky weave creates more dimension in each bubble; straight weave looks more dramatic and sleek
- Strategic placement: Make your bottom bubbles slightly larger than the top ones for a flattering silhouette that feels balanced
- Elastics count: Colored elastics, metallic bands, or beaded hair jewelry placed at each bubble section can elevate this style significantly
- Refresh between wears: Gently fluff each bubble with your fingers or a wide-tooth comb to keep the shape defined throughout the week
A bubble ponytail typically lasts 5-7 days without looking tired, and you can take it down and restyle it multiple times before that point without damaging your locs.
3. The Twisted Rope Weave Ponytail
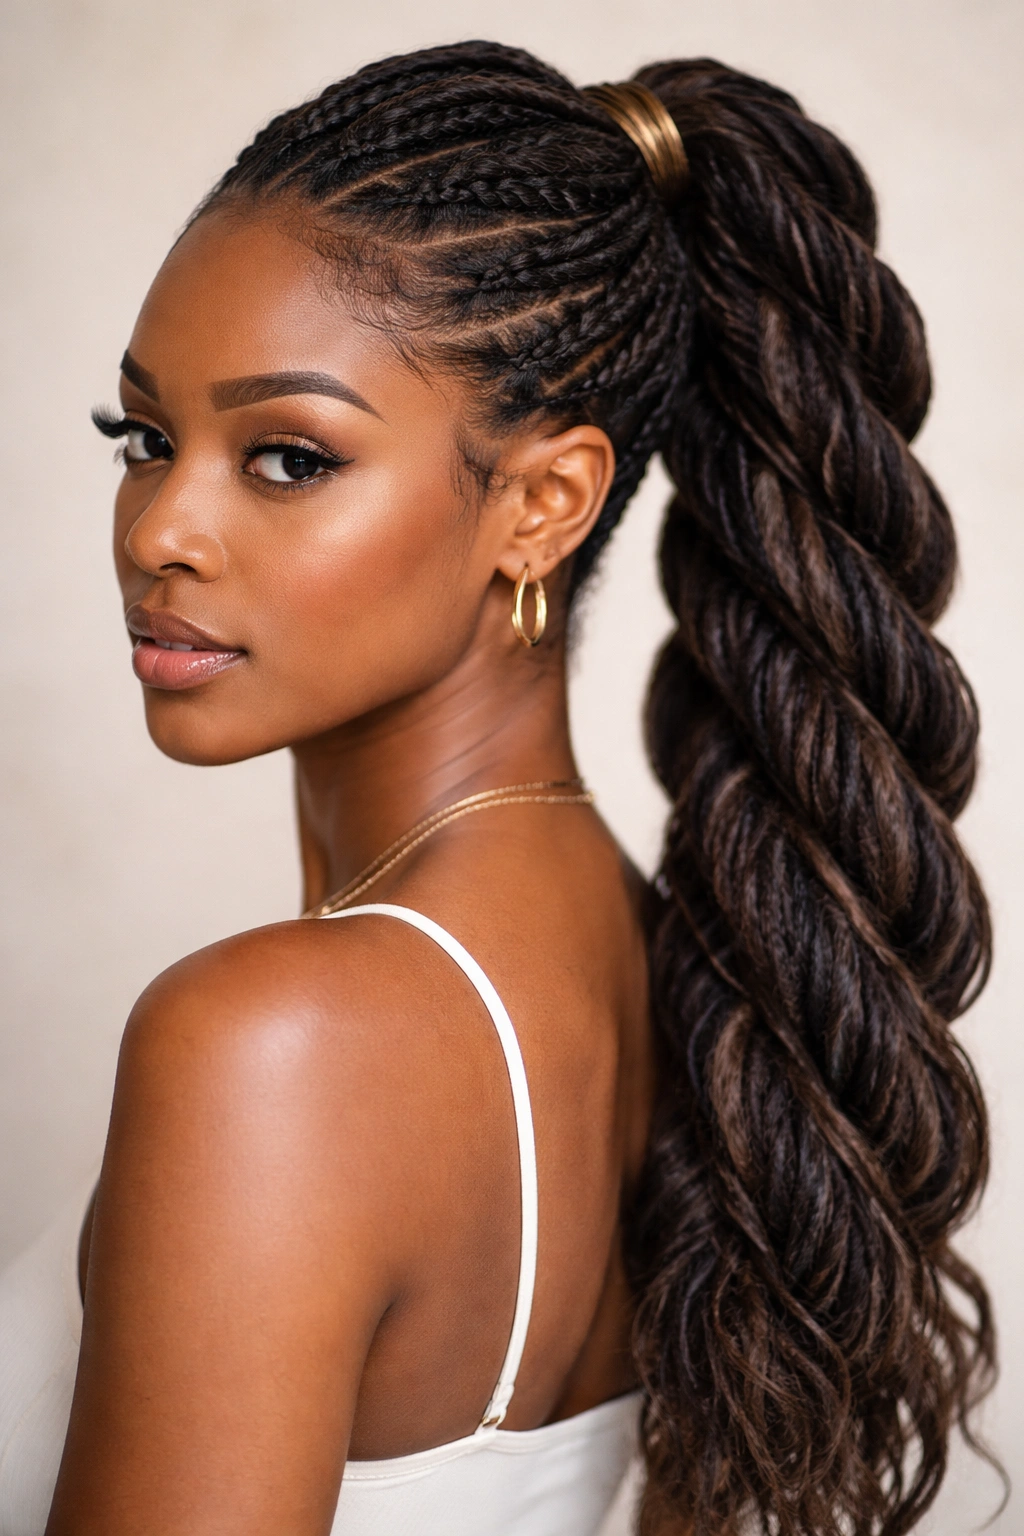
This style brings sophistication and visual interest by incorporating twisted sections throughout the ponytail structure. Instead of straight braids or smooth weave, you’re creating twisted rope patterns that weave your locs and the hair extensions together, resulting in a textured, dimensional look that’s absolutely eye-catching.
The Twisting Technique
Gather your locs into a medium-height ponytail, creating a loose base that you’ll add to as you go. Begin with a small section of your locs and the weave hair held together between your thumb and forefinger. Twist these sections around each other, keeping them relatively close together so the twist stays defined and uniform. Work your way down the entire length of the ponytail, maintaining consistent tension so every twist looks deliberate and aligned. The rope twist naturally holds everything together, and you can secure the very end with a small elastic that matches your hair.
Texture and Appearance
- Rope twists add movement: The twisted sections create visual flow that moves and shifts as your hair moves throughout the day
- Works with mixed lengths: If your locs have some variation in length, this style actually works in your favor because the twists can accommodate slight length differences
- Styling time investment: This one takes longer than a straight weave ponytail — expect 20-30 minutes if you’re doing it yourself — but the results last at least 7-10 days
- Heat styling option: Some stylists lightly touch the twisted sections with a flat iron to seal and smooth the twists, creating a more finished appearance
Worth knowing: Rope twists work beautifully with human hair weave because the blending is seamless, but you can achieve a striking look with quality synthetic hair too — the texture contrast can actually be intentional and visually compelling.
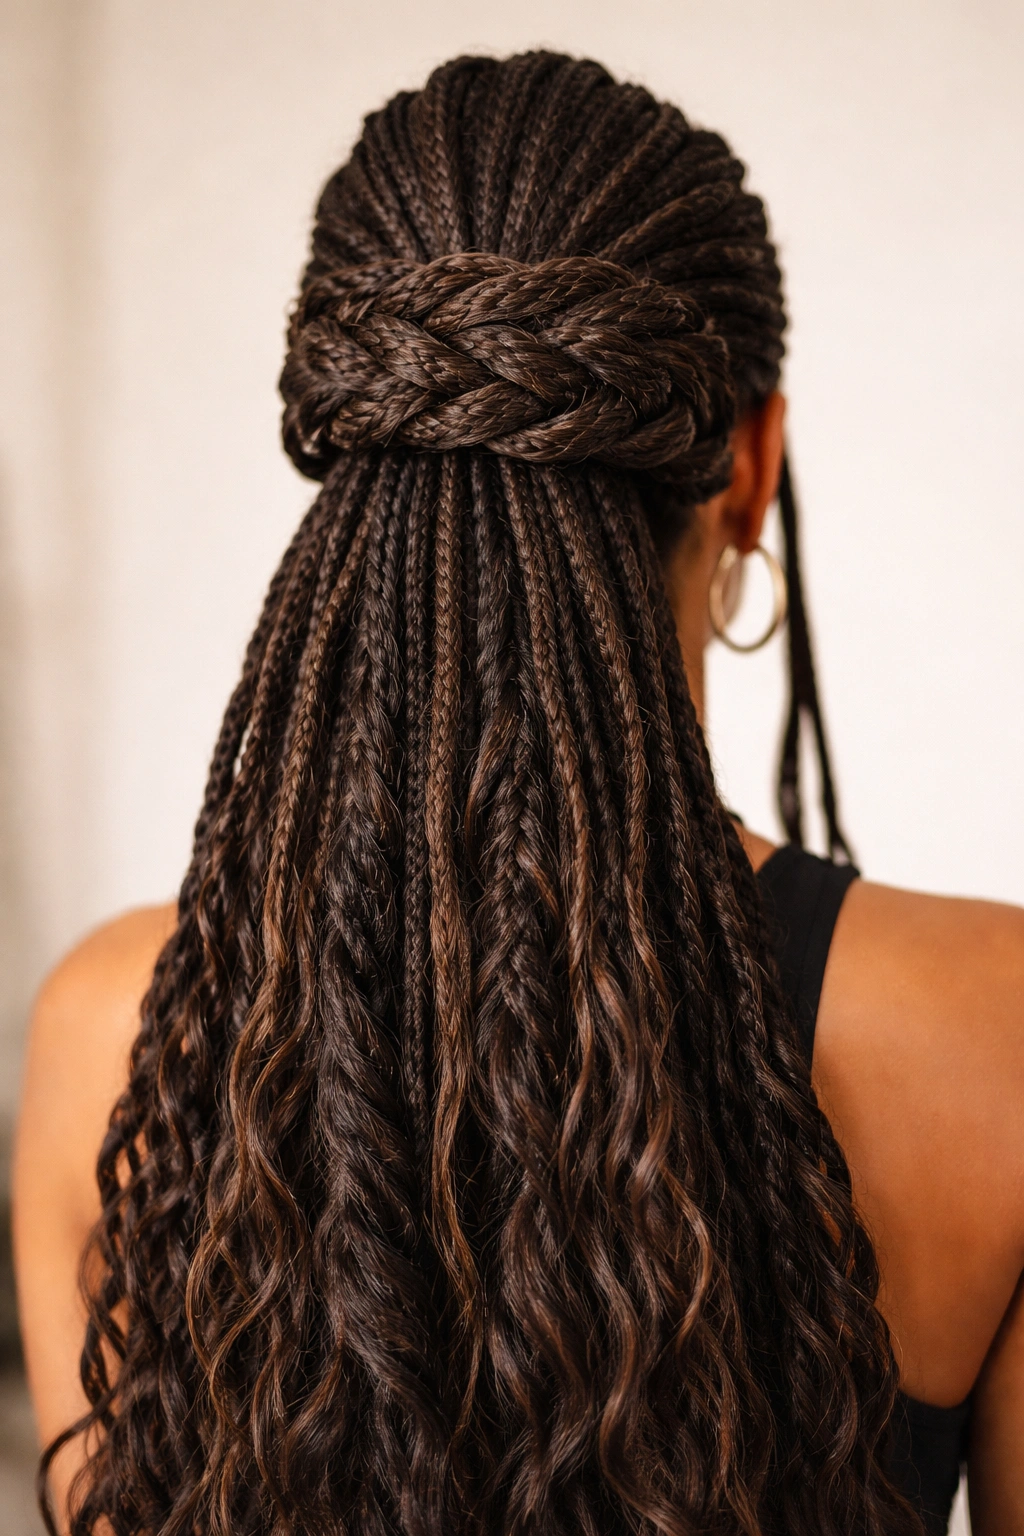
4. The Half-Up Weave Ponytail with Crown Detail
For those days when you want structure without committing to a full ponytail, the half-up style offers the perfect balance. By weaving extensions only into the upper section of your hair and leaving the lower locs loose, you create a layered look that feels both polished and relaxed. Adding crown detail — whether that’s a thin crown braid, a twisted halo, or woven sections creating a frame around your face — elevates this style into something truly special.
Creating Crown Structure
Section off the top third of your head from temple to temple, crossing over the crown. Gather this top section into a ponytail at the back of your crown. Now here’s where the weave comes in: instead of just adding it to the ponytail base, create a thin feed-in braid using your locs and weave that follows the natural curve of your crown, starting near one temple and ending near the other. This creates a halo effect that frames your face beautifully. Incorporate the crown braid directly into the half-up ponytail, so it becomes part of the base structure rather than a separate element.
Styling Details That Matter
- Leave the right amount of locs down: You want enough loose locs in the back to create a full, natural-looking frame that balances the structured top section
- Crown placement: Position the ponytail slightly higher than dead center — this creates better proportions and photographs beautifully
- Weave texture choice: Kinky or textured weave reads as more intentional in a crown detail; straight weave creates a sleeker, more refined vibe
- Accessories enhance it: A decorative hair cuff, gold or silver beads, or even a delicate wire piece worn through the crown section adds significant polish
This style is surprisingly wearable for 8-10 days because you’re not putting the same tension on your locs all over your head — the weight is distributed across the crown structure.
5. The Braided Wrap Weave Ponytail
When you want maximum texture and a truly artistic appearance, the braided wrap style delivers. This involves creating thick, defined braids using your locs and weave extensions, then wrapping these braids around the base of your ponytail to create a gorgeous crowned effect. It’s a style that looks intricate and intentional, perfect for someone who loves the bold, creative side of hair styling.
Building the Braided Crown
First, secure your locs into a ponytail at your preferred height — high, middle, or low depending on your vision. Take a generous section of your locs and weave hair (thicker than you’d use for delicate braids) and create a substantial 3-strand or cornrow braid that will become your wrap. The key is making these braids thick enough to create visual weight and presence at the base of the ponytail. Once your first braid is complete, wrap it around the elastic at the base of the ponytail, securing the end with bobby pins or by incorporating it back into the ponytail. Create multiple braids and wrap them in layers, creating a dimensional, sculptural look.
Technique Considerations
- Braid thickness: Thicker braids photograph better and create more dramatic impact than delicate ones
- Wrap direction: You can wrap braids in one direction for a neat spiral effect, or crisscross them for a more abstract, artistic appearance
- Weave integration: The contrast between your dark locs and lighter weave creates stunning definition in each braid
- Durability: Braided wraps actually reinforce the ponytail structure, so this style can comfortably last 10-14 days
- Refresh potential: You can take this style down and restyle it 2-3 times before the weave needs replacing
Insider note: This style is perfect if you’re someone who gets bored easily with hair, because the braids you incorporate into the wrap can be adjusted, tightened, or even re-braided mid-week to refresh the look without starting from scratch.
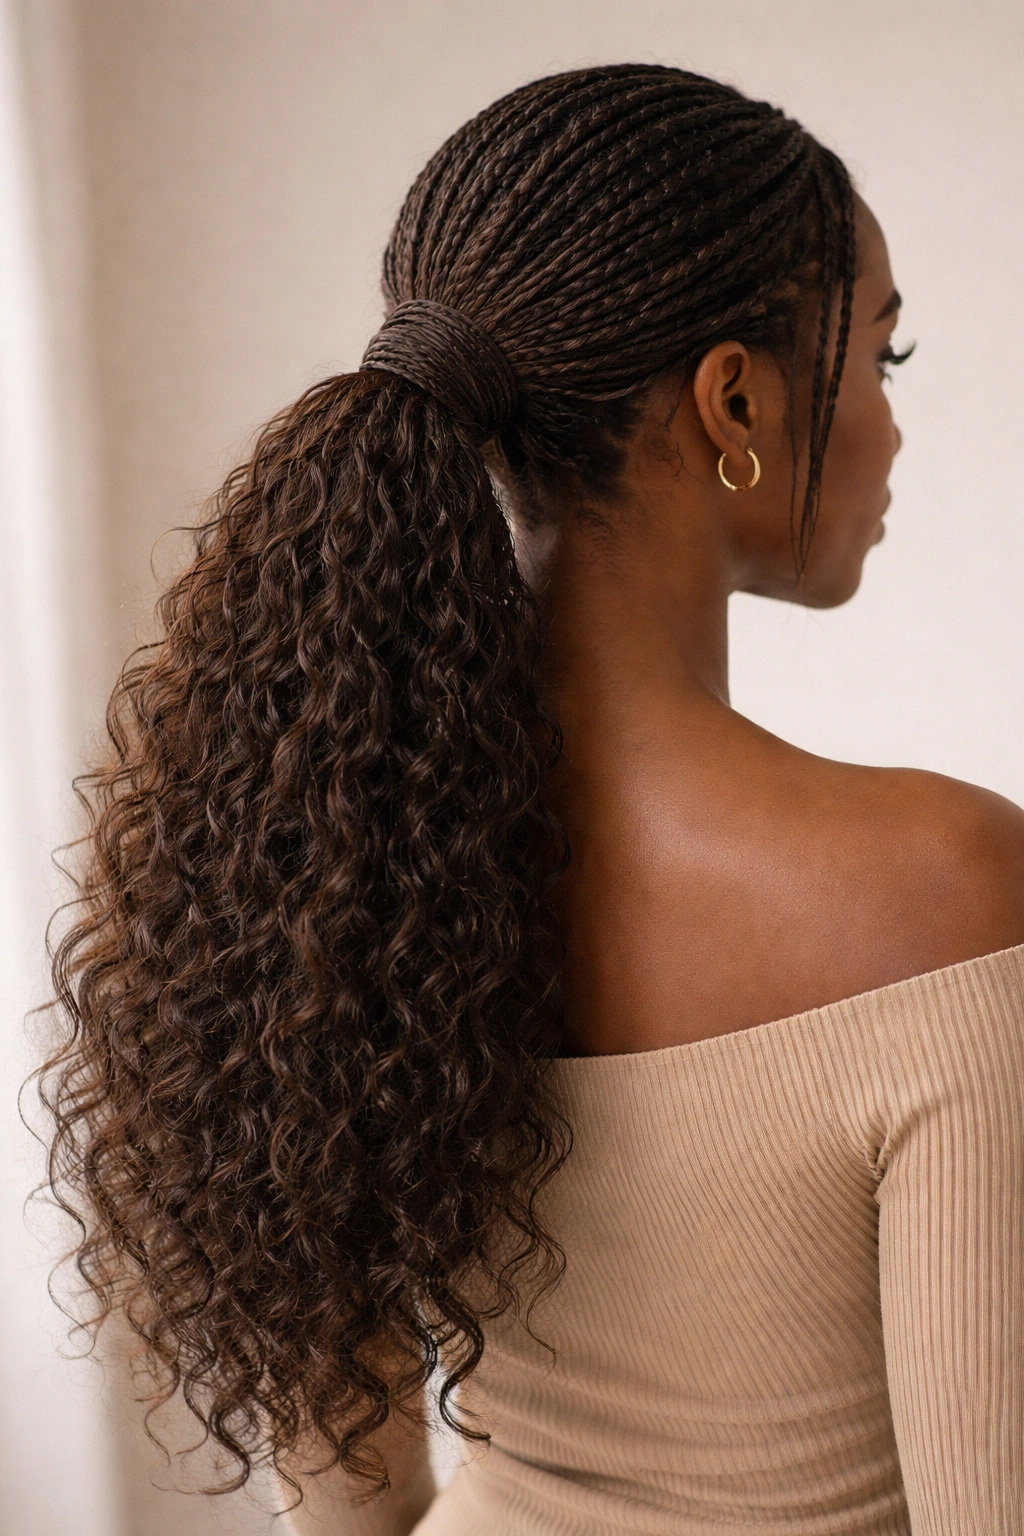
6. The Textured Low Weave Ponytail
A low ponytail has an understated elegance that works beautifully for professional settings, casual everyday wear, or when you want something comfortable for warmer weather. By incorporating textured weave — kinky, curly, or wavy — instead of sleek straight hair, you’re creating visual interest and dimension while keeping the overall silhouette refined and wearable.
Positioning and Execution
Create your base low ponytail at the nape of your neck, roughly 2-3 inches above where your collar would sit. Use a secure elastic that matches your hair color. Rather than adding weave right at the base like you would for a sleek style, begin incorporating curly or kinky textured weave throughout the length of the ponytail, integrating it into loose braids or twists that sit along the edges of the ponytail. This keeps the bulk at the base minimal while creating texture and movement throughout the length.
Why Texture Works Here
- Movement and flow: Curly or kinky weave moves and bounces naturally, creating an organic, lived-in appearance that looks effortlessly polished
- Conceals wear: A textured low ponytail hides any frizz or loose pieces much better than a sleek style because the texture is part of the design
- Comfortable for daily wear: Lower positioning with lighter texture throughout feels less heavy and is ideal for wearing for extended periods
- Blends beautifully: Because your locs likely have texture themselves, adding textured weave creates seamless blending that looks intentional rather than like you’re mixing two different hair types
- Maintenance: Low ponytails experience less stress on the locs at your hairline, making this a gentler protective style option
Quick facts:
- Pairs well with minimal makeup for an understated vibe
- Works with business casual or formal professional dress codes
- Comfortable worn while sleeping without needing intensive nighttime care
- Can be worn 8-12 days depending on how much movement you put your hair through
7. The Stacked Weave Ponytail
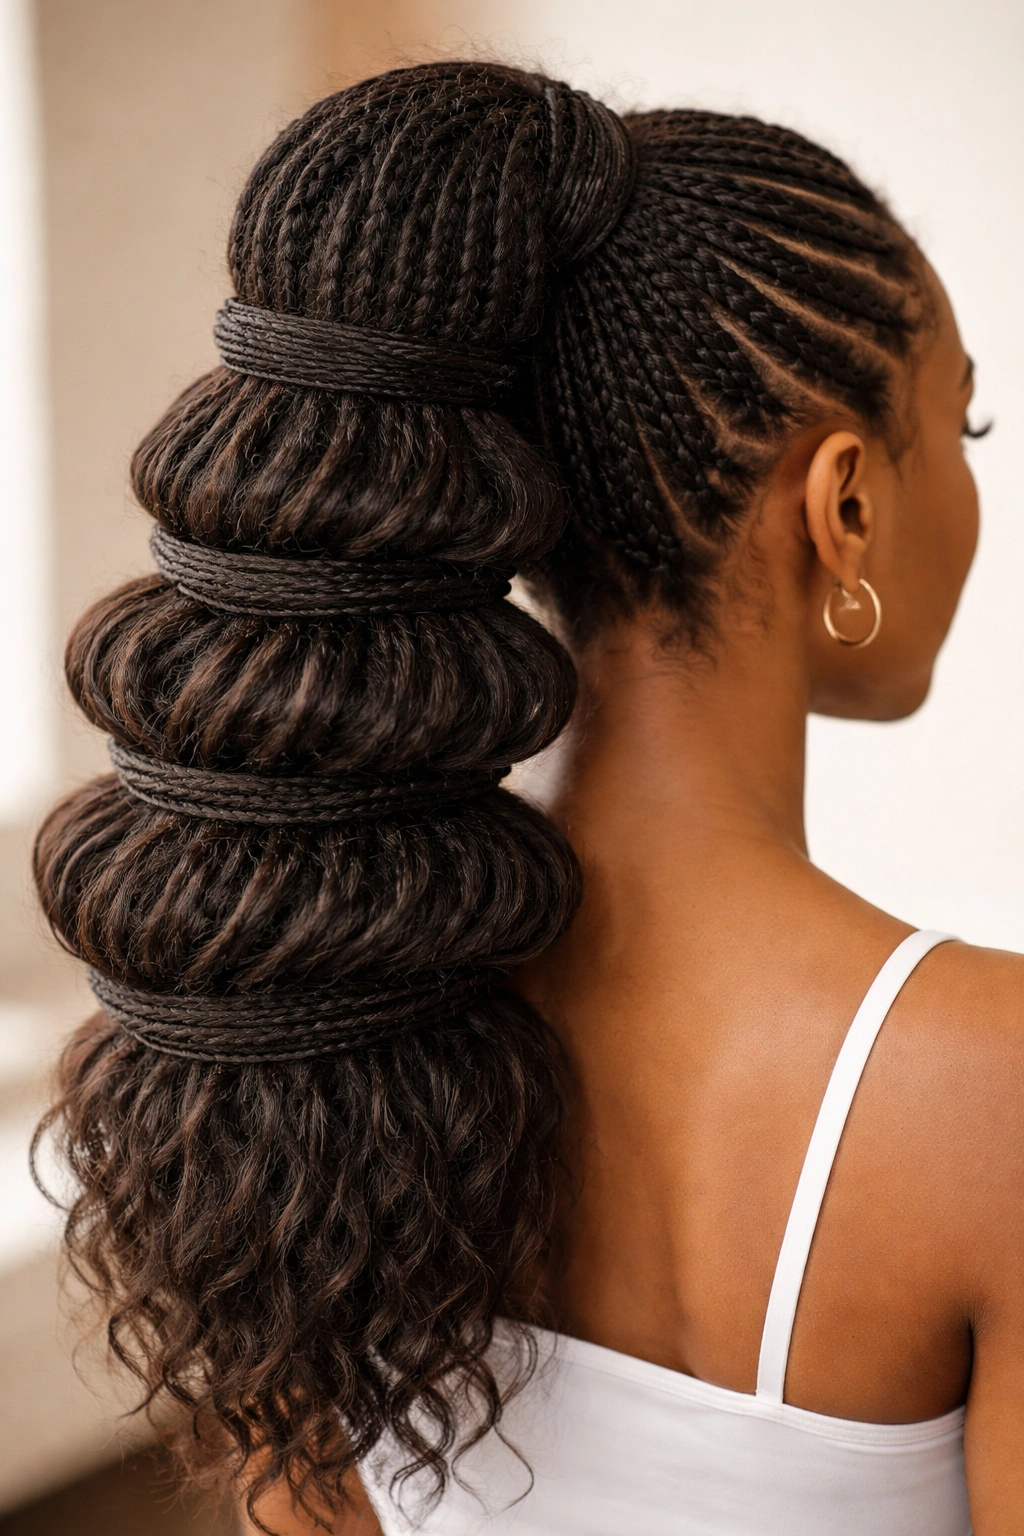
For maximum volume and drama, nothing compares to the stacked ponytail. This style layers weave sections on top of each other, building a silhouette that’s full, impressive, and undeniably eye-catching. It works particularly well if your locs on the thinner side or if you simply love the statement-making quality of a voluminous style.
Creating the Stacking Effect
Divide your ponytail into 3-4 distinct sections horizontally — imagine creating thick slices from top to bottom. In each section, incorporate weave hair by creating braids or twists that add volume and thickness. The trick is making each section slightly thicker than the one above it, so the ponytail flares outward rather than staying cylindrical. Use larger diameter braids in the lower sections and slightly thinner braids at the top for a flattering, balanced shape that actually frames your face beautifully even though it’s positioned at the back of your head.
Volume and Visual Impact
- Hair quantity matters: Stacked styles require more weave hair than other ponytail styles — plan on using slightly more than you normally would
- Weight distribution: The stacking technique distributes weight evenly throughout the ponytail rather than concentrating it all at the base, which is actually more comfortable for extended wear
- Durability: Because the volume comes from the structure itself rather than relying on tension to hold everything together, this style lasts an impressive 10-14 days
- Styling options: You can create a smooth stacked effect or a more textured, piece-y stacked effect depending on your mood and the occasion
Pro tip: When you’re ready to take this style down, gently unravel each section from bottom to top rather than just unraveling it all at once — this prevents any tangles in your weave and keeps everything in good condition for re-styling or reuse.
8. The Side Sweep Weave Ponytail
This romantic, slightly flirty style moves your ponytail off-center and drapes it over one shoulder, creating an asymmetrical silhouette that’s visually interesting and surprisingly flattering. Adding weave to a side sweep ponytail gives you the volume and movement to make the style really shine without looking thin or wispy.
Positioning for Maximum Effect
Rather than centering your ponytail at the crown or nape, position it to one side — you could put it low and to the left, or higher and to the right, depending on your preference and the overall look you’re going for. Secure it with an elastic that matches your hair color. Now incorporate weave by creating twists, braids, or smooth sections that flow from the ponytail base down and across toward your shoulder. The weave should follow the natural direction of where the ponytail sweeps, creating movement and visual flow rather than working against the style’s direction.
Creating Movement and Balance
- Face-framing options: Leave a few face-framing pieces loose to soften the overall look and draw attention to your face
- Weave texture: Wavy or curly weave works beautifully here because the movement reinforces the sweeping, draped quality of the style
- Shoulder positioning: Decide if you want the ponytail to drape all the way down your front shoulder or stay more toward your back — each creates a different aesthetic
- Photography magic: Side sweep ponytails photograph beautifully and create striking visual interest in photos and videos
- Versatility: You can dress this up with jewelry and makeup for an evening look or keep it casual for daytime wear
This style typically lasts 7-10 days, and the side positioning means you can sleep on it without worrying about flattening the ponytail completely.
9. The Zigzag Feed-In Weave Ponytail
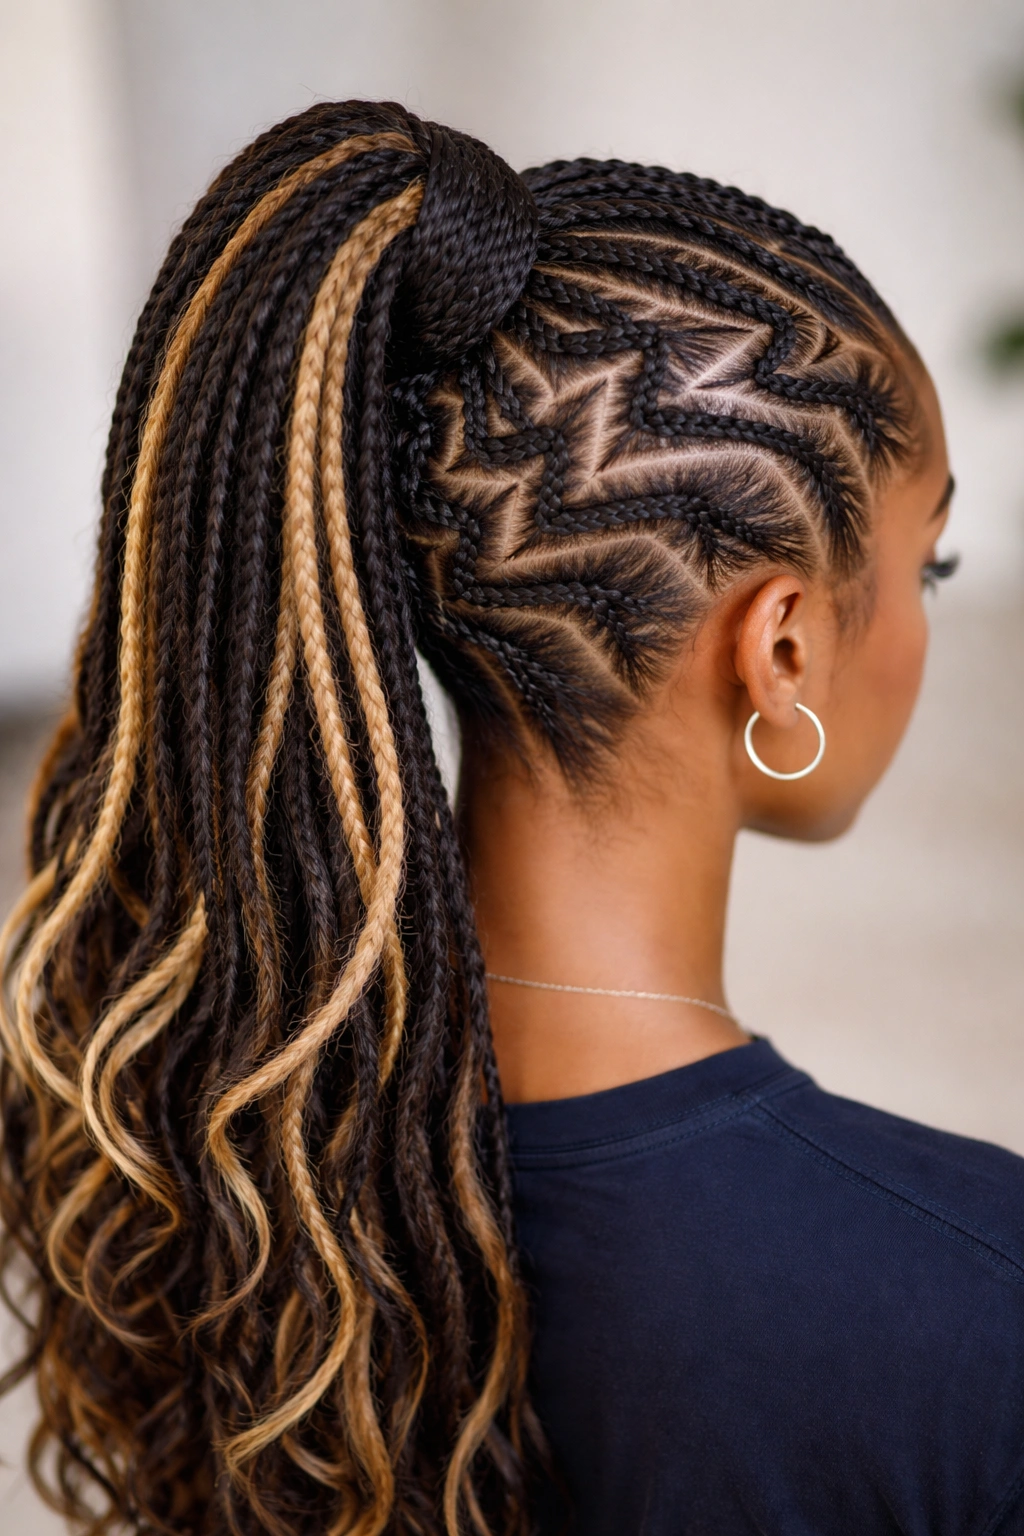
For something truly artistic and eye-catching, the zigzag feed-in style creates geometric patterns across your scalp as you build toward the ponytail. Instead of straight parts or curved braids, you’re creating intentional zigzag lines that guide the eye toward your ponytail and create a sense of movement and direction across your entire head.
Mapping Your Zigzag Pattern
Before you start, mentally map out where your zigzag pattern will go — it might start at one temple, zig across the top of your head, zag down the other side, and then meet at the ponytail base. As you create feed-in braids following this zigzag pattern, incorporate weave hair from the start, making the braids thick and defined enough that the geometric pattern is clearly visible. The zigzag lines should be consistent in width and spacing, which takes some practice but becomes easier once you understand the visual pattern you’re creating.
Pattern and Precision
- Weave color: High-contrast weave (light weave in dark locs or vice versa) makes the zigzag pattern more visually striking
- Braid thickness: Consistent braid width is essential for the pattern to read clearly — if some braids are much thicker than others, the pattern becomes confusing rather than beautiful
- Time investment: This is one of the more time-intensive styles and can take 45-60 minutes to complete, but the payoff is genuinely impressive
- Durability: The feed-in technique is extremely secure and holds beautifully for 10-14 days
- Styling time: If you’re getting this done by a professional, expect to budget accordingly — the artistry involved commands fair compensation
Worth knowing: The more you create zigzag patterns, the better you become at calculating the spacing and executing them symmetrically — many stylists with this skill use it as a signature element that clients specifically request.
10. The Accessorized High Weave Ponytail
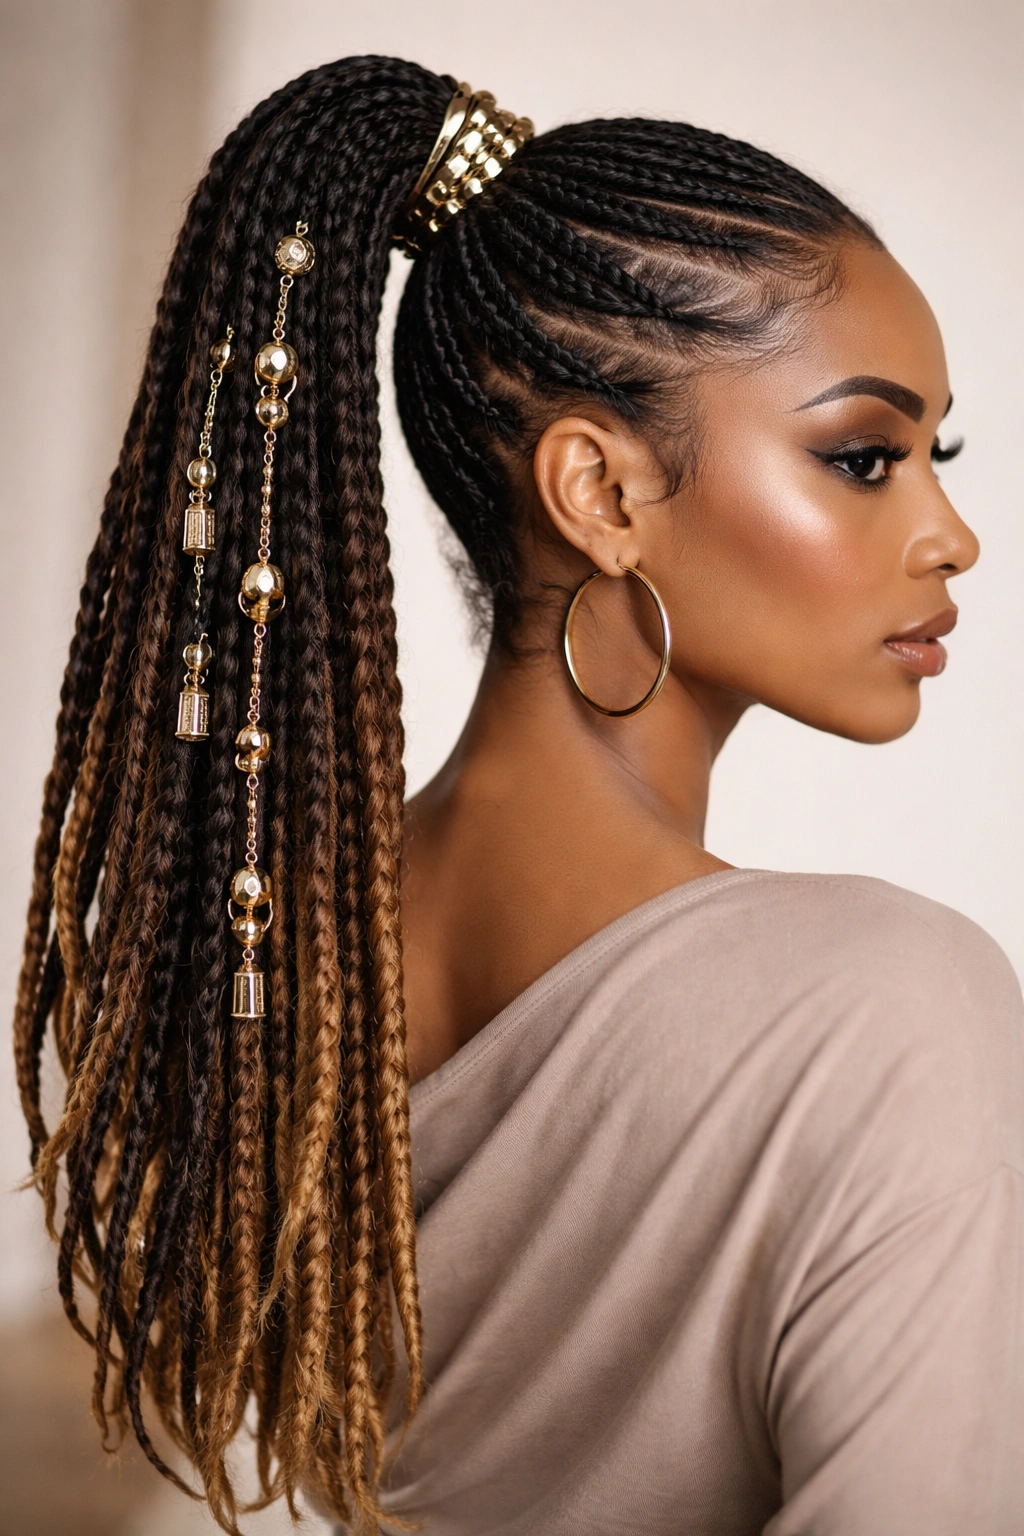
Sometimes the simplest base becomes extraordinary when you add the right accessories. This style starts with a beautiful high weave ponytail and then elevates it with strategic jewelry, cuffs, rings, or ornamental pieces woven directly into the ponytail. The accessories become functional design elements rather than afterthoughts, transforming a basic ponytail into something memorable and polished.
Accessory Integration Techniques
Create a clean, secure high ponytail first — this becomes your canvas for accessorizing. Now, instead of just placing a single elastic at the base, use a combination of accessories and structural elements. You might weave decorative cuffs directly into the base of the ponytail, add gold or silver rings at strategic intervals down the length, or incorporate beads or ornamental clips that catch light and create visual interest. The key is spacing these accessories deliberately rather than clustering them all at the base — distribution across the length of the ponytail creates better visual balance.
Choosing Accessories Thoughtfully
- Material durability: Metal cuffs and rings hold up indefinitely; acrylic or plastic pieces may crack with weight and wear over time
- Weight considerations: Heavier accessories positioned lower in the ponytail won’t strain your locs as much as if they’re all clustered at the base
- Color coordination: Gold, silver, bronze, or black accessories each create completely different vibes — choose based on your skin tone and the overall look you’re going for
- Occasion appropriateness: Minimal accessorizing looks professional; bold, statement pieces are perfect for creative industries, events, or personal expression
- Maintenance: Metal accessories won’t pull or snag your weave the way rough plastic might
Quick facts:
- Accessorized ponytails photograph beautifully and create striking visual content
- Single statement piece is often more sophisticated than multiple small pieces
- This style works with weave of any texture — the accessories are the focus
- Comfortable to wear for full days and evenings without feeling heavy or restrictive
11. The Mohawk Weave Ponytail
If you’re ready to make a bold statement, the Mohawk ponytail is where you go. This style takes the structural concept of a Mohawk (leaving a strip down the center of your head) and applies it to a ponytail context — your locs remain free along the sides while weave creates a dramatic raised center section that leads down into a voluminous ponytail.
Creating the Dramatic Centerline
Start by establishing a clear center part running from your hairline straight back to the nape of your neck. Using this as your guide, create feed-in braids on either side of this center line, angling them so they frame rather than cover your central section. The center section — your actual locs — remains unbothered and free. These side braids incorporate weave and should be thick enough to create clear definition and make the central section appear even more prominent. At the back of your head, gather that central section of your locs into the ponytail, and your side braids should meet this ponytail base, where you can incorporate them or let them blend into the overall style.
Statement and Structure
- Height matters: The more space you create between your side braids, the more dramatic the Mohawk effect becomes
- Weave color choices: Contrasting colors for the side braids make the Mohawk effect even more striking, while matching colors create a more subtle version
- Face-framing: Some stylists leave strategic pieces loose along the hairline to soften the severity of the center part, while others keep everything slicked back for maximum boldness
- Durability: This style is extremely secure and holds beautifully for 12-16 days because all that structural work keeps everything in place
- Confidence required: This is a style for someone who wants to be noticed and isn’t interested in blending in — embrace it fully
Insider note: The Mohawk ponytail is surprisingly versatile for “dressing up or down” — simple jewelry and minimal makeup makes it edgy and casual, while adding earrings, foundation, and a coordinated outfit turns it into a statement look suitable for nights out or creative events.
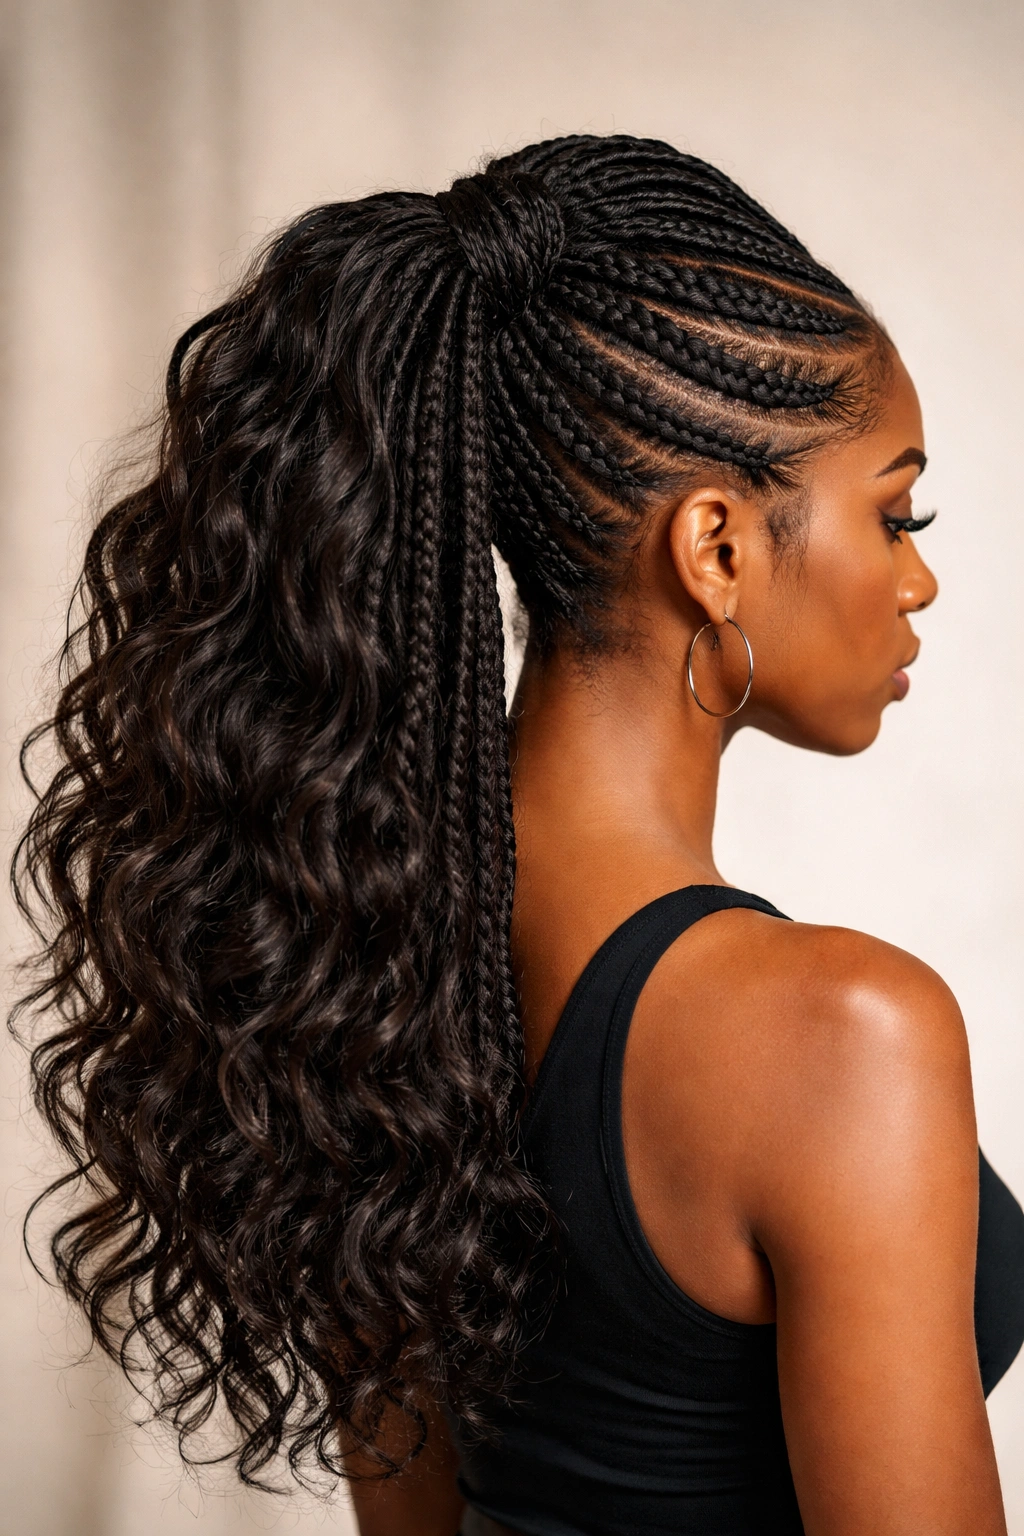
12. The Layered Weave Ponytail with Movement
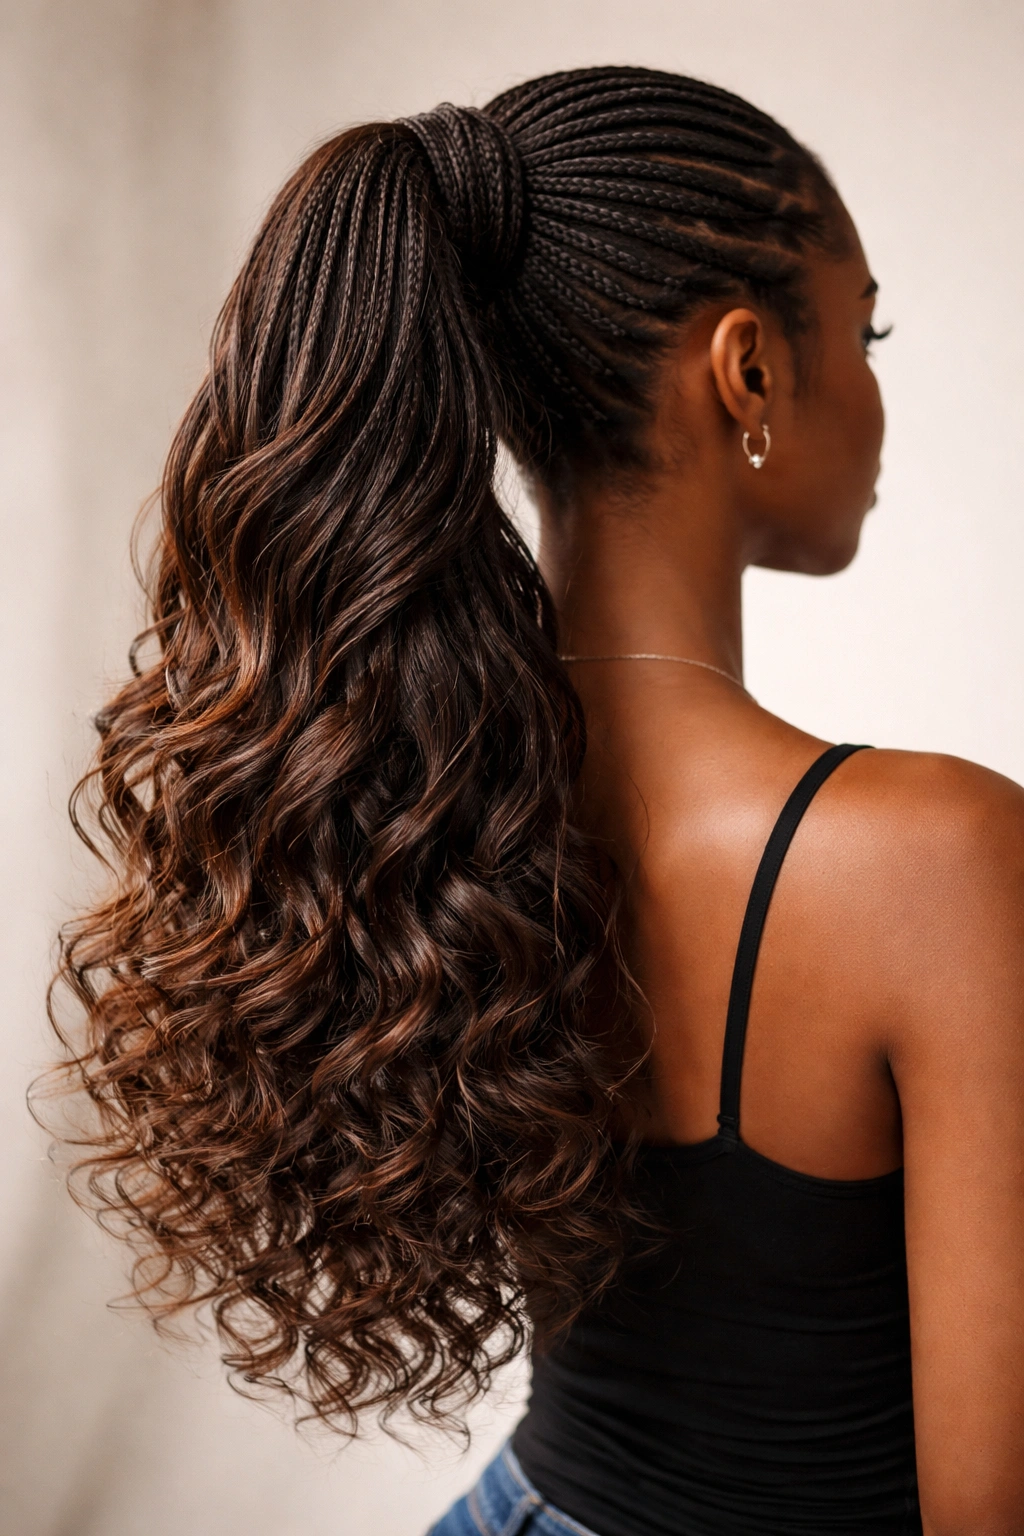
For the ultimate in dimension and visual complexity, the layered weave ponytail creates a multifaceted style where different sections move, bounce, and catch light independently. By integrating multiple weave textures and creating distinct layers within a single ponytail, you achieve a look that’s sophisticated enough for professional settings yet playful and expressive enough for everyday wear.
Building Dimensional Layers
Instead of treating your ponytail as a single element, divide it into distinct layers — think of it like creating a waterfall or cascade effect. At the top, incorporate smooth, sleek weave that’s tightly braided or twisted. In the middle sections, transition to slightly more textured weave that creates movement. In the lower section, go full texture with curly or kinky weave that bounces and flows. Each layer should have slightly different handling, color, or texture so that when you move, different elements catch light and create visual interest. The transitions between layers should be subtle enough to feel intentional rather than like you’re wearing completely different hair types.
Creating Visual Complexity
- Texture progression: Move from sleek to textured as you go from top to bottom, or reverse it — either creates beautiful visual flow
- Color integration: Subtle color variations between layers (perhaps a touch of blonde or copper in the lower sections) can add incredible depth
- Length variation: Layers of slightly different lengths create even more movement and bounce
- Styling time: This is one of the more involved styles and typically takes 45-60 minutes, but the results genuinely justify the time investment
- Longevity: Because you’re not relying on a single braiding technique or weave texture, this style adapts well to changes and can last 12-16 days
Pro tip: When you’re ready to refresh this style mid-week, focus on the texture sections at the bottom — add a bit of water, redefine the waves or curls, and the entire style looks fresh again without needing a complete rework.
Final Thoughts

Weave ponytails for locs offer something truly special — the ability to completely transform your aesthetic while protecting your natural hair underneath. Each of these styles brings something different to the table, whether you’re drawn to the sleek minimalism of a smooth ponytail, the drama of a stacked style, or the artistry of a patterned feed-in design. The versatility means you can change your look as often as your mood shifts, exploring everything from sophisticated and professional to bold and expressive within the same protective styling framework.
What makes these styles work so well is the fundamental compatibility between locs and weave ponytails. Your locs already have character, history, and texture — adding weave isn’t about covering them up or changing what they are, but rather about expanding your creative options and giving yourself new ways to style and express yourself. Whether you’re getting these done by a skilled stylist or attempting them yourself, investing in quality weave and taking care of your locs during the styling process ensures that you get the most out of your look while keeping your natural hair in excellent condition. The result is a hairstyle that looks intentional, feels comfortable, and makes you feel confident every single day you’re wearing it.