There’s something effortlessly chic about a loose low ponytail that a sleek, pulled-tight version simply can’t touch. The difference isn’t just visual—it’s about attitude. A loose low ponytail says you woke up knowing exactly what you wanted without trying too hard, which is probably the most universally flattering vibe a hairstyle can convey. Whether you’re heading to the office, meeting friends for coffee, or navigating a hectic day, a low ponytail keeps hair off your face and neck while maintaining an undeniably cool, relaxed aesthetic that works across every season and occasion.
The magic of loose low ponytails lies in the details. It’s not just about gathering your hair at the nape of your neck and calling it done. The best versions incorporate texture, subtle styling techniques, and strategic placement of face-framing pieces to create dimension and movement. These styles work beautifully on nearly every hair type and length—from thick, coarse hair that needs control to fine, delicate strands that benefit from the illusion of fullness that loose ponytails create. More importantly, loose low ponytails are genuinely low-maintenance once you understand the foundational techniques.
What makes a loose low ponytail different from a casual messy one is intention. You’re creating a hairstyle that looks effortless because you’ve actually put thought into it, not because you threw your hair together in frustration. The positioning matters—how low you place the base changes the entire vibe and face shape you’re framing. The texture matters—whether you’re working with waves, curls, or straightened strands creates a completely different mood. The finishing details matter—a wraparound section, some face-framing pieces, or a subtle accessory can elevate the entire look from ordinary to noteworthy.
1. The Perfectly Undone Textured Low Ponytail
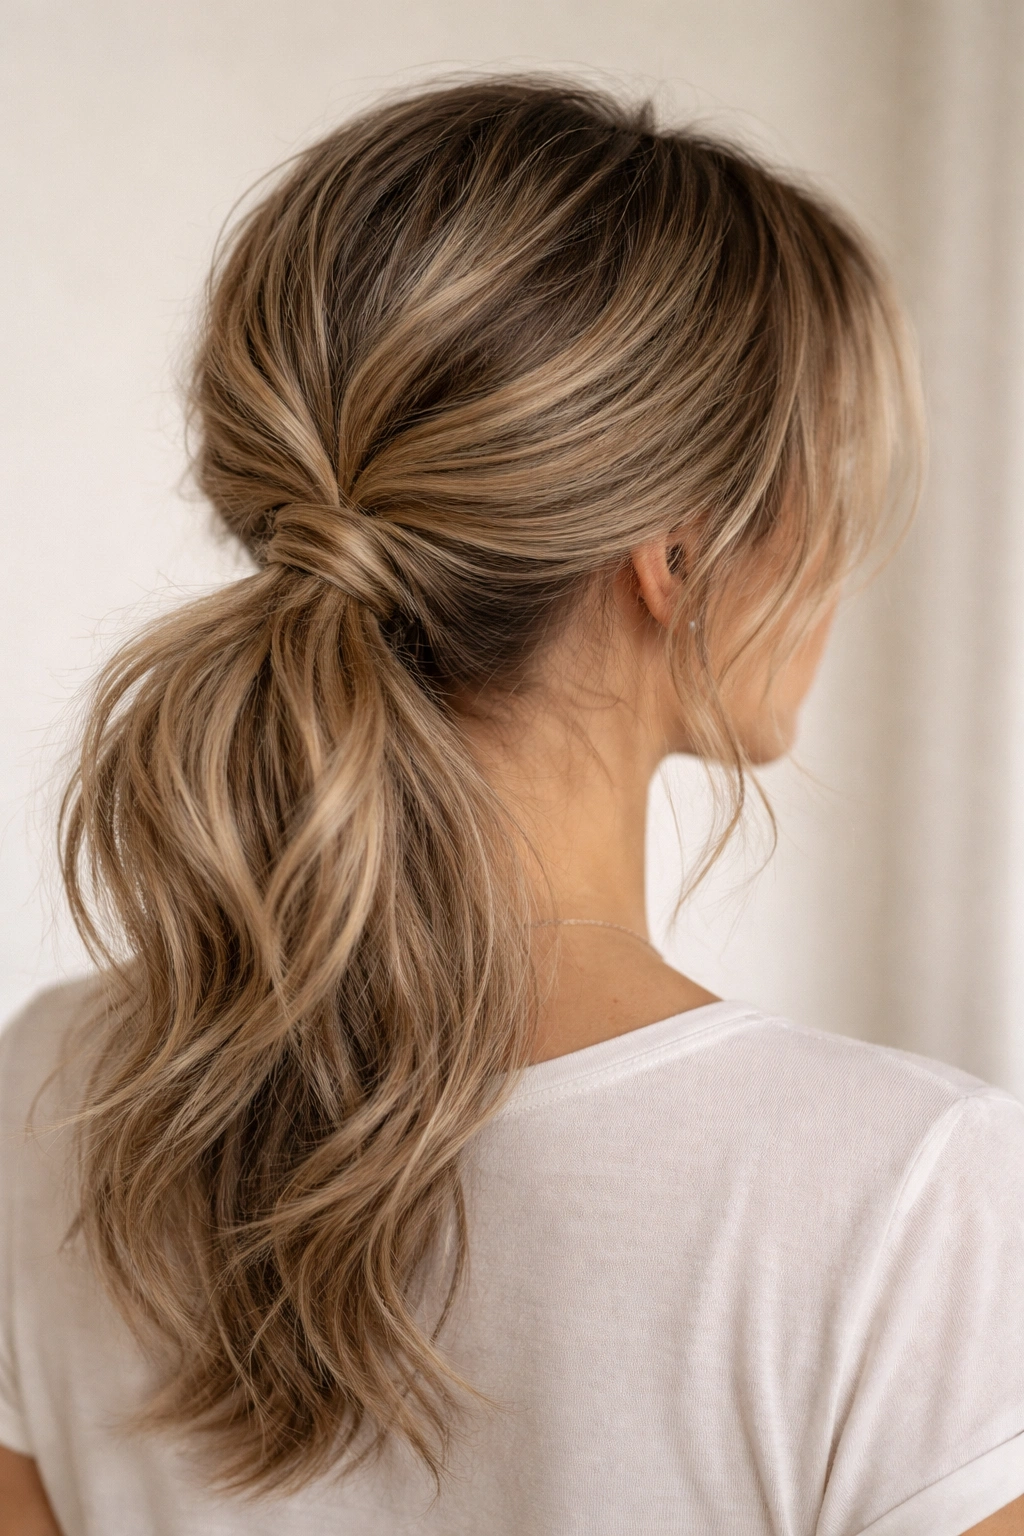
This is the gateway loose low ponytail, the one that looks like you barely did anything but actually demonstrates real understanding of hair styling. The key to this style is starting with textured hair rather than smooth, sleek strands. If your hair naturally has waves or curls, you’re already halfway there. If not, use a texture spray or salt spray on dry hair before styling, or apply a light wave to your hair with a curling iron, being intentional about making the waves look irregular rather than uniform.
Why This Look Works So Well
Texture automatically reads as “relaxed” and “undone,” which is precisely the vibe you’re going for. When you combine texture with a low placement and a slightly loose base, you’re creating visual interest without the appearance of effort. The more imperfect your waves and the more haphazard your curl placement, the more intentionally relaxed the final ponytail appears. This style is incredibly forgiving—small flyaways and baby hairs actually enhance the look rather than detract from it.
How to Create This Style
- Start with textured or waved hair (dry or slightly damp); apply a light texture spray if needed
- Gather hair at the nape of your neck, roughly 2-3 inches below where your ears sit at the back
- Use a small elastic to secure loosely—resist the urge to pull tightly, which defeats the purpose
- Gently tug small sections of hair at the crown and sides to loosen the ponytail base
- Smooth your hands over the gathered section once, then deliberately mess it up slightly by working your fingers through it
- Leave 2-3 pieces of hair loose on either side of your face, roughly the width of your index finger
- Finish with a light hairspray to hold texture in place without creating a stiff, product-heavy appearance
2. The Braided Wrap Low Ponytail
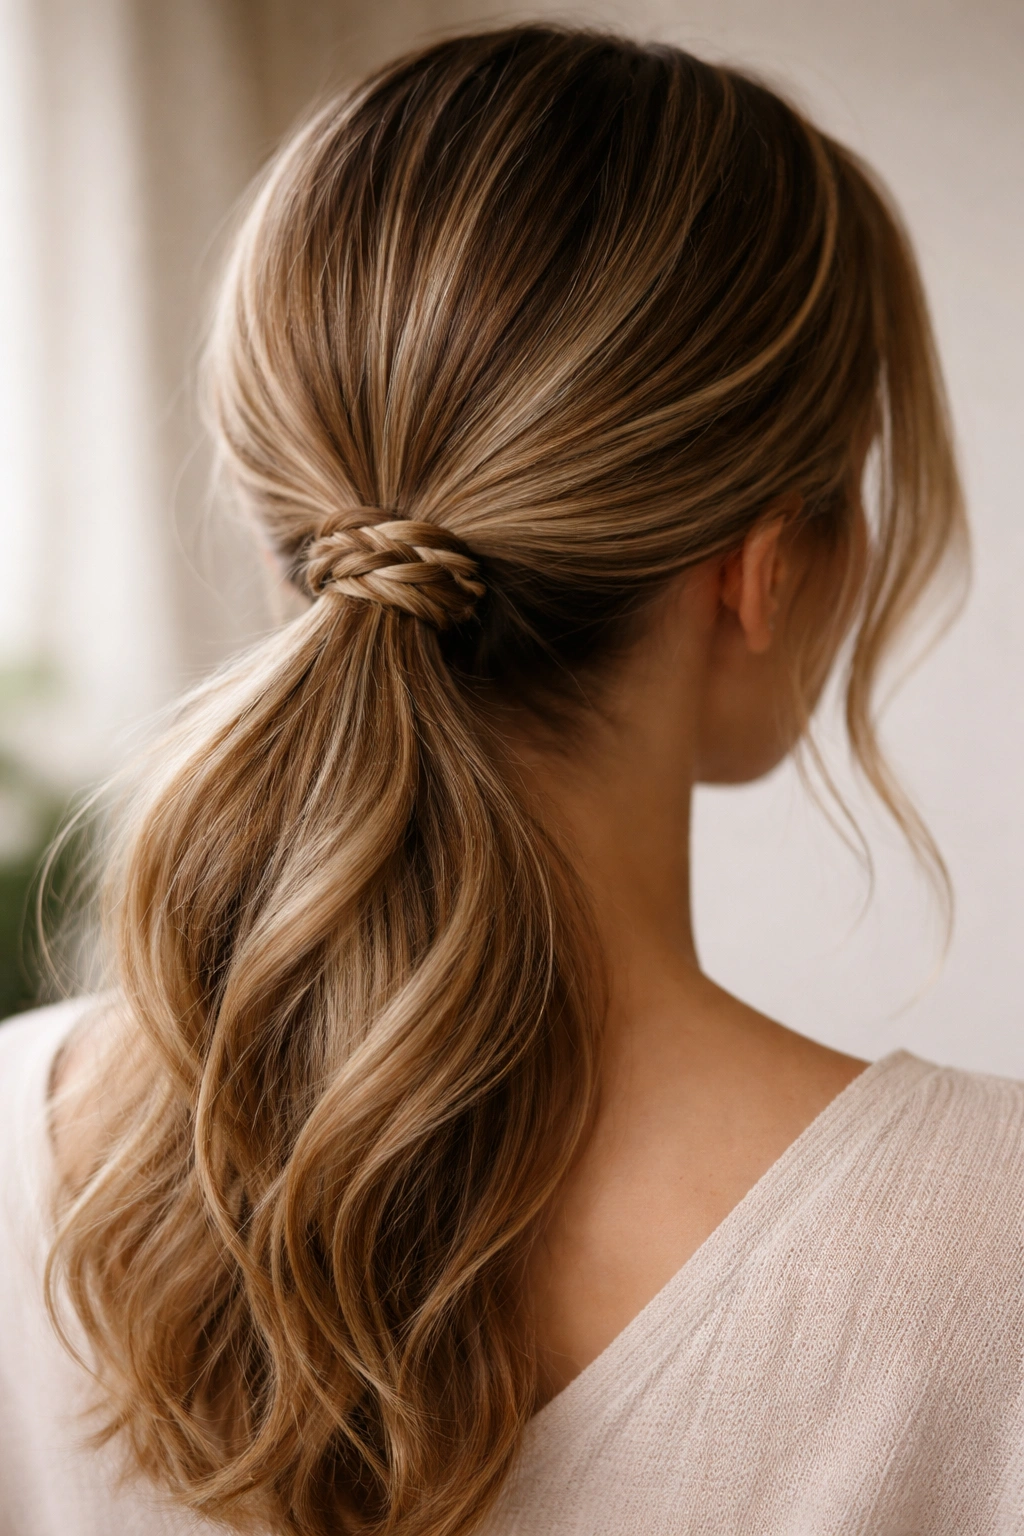
This version incorporates a thin braid that wraps around the base of your ponytail, creating an intricate detail that catches light and adds visual dimension without requiring complex techniques. The braid itself is typically a simple three-strand braid—what makes this style work is how you position and finish it. The wrap changes the entire aesthetic from simple to considered, which is why this style works beautifully for both casual settings and professional environments where you want to look polished.
Why This Styling Choice Elevates a Basic Ponytail
A braid wrap draws attention to the nape of your neck, which elongates your silhouette and creates a flattering focal point. The braid also creates a visual frame for your face, and because it’s positioned low, it reinforces the relaxed vibe rather than making the style look formal or overdone. The textural contrast between the smooth ponytail and the woven detail of the braid keeps the look interesting and multidimensional.
Step-by-Step Instructions for This Technique
- Gather your hair into a low ponytail, leaving it slightly loose at the base
- Take a small section of hair from the underside of the ponytail (roughly one inch wide)
- Create a three-strand braid from that section, braiding it as far down as the elastic allows
- Wrap the braid around the elastic and base of the ponytail, securing the end with a bobby pin tucked underneath
- Gently tug the braid sections to add texture and fullness to the wrapped detail
- For added sophistication, use a coordinating colored elastic underneath the braid so the wrap appears seamless
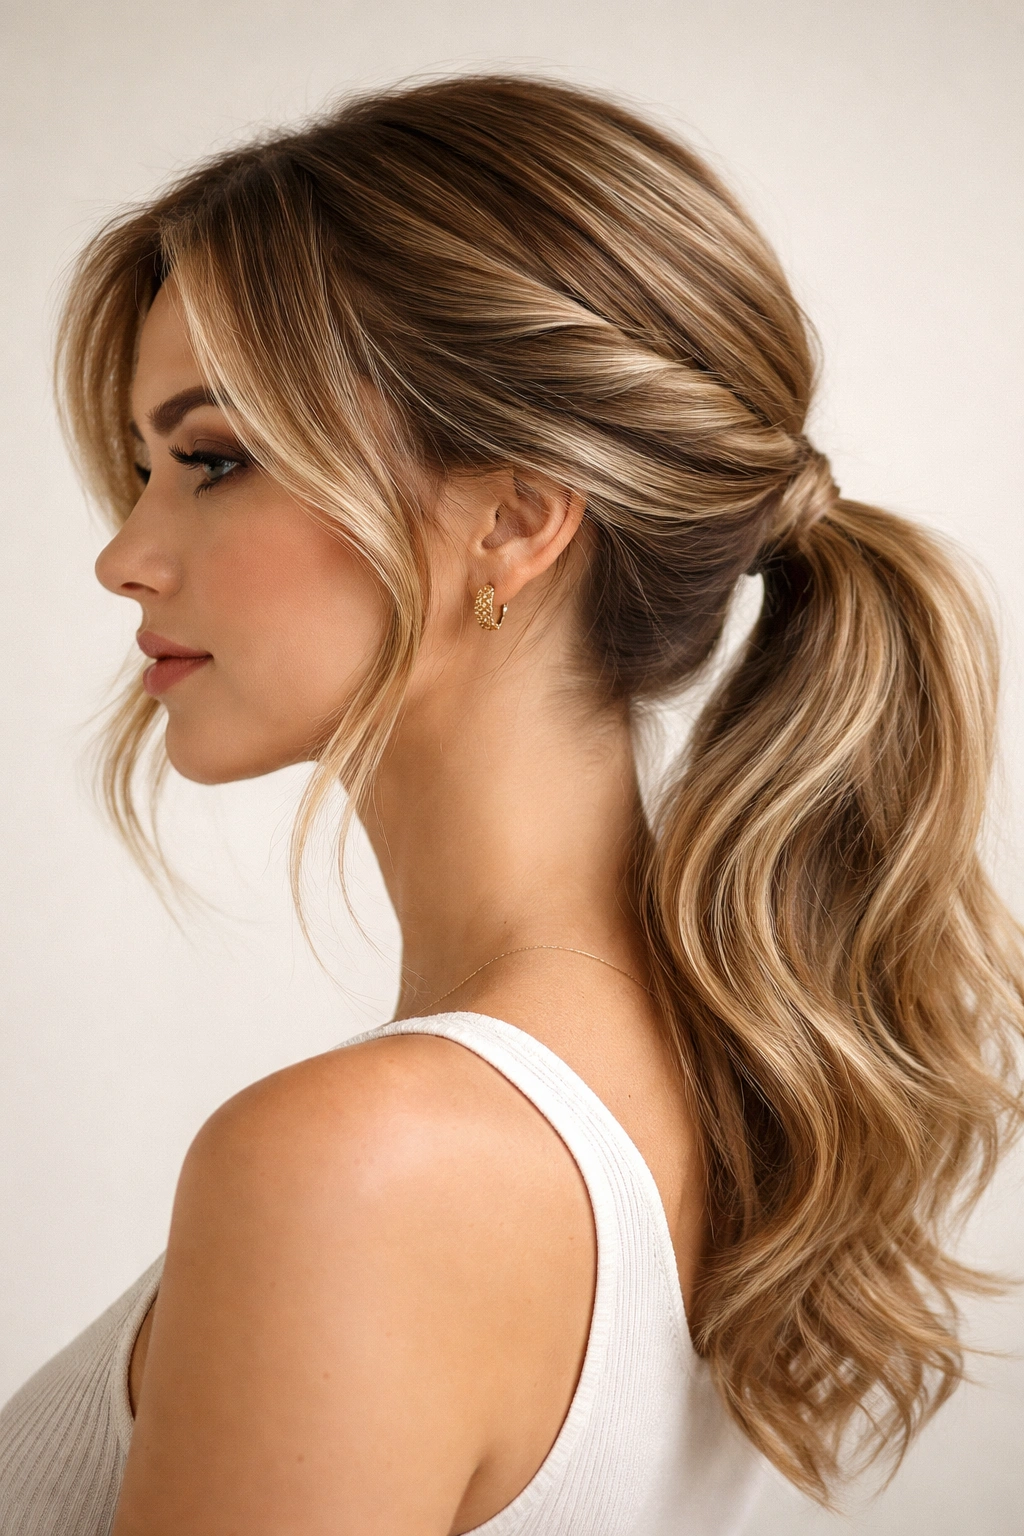
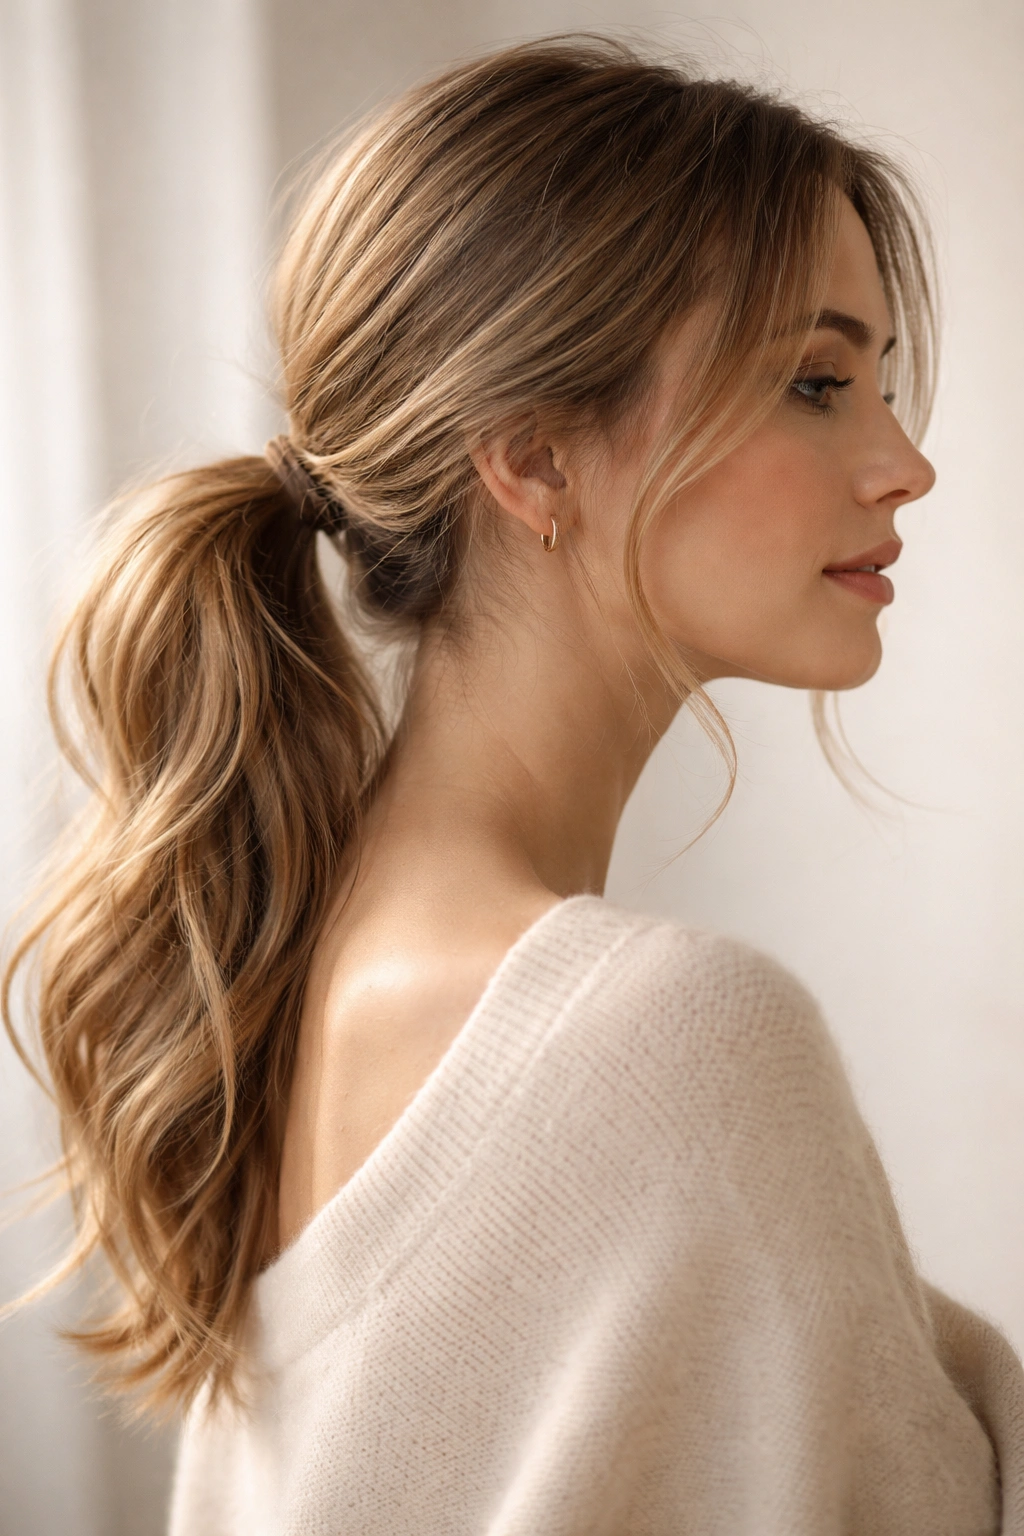
3. The Sleek and Smooth Low Ponytail with Face-Framing Pieces
While texture is the default loose low ponytail approach, this version proves that smooth and relaxed aren’t mutually exclusive. The trick is keeping the ponytail itself smooth while incorporating loose, wispy pieces around your face that soften the overall effect. This style reads as intentionally styled rather than carelessly put together, which makes it ideal when you want polished without appearing overly formal.
What Makes This Silhouette So Flattering
Face-framing pieces immediately soften any hairstyle, and they break up the severity that sometimes comes with smooth, pulled-back hair. These pieces catch light and create movement around your face, which is flattering for most face shapes. The contrast between the neat ponytail and the loose framing pieces creates visual interest and suggests you’ve actually thought about your styling choices rather than just securing your hair out of the way.
Creating a Polished Version of This Style
- Start with straightened or smoothed hair using a blow dryer and styling balm or serum
- Section out two small pieces from your temples, roughly one inch wide on each side—these become your face-framers
- Gather the remaining hair into a low ponytail at the nape of your neck
- Secure with a sleek elastic that matches your hair color for an invisible finish
- Take each face-framing piece and gently wave it using a curling iron set to a medium heat (around 350°F)
- Arrange the waved pieces so they fall naturally in front of your ears and along your jawline
- Use a smoothing serum or lightweight styling cream on the main ponytail to keep it sleek without looking wet or heavy
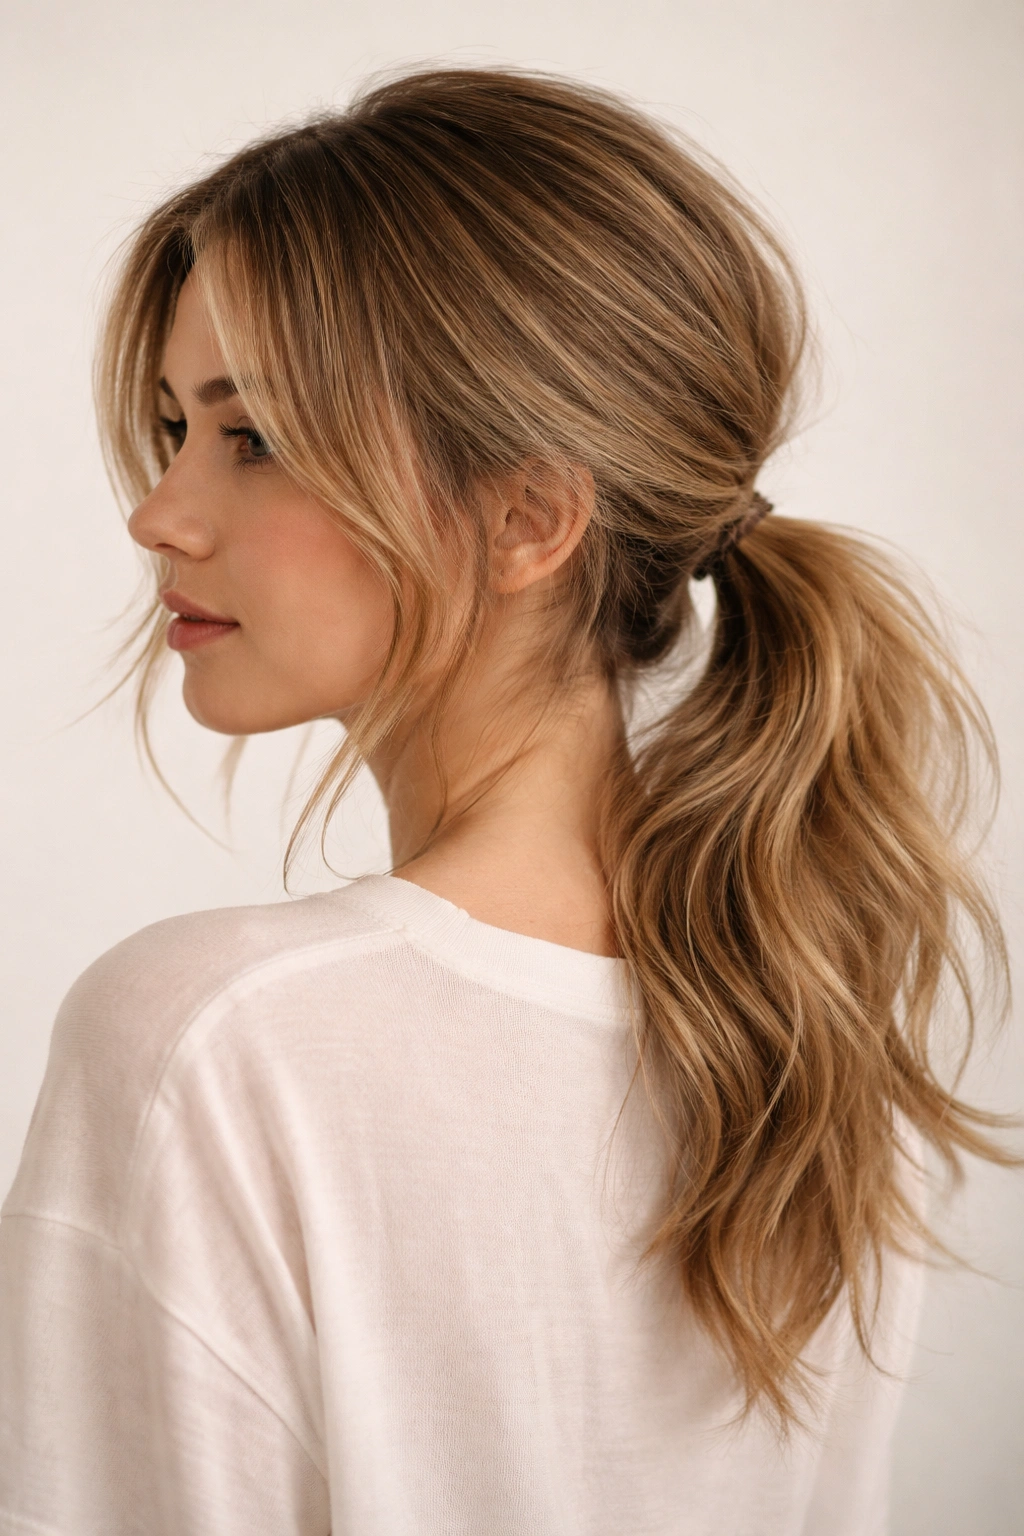
4. The Messy Bun-Inspired Low Ponytail
This style borrows the relaxed energy of a messy bun but maintains the elongated silhouette of a ponytail. The result is something that looks more intentional than a true messy bun while retaining all the casual sophistication that makes loose low ponytails so appealing. The key is understanding that “messy” in this context means strategically placed texture and volume, not actually chaotic or unkempt.
Why This Hybrid Approach Works
A bun-style low ponytail creates volume at the back of your head, which is flattering for most face shapes and adds visual fullness. The messy element prevents it from looking overly formal or severe. This style is particularly effective for thicker hair that naturally has volume, but finer hair types can achieve it by strategically teasing the ponytail before loosening it.
Technique for Building Intentional Messiness
- Create a low ponytail at the nape of your neck, leaving it looser than you normally would
- Using a fine-tooth comb or teasing brush, gently backcomb small sections throughout the ponytail to build texture and volume
- Smooth the outer layer slightly so it doesn’t look actually tangled, but keep the interior texture visible
- Wrap a small section of hair from inside the ponytail around the base elastic and secure with a bobby pin
- Gently pull and tug various sections of the ponytail to create an undone, voluminous appearance
- Leave wispy pieces loose around your face and nape area—these should look like they escaped rather than being intentionally placed
- Finish with a flexible-hold hairspray that keeps the shape without making it feel stiff or crunchy
5. The Twisted Side Low Ponytail
This version incorporates a twist element that starts at one side of your head and leads into your ponytail, creating movement and visual interest without the commitment of an actual braid. Twists are easier to master than braids for many people, and they create a similarly sophisticated result. The side element also creates an asymmetrical balance that reads as modern and intentional.
The Visual Appeal of Twisted Details
A twist creates a linear element that your eye naturally follows, which is flattering because it can be positioned to emphasize your best features or minimize areas you’re less fond of. Because the twist originates from the side, it creates the illusion of movement and dimension even when the rest of your hair is relatively still. This styling element works beautifully across different hair types and textures—smooth hair shows the twist clearly, while textured hair adds an extra dimension of visual interest.
Creating a Twisted Side Ponytail from Start to Finish
- Section off a piece of hair from one temple, about one inch wide
- Begin twisting this section loosely as you move backward toward the nape of your neck
- As you twist, gradually incorporate small sections of hair from the surrounding area, adding to the twist width
- Twist continues until you reach the nape of your neck, where you gather the remaining hair
- Secure everything into a low ponytail with an elastic
- Gently pull the twist sections outward to add texture and fullness
- Smooth any flyaways around your face with a fine-tooth comb and smoothing cream
- Optional: wrap a small section of hair around the elastic base to conceal it and add a finished detail
6. The Wispy Layered Low Ponytail
This style is specifically designed for people with textured, curly, or naturally layered hair. Rather than fighting your hair’s natural texture, you’re celebrating it by allowing your layers to fall loose around your face and shoulders while the bulk of your hair is secured in a low ponytail. This approach works brilliantly for those days when you want your hair off your neck but don’t want a severe, pulled-back appearance.
Why Layered Hair Looks Effortlessly Relaxed
Layers create natural movement and dimension, and when you leave them loose while securing the bulk of your hair, you’re creating an inherently balanced, intentional-looking style. This is one of the few loose low ponytail styles where product-free, air-dried hair actually works beautifully. The less you manipulate curly or wavy layers, the more naturally beautiful they appear, and that’s exactly what makes this style so appealing.
How to Style Your Layered Texture into This Look
- Allow your natural texture to air dry or style it with your usual curl-enhancing products
- Rather than gathering all your hair, identify your longest layers—these typically fall around shoulder length or longer
- Gather your hair at the nape of your neck, but intentionally leave out your face-framing layers and any shorter pieces
- Secure the gathered section with a flexible elastic that won’t create a harsh line
- Arrange your loose layers so they fall naturally around your face and shoulders
- You can enhance waves or curls in the loose sections with a curl-enhancing cream or lightweight mousse
- Use a light hairspray that maintains hold without crunching your natural texture
7. The Bubble Ponytail (Low Version)
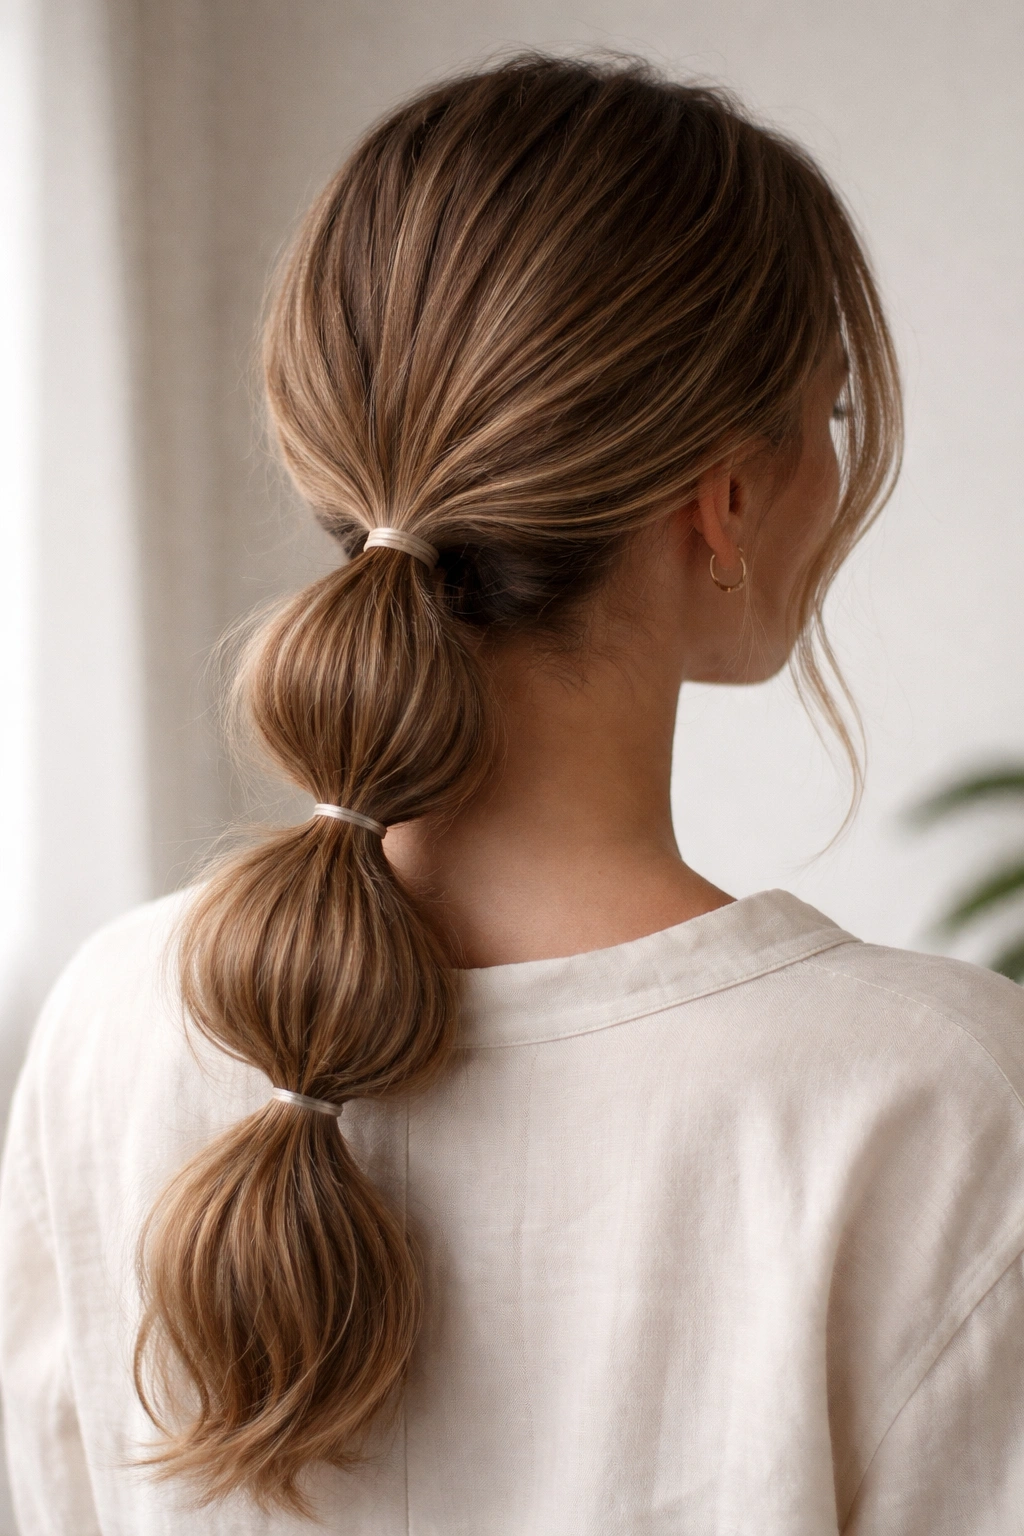
A bubble ponytail uses multiple elastics spaced down the length of your ponytail to create distinct, rounded segments that look playful and modern. The low version positions this trend-influenced style at the nape of your neck rather than high on the crown, making it more subtle and wearable in professional or conservative settings. The bubble effect is surprisingly easy to create once you understand the basic technique.
What Makes Bubble Ponytails Feel Relaxed Rather Than Trendy
The secret is using fewer, larger bubbles rather than many tiny ones, and spacing them generously rather than tightly. Large, loosely spaced bubbles create a more sophisticated, relaxed effect than tight, closely spaced segments. The low placement also softens the visual impact, making it feel more effortless and less obviously styled. This version appeals to people who like the visual interest of the bubble trend but want something they can wear regularly without it feeling overly fashion-forward.
Step-by-Step Process for Creating Bubble Ponytails
- Create a low ponytail and secure it with a small elastic at the base
- Measure roughly three inches down from the first elastic
- Use your index and middle fingers to push the hair between the first and second elastic point upward, creating a bubble
- Place a second elastic at your three-inch mark, securing the bubble in place
- Repeat this process three or four times, depending on your hair length
- For a relaxed effect, gently tug each bubble outward to add volume and texture
- Leave a few inches of unsecured hair at the bottom of your ponytail for a soft, undone finish
- Optional: pull out small wisps of hair from each bubble to create a messier, less polished appearance
8. The Low Ponytail with Ribbon or Scarf Accent
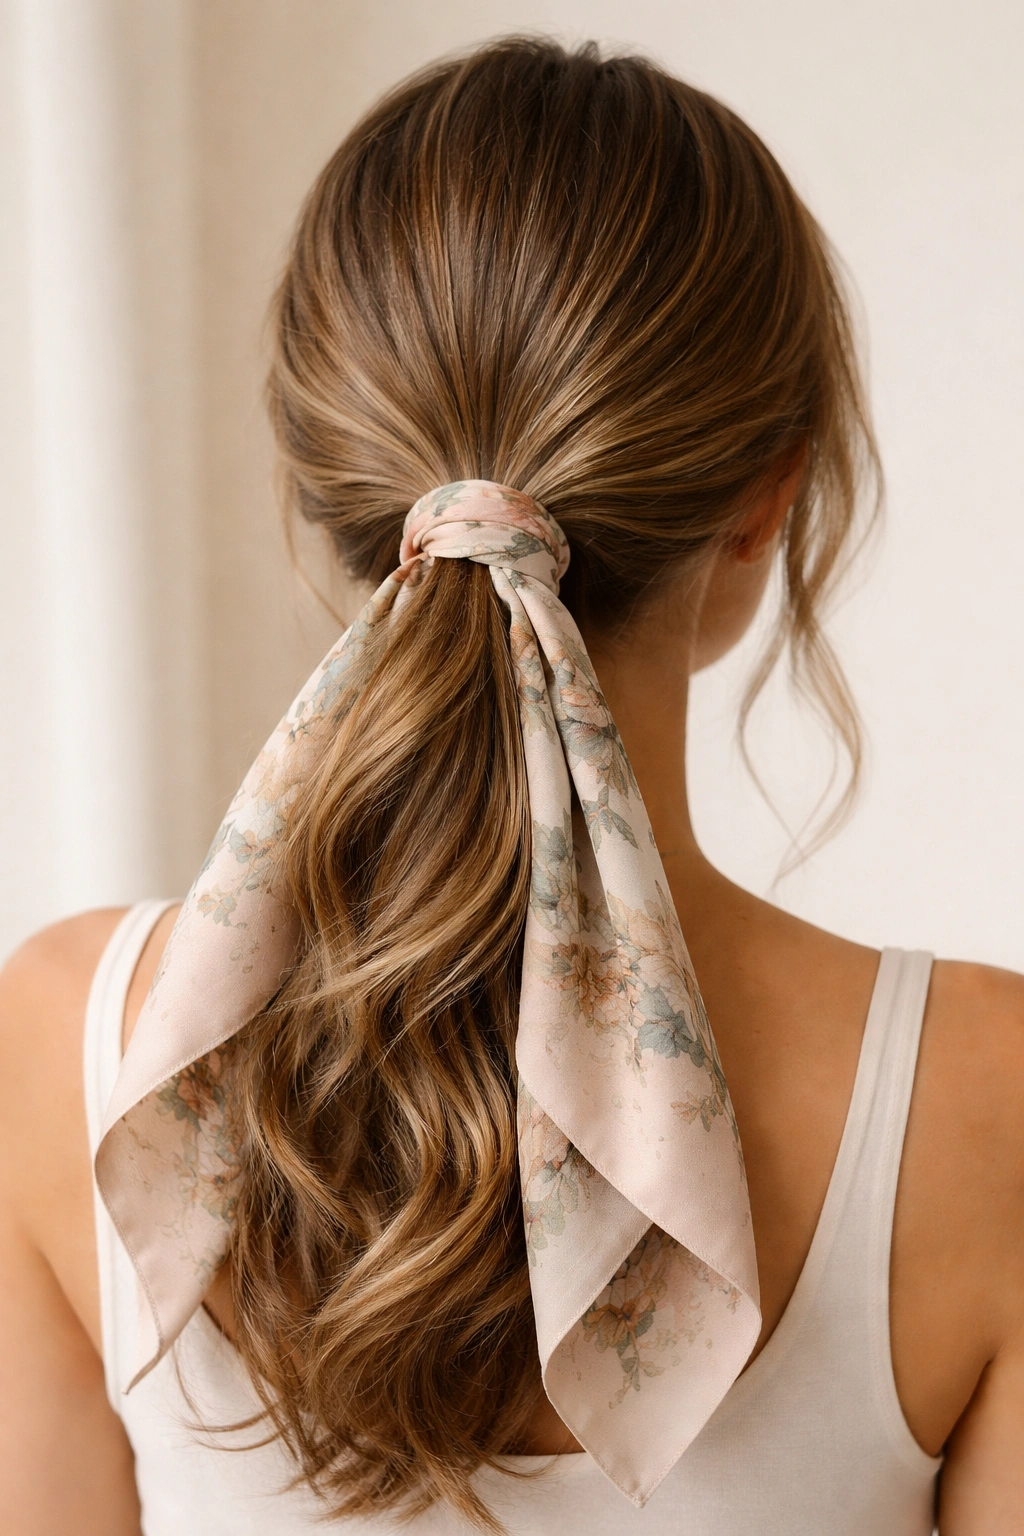
Adding a ribbon, silk scarf, or decorative element to your low ponytail instantly elevates the style from basic to intentional. Beyond the visual appeal, these accessories serve practical purposes—they can conceal an elastic band, add texture and color without requiring hair products or tools, and allow you to customize your look based on your outfit or mood. This approach makes even a simple, gathered low ponytail feel polished and put-together.
Why Accessories Transform a Basic Hairstyle
A well-chosen ribbon or scarf adds a focal point at the back of your head and neck, which draws attention to that area and creates visual interest. Color coordination between your accessory and outfit creates a cohesive, intentional appearance that reads as thoughtfully styled. Texture from a silk ribbon or scarf creates dimensional interest without requiring you to manipulate your hair with heat tools or products. This is one of the simplest ways to create multiple different looks from the same basic ponytail base.
Techniques for Incorporating Ribbon and Scarves
- Create a low ponytail and secure it loosely with an elastic
- Choose a ribbon (satin, grosgrain, or velvet all work beautifully) or a silk scarf approximately 1-2 inches wide
- Wrap the ribbon or scarf around the base of your ponytail, covering the elastic
- Tie it into a bow at the back, or secure it with a bobby pin for a seamless look
- Alternative method: thread the ribbon or scarf through a strand of hair before securing the ponytail, so the accessory is integrated rather than wrapped on top
- For a more textured approach, fray the edges of your ribbon or allow the scarf to billow slightly at the base
- Choose colors that complement your hair color and contrast with your outfit for maximum visual impact
9. The Half-Up Half-Down Loose Low Ponytail

This hybrid style captures the best of both worlds—the face-framing movement of down hair with the neck-clearing functionality of a ponytail. Despite the name, your hair isn’t actually secured into a traditional ponytail. Instead, you’re gathering the top and back sections while leaving the underneath layer and some side pieces loose. This approach creates incredible dimension and works beautifully across all hair lengths and textures.
Why This Style Offers Maximum Versatility
The half-up half-down approach is genuinely flattering because it frames your face while controlling the bulk of your hair. This style works for nearly every face shape, hair texture, and occasion. It’s casual enough for weekend wear but polished enough for professional settings. The movement created by the loose bottom layer prevents the style from ever looking severe or overly controlled, which keeps it in the relaxed vibe category.
Creating the Illusion of a Half-Up Half-Down Ponytail
- Identify where you want the “half-up” section to end—typically around mid-crown or slightly lower
- Gather hair from the crown area and sides, creating a section that’s roughly the same width as your head from temple to temple
- Secure this section with an elastic at the back of your head
- Leave the underneath layer completely loose—this becomes your “half-down” section
- For added dimension, tease the crown slightly before securing it, creating volume at the top
- Leave face-framing pieces loose on either side, pulling them gently around your face
- You can loosely twist the gathered section before securing it for added sophistication
- Allow your loose hair to fall naturally—the contrast between the gathered top and loose bottom creates the relaxed effect
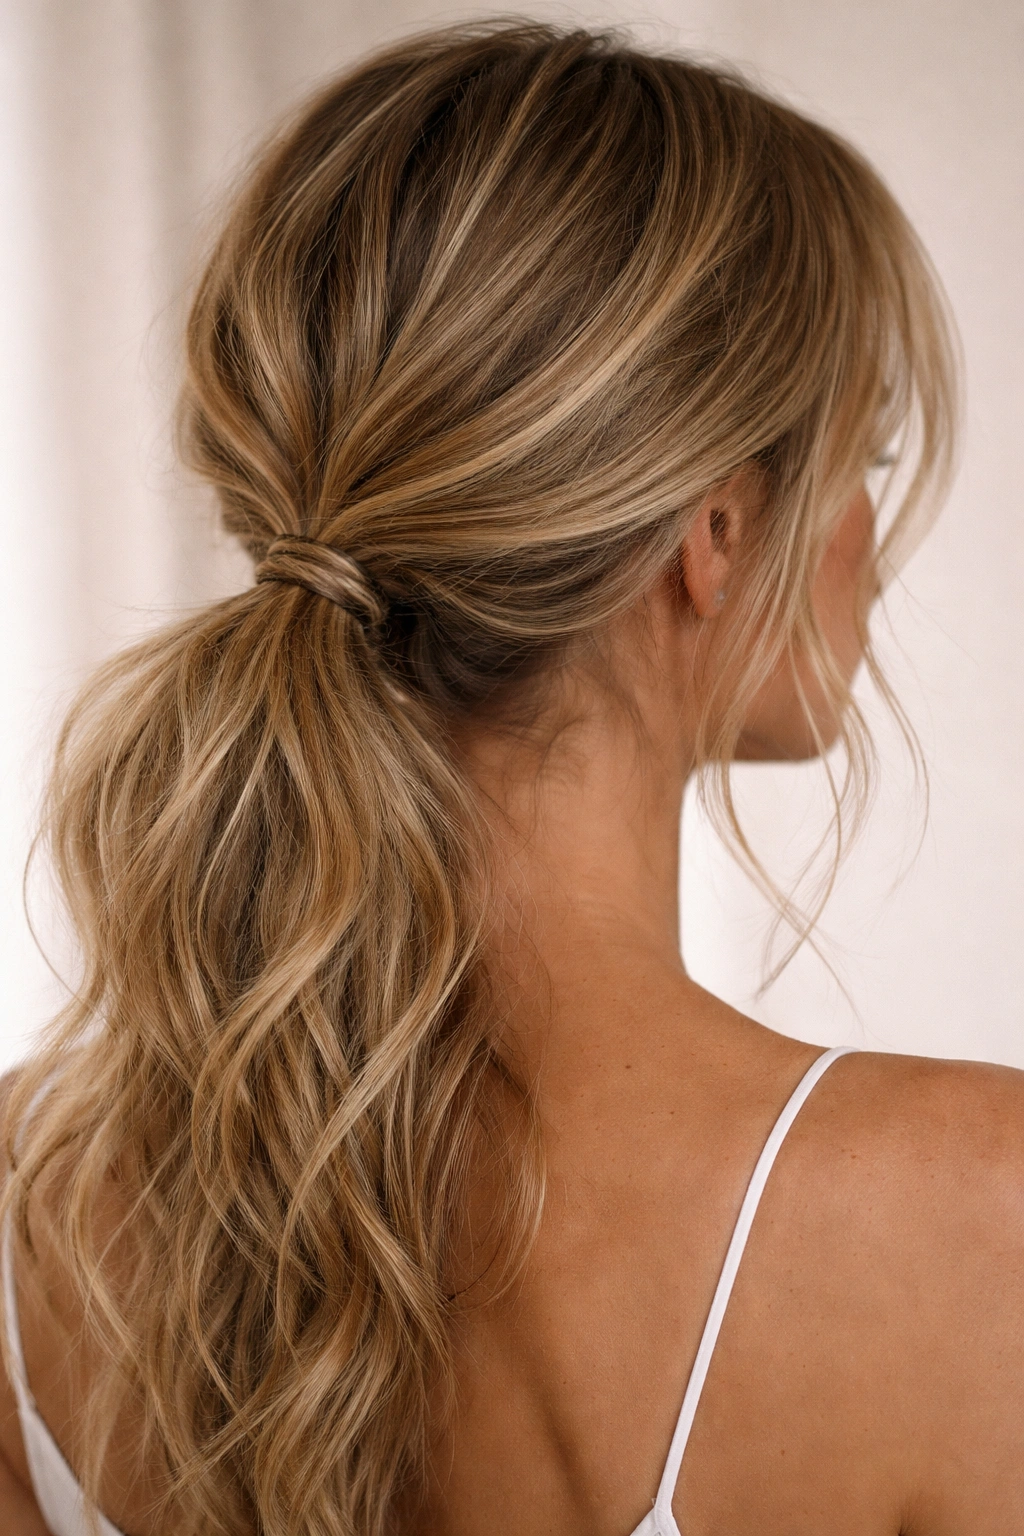
10. The Curved or Wrapped Low Ponytail

This style incorporates a curved or C-shaped element created by positioning your ponytail slightly off-center and wrapping a section of hair around it in a subtle arc. The result is more dimensional and interesting than a centered ponytail, and the curved line is flattering to most face shapes because it echoes the natural curves of your face and neck. This approach requires minimal additional effort but creates a noticeably more intentional appearance.
The Flattering Geometry of Curved Lines
Curved and diagonal lines are inherently more flattering and interesting than straight, centered lines. By curving your ponytail placement and wrapping it, you create visual movement that draws the eye and creates a more dynamic silhouette. The wraparound element also hides the elastic band, giving the style a more seamless, finished appearance. This is one of those styling tricks where a small geometric adjustment creates a surprisingly significant difference in the overall impression.
How to Create a Curved Wraparound Low Ponytail
- Gather your hair slightly lower and slightly to one side compared to a traditional centered low ponytail—roughly two inches lower and one inch to the side
- Secure with a small elastic at this off-center, low placement
- Take a thin section of hair from inside your ponytail, approximately one inch wide
- Wrap this section around your ponytail base in a gentle arc or curve
- Secure the wrapped section with a bobby pin tucked underneath where it won’t be visible
- Gently pull sections of your ponytail to add texture and volume
- The curve should be subtle enough that it looks like a natural styling choice, not an obvious manipulation
- Leave face-framing pieces loose on both sides to balance the off-center placement
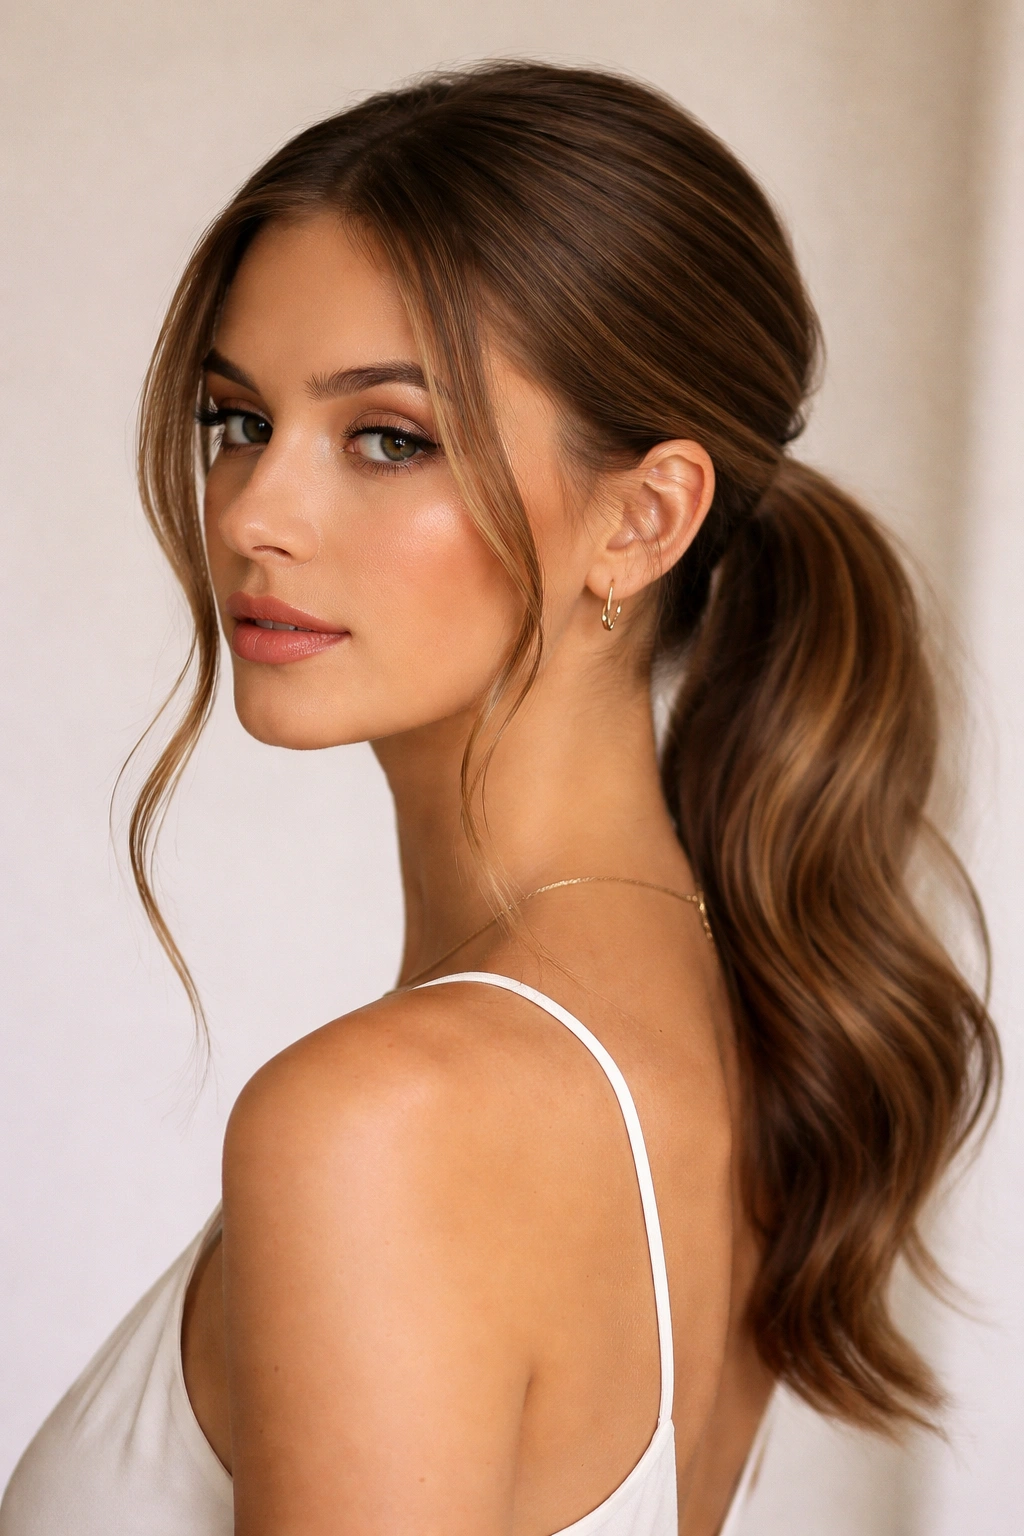
11. The Romantic Low Ponytail with Soft Waves
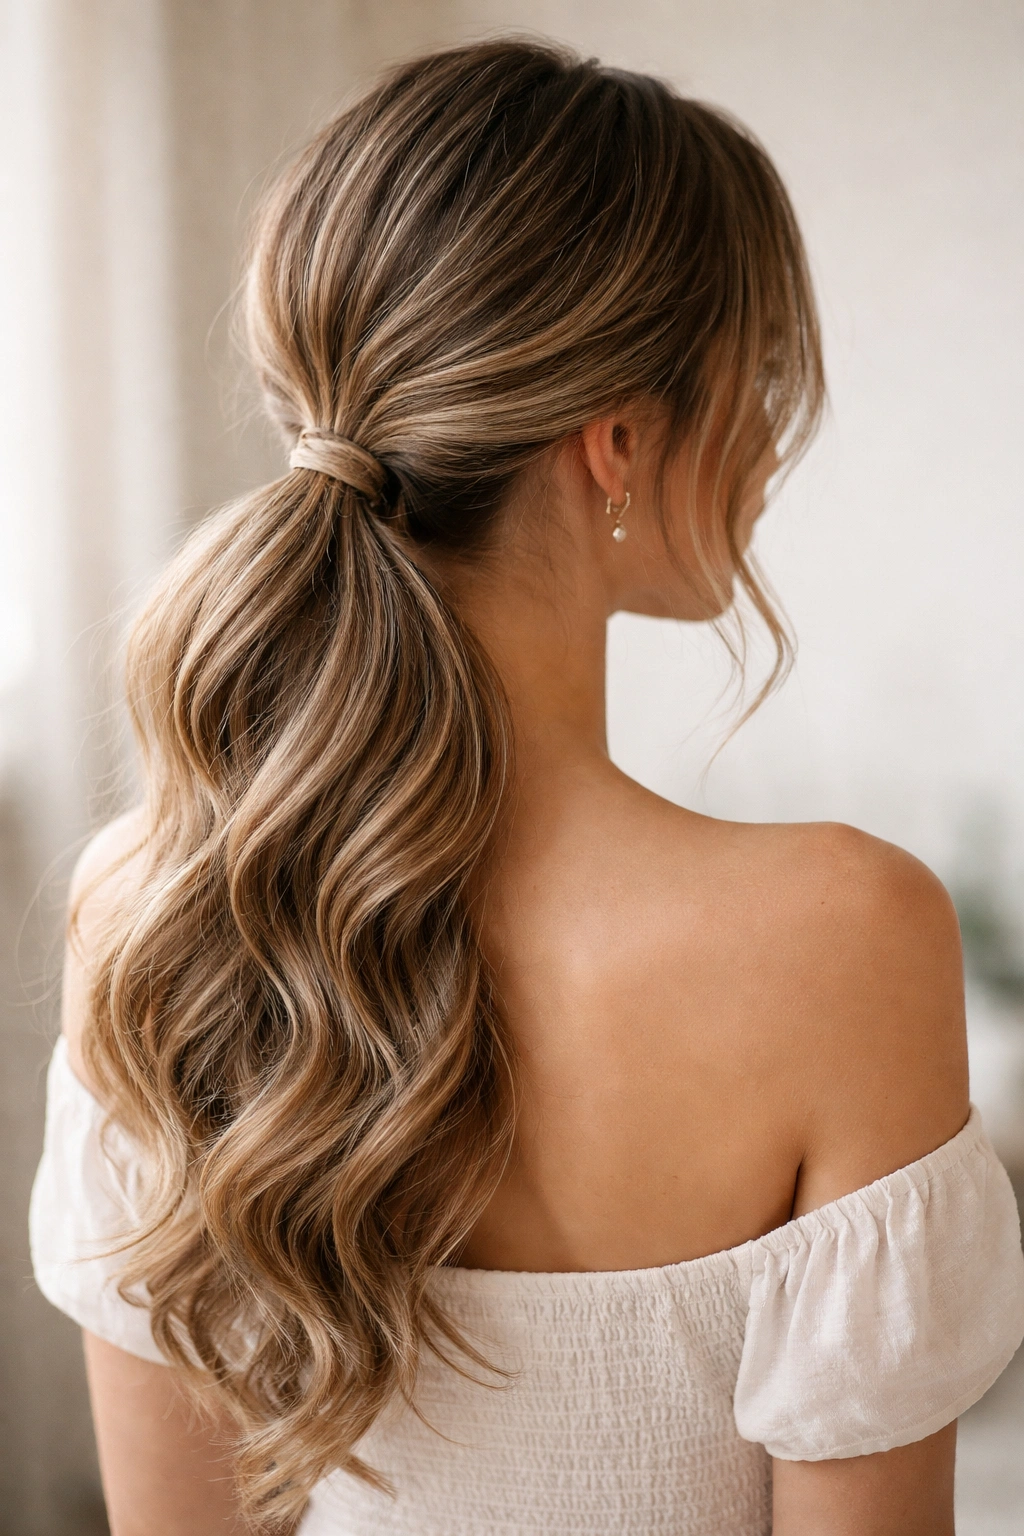
This version emphasizes femininity and movement through the use of soft, romantic waves throughout your hair. Rather than using heat tools to create uniform curls, this style uses looser, more organic waves that move and flow naturally. The low ponytail gathers your wave-textured hair while allowing waves to continue throughout, creating a cohesive, intentionally styled appearance that reads as both romantic and relaxed.
Creating Waves That Enhance Rather Than Constrain
Soft waves create natural dimension and movement, which is precisely what makes loose low ponytails so appealing. Rather than flattening your hair by securing it tightly, waves give your ponytail itself volume and visual interest. This approach works beautifully for special occasions—weddings, dates, or any situation where you want to look polished and intentional without appearing overly formal. The romantic element comes from the softness and movement, not from any single technique.
Building and Styling Romantic Waves
- Create soft waves throughout your hair using a large-barrel curling iron (1.5 inches or larger) or a wave-creating product applied to damp hair
- Allow waves to cool completely before touching them—this sets them properly
- Gather your waved hair into a low ponytail at the nape of your neck, leaving it loosely secured
- Gently tug the base of your ponytail to loosen it and create volume
- Pull out small sections from the ponytail itself to create texture and soften the gathered appearance
- Leave wispy pieces loose on either side of your face—these should have visible waves
- Use a light hairspray or texture spray to hold your waves without creating a stiff appearance
- Consider adding a delicate hair accessory like a pearl clip or decorative pin for an extra romantic touch
12. The Textured Waves Low Ponytail with Volume
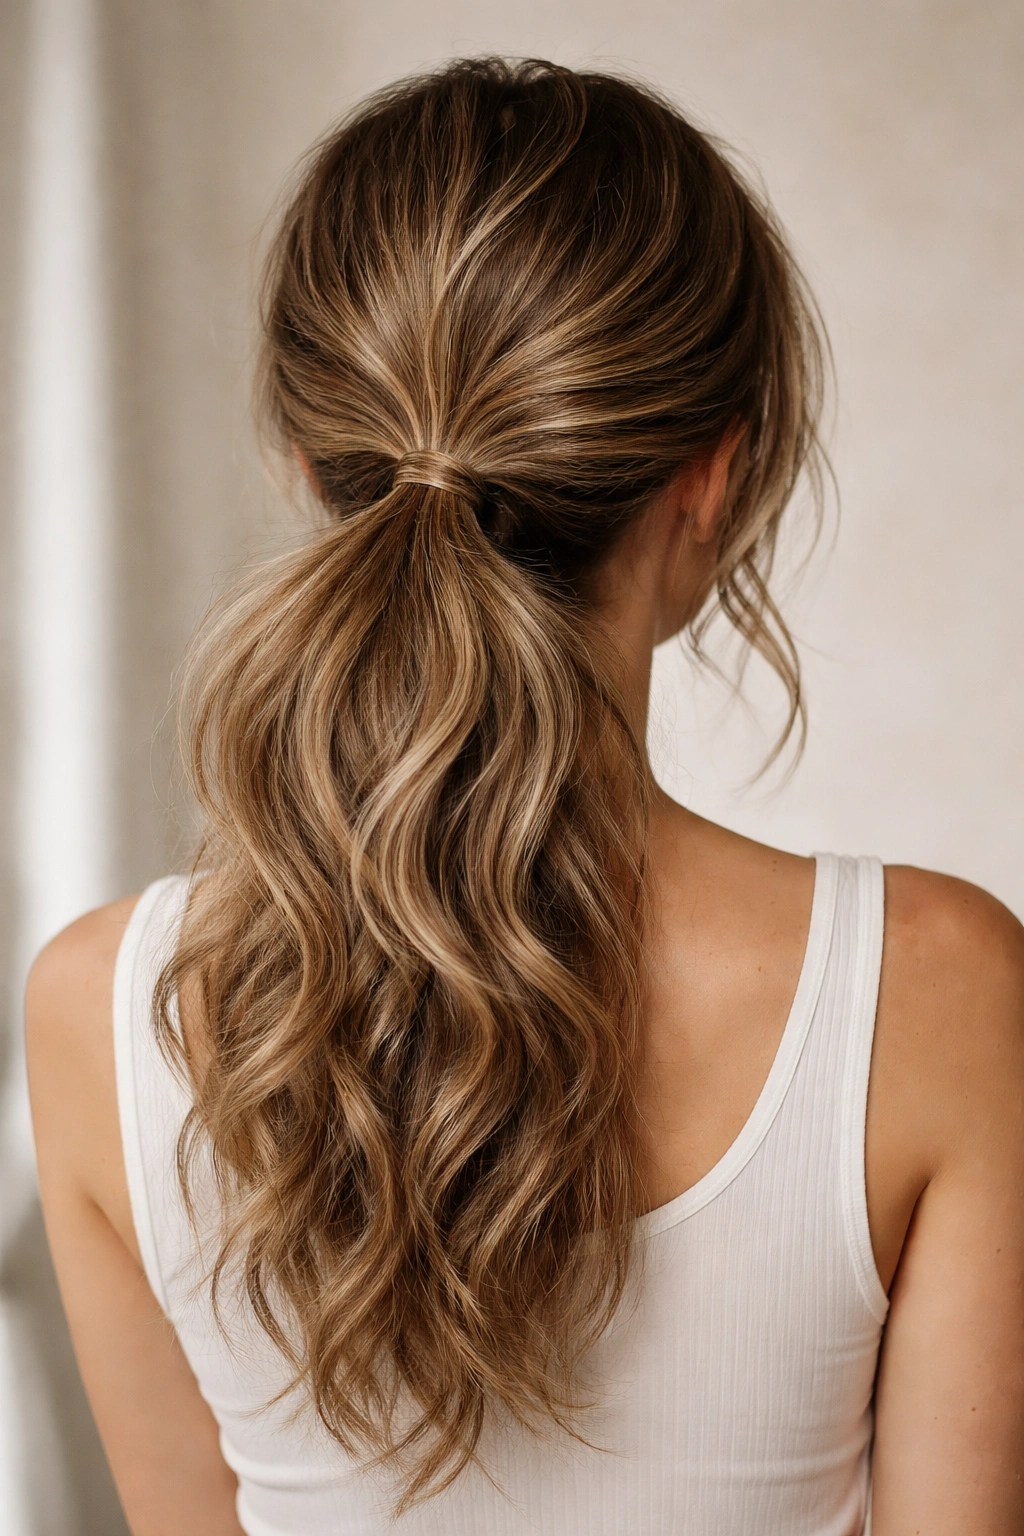
This final style emphasizes volume and textured movement by starting with heavily textured, curly, or waved hair and creating a low ponytail while maintaining as much of that texture as possible. Unlike styles that smooth or refine your texture, this approach celebrates it by allowing your natural or styled waves to create an inherently voluminous ponytail. This is ideal for those with naturally textured hair or anyone who loves the drama and movement that waves create.
Why Volume-Focused Texture Creates Maximum Impact
Textured, voluminous ponytails read as effortlessly beautiful because they require less control and styling. The natural movement of your waves does the work for you, creating a style that looks like you woke up with perfect hair rather than spending an hour styling. This approach is particularly flattering for oval and heart-shaped faces, as the volume at the back creates balance. The texture itself catches light and creates dimension, making your hair appear thicker and healthier.
Technique for Maximum Volume and Texture
- Begin with heavily textured or waved hair—allow air drying with curl products, or use a curling iron or wave tool to create texture throughout
- Don’t brush through your waves; instead, use your fingers to separate sections and enhance texture
- Gather your textured hair into a low ponytail, resisting the urge to smooth it—you want volume and movement to be visible
- Secure with an elastic, but don’t pull tightly; the looser you secure it, the more volume reads visually
- Use a teasing brush or your fingers to create additional volume at the base of your ponytail
- Gently pull sections from throughout your ponytail to enhance the textured, undone appearance
- Allow shorter layers and pieces to fall loose around your face and nape—these shouldn’t look intentional, but rather like they escaped the ponytail naturally
- Finish with a lightweight, flexible-hold hairspray that maintains texture without crunching or creating a product-heavy appearance
Final Thoughts
A loose low ponytail is remarkably versatile—it adapts to your hair texture, your personal style, the occasion, and the amount of time you want to spend styling. The foundation of every version is the same: positioning your ponytail low, keeping it slightly loose, and leaving pieces free around your face and nape. Everything else—the texture, the wraps, the accessories, the degree of messiness—is customization based on your specific hair and your specific vibe that day.
What makes these styles so appealing is that they all prioritize relaxation and movement over control and perfection. A loose low ponytail says you’re confident enough not to need a severe, pulled-back style, and you’re thoughtful enough to put some intention into how you present yourself. You’re not trying too hard, but you’re definitely not being careless either—that balance is precisely what makes loose low ponytails work across every setting and every circumstance.
The best part? Once you understand the basic technique, you can switch between any of these versions depending on your mood, your hair that day, and what you’re doing. Some days you’ll want the textured, undone version. Other days you’ll reach for the polished wraparound technique. That flexibility—the ability to take one basic ponytail concept and express it in a dozen different ways—is what makes loose low ponytails such an essential hairstyle to master.