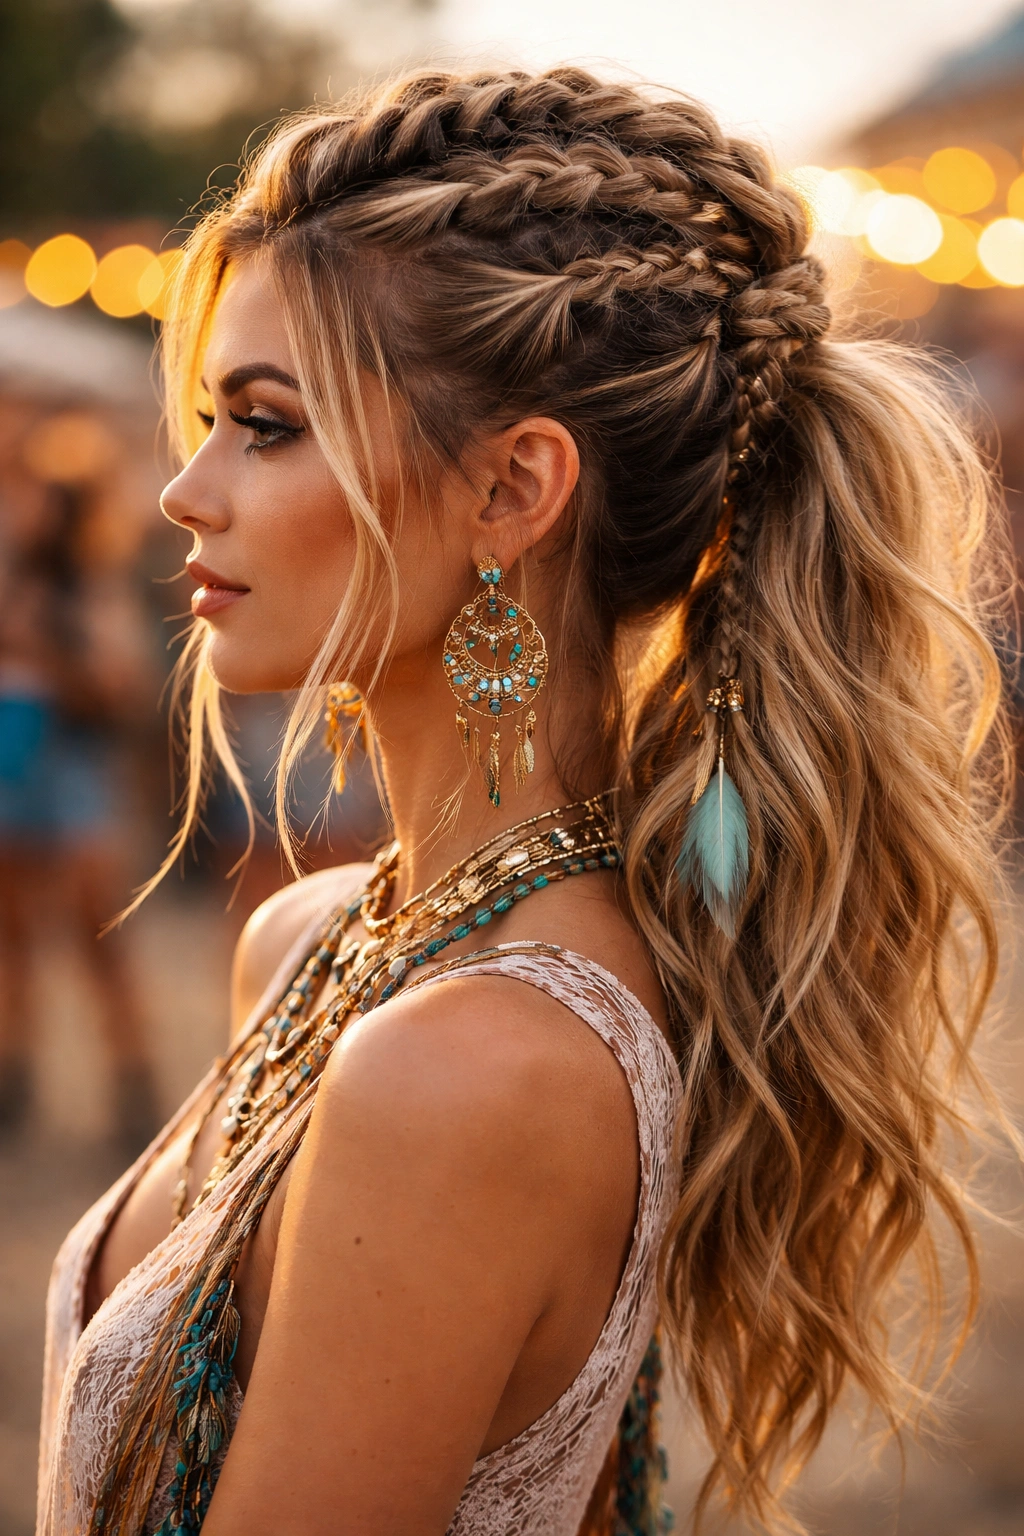
Braided mohawk ponytails are the kind of hairstyle that makes a statement the second you walk into a room. It’s the perfect fusion of edgy and intricate—bold enough to turn heads, but intricate enough to show you actually put thought into your look. Whether you’re heading to a festival, a night out, or just want to shake things up on an ordinary Tuesday, this hybrid style gives you way more personality than a standard braid or basic ponytail ever could.
The beauty of braided mohawks is that they work across different hair types, lengths, and textures. You’ve got the power to go sleek and structured or tousled and free-spirited. The braid pattern creates height and dimension, while the ponytail keeps everything secure and polished enough for nearly any occasion. Plus, once you understand the mechanics of how they work, you can mix and match techniques to create a version that feels entirely yours.
What makes these styles so captivating is the way they command attention without screaming for it. A braided mohawk reads as intentional, creative, and undeniably confident. It’s for anyone who wants their hair to reflect their personality—someone who isn’t afraid to take a few extra minutes to braid something bold and beautiful. Let’s walk through ten variations that range from classic to edgy, so you can find the exact braided mohawk that makes you feel like the best version of yourself.
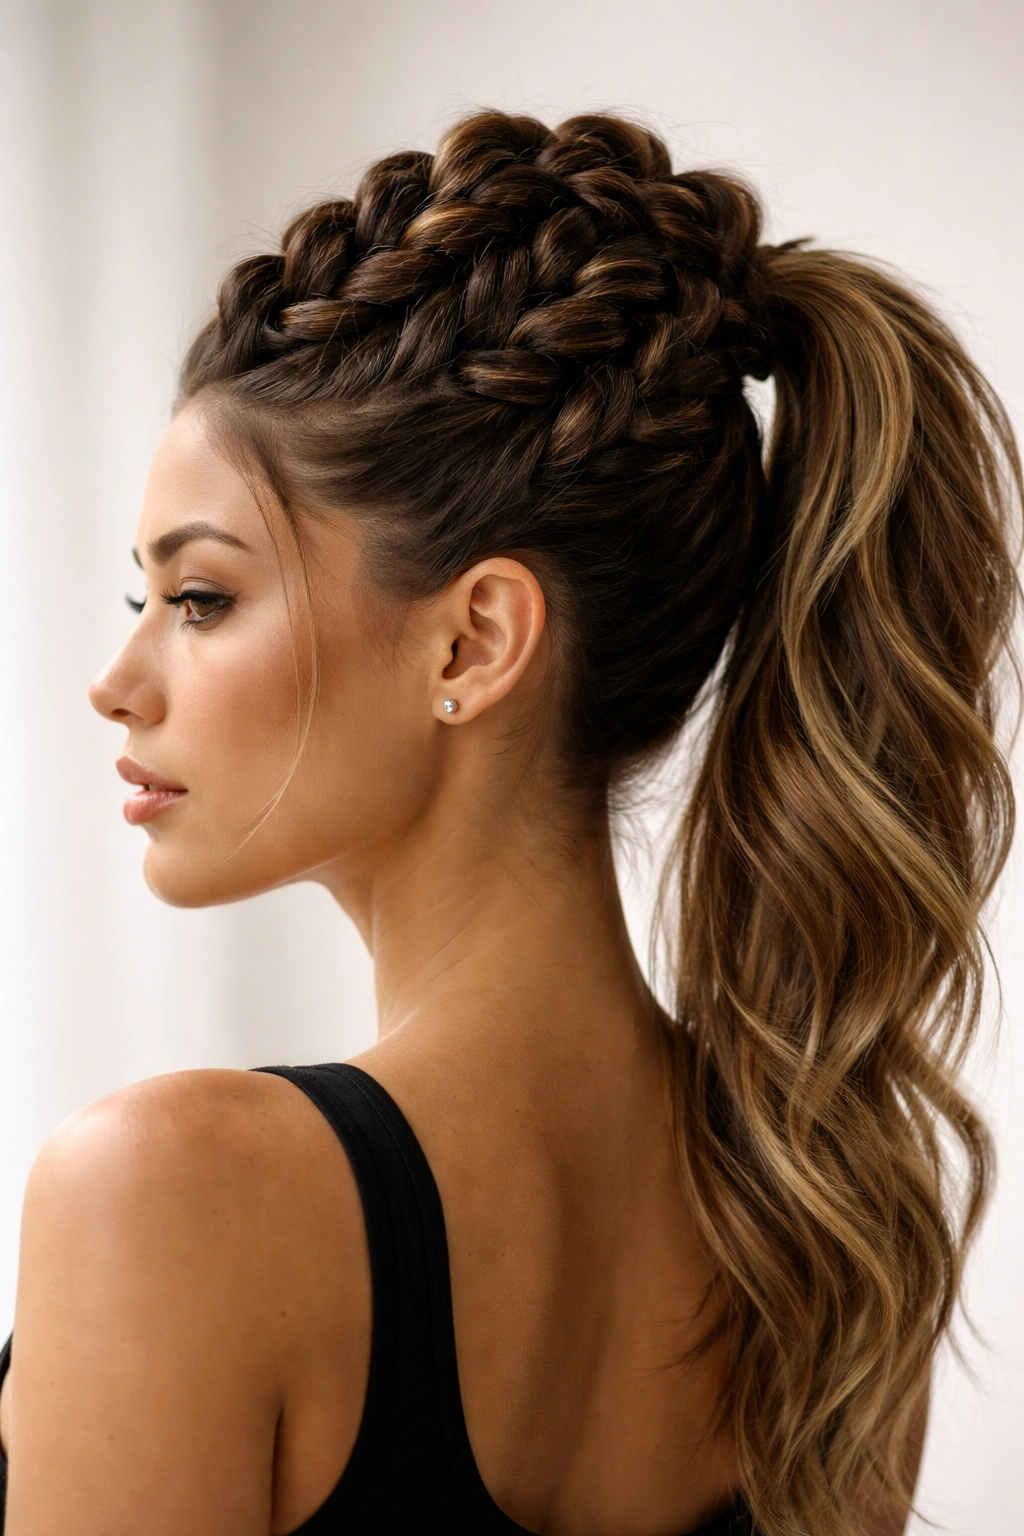
1. Classic Center Braid Mohawk Ponytail
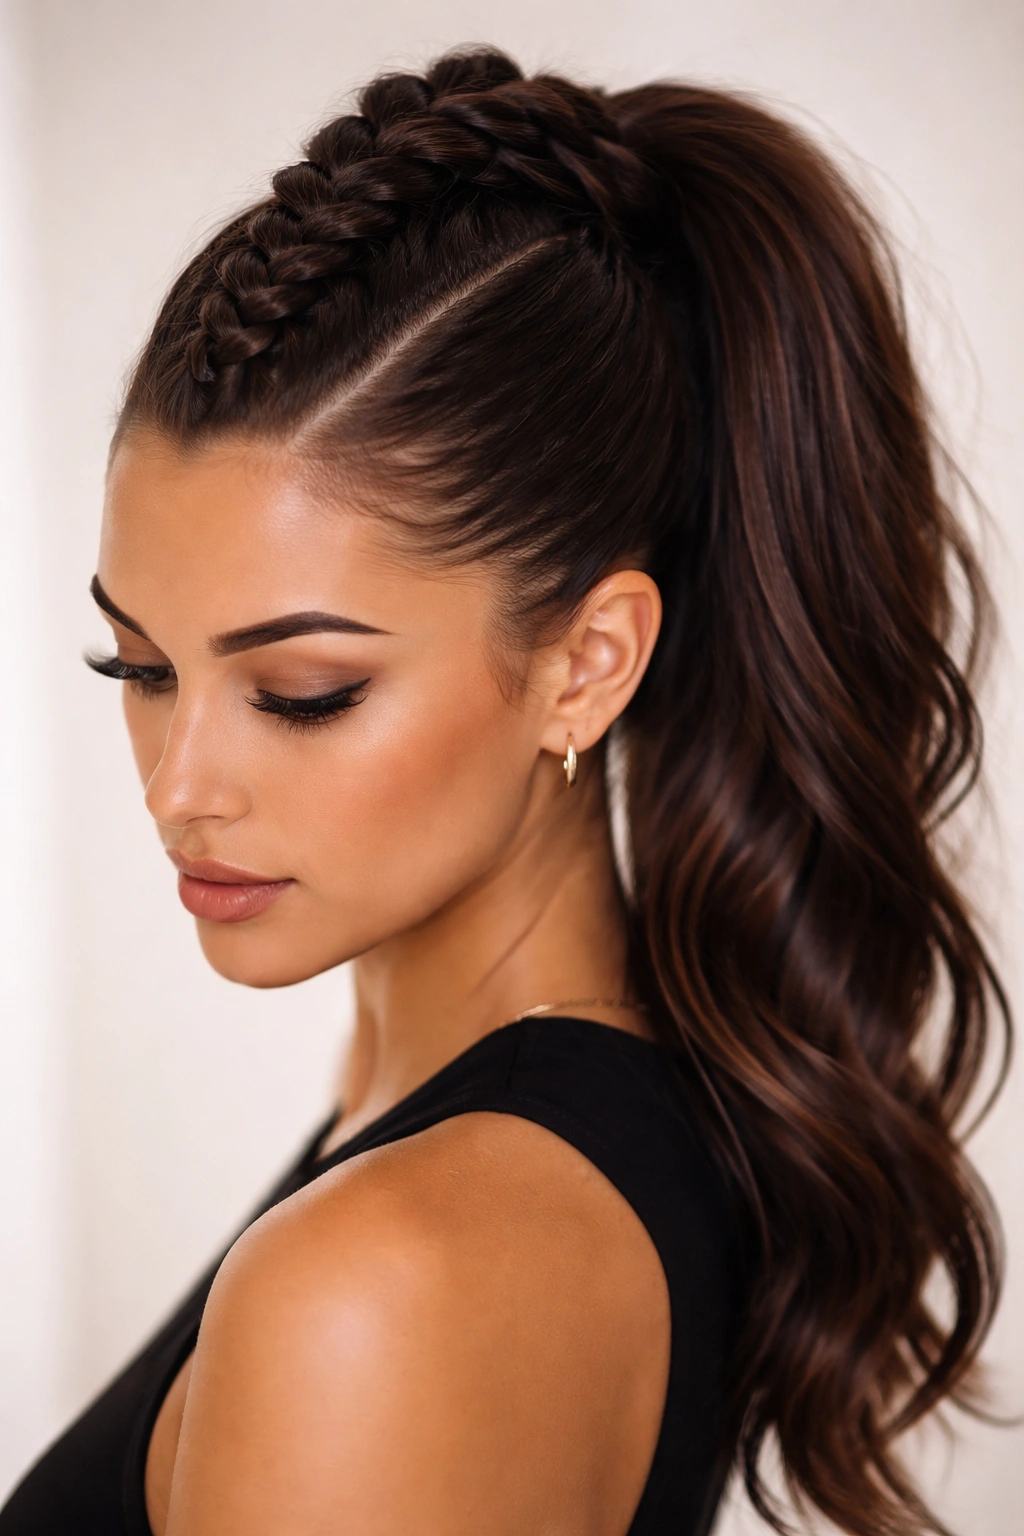
This is the foundation style that started the braided mohawk trend, and it remains absolutely stunning. A single, chunky braid runs down the center of your head from the hairline to the crown, creating that signature mohawk silhouette, then flows seamlessly into a high or mid-level ponytail. The simplicity is part of the power—nothing distracts from the clean lines and three-dimensional texture of the braid itself.
Why This Style Stands Out
The center braid mohawk works because it’s mathematically flattering to most face shapes. The braid naturally draws the eye upward and creates symmetry, while the height at the crown elongates your overall appearance. It’s bold without being overwhelming, making it accessible for first-timers who want to try the braided mohawk look without committing to something ultra-complicated.
How to Perfect the Technique
- Start with damp hair and a texturizing spray or light mousse to help the braid grip without slipping
- Section hair straight down the center of your head from forehead to nape, clipping one side back temporarily
- Begin your three-strand braid at the hairline and braid snugly down the center, adding small sections as you go if you’re doing a Dutch braid (pushing the sections forward for height)
- Gather the remaining hair at the crown or nape into an elastic and secure the braided section into the ponytail base
- Tease the ponytail gently and smooth the outer layer with a fine-tooth comb for polish
- Finish with hairspray to lock in the texture and keep flyaways contained
Pro tip: Pull a few face-framing pieces loose after you’ve finished for a softer, less severe final look. It keeps the style from feeling too rigid.
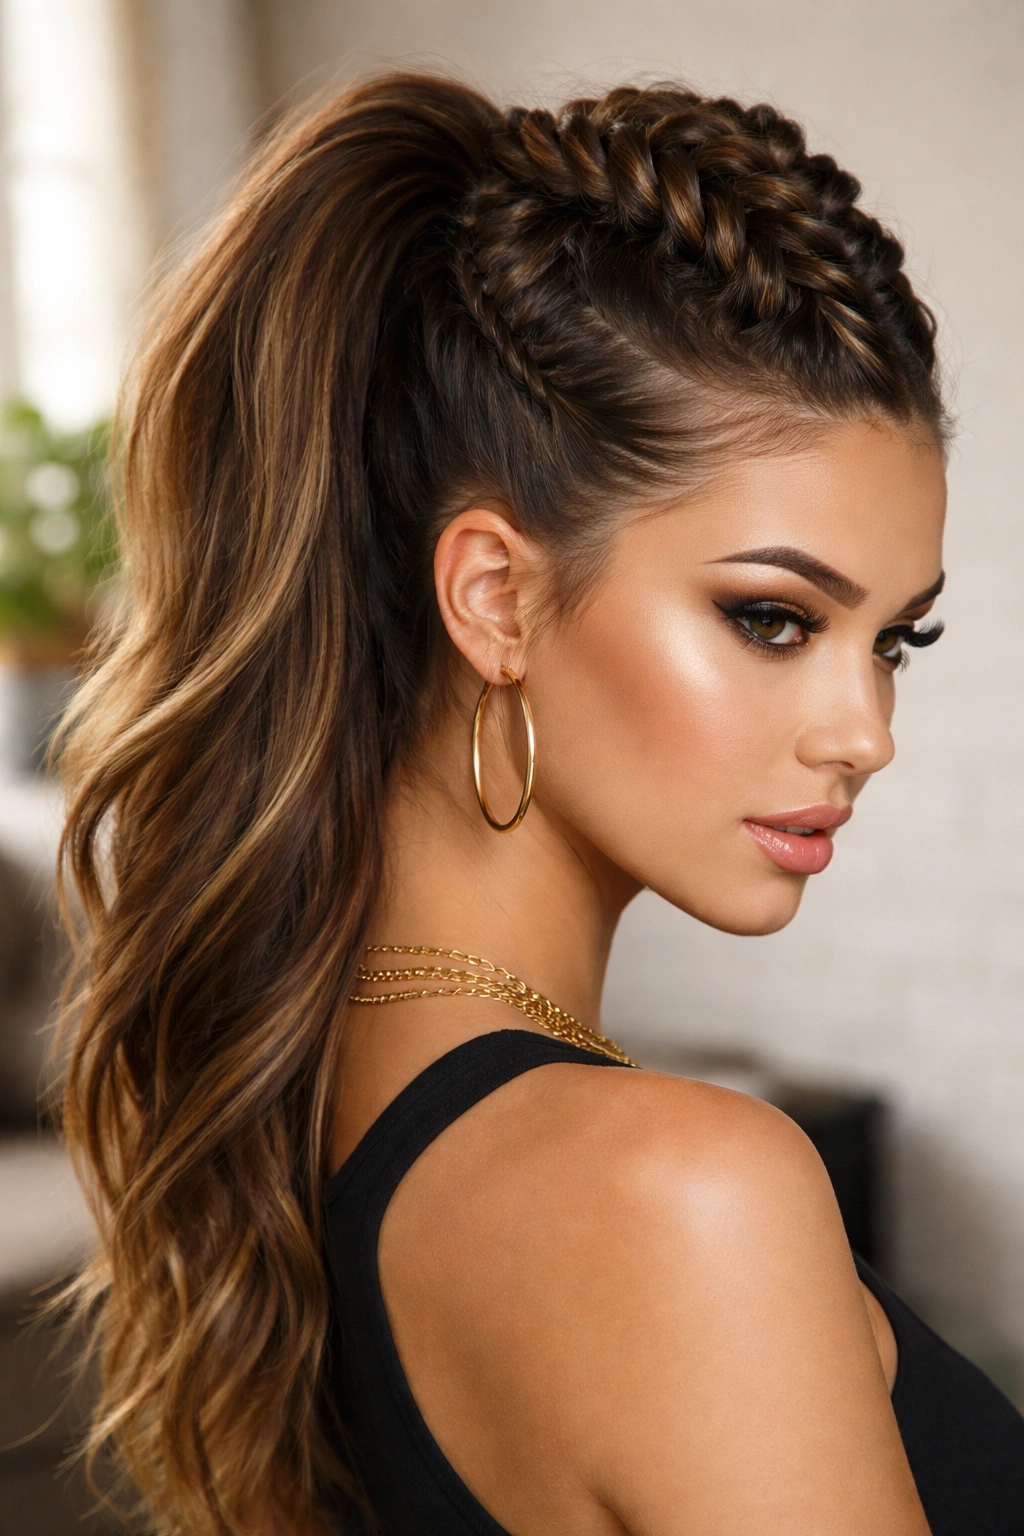
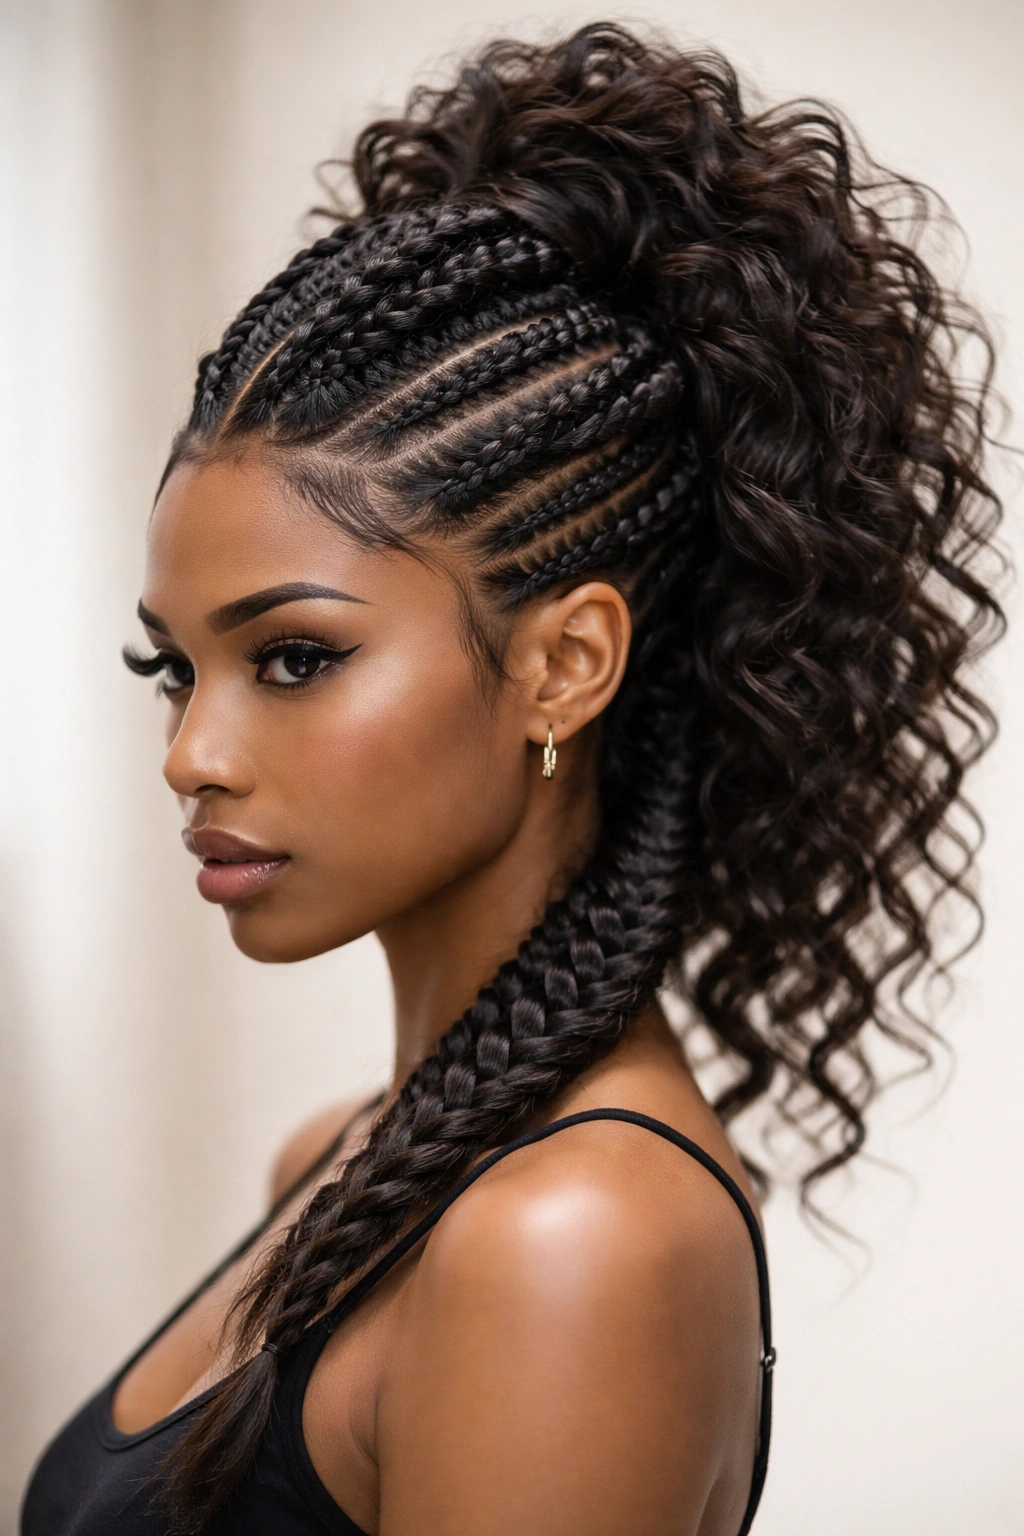
2. Double Dutch Braids Down the Sides
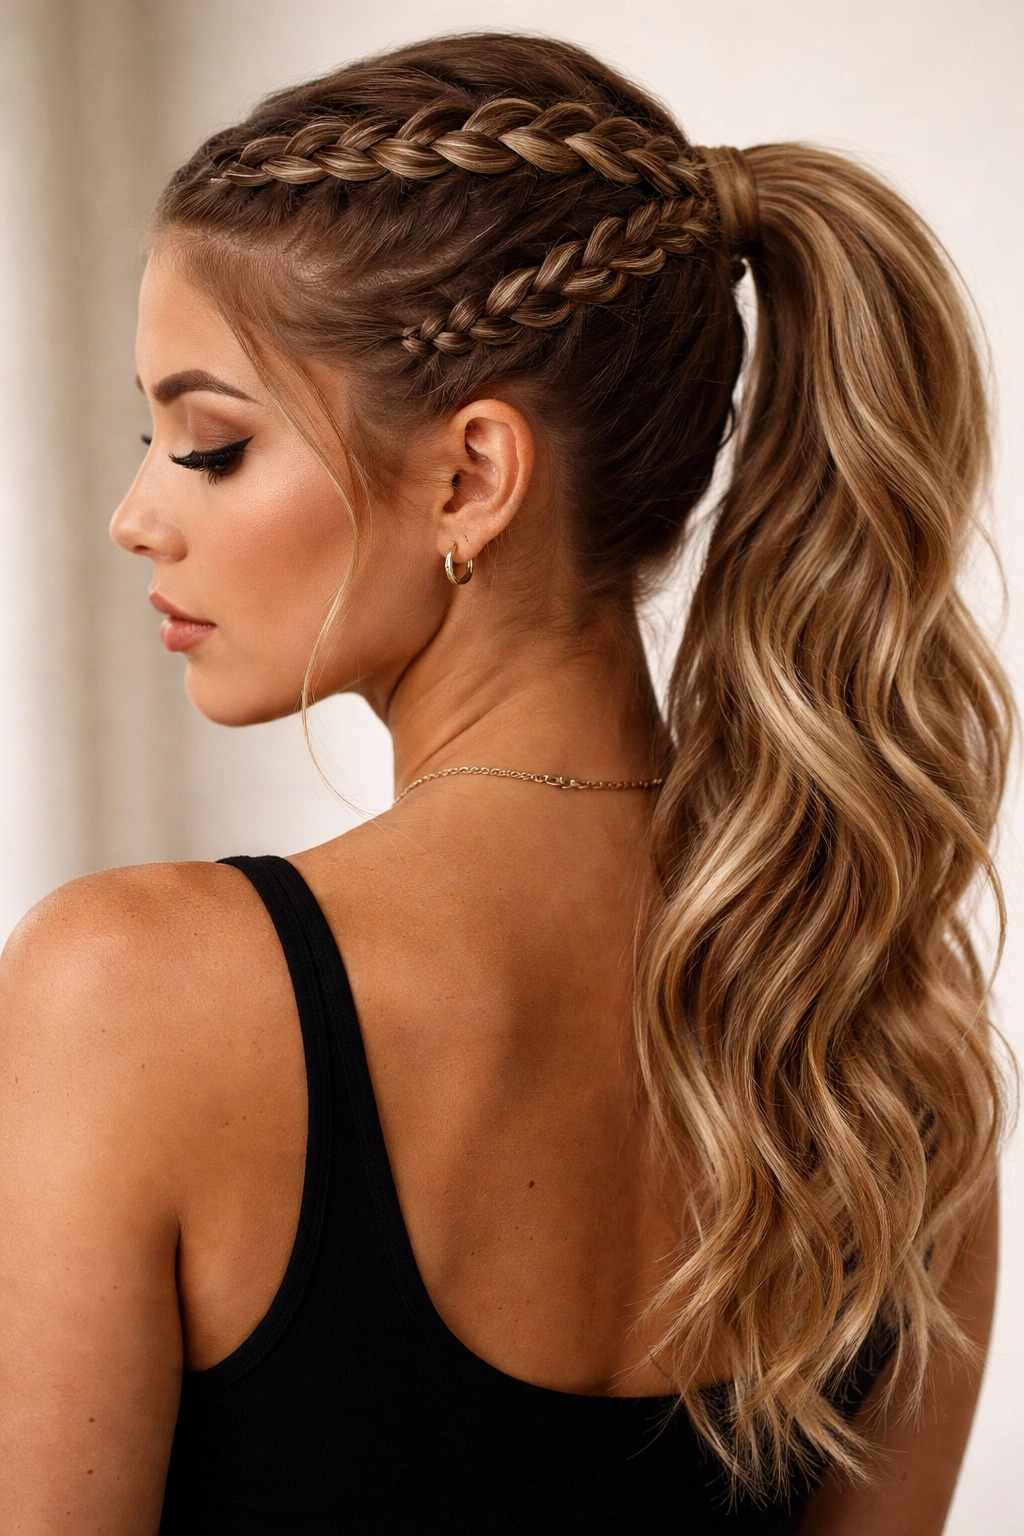
This variation creates a faux-hawk effect by running two Dutch braids down either side of your head. Instead of one center braid, you’re working with two, which doubles the visual impact. Both braids meet at the nape where they feed into a single low or mid ponytail. It’s intricate, dimensional, and gives off major creative energy.
What Makes It Visually Dynamic
Two braids catch light differently than one, creating more texture and movement. The parallel lines also frame your face beautifully while maintaining that aggressive, eye-catching mohawk attitude. This version lets you showcase more braiding skill and works especially well if you have thicker hair or want maximum volume.
Building the Double Braid Foundation
- Create a clean middle part from your hairline to your nape using a rattail comb
- On one side, section off a rectangular area from temple to ear, using the part line as your guide
- Dutch braid this section tightly toward the back of your head, incorporating small sections from both the part line and the hairline as you work back
- Repeat on the opposite side, keeping both braids at the same tension and thickness for balanced symmetry
- Gather both braids and all remaining hair into a low elastic at your nape
- Wrap a small section of ponytail hair around the elastic base to hide it and secure with a bobby pin
3. Fishtail Braid Mohawk with High Ponytail
The fishtail braid is finer and more delicate than a traditional three-strand braid, creating an almost-lace appearance when executed well. Running a fishtail braid (or even two of them in a wide mohawk shape) down the center or sides into a sleek high ponytail gives you a completely different energy—more romantic and intricate, less utilitarian.
Why Fishtail Changes the Aesthetic
Fishtail braids read as more sophisticated and effort-intensive, which changes how people perceive the style. It’s still edgy because of the mohawk silhouette, but the delicate braid pattern adds elegance and refinement. This works beautifully if you want bold with a dose of femininity, or if you’re heading somewhere that needs a bit more polish than a chunky Dutch braid allows.
Executing a Fishtail Mohawk
- Start with smooth, dry or barely-damp hair and apply a smoothing serum or light hairspray to reduce frizz
- Part down the center and section the hair you’ll be braiding, clipping the sides back
- Divide your working section into two sections instead of three (unlike a traditional braid)
- Take a thin piece of hair from the outer edge of the right section and cross it over to join the left section
- Repeat on the left side, taking a thin piece from the outer edge of that section and crossing it to the right
- Continue alternating, keeping your pieces thin and your tension consistent—thin pieces create the delicate, intricate look
- Secure at the nape and gather everything into a high ponytail
- Gently pull the braid slightly wider to create more dimension and the signature fishtail texture
Worth knowing: Fishtail braids loosen and look even better as you move throughout the day, so don’t panic if it’s not picture-perfect immediately after styling.
4. French Braid Mohawk Ponytail
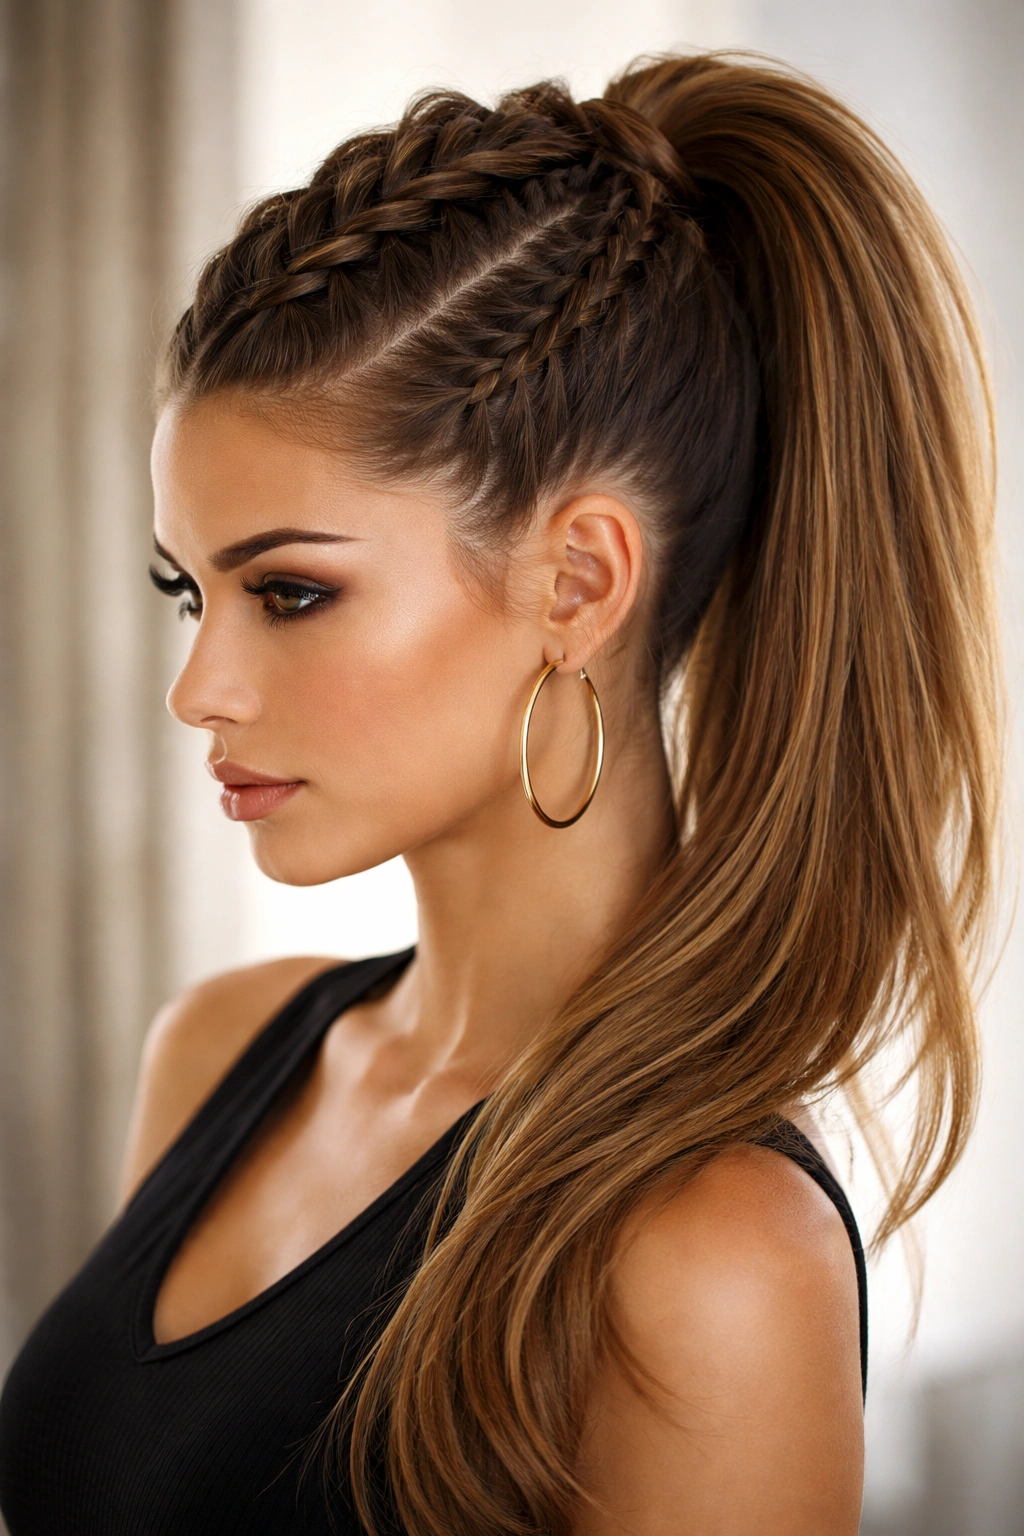
A French braid builds up volume continuously as you work down your head because you’re always incorporating new hair. Starting with a French braid instead of the other techniques gives you a completely different look—more uniform, more integrated with your scalp, and more dramatic in terms of height and structure. This becomes your ponytail base.
The French Braid Advantage
French braids grip the scalp differently than Dutch braids, creating smooth lines that sit closer to the head rather than standing away from it. This creates a sleeker silhouette while still delivering that bold, geometric mohawk punch. If you have finer hair or want something that looks seamlessly woven into your scalp, this is your style.
Mastering the French Braid Technique
- Begin with dry or slightly damp hair and comb through thoroughly to eliminate tangles
- Start at your hairline with three small sections of hair, crossing them the traditional way (right over middle, then left over middle—opposite of Dutch)
- With each crossing, add a thin section of new hair from either side to incorporate more of your hair as you braid down
- Keep your hands relaxed and your sections even in size for a uniform, polished appearance
- Continue braiding all the way down to your nape or wherever you want your ponytail to begin
- Secure the braid with a small elastic and gather all hair into your ponytail
- Use a fine-tooth comb to smooth the braided section for a sleek finish
5. Loose Bohemian Braided Mohawk
Not all braided mohawks need to be tight and structured. A loose, undone, almost-falling-apart braided mohawk reads as boho-chic while still delivering the bold edge. Work with three chunky braids (one center, two sides) or one thick, loose center braid that’s been gently pulled and textured. Pair it with a low, voluminous ponytail and you’ve got an effortlessly cool vibe.
When Loose Works Better Than Tight
Loose braids photograph beautifully and feel more relaxed and approachable. They suit longer hair especially well and work great if you’re heading to a festival, beach day, or casual hangout. The loose texture also accommodates different hair thicknesses—you don’t need rail-straight hair or heavy texture for this to look intentional.
Creating Intentionally Undone Texture
- Start with slightly texturized hair (salt spray, second-day texture, or even light waves work perfectly)
- Braid normally but don’t pull the sections super tight—leave some slack as you work
- Once finished, gently pull on sections of the braid to widen it and create a looser, more romantic appearance
- Leave 1-2 small sections of hair loose on either side of your face to frame it
- Gather into a low or mid-level ponytail with a soft, undone finish
- Spritz lightly with texture spray to encourage the pieces to stay slightly separated
Insider note: The second day of a loose braided mohawk actually looks better than day one—it settles into itself and gets softer and more interesting.
6. Inverted Braid Mohawk Ponytail
An inverted (or inside-out) braid creates a rounded, dimensional appearance because the braid sits on top of itself rather than lying flat against the scalp. This technique, applied in a mohawk shape, creates serious visual drama. The braid almost looks three-dimensional and stands away from your head, which is perfect if you want maximum impact and thickness.
Why Inverted Changes Everything
Inverted braids photograph incredibly well and create an almost sculptural quality. The braid itself becomes the focal point because of how it sits in space. Combined with a ponytail, it’s an undeniably bold statement. This works particularly well if you’re trying to add visual thickness or just want people to seriously notice your hair.
The Inverted Braid Formula
- Start with damp, textured hair that has some grip (this braid can slip on smooth hair)
- Section off your braiding area and begin with three sections at your hairline
- Instead of crossing sections over the middle, cross them under the middle section (this is the key difference)
- Incorporate new hair as you work back, always crossing sections underneath rather than over
- Continue down to your nape, maintaining even tension throughout
- The braid will naturally sit higher and rounder on your head than a traditional braid
- Secure into a ponytail at the base and gently pull the braid wider to show off the dimension
- Hairspray helps lock in the texture and keeps the rounded shape intact
7. Braided Mohawk with Undercut Appeal
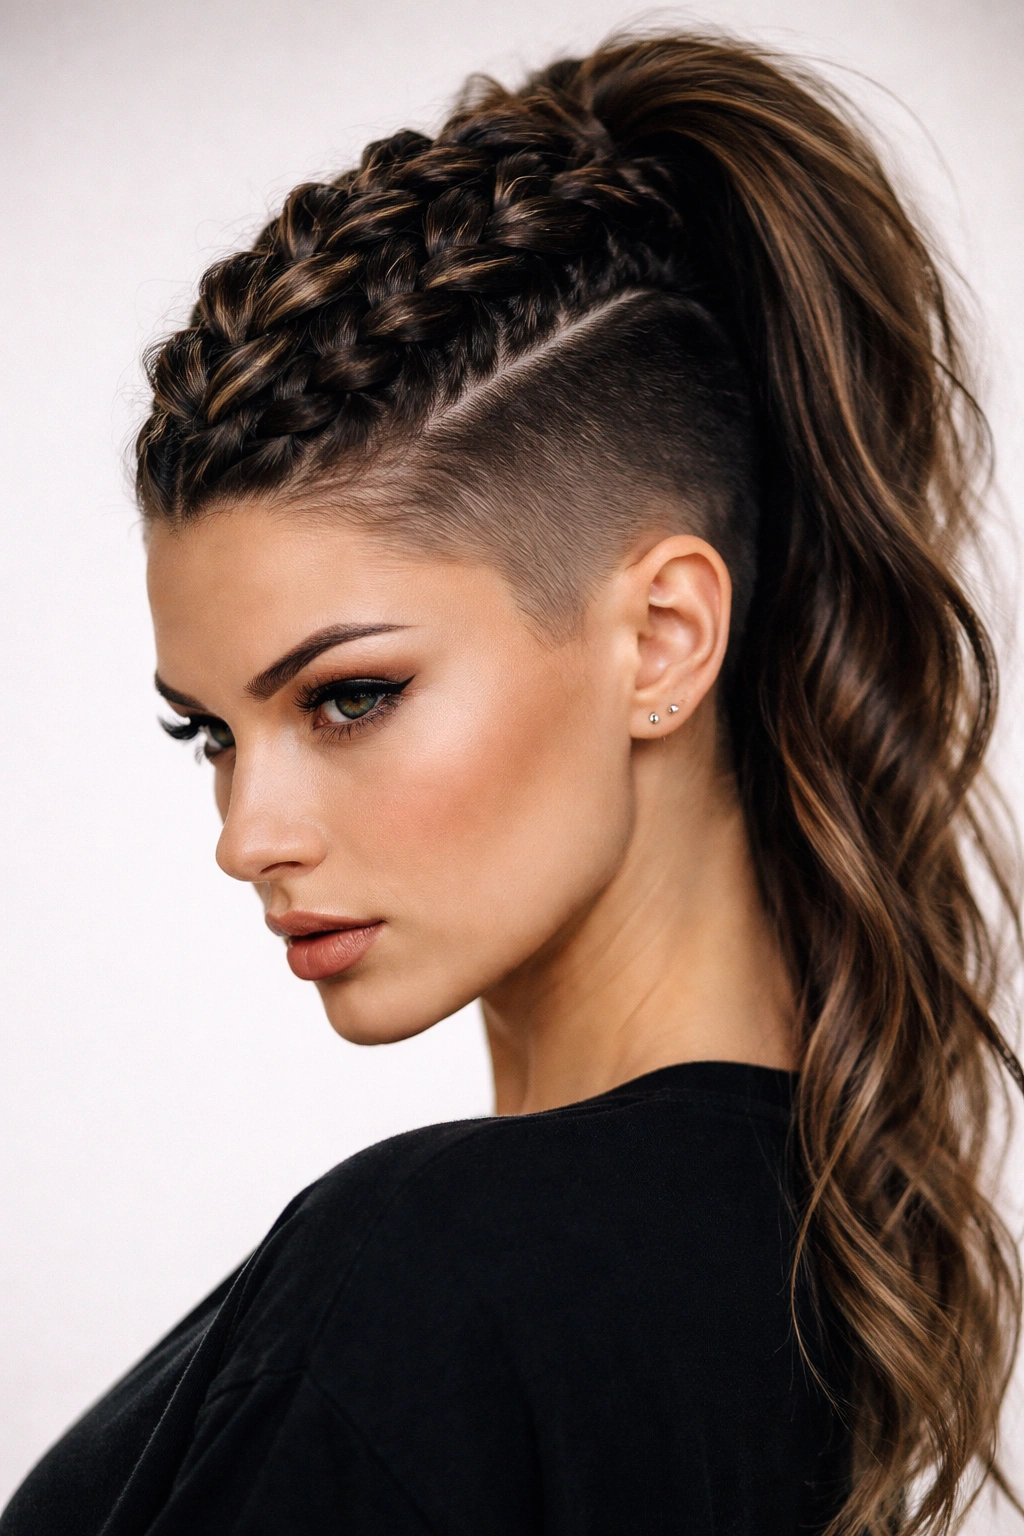
If you’ve got an undercut, shaved side, or shorter sides with longer hair on top, you can play with that contrast beautifully. Run one thick center braid down the longer section, or go with two side braids that follow the natural lines of your hair growth. Let the shorter sides show through—the contrast between the braided texture on top and the shaved or very short sides underneath creates an undeniably edgy silhouette.
Leveraging the Undercut Contrast
The undercut braided mohawk is for people who want to signal serious confidence and style awareness. It’s not subtle, but it’s also incredibly cool. The shaved portions frame the braids and make them stand out even more dramatically. This look works best on people with strong enough conviction to commit to it.
Styling for Maximum Contrast
- Keep the braided section thick and textured to create maximum contrast with the close-cropped sides
- Use a Dutch braid or inverted braid to create height and dimension—the taller the braid sits, the better it plays against the undercut
- Tease gently at the crown if you want even more height
- Secure the ponytail at the back where the longer hair transitions into the undercut
- Let a few face-framing pieces loose in the front for balance
- Hairspray and texture spray work overtime to keep everything in place with this bold style
Pro tip: This style benefits from regular undercut trims (every 4-6 weeks) to keep the sides sharp and defined.
8. Zigzag Braid Mohawk Style
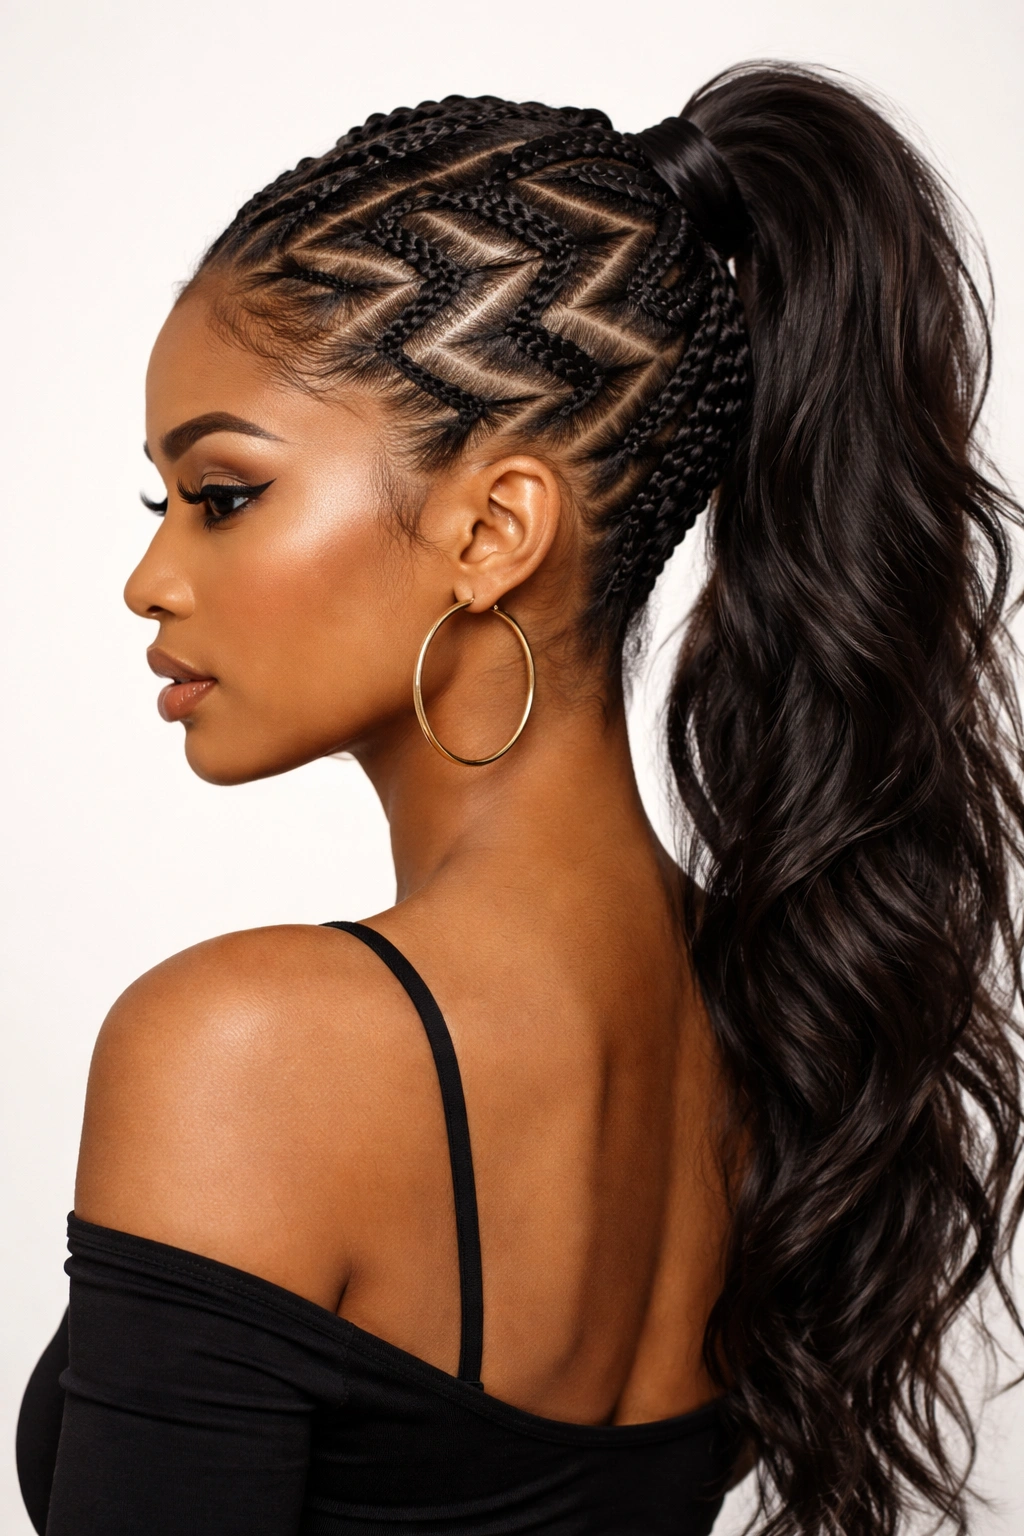
Instead of traditional straight braids, create a zigzag pattern by braiding at angles—alternating between angling toward the left, then the right, then the left again as you work down the center of your head. This creates a geometric, almost architectural look that reads as ultra-modern and intentional. Secure the zigzag into a ponytail and you’ve got a style that’s genuinely one-of-a-kind.
The Geometry of the Zigzag
Zigzag braids require more concentration but deliver a visual payoff that’s totally worth it. The movement and geometric pattern catch light differently as you move, creating an almost 3D effect. This is for anyone who wants people to actually ask them how they did their hair.
Creating the Zigzag Pattern
- Section your hair carefully down the center, creating clear guides for where your braid will sit
- Start at the hairline with a small section and angle your first braid toward the left side of your head
- At about mid-scalp, angle your next braiding section toward the right
- Then angle toward the left again
- Continue this alternating pattern all the way down to your nape
- Each section should overlap slightly with the previous one, creating connected diagonal lines
- Secure at the base and gather into a ponytail
- Gently tease each section slightly to create definition between the angles
9. Chunky Rope Braid Mohawk Ponytail
For maximum drama with minimal complexity, use a two-strand rope braid instead of the traditional three-strand. A two-strand braid looks thicker and chunkier than a traditional braid, and when styled in a mohawk shape, it’s absolutely striking. It’s also faster to execute, making it perfect if you want the bold look without spending 20 minutes on your hair.
Why Rope Braids Read So Boldly
Two-strand braids have a chunky, twisted appearance that photographs beautifully. They’re modern and graphic in a way that three-strand braids aren’t. The simplicity of the technique also means you can focus on getting the placement and ponytail just right rather than managing complex braiding patterns.
The Two-Strand Rope Braid Method
- Section the hair you want to braid and divide it into two equal sections
- Twist the right section clockwise, then the left section clockwise
- Cross the right twisted section over the left section, then the left over the right
- Continue this over-and-under pattern, keeping both sections twisted as you work
- Add new hair to each section as you incorporate more of your head (optional, but creates a fuller braid)
- Work all the way down to your nape or desired ponytail starting point
- Secure with an elastic and gather everything into a high or mid-level ponytail
- Gently pull the braid wider for a chunky, undone appearance
Worth knowing: Rope braids can sometimes unravel more easily than traditional braids, so a light hairspray before you start helps them hold their shape.
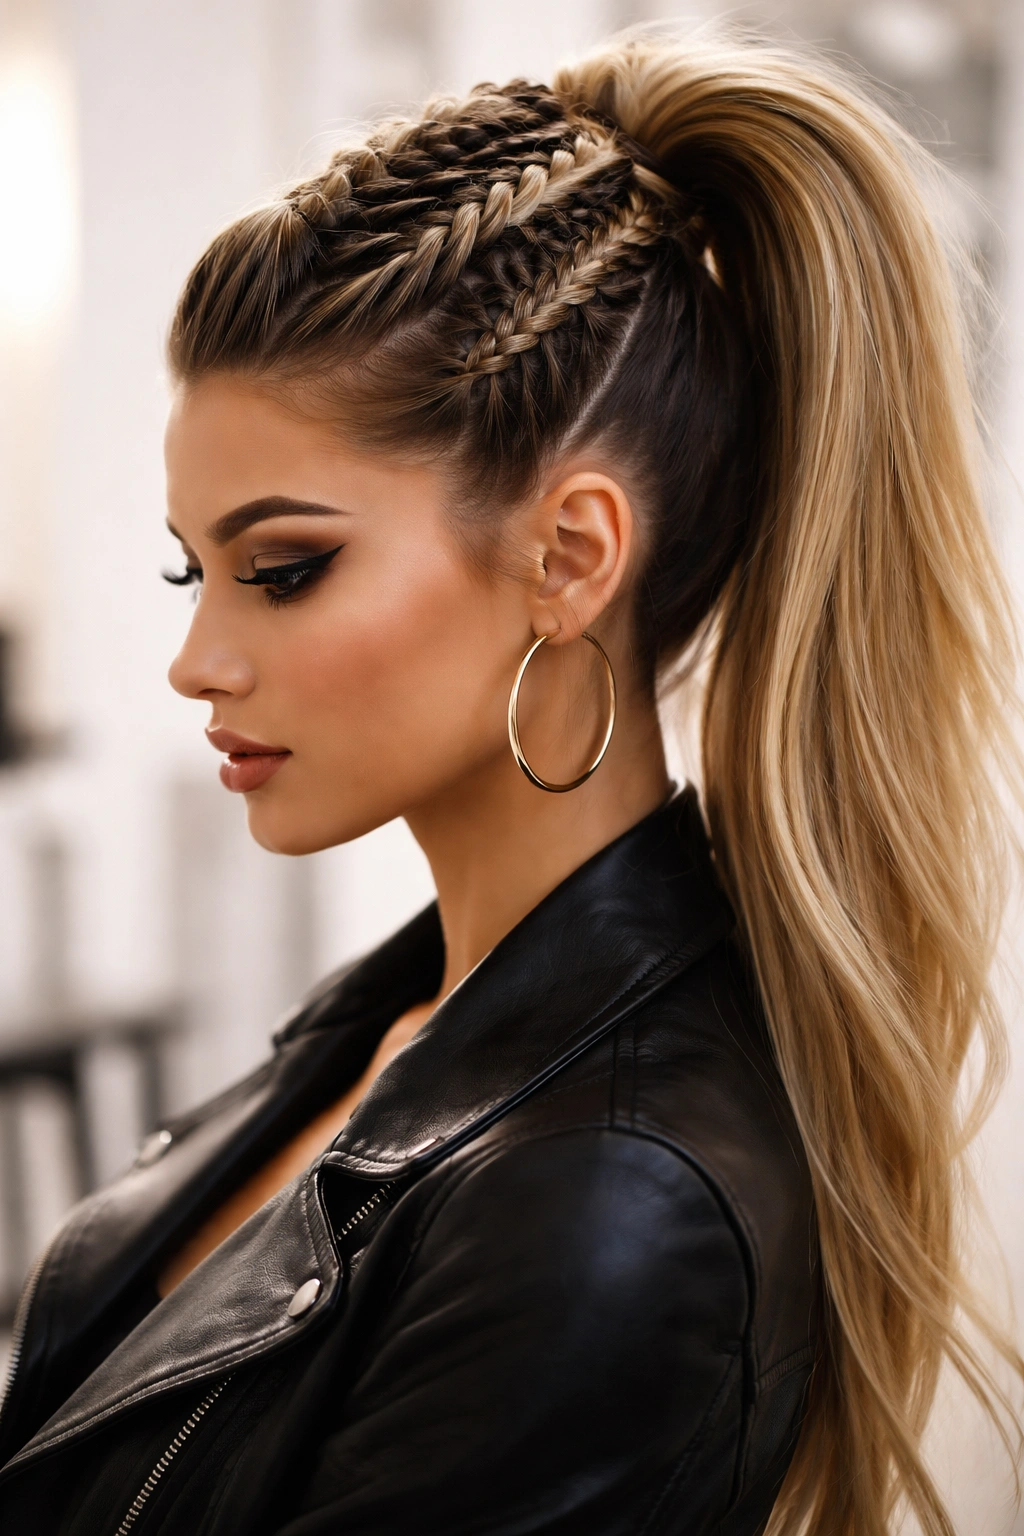
10. Braided Mohawk with Mixed Textures
Take everything you’ve learned and combine multiple braiding techniques in one style. Maybe you do a loose fishtail braid down the center, but incorporate a thin two-strand rope braid on either side. Or create two Dutch braids that flow into a loose three-strand braid. Mix textures, mix tightness, mix everything—this is for anyone who wants complete creative freedom and isn’t afraid to spend 30 minutes getting it just right.
The Creative Mashup Approach
Mixed-texture braided mohawks show off your technical skill and your willingness to experiment. There’s no single “right way” to do it—the whole point is that it’s uniquely yours. This style works for anyone with shoulder-length hair or longer who wants a statement piece that’s entirely customized.
Building Your Custom Braided Mohawk
- Decide which textures you want to incorporate (three-strand, Dutch, fishtail, rope, etc.)
- Plan out your pattern before you start—sketch it out or just visualize where each braid will sit
- Begin with the most visible central braid and nail that first
- Add supporting braids on either side or incorporated within the main structure
- You can vary the tightness intentionally—tight in some sections, loose in others
- Incorporate small sections of loose hair between braids if you want extra dimension
- Secure everything into a ponytail with the confidence that comes from doing something totally original
- Step back and admire what you’ve created—this took effort and it shows
Pro tip: Take progress photos as you braid so you can remember exactly what you did if you want to recreate it later.
Final Thoughts
Braided mohawk ponytails sit at the perfect intersection of bold and beautiful. They’re accessible enough that anyone with basic braiding knowledge can attempt them, but they look impressive enough that people genuinely notice the effort and creativity you’ve put into your appearance. Whether you go with the clean symmetry of a center braid, the complex geometry of a zigzag pattern, or the effortless vibe of a loose, textured braid, you’re making a choice to show up as someone who cares about how they present themselves.
The best part is that there’s genuinely no wrong way to wear one. Your hair texture, length, and personal style all influence how the braid sits and what it communicates. A tight French braid reads differently than a loose bohemian version, but both are undeniably cool. Start with whichever variation speaks to you, practice it a few times to nail the technique, and then feel free to play with variations once you’re comfortable.
Braided mohawk ponytails are the kind of hairstyle that deserves multiple wearings. You’ll get faster at executing them, they’ll sit more naturally as your hair adjusts to the style, and you’ll start noticing small tweaks that make your version of the style uniquely yours. That confidence in how you wear it—that’s what really makes the look sing.