Four-C hair is one of the most versatile hair textures out there, and yet styling options often feel limited when you’re searching for something protective and polished. The tight coils and delicate strands of 4C hair need a different approach than other curl patterns — it’s not just about pulling hair back and calling it a day. When you do it right, though, a well-executed ponytail can be both a protective style that keeps your ends safe and a genuinely gorgeous look that works for everything from the office to a night out.
The challenge with 4C hair isn’t a lack of ponytail possibilities — it’s knowing which styles actually work with your hair’s natural texture rather than against it. You want styles that don’t rely on heat styling or harsh tension, that keep moisture locked in rather than exposing dry ends, and that genuinely look intentional rather than like you’re just trying to contain your hair. The ponytails that thrive on 4C hair are the ones that embrace your curl pattern instead of fighting it, that distribute weight evenly to prevent breakage, and that can be customized based on your hair’s current moisture level and length.
What makes a ponytail work for 4C hair comes down to a few key factors: how you prep your hair beforehand, the techniques you use to gather and secure it, whether you’re adding texture or leaving it natural, and how you treat it once it’s styled. This is where the real difference happens — the difference between a style that makes your hair thrive and one that leaves you with breakage along your hairline or dried-out edges. Each of the ponytail styles below is designed specifically with 4C hair’s needs in mind, and I’ve included the specific techniques that make each one work without compromise.
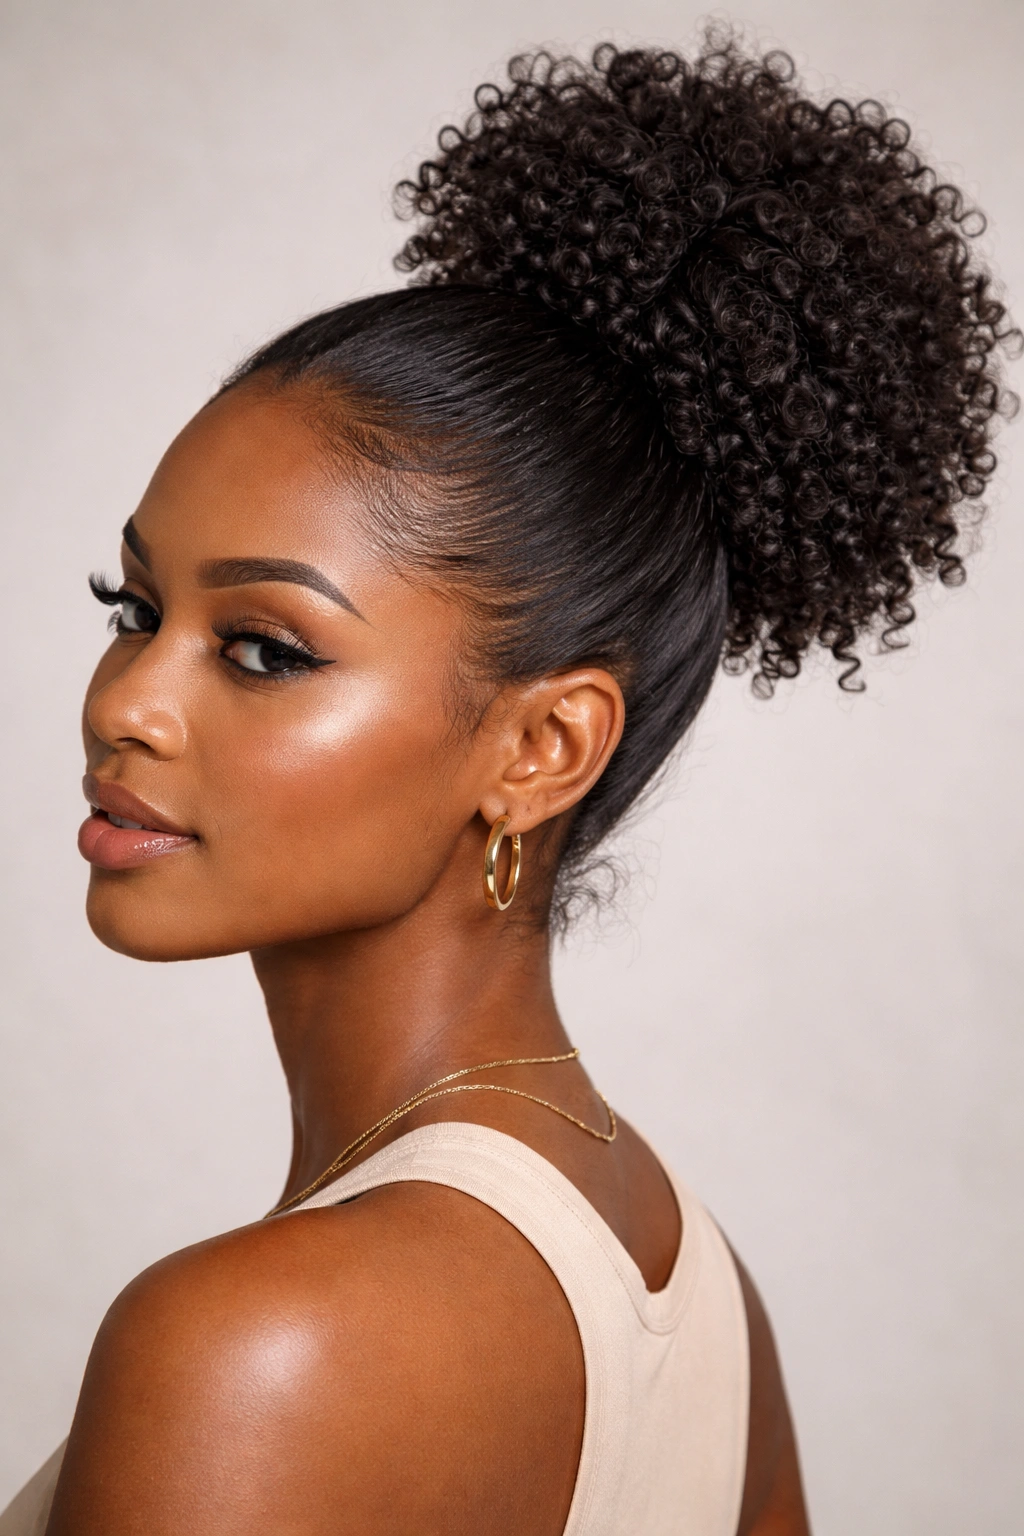
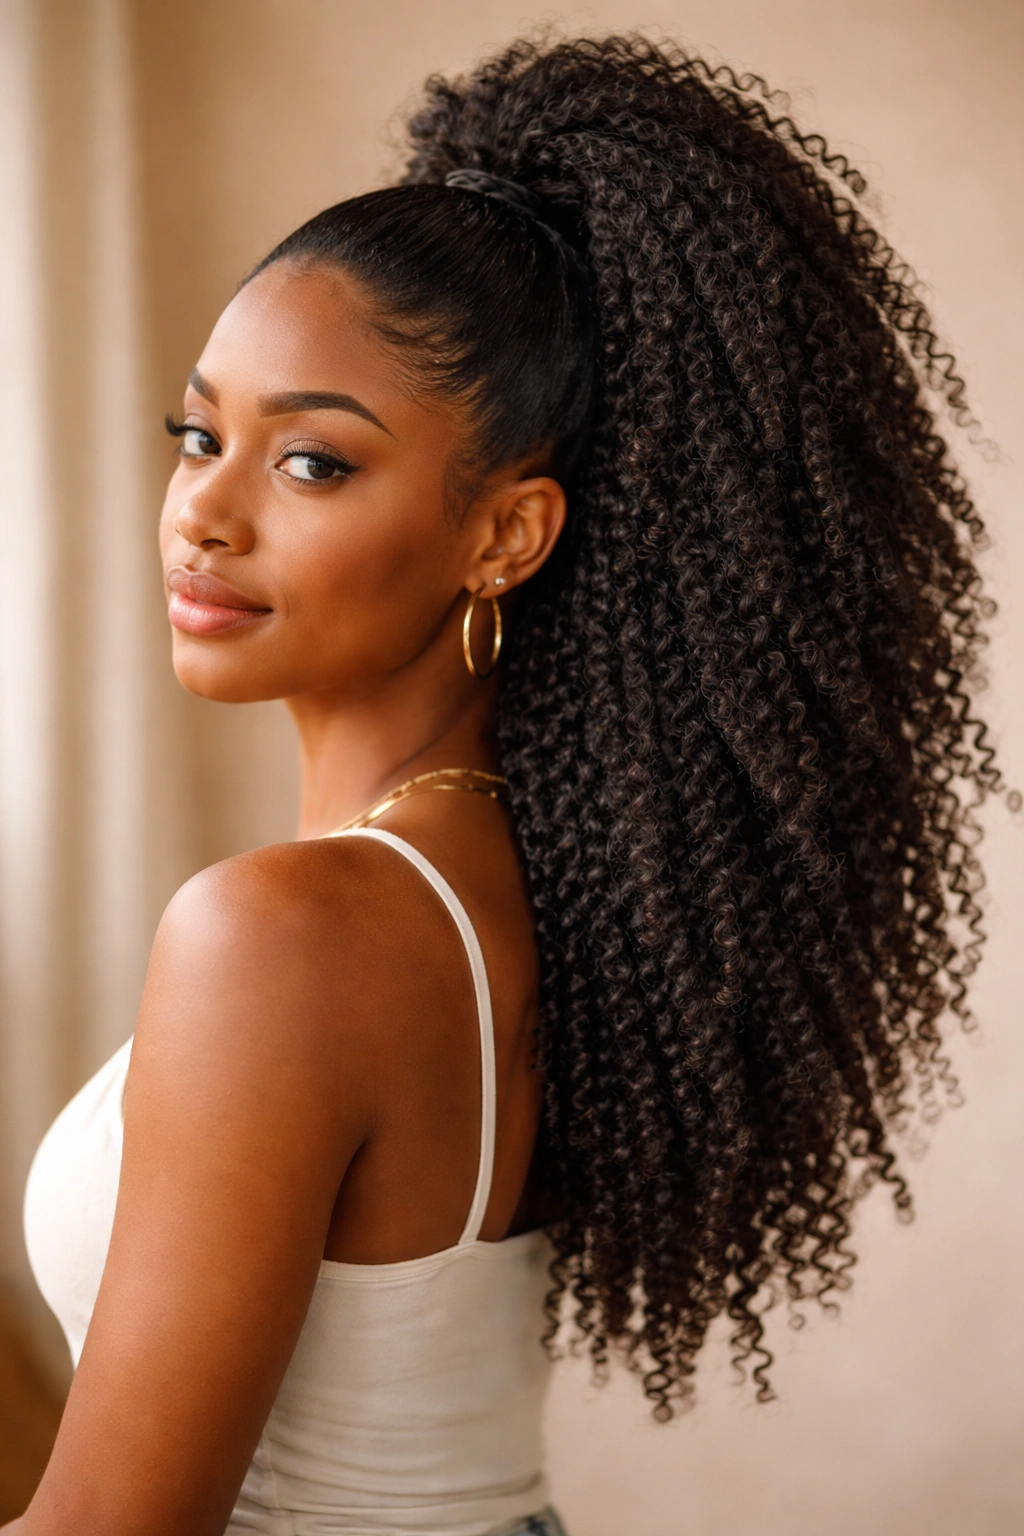
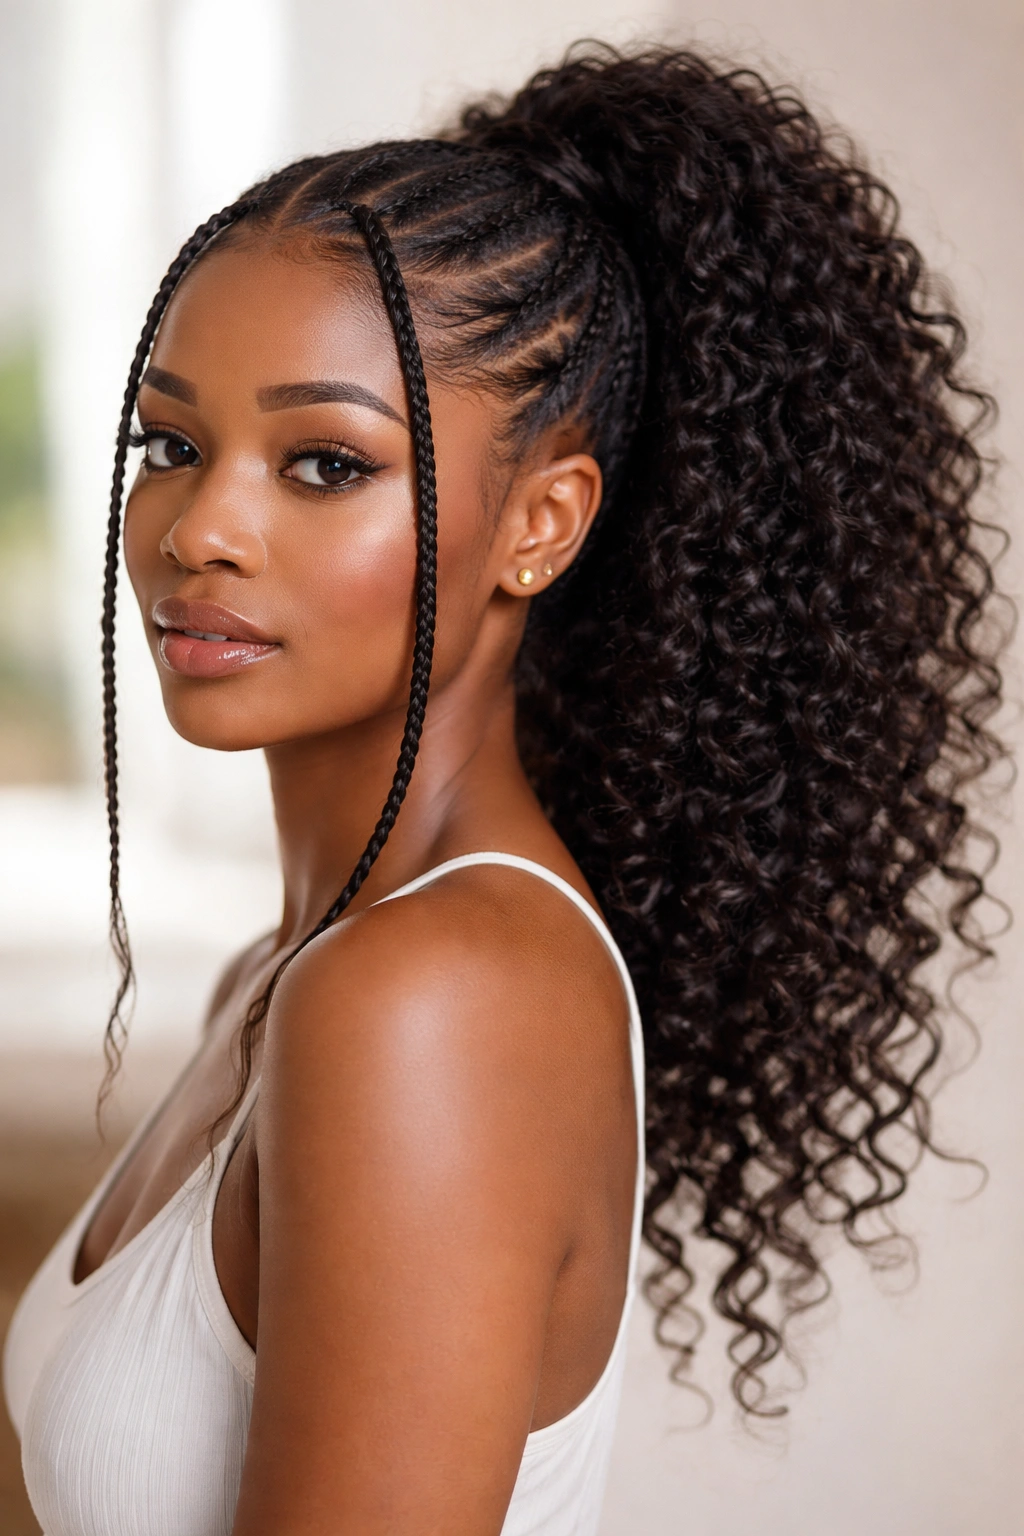
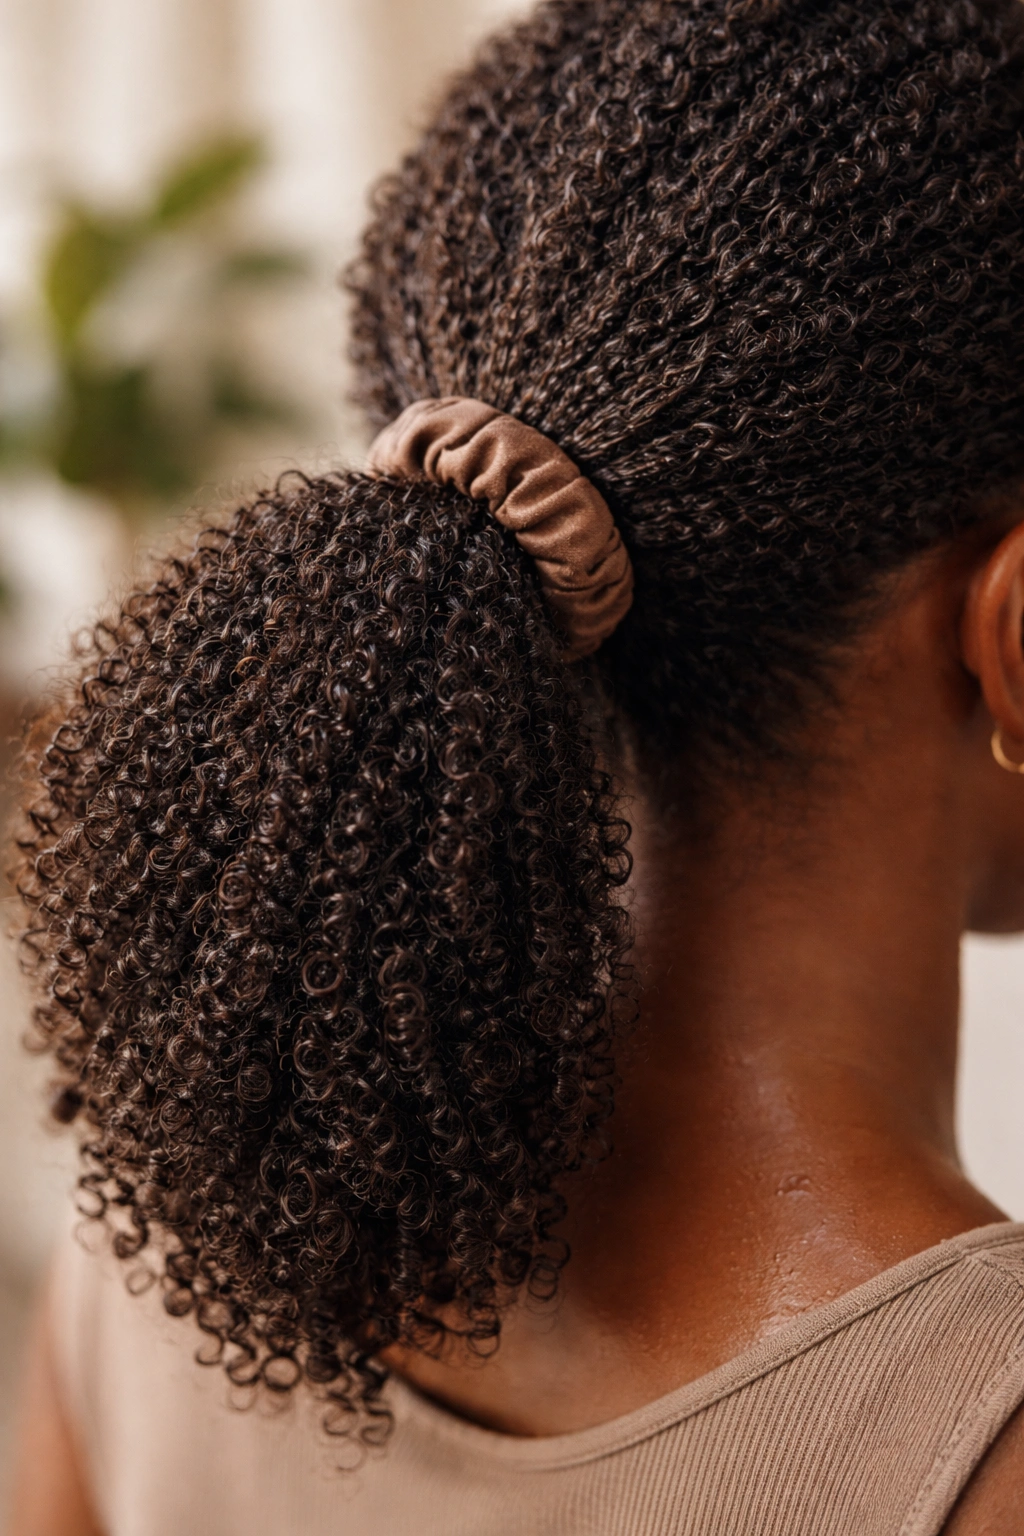
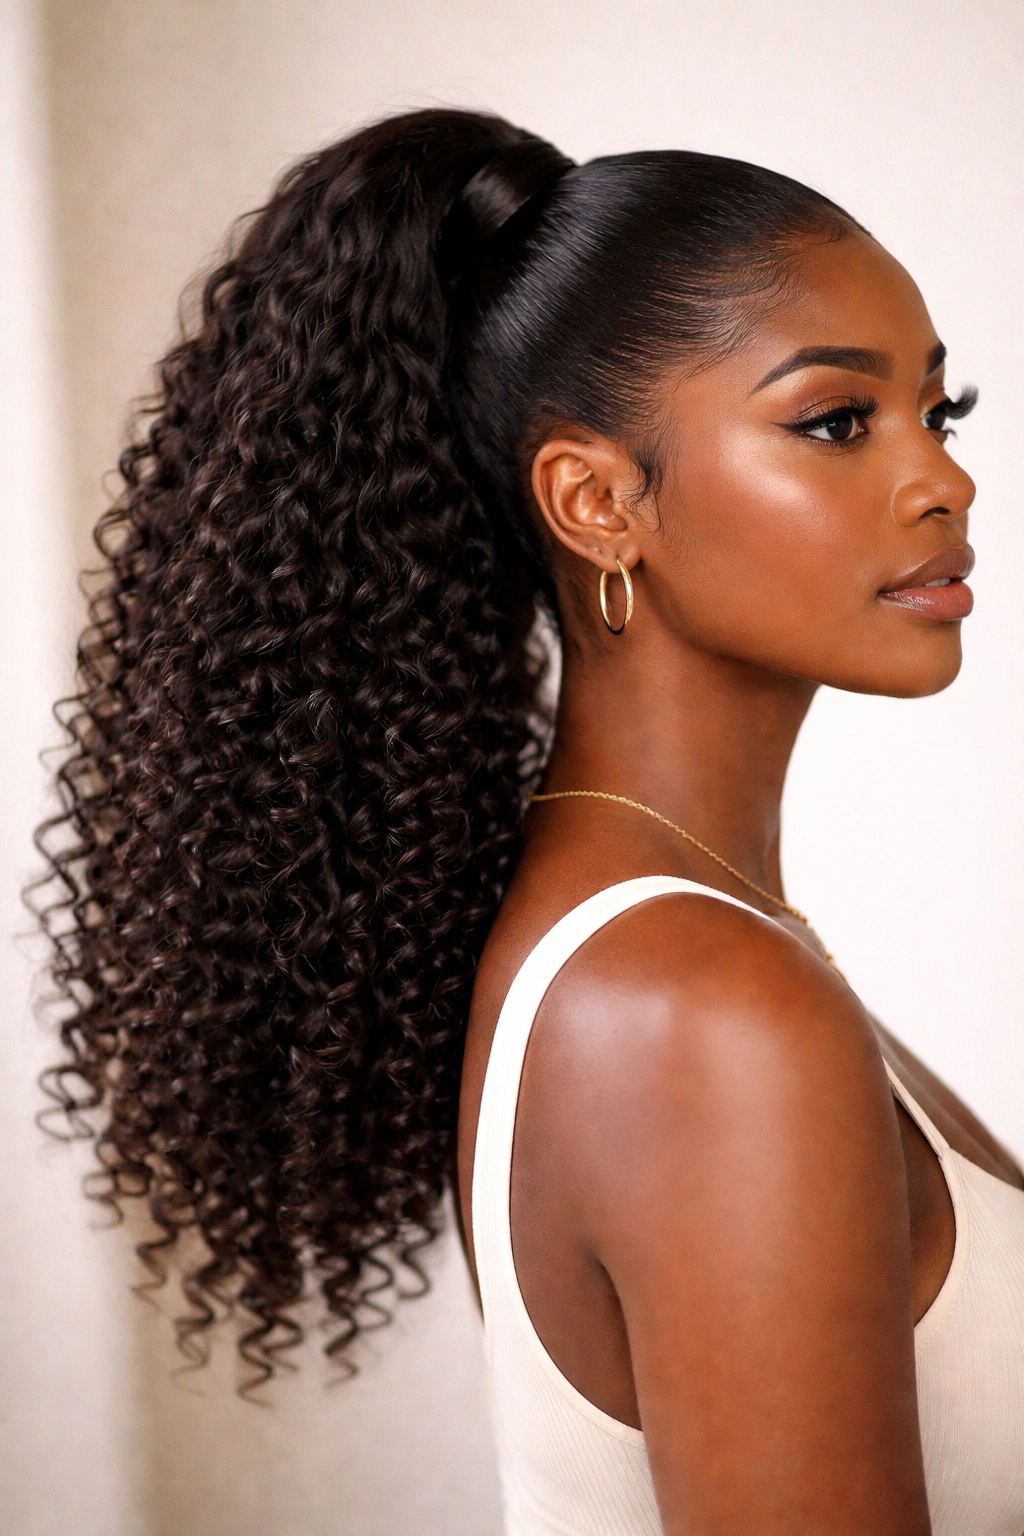
1. The Sleek High Ponytail with Defined Curls
A sleek high ponytail is the classic polished look, and it works beautifully on 4C hair when you prioritize smoothness at the roots while keeping your curl pattern intact at the ends. The key is getting that smooth base without using a flat iron — instead, you’re using a combination of product, a brush or comb, and tension applied correctly.
How to Perfect This Style
Start with hair that’s freshly washed and deep conditioned, while it’s still damp. Apply a smoothing cream or gel to the roots and front edges — something like a lightweight cream that won’t leave buildup on tightly coiled hair. Using a fine-tooth comb or detangling brush, smooth the hair back from your face and crown, gathering it into a high ponytail at the back of your head. The tension should be firm enough to keep flyaways down but never so tight that you feel pulling at your scalp. Secure with a cloth-covered elastic that won’t snag or break strands.
Product and Technique Tips
The smoothing product you choose matters more than most people realize. Avoid heavy butters that can weigh down 4C curls or flake when your hair dries. Instead, reach for a gel with flexible hold or a smoothing cream designed for textured hair. Apply it sparingly to the edges and the section of hair you’re smoothing back — you want shine and control, not crunch. If you want even more definition, you can gently re-twist or coil the ponytail section as it dries, which enhances the natural curl pattern and adds dimension.
Pro tip: Do this style on second-day hair or hair that’s at least one day old. Freshly washed hair can be too fluffy to smooth back elegantly, and waiting a day allows your hair’s natural oils to settle, giving you more grip and better-defined curls.
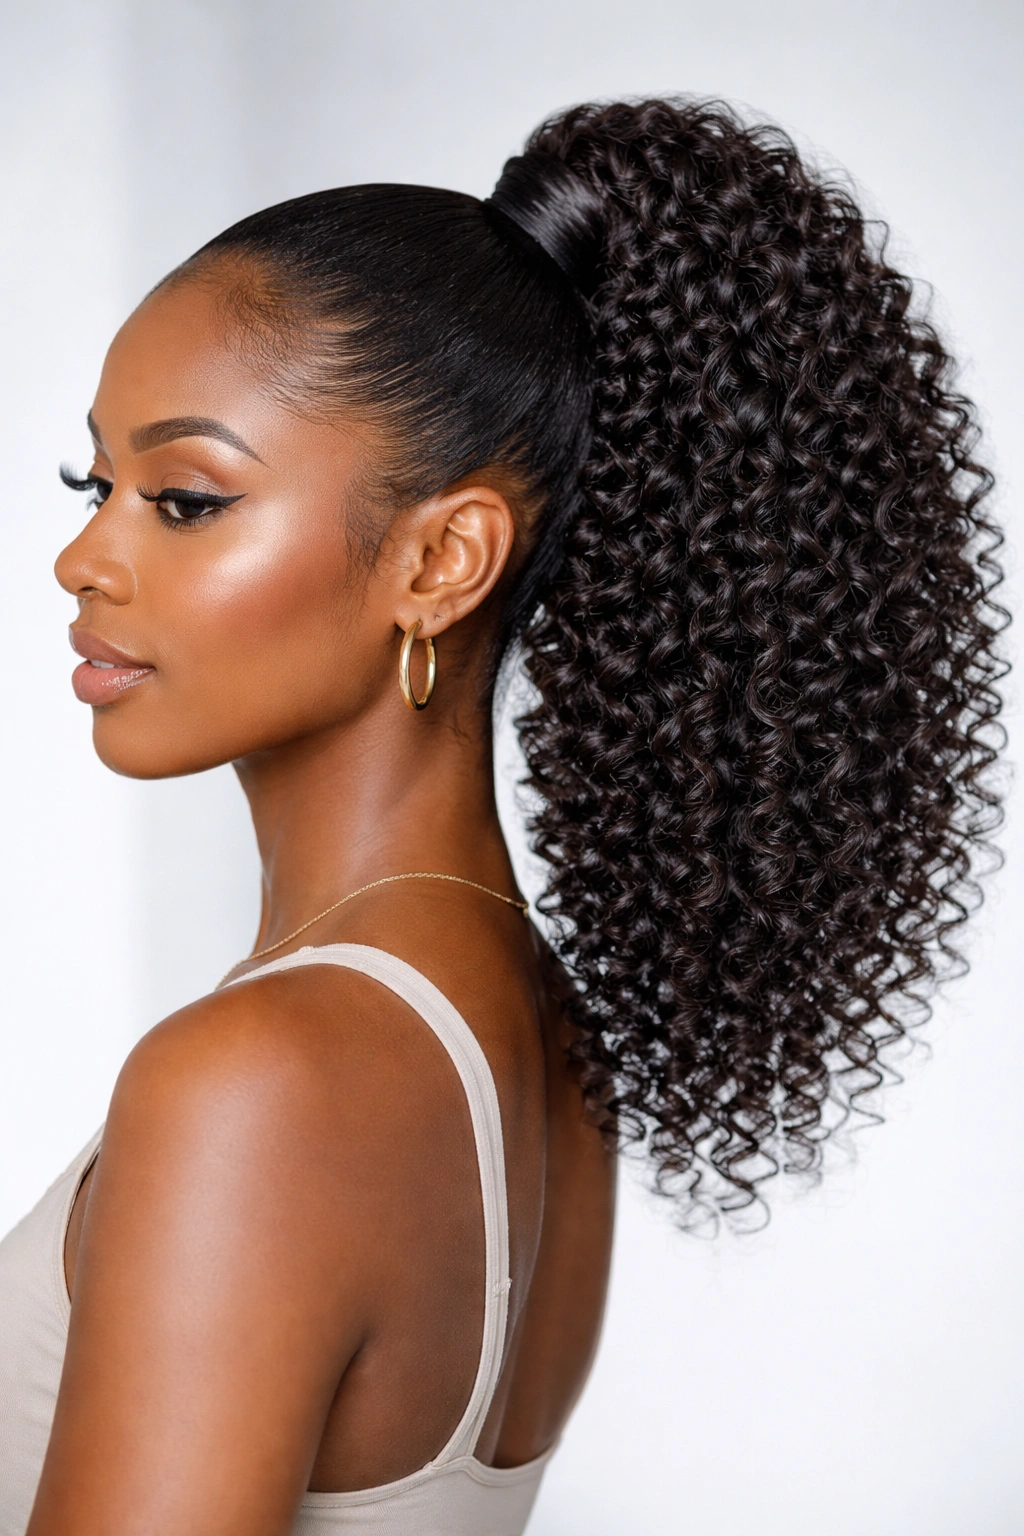
2. The Straw-Set Ponytail with Volume
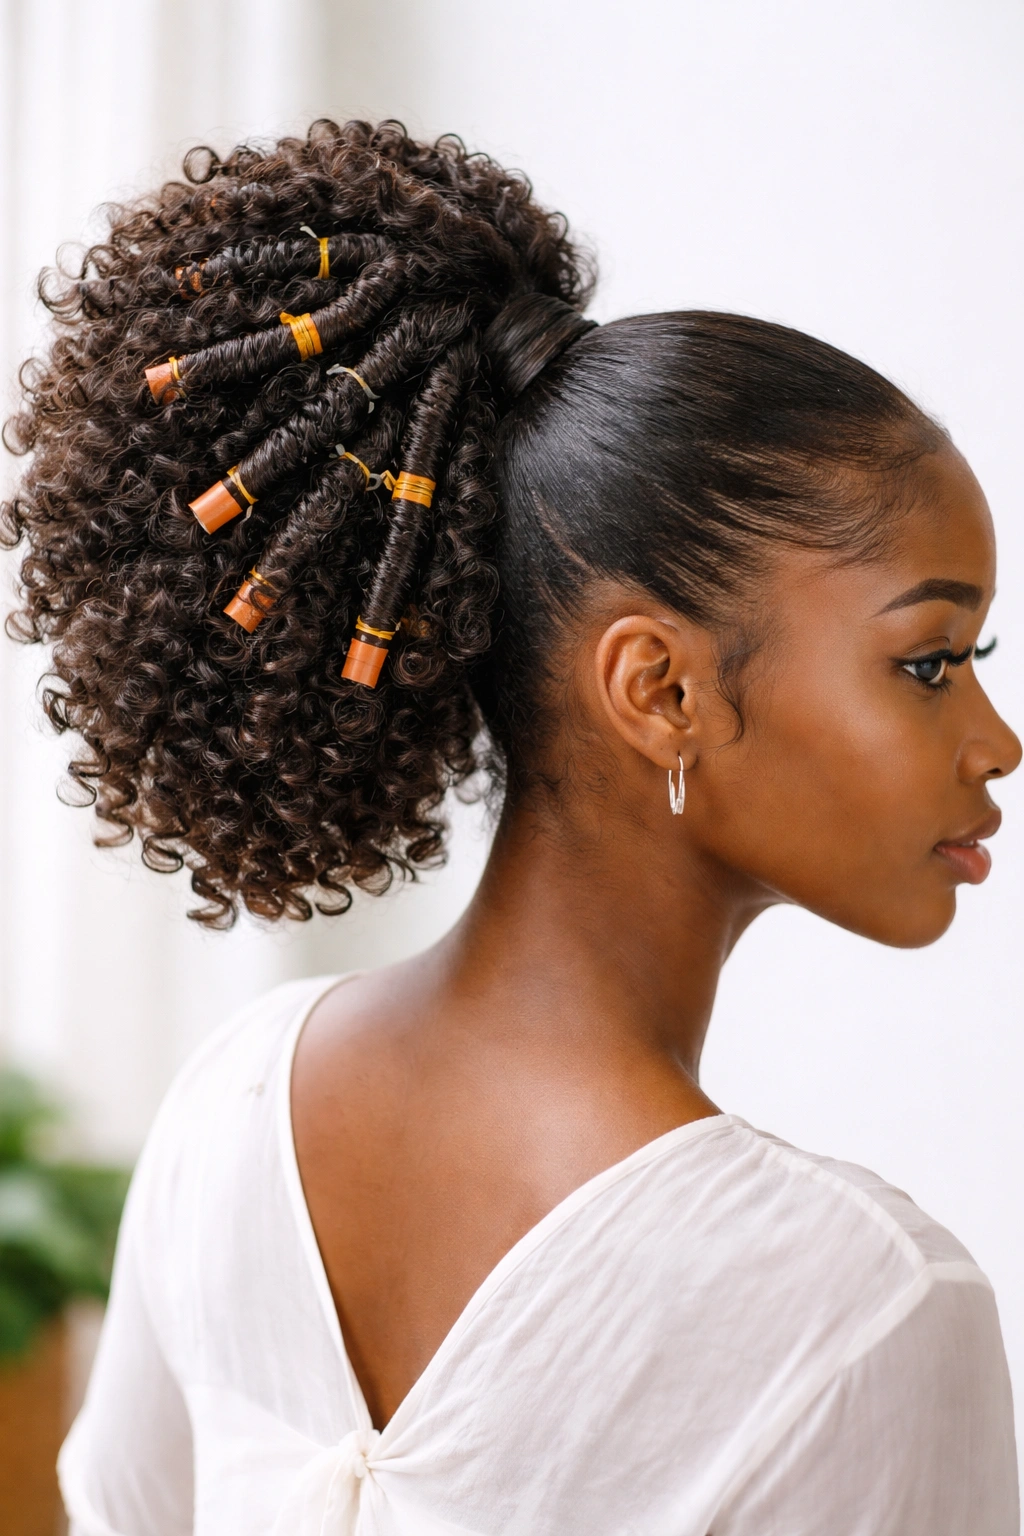
A straw set creates beautiful, defined curls throughout your entire ponytail with zero heat damage, and the results are gorgeous and long-lasting. This is essentially using straws (or flexible rods) as rollers, which gives you bouncier texture than your natural curl pattern without any thermal styling.
The Straw-Setting Process
Gather your damp hair into a high or mid-level ponytail and secure it loosely. Divide the ponytail into 6-8 sections depending on thickness. Take a flexible straw or spiral rod, insert the end of one section into it, and wrap the hair around the straw from bottom to top, rolling gently. Secure the straw by folding the ends together or using a small clip. Repeat for each section. Apply a light styling cream or gel to each wrapped section, then let your hair air dry completely — this typically takes 6-8 hours or overnight.
Why This Works for 4C Hair
Straw sets create curl definition without the stress that heat puts on tightly coiled hair. The spiral texture that results is often more uniform than your natural curl pattern, which creates a polished, intentional look. When your hair fully dries, remove each straw gently and fluff your curls with your fingers — you’ll have a voluminous, defined ponytail that lasts for several days with minimal manipulation.
Worth knowing: The size of your straw determines your curl size. Smaller straws create tighter curls; larger straws create looser waves. Experiment to find what works best with your natural texture and the look you’re going for.
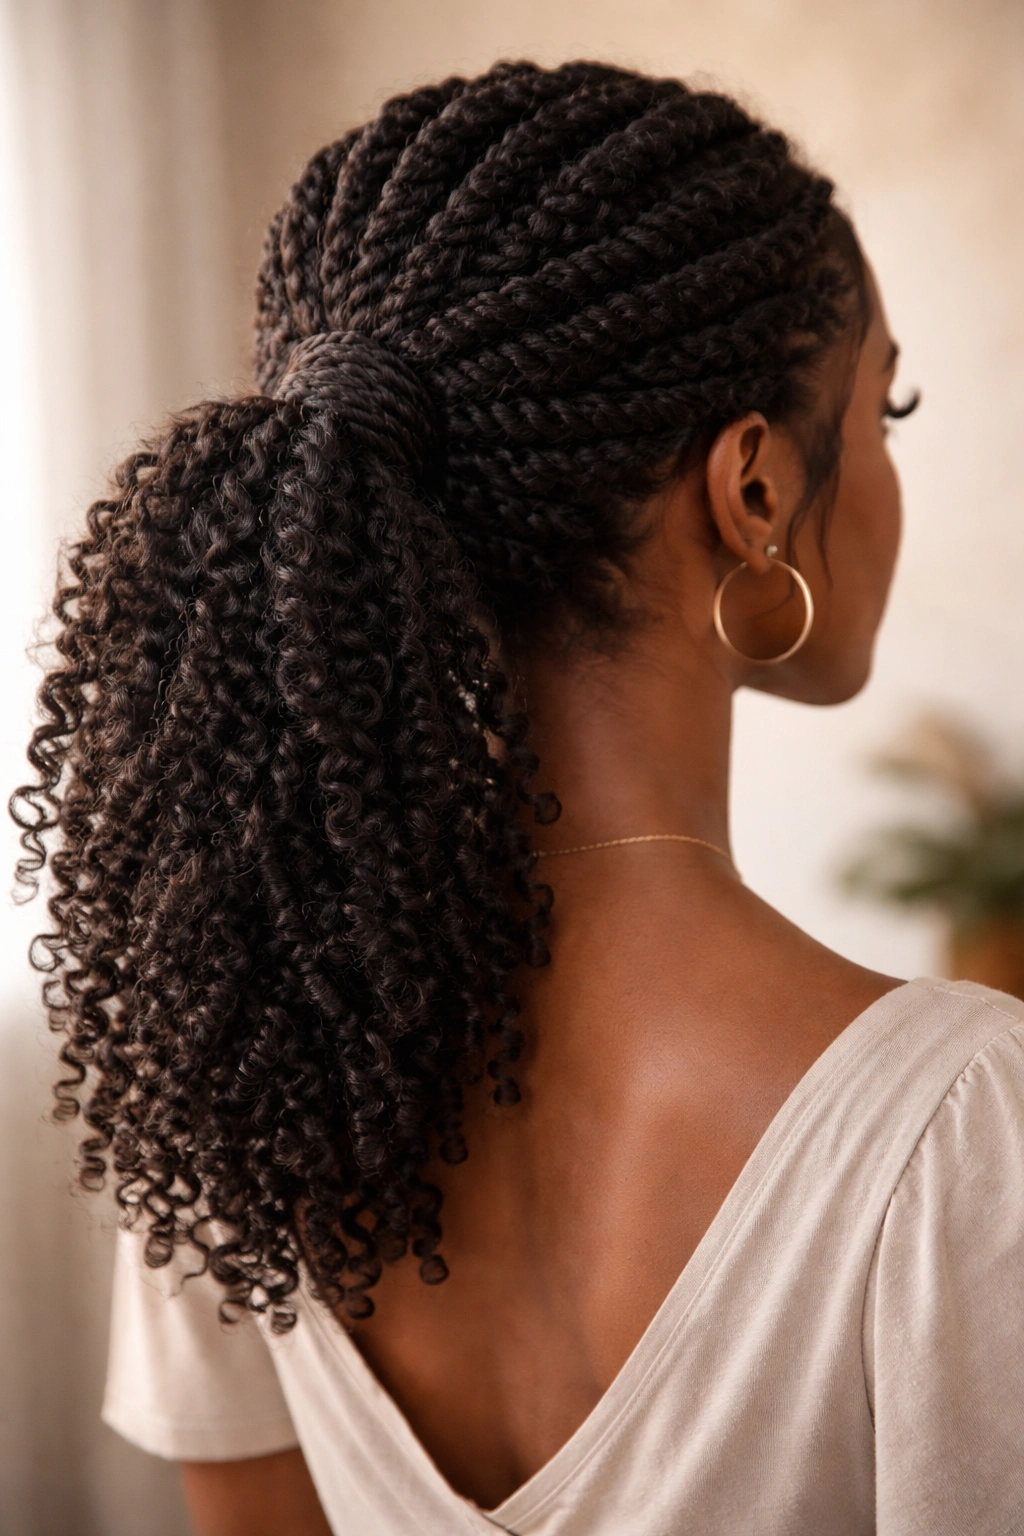
3. The Chunky Two-Strand Twist Ponytail
Two-strand twists are a foundational protective style for 4C hair, and incorporating them into a ponytail gives you texture, grip, and a genuinely eye-catching style. The chunky twists add volume and visual interest while keeping your ends protected and your hair moisturized.
Creating the Twist Structure
Gather your hair into a high ponytail and secure it loosely. Divide the ponytail into 4-6 thick sections. Take one section and split it into two strands. Twist each strand around the other, working from the base of the ponytail down to the ends. As you twist, apply a moisturizing cream or curl-defining product to keep the twists smooth and prevent frizz. When you reach the end, you can either leave it loose for a softer look or roll the end around your finger to create a coil.
Maintaining the Twists
Two-strand twists can last up to two weeks if you maintain them properly. Each night, wrap your ponytail loosely in a silk or satin scarf, or sleep on a satin pillowcase to reduce friction and frizz. You can re-moisturize the twists every few days with a lightweight leave-in conditioner, spraying it lightly and sealing with a tiny bit of oil. This keeps your hair hydrated and your twists looking defined throughout the style’s lifespan.
Insider note: If your ponytail starts to look fuzzy after a few days, don’t re-twist the entire thing. Instead, just re-twist the first inch or so at the base where your hair is growing out — this refreshes the look without the manipulation of touching your hair too much.
4. The Braided Crown Ponytail

A braided crown wraps around the back of your head and gathers into a ponytail, creating a romantic, polished look that’s genuinely stunning on 4C hair. The braid adds texture and visual complexity while keeping hair neatly secured.
Braiding Technique for 4C Hair
Start with moisturized, detangled hair. Create a deep side part and begin a Dutch braid (an inside-out braid) at one temple, working it back horizontally across the back of your head. As you braid, you’re tucking in small sections from the ponytail area — essentially gathering hair as you go. When you reach the other side of your head, gather all the remaining hair into a ponytail at the back and secure it. The braid creates a frame, while the ponytail falls from the gathered section.
Customizing for Your Hair Texture
With 4C hair, you have options for how loose or tight you want the braid. A slightly looser braid shows off your curl pattern beautifully, while a tighter braid creates a more structured, polished look. Apply a curl cream to your hair before braiding to enhance definition and reduce frizz. You can also create a slightly fuzzy texture by gently pulling the braid apart slightly once it’s complete — this softens the look and adds volume.
Pro tip: Do this style on hair that’s at least two days old. Fresh hair can slip out of braids more easily, but slightly textured hair from previous styling holds braids much better.
5. The Pineapple High Ponytail
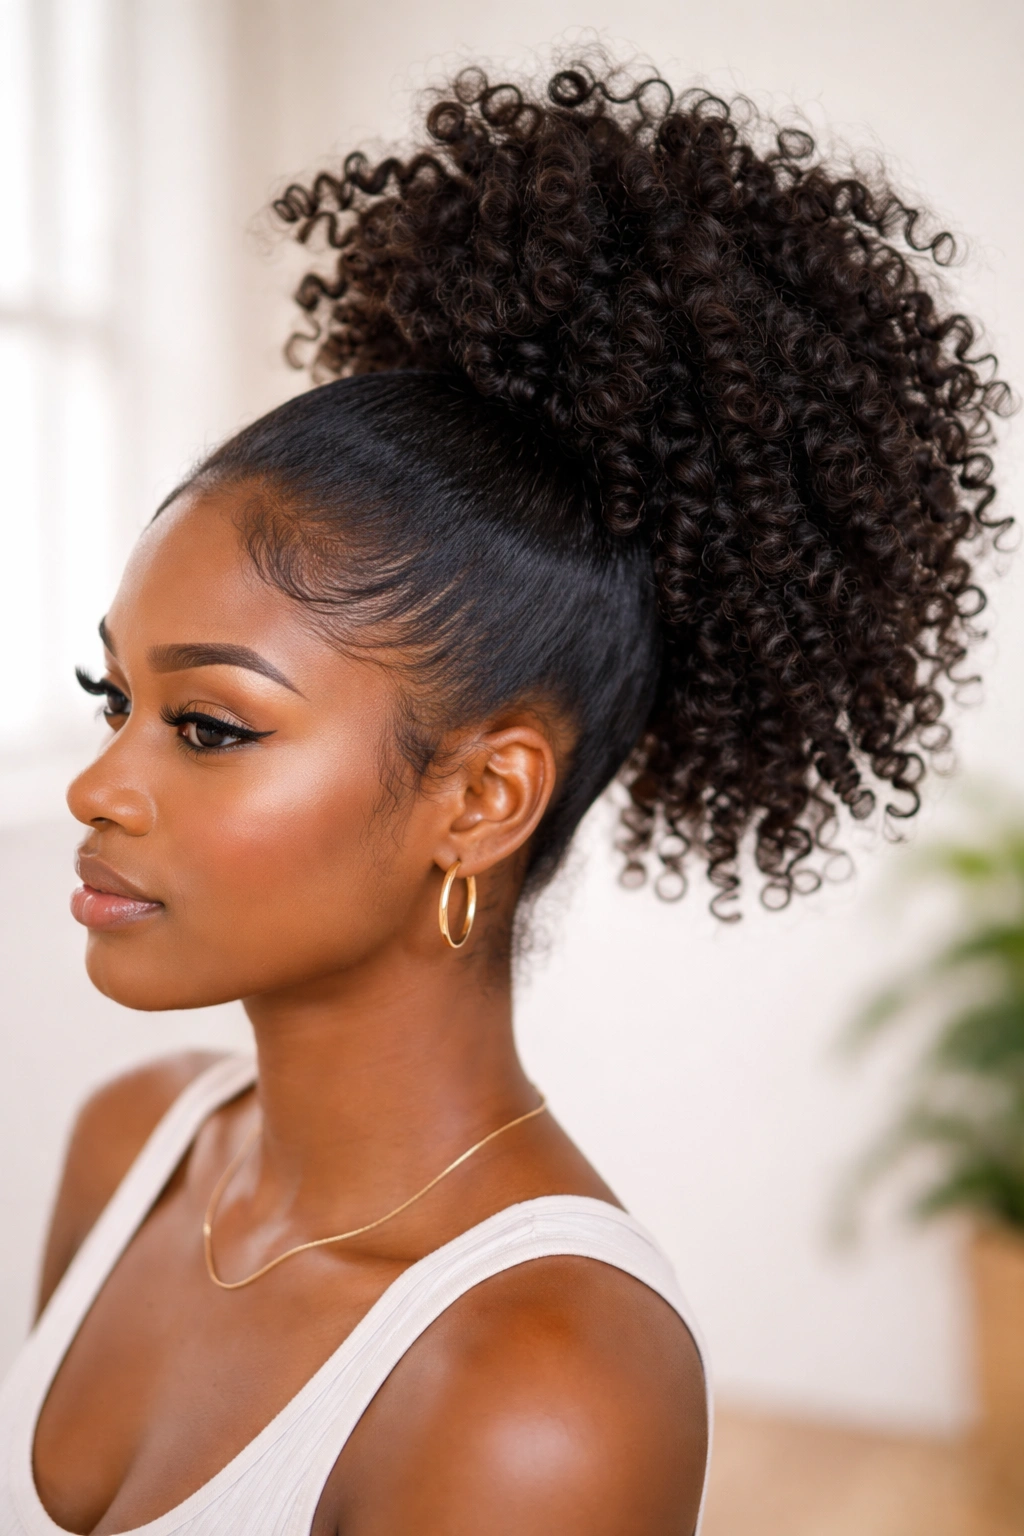
The pineapple method is originally designed to protect curls while you sleep, but it also creates a gorgeous, voluminous ponytail style. The technique gathers hair loosely at the crown, which keeps your curls stacked and prevents compression while creating natural-looking volume.
Creating the Pineapple Ponytail
Start with curls that have been set in some way — they can be your natural texture or curls you’ve created through twists, braids, or rod sets. Gather your hair into a very high ponytail at the crown of your head, positioning it higher than you would for a typical high ponytail. Use a soft, stretchy hair tie that won’t leave creases. The key is looseness — you want just enough tension to hold the ponytail in place, but not so much that you’re compressing your beautiful curl pattern.
Styling the Ponytail Itself
The ponytail section has room to expand and show off your curls. You can gently separate and fluff the curls with your fingers to create even more volume, or leave them slightly compressed for a more defined look. Apply a lightweight shine spray or curl refresher if you want to add sheen without weighing anything down.
Worth knowing: This style works particularly well if you’ve created your curls the night before and slept on them in the pineapple position. Your curls are already set and defined, so moving them to a ponytail just refreshes the style for another day.
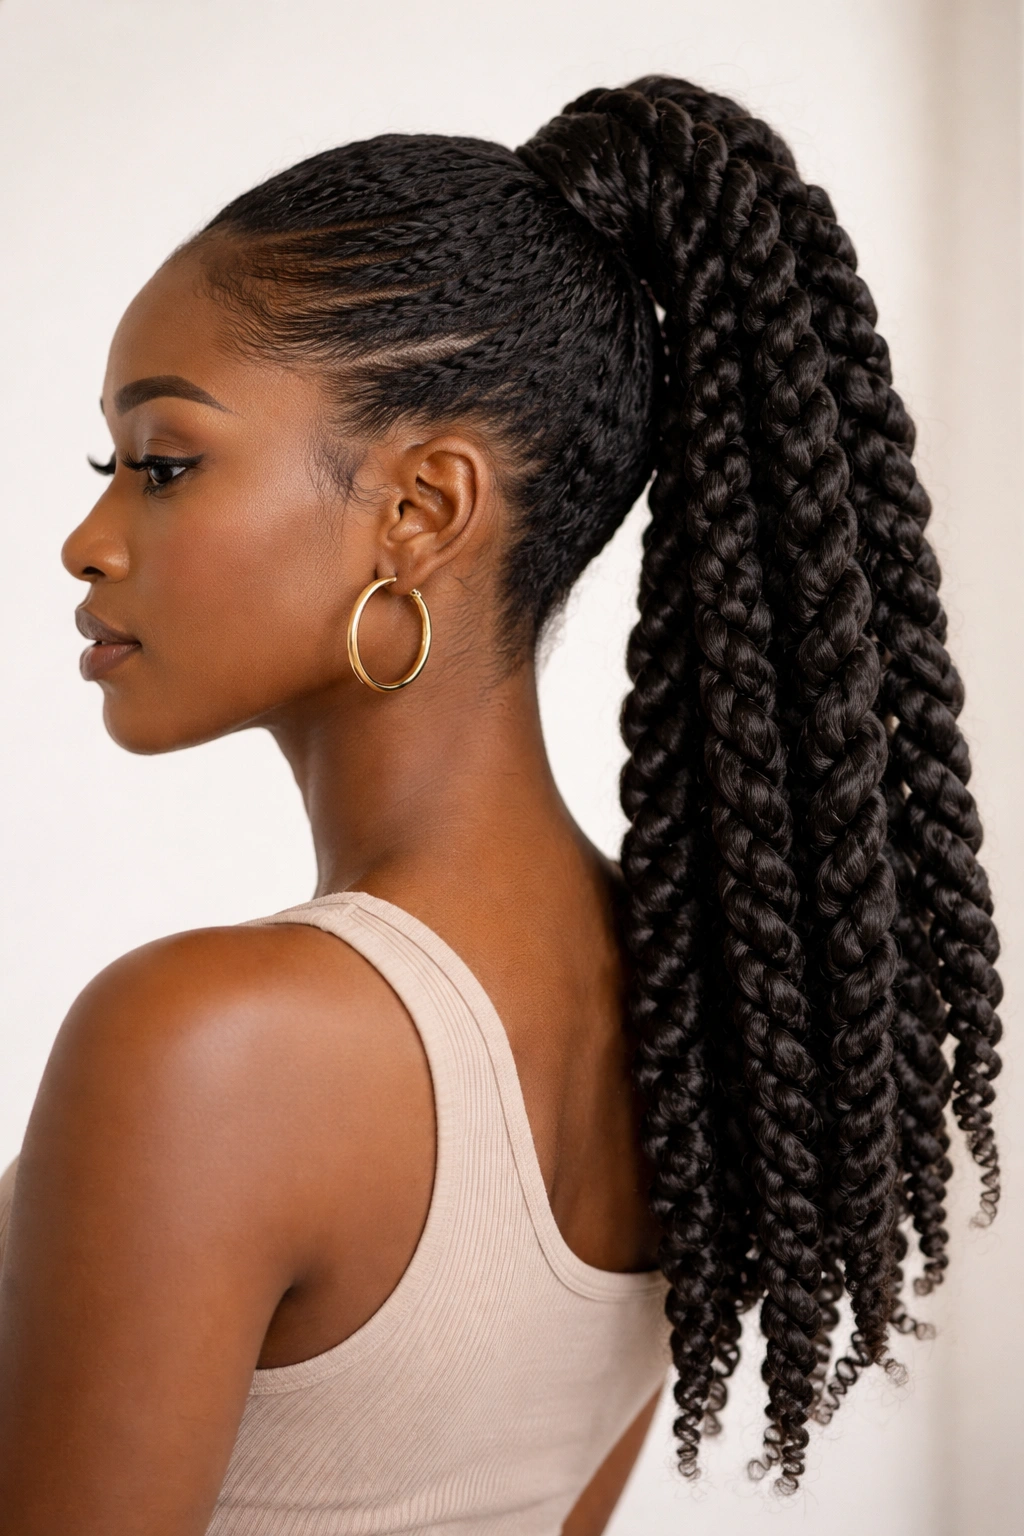
6. The Rope Twist Ponytail with Added Hair
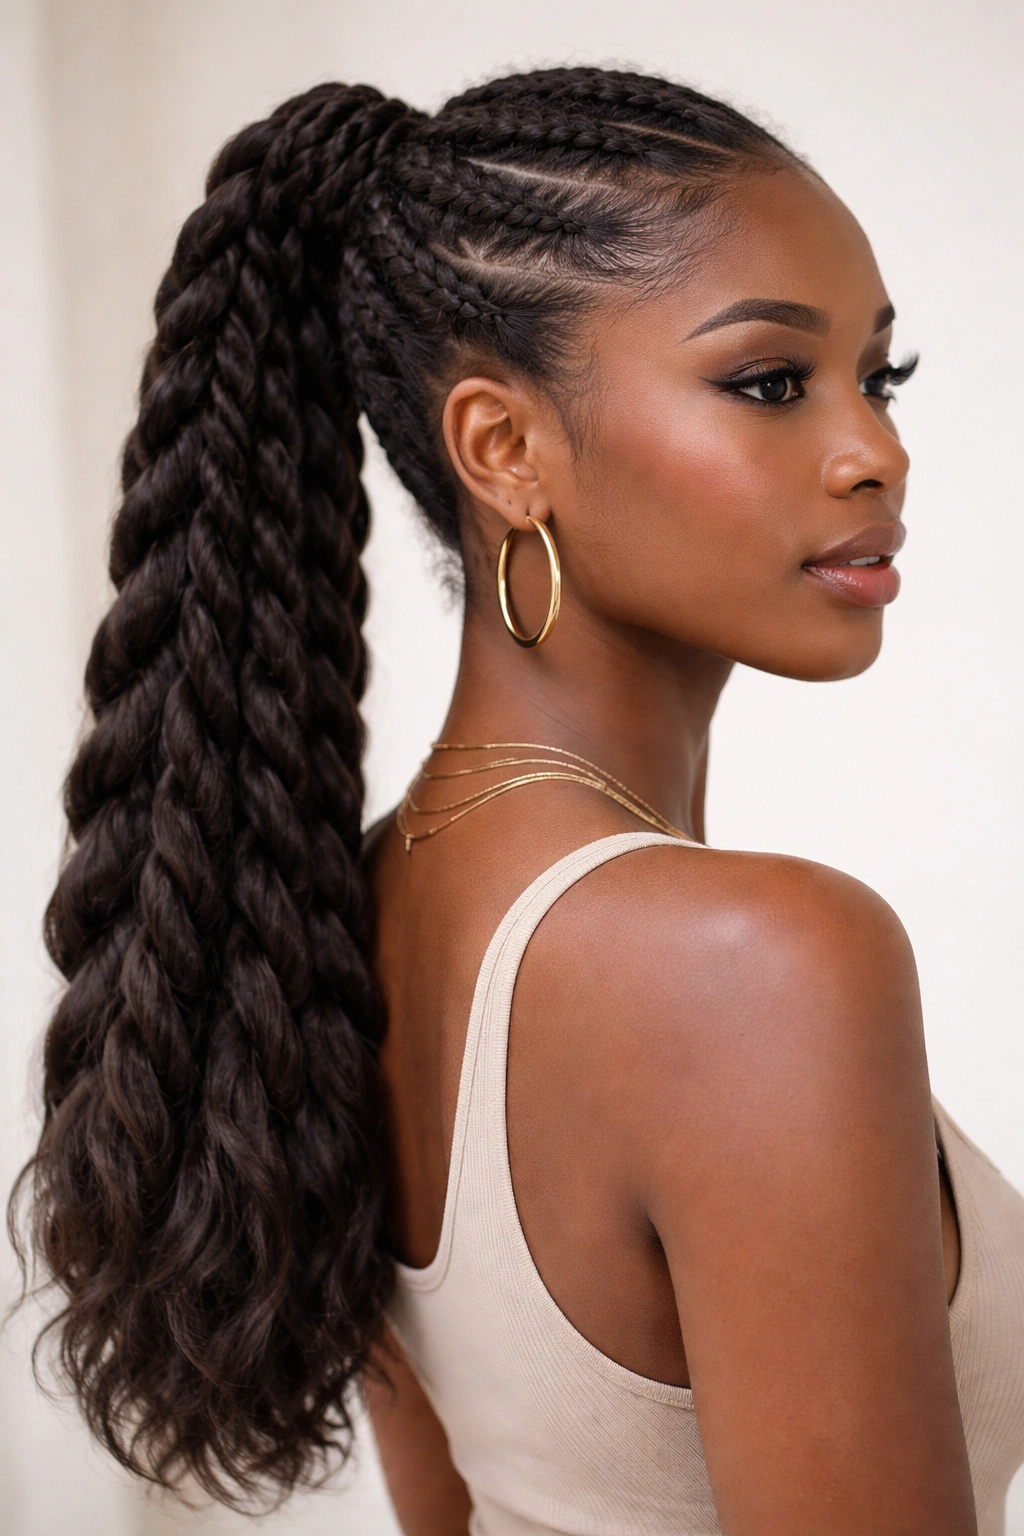
Adding texture to your ponytail — whether through rope twists, braids, or other embellishments — instantly elevates the look from everyday to intentional. Rope twists, which are created by wrapping two strands around each other rather than plaiting them, create a smooth, elegant texture that complements 4C curls.
Creating Rope Twists in Your Ponytail
Secure your natural hair into a ponytail, then take a section of the ponytail and divide it into two strands. Twist each strand individually in the same direction, then wrap the two twisted strands around each other in the opposite direction. This creates a smooth, cordlike texture. Repeat for each section of your ponytail. Rope twists tend to look sleeker than two-strand twists and have a slightly more polished appearance.
Adding Texture with Extensions
Many people enhance rope twist ponytails by incorporating Kanekalon hair, yarn, or other lightweight additions. After creating your base ponytail, you can add synthetic hair to each rope twist section for extra volume, length, or visual interest. This is particularly helpful if your hair is shorter or if you want a fuller, more dramatic style without putting tension on your own hair.
Insider note: If you do add extensions, keep the weight distributed evenly throughout your ponytail. Too much weight concentrated in one spot can cause breakage at your hairline or put strain on your edges.
7. The Coily Bun Ponytail
A bun-style ponytail that shows off your natural coily texture is simultaneously protective and utterly gorgeous. Instead of smoothing your curls, you’re embracing them and building a style around their natural shape and volume.
Building the Coily Structure
Gather your hair into a mid-level or high ponytail, but don’t smooth it. Let your curls maintain their natural texture and volume as you secure them. Once your ponytail is in place, gently fluff it with your fingers to enhance the coil definition. You can either leave it as a full, fluffy ponytail, or wrap the ponytail loosely around its base to create a bun shape. Secure with bobby pins that match your hair color, tucking them in among the curls so they’re not visible.
Maintaining Curl Definition
Apply a lightweight curl cream or gel to your ponytail section before gathering it to enhance definition and reduce frizz. Throughout the style’s lifespan, you can refresh your curls by lightly misting them with water and a curl refresher product, then gently scrunching to reactivate the curl pattern.
Pro tip: This style is perfect for when you want something protected but still want to show off your natural texture. It works particularly well for professional settings where you want polished but authentically you.
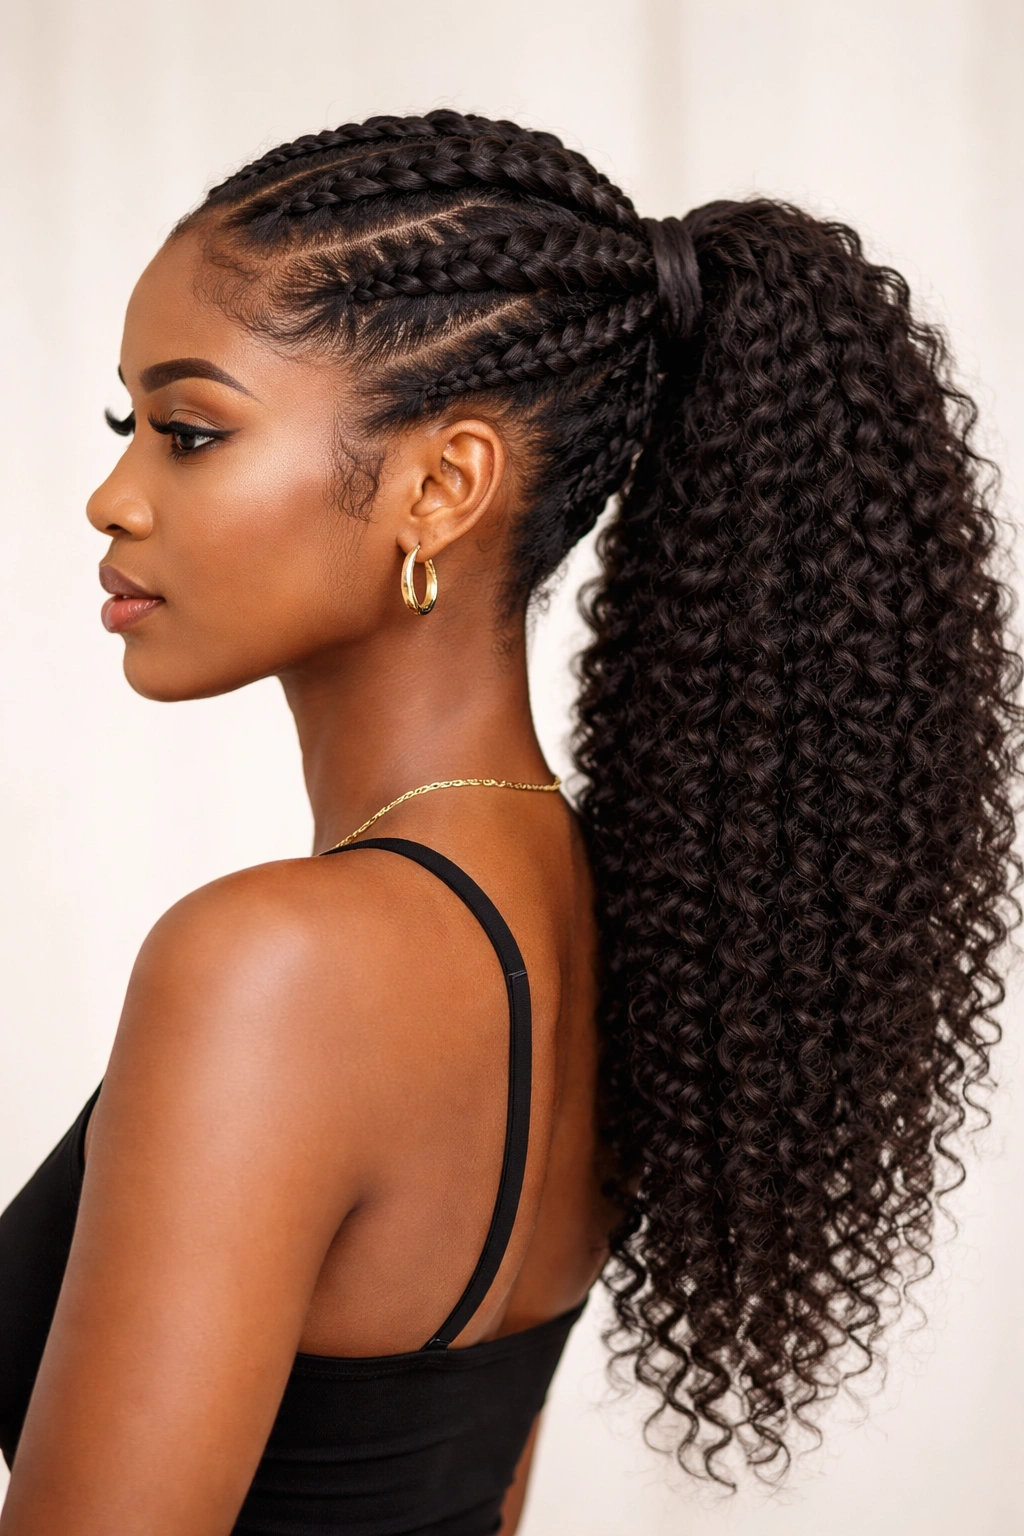
8. The Feed-In Braids Ponytail
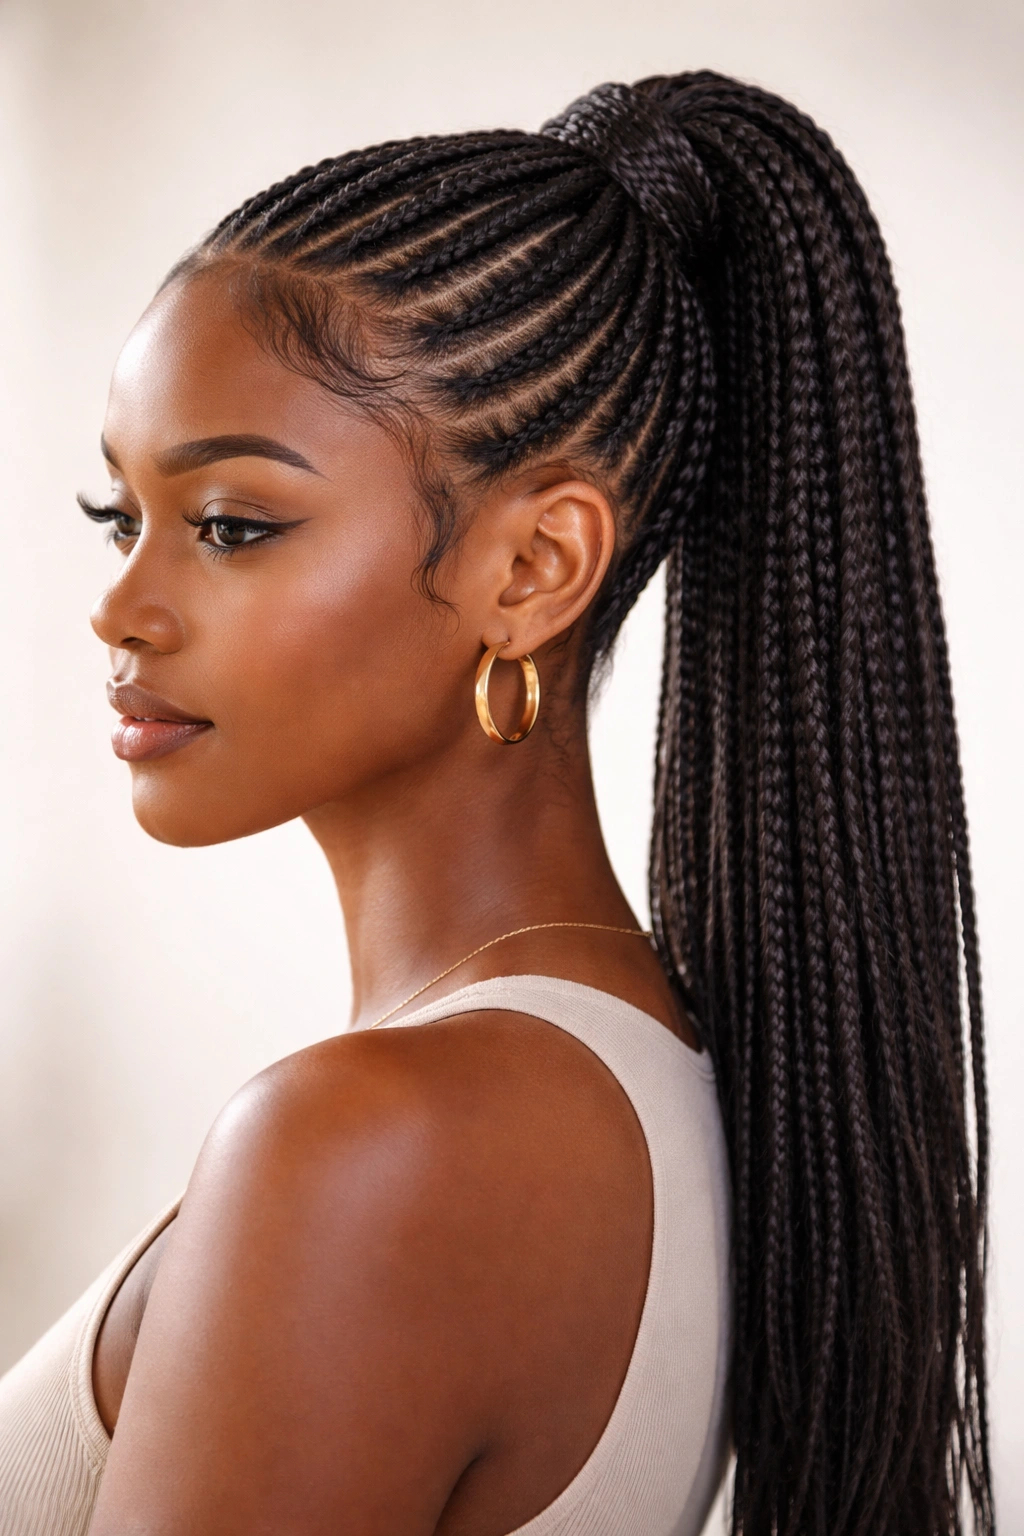
Feed-in braids are a protective braiding technique where you add small amounts of braiding hair gradually as you braid, which distributes tension evenly and keeps your natural hair safe. Gathering feed-in braids into a ponytail creates an intricate, intentional style with built-in protection.
The Feed-In Braiding Process
Start with clean, moisturized hair. Begin a standard three-strand braid at your hairline, but as you braid, you’re adding small sections of extension hair gradually — hence “feed-in.” This creates a braid that incorporates both your natural hair and the added hair seamlessly. Once you’ve braided your entire head (or just the sides, depending on the pattern), gather the ends into a ponytail and secure it. The braids create an intricate frame, while the loose ponytail section shows off volume and texture.
Why This Protects Your 4C Hair
Feed-in braids distribute tension more evenly than box braids because there’s no concentrated pulling at a single point. Your hairline gets a break, your ends are tucked into the braids (away from friction and environmental stressors), and your hair stays moisturized because the braids don’t create as much tension. This is why feed-in braids are considered one of the gentler protective styles for 4C hair.
Worth knowing: The size of your feed-in braids determines how intricate the style looks and how long the style lasts. Thinner braids create more visual interest but take longer to install; thicker braids are faster but have less detail.
9. The Twisted Updo Ponytail
Twisting your hair into an updo and then gathering it into a ponytail shape creates a romantic, textured look that’s both protective and genuinely beautiful. This style works particularly well for special occasions or when you want something more polished than your everyday style.
Building the Twisted Structure
Section your hair into 4-6 zones. Starting with one zone, create a two-strand twist from the roots down to the ends, applying a moisturizing product as you go. Once twisted, wrap that twist loosely around the base to create a coil, and secure it with bobby pins. Repeat for each section. Once all sections are twisted and coiled, gather any remaining loose hair into a ponytail at the back of your head, allowing the twisted sections to flow into the ponytail.
Creating Dimension and Shine
You can create additional dimension by using different products on different sections — perhaps a gel for more definition in some sections and a cream for softer texture in others. This variation in product and finish creates visual interest and prevents the style from looking too uniform.
Insider note: This is a great style to do the night before an event. The twists set overnight, giving you crisp definition and more volume the next day.
10. The Chunky Gel-Defined Ponytail
Sometimes the simplest styles are the most striking, and a high ponytail with deeply defined curls created through gel and moisture is an absolute classic. The key is using the right gel — something that defines without flaking or feeling crunchy.
Achieving Defined, Shiny Curls
Start with damp hair and apply a lightweight leave-in conditioner throughout. Then, working in sections, apply a flexible-hold gel or curl cream to each section from root to tip. Use your hands or a curl pick to encourage the natural curl pattern and enhance definition. As your hair dries, the gel sets your curls in place and creates shine. Gather your hair into a high ponytail once it’s completely dry.
Maintaining the Definition
This style lasts beautifully for 2-3 days if you care for it properly. Each night, lightly mist your ponytail with water and curl refresher, gently scrunch, and allow it to air dry. This reactivates the gel and refreshes your curl definition without applying more product on top of old product, which can create buildup.
Pro tip: If your gel begins to feel heavy or flaky after a few days, it’s time to re-wash and start fresh. Layering gel on top of gel eventually leads to stiffness and buildup that your hair doesn’t need.
11. The Half-Up Ponytail with Natural Texture
A half-up style uses only the top portion of your hair for the ponytail while leaving the bottom section out. This creates a lighter feel, shows off more of your texture, and is genuinely versatile — it works for casual days and can be dressed up for special occasions.
Creating the Half-Up Structure
Section off the top portion of your hair — roughly from ear to ear across the crown. Gather this section into a ponytail at the back of your head, leaving the bottom half of your hair down. You can smooth the top section for a polished look, or leave it with natural texture for a more relaxed vibe. Secure with a hair tie and bobby pins if needed.
Styling the Released Section
The bottom section of hair that’s released from the ponytail frames your face and shows off your natural curl pattern. You can leave it as is, or create additional texture by braiding one or both sides and pulling them back to tuck into the ponytail base — this adds visual interest without putting all your hair up.
Worth knowing: This style is genius for days when you want your hair out of the way but not completely up. It also looks less formal than a full ponytail, making it perfect for casual settings.
12. The Goddess Braid Ponytail
Goddess braids are essentially thick, chunky Dutch braids that run along the sides of your head and gather into a ponytail. They’re eye-catching, beautifully textured, and genuinely protective because the braids keep your ends tucked away.
Braiding for Impact
Create a deep side part. Beginning at one temple, create a thick Dutch braid (the braid that sits on top of your hair rather than beneath it), working it back toward the nape of your neck. Repeat on the other side so you have two braids that meet at the back. Once they meet, gather all your hair — including the ends of the two braids — into a ponytail and secure it. You can leave the ponytail as loose, voluminous curls, or create additional texture by twisting or braiding the ponytail section itself.
Creating Definition and Movement
Apply a gel or cream to your hair before braiding to enhance definition and keep everything smooth. As you braid, don’t pull too tightly — you want the braids to look intentional but not severe. Once complete, you can gently pull the braids apart slightly to create a fuller, softer appearance.
Insider note: This style is perfect for protecting your hairline because the braids frame your face without putting direct tension on your front edges.
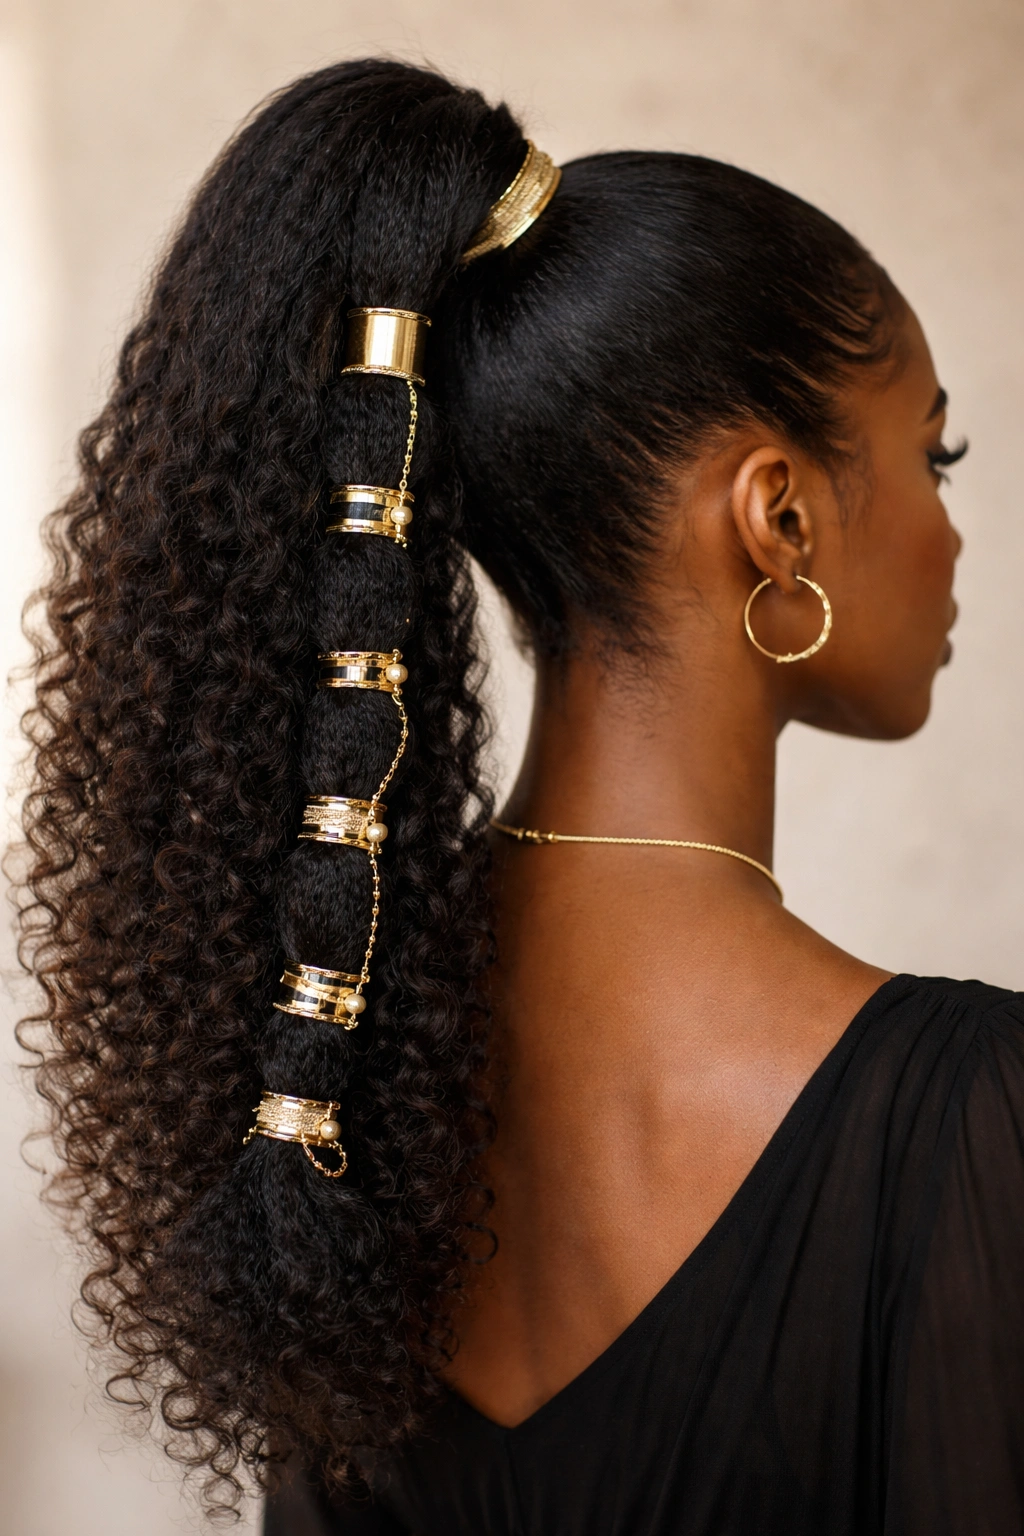
13. The Adorned Ponytail with Cuffs and Rings
Sometimes the simplest way to elevate a ponytail is through intentional accessories. Hair cuffs, rings, and wraps add visual interest and can transform a basic ponytail into something special and intentional.
Choosing the Right Accessories
Look for hair cuffs and rings made from materials that won’t snag or damage your hair. Avoid sharp metal, and choose smooth options like beaded cuffs, silk-wrapped rings, or decorative scrunchies. You can place a single cuff near the base of your ponytail, or layer multiple cuffs at different heights for a more dramatic look. Metallic cuffs in gold or silver instantly elevate your style, while beaded options add texture and personality.
Placing Accessories for Maximum Impact
A single cuff at the base of a simple, voluminous ponytail creates an instant polished look. Multiple cuffs at varying heights down the length of your ponytail create a more editorial, intentional appearance. You can even wrap silk or decorative thread around sections of your ponytail for additional texture and color.
Pro tip: Combine metallic cuffs with natural texture for a beautiful contrast between shine and matte finish.
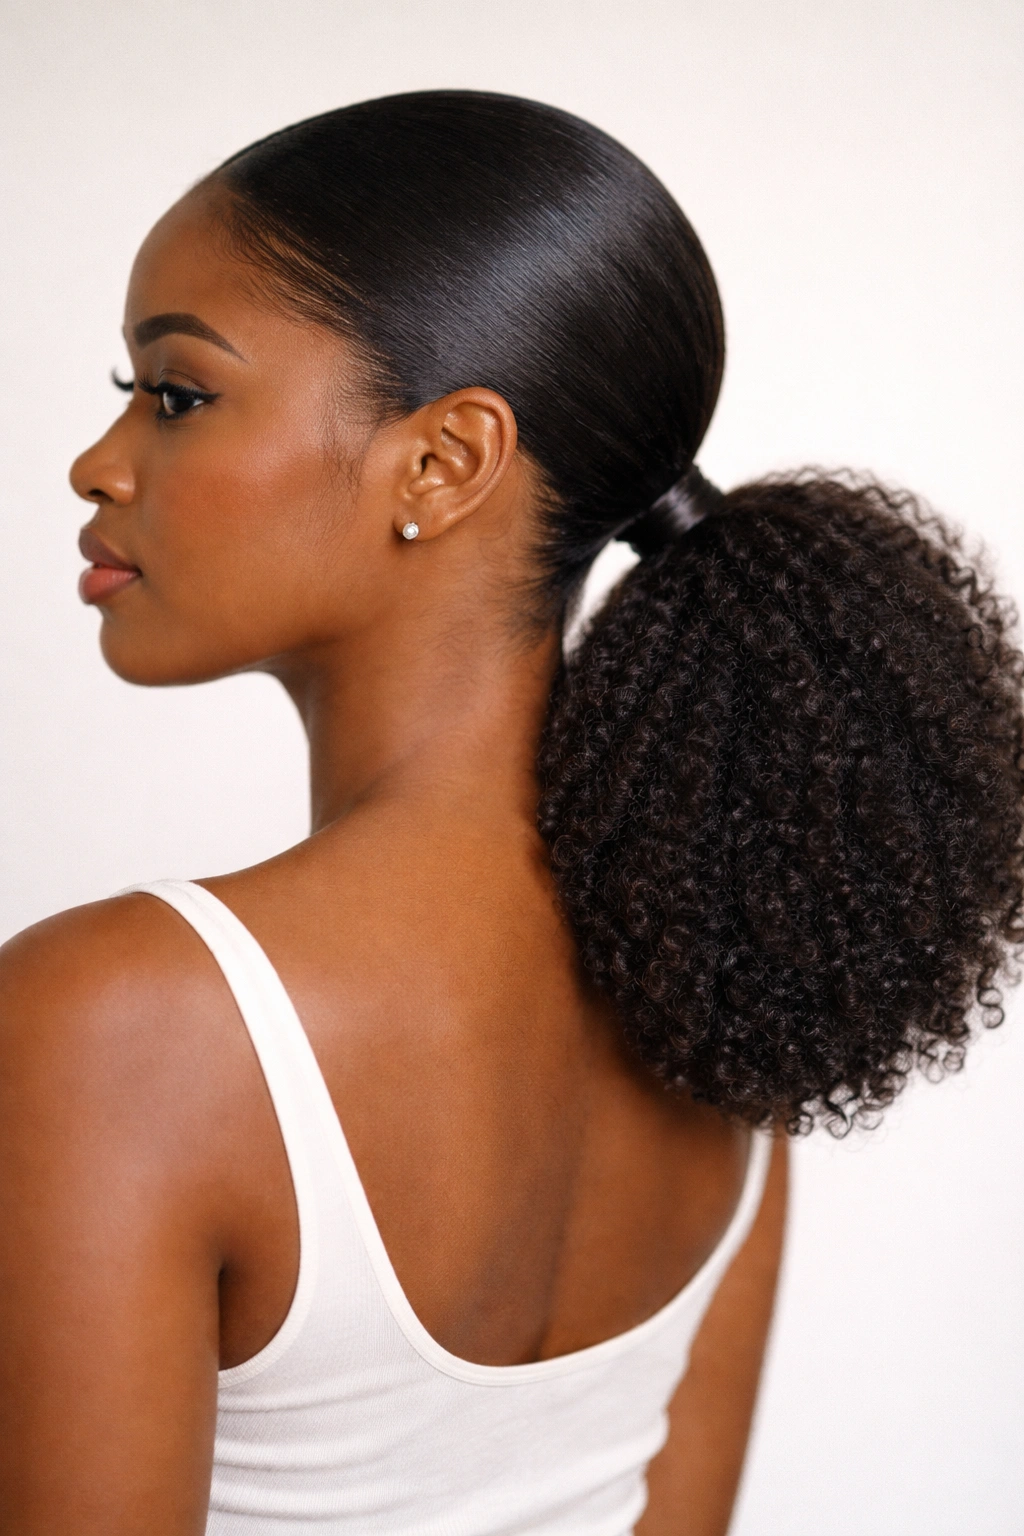
14. The Sleek Low Ponytail with Puffed Ends
A low ponytail is slightly more relaxed than a high ponytail, and when you pair it with intentionally puffed, voluminous ends, you get a style that’s both polished and full of personality. This works beautifully on 4C hair because you’re showing off texture where it matters most.
Creating the Sleek Base
Apply smoothing cream or gel to your edges and the section of hair you’re pulling back. Using a fine-tooth comb, smooth your hair back low onto your head and secure it at the nape of your neck with a cloth-covered elastic. Keep the base sleek and controlled, but allow the ponytail section to remain full and textured.
Building the Puffed Effect
Once your ponytail is secured, gently flip your head upside down and fluff the ponytail section with your fingers. This separates your curls and creates volume. Flip back over and arrange the puffed section so it looks balanced and intentional. You can mist lightly with a shine spray if you want added sheen, or leave it matte for a more natural appearance.
Worth knowing: This style works at any hair length, but it’s particularly striking on longer hair where you have more volume to work with. On shorter hair, you can still create a puffed effect, but it will have a more compact appearance.
15. The Braided Ponytail with Loose Curls
This final style combines braids and loose curls in a way that’s visually interesting and provides the benefits of both protection and texture. Small braids frame your face while the bulk of your hair falls as loose, defined curls.
Creating the Braided Frame
Take small sections of hair at your temples and create thin braids, working them back toward your ears. Gather all your hair — including the ends of these braids — into a high or mid-level ponytail. The small braids frame your face and add detail, while the ponytail section remains loose and curly.
Enhancing Curl Definition
Apply a curl cream or light gel to your ponytail section to enhance definition and create shine. Allow your hair to air dry completely so your curls set in place, or use a microfiber towel to gently encourage definition while drying. The small braids create structure, while the loose curls in the ponytail add movement and dimension.
Insider note: You can customize the number and thickness of your face-framing braids depending on how much detail you want. Two thin braids feel delicate and romantic, while four or six create a more intricate look.
Getting Your Hair Ready for Any Ponytail Style
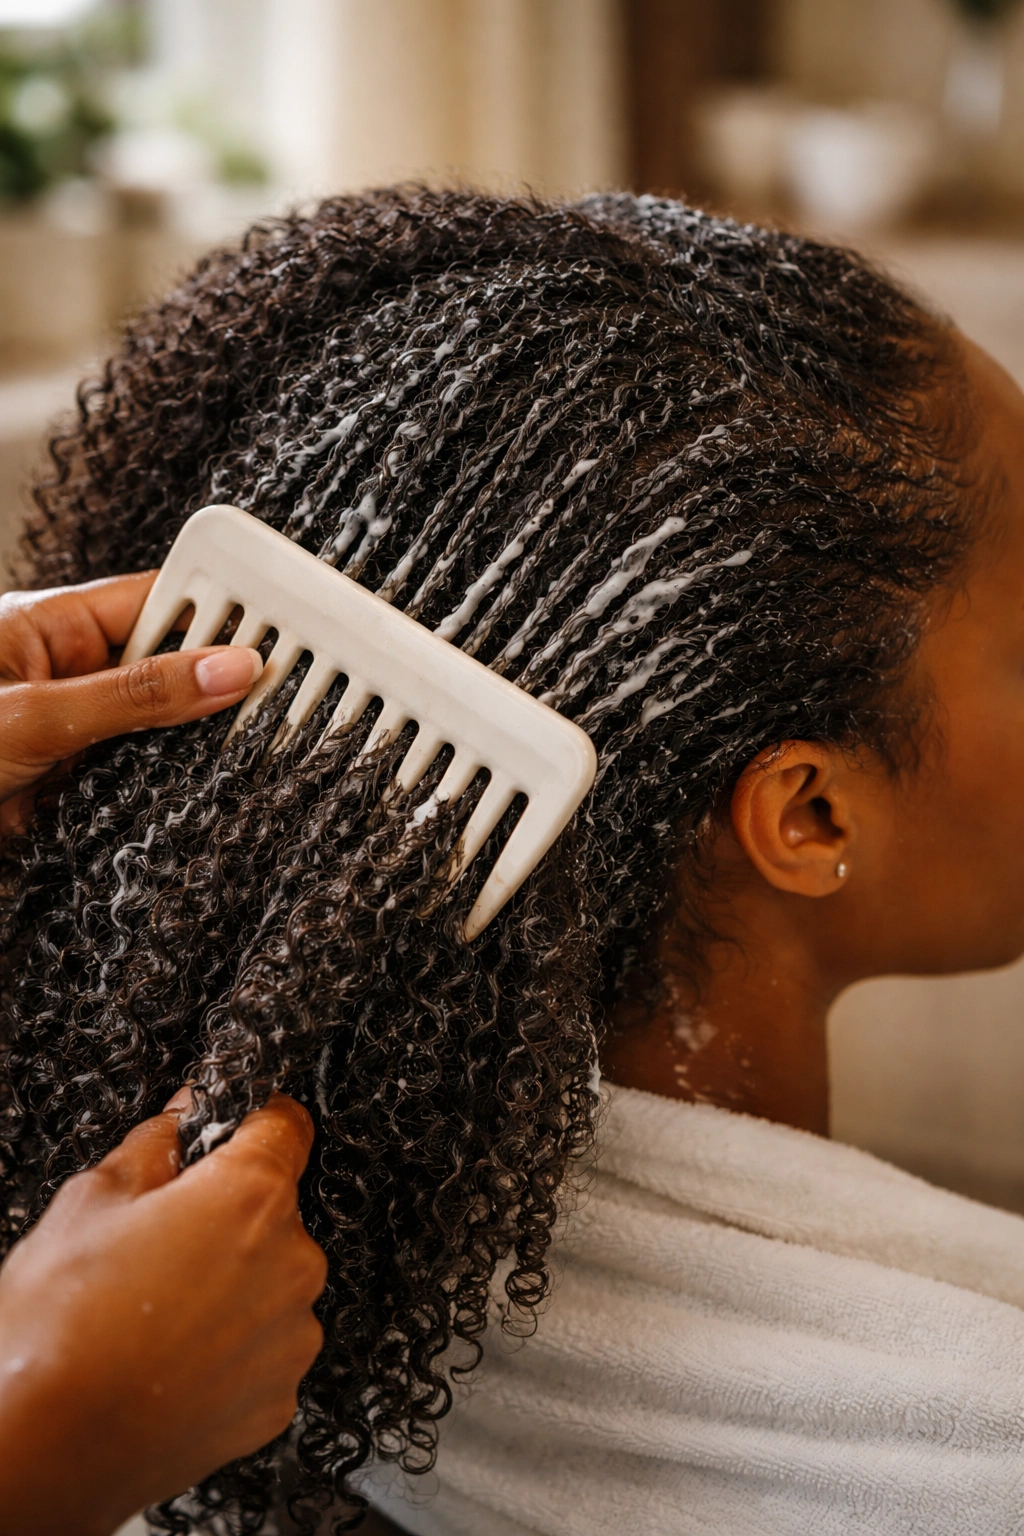
The foundation for any beautiful ponytail is properly prepared hair, and with 4C hair, preparation is genuinely non-negotiable. Your hair needs to be clean, deeply conditioned, and moisturized before you attempt any style. Wash your hair with a sulfate-free cleanser that won’t strip your natural oils, then apply a deep conditioning mask and leave it on for at least 20 minutes while your hair is damp.
After conditioning, focus on detangling. Work through your hair gently in sections, using a wide-tooth comb or detangling brush and applying a leave-in conditioner as you go. This is not the time to rush. Your 4C curls are delicate, and taking time to detangle properly prevents breakage and makes styling infinitely easier. Never detangle dry hair — this is one of the fastest ways to create unnecessary breakage and frizz.
Apply a moisturizing leave-in conditioner to your entire head, focusing on the mid-lengths and ends of your hair. Your roots produce natural oils, so they don’t need as much product, but your ends — which are the oldest part of your hair — are always thirsty. A good leave-in conditioner keeps your moisture levels up throughout the style’s lifespan, which is when your hair is most vulnerable to drying out and breaking.
Protecting Your Edges and Hairline
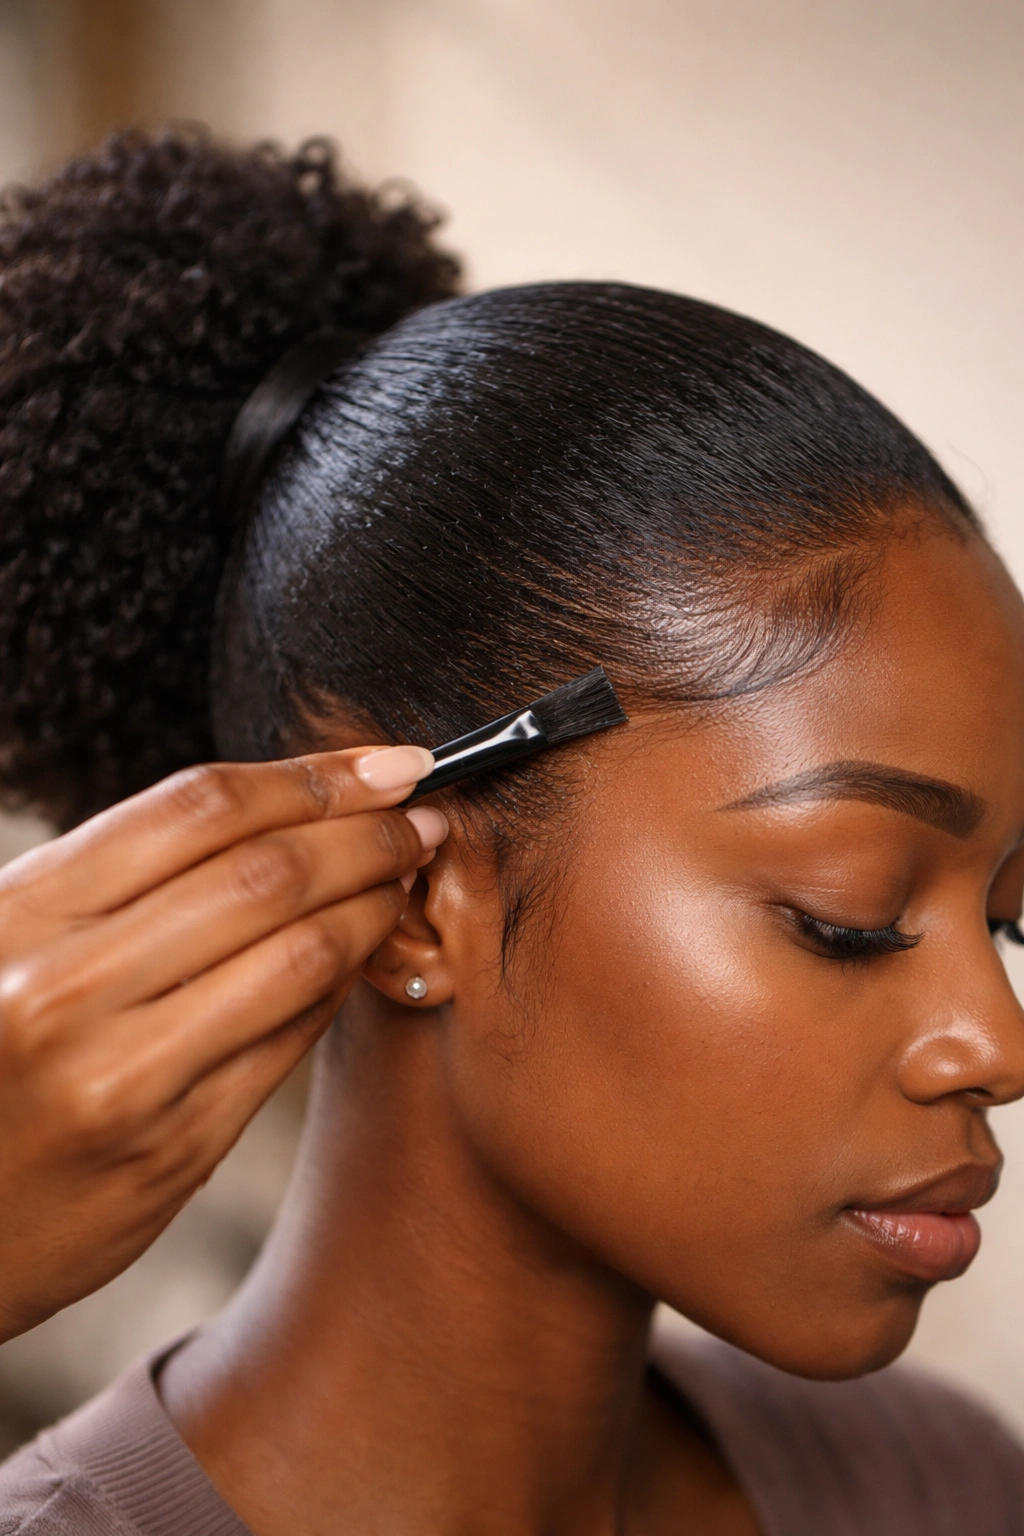
Your edges and hairline need intentional care when you’re wearing ponytails, because they bear the weight and tension of the style. Never create a ponytail so tight that you feel tension or pulling at your scalp — this is the fastest way to cause traction alopecia (hair loss caused by constant pulling). Your ponytail should feel secure but never painful.
Apply a protective edge control or gel to your hairline before you style, creating a barrier between your hair and the edge control itself. This prevents direct product buildup on your delicate baby hairs and edges. Once your ponytail is complete, you can apply a small amount of edge control to your hairline for a polished look, but this is optional and not required for the style to work.
If you notice your hairline is feeling tender or sensitive after wearing a ponytail, that’s your sign to either loosen the tension next time or take a break from tight styles entirely. Your edges will thank you. Many people find that alternating between tight styles and loose styles, or taking breaks between ponytails, keeps their hairlines strong and healthy long-term.
Moisturizing Your Ponytail Between Washes
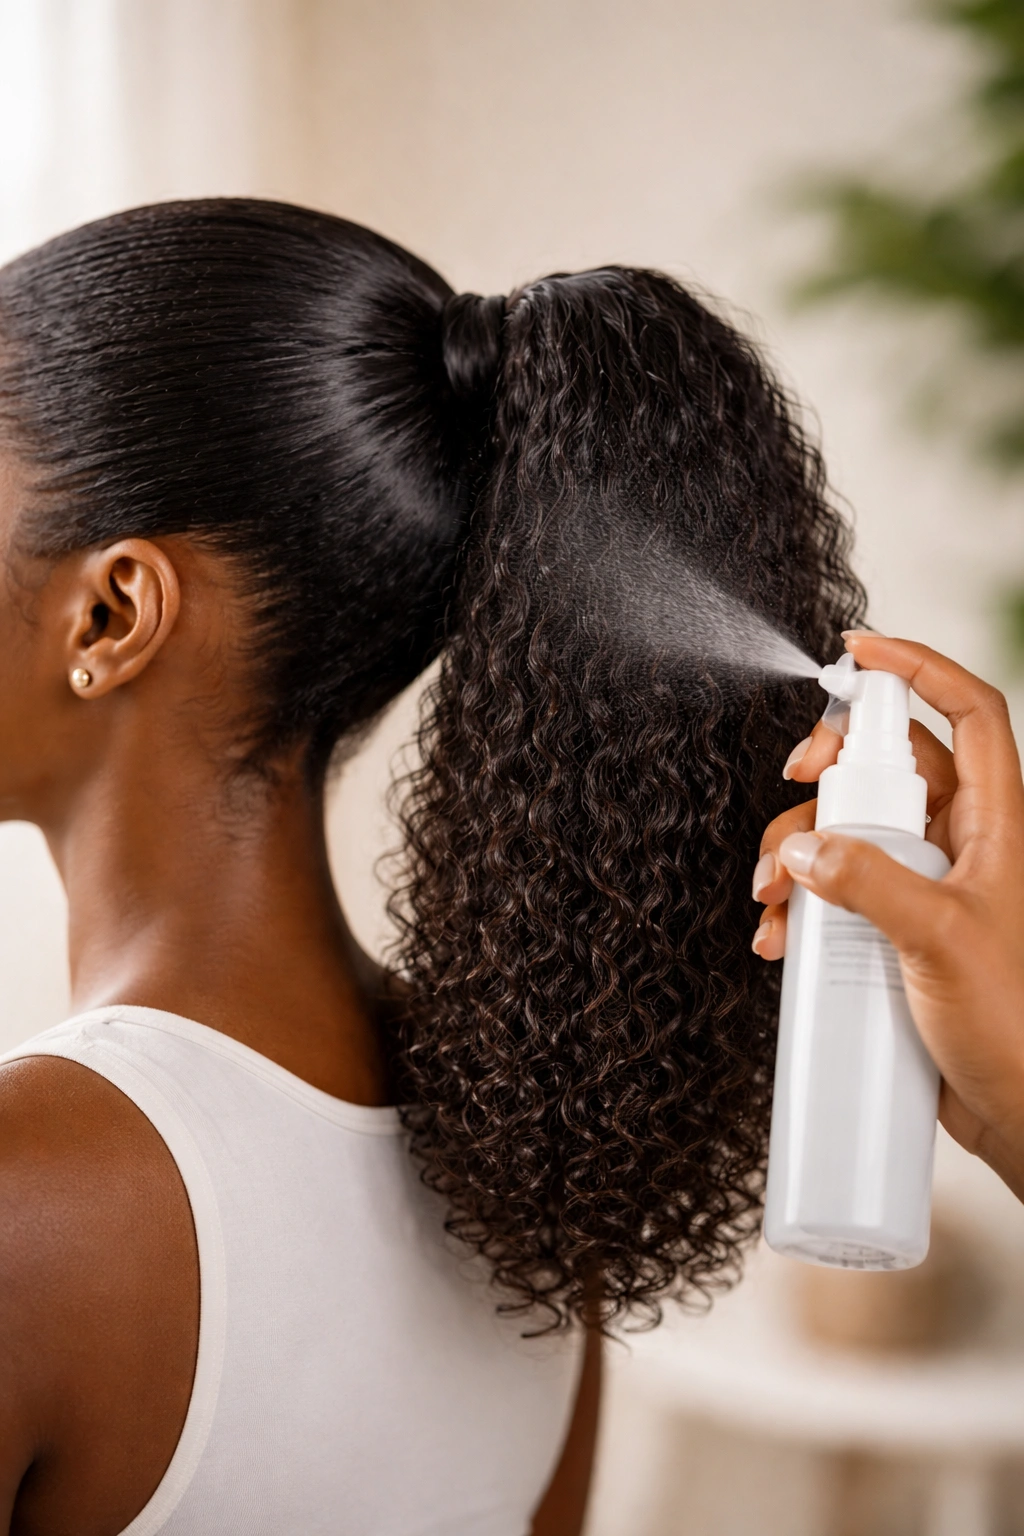
Once you’ve created your ponytail, your job doesn’t end there. Keeping your hair moisturized throughout the style’s lifespan is what determines whether your hair thrives or suffers. Every 2-3 days, lightly mist your ponytail with a curl refresher spray and apply a lightweight leave-in conditioner. Scrunch gently to distribute the product, then allow it to air dry. This keeps your moisture levels up and prevents your curls from drying out and breaking.
At night, protect your ponytail by wrapping it loosely in a silk or satin scarf, or sleeping on a satin pillowcase. This reduces friction between your hair and your cotton pillowcase, which causes frizz and breakage. Cotton pillowcases absorb moisture from your hair — one more reason to switch to silk or satin if you’re serious about maintaining moisture levels.
Common Mistakes That Damage 4C Hair in Ponytails
The most common mistake is using a regular elastic hair tie instead of a cloth-covered or fabric hair tie. Regular elastics snag your hair and break strands every single time you put your hair in a ponytail or take it down. Invest in a few quality cloth-covered hair ties — they cost just a few dollars and make a genuine difference in the health of your hair.
Another frequent mistake is not moisturizing before styling. Going into a ponytail with dry, un-conditioned hair almost guarantees that your hair will dry out further and become brittle during the style. Always start with moisturized hair, always apply a leave-in conditioner, and always refresh your moisture throughout the style’s lifespan.
Excessive tension is perhaps the most insidious mistake because the damage isn’t always immediately obvious. You won’t see traction alopecia until you’ve been pulling your hair too tightly for months. Be honest with yourself about how tight your ponytails are. Your hair should feel secure, not like it’s being pulled off your scalp.
Finally, leaving a ponytail in too long without refresh is a silent killer. Even the most protective style stops protecting your hair if you’re not maintaining moisture and refreshing your curl definition. Most ponytails look their absolute best in the first 3-5 days. After that, you can extend the style by refreshing, but at a certain point (usually 7-10 days depending on the style), it’s better to take it down, refresh your hair, and start fresh.
Final Thoughts
The best ponytail for your 4C hair is one that makes you feel beautiful and confident while keeping your hair healthy and protected. These fifteen styles offer genuine variety — from sleek and polished to textured and voluminous, from simple daily styles to intricate looks for special occasions. The common thread is that every single one respects your hair’s texture, prioritizes moisture, and avoids unnecessary tension or damage.
Your 4C curls are your superpower. A ponytail isn’t about conforming your hair to someone else’s standard of “neat” — it’s about showing off your texture, protecting your ends, and feeling like the best version of yourself. Try different styles, pay attention to what makes your hair feel and look best, and don’t hesitate to adjust or adapt based on your hair’s current state. Your hair will let you know what it needs if you’re paying attention.