Prom night calls for a hairstyle that’s polished, memorable, and true to who you are. For those with gorgeous curls, a ponytail might not seem like the obvious choice—but when styled intentionally, it becomes one of the most stunning options on the dance floor. The key is working with your curls rather than against them, creating updos that showcase texture, movement, and sophistication.
A well-executed curly ponytail does something magical: it keeps hair off your face and shoulders (practical for dancing and photos), while letting your curls work their best magic. You avoid the flattened look that comes from tight, slicked-back styles. Instead, you embrace dimension, volume, and that enviable bounce that naturally textured hair provides. Whether you’re going for romantic and ethereal or bold and modern, there’s a curly ponytail approach that’ll make you feel like the best version of yourself.
The styles ahead range from soft and swept to high and dramatic, with plenty of texture-enhancing techniques that make curls genuinely shine. Most of these can be created with tools you probably already own, though a curling iron or wand helps if your curls need a little texture boost. Better yet, many of these styles actually look better when you start with curls that are a day or two old—second-day texture tends to hold ponytails better than freshly washed curls.
1. The Romantic Side Sweep
This is the ponytail for anyone who wants their curls to take center stage while still keeping hair swept elegantly away. The side sweep starts with curls that are full and defined, gathered to one side at roughly ear level. What makes this romantic rather than just casual is the way loose tendrils frame your face and the intentional softness of the gathering itself.
How to Create This Look
Start with curls that have good separation and definition—use a curl-defining cream or gel if needed. Let your natural curl pattern show, avoiding any attempt to smooth or straighten. Brush through your curls gently with your fingers or a wide-tooth comb to add some fluff and volume without disrupting the curl pattern. Then sweep everything to one side, gathering loosely at ear level with a clear elastic or a decorative hair cuff. Leave a few face-framing pieces down intentionally—these shouldn’t look like an accident but rather like a purposeful design choice.
Styling Tips for Maximum Impact
- Use a light hairspray that holds without stiffening or crunching your curls
- Pin loose pieces in place with bobby pins that match your hair color so they disappear
- Add a delicate hair accessory like a pearl clip or jeweled bobby pin at the gathering point
- Consider face-framing pieces that are slightly tighter curls than the rest—this adds intentional sophistication
Why It Works for Prom
The side sweep is inherently elegant and flatters most face shapes. It photographs beautifully from both angles, shows off your curls without feeling overly casual, and stays comfortable throughout the evening. You can dress it up further with an ornate clip or keep it understated depending on your dress style.
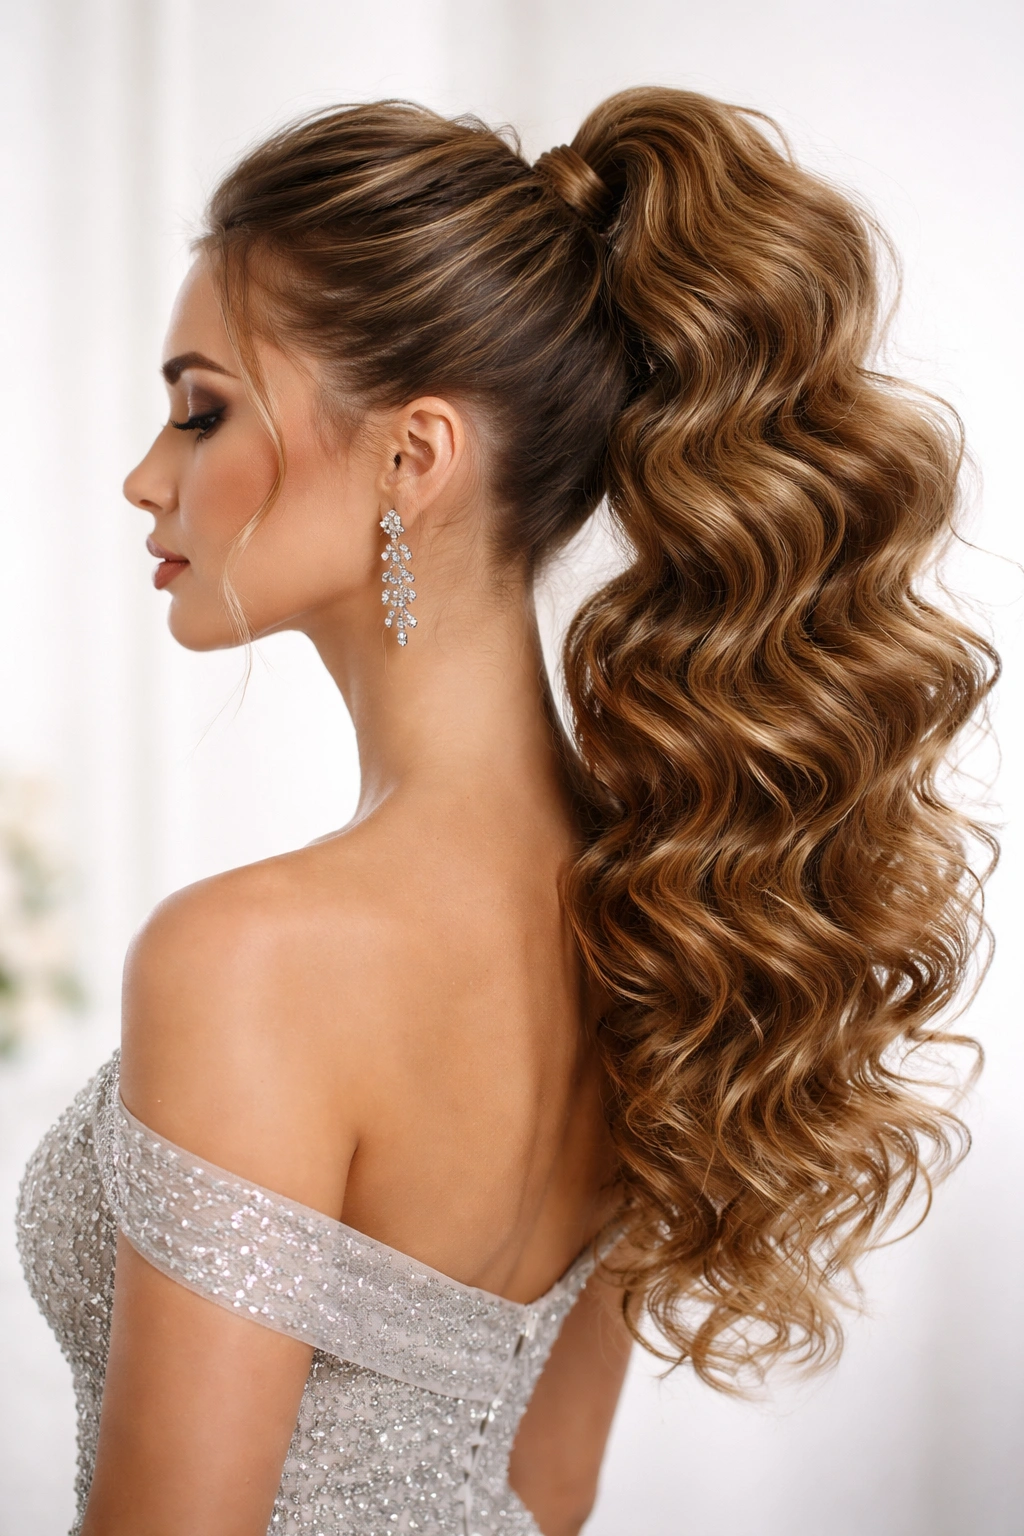
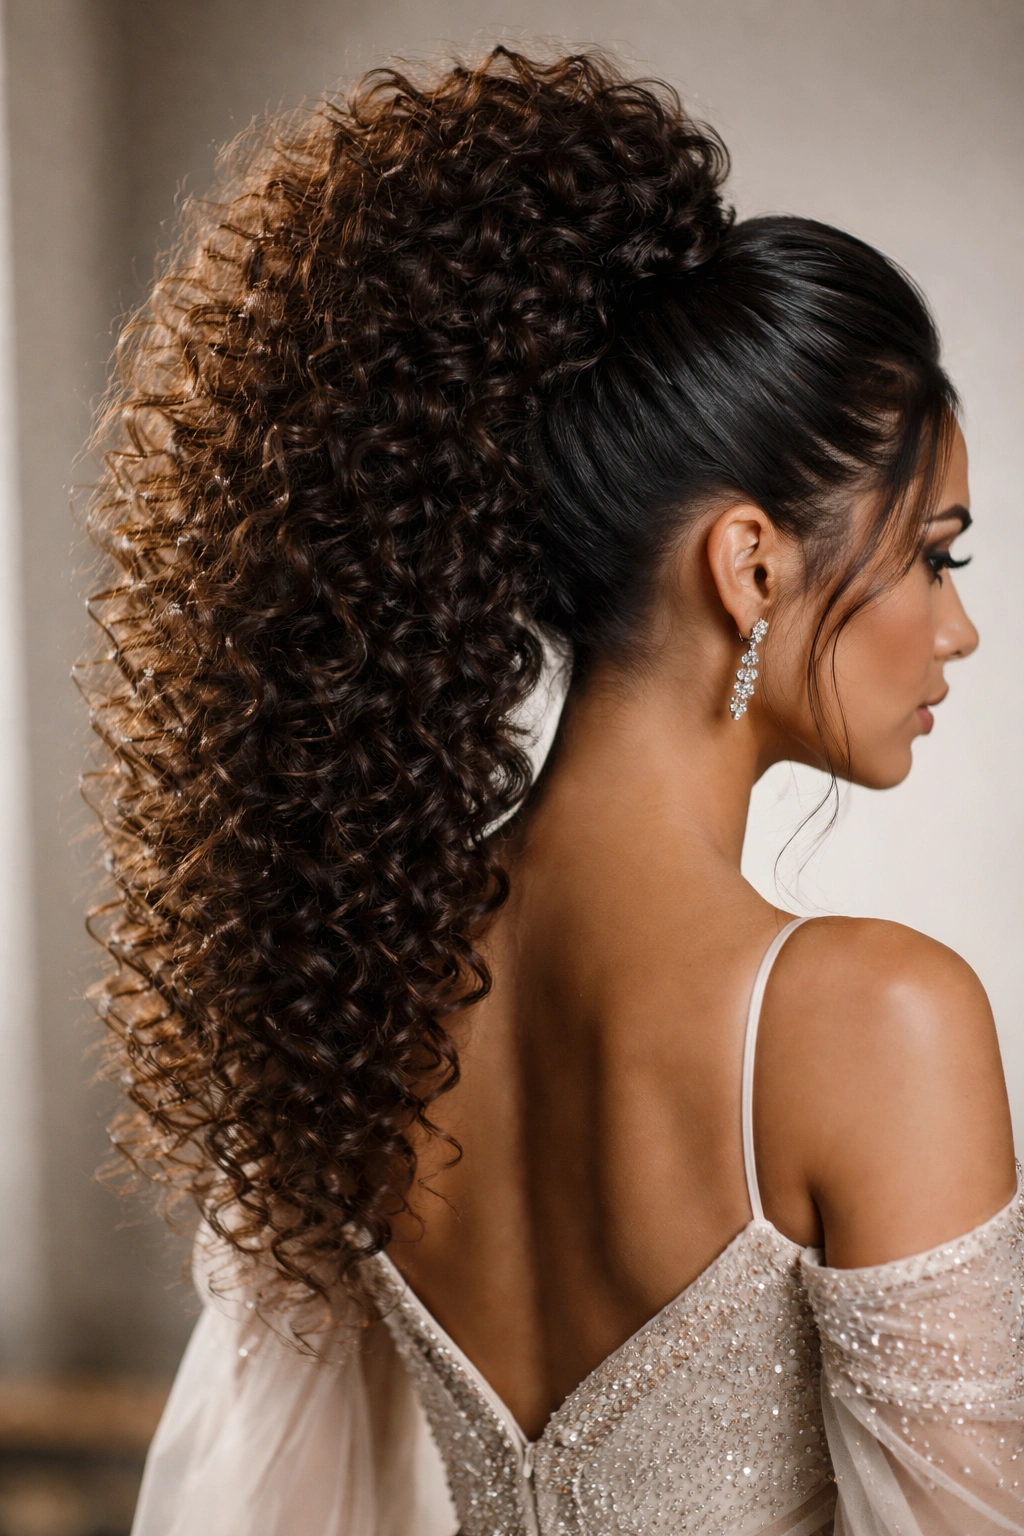
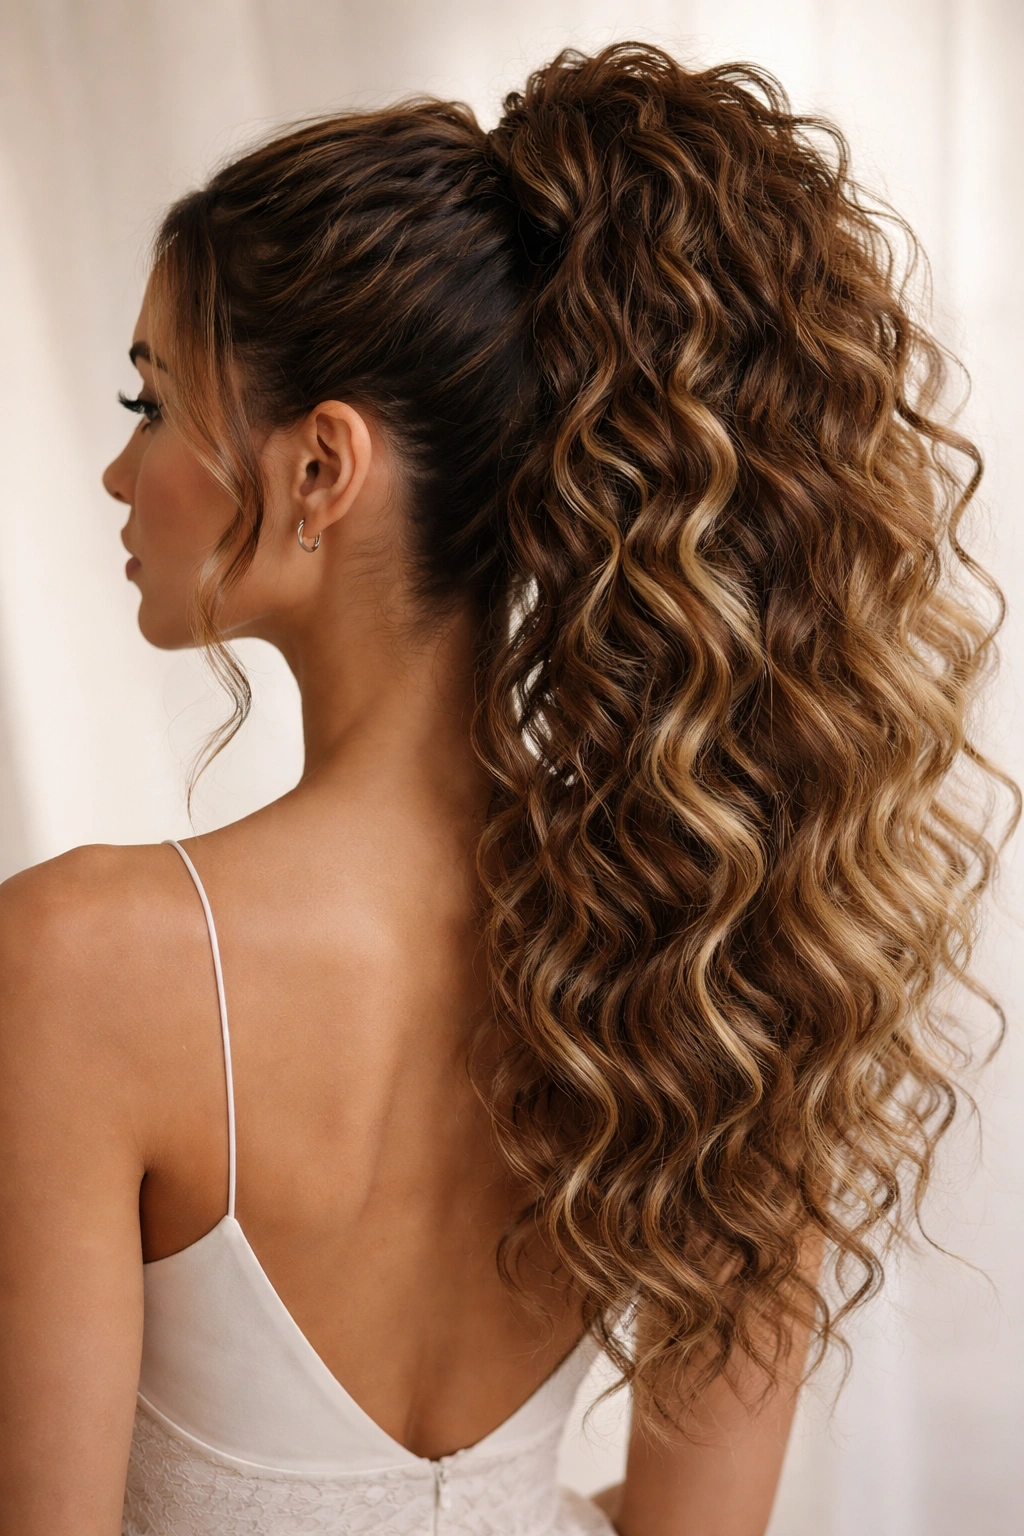
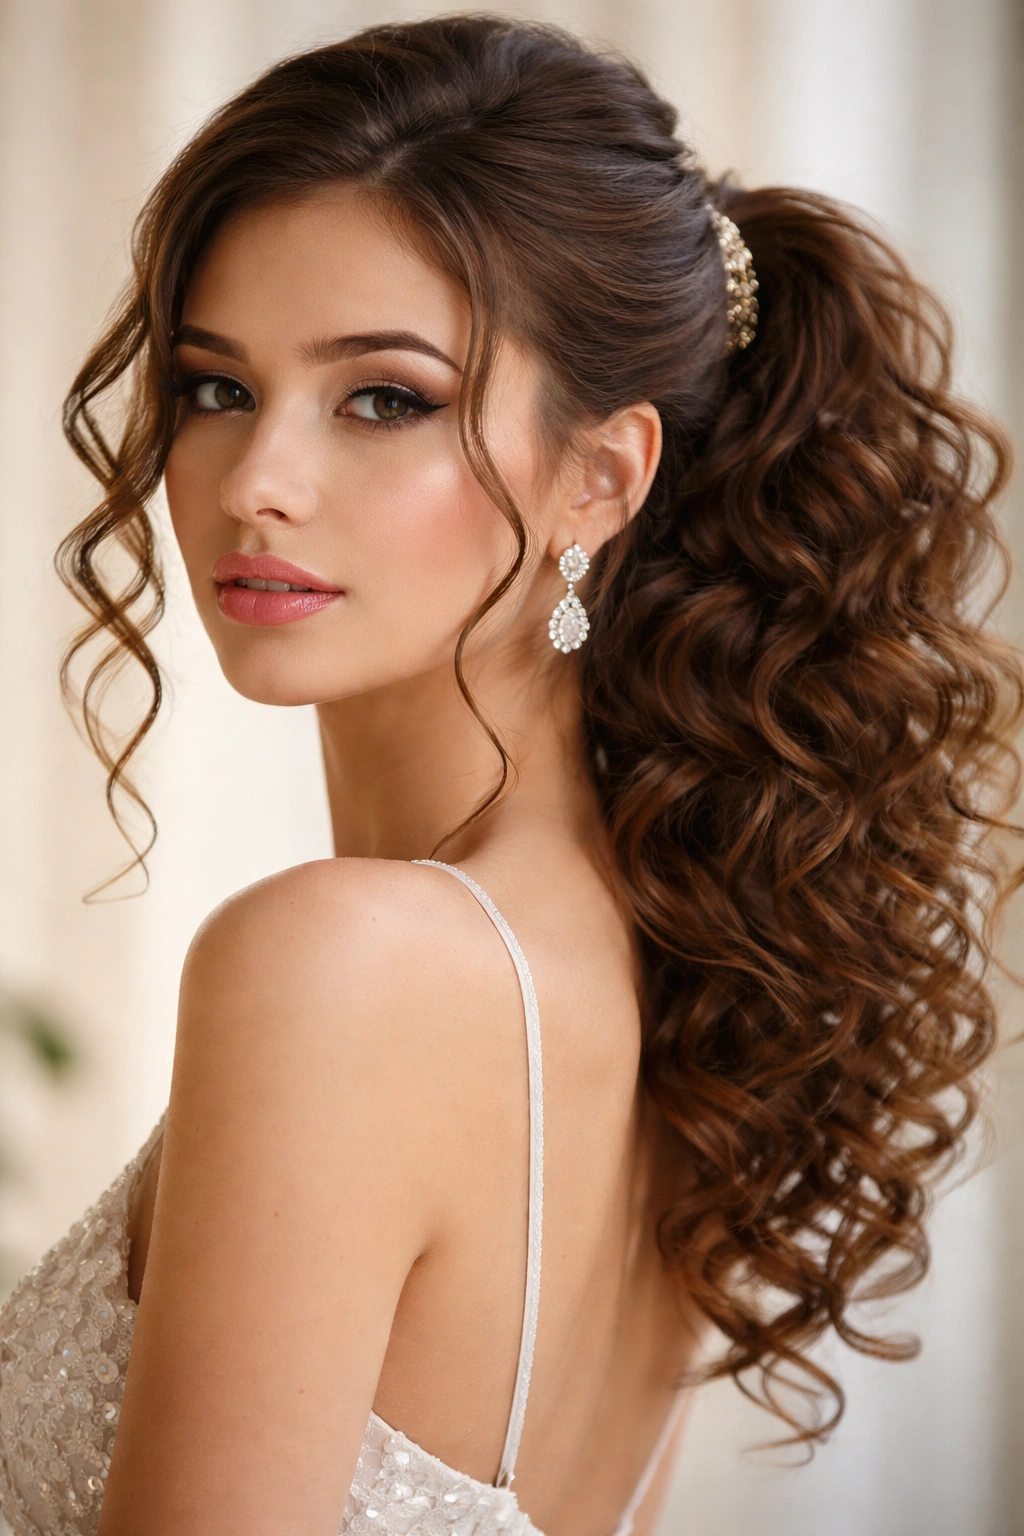
2. The High Spiral Ponytail
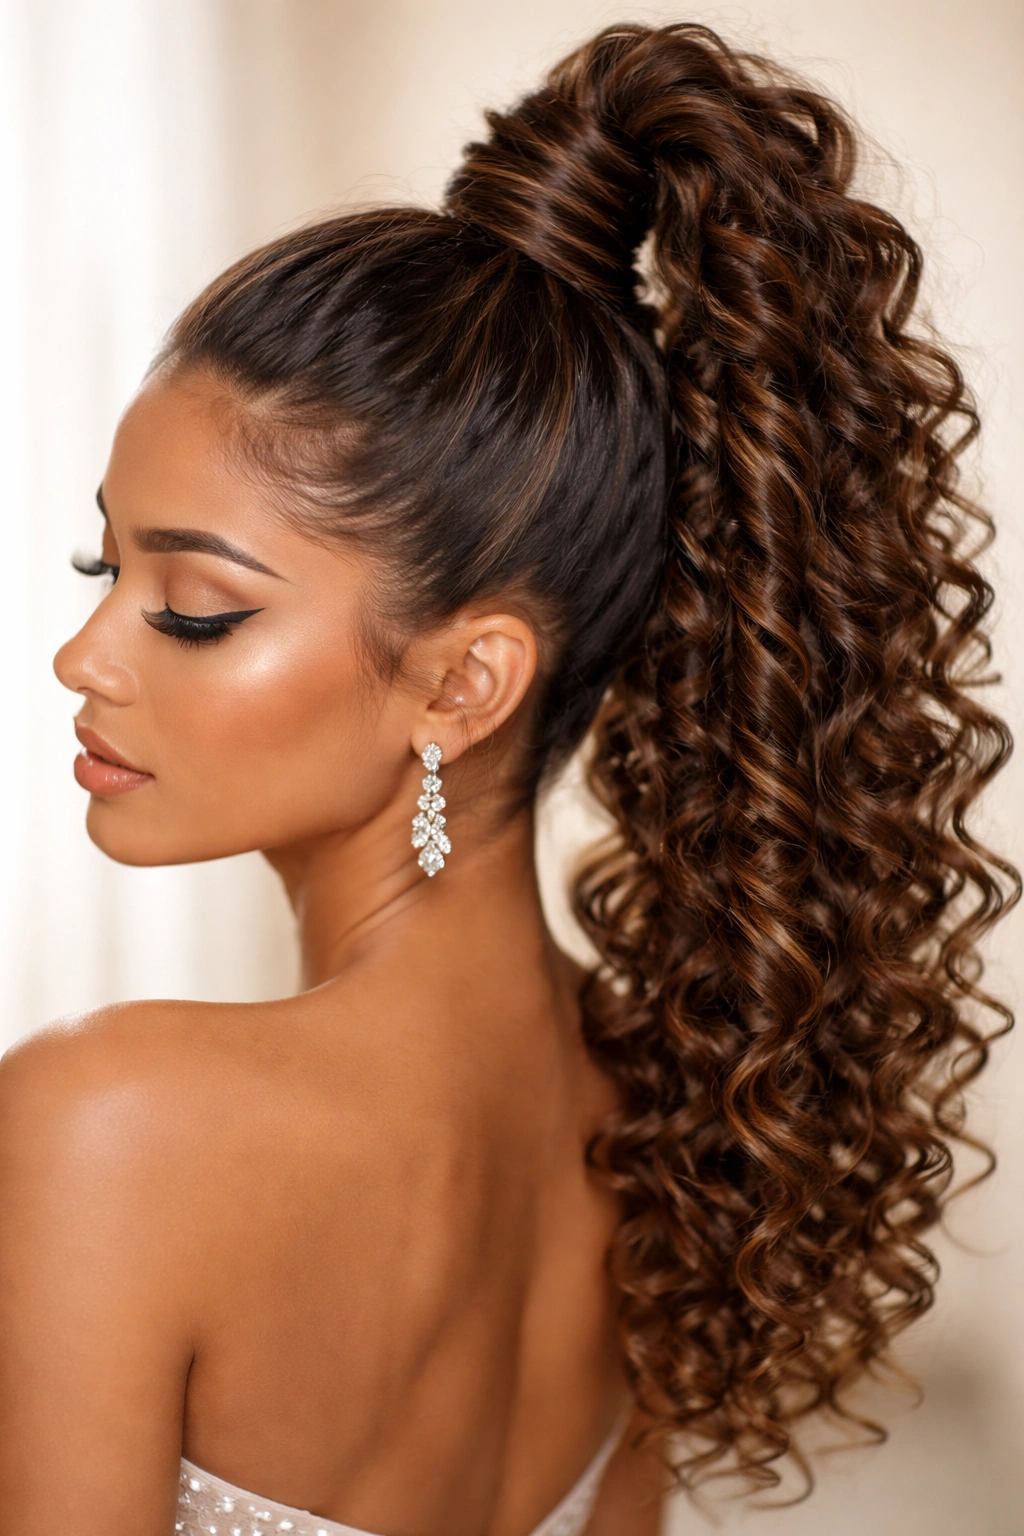
For something with real presence and architectural interest, the high spiral ponytail twists curls into a rope-like structure that wraps around itself. It’s dramatic without being over-the-top, and it creates the illusion of even more height and volume than a regular high ponytail would.
The Technique Behind the Spiral
Gather your curls high on the crown—imagine where a gymnast’s ponytail would sit. Secure loosely with an elastic. Now take small sections and gently twist them, allowing the natural curl to feed into the twist. Wrap these twisted sections around the base of the ponytail, pinning as you go. The curls themselves create texture within the twist, so you don’t need to add more volume artificially. This works best when your curls already have some natural definition and hold.
Customizing for Your Curl Type
- Fine or loose curls: Start with a texturizing spray before gathering to give the twists more grip
- Tight coils or kinks: These actually create the most stunning spirals because the texture is already defined
- Wavy curls: Use a curling iron on lower sections to enhance definition before creating the spiral
Pro Finishing Touches
Smooth a tiny amount of anti-frizz serum over the spiral structure to keep flyaways at bay. Add a statement hair comb or jeweled clip at the base where the spiral begins. A few soft face-framing pieces can soften the look if the high placement feels too severe for your style.
3. The Textured Low Bun Ponytail
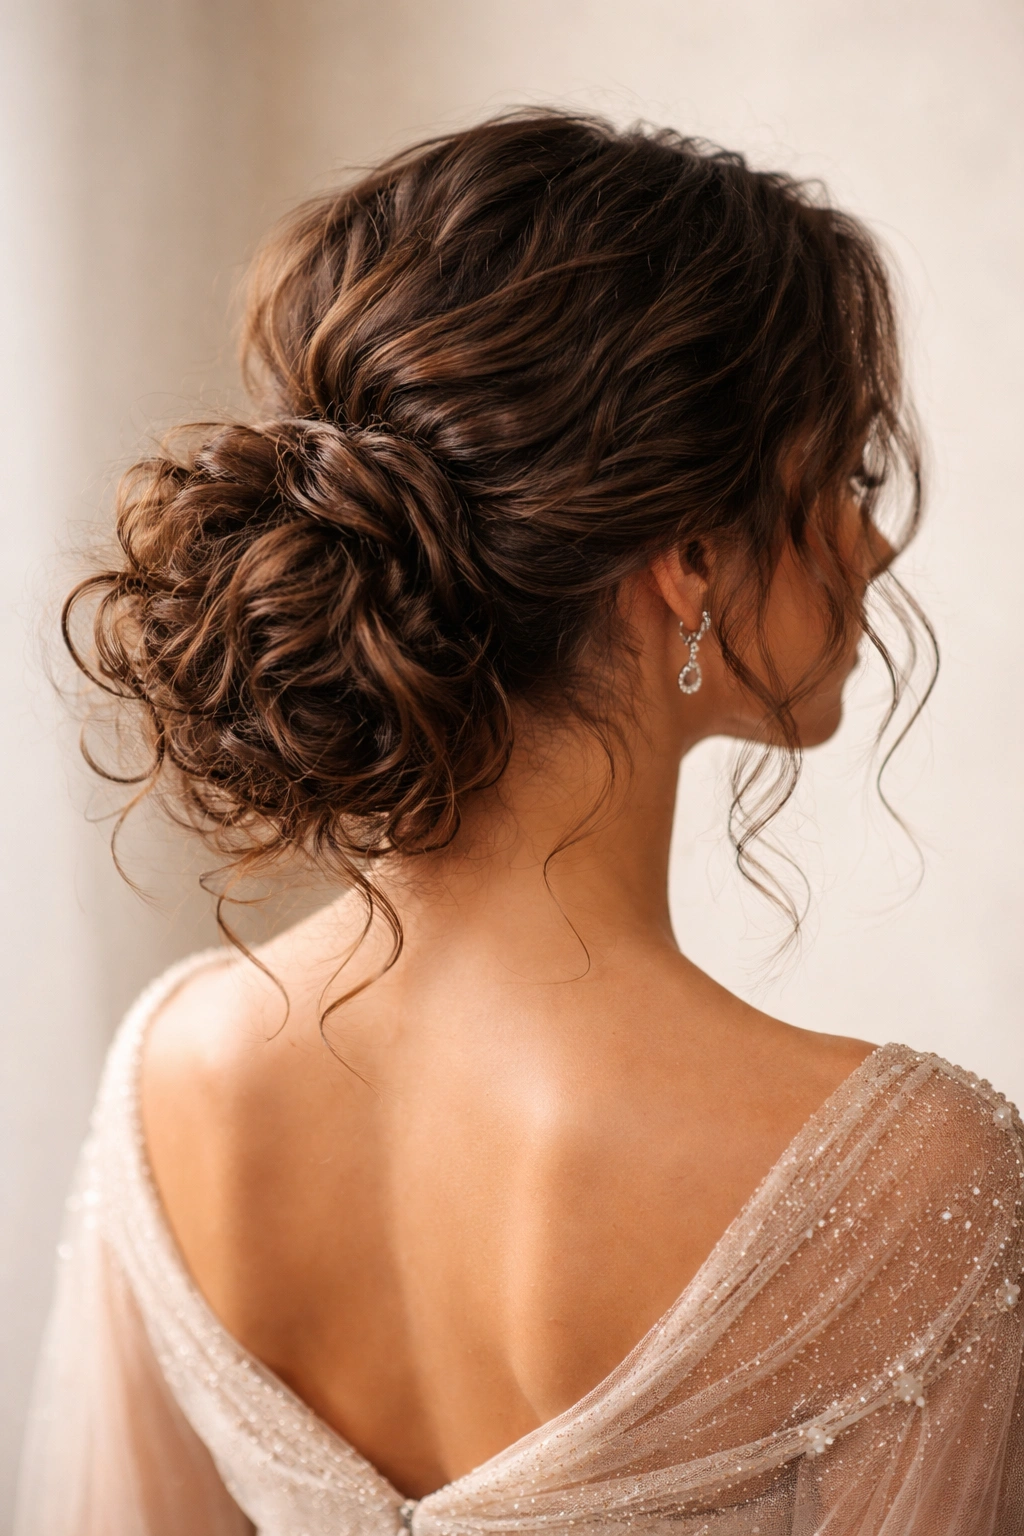
This is technically a bun, but it deserves its place here because it feels and functions like a sophisticated ponytail—it’s curly, it’s dimensional, and it has all the polish you need for prom without feeling stiff or overly formal. Think of it as a loose, airy bun that celebrates texture rather than containment.
Building the Bun Structure
Gather curls into a low ponytail at the nape of your neck, but don’t tighten the elastic. Instead, loop your curls loosely and pin them so they create a relaxed, undone shape. The goal is a bun that looks like it might fall apart at any second but won’t because everything’s carefully pinned beneath the curls. Leave several inches of the ponytail’s length unincorporated—wrap this around the bun’s base for extra dimension.
Making It Look Intentionally Textured
- Gently pull and tease small curls out from the bun structure to add visual interest
- Don’t worry about perfection—slightly messy, textured buns are far more sophisticated than tight ones
- Use bobby pins in your hair color so they’re invisible
- Finish with a flexible hold spray that won’t make curls feel crunchy
The Prom Advantage
This style keeps hair completely off your face and neck, which is perfect for a fancy dress with an open back or delicate shoulders. It reads as polished and intentional while still looking like you—not like you showed up in a style that doesn’t match your personality.
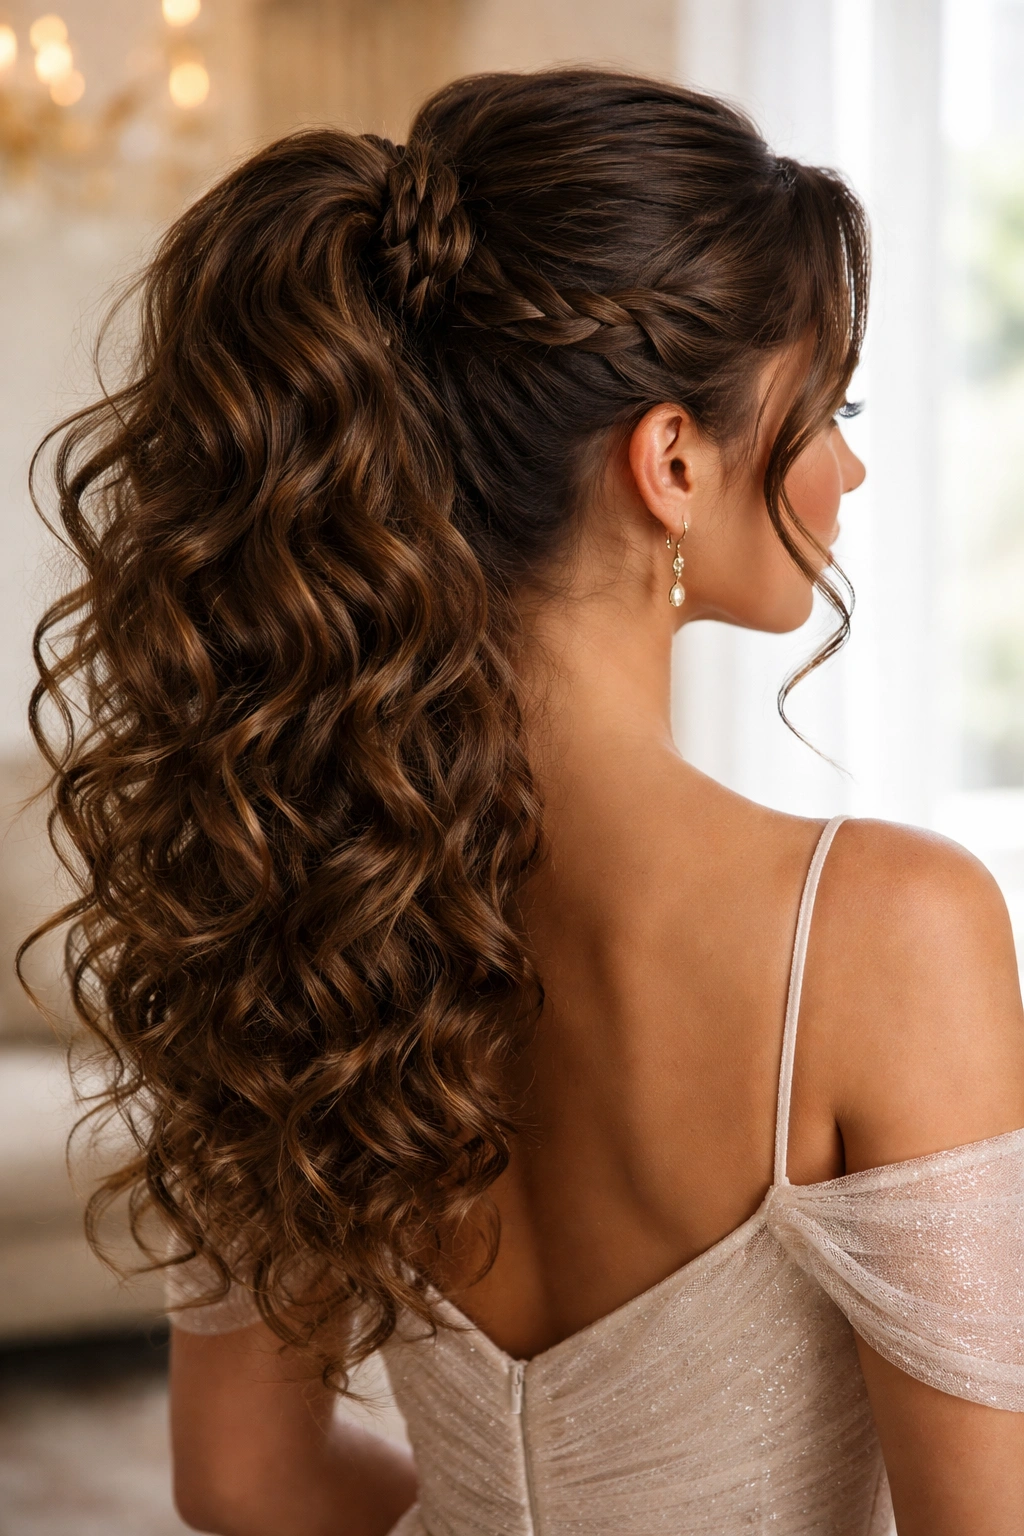
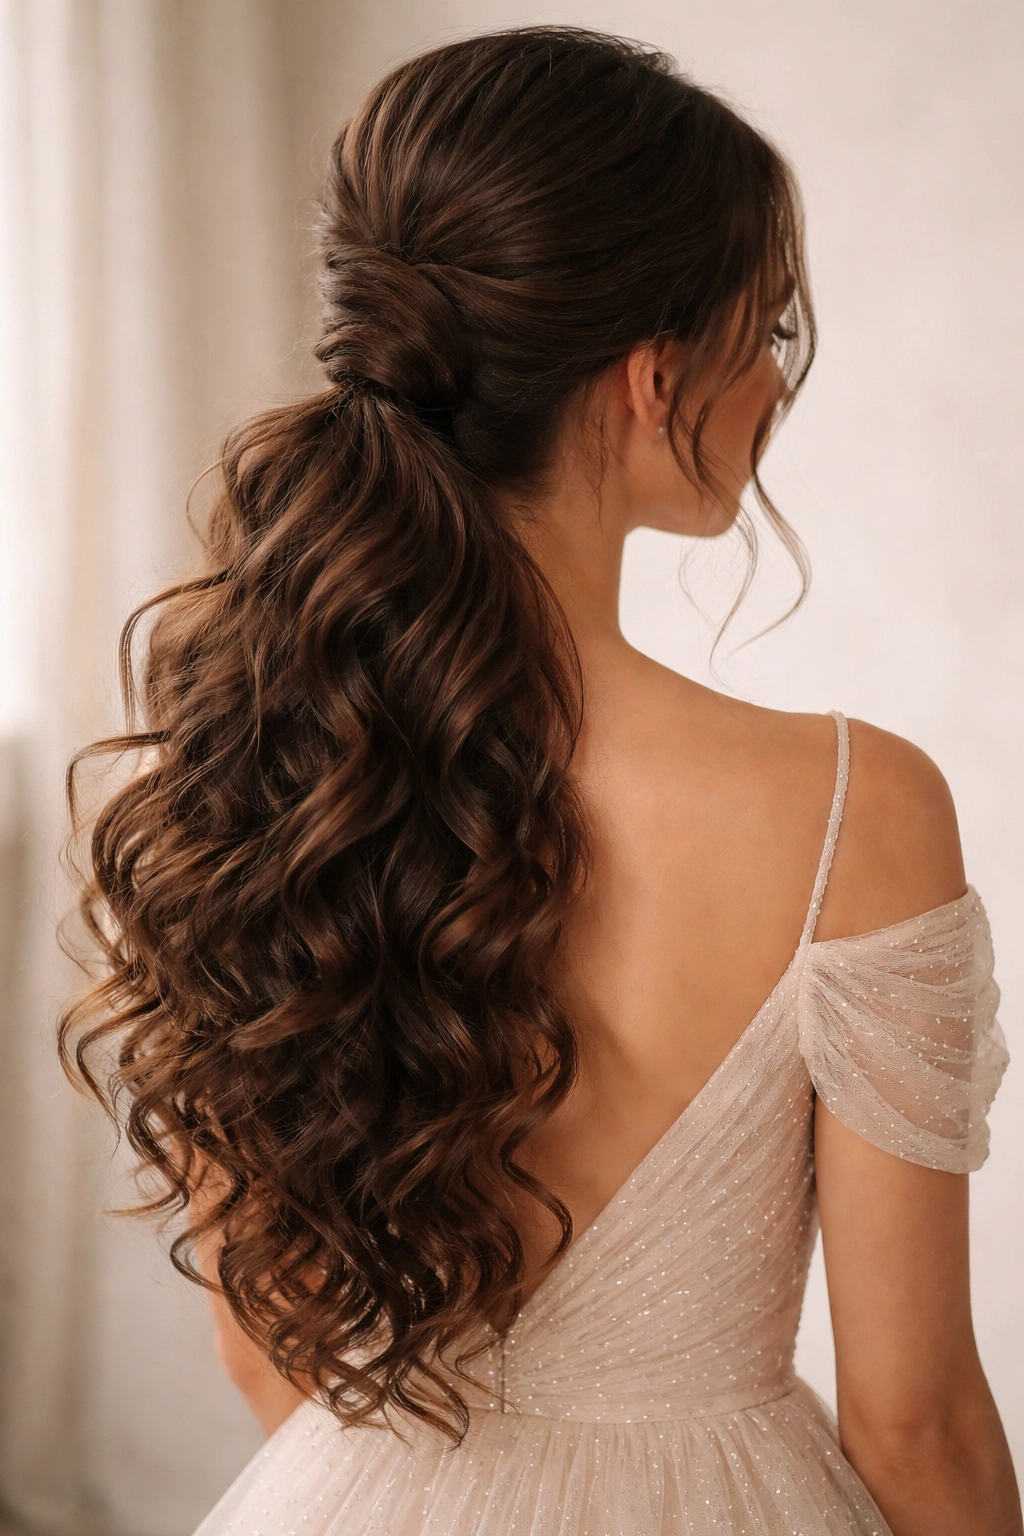
4. The Half-Up Curly Moment
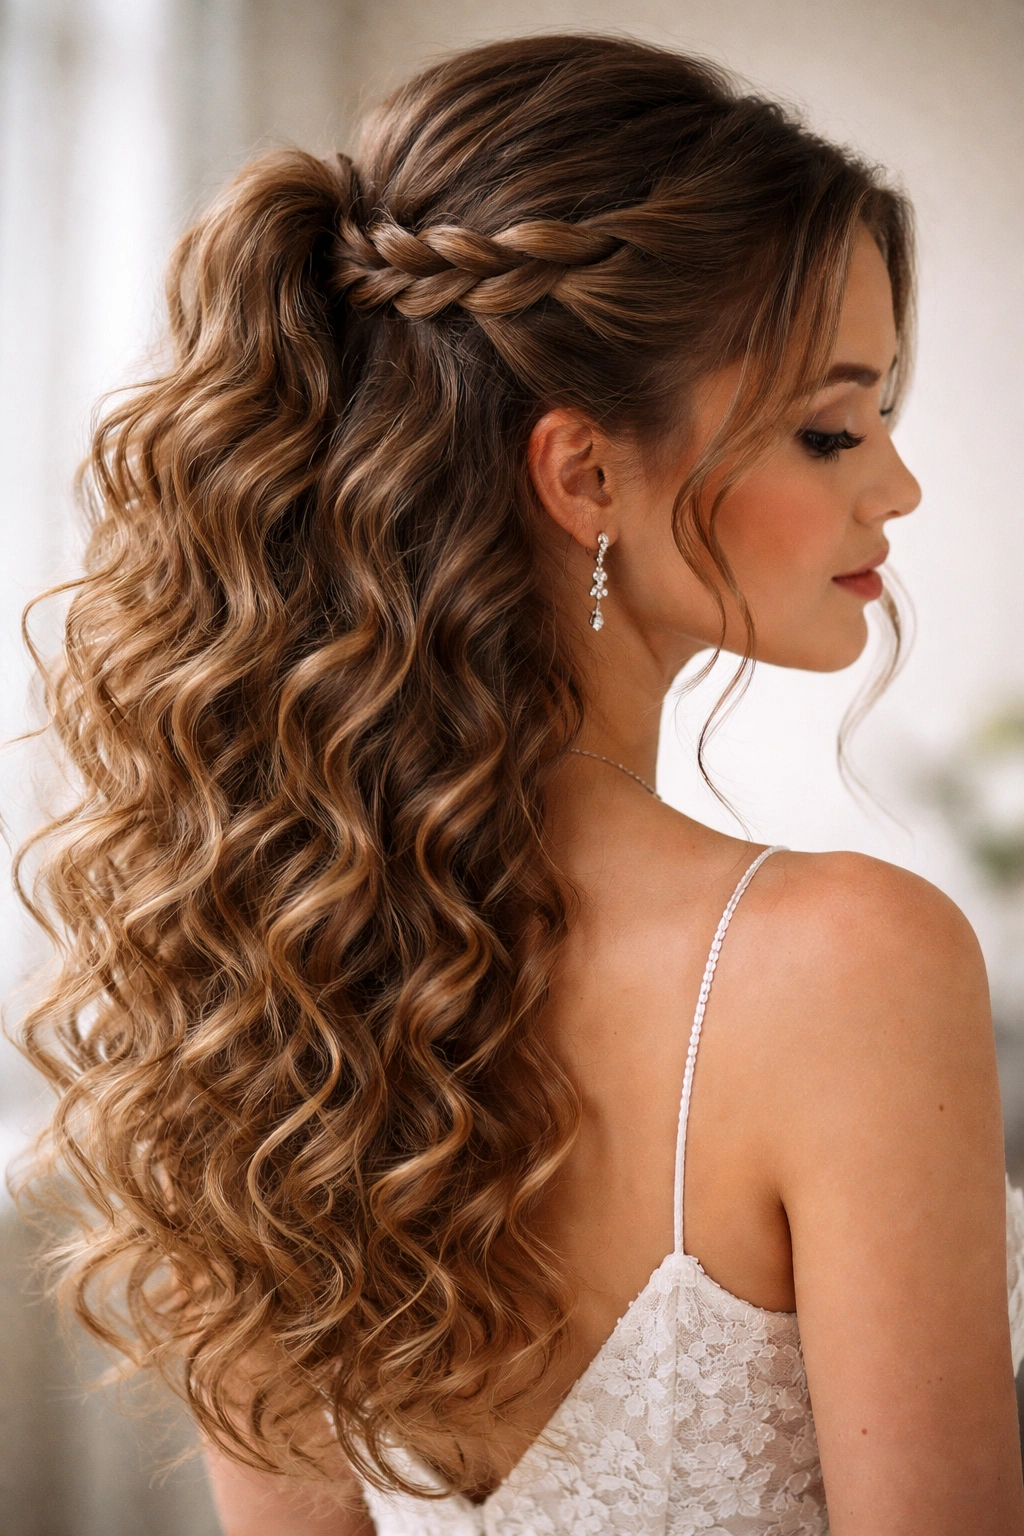
For those who can’t choose between wearing curls down or up, the half-up half-down ponytail splits the difference beautifully. About half your curls are gathered back, while the rest cascade down your back and shoulders, creating volume and movement that’s impossible to achieve in a full ponytail.
Sectioning and Gathering Technique
Take a horizontal section across the crown from ear to ear—this is your upper half. Divide this into three subsections (left, center, right) and twist each one gently, bringing them together at the back of your head roughly at your crown. Twist the three sections together as you bring them to the gathering point, creating a three-strand twisted effect. Secure with a clear elastic or a decorative hair tie. The curls below remain completely loose and flowing.
Styling for Maximum Dimension
- Tease gently at the crown before gathering to add height without weight
- Leave a few soft curls out around your face even in the gathered section
- Use a lighter-hold product on the gathered section and a more structuring product on loose curls to maintain separation
- Consider curling just the bottom sections with a barrel iron to enhance bounce and dimension
Why This Works
The half-up style feels modern and youthful while still having plenty of sophistication for prom. It showcases the length of your curls while keeping hair partially back. It’s also more comfortable than a full updo if you’re planning to dance all night—you get the practical benefits of some hair being secured without the weight of a complete updos.
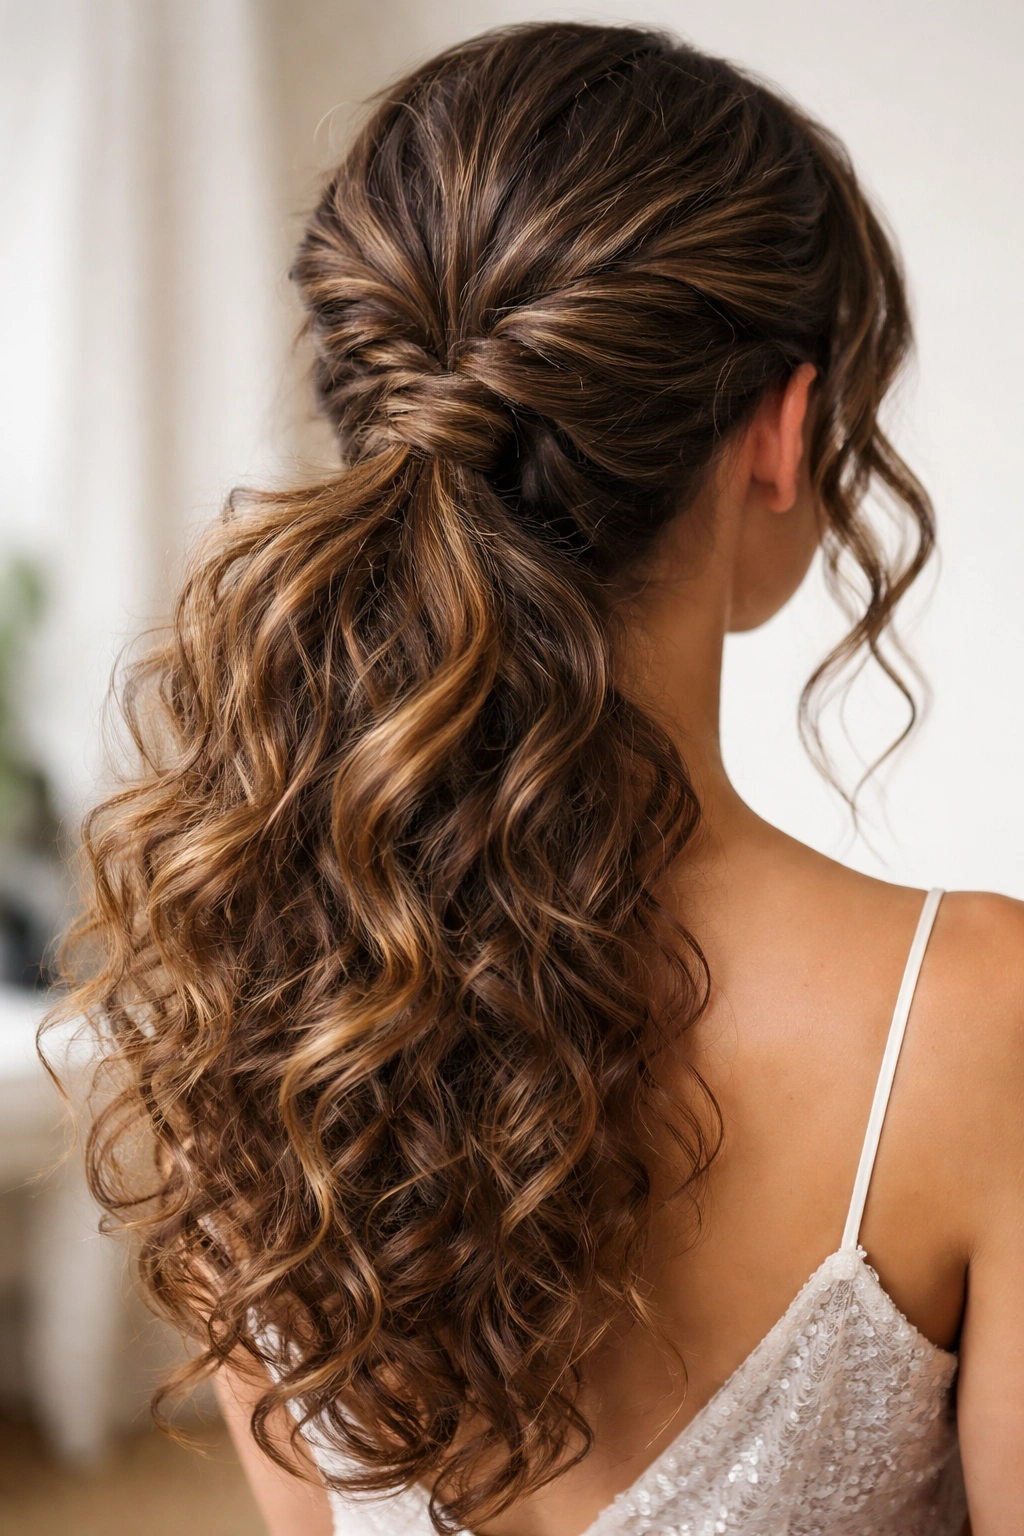
5. The Braided Wrap Ponytail
This style takes a regular ponytail and elevates it by wrapping a braid around the base, creating a crown-like effect that feels both delicate and intricate. It’s the kind of style that makes people ask, “How did you do that?” but it’s surprisingly straightforward to execute.
Creating the Wrap
First, gather your curls into a mid-height or high ponytail—looser than you’d normally wear it. Take a small section from one side of the ponytail and create a three-strand braid, but make it loosely and let curls feed into the braid naturally rather than trying to create a tight, controlled structure. Wrap this braid around the base of the ponytail and secure the end with a bobby pin. The braid doesn’t need to be perfectly even—in fact, loose, textured braids look far more interesting with curly hair.
Variations on the Wrap
- Double wrap: Create two thin braids and wrap them both around the base
- Accent braid: Use just one thin braid for subtle elegance
- Decorative contrast: If you have any lighter pieces or highlights, incorporate those into the braid for visual interest
Styling Details That Elevate It
Leave a few curls entirely out of the gather—these should frame your face and create softness. Tuck small bobby pins with tiny pearls or rhinestones into the wrap for a hint of sparkle. Smooth the wrap lightly with a tiny amount of anti-frizz serum to keep it looking polished without feeling stiff.
6. The Voluminous Bubble Ponytail
If you want height, dimension, and a style that’s distinctly modern, the bubble ponytail delivers. This style uses multiple elastics spaced down the length of the ponytail to create individual “bubbles” of curls, each puffed out for maximum volume and texture.
The Bubble Technique
Create a high ponytail and secure it with a clear elastic. About an inch or two down from the first elastic, add a second elastic, but before you tighten it, gently puff out the curls between the two elastics to create a bubble shape. Continue adding elastics and creating bubbles all the way down the ponytail. Each bubble should be full and rounded, created by teasing and gently pulling curls outward.
Customizing Bubble Size and Spacing
- For a romantic look: Use larger bubbles spaced further apart
- For bold impact: Use smaller, tighter bubbles spaced closely together
- For a blended effect: Vary bubble sizes throughout the length
- Work with your curl length: Shorter curls create naturally smaller bubbles, longer curls can handle bigger ones
Making Bubbles Last All Night
This style holds better than you’d expect, especially if your curls have natural texture. Use a flexible-hold spray between elastics to keep curls positioned outward. Don’t pull elastics too tight—the tension should come from the curls themselves being puffed out, not from elastic pressure.
7. The Sleek Curly Top Knot
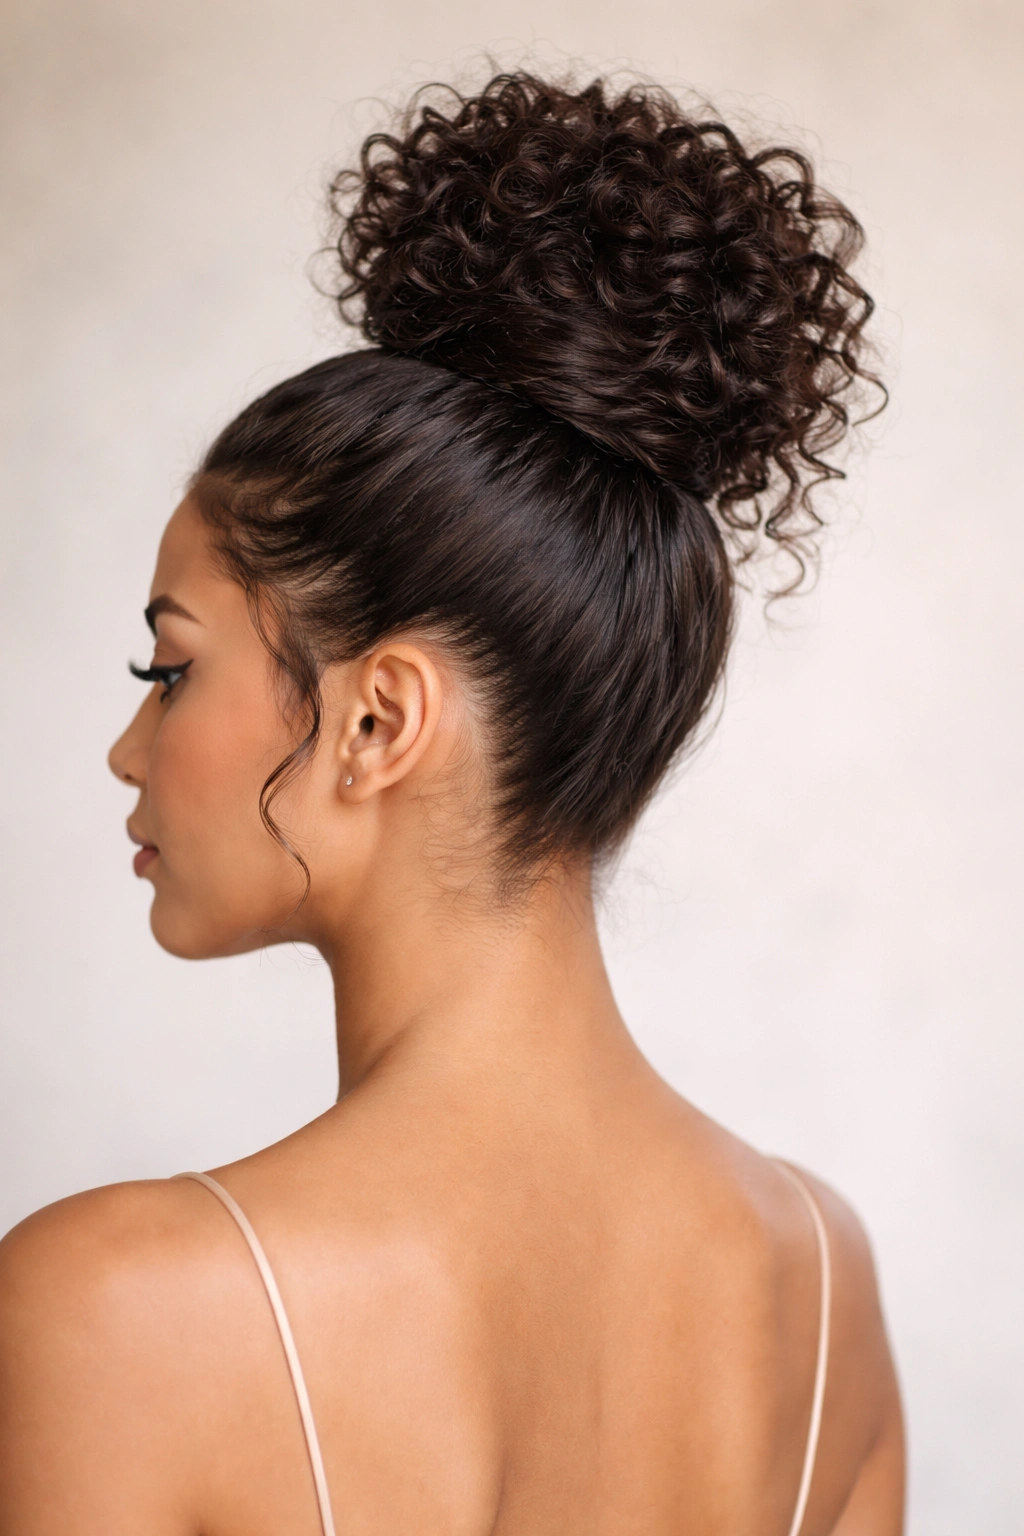
Don’t let the word “sleek” fool you—this is not a smooth, pulled-tight bun. Instead, it’s a soft, curly top knot that sits high on the crown with textured curls creating fullness while the overall silhouette remains relatively contained. It’s the style for anyone who wants sophistication with a modern edge.
Building Curly Fullness at the Crown
Gather curls high on the crown—higher than a typical ponytail base. Use a texturizing spray if your curls are naturally fine. Create a loose loop with your ponytail, but don’t pull it through completely. Instead, leave the end of the ponytail out, and wrap it around the loop multiple times, pinning as you go. This creates a knot that has the fullness of curls but appears sleek and intentional from a distance.
The Sleek Element
The “sleek” part comes from not having loose, face-framing pieces or flyaway curls around the style. Smooth your hairline and the sides with a light gel or edge control, but avoid anything so heavy it crushes your curls. The contrast between the smooth, controlled sides and the textured curly knot on top creates visual interest and sophistication.
Accessory Choices
A geometric hair cuff, a delicate comb, or even a small decorative chain draped around the knot can elevate this style. Keep accessories clean and minimal—the curls are the statement here.
8. The Curly Mohawk Ponytail
For the bold and confident, a curly mohawk ponytail creates an edgy, avant-garde look that’s undeniably striking. This style involves gathering curls into a high center section while keeping the sides slightly lower and fuller, creating the illusion of a mohawk shape within the ponytail structure.
Creating the Mohawk Effect
Divide your hair into three sections: a center strip from forehead to nape, and two side sections. Gather the center section high, right at the crown, and secure it. The two side sections also get gathered back, but at a lower height and with looser, fuller tension. The three sections create a cohesive ponytail, but the center appears taller and more prominent, mimicking a mohawk silhouette.
Textural Contrast for Impact
- Curl the center section more tightly if it’s naturally less textured
- Use slightly different products on the center versus side sections to create visible contrast
- Leave more flyaways and loose curls in the side sections
- Add subtle color contrast if you have any highlights
Who Should Wear It
This works best for those with naturally textured, voluminous hair, or for anyone brave enough to add volume with product and technique. It’s a statement style that says you’re confident in your individuality—perfect for prom if your personality matches the boldness.
9. The Wrapped Bun with Cascading Curls
This style creates a bun that’s not at all contained, but rather a gathering point from which curls flow and cascade. It combines the sophistication of a bun with the beauty and movement of cascading curls, giving you the best of both worlds.
The Gathering and Flow Technique
Create a low ponytail at the nape of your neck, but keep it very loose—almost more of a guide than an actual ponytail. Twist this section gently and wrap it around itself to form a soft bun shape, but don’t secure it tightly. Leave at least 50% of your ponytail length unincorporated into the bun. These longer curls should cascade from the bun down your back and over your shoulders, creating a waterfall effect.
Enhancing the Cascade
The cascading curls should look intentional, not like the bun is falling apart. Curl the cascading sections if needed to create bounce and dimension. Use a medium-hold product that keeps curls defined but doesn’t make them feel stiff or unnatural.
Pinning Strategy
Use bobby pins in your hair color, tucking them into the bun structure invisibly. The bun itself shouldn’t feel tight or controlled—it should feel like a soft anchor point for curls that want to move and flow.
10. The Multi-Textured Crown Ponytail
For maximum visual interest, a multi-textured crown ponytail uses different textures and curl patterns to create complexity and depth. This style works especially well if you have naturally varied curl patterns or if you’re willing to use tools to create intentional texture variations.
Building Texture Variation
If your curls are all one pattern, add variation using a curling iron or wand. Create some tighter spirals, some looser waves, and some medium curls throughout your hair. Gather all of these varied textures together in a high ponytail. The different curl sizes and patterns create a rich, multidimensional effect that’s far more interesting than uniform curls would be.
Sectioning for Intentional Variation
Consider curling your front sections more tightly, mid-sections with medium curls, and back sections with looser waves. Gather everything together so the different textures intermix, creating visual depth. This technique makes even moderately textured hair look incredibly voluminous and sophisticated.
Color Play Within Texture
If you have highlights, dimensional color, or even temporary color pieces, the varied texture actually showcases these better. The light hits different curl sizes differently, making color depth far more visible than it would be in uniform curls.
11. The Twisted Double Ponytail
For a style that feels intricate but is actually straightforward to create, the twisted double ponytail divides curls into two sections that are twisted separately, then twisted together for a cohesive final look. It creates height, dimension, and a silhouette that’s distinctly modern.
The Two-Section Technique
Divide your curls into left and right sections with a center part from forehead to nape. Twist the left section loosely, then twist the right section. Bring both twisted sections together at the back, twist them together, and secure with an elastic at your preferred height. The combination of three separate twists (left, right, and the final central twist) creates texture and dimension that a single ponytail couldn’t achieve.
Varying the Tightness
Keep your twists intentionally loose so curls feed into them naturally rather than creating a tight rope effect. This loose approach lets your curl pattern shine through the twist rather than flattening it.
Softening the Lines
Pull a few curls out from the twisted structure to soften any harsh lines. Face-framing pieces should be intentional and soft, creating a romantic element within the modern structure of the style.
12. The Ringlet Cascade Ponytail

For the most romantic, princess-like option, the ringlet cascade ponytail uses curls that are spiraled and shaped to create the impression of cascading ringlets even though curls are partially gathered back. It’s the style for anyone who wants glamour and femininity in maximum doses.
Creating Defined Ringlets
Use a barrel curling iron or a curling wand to create individual ringlets throughout your hair. Rather than curling randomly, be intentional: curl all sections away from your face, and make ringlets roughly the same size throughout. Once cooled, gently separate each ringlet with your fingers to enhance definition.
The Gathering That Feels Like It’s Not
Create a mid-height or high ponytail with these ringlets, but gather loosely so curls maintain their individual shape rather than merging into a mass. Use an elastic that’s decorative rather than purely functional—the elastic becomes a design element rather than something to hide.
The Cascade Illusion
The key to making this feel like a cascade rather than a traditional ponytail is leaving lots of length in the gathered section and ensuring individual ringlets remain separated and visible. Some curls should fall loosely in front of your shoulders; others should cascade straight down your back. The effect should feel effortless and romantic, not controlled or architectural.
Final Touches for Red-Carpet Ready
Set everything with a light hairspray that holds without crunching. Add a delicate hair accessory like a pearl comb or a rhinestone clip. Consider a soft sparkle or shimmer spray on the ringlets if your dress is glamorous—the light will catch and create magical shimmer as you move.
Final Thoughts
The beautiful truth about styling curly hair for prom is that your curls are already doing half the work. You’re not fighting against texture or trying to create volume that doesn’t exist naturally. Instead, you’re choosing a structure and a gathering point that lets your curls be themselves while looking intentional and polished. Each style here works with curly hair’s strengths—dimension, texture, natural body, and movement—rather than against them.
The best curly hair ponytail for your prom is ultimately the one that feels like you. If you love romantic and soft, the ringlet cascade or the romantic side sweep will make you feel confident. If you’re bold and modern, the curly mohawk or the textured bubble ponytail might be your call. If you’re somewhere in the middle, the braided wrap or the half-up option gives you that balanced sophistication.
Start with your curls in the best possible condition: properly moisturized, well-defined, and ideally a day or two old so they hold shape better. Use products that enhance rather than flatten your natural texture. Practice whichever style you choose at least once before prom night—not because these are difficult, but because knowing exactly how your hair behaves and how long the style actually takes will make you feel genuinely prepared and confident. When you feel good about your hair, it shows in every photo and every moment on the dance floor.