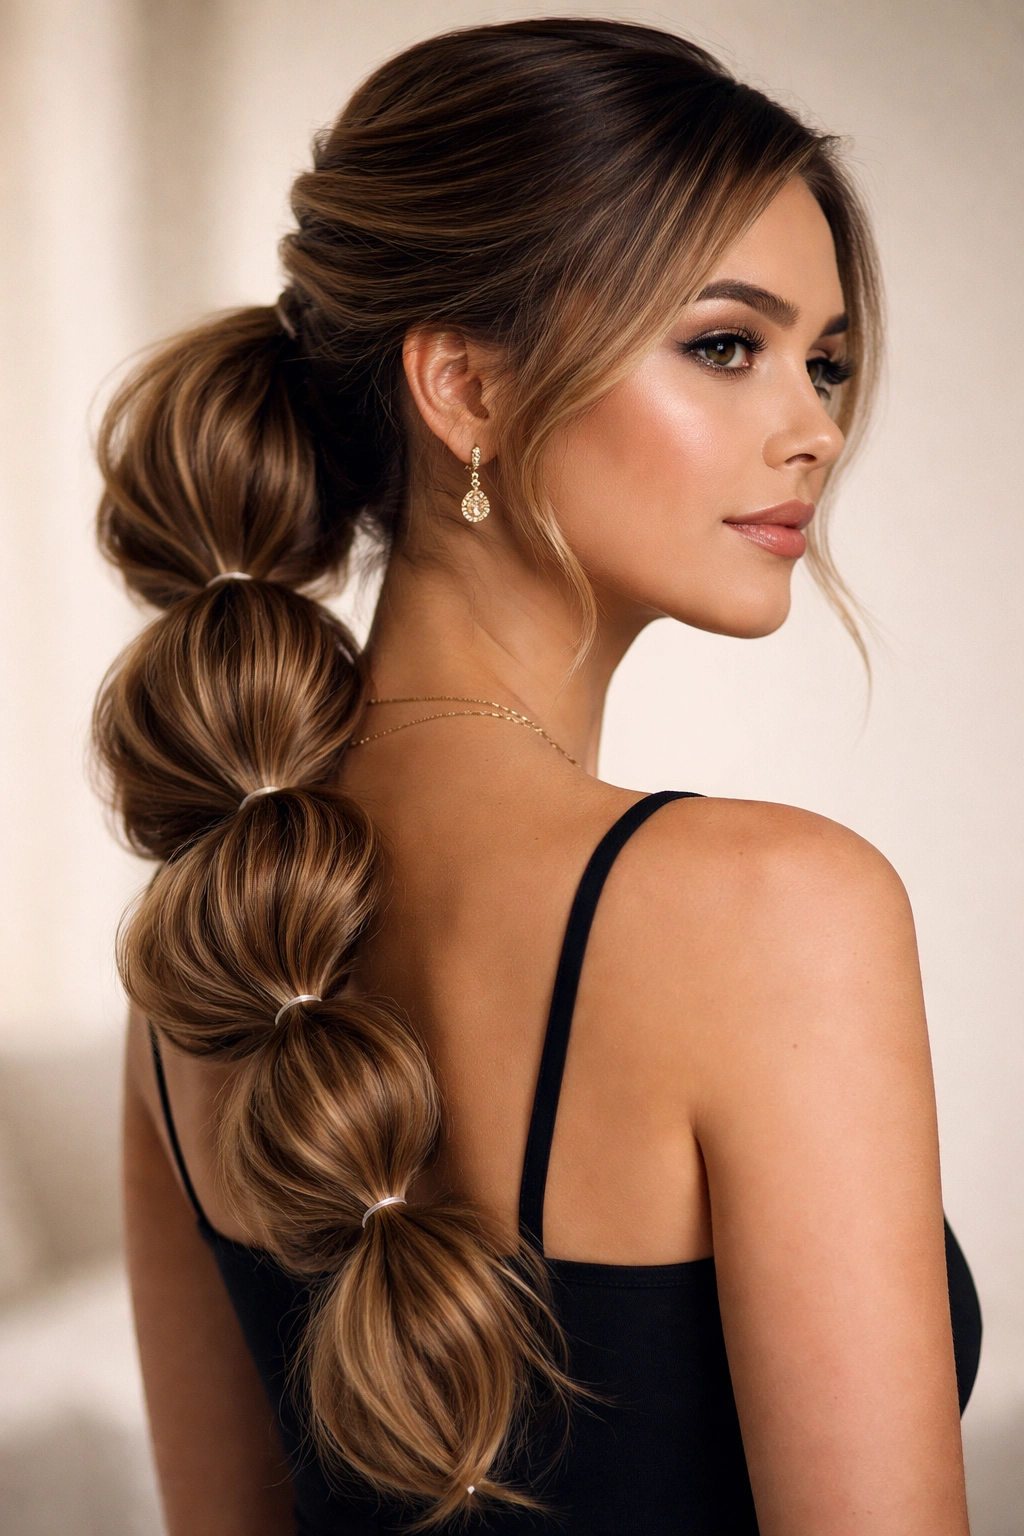
Bubble weave ponytails have become a go-to hairstyle for anyone looking to add dimension, movement, and visual interest to their everyday look. The beauty of this technique lies in how it transforms a simple ponytail into something that looks intricate and intentional without requiring hours at the salon. Each section is gathered, fluffed, and secured with a thin elastic, creating those signature bubble pockets that run the length of your hair—and the possibilities for customization are genuinely endless.
What makes bubble weave ponytails so appealing is their versatility. Whether you prefer a sleek, structured vibe or something more relaxed and tousled, this style adapts to your preference and hair type. The bubbles add volume where you want it, frame your face beautifully, and give even thin or fine hair the appearance of thickness and texture. Plus, the technique itself is forgiving—small imperfections actually enhance the lived-in, effortlessly polished aesthetic.
The best part? You don’t need any special skills or professional-grade tools to pull off a stunning bubble weave ponytail at home. A handful of clear elastics, a brush, and maybe a texturizing spray are all you truly need to create salon-quality results. From there, it’s about understanding the different styling directions you can take and choosing the version that matches your mood, outfit, and hair goals for the day.
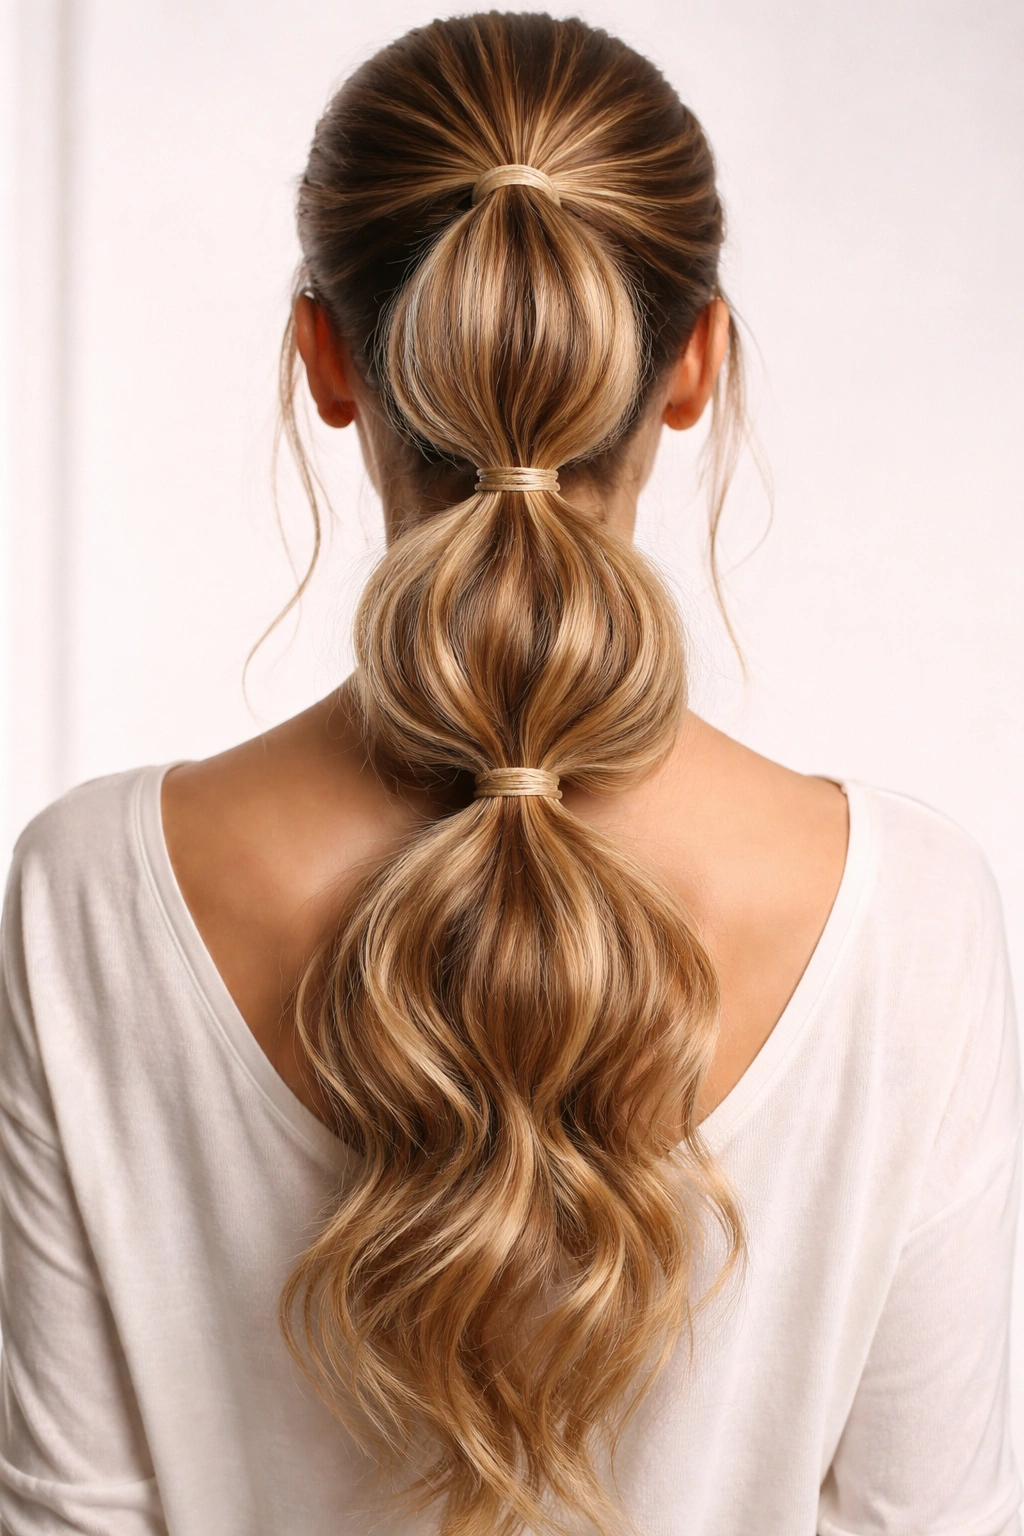
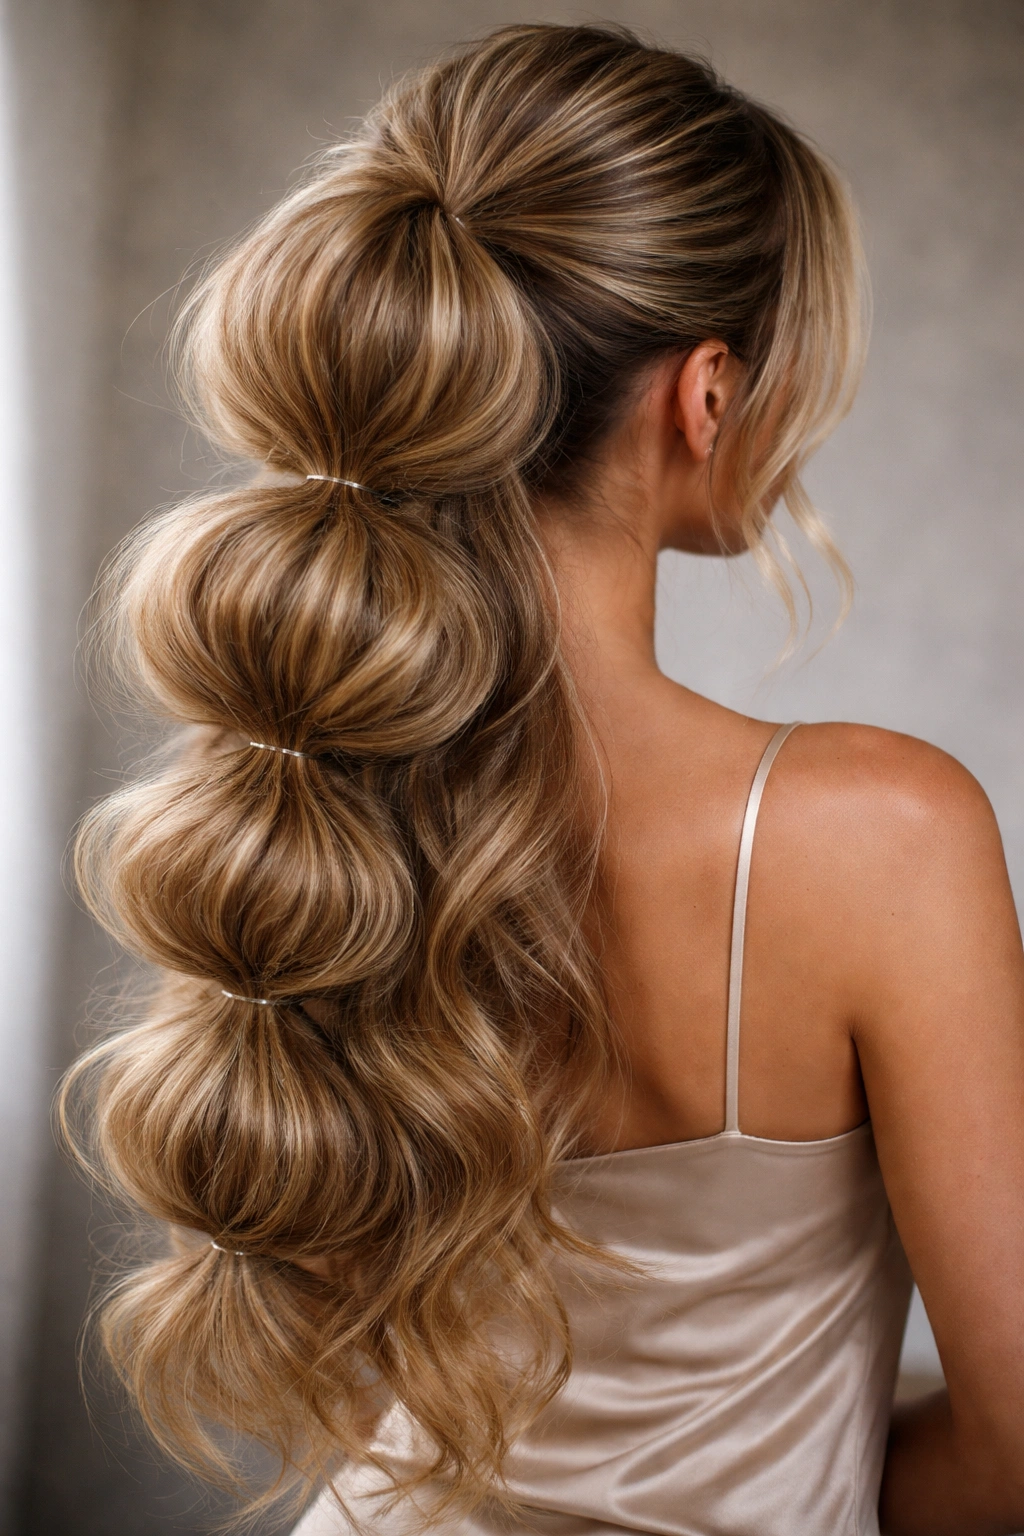
1. Classic High Bubble Weave Ponytail
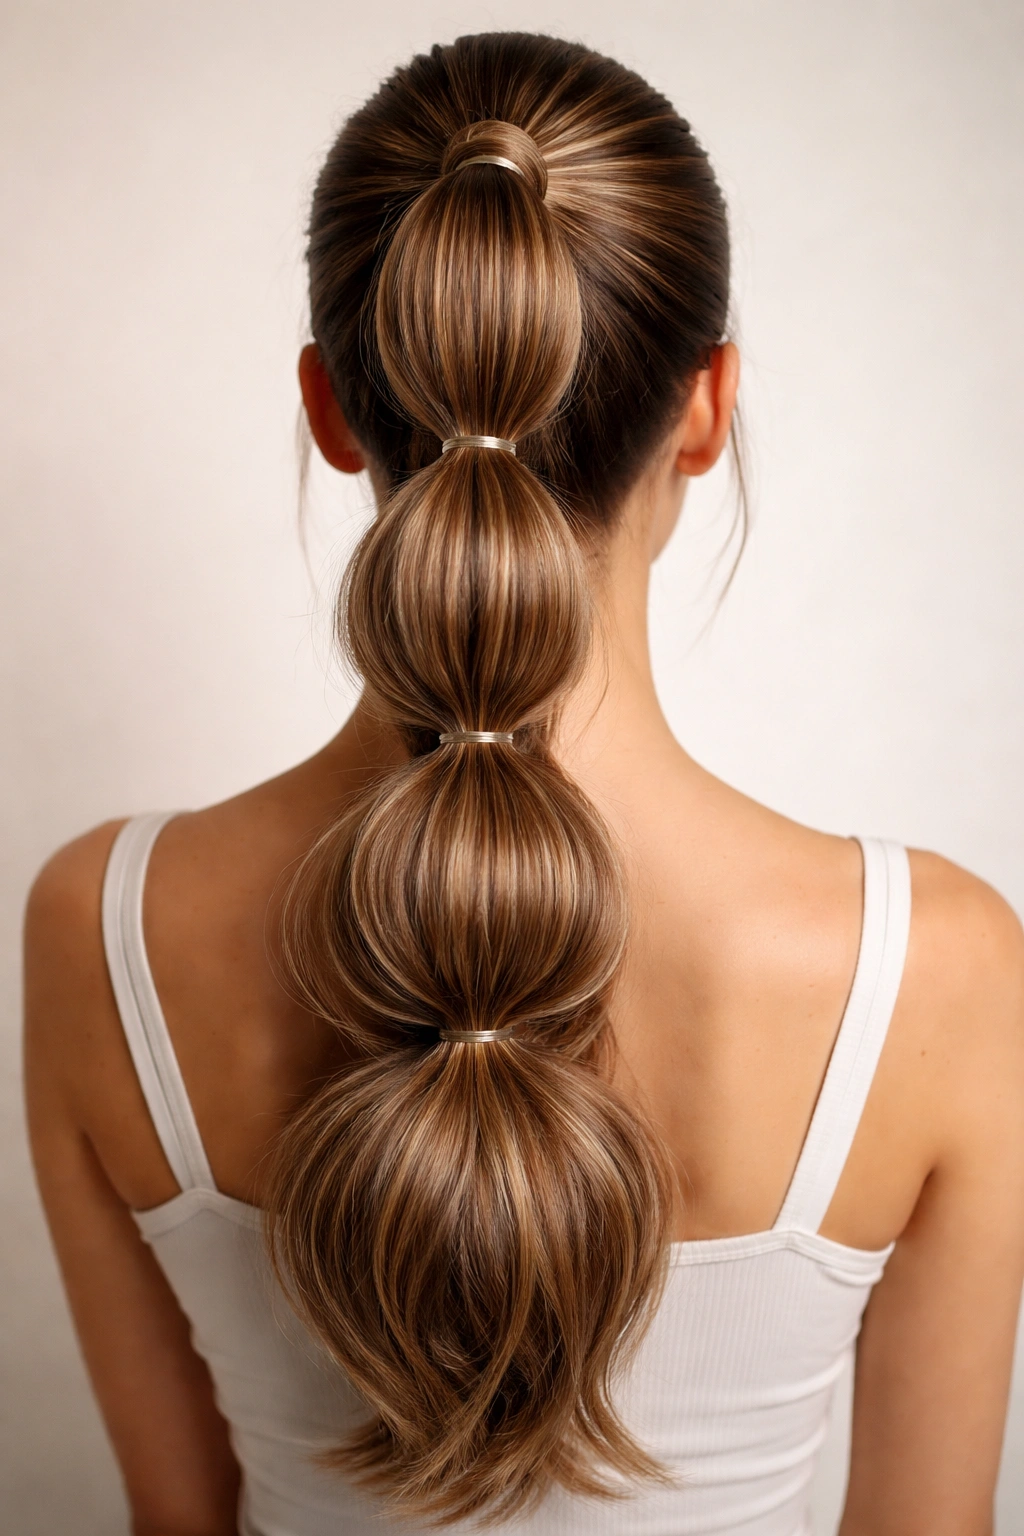
The classic high bubble weave is the foundation style that started the whole trend, and it remains the most universally flattering option. This version sits at the crown of your head, creating an instant lift that opens up your face and elongates your neck. The bubbles run down in a clean, uniform pattern that catches light beautifully, giving you that dimensional, styled-by-a-pro appearance.
To create this look, start by pulling your hair into a high ponytail at the crown and secure it with an elastic. Divide the ponytail into 4-6 equal sections, depending on how many bubble pockets you want. Take the first section closest to your scalp and gently flip it up away from the base of the ponytail, then secure it with a small clear elastic just below the first elastic. Repeat this process down the length of your hair, ensuring each bubble is roughly the same width and fluff.
The Pro Technique for Perfect Bubbles
The key to pillowy, Instagram-worthy bubbles is the fluff factor. After securing each section with an elastic, gently tease the hair within that bubble and then smooth it out slightly—this creates dimension without looking frizzy or undone. Don’t pull too tightly; the bubbles should have some give and movement. Loose, relaxed bubbles read as intentional and chic, while overly tight ones can look juvenile or constrained.
Best For
- Oval and heart-shaped faces (the height complements these proportions beautifully)
- Everyday wear, casual outings, and even professional settings
- Straight to wavy hair types that hold elastics well
- Creating a polished look that’s still undeniably trendy
This style typically lasts 6-8 hours before needing touch-ups, and it works equally well with freshly washed hair or day-old texture.
2. Low and Loose Bubble Weave Ponytail
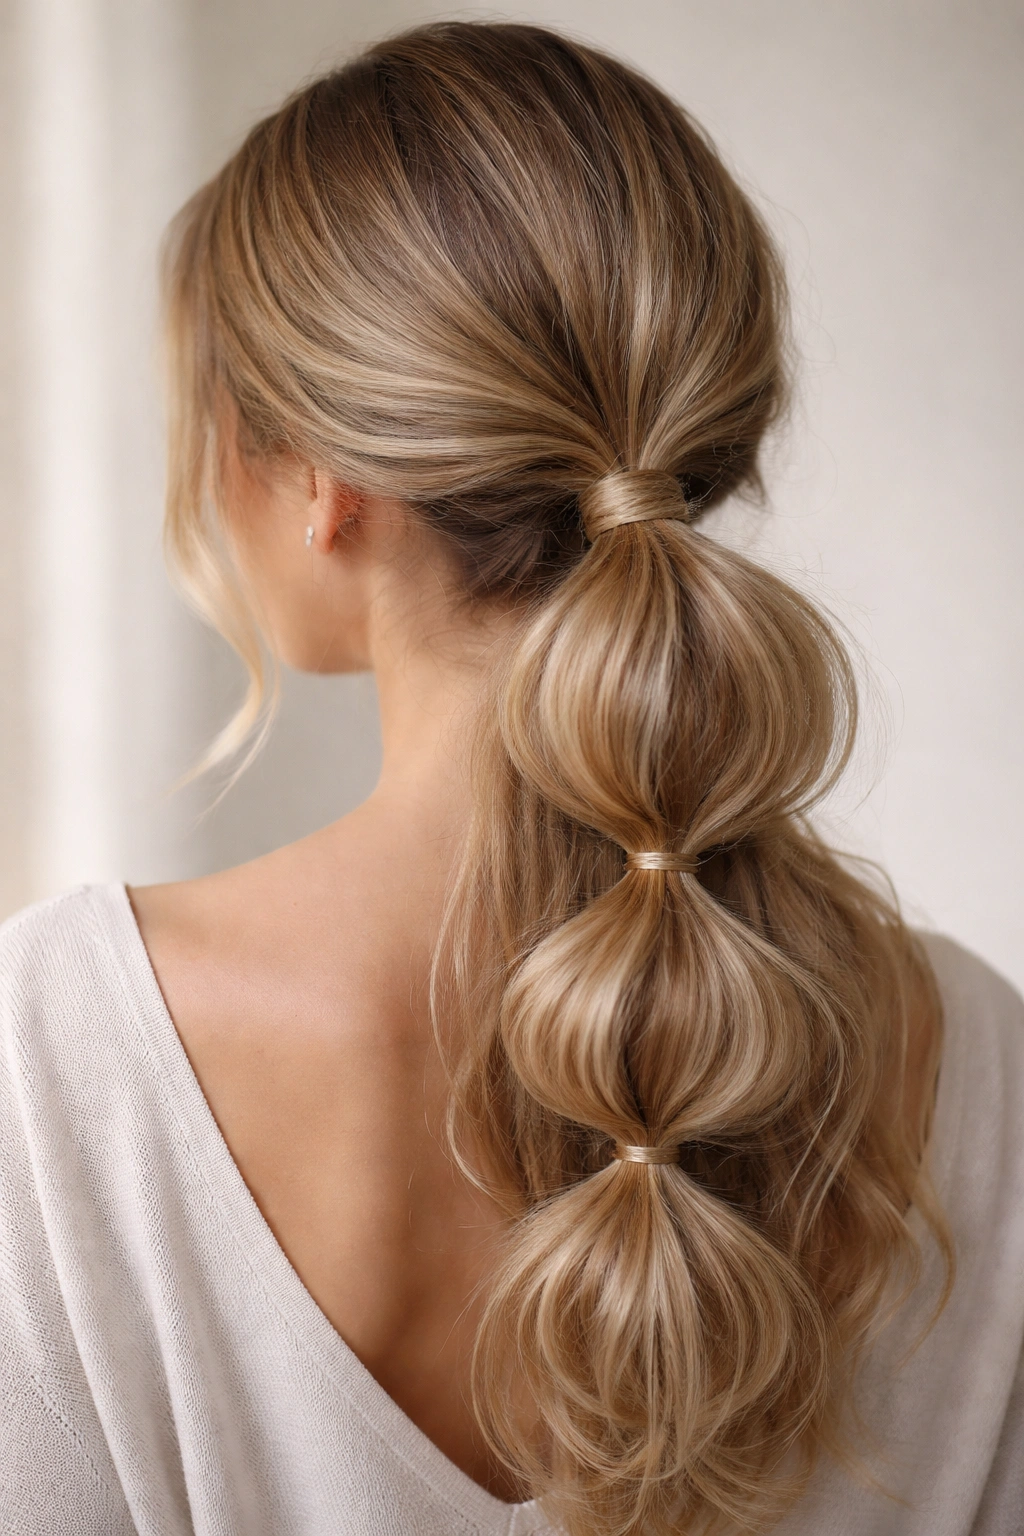
If the classic high version feels too formal or face-framing for your taste, the low and loose bubble weave brings all the visual interest down to the nape of your neck with a more relaxed, effortless energy. This version feels less structured and more romantic—perfect for days when you want to look put-together without announcing that you tried.
Position your ponytail lower, somewhere between the mid-back of your head and the nape of your neck. The lower placement naturally softens the overall look and creates a more grown-up aesthetic. Follow the same bubbling process, but this time embrace slightly larger, more generously proportioned bubbles. The bigger pockets of hair create a looser silhouette that photographs beautifully and feels comfortable for extended wear.
The Softness Factor
The magic of the low bubble weave is in how you handle the bubbles themselves. Rather than creating tight, defined pouches, gently pull and stretch each bubble outward and downward slightly, creating elongated pockets with soft edges. This technique, sometimes called “spiking” or “fluffing,” makes the style feel lived-in and intentional rather than pristine. A light mist of texture spray after you’ve fluffed the bubbles helps them maintain their shape throughout the day without looking stiff or overly done.
Best For
- Rectangular and long face shapes (the lower placement balances proportions nicely)
- Date nights, casual dinners, and social gatherings
- Fine or delicate hair (the relaxed bubbles don’t emphasize thinness the way tighter styles can)
- Creating a romantic, slightly undone aesthetic that still reads as intentional
This style is particularly good for second or third-day hair, where natural texture and slight greasiness actually work in your favor to help the bubbles hold their shape.
3. Side-Swept Bubble Weave Ponytail
The side-swept version shifts the entire silhouette to one side, creating an asymmetrical, fashion-forward look that draws the eye in an unexpected direction. Instead of gathering hair at the center crown or nape, you’re pulling the ponytail to the side—whether left or right—and creating bubbles along that shifted line.
Begin by brushing your hair to one side and gathering it into a ponytail positioned slightly off-center, roughly where your ear is. Secure it firmly, then follow your standard bubble-weaving technique down the length. Because of the side placement, the bubbles naturally fall along a diagonal line down your shoulder, creating movement and flow that flatters almost every face shape.
The Face-Framing Advantage
With a side-swept ponytail, you have freedom to leave some face-framing pieces down, which softens the overall effect. Pull a few inches of hair from the opposite side of the part and allow these strands to fall naturally against your cheek and neck. This creates dimension at the face and prevents the style from looking too severe or one-dimensional. The side-swept bubble weave works beautifully with textured, wavy hair because the movement of the hair complements the asymmetrical placement.
Best For
- Square and angular face shapes (the diagonal line softens strong features)
- Situations where you want to show off an undercut, shaved design, or clear skin on one side of your head
- Versatile styling—this look works for both casual and slightly dressier occasions
- Hair with natural texture or waves (the side placement emphasizes movement beautifully)
The side-swept version typically holds well for 7-9 hours, especially if you’ve used a light hairspray to lock the bubbles in place without making them feel crunchy.
4. Bubble Weave Ponytail with Color-Blocked Sections
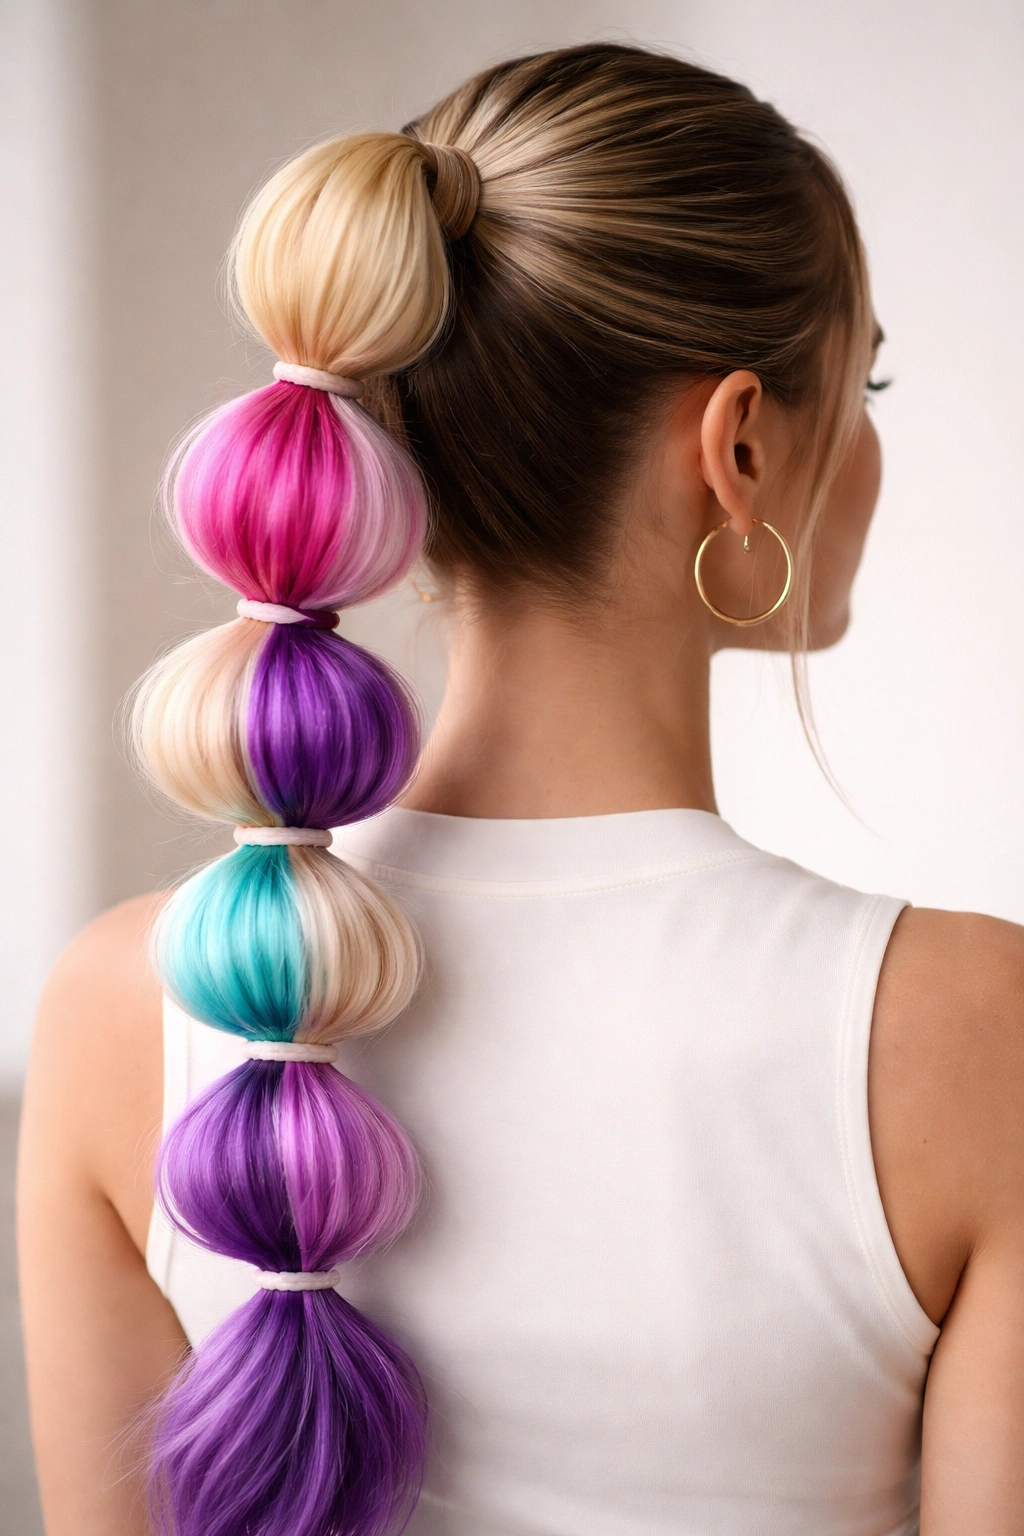
If you’re looking to take your bubble weave to the next level visually, color-blocking creates instant drama and interest. This approach uses color—whether through temporary chalk, clip-in extensions, or even ribbon threaded through the bubbles—to create distinct sections that emphasize the bubble structure and add playful contrast.
Start with your base bubble weave ponytail, whether high or low. Then, using temporary hair chalk, color a few alternate bubbles in a contrasting shade. You might color every other bubble, create a gradient effect where the color deepens as you move down the ponytail, or block out just the bottom three bubbles for a peek of color that reveals itself as you move. The beauty of temporary color is that it washes out with your next shampoo, so you can experiment without commitment.
DIY Coloring Techniques
If you’re using temporary hair chalk, spray your chalk with a little water first—it adheres better and creates more vibrant color. Work in sections and don’t overwork any one area, as too much manipulation can cause breakage. For a more permanent approach, thread thin ribbons or embroidery floss through alternating bubbles before securing them with elastics. This creates a striking visual effect and adds texture to the style without any damage to your hair.
Best For
- Expressive personalities and anyone looking to stand out
- Formal events, performances, fashion-forward occasions, or creative workplaces
- Darker hair (where temporary colors show up most dramatically)
- Anyone wanting to test-drive a color before committing to a permanent dye job
This variation adds maybe 5-10 extra minutes to your styling time, but the payoff in terms of visual impact is absolutely worth it.
5. Double Bubble Weave Ponytail
A double bubble weave takes the concept and doubles it—literally. Instead of one ponytail with bubbles running down its length, you create two separate bubble weave ponytails, typically positioned one above the other or side-by-side. This creates serious visual impact and works beautifully on medium to thick hair.
Divide your hair horizontally into two sections: an upper section at the crown and a lower section beneath it. Create a high bubble weave ponytail with the upper section, securing it at the crown. Then, using the lower section of hair, create a second bubble weave ponytail just below the first one. You can position the lower ponytail to start where the upper one ends, or you can overlap them slightly for maximum drama.
Styling the Double Version
The beauty of a double bubble weave is that you can adjust the size and proportion of each ponytail independently. Some people prefer the top ponytail to be fuller and the bottom more refined, while others create two identical-sized ponytails for symmetry. Experiment with how much hair you allocate to each section and adjust based on your hair thickness and the proportions you prefer.
Best For
- Thick, voluminous hair that can support two ponytails without looking thin
- Creating maximum visual interest and a truly statement-making hairstyle
- Younger clients or anyone with a fun, playful aesthetic
- Photoshoots, performances, or any situation where you want serious hair presence
This style requires more elastics and takes slightly longer to create, but the results are undeniably eye-catching.
6. Bubble Weave Ponytail with Braided Crown
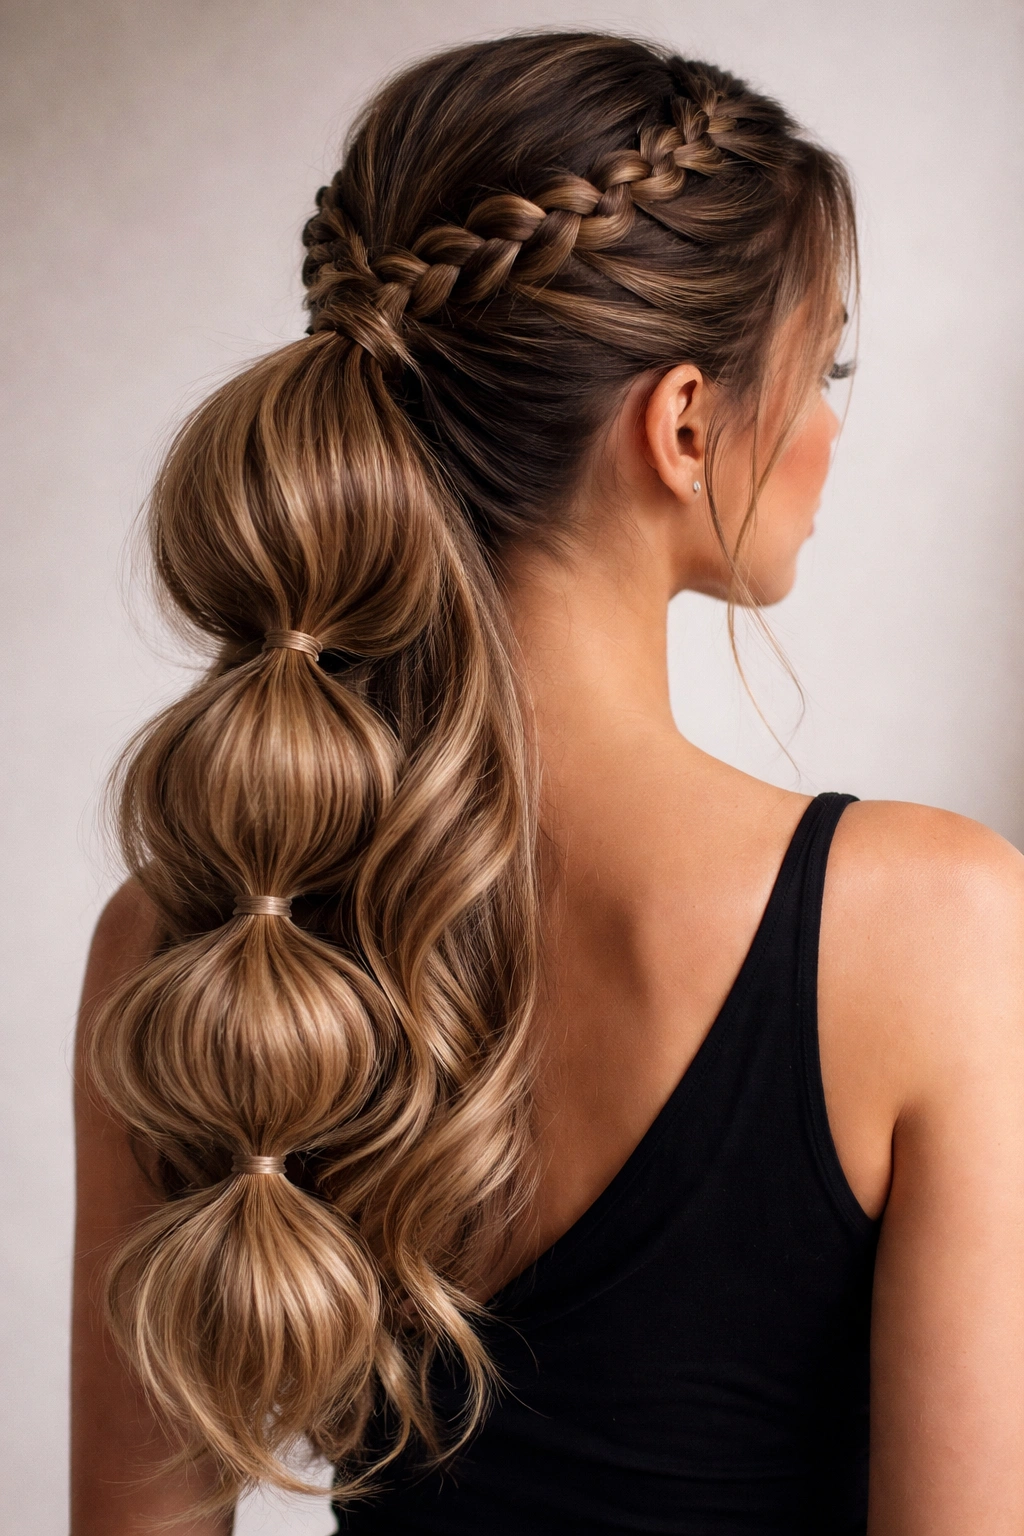
Combining a braided crown with a bubble weave ponytail creates a style that’s both intricate and romantic. This version starts with a Dutch or French braid that runs from one side of your head to the other (or simply across the back), and then transitions into a bubble weave ponytail at the base of the braid.
Create your braid first, whether it’s a simple three-strand braid or something more complex. Once you reach the nape of your neck, gather all your hair—including the tail end of the braid and your remaining loose hair—into a ponytail. From there, follow your standard bubble-weaving process. The braid serves as a decorative frame that adds sophistication and visual interest to the crown area, while the bubbles create movement and dimension below.
Braid and Bubble Coordination
The style of your braid sets the tone for the entire look. A loose, relaxed braid pairs beautifully with loose, generous bubbles, while a tight, intricate braid works well with more defined, structured bubbles. Play with these proportions to create balance. For extra impact, you can even add texture or waves to the loose crown area around the braid before gathering your ponytail, which creates a fuller, more romantic silhouette.
Best For
- Events with a bohemian, romantic, or vintage aesthetic
- Medium to long hair with enough length to accommodate both a braid and bubbles
- Anyone who loves braids but wants to try something beyond the typical braided ponytail
- Creating a hairstyle that’s intricate enough to feel special but not so complex that it takes forever
This variation feels more dressed-up than a simple bubble weave, making it ideal for weddings, formal dinners, or any occasion where you want to look thoughtfully styled.
7. Bubble Weave Ponytail with Ribbon Accents
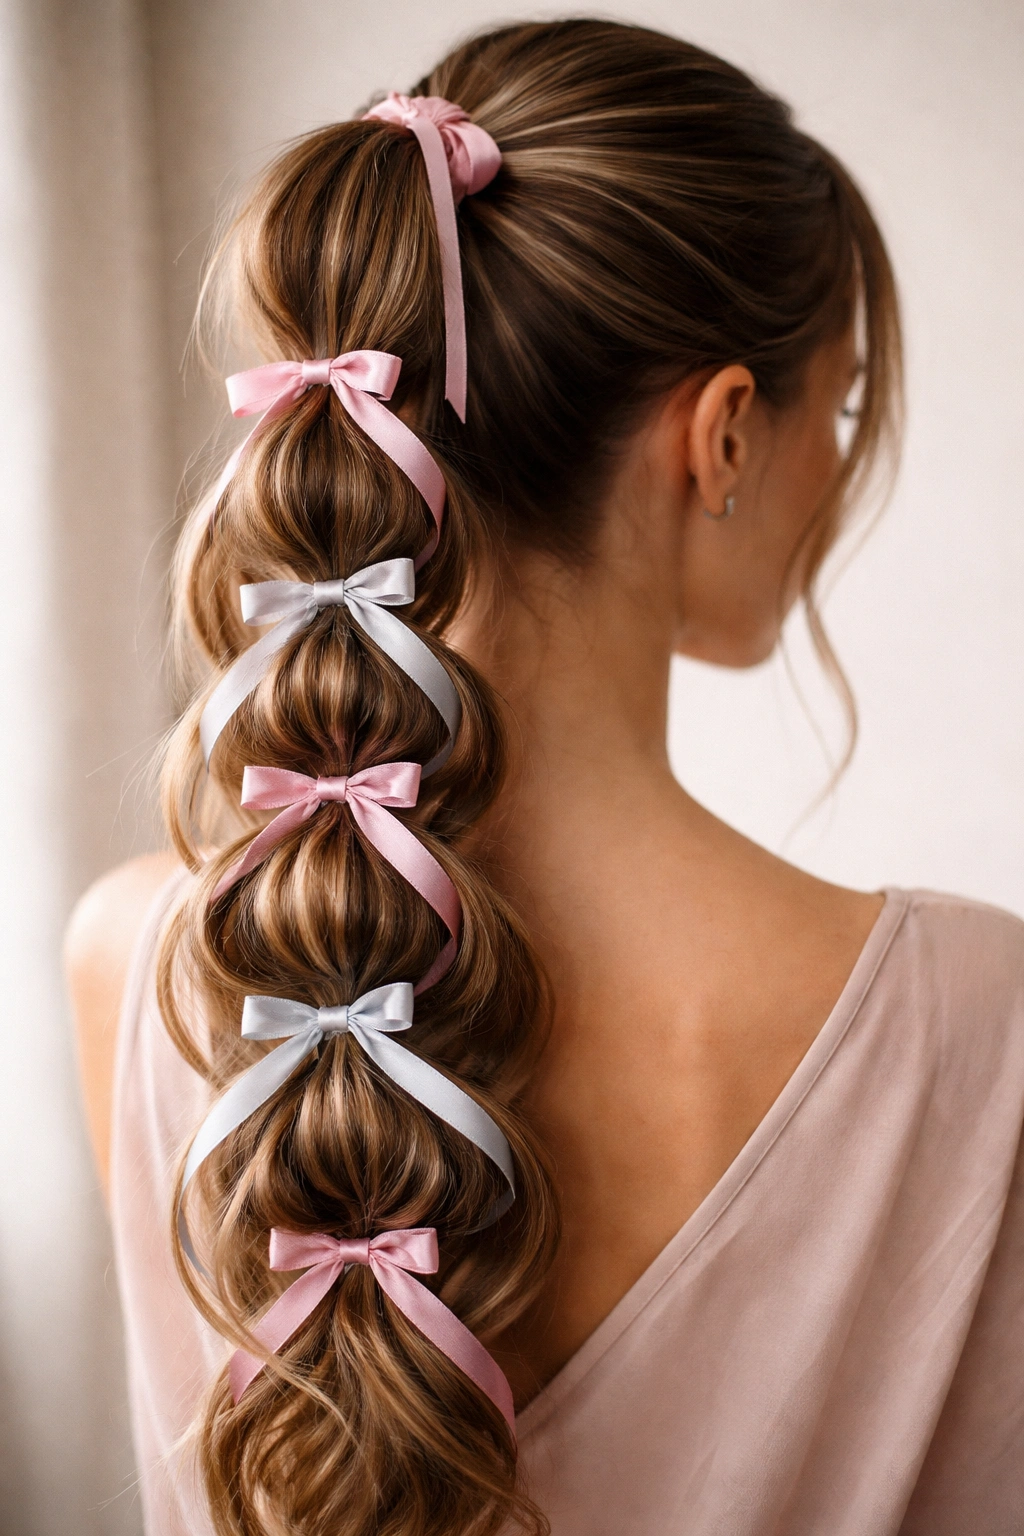
Threading ribbon through your bubble weave ponytail adds color, texture, and a polished finishing touch that elevates the entire style. The ribbon runs through or wraps around each bubble, creating visual interest and a coordinated, intentional look.
Gather your hair into your chosen ponytail placement and begin creating your bubbles. As you secure each bubble with an elastic, slip a length of ribbon under the elastic before pulling it tight, or wrap the ribbon around the elastic and tie a small bow. You can use one continuous ribbon that weaves throughout all the bubbles, or change ribbons every few bubbles for a multi-colored effect.
Ribbon Selection and Styling
The width and texture of your ribbon dramatically affect the overall aesthetic. Thin, delicate ribbons create a feminine, dainty look, while thicker velvet or silk ribbons feel more dramatic and statement-making. Satin ribbons slide easily through elastics, while grosgrain ribbons have more texture and grip. Match your ribbon color to your outfit, skin tone, or the occasion—metallic ribbons add glamour, while pastels feel soft and romantic.
Best For
- Formal occasions, proms, weddings, or any dressed-up event
- Adding a pop of color without committing to hair dye
- Creating a polished, put-together aesthetic that feels intentional and thoughtful
- Anyone who loves accessories and enjoys the extra styling details
Ribbon accents add minimal time to your styling process but create maximum visual impact and sophistication.
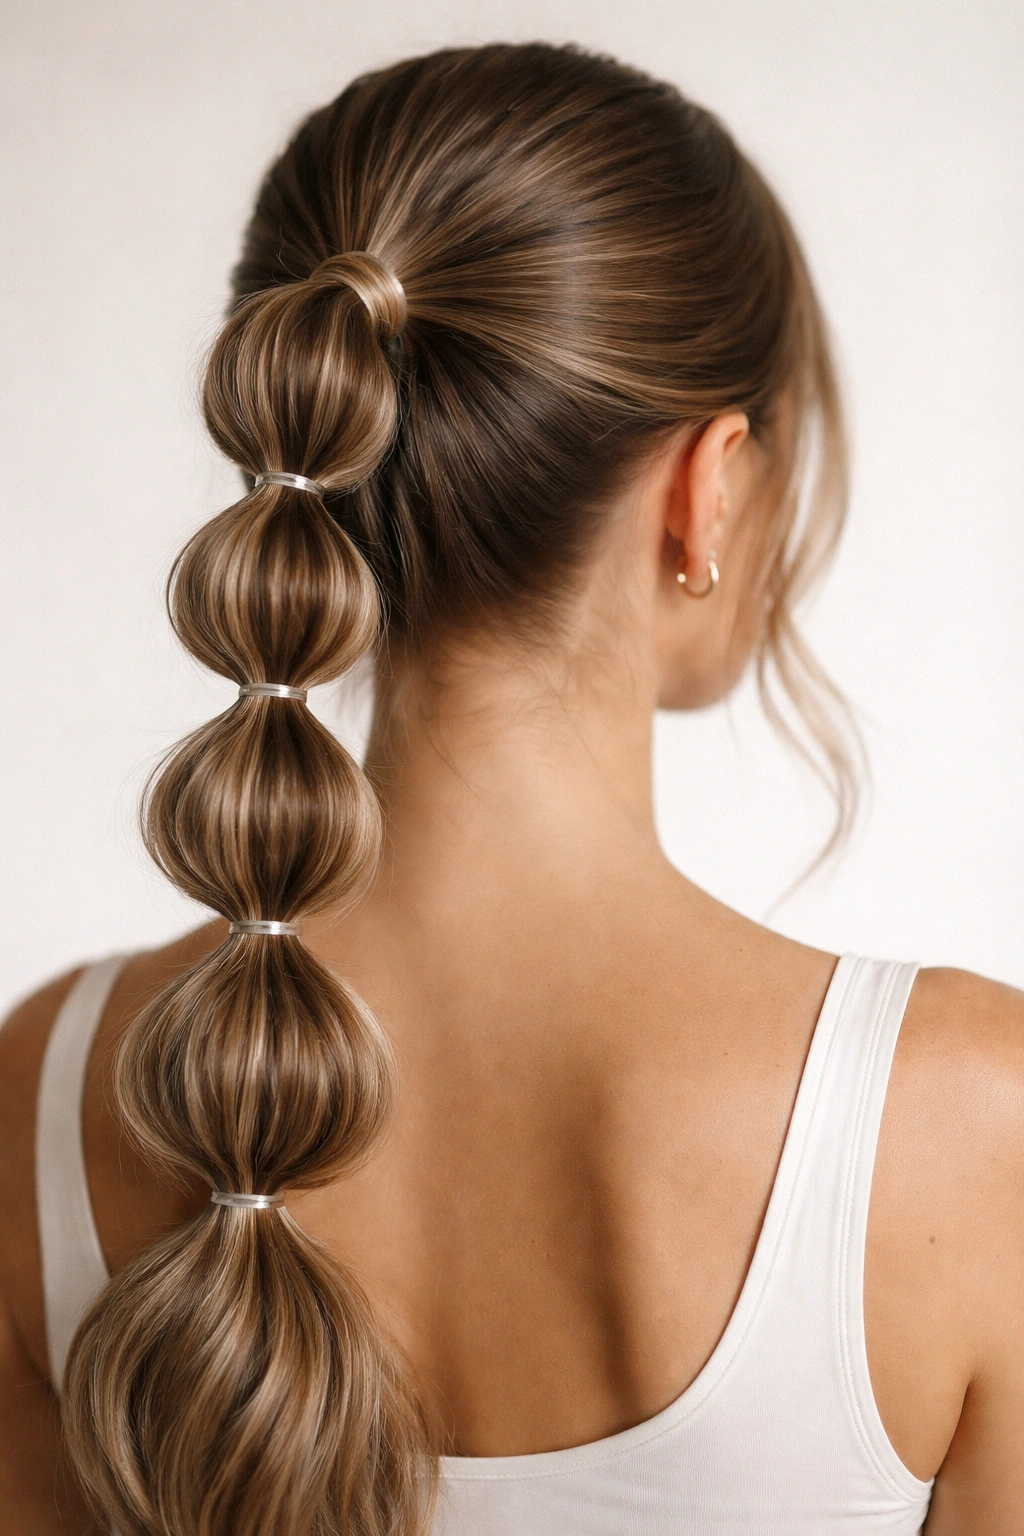
8. Sleek Bubble Weave Ponytail with Clean Lines
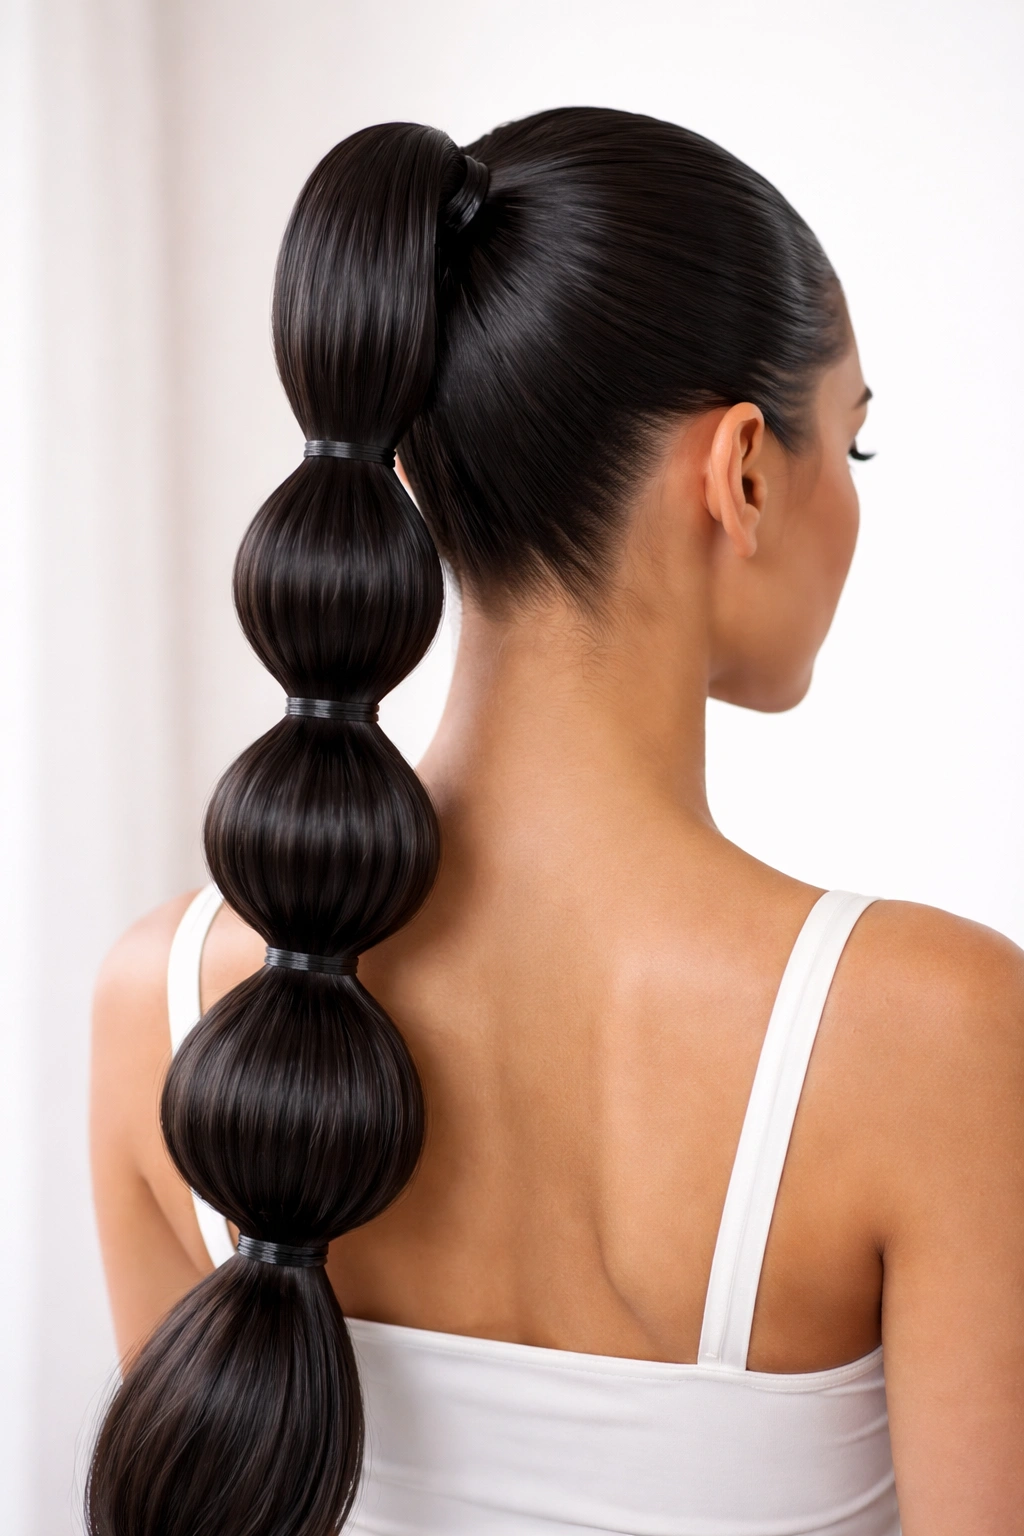
A sleek bubble weave maintains all the visual interest and dimension of the style but presents a more refined, structured aesthetic. This version emphasizes clean lines, smooth hair, and precisely defined bubbles that look almost architectural in their precision.
Start by smoothing your hair back with a fine-tooth comb and a smoothing serum or gel. Gather your ponytail as tightly as you’re comfortable with, and use the comb to ensure no flyaways or loose pieces interrupt your clean base. Create your bubbles, but this time, define each one sharply by keeping the hair within each bubble smooth and sleek rather than teased or fluffed. Use small, clear elastics and position them precisely.
Achieving the Polished Look
The key to sleek bubbles is applying a light smoothing product to your ponytail before you begin bubbling. A serum or anti-frizz cream keeps flyaways in check and makes each bubble look intentionally smooth rather than textured. After securing each bubble, run your fingers along the edges to smooth any stray hairs back into place.
Best For
- Professional settings, corporate environments, or formal events
- Straight to slightly wavy hair types that hold smooth finishes well
- Creating a modern, polished aesthetic that feels contemporary and refined
- Anyone who prefers precision and structure in their styling choices
This version works beautifully with sleek makeup and streamlined outfits, creating a cohesive, high-fashion aesthetic.
9. Voluminous Bubble Weave Ponytail
If you love maximum volume and drama, the voluminous bubble weave takes everything up a notch. This version emphasizes teasing, fluffing, and creating the biggest, puffiest bubbles possible, resulting in a statement-making style that reads as bold and confident.
Create your bubble weave as usual, but add an extra step: tease each section aggressively before bubbling it. Use a fine-tooth teasing brush and backcomb the hair within each bubble to create maximum lift and texture. Then, using a wider comb or your fingers, gently smooth the outer layer while keeping all that volume intact inside. The result is bubbles that are genuinely three-dimensional and eye-catching.
Creating Impressive Texture
A texturizing or volumizing spray applied before you begin the teasing process helps create more grip and hold. Alternatively, you can create volume the night before by braiding your ponytail loosely and sleeping on it; the waves that result from taking down the braid add natural texture that’s perfect for creating voluminous bubbles.
Best For
- Thick, healthy hair with enough density to support maximum teasing
- Anyone who loves bold, statement-making hairstyles
- Situations where you want serious presence and impact
- Creating the appearance of fullness and length, especially for fine or thin hair
The voluminous version takes a bit longer to create due to the extra teasing, but the results are absolutely worth the effort.
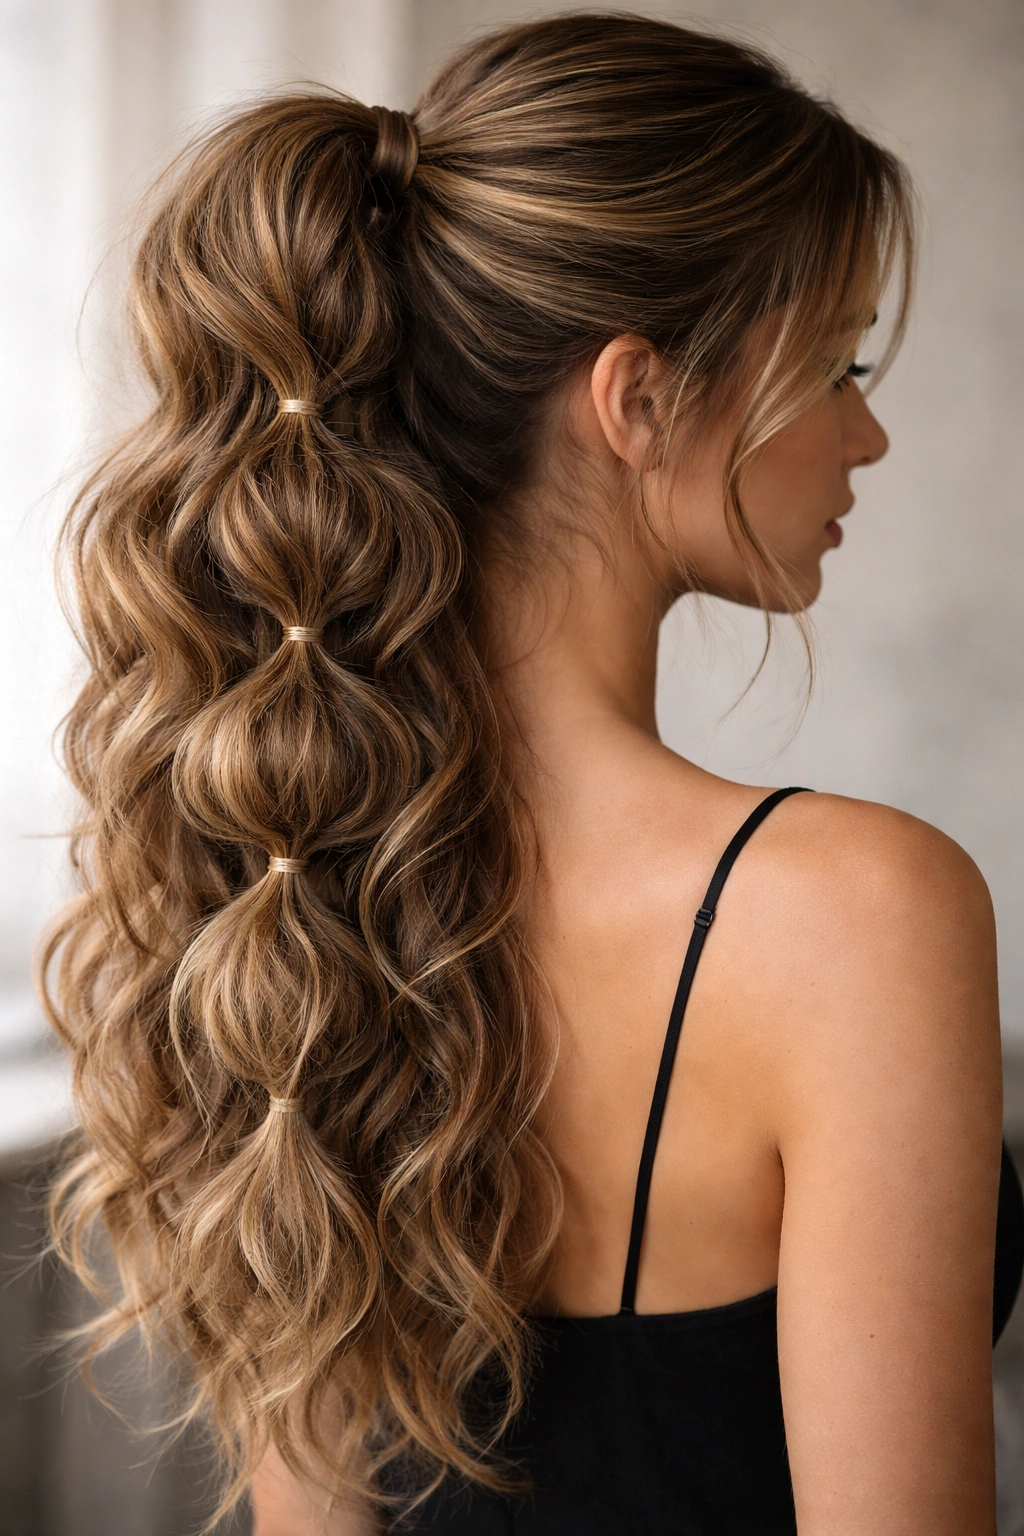
10. Bubble Weave Ponytail with Curled Ends

Adding curls to the ends of your bubble weave ponytail creates a romantic, feminine finish that transforms the overall vibe of the style. Instead of keeping your ponytail straight, you curl the ends, creating a combination of texture and movement that’s undeniably beautiful.
Create your bubble weave as usual, then take the remainder of your ponytail (below the last bubble) and curl it using a curling iron or hot rollers. Wrap sections around your curling iron, hold for 5-10 seconds depending on how tight you want the curl, and release. Work in 1-2 inch sections for consistent results. Allow the curls to cool completely before running your fingers through them and arranging them to your liking.
Curl Customization
The size of your curls should coordinate with the overall vibe of your bubble weave. Loose waves pair beautifully with soft, relaxed bubbles, while tighter ringlets complement more defined, structured bubbles. For a lived-in, tousled effect, run your fingers through the curls and apply a light texturizing spray; for a more controlled look, use a curl-defining cream and a light hairspray to set the curls in place.
Best For
- Romantic occasions, date nights, or any event with a feminine aesthetic
- Medium to long hair with enough length below the last bubble to show off the curls
- Creating a hairstyle that’s dynamic and changes appearance as you move
- Anyone who loves curls but wants to try a new way to incorporate them
The curled-ends version takes about 10-15 extra minutes but creates a completely transformed, polished finish.
11. Bubble Weave Ponytail with Accessory Charms
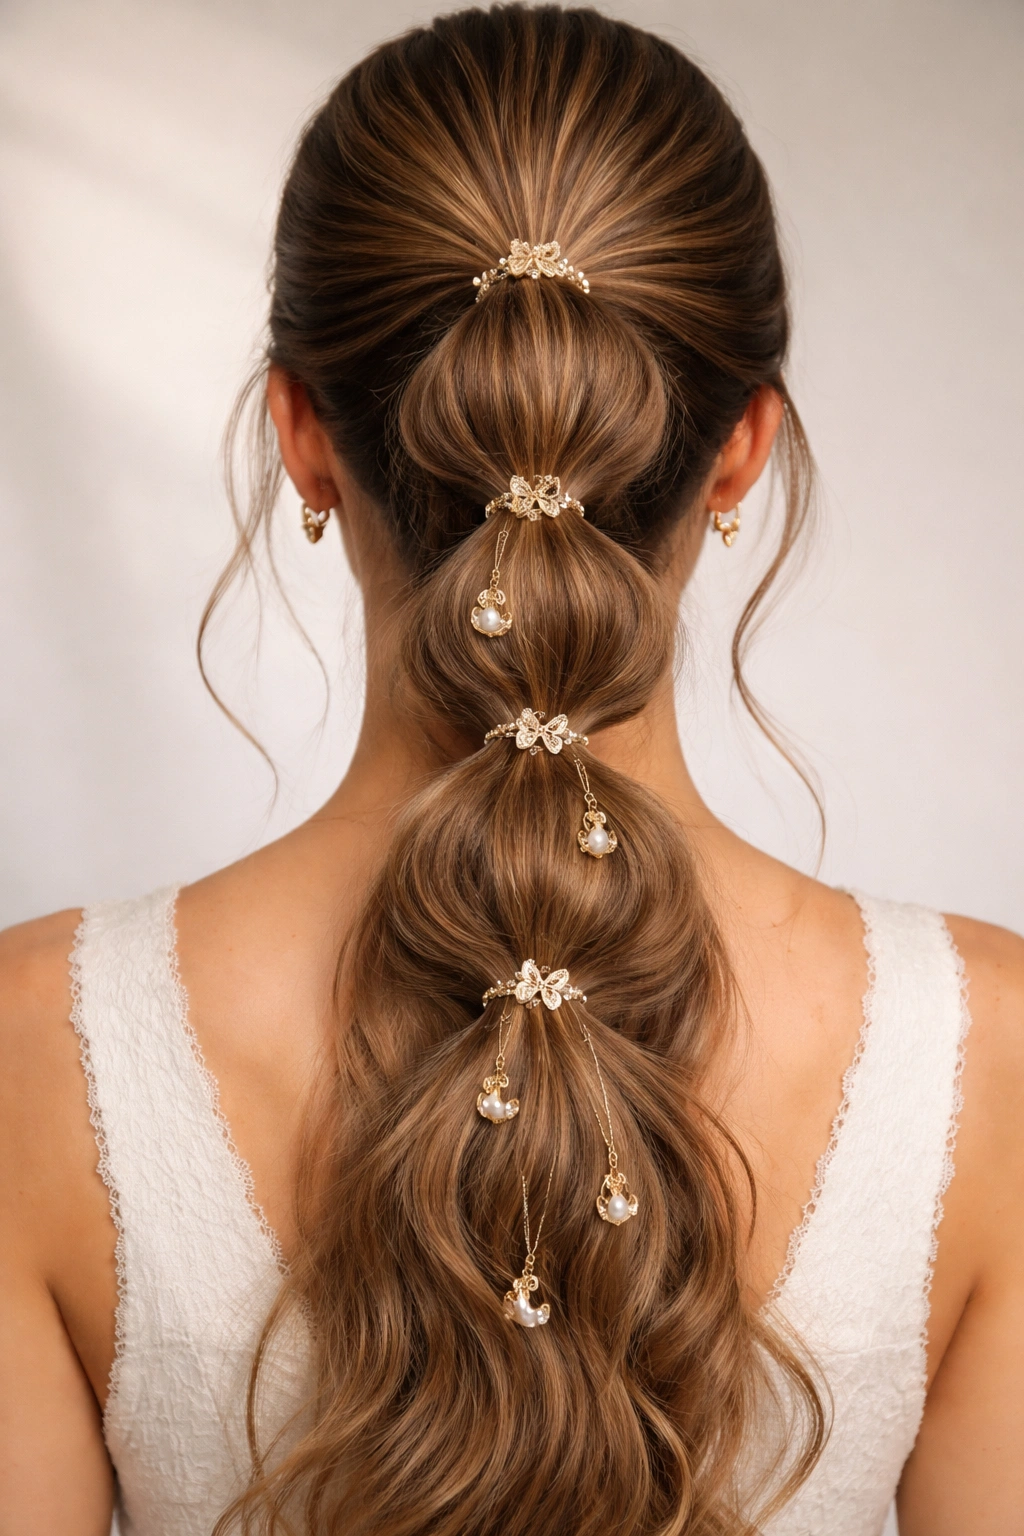
Adding charms, clips, or decorative accessories to your bubble weave ponytail creates a playful, personalized version of the style. You can attach small charms to your elastics, weave clips through the bubbles, or add decorative slides that hold the ponytail in place.
After creating your basic bubble weave, attach small charms or decorative elements to select elastics using small jump rings or by tying them directly to the elastic. Alternatively, use decorative hair clips that clamp around sections of your ponytail, or thread smaller elastics decorated with beads or charms through your bubbles before securing them.
Accessory Selection
Choose accessories that coordinate with your outfit and personal style. Pearl or metallic charms feel elegant and refined, while colorful beads or enamel charms feel more playful and youthful. Mix and match different styles for an eclectic, personal aesthetic, or stick with a coordinated set for a more polished look.
Best For
- Younger clients or anyone with a fun, expressive style
- Festivals, creative workplaces, or casual social gatherings
- Personalizing your style and making the look truly your own
- Creating visual interest that’s unique to you and reflective of your personality
This version is endlessly customizable, allowing you to change your accessories based on your mood or outfit.
12. Textured Bubble Weave Ponytail with Waves
A textured, wavy version of the bubble weave embraces natural wave patterns and creates a style that feels effortless and undone while still being intentional and styled. This version starts with pre-styled wavy or curled hair and uses that texture to inform how you create and style your bubbles.
Begin by creating waves throughout your hair using a curling iron, wand, or heat-free methods like braiding or pin curls. Once you have defined waves, gather your hair into your chosen ponytail placement. The existing waves will create natural texture and movement within each bubble, so the bubbles themselves will look fuller and more three-dimensional than they would on straight hair.
Working with Natural Texture
The beauty of this approach is that you’re not fighting your hair’s natural texture—you’re embracing it. The waves add volume and interest organically, so your bubbles don’t need to be teased as heavily. In fact, light teasing combined with pre-existing waves creates the perfect balance between definition and movement. Apply a light texturizing spray after you’ve created your bubbles to ensure the waves hold throughout the day without looking stiff or overly done.
Best For
- Naturally textured or wavy hair that holds waves beautifully
- Creating a style that looks effortless and undone while still being clearly intentional
- Casual to semi-formal occasions where a slightly relaxed aesthetic feels right
- Anyone who loves the combination of structure (the bubbles) and texture (the waves)
This version feels like the perfect middle ground between polished and lived-in, making it incredibly versatile for different settings and occasions.
Final Thoughts
Bubble weave ponytails offer something genuinely special—they’re trendy and visually striking, yet simple enough to create at home with just elastics and a brush. Whether you prefer the classic version or want to experiment with lower placements, added braids, ribbons, or color, there’s a bubble weave style for every hair type, face shape, and personal aesthetic.
The beauty of this technique is that it’s entirely customizable and forgiving. Small imperfections actually add to the charm, and you can adjust the size, tightness, and texture of your bubbles based on your mood, hair condition, and how much time you have available. What takes 30 minutes of planning can become a 10-minute morning routine once you get comfortable with the technique.
Start with whichever style speaks to you most, master the basic technique, and then build from there. Mix and match elements from different versions—combine a side-swept placement with ribbon accents, or add curled ends to a braided crown bubble weave. The possibilities are genuinely endless, and half the fun is discovering what works best for your hair and your personal style. Each time you try a new variation, you’ll refine your technique and develop your own signature approach to the bubble weave.