Springy afro twists have a funny habit of looking easy right up until the day starts moving. They can be neat in the mirror and fuzzy by lunch if the sections are sloppy, the roots are too soft, or the hair is still damp when you walk out the door.
The good news is that all-day hold is not a mystery. It comes down to a few plain things: clean parting, the right amount of tension, enough dry time, and ends that are shaped instead of left to do whatever they want.
Dry hair wins. Not brittle-dry. Just dry enough that the twist has memory.
Too much cream weighs the style down. Too much gel can make the front look crusty or stiff. The sweet spot is lighter than most people think: a small amount of product, even sectioning, and a finish that keeps the twist springy instead of swollen. Once those pieces are in place, the style starts behaving better, and the difference shows up fast — at your desk, on the train, in wind, or after you take a scarf off and expect the whole look to hold together.
The styles below all do that in slightly different ways. Some are tighter and more polished. Some move more. A few are better for thick coils, a few are kinder to finer strands, and one or two are the sort of styles that save you when you need your hair to stay put without looking overworked.
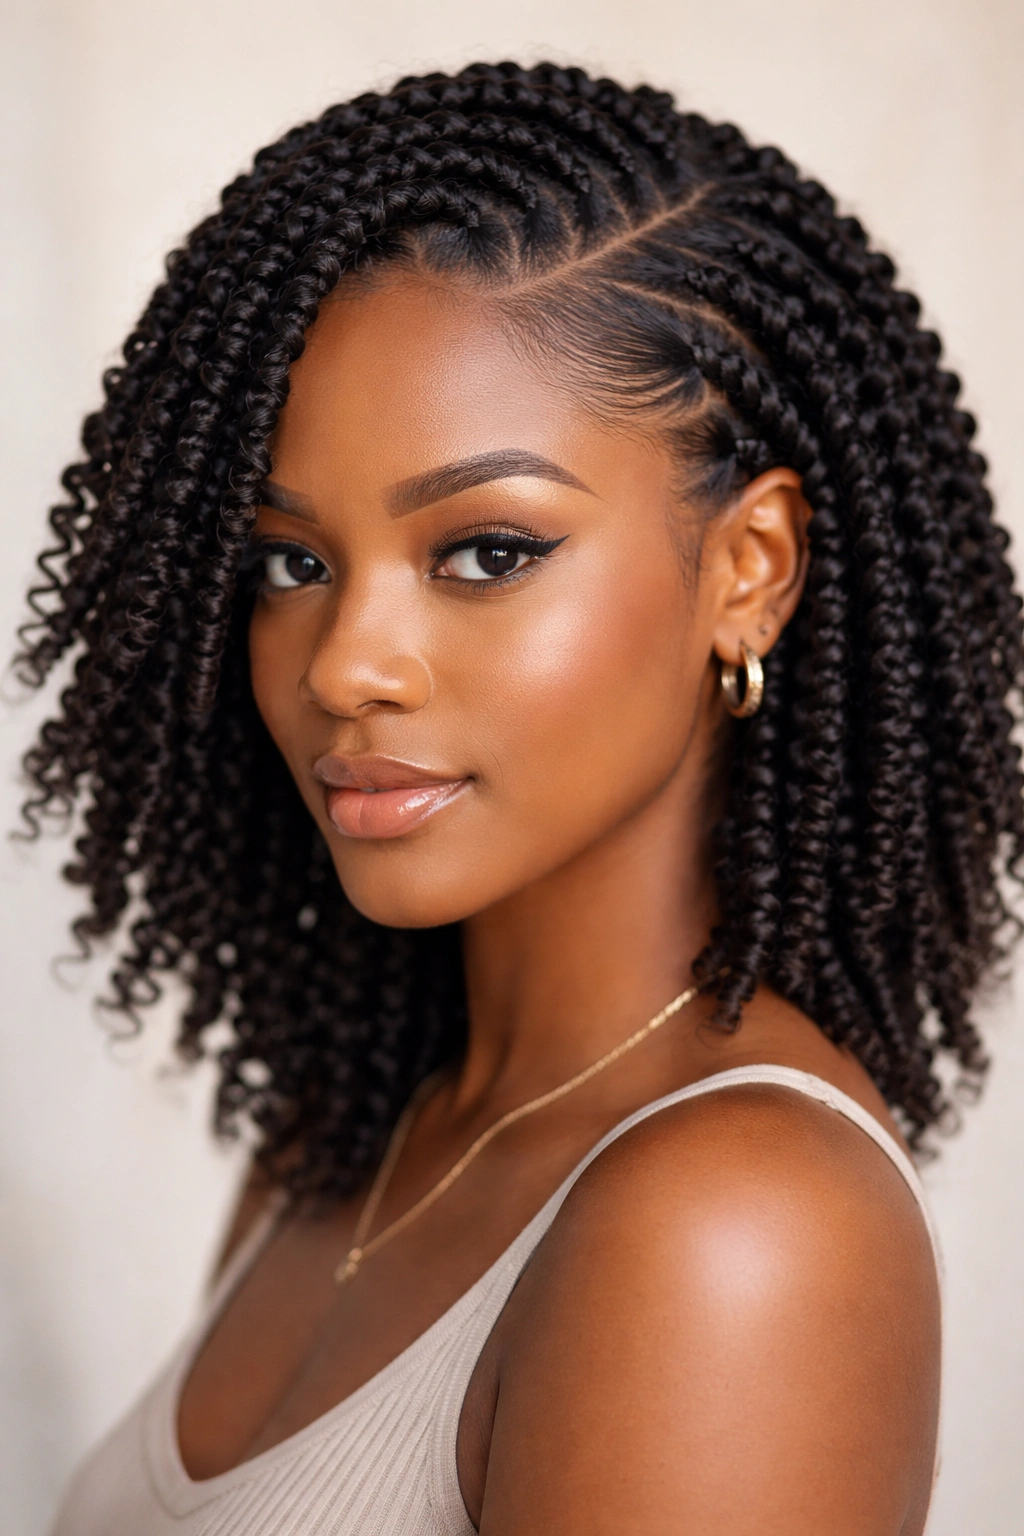
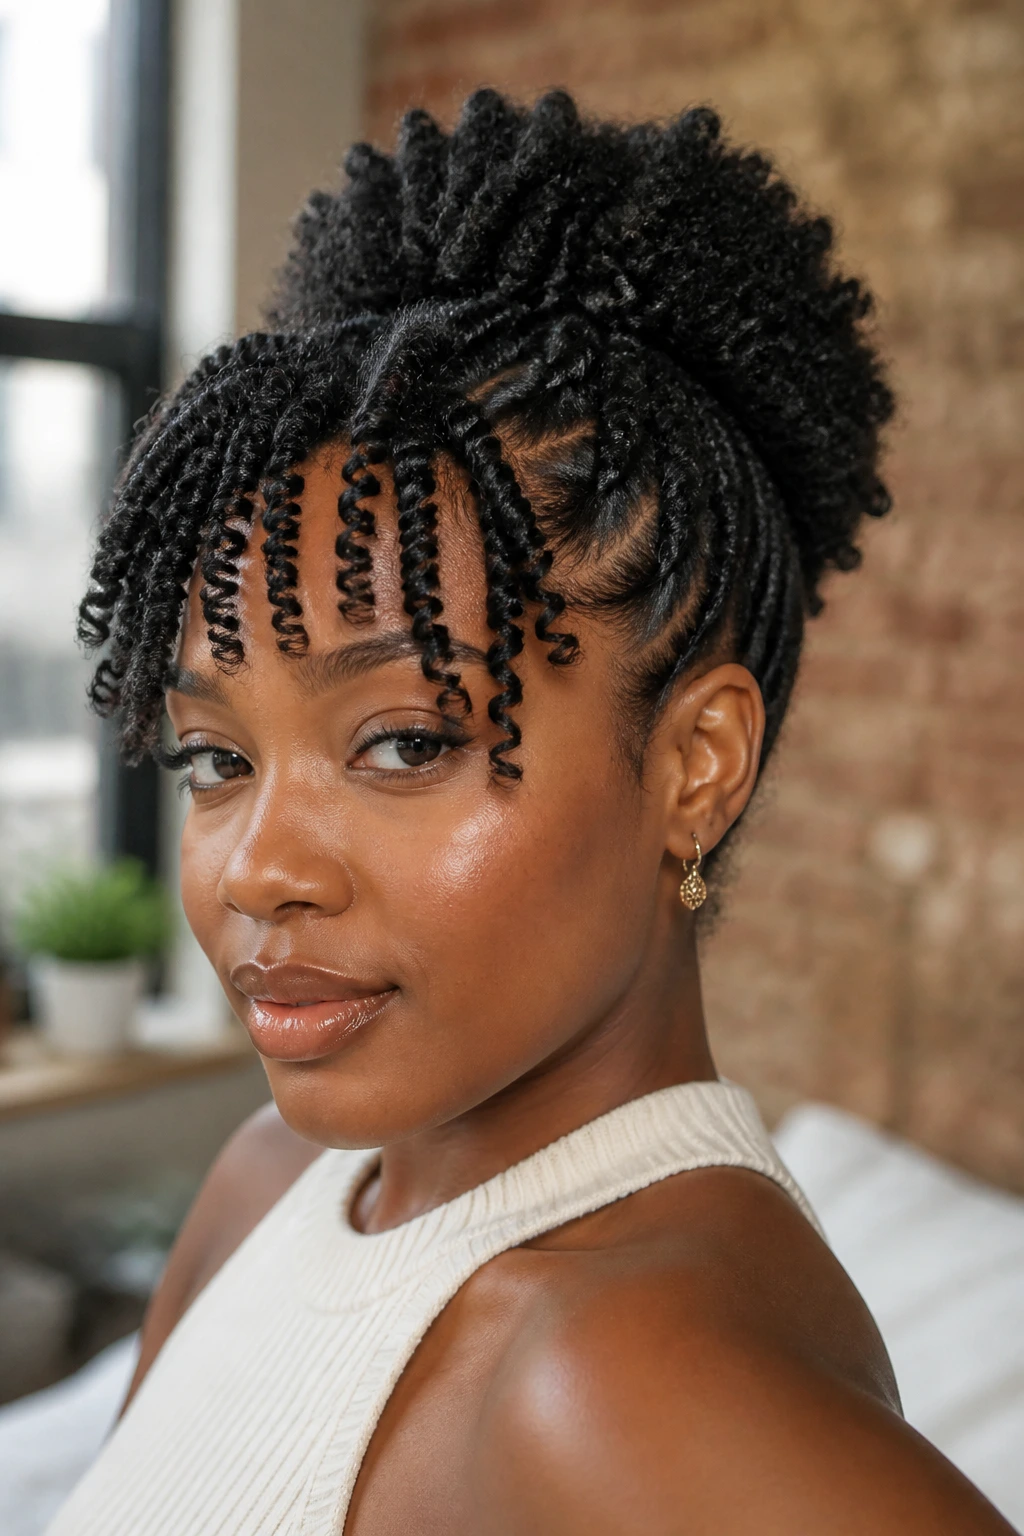
1. Small Two-Strand Afro Twists on Stretched Hair
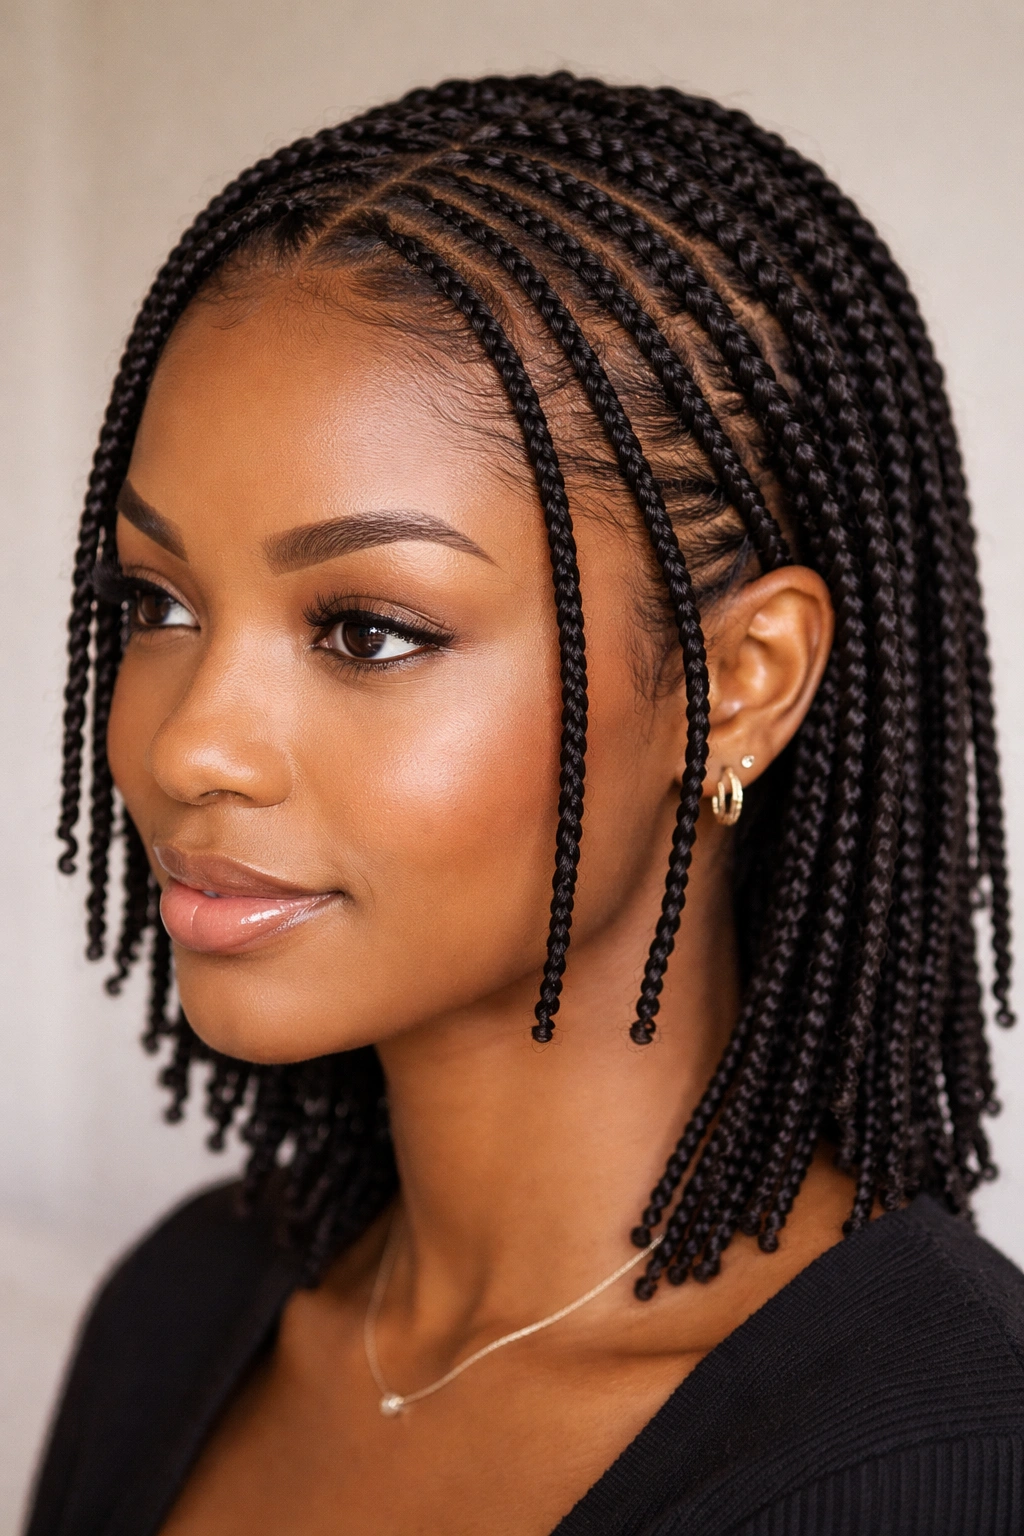
Small two-strand twists are the quiet workhorses of the bunch. They look modest at first glance, then keep their shape long after looser styles have started to puff up and lose their line.
The reason is simple: smaller sections carry less weight, so the twist base stays cleaner. When the hair is lightly stretched first — with a blow-dry on low heat, banding, or a good old twist-and-stretch method — the coil has less chance of shrinking into a fuzzy cloud by midafternoon.
Why the size matters
Think pencil-width, not thumb-width. That size gives you enough grip at the root without making the hair feel crowded. It also helps the twist dry faster, which matters more than people want to admit.
A little product goes a long way here. A pea-sized amount of twisting cream on each section is enough for most textures. Add a touch of mousse over the finished twists, then let them set fully before you separate anything.
- Keep the section lines clean with a rat-tail comb.
- Twist in the same direction all over the head.
- Smooth the roots with fingertips, not a heavy palm full of gel.
- Let the hair dry flat, or the back will puff first.
Best move: finish with a silk scarf for 15 to 20 minutes while the hair cools. That one step helps the roots lie down instead of rising up the second you step outside.
2. Medium Rope Twists with a Firm Base
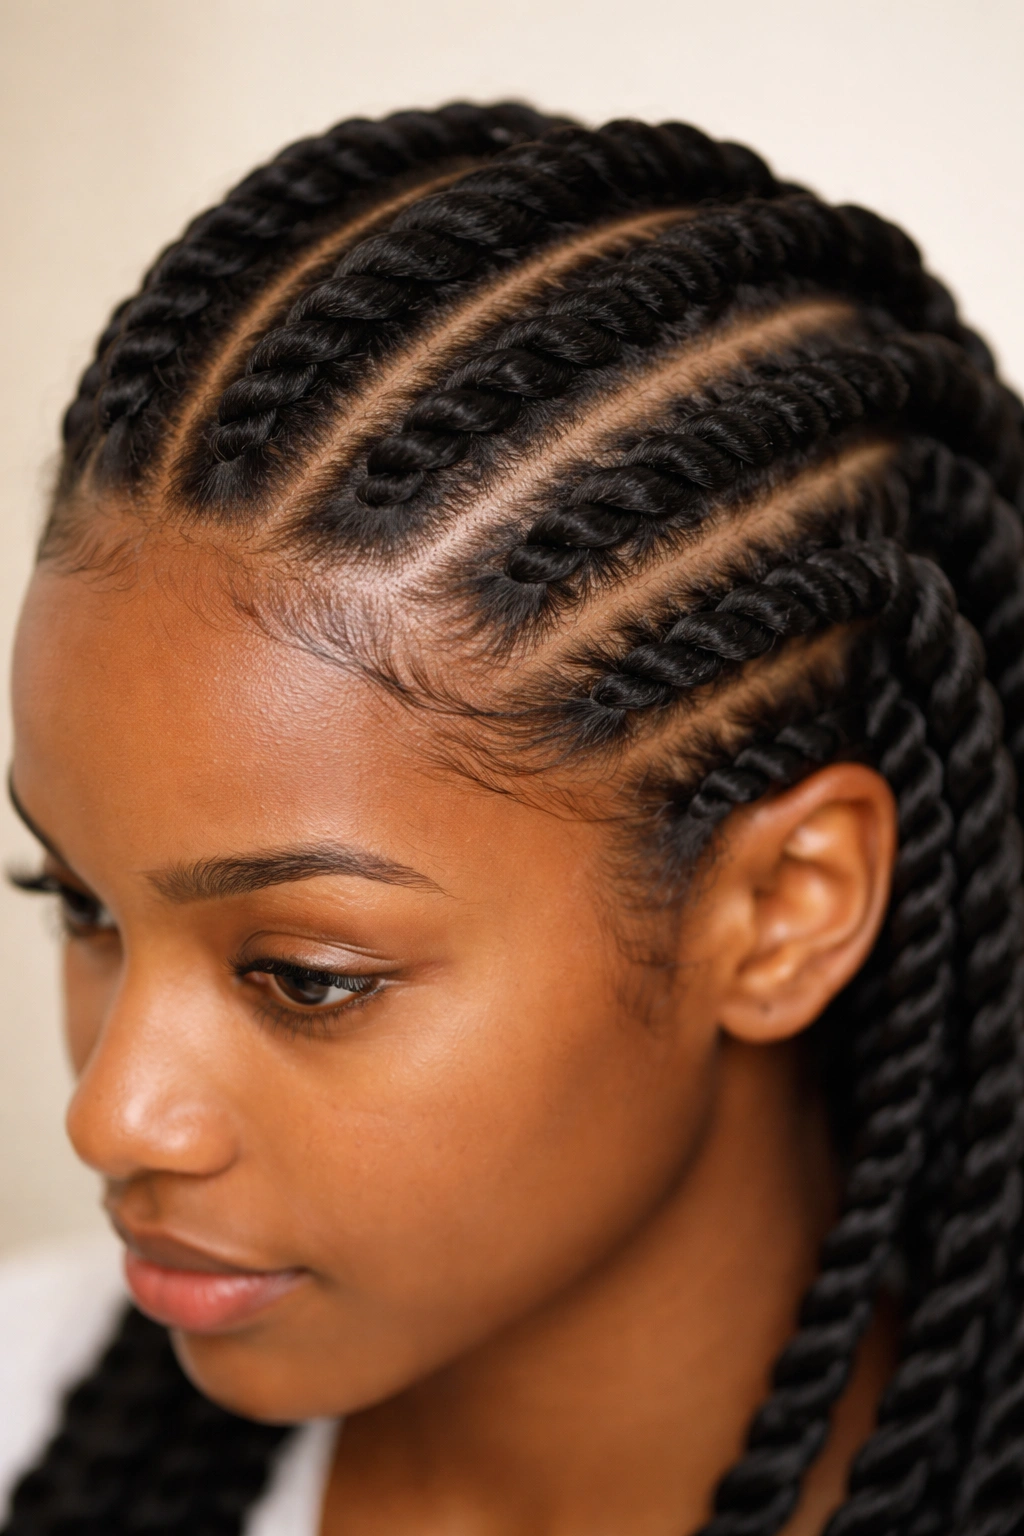
Why do medium rope twists hold better than loose versions? Because the shape works with you instead of against you. A rope twist creates its own little lock, and once the strands start wrapping around each other, the whole thing gets a firmer grip at the root.
The trick is not to crank the tension so hard that the scalp complains. You want the twist snug, not painful. If the base hurts while you’re doing it, the style will probably loosen in strange places later, and that’s always the part people notice first.
How to keep the root from loosening
Use a light hold foam or mousse before you twist. It gives the strands a little slip while you work, then dries with a cleaner finish than thick cream alone. If your hair is dense, clip the base of each section for a few seconds before moving on. That small pause helps the root settle.
Rope twists also benefit from a neat part. A crooked part can be charming on purpose. A crooked part from sloppy sectioning just looks unfinished.
Finish by palm-rolling the ends and sealing them with a tiny bit of gel if they tend to unravel. Not a glob. Just enough to keep the tail from fraying into little fuzzy threads by lunchtime.
3. Flat Twists Swept into a High Puff
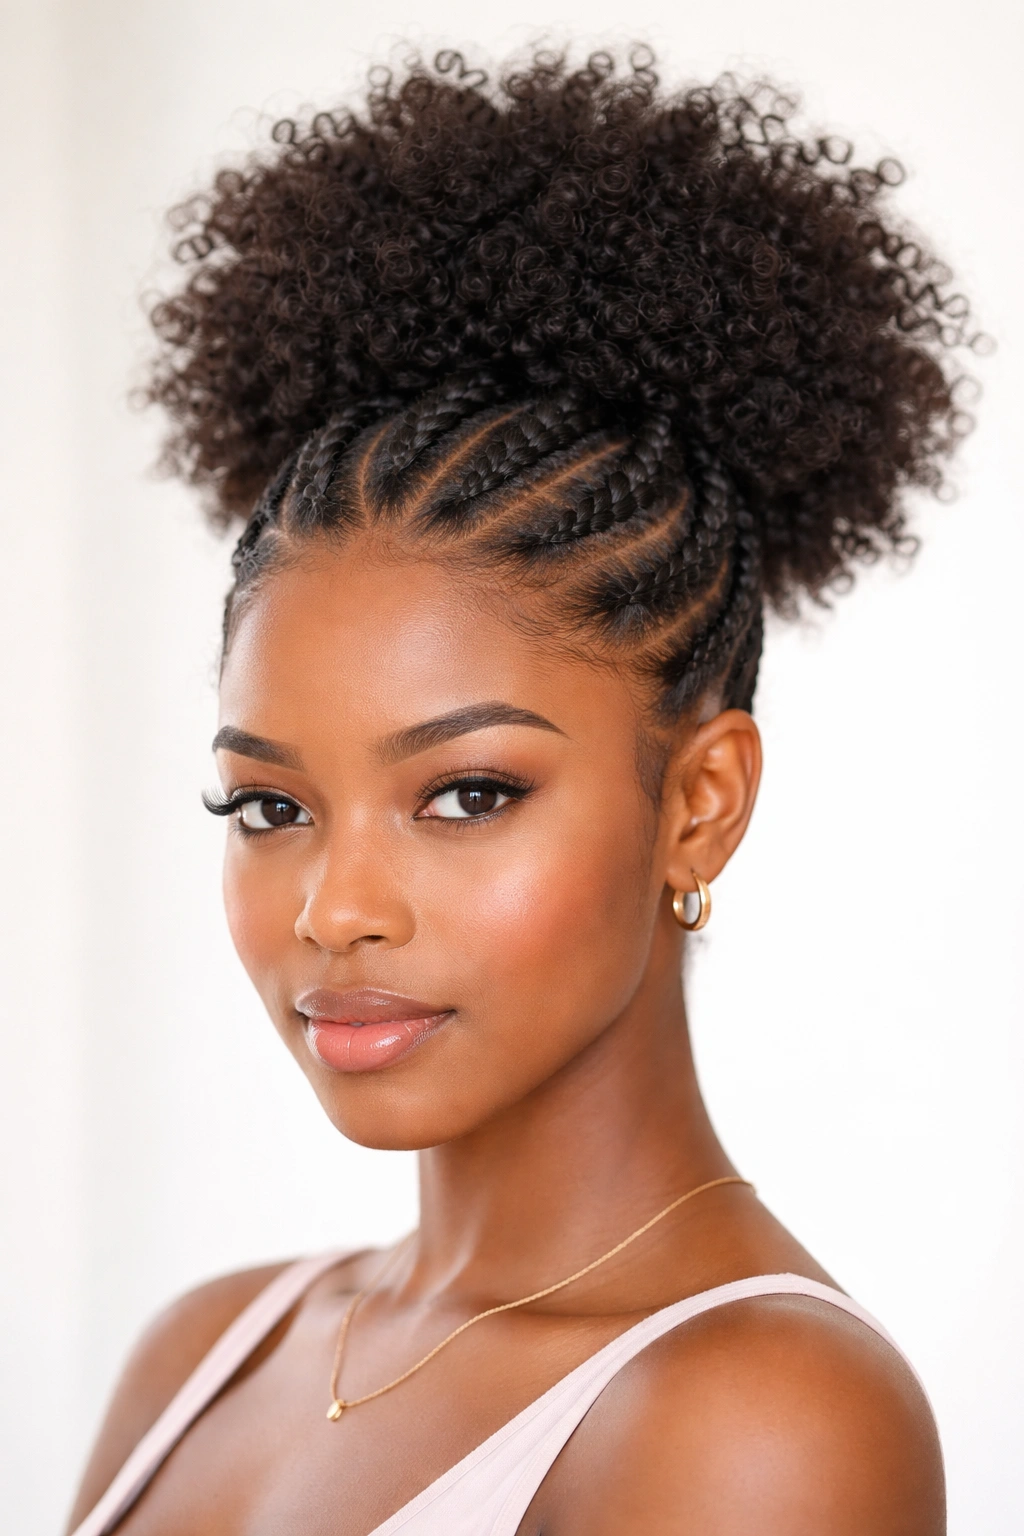
Picture a style that survives a commute, a lunch break, and a scarf removal without turning into a puffball gone rogue. That’s the appeal of flat twists feeding into a high puff. The twists anchor the front and sides, while the puff keeps the hair lifted off the neck and away from friction.
This one works especially well when the crown needs polish but the rest of the hair wants movement. You get structure where people can see it and softness where you want a little drama. The contrast is the whole point.
What keeps it neat all day
- Part the hair cleanly from forehead to nape.
- Keep the flat twists close enough to the scalp to grip, but not so tight that the hairline starts complaining.
- Use a snag-free elastic for the puff so it doesn’t chew through the curls.
- Smooth the front with foam first, then tie a scarf for 10 minutes before you leave.
The puff itself should sit high enough to avoid collar friction. Low puffs get rubbed flat. High puffs hold shape better, and they show off the twist pattern around the face.
This is one of those styles that looks put together even when the rest of the day is not. Nice bonus.
4. Big Havana Twists with a Lightweight Base
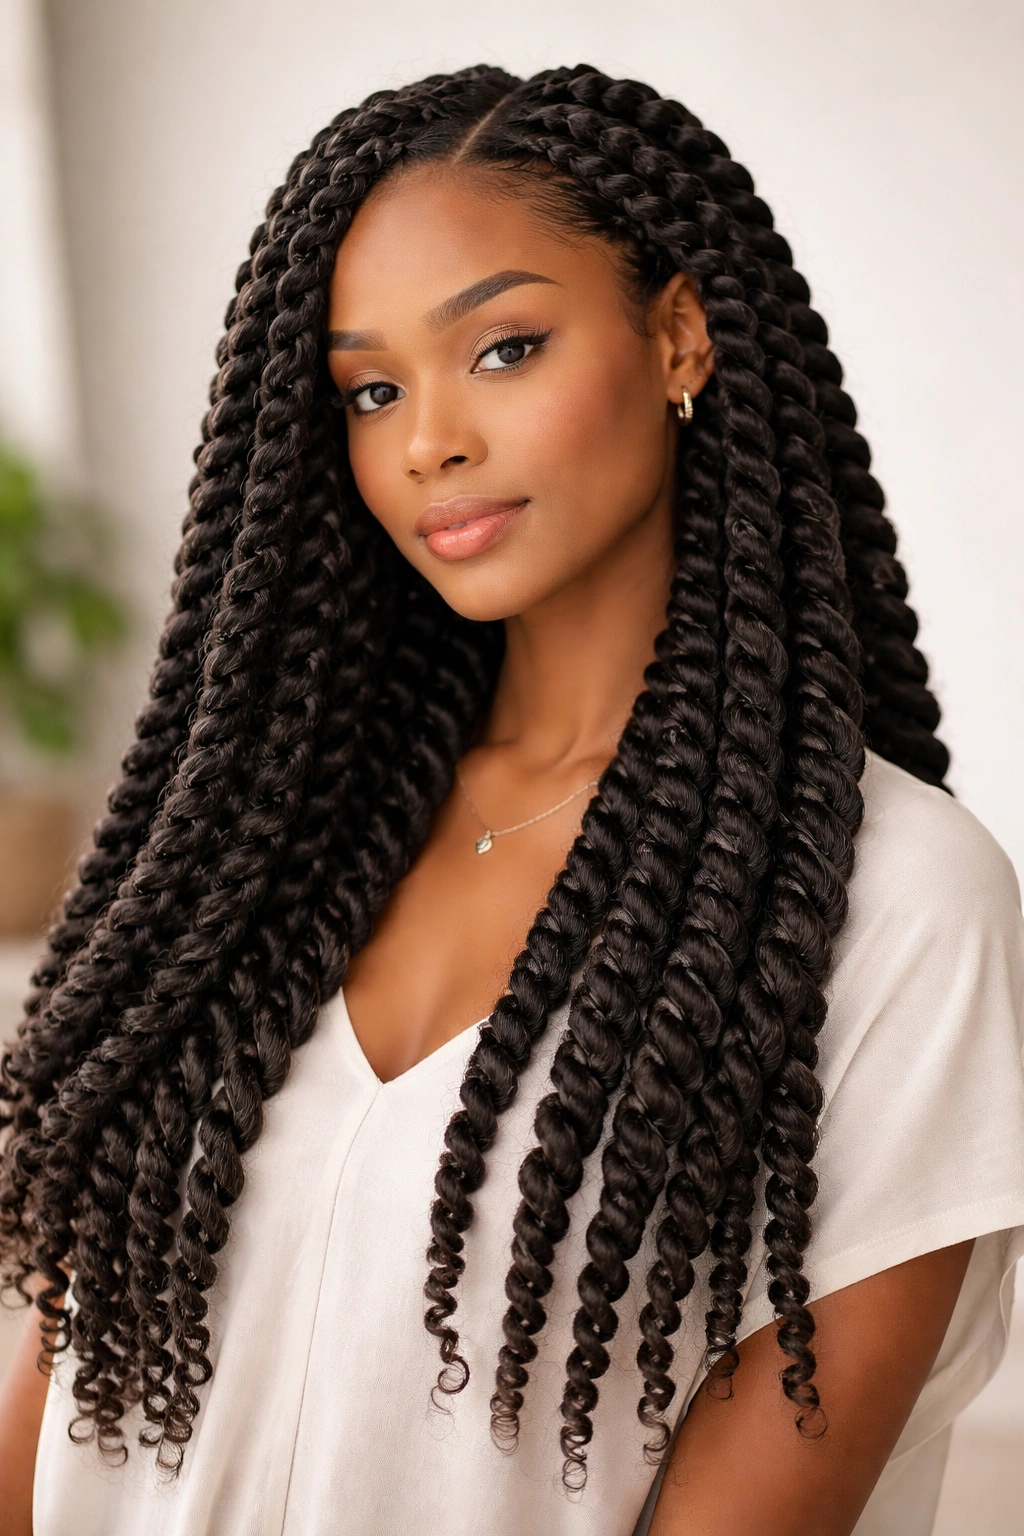
Heavier twists can look gorgeous. They can also collapse fast if the roots are too soft or the extension hair is too dense for the base to carry comfortably.
That is the tradeoff with Havana twists. They give you that full, textured silhouette, but they need a better foundation than people expect. If the hair underneath is loose, under-dried, or overloaded with product, the twists slide, swell, and start pulling in odd directions. Nobody wants that halfway through the day.
Keep the base light. Really light. The scalp should feel calm, not coated. Use just enough cream to smooth the natural hair before adding extension hair, then keep the wrap even as you twist downward. If you use synthetic hair, choose a lightweight texture that does not fight the natural coil. Heavy fiber makes the whole style droop before dinner.
A middle or slightly off-center part helps here because it spreads the weight more evenly. That matters more on fine strands than most styling videos admit. If the part is clean and the roots are dry, the style stays crisp. If not, the bulk starts to sag at the exact spots you were trying to showcase.
My favorite thing about Havana twists is the body. My least favorite thing is how fast they can expose bad prep. They are honest like that.
5. Passion Twists with Feathered Ends
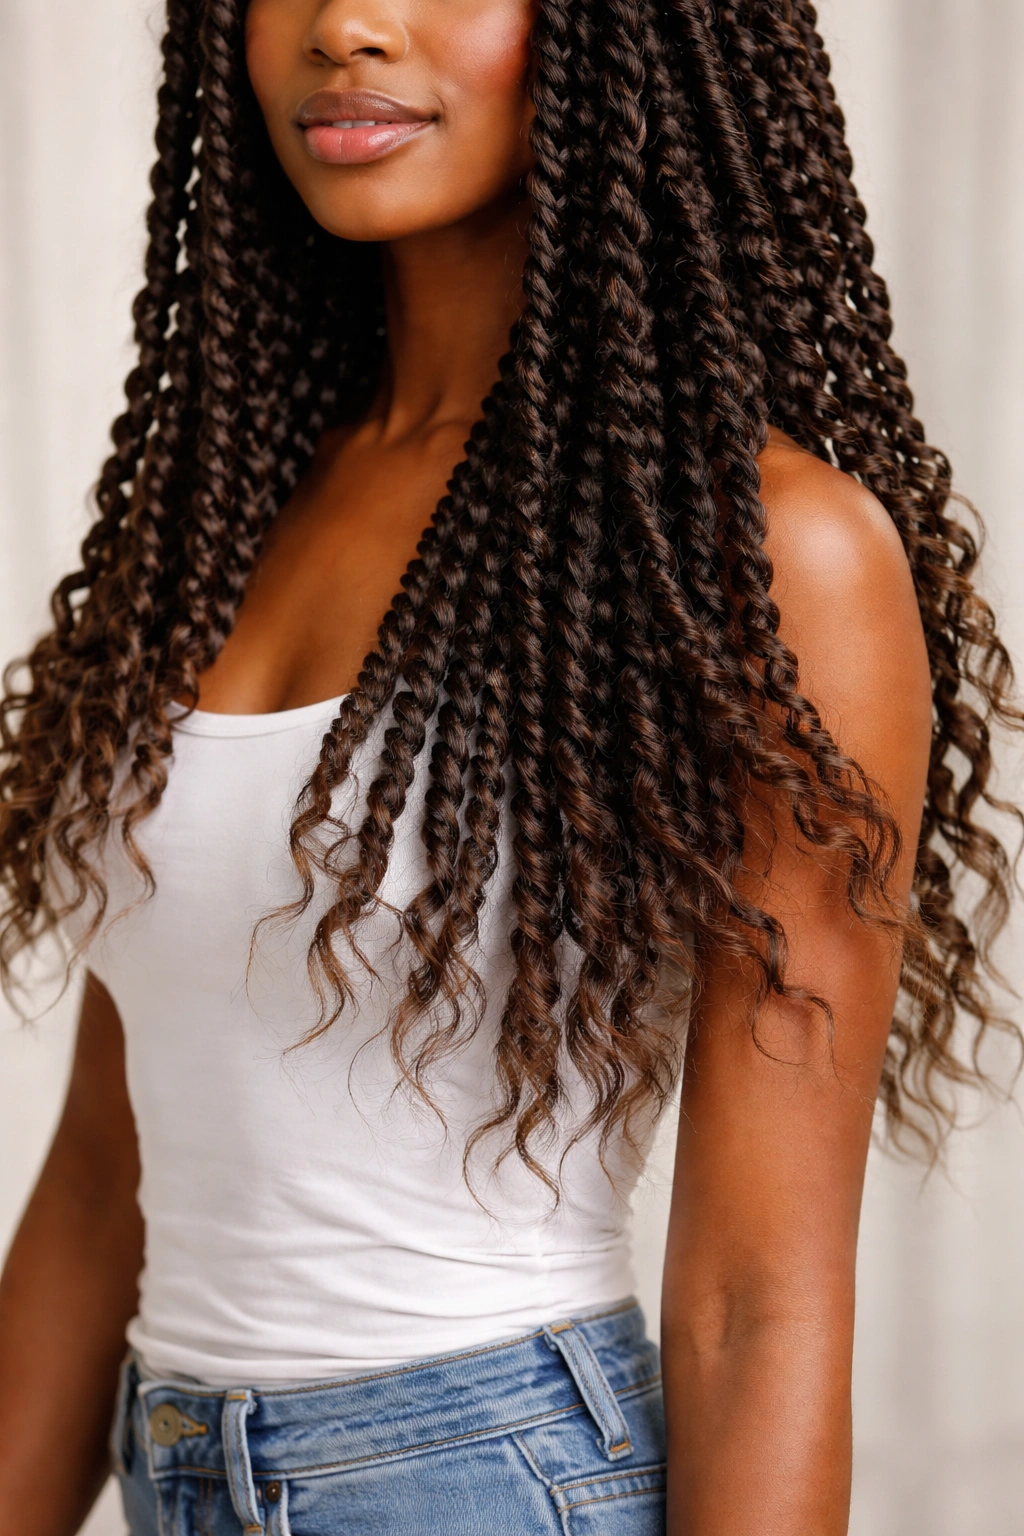
Passion twists have a softer personality than tighter twist styles, and that softness is exactly why so many people reach for them. They move. They swing. They do not sit there looking frozen. When the ends are feathered and lightly coiled, the whole style feels airy instead of stiff.
Best for hair that likes movement
Passion twists look especially good when you want spring without a sharp, braided finish. The wrap is looser, the texture is more lived-in, and the final result reads a little more relaxed than a classic rope twist. That is not a flaw. It is the point.
The only catch is frizz. If you rush the set or keep touching the ends, they lose their shape early. Use a foam wrap or setting lotion on the finished twists, then let them dry fully before separating anything. Half-dry passion twists are a trap. They always look better for about twenty minutes, then the fuzz starts.
How to keep the ends springy
- Twist the natural hair around the extension with gentle, even tension.
- Stop a little short of the ends, then finger-coil the last inch.
- Let the coils dry completely before you shake them out.
- Sleep with a satin bonnet so the ends do not rub flat.
A soft side part suits this style well. It breaks up the face frame and keeps the look from feeling too uniform. And if you want the hair to hold through a long day, avoid heavy oils on the finished twists. They make the surface slick in all the wrong ways.
6. Mini Twists for Maximum Hold
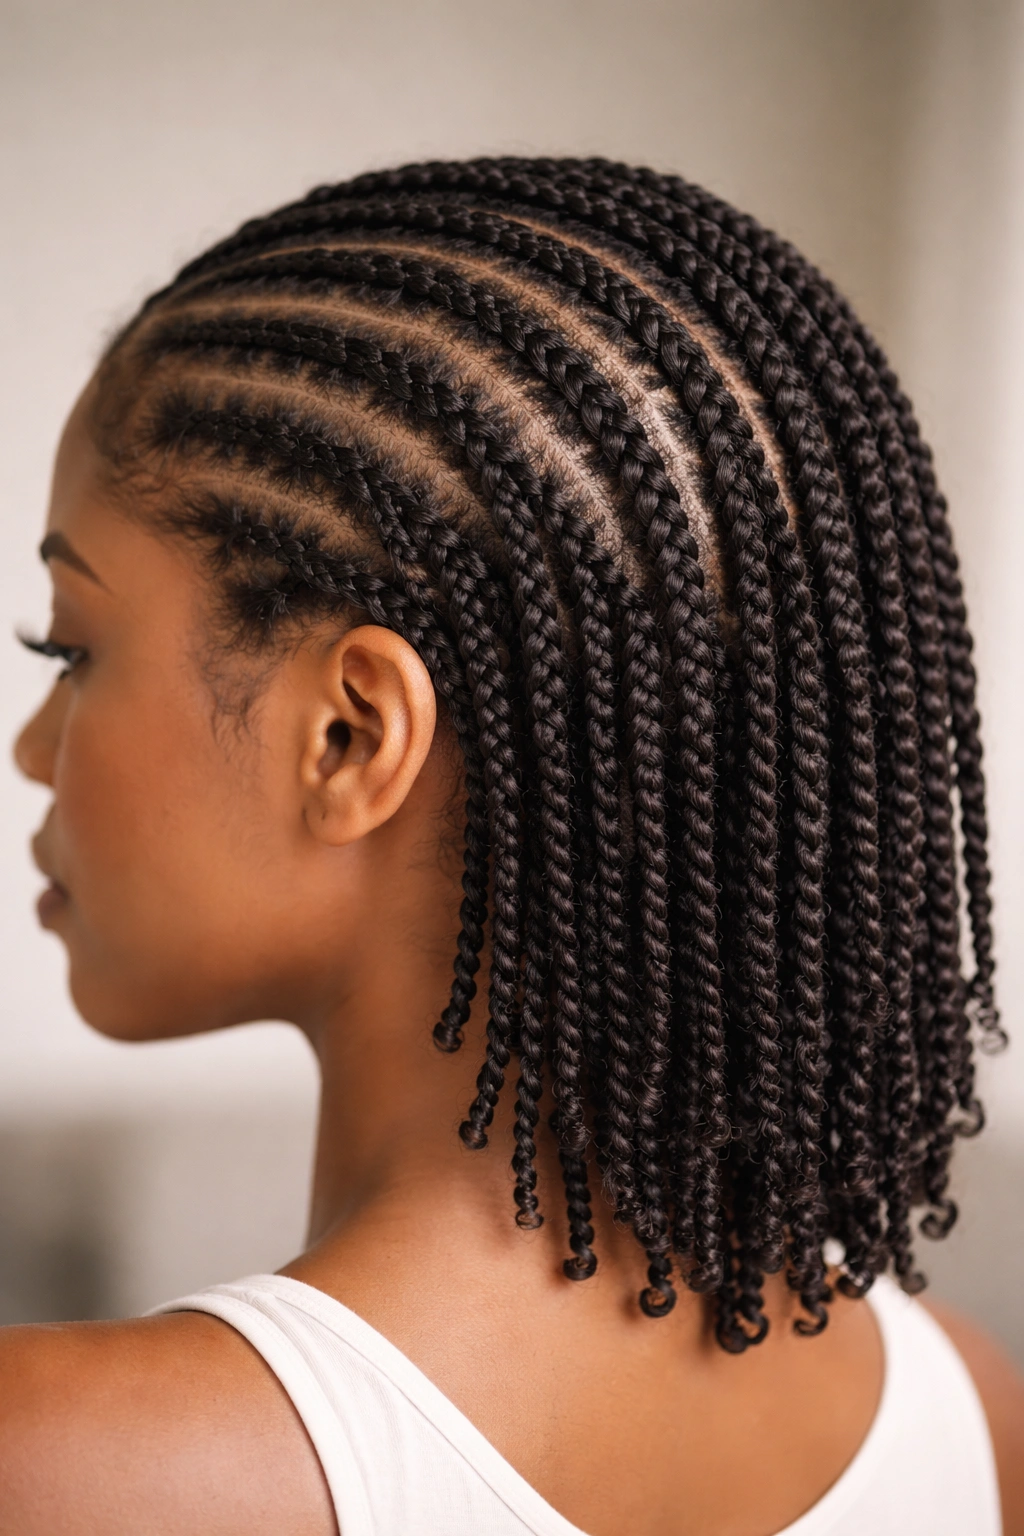
Can mini twists feel neat without looking stiff? Yes, if you keep the product light and the sections even. Mini twists last because each twist carries almost no weight, so the roots are less likely to slump before the day is over.
The style does ask for patience. Small sections mean more work up front, and there is no way around that. But the payoff is a clean, compact shape that holds up well when the weather is humid or your schedule is long and annoying.
Mini twists are also one of the few styles that can still look polished when they get a little older. They fuzz at the edges in a softer way than bigger twists do. That softness can look good if the base was neat to begin with.
How to set the ends
Use a tiny bit of gel only if the ends tend to unravel. If your hair coils easily on its own, a little mousse is enough. Heavy grease makes mini twists sticky, and sticky twists collect lint faster than anyone likes to admit.
One nice detail here: mini twists frame the face nicely without demanding a dramatic part. A simple center part works. A deep side part works too. Keep the front sections crisp, and the rest of the hair can do its own thing.
If you want them to last all day, dry them fully. No shortcuts. A twist that still feels cool near the scalp will usually puff faster than one that feels room temperature all the way through.
7. Twisted Crown Updo with Tucked Ends
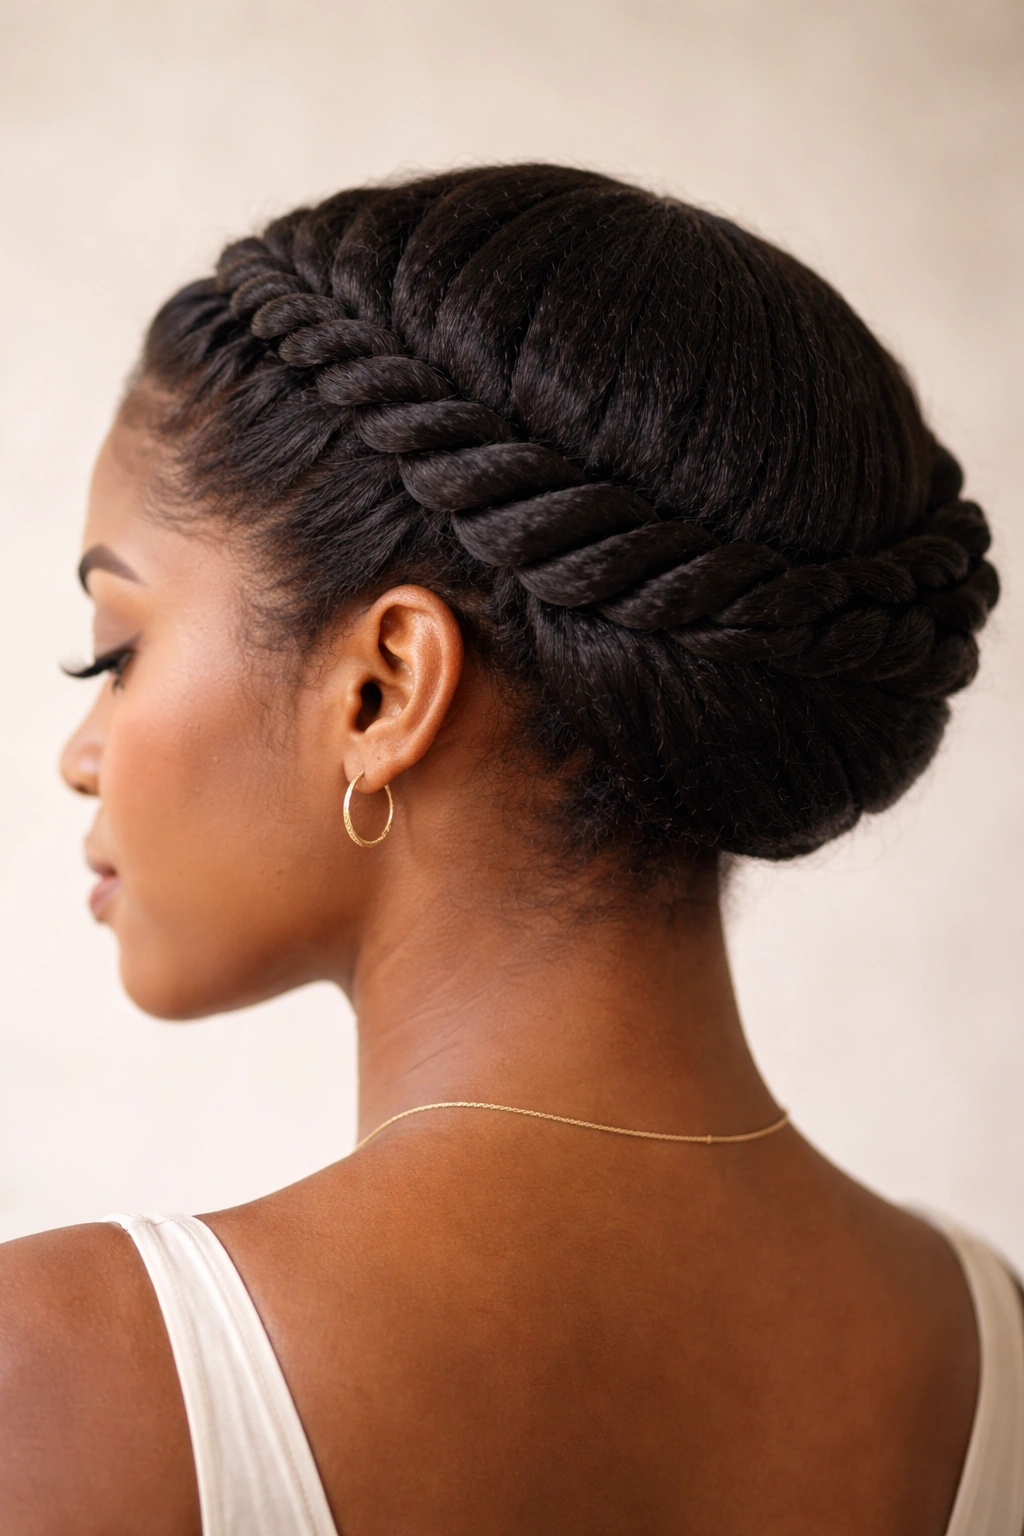
A flat-twist crown is the kind of style that looks calm from the front and works hard in the back. It keeps the ends tucked away, which means less rubbing against collars, chair backs, and the usual daily chaos that ruins neat hair faster than product choice ever will.
This is a smart option when you want twist definition but do not want loose lengths brushing your shoulders all day. The crown shape gives the style structure, and the tucked ends make it practical. That combination is why people wear it for work, events, travel, and any day that asks for hair to stay out of the way.
A good crown updo lives or dies on pin placement. Use U-pins or flat bobby pins, and slide them in where the twist overlaps instead of jamming them into the center of the hair. That keeps the hold secure without making the scalp feel poked from every angle.
- Start with a clean side part or middle part.
- Keep the flat twists close to the head so the crown sits neatly.
- Tuck the ends under the rolled section instead of leaving them loose.
- Press the finished style down with a scarf for 10 minutes.
One-sentence truth: tension belongs at the back, not the hairline. Pull too hard near the temples, and the whole style starts to look tired before lunch.
8. Side-Part Twists with a Sleek Front
Not every twist style needs to be centered or symmetrical. A side part can make the whole look feel sharper, and it helps distribute the hair in a way that often holds better around the front hairline.
The reason I like this option is that it frames the face without making the twist pattern feel heavy. One side sits flatter. The other side gets a little lift. That small imbalance gives the style movement, which is exactly what makes it look fresh even after several hours of wear.
A clean part line matters here. Use the tail of a rat-tail comb and take the part all the way back in one clean pass. If you stop halfway and redraw it three times, the front starts looking messy before the twists even go in. I’m picky about that, because the line at the front is what people see first.
The sleek front only needs a thin layer of gel or edge control. Thin. Not shiny-wet. Too much product makes the roots clump, and clumps are the enemy of a twist style that needs to stay springy.
This one works especially well when the rest of the hair is full and the face needs some shape around the forehead and cheekbone area. It is polished without trying too hard, which is probably why it keeps showing up in rotation.
9. Twist-and-Curl Bob with Coiled Ends

A bob-length twist style is a gift to anyone tired of hair brushing every surface it passes. Shorter length means less friction, and less friction means the style stays neater for longer. That alone makes this one a strong choice for all-day wear.
The bob shape also changes the whole feel of the twists. Instead of hanging and stretching as the day goes on, the hair holds a more compact outline. That’s useful if you want spring and bounce without the ends turning ragged by the afternoon.
Why bob length helps
The ends sit away from your collar, which cuts down on roughening. They also dry faster, which matters if your hair tends to hold moisture at the back. A twist that’s dry at the ends but still cool at the roots will swell unevenly. A bob reduces that problem a lot.
Use flexi rods, perm rods, or finger-coiled ends if you want a little curl at the bottom. That detail gives the style a bounce that reads clean instead of blunt. If the ends are left too straight, the whole bob can look boxy.
Keep the curl tight while it sets. Once it loosens, the bob loses the crisp finish that makes this version feel intentional. A light mousse and a full dry time are enough for most textures. Heavy cream tends to flatten the curl before it has a chance to hold.
10. Twist-and-Tuck Puff with Coiled Fringe
If you want one style that can get you through a full day without a lot of fuss, a twist-and-tuck puff is hard to beat. The hair stays gathered away from the parts of your day that usually destroy style — collars, car seats, humid air, and your own hands when you keep checking the back of your head.
The shape is practical, but it is not boring. A coiled fringe in front keeps the face frame lively, and the tucked-back body gives the style a clean outline from every angle. That is a useful combination when you need something that looks done without looking fussy.
How to finish it so it stays neat
Start by twisting the front sections or the perimeter of the hair, then tuck the rest into a puff with a soft elastic. A scarf over the front for 10 to 15 minutes helps the twists settle into place. If the puff is high, place the elastic a little above the crown so the base does not flatten out as you move.
Use pins only where the tuck needs help. Too many pins make the style feel crowded, and crowded styles loosen in strange ways. A few well-placed pins do more than a dozen jammed into the same spot.
The real advantage here is that the style forgives a long day. A twist-and-tuck puff can start neat, take a little wear, and still look like you meant it that way. That is worth more than a perfectly photographed style that falls apart the moment you get out the door.