10 Party Hairstyles for Straight Hair
If you’ve got naturally straight hair, you’re sitting on a goldmine for party styling. Straight hair is the ultimate canvas—it holds shapes beautifully, drapes elegantly, takes to accessories like nobody’s business, and requires far less fussing to maintain its polished look throughout an entire evening. But knowing how to leverage that texture is another thing entirely. Most straight-haired people default to leaving it down and simple, which misses the real opportunity here. Straight hair shines when you add structure, movement through contrast, and thoughtful accessories that emphasize its natural sleekness.
The key difference between casual straight hair and party-ready straight hair comes down to intentionality. It’s about choosing a style that either plays up the sophistication of your hair’s texture or contrasts it with unexpected elements—a sleek base with metallic accents, a structured updo with softly escaped pieces, or precision braiding against perfectly straight sections. The styles that work best for straight hair at a party are those that respect its natural properties instead of fighting against them.
What follows are ten genuinely wearable, genuinely elegant party hairstyles designed specifically for people with straight hair. These aren’t variations on the same theme; each one approaches the evening differently, whether you’re looking for drama, minimalism, romance, or edge. Most of these can be achieved in 15-30 minutes with basic tools and zero specialty products, though the finishing touch always comes down to the details—the clip placement, the way you secure the pieces, and how intentionally you’ve thought through what you’re adding to enhance the style.
1. Sleek Low Bun with Face-Framing Tendrils
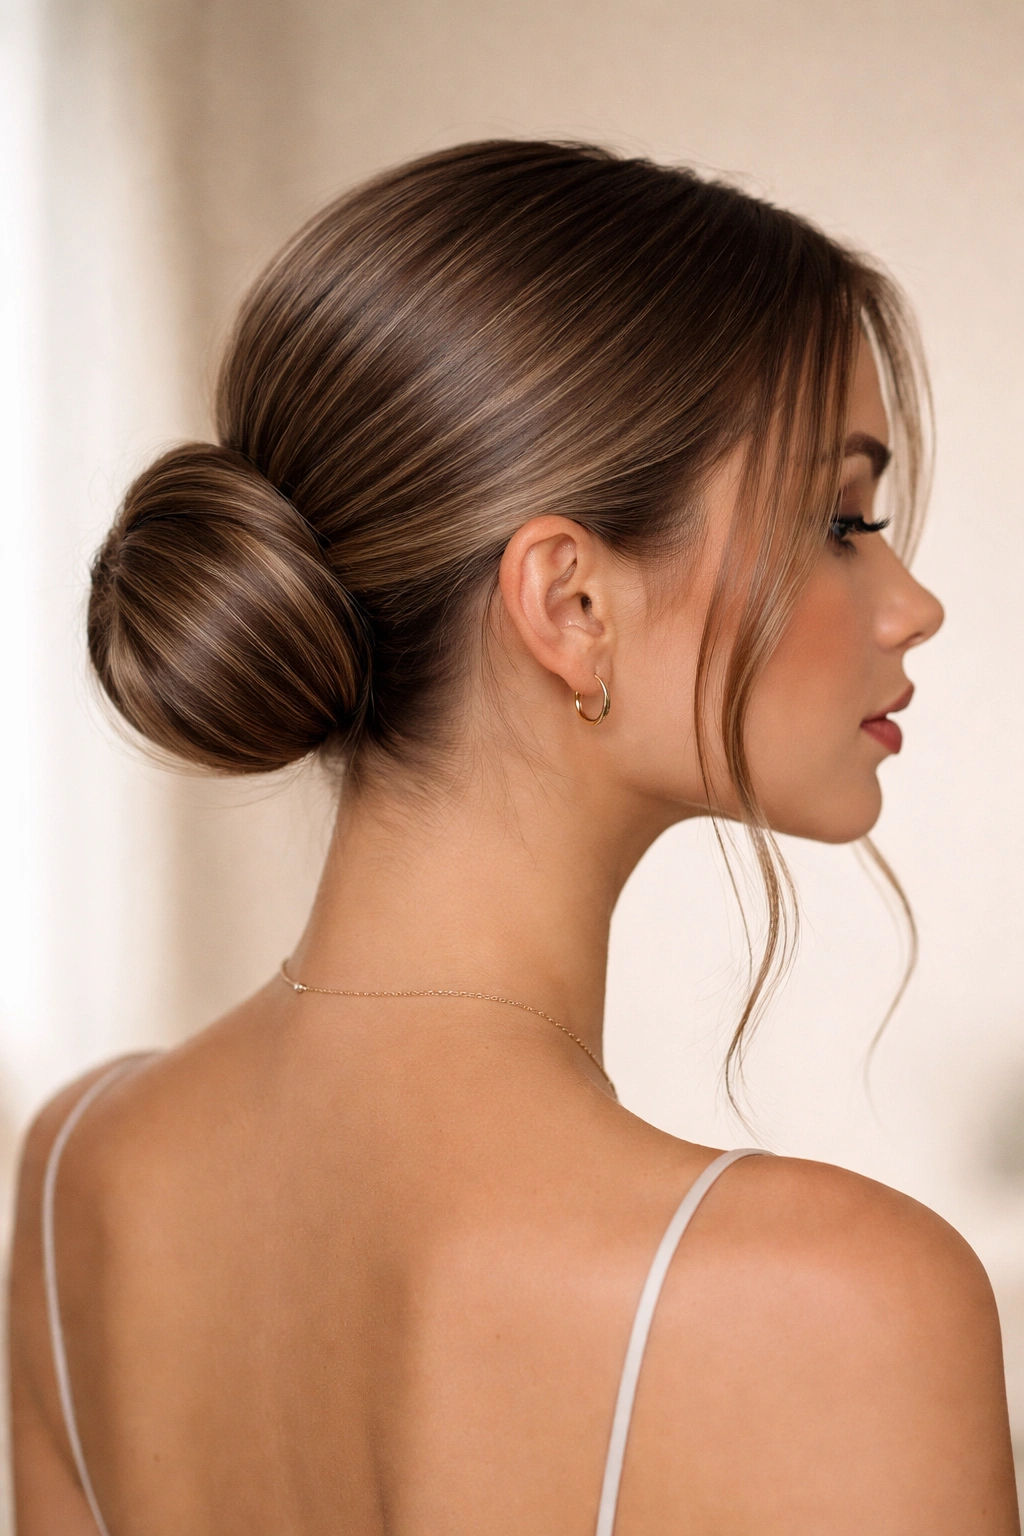
This is the style you reach for when you want to look polished without the severity of a completely pulled-back bun. The genius of this approach is how a few loose strands at the face instantly soften the whole composition, making it feel intentional and romantic rather than utilitarian.
Start with hair that’s been straightened and smoothed with a lightweight serum or polish. Brush your hair back into a low ponytail positioned at the nape of your neck—aim for the exact spot where your hairline would be if you turned sideways and looked at yourself in profile. Before you secure it, pull out two thin sections from each side of your face; these will become your frame. Twist the main ponytail and wrap it around itself in a coil, pinning it securely with bobby pins tucked underneath so they’re completely hidden. The twist, rather than a basic wrap, prevents the bun from looking flat or stark.
Why This Works for Straight Hair
Straight hair is actually the ideal texture for this style because the ponytail holds its shape without flyaways—the polished base makes the intentional tendrils read as elegant choice rather than accident. The contrast between the structured bun and the loose face-framing pieces creates visual interest without muddying the sophistication of the look.
How to Perfect It
- Smooth your hair obsessively before you start; use a fine-tooth comb and a lightweight flyaway spray
- Make the tendrils by taking each section and loosely curling it around your finger, then releasing it so it falls in a soft wave rather than a tight curl
- Secure the bun with enough bobby pins that it feels immovable—you want zero shifting throughout the night
- Finish with a light-hold hairspray that locks the tendrils in place without making them stiff
Pro tip: The lower you position the bun, the more modern and flattering it reads. Buns positioned too high can look dated; aim for just a touch above the nape.
2. Half-Up Twisted Crown

This style sits at that perfect middle ground between totally down and fully pulled back, giving you the volume and drama of down hair paired with the elegance of an updo. It’s also incredibly adaptable—you can dress it up or down depending on what you’re wearing, and it works for everything from a cocktail party to a wedding.
Straighten and smooth your hair thoroughly, then create a clean side part. Take a section of hair from behind one ear, about two inches wide, and twist it tightly as you move across the back of your head toward the opposite ear. The key here is to twist, not braid—a twisted section is sleeker and reads more modern on straight hair. As you reach the opposite side, secure the twist with bobby pins, tucking them underneath so they’re hidden completely. You should have a twisted band running across the crown of your head, with the front and bottom sections of hair left down and straight.
The Science Behind the Elegance
This style works because it catches light differently than completely down hair would. The twisted crown creates dimension and movement even though every single strand is technically straight. It’s a visual illusion—the angle of the twist makes straight hair look like it has more texture than it actually does, which reads as intentional styling.
Elevation Details That Make the Difference
- Tease gently at the crown before you start, just enough to give the twist something to grip and create a subtle lifted effect
- Use a very thin, fine-tooth bobby pin that matches your hair color; these disappear completely
- Don’t pull the twist too tight—a slightly loose, organic-looking twist reads more current and romantic than a military-precise one
- Add a delicate hair clip, small comb, or ornamental pin at the front where the twist begins for an instant glam-up
Worth knowing: This is one of the easiest styles to do on yourself, which makes it perfect for a party where you might be getting ready solo. The whole thing takes maybe eight minutes once you’ve straightened your hair.
3. Straight Hair with Smooth Waves and Sculptural Clips
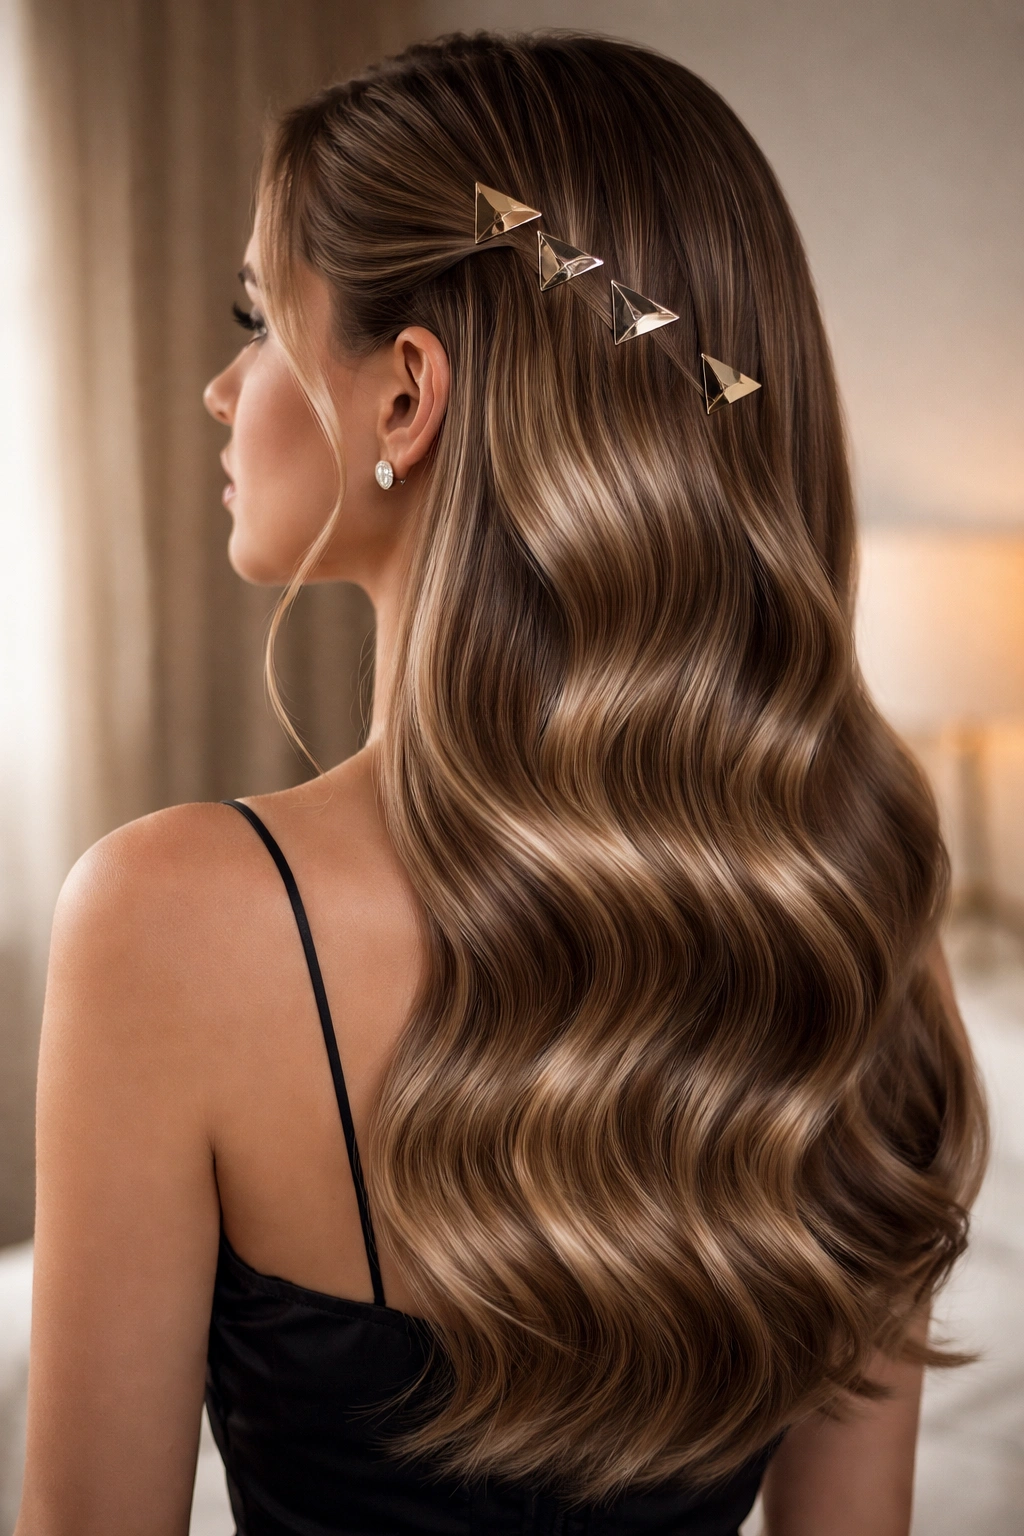
The trick to making this work is understanding that waves on straight hair aren’t about creating texture—they’re about creating a subtle shape that makes the hair read differently in light. You’re not going for soft waves; you’re going for architectural waves that almost look geometric.
Using a large-barrel curling iron (1.5 inches minimum), create deep waves by wrapping sections of hair around the barrel, holding for a few seconds, and releasing. The key is to alternate the direction of your waves—wave one section away from your face, then the next section toward your face. This creates an undulating pattern that catches light beautifully. Once you’ve waved the entire head, run your fingers gently through the waves—not your comb, just your fingers—to loosen them and make them feel less uniform. The goal is waves that look like they grew that way, not waves that look curled.
Now for the architectural part: clip small, geometric metal clips onto the waves themselves, placing them where the wave peaks. These clips (think sculptural hair cuffs, minimalist metal combs, or abstract wire clips) sit right on top of the waves and become part of the visual design. They’re not meant to hold the hair—that’s not their job. They’re meant to emphasize the wave’s shape and add an unexpected design element.
Why Straight Hair Makes This Approach Sing
Straight hair already has a sleek foundation, so the waves read as intentional sculptural choices rather than everyday texture. The clips sit cleanly on perfectly smooth hair, highlighting both the wave and the clip itself without competing visual noise.
Making It Last All Night
- Use a strong-hold hairspray after you create the waves, but before you add the clips
- Curl your hair toward the end of your getting-ready process, not hours ahead, since waves fall faster on straight hair
- Choose weightless metal clips rather than heavy beaded ones—heavier clips will slide through straight hair’s slippery texture
- Position clips where waves naturally want to sit, not fighting the wave structure
Insider note: If your hair is very silky or fine and won’t hold waves easily, try texturizing spray before curling—it gives the barrel something to grip and makes waves last significantly longer.
4. Sleek High Ponytail with Geometric Accessories
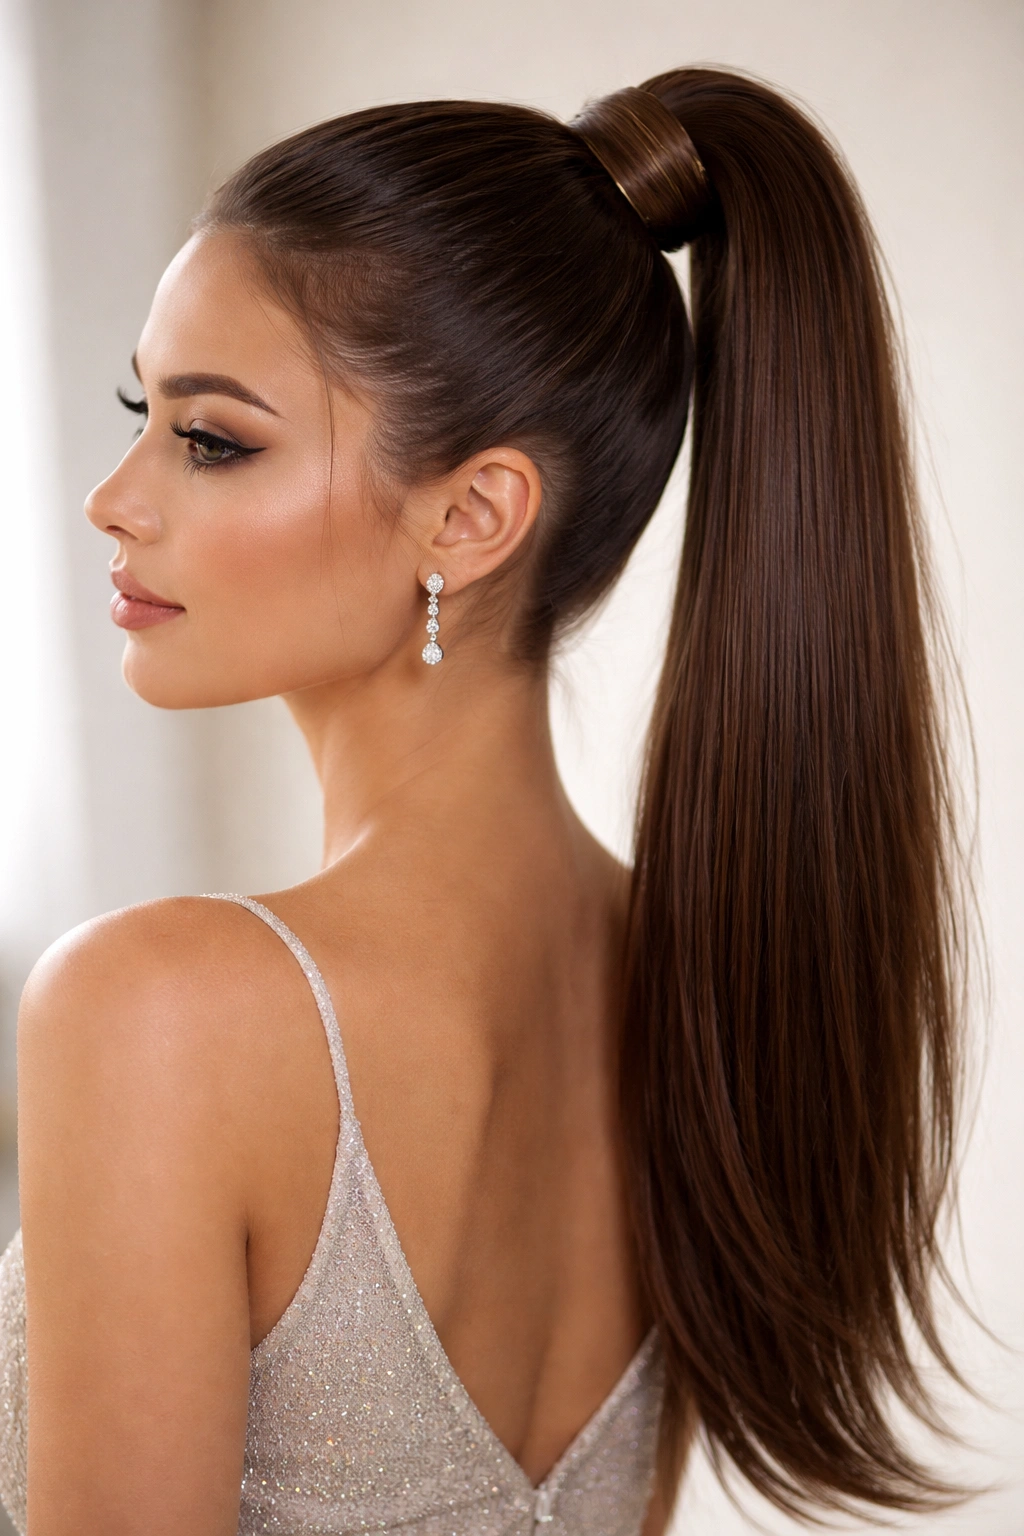
The high ponytail is a classic, but on straight hair it can read as severe unless you’re intentional about softening it and adding visual elements that make it feel less utilitarian. The secret is what you do after you’ve secured it.
Create a clean, high ponytail positioned at the crown. This is crucial—the placement should be where your hair naturally wants to separate if you were to part it, not pulled back so far that it strains your hairline. Secure it tightly with an elastic that matches your hair color. Now take the elastic off—you’re going to replace it with something more intentional. Cut a small section of hair from underneath the ponytail (about half an inch), and use that section to wrap around the base of the ponytail, completely covering the elastic. Pin the wrap in place with a bobby pin hidden underneath, and finish by clipping a geometric metal hair cuff or an ornamental clip right over that wrapped section. The effect is that your ponytail appears to be held by nothing but the decorative element itself.
What Makes This Feel Party-Ready
A plain ponytail reads casual. A ponytail with an elegant geometric clip or metal cuff reads intentional and deliberately styled. The wrapped base elevates the whole situation, making it feel like a design choice rather than a hairstyle you threw together in five minutes.
Styling Decisions That Elevate It Further
- Keep the ponytail itself perfectly smooth and glossy; this is where all your attention goes visually
- Add a light serum to the ponytail before securing it so it catches light and looks almost luminous
- Consider pulling out one or two thin wisps from the front hairline; a completely swept-back face can feel harsh
- Choose a clip or cuff in a precious metal (gold, silver, rose gold) or a unexpected material like acrylic or enamel
Real talk: The height of a ponytail dramatically affects how old a style reads. Too low reads boring and dated; too high reads trendy but can feel juvenile. Aim for somewhere between your crown and where your natural hairline meets your scalp—that middle-ground position is universally flattering.
5. Deep Side Part with Sleek Asymmetrical Waves
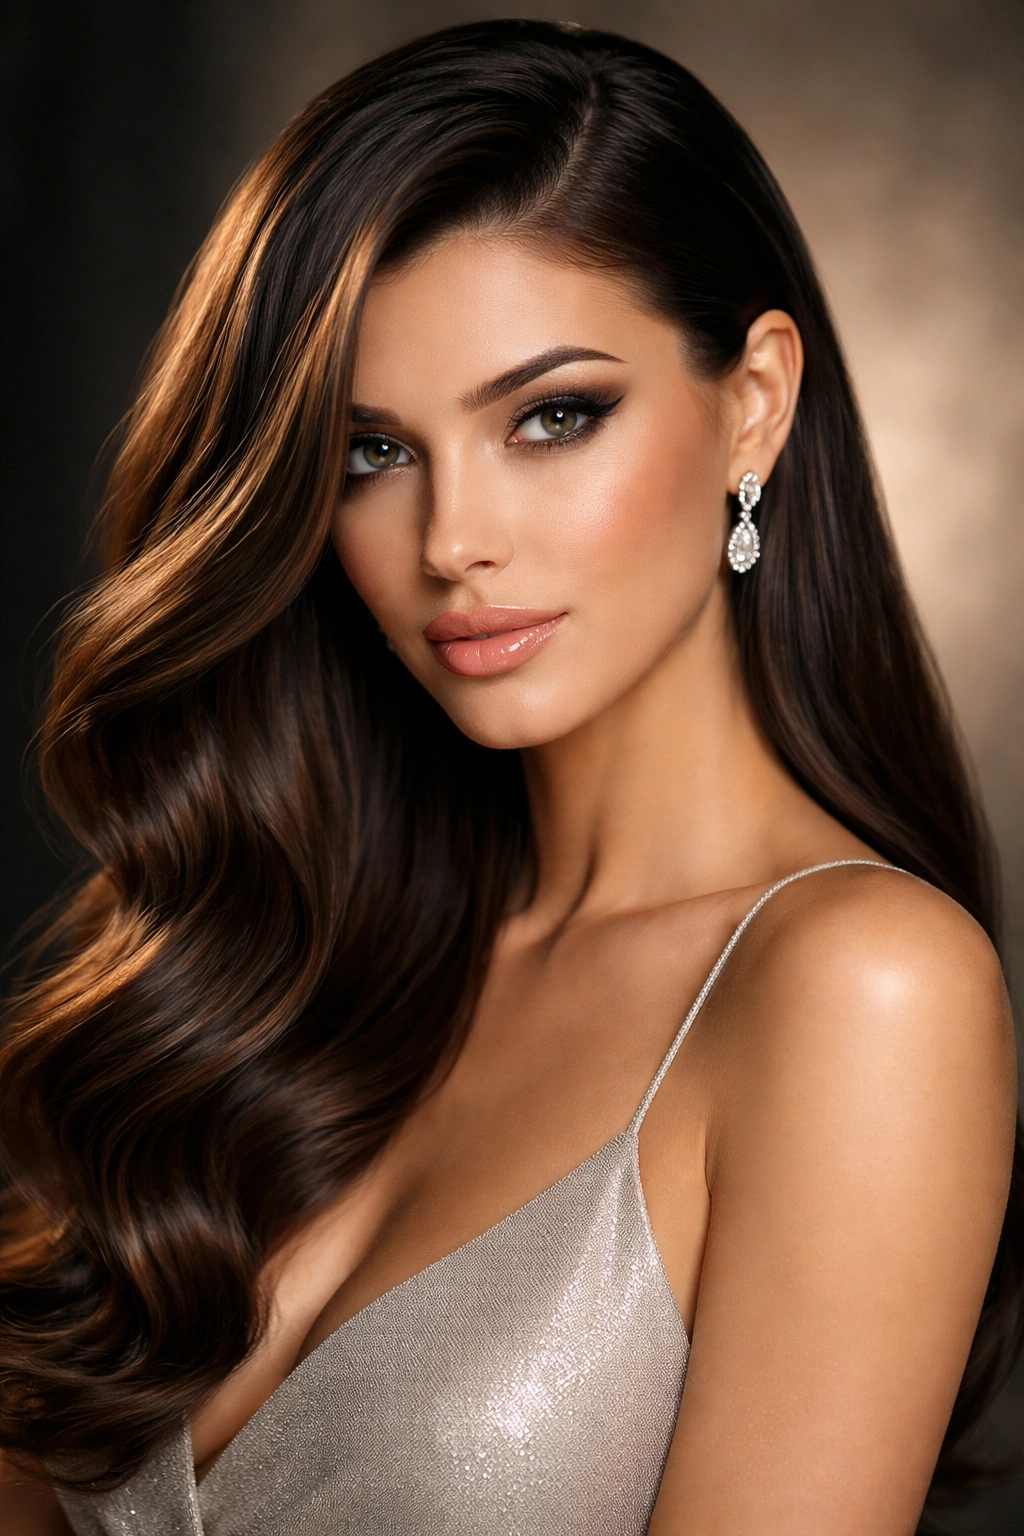
This style trades geometric precision for flowing asymmetry, creating drama through imbalance rather than structure. It’s a statement style that announces you’re in a moment the second you walk in.
Part your hair deeply to the side—I’m talking almost extreme, where one side has maybe two inches of hair visible from the center part, and the other side has most of your hair. Straighten both sides meticulously. On the side with more hair, use a large-barrel curling iron to create loose, flowing waves—these can be more relaxed than the architectural waves from the previous style. You want movement and flow rather than sharp peaks. On the smaller side with less hair, smooth it completely; keep it sleek and glossy as a contrast to the wavy abundance on the opposite side.
The asymmetry is the whole point here. One side reads sophisticated and restrained; the other side reads romantic and abundant. The contrast between them is what makes the style visually striking.
Why This Works Specifically on Straight Hair
Straight hair gives you a totally clean canvas to create imbalance. On textured or naturally wavy hair, asymmetry can read messy. On straight hair, even significant asymmetry reads intentional and editorial because one side is so precisely sleek.
The Details That Make It Work
- Make sure the part is truly deep and deliberate; a wishy-washy side part reads indecisive
- The waves on the fuller side should move; they shouldn’t sit static. Tousle them gently with your fingers to encourage them to fall naturally
- Use a shine spray on both sides to enhance the contrast—the smooth side becomes almost mirror-like, while the waves become luminous and dimensional
- Don’t underestimate how powerful pure volume is; the wavy side should have plenty of bounce and movement
Worth knowing: This style photographs beautifully because the asymmetry creates visual interest from every angle. If you’re planning to take photos at the party, this is genuinely one of the best choices.
6. Slicked-Back High Shine with Statement Earrings
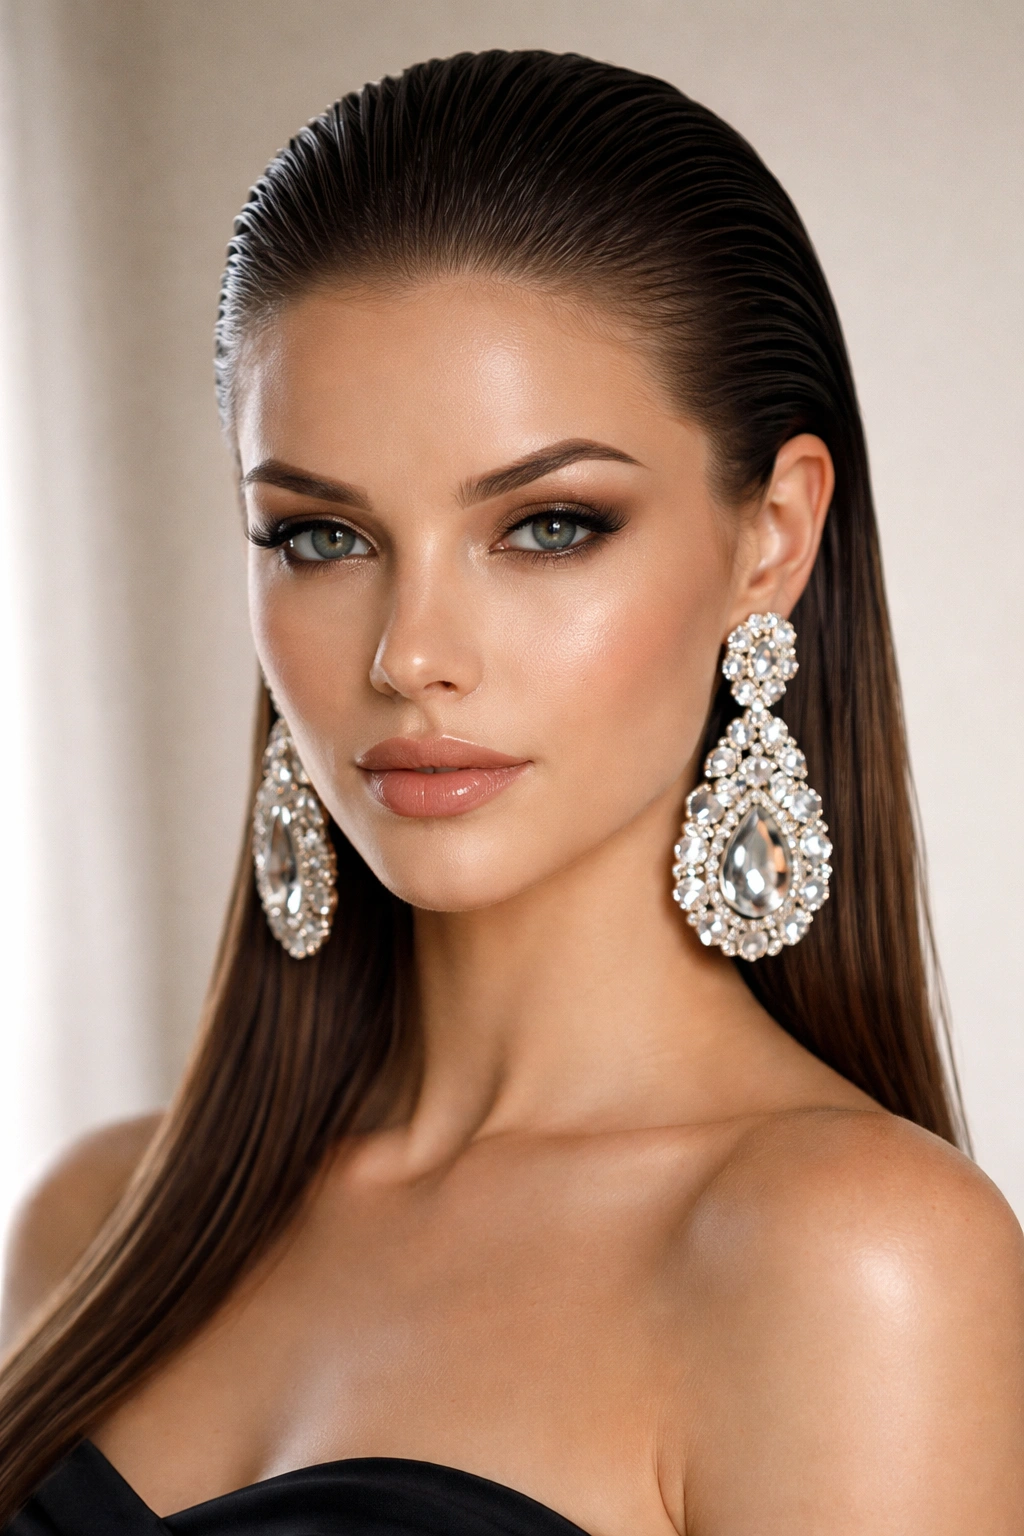
Sometimes the best party hairstyle is the simplest—it’s about pushing polish so far that simplicity becomes drama. This is the style for that vibe.
Straighten your hair obsessively. Use a smoothing cream or serum while your hair is still warm from the blow-dry, working it through every section. Brush your hair straight back and away from your face—not into a ponytail, just brushed back so your entire face and neck are exposed. Use edge control on your hairline to ensure everything is utterly sleek; not a single hair should escape. Secure the back with pins if needed so nothing moves, but keep the front intentionally smooth without any texture or bumps. The entire point of this style is absolute, unwavering sleekness.
Your hair becomes almost lacquered—it should catch light and look almost wet, in the most elegant way possible. Every single edge should be clean and precise. This is your canvas for whatever statement earring you’re planning to wear. Without the distraction of complicated hair, your earrings become the focal point.
Why Straight Hair Is Essential for This Style
This style would not work on textured hair—it would read unfinished. On straight hair, this level of sleekness reads intentional, powerful, and utterly confident. It’s almost sculptural; you’re treating your hair like a glossy architectural element.
Making It Actually Wearable
- Use edge control sparingly but effectively; it should feel light and not flake or look chalky
- Straighten your hair the morning of the event, or at least a few hours before, so it’s at peak smoothness
- Apply a hair serum while your hair is still slightly warm from styling to lock in shine
- Do a final smoothing pass with a paddle brush dipped in a light smoothing cream right before you leave the house
- Pin the back gently and securely so nothing shifts when you move
Pro tip: This style is the perfect counterpoint to bold, dangly earrings or sculptural pieces. It’s so minimal that earrings have room to be the statement. If you’re going with subtle jewelry, this style might read too severe.
7. Braided Halo with Straight Hair Underneath
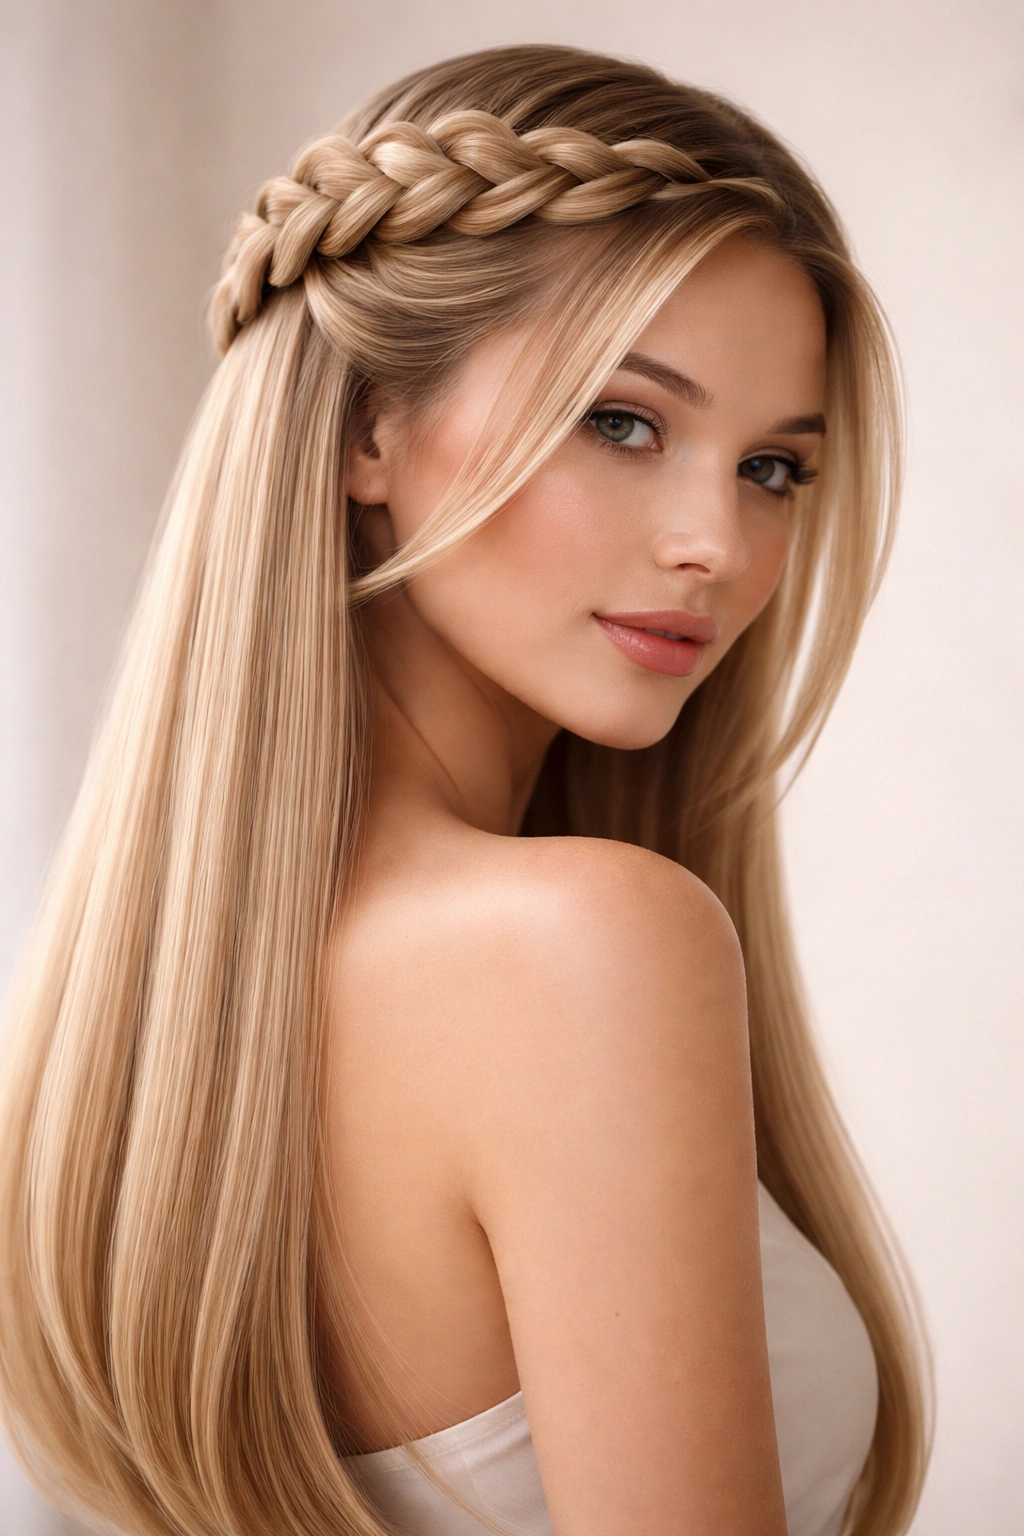
This style combines the romance of a braided halo with the sleekness of straight hair, giving you softness and sophistication at the same time. It’s unexpectedly wearable despite sounding complicated.
Create a halo braid by starting at one ear, braiding a section of hair around the crown of your head, and ending at the opposite ear. French braid technique works beautifully here, adding volume as you go. Once you’ve finished the braid and secured the end with a small elastic, you should have an elegant braided band running around your head like a crown, with the rest of your hair still down and straight below it.
Leave the rest of your hair completely straight and glossy—this is the crucial contrast. The braid creates a soft frame and adds visual interest, but the straight hair underneath keeps the style elegant and modern rather than overly romantic or cottagecore. Smooth the straight hair with serum, and let it drape cleanly down your back and shoulders.
The Balance This Style Creates
Too much braid can feel costume-like. Too much straight hair feels boring. This 50/50 split gives you texture and interest without overwhelming the look with fussy detail. The straight sections ground the style; they make it wearable for a sophisticated party rather than a festival.
Executing It Smoothly
- Practice the braid beforehand if you’re doing it yourself; it’s easier than it looks, but muscle memory helps
- Don’t make the braid too loose or too tight; it should sit snugly but comfortably against your head
- Make sure the straight sections of hair below the braid are absolutely glossy and smooth—use a shine serum and a paddle brush
- Consider loose waves in the straight section if you want slightly more movement, but keep them soft and flowing, not defined
- If securing the braid end is awkward, hide the elastic under a few strands of the straight hair that drape over it
Worth noting: This style actually works beautifully whether your hair is stick-straight or has some natural movement. The contrast between the braid and the loose sections is what matters.
8. Center Part with Sleek Low Pigtail Buns

This is the style for when you want something that feels unexpected and playful but still entirely sophisticated. Two buns aren’t childish when they’re positioned right and executed with precision.
Create a perfect center part and straighten both sides meticulously. Divide your hair into two sections at the back—not at the sides like traditional pigtails, but at the nape of your neck. Take each section and smooth it back into a low bun positioned behind each ear. Wrap each ponytail tightly around itself and pin it securely, hiding all the bobby pins. The buns should sit low and close to the back of your neck, not out at the sides of your head. Keep the front sections of your hair straight and framing your face.
The result is a style that’s clean and contemporary, with a playful edge that reads intentional rather than juvenile. It’s symmetrical but not stern; it’s structured but not severe.
Why This Works at a Party
Two low buns feel modern and editorial when they’re this precisely executed. You’re not going for cute or quirky; you’re going for intentional, contemporary design. The precise center part and completely straight front sections reinforce the polished intention.
Precision Points That Matter
- The center part must be absolutely straight; use the tip of your tail comb to create a clean line from your forehead to the nape of your neck
- Each bun should be exactly the same size and positioned at the exact same height—symmetry is key
- Smooth the front sections obsessively; they should be glossy and show zero texture
- Add a light serum to the buns so they catch light and look deliberately shiny rather than matte
Honest take: This style is for someone who wants to stand out in a good way. Most people don’t do two buns at a party, so you’ll definitely read as fashion-forward rather than following convention.
9. Straight Hair with Jeweled Hair Clips as Accent
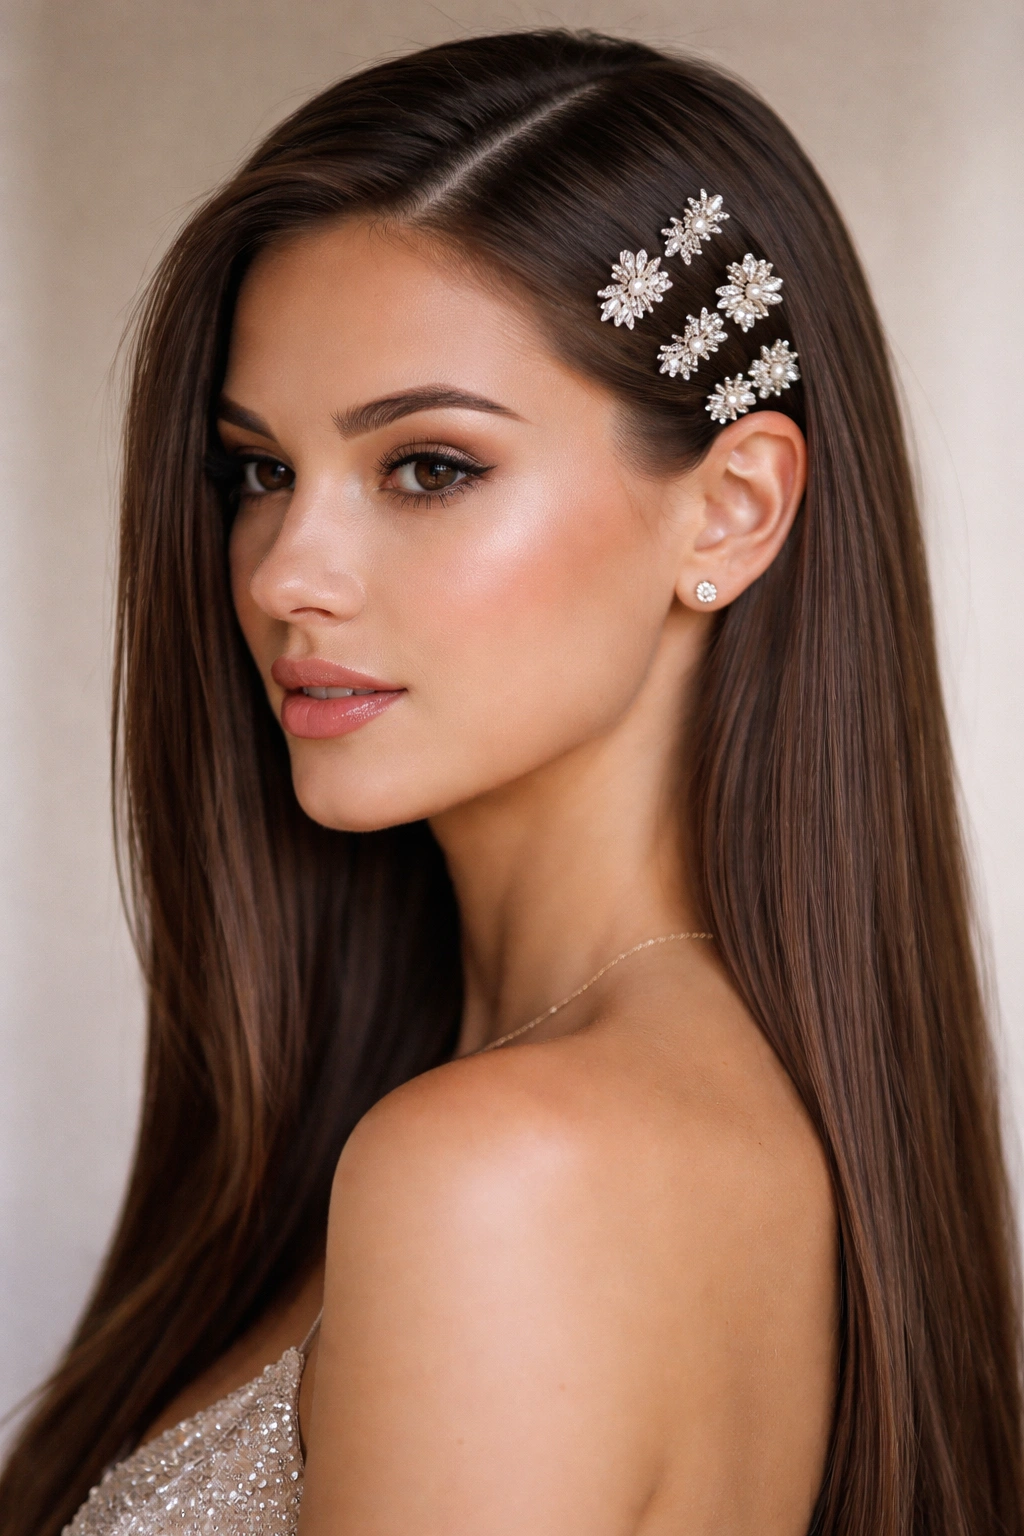
Sometimes the best styling choice is to let your straight hair do what it does best—be sleek, shiny, and beautiful—and then elevate it with carefully placed accessories that add just enough drama.
Straighten your hair thoroughly and style it down and loose. Use a smoothing serum to enhance shine. Create a subtle side part. Now, strategically place jeweled clips throughout your hair, focusing on the side opposite your part. Don’t scatter them randomly; instead, cluster three to five clips together on one side, or place them in a gentle diagonal line from temple to ear. The clips should sit right at the hairline or just slightly underneath so they’re visible and become part of the overall composition.
The straight hair is the backdrop; the clips are the punctuation. This approach is so effective because you’re not fighting your hair’s natural texture or trying to add volume and movement. You’re respecting its inherent sleekness and using accessories to add visual interest.
What Makes Jeweled Clips Different from Other Hair Jewelry
The right clip catches light and reads luxe without looking costume-like. Choose clips with genuine sparkle—crystals, pearls, or semi-precious stones—rather than cheap rhinestones that look flat and plastic. A five-dollar clip reads like a five-dollar clip; a well-made jeweled piece reads elegant.
Styling Decisions That Amplify the Effect
- Keep your makeup and outfit relatively streamlined so the hair clips become the focal point
- Choose clips in metallic or jewel tones that complement your complexion—rose gold for warm tones, white gold or silver for cool tones
- Position clips where they’ll catch light as you move—typically on the side of your head near your temple or ear
- Ensure each clip is securely fastened so it doesn’t shift throughout the evening
Real talk: This style is incredibly low-maintenance but reads like you put significant effort in. That’s the magic of it—the drama comes from the accessories, not complicated styling technique.
10. Sleek Straight Hair with Volume at the Crown
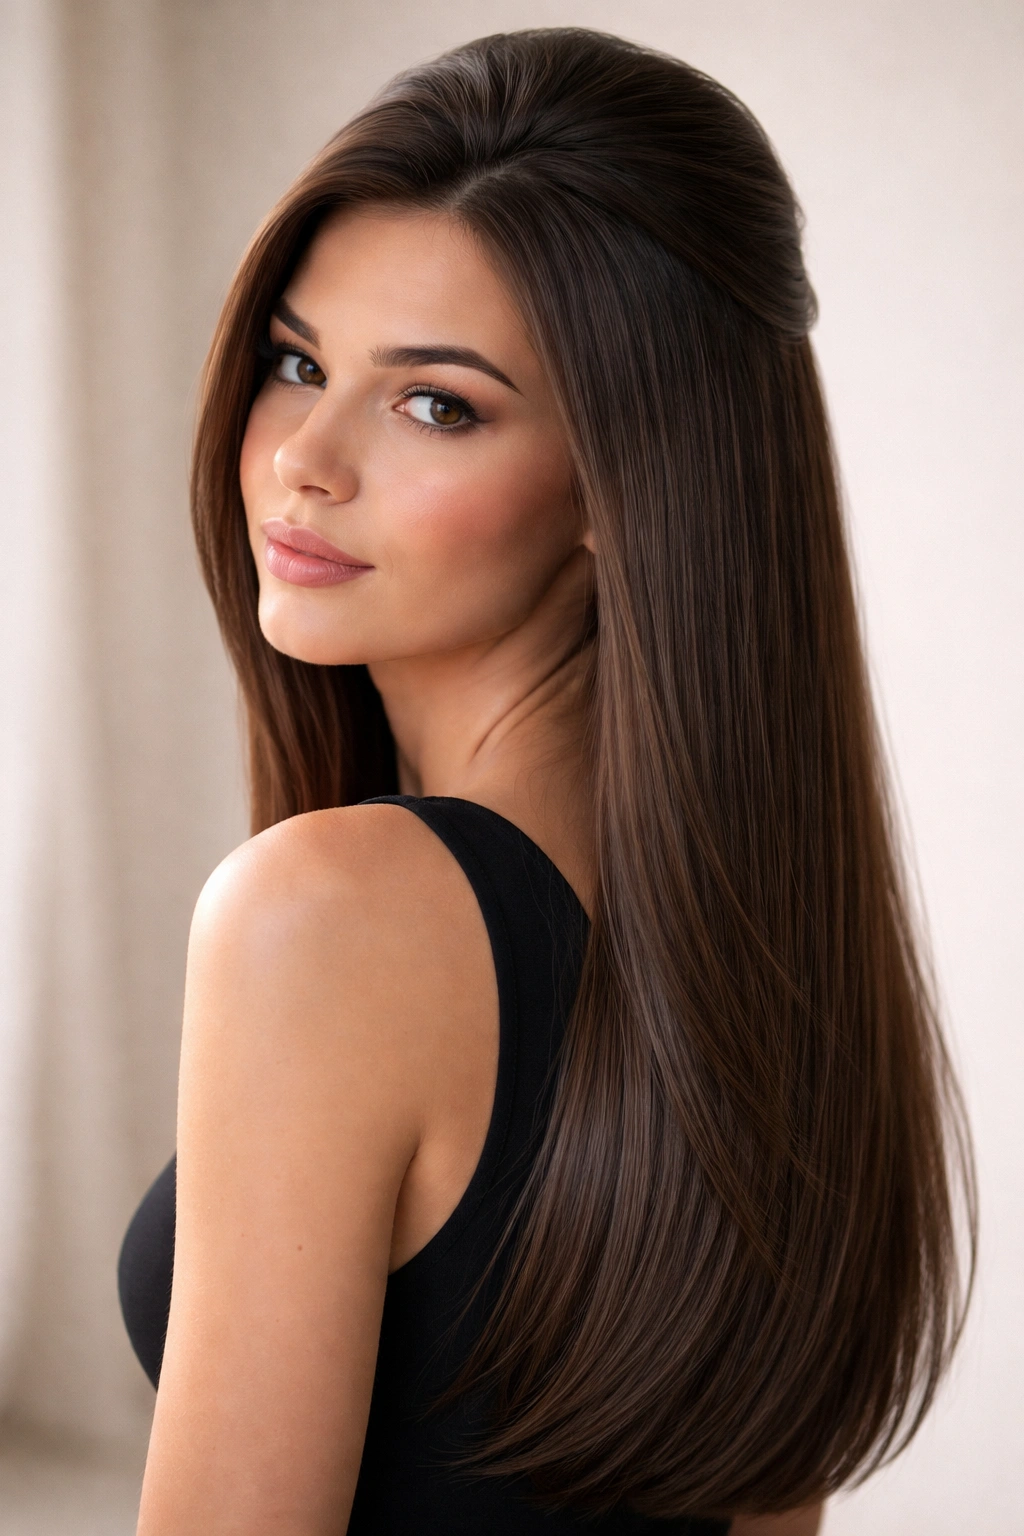
This is the style for when you want traditional elegance with just enough modern energy to feel current. It’s about creating subtle dimension in an otherwise perfectly straight silhouette.
Straighten your hair meticulously, paying special attention to making sure each section is glossy and smooth. Once you’ve straightened everything, use a teasing brush to gently backcomb at the crown—you’re not going for obvious volume, just a subtle lift. Smooth the outer layer with a paddle brush so it looks sleek on top while the underneath has just enough texture to create height. This is invisible volumizing; from the front, your hair looks completely straight and smooth, but you’ve got structure and lift at the crown.
Let your hair fall straight down the back and sides. The entire point is that from most angles, someone would think your hair is just naturally straight and beautiful, but when you move or they see you from above, they’d notice the subtle crown volume. It’s sophisticated because it’s understated.
The Technique That Makes It Work
This isn’t about creating a pouf or an obvious bump. You’re creating just enough texture at the roots to give your head shape without anyone being able to pinpoint exactly what you’ve done differently. The skill is in restraint.
How to Execute It Subtly
- Use a light hand with the teasing brush; you’re not creating texture, just disturbing the smoothness enough to catch light differently
- Smooth the outer layer very deliberately with a fine-tooth comb or paddle brush
- The crown volume should not be visible from the front; you should only notice it from certain angles
- Finish with a light-hold hairspray that locks everything in place without making it crunchy
Pro tip: This is the perfect style for someone who likes looking effortlessly polished. It’s minimal, it’s elegant, and it reads like you didn’t try too hard—which, of course, you absolutely did.
Final Thoughts
The most important thing to remember with straight hair at a party is that your texture is an asset, not a limitation. Straight hair is already sleek, already shiny, already reads as polished—you don’t need to fight that or apologize for it. Instead, lean into it. Every style here works because of straight hair’s natural properties, not despite them.
The second thing worth remembering is that the difference between a casual hairstyle and a party hairstyle often comes down to intention and detail, not complexity. Adding one strategically placed clip, creating asymmetry through a deep part, or using a wrapped base on a ponytail—these small, smart choices elevate a style without requiring advanced technique or hours of effort. You’re not trying to transform your hair into something it’s not; you’re making deliberate choices that emphasize what it already is.
Pick a style that actually feels like you, rather than defaulting to whatever you’ve always done. The best party hairstyle is the one that makes you feel confident and beautiful, and that makes you feel like yourself—just a slightly more intentional, slightly more styled version of yourself.