Braided ponytails have become a staple protective style for Black women, offering versatility, elegance, and the practical benefit of keeping natural hair protected while looking polished. The beauty of mid-length braided ponytails lies in their sweet spot — long enough to make a statement, short enough to feel fresh and manageable. Whether you’re heading to work, a special event, or just want a style that carries you through the week, braided ponytails deliver on both aesthetics and hair health. The braid component adds texture, visual interest, and an extra layer of sophistication that simple ponytails simply can’t match.
What makes mid-braided ponytails particularly appealing is their incredible range. You can go sleek or voluminous, tight or relaxed, minimalist or ornate — all within the same general style category. The placement of the braids, their thickness, the direction they flow, and how they transition into the ponytail itself create dozens of distinct variations. This means you can wear this style multiple times and have it feel completely different each time, which is perfect for anyone looking to maximize their styling options without needing entirely new looks.
The technical challenge with braided ponytails is getting the transition smooth and secure. The braid needs to flow naturally into the ponytail base without visible gaps, bumps, or loose sections that will unravel by midday. This is where technique, proper sectioning, and understanding the specific mechanics of each style becomes essential. The styles we’re covering below all address this challenge differently, giving you options depending on your skill level, available time, and the specific aesthetic you’re aiming for.
1. Goddess Braids High Ponytail with Wrapped Base
Goddess braids are thicker, more sculptural braids that create an undeniably regal appearance. When pulled into a high ponytail, they command attention and read as deliberately polished rather than casual. This style features three to five substantial goddess braids (or however many coordinate with your hair volume) starting from the front or sides of your head and flowing directly back into a gathered ponytail. The size and boldness of goddess braids make them instantly recognizable, and the high placement adds height and glamour.
Why This Style Works
Goddess braids work beautifully in a high ponytail because the braid’s thickness means the transition into the gathered hair is naturally prominent and visible — which is exactly what you want here. Rather than trying to hide the connection, this style celebrates it. The braids themselves act as the design element, and the high position makes them the focal point of your entire look. This works wonderfully for occasions where you want to look intentionally styled and put-together, not understated.
How to Create It
Start by sectioning your hair into three to five clean sections (depending on your hair density and personal preference — thicker sections create thicker braids). Begin each goddess braid at your hairline or temple and use a flat-twist or cornrow base combined with extensions or added hair to build the braid’s thickness. Keep the tension moderate and consistent, and guide each braid straight back toward where you want your ponytail to sit. Gather all the braids and loose hair into a high elastic, then smooth the transition area with edge control or slicked-back gel. Wrap a small section of hair around the base where the elastic sits to hide it completely.
Best For
This style shines for special events, date nights, professional headshots, or occasions where you want maximum visual impact. It’s ideal if you have medium to thick natural hair density because goddess braids show up best when there’s substantial hair framing them. The high position suits longer face shapes particularly well, as it elongates the face and creates balance.
Pro tip: Use braiding extensions in a shade that matches your hair closely, or go bold and choose contrasting colors for extra visual drama — metallic, bright, or jewel-toned extensions transform this from elegant to show-stopping.
2. Cornrow Braided Ponytail with Side Sweep
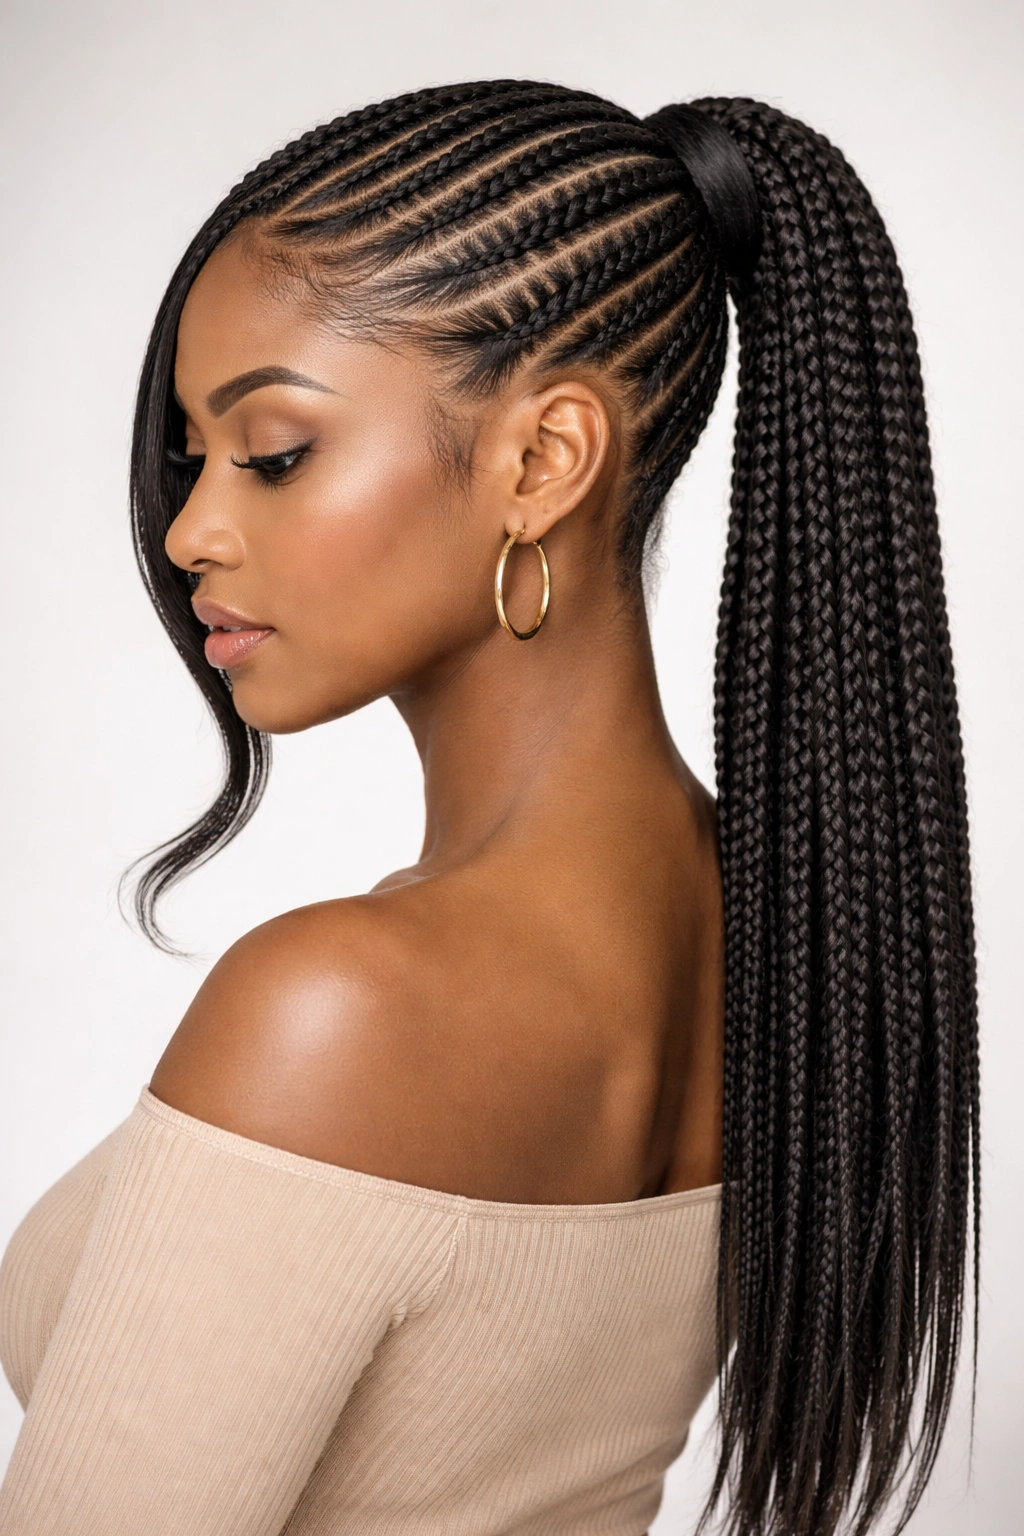
Cornrows offer a more defined, geometric look than goddess braids, and when swept to one side before flowing into a ponytail, they create immediate movement and visual direction. This style typically features three to four cornrows that start at the crown and angle toward the side where your ponytail will sit, then transition seamlessly into gathered hair at the back or side. The cornrows essentially guide the eye along a deliberate path, which makes the overall composition feel thoughtfully designed rather than random.
Why This Style Works
Cornrows are incredibly precise, which means they photograph beautifully and maintain their crisp appearance throughout the day. The side sweep adds asymmetry that feels modern and intentional — it’s not a simple center ponytail, it’s a considered style choice. The defined lines of cornrows also draw attention to the texture of your hair, which is especially striking with natural texture. This works as both a casual everyday style and a put-together professional look depending on how sleek you make the edges.
How to Create It
Section clean hair and create three to four cornrows starting from the crown area, angling them toward the side where your ponytail will ultimately sit. Keep the rows parallel and the tension even for the most polished appearance. Braid each cornrow all the way to the end of your natural hair. At the gathering point (typically the side-back of your head), secure the cornrow ends and loose hair together with a strong elastic. Smooth down any flyaways with gel or edge control, paying special attention to where each cornrow begins — these should look crisp and intentional.
Best For
This style works beautifully for work, school, casual outings, or anytime you want a style that looks neat without appearing overdone. It’s perfect for anyone transitioning their hair or managing varied textures, since the cornrows contain the hair neatly while the ponytail portion can be as textured or smoothed as you prefer. The side placement suits most face shapes, but particularly flatters round faces by creating vertical line and balance.
Worth knowing: The cornrows will last longer and look crisper if you apply edge control to each row as you braid, rather than waiting until the end — this helps set the shape and keeps flyaways from compromising the crisp lines you worked to create.
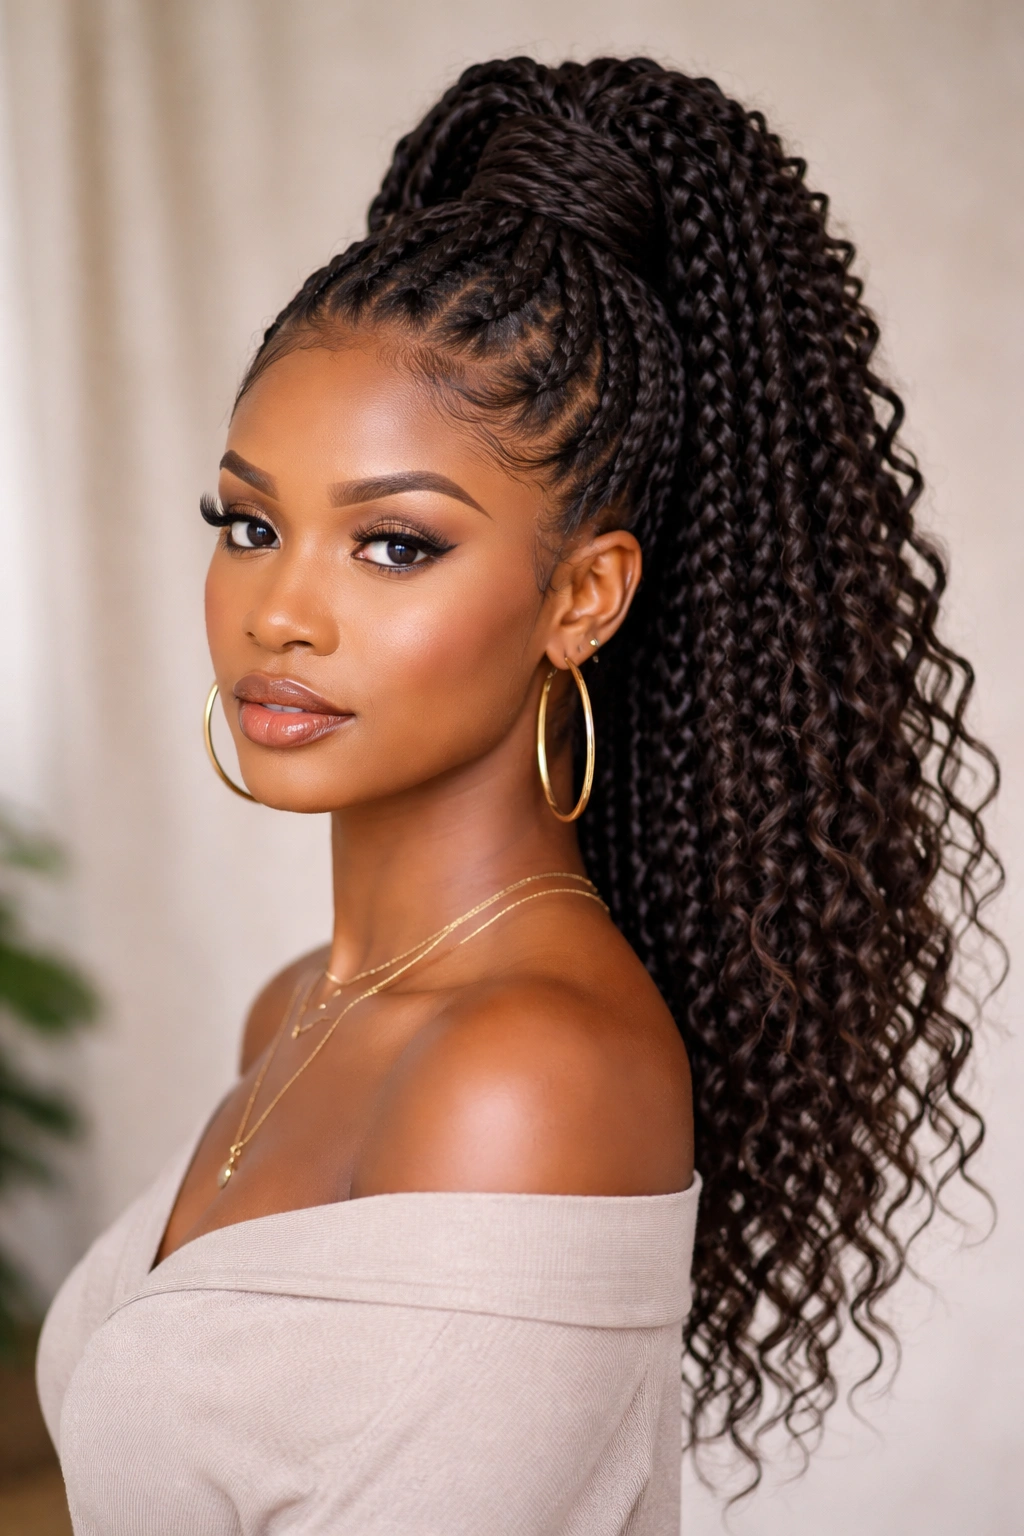
3. Box Braids Pulled Into a Sleek Ponytail
Box braids are individual braids created in distinct, square-shaped sections, and they offer tremendous versatility when styled into a ponytail. You can cluster a dozen or more box braids together at the base of your pony for maximum volume and visual impact, or gather just a few for a more restrained look. The beauty of this approach is that box braids can be done by many braiders and come pre-made, so you’re working with a style that’s already partially completed before you even attempt the ponytail conversion.
Why This Style Works
Box braids are forgiving in a ponytail style because each individual braid holds its own shape and integrity — you’re not relying on one unified structure to perform well. Even if one braid loosens slightly, the others maintain their appearance. The uniform geometry of box braids creates visual interest without requiring complex techniques; the braids themselves are already doing the heavy lifting aesthetically. A sleek ponytail base paired with textured box braids creates beautiful contrast between refined and natural.
How to Create It
If your box braids are already in, you’re already most of the way there. Gather all the braids (or your chosen subset) into your desired ponytail position and secure with a sturdy elastic. Go over the section where the elastic sits with a fine-tooth comb and edge control to smooth any wispy bits, creating a polished base. Consider wrapping a strand of hair around the elastic to hide it, or leave the elastic visible if you prefer a more casual look. You can also add decorative cuffs, beads, or rings around the base for extra flair.
Best For
This style is ideal for anyone who already has box braids installed because it extends their versatility without requiring removal and reinstallation. It works for casual wear and professional settings alike. The individual braids are protective and low-maintenance, which makes this perfect for active people, athletes, or anyone wanting a style that genuinely lasts two to three weeks without needing touch-ups or maintenance.
Insider note: If you have the skill to cornrow or braid, you can create a small set of cornrows from your hairline back to where your ponytail will sit, then gather all your box braids from that point backward — this creates an extra-polished transition and makes the style feel more intentional.
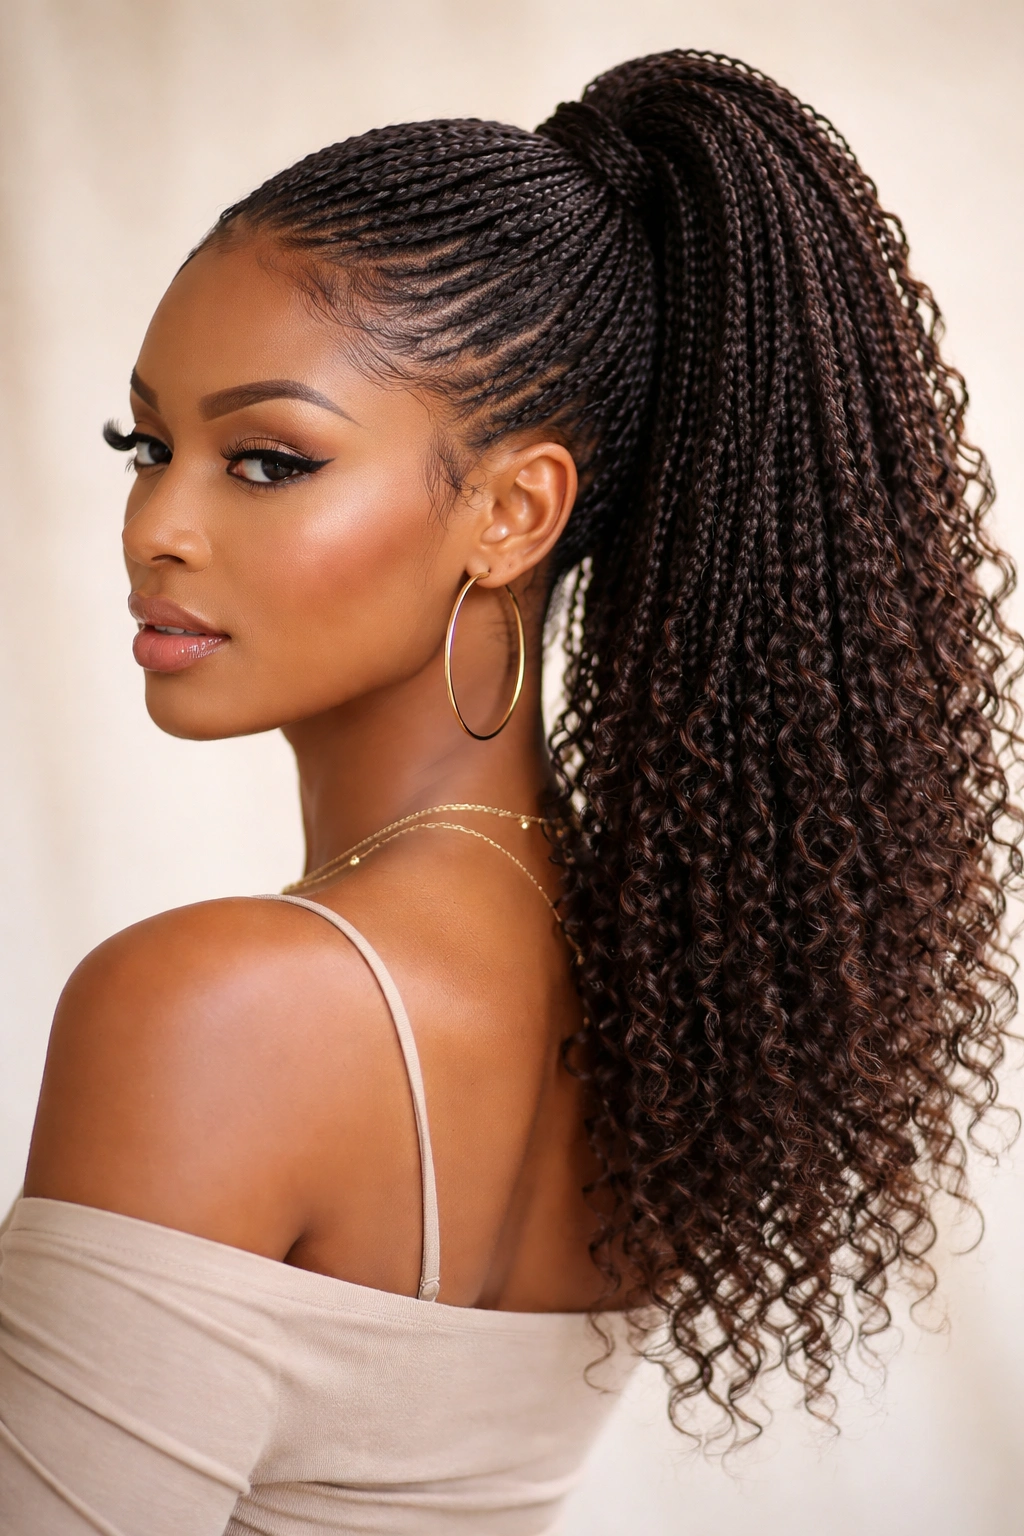
4. Fulani Braids Styled Into a Mid-Length Pony
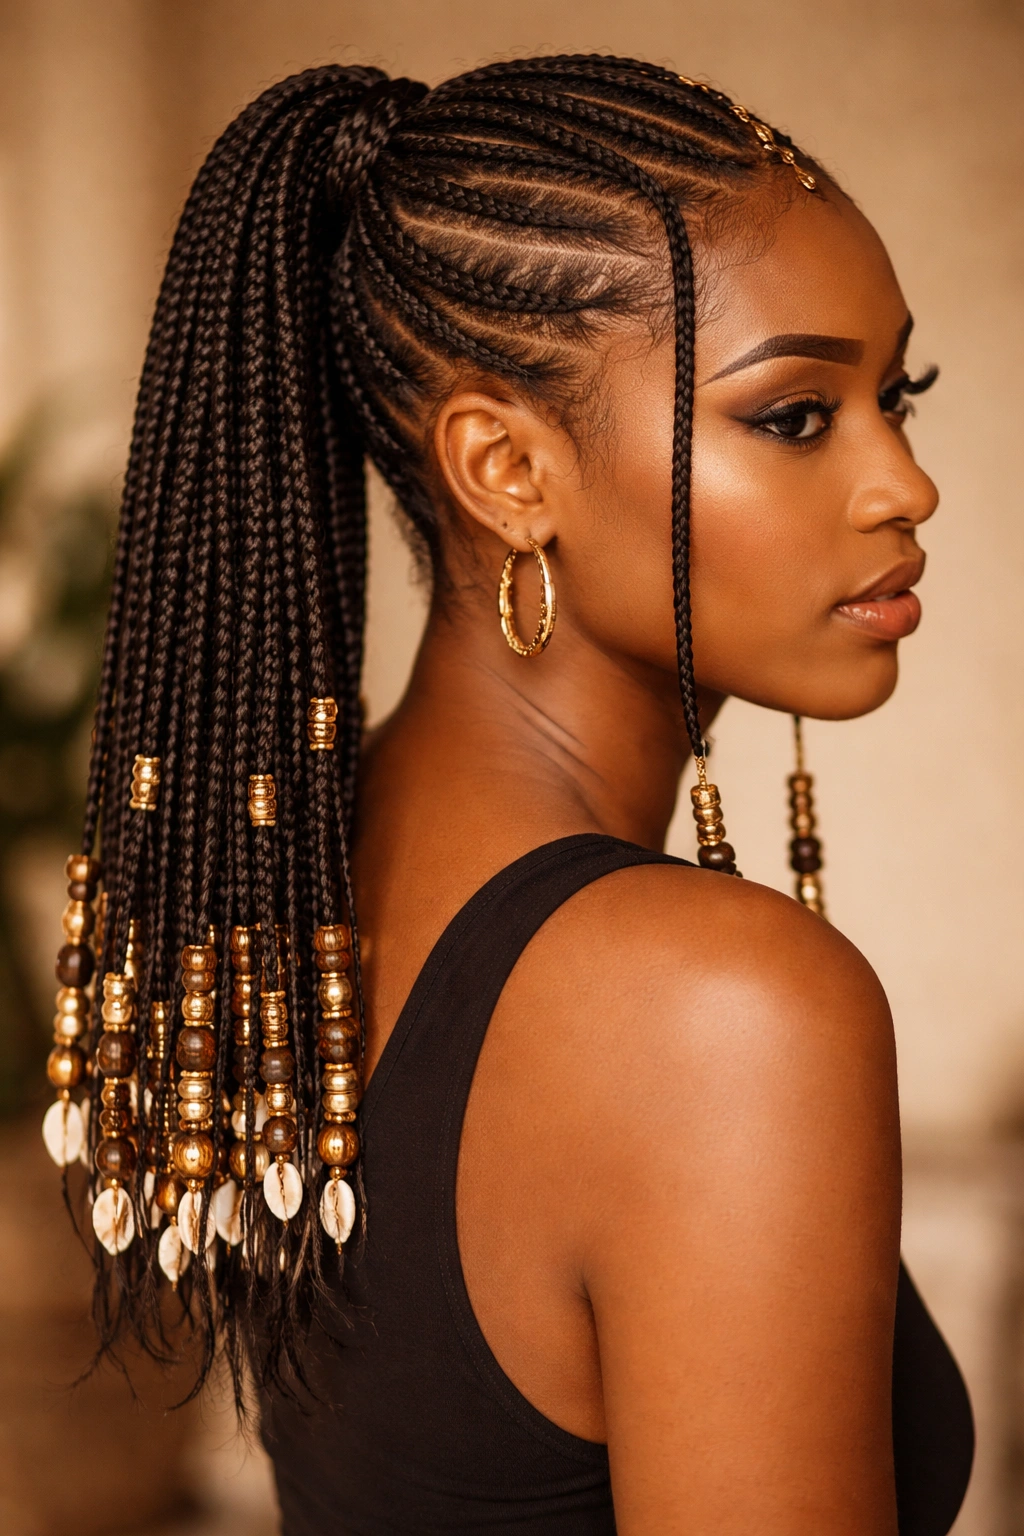
Fulani braids, originating from West African styling traditions, feature distinctive characteristics: they’re typically thin to medium-weight, and they incorporate beads, rings, or cowrie shells at the ends for cultural authenticity and visual interest. When styled into a mid-length ponytail, the decorative elements dangle at the gathered point, creating movement and a genuinely eye-catching finish. The thin braid work showcases incredible detail and artistry, especially when multiple braids are woven together toward the ponytail.
Why This Style Works
Fulani braids immediately signal cultural awareness and appreciation for Black beauty traditions. The intricate braid work is an art form in itself, and gathering them into a ponytail doesn’t diminish that artistry — it transforms it. The beads or shells create auditory and visual interest, catching light and moving with your head, which makes the style feel alive and dynamic. This is a style that announces intentionality and celebrates heritage.
How to Create It
This style genuinely requires a skilled braider who understands Fulani braid traditions — the thin braid work, the specific angle of placement, and the incorporation of beads all demand expertise. Once your braids are in, gather them into your ponytail position and secure with an elastic. The decorative elements at the ends should dangle freely below the ponytail base for maximum visual impact. Consider leaving some braids unclipped to frame your face, creating a softening effect while the gathered portion remains defined.
Best For
Fulani braids suit anyone wanting a style that celebrates cultural tradition and craftsmanship. They’re stunning for celebrations, cultural events, date nights, or anytime you want a style that provokes conversation and appreciation. The thin braids are ideal for those with finer hair textures or anyone wanting a lightweight style that won’t create tension on the hairline. The beaded elements make this particularly striking with deep skin tones and rich hair colors.
Pro tip: Alternate the side you wear your Fulani braid pony to prevent uneven tension on your hairline, which helps preserve your edges long-term while extending the overall lifespan of this protective style.
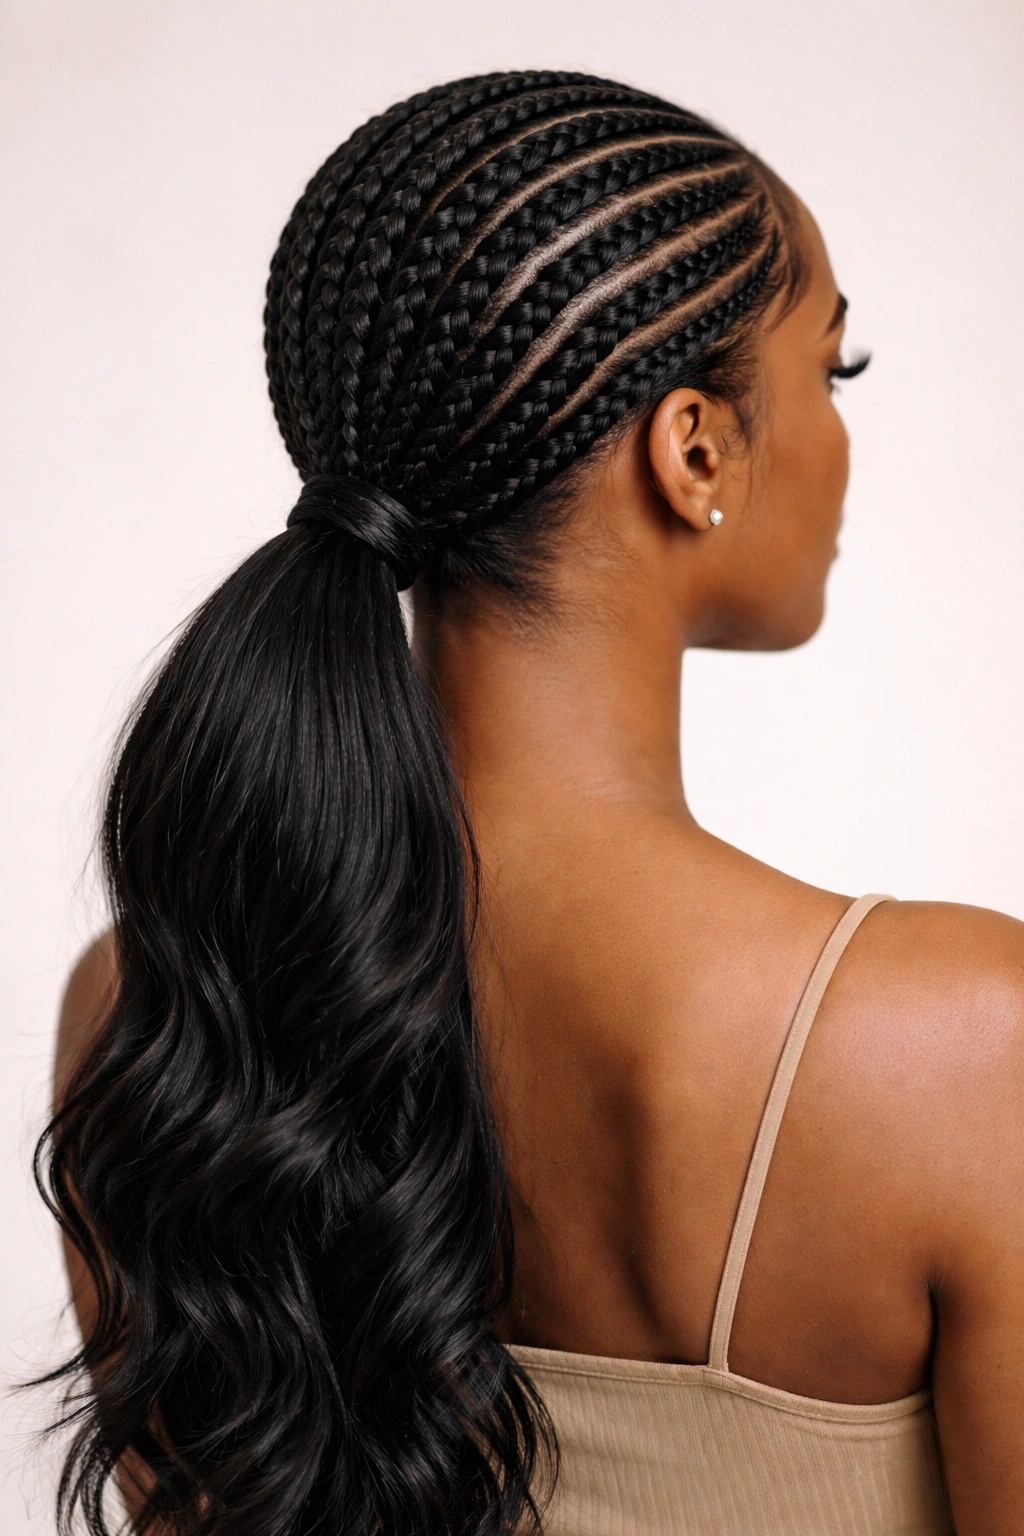
5. Dutch Braids Converging Into a Thick Ponytail

Dutch braids (which look like inside-out cornrows or French braids) can be created individually and then gathered into a ponytail, or multiple dutch braids can actually converge into a single thick braid before being swept into a pony. This creates a sculptural effect where two or three braids literally weave into one another at a mid-point, then continue as one unified element into your gathered hair. It’s visually striking and technically impressive-looking, even though it’s achievable with practice.
Why This Style Works
The converging aspect of this style creates visual drama and immediately reads as intentionally designed. It’s the kind of style that makes people ask “how did you do that?” even though it’s actually quite doable. Dutch braids are reversals of the traditional braid direction, which means they look three-dimensional and sculptural — they literally pop off the head. When multiple braids converge into one, you’re essentially creating a growth pattern that leads directly into your ponytail, making the transition feel organic and inevitable.
How to Create It
Begin by creating two or three dutch braids, starting from different points on your head (the crown area and temple areas work well). As you move down toward where your ponytail will sit, begin incorporating the braids into one another, weaving them together into a single, thicker dutch braid. This requires some practice to keep the tension even, but the effect is worth the effort. Continue the unified braid to the point where you’ll secure your ponytail, then gather all remaining loose hair along with the braid ends into an elastic. Smooth the base with edge control for a polished finish.
Best For
This style showcases your braiding skill, so it’s ideal if you’re comfortable handling your own hair or have access to a braider who specializes in creative work. It suits any occasion because it reads as both artistic and put-together. The sculptural nature of dutch braids makes them particularly stunning in person and in photos, so this is excellent for events, date nights, or anytime you want to feel especially confident about your styling.
Worth knowing: Dutch braids can be created more loosely for a romantic, relaxed feel or tighter for a sleek, structured aesthetic — the same style can read completely different depending on braid tension, so experiment with what feels and looks best for your face shape and personal style.
6. Senegalese Twist Ponytail with Curled Ends
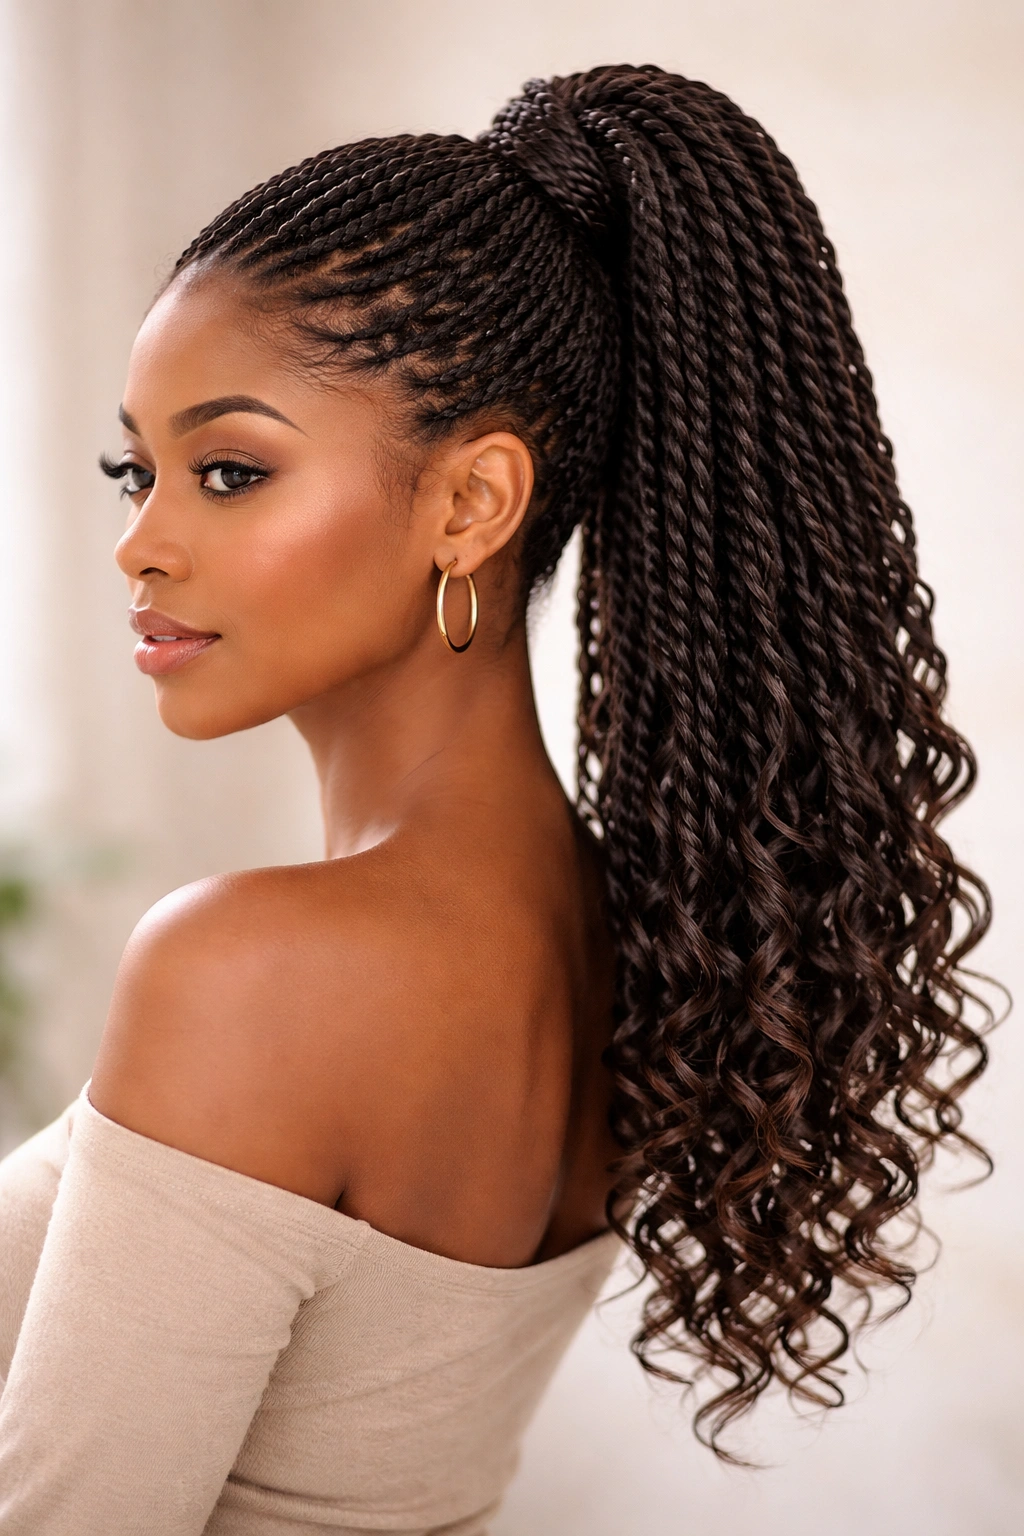
Senegalese twists are created by twisting two strands of hair together in a spiral motion, rather than interlocking them as in traditional braids. They create a rounder, softer look than braids and photographs beautifully with their natural spiral texture. When gathered into a ponytail and left with loose, curled ends, they create an undeniably romantic and feminine aesthetic. The twists themselves are slightly less defined than braids, which means they feel softer and less rigid.
Why This Style Works
Senegalese twists are technically easier to execute than intricate braiding, which makes them accessible even if you’re relatively new to protective styling. They’re also incredibly comfortable once installed because the twists don’t create tension points the way tight braids can. When you gather them into a ponytail and leave the ends loose and curled, you’re creating a style that feels effortlessly pretty — not overdone, not underdone, just thoughtfully styled. The texture of the twists combined with curled ends creates beautiful visual movement.
How to Create It
Create Senegalese twists starting from your scalp at various points on your head, twisting two sections of hair (with or without extensions, depending on your desired thickness) together all the way down. As your twists reach the gathering point for your ponytail, secure them with an elastic. Take the loose ends of your twists and curl them using a curling iron or by allowing them to set on flexi rods overnight. The curls soften the overall aesthetic and add volume at the ponytail base, creating a gorgeous silhouette.
Best For
Senegalese twists suit anyone wanting a protective style that looks and feels lighter than braids. They’re ideal for professional settings because they read as refined without appearing overly decorative. The curled ends add sophistication and femininity, making this particularly perfect for date nights or formal occasions. This style is excellent if you have finer hair or sensitive scalp, as twists generally create less tension than tight braids.
Pro tip: Refresh your curled ponytail ends every two to three days using a curling iron and light hairspray — this keeps the style looking intentional and polished throughout the week without needing a full restyle.
7. Halo Braid Wrapped Around a Ponytail Base

A halo braid (also called a crown braid) creates a circular, frame-your-face effect, but instead of this braid sitting alone, you can weave it directly into a ponytail situation where the halo portion sits at the crown and the remaining hair flows directly downward into a gathered pony. This creates a royal, intentional appearance where your braided crown literally crowns your ponytail. It’s one of the most inherently elegant braided ponytail variations.
Why This Style Works
The halo braid placement creates immediate sophistication because it frames your face and showcases your features beautifully. There’s something about the crown placement that feels both protective and celebratory — like you’re acknowledging yourself as worthy of decoration. The halo element draws the eye to your face and upward, creating a flattering visual that works for most face shapes. This is a style that feels romantic and intentional without appearing theatrical.
How to Create It
Create a halo braid (or two partial braids that meet at the back) starting just above one ear, traveling around the crown of your head, and ending just above the opposite ear. Use either cornrow or standard braid techniques, and keep the tension moderate for comfort and a soft appearance. Once your halo is complete, gather all remaining hair (including the loose ends from your halo braid) into your desired ponytail position and secure with an elastic. The halo sits independently while framing the ponytail, creating beautiful dimension and structure.
Best For
This style elevates any occasion and reads as intentionally styled and somewhat formal. It’s perfect for weddings, date nights, professional events, or anytime you want to feel particularly put-together and beautiful. The halo placement suits most face shapes beautifully, but particularly flatters wider or rounder faces by creating a framing effect that balances proportions. It’s ideal if you have the patience to create the halo with precision, as the quality of this element truly determines the overall impact.
Insider note: Use a very thin braid for your halo if you want an ethereal, delicate look, or use a thicker, more textured braid if you prefer more visual weight and drama — the same placement creates a completely different aesthetic depending on braid size.
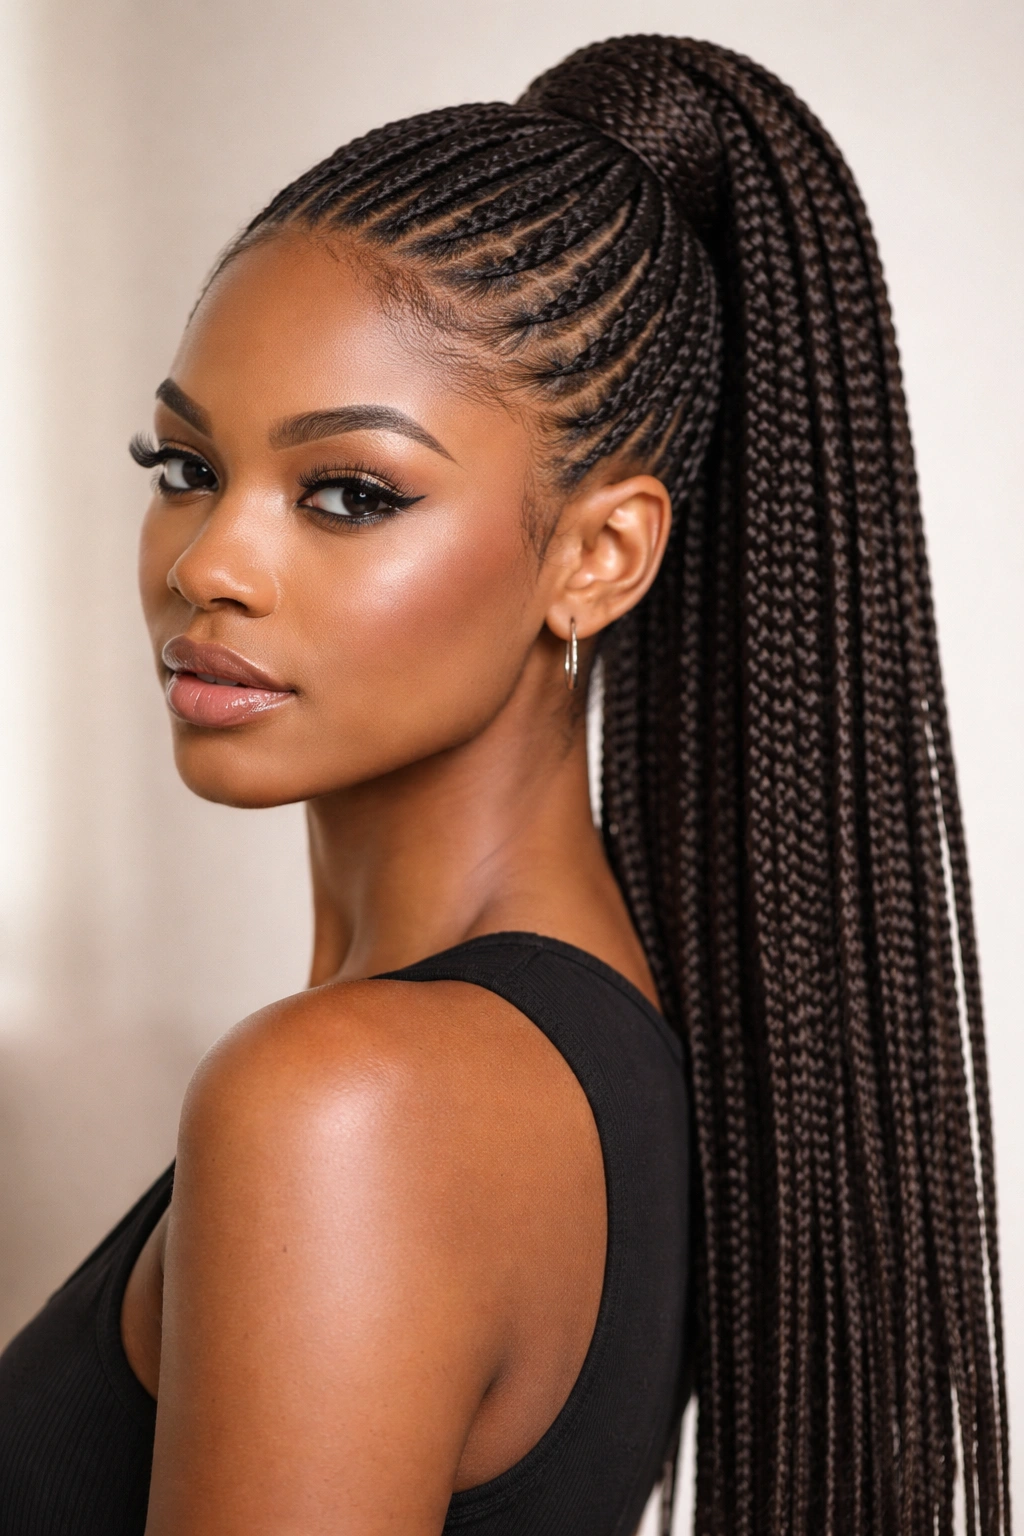
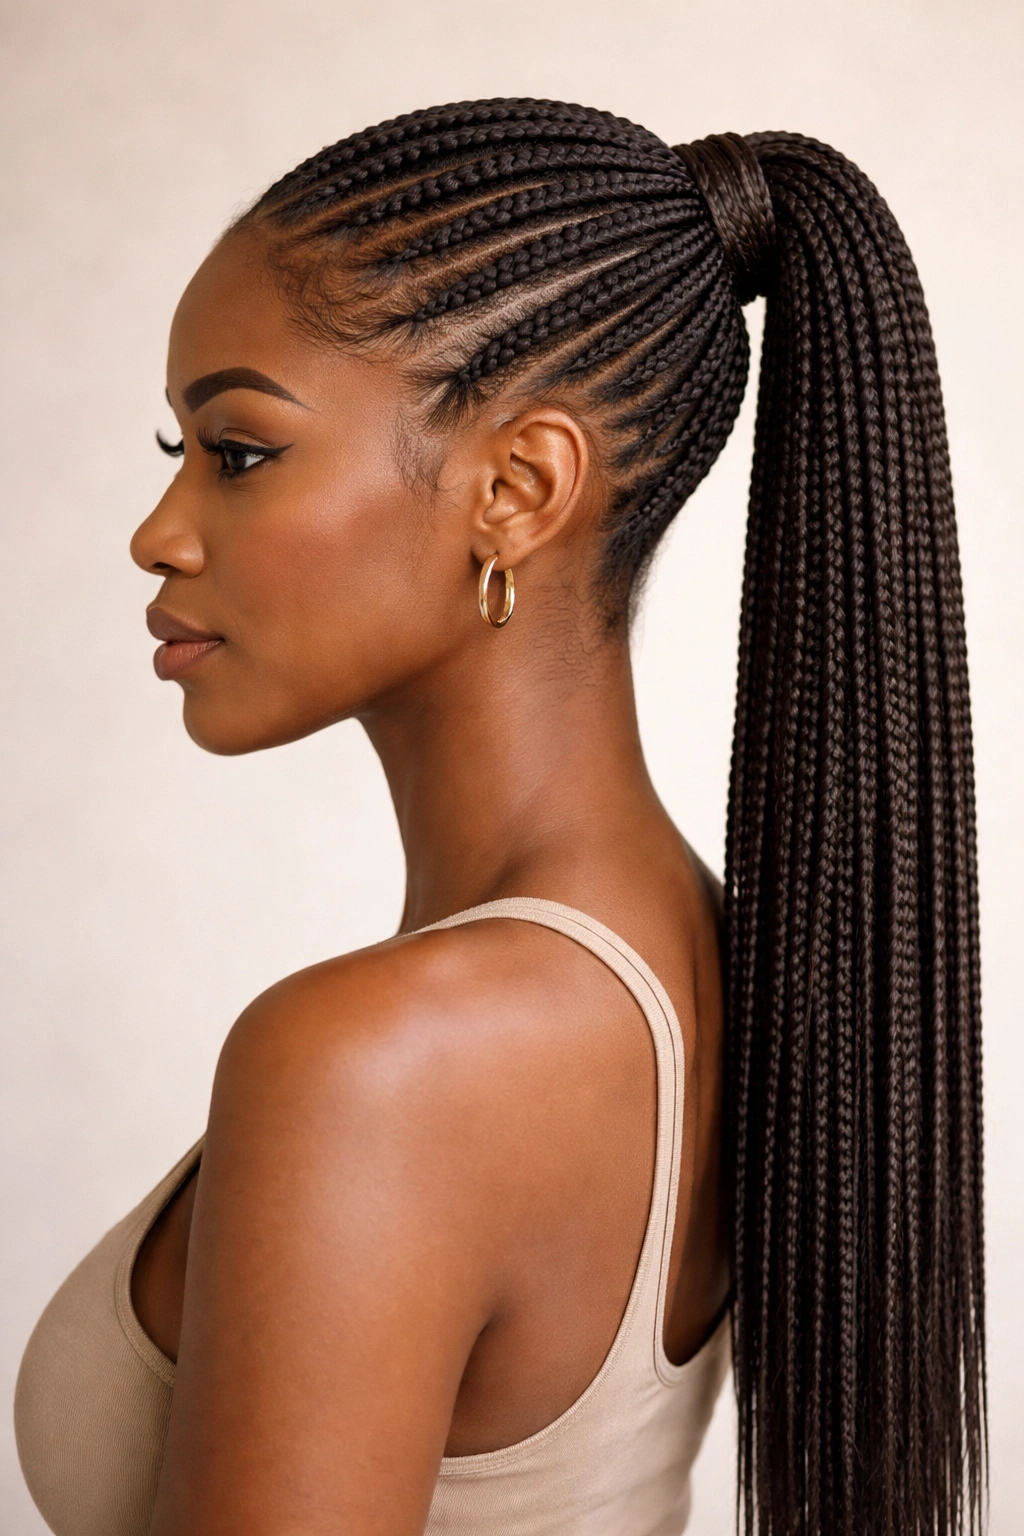
8. Feed-in Braids Transitioning to a Low Ponytail
Feed-in braids (also called invisible braids or growing braids) start very thin at the scalp and gradually thicken as you add more hair throughout the braid creation process, resulting in what looks like hair growing directly from your scalp. When created flowing toward the back of your head and gathered into a low ponytail, they create an incredibly sleek, seamless appearance. This is the braiding technique that most closely mimics the look of your own hair naturally braided, which makes it feel refined and wearable anywhere.
Why This Style Works
Feed-in braids literally blend with your scalp in a way that more obviously constructed braids simply don’t. The gradual thickening makes the transition from scalp to braid imperceptible, which is why this style reads as effortlessly elegant rather than obviously styled. A low ponytail gathers these braids in a way that feels casual and polished simultaneously — it’s appropriate for work, school, casual hangouts, or anywhere you want to look put-together without appearing overdressed. The low placement is also more universally flattering than high ponytails.
How to Create It
Create feed-in braids starting at your hairline or crown (depending on where you want them positioned), beginning with very thin braid sections and gradually adding more hair from the scalp as you braid downward. Continue these braids all the way to the length you want, then gather them into a low ponytail position (typically at the back of your head at ear level). The key to this style is consistent tension and smooth sections — any lumpy or uneven sections will be visible in the final style, so take your time during the creation phase.
Best For
This is genuinely the most versatile braided ponytail because it reads as appropriate in literally any setting. Wear it to your corporate office, to a casual brunch, to the gym — it works everywhere. It’s ideal if you value a professional appearance and want your protective style to feel understated rather than decorative. Feed-in braids are perfect for anyone wanting their braids to feel and look like their own hair, and the low ponytail positioning provides additional face-framing softness.
Worth knowing: The quality of feed-in braids depends entirely on your braider’s technical skill and patience — this isn’t a style to rush through. If you find a braider who truly excels at this technique, keep their contact information and commit to regular appointments, because good feed-in braid work is worth the investment.
9. Knotless Braids Fastened Into a Sleek Pony
Knotless braids are created without the tight knot at the root that traditional braids produce, beginning instead with a straight section of hair at the scalp that gradually transitions into braided hair as you move down. This technique reduces scalp tension and tends to be more comfortable for longer wear. When gathered into a sleek ponytail, knotless braids create clean lines and a polished appearance without the risk of uncomfortable tension at the base.
Why This Style Works
Knotless braids are fundamentally designed to be more comfortable than traditional braids, which means you can wear this style longer without discomfort. The absence of the initial knot also creates a cleaner aesthetic at the scalp — each braid looks like it’s simply emerging from your head rather than being tied on. This technique is newer and requires skilled braiders, so choosing it signals that you’re thoughtful about both comfort and appearance. A sleek ponytail showcases this cleaner aesthetic beautifully.
How to Create It
Work with a braider experienced in the knotless technique, as this truly requires skill and practice to execute well. The braider will create your braids starting with loose, un-knotted sections at the root that gradually tighten into braids as they move down. Once complete, gather your knotless braids into a sleek, low or mid-height ponytail position and secure with an elastic. The knotless base means there’s no built-up area to cover, so you can actually see clean, individual braid roots at your scalp, which is quite striking.
Best For
Knotless braids suit anyone prioritizing comfort and a clean, modern aesthetic. They’re ideal if you plan to keep your braids in for an extended period (six to eight weeks is common), as the reduced tension means less risk of breakage or scalp irritation. The sleek ponytail positioning works beautifully for professional settings, athletic activities, and anytime you want a style that feels contemporary and intentional. This is particularly ideal if you have a sensitive scalp or have experienced tension-related hair loss in the past.
Pro tip: Knotless braids tend to unravel slightly more easily than traditional braids, so be extra gentle when securing your ponytail and consider using a silk scarf or bonnet at night to protect the braid ends from unraveling.
10. Micro Braids Clustered Into a Voluminous Ponytail
Micro braids are incredibly thin, delicate braids that create maximum texture and dimension. Clustering dozens of these tiny braids into a ponytail creates a look of abundance and fullness that’s genuinely stunning. The individual braids are so thin that they read more like textured hair than obviously braided hair, but clustered together they create undeniable visual impact. This is the most intricate and time-intensive option on this list, but the payoff is a style that’s truly one-of-a-kind in its texture and visual drama.
Why This Style Works
Micro braids offer protection with maximum versatility — you can wear them in a thousand different styles because they’re so thin and flexible. When clustered into a ponytail, they create volume and texture that thick braids simply can’t achieve. The overall effect is sophisticated and artistic; this is a style that announces you’ve put thought and care into your appearance. Micro braids also feel remarkably lightweight and comfortable despite their tiny size, which makes them practical as well as beautiful.
How to Create It
This is genuinely a job for a professional braider with experience in micro-braid work. Expect this to take six to eight hours or longer, depending on your hair density and length. Once your micro braids are installed, gather them into your desired ponytail position — you can create a sleek base with edge control for contrast, or leave them textured throughout for a more romantic, undone feel. The sheer quantity of braids means the ponytail will have significant volume even without adding additional hair or extensions.
Best For
Micro braids suit anyone wanting the ultimate in protective styling longevity and versatility — you can genuinely keep these in for eight to ten weeks and style them differently each week. They’re ideal if you love texture and visual interest and don’t mind the significant time investment required for installation. This style shines for creative people, artists, and anyone wanting a style that absolutely makes a statement. The clustered ponytail positioning is perfect for date nights, celebrations, or anytime you want to feel absolutely stunning.
Worth knowing: Maintaining micro braids requires attention to moisture and scalp health — spray your braids lightly with water and lightweight oil several times per week to keep your hair and scalp hydrated, which prevents dryness, itching, and breakage throughout your wearing period.
Final Thoughts
Braided ponytails represent some of the most versatile, creative, and wearable styles available to Black women. Whether you choose the boldness of goddess braids, the artistic precision of Fulani braids, the modern accessibility of feed-in braids, or the textured abundance of micro braids, you’re selecting a style that protects your hair while allowing you to express yourself beautifully. The key to success with any of these styles lies in three things: finding a skilled braider whose work you trust, choosing the variation that genuinely appeals to you (rather than what you think you should like), and maintaining your style consistently once it’s installed.
Each of these ten styles offers something different, which means there’s genuinely a braided ponytail option for every occasion, face shape, hair type, and personal aesthetic. You might wear feed-in braids to work, switch to goddess braids for date night, and rock micro braids for the weekend — the versatility is remarkable. The beauty of protective styling is that it allows you to experiment with different looks while keeping your natural hair safe and moisturized underneath, so give yourself permission to try multiple styles and discover which ones make you feel most confident and beautiful.