There’s something magical about running your fingers through a braid—that tactile satisfaction mixed with the knowledge that you’ve just created something beautiful is hard to beat. Braided ponytails sit at this perfect intersection where they look polished enough for nearly any situation, yet they’re casual enough that you can throw one together on a rushed Tuesday morning. They’re also incredibly forgiving. A slightly imperfect braid reads as effortlessly textured rather than messy, and they hold up beautifully through a full day of movement, meetings, and real life without demanding a second touch-up.
The real beauty of braided ponytails is their flexibility. Whether you have thick, voluminous hair or something finer and more delicate, long hair or a shoulder-length bob, there’s genuinely a braided ponytail style that’ll work with your hair type and your daily routine. They can transform how you feel about your hair on days when styling seems like too much effort. Once you learn a few core techniques, you’ll find yourself reaching for these styles constantly because they deliver maximum polish with minimal fuss—and that’s exactly what everyday hair should be.
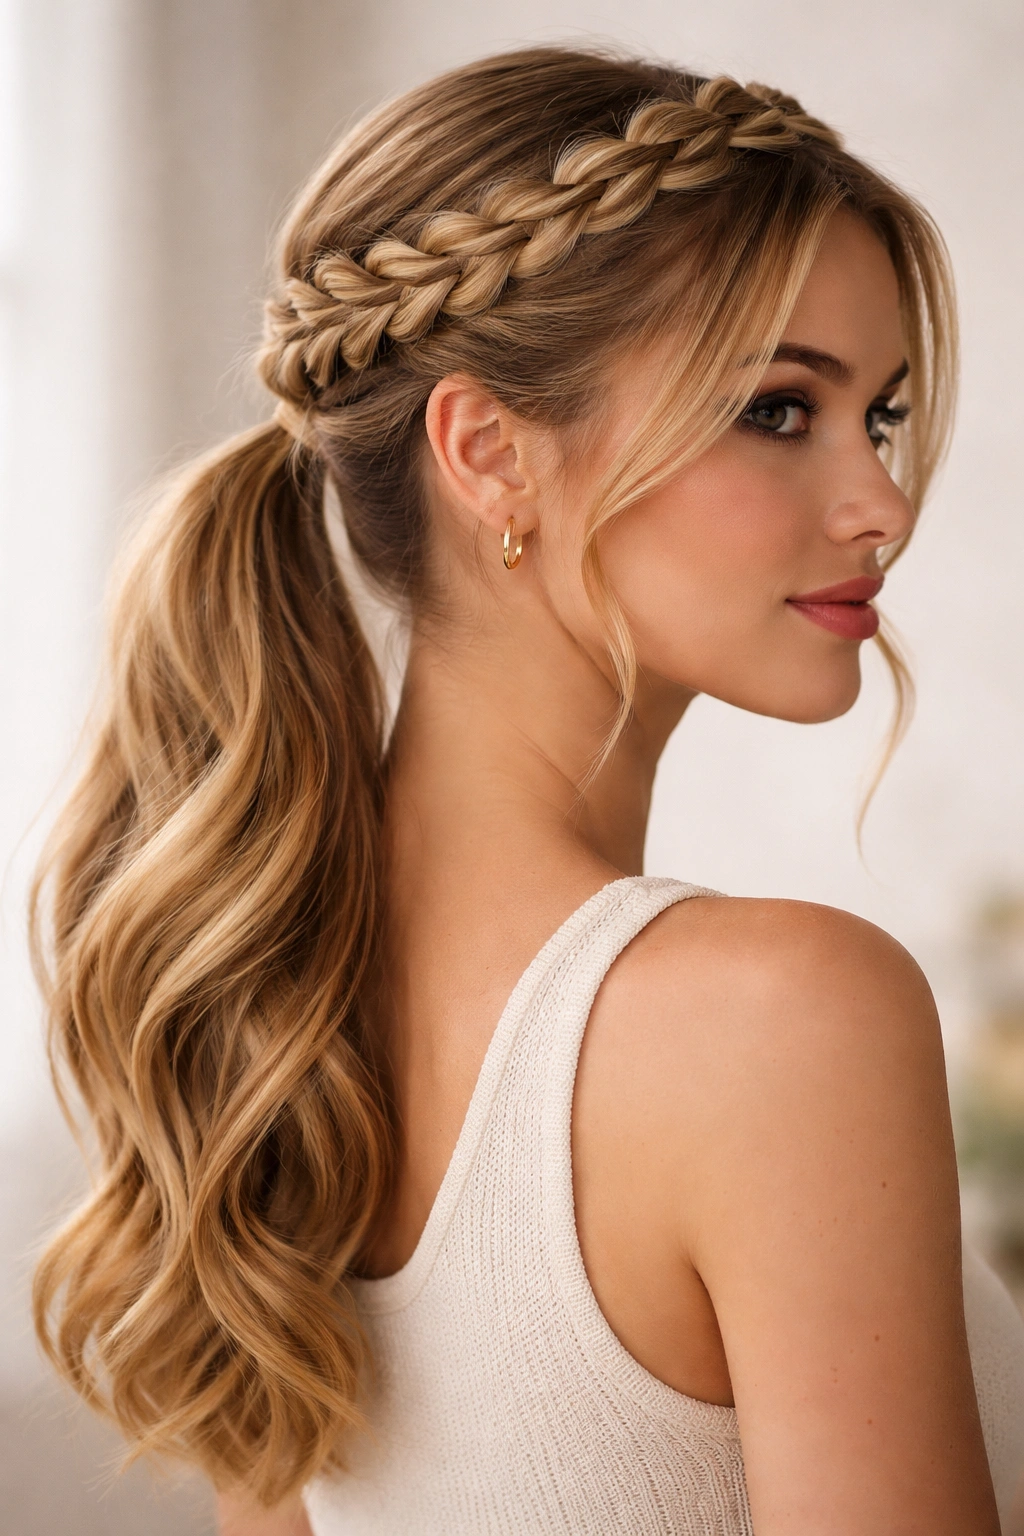
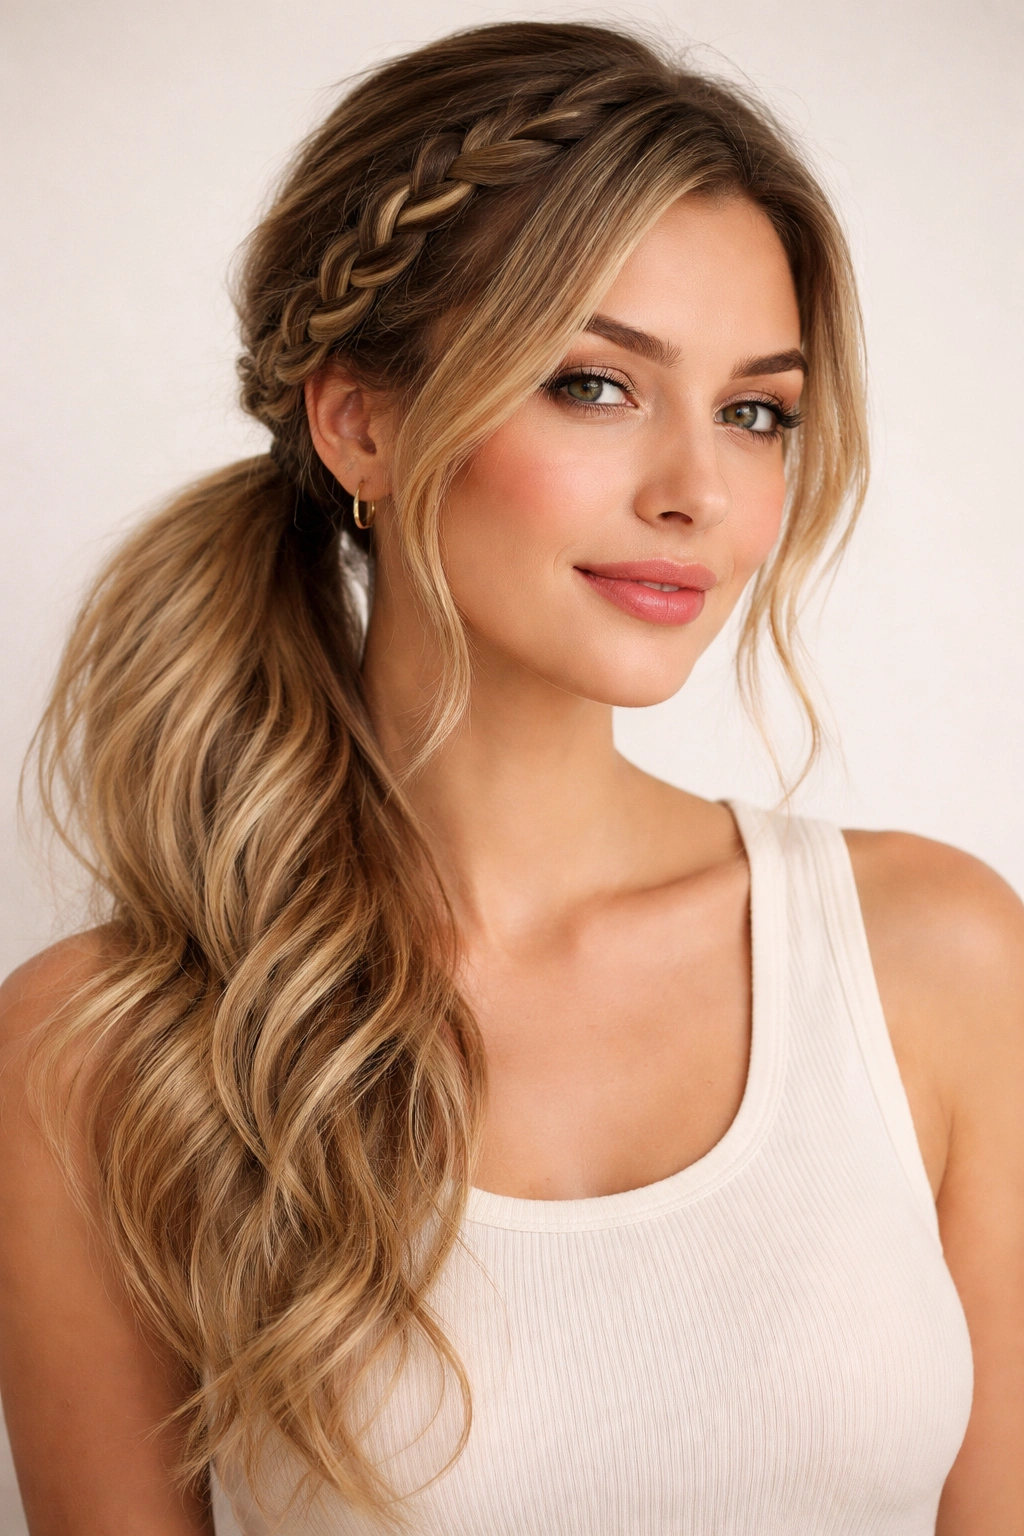
1. Classic Three-Strand Braid Ponytail
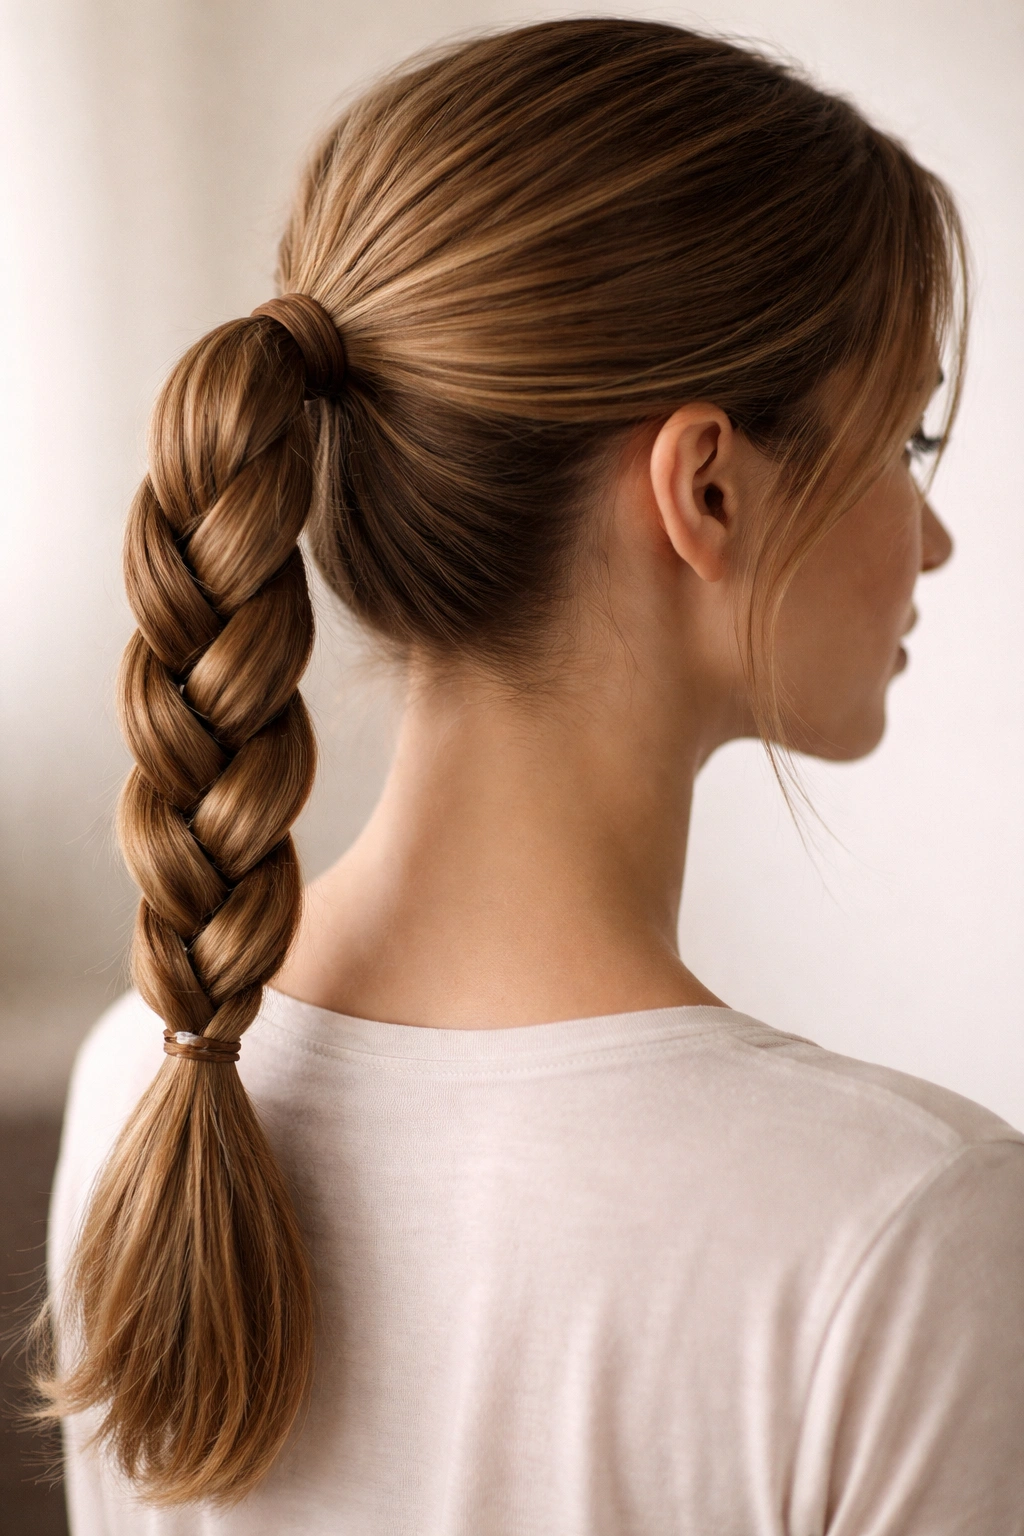
The three-strand braid is the foundation that everything else builds from. It’s the style you’ll reach for on days when you want something polished without overthinking it, and it’s the starting point if you’re teaching yourself or someone else how braids actually work. The beauty of a three-strand braid is that it looks substantially more intentional than a plain ponytail, but the technique is so straightforward that you can execute it on yourself even if you’re still building your confidence with hair styling.
Why This Works for Every Day
A three-strand braid reads as deliberately styled without being fussy. It doesn’t require any special tools, product, or advanced technique—just your hands and a hair tie. The braid sits neatly in a ponytail format, so your hair stays completely off your face and neck, making it practical for actual activities throughout your day. It’s equally at home at the gym, at the office, or running weekend errands.
How to Create the Perfect Three-Strand Braid
Start by gathering your hair into a ponytail at whatever height feels right for you—middle of the back of your head works beautifully for most face shapes. Secure it loosely with a hair tie. Divide the ponytail into three equal sections, holding the left section in your left hand and the right section in your right hand while keeping the middle section between your fingers. Cross the left section over the middle (now the left section becomes the middle), then cross the right section over the new middle section. Continue this pattern—always crossing an outer section over the middle—until you reach the end of your hair. Secure with a small elastic. If your braid feels tight or structured, gently pull at the edges to loosen and soften it slightly, which adds texture and prevents that overly done appearance.
Pro Tips for Best Results
- Braid loosely from the start. Tight braids look overly formal and are harder on your hair. A soft, slightly loose braid photographs beautifully and feels comfortable all day.
- Textured hair braids more easily. If you have very slippery hair, a light texturizing spray or dry shampoo applied before braiding gives your braid grip and helps it hold its shape longer.
- Pull the braid apart slightly for volume. After braiding, gently tug at alternating sections from the sides and top of the braid. This creates a fuller, softer, more modern look compared to a tight, structured braid.
2. Dutch Braid Ponytail
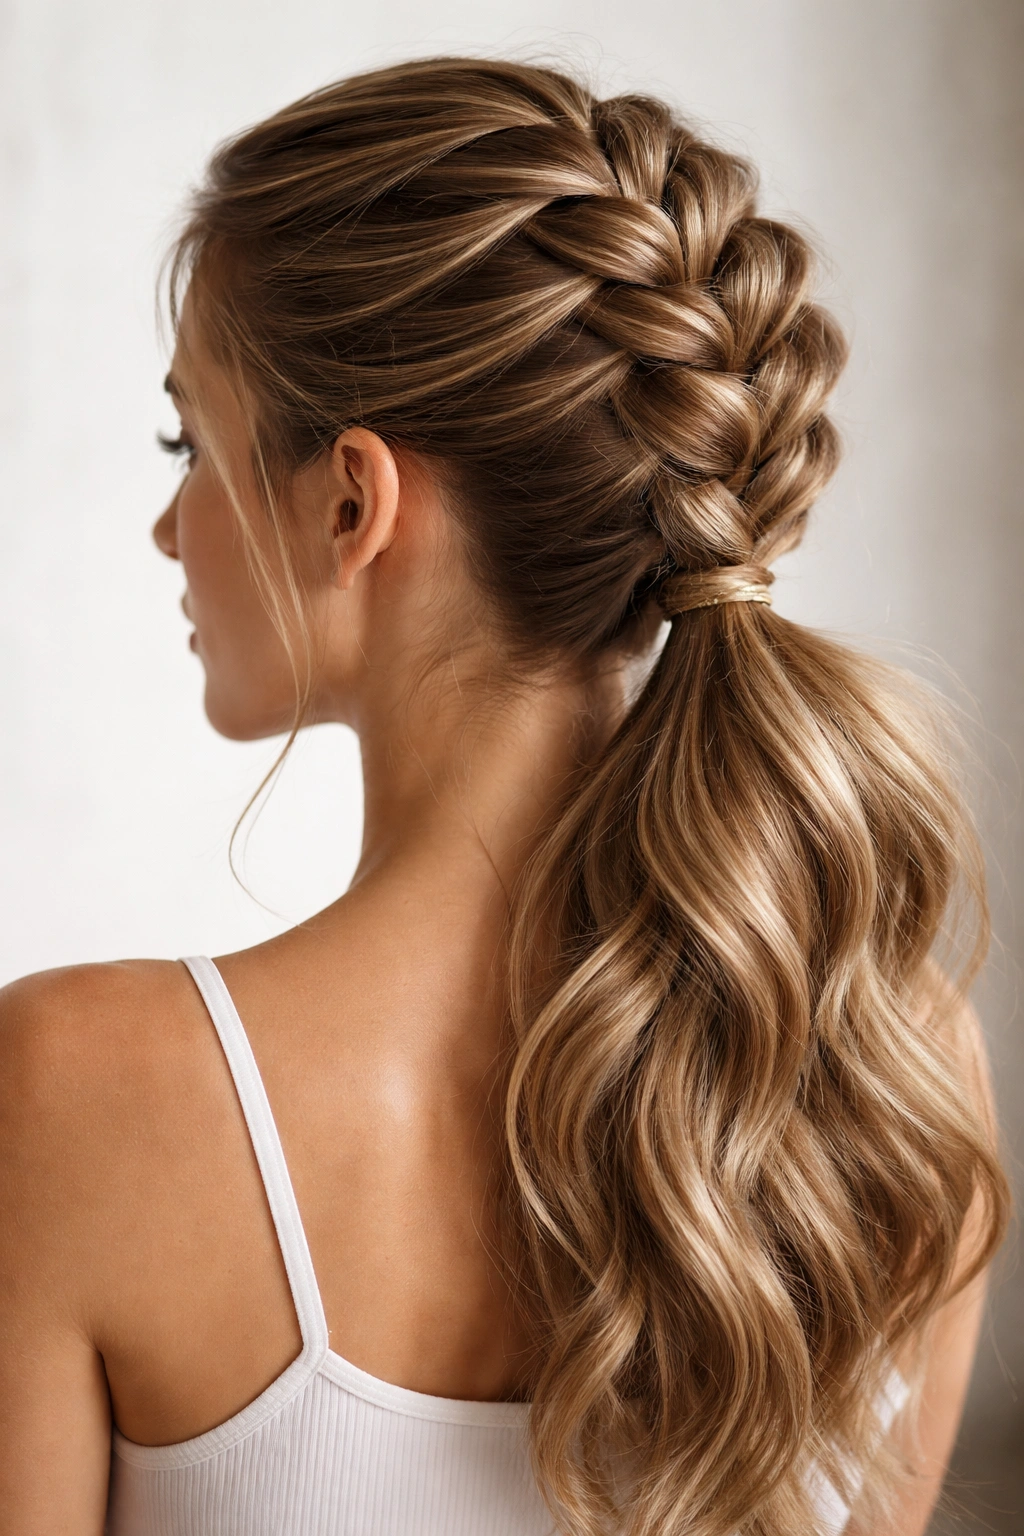
A Dutch braid flips the traditional braiding pattern on its head—literally. Instead of crossing sections over the middle, you cross them under. The result is a braid that sits visibly raised and textured, catching light beautifully and reading as noticeably more polished than a regular three-strand. The Dutch braid ponytail transforms a simple pulled-back style into something that looks like you spent actual time on your hair, even if you only spent five minutes.
What Makes It Stand Out
The dimensional appearance of a Dutch braid comes from the way the pattern creates ridges and texture along the braid’s surface. It has more visual presence than a regular braid—from the back, from the side, even in photographs. This makes it perfect when you want a hairstyle that’s doing some heavy lifting for your overall look, but you don’t want to deal with curling tools or complicated styling.
Building Your Dutch Braid
Gather your hair into a ponytail and secure it loosely. Divide into three sections. Here’s where the technique changes: instead of crossing the left section over the middle, you’ll cross it under the middle. Cross the right section under the new middle section. Continue crossing each outer section under the middle all the way down. It takes a little practice to retrain your hands if you’re used to regular braiding, but the motion becomes automatic after a few attempts. Secure at the end and loosen by gently pulling the sides outward.
When to Wear This Style
Dutch braids handle activity beautifully—they won’t slip or loosen the way a looser braid might. They look equally good with casual workout clothes, everyday jeans, or slightly dressier pieces. The raised texture adds visual interest that a casual ponytail can’t match, making them a smart choice for days when you want to look put-together without extra effort.
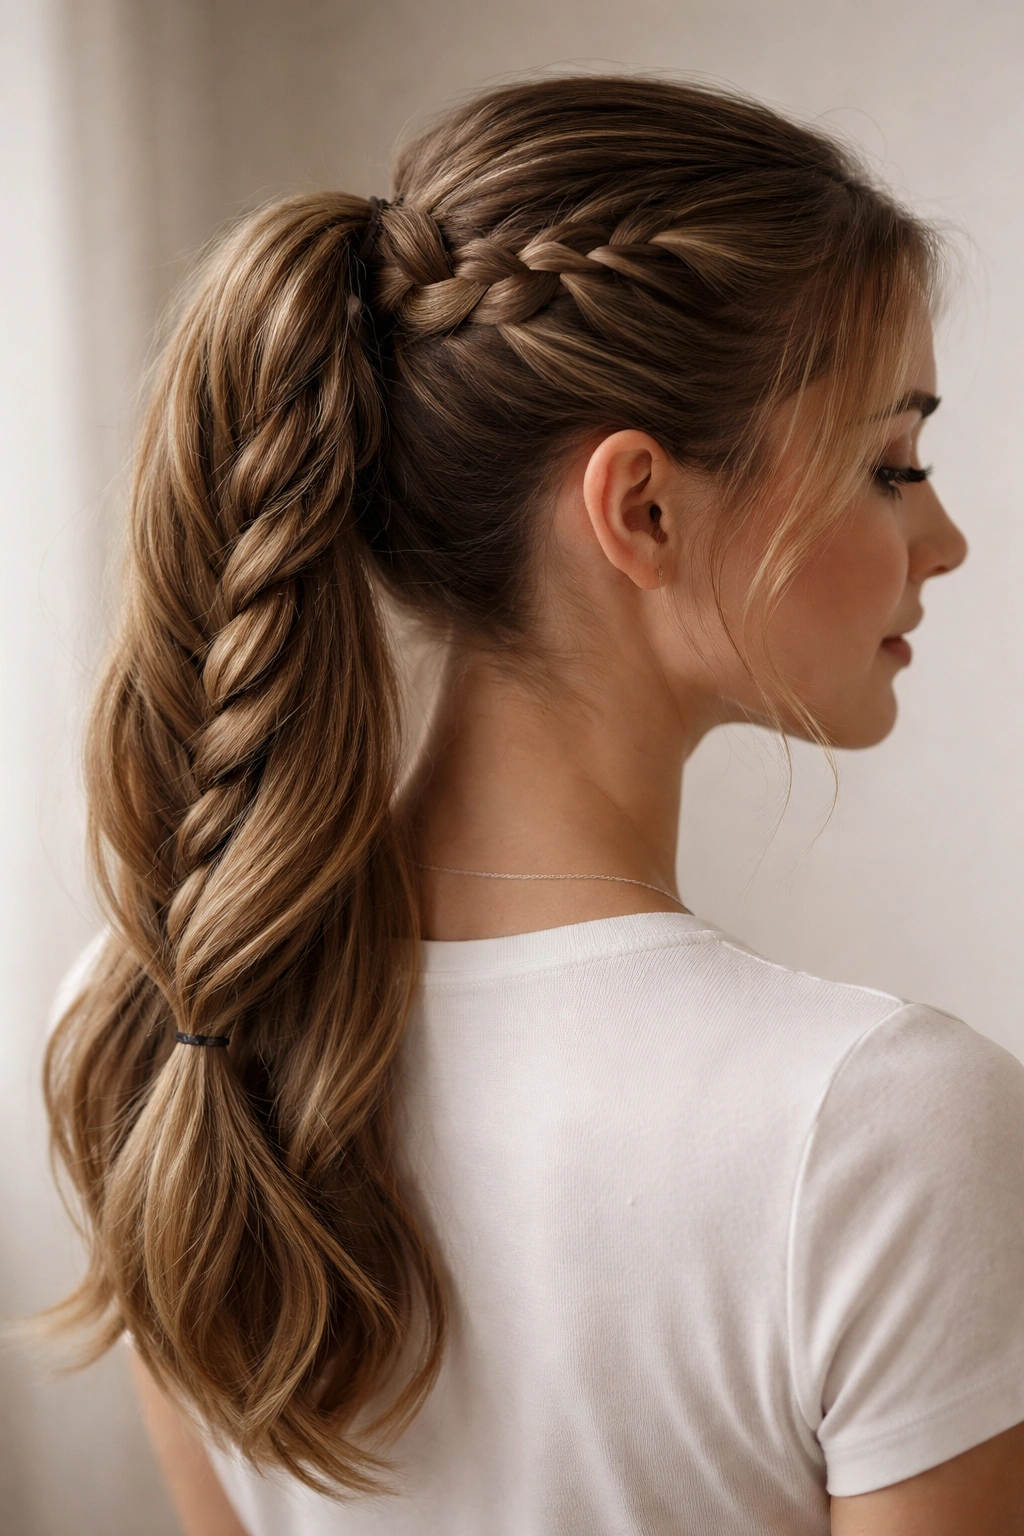
3. French Braid Ponytail
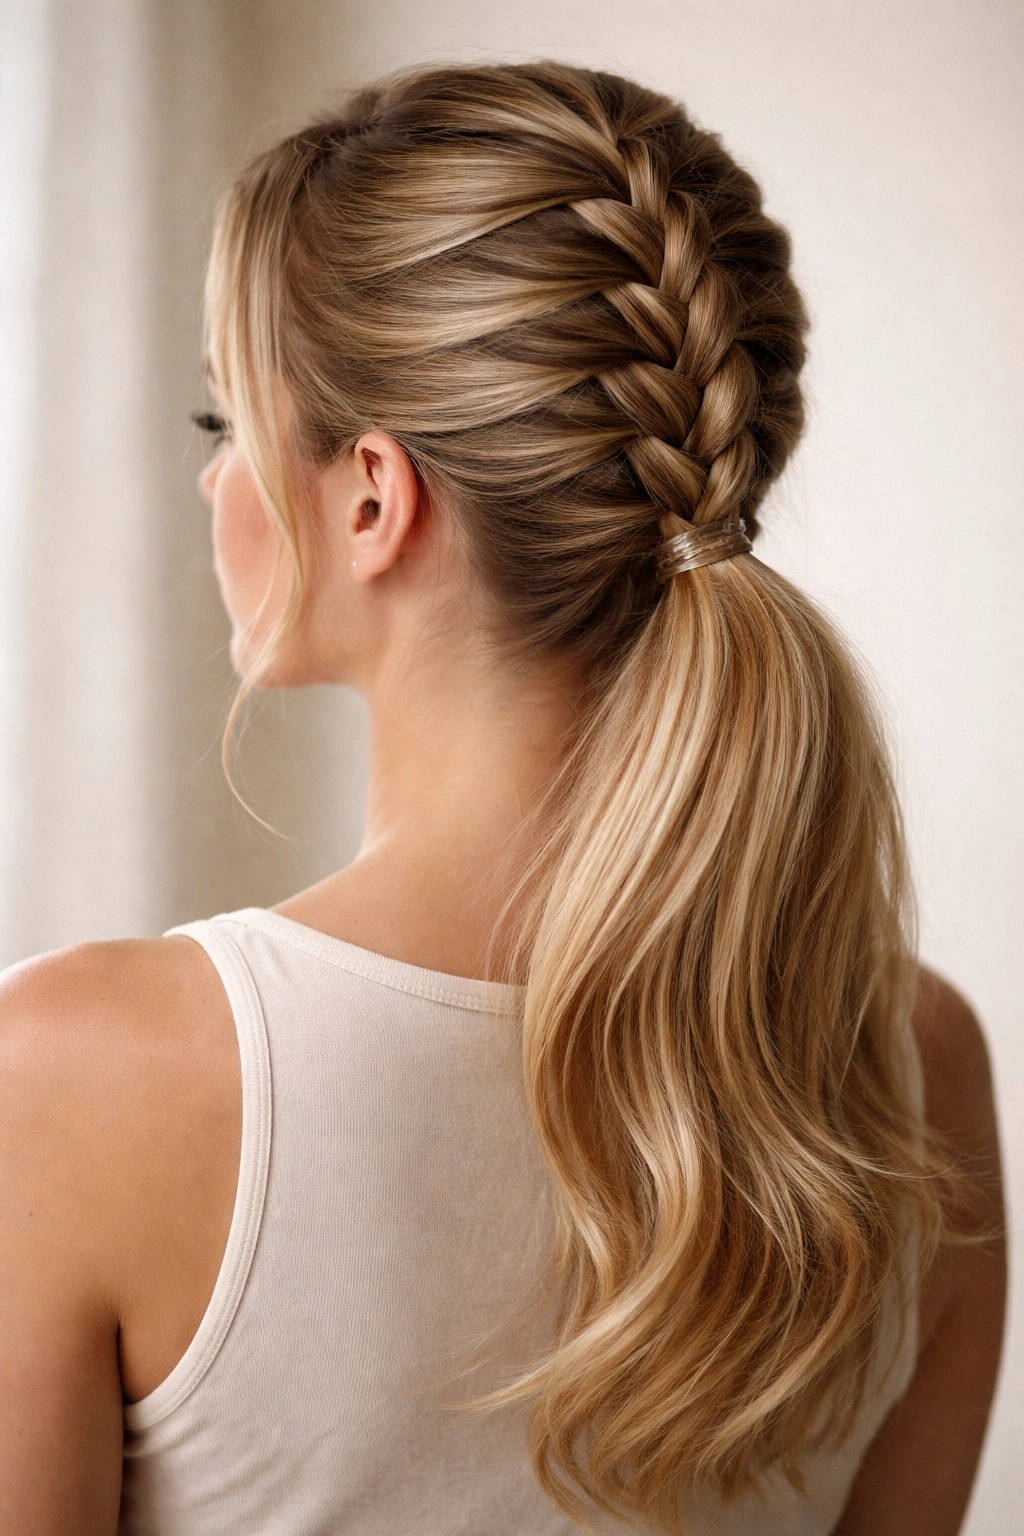
The French braid starts at the crown of your head and pulls downward, incorporating hair as you go down toward the nape of your neck. When you finish the braid and gather the remaining hair into a ponytail, you create a style that feels layered and intentional—like you’ve woven your hair into an architectural structure. French braids read as more technically skilled than a standard ponytail, but honestly, the technique is just a slightly different starting approach.
The Real Appeal
French braids have this inherent elegance because they frame your face and pull your hair back in a way that emphasizes bone structure and facial features. They also make thin or fine hair appear fuller because the braid starts at the roots where you have the most density, and the braiding pattern distributes that hair across the surface. If you’re self-conscious about having fine hair, a French braid ponytail is secretly one of your best styling weapons.
How to French Braid Into a Ponytail
Start at your crown—basically at the highest point on the back of your head where you’d start a regular braid. Take a section of hair about the width of your finger and divide it into three subsections. Cross the left over the middle, then the right over the middle, just like a regular braid. But here’s the difference: each time you cross a section over, you’re also picking up a new thin strand of hair from that side of your head and incorporating it into that section before crossing. As you braid down, you’re constantly adding new hair to the braid from both sides. Continue until you’ve reached the base of your skull and have incorporated most of your hair into the braid. Finish by gathering any remaining loose hair into a ponytail with the braided section, then secure everything with a hair tie. Gently loosen the braid by pulling at the sides for a softer appearance.
Essential Tips for Success
- Start with damp or textured hair. Freshly washed, slippery hair is harder to work with. Either braid the morning after you wash your hair, or lightly mist your hair with water or texturizing spray before starting.
- Keep even tension. The most common mistake is pulling more tightly at the crown and loosening as you go down. Try to maintain consistent tension throughout, which creates a balanced, polished finish.
- Loosen generously. A French braid automatically reads as formal. Pulling out the sides transforms it into something much softer and more modern-looking.
4. Fishtail Braid Ponytail
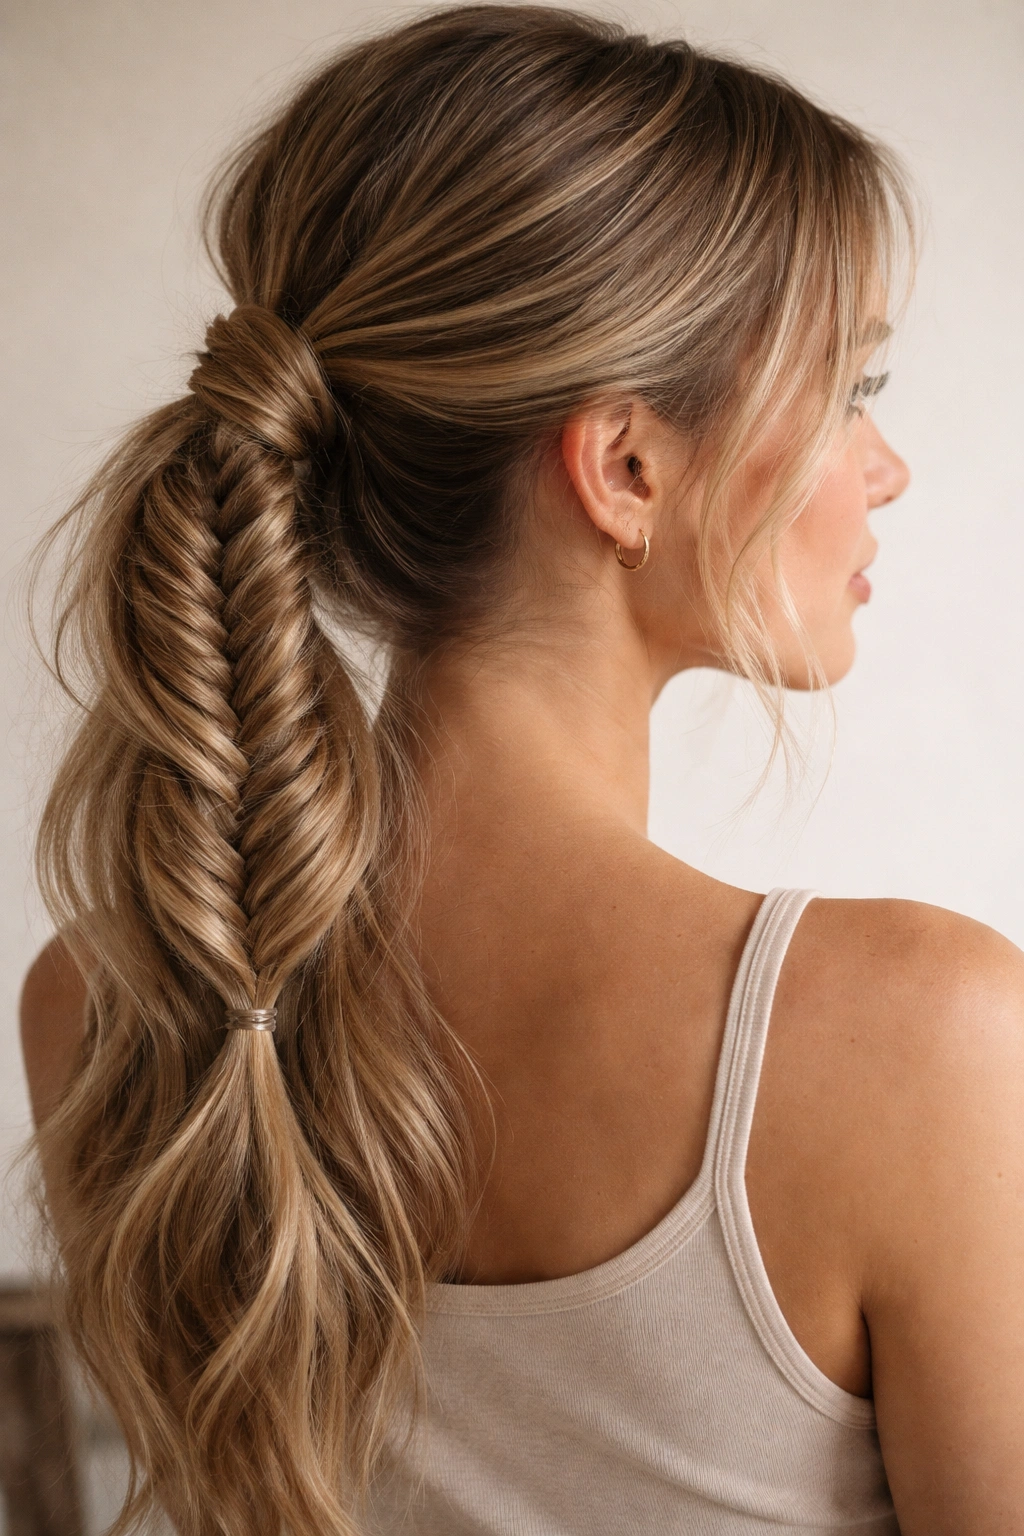
A fishtail braid uses a different technique entirely—instead of three sections, you’re working with two. It seems counterintuitive until you try it, but somehow two sections create a braid that looks far more intricate and interesting than a three-strand. The pattern resembles the skeleton of a fish (hence the name), with tiny crossing sections creating visual texture and complexity. Fishtail braids are slightly fiddly at first, but once your hands learn the motion, they become faster than you’d expect.
Why Fishtails Feel Special
The beauty of a fishtail is that it looks notably more complicated than it actually is. People always assume you spent ages perfecting it. The two-section technique also creates a naturally looser, more relaxed braid that doesn’t require as much pulling-apart afterward. Fishtails also work beautifully with finer hair textures because the pattern creates the illusion of fullness and texture.
The Two-Section Fishtail Technique
Gather your hair into a ponytail and divide it into two equal sections. Take a thin piece of hair from the outer edge of the right section, cross it over to the left section, and incorporate it into the left section. Now take a thin piece from the outer edge of the left section, cross it over to the right section, and incorporate it. You’re alternating, always taking from the outside of one section and moving it to the other. The sections get slightly narrower as you go, but keep working the pattern down. The key is making your cross-over pieces small and consistent—thicker pieces look clunky. Once you reach the bottom, secure with an elastic. Loosen gently from the sides to create a softer, fuller appearance.
Making It Easier on Yourself
- Practice makes perfect. The fishtail motion feels weird at first. Do a few practice braids when you’re not in a time crunch, and it’ll click. Then it becomes something you can do without thinking.
- Work with textured hair. Second-day hair or hair with some texture holds a fishtail much better than freshly washed hair. If you have slippery hair, a tiny bit of dry shampoo helps tremendously.
- Embrace the softness. Unlike three-strand braids, fishtails should look intentionally soft and slightly undone. Don’t aim for precision—aim for the impression of complexity.
5. Boxer Braids Ponytail
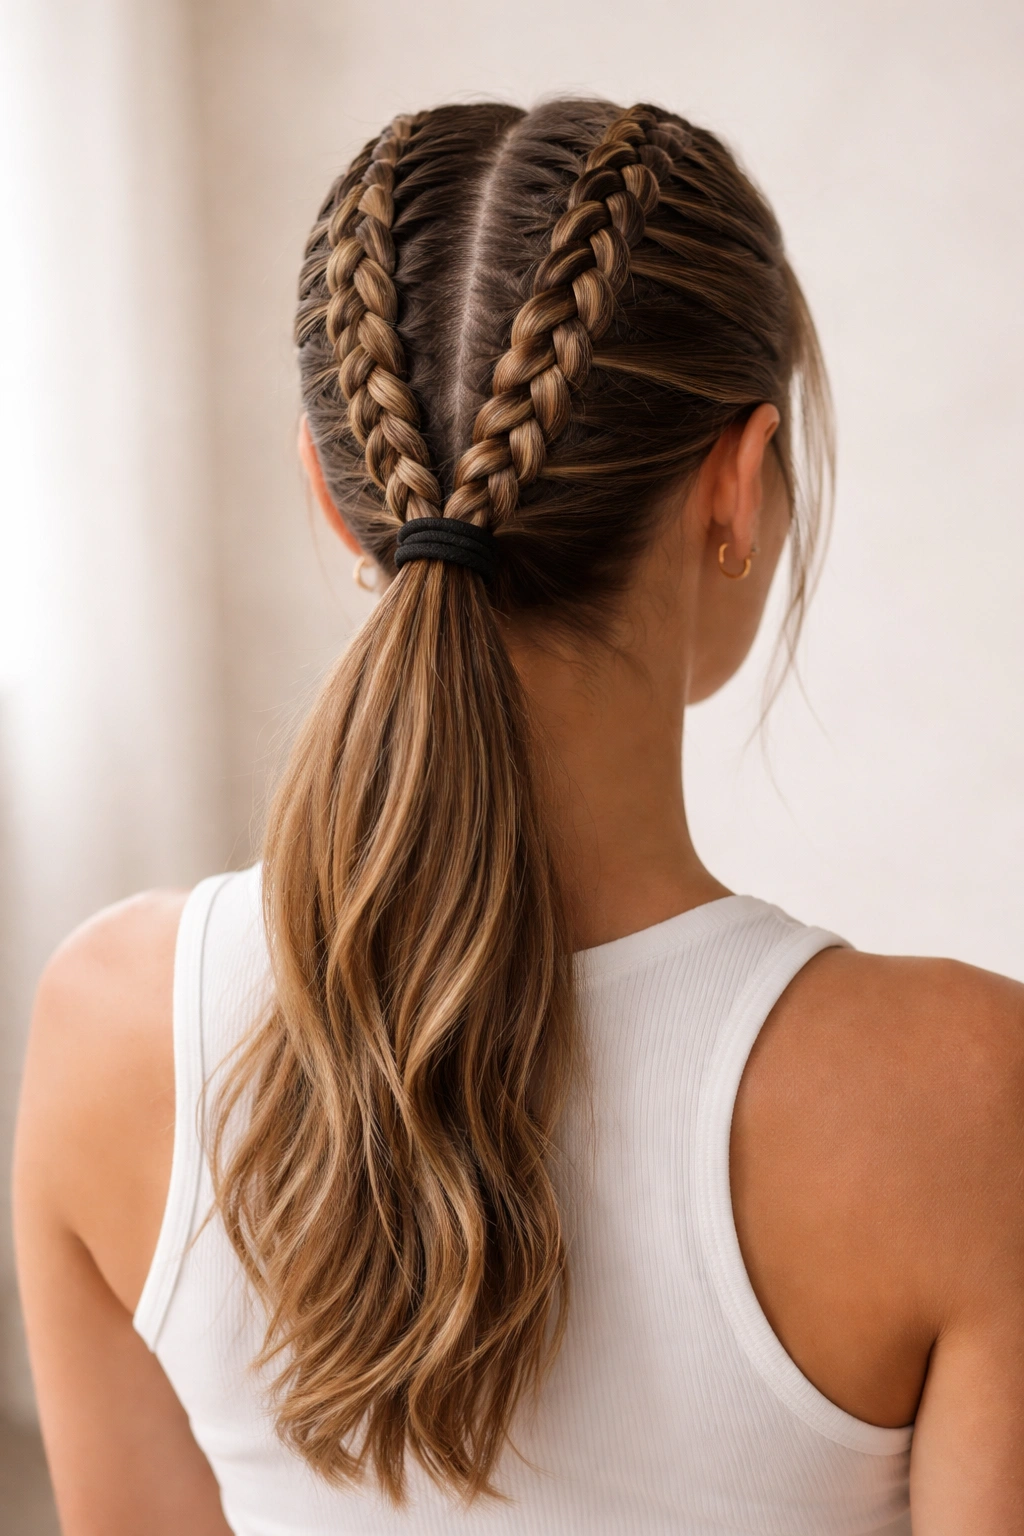
Boxer braids are essentially two Dutch braids running parallel down the back of your head, meeting at the nape of your neck where you finish them into a single ponytail. They’re striking, sporty, and undeniably practical—your hair stays completely controlled, which is why they’re beloved by athletes and active people. They also photograph beautifully and create an immediately polished, intentional appearance.
The Appeal for Active Life
Boxer braids don’t loosen throughout the day the way a single braid might. Two braids sharing the work of holding your hair means each one carries less tension, so they stay neat longer without feeling tight or uncomfortable. They’re perfect if you’re actually going to be active—whether that’s a workout, a full day of running around, or just the general chaos of daily life.
Creating Boxer Braids
This style works best if you can see the back of your head, so position yourself in front of a mirror or ask someone to help until you build the muscle memory. Start by creating a center part from your forehead to the nape of your neck. Take the hair on the right side of the part. Using the Dutch braid technique (crossing under rather than over), start a braid from your right temple and braid downward, incorporating hair as you go, until you reach the right side of your nape. Repeat on the left side, creating a mirror-image braid. At the nape of your neck, you’ll have two separate braids. Gather the loose hair below both braids, pull it together with the tails of both braids, and secure everything into a low ponytail with a hair tie. Loosen both braids by gently pulling at the sides.
Pro Approach
- Boxer braids are easier than they look. You’re essentially doing the same Dutch braid twice. Once you can Dutch braid, you can do boxer braids—it’s just a matter of doing it twice.
- They look good messy. Unlike more formal styles, boxer braids actually look better when slightly imperfect. Loose, textured boxer braids read as effortlessly cool.
- Perfect for gym to social plans. You can wear boxer braids to work out, then head straight to lunch or social plans without feeling like your hair needs refreshing.
6. Half-Up Braid Ponytail
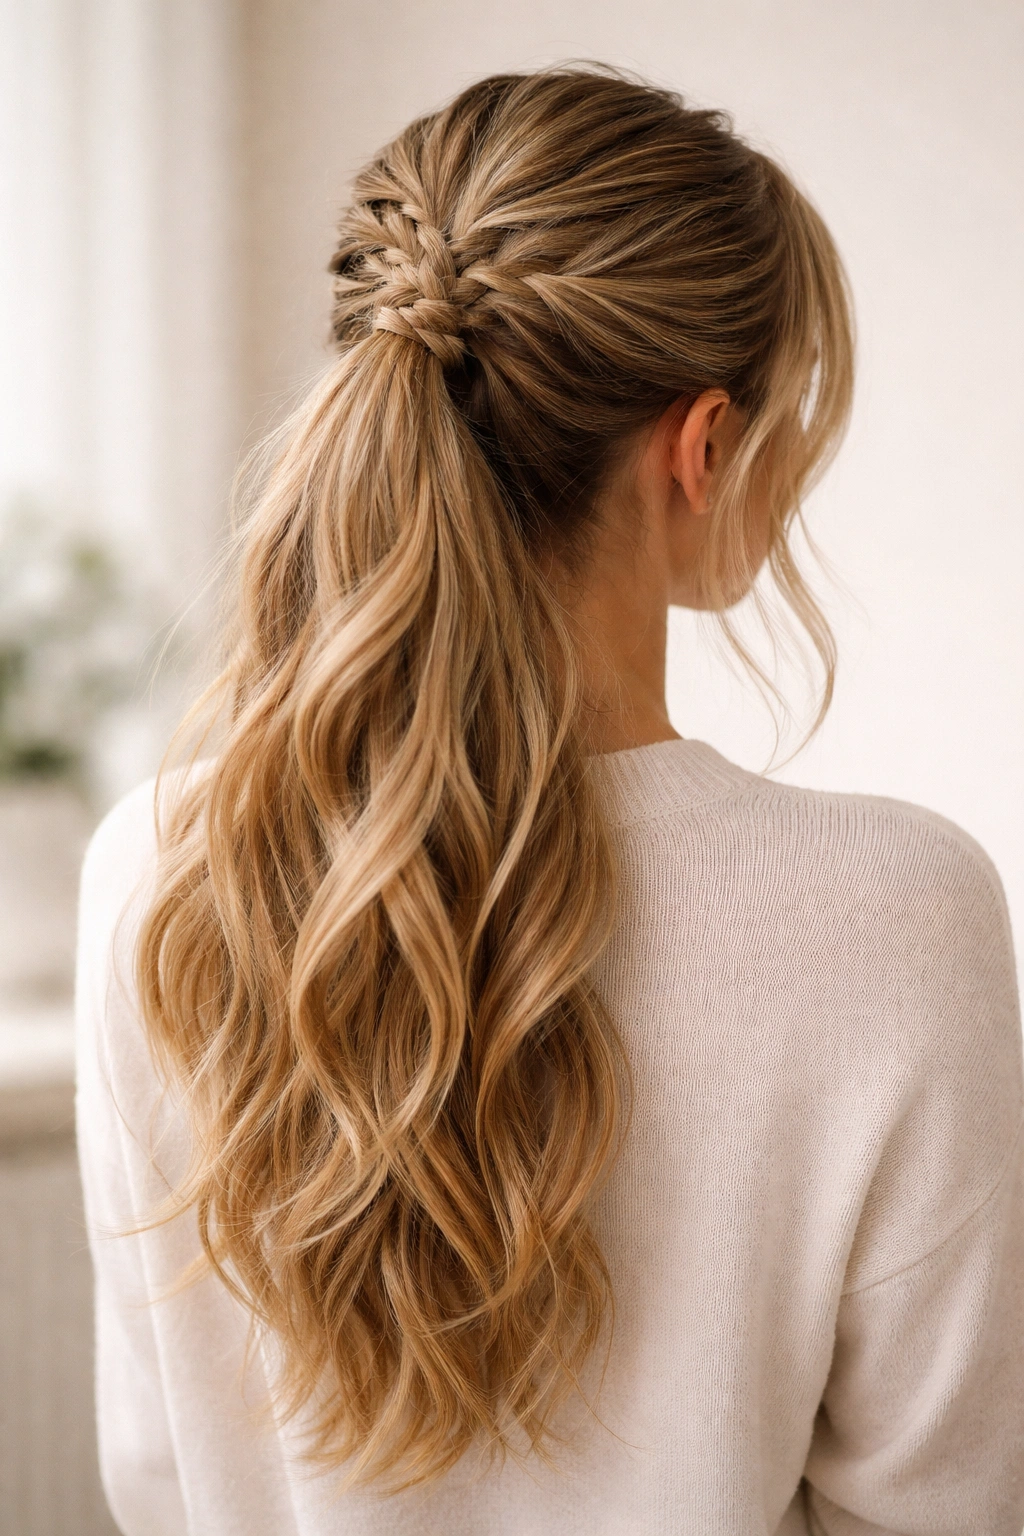
A half-up braid ponytail keeps some hair down while pulling the upper portion into a braid and ponytail. This style walks a beautiful line between completely down and fully pulled back. It’s dressier than a full ponytail but softer than a fully braided style. The half-up approach works especially well if you love your hair down but need it partially controlled, or if you want to show off length while keeping face-framing pieces away from your face.
Why This Hybrid Works
The half-up format gives you the softness of hair down without the inconvenience of full hair in your face. It’s practical for actual daily activities—you get the movement and flow of down hair with the function of something pulled back. It also suits nearly every hair length and texture. You can do this with shoulder-length hair or waist-length hair, fine or thick, straight or curly.
Building Your Half-Up Style
Gather the top portion of your hair—think from ear to ear across the crown. Braid this section using whichever braid technique appeals to you (three-strand, Dutch, French). Secure the braid with a small elastic at the base. Then gather this braided section along with the hair from below and tie everything into a ponytail. The braided section becomes part of a larger ponytail structure. This creates layers of texture—the braid, then the loose section, then the ponytail—that feel modern and intentional.
Styling Considerations
- Choose your braid wisely. A Dutch or fishtail braid is more visually interesting for this style, since you’re only braiding half your hair and want that section to feel special.
- Leave face-framing pieces. Pull the top section back, but leave a few small pieces around your face loose. This softens the overall look and feels more wearable for everyday.
- Let the bottom half move. Don’t overwork the lower loose section. You want it to look naturally soft, not artificially curled or styled. This style is about the contrast between the intentional braid and the natural flow below.
7. Messy Braided Low Ponytail
A messy braided low ponytail prioritizes comfort and ease while still looking deliberately styled. The braid is intentionally loose and soft, the ponytail sits low on the back of your head, and the overall effect is effortlessly polished rather than precisely perfect. This is the braided ponytail you reach for when you want to look like you tried without actually trying very hard.
The Appeal of Controlled Messy
There’s an art to looking effortlessly put-together, and a messy braided ponytail nails it. It says “I have time for my appearance but not so much time that I’m obsessing over perfection.” It works in almost any context—work, casual hangouts, running errands, weekend plans. The low placement keeps it from feeling too formal or too sporty; it just feels real.
Achieving Intentional Messiness
This style actually requires you to not overthink it. Gather your hair into a low ponytail—somewhere around the base of your head where your neck begins. Braid it loosely using a three-strand or Dutch braid, pulling apart the sides generously as you go. Don’t aim for a perfect braid. Instead, aim for texture and softness. The braid should look like it’s on the verge of falling apart, which is exactly the look you’re going for. A few flyaways around your face and at the base of your head add to the aesthetic rather than detracting from it.
Getting the Balance Right
- Low placement matters. A braid at the crown reads as more intentional and formal. A braid starting lower on your head automatically looks more relaxed.
- Texture is your friend. This is one style where second-day hair actually works better than freshly washed hair. The natural oils and texture help the braid hold its shape while maintaining that soft, effortless appearance.
- Don’t perfect it. Resist the urge to tighten or smooth anything. The beauty is in the slight imperfection and relaxed feel.
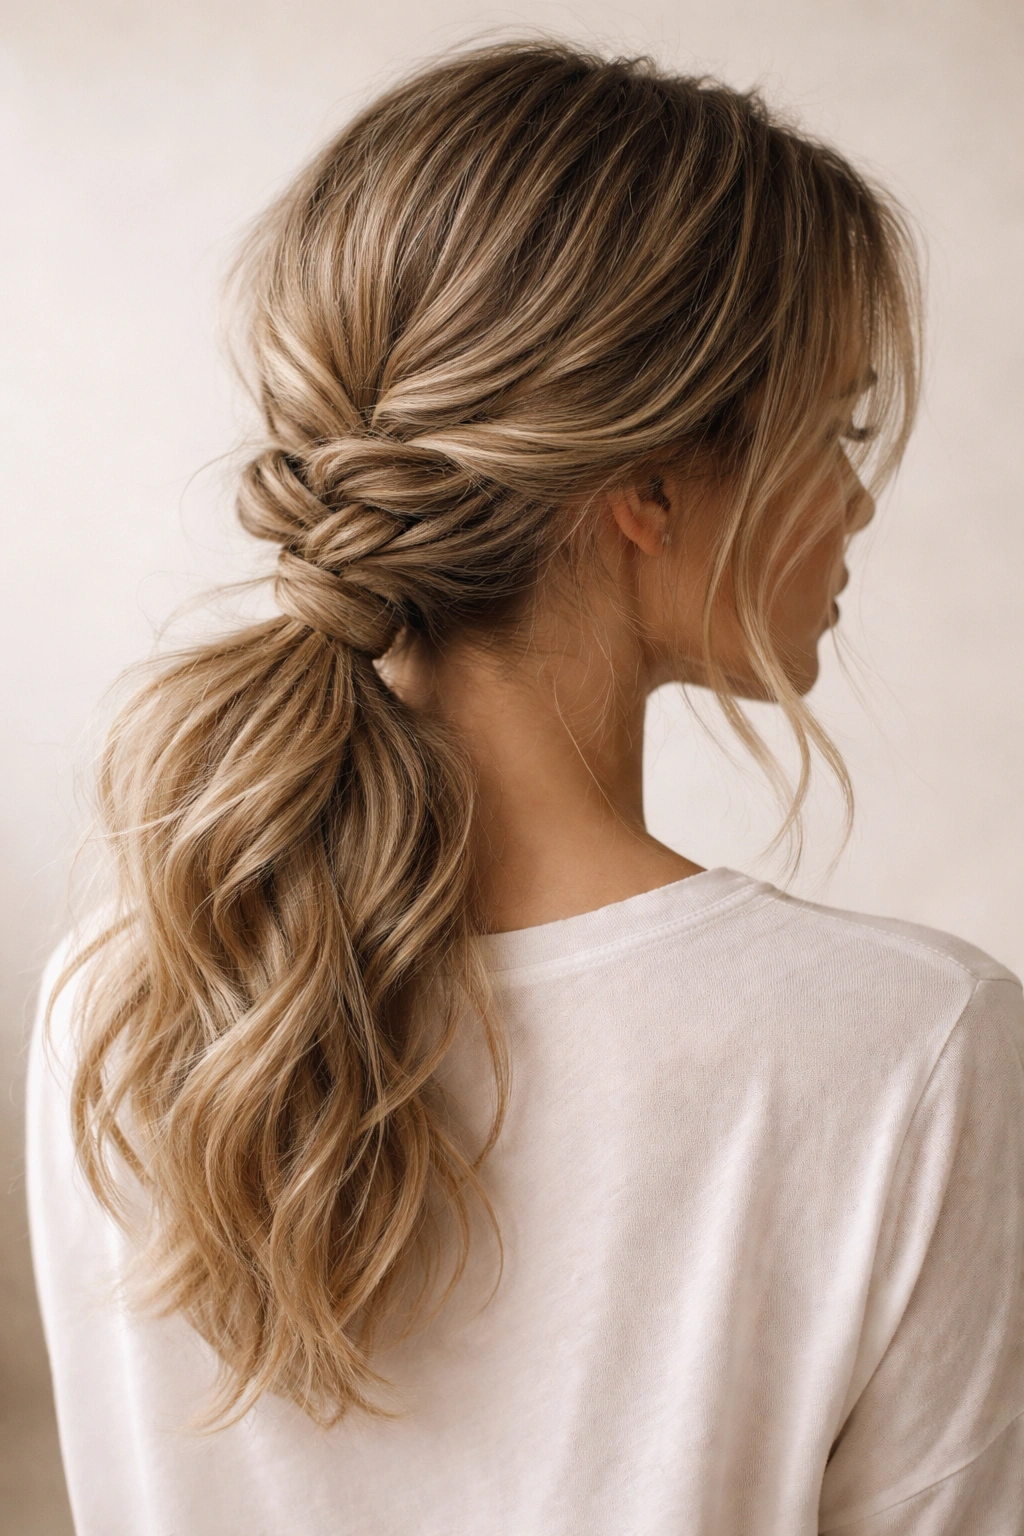
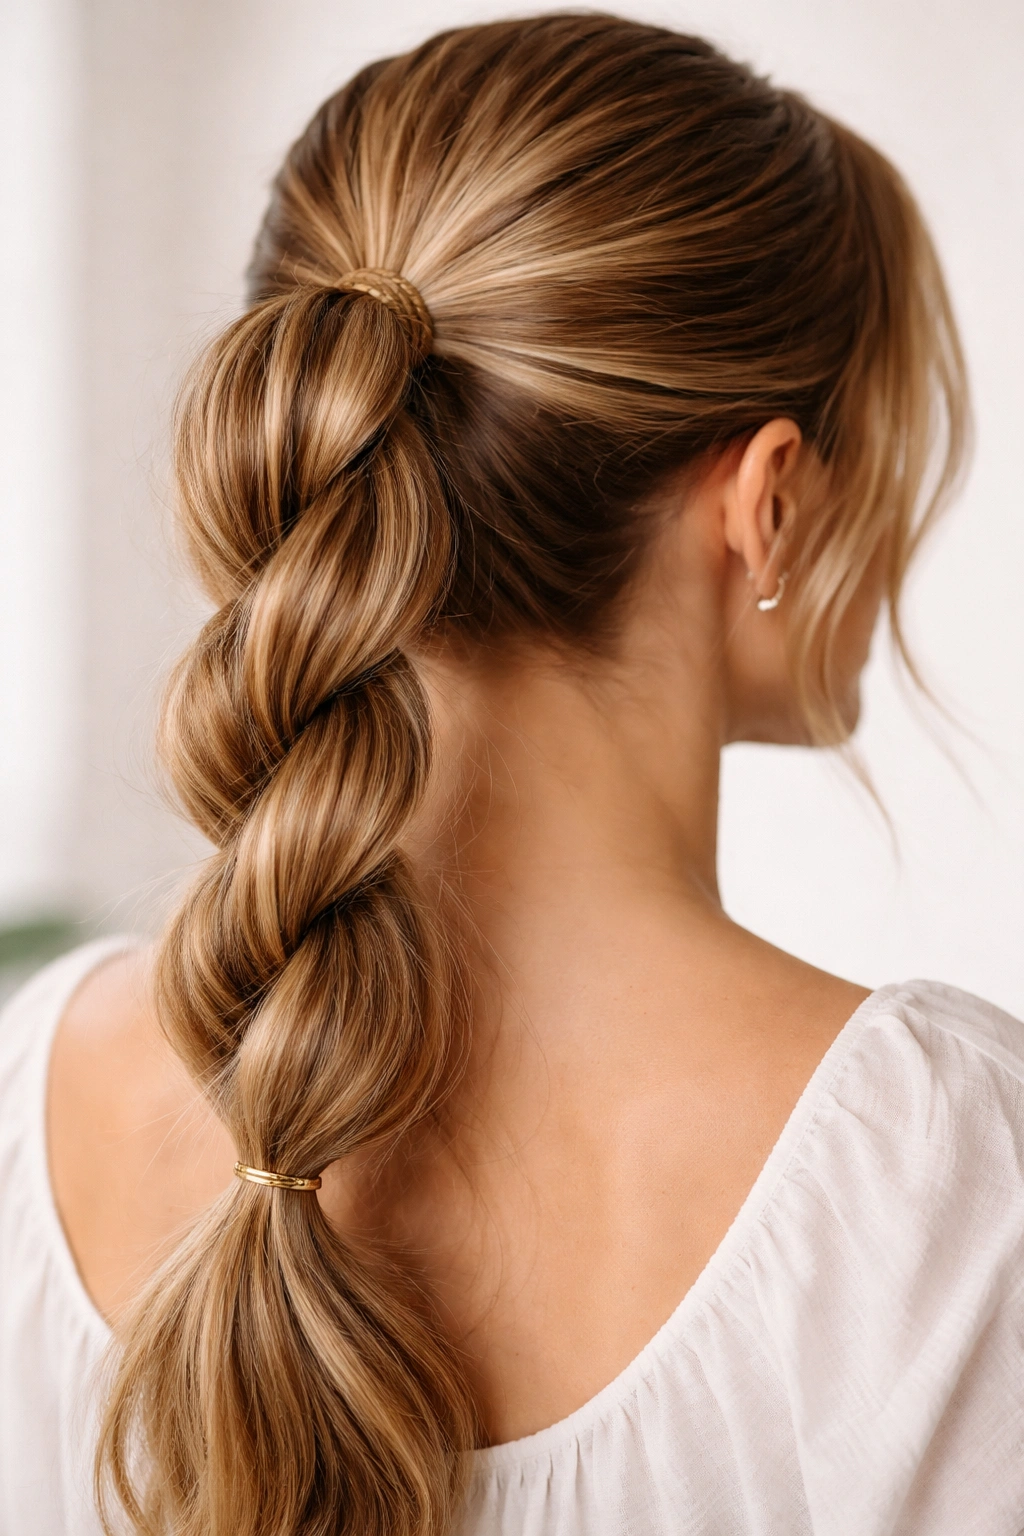
8. Twisted Braid Ponytail
A twisted braid is technically simpler than a traditional braid—you’re just twisting two sections of hair together rather than braiding three sections. But the visual result is surprisingly sophisticated. Two-strand twists create diagonal texture and visual interest, and when you finish them into a ponytail, you get a style that feels modern and intentional without requiring advanced technique.
Why Twists Feel Different
Twists are slightly more delicate and refined-looking than braids. They have a softer visual impact and often feel slightly dressier or more feminine, depending on how you style them. Twists also work beautifully with all hair textures, including naturally curly or textured hair where traditional braids might feel too structured.
The Two-Strand Twist Technique
Gather your hair into a ponytail at whatever height feels right. Divide the ponytail into two equal sections. Twist the left section clockwise (or counterclockwise—just pick a direction and stick with it), then twist the right section in the same direction. Now wrap the left twisted section around the right twisted section, twisting them together as a unit. Continue twisting these two sections around each other all the way to the ends. Secure with a small elastic. Gently pull the sides to loosen and add texture. For extra softness, separate the twisted sections slightly so they look less uniform and more organic.
Making Twists Work
- Twists work well with any hair length. You don’t need long, thick hair to make twists look good. Even shorter hair can support a twisted ponytail beautifully.
- They hold better when loosely twisted. A tightly twisted ponytail can feel uncomfortable and look overly formal. Loose, soft twists read as deliberately relaxed.
- Layer twists for dimension. Create multiple small twists and spiral them together rather than one large twist. This creates more visual interest and texture.
9. Crown Braid Ponytail
A crown braid wraps around your head like a halo before meeting at the back in a ponytail. It’s the most romantic and dressier option of the bunch, perfect for when you want something more polished or elevated than your everyday style. Crown braids create an almost fairytale-like appearance, making them ideal for special occasions or days when you want your hair to feel extra beautiful.
Creating Crown Braid Magic
Start by creating a section of hair from one temple (the area near your ear on the side of your head). Braid this section using a French braid technique, pulling the braid toward the back of your head and over the crown rather than down the back of your head. As you braid, incorporate hair from the top and back of your head, creating a path that goes around your head from one side to the other. The braid should end at the opposite temple. Finish by gathering this braid along with any remaining loose hair into a low ponytail. Loosen the crown braid generously—it should look soft and romantic rather than tight and formal.
When This Style Shines
Crown braids are perfect for events where you want your hair to feel special but you still want it back and controlled. They work beautifully with dressier clothing, for date nights, for celebrations, or whenever you want your hair to be a statement. They also photograph gorgeously—the wraparound effect creates dimension and interest that reads beautifully in pictures.
Execution Tips
- Practice before the big day. Crown braids are more involved than other styles, so if you’re doing this for a specific event, practice a few times first.
- Use bobby pins if needed. If your braid doesn’t feel secure, tiny bobby pins hidden within the braid keep it in place without being visible.
- Balance with your makeup and outfit. Crown braids are visually striking, so consider your entire look. They pair beautifully with softer makeup and romantic or classic clothing.
10. Braided Side Ponytail
A side ponytail sits off to one side of your head rather than centered at the back. When you add a braid to this format, you get a style that’s playful, youthful, and distinctly different from the more standard centered ponytails. Side ponytails have a fun energy that works beautifully for casual settings, creative work environments, or simply when you want something a bit more interesting than a typical style.
The Appeal of Asymmetry
Side ponytails automatically feel less formal and more intentional than centered ones. They draw attention to your face from a slightly different angle, which can be flattering and interesting. They also work beautifully with side-swept bangs or face-framing pieces, creating a soft, modern aesthetic.
Building Your Braided Side Ponytail
Gather your hair to one side of your head—typically toward your shoulder rather than at the very back. Create a braid using whichever technique appeals to you, then secure the entire section into a side ponytail. You can braid all the way down and then gather it into a ponytail, or you can braid partway and then gather the braided section with loose hair below into the ponytail. Loosen the braid to soften it. The side placement naturally creates an asymmetrical, modern look without requiring any additional styling.
Styling Notes
- Side ponytails work best positioned toward your stronger side. If you have a side of your face you prefer to show, position your side ponytail on that side to draw attention there.
- Leave face-framing pieces. A few small wisps around your face balance the side placement and feel intentional rather than accidental.
- Keep it soft. Don’t pull too tightly. The charm of a side ponytail is its slightly playful, relaxed quality.
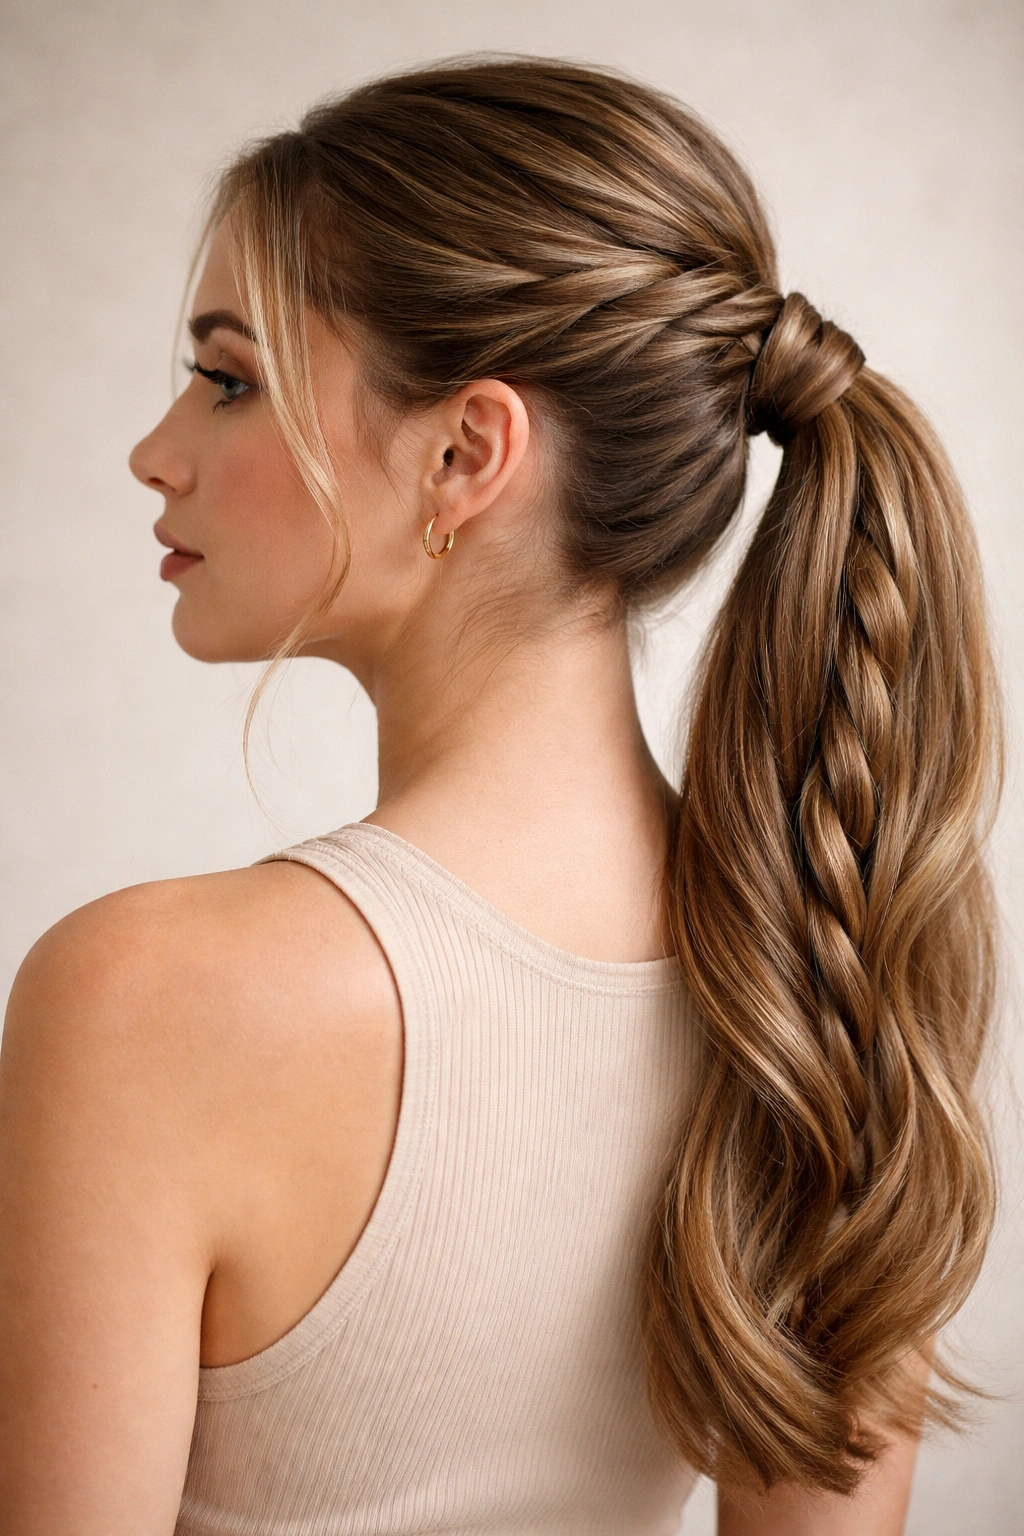
11. Rope Braid Ponytail
A rope braid is created by twisting two sections of hair together (similar to a two-strand twist) and then wrapping that twisted unit around itself to create a rope-like texture. It’s technically one of the simpler braid variations, but the result looks beautifully complex. Rope braids read as more intricate than they actually are, making them perfect if you want something that looks impressive without requiring advanced skill.
What Makes Rope Braids Special
Rope braids have a distinctive thick, dimensional appearance. They catch light beautifully and create visual texture that reads as intentional and polished. Because they’re thicker than standard braids, they work especially well with finer hair, where they create the illusion of fullness and density.
The Rope Braid Process
Gather your hair into a ponytail. Divide it into two equal sections. Twist each section tightly in the same direction (both clockwise or both counterclockwise). Now twist these two twisted sections around each other in the opposite direction. This counter-twisting is what creates the rope effect—it prevents the braid from unraveling and creates that beautiful dimensional appearance. Secure at the end and gently loosen by pulling at the rope’s surface, which separates the twisted sections slightly and adds to the textured appearance.
Making Rope Braids Work
- Tight twisting creates the rope effect. Unlike regular twists, rope braids need fairly tight twisting to create that signature rope-like appearance.
- This works especially well on fine hair. The thick, dimensional appearance makes fine hair look fuller and more textured.
- Rope braids can feel slightly formal. If you want them to feel more casual, loosen them more generously or combine them with a lower ponytail placement.
12. Waterfall Braid Ponytail

A waterfall braid is a French braid variation where you let sections of hair fall free as you braid, creating the effect of water cascading down. When you finish a waterfall braid into a ponytail, you get a style that’s dreamy, romantic, and visibly more complex than a standard braid. The falling sections of hair add softness and movement while the braid itself creates structure.
The Romance of Waterfall Braids
Waterfall braids are one of the most visually striking braid variations. The contrast between the structured braided sections and the free-falling sections creates dimension and movement. They feel special and intentional, making them perfect for occasions when you want something elevated beyond your everyday style while still keeping your hair partially back and controlled.
Creating a Waterfall Braid
This technique requires focus, so position yourself in front of a mirror or have someone help until you learn it. Start at one temple. Take a section of hair and divide it into three subsections. Begin a regular three-strand braid, but after you cross the bottom section over, let it fall free as the waterfall. Pick up a new section of hair from that side to replace the fallen section, and continue braiding. You’re constantly letting sections fall and replacing them with new ones, creating a braid that appears to have hair flowing through it. Continue this pattern toward the back of your head, then gather the braid plus any remaining loose hair into a ponytail. The fallen sections will hang softly around the braid.
Waterfall Braid Tips
- This is more advanced. Waterfall braids require more practice and coordination than simpler braids. Practice when you’re not in a time crunch.
- They look best slightly loosened. Once you’ve completed the braid, gently pull at the sides to soften it. The falling pieces should look naturally soft.
- Pair with soft makeup and clothing. Waterfall braids are romantic and delicate, so they look most cohesive with softer overall styling.
- Perfect for special occasions. While simpler braided ponytails work for everyday, waterfall braids are ideal for events where you want your hair to feel extra beautiful and intentional.
Final Thoughts
The beauty of braided ponytails is that there’s genuinely something for everyone, whether you prefer super simple three-strand braids or more complex waterfall styles. Once you’ve got the basic braiding techniques down, you can rotate through different styles based on your mood, the time you have available, what you’re doing that day, and how polished you want to feel. What makes these styles so valuable is that they bridge the gap between “I just threw my hair up” and “I spent an hour on my hair,” and most people can’t quite tell which one you actually did—which is exactly the point. Pick one or two that feel most natural to your hands and your lifestyle, practice those until they become automatic, and then gradually explore the others. Before long, you’ll have a full rotation of braided ponytail styles that work in virtually any situation, and your hair will always feel intentional without requiring excessive effort.