Straight hair is something of a canvas—it holds its shape, catches the light beautifully, and takes to braids in ways that textured hair sometimes can’t quite match. If you’ve got that smooth, sleek texture, you have an incredible opportunity to showcase braids that might look loose or shapeless in curlier hair types. The key to making braids shine on straight strands isn’t about finding impossible techniques; it’s about choosing styles that genuinely complement the way straight hair naturally behaves and knowing how to execute them so they look polished without looking overdone.
The best braids for straight hair tend to be ones that create clean lines and visible texture contrast—braids that actually show rather than disappear into curl patterns. Some styles work best when they’re tight and geometric, while others gain personality from being slightly loosened and textured after the fact. What makes a braid truly pretty isn’t just the pattern; it’s the way it interacts with light, how it frames your face, and whether it photographs well (because let’s be honest, we all care about that). The following ten braids are specifically chosen because they look genuinely stunning on straight hair, they’re achievable even if you’re not a professional stylist, and they work for everything from casual Saturdays to occasions where you want to look polished and intentional.
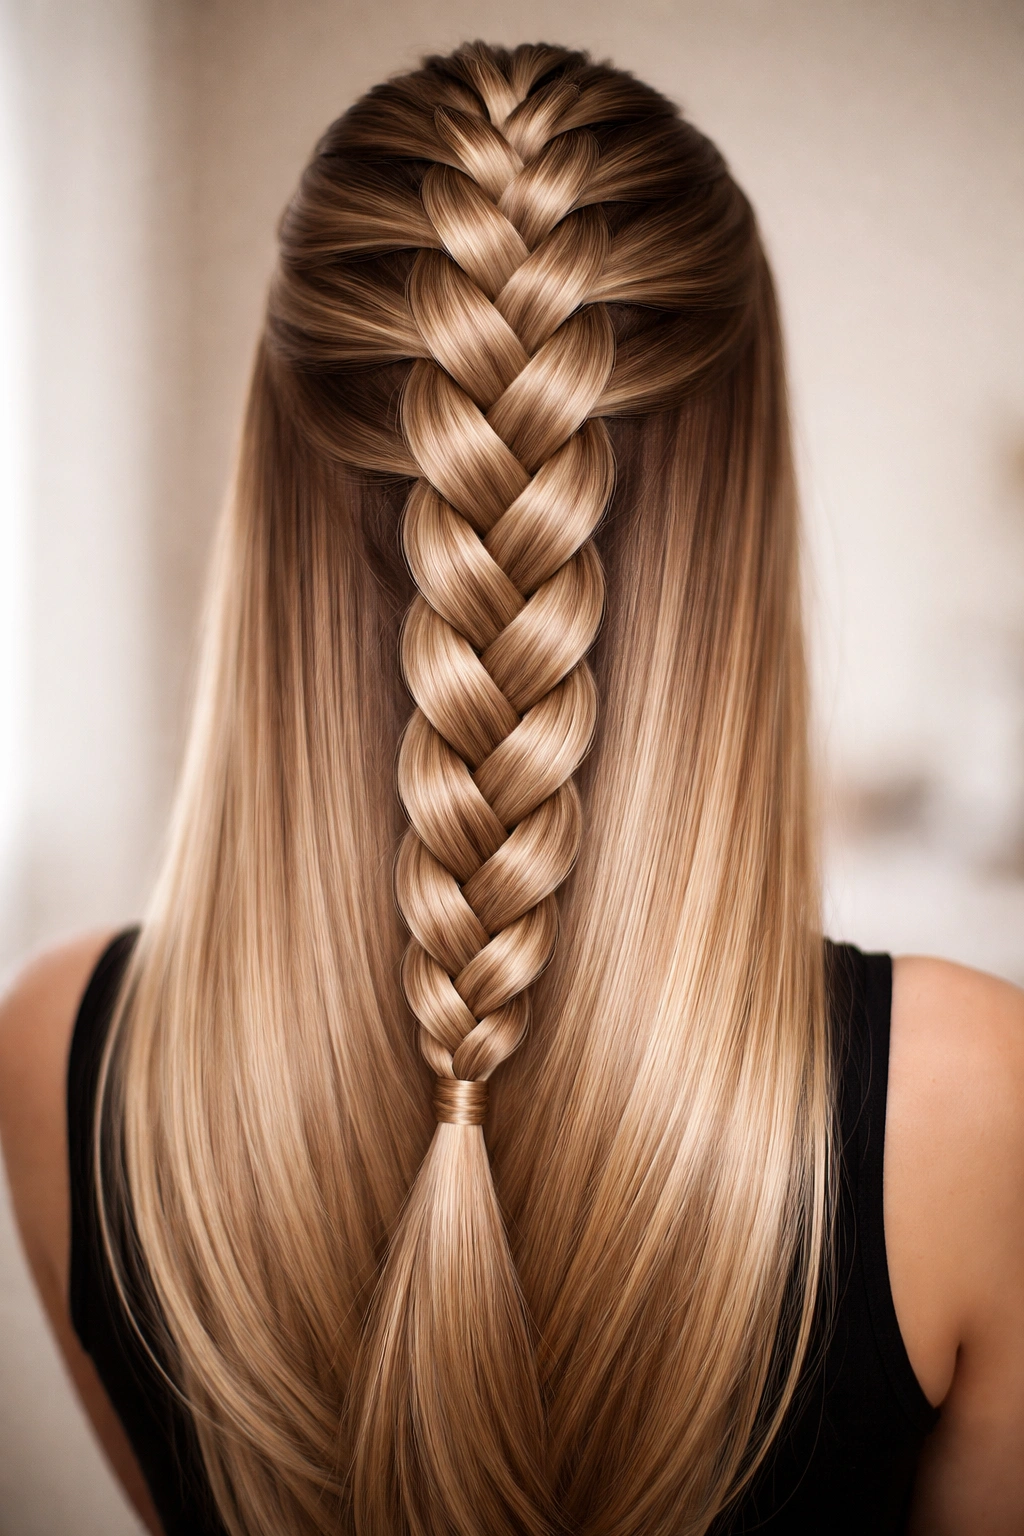
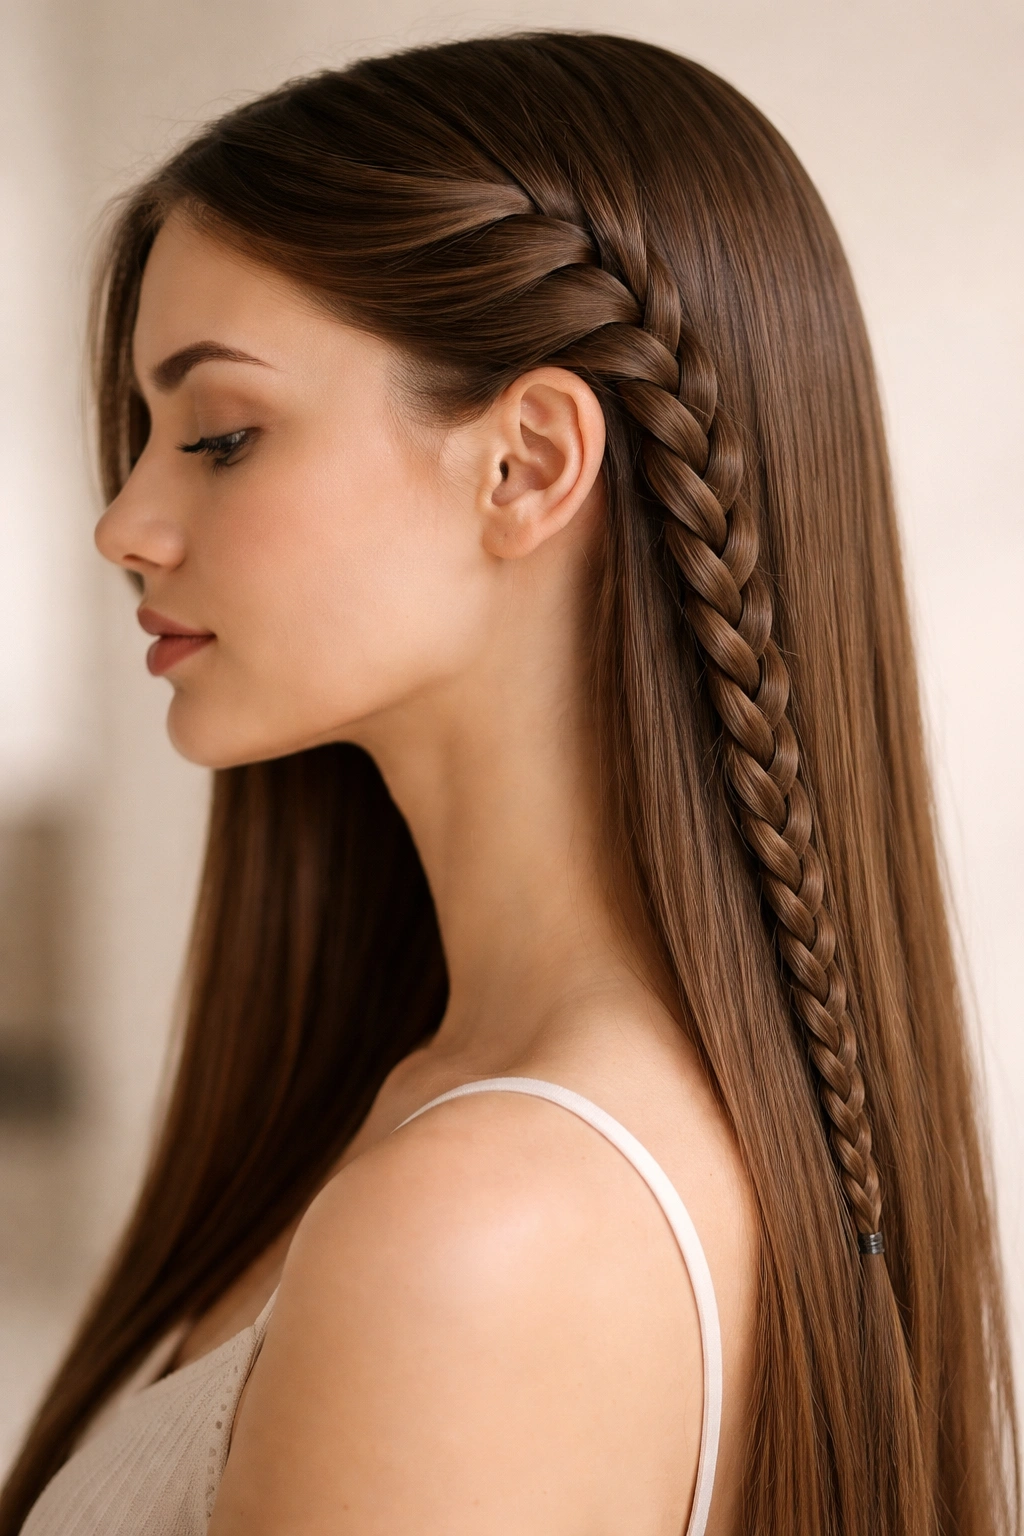
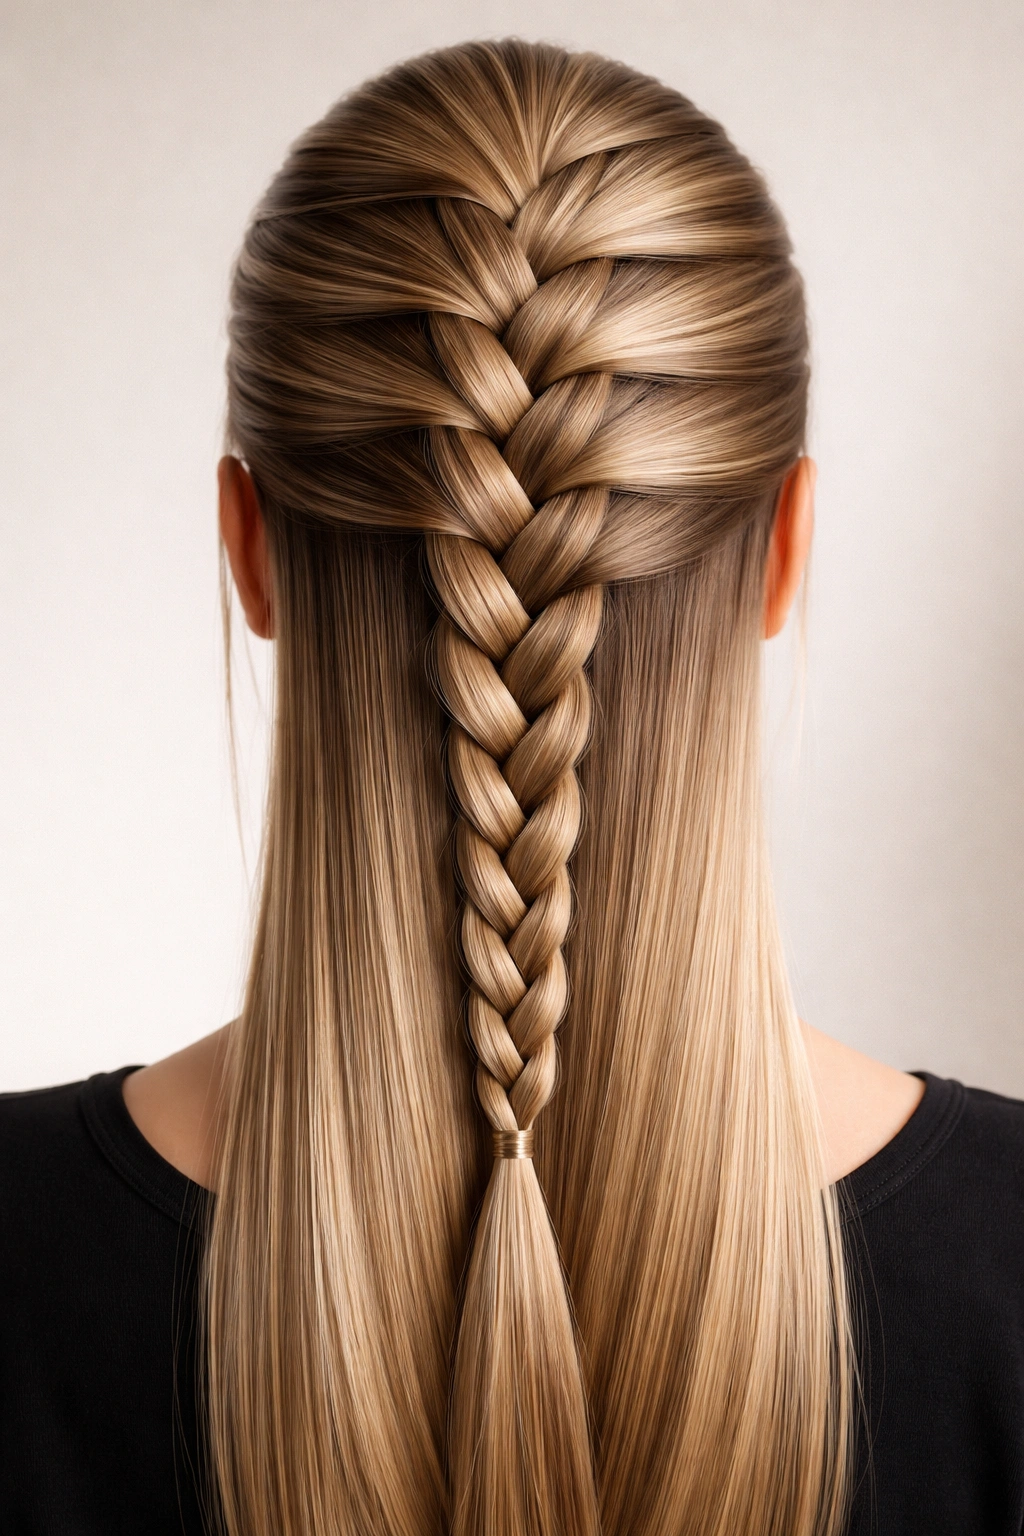
1. French Braid
The French braid is the foundational braid that everything else builds from, and it looks absolutely beautiful on straight hair because of the crisp, defined lines it creates. Unlike looser, messier braiding styles that blend into textured hair, a French braid on straight strands has clean separation between each woven section, making the entire pattern visible and three-dimensional.
Why It’s Perfect for Straight Hair
A French braid works especially well on straight hair because the smoothness of your strands means the braid stays tight and structured without fighting against your natural texture. The light reflects beautifully off the polished surface of the braid itself, creating subtle dimension and shine that makes the style look intentional and refined. You can wear a French braid down the back of your head, to one side, or even slightly off-center for a softer, more romantic effect. The braid itself becomes a design element rather than just a way to contain your hair.
How to Get the Best Results
Start with clean, dry or slightly damp straight hair—damp hair grips better, but straight hair doesn’t need much help holding a braid. Begin at the crown and keep your sections even and consistent as you weave. The tighter you braid, the more structured and polished the final look; if you prefer something slightly softer, you can gently loosen each section after you’ve secured the braid at the bottom. For extra definition and shine, run a smoothing serum or light hairspray through the braid once it’s finished—straight hair shows product application, so a little goes a long way.
Pro tip: If you’re braiding your own hair, practice in front of a mirror with good lighting until the motion becomes automatic. Once you understand the rhythm—adding a new section of hair with each pass—the rest flows naturally.
2. Dutch Braid
A Dutch braid is essentially a French braid in reverse, where you weave the outer sections under the center section instead of over it. On straight hair, this creates a raised, almost 3D effect that catches light in a completely different way than a French braid, and it photographs remarkably well.
Why It Creates More Visual Impact
The Dutch braid looks bolder and more textured than a French braid, which is a significant advantage on straight hair where you want visual interest and dimension. Because the braiding technique creates an under-weave, the sections appear to pop forward and create actual depth—your hair doesn’t lay flat against your head the way it does in a French braid. If you’re going for a look that says “I put effort into this,” a Dutch braid delivers that message clearly.
Styling and Customization
Dutch braids work beautifully as a single center braid, paired as double Dutch braids on either side of your head (an edgy, athletic-looking style), or even woven loosely into a half-up style that frames your face. On straight hair, you can start a Dutch braid at your hairline and let it run all the way down your back, or you can begin at the crown for a smaller, neater look. Once you’ve secured the braid with a small elastic, you can carefully loosen each section for a softer, slightly messier aesthetic that still maintains the structural integrity of the style.
Worth knowing: Dutch braids look particularly striking with a sleek, straight ponytail underneath or with your hair left down and curled at the ends for contrast between the geometric braid and bouncy waves.
3. Fishtail Braid
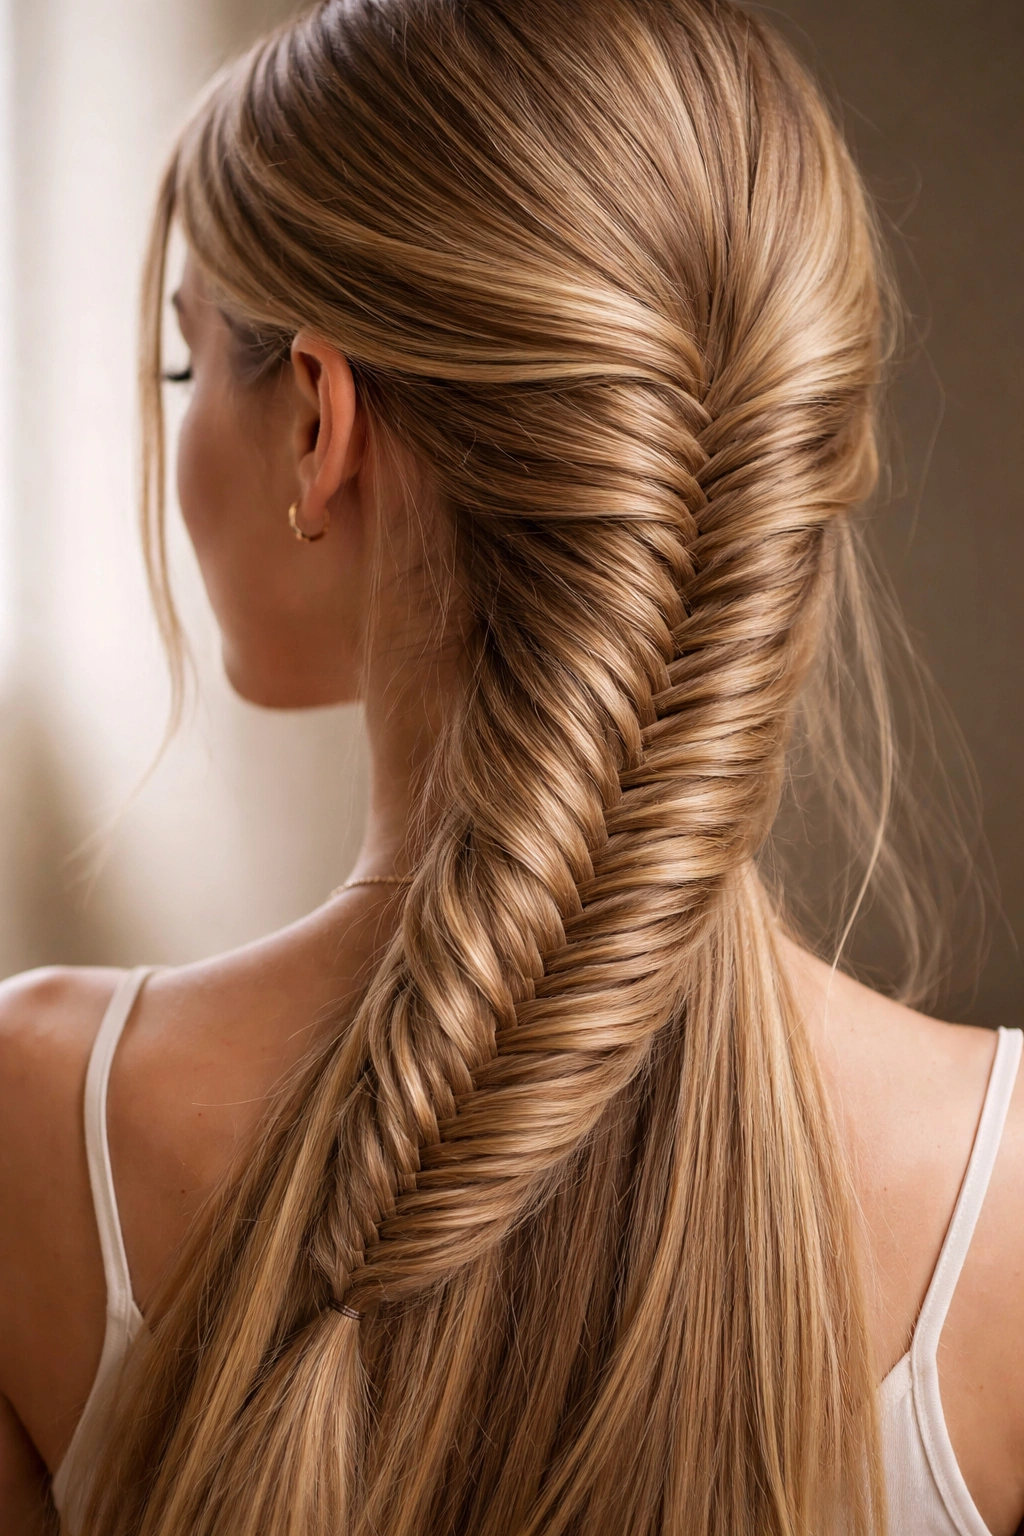
The fishtail braid uses a completely different technique than French or Dutch braids—instead of taking one section from each side, you’re pulling thin strands from the outer edges of two base sections and weaving them across the center. The result is a delicate, intricate-looking braid that catches light and looks far more complicated than it actually is.
What Makes It Stand Out on Straight Hair
Fishtail braids are deceptively simple once you understand the technique, and straight hair shows off the intricacy beautifully because of how each tiny strand catches the light differently. On textured hair, the fishtail pattern can disappear; on straight hair, it’s almost three-dimensional. The braids look fine and detailed, which gives them an elegant, intentional quality—this style reads as “put-together” in a way that feels appropriate for both casual days and more formal occasions.
Execution Tips
Begin by dividing a section of hair into two parts. From the left side, take a thin strand from the outer edge and pull it across to meet the right section, then repeat from the right side. The thinner your strands, the more intricate the final look; the thicker your strands, the looser and chunkier the fishtail will appear. Straight hair is forgiving here because the strands don’t slip as much as they might in curlier textures. You can wear a fishtail braid as a single center braid, as a partial braid woven into a half-up style, or looped into a low bun for a more polished evening look.
Quick fact: Fishtail braids look especially pretty when you gently pull and loosen the sections after securing the braid—this creates a softer, almost romantic appearance that photographs beautifully.
4. Waterfall Braid
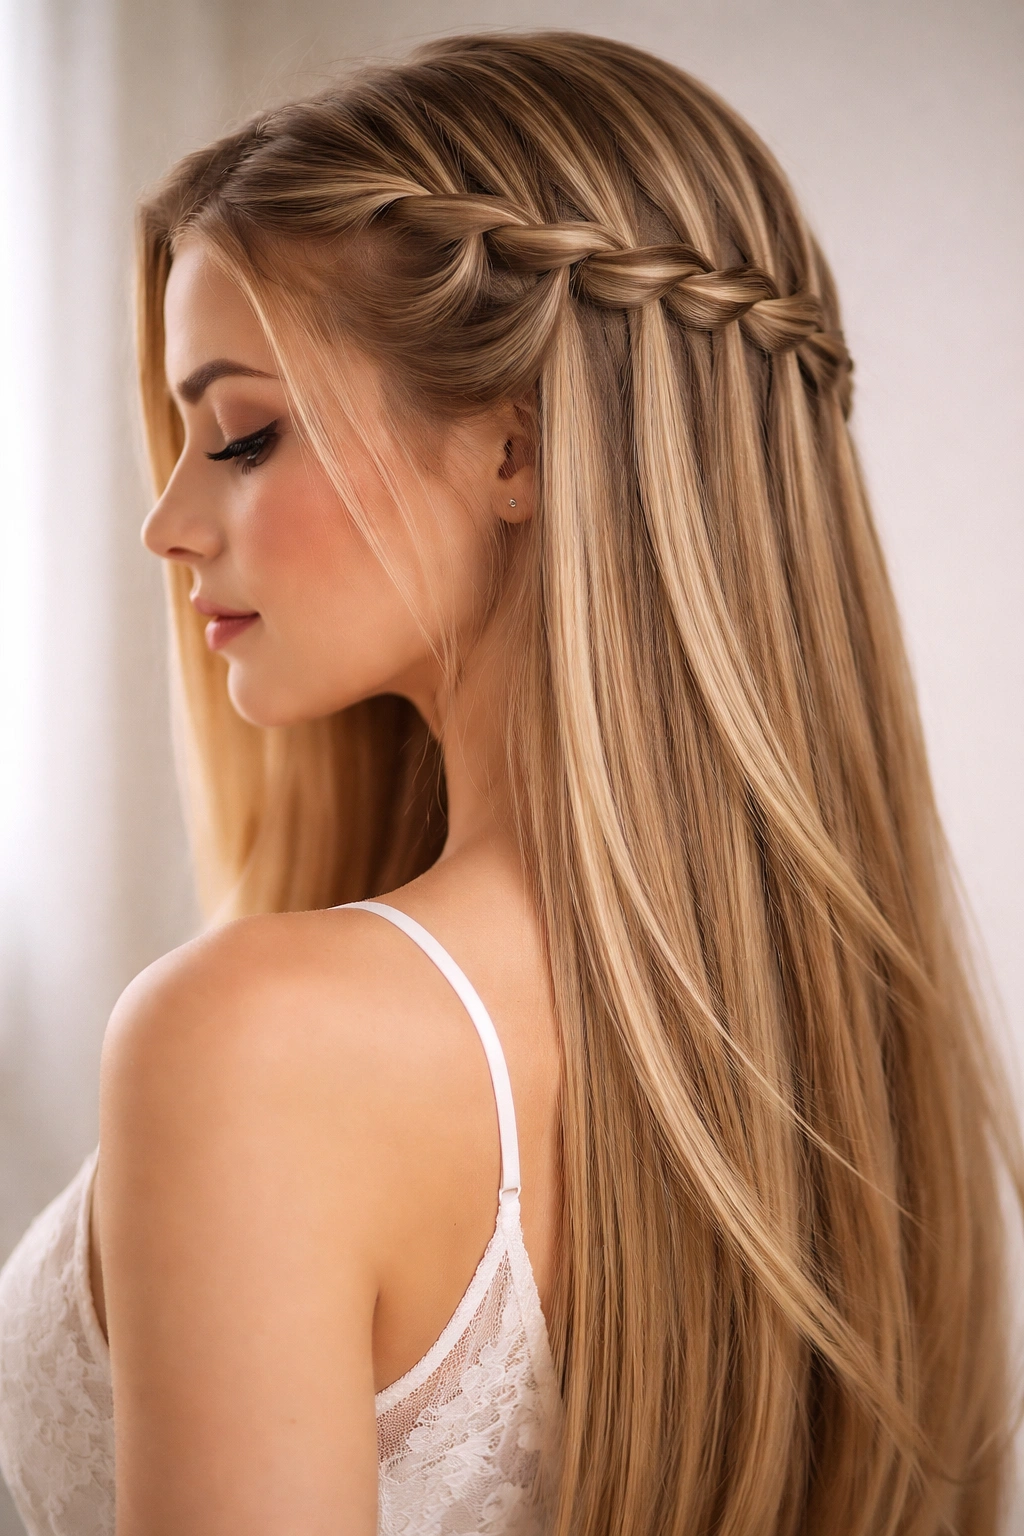
A waterfall braid is a French braid variation where you drop sections of hair as you braid, allowing them to cascade freely while the braid itself runs across the back or side of your head. It’s a technically intermediate style, but the payoff is a romantic, flowing look that’s genuinely stunning on straight hair.
Why It’s Worth Learning
The waterfall braid combines the structure of a traditional braid with the softness of loose, flowing hair—it’s a hybrid that looks delicate without being fragile or obviously styled. On straight hair specifically, the “waterfall” sections hang smoothly and catch light beautifully, creating a almost ethereal effect. The braid itself looks intricate and thoughtful while the loose sections prevent the style from feeling too formal or restrictive.
How to Create the Effect
Start a French braid at one side of your head, perhaps above your ear, and begin weaving diagonally across the back. With each new weave, instead of adding a new section of hair from that side, you drop the section you just added and pick up a new strand from below it. This creates the waterfall effect—the dropped strands hang freely while the braid continues. On straight hair, these dropped sections stay smooth and elegant. You can wear a waterfall braid across the back of your head, around the sides, or even create a full circle waterfall that spirals around your crown.
Pro tip: Curl the waterfall sections gently with a curling iron after the braid is finished—the contrast between the straight braid and the curled sections is absolutely striking and adds femininity to the style.
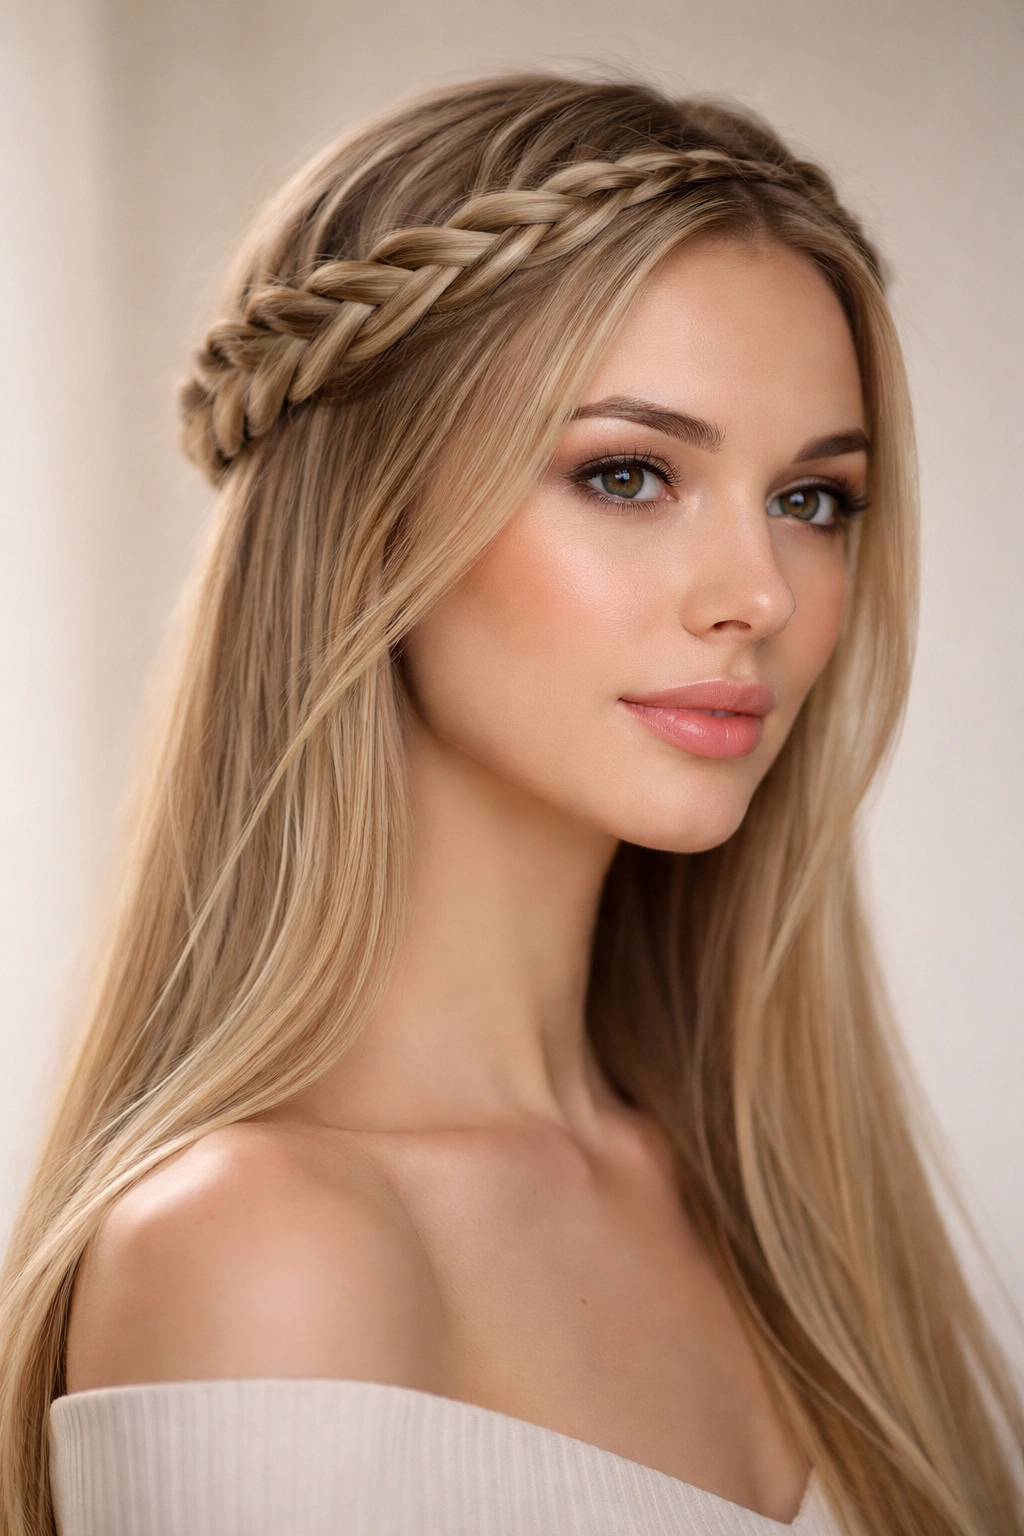
5. Crown Braid
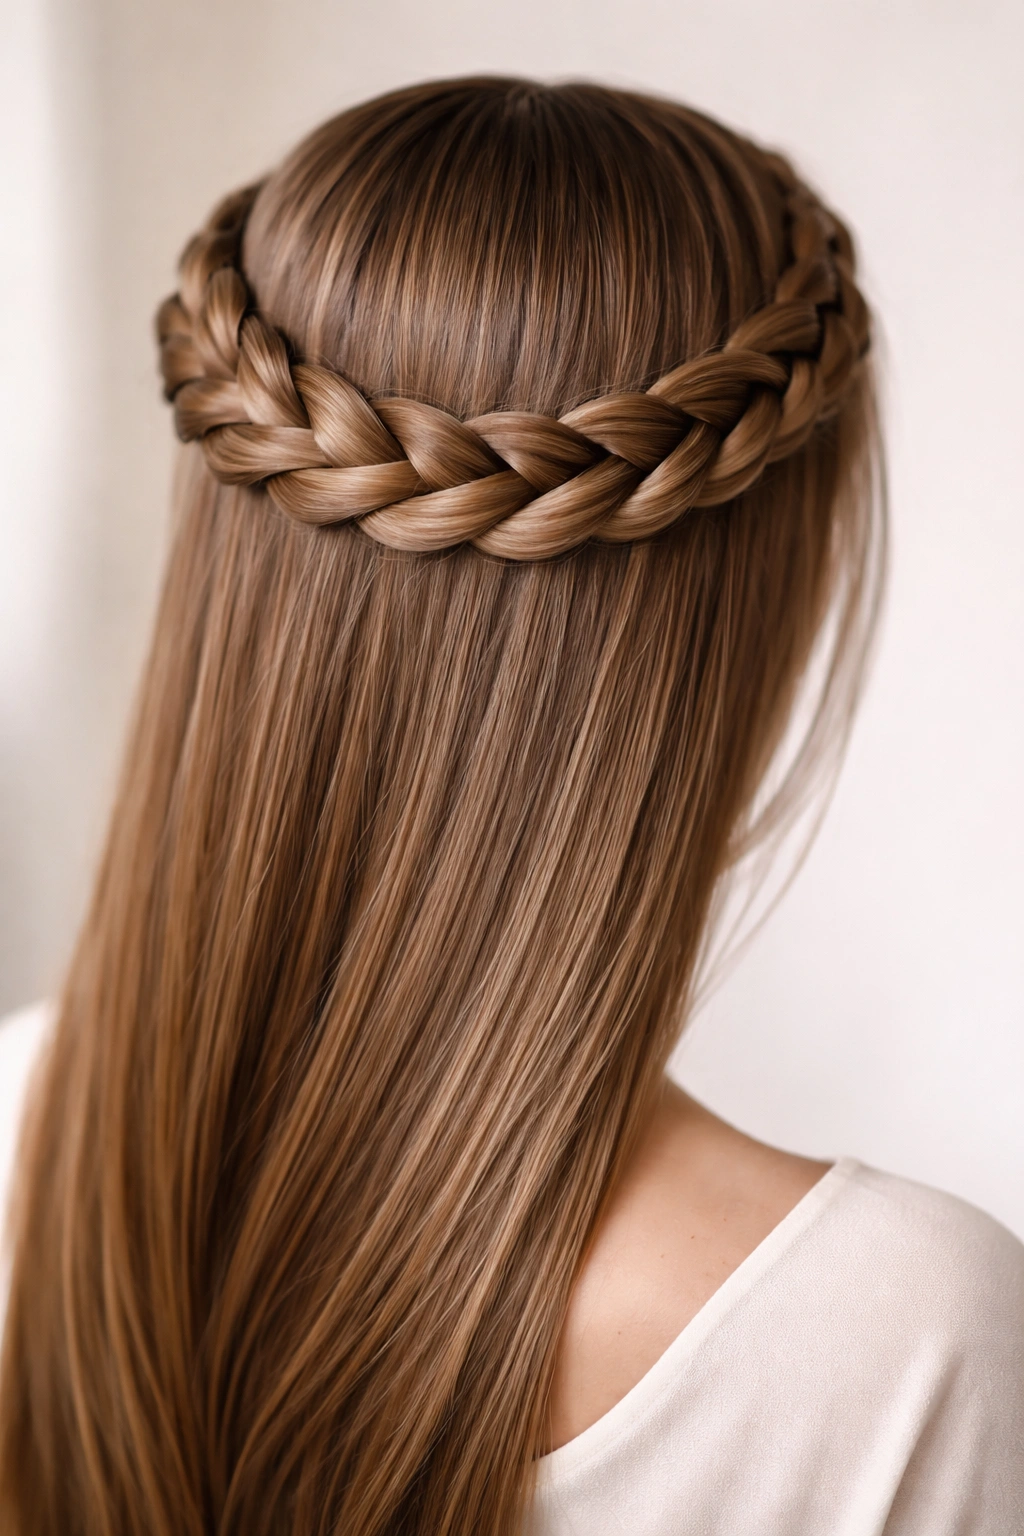
A crown braid is essentially one braid (usually a Dutch or French braid) pinned around the circumference of your head like a crown or halo. On straight hair, this creates a regal, polished look that works for everything from special occasions to everyday styling.
Why It Works So Well on Straight Hair
The crown braid looks particularly intentional and structured on straight hair because the braid maintains its shape and definition without fighting against your natural texture. The circular arrangement of the braid frames your face beautifully and has a balanced, symmetrical quality that feels both romantic and put-together. It’s also a practical style—it keeps hair off your face and neck while still looking elegant rather than purely functional.
Getting the Placement Right
You can create a crown braid by starting at one ear, braiding around the back and side of your head, and pinning the end near your other ear. Or you can create two thinner braids, one on each side, and pin them together at the back for a softer effect. The tighter you braid, the more polished the final look; loosening the sections slightly after braiding adds a softer, more romantic quality. On straight hair, bobby pins stay hidden more easily because the hair lies flat, so you can create a seamless-looking crown without visible anchoring.
Worth knowing: A crown braid is one of the most face-framing styles possible, making it perfect if you want to emphasize your features or create a softer, more delicate appearance.
6. Side Braid
A simple side braid is exactly what it sounds like—a single braid that runs from one side of your head down, usually starting behind one ear or at the top of the head near one side. It’s effortless-looking but genuinely pretty on straight hair, where the braid hangs smoothly without bunching or twisting.
The Elegance of Simplicity
Side braids have an easy elegance that works because they’re not trying too hard to be complicated. On straight hair, the simplicity works in the style’s favor—you get a clean, visible braid that looks intentional and polished without requiring advanced technique or styling skills. The side placement is flattering because it frames one side of your face and creates visual interest without overwhelming your features. A side braid can be dressed down for a casual weekend or dressed up with accessories for a more formal occasion.
Styling Variations
A side braid works as a simple three-strand braid, a French braid running down the side, a Dutch braid for more texture, or even a fishtail braid for more intricacy. You can create a full-length braid that extends all the way down your back, or you can stop at your mid-back or shoulder length. On straight hair, you can loosen the sections slightly for a softer look, leave it tight for something more structured, or even wrap the finished braid around the base of a low ponytail for a more polished appearance.
Quick fact: Side braids photograph beautifully from certain angles and work well with specific facial features—if you have a wider face, a side braid on one side is more flattering than a center part and center braid.
7. Halo Braid
A halo braid is similar to a crown braid but typically uses a fishtail or more delicate braiding style that creates an almost ethereal, floating quality around your head. It’s a genuinely pretty style that looks especially lovely on straight hair, where the delicate sections are fully visible.
Creating an Ethereal Effect
The halo braid looks romantic and slightly more elevated than a crown braid because of the delicate nature of the braiding pattern—fishtail halos are particularly stunning. On straight hair, each tiny section of the fishtail is visible, creating an intricate pattern that catches light and looks more complicated than it actually is. The effect is soft and intentional, feminine without being fussy.
Execution and Customization
Create a halo braid by starting at one side near your ear and working around the back of your head, pinning the end near your opposite ear. You can create a full halo around your entire head, or you can run the braid just across the back for a softer, less formal appearance. On straight hair, loosening the sections after pinning creates an even softer, more romantic look that’s perfect for occasions where you want to look polished but not overly done.
Pro tip: A halo braid is particularly pretty with a sleek, straight low ponytail underneath or with all your hair left down and smoothed straight for a completely polished, intentional appearance.
8. Boxer Braids
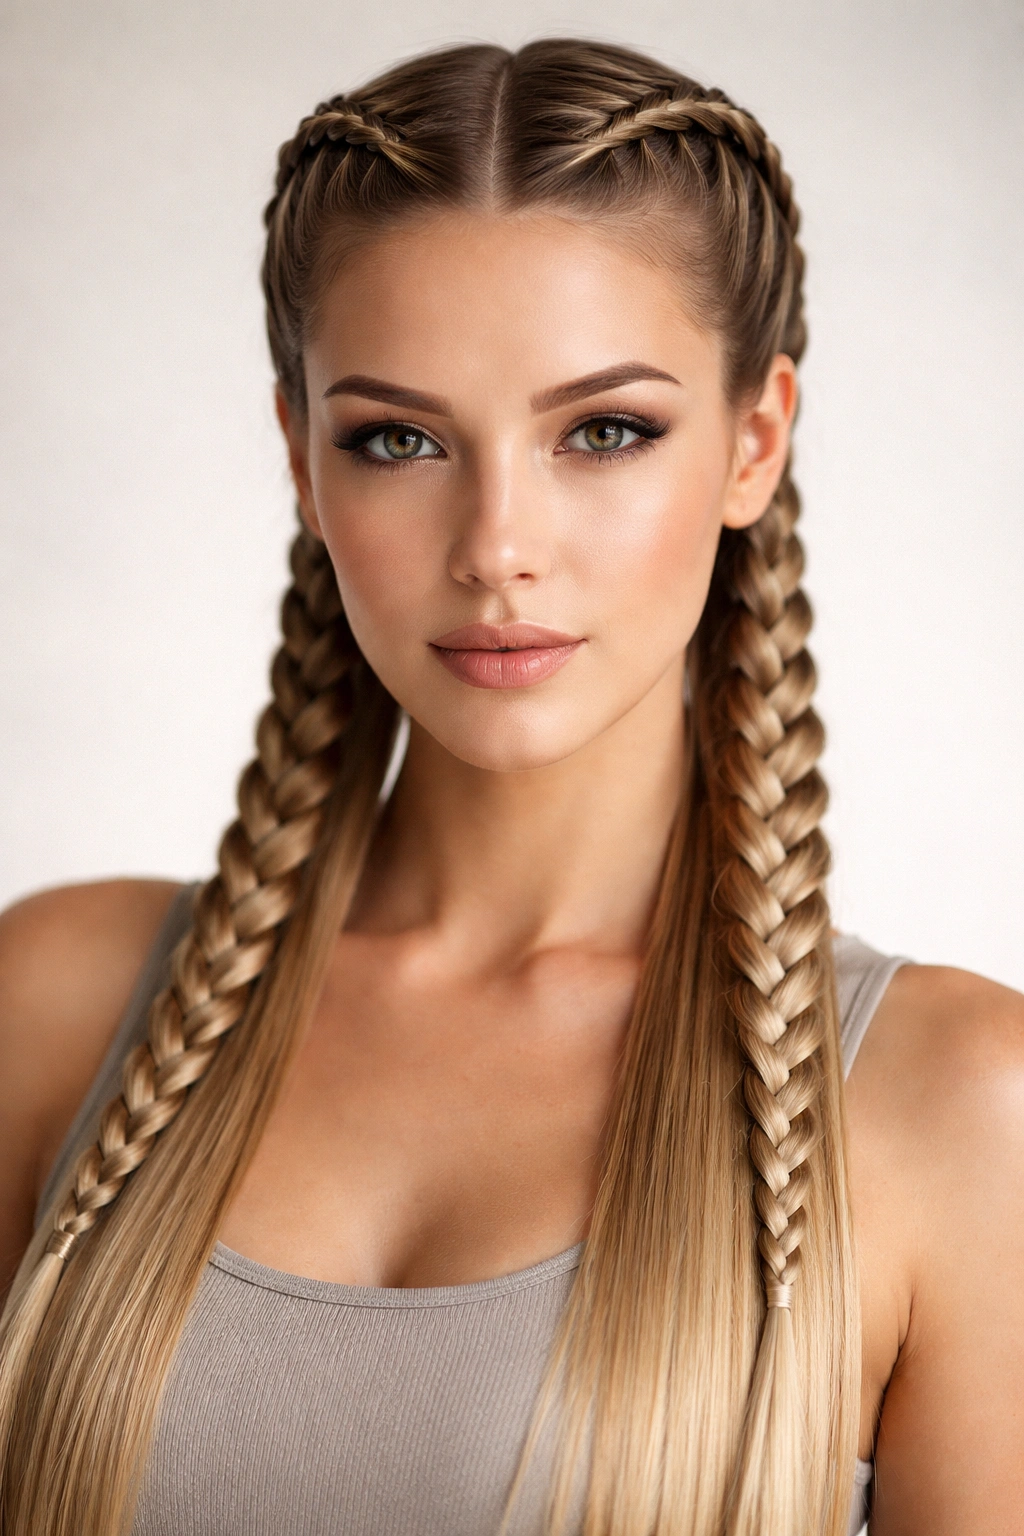
Boxer braids are two Dutch braids worn side by side, typically starting at the hairline and running down the back of the head. They’re structured, edgy, and genuinely striking on straight hair, where the geometric pattern is completely visible.
Why They Look So Good on Straight Hair
Boxer braids have an athletic, modern quality that works especially well on straight hair because the parallel lines are crisp and defined. The straight hair amplifies the geometric nature of the style, making it look intentional and sharp. These braids can range from preppy and polished to edgy and fashion-forward depending on how tight you braid them and what you wear with them.
Styling for Maximum Impact
The key to great boxer braids on straight hair is keeping them even and parallel to each other—if one braid is tighter or looser than the other, it throws off the whole look. Start at your hairline and braid straight down the back, dividing your hair into two even sections. You can wear them tight for a sleek, athletic look, or loosen the sections afterward for something softer and less severe. Boxer braids look particularly striking with a sleek, straight ponytail at the bottom or left loose at your ends.
Worth knowing: Boxer braids work for casual ponytails, gym styles, and even more polished looks with the right clothing and accessories. They’re surprisingly versatile despite looking quite specific.
9. Milkmaid Braid

A milkmaid braid involves creating two braids (typically French or Dutch braids) and then wrapping them around your head like a crown, with each braid running from one side of your head up and over the top. It’s a truly pretty style that’s both romantic and practical.
The Charm of Milkmaid Styling
The milkmaid braid looks quaint and charming, with a slight retro or romantic quality—think Swiss Alps and traditional folk styling. On straight hair, each braid is visible and defined, creating a structured, intentional look that still feels soft and feminine. The style is particularly flattering because it frames your entire face and keeps hair off your neck while creating visual interest and dimension.
How to Create the Look
Part your hair down the middle and create a braid on each side, starting near your ear and braiding upward and back. Cross the first braid over the top of your head and pin it down on the opposite side, then do the same with the second braid, creating a woven, interconnected crown effect. On straight hair, you can keep the braids tight for a more polished, intentional look, or loosen them for something softer and more romantic. This style works especially well for special occasions, outdoor events, or any time you want to look thoughtfully put-together.
Quick fact: Milkmaid braids are easier to create than they sound—once you understand you’re just creating two side braids and pinning them across your head, the technique becomes straightforward.
10. Rope Braid
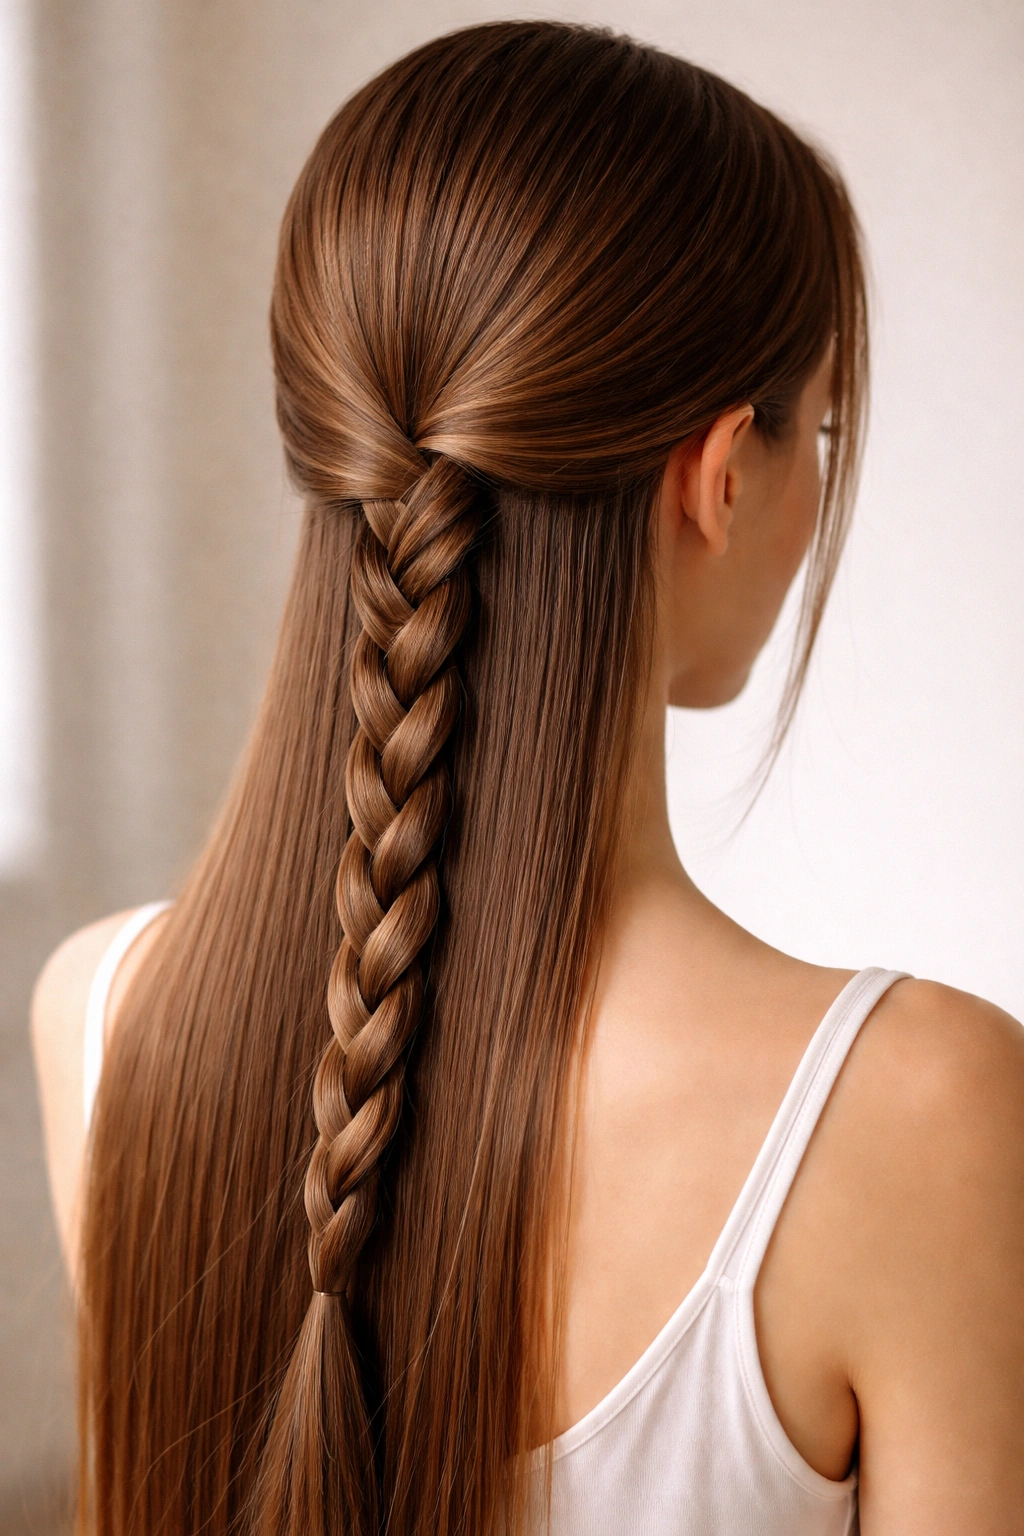
A rope braid is created by dividing a section of hair into two parts, twisting each section individually, and then twisting those two twisted sections around each other. Despite its name, it’s not technically a braid, but it creates a rope-like effect that looks beautiful on straight hair.
Why Rope Braids Stand Out
Rope braids have a sleek, modern quality that works particularly well on straight hair because the twisting creates a smooth, almost sculptural effect. The style looks more complex than it actually is, making it a great choice if you want to look polished without requiring advanced braiding skills. Rope braids catch light differently than traditional braids, creating subtle dimension and shine.
Making Rope Braids Work for You
Divide a section of hair into two equal parts. Twist each section clockwise (or both in the same direction), then wrap those two twisted sections around each other in the opposite direction—so if you twisted them clockwise, you’d twist them counterclockwise around each other. The result is a smooth, rope-like braid. You can create a single rope braid down the back of your head, double rope braids on either side (similar to boxer braids), or incorporate rope sections into a more complex hairstyle. On straight hair, rope braids look especially sleek and polished.
Pro tip: Rope braids stay tighter longer than traditional braids when you use a light hairspray or texturizing spray before braiding, which helps your hair grip better as you twist.
Final Thoughts
The beauty of straight hair is that virtually every braid style is achievable and stunning once you understand the basic techniques and practice enough to build confidence. What separates a pretty braid from an okay one on straight hair isn’t the complexity of the pattern—it’s the precision of your execution, the intentionality of your styling choices, and whether you take a moment to loosen the sections afterward if you’re going for something softer.
Start with whichever of these ten styles feels most approachable to you. French and Dutch braids are foundational, fishtail braids look more complicated than they are, and rope braids give you a completely different texture to work with. As you practice each style, you’ll develop muscle memory, and what once felt awkward will become automatic. Your straight hair is actually an advantage here—it grips well, it doesn’t fight against the pattern, and it shows off the detail and light-reflection beautifully. Each of these braids is genuinely pretty on straight hair; it’s just a matter of finding which ones feel like you.