Box braids have become a go-to protective style for people with curly hair, offering a perfect balance between versatility, low maintenance, and aesthetic appeal. When you combine box braids with the half up half down styling technique, you unlock a hairstyle that manages to be both practical and undeniably striking. The half up portion keeps hair away from your face and neck while allowing the bottom half to flow freely, creating dimension and visual interest that works beautifully with the texture and movement of box braids.
What makes this combination particularly appealing for curly hair is how it addresses real-world concerns. Curly textures thrive when they’re not constantly being manipulated, and the half up half down approach gives your curls breathing room while still looking intentional and polished. You get the security of braids where you need it, combined with the freedom to showcase your natural texture below. This hybrid approach also makes styling easier on wash days, reduces breakage at the roots, and allows you to experiment with different looks throughout the week without starting from scratch each time.
The versatility is genuine too. Whether you’re heading to work, a social event, or simply want to switch up your everyday look, box braid half up half down styles adapt to virtually any occasion. You can go sleek and structured, playful and textured, edgy and dramatic, or soft and romantic—all using the same foundational braid style with different sectioning and finishing techniques. Let’s explore eight distinct ways to style box braids in the half up half down format, each offering its own unique vibe and level of ease.
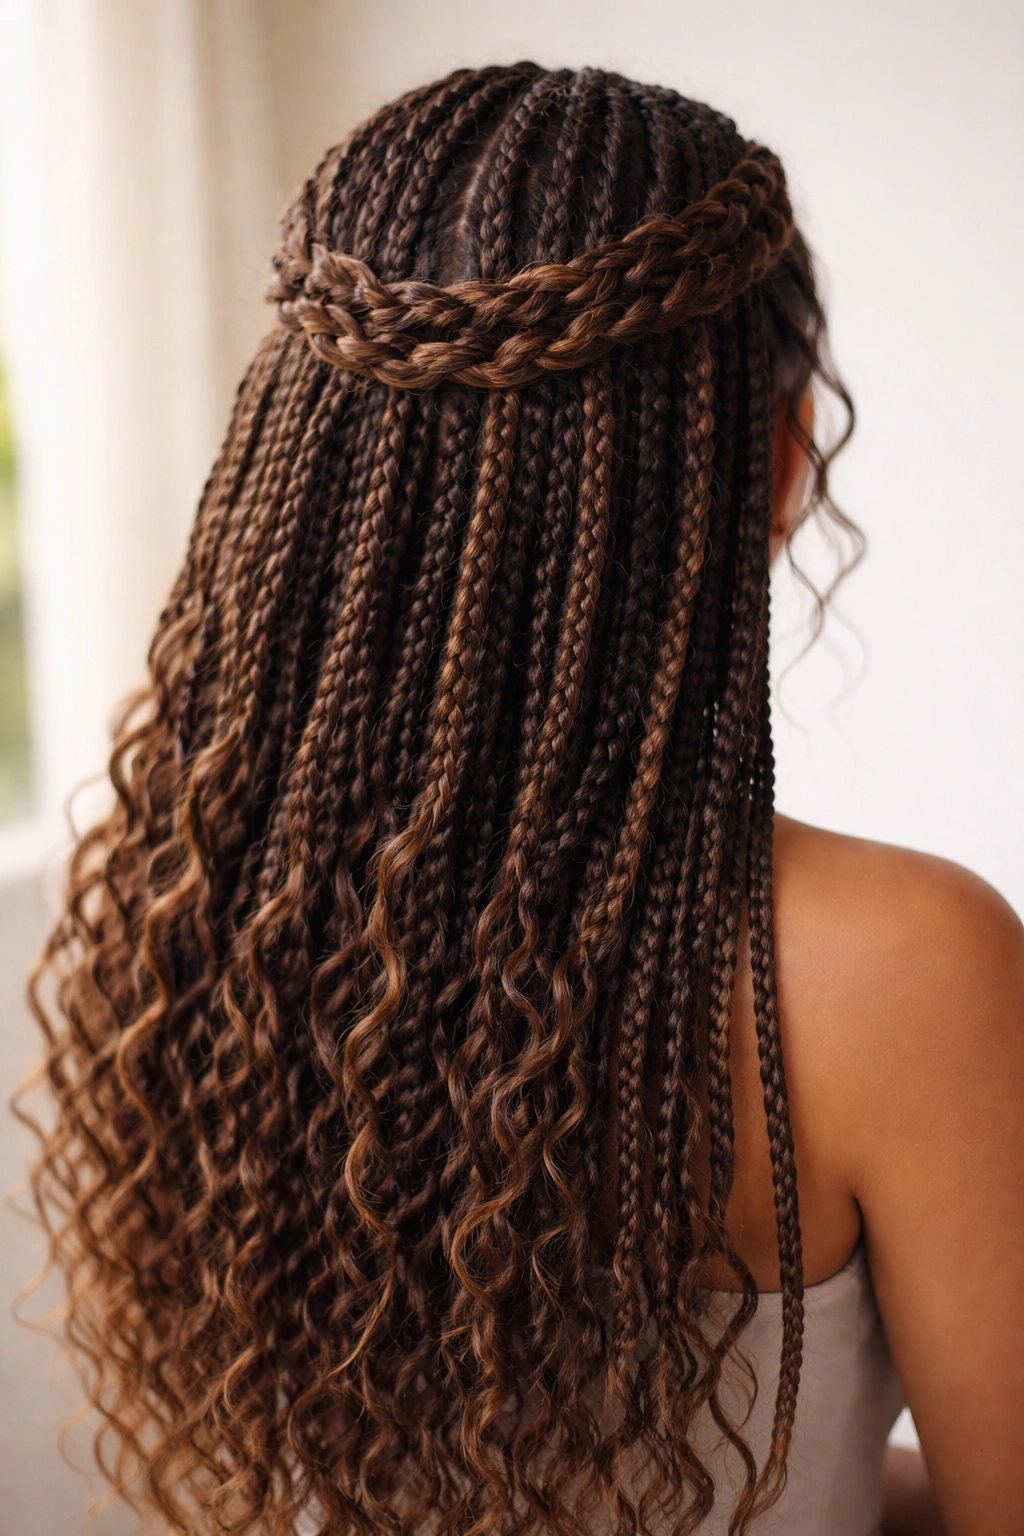
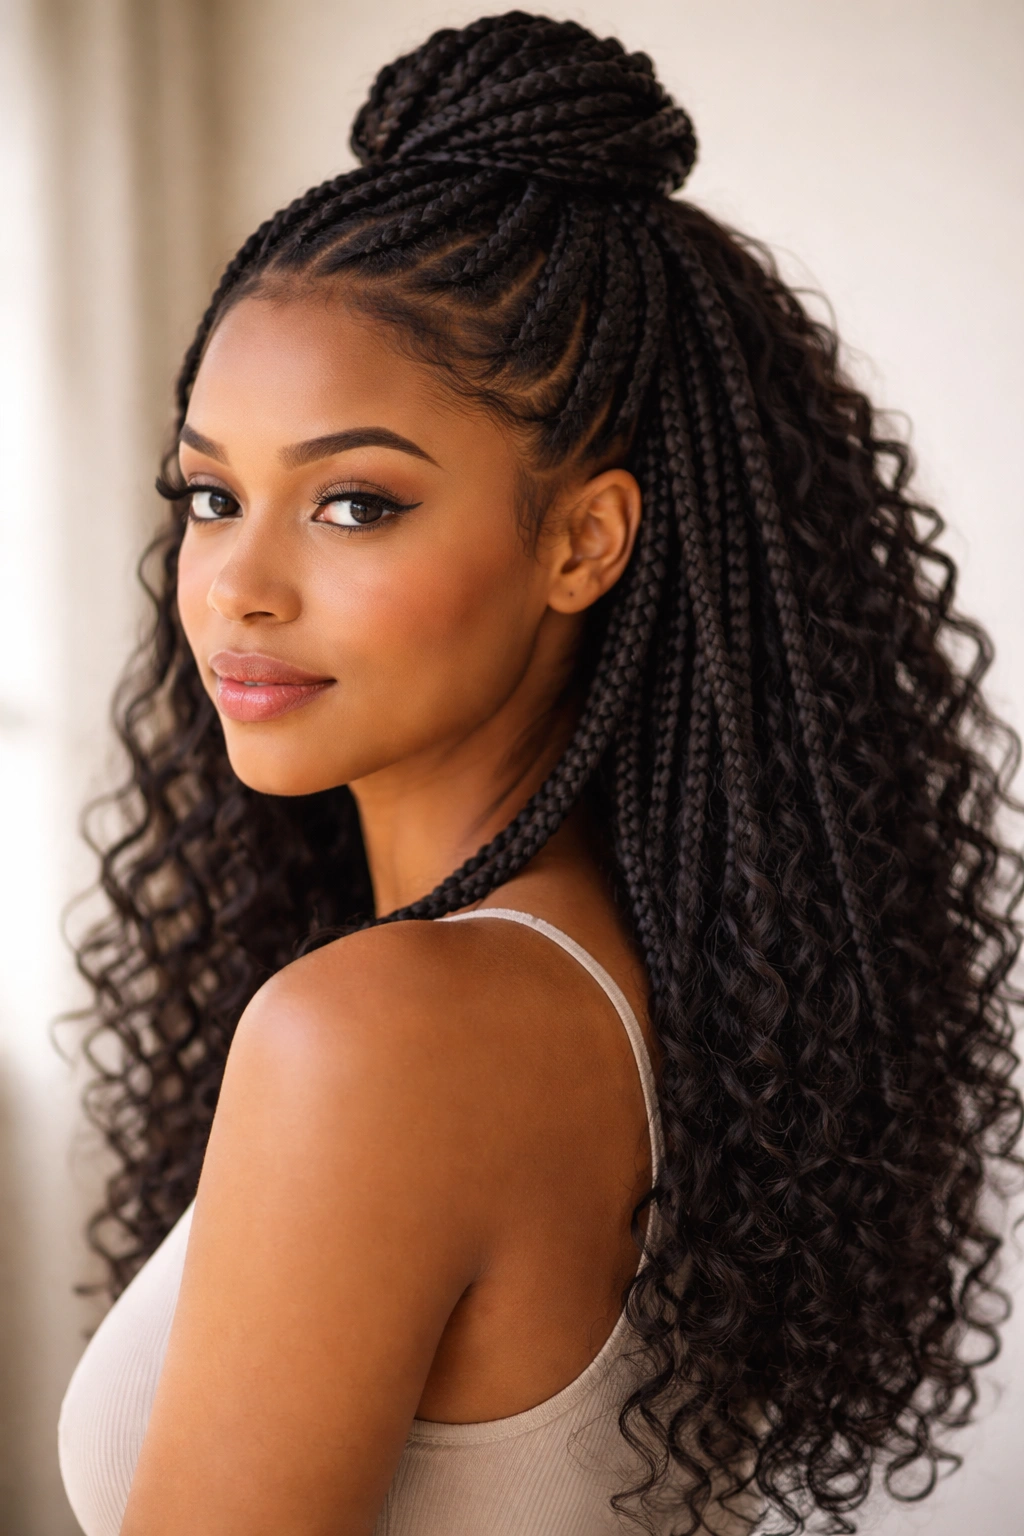
1. Classic Box Braid Half Up with Sleek Bands
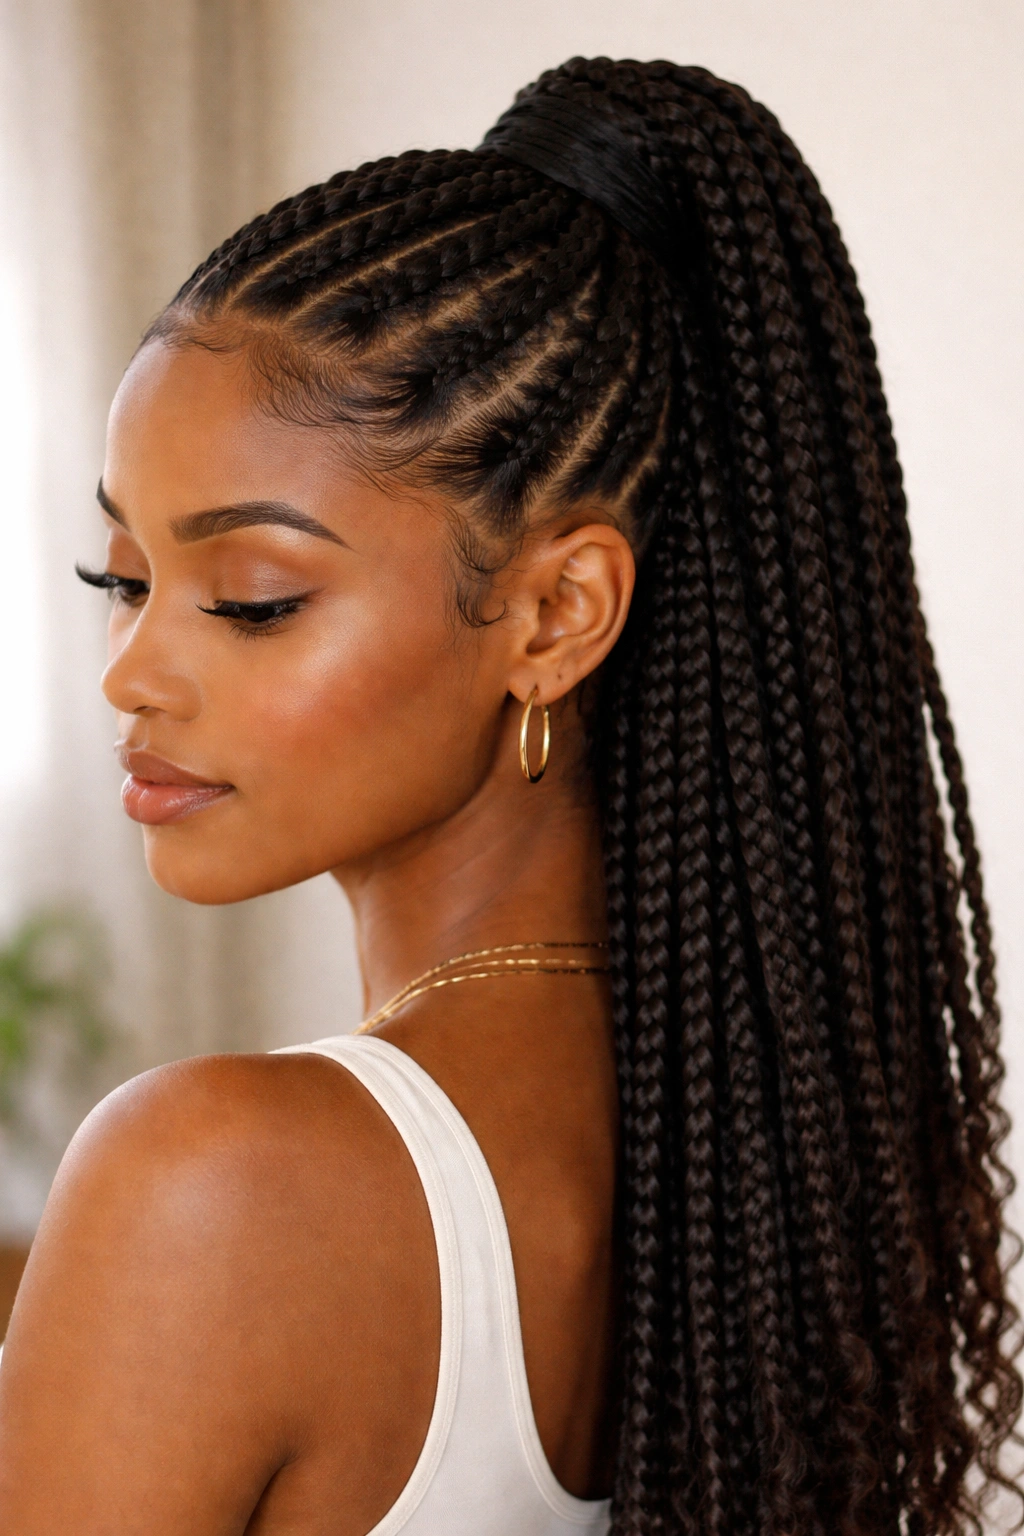
This is the foundational half up half down look that works as an everyday style or can be dressed up for more formal occasions. The technique involves taking a clean section from your front hairline—roughly from temple to temple across the crown—and securing it at the back of your head with a coordinating hair tie or band. What makes this version “sleek” is the precision: you’re keeping the edges clean and the tension even throughout, which means the braids in that upper section maintain their definition without frizz.
How to Execute This Look Perfectly
Start by using a rat-tail comb to create a clean, strategic parting line that runs from one temple, over the crown, and down to the other temple. The depth of this section should be roughly 1.5 to 2 inches—deep enough to capture enough hair to feel substantial, but not so deep that you’re incorporating too much volume. Once you’ve sectioned off that upper portion, gather the braids from this section toward the back center of your head, just at the crown, and secure them with a matching fabric-wrapped band or silk scrunchie. Never use rubber bands with metal pieces, as these will snag and break both your braids and your natural hair.
Why This Stays a Favorite
- The updo anchor is positioned at the crown, which creates lift and makes your face appear more open and defined
- Sleek bands create a polished finish that reads as intentional styling rather than casual hair holding
- This style lasts 4-5 days without needing adjustment or re-securing
- The look reads equally well in professional settings and casual contexts
- You can add small ornamental clips at the base for extra polish without compromising the braid integrity
- The style works on braids that are 2-4 weeks old, even as they begin to show some new growth
You can create subtle variation by adjusting which braids you pull up—pull every braid for maximum security, or weave and skip braids in an alternating pattern for a more textured, fashion-forward take. Some people prefer to pull just the braids from directly above the ears, leaving the front-most braids to frame the face while pulling back everything else.
2. Loose Wavy Box Braid Half Up Half Down
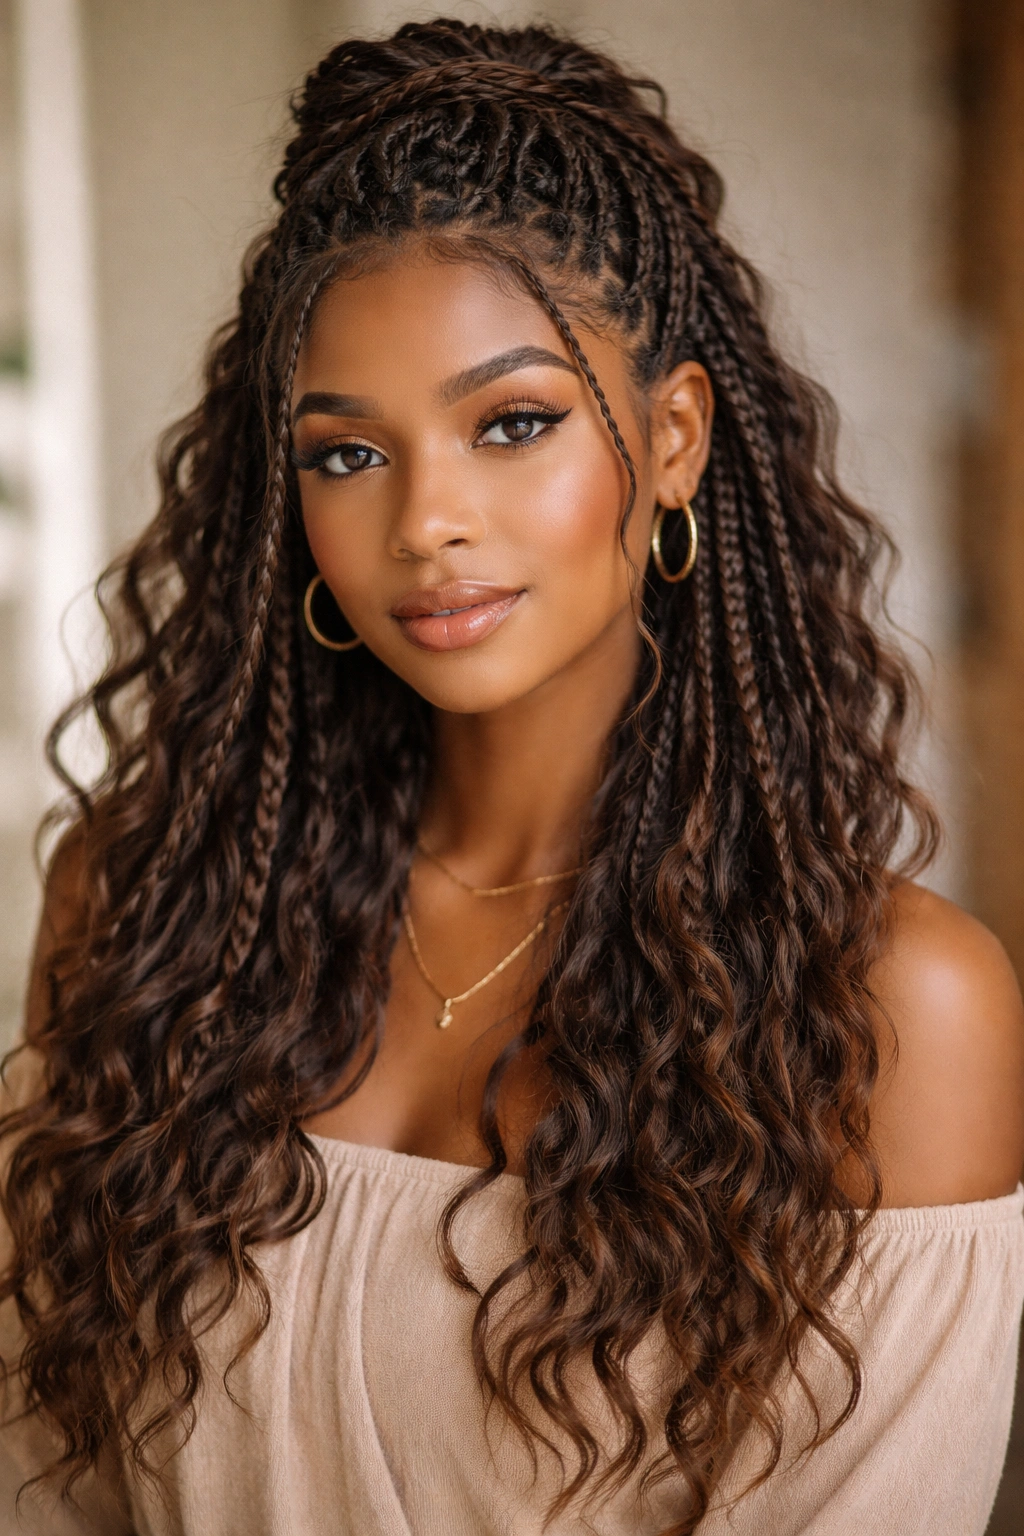
This version embraces a more relaxed, bohemian aesthetic where the braids themselves look deliberately undone. Instead of pulling the upper section straight back, you’re allowing gentle curves and waves in both the pulled-up portion and the loose braids hanging below. This style works particularly well if your natural curl pattern has some wave to it, or if you’ve allowed your braids to slightly relax and loosen over time.
What Makes This Look So Effortlessly Chic
The key to pulling off this style is intentional looseness—you’re not aiming for tight, pristine braids, but rather textured braids with slightly separated strands that give the impression of movement. Take the upper section, but don’t pull it straight back to the very center of your crown. Instead, gather it toward the back but slightly off-center, creating an asymmetrical pull that feels more artistic. Use a matte silk scrunchie rather than a shiny metallic one, as this reads softer and more intentional.
How to Style and Maintain This Look
- Gently separate each braid strand by strand once they’re secured in the half up portion, giving them a fuller, cloudier appearance
- Allow the lower half to flow down your back with minimal interference—this is where your natural curl pattern can play a role if you removed braids previously or have new growth
- If you want added texture, try finger-coiling small sections of the loose-hanging braids to create kinked waves that catch light
- Mist the pulled-up section lightly with lightweight styling spray to encourage gentle waves without creating crunch
- This look benefits from being styled on day 2 or 3 of your braid wear, when braids have naturally loosened slightly
The beauty of this approach is that it requires less precision than the sleek version, making it ideal for mornings when you want something beautiful but don’t have time for meticulous sectioning. It also photographs exceptionally well because the wave and movement create visual depth and dimension that reads beautifully in photos.
3. Zig-Zag Pattern Half Up Braids with Curls
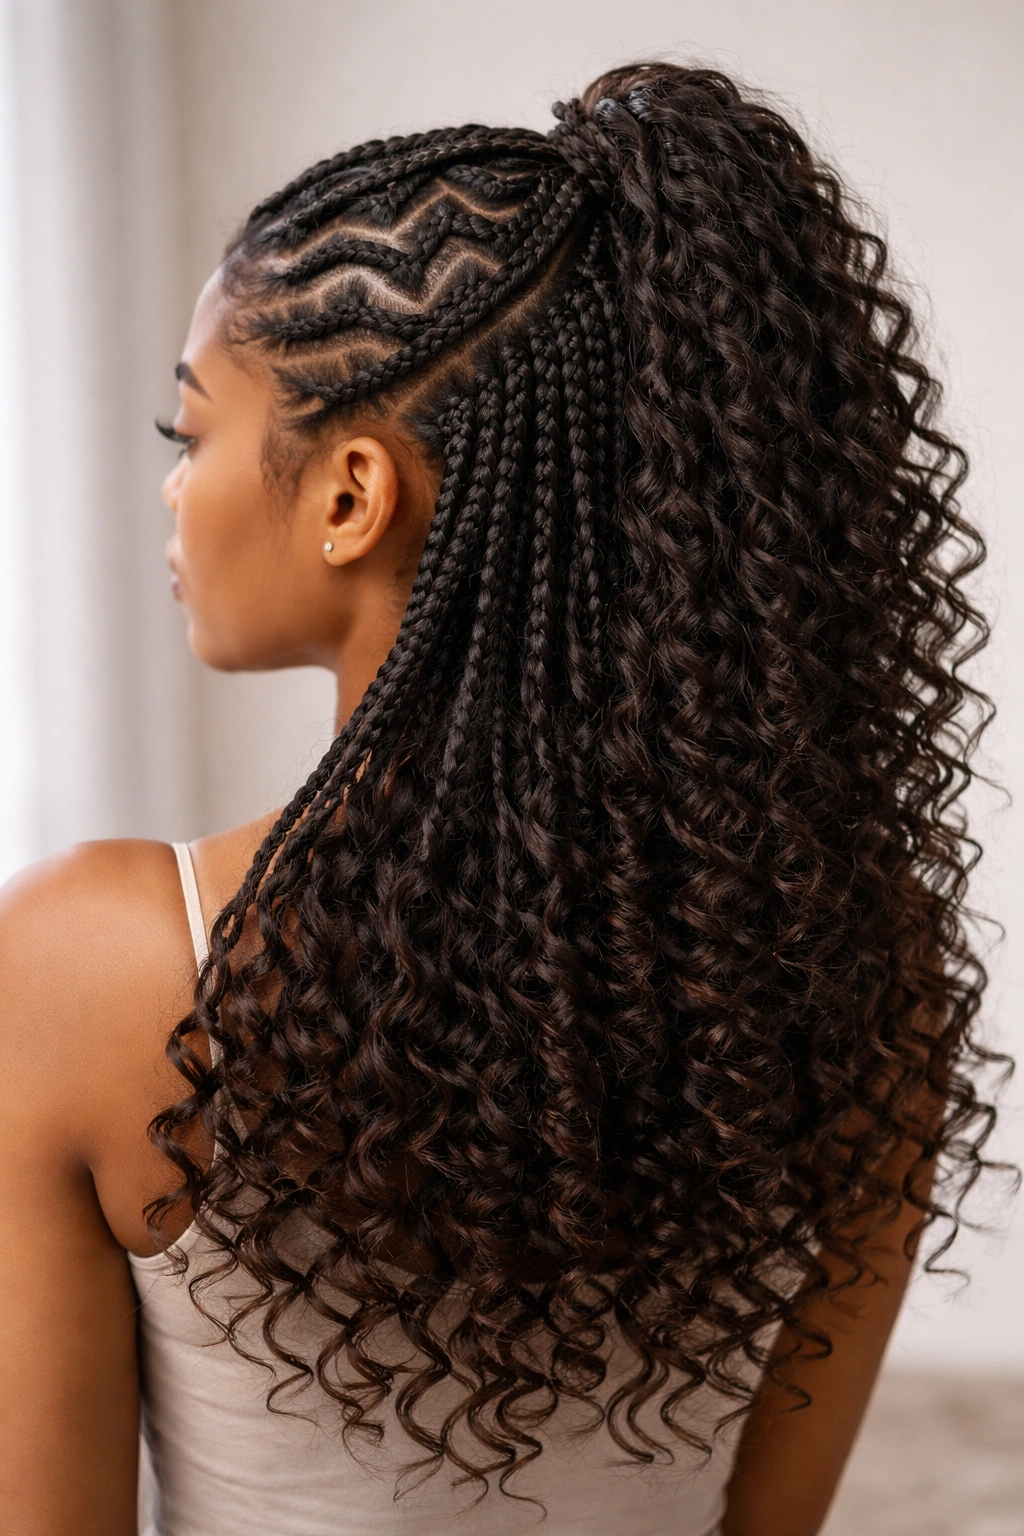
This style takes the half up concept and adds architectural interest through an unexpected sectioning pattern. Instead of a simple horizontal parting line, you create a zig-zag or diagonal chevron pattern when selecting which braids to pull up. This creates a dynamic visual effect where the braids appear to flow in different directions, and it showcases more of the braided texture while still keeping hair off your face.
The Sectioning Technique That Makes This Work
Begin at one temple and identify your natural braid lines. Starting from your hairline, take the first braid, skip the next, take the third, skip the fourth—creating a checkerboard or alternating pattern as you move toward the center of your crown. When you reach center, mirror this pattern toward the opposite temple. This creates a zig-zag movement across the top of your head that’s visually striking. Once you’ve selected your braids, twist or braid them together as you move toward the back, creating additional texture beyond the original box braids, then secure at the nape or slightly higher.
Building in Texture and Visual Interest
- The alternating pattern naturally creates volume and dimension that photographs beautifully from the front
- By skipping every other braid, you’re allowing the loose braids below to frame your face in an intentional way
- Consider creating a small secondary braid or twisted rope with some of the loose hair before securing the main ponytail—this adds another layer of detail
- The zig-zag can be emphasized by gently separating the braids in the pulled-up section to create even more visual movement
- This works best on braids that are 3-4 weeks old and have naturally loosened slightly from their original tightness
- The style looks especially striking against darker skin tones where the braid texture creates natural shadowing
This is the approach to choose when you want maximum visual impact and don’t mind spending 5-10 minutes on precise sectioning. It’s popular for special occasions, date nights, and situations where you want your hair to be a statement.
4. Double Twisted Half Up with Box Braids
This variation incorporates two separate half-up sections pulled at different heights and secured either together or with independent bands, creating a stacked, dimensional look. The first section is pulled from your temples up and secured at a higher point on your crown, while the second section sits lower and is secured at the base of where the first section ends. This creates layers of interest and a look that reads as more elaborate than a standard half up style.
Creating Clean, Intentional Layers
Start by sectioning your hair into two horizontal zones with invisible or minimal parting lines. The upper zone should run from temple to temple across the top of your head, about 2.5 to 3 inches deep. Pull these braids up and secure them with your first band at the crown. Then, below this section, identify a second layer of braids—typically 6-8 braids in the next 2.5-inch band downward. Pull these braids up and secure them just below the first secured section, ideally with a contrasting or matching band that creates a stacked effect.
Why This Style Is More Complex But Worth It
- The two-tier look creates instant volume and visual complexity that makes your braids appear fuller and more styled
- You can use two different band colors or materials to emphasize the layering—perhaps matte silk on top and a metallic accent band on the bottom layer
- The stacked effect naturally creates more lift at the crown and a lifted silhouette overall
- This works particularly well if you have fine or medium-density hair, as the layering creates the illusion of thickness
- The lower section requires re-securing more frequently than a single pull-up, so this works best as a style you’d wear for 1-2 days before taking it down and restyle
- Small ornamental clips or jeweled bands at each secured section elevate this look for special occasions
The double pull technique requires a bit more planning and precision, but it produces one of the most eye-catching versions of the half up half down box braid look. It’s worth the extra effort if you’re aiming for a more dramatic aesthetic.
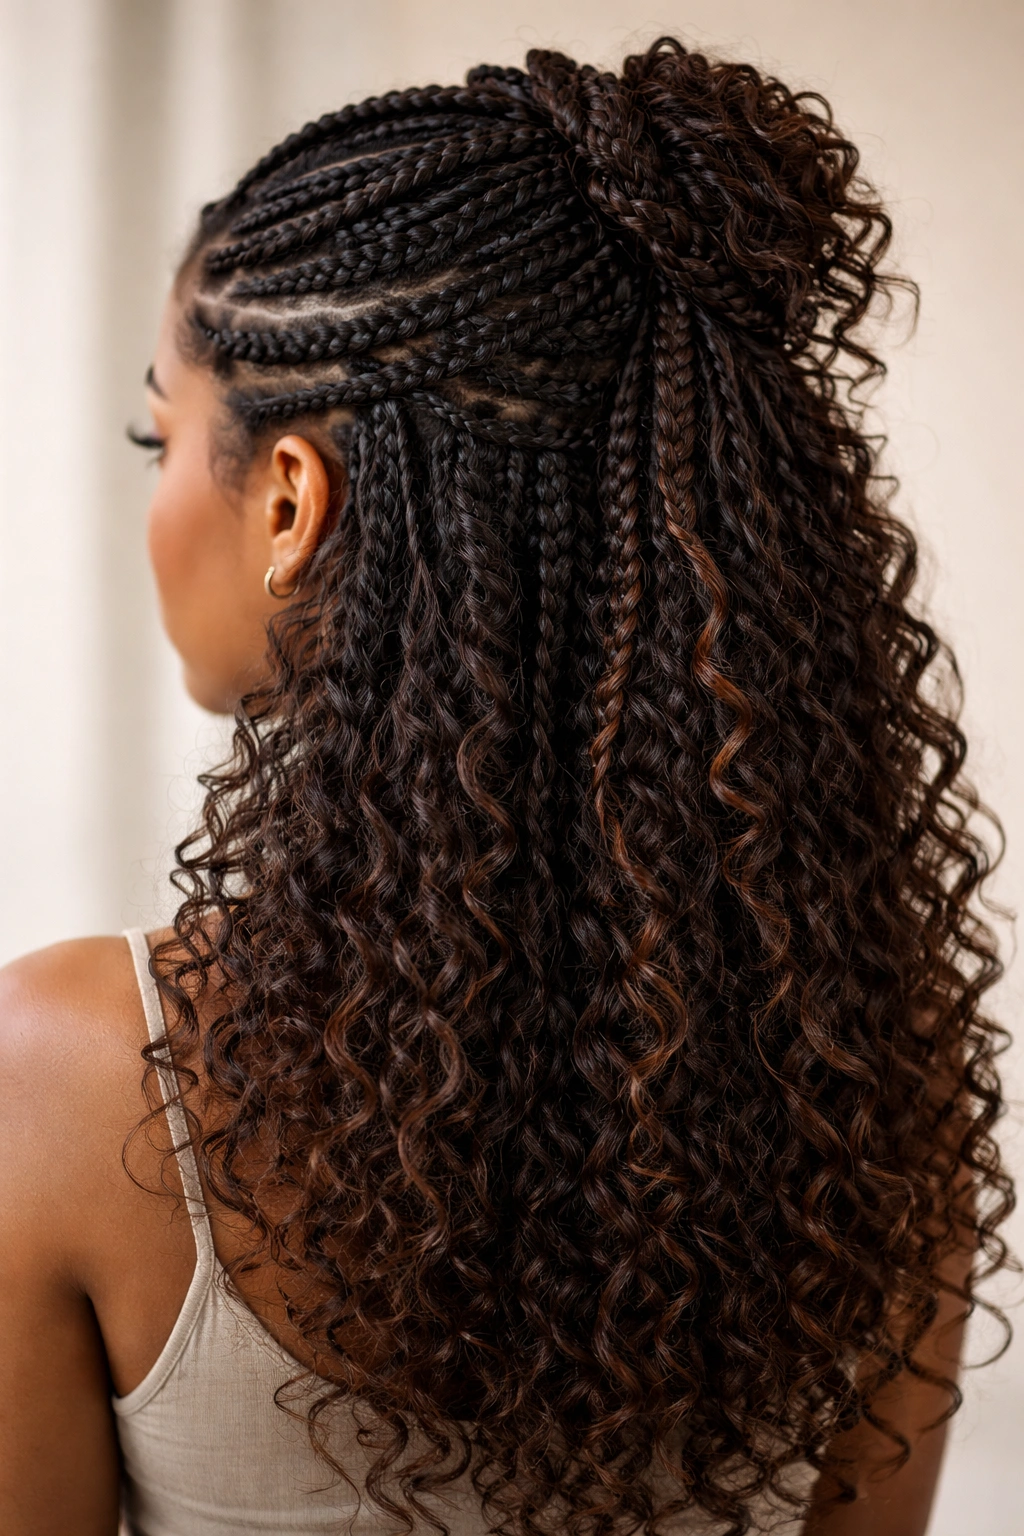
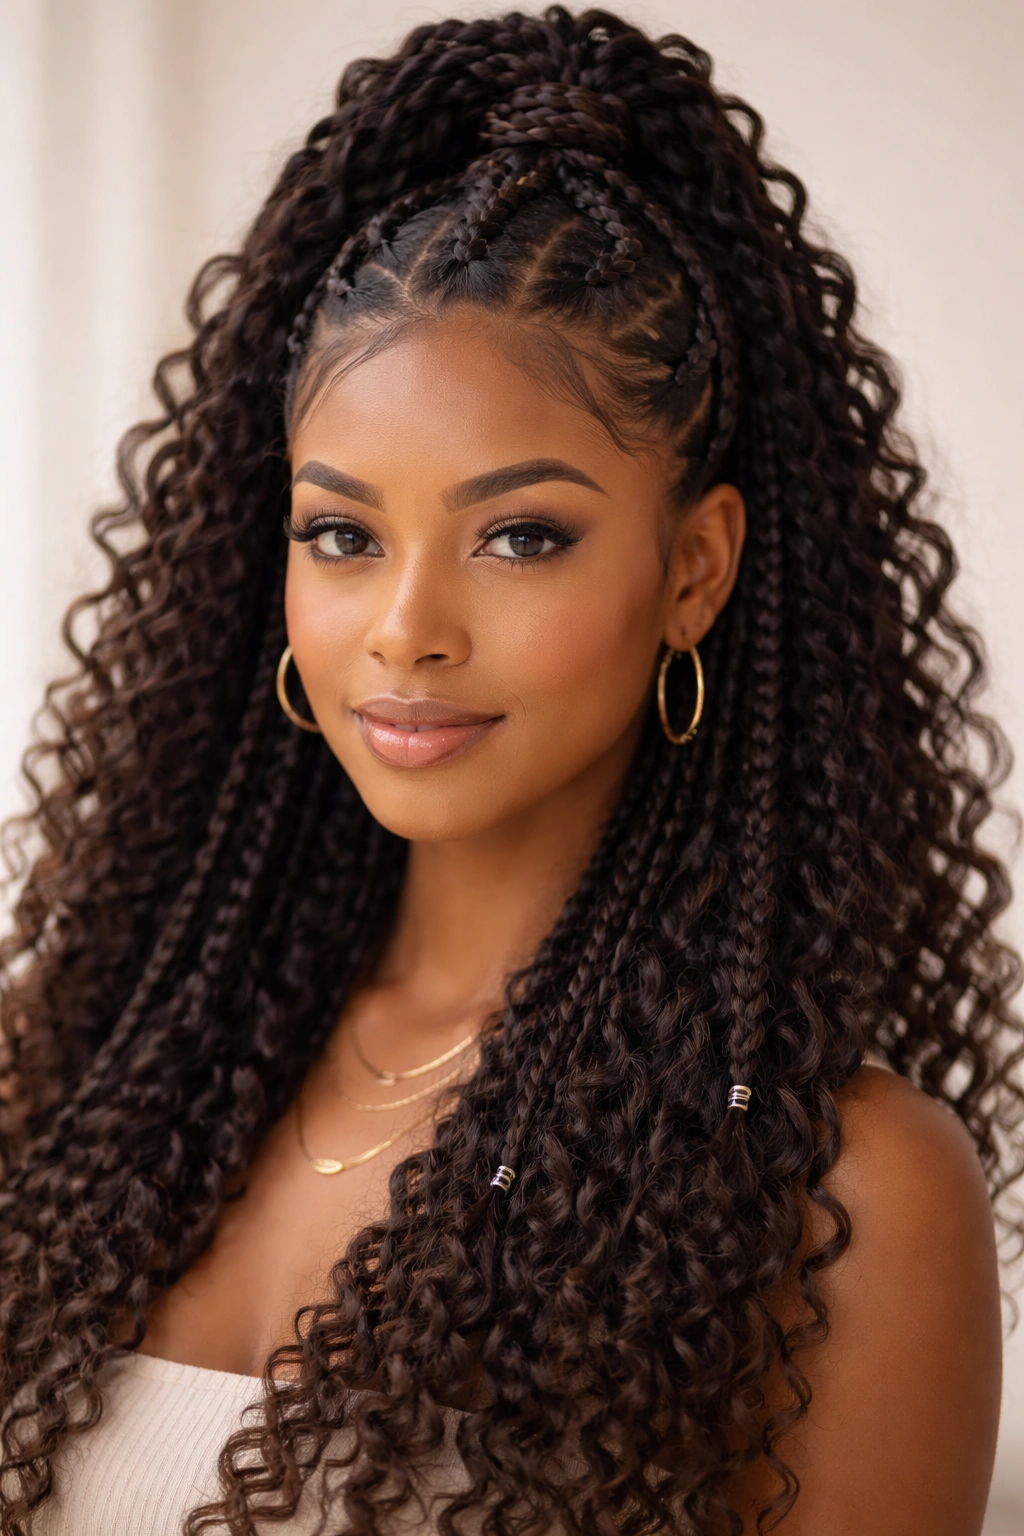
5. Braided Crown Half Up Half Down
This approach treats the upper section not just as a simple ponytail but as an actual crown-style braid. You’re taking your pulled-up section and weaving the braids together in an additional braiding or twisting pattern that creates a visible, intricate detail at the back of your head. The result looks like a crown of braids sits on top of your loose braids below, creating a look that’s both protective and absolutely stunning.
Mastering the Crown Technique
After you’ve pulled up your upper section to the back of your crown, instead of simply securing it, you’re going to create a three-strand or fishtail braid using the pulled-up braids themselves as your “strands.” Take your leftmost pulled-up braid and cross it over the center braids, then take your rightmost and cross it over center, continuing this pattern toward the back. This creates a secondary braid structure that sits on top of your head like an actual crown. Secure the end of this crown braid with a small, matte band that blends with your hair color.
The Visual and Practical Impact
- The crown braid creates an almost halo effect that frames your face beautifully and draws attention to your features
- This look requires braids that are at least 2-3 weeks old to have enough looseness and flexibility to braid together effectively
- The secondary braiding adds significant hold, so this style can easily last 5-7 days without adjustment
- It’s one of the most wedding-appropriate and formal-occasion-appropriate box braid variations
- The look works on all hair densities and types, though it’s especially striking on people with larger head shapes where the crown creates a proportional balance
- Creating clean, tight secondary braiding at the crown requires about 10-15 minutes the first time you try it, but becomes faster with practice
This is the style to choose when you want something that looks professionally styled and requires serious staying power. It’s also incredibly Instagram-worthy and photographs beautifully from every angle.
6. Side-Swept Box Braid Half Up Style
Rather than pulling your upper section straight back to the center back of your head, you’re sweeping it dramatically to one side, creating an asymmetrical look that feels modern and slightly edge. This variation works beautifully on people who prefer asymmetrical styling or want a look that shows off one side of their face and neck while still keeping some hair secured.
Achieving the Perfect Side Sweep
Begin with your standard sectioning from temple to temple across the crown, but instead of pulling this section straight back, gather it toward the nape on the opposite side of your head from where you’re sweeping. If you’re sweeping to the right, you’ll secure the gathered braids on the left side of the back of your neck. This creates a dramatic diagonal line across the back of your head. You can secure this with a single band, or create a secondary twist or braid as you move the braids toward the side before securing.
Why Side-Swept Reads as More Fashion-Forward
- The asymmetry instantly modernizes the half up half down concept and prevents it from looking too safe or predictable
- This style flatters different face shapes in different ways—if you have a longer face, sweeping to the side can balance proportions; if you have a rounder face, it creates definition
- You’re naturally showing off more of one side of your neck and shoulder, which creates a sleeker silhouette
- The style works well with statement earrings on the exposed side, as it creates a cohesive look
- One side of your face has more framing braids while the other side is fully exposed, which can be flattering for people who have a preferred angle
- This requires less precision in sectioning than some other variations, making it great for days when you want something quick but impactful
The side-swept look is ideal for second or third-day braids when they’ve loosened slightly, as the asymmetrical pull works beautifully with naturally relaxed texture.
7. Intricate Braided Half Up with Textured Layers
This variation elevates the half up concept by incorporating multiple textures within the pulled-up section itself. Instead of simply pulling existing box braids straight back, you’re creating new texture through twists, smaller braids, or braided sections within the pulled-up portion. This creates a look where the upper half is visibly more intricate and layered than the lower half, almost creating a sculptural effect.
Building Intentional Texture and Detail
After pulling your upper section back, take this gathered hair and subdivide it into 2-4 smaller sections. Within each section, create a tight two-strand twist, a French braid, or a cornrow that runs from the point where you initially pulled the hair down to where you’re securing it. These secondary textures run alongside or through your existing box braids, creating dimension and complexity. Secure the end of these secondary braids/twists with very small bands or by tucking and pinning.
The Aesthetic and Practical Advantages
- The layered textures create a high-fashion, editorial look that feels intentional and curated
- You’re creating additional security and hold through the secondary braiding, so this style lasts even longer without adjustment
- The intricate detail draws the eye and makes even a simple color palette of braids look more sophisticated
- This works best on braids that are 2-3 weeks old, when they have enough elasticity to weave secondary structure through them
- The complexity of this look makes it ideal for special occasions, photoshoots, or when you want to make a strong style statement
- Creating these secondary textures requires patience and good fine motor control, so plan 15-20 minutes for styling
This is the ultimate option if you love the half up half down concept but want it to feel like you’ve created something genuinely unique and intricate. It shows serious styling dedication and reads as high-fashion.
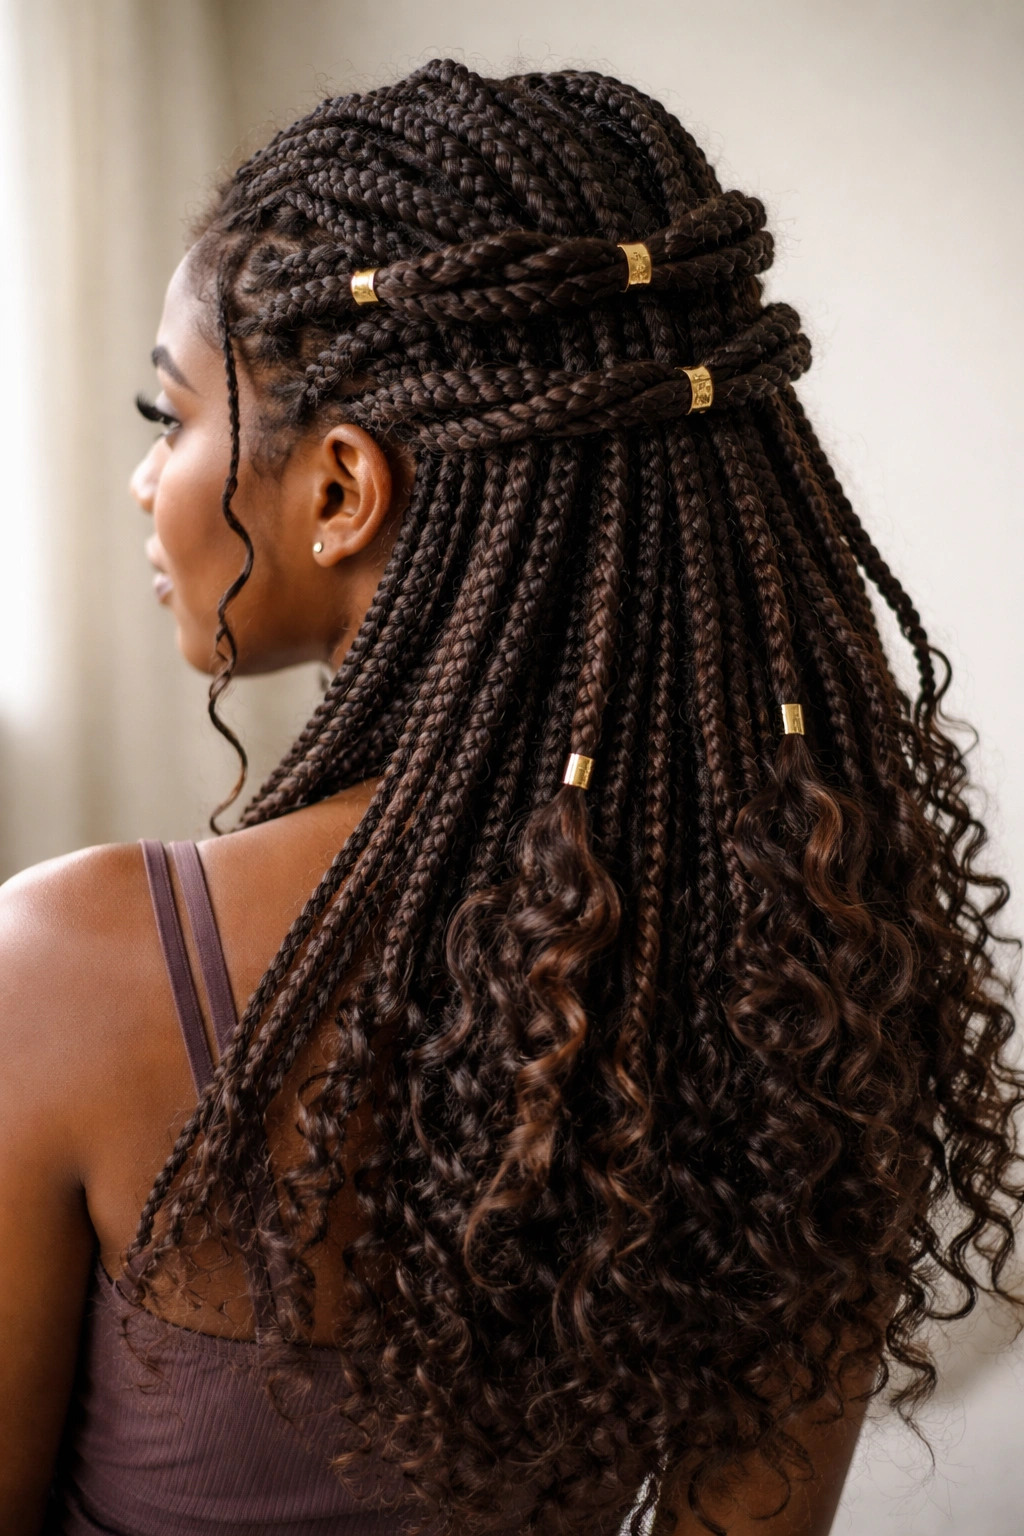
8. Bubble Braid Half Up Half Down Hybrid
This final variation takes the bubble braid trend—where you create distinct, puffy sections along a braid by securing the braid at intervals with small bands—and applies it to the half up half down concept. You’re pulling up your upper section, then creating these bubble divisions within the pulled-up portion, resulting in a playful, dimensional, almost sculptural look that’s fun and eye-catching.
Creating Perfect Bubbles Within Your Half Up
Pull your upper section back as you would for a standard half up style, but instead of securing it once at the base, you’re securing it at multiple points. After gathering the braids and securing them at the top of the crown, move down approximately 1.5 inches and place another small band. The hair between these two bands will puff out slightly, creating the bubble effect. Continue this every 1.5 to 2 inches down the length of your pulled-up section. Each bubble should be slightly fuller than the one above it, creating a cascading effect.
The Fun Factor and Maintenance Considerations
- The bubble effect is playful, youthful, and instantly eye-catching—it reads as confident and fashion-forward styling
- This look works best on braids that are 3-4 weeks old and have naturally loosened, giving them the flexibility to puff out between bands
- You’ll need small, matte fabric-wrapped bands in a matching or contrasting color—the more visible the bands, the more intentional the look appears
- The styling process takes about 10-15 minutes to create evenly sized, symmetrical bubbles
- This is excellent for people who want their styling to feel playful and less serious than some of the more structured options
- The frequent banding does create slight stress points in the braids, so this look is best worn for 2-3 days before removing the bands and restoring the braids
This is the version to choose when you want maximum personality and visual impact, and you don’t mind your styling being a statement piece. It works particularly well on younger audiences or in creative fields where bold hair choices are celebrated.
Final Thoughts
Box braid half up half down styling offers something genuinely special for people with curly hair: the protective benefits of braids with the versatility of an open style. Each of these eight variations operates on the same foundational technique—sectioning the upper portion of your hair and securing it—but the differences in where you section, how you secure, what you do with the upper portion, and how much additional texture you create completely change the look and vibe.
The real power of learning multiple versions of this style is that you can adapt your braids to your current mood, occasion, and lifestyle needs throughout the weeks you’re wearing them. You might start with the classic sleek version on day one, transition to the loose wavy look by day three, try the side sweep by day five, and end with something as intricate as the textured layers or bubble braids by the final week. This flexibility means you get weeks of variety from a single protective style, which maximizes the value of the time and investment you’ve put into getting your braids installed.
The styling techniques are genuinely learnable—none of these require professional installation or advanced technical skills. With a few good quality silk bands, a rat-tail comb, and 10-15 minutes, you can create looks that rival what you’d get from a professional stylist. As you practice these techniques, you’ll develop intuition about what works with your specific braid thickness, your head shape, and your personal aesthetic. That intuition is what transforms box braids from simply “protective hair” into a genuine styling tool with virtually unlimited creative potential.