Curly hair has a funny habit of looking its best on the days you barely touch it. The catch is that “barely touch it” still takes a little know-how, because curls can go from soft and defined to puffy and uneven fast if you pile on too much handling. The sweet spot is a hairstyle that respects the curl pattern, uses a few smart pins or ties, and doesn’t ask you to fight your own texture.
That’s why low-maintenance hairstyles for curly hair matter so much. They’re not about hiding curls or forcing them into something sleek and slippery. They’re about working with the bend, the shrinkage, the frizz, and the volume that already live there.
A good curly style also has to survive real life. School drop-offs. Long workdays. Errands. Humid air. Day-three hair. The styles that stick around are usually the ones that need only a satin scrunchie, a claw clip, a couple of bobby pins, or a quick twist with your fingers.
Some of the best options are almost embarrassingly simple. Good. That’s the point.
1. Pineapple Puff
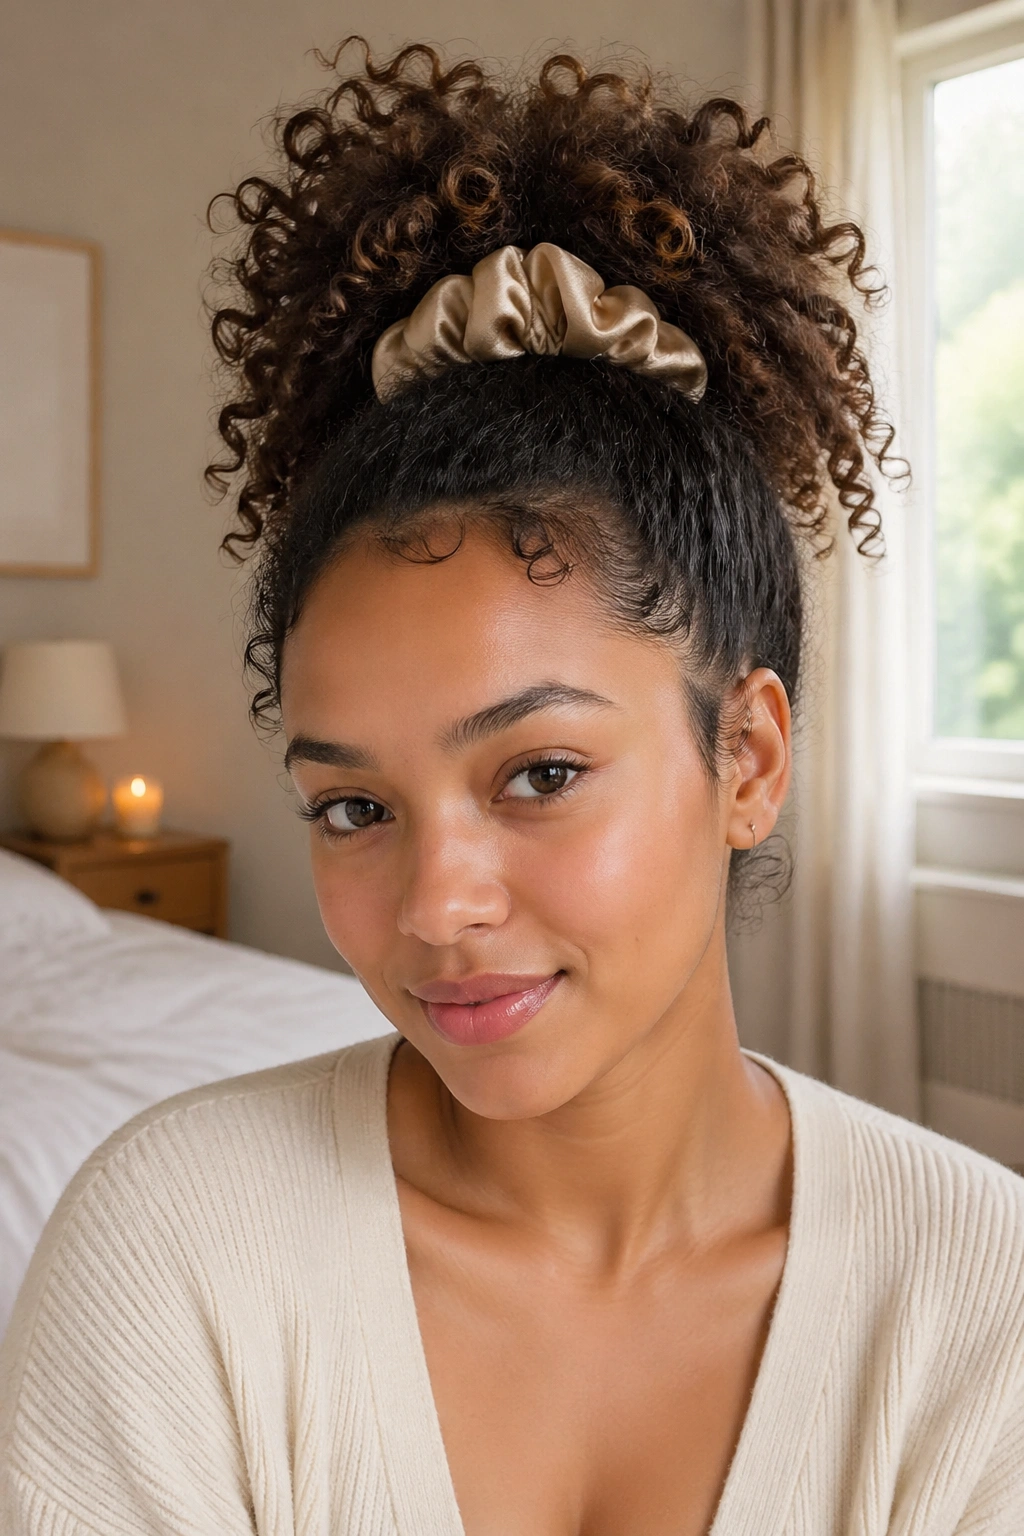
The pineapple puff is the closest thing curly hair has to a universal reset button. You gather the curls high on the crown with a soft scrunchie, leave the ends loose and springy, and instantly get a style that works for sleep, errands, and those mornings when you do not want to start from scratch.
The trick is keeping it loose. Tight elastics flatten the front and leave a dent that takes forever to shake out. A satin scrunchie or spiral tie is easier on the curls, and if your hair is thick, you may need to gather it in two passes so you do not yank the roots.
It works best on second- or third-day curls that still have shape but need a lift. One quick mist of water or a light curl refresher around the hairline helps the front pieces sit nicely instead of puffing out in random directions. Keep the base high, but never tight. That’s what makes this style easy instead of annoying.
It’s also one of the few styles that can look intentional even when the rest of your morning was chaos. Convenient. A little smug, even.
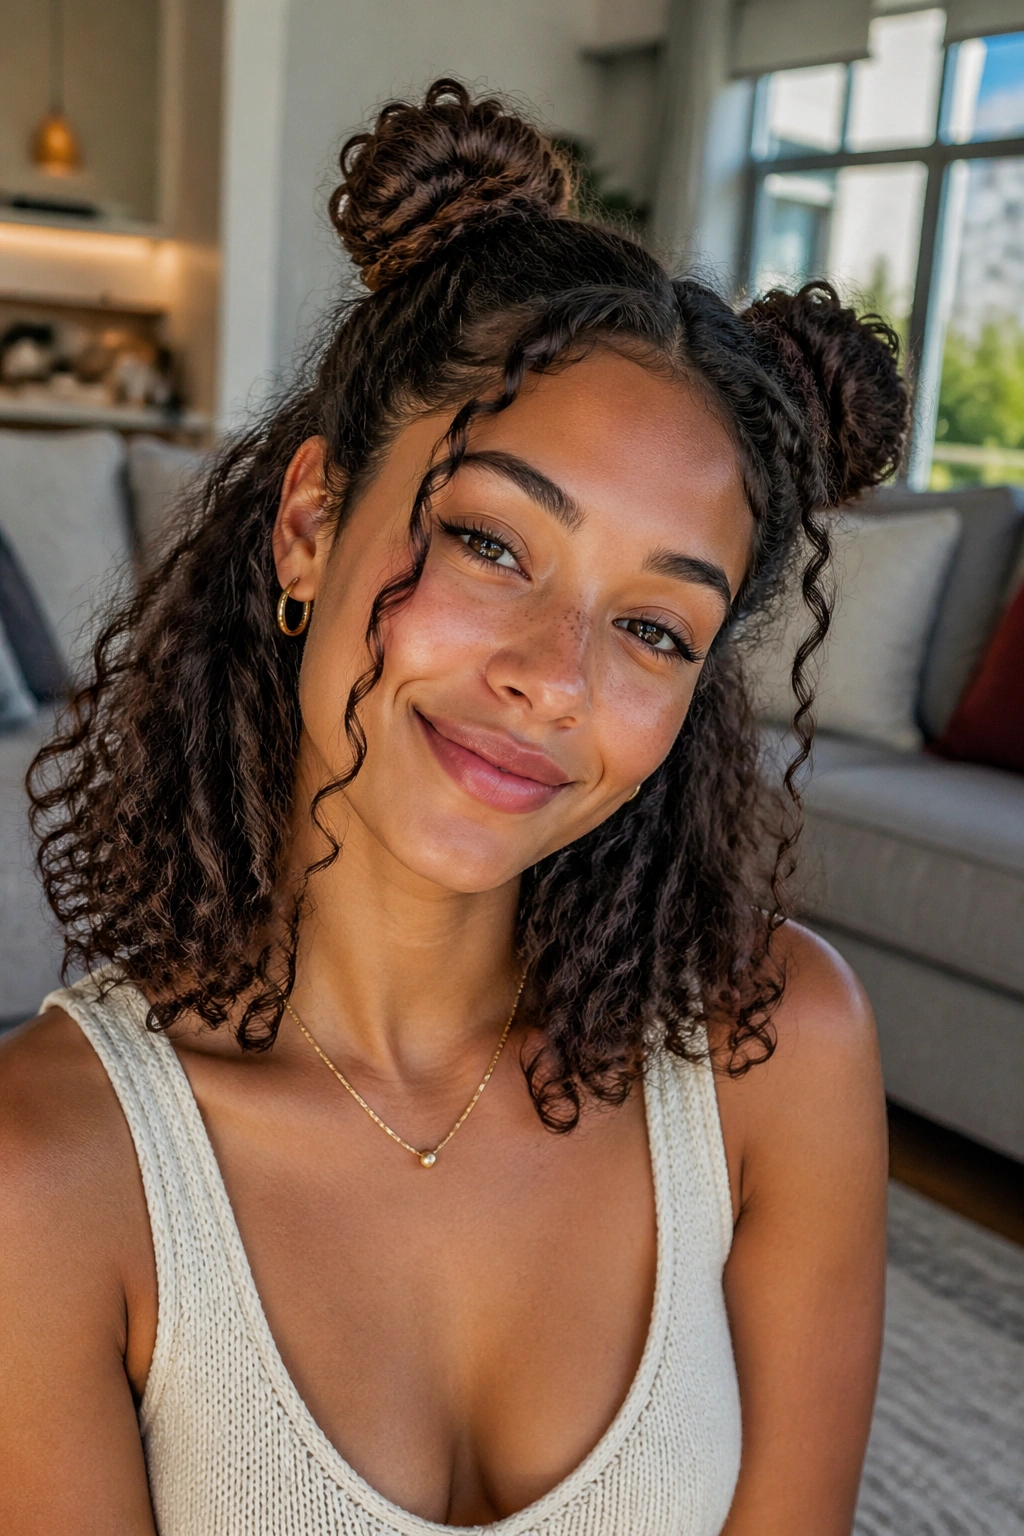
2. The Half-Up Claw Clip Twist
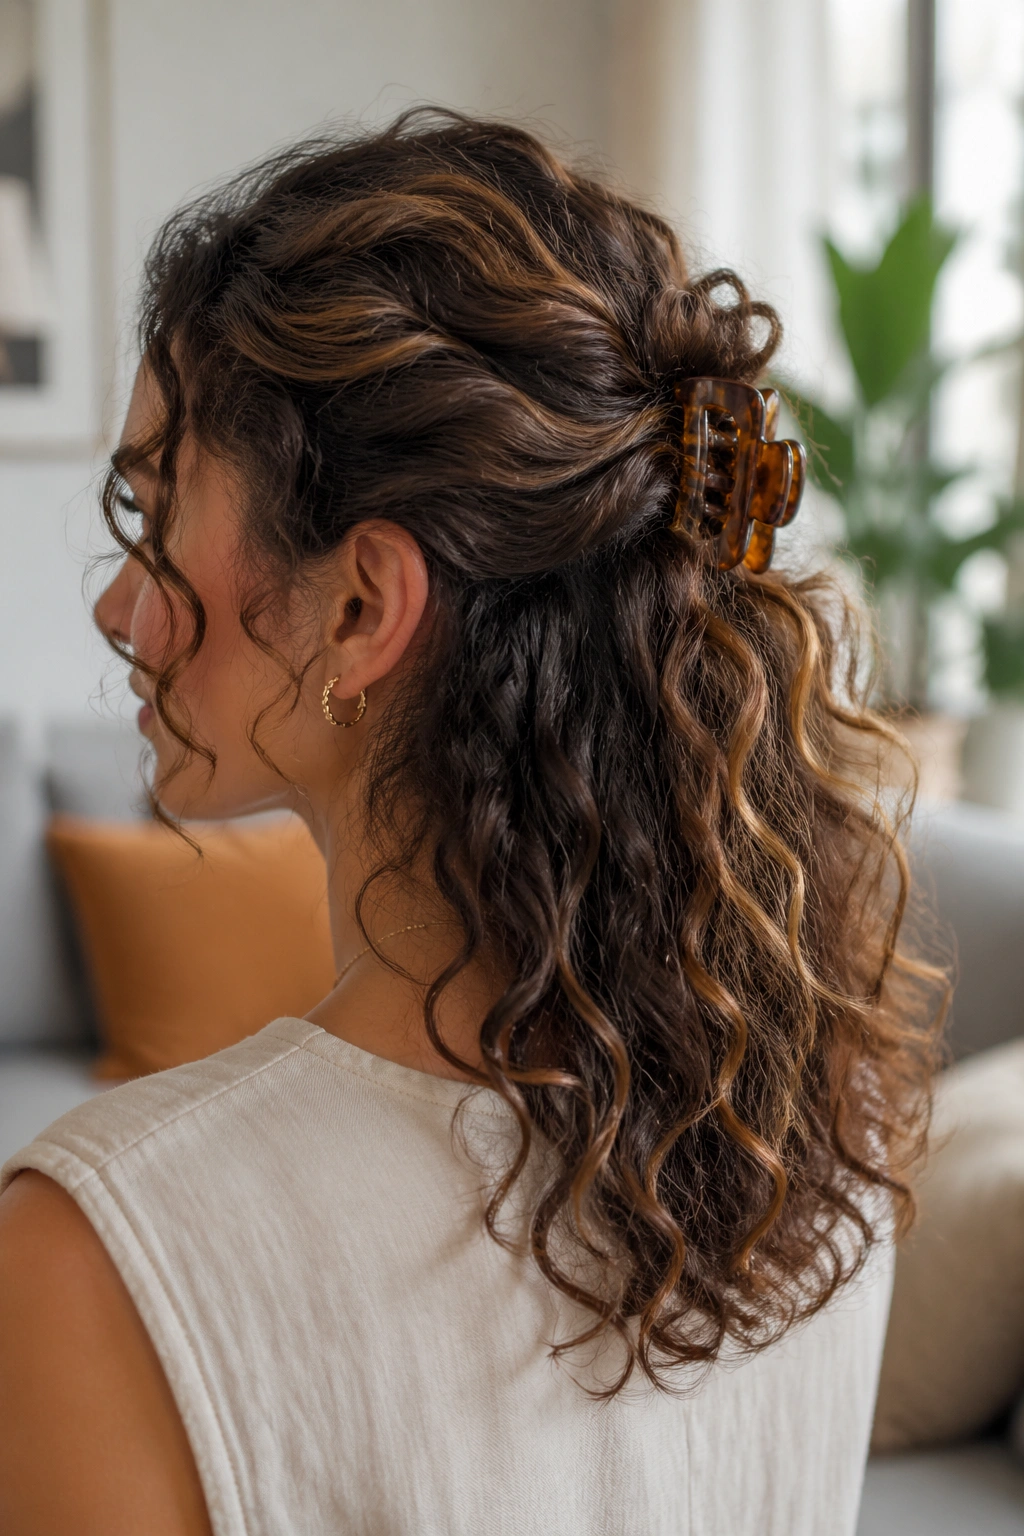
A good claw clip can save a whole afternoon. This style pulls the top half of the curls back, twists them once or twice, and lets the ends spill over the clip so the whole thing feels relaxed instead of stiff.
Why the Clip Matters
The size of the clip makes a bigger difference than people expect. Thick curls usually need a larger clip with teeth that actually grip, not just a tiny decorative one that slips out after ten minutes. If your hair is dense, the clip should sit low enough to catch the twist without squeezing the crown flat.
You don’t need to smooth everything. In fact, trying to make curls sleek usually makes the style look fussy. Leave a little lift at the roots, twist only the top section, and let the lower half keep its shape.
- Best on shoulder-length to long curls
- Works well for day-two hair
- Needs less than 2 minutes once you know the hand placement
- Can be dressed up with a tortoiseshell or matte clip
Tip: If the clip slides, rough up the twist a little with your fingers before clipping it in. Too much softness is the problem.
3. The Low-Effort Wash-and-Go
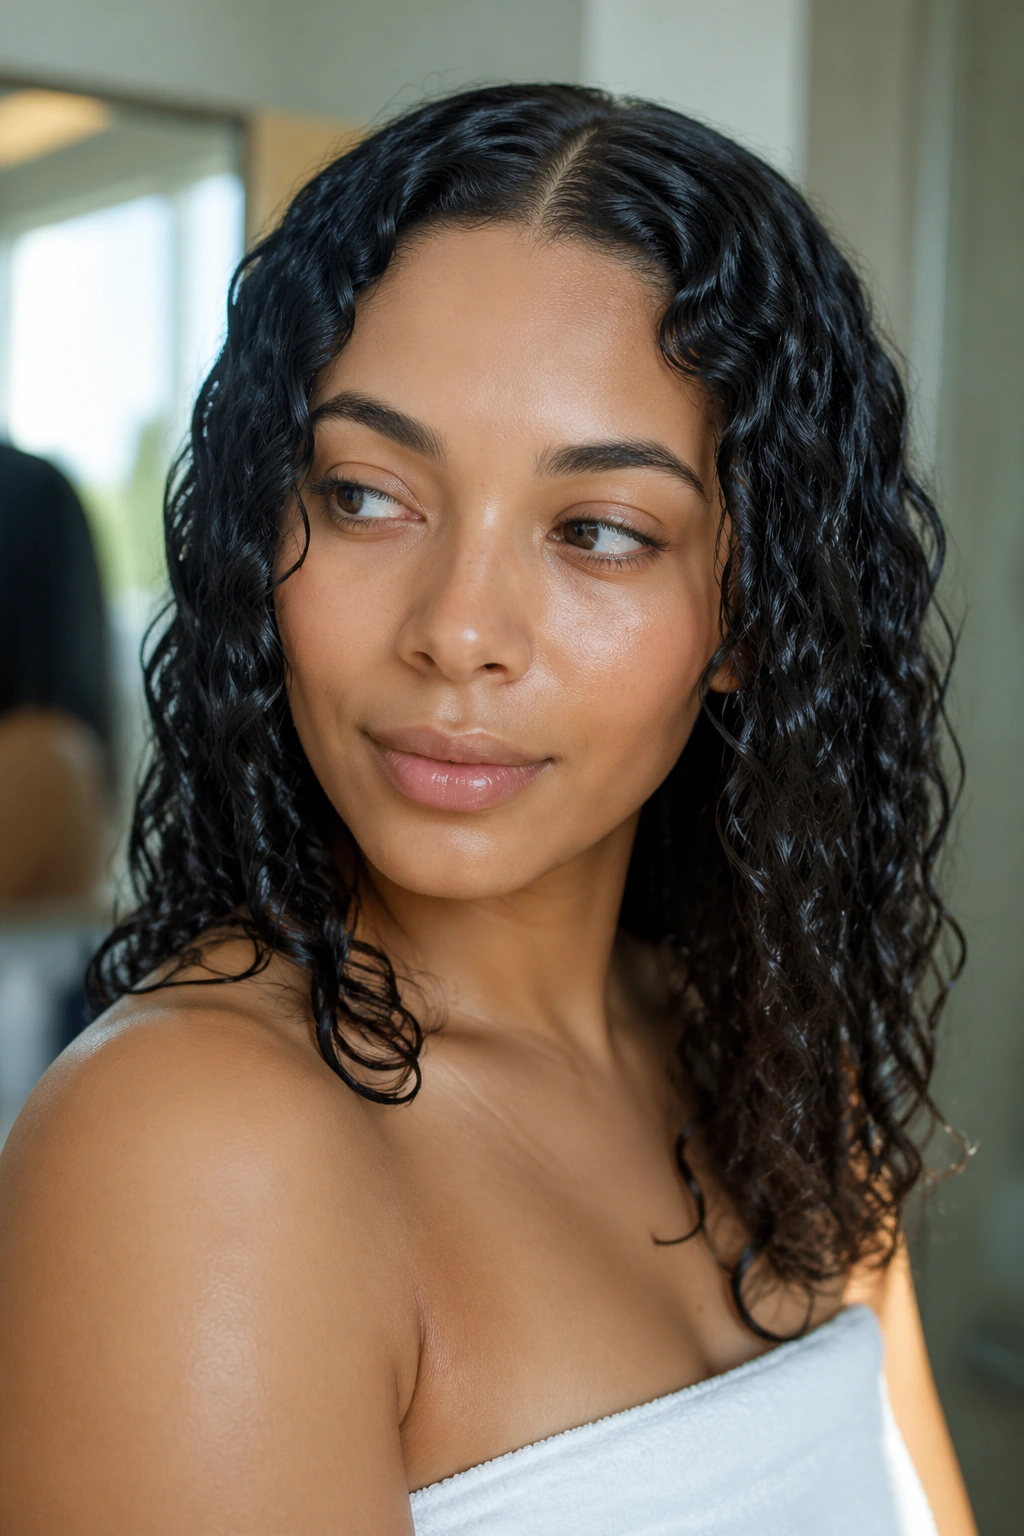
Why do some wash-and-gos look effortless and others look like they fought the entire bathroom? Usually, it comes down to timing, not talent. Curly hair tends to behave best when styled while damp, parted cleanly, and left alone long enough to dry without constant poking.
How to Keep the Part Clean
Start with leave-in conditioner and a gel or cream that matches your curl density. Fine curls usually want something lighter; coarser curls can take more product without collapsing. Make the part while the hair is wet, because trying to carve a clean line after the curls set usually creates frizz.
If you want the style to last, resist the urge to touch it during drying. That’s the hard part. Air-drying works fine, and a diffuser helps if you want more root volume, but both need patience. Scrunching every few minutes just breaks the forming curl pattern.
This style is low-maintenance because the work happens once. After that, you’re mostly preserving the shape with sleep protection and a quick refresh spray.
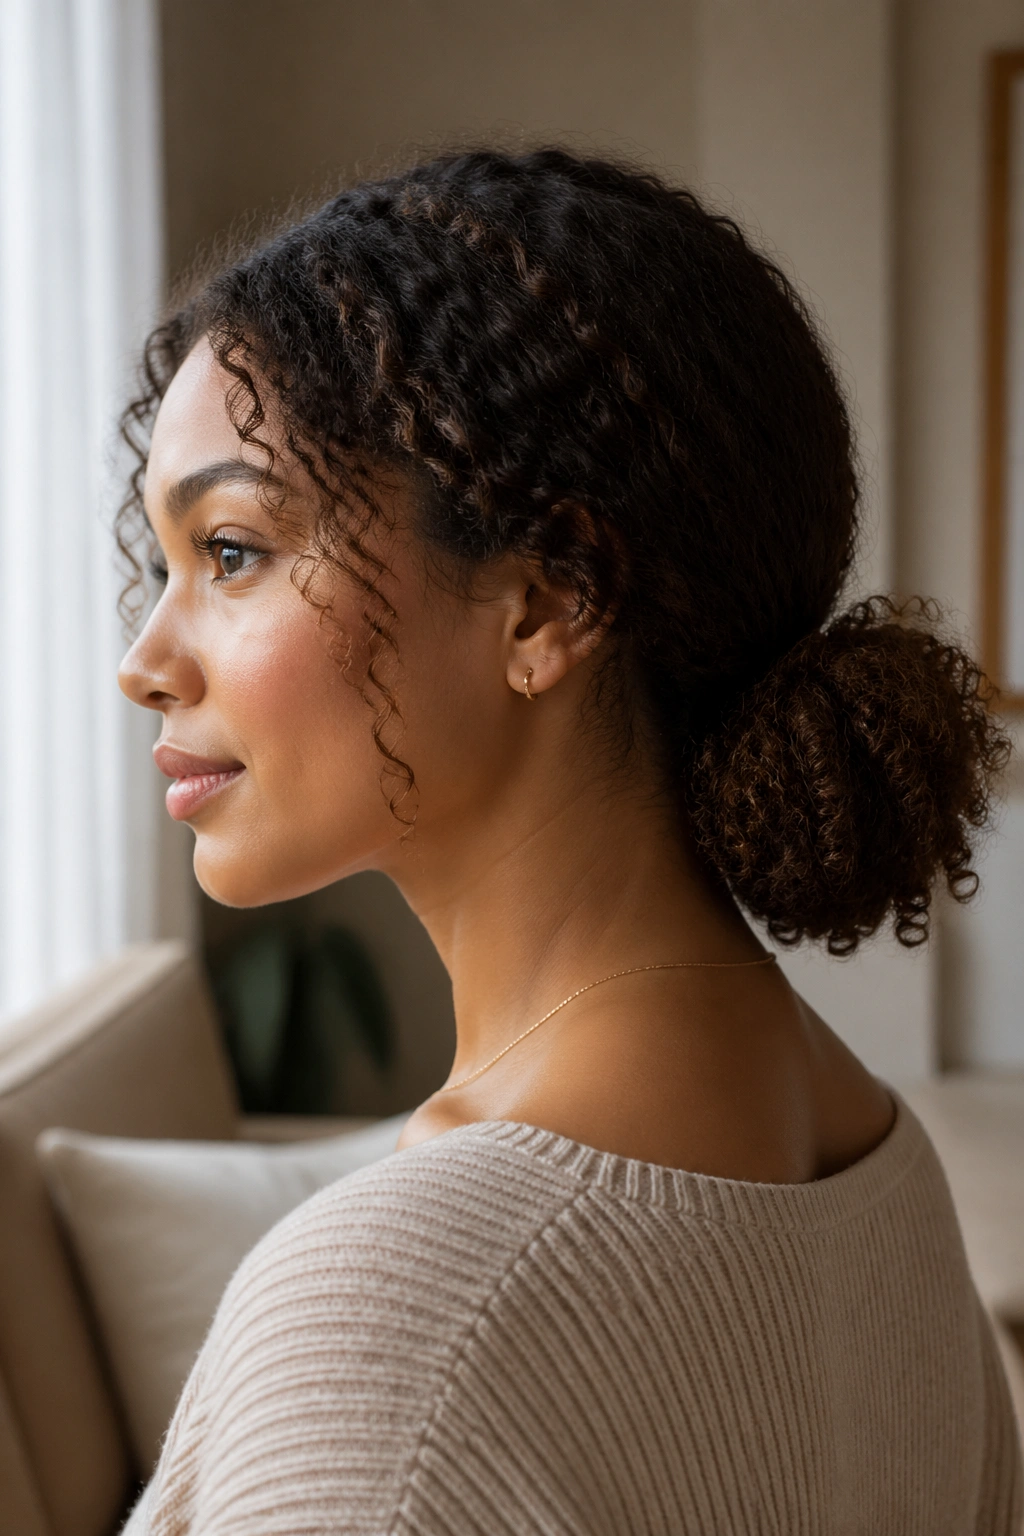
4. The Low Curly Bun
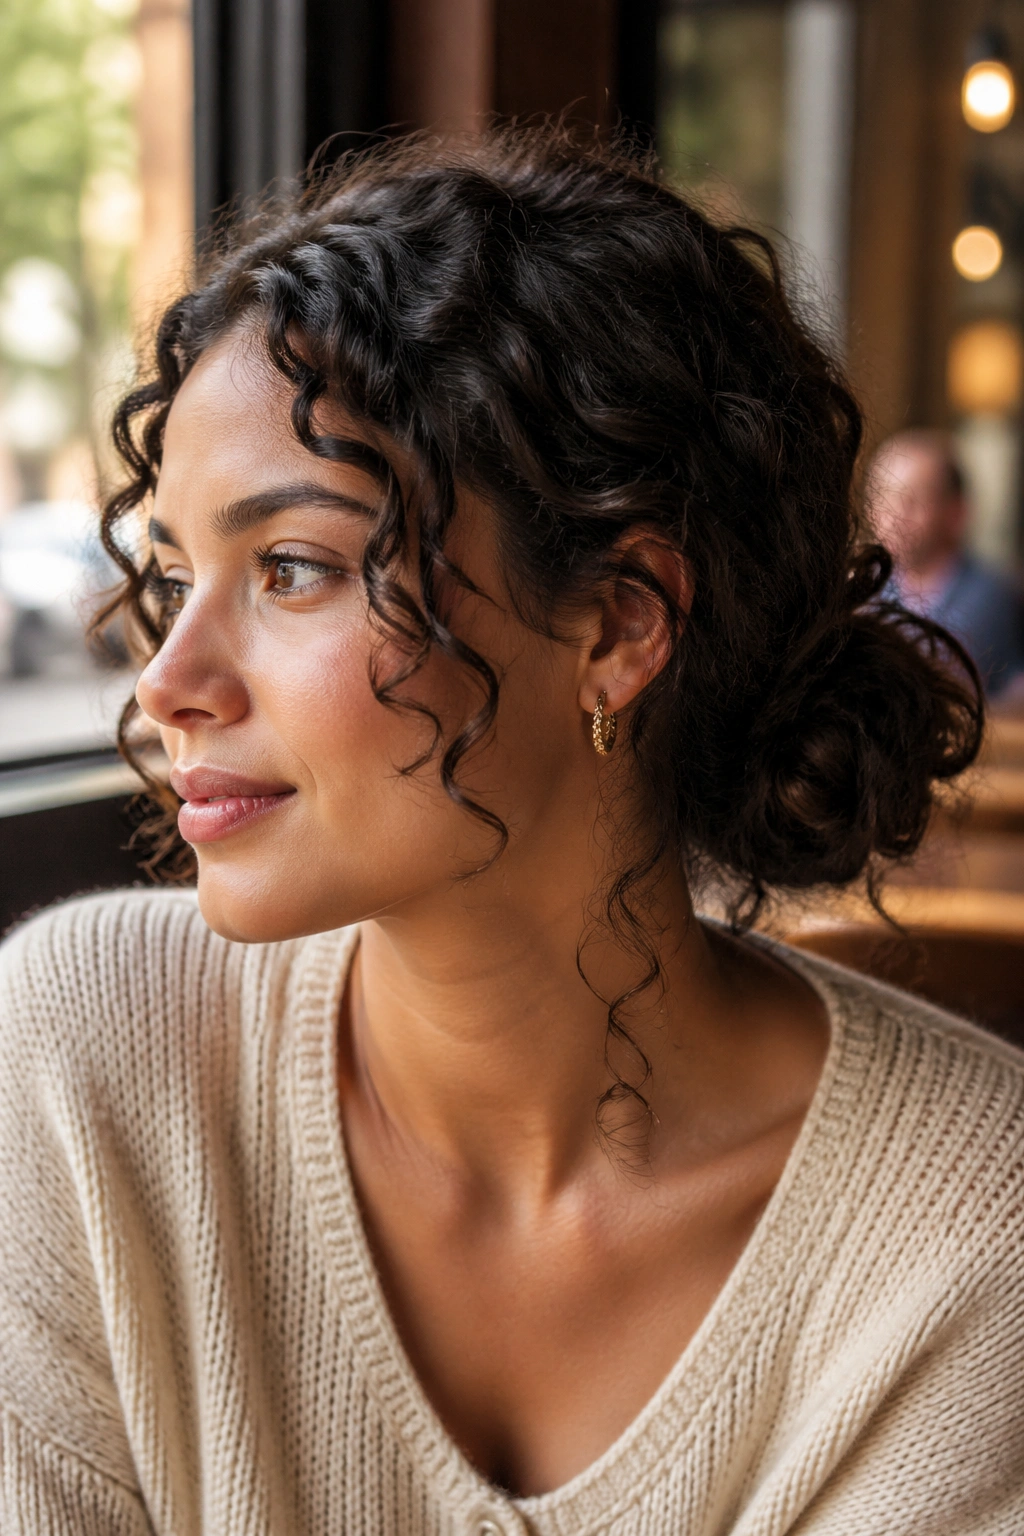
A low curly bun is the kind of style people underestimate until they need one. It sits at the nape, keeps the hair off your face, and still lets a few curls escape around the ears and neckline so it doesn’t feel severe.
The best version starts with slightly stretched curls. Freshly washed hair can work, but day-two or day-three hair tends to hold better and gives the bun a little grip. Gather the hair low, twist it loosely, and pin it in place instead of yanking it into a hard knot.
You do not need a perfect circle. A good low bun has a little softness at the edges. A few loose spirals around the temple make it look lived-in instead of scraped back.
- Use 2 to 4 bobby pins, crossed in an X if needed
- Keep tension low at the hairline
- Leave the ends slightly exposed for shape
- Mist the front lightly if the curls have gone fuzzy
Some styles are polished. This one is practical first.
5. Two-Strand Twists You Can Wear Out
Two-strand twists are one of the few curly styles that actually give you time back later. You twist two small sections around each other from root to end, and the result can be worn as is, pinned up, or unraveled later for a softer twist-out.
Why They Buy You Time
Twists keep the hair from tangling as much, which is a gift if your curls knot easily at the nape or around the shoulders. They also let you stretch your hair a little without heat, which can help if your curls shrink hard and you want a longer silhouette for a few days.
Start with damp hair and a small amount of cream or butter so the strands slide together instead of fraying apart. The sections should be even, but not tiny unless you want a longer set time. Medium twists dry faster and are easier to redo if one comes loose.
A lot of people make the mistake of twisting too tightly at the scalp. Don’t. A twist that feels like it’s pulling will not stay comfortable, and it can leave the front flattened in a way that takes hours to recover.
This is one of those styles that looks like work but saves work later. Worth it.
6. A Side Braid That Leaves the Curls Alone
A side braid is a smart move when you want hair off one shoulder but don’t want to lose all the curl texture. The braid does the boring part near the face, while the rest of the curls stay loose and full.
The nicest version starts near the temple and stops before it gets too tight. You’re not trying to turn the whole head into a braiding project. One loose braid along the hairline is usually enough to keep bangs, layers, and shorter front pieces from getting in your eyes.
That loose finish matters. A braid that’s too neat can look flat against curly hair, and then the ends stick out like an afterthought. Pull the braid apart a little with your fingers once it’s secured. Not too much. Just enough to let the texture breathe.
This style works especially well on medium and long curls that get frizzy around the face first. It’s neat without being severe, and you can redo it with no mirror if needed.
7. The Curly Ponytail with a Wrapped Base
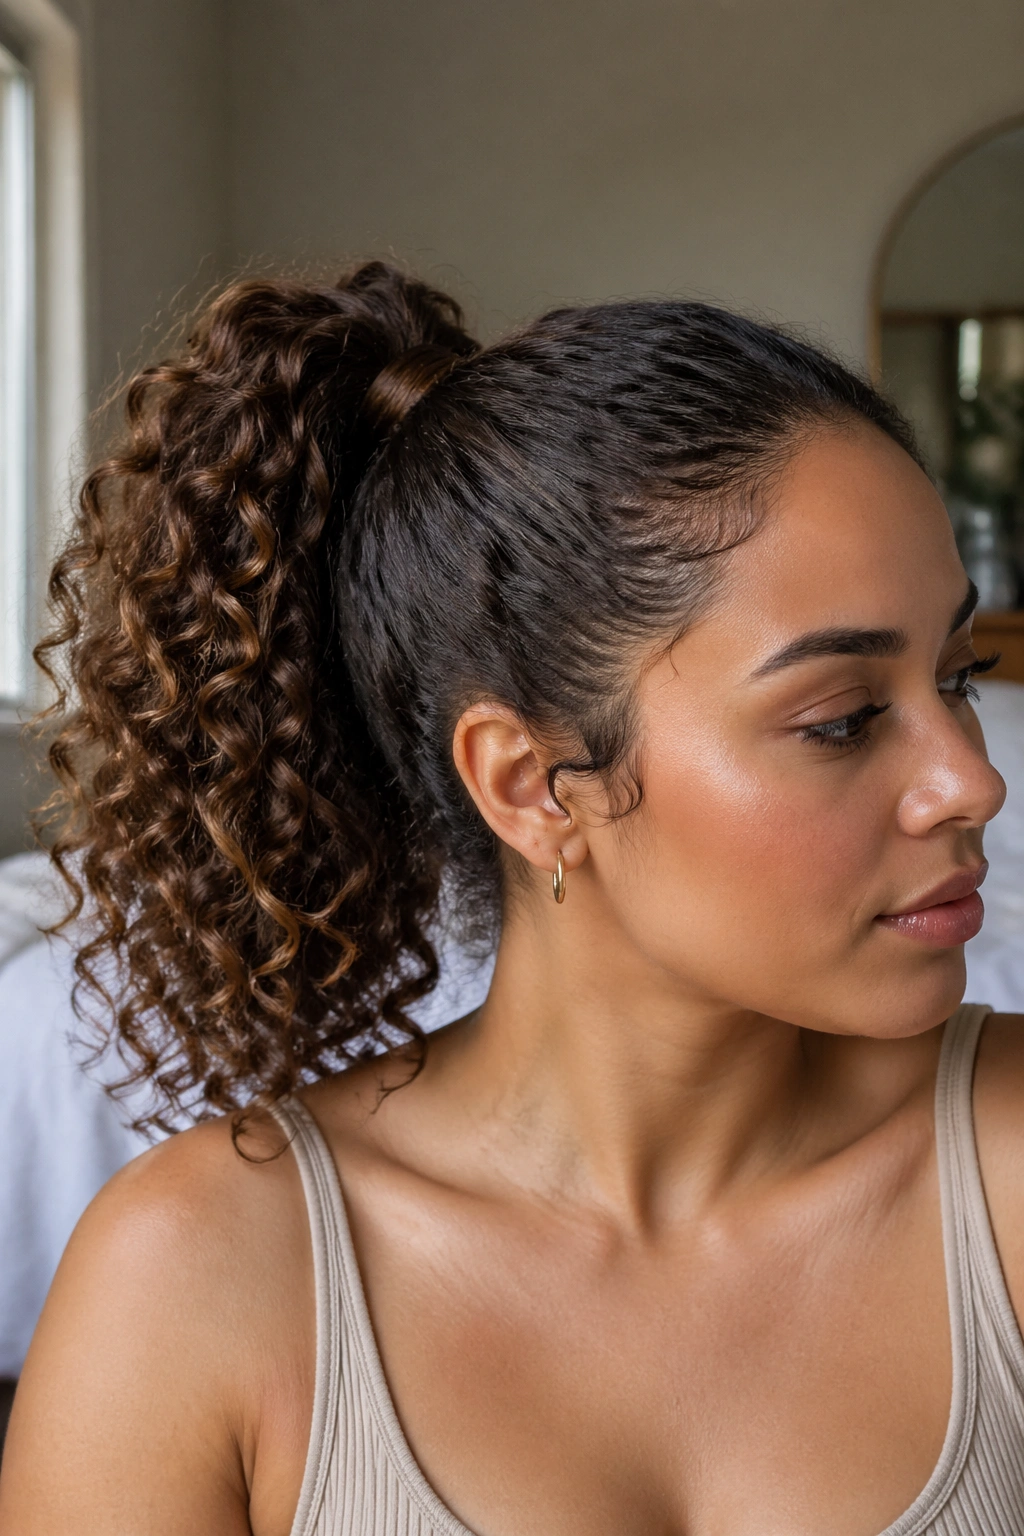
A curly ponytail can look plain or sharp, depending on where you place it and what you do with the base. At the right height, it keeps the shape of your curls while clearing your neck and face, which is exactly what a low-maintenance style should do.
Where the Polish Comes From
The wrapped base is the tiny detail that changes the whole mood. Take a small curl or a thin section from the ponytail, wrap it around the elastic, and pin the end underneath. That hides the tie and gives the style a finished look without adding time.
If your hair is heavy, place the ponytail a little lower than you think. Too high and it starts dragging the scalp by lunchtime. Too low and the curls lose their swing. The middle zone usually works best.
A satin scrunchie helps if your hair breaks easily, but a regular elastic is fine if it’s wrapped well and not pulled too tight.
Watch for this: if the crown feels sore after a few hours, the ponytail is too tight or too high. Fix that first, then fuss with the curls.
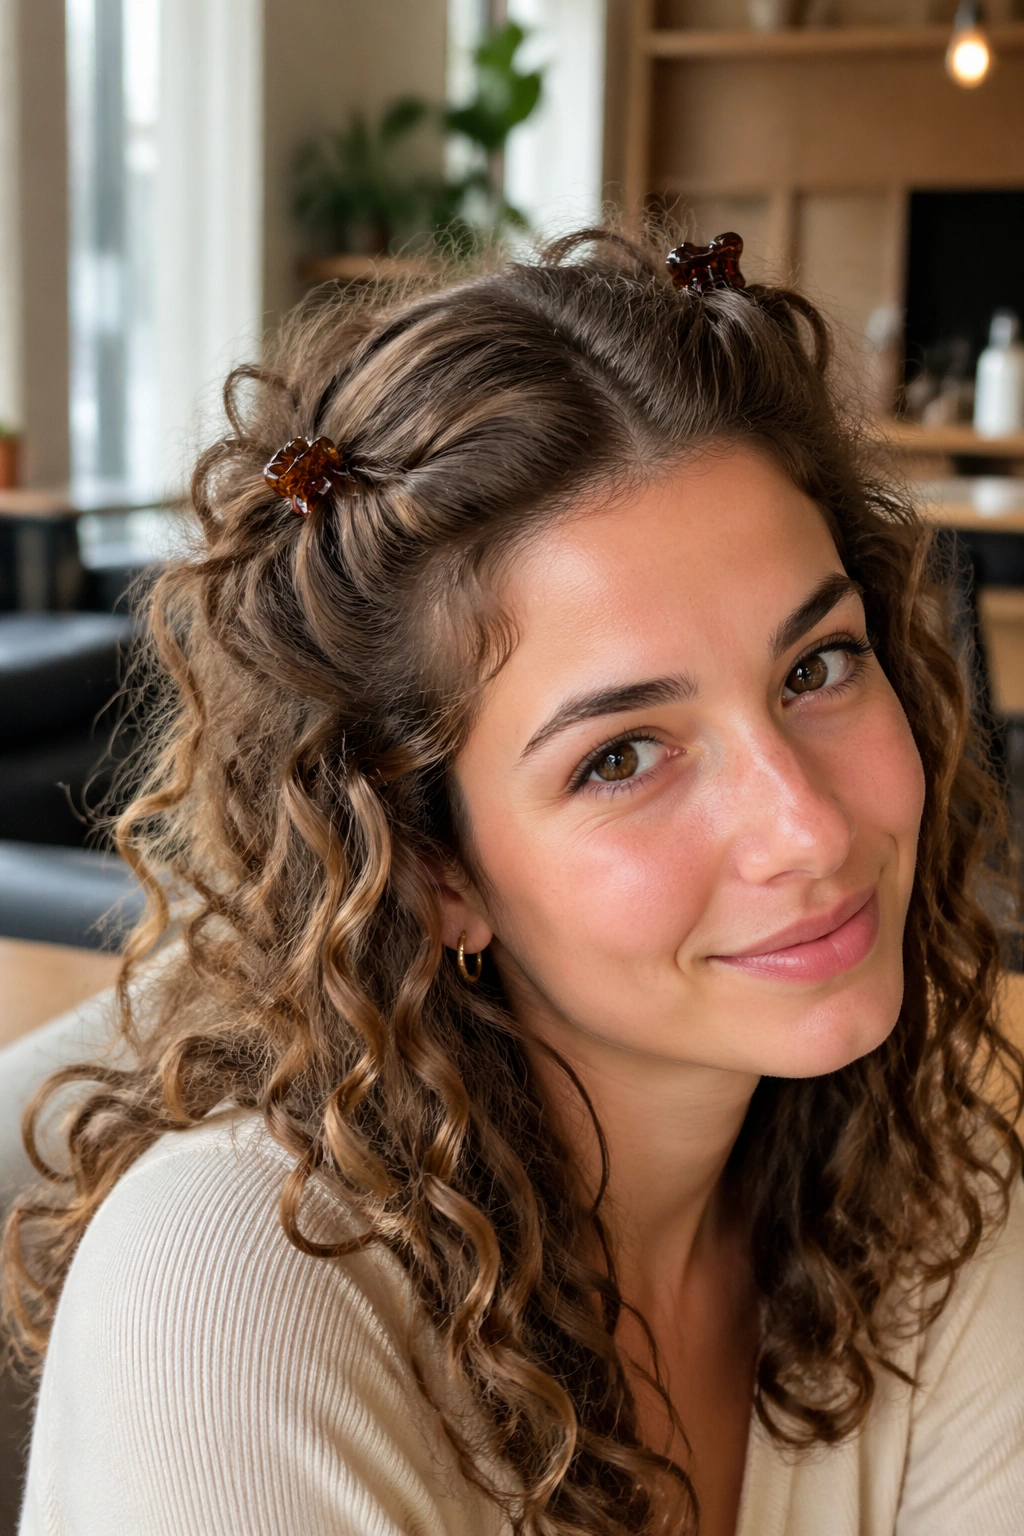
8. The Headband Tuck
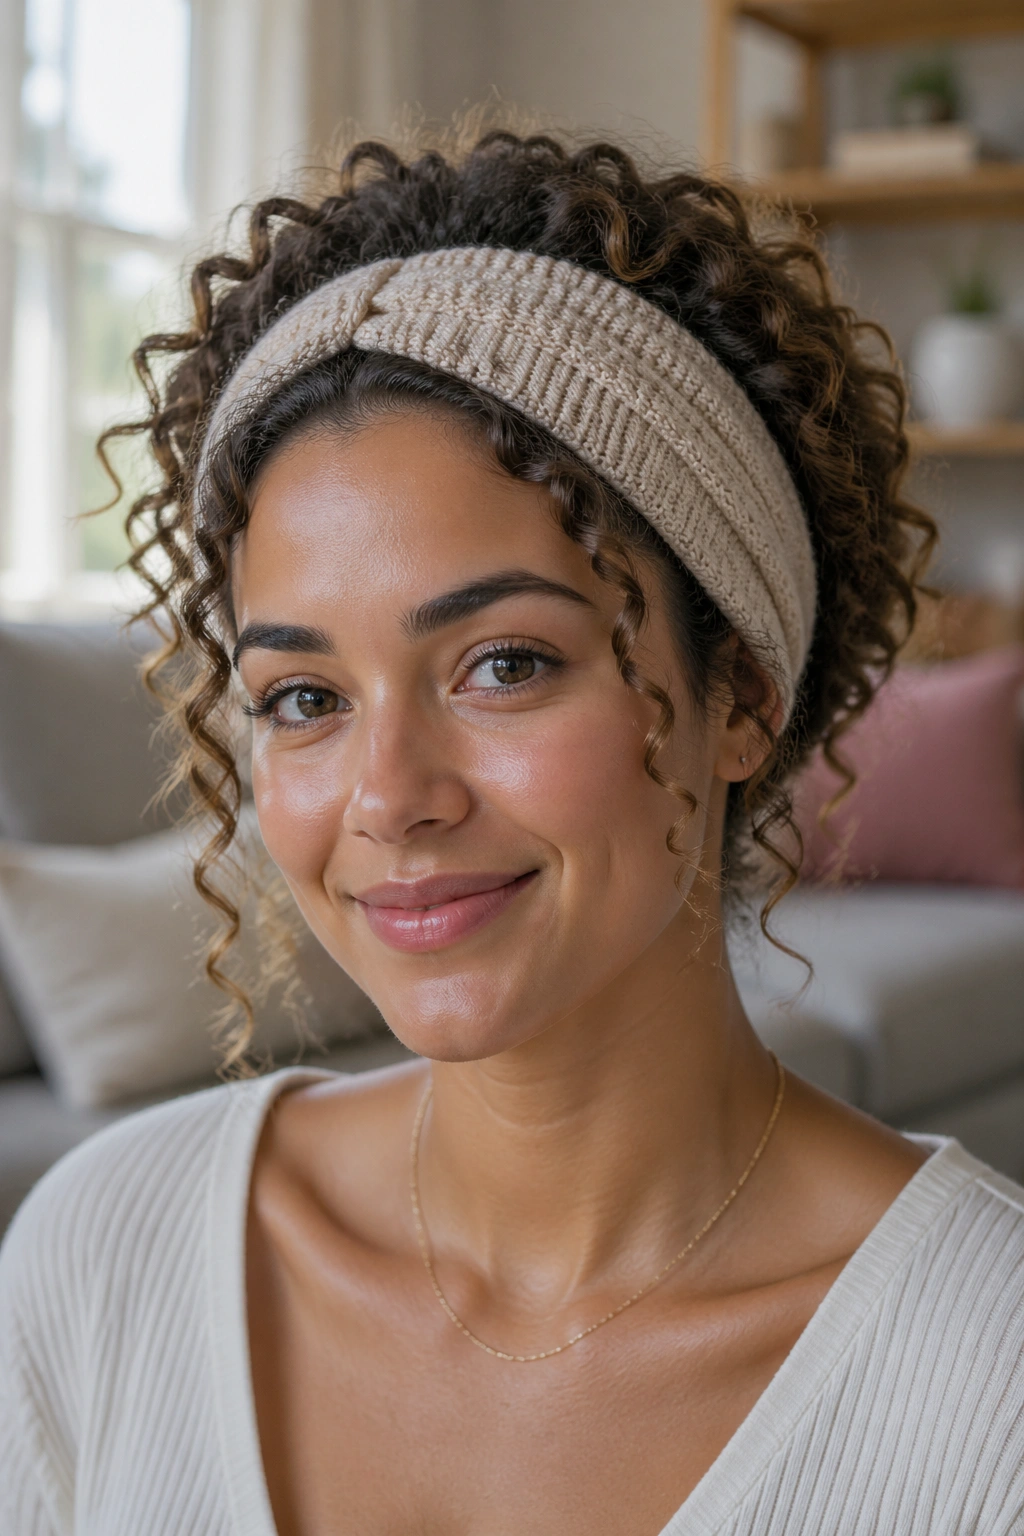
Some mornings call for speed, not strategy. A stretchy headband and a few tucked curls can make the difference between “I made an effort” and “I got caught in the wind and lost.”
The headband tuck works by pushing the front and side sections back under the band so the top stays smooth while the ends keep their shape. It’s especially good for curls that get wide at the temples or frizzy around the hairline. A soft knit band or wide fabric band is kinder than a stiff plastic one, which tends to create a line across the forehead.
This style looks best when you let the crown stay a little loose. If you flatten every inch of volume, the hair can look helmet-like. Leave a bit of lift at the top, tuck the sides gently, and let the rest fall naturally.
- Great for running errands
- Good on medium-length curls
- Easy to pair with earrings or glasses
- Takes less than 3 minutes
It’s a rescue style, and it knows it.
9. Space Buns With Soft Ends
Are space buns childish? Only if you make them too perfect. The loose version is a different story. Curly hair gives the style a softer shape, and the ends that escape around the buns keep it from looking stiff.
The Quick Version
Part the hair down the middle and gather each side into a high puff or bun. Don’t drag the sections tight across the scalp. You want lift, not tension. If the curls are long enough, leave some ends loose under the bun so the shape stays fluffy and round.
This style is handy on gym days, but it also works when you want the hair off your neck without losing all the texture. Shorter curls make smaller buns, which can look charming in a messy, thrown-together way. Longer curls make chunkier buns that hold their shape better.
A little frizz actually helps here. Too much smoothing takes the life out of the style.
One of the nice things about space buns is that they look more deliberate the less perfect they are.
10. The Flat Twist Crown
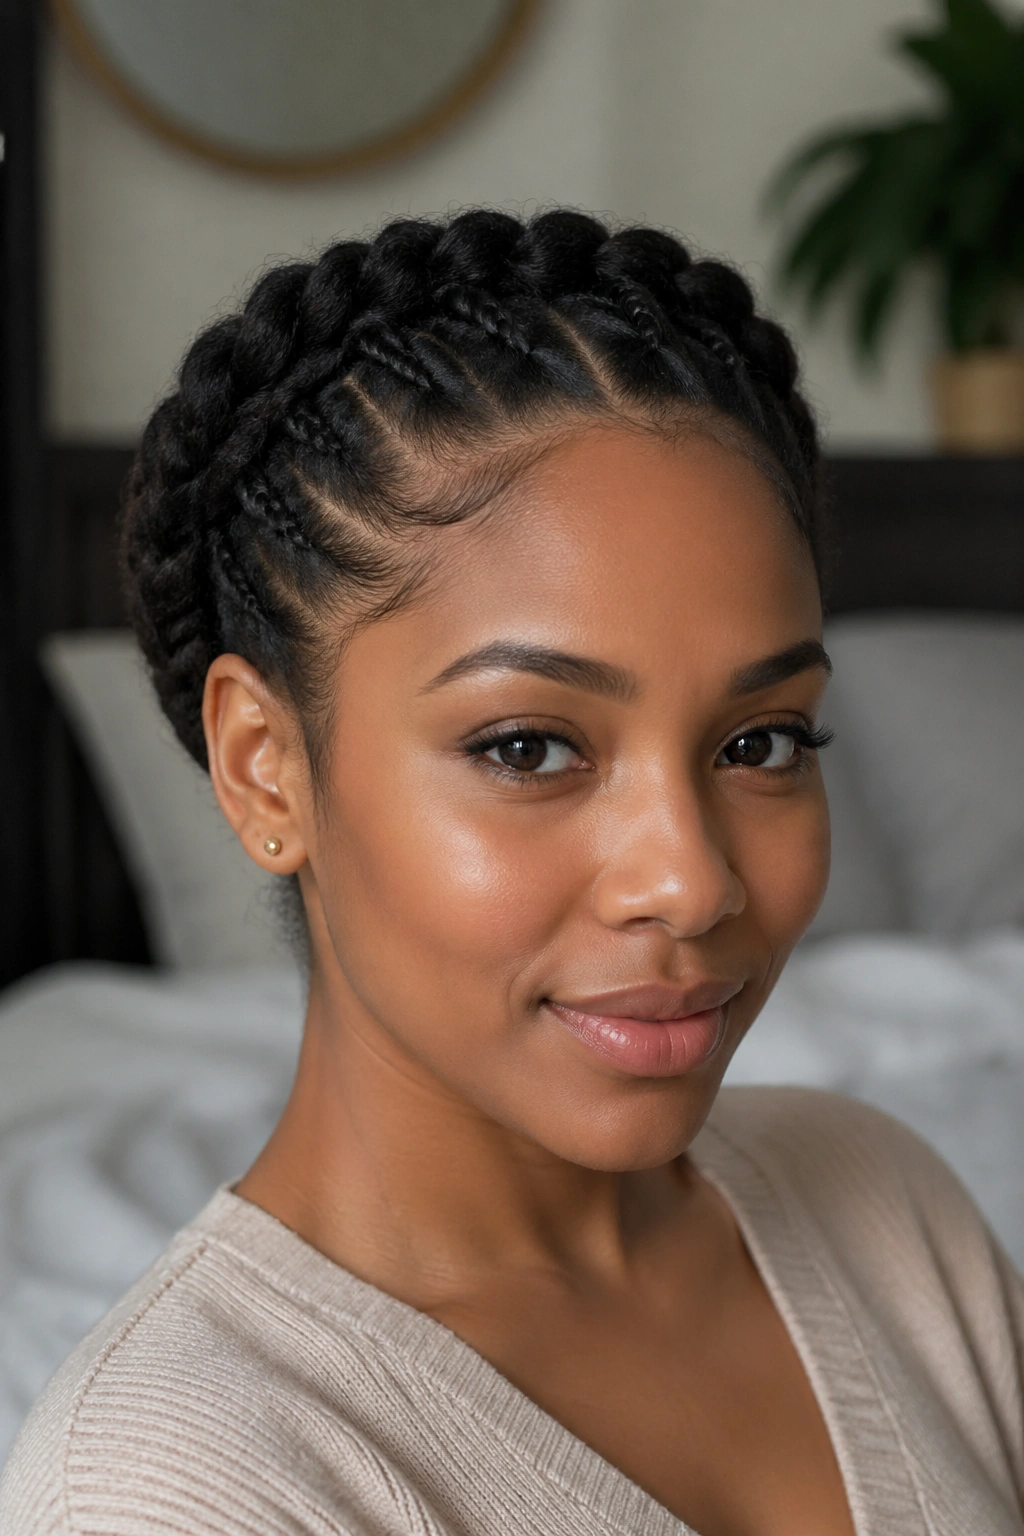
A flat twist crown looks like effort, but it’s really just smart placement. You twist sections flat against the scalp along the hairline, then pin or tuck the ends at the back so the curls stay protected and the front stays out of your face.
Why It Survives a Long Day
Compared with a tight braid, a flat twist usually feels gentler at the scalp. That matters if you wear protective styles often or if your hairline gets sore fast. The twist also keeps shorter layers from poking out as much, which is helpful if your curls are in that awkward “not quite long enough to tie, too long to ignore” stage.
You can keep the crown neat and the back loose, which gives the style a nice contrast. The front looks tidy. The curls still look like curls.
A pin placed flat against the scalp holds better than one shoved in at an angle. Tiny detail. Big difference.
If your hair slips a lot, add a bit of styling cream before twisting. Not a lot. Just enough to give the strands some grip.
11. The Mini Claw-Clip Twist-Up
This one is for the days when the top layer looks tired but the rest of the curls are still doing fine. You twist or clip back just enough hair from the front and crown to open the face, then leave the bottom layers loose and bouncy.
It’s fast. That’s the whole appeal.
Mini claw clips work best on medium-density curls, especially if the hair is layered. You can catch one side, then the other, or twist both temple sections back separately for a softer shape. The style looks casual, which makes it easy to wear even when the curls are a little uneven from sleep.
If your hair is thick, use two small clips rather than one tiny one. A clip that has to stretch to its limit won’t last. A clip that fits comfortably usually stays put for hours.
This is a good style when you want your curls to stay visible but your face to stop dealing with them.
12. The French Braid Into a Puff
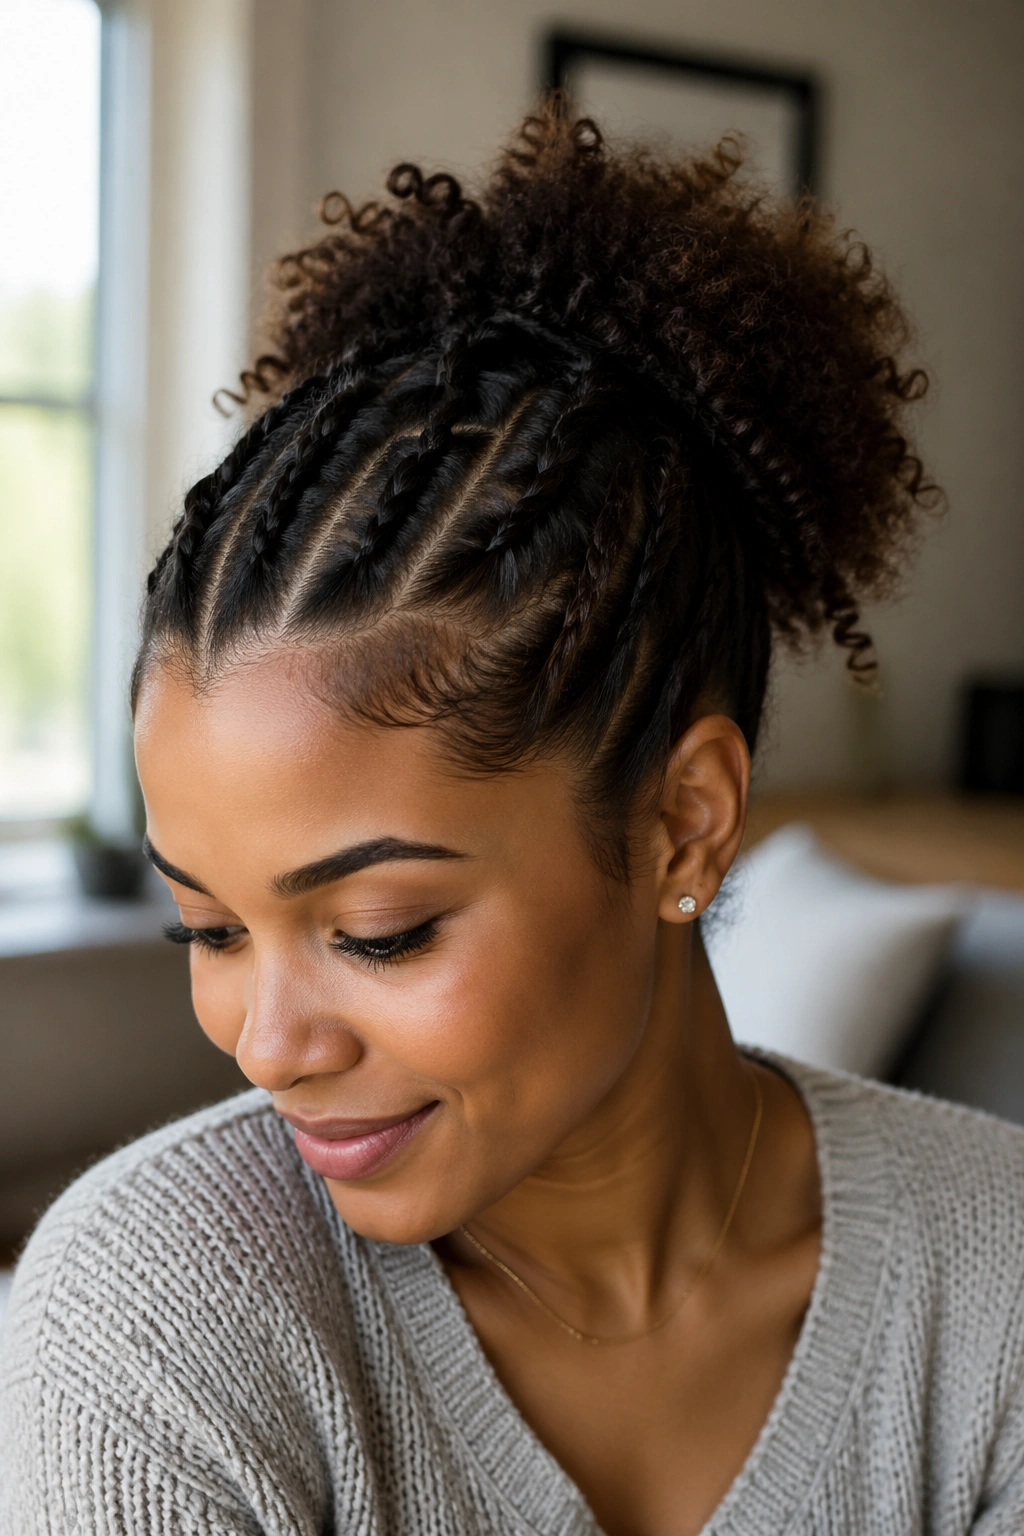
What makes a French braid into a puff so useful is that it only asks the braid to do half the job. The braid handles the top and sides, then the rest of the curls can live their own life at the back.
The Sweet Spot
Start the braid at the front hairline and keep it centered or slightly off-center, depending on where your curls naturally part. Braid until you reach the crown, then stop and secure the remaining hair into a puff or ponytail. That shift from braid to loose texture is what keeps the style from feeling too formal.
This is a good option when you need the hair controlled at the front but still want volume. It’s also kinder to curls than braiding the whole head tight, which can leave the lengths looking compressed and a little sad when you finally take it down.
A braid that is too tight at the start will show. Fast. Keep the tension even and relaxed. If the braid starts wobbling, that’s fine. Slight looseness suits curly hair better anyway.
This one sits right in the middle between tidy and relaxed.
13. The Curly Faux Hawk
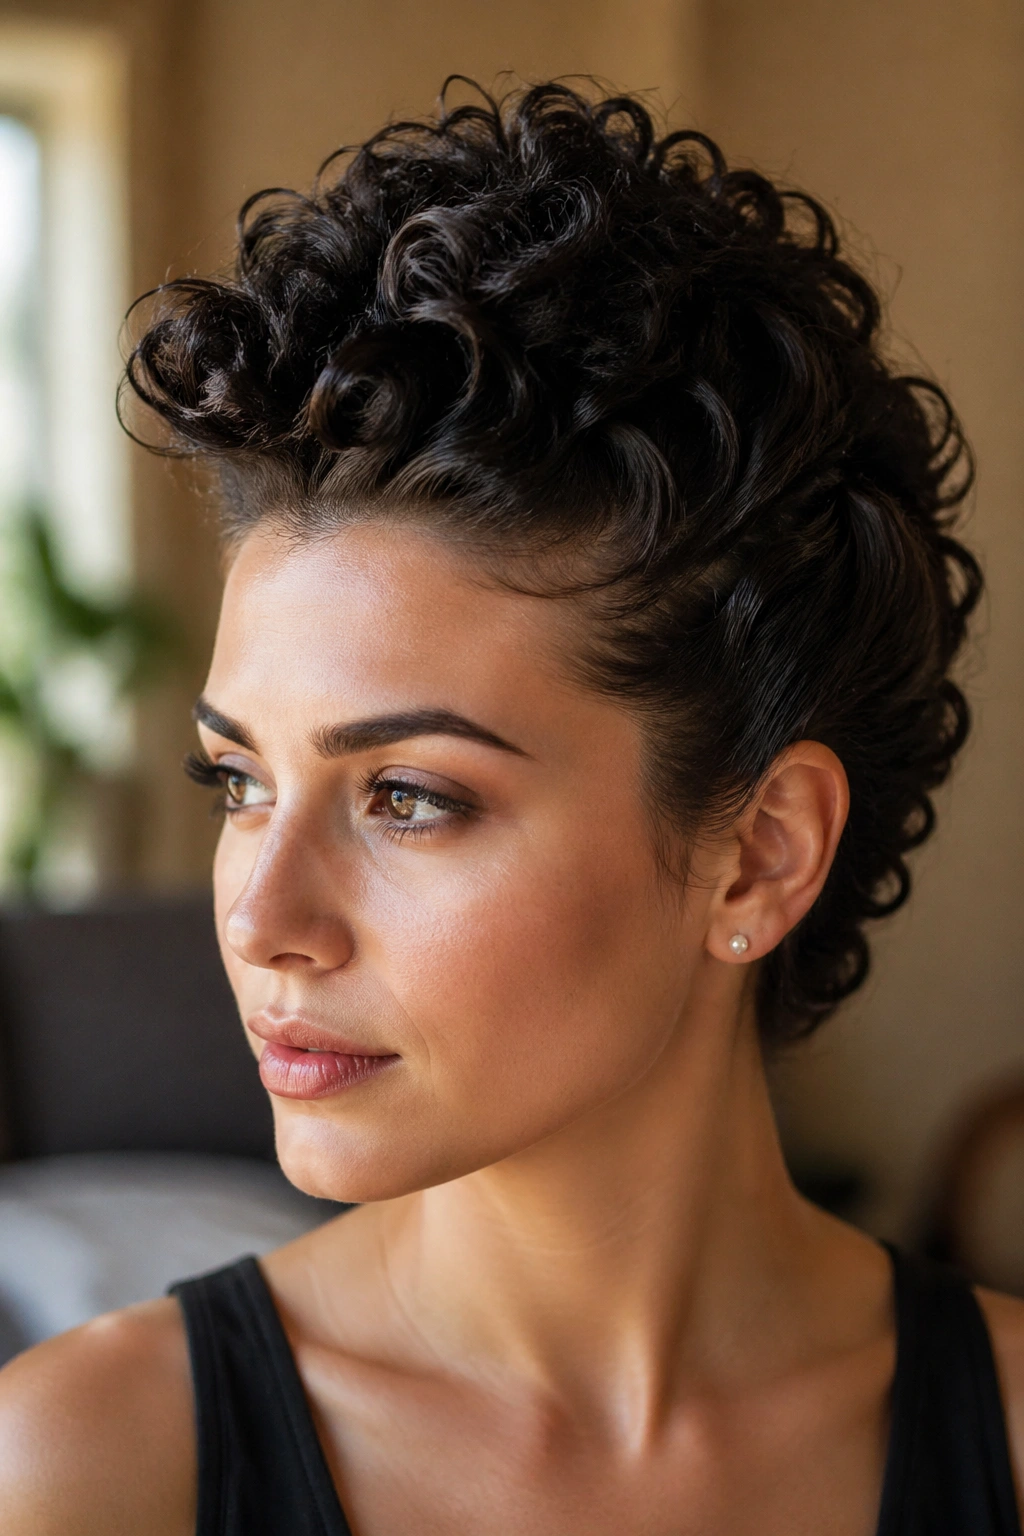
A curly faux hawk has attitude without demanding a full styling session. You pin or smooth the sides back, keep volume down the center, and let the curls form a ridge that runs from forehead to nape.
That shape does a lot of the work for you. It pulls attention to the texture on top and makes even slightly chaotic curls look intentional. If your hair tends to puff wider at the sides, this style narrows the silhouette without flattening everything into submission.
You can do it with bobby pins, a few small twists, or a little gel at the temples. I like the version that keeps the top fluffy and leaves the edges soft. Too sleek and it loses the point. Too messy and it just looks unfinished.
This style is especially useful for medium-length curls that need structure but not neatness. A little edge. Not too much.
14. The Low Puff
A low puff is one of the easiest styles to wear when your curls need to be corralled but not hidden. Unlike a bun, it keeps the curl pattern visible and soft, especially if the puff is placed low and shaped by hand instead of forced into a hard circle.
The trick is not over-smoothing the roots. Gather the hair gently at the nape with a soft elastic, then loosen the crown a little so the top doesn’t look pulled. Once the puff is secured, use your hands to shape the outside instead of trying to comb it into obedience.
That’s the whole appeal. The style looks better when the texture is still there.
- Use a satin scrunchie or snag-free elastic
- Place the tie just above the nape
- Fluff the puff outward with fingertips
- Leave a few curls loose around the ears if you want softness
It’s a plain style on paper. On curly hair, plain can be exactly right.
15. The Banded Puff
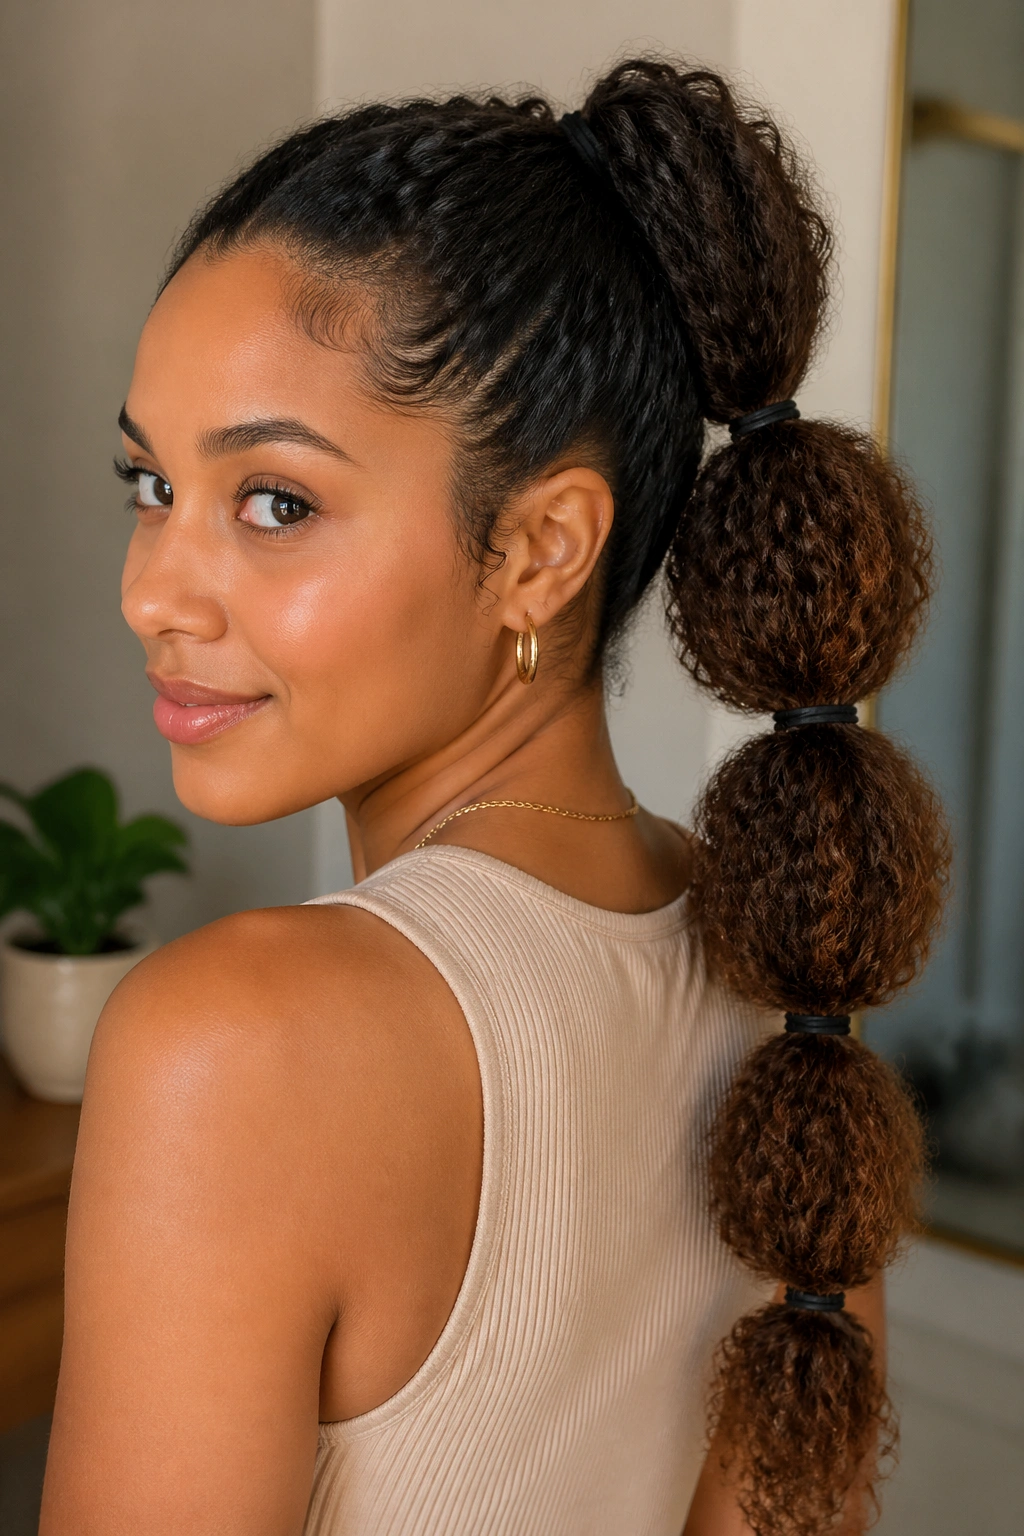
A banded puff is what happens when you want shape, length, and a little bit of drama without spending an hour in the mirror. You section the ponytail with small elastics every few inches, which creates that stacked, rounded look that curls carry so well.
How to Stop It From Looking Stiff
Don’t pull each section tight. That’s the mistake people make, and it’s why the style can look cartoonish in a bad way. Leave each bubble slightly relaxed, then fluff the curls in between the bands with your fingers to make the sections look full.
This works best on long curls or stretched hair, because the extra length gives the bubbles room to show. If your hair is shorter, the bands can bunch too close together and lose the effect.
A little oil on the ends helps them stay soft, but too much product will make the elastics slide. That’s an easy balance to miss. Use just enough to reduce roughness, not so much that the whole thing slips down by noon.
It’s a style that looks playful without being fussy. I’d call that a win.
16. The Scarf-Wrapped Curl Style
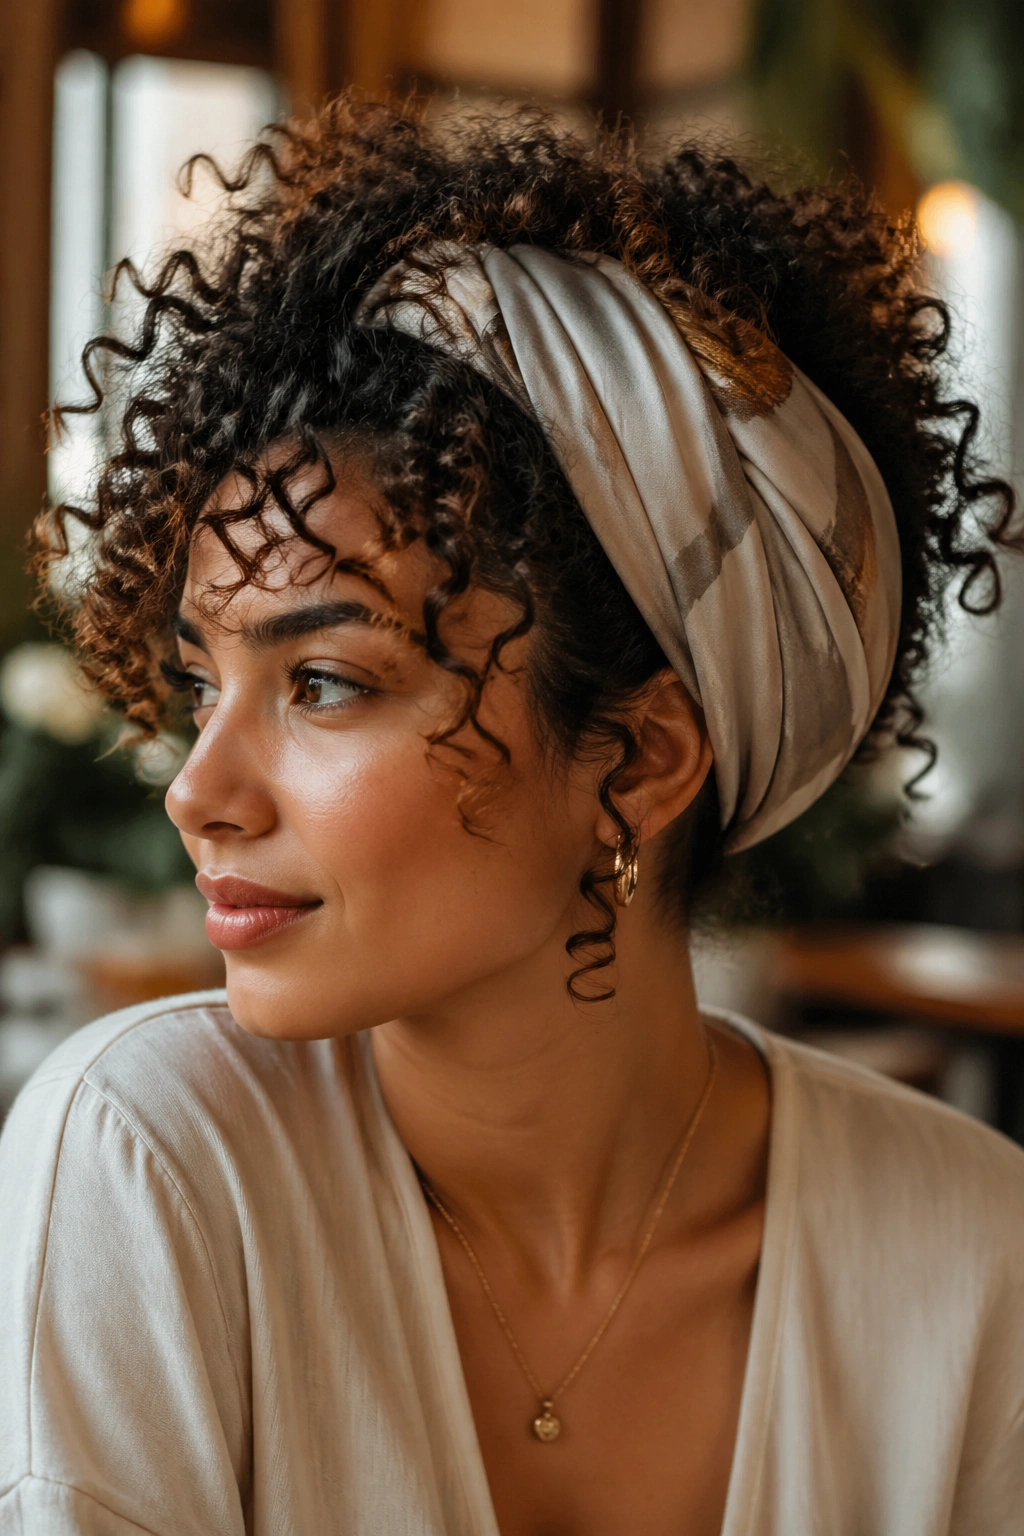
A scarf can fix a bad hair day faster than almost anything else in the drawer. Fold a silk or satin scarf into a band, wrap it around the crown, and let the curls spill out below it. Or tie it low around a puff if you want more of the hair covered.
The best part is how little it asks from the curls themselves. The scarf does the visible work while the hair gets a break from friction and constant touching. That matters if your ends are dry or your hairline gets frizzy from weather, hats, or sleeping on cotton pillowcases.
A scarf that’s too stiff will fight the style. Soft fabric drapes better and sits closer to the head. You can knot it at the top for a little height, or keep the tie hidden under the curls for a quieter look.
This is the kind of style that feels calm. Not plain. Calm.
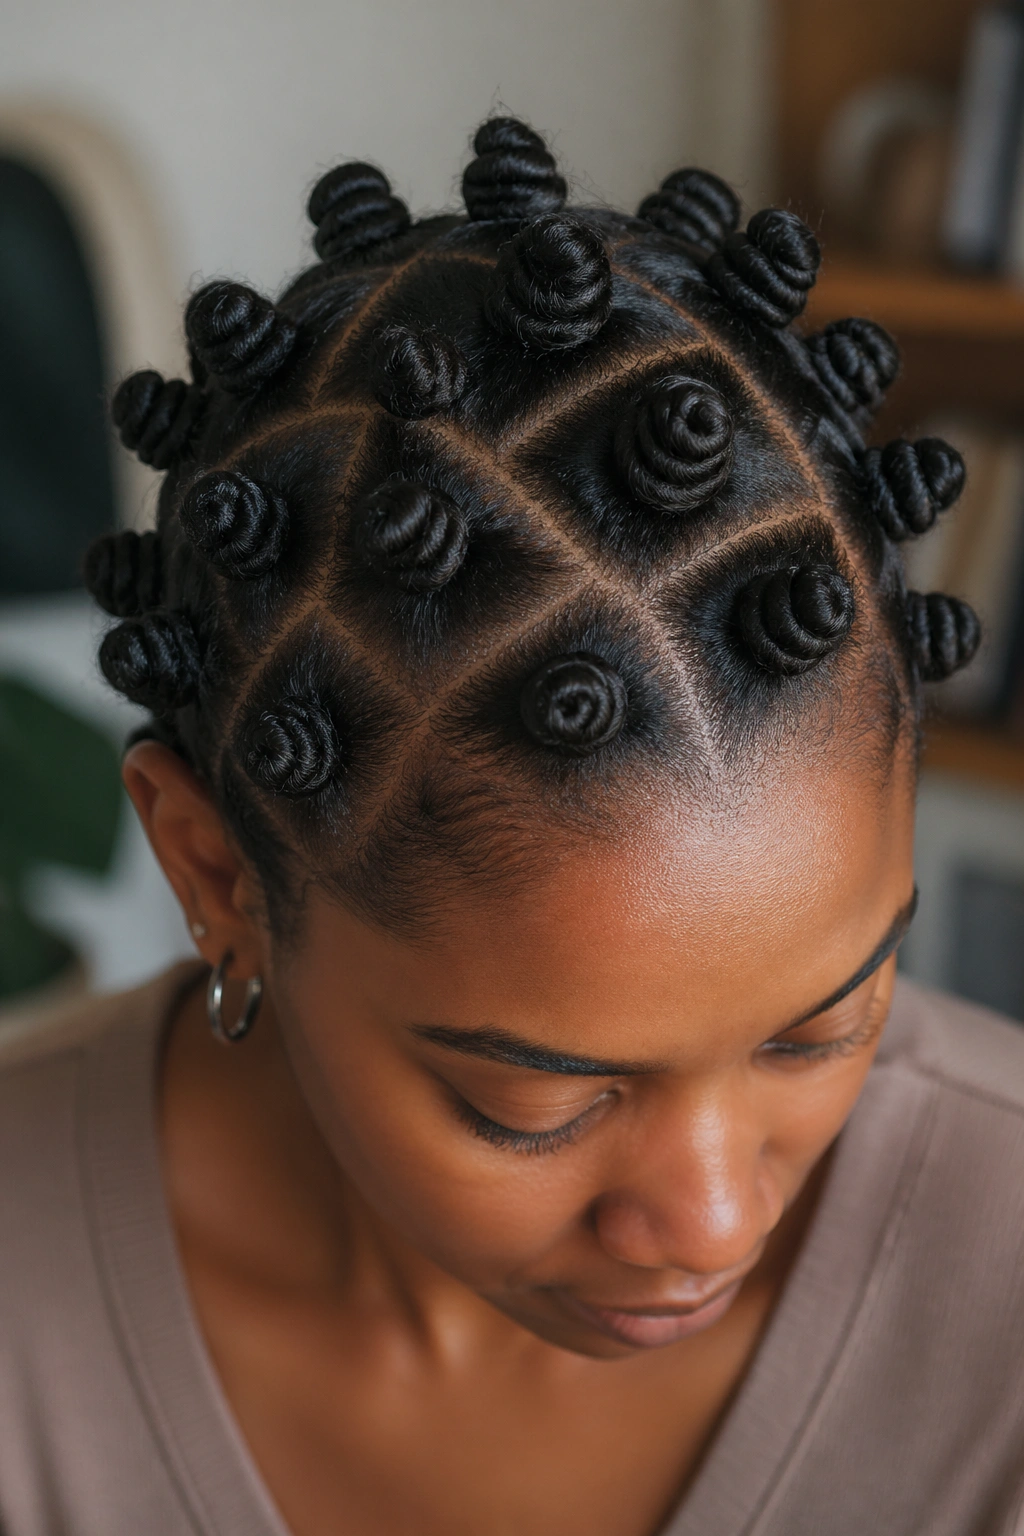
17. Bantu Knots
Bantu knots are not the fastest style in the group, and I’m not going to pretend they are. But once they’re in, they’re one of the easiest ways to keep curls contained, protected, and ready for the next day.
Where They Make Sense
The style works by dividing the hair into small sections, twisting each one, and wrapping it into a tight little knot close to the scalp. You can wear the knots as the style itself, or take them down later for a defined curl pattern. Both options have their place.
Use a small amount of cream or gel so the sections hold together, but do not load them up so heavily that the knots dry forever. Tight sections take longer to set, and heavy product can make them feel sticky instead of secure.
This is a smart choice when you want a style that stays put overnight and still gives you a second look the next day. It’s not a grab-and-go style in the morning. It’s more of a set-it-once, enjoy-it-twice style.
Good in that very specific way. Which is enough.
18. The Half-Up, Half-Down Twist Back
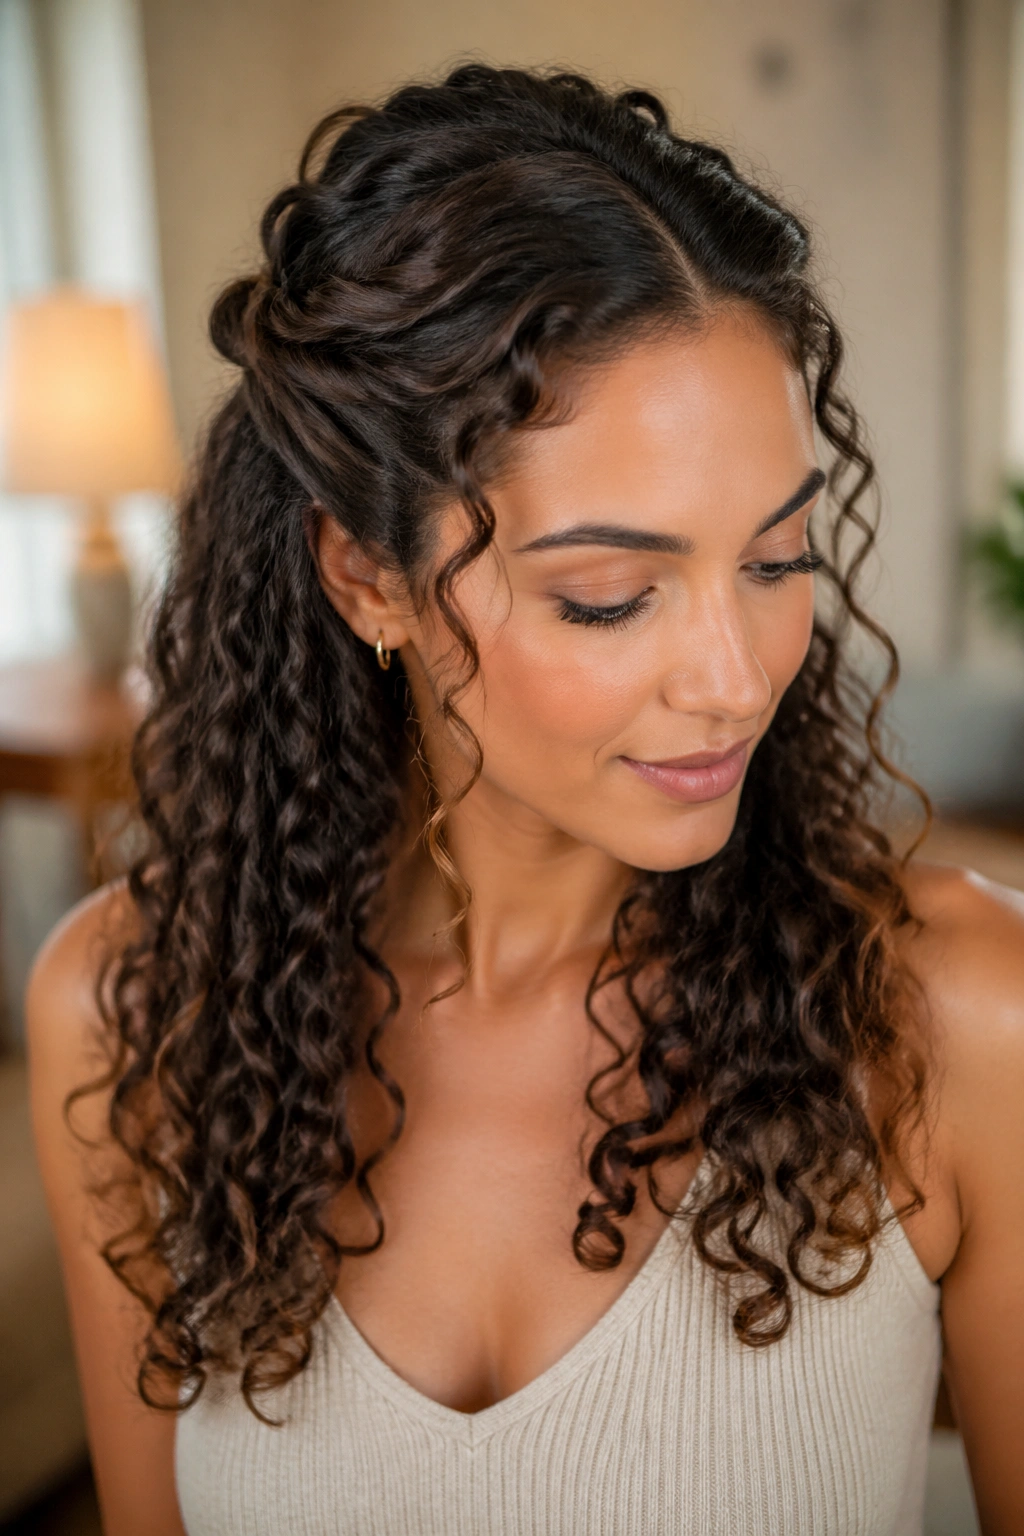
Some styles solve the “hair in my face” problem without making you choose between up or down. The half-up, half-down twist back does exactly that: you twist two front sections away from the temples, pin them at the back, and leave the rest of the curls loose.
The shape is simple, but the effect is tidy. You can keep the front neat without flattening the whole head, which is why it works so well for curls that want volume. It also gives you a place to hide pins, which is useful because curly hair tends to eat a bobby pin if you place it carelessly.
Use two pins per side if the hair is thick. Cross them like an X if one pin starts sliding. That tiny bit of extra hold keeps the style from sagging when the curls move.
This one is easy to dress up with a barrette or a small clip, but it doesn’t need anything fancy to work.
19. The Bubble Ponytail for Curly Hair
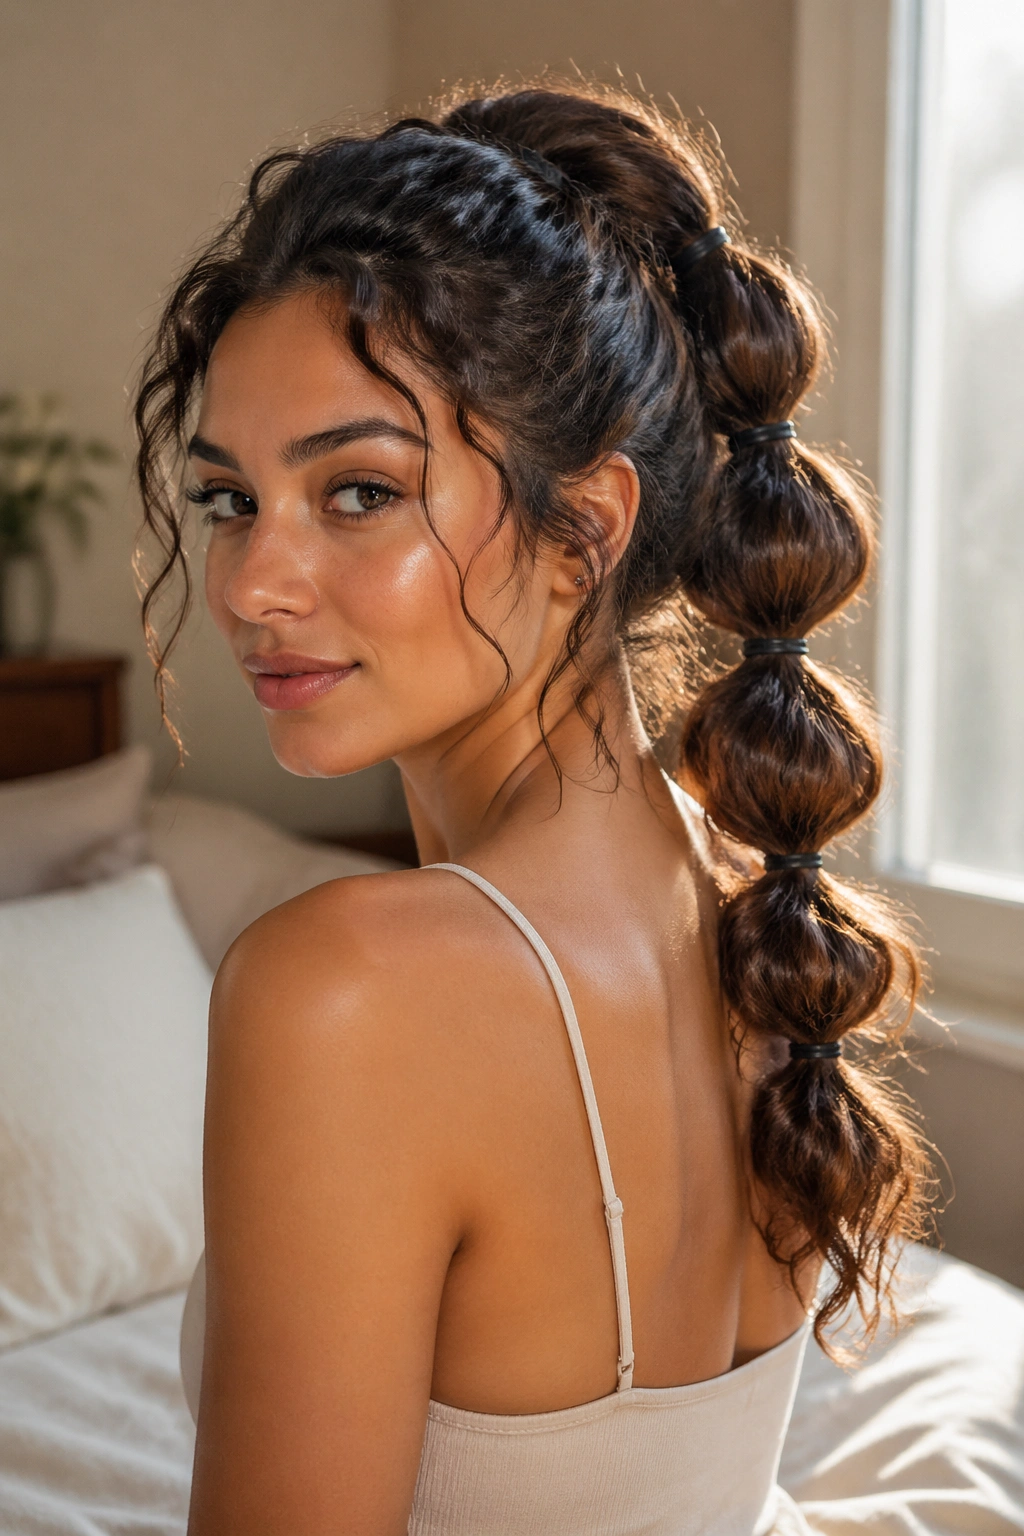
A bubble ponytail looks more styled than a plain ponytail, but it’s not much harder. You gather the hair into one ponytail, then add small elastics every 2 to 3 inches down the length, pulling each section gently to form round “bubbles.”
Why It Works on Curls
Curly hair already has texture, so the bubbles don’t need to be perfect. That’s the beauty of it. The shape comes from the elastic spacing, while the curls provide volume and softness between each tie.
A lot of people overthink this one and smooth the ponytail too much at the start. Don’t. Keep some lift at the base and a little fuzz in the sections. That makes the style look full instead of stiff. If your curls are especially tight, you may only need two or three bands to get the look.
This style is a nice fit for longer curls that need a change from the usual ponytail. It also holds up better than people expect because each elastic helps support the length.
A bubble ponytail is neat, but not precious. That’s what makes it useful.
20. The Rounded Curly Crop with a Side Part
Short curly hair deserves its own easy style, because the rules change once the length gets cropped. A rounded curly cut with a side part is one of the simplest low-maintenance looks because the shape does most of the work for you. You’re not building a style from scratch every morning; you’re just nudging the curls into place.
The side part gives the face a little asymmetry, which helps the whole shape feel intentional even if you only used your fingers and a touch of leave-in conditioner. If one side tends to puff wider, tuck a front piece behind the ear or clip it back with a small barrette. That’s enough. Really.
This is the style I’d point a busy short-haired curl wearer toward first. It needs the least gear, the least sectioning, and the least patience. A little moisture, a clean part, and a quick shake at the roots go a long way.
Short curls do not need much help. They need a shape that lets them do their own thing, and this one does exactly that.