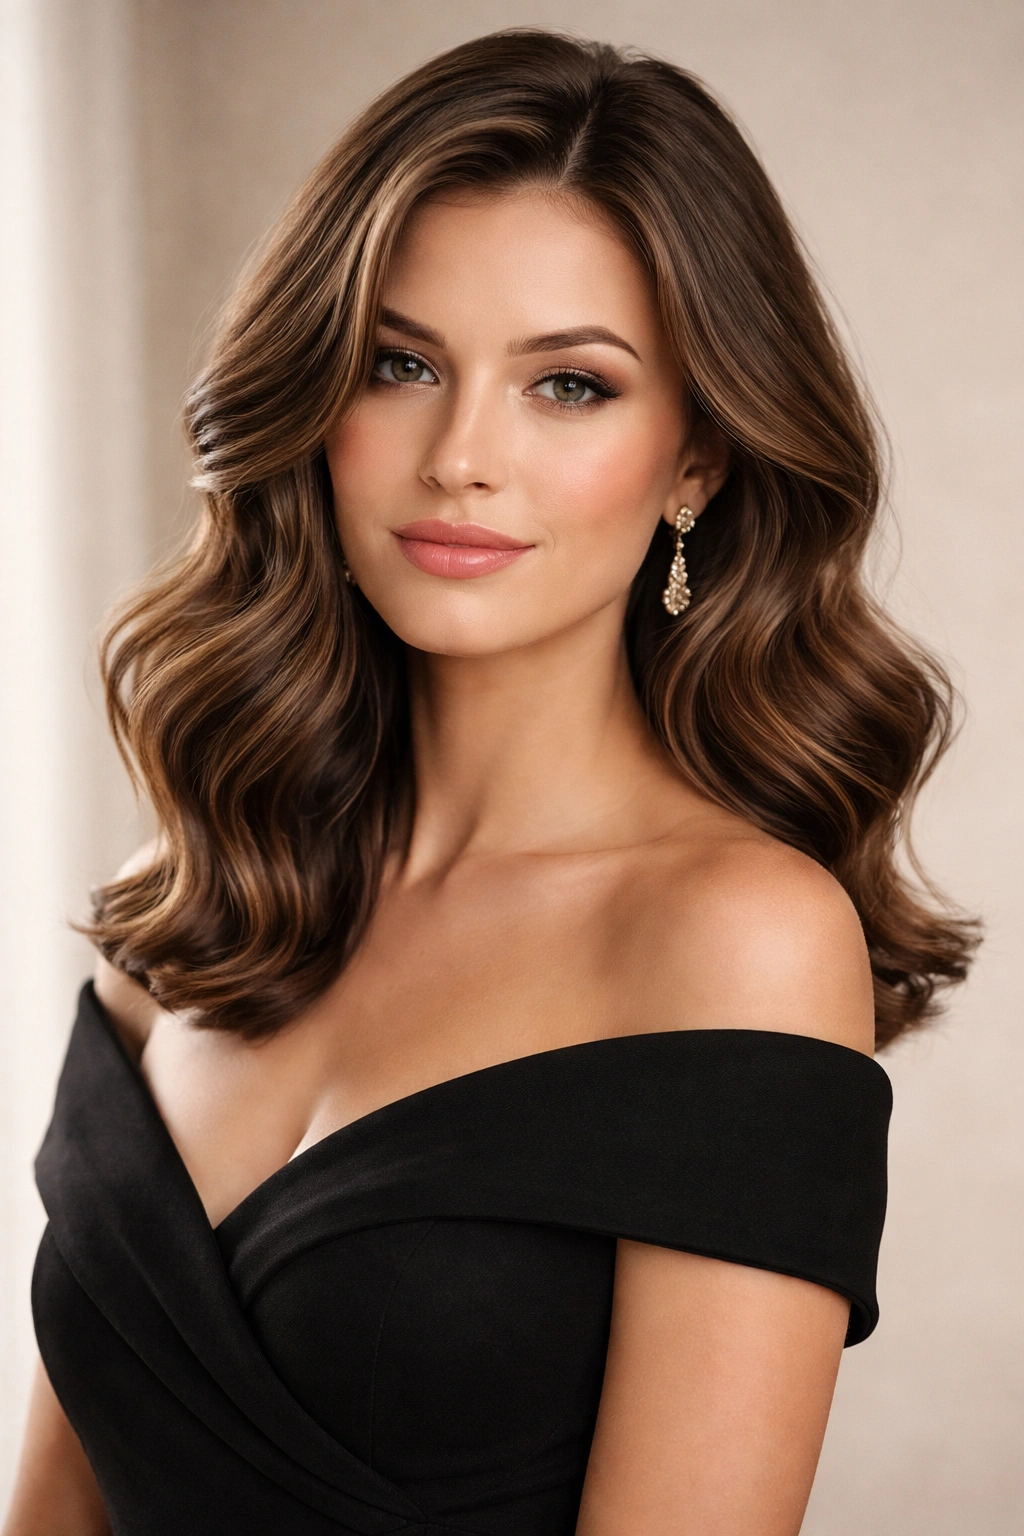
Medium-length hair is surprisingly versatile when it comes to formal occasions, and wavy textures strike that perfect balance between polished sophistication and effortless elegance. Whether you’re heading to a wedding, gala, corporate event, or black-tie dinner, wavy styles offer a way to look refined without appearing overly stiff or rehearsed. The beauty of waves at medium length is that they catch light beautifully, create natural volume and movement, and photograph exceptionally well—all things that matter when you’re dressed to impress.
The challenge, though, is figuring out which wavy style actually works with your face shape, hair texture, and the specific vibe of the event you’re attending. Not every wavy look reads as “formal.” Some styles skew too casual, while others demand hours of styling time you might not have. What you really need are proven options that consistently deliver that intersection of glamorous and wearable—styles that can be achieved at home or with minimal professional help, styles that hold up throughout a long evening, and styles that genuinely flatter a range of face shapes and hair types.
That’s what this guide delivers: eighteen medium wavy hairstyles specifically selected for formal events. Each one comes with clear styling guidance, the tools and products that make it work, which face shapes it complements best, and honest details about how long it actually takes and whether it requires professional installation. Some of these styles are timeless classics that work across decades. Others are modern twists that feel current without being trendy. All of them work for medium-length hair and wavy texture, and all of them will make you feel genuinely confident walking into a formal space.
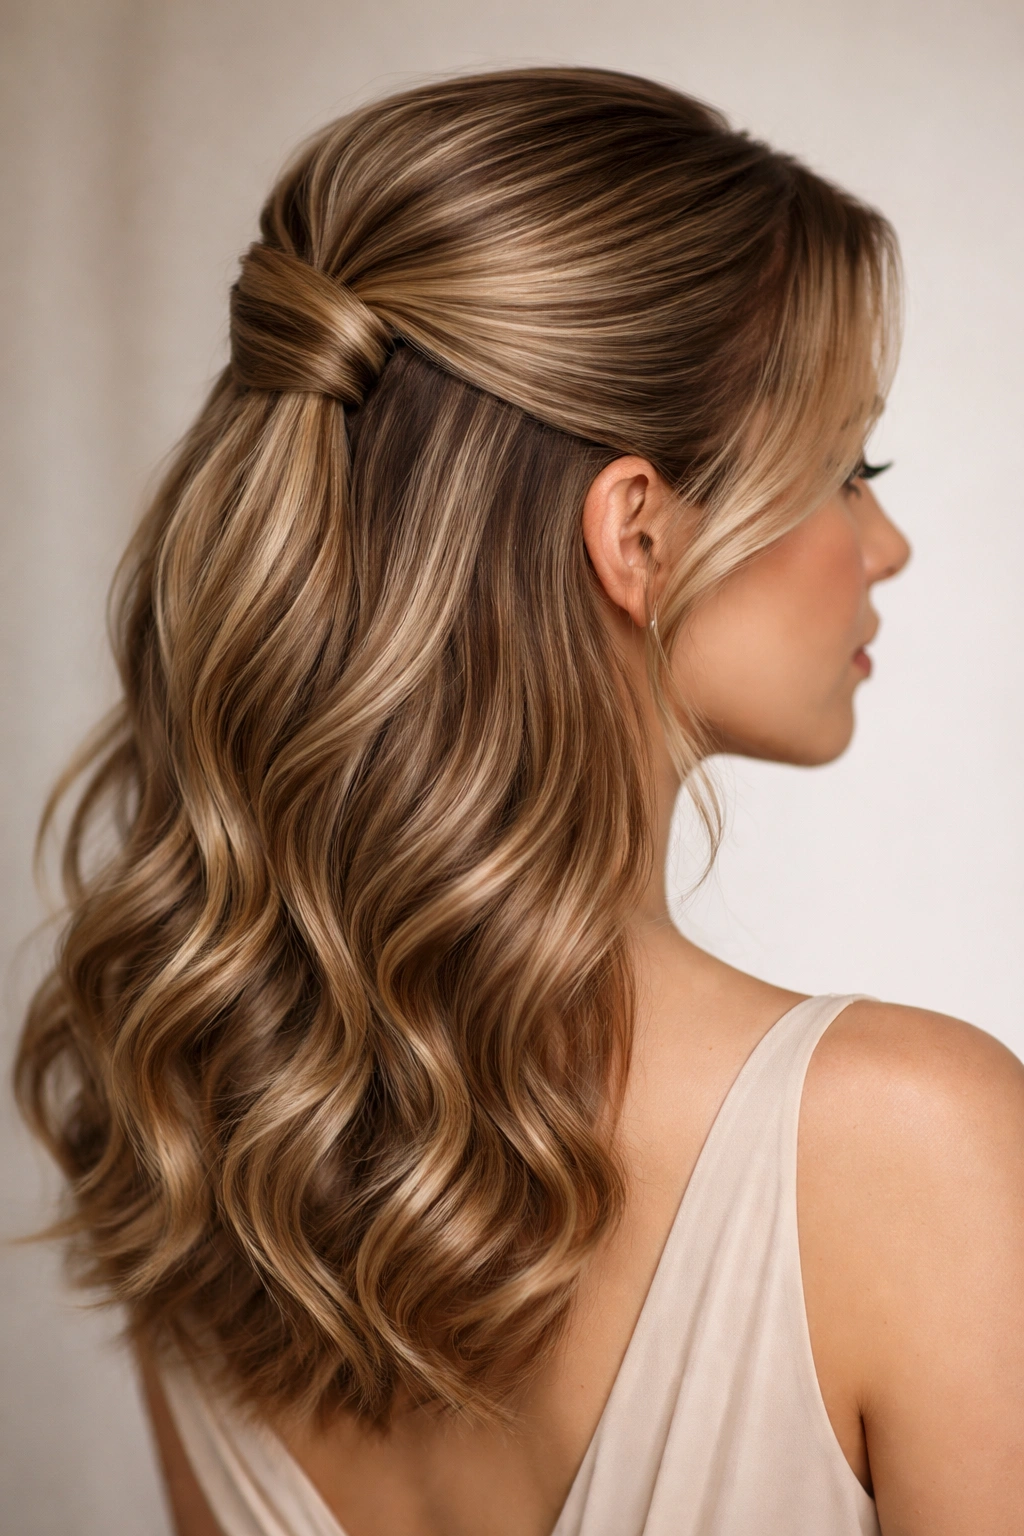
1. The Side-Swept Waves with Half-Up Twist
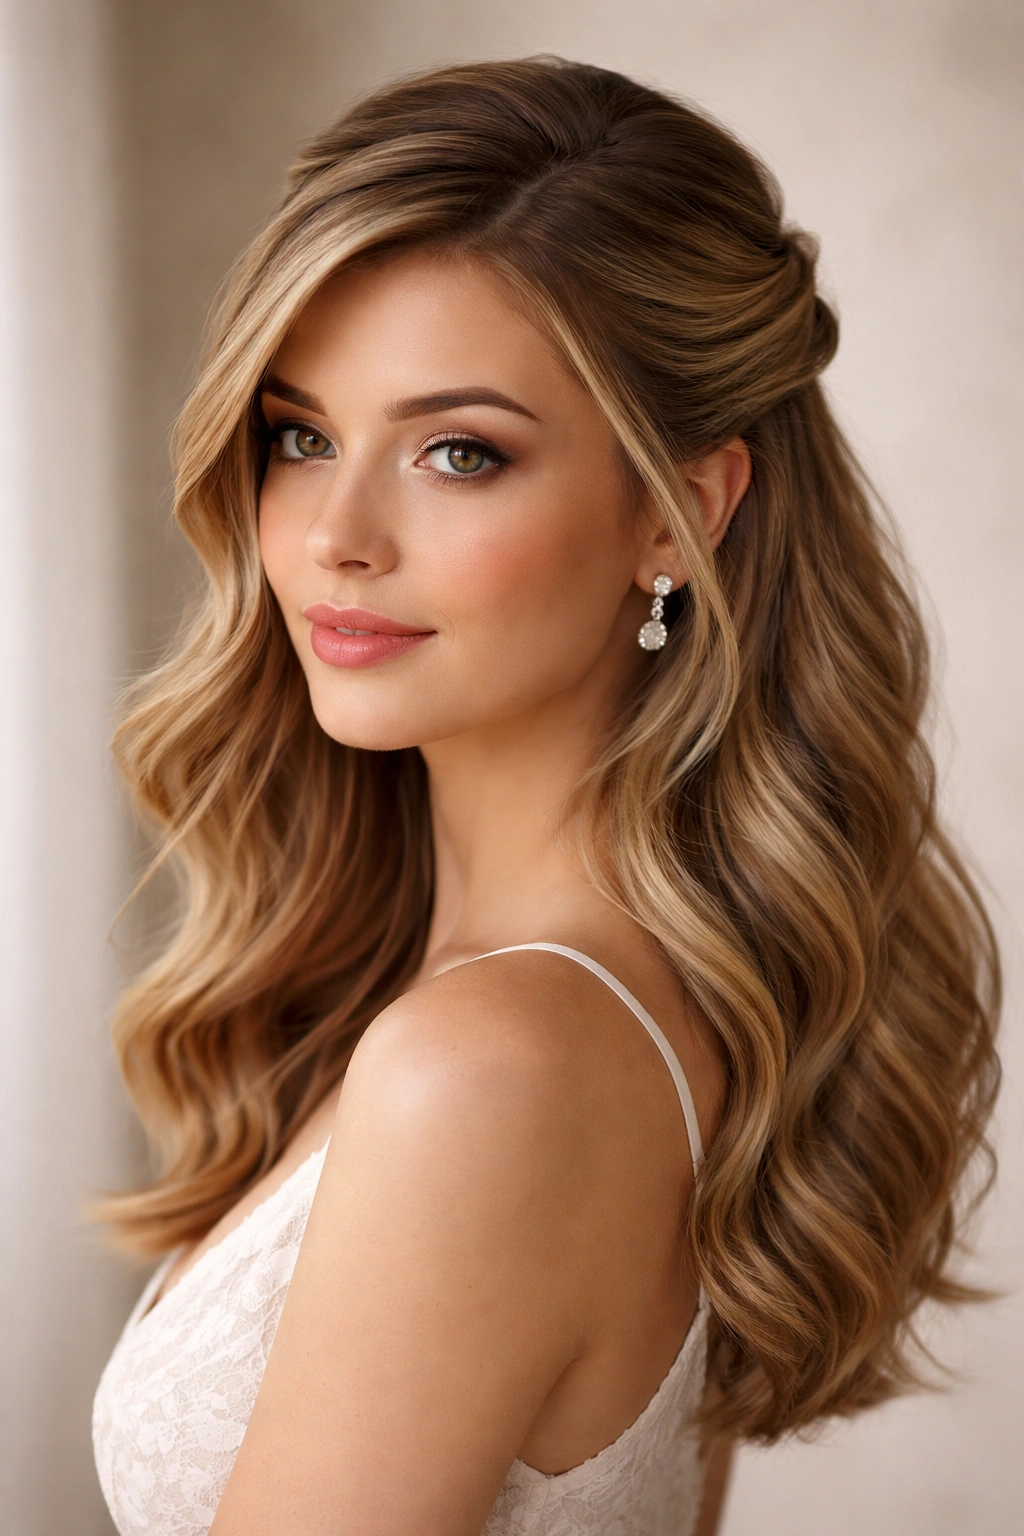
This is the workhorse of formal hairstyling—elegant, forgiving, and flattering on nearly every face shape. The style features soft waves throughout the hair with the front and upper sections twisted or swept to one side and pinned at the back of the crown. The bulk of your hair remains down, so you get maximum impact and movement while keeping hair partially off your face.
Why It Works for Formal Events
The half-up-twist element gives the style an intentional, polished look without feeling overly severe. The side sweep creates a naturally asymmetrical silhouette that’s more interesting than a straight middle part, and it keeps hair from falling directly in your face during a long evening of talking, eating, and moving around. The waves provide visual interest and texture while the twisted sections add dimension and a sense of effort that reads as formal preparation.
How to Create This Style
Start with pre-styled wavy hair—use a 1.5-inch curling iron or beach waves spray applied to damp hair and blow-dried, or let natural waves set overnight. Once your waves are established, brush them through gently with a wide-tooth comb to soften them slightly. Part your hair deeply to one side (about 60/40 rather than dead center). Take a 2-3 inch section from the deeper side of the part and begin twisting it gently as you move toward the back of your head, gathering loose sections into the twist as you go. Secure the twist at the nape with bobby pins that match your hair color, tucking the ends under and securing them as well.
Pro tip: Mist your twist with light hairspray as you go—this prevents flyaways and keeps the twist smooth without making it feel stiff. If your hair is very straight or fine-textured, apply volumizing mousse to damp roots before blow-drying to give the waves more staying power throughout the event.
Best For
Oval and heart-shaped faces, most hair textures, and events ranging from cocktail parties to black-tie galas. The side-sweep is particularly flattering on round faces because the asymmetry creates definition.
2. Romantic Waves with Low Tucked Ponytail
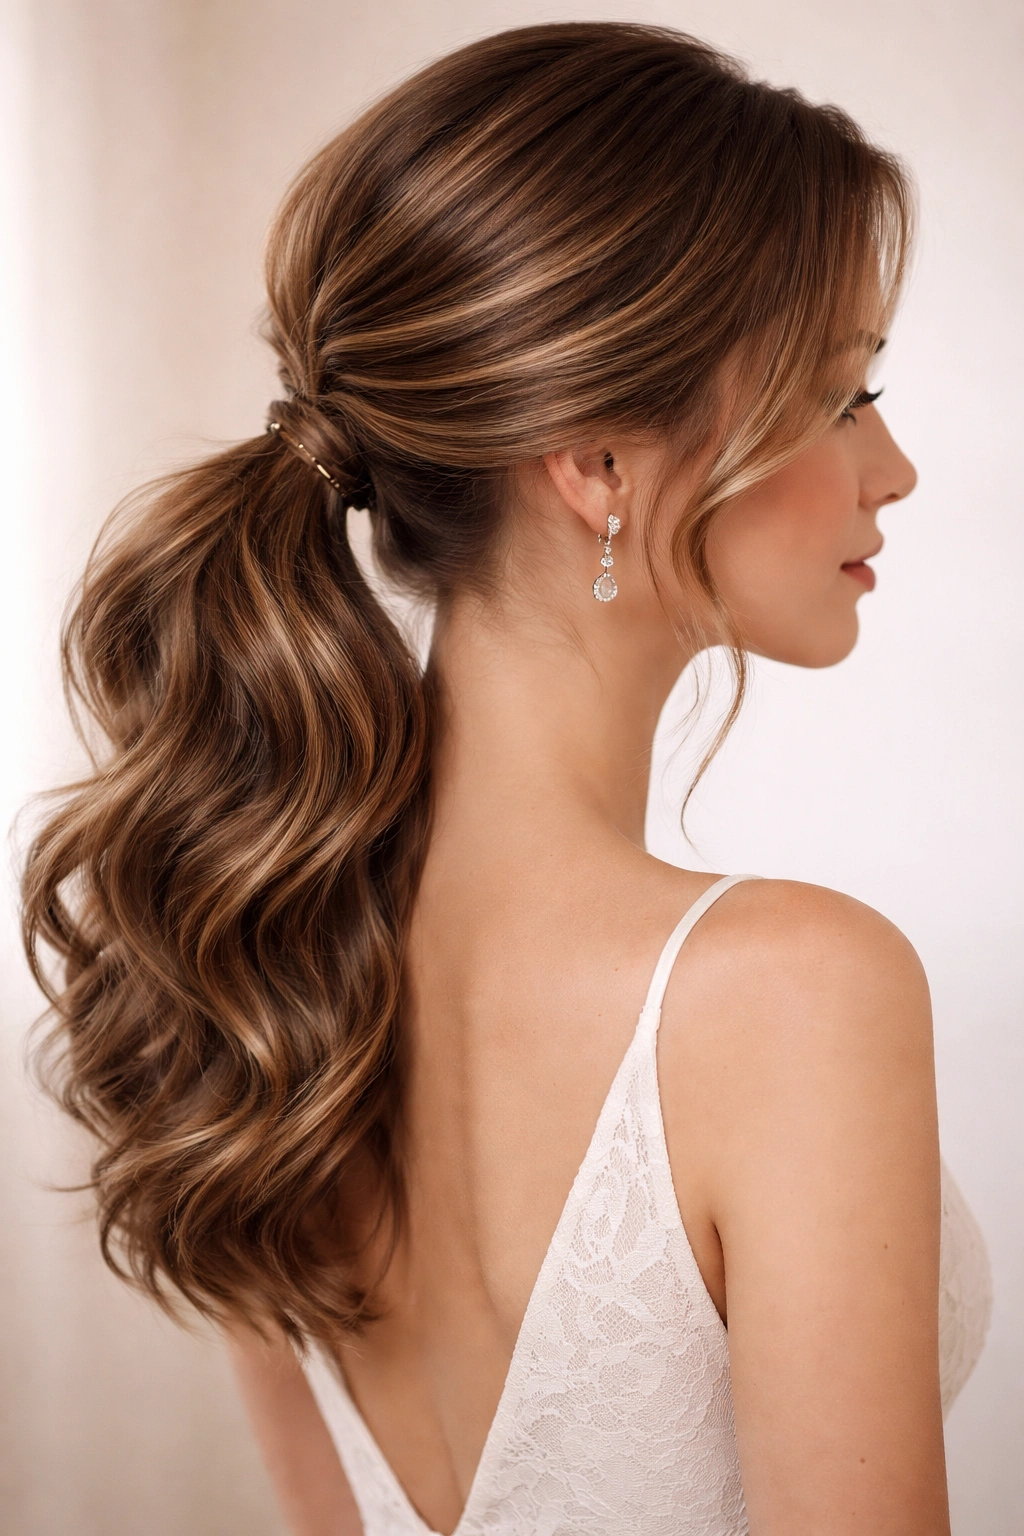
This style gives you the visual impact of a full head of soft waves with the practicality of a low ponytail—the best of both worlds for formal events where you need to look polished without hair constantly falling around your face. The waves are loose and romantic throughout, with a low ponytail formed at the nape that’s soft, not tight.
The Chemistry Behind the Hold
What makes this style work for a formal event is the tension and softness balance. A tight ponytail can look severe, but this version uses the softness of the waves to create movement and texture even though hair is technically pulled back. The ponytail sits low enough that it feels formal and intentional, high enough that it’s not slipping by midnight.
Styling Steps
Begin with your waves already set—this works best with waves that are 2-3 days old or that have been lightly refreshed with a curling iron. Use a fine-tooth comb or paddle brush to gently brush through the waves, creating a soft, slightly tousled texture. At the nape of your neck (about 2 inches above where your neck meets your shoulders), gather your hair into a low ponytail using a smooth elastic band. Don’t make it tight—gather the ponytail loosely, then gently pull a few face-framing strands free. Take a small section of hair from the ponytail itself, wrap it around the elastic band to conceal it, and secure that section with a bobby pin.
Worth knowing: The undone-looking ponytail requires more specific execution than a sleek one. Use a microfiber hair tie or silk scrunchie to prevent breakage and crease lines. Mist the entire style with a flexible-hold hairspray rather than a strong one—you want the waves to move naturally even though the ponytail is secured.
Best For
Rectangular and oblong face shapes, very thick hair that needs to be partially secured, and anyone who wants a formal look but needs practical manageability. Works beautifully for outdoor events where wind might be a factor.
3. Waves with Metallic Hair Accessories
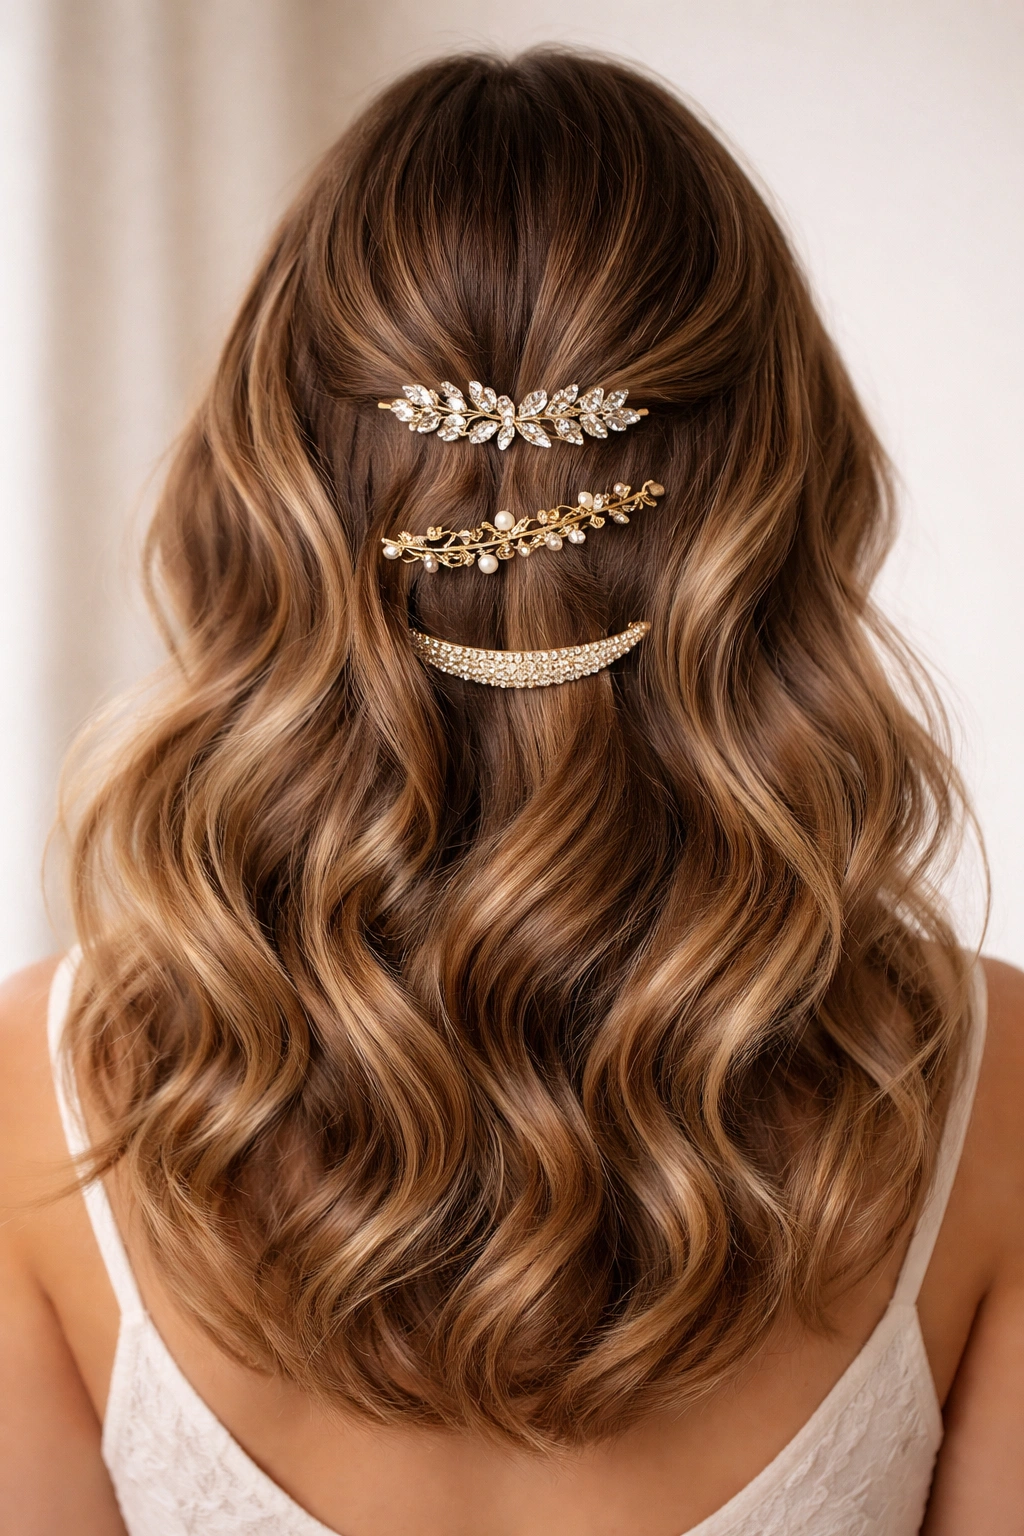
The waves themselves are soft and romantic, but the show-stopper is the addition of metallic hair clips, bobby pins, or a jeweled comb strategically placed throughout. This approach elevates simple waves into something decidedly formal and special. The accessories catch light and create visual interest without requiring complex styling.
Choosing the Right Accessories
Metallic accessories work best on darker hair (gold on warm tones, silver on cool tones), but they also create beautiful contrast on very blonde or white-blonde hair. If you choose a comb-style piece, you only need one focal point, typically worn slightly off-center near the back. If you’re using smaller bobby pins or clips, cluster 2-3 of them on one side or distribute them asymmetrically through the back section of waves.
Installation Method
Curl your hair into soft, defined waves using a 1.25-inch or 1.5-inch iron, creating S-curves through the mid-lengths and ends. Once cooled, gently finger-comb the waves to soften them slightly. If using a comb piece, position it so that it sits securely against the wave pattern—you want it anchored by the waves themselves, not requiring a separate clip. If using smaller pins, slide them through the waves at slight angles rather than straight in, which creates a more secure, natural-looking hold while showing off the metallic finish.
Real talk: Metallic accessories photograph beautifully, which makes them ideal if the event is being photographed professionally. The light reflection adds dimension to photos and reads as more formal than the same waves without accessories.
Best For
Formal evening events, galas, and weddings where you want a statement element without committing to an elaborate updo. Flatters most face shapes—the accessories draw the eye upward and add visual interest without the harsh lines of pulled-back styles.
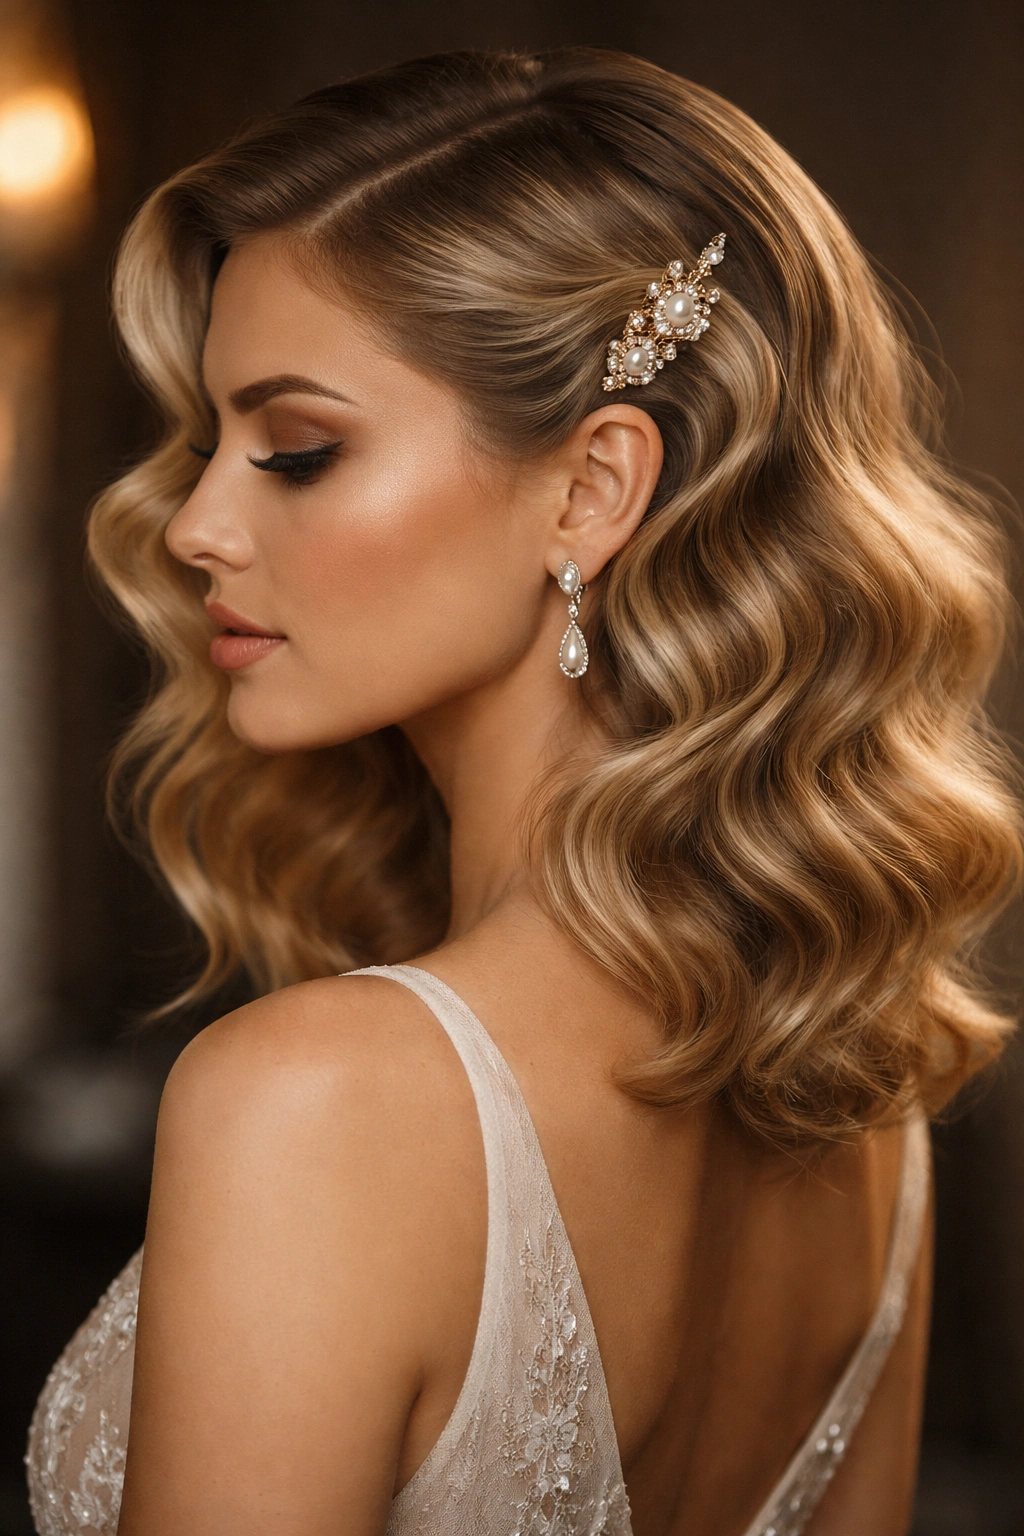
4. Soft Waves with Pearl Hair Pins
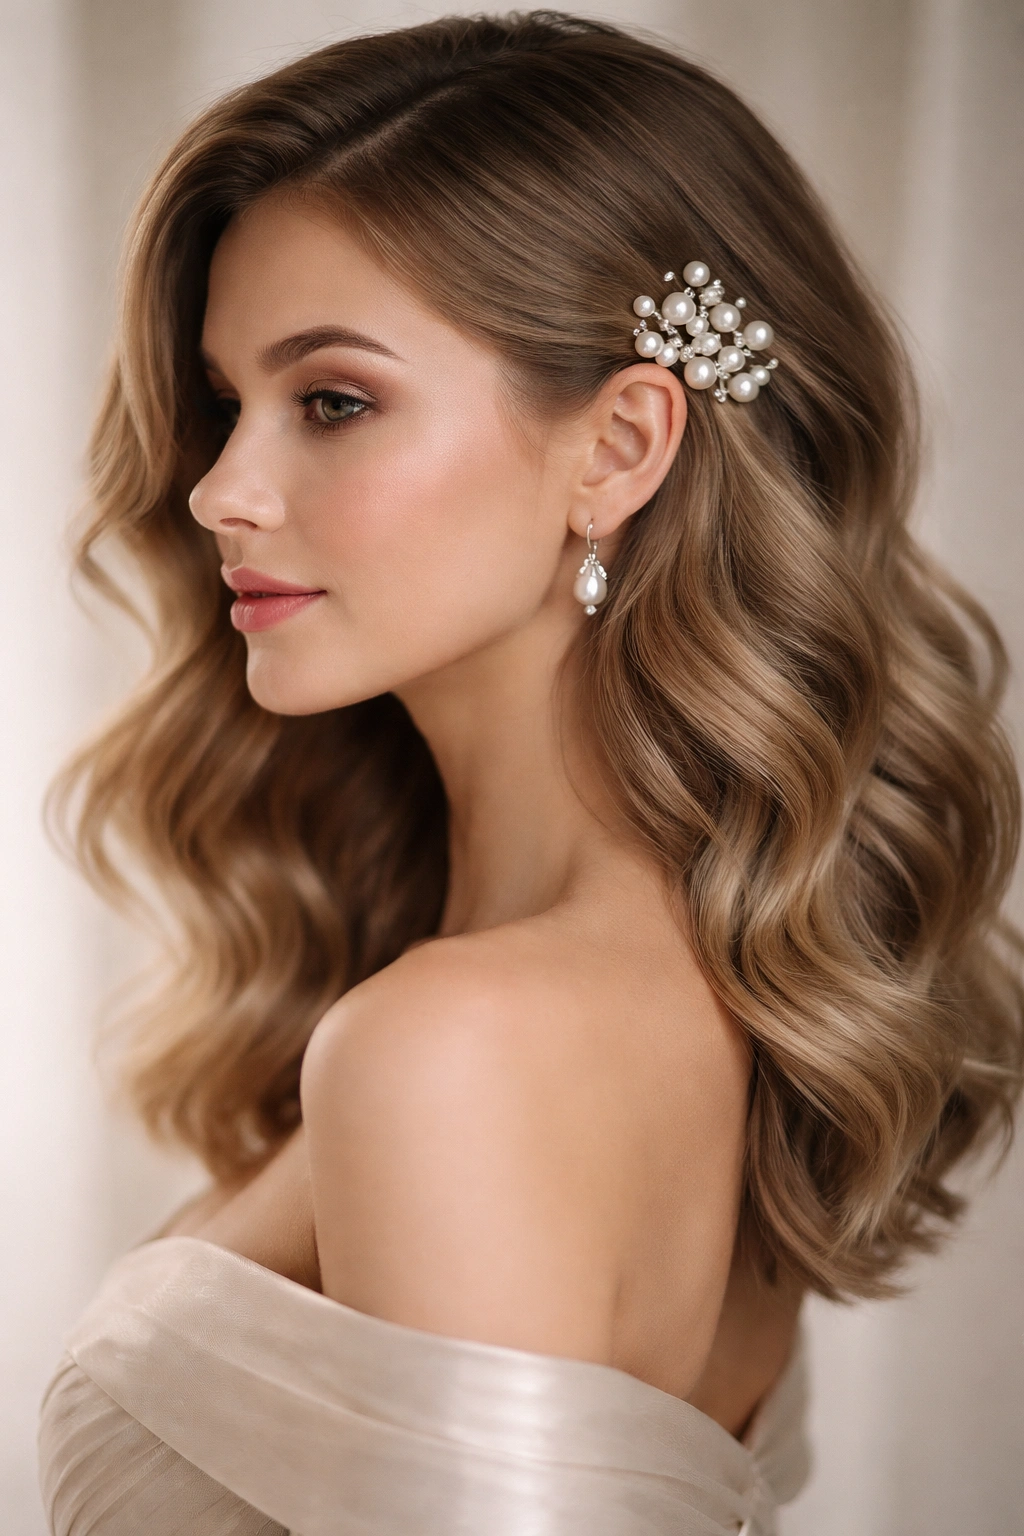
Similar in concept to metallic accessories but with a softer, more classic aesthetic, pearl hair pins (or baroque pearl pieces) are experiencing a return in formal styling. These work beautifully with soft, loose waves and read as elegant and timeless rather than trendy.
The Pearl Advantage
Pearl pieces have an inherent formality—they’re classic, expensive-looking, and they work with virtually any color hair and any event. They’re particularly stunning on brunettes and redheads, where the contrast between hair color and pearl creates natural sophistication. The matte finish of pearls is less reflective than metallics, giving a more subtle, refined appearance.
Styling Technique
Create soft, loose waves throughout your medium-length hair using a larger-barrel curling iron (1.75 inches) or a wave-styling spray applied to damp hair. The goal is waves that are loose enough to feel romantic and formal, not tight or bouncy. Once waves have cooled and set, use a texturizing spray for grip and staying power. Position pearl pins asymmetrically—perhaps clustering 2-3 on one side near the ear or temple, or distributing them along the back crown area. Slide each pin through the waves at a slight angle, allowing the wave structure itself to hold the pin in place.
Pro tip: If you’re wearing a formal updo, a single large pearl comb as a focal point can anchor the style. If you’re wearing waves down, use smaller pins in multiples for a more modern, scattered effect.
Best For
Formal dinners, black-tie events, and situations where you want to look undeniably elegant without appearing trendy or overly done. Works particularly well if you’re wearing a simple, classic gown rather than something heavily embellished.
5. Waves with a Thin, Jeweled Headpiece
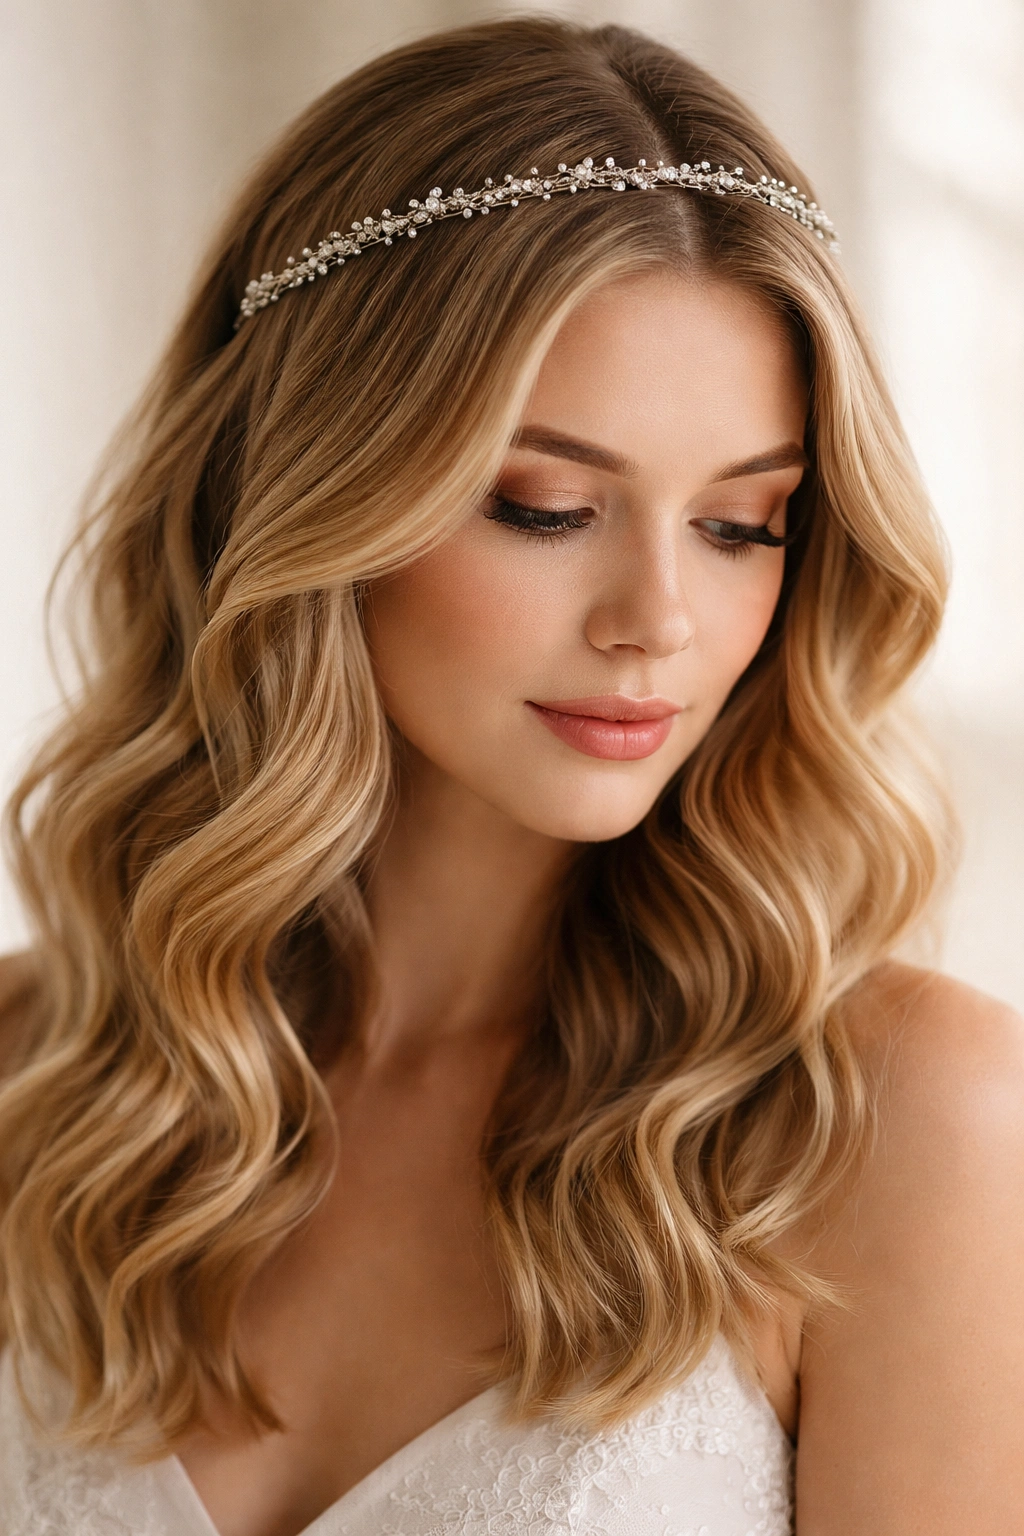
A delicate headpiece—think a thin metal band with scattered crystals or pearls, or a chain-style piece that sits across the crown—adds instant formal impact to otherwise simple waves. This works without requiring your hair to be styled into a complicated shape.
Selecting the Right Headpiece
The piece should be lightweight enough to sit comfortably for several hours without causing headaches. Avoid anything with a wide, heavy band. The most flattering styles are ones that sit just slightly back from your natural hairline, creating a halo effect rather than a crown-like band across the very top. The piece should complement your hair color (warm metal for warm-toned hair, cool silver for cool tones) and match any other jewelry you’re wearing.
Integration into Your Waves
Style your waves first—soft, loose curls throughout the mid-lengths and ends, nothing too tight. Once your waves are set, you’ll position the headpiece by first securing it with bobby pins that match your hair color, hiding pins within the waves themselves. The headpiece should sit at an angle that feels natural and balanced on your head—neither sliding forward nor pulling backward. Tease gently at the crown if you need extra grip for the pins.
Worth knowing: A headpiece reads differently depending on where it sits. Positioned lower (more toward the back crown), it feels bohemian and romantic. Positioned higher and more centered, it feels more formal and wedding-appropriate. Positioned to one side with a deep part, it feels modern and fashion-forward.
Best For
Formal events with a romantic or glamorous vibe—think destination weddings, galas, and upscale evening parties. The headpiece adds sophistication without requiring hair to be pulled back tightly, making it an excellent option for anyone uncomfortable with tight pulled-back styles.
6. Hollywood Waves with Deep Side Part
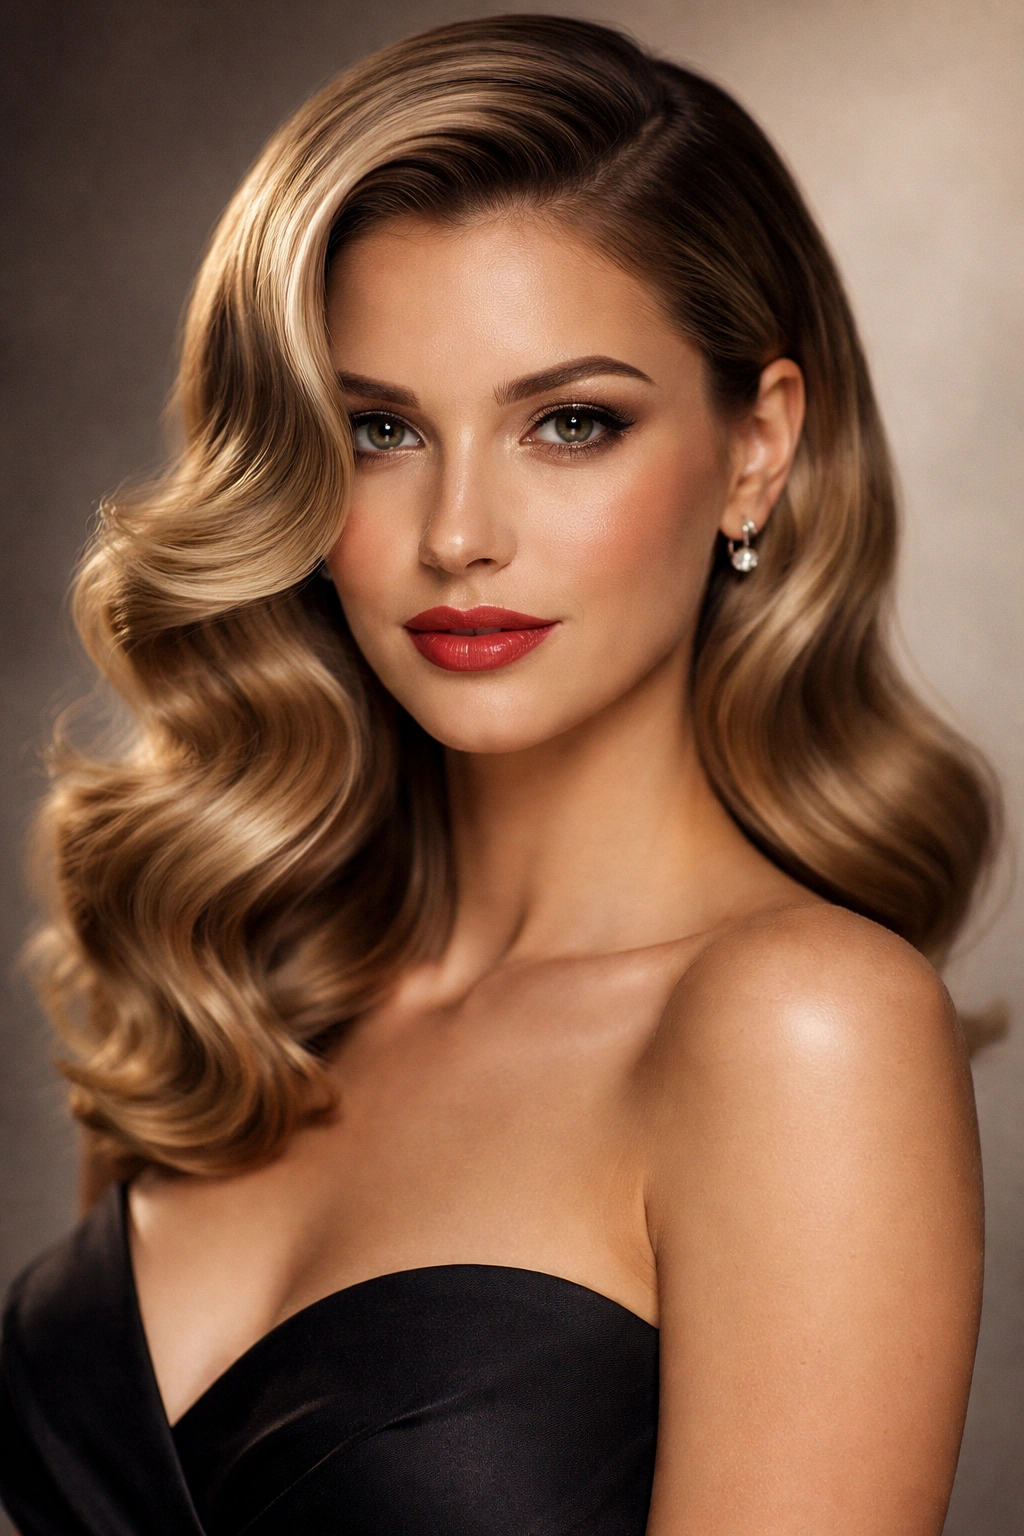
Old Hollywood glamour never goes out of style for formal events. This is a structured, intentional wave pattern—tight, sculpted waves created with a styling brush and blow dryer or with pin curls. The deep side part adds to the classic, polished aesthetic.
Creating That Sculpted Wave
Hollywood waves require patience and the right tools: a round brush, a blow dryer with a concentrator nozzle, and setting lotion or wave spray applied to damp hair. Take 1-2 inch sections from the crown area and smooth them over the round brush, curling the brush away from your face. Direct the blow dryer heat from roots to ends, allowing the brush to create the wave shape. Once the section is dry, carefully slide the brush out and allow the wave to cool before moving to the next section. This cooling period is crucial—it sets the wave shape. Continue across the entire head.
The result is waves that hold their shape throughout the evening, creating a line-by-line sculpted pattern that reads as undeniably formal. The waves don’t feel soft and romantic; they feel intentional and polished.
Finishing the Look
Once all waves are set, create a deep side part (at least 70/30, possibly even more extreme). Smooth the deeper side gently with a styling brush and finish spray. The side without the deep part can be tucked slightly behind the ear or left to frame the face. This style benefits from matte finish products—shiny products can make it read as overly sleek rather than glamorous.
Pro tip: This style photographs beautifully because the structured waves create dimension and the deep part creates visual interest. It’s ideal for events where you know professional photos will be taken.
Best For
Oval and rectangular face shapes, formal evening events, anyone who wants to commit to a very polished, intentional look. Works well if you have thick, healthy hair that can support the structure—fine or fragile hair may not hold sculpted waves throughout the evening.
7. Waves with Dramatic Low-Side Ponytail
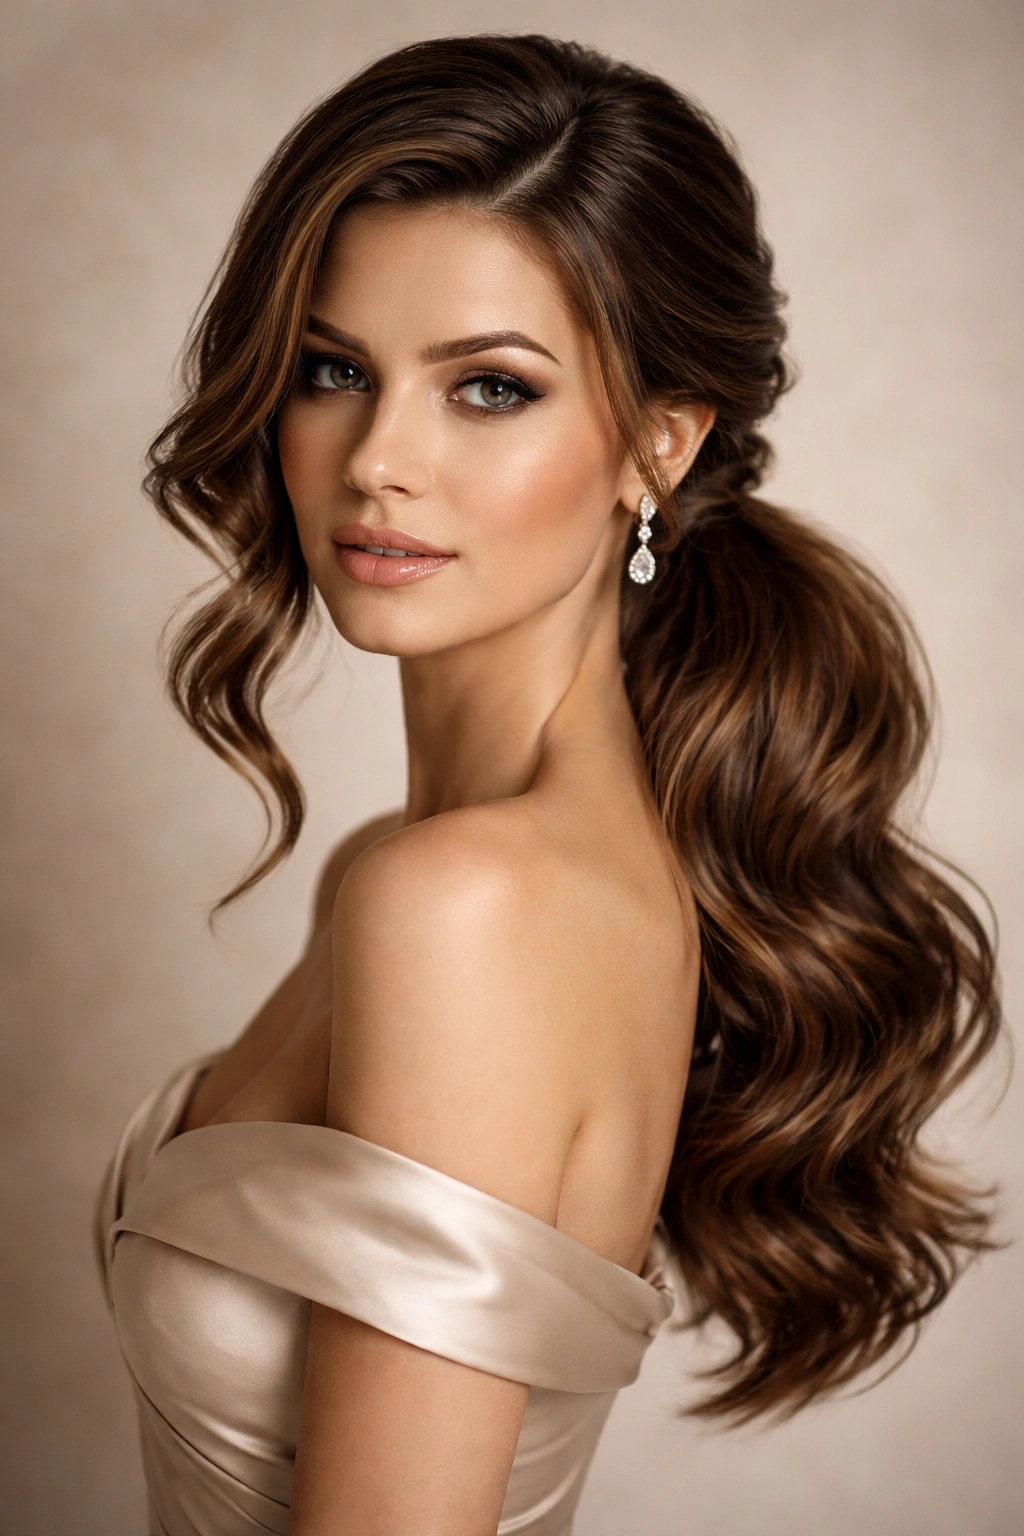
This style takes the low ponytail concept further by making it the focal point rather than simply a way to manage the waves. The ponytail is positioned extremely low (almost at the nape) and sits dramatically to one side, creating strong visual asymmetry.
The Focal Point Approach
Instead of the ponytail being secondary to the waves, this style makes the ponytail itself the statement element. The waves frame the face and shoulders, but the dramatic low-side placement of the gathered hair at the nape creates a sculptural element that reads as very formal and intentional. This works particularly well with medium-length hair because the ponytail has enough length to look substantial without being unwieldy.
Execution Details
Style your waves loosely and let them settle slightly before creating the ponytail—this gives you more control and prevents the ponytail from pulling the still-soft waves out of shape. Use a fine-tooth comb to smooth the hair at the nape area where the ponytail will sit. Gather into a low ponytail at the base of one side of your neck, positioning it slightly off-center toward whichever side feels balanced with your face shape. Secure with a smooth elastic band, then wrap a thin section of hair from the ponytail around the band to hide it. Smooth any flyaways with a fine-tooth comb and finish spray.
Worth knowing: This style is not as practical as a centered low ponytail if you need to look backward frequently—the asymmetry means it’ll be more noticeable if the ponytail shifts. It’s excellent for events where you’ll be seated or moving relatively slowly.
Best For
Heart-shaped and square faces (the side placement balances angular jawlines), formal dinners and galas, anyone who wants a statement look that still feels wearable. Works well with structured, tailored formal gowns.
8. Soft Beach Waves with Lace Braid Detail
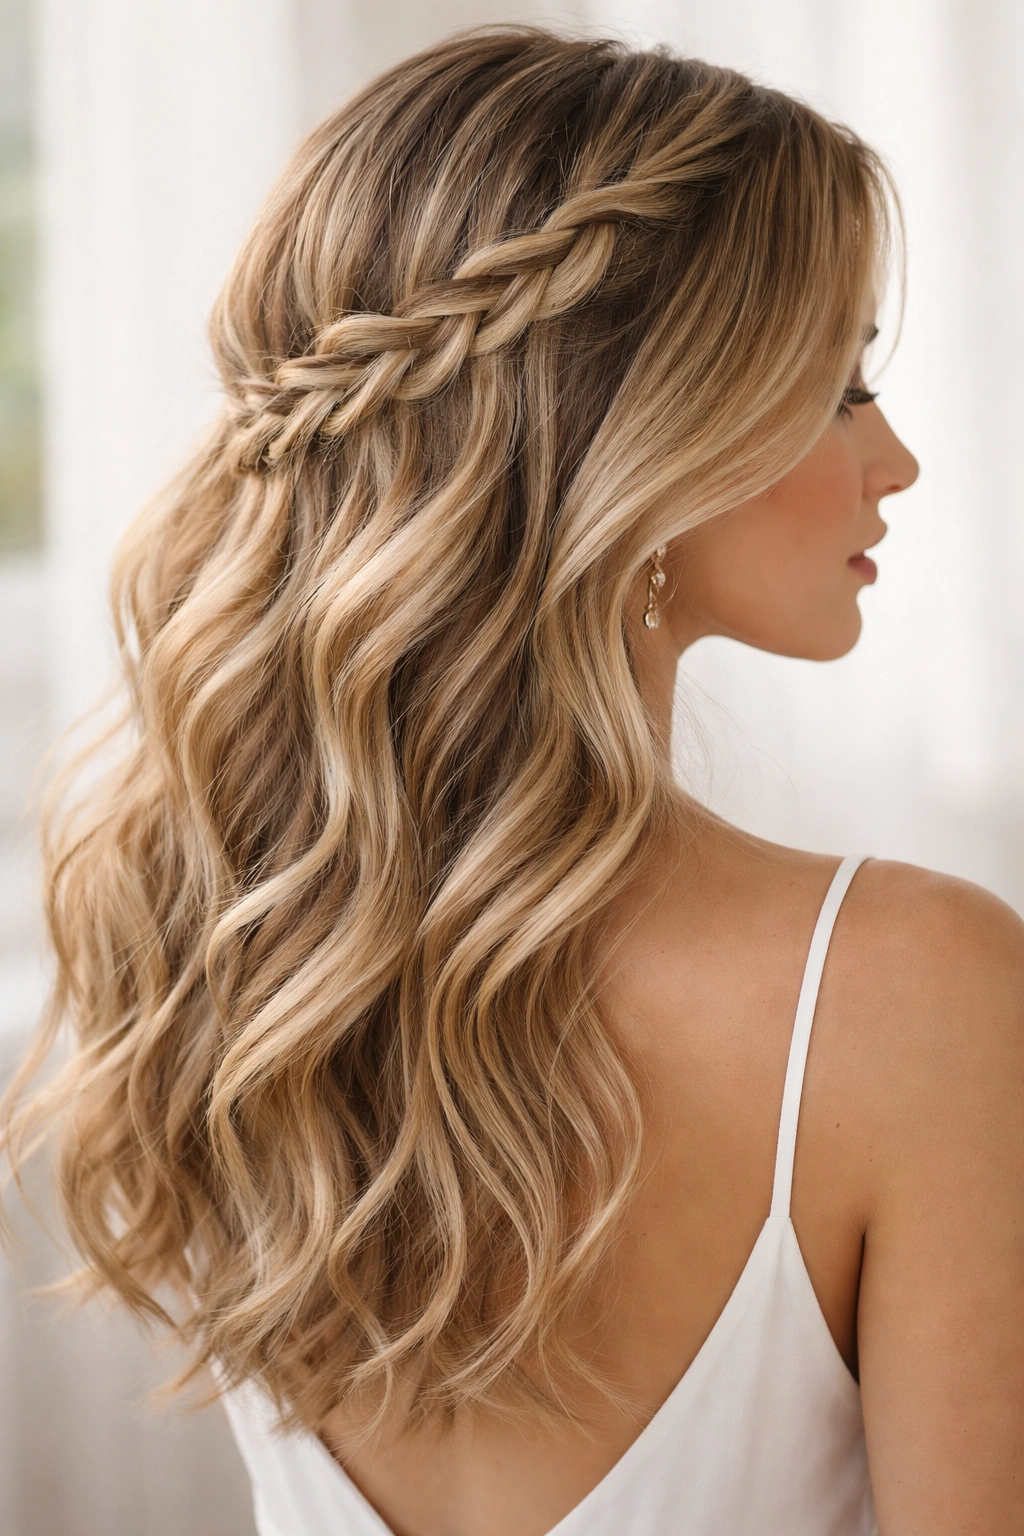
This combines the romantic texture of soft beach waves with a delicate lace braid—a braid where the strand sections are deliberately loose and airy rather than tightly woven. The braid weaves through the waves without pulling them tightly or altering the overall soft texture.
Understanding Lace Braiding
A lace braid (also called a Dutch lace or fishtail variation) creates an open, delicate appearance because the strand sections are looser than traditional braids. Rather than pulling sections tight and close to the head, you weave them with space between the strands, creating a lacy appearance. This works beautifully with soft waves because it doesn’t disrupt the wave pattern—it threads through it.
How to Build It
Start with your soft beach waves already set. Take a section of hair from one side (starting near the temple) and begin a loose lace braid, moving toward the back of your head and gradually incorporating more hair as you go. You want the braid to sit among the waves rather than creating a defined row—the waves should be visible around and through the braid. Once the braid reaches the back crown area, secure it loosely with a small elastic band that matches your hair color. Leave several inches of wavy hair free below the braid.
Real talk: Lace braids require practice. If you’re new to braiding, practice on a friend or yourself a few days before the event. Alternatively, your stylist can create this braid for you just before the event if you want to ensure it looks perfect.
Best For
Romantic formal events—destination weddings, garden galas, any event with a softer aesthetic. Flatters most face shapes and works particularly well on long, fine hair where delicate details show clearly.
9. Waves with a Structured Half-Up Style (Modern Geometric)
Rather than the softly twisted half-up from style #1, this version uses more geometry and structure. The upper portion is smoothed back and secured in a clean, sculpted shape, while the lower waves remain soft and full—creating a two-texture visual effect.
The Structure Details
The upper half isn’t twisted; instead, it’s smoothed back from the face and secured with geometric precision. You might create a small, tight knot or bun at the back crown, or you might smooth it back and secure it with a clip that’s positioned vertically (rather than horizontally) for a modern look. The contrast between the structured top and the soft waves below creates visual interest and reads as intentional and formal.
Styling Steps
Blow-dry your waves into shape, then use a smoothing serum and a flat paddle brush to gently smooth the hair from your face and crown area backward. Gather this section at the back crown (higher than a traditional low ponytail, more toward the top-back of your head). You can secure it with a sleek clip, a small elastic band concealed under wrapped hair, or by creating a small twisted knot. The key is ensuring the top section looks polished while the waves below maintain their texture and softness.
Pro tip: This style photographs beautifully because the two different textures and the geometric divide between them create visual interest. It also feels modern rather than traditional, which works well for contemporary formal events.
Best For
Oval and oblong faces, modern formal events, anyone who wants a more editorial, fashion-forward look. Works particularly well if you’re wearing a high-necked or high-backed gown where showing the back is less important.
10. Vintage Finger Waves with Modern Twist
Finger waves are a classic formal technique, but the modern interpretation is looser and less uniform than vintage versions. The waves are created using similar techniques but are allowed to be slightly imperfect, with some waves more pronounced and others softer.
The Technique Breakdown
Finger waves are created by styling damp hair with setting lotion, using a comb and your fingers to create wave patterns, and pinning those patterns in place until dry. The traditional method involves very neat, uniform waves in parallel lines—almost sculptural. The modern approach creates the same wave shape but allows some variation so it doesn’t feel like a costume or costume piece.
Creating Modern Finger Waves
Apply setting lotion to damp hair (from roots to ends). Using a fine-tooth comb, create an S-shaped wave pattern by combing in one direction to create the crest of the wave, then combing in the opposite direction to create the valley. Use your fingers to shape and smooth as you go. Pin each wave in place with a small wave clip or bobby pin. Sit under a warm hood dryer or air-dry until completely dry (at least 45 minutes to several hours). Once dry, carefully remove the pins. The result is defined, sculptural waves that look intentionally styled.
Worth knowing: Finger waves require time and practice. Many people find it easier to visit a stylist for this technique rather than attempting it at home. If you do it yourself, plan significant time and have a backup plan if it doesn’t turn out perfectly on your first attempt.
Best For
Retro-inspired formal events, anyone who wants a statement look that’s clearly been meticulously styled. Works on most hair types but requires hair with enough texture to hold the pattern—very slippery, fine, or freshly-washed hair may not hold finger waves effectively.
11. Loose Waves with Strategic Volume at Crown
This style prioritizes creating the illusion of maximum volume and height at the crown while maintaining soft, loose waves throughout. It’s achieved through teasing, strategic blow-drying, and volumizing products rather than through complicated styling techniques.
Building the Volume Foundation
Volume at the crown is crucial for formal styling because it elongates the face, creates a more balanced silhouette, and photographs beautifully. To build volume, apply volumizing mousse to the roots of damp hair before blow-drying. Using a blow dryer and round brush, direct the airflow upward and away from the scalp as you work through the crown area. Once the hair is dry, use a fine-tooth comb or teasing brush to gently backcomb the roots at the crown, then smooth the surface layer gently with the comb to hide the texture while maintaining the height.
Layering in the Waves
Once you’ve created the crown volume, curl the mid-lengths and ends into soft waves using a 1.5-inch barrel iron or wave spray. The volume at the crown creates a foundation that prevents the waves from flattening, even as the evening progresses and you move around.
Pro tip: Crown volume combined with soft waves is particularly flattering on anyone with a longer face or a narrow forehead—the height at the crown creates balance and draws the eye upward.
Best For
Oval and rectangular face shapes, formal events where you’ll be photographed, anyone who wants an elegant look that appears effortless but is actually carefully constructed. Works on most hair types and textures.
12. Waves with a Sleek Side-Swept Accent

The primary style is soft, romantic waves throughout the hair, but one side is deliberately smoothed back and tucked behind the ear, creating an asymmetrical accent. This gives the style definition and polish while maintaining the softness of the waves.
Creating the Asymmetrical Element
Style your waves loosely and let them set. Once they’re established, take the hair on one side (the shallower side of a deep part works well) and smooth it back using a smoothing serum and a flat paddle brush. Tuck this smoothed section behind your ear and secure it there with a bobby pin that matches your hair color, hidden by the waves. The other side remains wavy and soft, creating visual interest through the asymmetry.
The Balance Principle
This works because it’s not completely asymmetrical—both sides have waves, but one is pulled back slightly. The pulled-back side shows your face and ear, creating an open, polished feeling. The wavy side provides softness and romance. Together, they read as sophisticated rather than plain.
Worth knowing: This style works particularly well if you have layers in your hair, as the layers allow the smoothed side to catch and secure easily while still looking natural. If your hair is very blunt, the smoothed side may feel too severe.
Best For
Heart-shaped and square faces (the pulled-back side balances angular features), most hair textures, formal events ranging from cocktail parties to galas. Particularly flattering if you have nice earrings or a good ear shape you want to show.
13. Waves with Integrated Braided Crown

This combines waves with a braided crown element—a braid that encircles or partially encircles the head, woven through the waves rather than sitting on top of them. The effect is romantic and formal simultaneously.
Choosing Your Braid Style
You can use a simple three-strand braid, a fishtail braid, or a Dutch braid, depending on your comfort level and the look you’re going for. The simplest approach is to create a three-strand braid that starts at one temple, travels along the crown area (roughly where a crown would sit), and ends near the opposite ear. The braid should be loose enough that the waves remain visible around it.
Integration Method
Start with soft, loose waves throughout your hair. Take a 1-inch section at one temple and begin your braid, gradually adding hair as you move toward the back of your head. The braid should weave through the waves rather than sitting on top of them—this requires positioning the braid slightly deeper in the hair structure. As you approach the opposite side of your head, taper the braid so it ends with a smaller section and a small elastic band. Tuck the end behind your ear or secure it with a bobby pin.
Pro tip: The looser your waves, the more delicate and romantic your braided crown will look. Tight waves make the braided crown read as more structured and less romantic.
Best For
Formal events with a romantic aesthetic—garden parties, destination weddings, upscale brunches. Most face shapes and hair types, though the style shows better on medium to long hair and on hair with some natural wave or texture.
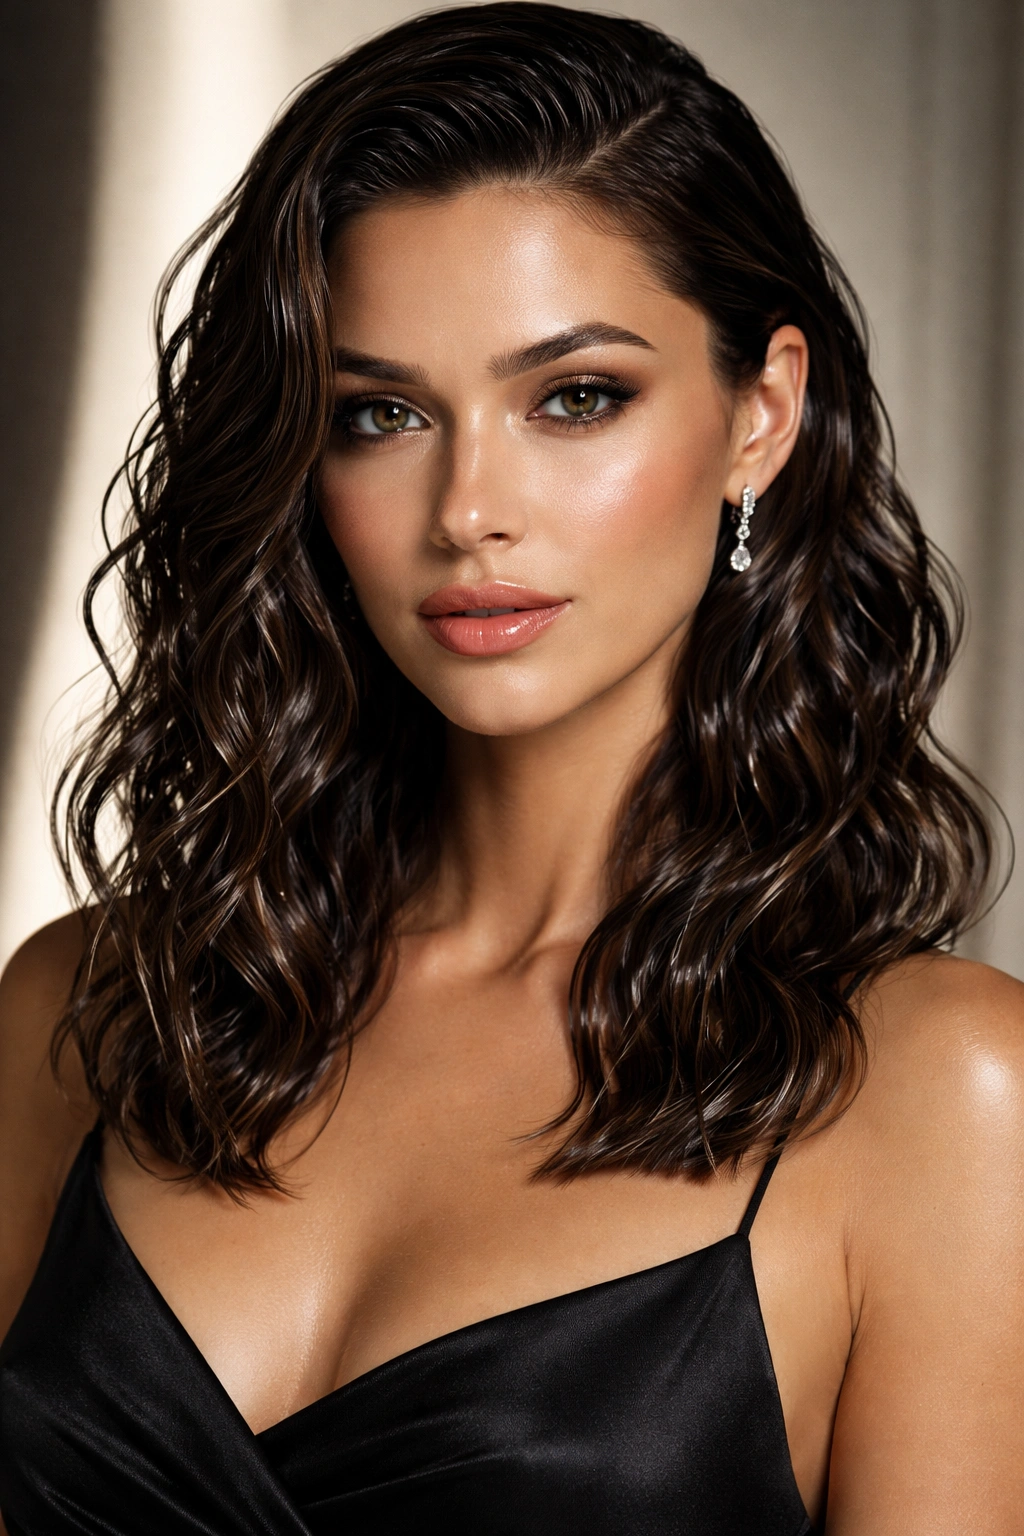
14. Polished Waves with High Shine Finish
The waves themselves are relatively simple—medium-sized curls that create soft movement throughout the hair—but the finish is deliberately high-shine and polished, achieved through the use of shine-enhancing products and specific blow-drying techniques.
The Shine-Building Process
A polished, high-shine look requires using shine serum on damp hair before blow-drying, curling with a ceramic or ionic barrel iron (which creates smoother hair surfaces that reflect more light), and finishing with a light shine spray. The light should visibly reflect off your waves in photographs and under formal event lighting.
Wave Creation for Maximum Shine
Use a 1.5-inch barrel iron and curl hair away from your face in consistent directions—all curls away from center, or alternating curls to create a consistent wave pattern. Hold each curl on the iron for slightly longer than usual (5-8 seconds rather than 2-3) to create tighter, more defined waves that will reflect more light. Allow curls to cool before releasing them from the iron. Once all curls are done, gently brush through with a boar-bristle brush to soften the waves slightly while maintaining shine.
Real talk: High-shine finishes show flyaways more clearly than matte finishes, so if you have any hair breakage or frizz, this might not be your best choice. This style works best on very healthy, well-maintained hair.
Best For
Formal events where professional photography is happening (the shine shows beautifully in photos), anyone with naturally shiny, healthy hair, dark-haired people (shine shows more dramatically on darker hair), formal dinners and galas.
15. Waves with Statement Ear Cuff or Ear Piece
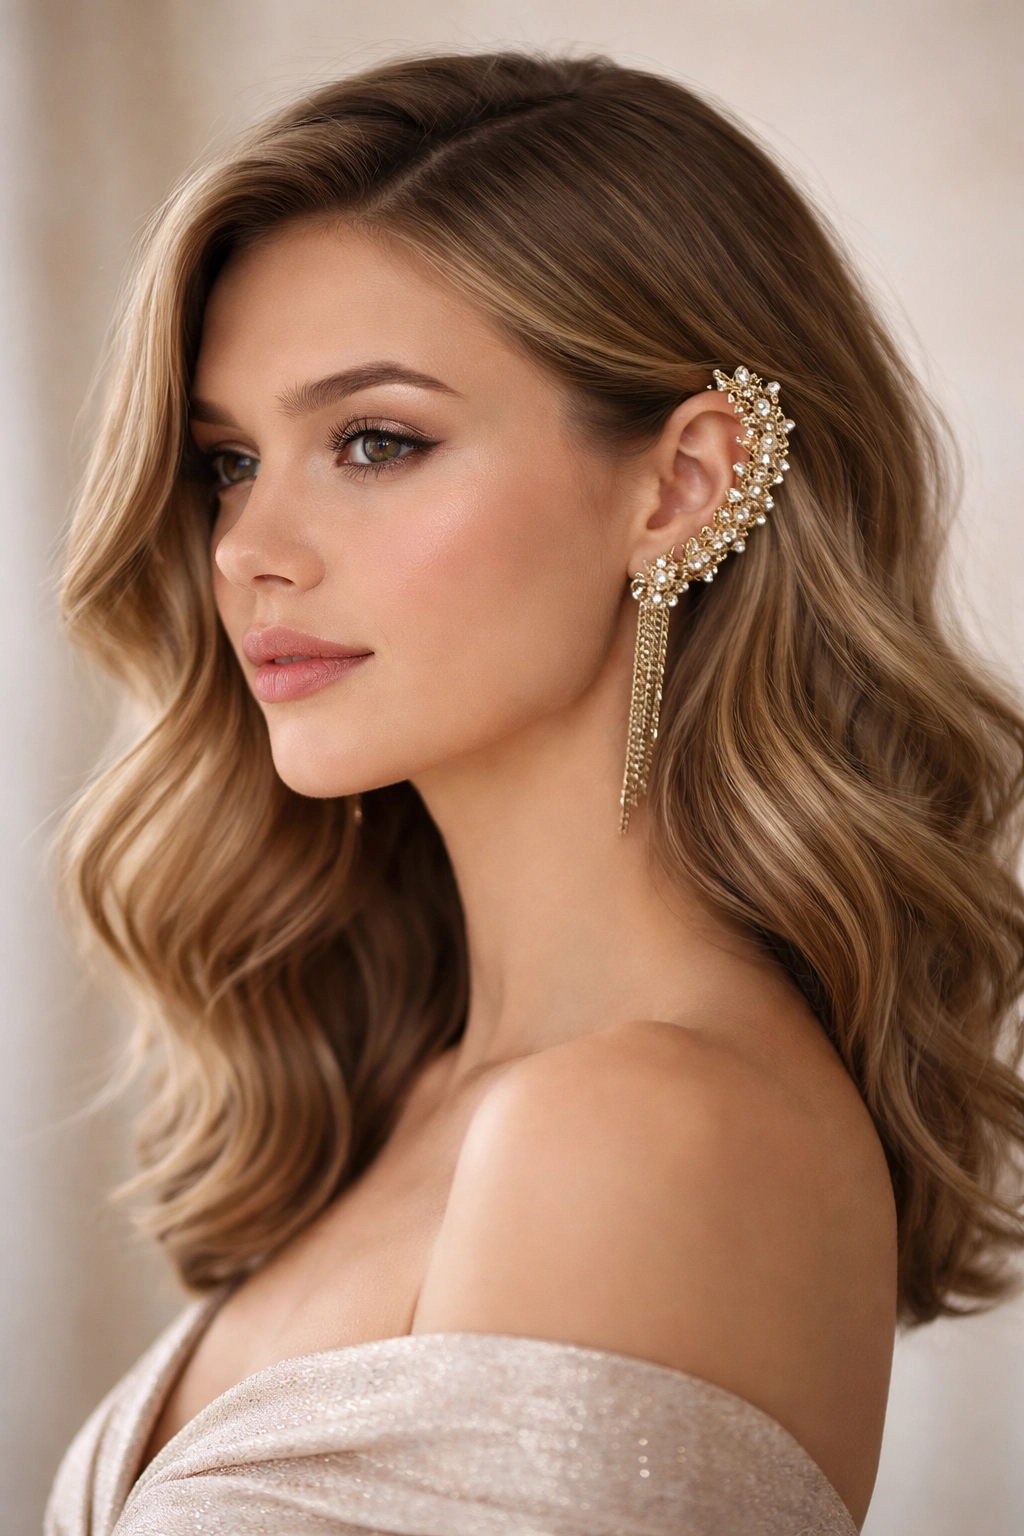
The waves are soft and romantic, but the focus is a bold ear cuff or statement ear piece positioned on one or both ears. This approach doesn’t require complicated hair styling—the jewelry does the talking.
Styling to Showcase the Piece
Since the ear piece or cuff is the star, you want to clear the hair away from the ears. Style soft waves throughout, then sweep one side (or both) back gently and tuck behind the ears. You don’t need a pulled-back style; just clear enough space that the ear piece is visible and the ear isn’t buried in hair. A deep side part helps ensure the ear on the deeper side of the part is clearly visible.
Choosing Your Ear Piece
A statement ear cuff can be sculptural and modern (abstract shapes, geometric designs), classic and elegant (pearl or crystal designs), or bohemian and ornate (chandelier styles, tassel designs). The style should complement your jewelry and your overall formal aesthetic. If you’re wearing understated jewelry elsewhere, go bolder with the ear piece. If you’re wearing a statement necklace, keep the ear piece more subtle.
Worth knowing: If you’ve never worn an ear cuff, practice wearing it for short periods before the event—some people find them uncomfortable, and you don’t want to be distracted during a formal event by ear piece discomfort.
Best For
Anyone who loves statement jewelry, formal events where you want a modern, fashion-forward edge, people who feel confident with distinctive accessories. Works on most face shapes and hair types—the piece itself becomes the focal point rather than the hair.
16. Soft Waves with a Jeweled or Beaded Hairnet
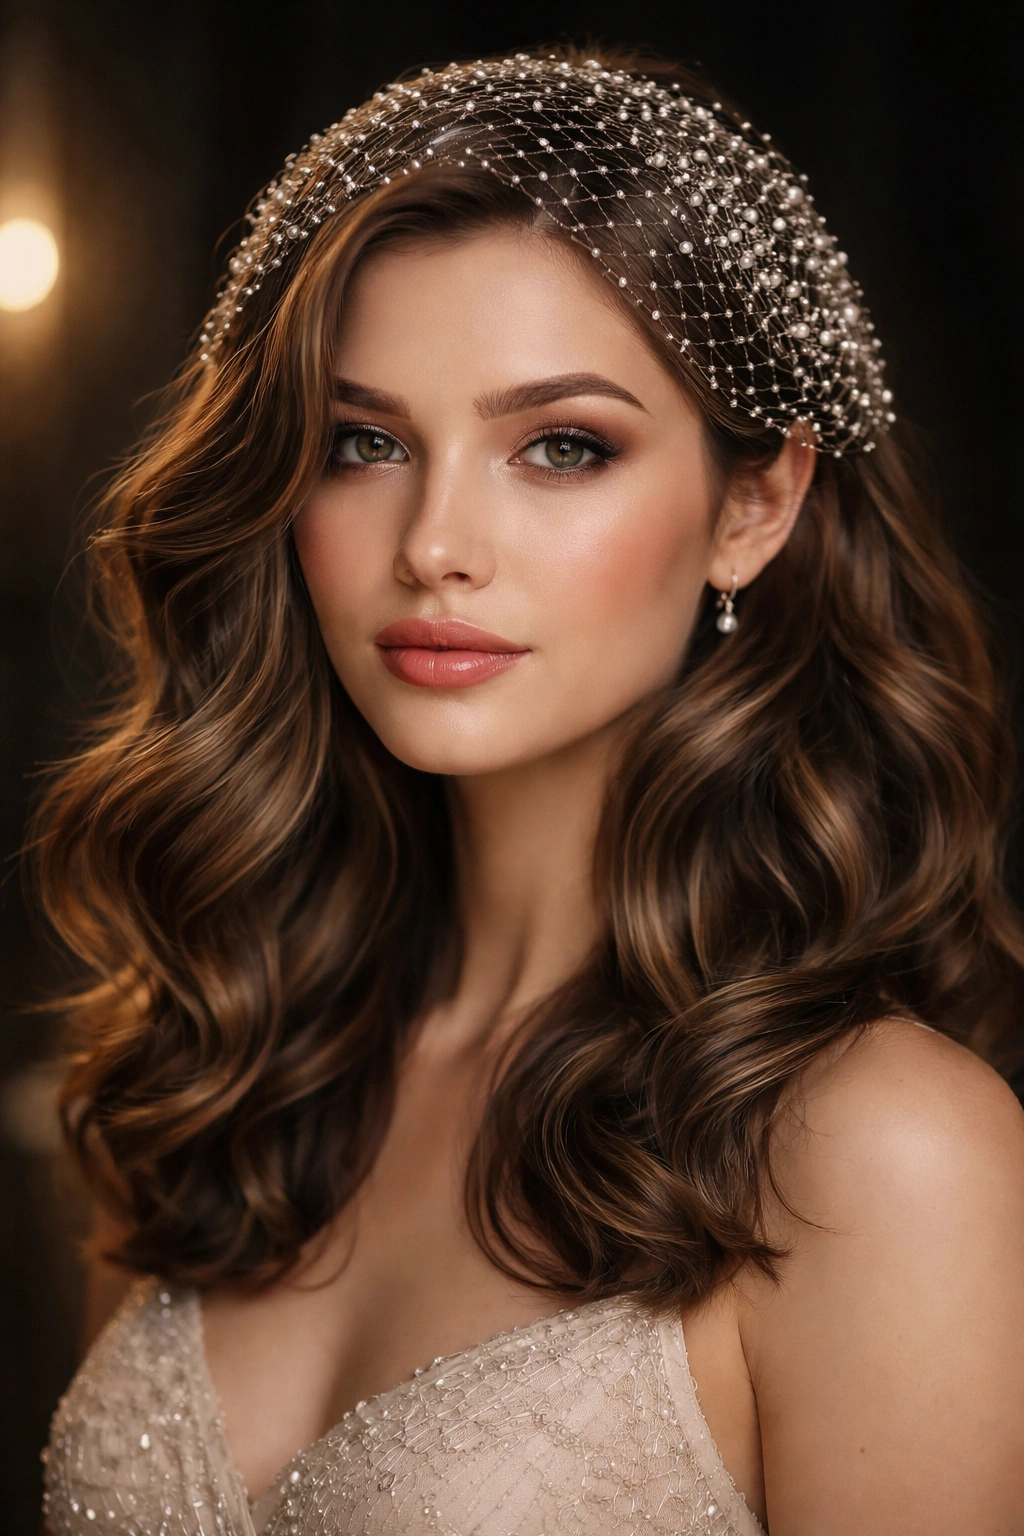
A decorative hairnet (something like a beaded net or crystalline net that’s visible and intentional, not practical/invisible) sits gently over soft waves, adding texture and visual interest without altering the wave pattern. This is a very formal, editorial approach.
Understanding Decorative Hairnets
Unlike practical hairnets (which are invisible and meant to contain hair), decorative hairnets are meant to be seen. They might be made of delicate chains with crystals, beaded threads, or metallic strands. The net sits over the waves, creating a layered, dimensional effect. This is a fairly advanced styling choice that reads very formal and fashion-forward.
Application Method
Style your soft waves first and let them cool and set. Position the hairnet carefully over your head, securing it with bobby pins that match your hair color, hiding the pins within the net and hair. The net should sit evenly and smoothly—you’re not trying to conceal it, but you want it to look intentional and placed rather than haphazard.
Pro tip: Decorative hairnets work best on darker hair where the contrast between hair and net is visible. On very light blonde hair, a metallic or crystalline net shows beautifully; on dark brown or black hair, a similar net might get lost.
Best For
Upscale evening events, galas, fashion-forward formal occasions, anyone comfortable with a very intentional, statement-making style. Requires confidence because this is a eye-catching look that people will notice and comment on.
17. Waves with Invisible Bobby Pin Clusters
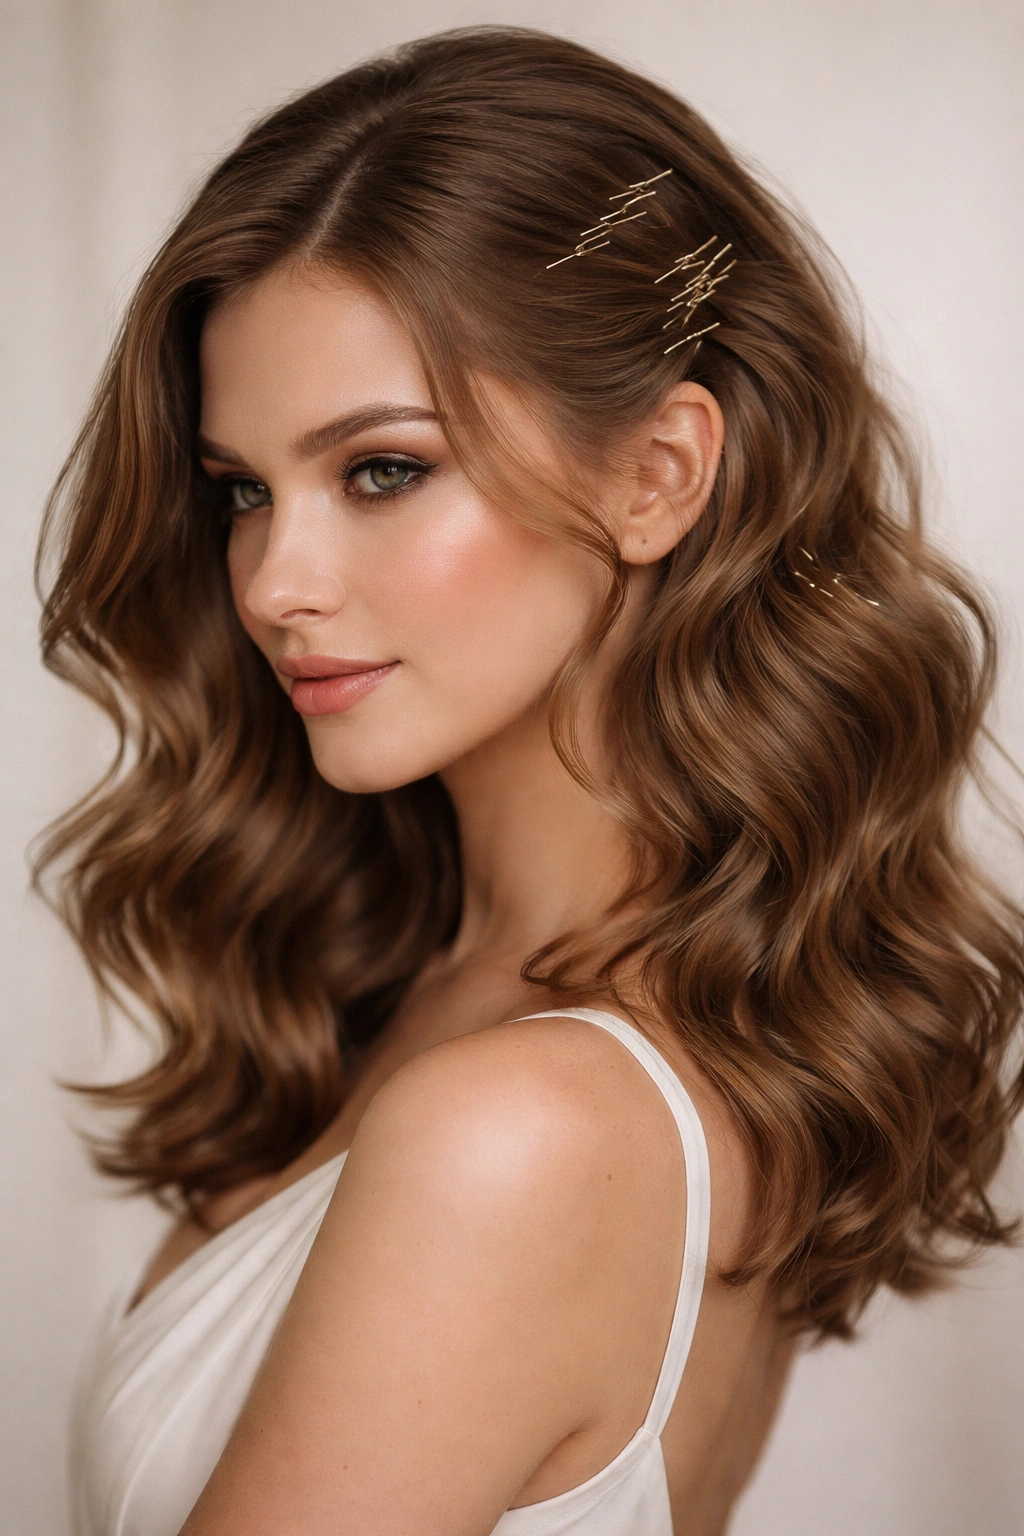
This minimalist approach uses invisible bobby pins (in shades that match your hair color) clustered strategically through the waves to create visual texture and a subtle, intentional look. The pins are part of the design, but they’re not obvious.
The Minimalist Strategy
Rather than using visible metallic accessories, decorative pieces, or elaborate braids, you’re using the practical element (bobby pins that hold the waves) as the design element. Cluster pins at the crown area, along one side, or distributed across the back section of waves. The pins catch light subtly without being obvious, and the clustering creates visual interest.
Placement and Styling
Style soft, loose waves throughout. Once waves are set, place bobby pins (that match your hair color exactly) in small clusters—a group of 3 pins positioned closely together creates one focal point. Create 2-3 such clusters rather than scattering individual pins throughout. This creates a more intentional, designed look rather than appearing like you simply have pins in your hair for practical purposes.
Worth knowing: This works best with bobby pins that are truly color-matched. If your hair is dark brown, invest in dark brown pins rather than using black ones—the color difference will be obvious. If your hair is medium blonde, use medium blonde pins, not light platinum.
Best For
Minimalist formal aesthetics, anyone who prefers understated elegance to dramatic statement pieces, formal events where you want a polished look without appearing overly done. Works on most face shapes and hair types.
18. Waves with Soft Gel Waves and Wet-Look Finish
This style features soft, defined waves with a moisturized, wet-look finish achieved through the use of gel products and wet-look finishing sprays. The waves are more defined than loose beach waves but not as sculpted as Hollywood waves, and the shine and moisture appearance adds drama.
Creating the Wet-Look Texture
Apply a light-hold gel or wet-look styling cream to damp hair and blow-dry into soft waves using a round brush. The gel provides hold while maintaining movement. Once waves are set, apply a wet-look finishing spray (these come in light and strong formulations). The combination of the gel base and the finishing spray creates the appearance of very shiny, moisturized, freshly-washed hair—but with waves that hold their shape throughout the evening.
The Wave Pattern
Use a 1.5-inch barrel iron to create consistent waves, but don’t brush through them after curling. The un-brushed waves maintain more definition, which works well with the wet-look finish. The look should feel wet and alive rather than dry and processed.
Pro tip: This style is particularly striking when worn with bold lip color or statement jewelry—the wet-look finish is modern and editorial, so it pairs well with other modern, statement-making elements.
Best For
Modern formal events, anyone with healthy, shiny hair, people who want a clearly contemporary rather than timeless look. Works well on most hair colors, though the wet look shows particularly well on darker hair where the shine is visible.
Final Takeaway
The right medium wavy hairstyle transforms a formal outfit into a complete, polished look that you’ll actually feel confident wearing for hours. The key is choosing a style that matches both your hair type and your personal comfort level—there’s no point selecting an elaborate style if you’ll spend the evening worrying about how it looks or wishing you’d chosen something simpler.
Most of these styles can be created at home with practice, but there’s absolutely no shame in booking a professional stylist before a major formal event, especially if you’re trying a new technique. A good stylist will not only execute the style beautifully but will also teach you tricks for maintaining it throughout the evening and can create a version that’s personalized to your face shape, hair type, and personal aesthetic.
Remember that the best formal hairstyle is one you feel genuinely confident wearing. If you’re constantly self-conscious or uncomfortable, that will show in photos and how you carry yourself. Test your chosen style at least once before the event, take some photos in different lighting, and make any adjustments you need. Then step into that formal event knowing your hair looks exceptional and that you can focus on enjoying the occasion rather than worrying about your waves.