There’s something liberating about pulling your hair back without hunting for a hair tie—especially when you’re caught without one or simply want to give your hair a break from elastic tension. The truth is, a ponytail doesn’t require the conventional elastic at all. Whether you’re dealing with hair breakage concerns, forgotten accessories, or just tired of the same old approach, learning to secure a ponytail with alternative methods opens up a world of creative styling possibilities that often look more interesting and intentional than standard ponytails.
The beauty of tie-free ponytails is that they tend to feel more elegant and effortless. They work particularly well for thicker hair textures that can hold their own weight and shape, though thinner hair can work beautifully too when you use the right securing technique. Many of these methods have been used for centuries—they’re not trendy tricks but rather time-tested approaches that deserve a comeback in modern styling.
What makes these techniques especially valuable is their versatility. You can create these styles with items you likely already have around your house: bobby pins, scarves, clips, pencils, or even just your own hair. Some methods work best for specific occasions, while others are perfect for casual everyday wear. The key is understanding the mechanics behind each approach so you can execute it with confidence, whether your hair is freshly washed or perfectly oiled.
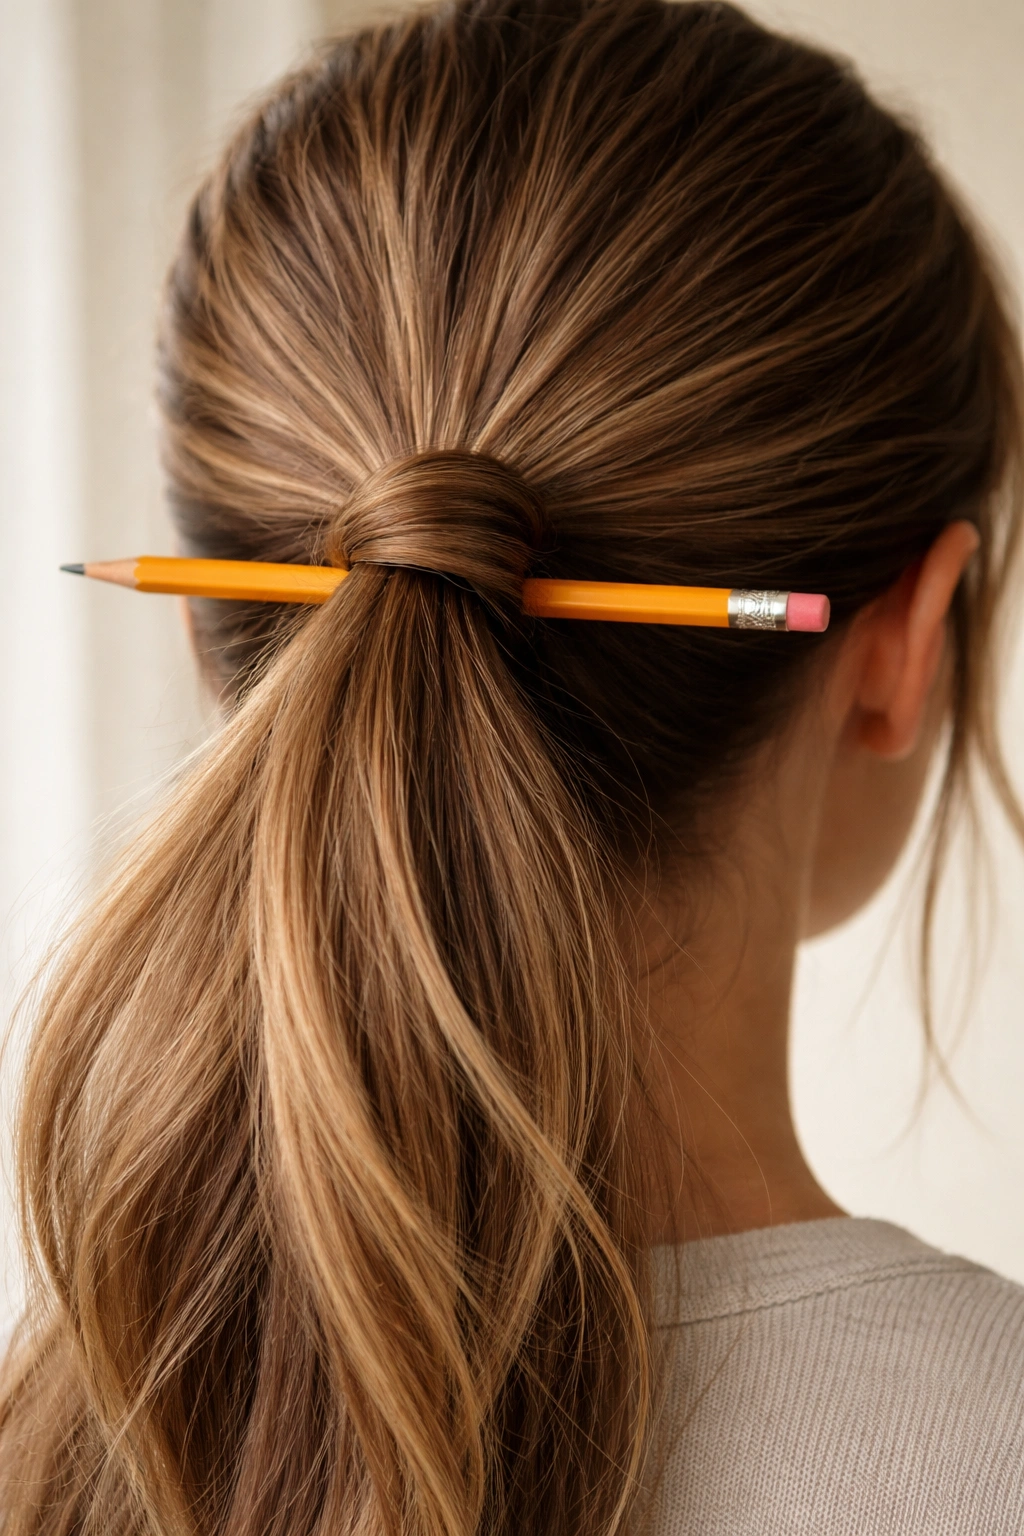
1. The Pencil Hold Method
This surprisingly effective technique uses a simple writing instrument as your ponytail’s anchor point. The pencil (or any smooth, cylindrical object about that size) threads through the base of your ponytail, holding it in place through tension rather than grip. Start by gathering your hair at your desired ponytail height and twisting or smoothing it into a unified bundle. Slide the pencil horizontally through the base of the ponytail bundle, making sure it sits snugly against your scalp.
How to Execute It Perfectly
The real secret to this method is creating enough twist or tension in your hair before inserting the pencil. If your ponytail is too loose, the pencil will simply slip out. Begin by taking your gathered hair and twisting it slightly—just enough to create a cohesive rope-like bundle. Hold this twist firmly with one hand while using your other hand to position the pencil. Slide it through the center of the twist, perpendicular to your head, so that the pencil passes through the twisted hair and rests against your scalp. The weight and resistance of your own hair keeps it locked in place.
When This Works Best
- Thick, textured hair that holds twists naturally without slipping
- Casual updo situations where the pencil is meant to be visible and intentional
- Situations where you want easy removal (just slide the pencil out)
- Creative styling where the pencil itself becomes part of the aesthetic
- Emergency situations when no other securing method is available
Pro tip: Smooth pencils work better than ridged ones—the smoother the surface, the more securely your hair grips it. Wooden pencils offer better grip than plastic ones.
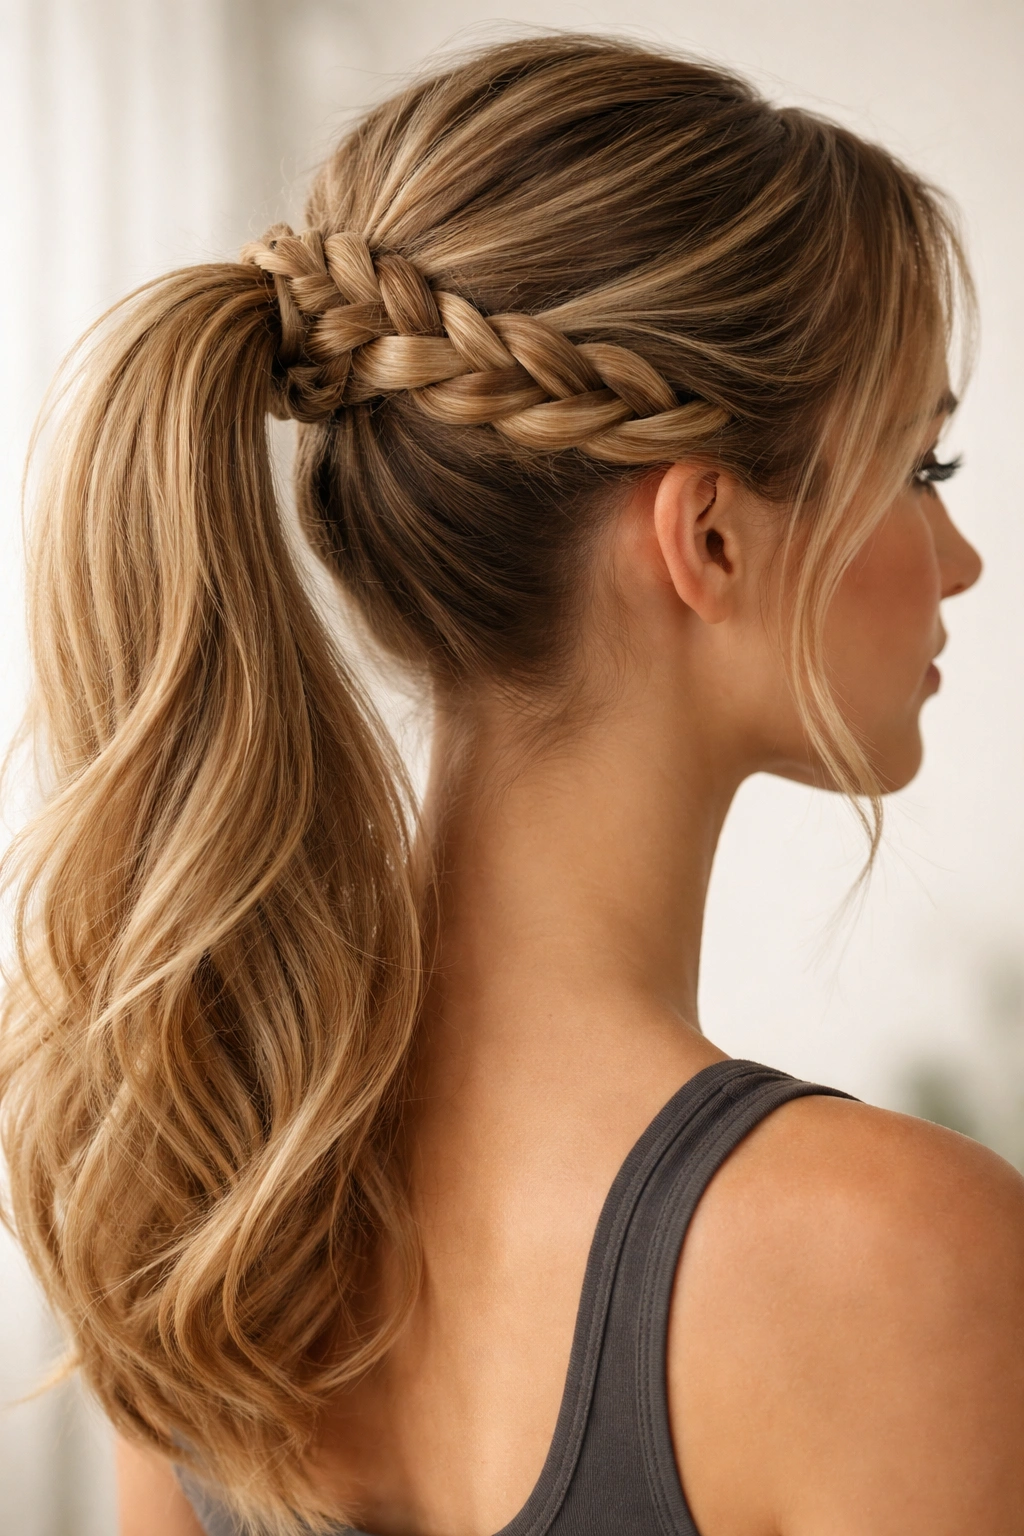
2. The Braid Lock Ponytail
This technique transforms your ponytail into its own securing mechanism by braiding a small section of it and wrapping that braid around the base. Instead of needing an external fastener, the braid acts as both part of the style and the anchor that holds everything in place. Start by creating your basic ponytail with your hands, gathering all the hair at your desired height.
The Step-by-Step Process
Once you’ve secured your ponytail with your hands (before it falls apart), take a small, thin section of hair from within the ponytail itself—about the width of a pencil. Divide this section into three strands and begin braiding. This braid doesn’t need to be tight or perfect; a loose, slightly messy braid actually looks more modern and romantic. Continue braiding this small section for about 3-4 inches, then wrap it snugly around the base of the ponytail, covering where you’re holding it with your hand.
Making It Stay Put
The magic moment comes when you tuck the end of the braid underneath itself or secure it with a single bobby pin hidden in the wrap. This creates a secured loop that holds the entire ponytail in place. The wrapped braid looks intentional and polished—more like you planned it this way than like you improvised. You can make this as tight or loose as you like, and you can adjust the thickness of the braid section to change how prominent the detail appears.
Best Hair Types for This Method
- Medium to long, healthy hair that holds braids without frizzing
- Hair with at least some natural texture or wave
- Thick enough to support a small braid without looking too thin
- Works beautifully on second-day hair that has some grit and texture
Insider note: This method actually extends how long your ponytail stays secure throughout the day—the braid’s friction around the base prevents slipping better than most elastic bands.
3. The Twist and Tuck Technique
This is perhaps the most minimalist approach: twisting your ponytail and tucking the twisted section into itself to create a self-locking loop. It requires no additional tools or materials beyond your own hair and works on almost any hair type if you understand the mechanics. The method relies entirely on tension and the natural grip your hair creates when twisted tightly.
Creating the Twist
Gather your hair at your chosen ponytail height and twist it as tightly as you comfortably can, rotating all the strands together as one cohesive unit. Keep twisting until you’ve created a rope-like formation that feels firm and unified. Continue twisting until you’ve gone around the base about 2-3 times, creating a circular coil at the base of your ponytail. This coil becomes your securing mechanism.
The Tuck That Locks It
Once you’ve twisted your hair around the base and created a coiled effect, tuck the remaining loose end of the twisted hair back into the coil itself, weaving it through the twisted sections. The overlapping twisted sections grip each other naturally, holding everything in place. You can further secure this by tucking any flyaway ends into the center of the coil. The result looks intentional, modern, and completely unified—like the whole thing was planned as a design element.
Best Results With
- Straight to wavy hair that holds twists without immediately unraveling
- Hair with some natural moisture or slight product (completely dry hair twists less effectively)
- Thicker hair that can sustain a tight twist without looking too thin
- Polished occasions where the twist detail itself is part of the styling aesthetic
Worth knowing: This method holds better if you do a double twist—twist the ponytail around the base twice instead of once, as the doubled tension provides backup grip.
4. The Bobby Pin Secure Approach
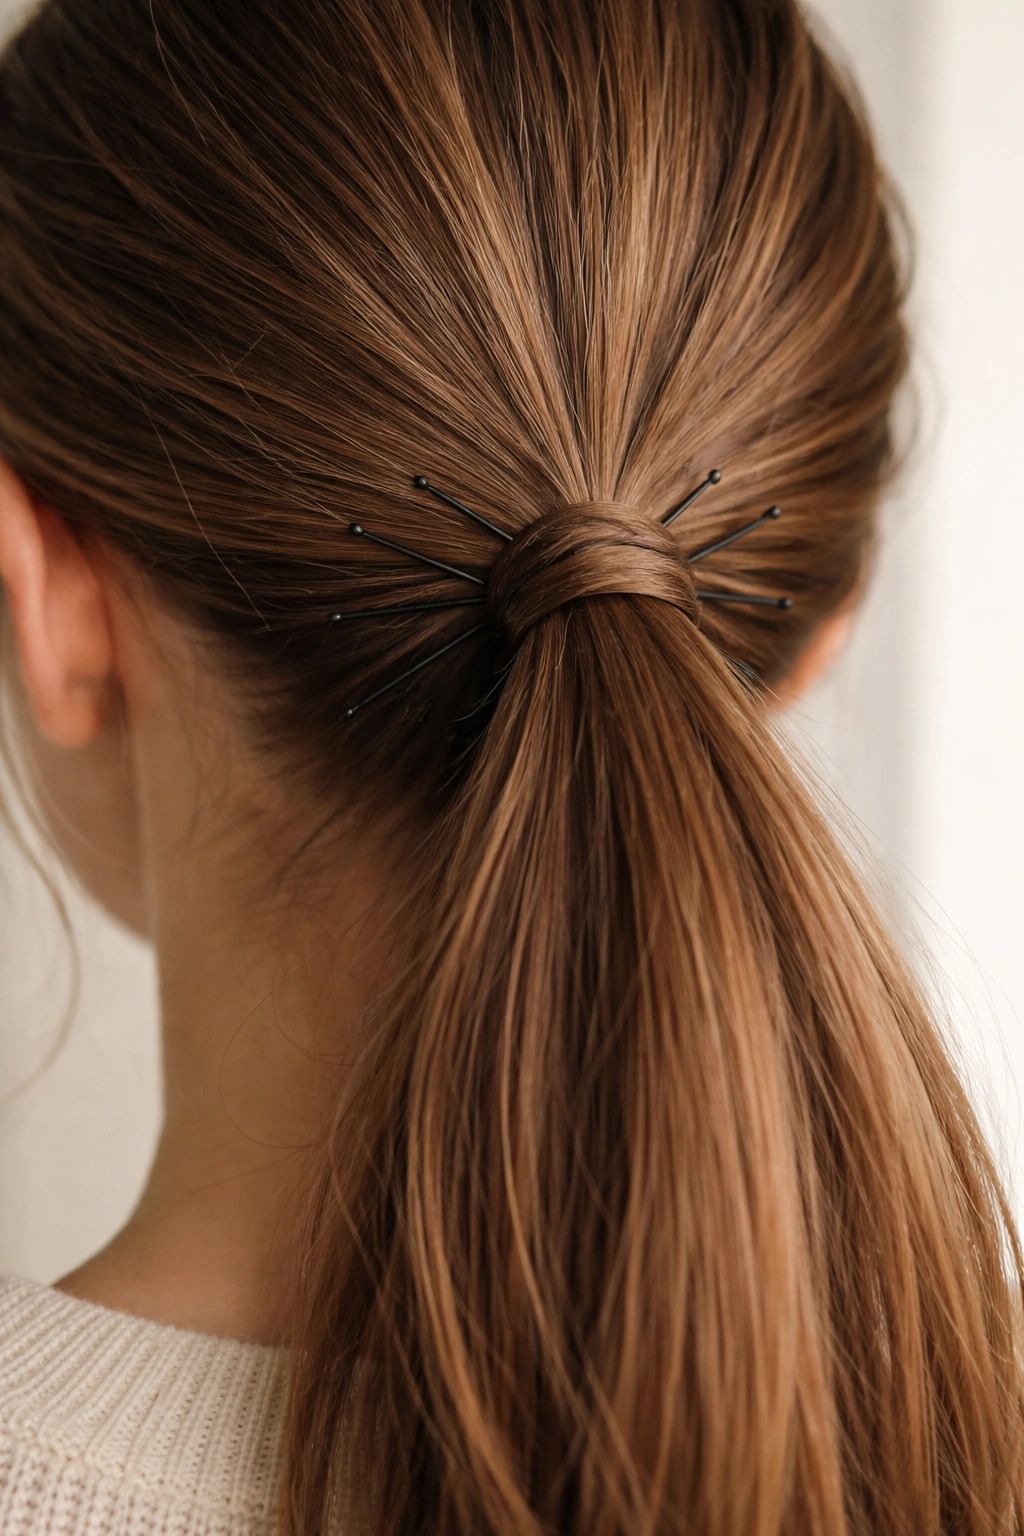
Using bobby pins to hold a ponytail in place might seem obvious, but there’s a specific technique that makes this work reliably without looking like emergency improvisation. The key is distributing multiple pins strategically around the base rather than just shoving a couple in randomly. This method distributes the weight and pressure, preventing the seesaw effect where one side of your ponytail gradually slips down.
The Strategic Pin Placement
Gather your ponytail as you normally would, then visualize the base as a compass point (north, south, east, west). Insert your first bobby pin going upward through the base of the ponytail into your scalp—this is your anchor. Add a second pin on the opposite side, then a third and fourth if you have thick hair. Each pin should pass through both the ponytail bundle and into your scalp beneath it, creating a grid of support rather than a single point of failure. Use pins that match your hair color to make them less visible.
Hiding Pins While Maintaining Security
The wrapped braid technique works beautifully with pinned ponytails—use a small braid or even just a small section of hair wrapped around the base to conceal where your pins are sitting. This creates a finished look while keeping your security mechanism hidden. Alternatively, if you’re going for a sleek, polished aesthetic, embrace the pins as part of the design and position them symmetrically for intentional visual interest.
Why This Method Reliably Works
- Works on all hair types and lengths
- Provides backup support that gets better with multiple pins
- Easily adjustable if the ponytail starts slipping midday
- Pins can be added or removed to adjust tightness and security
- Nearly invisible when hidden under wrapped hair or positioned strategically
Pro tip: Cross your bobby pins (one going right, the next going left) rather than inserting them parallel—the criss-cross pattern provides stronger support.
5. The Clip-Based Ponytail
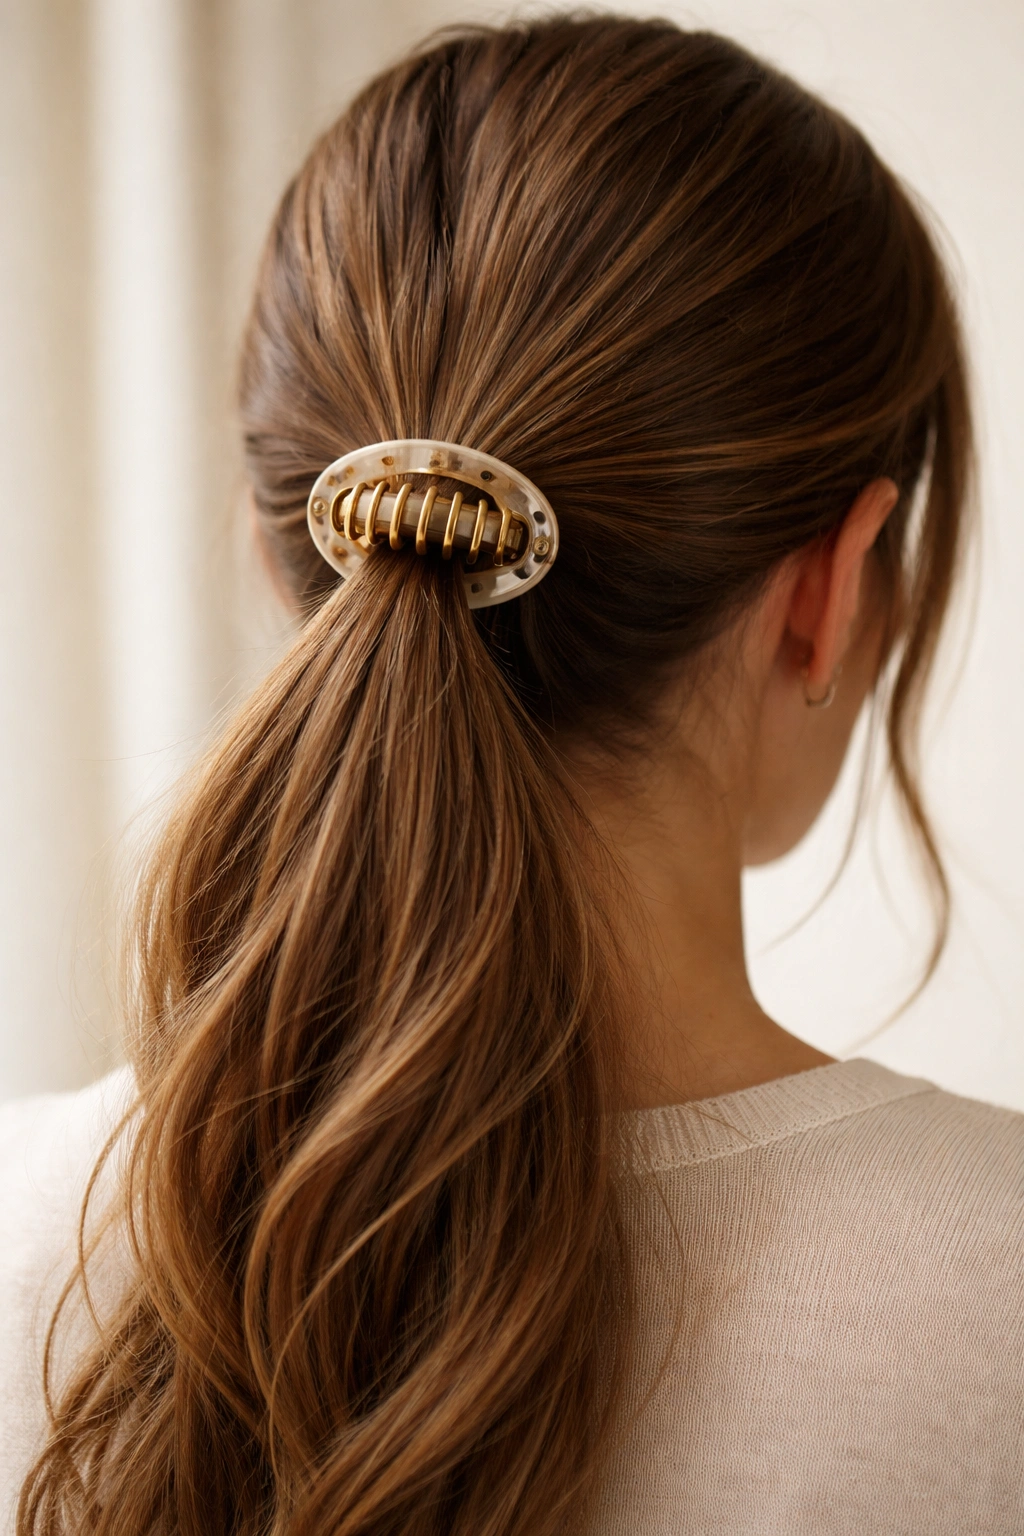
Hair clips designed for securing buns and ponytails (the round claw clips or jaw clips that have become trendy) work beautifully as your sole securing mechanism. These clips grip hair through pressure rather than elasticity, making them gentler on hair while still providing reliable hold. Position your clip at the base of your gathered ponytail, ensuring it’s clamped tight enough to support the weight of your hair.
Choosing the Right Clip Size
The clip must be proportional to the amount of hair you’re securing. A too-small clip will slip; a too-large clip will look awkward and unfinished. For a substantial ponytail, use a larger claw clip (2-3 inches wide). For a sleeker, tighter ponytail, a smaller clip works better. Round clips tend to distribute pressure more evenly than rectangular ones, making them slightly more secure for heavier hair. Test the clip’s grip by gently tugging on the ponytail after clamping—it shouldn’t shift or move.
Styling Around Your Clip
The beauty of clip-secured ponytails is that the clip itself can become a design feature. A tortoiseshell clip adds visual interest and movement to an otherwise simple style. You can position the clip to be the focal point at the nape of your neck, or you can hide it by wrapping a section of hair around the ponytail base. Decorative clips with pearls, metallic finishes, or interesting shapes work particularly well when left visible as an intentional styling choice.
Hair Types This Works Best For
- Thick hair that provides enough weight and volume to stay seated in the clip
- Straight to wavy hair that grips the clip without slipping
- Hair with some texture or slightly oily scalp (not freshly washed slippery hair)
- Medium to long length where the ponytail’s weight helps secure the clip
Worth knowing: Clamping the clip slightly off-center (toward the back rather than directly on top) often provides more secure hold than centering it directly on the ponytail.
6. The Hair Stick or Chopstick Method
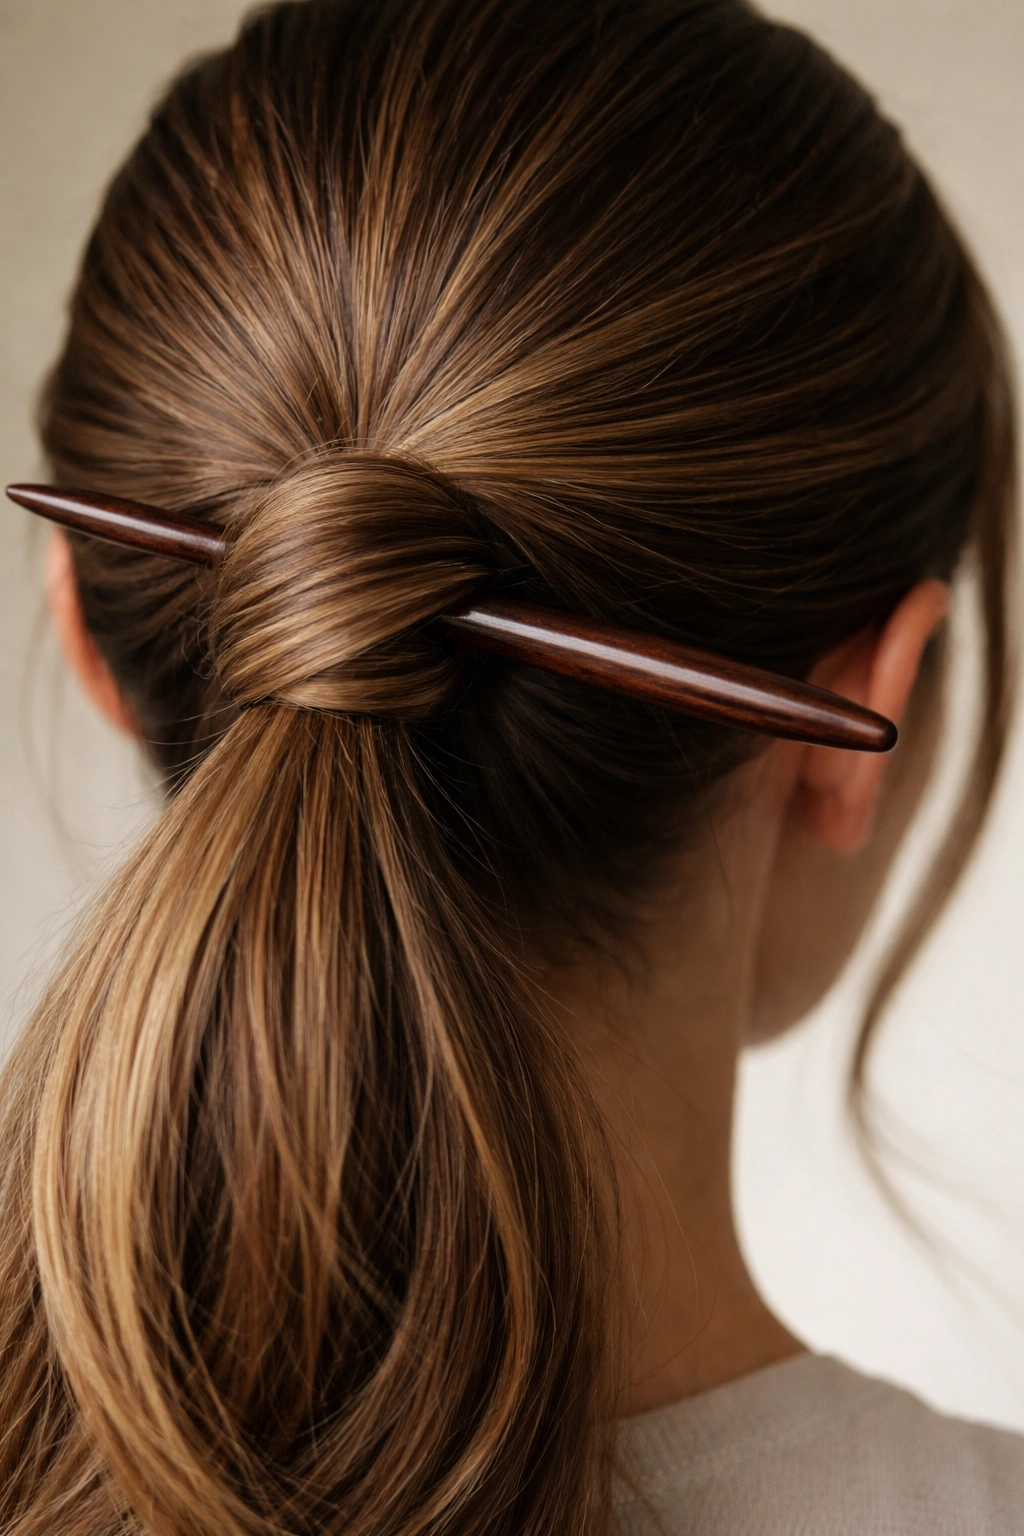
Similar to the pencil technique but more elegant, using a decorative hair stick or even a smooth wooden chopstick creates a secured ponytail with an instantly polished appearance. Hair sticks come in beautiful finishes and materials—wood, bone, lacquered designs—and they’ve been used for centuries in Asian hairstyling traditions. The mechanism is identical to the pencil method but the finished result feels more intentional and beautiful.
How Hair Sticks Differ From Pencils
Hair sticks are typically smoother, more tapered, and more aesthetically appealing than writing implements. They’re designed specifically for this purpose, which means they often have better balance and weight distribution. The tapered ends slide through twisted hair more smoothly than blunt pencil tips, and the overall design is meant to be visible as a style element rather than hidden.
Technique for Maximum Security
Create a tight twist or bun-like coil with your ponytail, then thread the hair stick through the center of the coil horizontally. The stick should pass through the twisted hair and rest against your scalp, with the stick’s weight and length providing the securing force. You can use two hair sticks crossed through the same ponytail for a more decorative, intentional look that’s also extremely secure. Thinner hair benefits from using a second stick, as it distributes the weight more evenly.
Creating Different Aesthetics
A single, simple wooden stick creates a minimalist, elegant look. Two sticks positioned to form an X create a more dramatic, artistic appearance. Ornately decorated sticks in metallic finishes or with carved details become jewelry-like styling elements. This method works beautifully for updos, low ponytails, and even high, playful styles where the sticks are meant to be visible and admired.
Best For
- Long, thick hair that can support the stick’s weight
- Occasions where the securing mechanism is meant to be decorative
- Twisted ponytails, buns, and updo styles
- Anyone wanting a romantic, intentional appearance
Pro tip: Two thin hair sticks provide more secure hold than one thick one—distribute the load rather than centralizing it.
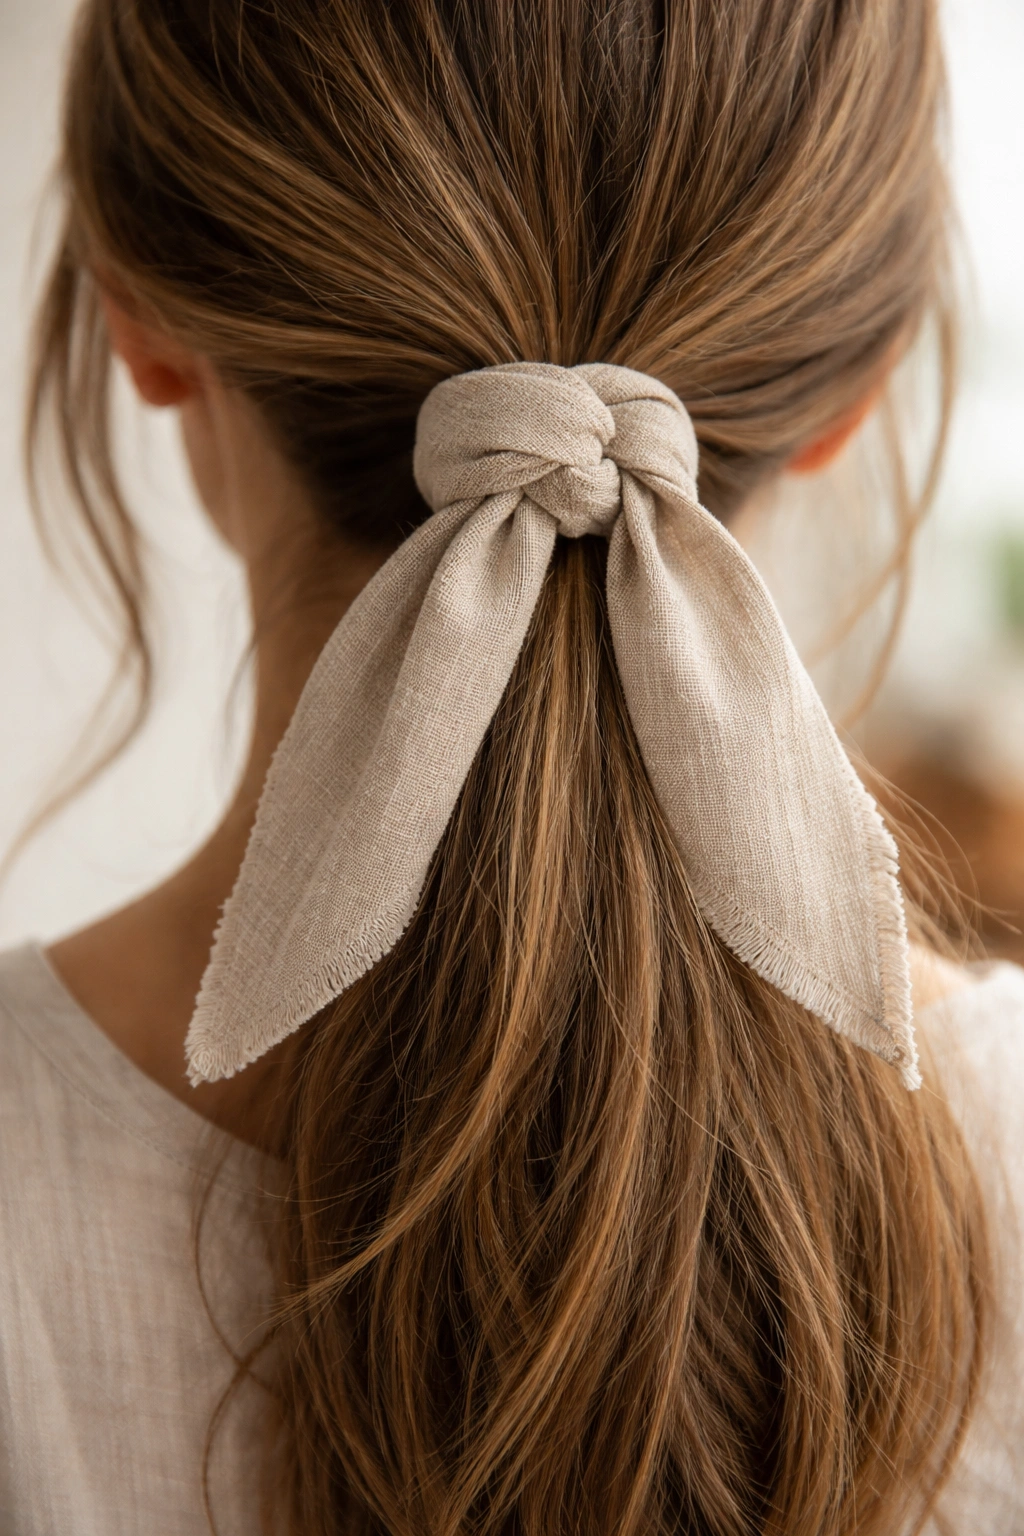
7. The Scarf or Ribbon Tie Method
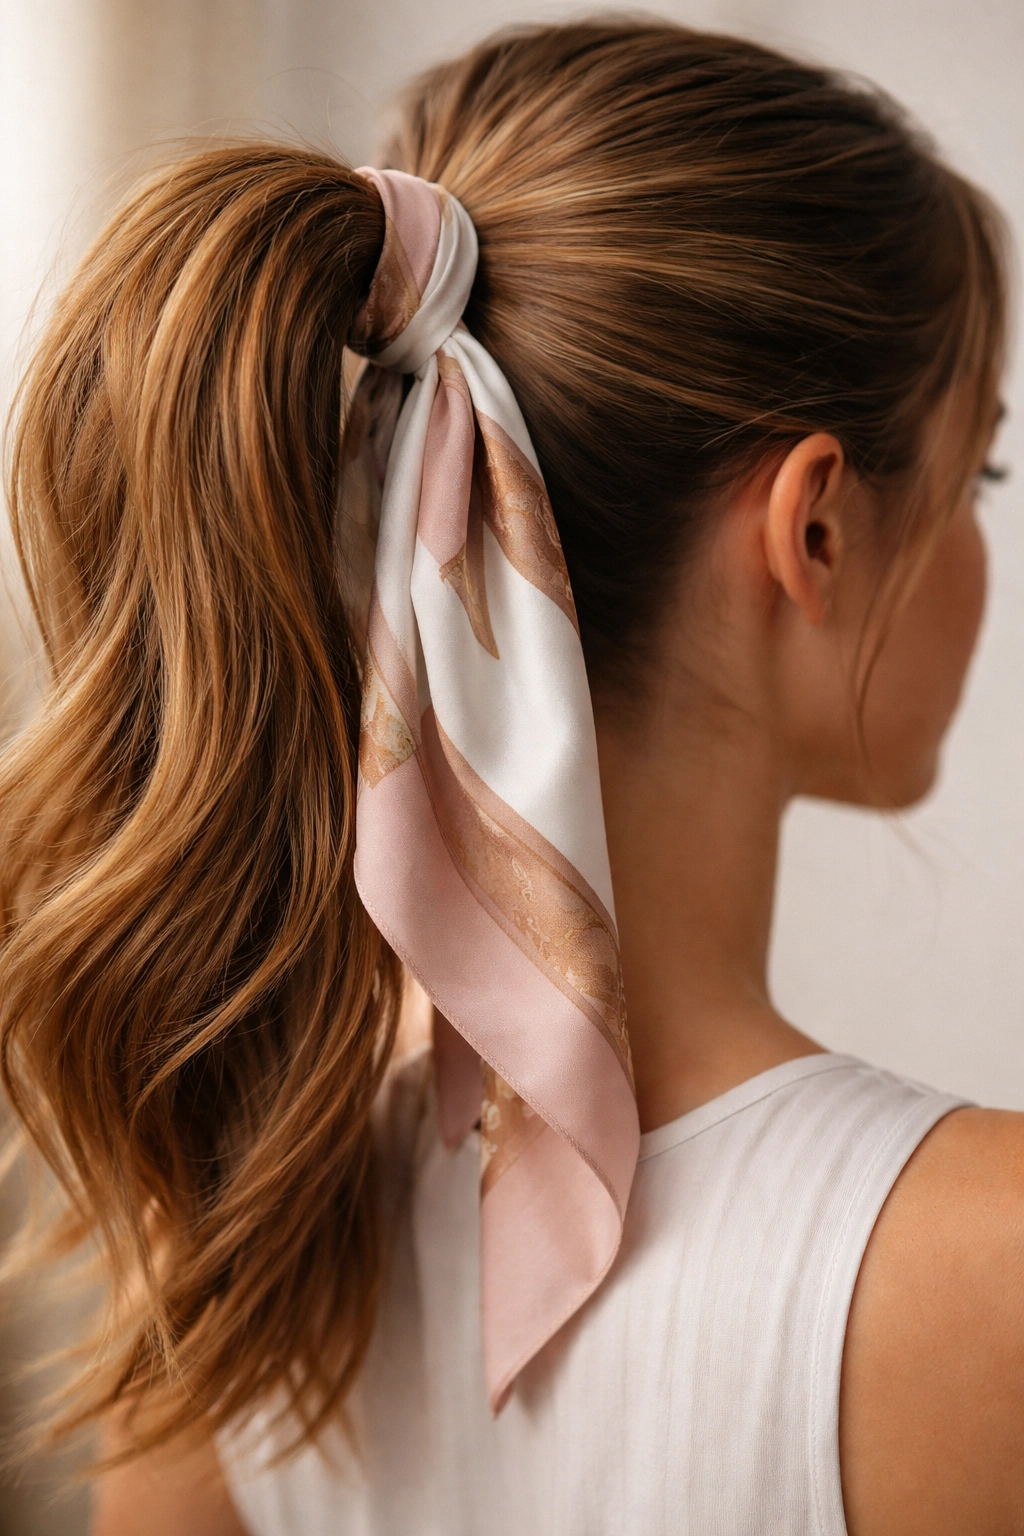
Using a scarf, ribbon, or decorative fabric strip as your ponytail fastener is as functional as it is beautiful. This method works particularly well because fabric is naturally gentle on hair while providing strong, reliable hold. A silk scarf, satin ribbon, or even a thin piece of cloth can be tied around the base of your ponytail in a way that’s either hidden or displayed as an intentional design detail.
Securing With Fabric
Gather your hair into a ponytail and hold it firmly at your desired height. Take your chosen fabric (a long scarf works beautifully, as does a thin ribbon about 12-18 inches long) and wrap it around the base of the ponytail. Pull it tight and tie it in a knot or a bow. The knot should sit snugly against your scalp and the ponytail bundle, securing everything in place. Fabric naturally grips hair without slipping the way some fasteners do, making this method exceptionally reliable for all day wear.
Style Variations With Fabric
You can tie the fabric in a simple knot that disappears into your hair, or you can tie a decorative bow that sits visibly at the base of your ponytail. For a boho aesthetic, use a patterned scarf and let the bow hang down the back of your neck. For a preppy look, use a silk ribbon and tie it in a neat bow that coordinates with your outfit. You can even wrap the fabric multiple times around the base if you have very thick hair or want extra security.
Best Fabric Choices
- Silk scarves (gentle on hair, drape beautifully, won’t slip)
- Satin ribbons (smooth texture that grips hair, won’t create friction)
- Lightweight cotton fabric (breathable, secure, casual aesthetic)
- Avoid elastic or stretchy fabrics that lose their grip over time
Perfect For
- Bohemian, romantic, or retro-inspired styles
- Anyone looking for a sustainable alternative to elastic hair ties
- Styles where the fastener is meant to be visible and decorative
- Creating a polished, intentional appearance
Insider note: Silk and satin fabrics actually protect your hair better than elastic because they create less friction—there’s a reason silk pillowcases are recommended for hair health.
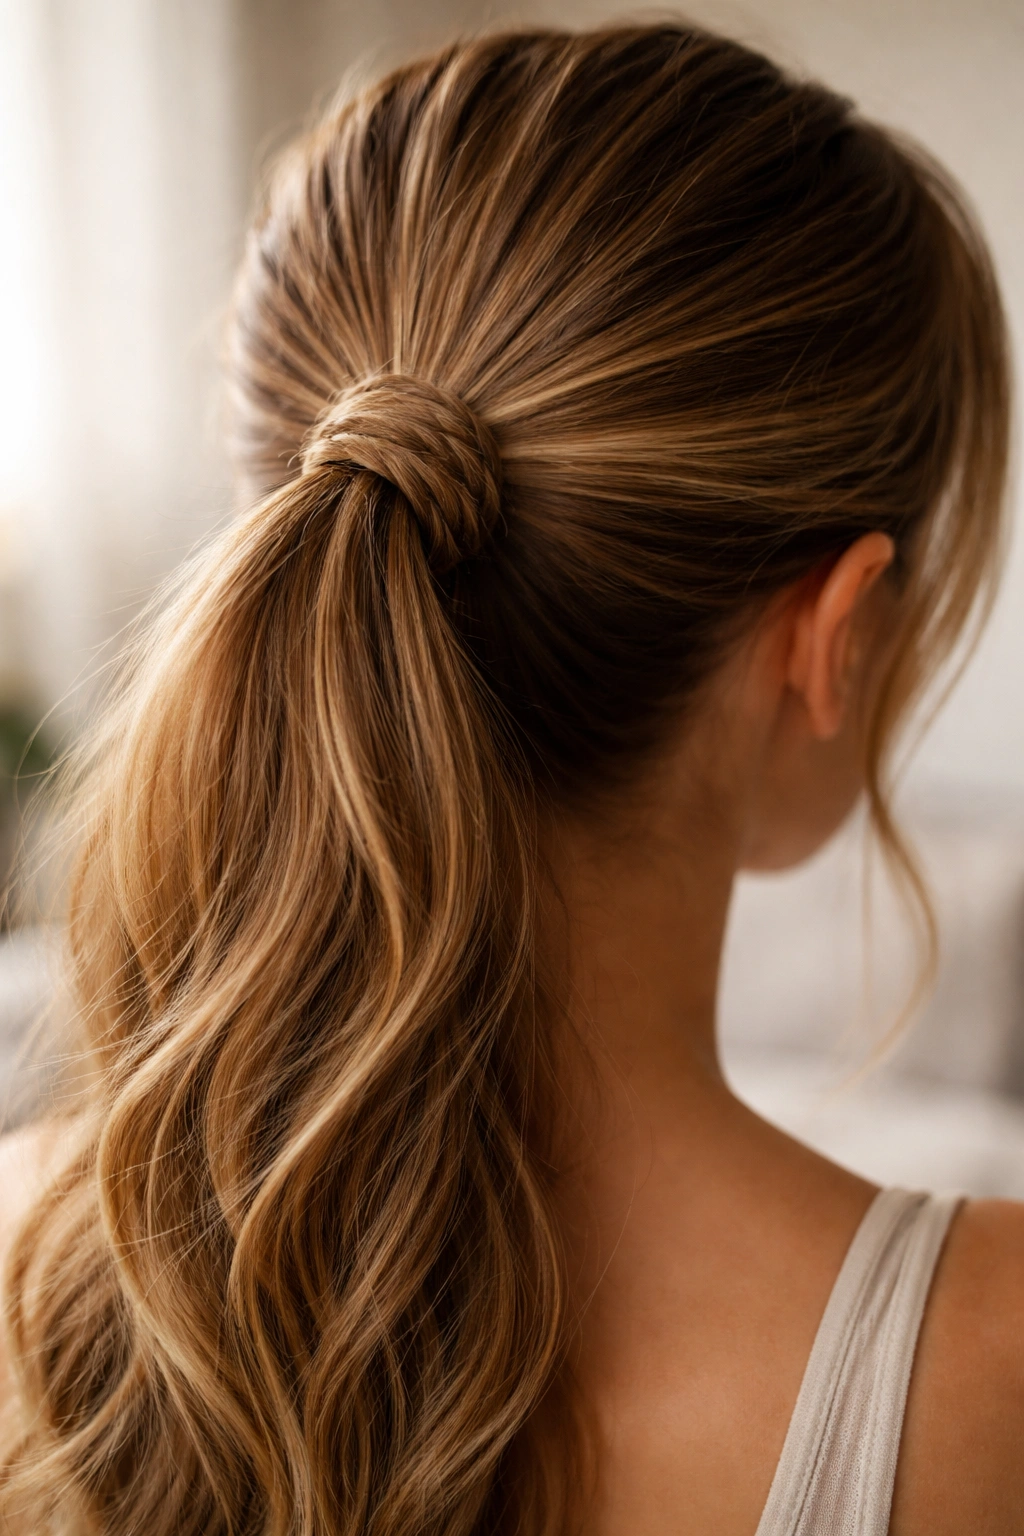
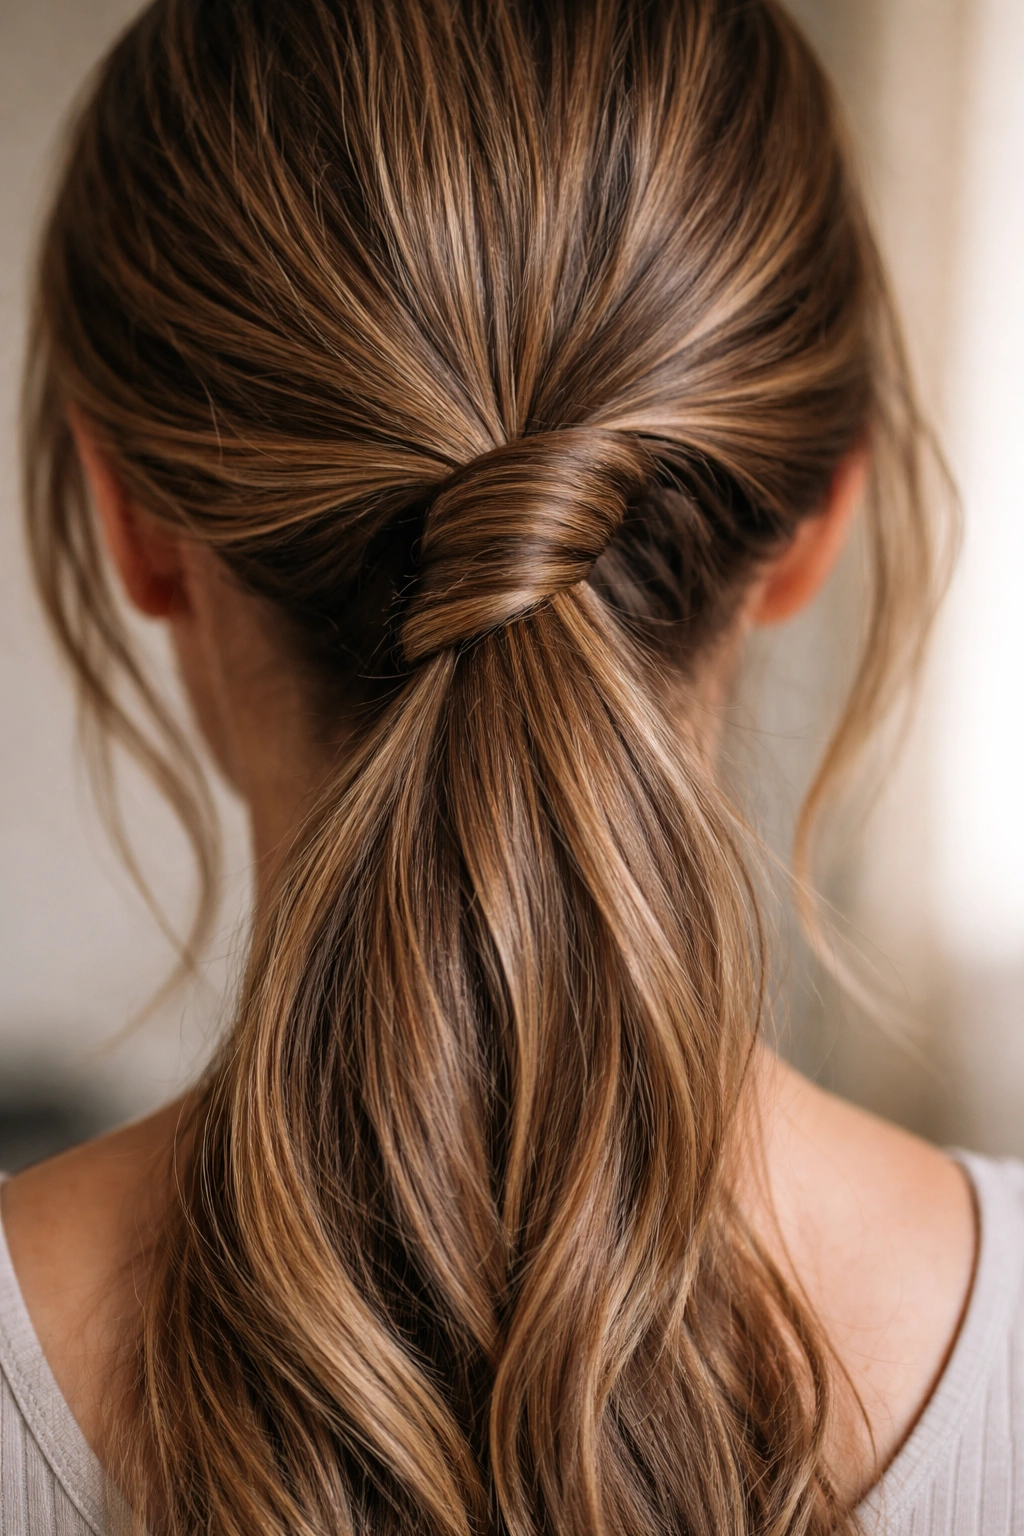
8. The Knotted Hair Method
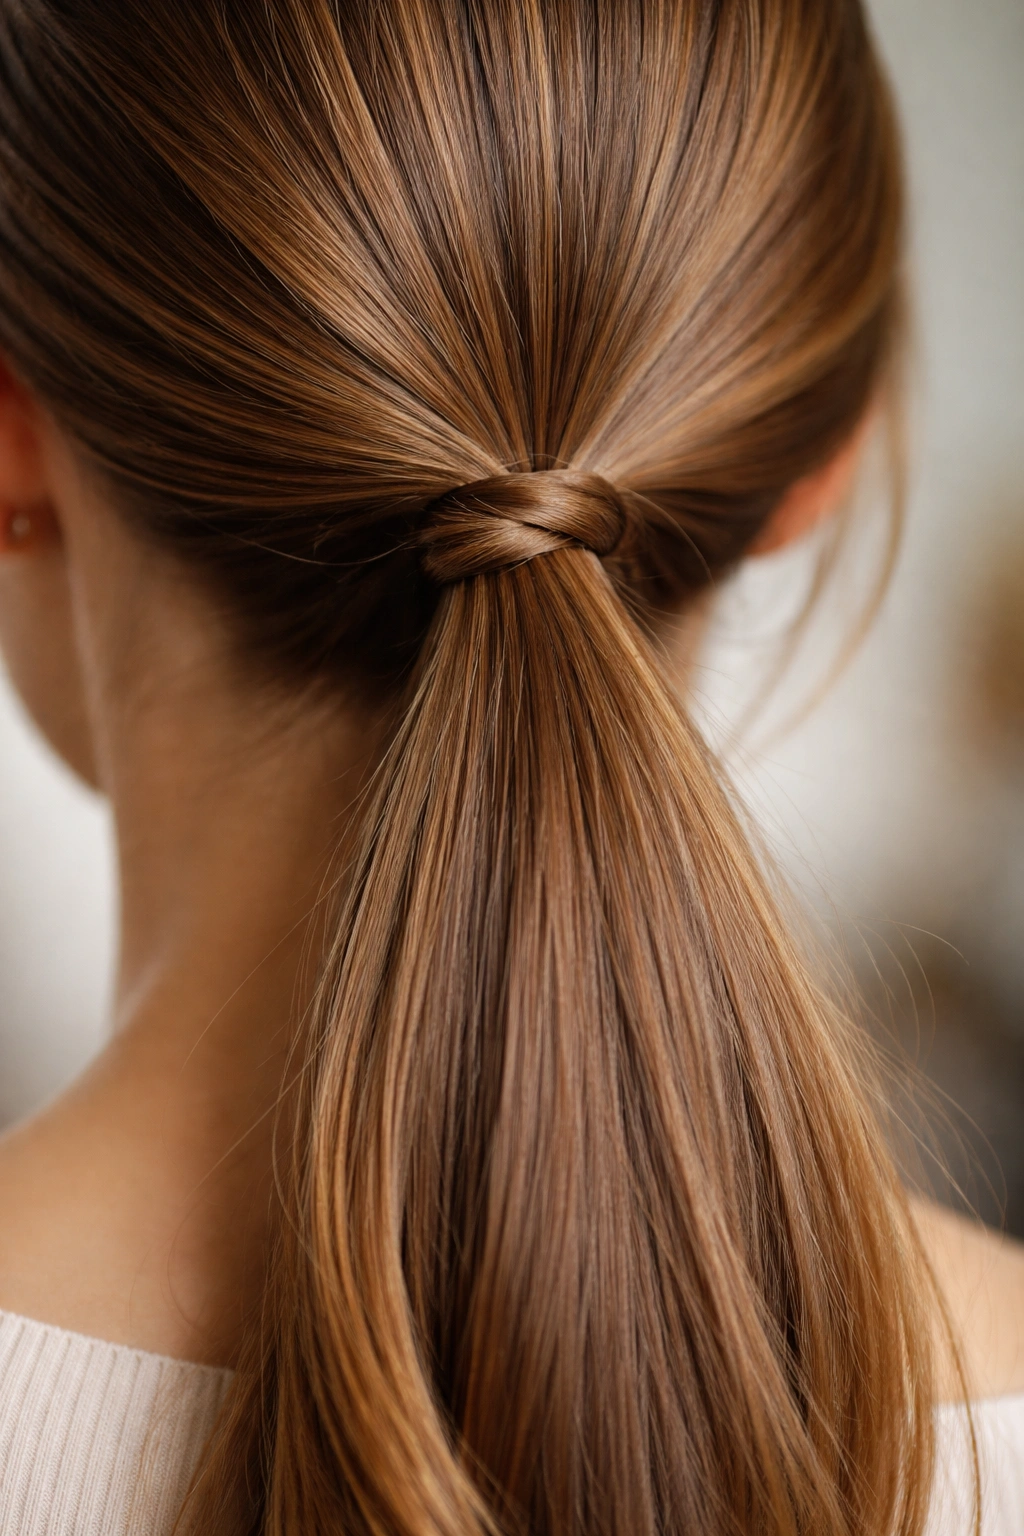
This subtle technique uses a small section of your own hair to create a knot that secures your entire ponytail. It’s one of the most invisible methods because the securing mechanism is literally made from your hair, making it completely seamless and intentional-looking. This requires hair thick enough to support the technique, but the result is stunning and surprisingly secure.
Creating the Securing Knot
Gather your hair into your ponytail as usual, then take a very thin section from the lower part of your ponytail—about the thickness of a pencil or less. Separate this thin strand completely from the rest of the ponytail. Now you’re going to tie this thin strand into a knot around the base of the remaining ponytail. Take the thin strand and loop it around the ponytail bundle, then tie it in a tight knot. The knot should sit directly at the base where you’re gathering the ponytail, and it should be pulled tight enough that it doesn’t slip.
Securing the Knot’s Ends
Once you’ve created and tightened your knot, you’ll have two ends of the thin strand hanging down. These can be tucked back into the ponytail itself, bobby pinned to the base, or even braided together if you prefer. The knot creates a permanent anchor point that prevents the ponytail from slipping, and because everything is your own hair, the entire look appears intentional and polished—like a designed style rather than improvised.
Making It Last All Day
The longevity of this method depends on the strength of your knot and how tightly you tie it. Pull it as tight as you can manage without causing discomfort or straining your scalp. Once the knot is secure, no additional fastening is needed—the knot itself holds everything in place. You can reinforce it with a bobby pin hidden in the hair if you’re concerned about slipping, but most people find the knot alone provides sufficient security.
Works Best With
- Thick hair that can accommodate a thin section being tied off
- Hair that holds knots without immediately unraveling
- Longer hair where the knot won’t create too-visible bumps
- Polished styles where seamless appearance is the goal
Worth knowing: Practice tying your knot loosely the first few times—once you know your hair’s behavior, you can tighten it more aggressively for all-day security.
9. The Crown Braid Wrap Technique
This elegant approach combines a small braid with a wraparound technique to create a secured ponytail that looks intentional and fashion-forward. Instead of using the braid from within your ponytail, you create a decorative braid from a section of hair at your crown, then wrap this braid around the base of your ponytail to secure it. The result is a multi-textured style that looks far more complicated than it actually is.
Creating Your Crown Braid
Start by taking a small section of hair from the crown or upper-back area of your head and braiding it loosely. This braid should be thin—about the width of a pencil or smaller. You’re not going for a statement braid here; you’re creating a functional wrapping tool. Braid this section for several inches, making sure the braid is loose enough to wrap comfortably around your ponytail but tight enough that it won’t immediately unravel.
The Wrap and Secure
Now create your ponytail as usual, holding it firmly at the base. Take your crown braid and wrap it around the base of the ponytail, covering where your fingers are gripping the hair. Wrap it around once or twice, depending on the braid’s length, and then tuck the end of the braid into the body of the ponytail or secure it with a hidden bobby pin. The braid creates a textured accent at the base while simultaneously securing your ponytail—it’s both functional and decorative.
Styling Variations
You can create a subtle, minimal look with a very thin braid wrapped once around the base. Or you can create a more dramatic style by using a thicker braid section, wrapping it around multiple times, and letting the end hang visible down the back. For special occasions, you can use ribbons woven into the braid to add color and visual interest. This method works beautifully for both casual and formal occasions, depending on how you style the crown braid.
Best Results With
- Medium to long hair that can accommodate braiding without looking too thin
- Hair with some natural texture or wave that photographs beautifully
- Occasions where braided details are part of the styling aesthetic
- Anyone who wants a style that looks more complex than it actually is
Pro tip: The crown braid wrap works better on second-day hair than freshly washed hair—the slight texture helps the braid sit snugly without slipping.
10. The Leather Cord or String Technique
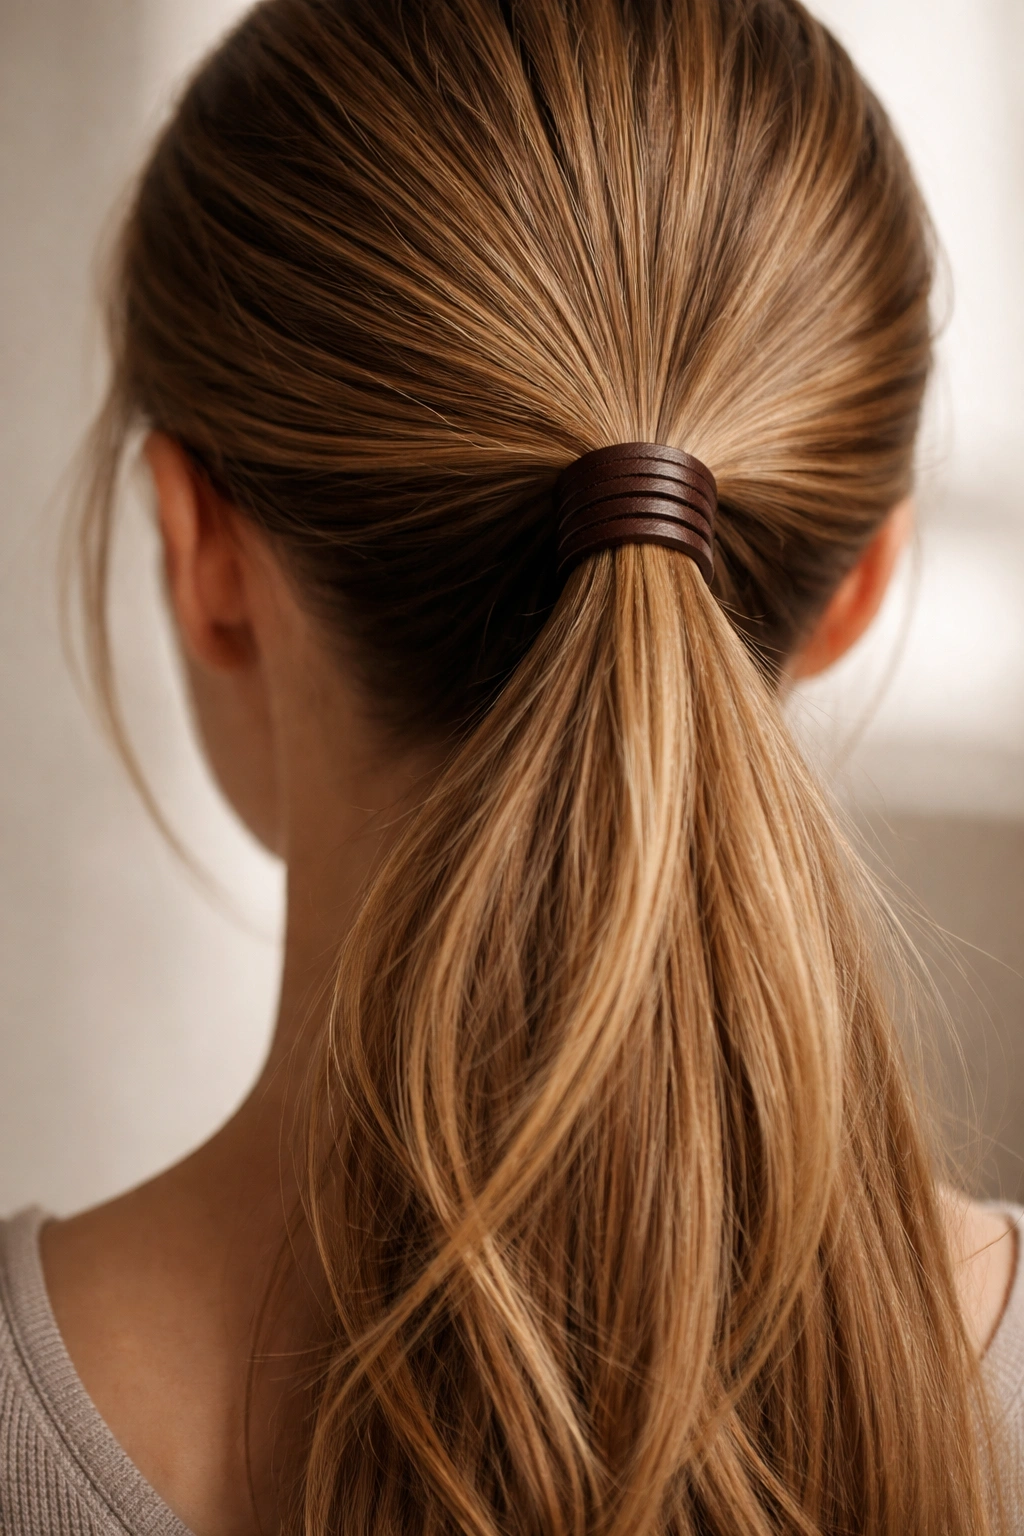
This minimalist approach uses a thin leather cord, decorative string, or even twine wrapped around your ponytail base for a modern, understated look. The cord is flexible enough to wrap securely around your hair bundle while being sturdy enough to hold throughout the day. This method appeals to people who appreciate clean, simple aesthetics and want their securing mechanism to be either hidden or visible as an intentional accent.
Selecting Your Cord
The diameter matters significantly—too thin and it slips, too thick and it looks awkward. A cord about the thickness of a pencil lead works beautifully for most ponytails. Leather cords in tan, brown, or black create a natural, earthy aesthetic. Metallic cords add sparkle and modernity. String in a color that matches your hair blends in seamlessly. You want something that’s smooth (not rough or fibrous) so it won’t snag or tangle with your hair.
Wrapping and Securing
Gather your ponytail and hold it at the base. Wrap your chosen cord around the ponytail base tightly, going around at least once and preferably twice for security. The wrapping should be snug—tight enough that it doesn’t slip when you release your hand but not so tight it’s uncomfortable. Tie the ends of the cord in a knot, and tuck this knot either into the body of the ponytail or position it so it’s hidden at the back of your neck. If you prefer the cord to be visible as a styling element, let the knot sit exposed and make sure it’s tied neatly.
Creating Intentional Style
One beautiful aspect of cord-wrapped ponytails is that they look deliberately styled rather than like an emergency fix. The cord becomes a visual accent, creating definition between your hair and the ponytail base. You can wrap the cord once for a subtle look or multiple times for more visual impact. Combining different colors—say, a burgundy cord on dark hair—creates a striking detail that reads as intentional and fashion-forward.
Works Best With
- All hair types and lengths, as the cord does the securing rather than relying on hair texture
- Thick ponytails where the cord’s grip is sufficient
- Any occasion where a minimalist or nature-inspired aesthetic is desired
- People who like sustainable, reusable hair securing methods
Worth knowing: Leather cords are more durable than string and reusable across many hair styling days, making them an economical choice long-term.
11. The Elastic-Free Braided Tail Method
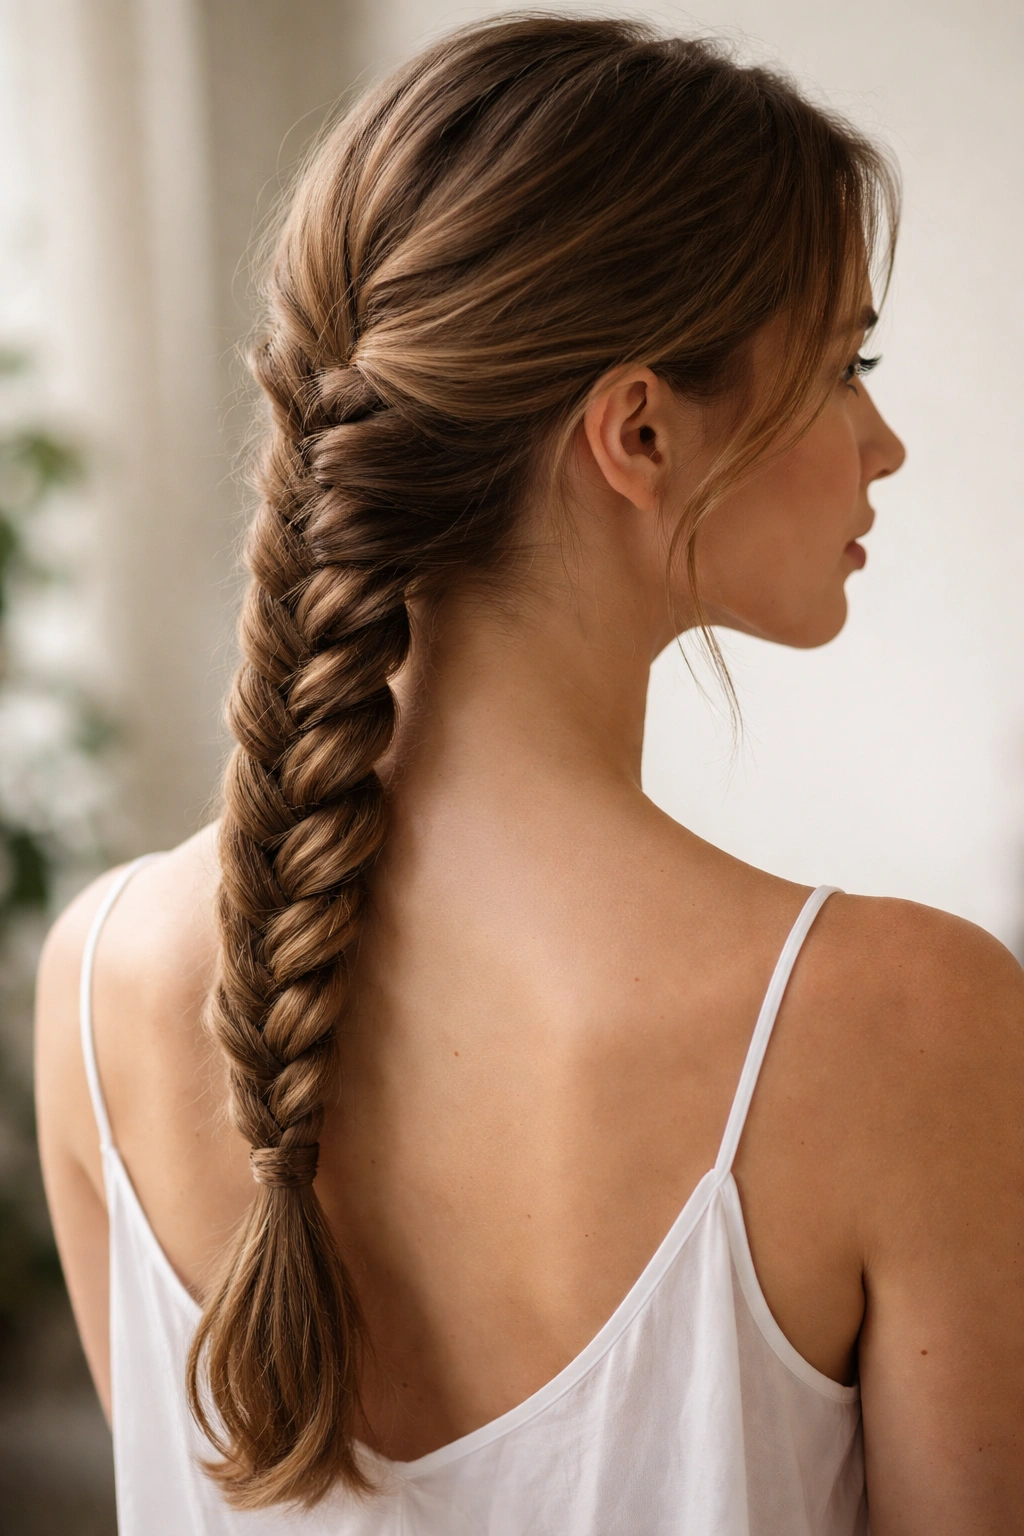
This approach creates a ponytail that’s entirely braided, with the braid itself acting as the securing mechanism rather than any fastener at the base. By braiding all of your gathered hair, you create a unified, secure style that holds together through the braid’s structural integrity rather than through external fasteners. This method works beautifully for creating a polished, athletic, or intentionally textured style.
Gathering Into a Braid
Start by gathering all your hair at your desired ponytail height and holding it firmly. Rather than securing this gathered hair with a tie, immediately begin braiding it. Divide the gathered ponytail section into three strands of equal thickness and begin braiding, working down the length of your hair. The braid’s structure inherently holds all the hair together, so you don’t need a fastener at the top where you’re gathering the hair.
Securing the Braid’s End
The only point where you need any fastening is at the very end of the braid. Here, you can use a small elastic, tie the braid off with a small section of hair (using the knotted hair method), or even leave it slightly loose and tuck the ends under for a casual, modern look. Many people find that a single bobby pin hidden in the final loops of the braid provides sufficient security without visible fastening.
Creating Visual Interest
A single unified braid reads as sleek and modern. However, you can create more visual texture by loosening the braid slightly after braiding—gently pull on the loops of each braid section to make it appear fuller and more textured. This creates an intentionally “undone” look that’s actually quite sophisticated. You can also create multiple braids from your ponytail for a more complex style, then secure the braids together at the ends.
Perfect For
- Athletic activities where you need secure hair that won’t shift
- Casual styles where braided texture is part of the aesthetic
- Long hair that has enough length to accommodate braiding
- Creating a polished look without visible fasteners
Insider note: Three-strand braids are easier to undo and restyle than other braid types, making them ideal if you plan to take your ponytail down and re-do it frequently.
12. The Decorative Brooch Pin Method
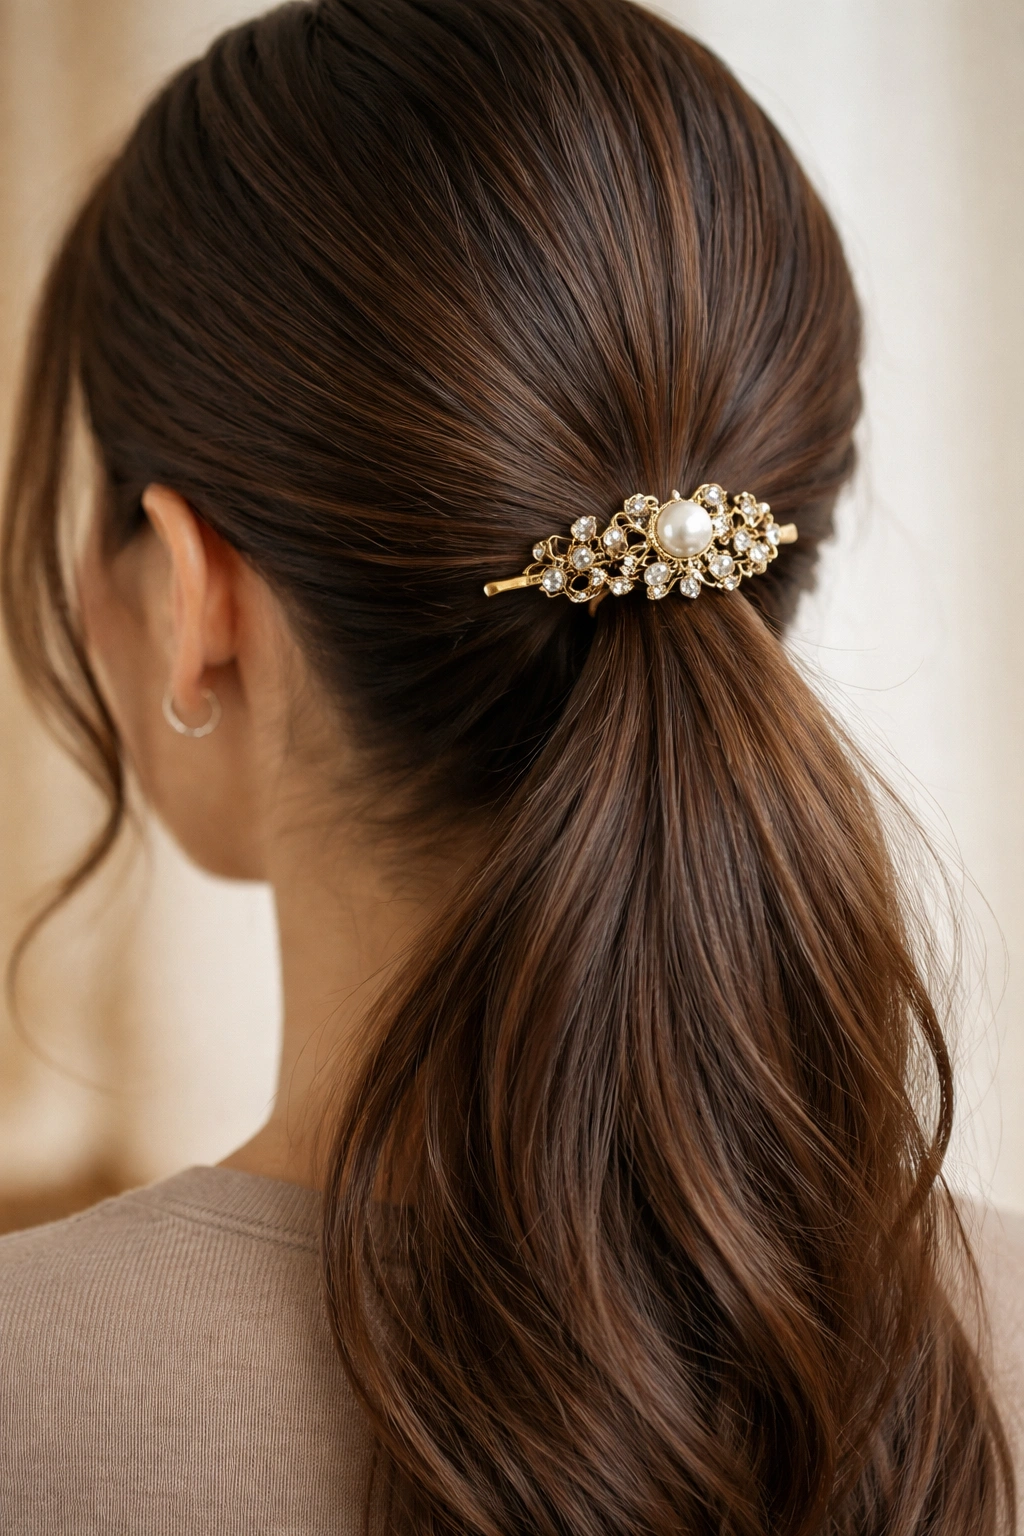
Using an ornamental brooch pin or safety pin as your ponytail fastener is both functional and fashionable. The pin passes through your gathered hair and latches onto itself (if using a safety pin) or hooks through the hair bundle (if using a decorative brooch). This method works particularly well for adding a touch of vintage glamour or modern minimalist design to your style, depending on which pin you choose.
Selecting the Right Pin
A safety pin, if you choose this route, must be substantial enough that its weight doesn’t pull away from your hair. You want a pin that’s at least 1.5 inches long and fairly sturdy. Decorative brooch pins—vintage designs, modern minimalist pieces, or statement jewelry—add intentional style while serving the functional purpose of securing your hair. The pin should pass easily through your hair bundle without snagging.
Positioning for Security and Aesthetics
Gather your hair into a ponytail and hold it firmly at the base. Open your safety pin and insert it through the gathered hair bundle, with the opening facing toward your scalp. The closed loop of the pin should rest against the outside of your ponytail, holding everything in place through the pin’s weight and structure. If using a brooch pin, position it so the pin mechanism goes through your hair horizontally, securing everything in place.
Styling Choices
You can hide the pin completely by positioning it at the back of your neck where it won’t be visible. Or you can display it proudly as a styling statement—a gleaming gold pin, a vintage brooch, or a delicate safety pin worn intentionally becomes a focal point. This method particularly suits polished, put-together aesthetics or edgy, fashion-forward looks, depending on your pin choice.
Works Best With
- Thick hair that can support a pin’s weight without slipping
- Occasions where you want a decorative accent at your ponytail base
- Creating an intentional, editorial-looking style
- Hair types that hold together without slipping
Pro tip: Vintage brooches designed for hair are sturdier and more secure than fashion jewelry pieces—if you’re choosing a decorative option, vintage is typically more reliable.
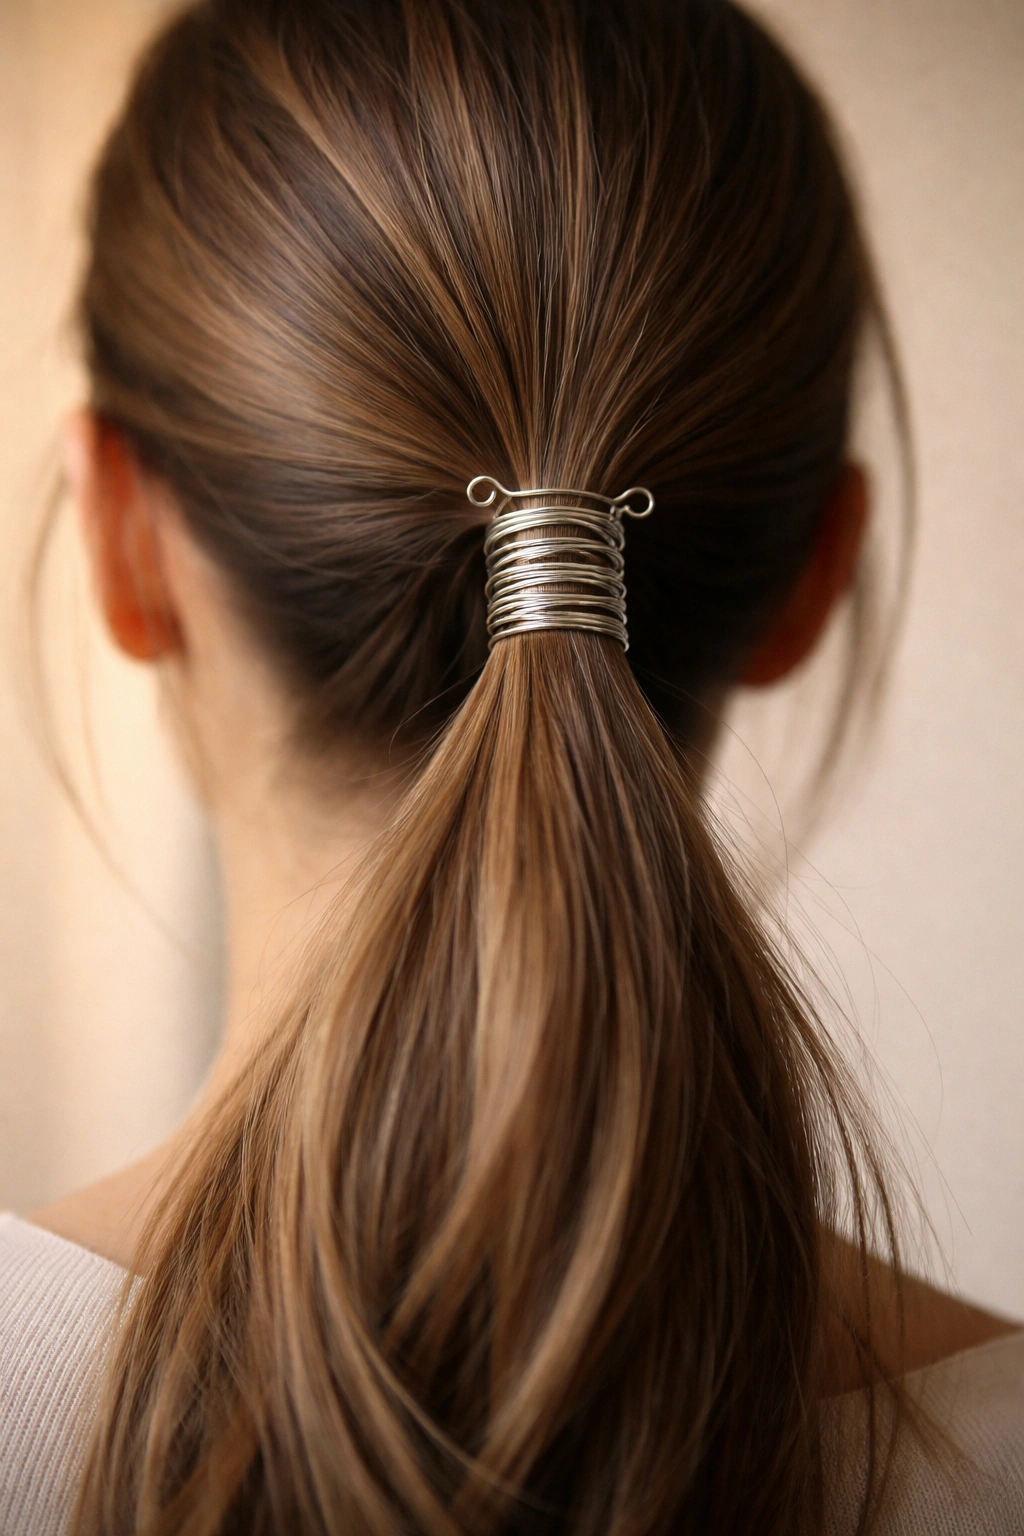
13. The Hair Cuff or Ring Method
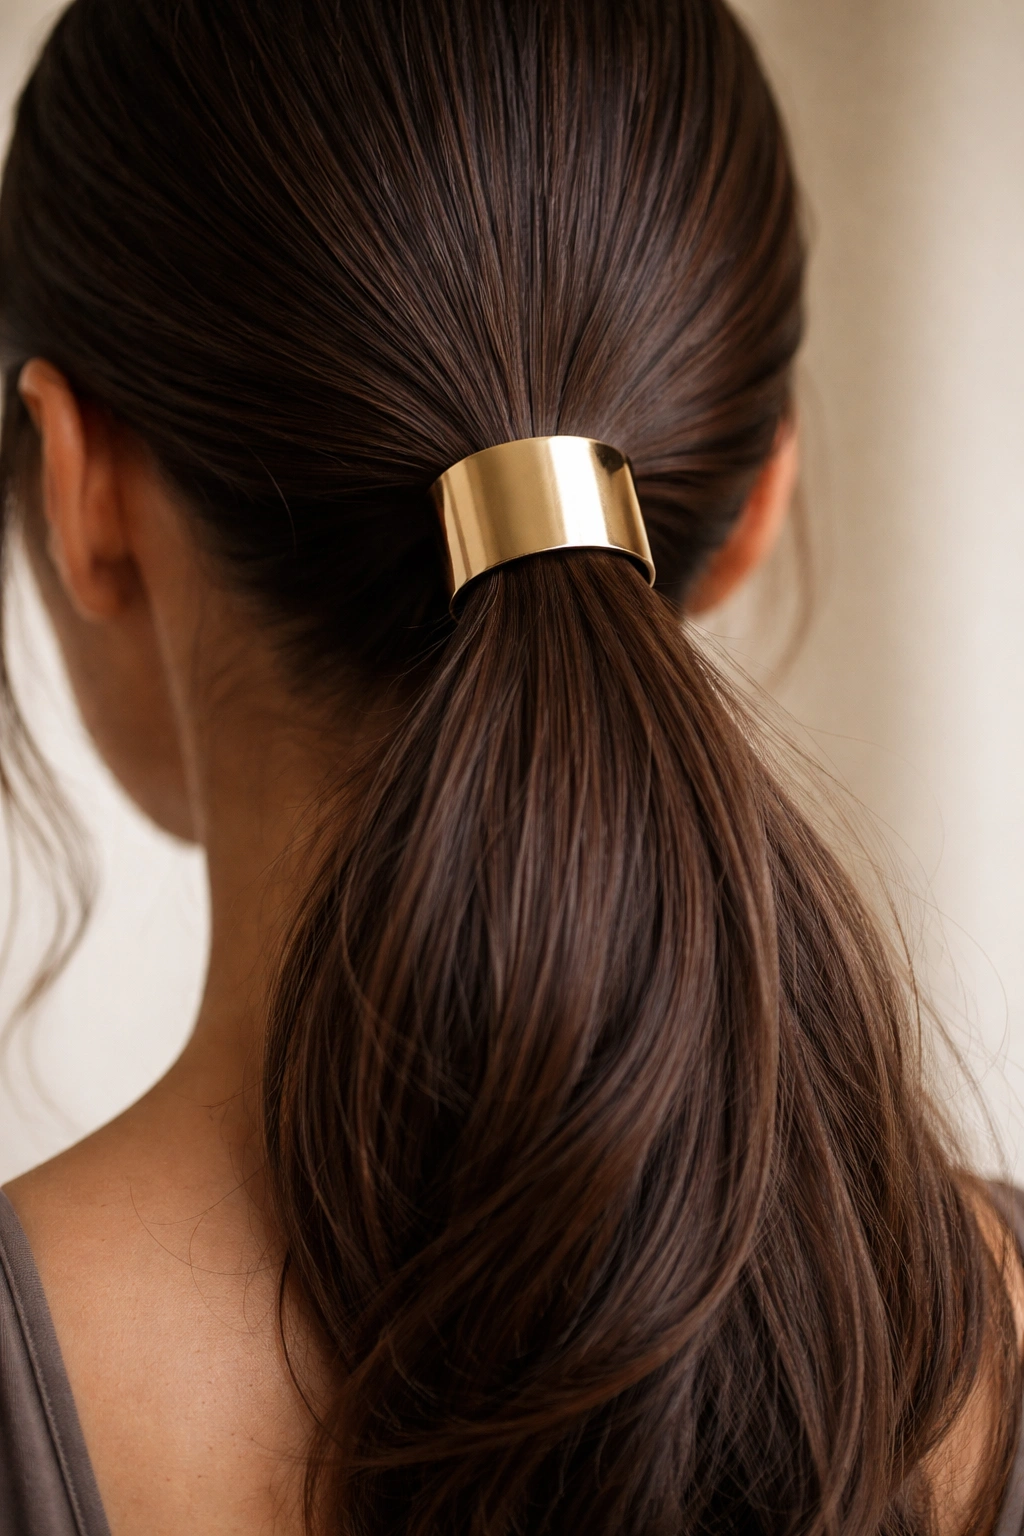
Hair cuffs (decorative metal tubes or rings designed to slide onto ponytails) offer a modern, chic way to secure your hair without traditional elastics. These cuffs come in various finishes—gold, silver, rose gold, blackened metal—and styles ranging from minimalist to ornate. The cuff works by sliding up your gathered ponytail and gripping the hair through pressure, very similar to how a hair clip works but with a more elegant, jewelry-like appearance.
How Hair Cuffs Provide Security
Gather your ponytail as usual, leaving the gathered section slightly loose and thick rather than tightly compressed. Slide the hair cuff up over the gathered ponytail, positioning it at the base where you’re holding the hair. The cuff’s interior diameter should be slightly smaller than the diameter of your gathered ponytail, creating pressure that holds everything secure. The cuff’s weight and the pressure it exerts keep your ponytail from slipping or falling throughout the day.
Choosing the Right Size
Hair cuffs come in various interior diameters, so selecting the correct size for your hair thickness is crucial. A cuff that’s too large will slip; one that’s too small won’t slide on or will feel uncomfortably tight. Most people with medium to thick hair do well with cuffs in the standard size range (usually 1-1.5 inches interior diameter). Fine or thin hair might require smaller cuffs designed specifically for delicate hair.
Style Statements With Cuffs
A sleek gold cuff on a high, polished ponytail reads as luxury and intentionality. Multiple thin cuffs stacked together create a more editorial, fashion-forward look. A single minimalist cuff provides subtle polish without dramatic statement. Some cuffs feature geometric patterns, engravings, or gemstone details, making them jewelry-adjacent rather than purely functional.
Best For
- Polished, professional styles where understated elegance is the goal
- Anyone who wants their securing mechanism to be a visible design element
- Creating a modern, minimalist aesthetic
- All hair types when the cuff diameter is correctly matched
Worth knowing: Hair cuffs are adjustable through their construction—some can be slightly bent to increase or decrease the grip, allowing you to customize fit.
14. The Fabric Scrunchie Alternative
While traditional hair ties fall into the “with a hair tie” category, fabric scrunchies represent a different approach that’s worth exploring as a tie-free option. However, the true tie-free version involves using a piece of fabric (much wider and more substantial than a thin elastic) to bundle and secure your hair. This could be a strip of fabric you tear from an old t-shirt, a bandana, or any piece of cloth about 2-3 inches wide.
Creating Your Fabric Fastener
Cut or tear a strip of fabric approximately 2-3 inches wide and 12-18 inches long. Cotton, linen, or soft jersey fabric works beautifully. Gather your ponytail as usual, then rather than tying it with an elastic, wrap your fabric strip around the base multiple times, just as you would wrap a cord or scarf. The fabric’s width creates substantial grip without needing the elasticity of traditional hair ties. Tie the fabric ends in a knot or a bow at the base of your ponytail.
Why Fabric Bundles Are Superior
Fabric’s surface area and weight provide security that thin elastics can’t match. The friction between fabric and hair naturally grips without squeezing the way elastic does. For this reason, fabric bundle methods are gentler on hair and less likely to create dents or breakage points. The fabric itself becomes a design element, allowing you to choose colors and patterns that coordinate with your outfit or personal style.
Styling Options
A simple knot of fabric at the base creates a minimalist look. Wrapping the fabric multiple times and tying a visible bow creates a retro or romantic aesthetic. Leaving the fabric’s ends to hang down the back of your neck or drape over your shoulder creates a bohemian, artistic impression. The fabric can be the same color as your hair for invisibility or a contrasting color for intentional style.
Perfect For
- Sustainable, zero-waste styling (use old fabric you already have)
- Casual, bohemian, or retro-inspired styles
- Anyone sensitive to elastic tension or experiencing hair breakage
- Creating a style that’s both functional and visually distinctive
Pro tip: Stretchy jersey fabric (from a t-shirt you’re repurposing) works better than rigid cotton because it molds to your hair shape while still providing grip.
15. The Wire-Wrapped Ponytail Technique
This creative method uses a thin, flexible wire (floral wire works beautifully, or even a twist-tie if you’re improvising) wrapped around your ponytail base to create secure hold while allowing you to position and reposition your ponytail as desired. The wire holds its shape once positioned, creating a unique aesthetic somewhere between functional and sculptural. This method works particularly well for creating playful, artistic styles or for anyone who enjoys experimental hair styling.
Selecting and Using Wire
Floral wire, available at craft stores in various gauges and colors, offers flexibility and durability. You’ll want wire that’s flexible enough to wrap around your hair without snapping but sturdy enough to hold its position. Some wire comes with a vinyl coating that prevents snagging. Alternatively, twist-ties or even a length of thin string can serve the same purpose. The wire should be about 12-18 inches long for most ponytails.
Creating the Wrap and Shape
Gather your ponytail as usual, then take your wire and wrap it tightly around the base of your ponytail, going around at least twice for security. Once wrapped, you can shape the wire’s ends into loops, coils, or decorative bends. This is where the sculptural quality comes in—you can position the wire’s ends into a spiral, a loop, or even a twisted shape that becomes part of the style itself. The wire holds whatever shape you create, allowing you to adjust and readjust throughout the day if desired.
Aesthetic Possibilities
Bare silver or copper wire creates an industrial, modern look. Vinyl-coated wire in bright colors adds playful visual interest. Tightly wrapped wire that completely disappears into your hair provides invisible security. Loosely wrapped wire with visible loops or spirals becomes an artistic statement piece. This method appeals to people who view hair styling as creative expression rather than purely functional grooming.
Works Best With
- Thick hair that can support wire’s weight without discomfort
- Casual, experimental, or artistic styling situations
- Anyone who enjoys creative problem-solving and fashion exploration
- Styles where the securing mechanism is meant to be visible and interesting
Worth knowing: Once you position wire the way you like it, leaving it in place for a few days can help it “memorize” that shape, making it hold better on subsequent uses.
Final Takeaways
The beauty of styling without traditional hair ties is that it encourages you to think creatively about what tools and techniques are actually available to you. Many of these methods have been used for years across different cultures and fashion traditions—they’re not new inventions but rather time-tested approaches that deserve reconsideration in contemporary styling. Whether you choose these methods because you’re giving your hair a break from elastic tension, because you forgot your hair tie, or simply because you enjoy exploring different styling possibilities, you’re gaining versatile skills that work in any situation.
The method you choose ultimately depends on your hair type, the occasion, your personal style preference, and what materials you happen to have available. Thick, textured hair tends to hold self-securing methods like twists and braids more easily. Sleeker, straighter hair might benefit more from physical fasteners like clips or pins. The best approach is to try a few methods and see which ones feel most secure, most comfortable, and most aligned with how you like to look and feel.
What makes these techniques most valuable is their flexibility. You’re not locked into using the same securing method every single day. Some days you might use a decorative clip, other days a scarf, and still other days a simple twist. This variety not only prevents repetitive strain on your hair from the same fastening point but also keeps your styling fresh and interesting. You become more adaptable and creative in your approach to hair care, which ultimately translates into healthier, more resilient hair and more confident styling choices.