Double French braid ponytails are one of the most flattering and versatile hairstyles you can master. They combine elegance with everyday practicality—you get the polished look of an intricate updo without spending half an hour in front of the mirror. Whether you’re heading to work, a casual weekend brunch, or a more formal event, a double braid ponytail works. The best part? You don’t need advanced braiding skills to pull off any of these styles successfully.
The main reason double French braid ponytails intimidate people is that they look complicated. In reality, once you understand the basic mechanics of a French braid—which is just a regular three-strand braid where you keep adding hair as you work down—combining two of them into a ponytail becomes straightforward. Beginners often worry they’ll mess up the symmetry or that their braids will look messy and unfinished. The truth is, slightly imperfect braids often look more intentional and modern than perfectly tight ones. Hair texture, length, and your comfort level all play a role in how quickly you’ll master these styles.
This guide walks you through twelve distinct double French braid ponytail styles, each designed specifically with beginners in mind. Every style breaks down the braiding technique step-by-step, explains what makes it beginner-friendly, and includes practical tips to help you nail it on your first or second try. You’ll learn how to adapt each style to your hair length, texture, and the occasion you’re dressing for. By the end, you’ll have the confidence to tackle these styles without tutorial videos playing on your phone.
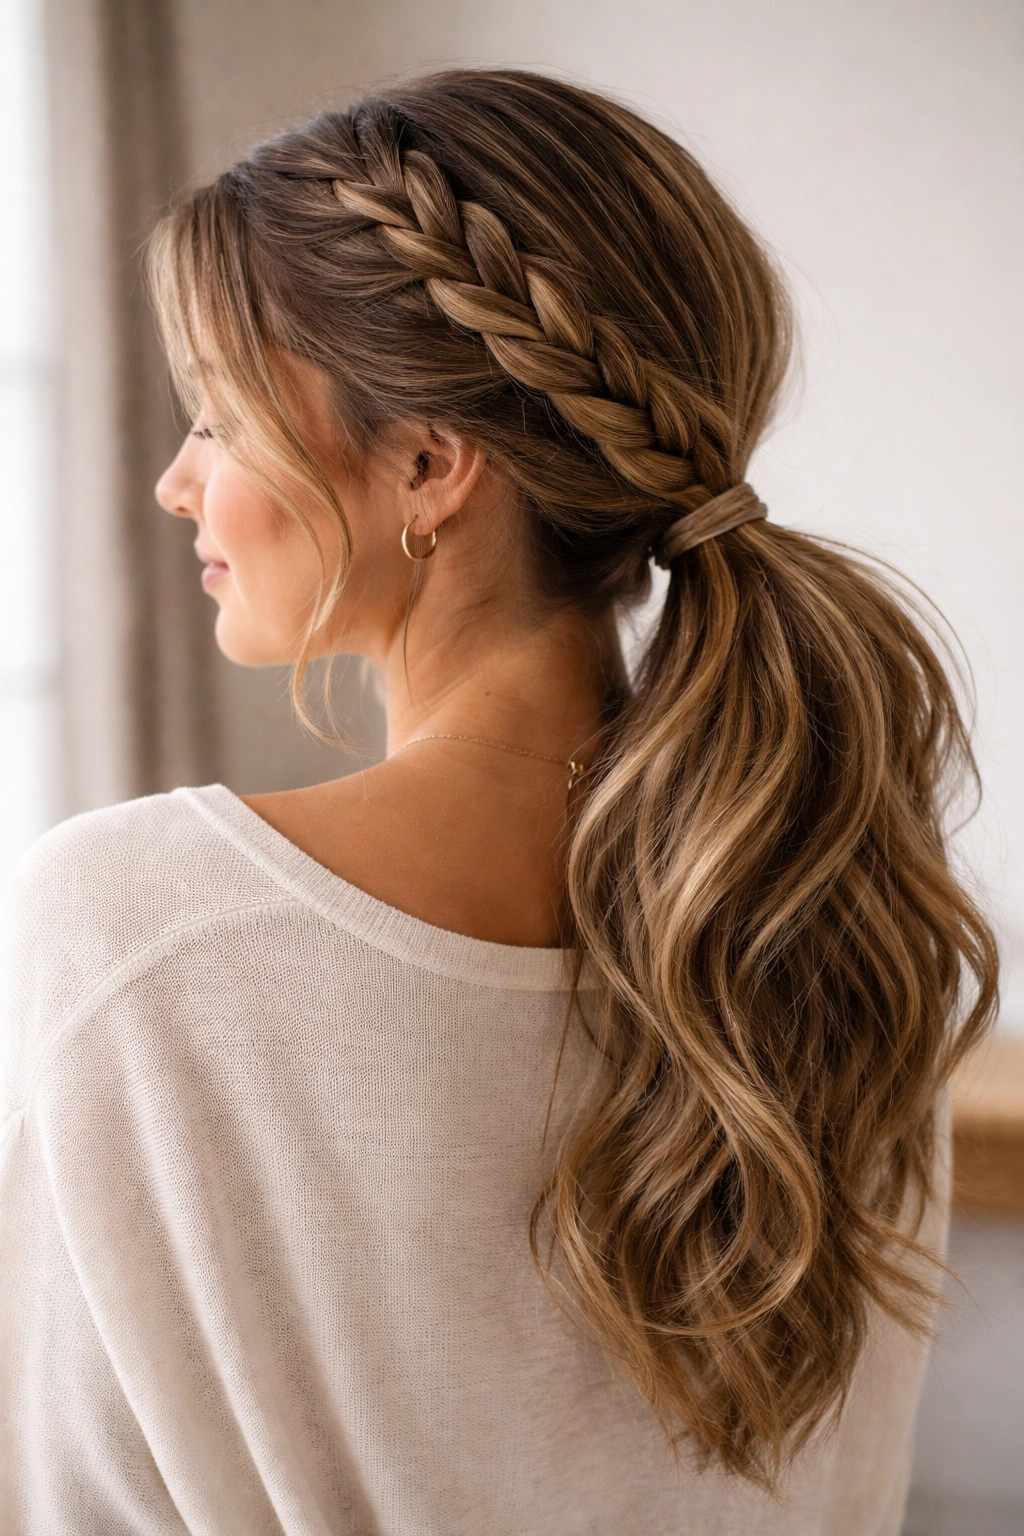
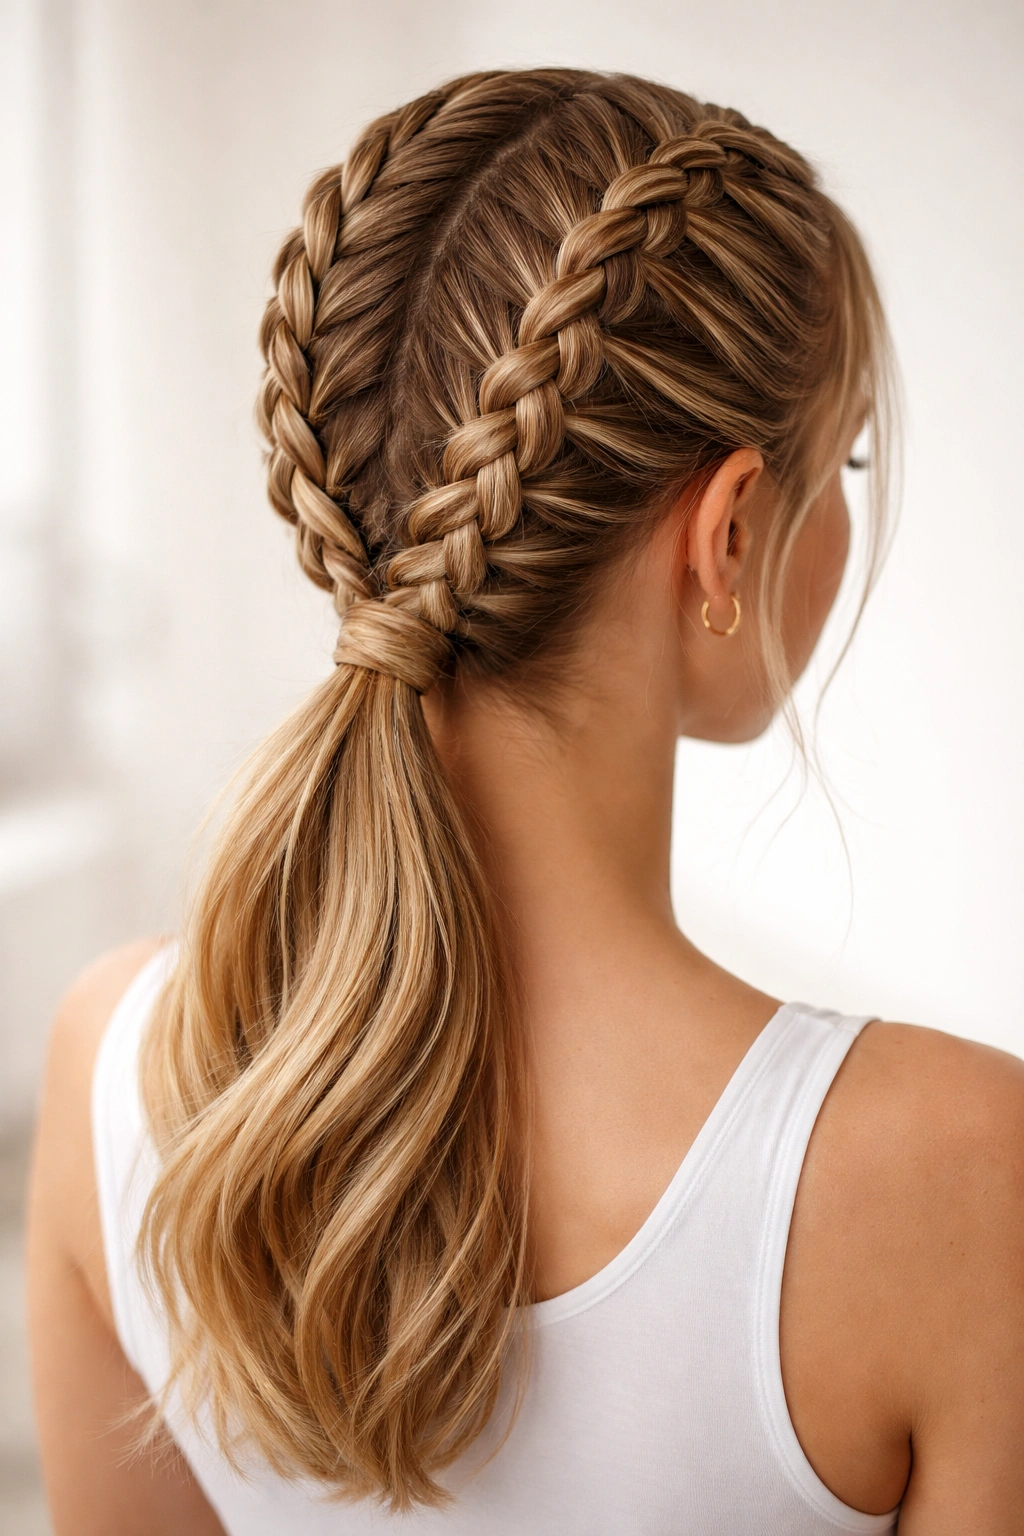
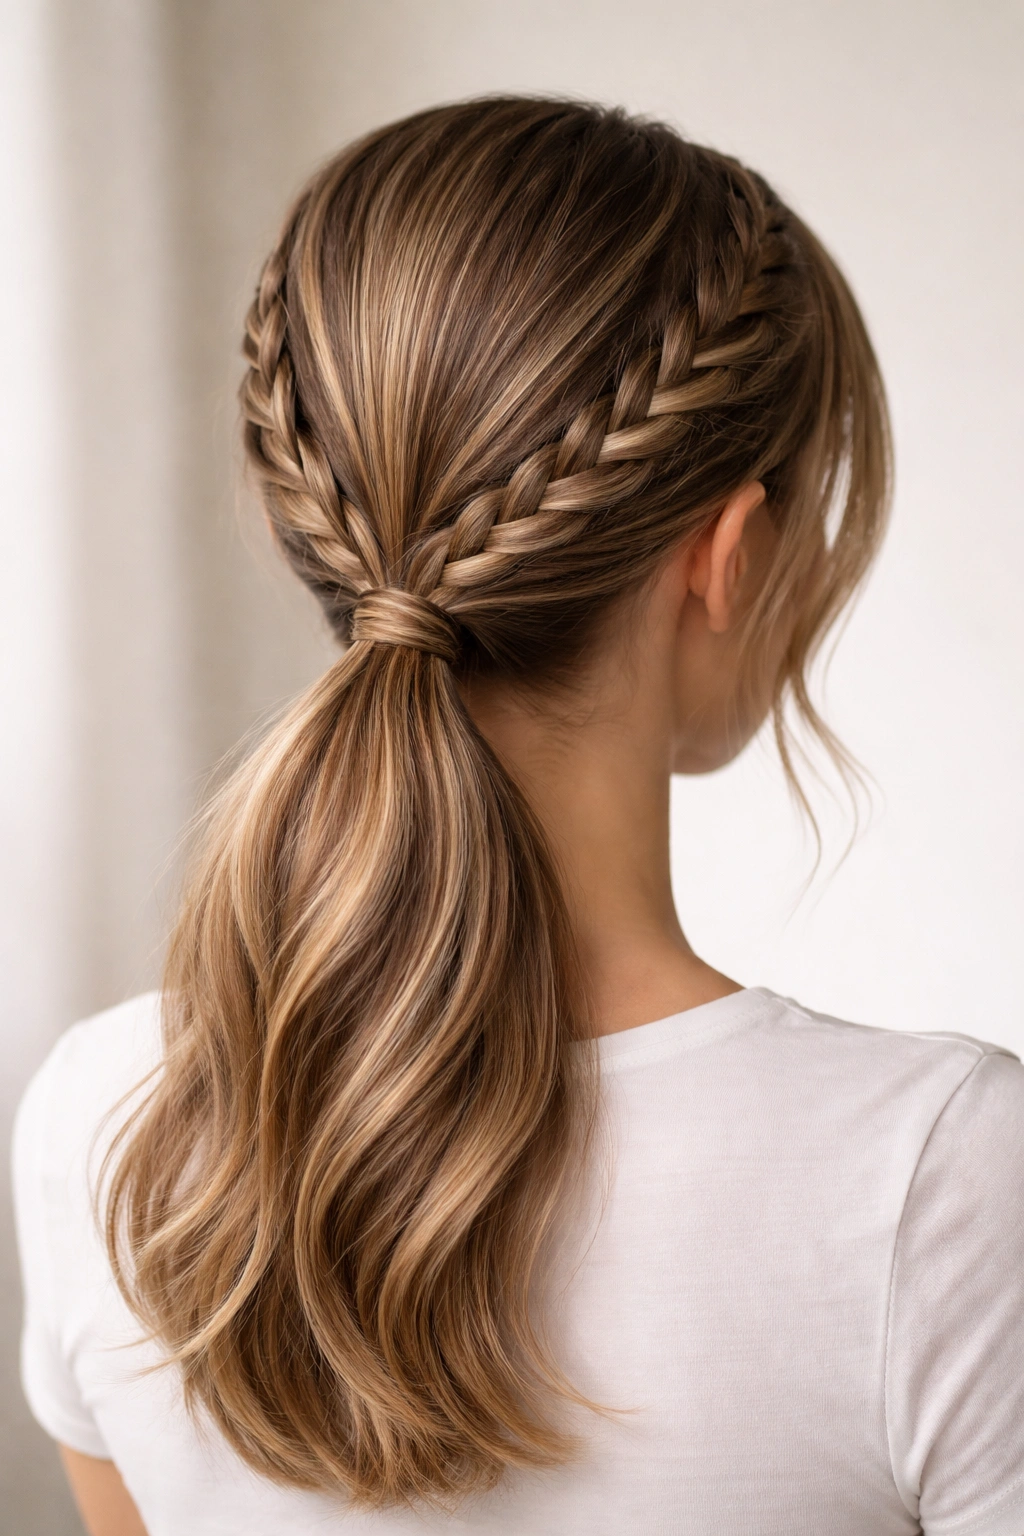
1. Classic Two-Braid Low Ponytail
The classic two-braid low ponytail is the foundation for every other style on this list. It’s the entry point into double French braid ponytails, and mastering it means you’ve cracked the code for everything else. Two braids run down the back of your head, starting near your temple on each side, and converge at the nape of your neck into a single sleek ponytail. This style works beautifully on straight hair, wavy hair, curly hair, and everything in between. It’s the kind of hairstyle that looks effortlessly polished, like you spent more time on it than you actually did.
Why It’s Perfect for Beginners
The beauty of the classic two-braid low ponytail lies in its forgiveness. Because both braids are identical and symmetrical, you’re not trying to create complex variations—you’re simply repeating the same motion twice, once on each side. If one braid comes out slightly looser than the other, nobody notices because your brain expects symmetry and your eye corrects for minor imperfections automatically. The low position at the nape of your neck also means flyaways and loose pieces actually add to the style rather than detract from it. You’re aiming for a soft, lived-in look, not architectural precision.
Step-by-Step Guide
Start with clean, dry or slightly damp hair—if your hair is slippery-smooth fresh from the shower, spray a light texture spray on the crown and sides to give your braids grip. Divide your hair down the center with a rattail comb, creating two equal sections from your forehead to the nape of your neck. On the right side, take a three-inch section of hair at your temple and split it into three strands. Begin a French braid by crossing the right strand over the center, then the left over the center, just like a regular braid. As you move down, add a thin slice of hair from the outer edge of your section to each outer strand before crossing it over. Continue this motion down to the base of your neck, then switch to a regular three-strand braid for the last two inches. Secure the end with a tiny elastic. Repeat the exact same process on the left side.
Once both braids are complete, gather them together with the rest of your loose hair at the nape of your neck and secure everything into a low ponytail with an elastic that matches your hair color. Use a fine-tooth comb or a teasing brush to gently blend the seams where the braids meet the ponytail. This seamless transition is what elevates the style from “practice run” to “intentional design.”
Pro Tips and Common Mistakes
Keep your braids slightly loose rather than pulling them tight—tight braids can look severe and are actually harder to manage as a beginner because any unevenness becomes glaringly obvious. Loose braids are more forgiving and photograph better. If you’re worried about symmetry, braid the right side first, then use it as a reference for the left side. Don’t aim for identical—aim for “similar enough that nobody else will notice the difference.” Most people won’t even realize you’ve done two braids instead of a single braid; they’ll just register that your ponytail looks interesting and polished.
2. Side-Swept Double Braid Ponytail
A side-swept double braid ponytail shifts the entire style to one side of your head, creating an asymmetrical, romantic look that feels more casual than the centered version. Both braids still run down the back, but they converge into a ponytail positioned low and to the left (or right, depending on your preference) rather than at dead center. This style is particularly flattering if you have a side part or if you’re trying to add dimension to fine or thin hair. It also feels less formal than the centered version, making it perfect for everyday wear or casual social events.
Why It’s Perfect for Beginners
Asymmetry is actually easier than symmetry for beginners because it forgives imperfections more readily. If your braids aren’t perfectly matched, that’s the whole point—one side is supposed to look slightly different from the other. The off-center ponytail placement also means you don’t have to be as precise about where you start your braids or how far down your neck they reach. This style also tends to look intentionally undone, which works in your favor. Small loose pieces and slight unevenness in braid tension actually contribute to the aesthetic rather than working against it.
Step-by-Step Guide
Begin with your hair parted on one side—if you’re going for a left-swept ponytail, part your hair more heavily to the left than usual. Take a section of hair from your right temple and begin a French braid there, angling it slightly toward the left as you braid down. The key difference from the classic style is that you want this right-side braid to curve across the back of your head rather than traveling straight down. As you braid, consciously angle your hand slightly left with each new addition of hair.
For the left-side braid, start from hair closer to your left ear and braid down, also angling slightly toward your end destination. Since you started the right braid closer to center, the left braid will have less distance to travel, which creates the asymmetry naturally. Both braids will converge at a point slightly left of center, at roughly the level of your ear on that side. Twist or loosely braid the last few inches of each braid together, or gather all the hair at that point into a small elastic and secure a low ponytail from there.
Pro Tips and Common Mistakes
The most common mistake is being too heavy-handed with the side part—a subtle side part looks more intentional than an exaggerated one. Don’t make the right section of hair significantly bigger than the left; aim for a 60-40 split rather than 70-30. As you braid, resist the urge to pull the braids extremely tight in an attempt to control them. Loose braids hold their shape better once you’ve secured the ponytail, and they’re far easier to adjust if you’re not happy with the initial result. If one braid looks noticeably loose compared to the other, you can gently tug on sections of the looser braid to tighten it after the fact—a technique called “pulling out” the braid.
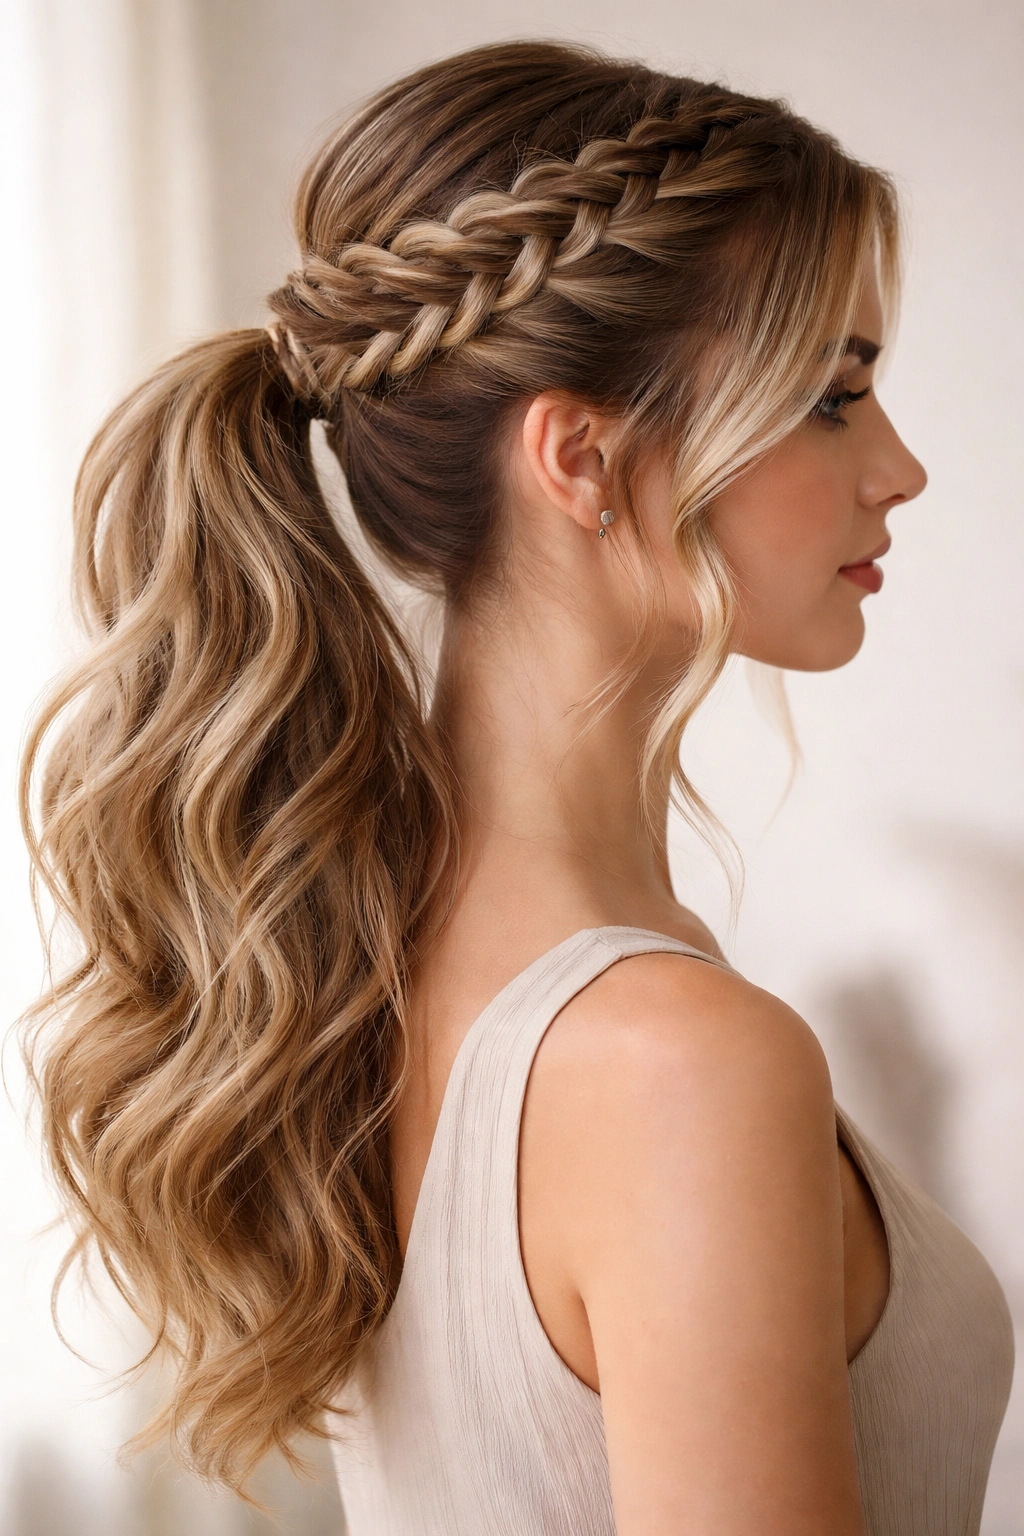
3. Braided Crown with Ponytail Base
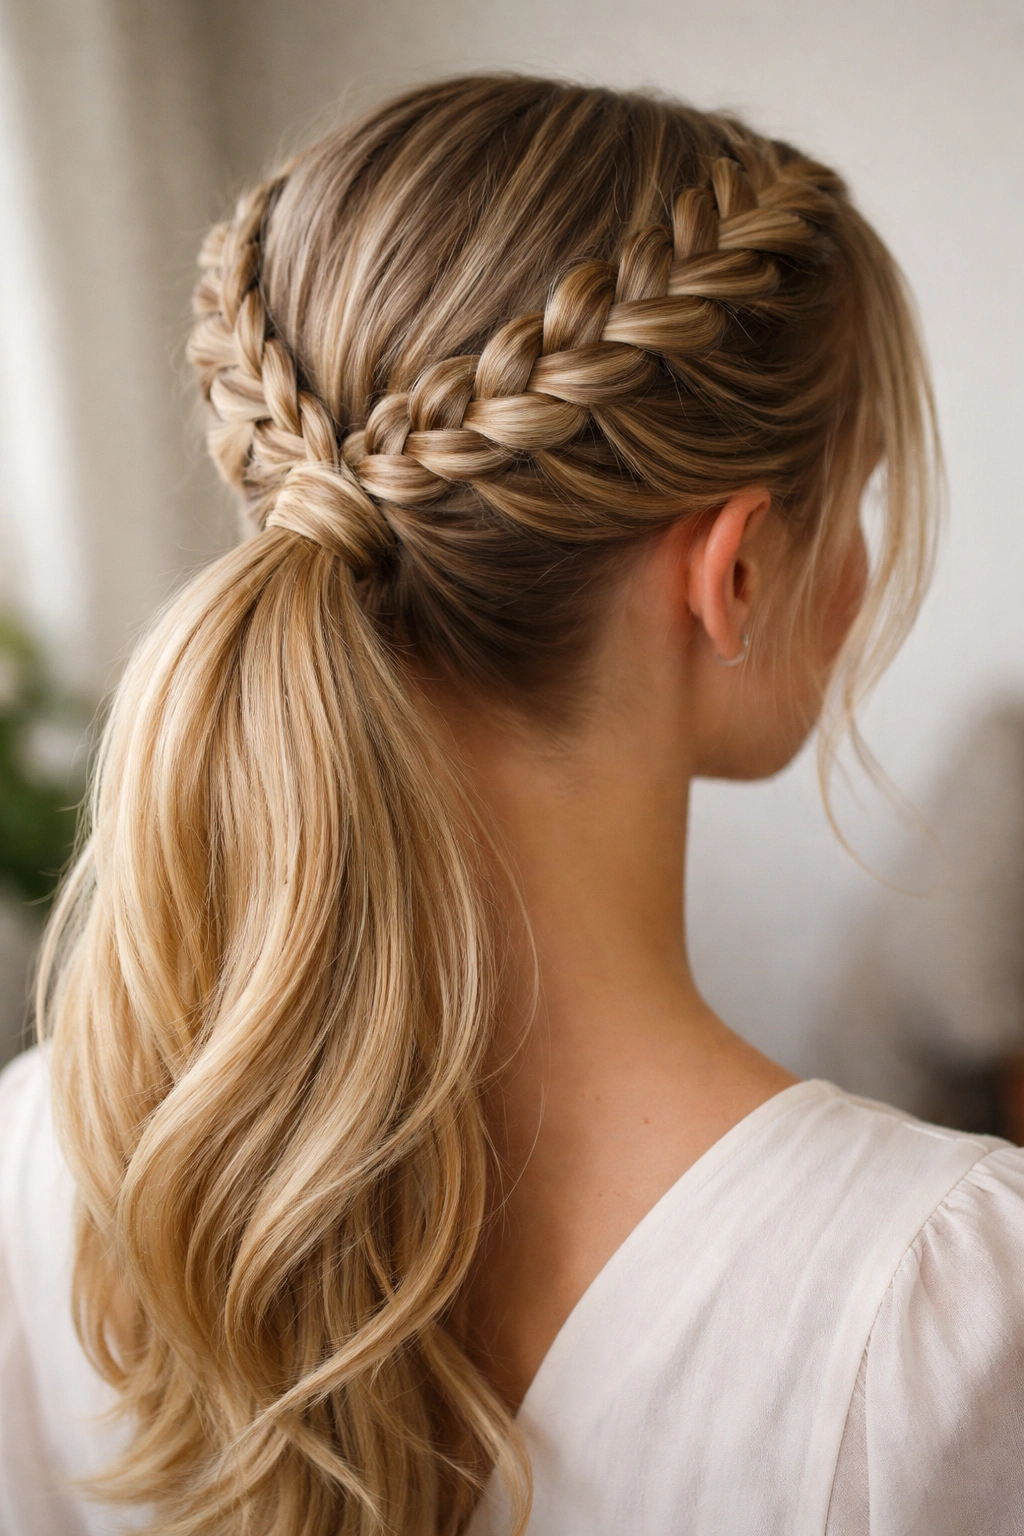
A braided crown ponytail combines an elegant upswept crown with functional double French braids that anchor at the crown and flow into a ponytail. Instead of your braids traveling all the way down your neck, they wrap around your head like a crown, with the braids meeting at the back of your head where they converge into a ponytail. This style is more formal than the previous two and works beautifully for special events, date nights, or when you want to feel extra put-together. It also solves the problem of hair falling out of a regular ponytail if you’re going to be moving around a lot.
Why It’s Perfect for Beginners
The crown placement actually makes this easier than it looks, because you’re working with less hair in each braid (you’re only incorporating hair from the sides and back, not the entire back section). The braids are also less visible on the crown, so small imperfections are camouflaged by their position on your head. The fact that both braids serve an architectural purpose—holding up your ponytail and framing your face—means the style looks intentional rather than like you’re practicing. Even if your braids aren’t perfectly neat, they’re contributing to the overall design.
Step-by-Step Guide
Start with your hair in a high ponytail at the crown of your head (roughly where a high pony would sit, not at the very top center). Use a bobby pin to anchor this ponytail temporarily so it doesn’t fall while you’re working. Now you’re going to create two braids that will form the “crown” around this base ponytail. On the right side, take a thin section of hair from near your right ear and begin a Dutch braid (an inverted French braid where strands cross under instead of over—this makes the braid pop outward visually). Braid this section toward the back of your head, adding hair as you go, but only incorporate hair from the side of your head, not from the ponytail itself.
Continue this right-side braid until you reach the center back of your head, roughly where the base of your crown ponytail is. Secure the end of this braid with a small elastic. Repeat on the left side, creating a matching Dutch braid that travels from your left ear to the center back. Once both braids are complete and secured, take both braids and the crown ponytail together and secure them all into a single elastic at the back of your head. The two Dutch braids will frame the sides of your head like a decorative crown, and the original ponytail sits underneath, fully supported.
Pro Tips and Common Mistakes
A common mistake is making your initial crown ponytail too high—if it’s at the very top of your head, the braids have to angle steeply downward to reach it, which looks awkward. Aim for a ponytail positioned at the back-middle area of your crown, not the very top. Dutch braids (braids that pop outward) work better for this style than French braids because they’re more visible and create a more decorative frame. If you’ve never done a Dutch braid before, practice it a few times on its own before attempting this style. The motion is the opposite of a French braid—instead of crossing strands over the center, you cross them under, but the principle of adding hair as you go is identical.
4. Half-Up Double Braid Ponytail
A half-up double braid ponytail keeps the top half of your hair down while braiding and securing only the bottom half into a ponytail. This is the perfect middle ground between a full ponytail and wearing your hair completely down. It’s casual enough for everyday wear but polished enough for professional settings or casual dates. The style also works beautifully as a solution for dealing with face-framing hair that’s too short to fully integrate into a full ponytail, and it prevents all your hair from being pulled back from your face if you prefer a softer look.
Why It’s Perfect for Beginners
Because you’re only braiding the lower portion of your hair, you have less hair to manage in each braid, making them easier to control and less likely to become tangled. The half-up placement also means that any wonky sections at the crown are completely hidden underneath your down hair. You can even brush or style the top layer of your hair separately if you want it to look more polished or voluminous, then create the braids beneath it. This two-step approach makes the whole process feel less overwhelming and gives you more control over the final appearance.
Step-by-Step Guide
Begin by creating a deep side part and brushing the top layer of your hair to the side—you want roughly the top third to one-half of your hair left down and unstyled for now. Clip this top section out of the way with a claw clip or large bobby pin. Now you’re working with just the lower half of your hair. Take a section from behind your right ear and begin a French braid, incorporating only the lower-back section of your hair (not the clipped-up part). Braid this down to the nape of your neck and secure it with a small elastic. Repeat on the left side.
Once both braids are complete, release the clip holding your top hair and gather all three sections—the two braids and the loose top layer—into a single ponytail at the back of your head, positioned lower than where a typical half-up clip would sit. The top hair should drape over the elastics, creating a soft, layered effect. Use a fine-tooth comb to gently blend the top layer with the braids where they meet at the base of the ponytail.
Pro Tips and Common Mistakes
The key to making this style look intentional is ensuring that your top layer is smooth and neat while your braids are slightly loose and textured. This contrast makes it clear that the style is deliberate, not accidental. Avoid pulling the top section too tight—a slightly loose, soft crown of hair looks far more sophisticated than a slicked-back top. If you want extra hold, use a light hairspray on the top section before braiding the bottom. This keeps everything in place without making your hair look stiff or overly styled.
5. Twisted Double Braid Low Pony

A twisted double braid low ponytail replaces traditional French braids with rope twists—two sections of hair twisted around each other, with new hair incorporated as you go. This style is significantly easier than French braiding because the motion is simpler (two strands instead of three), yet it looks equally sophisticated. The twists create a different visual texture than braids, making it perfect if you want to switch up your look or if you struggle with traditional French braids. Rope twists also hold together slightly more naturally than braids, so they’re less likely to come loose as the day goes on.
Why It’s Perfect for Beginners
Rope twists are genuinely easier to execute than French braids, especially if you’re still developing hand coordination and muscle memory for the braiding motion. The basic principle is simple: take two strands, twist them around each other, add a slice of hair to one strand, and repeat. There are fewer moving parts than in a three-strand braid, so there’s less that can go wrong. Many beginners find that rope twists feel more natural and intuitive than braids because the twisting motion is something most people have done casually with hair before. Once you nail rope twists, you’ve essentially unlocked the ability to create more refined versions of double braid styles.
Step-by-Step Guide
Divide your hair down the center with a fine-tooth comb, creating two equal sections from your forehead to your neck. On the right side, take a one-inch section of hair at your temple and divide it into two equal strands. Cross the front strand behind the back strand, then take a thin slice of new hair from the outer edge of your right section and add it to the back strand (the one that’s now in the back). Cross the updated back strand in front of the front strand, and immediately add a thin slice of new hair from the outer edge to the front strand. Continue this alternating pattern down to the nape of your neck—twist, add hair to the back strand, twist, add hair to the front strand. The rhythm becomes: twist, add hair, twist, add hair.
Once you’ve incorporated all the hair from your right section, continue with a basic two-strand twist (no new hair being added) for the last inch or two, and secure it with a small elastic. Repeat the entire process on the left side. Gather both twists and the remaining loose hair into a low ponytail at the nape of your neck.
Pro Tips and Common Mistakes
The most common mistake is adding too much hair to each strand each time, which makes the twists bulky and uneven. Keep each addition to a thin, quarter-inch slice—the thinner the addition, the more refined and polished the final result. The other common mistake is twisting too tightly, which limits the amount of hair you can incorporate and makes the twists look severe. Keep your twists loose enough that you can still gently slide your fingers underneath them as you go. If you find yourself confused about which strand is which, remember this: the strand on top is always the next one you’re going to pull over. Just keep twisting the same direction and adding hair consistently.
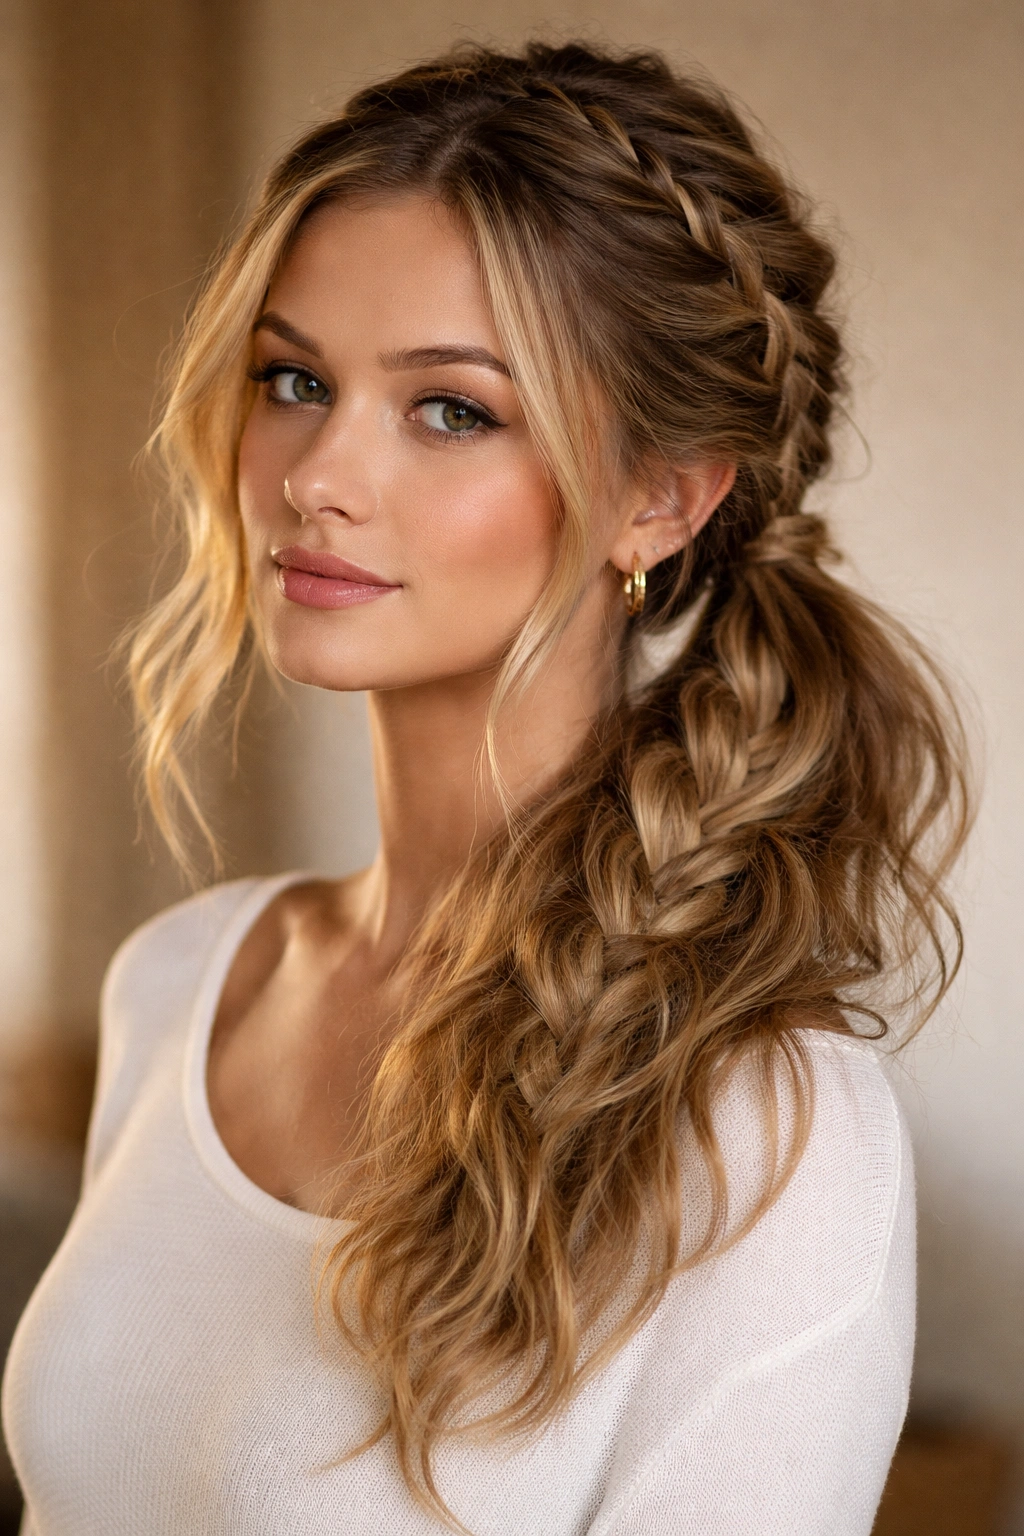
6. Braided Ponytail with Face-Framing
A braided ponytail with face-framing keeps strategic pieces of hair loose around your face while the rest goes into double French braids and a ponytail. These face-framing pieces soften the overall look and create a more romantic, less severe aesthetic than a fully pulled-back style. This is perfect if you love the neatness of a ponytail but don’t want to look too buttoned-up, or if you have wispy layers that don’t naturally get incorporated into a full ponytail anyway. The style also works beautifully if you have a longer face shape and want to add width at the cheekbones.
Why It’s Perfect for Beginners
Face-framing pieces actually make this style easier, not harder, because you’re not trying to incorporate every single hair into your braids and ponytail. You have permission to leave pieces loose, which reduces the amount of hair you’re managing in each braid. The loose pieces also camouflage any imperfections in your braiding—if your braids aren’t perfectly even or tight, the wavy face-framing pieces draw attention away from them and toward your features instead. This style also allows you to customize how loose or how tight everything else is based on your preferences and comfort level.
Step-by-Step Guide
Before you start braiding, identify which pieces you want to leave out for face-framing. Typically, this means taking a small section (about one inch wide) from in front of each ear, and potentially a thin section from your center part line if you want that effect. Clip these sections out of the way. Now you’re going to create your two French braids from the sections of hair behind your ears, braiding the back portion of your hair just as you would for the classic two-braid ponytail (see Style #1). Once you’ve finished both braids and secured them with small elastics, release your face-framing clips.
Gather the two braids and any remaining loose back hair into a low ponytail. The face-framing pieces should sit naturally around your face, in front of your ears. If you want them to have waves or curls, you can lightly curl them with a curling iron or wand before you start braiding everything else. Alternatively, you can wave them after you’ve finished the ponytail for a more effortless look.
Pro Tips and Common Mistakes
The key to making face-framing look intentional is keeping those loose pieces relatively thin and consistent on both sides. If one side has significantly more hair out than the other, it reads as accidental rather than designed. Use a mirror to check symmetry before you commit to your final ponytail placement. If your face-framing pieces are prone to falling out or getting in your face throughout the day, use a tiny dab of gel or a light hairspray to smooth them back, then gently tuck one behind your ear or one in front for a styled but relaxed effect. The goal is soft and intentional, not rigidly controlled.
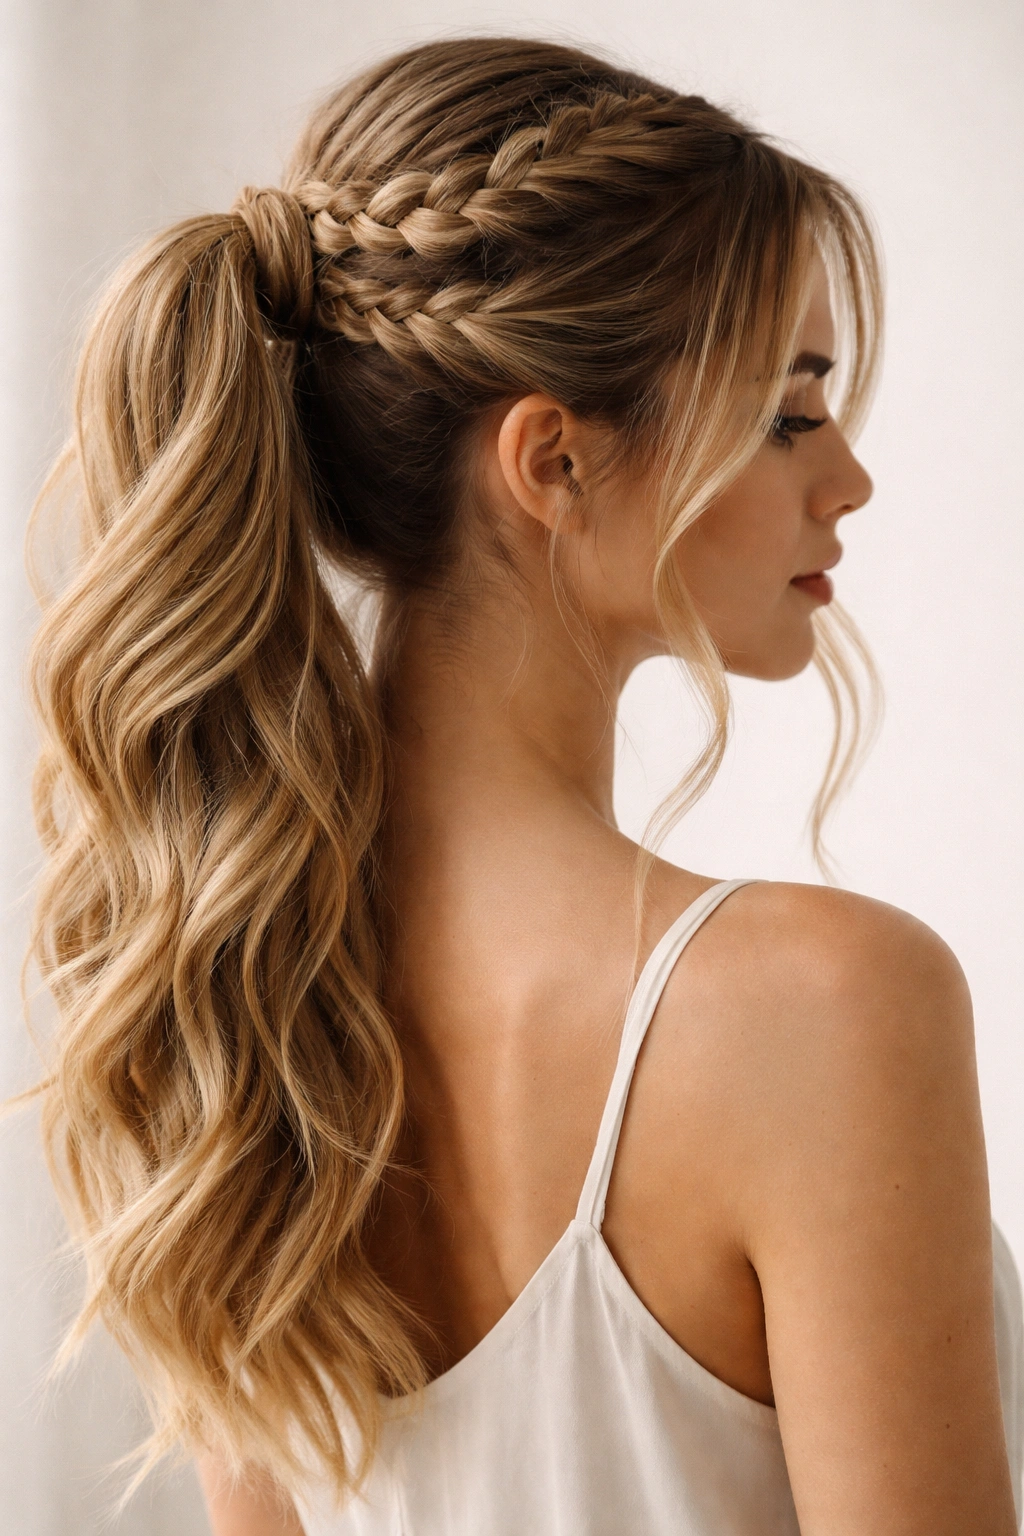
7. Sleek Double Braid High Ponytail
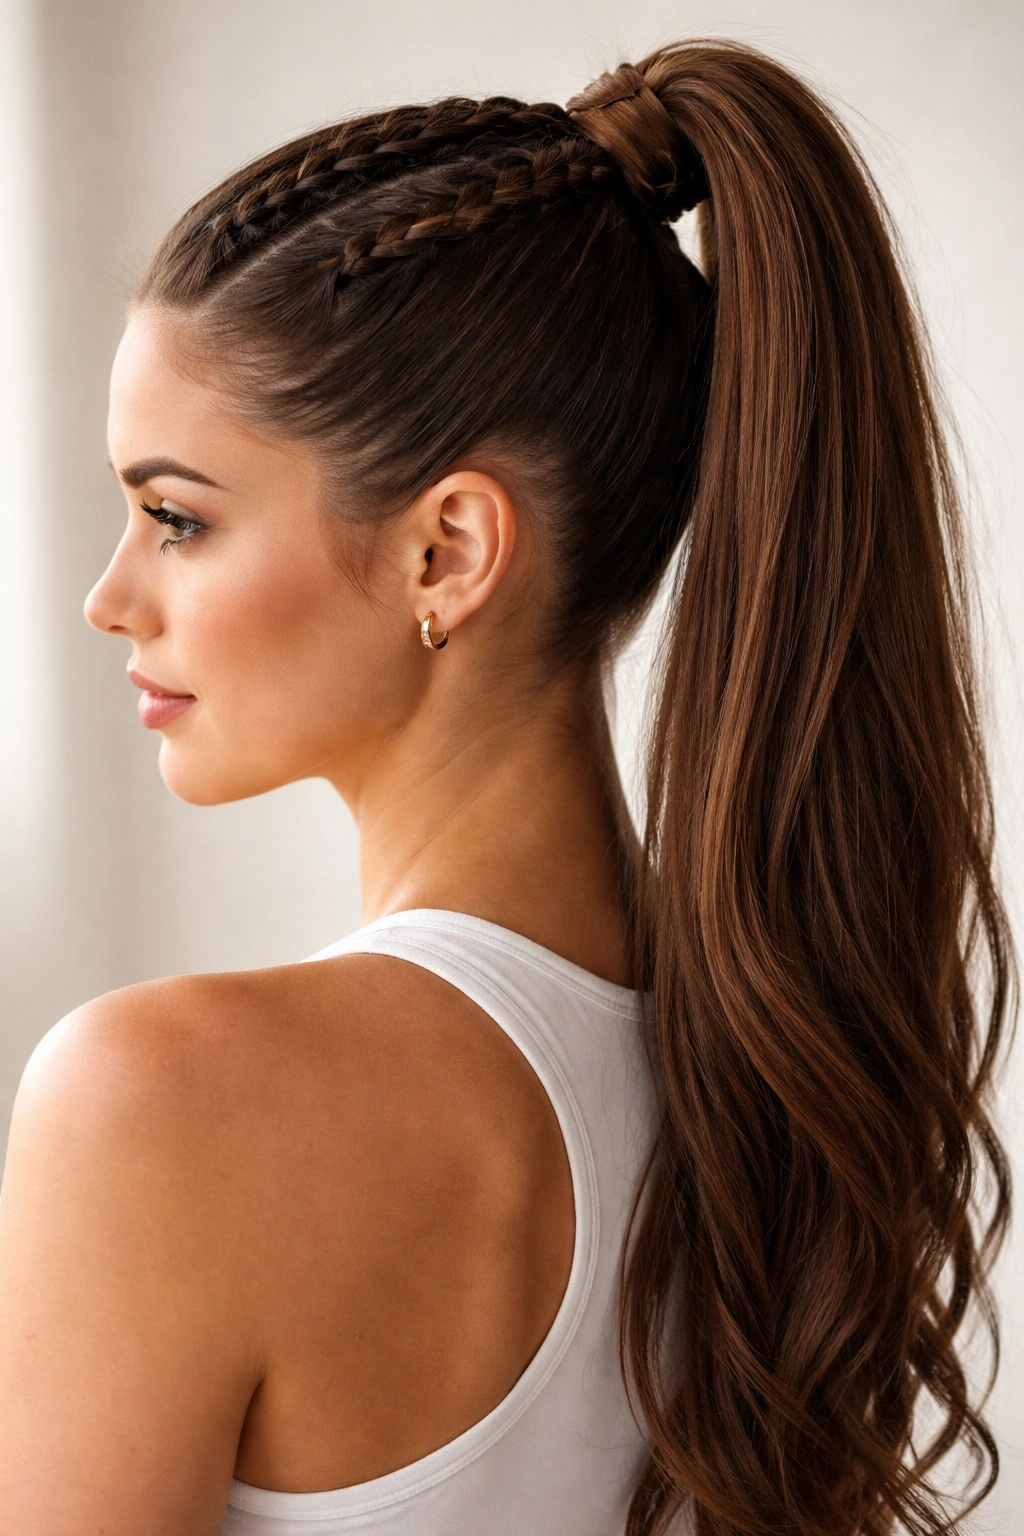
A sleek double braid high ponytail takes the classic two-braid style and positions it higher on your head, creating a more youthful, sporty, or athletic vibe. Everything is pulled back tightly and smoothly, with the two braids converging into a high ponytail at the crown or just slightly below it. This style works exceptionally well if you’re going to be active (exercising, playing sports, dancing) because everything is secured firmly away from your face. It also looks fantastic with a side-swept bang or longer face-framing layers because those pieces contrast beautifully against the sleekness of everything else.
Why It’s Perfect for Beginners
While a sleek high ponytail requires slightly more tension control than a loose low pony, it’s actually more forgiving in terms of braid neatness because the tightness of the style means flyaways and imperfections are subdued visually. The higher position also means you’re braiding a shorter distance, so the whole process takes less time and there’s less hair to wrangle in each braid. The sleekness comes from a smoothing product and careful sectioning, not from any advanced braiding technique—the braids themselves are created the same way as in Style #1, just positioned higher on your head.
Step-by-Step Guide
Apply a smoothing serum or gel to your palms and run your hands over your entire head to smooth away flyaways and create a slick base. Use a fine-tooth comb to section your hair down the center, starting at your forehead and creating two equal halves. Begin your right-side braid at your temple, pulling the hair back and up at a steeper angle than you would for a low pony. French braid this section up and back toward where your high ponytail will sit (roughly at the crown of your head). As you braid, keep gentle tension on the braid to maintain the sleekness—not so tight that it’s uncomfortable, but definitely snug.
Once you reach the crown, secure this braid with a small, clear elastic. Repeat on the left side with matching tension and angle. Gather both braids and any remaining loose hair into a high ponytail at the crown, using a clear or hair-color-matched elastic. Use your fine-tooth comb to smooth any flyaways around your face and along the braids, and finish with a flexible hold hairspray that keeps everything in place without making your hair look stiff.
Pro Tips and Common Mistakes
The biggest mistake people make with sleek styles is pulling the hair too tightly, which can cause tension headaches and, over time, can lead to hair breakage. Aim for “firmly secured but not painful”—if you have a headache after putting your hair up, it’s too tight. Using a smoothing product is key to achieving that sleek look without needing to braid so tightly that you hurt yourself. You can always tighten a loose braid by gently pulling on the strands afterward, but you can’t loosen a braid that’s already too tight without undoing it entirely. Start slightly loose, assess the look, and tighten as needed.
8. Bohemian Loose Double Braid Pony
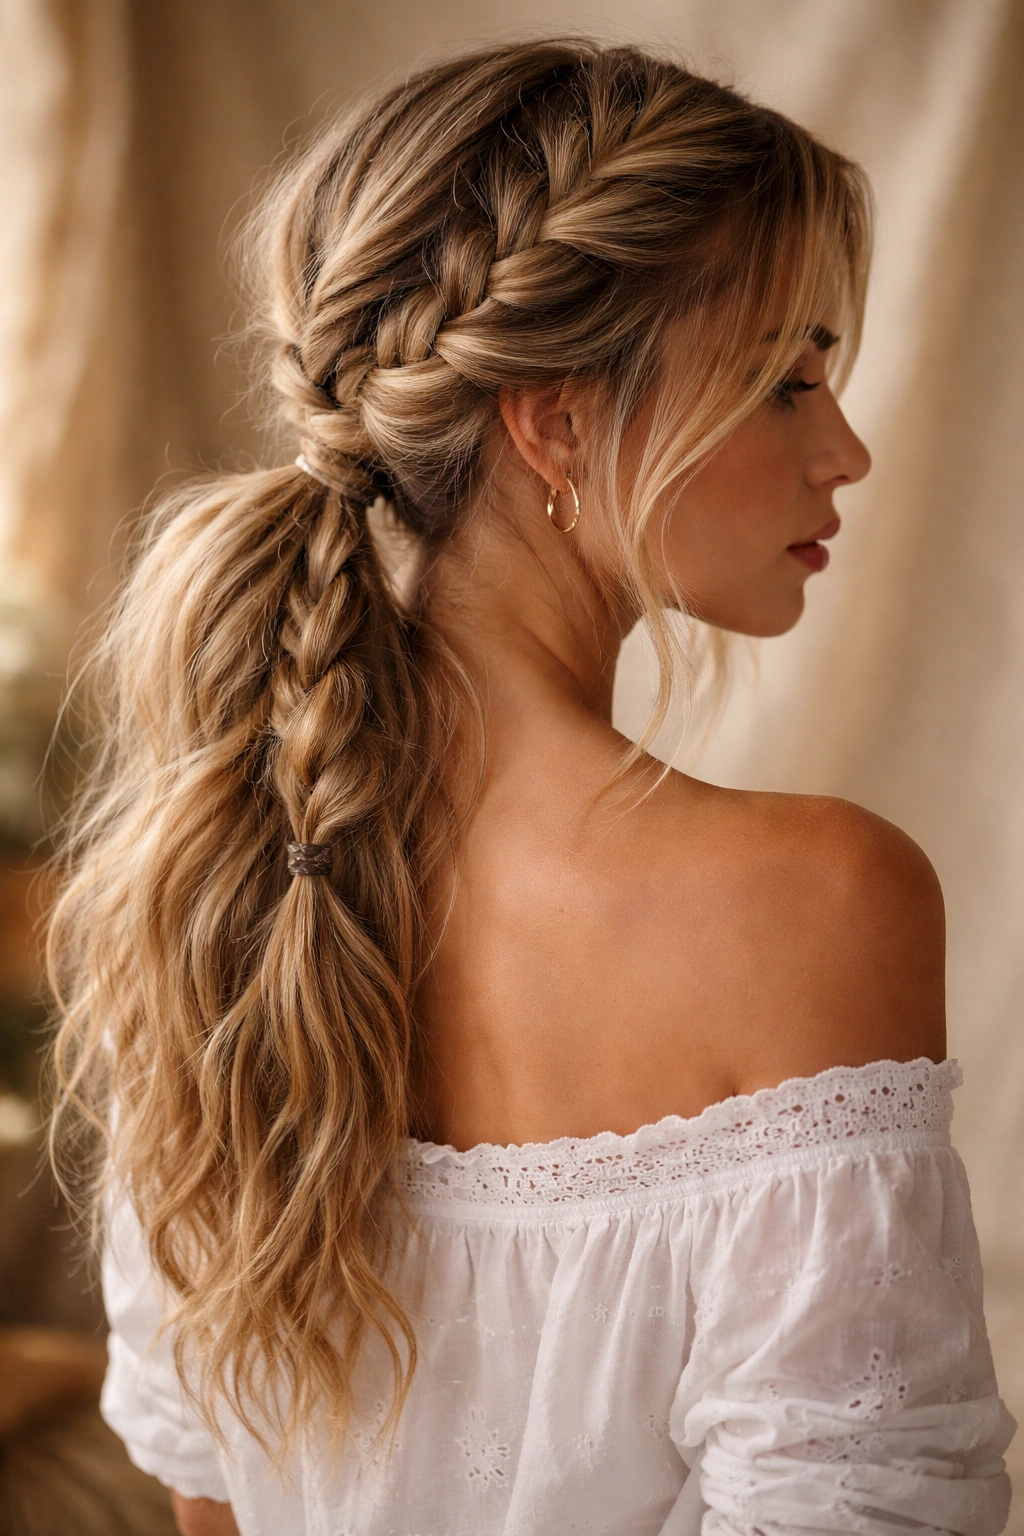
A bohemian loose double braid ponytail is all about embracing a relaxed, textured, intentionally undone aesthetic. The braids are deliberately loose, and you might even gently pull out sections of each braid after securing it to make it look even fuller and more romantic. This style pairs beautifully with beachy waves or natural texture, and it’s perfect for events where you want to look effortlessly beautiful without appearing like you spent hours getting ready. The boho vibe also pairs well with certain outfits—think sundresses, flowing fabrics, or bohemian-inspired clothing.
Why It’s Perfect for Beginners
This style is incredibly forgiving because loose and imperfect is exactly the goal. Your braids don’t need to be even, your ponytail doesn’t need to be perfectly centered, and loose pieces throughout your hair are not a bug—they’re a feature. In fact, the more relaxed and undone your braids look, the better this style functions aesthetically. Beginners often stress about making perfect braids, but with this style, you can let go of that perfectionism entirely. The technique is the same as the classic two-braid ponytail (Style #1), but the execution is deliberately loose and the finishing touches involve making the braids look even less polished.
Step-by-Step Guide
Begin with slightly textured hair—if you have straight hair, create some waves with a curling iron or by braiding damp hair and letting it dry, or just embrace your natural texture. Divide your hair down the center and create two loose French braids, keeping the tension relaxed throughout. Don’t aim for evenness; aim for a soft, flowing braid that looks like it might fall apart any second but somehow holds together. Once both braids are complete and secured with small elastics, gently pull out the sides of each braid to make them wider and fuller. You’re essentially loosening the braid slightly by pulling on the exterior edges—this creates a much softer, more romantic look than a tight braid.
Gather the two braids and your remaining hair into a low ponytail. Optionally, pull out and loosen the seams where the braids meet the ponytail to create an even more seamless, undone transition. A few wispy pieces around your face and neck actually enhance this style rather than detract from it, so don’t spend time trying to tame every stray hair.
Pro Tips and Common Mistakes
The key to pulling off boho loose braids is committing to the looseness. Many people try to create a half-loose, half-tight hybrid that ends up looking more accidentally messy than intentionally bohemian. Go all-in on the loose texture. Texture spray, sea salt spray, or even just finger-combing your hair gently throughout the day can help maintain that lived-in, beachy vibe. If you’re using elastics, choose ones that blend with your hair color so they’re not visible through the loose sections. Clear elastics work well, as do elastics designed for bohemian styles that have small decorative elements rather than looking corporate.
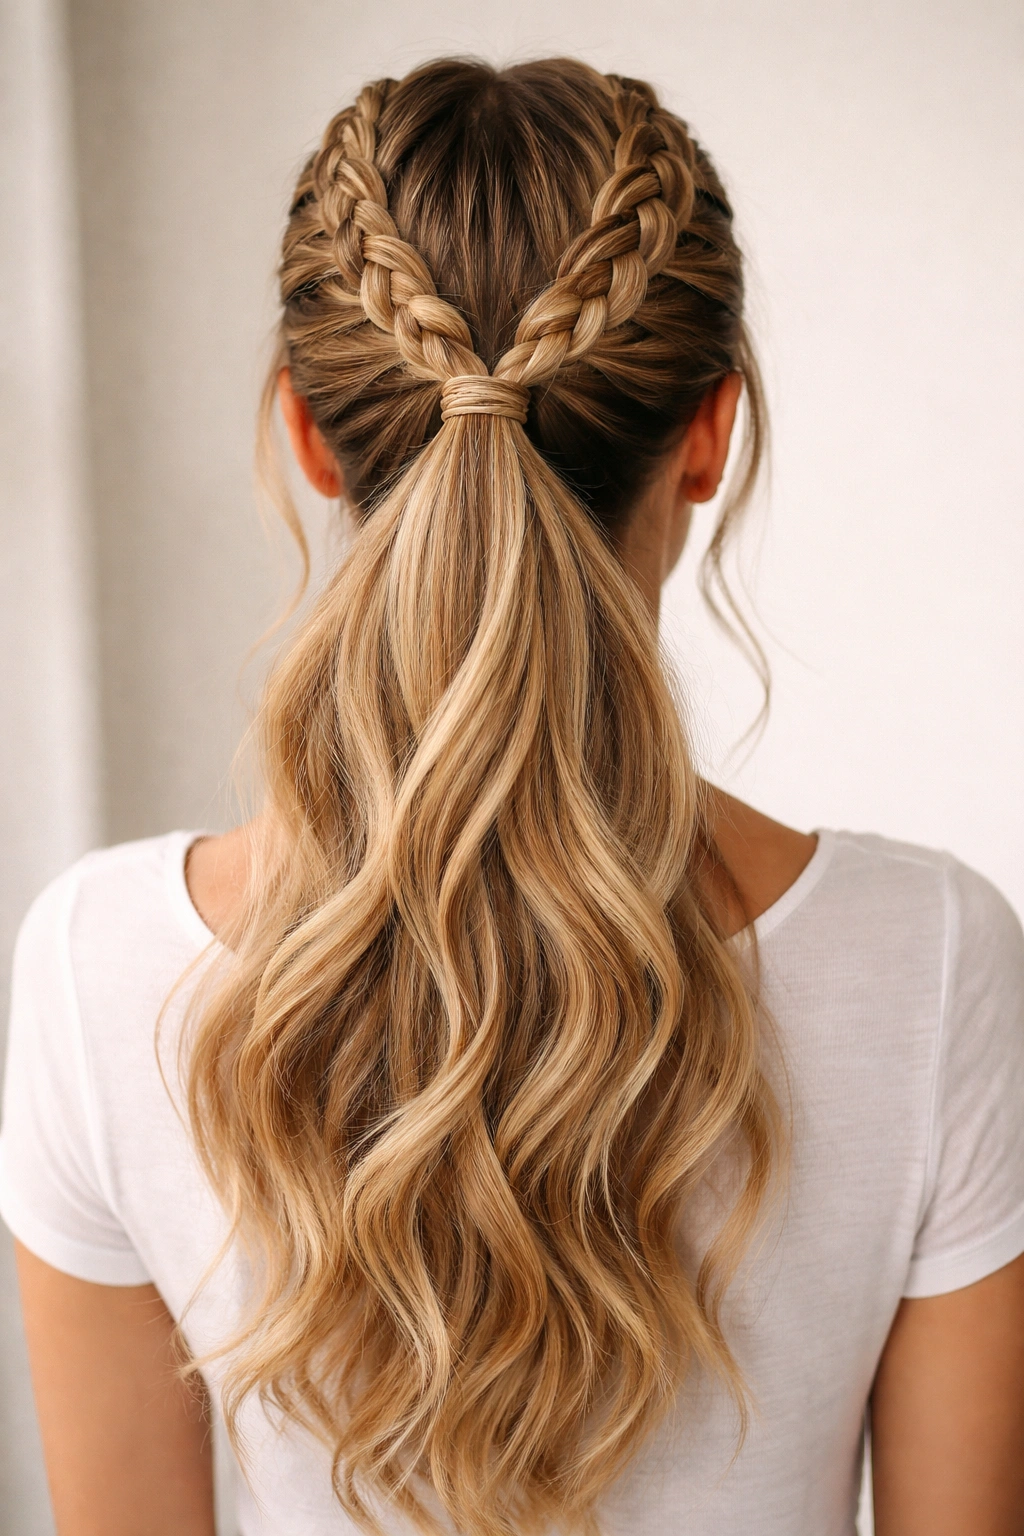
9. Dutch Braids Into Low Ponytail
Dutch braids (also called reverse French braids because the strands cross under rather than over) create a different visual effect than traditional French braids—they sit on top of your hair and look more sculptural and three-dimensional. Converting these into a double Dutch braid ponytail creates a style that’s slightly more eye-catching than the classic French braid version and works beautifully if you want your braids to be more prominent and visible. The style is particularly stunning on thicker hair types where the braids really pop visually.
Why It’s Perfect for Beginners
Dutch braids use the exact same principle as French braids—incorporating hair as you go—just with strands crossing underneath instead of over. If you’ve already mastered a French braid (Style #1), learning Dutch braids just requires reversing the direction your hands move. The main advantage for beginners is that Dutch braids are almost impossible to make look sloppy because they sit on top of your hair, making them look intentional and decorative regardless of how they turn out. Imperfect Dutch braids still look great; imperfect French braids can sometimes look unfinished. This makes Dutch braids a confidence-builder for anyone still developing their braiding skills.
Step-by-Step Guide
Divide your hair down the center with a fine-tooth comb. On the right side, take a section of hair at your temple and divide it into three strands. Instead of crossing the right strand over the center (as you would with a French braid), cross it under the center. Then cross the left strand under the center. Now add a thin slice of hair from the right side to the right strand, then cross that updated strand under. Add hair to the left strand and cross it under. Continue this pattern down the back of your head toward the nape of your neck.
The motion might feel awkward at first because you’re working backward from what your brain naturally wants to do when braiding, but after a few repetitions, muscle memory kicks in. Continue down to the base of your neck and secure with a small elastic. Repeat the exact process on the left side. Once both Dutch braids are complete, gather them with your remaining hair into a low ponytail.
Pro Tips and Common Mistakes
The most common mistake is getting confused about which strand goes where—remember that with Dutch braids, all strands cross under the center strand, never over. If you get confused, pause and look at your braid. The two outer strands should be slightly lower than the center strand visually. If you see an over-cross happening, you’ve accidentally switched back to a French braid. It takes practice, but it clicks relatively quickly. Some people find it helpful to practice Dutch braiding on a mannequin or on a friend before attempting it on themselves, since you can’t see the back of your own head as clearly while you’re working.
10. Double Braid with Bun Extension
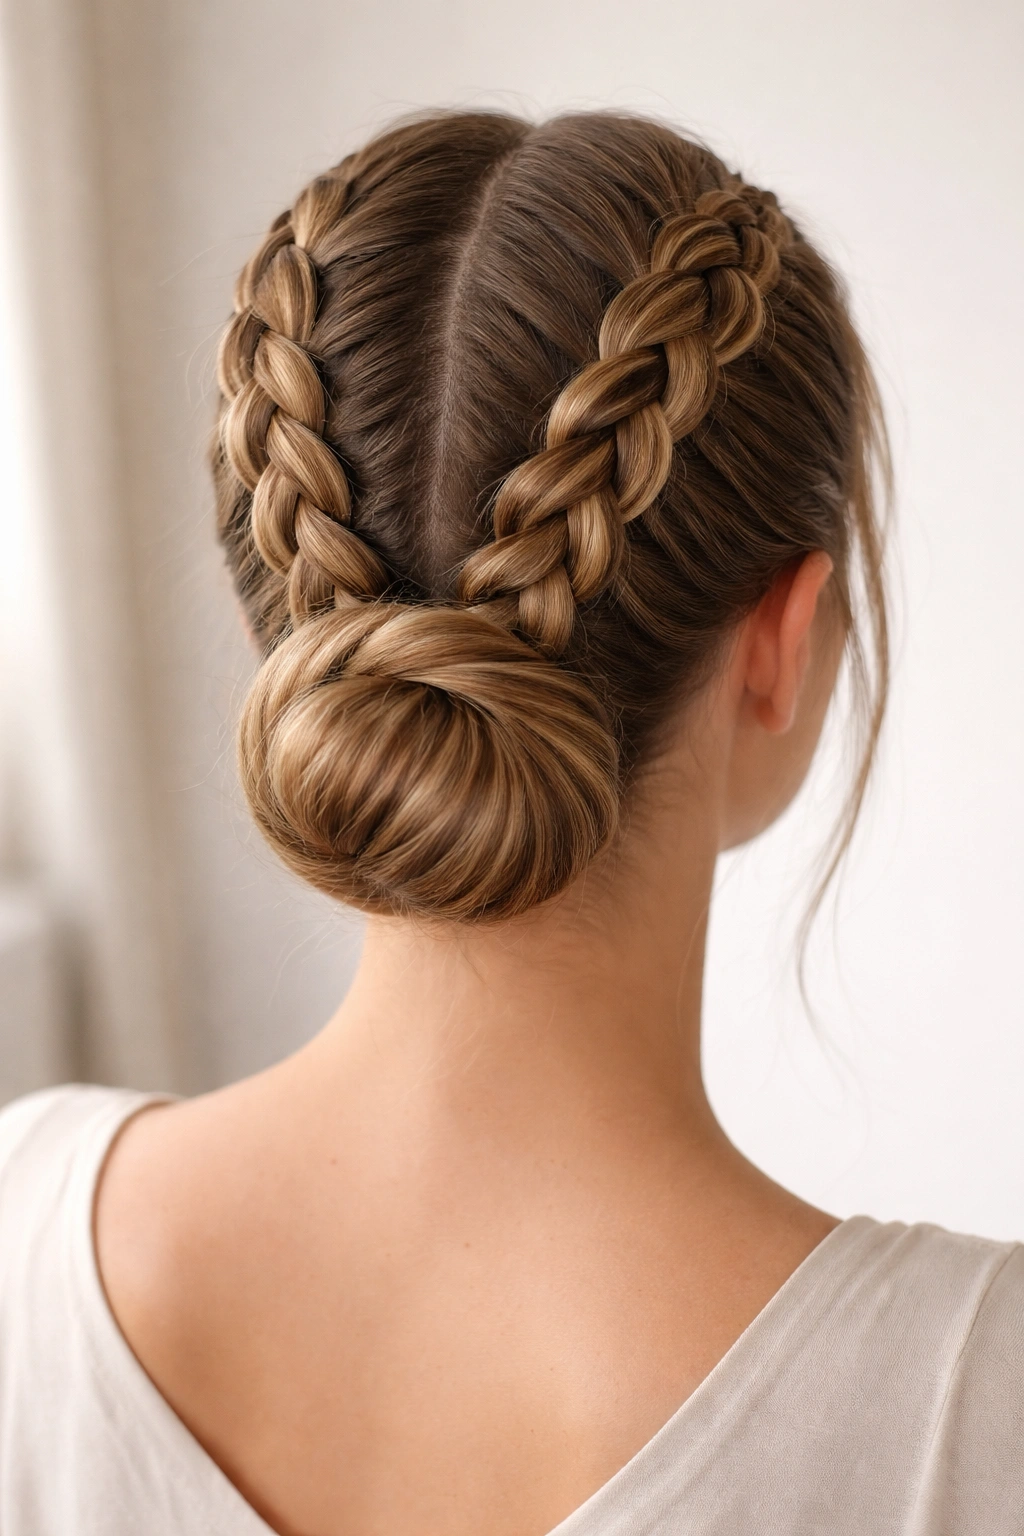
A double braid with bun extension creates a double braid ponytail, then transforms that ponytail into a bun using a hair donut or by wrapping and securing the ponytail around the elastic. This is the perfect option if you want the visual interest and effort of double braids but also want the neatness and security of a contained bun. It’s ideal for work environments, formal events, or situations where a flowing ponytail might get in the way. The bun also makes the whole style last longer throughout the day without looking like it’s coming apart.
Why It’s Perfect for Beginners
The braiding portion of this style is identical to the classic two-braid ponytail (Style #1), so you’re not learning a new braiding technique. What’s new is the bun transformation, which is actually simpler than it sounds and doesn’t require any additional braiding skill. The bun extension also provides a clear endpoint for your style, making it feel more finished and intentional than a regular ponytail. Even if your braids aren’t perfectly executed, the bun draws focus to the overall shape and polish of the style rather than to any individual imperfections in the braiding.
Step-by-Step Guide
Create two classic French braids following the instructions from Style #1, securing them both into a low ponytail at the base of your neck. Now you have a choice: use a hair donut (a padded ring designed specifically for creating buns) or create a bun manually. For the donut method, slide the donut onto the ponytail just above the elastic, distribute your ponytail hair evenly around the donut, then roll the donut toward the base of your ponytail to wrap all the hair around it. Secure with bobby pins that match your hair color, tucking them underneath the wrapped hair so they’re hidden. Finish by smoothing the surface of the bun with a fine-tooth comb and a light hairspray.
For a manual bun without a donut, twist your ponytail tightly, then wrap it around the base of the ponytail in a spiral, tucking the ends underneath and securing with multiple bobby pins. This creates a more textured, less perfectly round bun, which can actually look more sophisticated than a donut bun on certain hair types.
Pro Tips and Common Mistakes
The biggest mistake is making your bun too tight or pinning it too aggressively, which can cause headaches and hair breakage. The bun should feel secure but not painfully pulled. Use the correct number of bobby pins (usually 4-6) but don’t overdo it with excessive pinning. If your bun feels like it’s loosening as the day goes on, a light texture spray applied to the bun can help it hold longer. The donut method works best on hair that’s at least medium thickness; very fine hair sometimes slides off the donut throughout the day, so a manual wrapped bun might be more reliable if you have delicate, thin hair.
11. Waterfall Double Braid Ponytail
A waterfall double braid ponytail incorporates a waterfall braid technique (where strands are released and fall free while others are braided) with the double braid ponytail structure. This creates a style where some hair flows down your back while other hair is braided and secured, giving you the security of a ponytail with the romantic flair of loose, falling hair. It’s a stunning option for semi-formal events, professional settings where you want to look polished but still approachable, or any situation where you want something more interesting than a regular ponytail but not as casual as fully loose hair.
Why It’s Perfect for Beginners
While waterfall braiding sounds complicated, it’s actually a beginner-friendly technique once you understand the concept. Essentially, you’re creating a French braid but releasing one strand every few crosses and replacing it with new hair from the outer edge. This creates the illusion of a waterfall flowing through your braid. The beauty is that any hair you accidentally “lose” from your braid or any imperfections in the technique just blend into the waterfall effect, making the style remarkably forgiving. You’re aiming for a general waterfall impression rather than a perfectly executed pattern.
Step-by-Step Guide
Begin on the right side of your head with a three-strand braid, starting at your temple. Do one regular braid cross (right over center, then left over center). Now, instead of adding new hair to the right strand, release the right strand entirely, letting it fall loose down your back. Immediately pick up a thin slice of new hair from the outer edge of your section and use that as your new right strand. Complete another braid cross. Repeat this pattern: braid cross, release the right strand and replace it with fresh hair from the section edge.
Continue this pattern down to the back of your neck, where you’ll secure the remaining braid with a small elastic. The released strands will create a cascading waterfall effect down your right side. Repeat the same technique on the left side, creating a matching waterfall on the left side that also flows down. Gather both waterfall braids and the remaining hair into a low ponytail, with the waterfall strands flowing freely from this ponytail.
Pro Tips and Common Mistakes
The most common mistake is releasing strands inconsistently, which makes the waterfall look unintentional rather than designed. Try to release a strand and add new hair at roughly the same interval each time—maybe every two braid crosses—so the waterfall has a regular rhythm. The second common mistake is making your waterfall braids too tight. They should be relaxed enough that the falling strands feel soft and don’t look like they’re being strangled. This style also benefits from being done on slightly wavy or textured hair, as the texture makes the waterfall effect more visible and romantic.
12. Textured Double Braid Side Pony
A textured double braid side ponytail combines the asymmetrical charm of a side ponytail with deliberately textured, undone-looking braids. Rather than creating sleek braids, you’re aiming for a tousled, relaxed texture throughout, and you’re positioning your final ponytail off to one side rather than at the nape of your neck. This style is perfect for beach days, casual hangouts, or any situation where you want to look effortlessly cool. It also works beautifully on naturally curly or wavy hair, as the texture becomes a feature rather than something to fight against.
Why It’s Perfect for Beginners
This style is simultaneously one of the most forgiving and most fun because texture and imperfection are the entire point. You don’t need your braids to be perfect, symmetrical, or even particularly neat—in fact, deliberately messy, textured braids are exactly what you’re going for. This takes the pressure off beginners to execute technically perfect braiding and lets you focus on the overall vibe instead. The side placement also means asymmetry is the whole aesthetic, so you have zero expectations to meet in terms of balance or symmetry. Your only job is to create two braids that look relaxed and cool.
Step-by-Step Guide
Start with textured hair—curls, waves, or bedhead texture all work beautifully for this style. Create a deep side part. On the fuller side of your part, take a section of hair from near your ear and begin a loose French braid, making no effort to make it neat or tight. In fact, intentionally braid loosely and unevenly; the wobblier it looks, the better. As you braid, pull out sections of the braid aggressively to make it look fuller and messier. Continue this braid down the back of your head, then secure it loosely.
On the smaller side of your part, create a matching loose, textured braid, also pulling it out generously as you go. Once both braids are complete, gather them together with your remaining hair and secure a side ponytail—positioned lower and further to the side than a typical side pony would be. The whole effect should scream “I didn’t try very hard” even though you actually did. Finish with texture spray to amp up the undone aesthetic.
Pro Tips and Common Mistakes
The only real mistake you can make with this style is braiding too neatly or too tightly. Fight your instinct to make everything perfect. The goal is “I just rolled out of bed and braided my hair while having coffee,” not “I spent an hour on this.” If your braids start looking too polished as you’re creating them, loosen them intentionally by pulling on the sides. A light sea salt spray or texture spray throughout the day keeps this style looking fresh and appropriately undone. If you’re worried your braids will fall apart, use a small elastic to secure each one loosely, but choose an elastic that blends with your hair rather than standing out.
Final Thoughts
Double French braid ponytails are truly accessible to anyone willing to practice, even if braiding feels completely foreign to you right now. The secret isn’t innate talent or perfect hands—it’s understanding the basic principle of adding hair as you braid, committing to practice, and being gracious with yourself as you develop the muscle memory that makes these styles feel effortless. Every single one of these twelve styles builds on the same foundation, so once you’ve mastered one, the others follow naturally.
Start with whichever style speaks to you most, not necessarily the one that seems easiest. If you’re drawn to the bohemian aesthetic, begin there and lean into the relaxed vibe—it’ll feel less like practice and more like creating something you actually want to wear. If you love the polished, sleek look, embrace that from the beginning. Your genuine interest in a particular style will carry you through the learning curve far more effectively than forcing yourself to master “beginner basics” you’re not excited about.
Remember that every hairstylist, every influencer with flawless braids, and every person whose double braids look magazine-worthy started exactly where you are now. They made wonky braids, they had flyaways sticking everywhere, they felt awkward and unsure. The difference between them and someone who gave up is that they kept trying, they looked at what went wrong, they adjusted, and they tried again. Your second attempt will be better than your first. Your tenth attempt will be substantially better than your second. By the time you’ve done any of these styles five or six times, your hands will understand the motion intuitively, and you’ll stop thinking about the mechanics and start focusing on the overall look.
These hairstyles aren’t just practical—they’re a genuine confidence boost because they signal that you’ve put effort and care into your appearance, and there’s something deeply satisfying about that, regardless of whether anyone else notices or compliments you. You’ll feel more put-together, more intentional, and genuinely more beautiful wearing your hair in a carefully crafted braid. That feeling, that transformation from getting out of bed to stepping into your day feeling like a better version of yourself, is the real payoff. So grab a brush, section your hair, and try one of these styles today.