There’s something about homecoming that makes you want to feel absolutely polished—confident, beautiful, and ready for whatever the night brings. Whether you’re heading to the dance, the game, or the after-party, your hairstyle sets the entire tone. And if you’re like most people, you’ve probably thought about a ponytail at some point. The right ponytail isn’t just practical (though keeping your hair off your neck while you’re dancing is definitely a win). It’s actually elegant, surprisingly versatile, and way more interesting than people give it credit for.
The beauty of a homecoming-worthy ponytail is that it works whether you’re going for glam, romantic, modern, or edgy. You can dress it up with accessories, texture, and clever styling techniques that transform a basic ponytail into something that looks like you spent hours at a salon. And the really good news? Most of these styles are genuinely achievable at home, even if you’ve never considered yourself a hairstyling expert. The key is understanding which techniques work, what products make the difference, and how to execute them with confidence.
This guide walks you through 15 distinct ponytail styles specifically suited to homecoming. Each one includes exactly what you need to know to nail the look—prep steps, styling tricks, timing considerations, and real talk about what makes each style work for the occasion. Whether you want something sleek and sophisticated, romantic and textured, or bold and fashion-forward, you’ll find options that match both your style and your skill level.
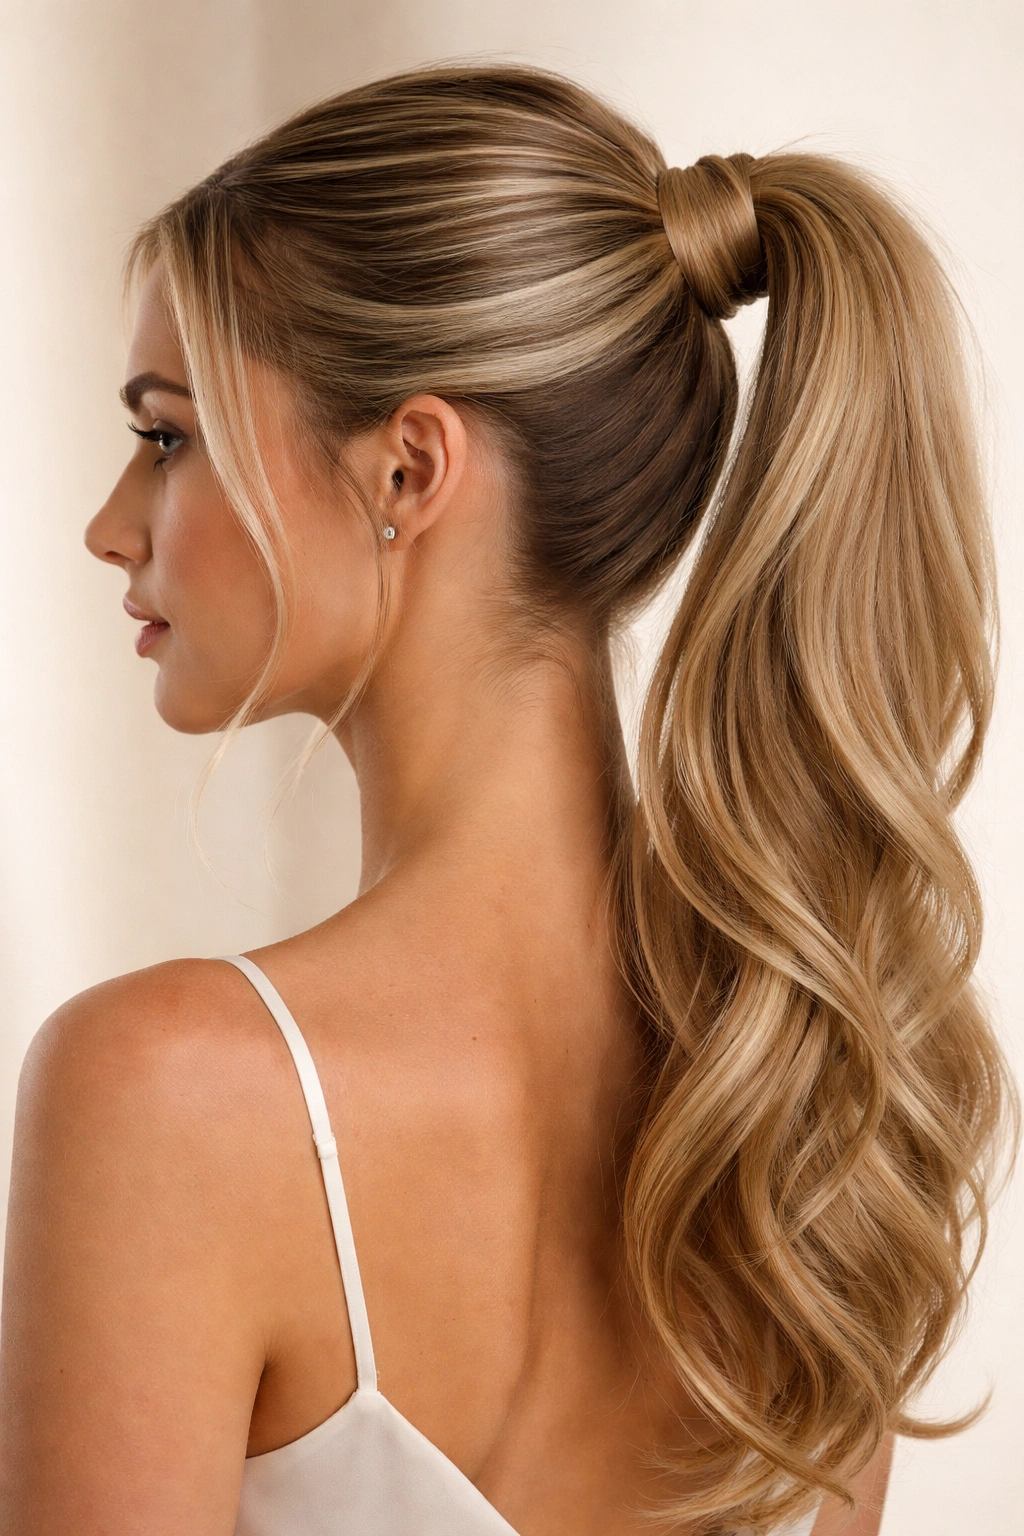
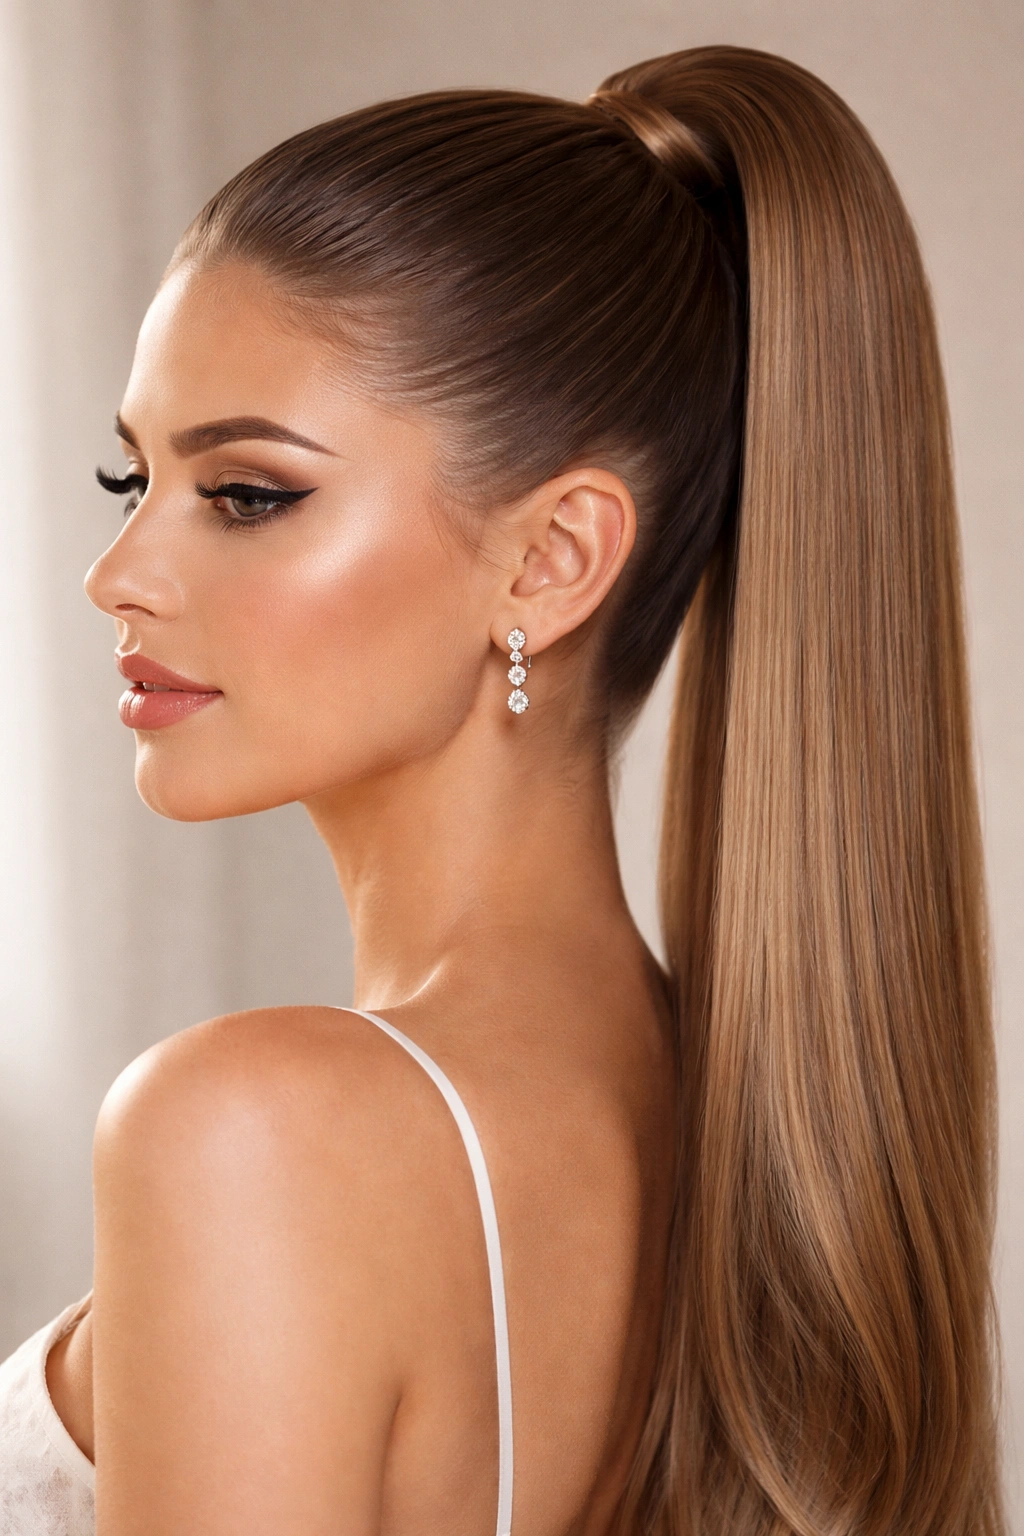
1. The Sleek High Ponytail
The sleek high ponytail is the definition of timeless elegance. Pulled tight and positioned at the crown, this style has the power to instantly transform you into a more polished version of yourself. The high placement creates an elongating effect on your face and draws attention upward, which is exactly why professional dancers, celebrities, and people about to walk into a formal event gravitate toward this look. It’s sharp, it’s clean, and it photographs beautifully.
Why It Works for Homecoming
The sleek high ponytail reads as intentional and put-together without looking like you’re trying too hard. It pairs perfectly with formal dresses, gives you a clear view of your face and makeup (which you’ve probably spent real time on), and keeps hair completely away from your face and neck—essential if you plan to actually move around and dance. The style also has a certain sophistication that feels age-appropriate and classic, never costume-like.
How to Create the Perfect Sleek High Ponytail
- Start with clean or second-day hair—freshly washed hair can be slippery, making the ponytail harder to secure
- Blow dry your entire head straight; this creates a smooth foundation and gives you more control
- Use a paddle brush or smoothing brush to brush hair straight back from your face and gather it at the crown
- Once gathered, smooth down any flyaways with a lightweight smoothing serum or gel (not so much that it looks wet, just enough to tame)
- Secure the ponytail with a sturdy elastic, wrapping it multiple times to ensure it won’t slip
- Wrap a small section of hair from the ponytail around the elastic base to hide it—this makes the whole look infinitely more refined
- Pin the wrapped section in place with bobby pins that match your hair color
Pro tip: If your hair is fine or thin, tease slightly at the crown before smoothing the top layer—it creates the illusion of fullness and helps the ponytail sit more securely without that “pulled too tight” look.
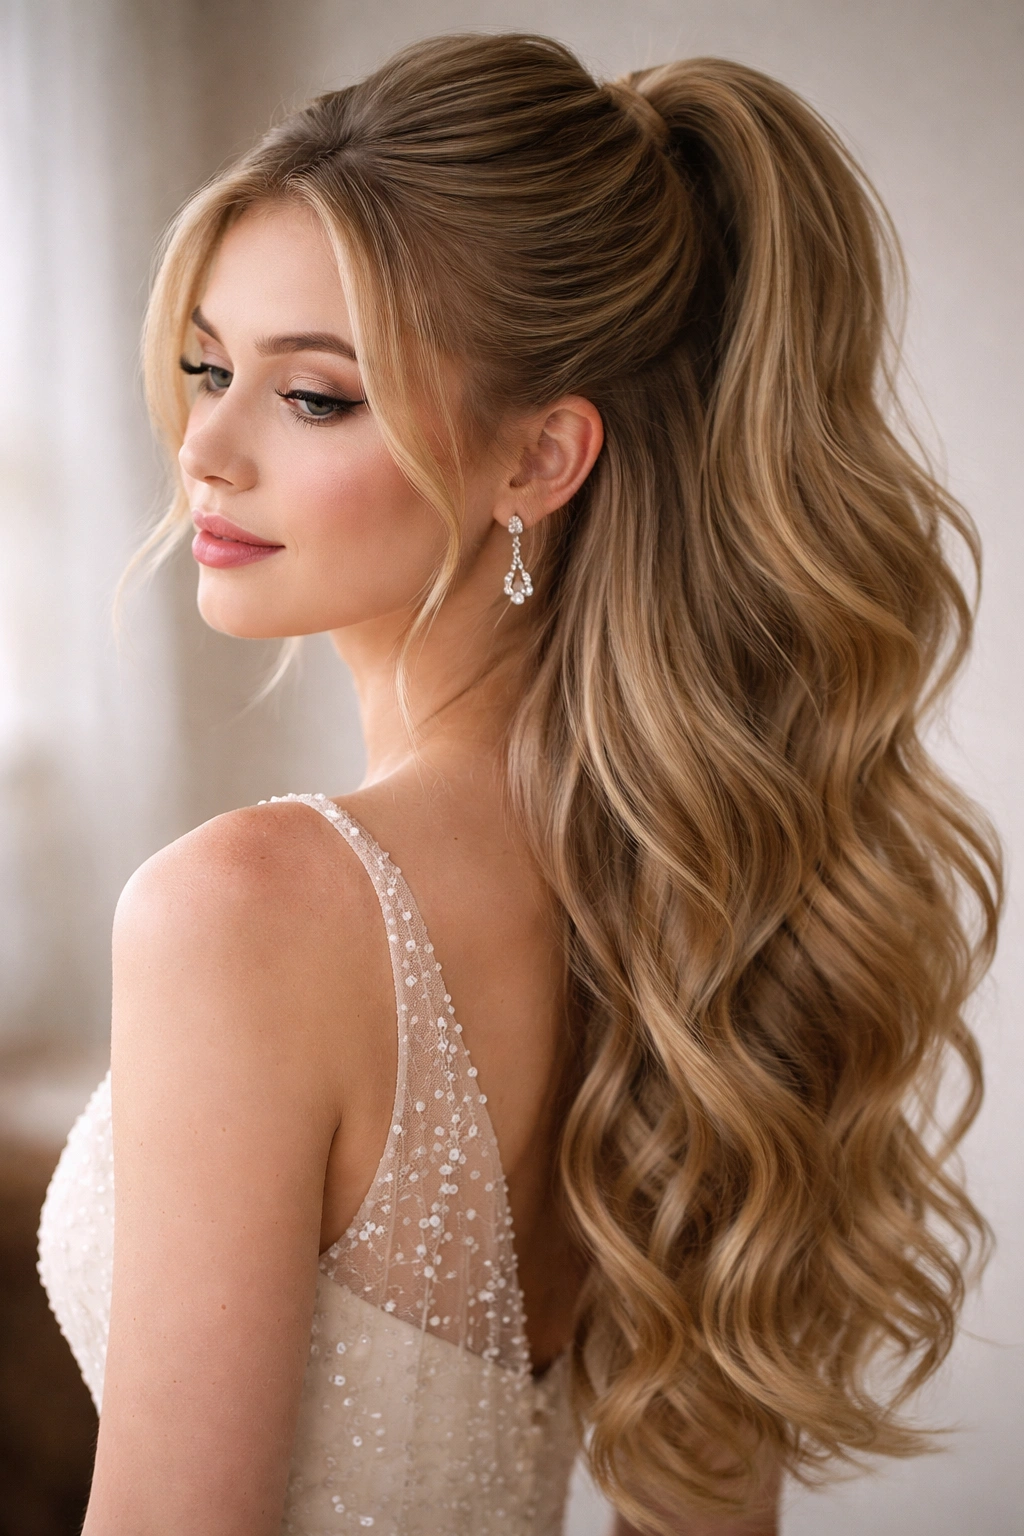
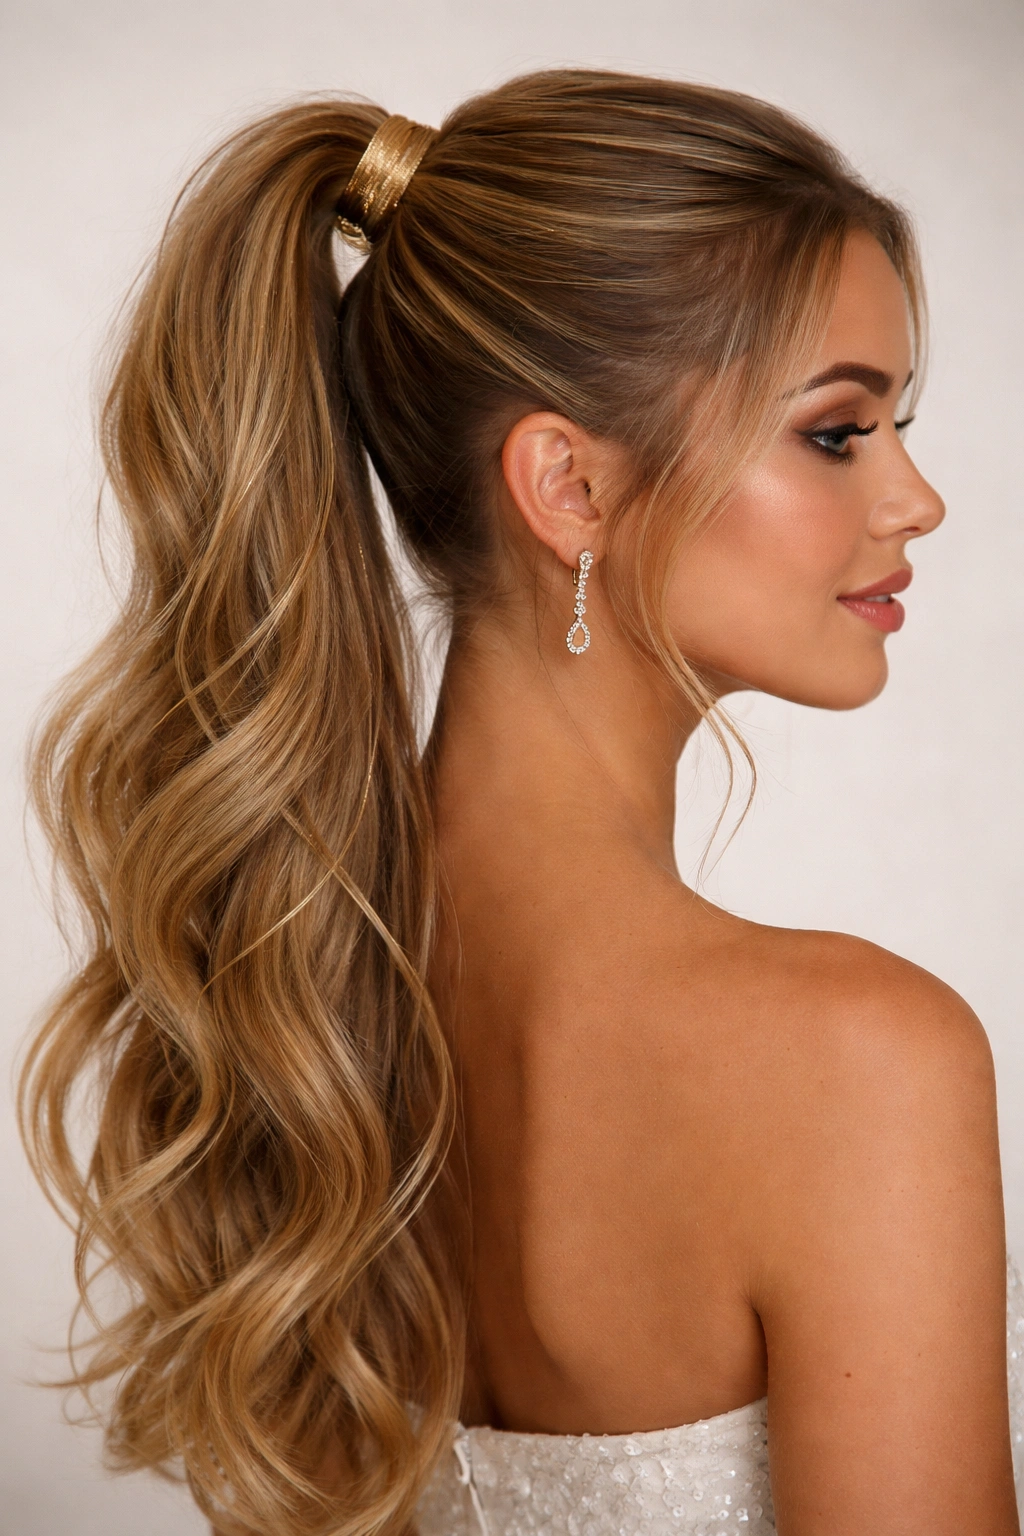
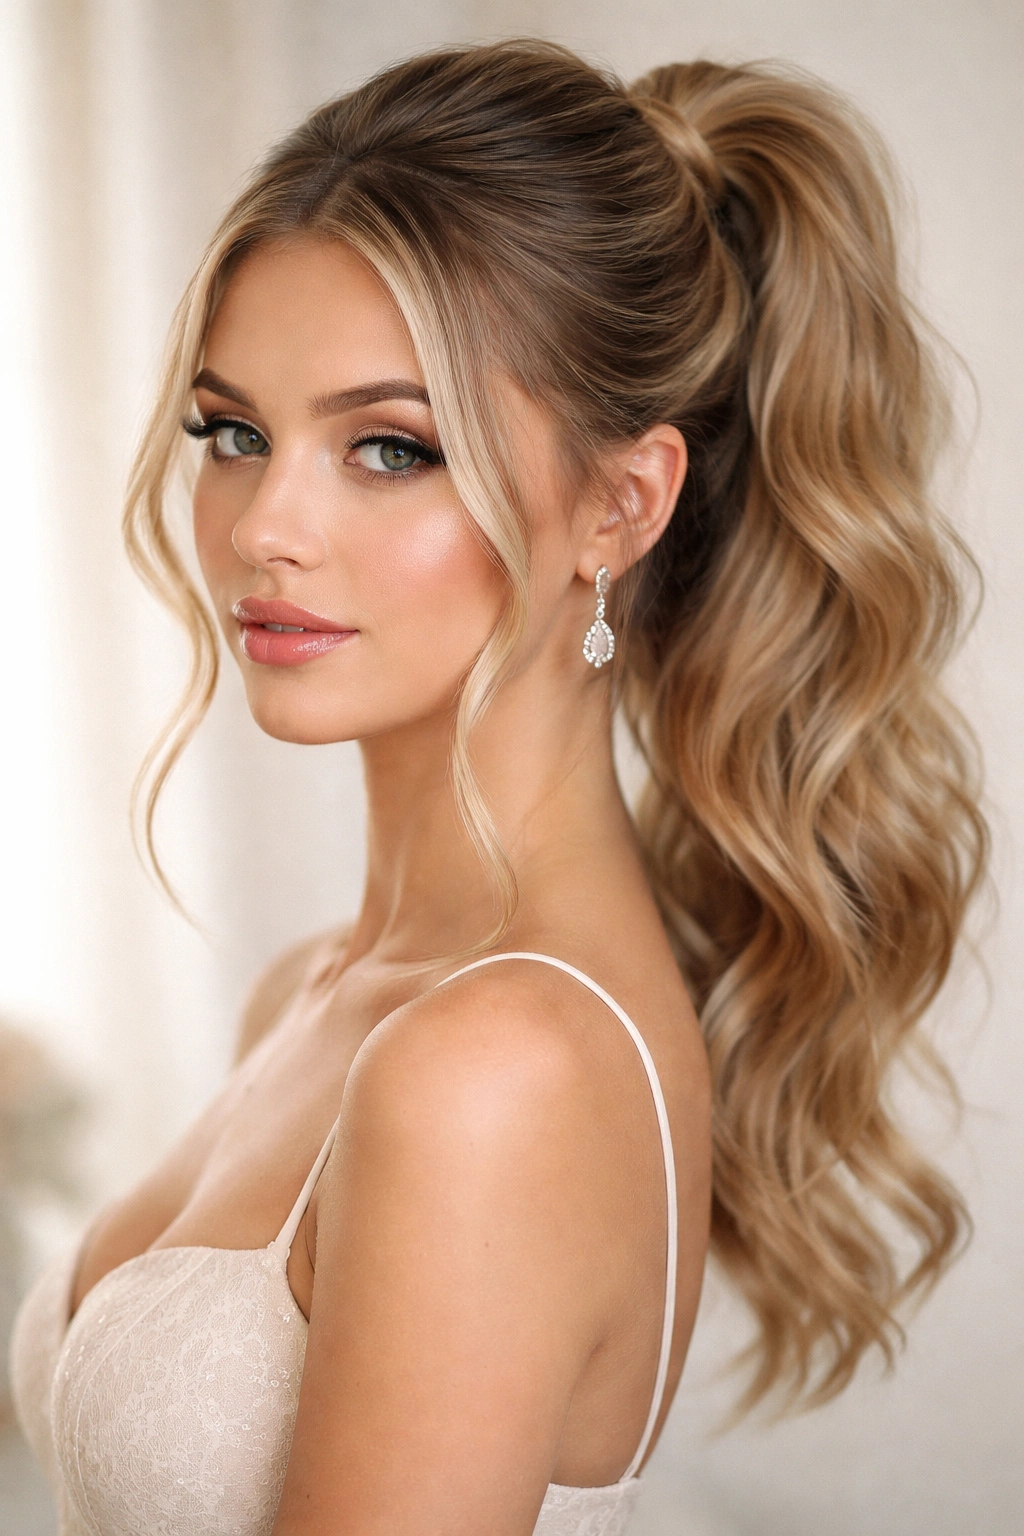
2. The Textured High Ponytail
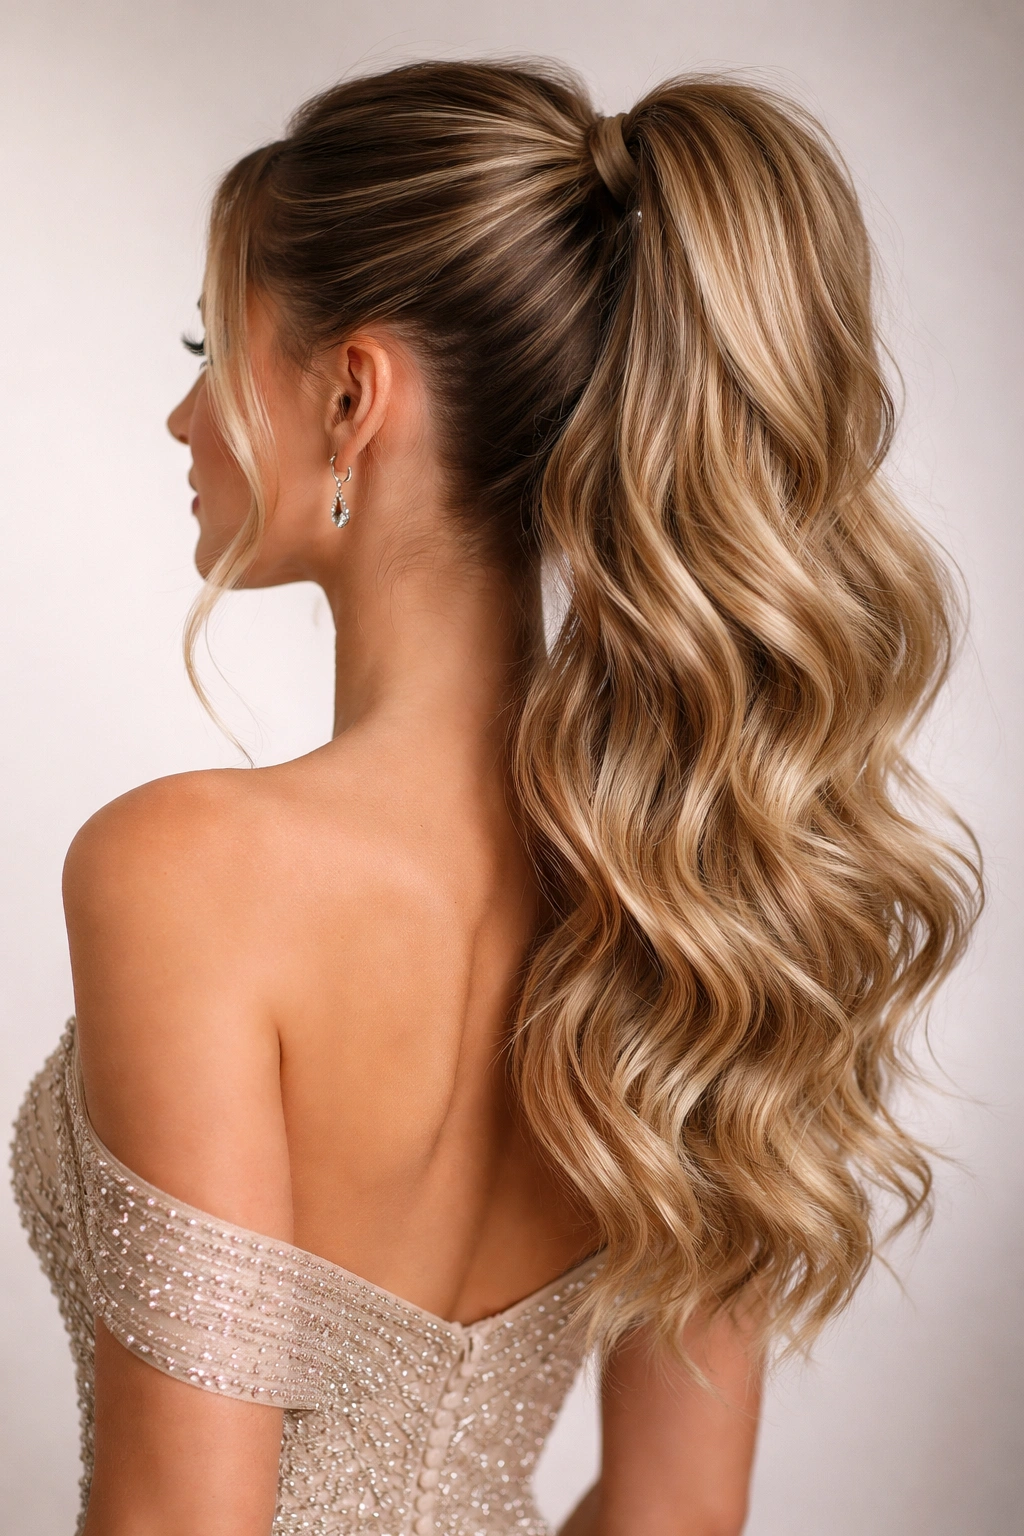
If the sleek high ponytail feels too rigid or formal for your taste, the textured version adds movement, dimension, and visual interest while maintaining that same polished vibe. This style starts with the same high placement but incorporates waves or curls throughout, creating a softer, more romantic feel. The texture catches light differently, looks fuller, and honestly feels more modern than a completely smooth version.
What Makes Texture Different
Texture adds personality. While the sleek version says “I’m formal and classic,” texture says “I’m formal and interesting.” The waves or curls create visual depth, make your hair look thicker, and work beautifully with jewelry and makeup because they don’t compete—they complement. This style particularly suits people who feel at home with their natural texture or who love working with waves and curls.
Creating Waves for Your Textured Ponytail
- The night before (or morning of, depending on your schedule), create loose waves using a 1.25-inch curling iron or wave wand
- Curl away from your face in sections, allowing each curl to cool completely before moving to the next section
- Once all waves are cool, gently brush through them with a paddle brush to blend and soften the individual curl pattern
- Gather the wavy hair into a high ponytail, arranging the waves so they fall naturally—don’t smooth them completely
- Secure with an elastic and wrap a section of hair around the base
- Use a light hairspray to help the waves hold their shape throughout the night
Worth knowing: The wave texture becomes more pronounced and holds longer if you do the waves the night before—overnight, the curls set more fully, giving you better staying power for evening wear.
3. The Sleek Low Ponytail
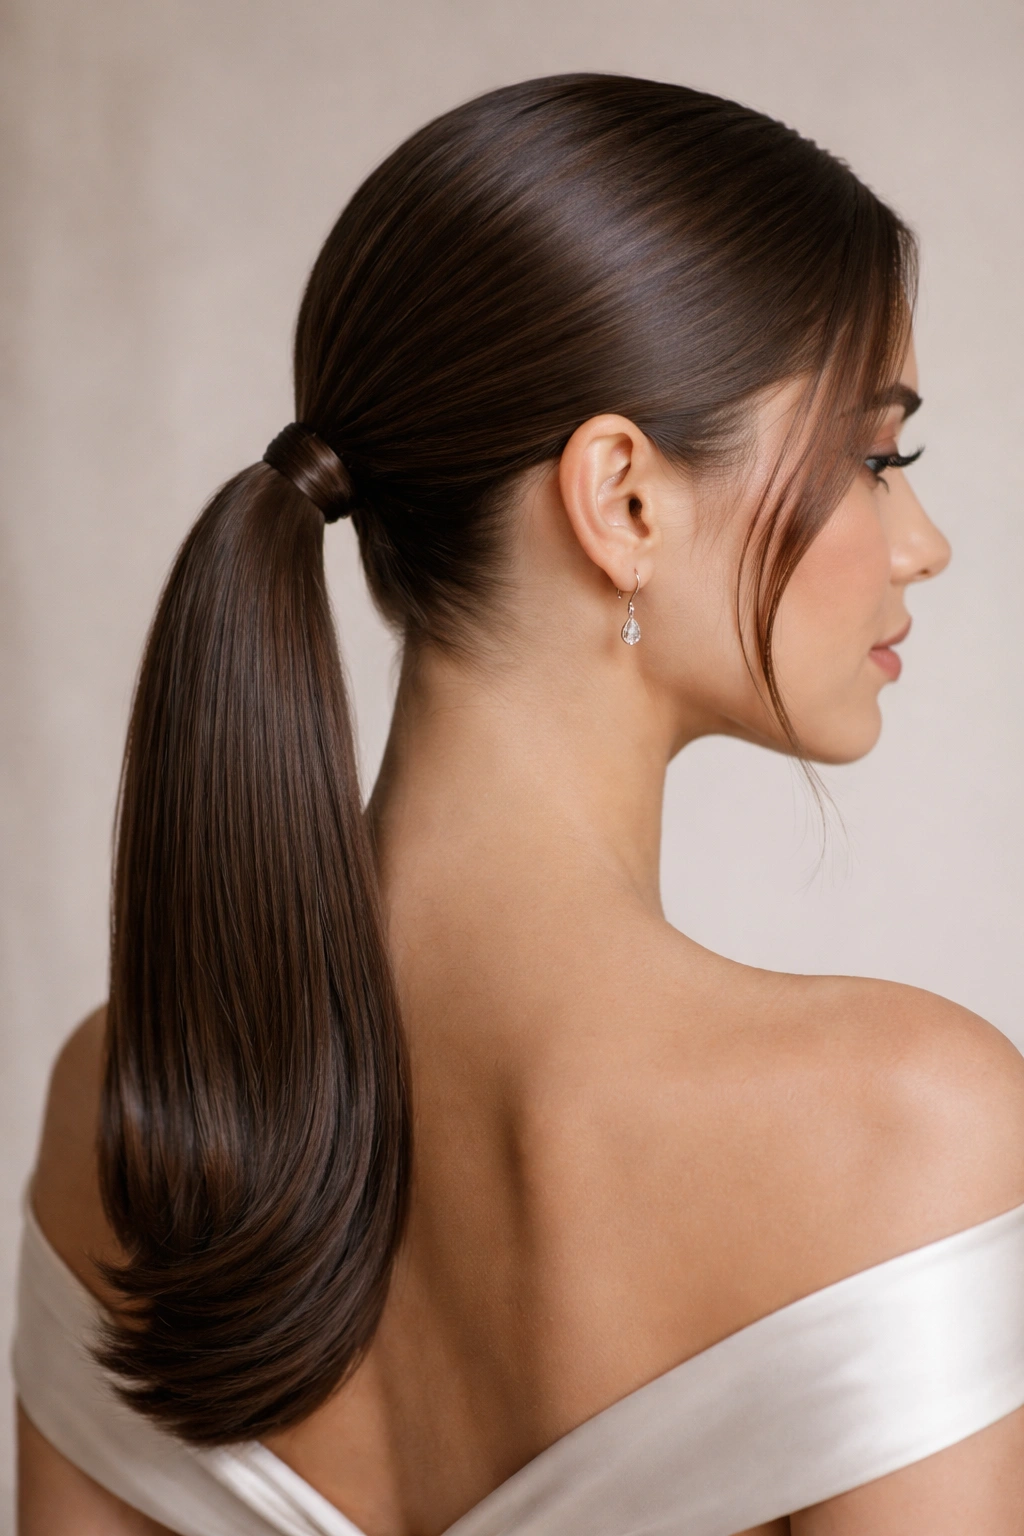
A low ponytail positioned just above the nape of your neck offers a completely different energy than the high version. This style communicates sophistication, maturity, and a certain European elegance. It’s the ponytail equivalent of the perfect black blazer—refined, ageless, and always appropriate. Low ponytails photograph gorgeously and work equally well with formal gowns and more casual dress-up outfits.
Why Low Positioning Changes Everything
The placement fundamentally alters how a ponytail reads. High ponytails feel youthful and playful; low ponytails feel grown-up and intentional. A sleek low ponytail directs focus toward your face, shoulders, and neckline—perfect if you’re wearing a dress with an interesting back or any detailed neckline. It also has the advantage of keeping hair off your face without that “pulled tight” intensity some people find uncomfortable.
Achieving the Flawless Low Ponytail
- Blow dry hair straight, focusing on smoothness rather than volume
- Use a paddle brush to gather hair at the base of your neck, slightly off-center if you prefer an asymmetrical look (subtle asymmetry looks more elegant than perfect center placement)
- Smooth any flyaways with serum or lightweight gel as you gather
- Secure tightly with an elastic; this ponytail requires secure anchoring since the lower placement puts less weight on the hair
- Wrap a section of hair around the elastic base and pin into place
- Consider clipping a delicate hair accessory near the base for added visual interest and a custom, expensive-looking finish
Pro tip: This ponytail works beautifully with an undercut or an underpiece of contrasting color if you have one—the low placement shows off subtle hair details perfectly.
4. The Bubble Ponytail
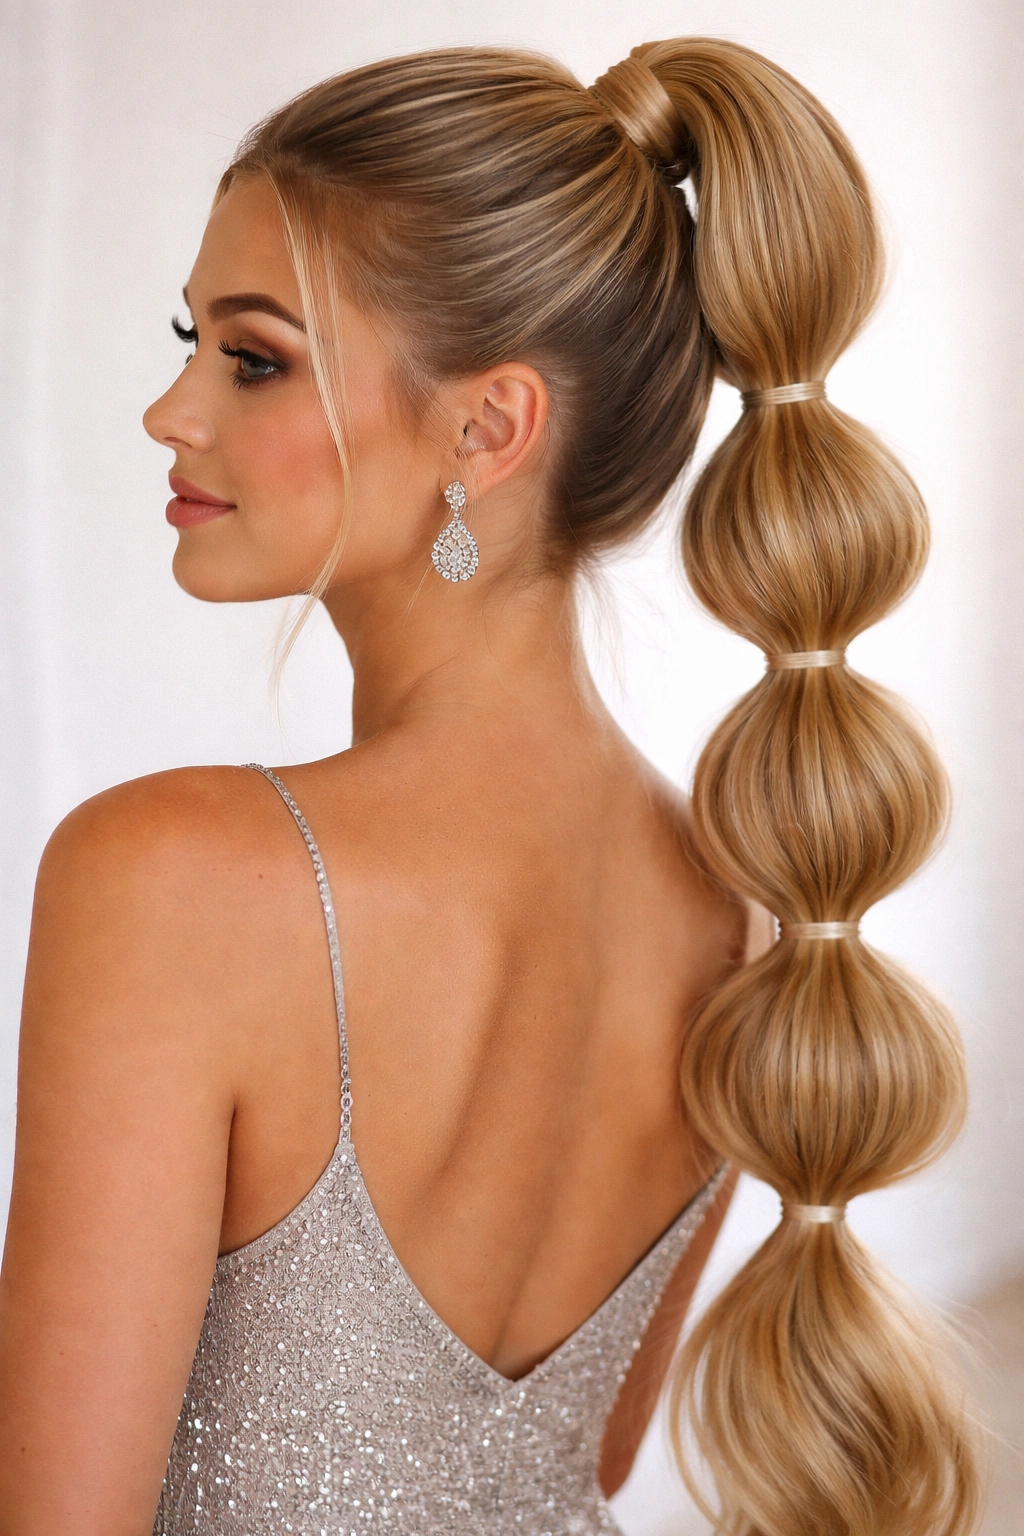
The bubble ponytail is a playful, fashion-forward style that looks complicated but is genuinely simple to execute. Multiple elastics spaced down the length of the ponytail create distinct, puffy sections—like little bubbles. It’s trendy without being costume-like, eye-catching without being over the top, and it works for someone who wants to stand out from the typical homecoming hairstyle crowd.
When the Bubble Ponytail Shines
This style works best on people with medium to longer hair and reads as modern and fashion-conscious. It photographs beautifully (those distinct sections look great in photos), works with both sleek and textured hair, and the individual sections mean you can add small accessories or threading details if you want to customize further. The bubble texture also gives the illusion of thicker, fuller hair.
Building Your Bubble Ponytail
- Gather hair into a high or mid-height ponytail and secure with an elastic
- Take a second elastic and wrap it around the ponytail about 2-3 inches down from the first elastic, creating a small gathered section
- Gently pull the hair between the first and second elastic slightly outward and upward to create the first “bubble”
- Continue placing elastics down the length of the ponytail, spacing them consistently (every 2-3 inches works well)
- After placing each elastic, pull the section between that elastic and the previous one to create the bubble effect
- As a final touch, gently fan out and loosen each bubble section to make them fuller and more defined
Real talk: This style requires your hair to be in good condition—any breakage will be more noticeable with sections on display. It also takes a few minutes to execute, so give yourself time during hair prep.
5. The Twisted Wrap Ponytail
A twisted wrap ponytail transforms a basic style by incorporating one or more twisted sections that wrap around the base. This detail creates visual interest, looks intentional and sophisticated, and works whether your ponytail is high or low, sleek or textured. The twist element catches light beautifully and photographs exceptionally well.
How Twists Add Dimension
Twists create a sculptural quality that simple ponytails lack. Instead of a flat elastic at the base, you have texture and dimension created by your own hair. This style particularly suits formal events because it reads as “I put thoughtful effort into this” while remaining elegant and not overdone.
Creating the Twisted Wrap Effect
- Gather hair into your chosen ponytail position (high or low) but don’t secure yet
- Take a small section of hair from the front left (near your temple) and twist it loosely down toward the ponytail base
- Wrap this twist around the base of where your ponytail will be, securing it temporarily with a bobby pin
- Repeat with a section from the front right, wrapping it in the opposite direction (this creates balanced visual interest)
- Once both twists are pinned in place at the base, secure the entire ponytail with an elastic
- Any remaining twisted section can wrap around the elastic itself, hiding it completely
- Pin the end of your twist wrap in place and smooth any flyaways
Insider note: Two-tone hair or highlights become much more visible with twisted details—if you have dimensional color, this style shows it off beautifully.
6. The Braided Ponytail
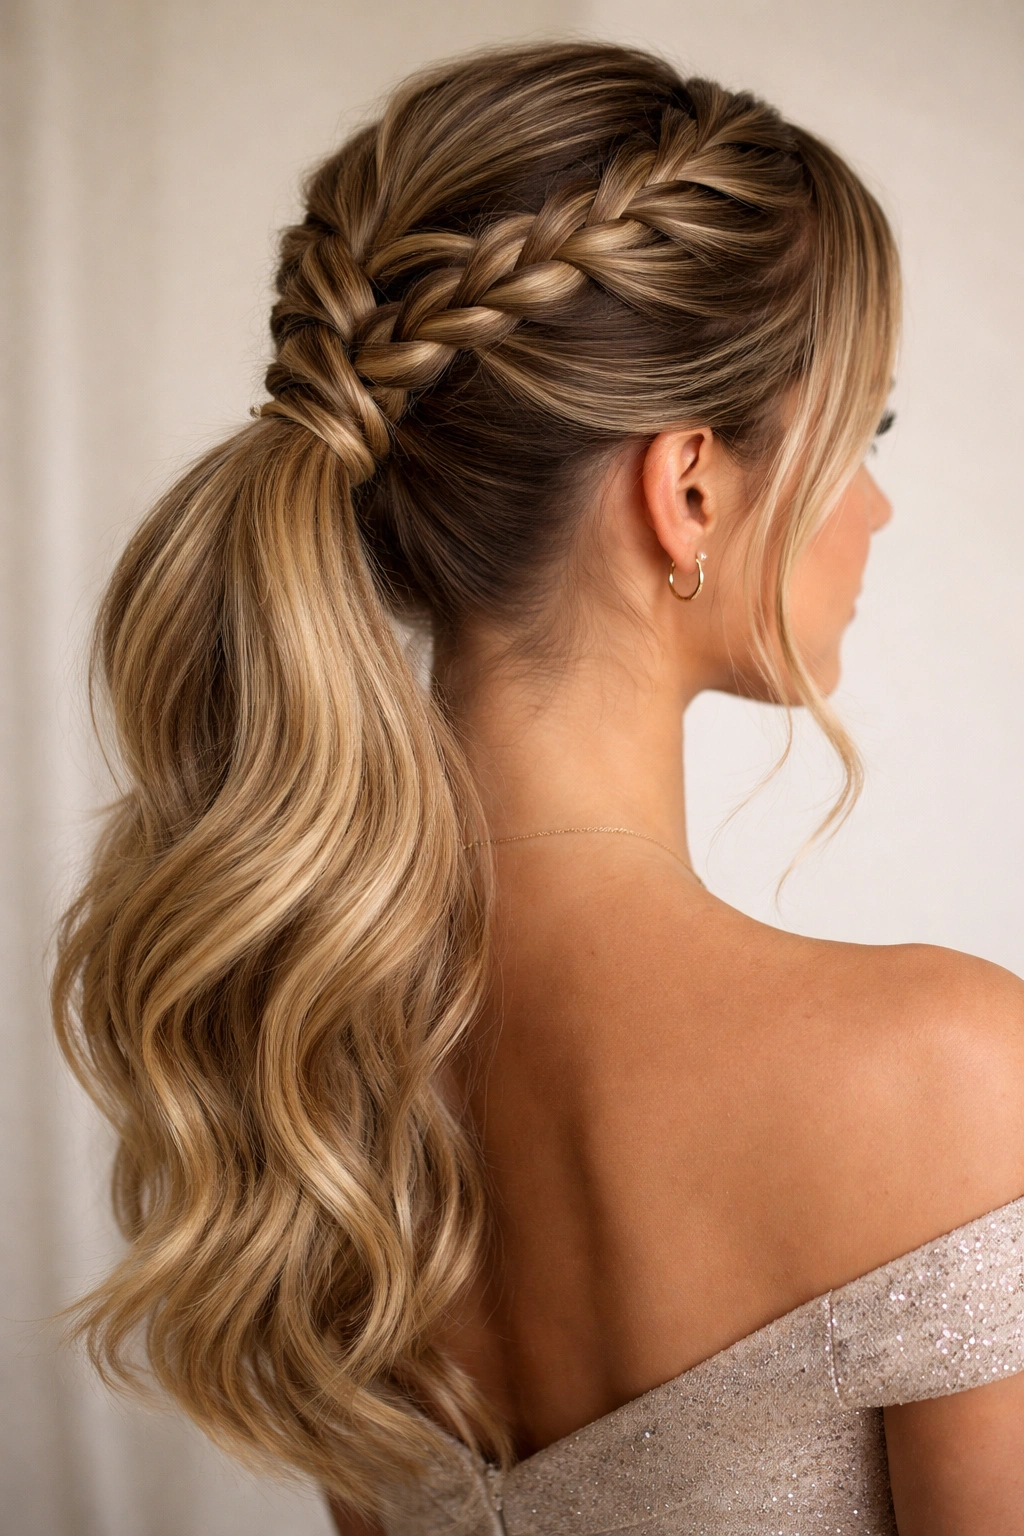
A braid woven into or around your ponytail adds an unexpected element of texture and sophistication. Unlike standalone braids, a braided ponytail keeps hair off your face while showcasing the detail of the braid. You can incorporate a braid at the crown leading into the ponytail, or weave a braid around the base of a finished ponytail for a more subtle effect.
Types of Braids That Work Best
A Dutch braid (braided “inside out” for a raised effect) looks especially striking leading into a high ponytail. A regular three-strand braid is always reliable and less time-consuming. A fishtail braid creates a delicate, intricate look. Whatever braid you choose, ensure it’s loose enough to look elegant rather than tight enough to create tension.
Executing the Crown-to-Ponytail Braid
- Blow dry hair smooth to textured, depending on your preference
- Create a deep side part (this creates visual interest and flatters most face shapes)
- Start a Dutch braid at the temple on the fuller side of the part
- Braid toward the back and crown, adding hair as you go, ending where you’d normally place a high ponytail
- At the crown, discontinue the braid and gather all hair (braided section and remaining hair) into the ponytail
- Secure with an elastic and wrap a section around the base
- Gently loosen the braid slightly for a softer, fuller appearance
Worth knowing: Braiding slightly damp hair makes the process easier and the braid holds better throughout the day. Use a dry shampoo on dry hair if you have slippery hair that resists braiding.
7. The Side-Swept Ponytail
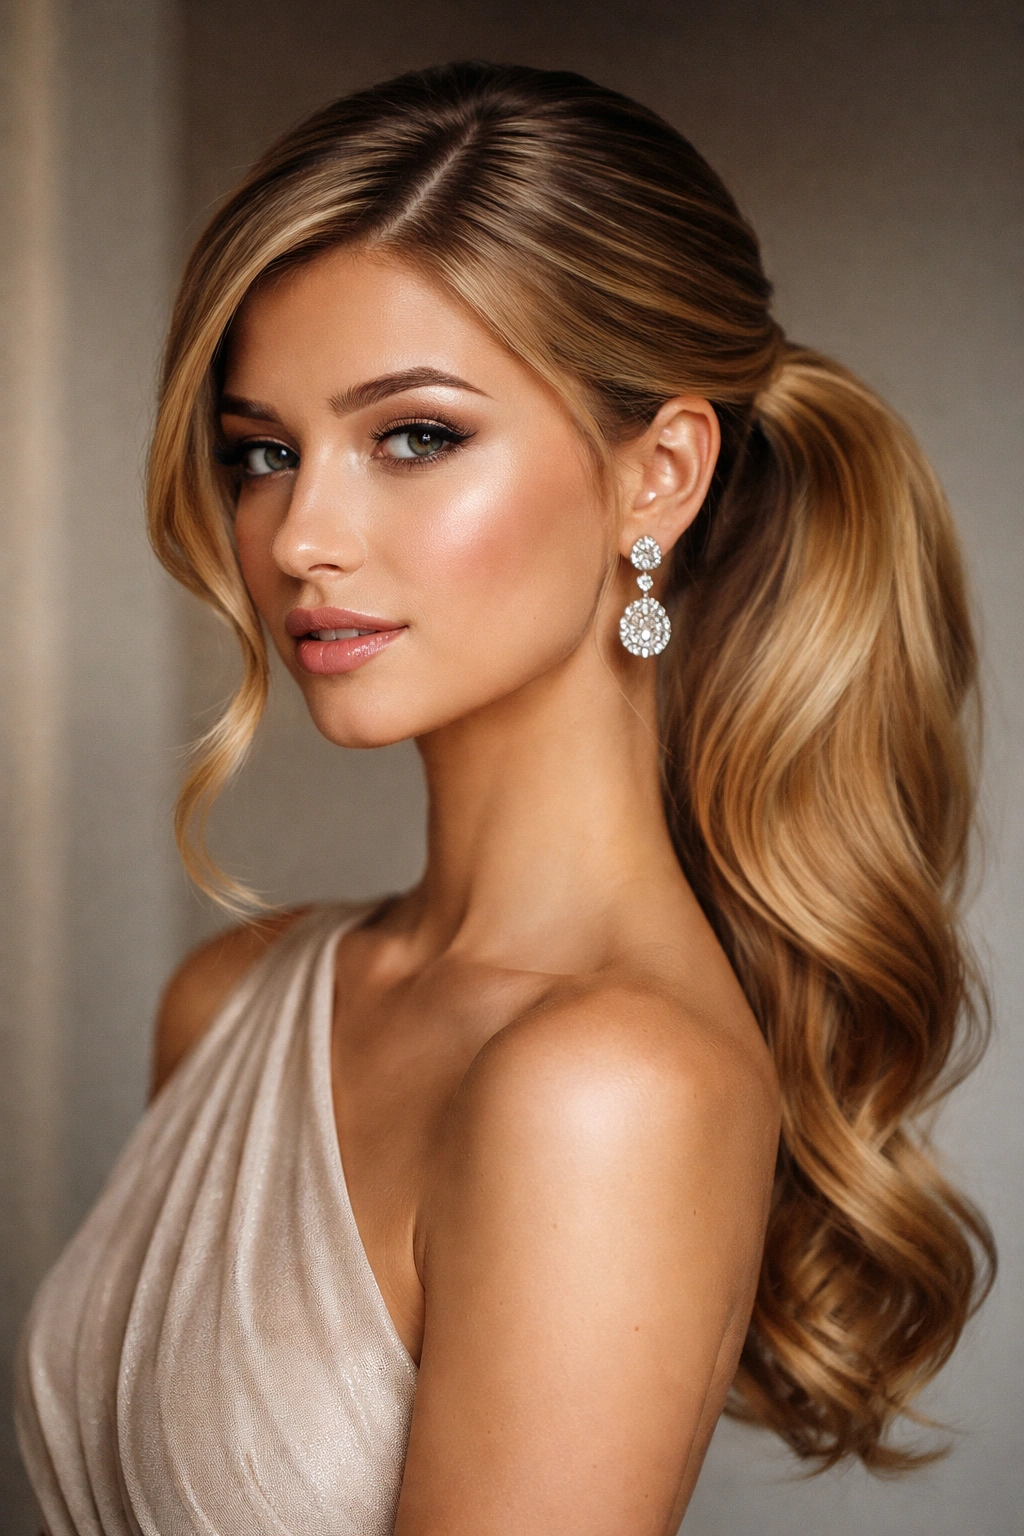
A side-swept ponytail positioned toward the side of your head rather than centered has an inherent elegance and asymmetry that reads as intentional. This style works beautifully for formal occasions and suits most face shapes. The side positioning naturally shows off one side of your face and creates visual interest without looking overly trendy.
Why Asymmetry Works
Asymmetrical styles often feel more modern and sophisticated than perfectly centered ones. A side-swept ponytail emphasizes the collarbone and shoulder on one side, works beautifully with one-shoulder dresses, and photographs with stunning depth.
Positioning Your Side-Swept Ponytail
- Blow dry hair straight or with subtle texture
- Create a deep side part, ideally sweeping hair to one side across the top of your head
- Gather hair toward the side, positioning the base of the ponytail at the lower-back section of that side rather than at the very back center
- The position should feel intentional—not so far to the side that hair falls forward in your face, but clearly off-center
- Secure tightly (side positioning requires secure anchoring) and wrap a section around the base
- Allow some hair to fall softly in front of your ear and around your collarbone for a romantic, asymmetrical feel
Pro tip: If you have a face shape you prefer to show off (one side you feel is more flattering), position your side-swept ponytail on the opposite side—this creates balance and draws eye to your preferred side.
8. The Half-Up Ponytail
A half-up ponytail keeps the elegance of a full ponytail while maintaining the romantic, softer feel of down hair. Approximately the top half of your hair is gathered and secured, while the bottom half flows freely. This style offers the best of both worlds—it keeps hair off your face and neck without the commitment of a full ponytail.
When Half-Up Is the Right Choice
This style works beautifully if you love the look of down hair but need the practical benefit of keeping some hair back. It’s particularly flattering if you have length and want to showcase it. Half-up styles photograph gorgeously and have a romantic, ethereal quality that pairs perfectly with softer makeup and delicate dresses.
Creating the Half-Up Effect
- Blow dry hair smooth or textured, depending on your desired finish
- Starting at one temple, gather a section of hair from the temple back toward the crown
- Add a section from the other side, meeting it at the back crown area (or slightly off-center for asymmetry)
- Secure with an elastic at the back crown, positioning it where you’d naturally want the division between “up” and “down” hair
- If desired, twist or lightly braid the sections before securing for added texture and interest
- Allow the remaining hair to fall in waves or curls for a soft, romantic finish
- For a more finished look, wrap a small section of gathered hair around the base elastic
Worth knowing: This style works beautifully with delicate pins, small pearl clips, or a thin metallic hair clip for added elegance—you have more canvas for accessories than a full ponytail.
9. The Voluminous Teased Ponytail
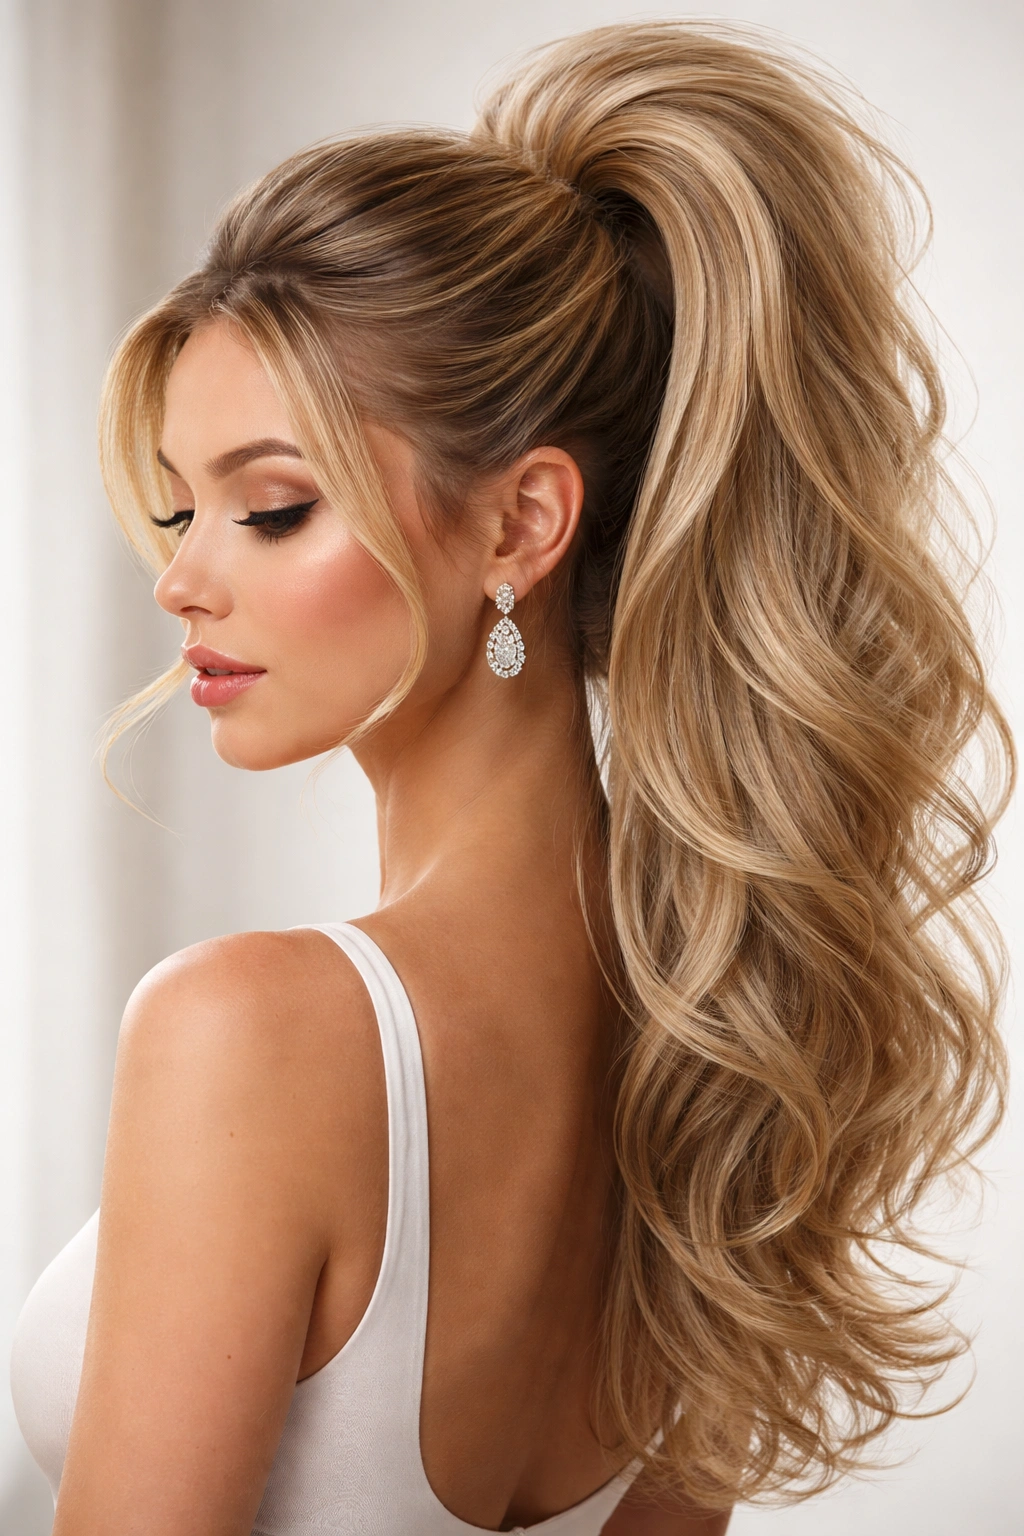
For someone who wants maximum impact and a truly striking presence, the voluminous teased ponytail delivers. Strategic teasing (also called backcombing) at the crown creates serious height and fullness. Combined with a high or mid-height ponytail, this style makes a bold statement and photographs with dramatic flair.
Creating Real Volume vs. Artificial Texture
Teasing works by combing hair backward against the hair growth, creating a tangled texture underneath that supports volume. When done correctly and finished smoothly on top, you get the volume without the “ratted hair” appearance. This technique is especially valuable if you have fine or thin hair, as it creates optical fullness.
Building Your Voluminous Ponytail
- Blow dry hair completely straight and smooth
- Using a fine-tooth comb or teasing brush, create a section at the crown (roughly 2-3 inches from front to back)
- Tease this crown section by combing backward against the growth, creating texture and volume
- Once you’ve created sufficient height, smooth the top layer of hair down with your brush, creating a smooth surface over the teased base
- Gather hair into your high or mid-height ponytail position, leaving the teased crown section prominent
- Secure the ponytail with an elastic and wrap a section around the base
- Use light hairspray to preserve the volume and smooth any flyaways
Real talk: Teasing requires commitment to gentle removal—use a conditioner-rich product and patient, careful brushing when taking it down to prevent breakage. It’s worth the effort for the impact, but this style does take more care afterward.
10. The Braided Crown with Ponytail Tail
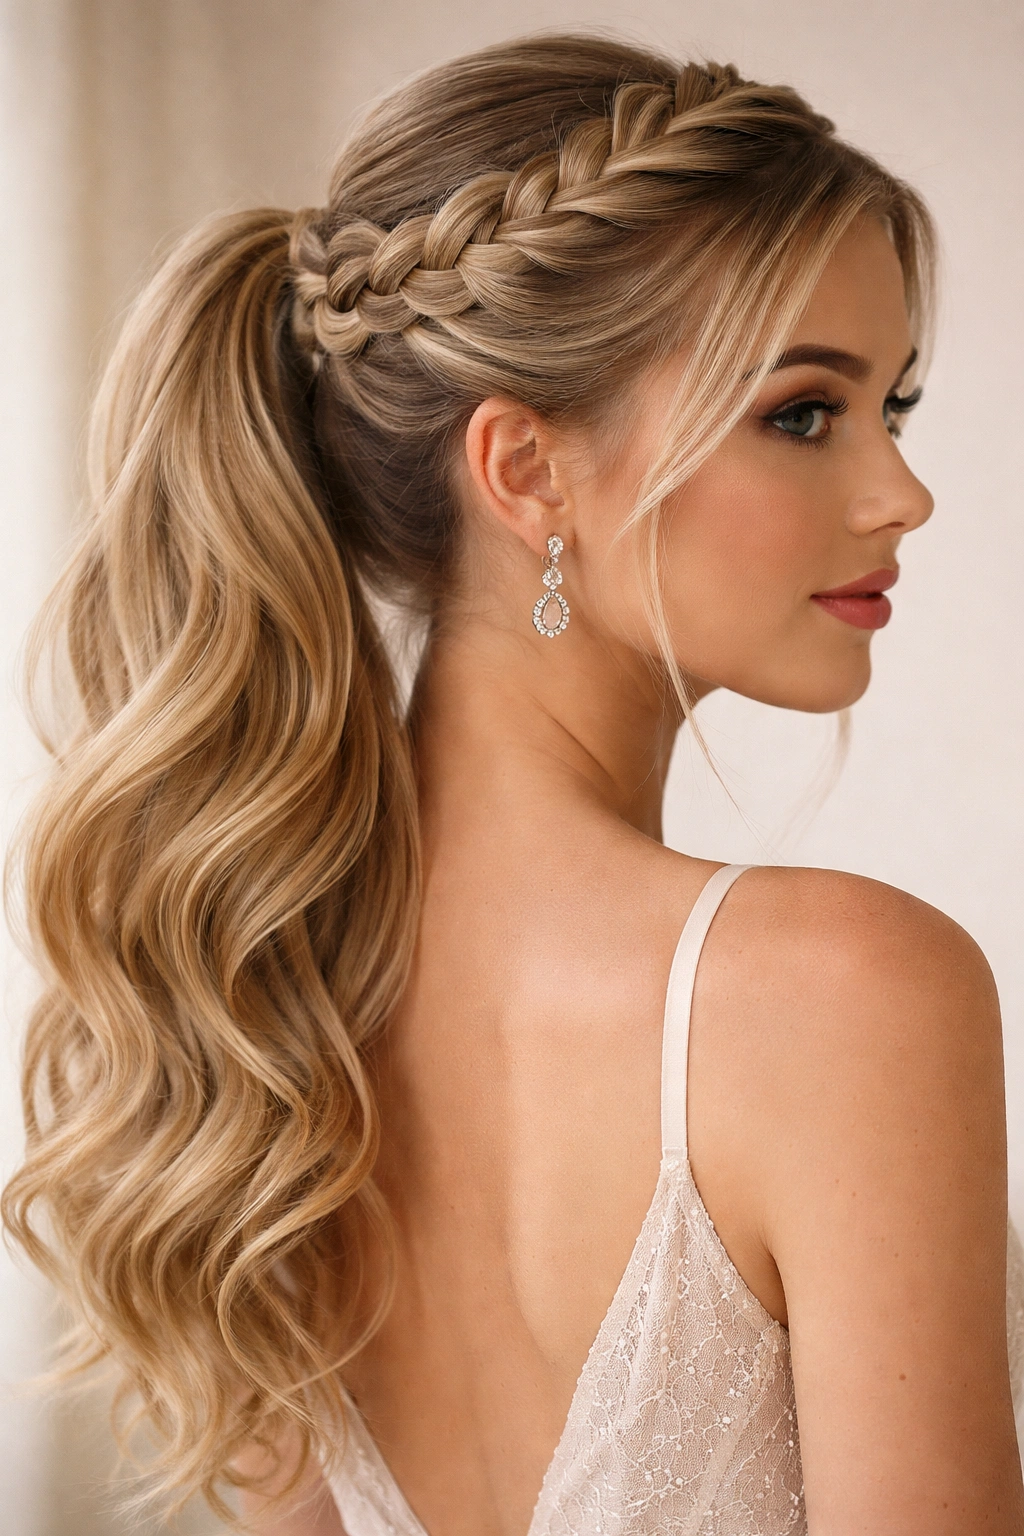
Combining elements of crown braiding with a flowing ponytail, this style creates a princess-like elegance that feels special without being costume-like. A braid circles around the crown, anchoring a ponytail that flows below. It’s romantic, sophisticated, and surprisingly achievable with practice.
The Appeal of Crown Integration
When a braid becomes part of the ponytail structure rather than separate from it, the overall look becomes cohesive and intentional. This style works beautifully for formal occasions and pairs perfectly with delicate jewelry and softer makeup looks.
Executing the Crown Braid with Ponytail
- Create a side part and begin a Dutch braid on one side of the head, starting at the temple
- Continue braiding around the back of the head, ending on the opposite side (you’re creating a braid that crowns the head)
- Gather all remaining hair plus the end of the braid into a ponytail at the nape of the neck
- Secure with an elastic and wrap a section of hair around the base
- Loosen the braid slightly for a softer, fuller appearance
- Consider leaving one or two soft waves to fall in front of the ear for romance
Pro tip: This braid-to-ponytail transition looks cleaner and more intentional when the braid ends exactly where the ponytail begins, creating a seamless transition rather than an obvious join point.
11. The Slicked-Back Low Bun Ponytail
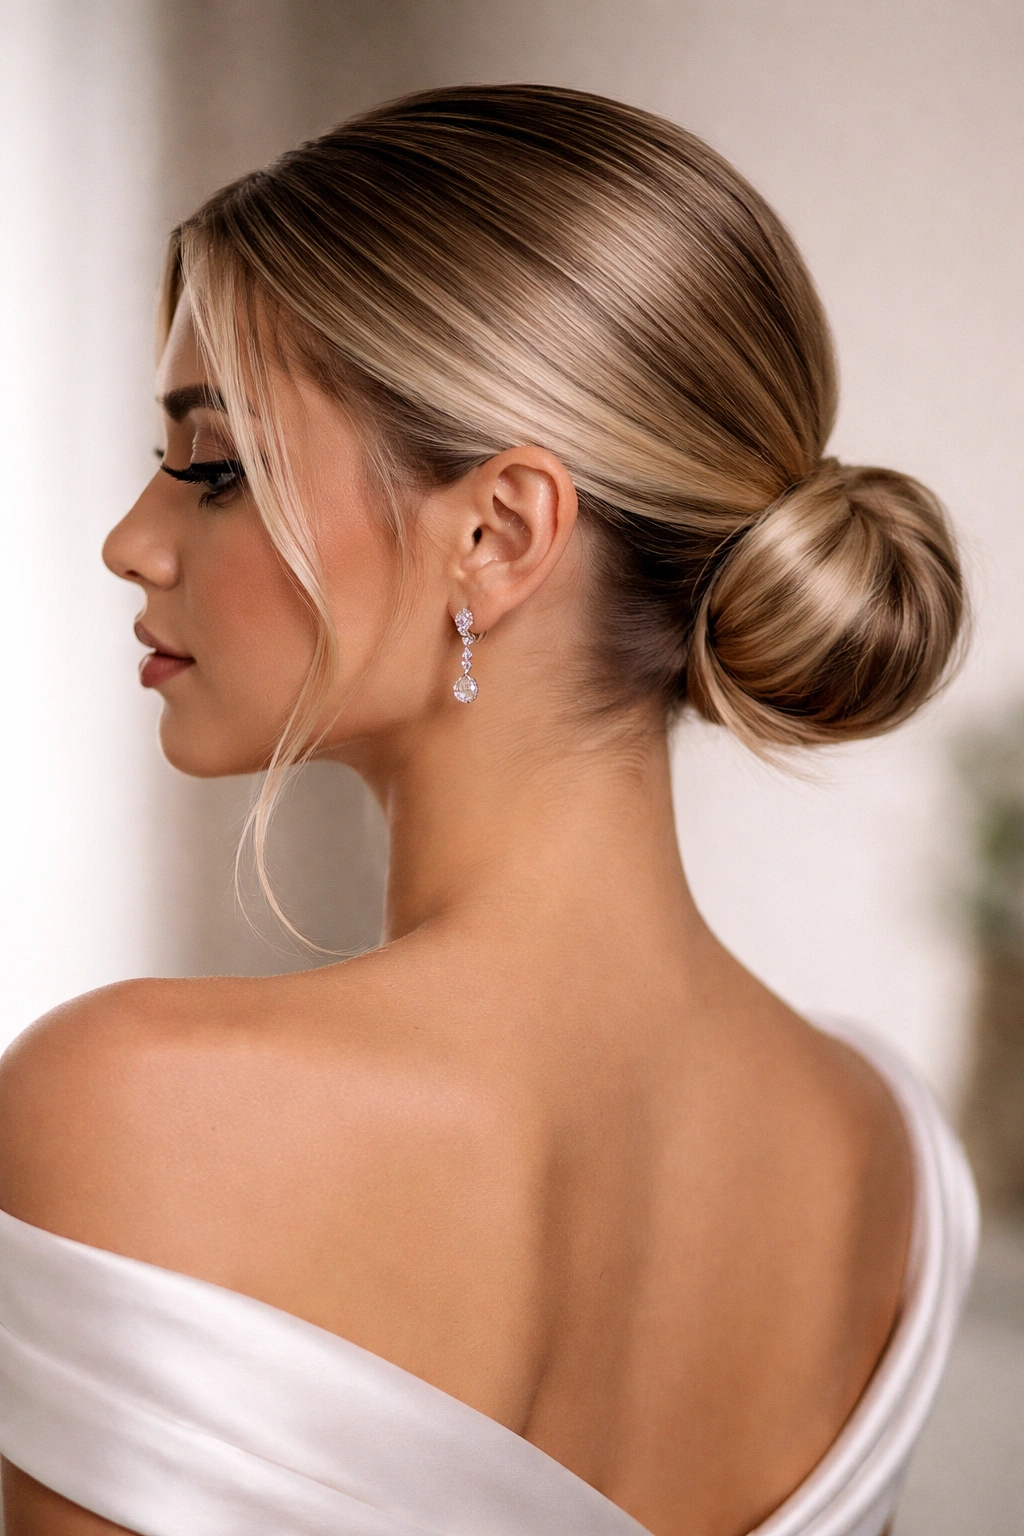
This style sits between a traditional ponytail and a low bun, offering the sleekness of a bun with the visual lightness of a ponytail. Hair is smoothed and slicked back, gathered low, and then loosely twisted or bunched rather than tightly rolled. It’s modern, sophisticated, and works beautifully for someone seeking an ultra-polished look.
Why Low Bun Ponytails Photograph Beautifully
The combination of slicked-back hair and a soft, loose gathering at the nape creates a defined, elegant silhouette. This style shows off your face, neck, and shoulders completely while maintaining a polished, intentional appearance. It’s the ponytail/bun hybrid that photographs like a professional styling.
Creating the Slicked Bun Ponytail
- Blow dry hair smooth and straight
- Apply a smoothing serum or light gel to damp hair, then blow dry for superior smoothness
- Using a paddle brush and additional smoothing product as needed, brush all hair back away from the face
- Gather hair at the nape of the neck into a low ponytail, securing with an elastic
- Instead of leaving it as a traditional ponytail, twist the gathered hair loosely and wrap it around the elastic base, creating a loose coil
- Pin the twisted coil in place, allowing it to create a soft, textured gather rather than a tight bun
- Smooth any flyaways with a light finishing spray
Insider note: This style requires truly smooth base hair to read as polished—it’s worth spending time on the blow-dry to create a perfectly smooth foundation.
12. The Spiky Accent Ponytail
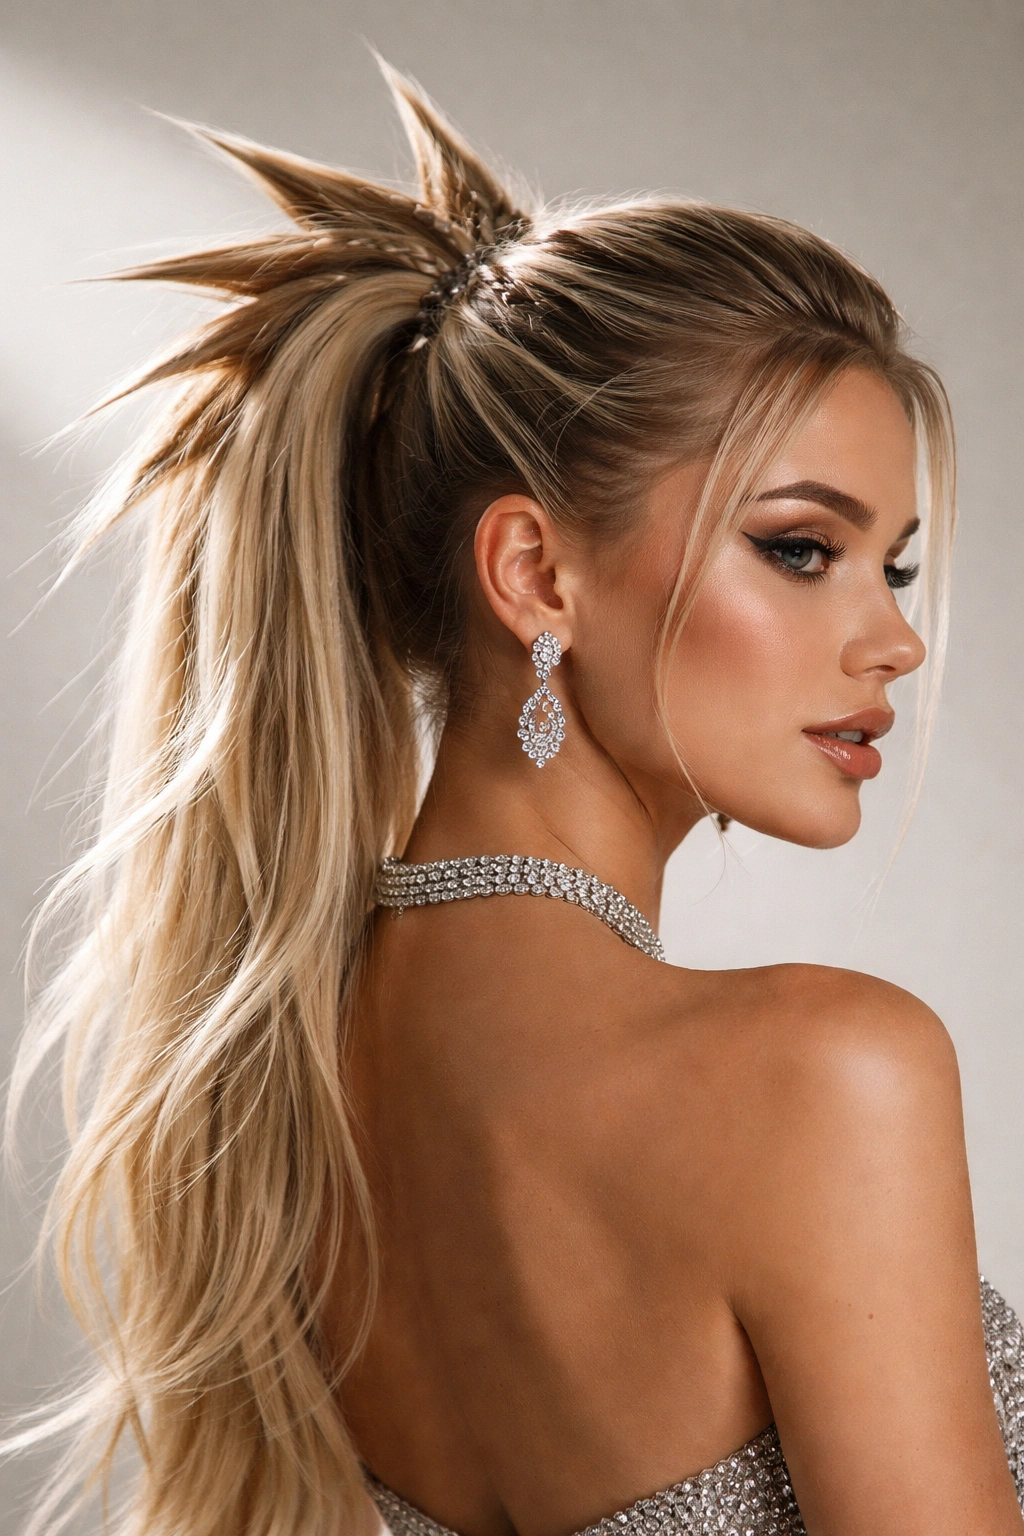
For someone wanting to make a bold, modern statement, a spiky accent ponytail incorporates angular, pointed elements. This might be created through strategic teasing, using small braids positioned to create edges, or pulling sections of the ponytail to create points. It’s edgy, contemporary, and demands confidence.
When Spiky Details Elevate a Look
Spiky elements add attitude and modernity to a formal style. Rather than traditional softness, you’re creating architectural interest and a contemporary edge. This style particularly suits strong personalities and anyone wanting to stand out from typical homecoming aesthetics.
Building Spiky Texture into Your Ponytail
- Tease sections throughout the ponytail to create texture and lift
- Pull individual strands or small sections upward and secure with bobby pins, creating pointed elements
- Alternatively, create small, tight braids throughout the ponytail, leaving the braids slightly looser on top to create pointed, spiky appearance
- Use a texturizing spray or sea salt spray to enhance grip and definition
- Consider spraying the spiky elements with light hairspray to hold points in place throughout the evening
Worth knowing: This style requires regular refreshing throughout the night—the spiky elements soften as you move and dance, so you may want to bring bobby pins and texturizing spray for touch-ups.
13. The Metallic Thread Wrapped Ponytail
Adding thin metallic threads, ribbons, or specialty hair threading creates unexpected glamour and catches light beautifully. The threads wrap around or weave through the ponytail, adding color, shine, and textural interest. This style is especially effective for formal events and photographs with spectacular shimmer.
How Threading Elevates a Simple Ponytail
A basic ponytail becomes instantly elevated when metallic or colored threading is incorporated. The threads catch light as you move, creating dynamic visual interest. This detail works with both sleek and textured ponytails and can be customized to match your dress color or jewelry.
Adding Threads to Your Ponytail
- Gather hair into your chosen ponytail style and secure with an elastic
- Take a thin metallic thread or specialty hair ribbon
- Wrap it around the ponytail base, covering the elastic completely, and secure the end with a bobby pin
- Alternatively, weave the thread through sections of the ponytail as you go, creating a pattern
- You can also braid the thread together with a small section of hair, creating an integrated design
- Use a lightweight hairspray to prevent the thread from slipping
Pro tip: Gold threading flatters warm undertones and works with gold jewelry; silver threading suits cool undertones and works with silver jewelry. Match your threading to your accessories for a cohesive, intentional look.
14. The Looped Ponytail with Face-Framing Pieces
This style creates loops or sections within the ponytail that curl back toward the face, creating dimension and a distinctly feminine quality. Small face-framing pieces are left down to create softness. It’s romantic, modern, and works beautifully for someone wanting a style that’s polished but still soft.
Why Loops Create Visual Interest
Loops and curved elements within a ponytail add movement and dimension that a straight ponytail alone doesn’t have. They create visual depth when photographed and give the style a curated, intentional quality.
Creating Looped Sections
- Gather hair into a high or mid-height ponytail, leaving small sections framing your face (one on each side)
- Secure the main ponytail with an elastic
- Take a section of the ponytail and create a loop by rolling it toward the face and pinning it to the ponytail base
- Repeat with another section, positioning the loop near the first one
- Continue creating loops throughout the ponytail, spacing them intentionally
- Allow the framing pieces to curl softly around your face, enhancing with a curling iron if needed
Worth knowing: This style requires secure bobby pinning—the loops put weight on specific points, so ensure each loop is pinned thoroughly to prevent slipping throughout the night.
15. The Braided Halo with Ponytail Center

The final style combines a halo braid (a braid that circles around the crown of the head) with a sleek or textured ponytail flowing from the center. This creates a truly striking, elegant look with maximum visual interest. It’s sophisticated, photographs beautifully, and suits anyone wanting to look like they spent hours at a salon.
Why This Combination Works
A halo braid creates a frame around your face and head, drawing attention upward and creating a romantic, princess-like quality. Combined with a clean ponytail from the center, the style has both softness and structure, both romance and sophistication.
Building Your Braided Halo with Center Ponytail
- Create a deep side part
- Beginning at one temple, start a three-strand or Dutch braid, working around the back of the head
- Continue braiding around the opposite side, ending near the opposite temple (you’ve created a crown/halo around the head)
- Gather all hair from the center crown area (not part of the braid) into a high or mid-height ponytail
- Secure the ponytail with an elastic
- The braid naturally frames this ponytail, creating a beautiful integrated look
- Wrap a section of ponytail hair around the elastic base
- Loosen the braid slightly for a softer, fuller appearance
- Consider curling the ponytail for added texture that contrasts beautifully with the sleek braid
Real talk: This style looks most striking with longer hair and takes about 10-15 minutes to execute, so plan accordingly. The payoff is completely worth the effort—this is genuinely one of the most elegant homecoming styles possible.
Final Thoughts
A great homecoming ponytail isn’t just about pulling hair back—it’s about choosing a style that makes you feel confident, that photographs beautifully, and that you can actually maintain throughout an entire evening of celebration. The 15 styles here run the full spectrum, from sleek and minimalist to braided and romantic to bold and modern. Every one of them communicates that you’ve put thought into your appearance without looking overdone or uncomfortable.
The truth is, the “best” ponytail for you depends on several factors: your hair texture and length, the style of your dress, your comfort level with styling techniques, and honestly, how you want to feel when you walk into that homecoming event. Someone confident in their ability to manage intricate details might gravitate toward braids and loops. Someone preferring ease and elegance might choose a simple sleek high or low ponytail. Someone wanting to stand out might go bold with volume, twists, or metallic threads.
Here’s what really matters: choose a style you’ve actually practiced at least once before homecoming. Don’t attempt a complicated braided halo for the first time on the day of the event. Test your chosen style, figure out what products you need, and understand how long it actually takes you to execute. You want to arrive at homecoming feeling prepared and confident, not stressed about whether your hair will hold up. With that confidence, and with the specific techniques and tips detailed above, you’ll walk in looking absolutely polished. That’s the entire point.