Natural curly updo hairstyles have a reputation for being fussy, but that usually comes from people trying to force curls into shapes they were never meant to hold. Curly hair looks best when it still looks like curly hair — springy, full, a little wild at the edges, and not flattened into a helmet.
That matters more than people admit. A good updo for curls has to respect shrinkage, density, and the way curls clump together once they dry. Pull too hard and you lose volume at the crown. Use the wrong tie and you get a dent that stays there all day. Skip enough pins and the whole style slowly slides south by lunchtime.
A strong curly updo can do a lot of jobs at once. It can keep hair off the neck, show off cheekbones, calm frizz around the hairline, and still leave enough texture to feel like your hair. Some styles need a wash-and-go that has had time to set. Others work best on stretched curls, a twist-out, or hair that’s on its second or third day and needs a little rescue.
The styles below lean practical first. Pretty matters, sure. But a curly updo that falls apart in the car or feels painful after an hour is not a win. A style that gives you lift, shape, and enough hold to live through real life is.
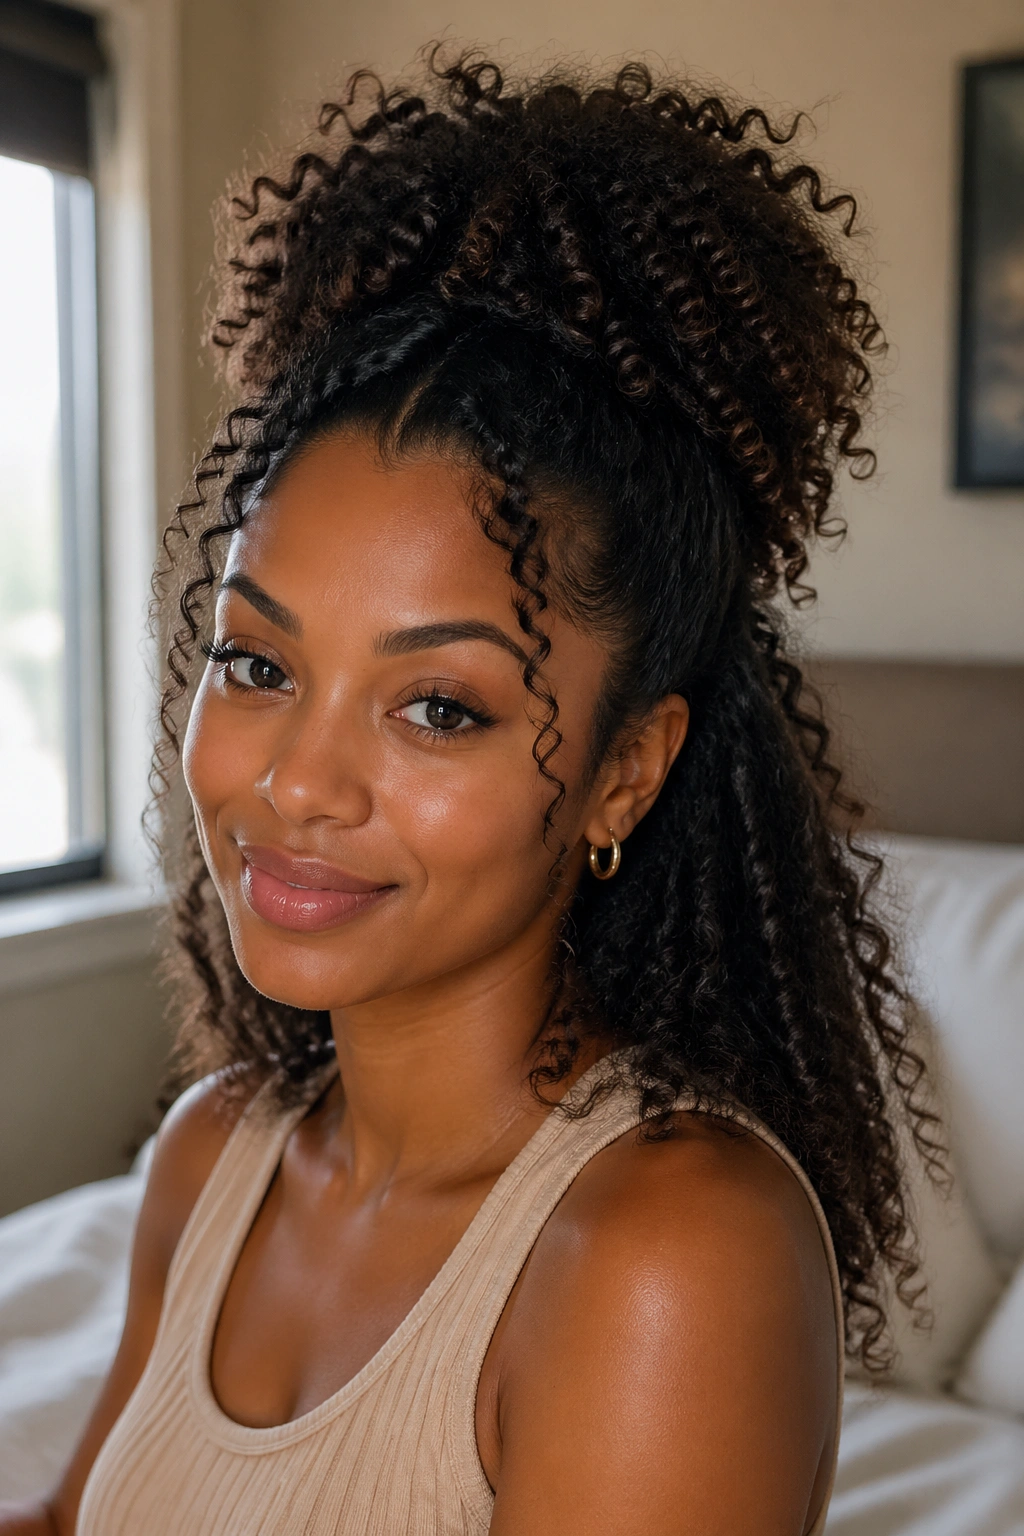
1. High Pineapple Puff That Keeps Curl Volume at the Crown
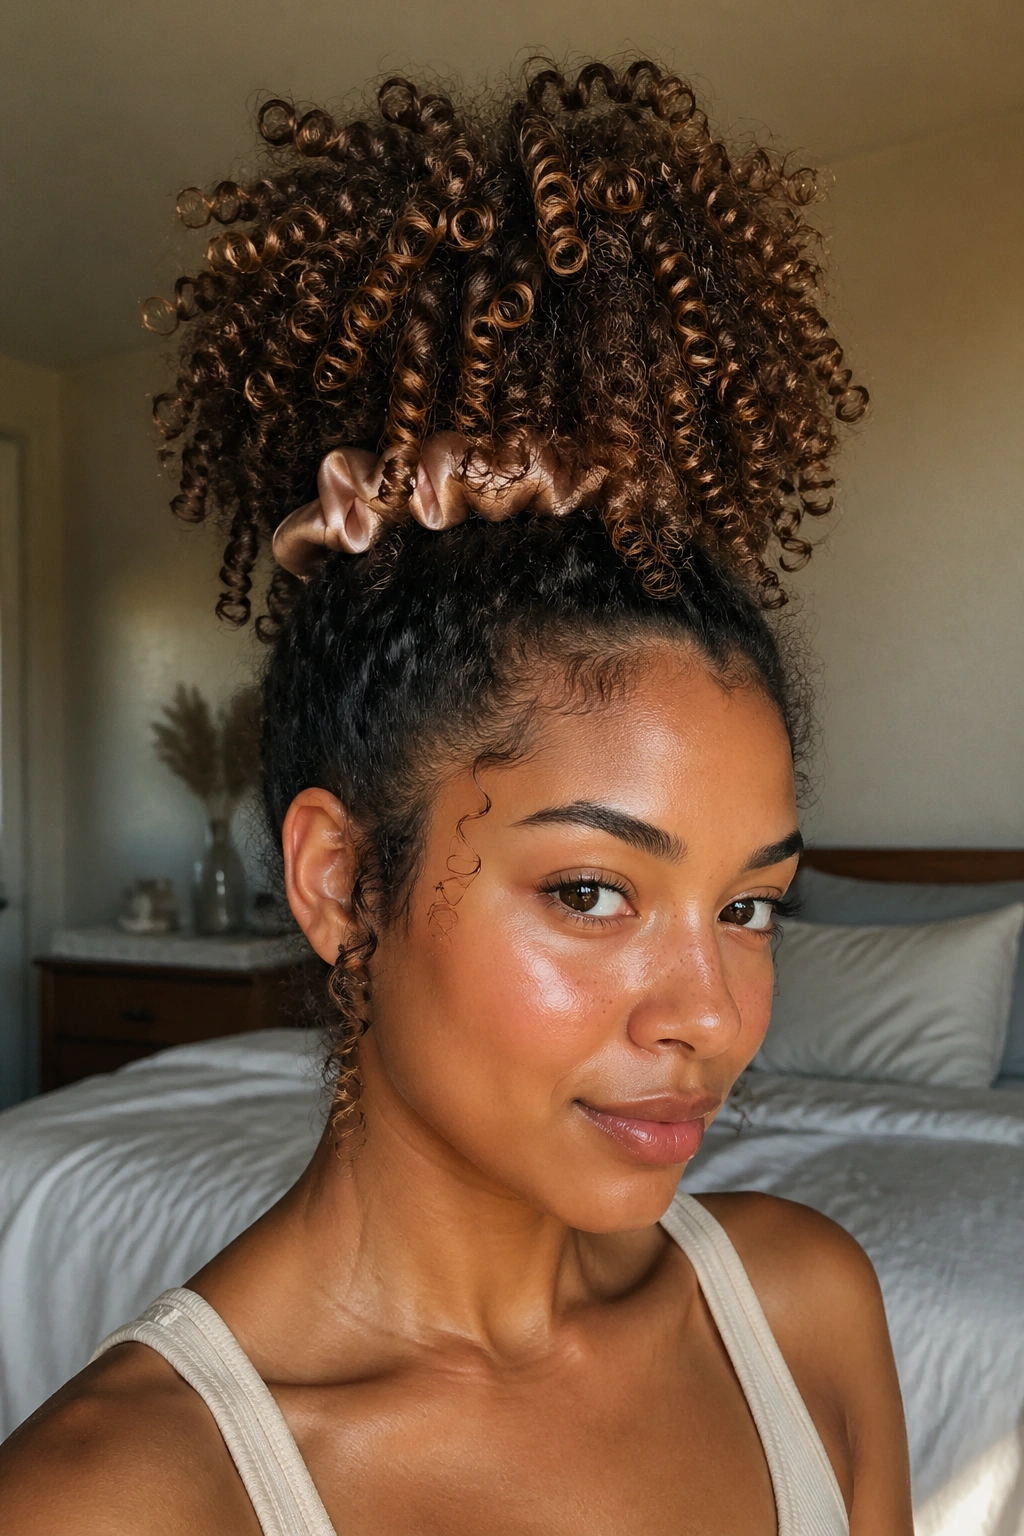
A high pineapple is one of the easiest natural curly updo hairstyles to pull off, and I mean that in the nicest way. It keeps the crown tall, lets the curls fall in one soft mound, and avoids the stiff look that comes from overworking the hair.
The trick is not to shove every strand straight to the top and call it done. Flip your head forward, gather your curls loosely with a satin scrunchie, and let the ends spill forward and upward instead of being crushed flat. If your curls are long, you can wrap them once around the base and leave the ends loose. If they’re shorter, pin the side pieces up with two or three bobby pins and let the puff sit a little higher.
Why it works
The pineapple keeps curl pattern visible at the top of the head, which is where a lot of other updos go wrong. It also gives you easy lift without teasing or backcombing. That matters on dense hair, because backcombing can create a rat’s nest that takes forever to detangle later.
- Use a satin scrunchie instead of a thin elastic.
- Keep the base loose enough to slide one finger underneath.
- Let a few curls drop around the temples if the style feels too severe.
- Refresh the front with a little water and leave-in before you start.
Best for: medium to long curls, wash-and-go hair, and days when you want volume without a lot of effort.
2. Twisted Crown Updo with Ends Tucked Low
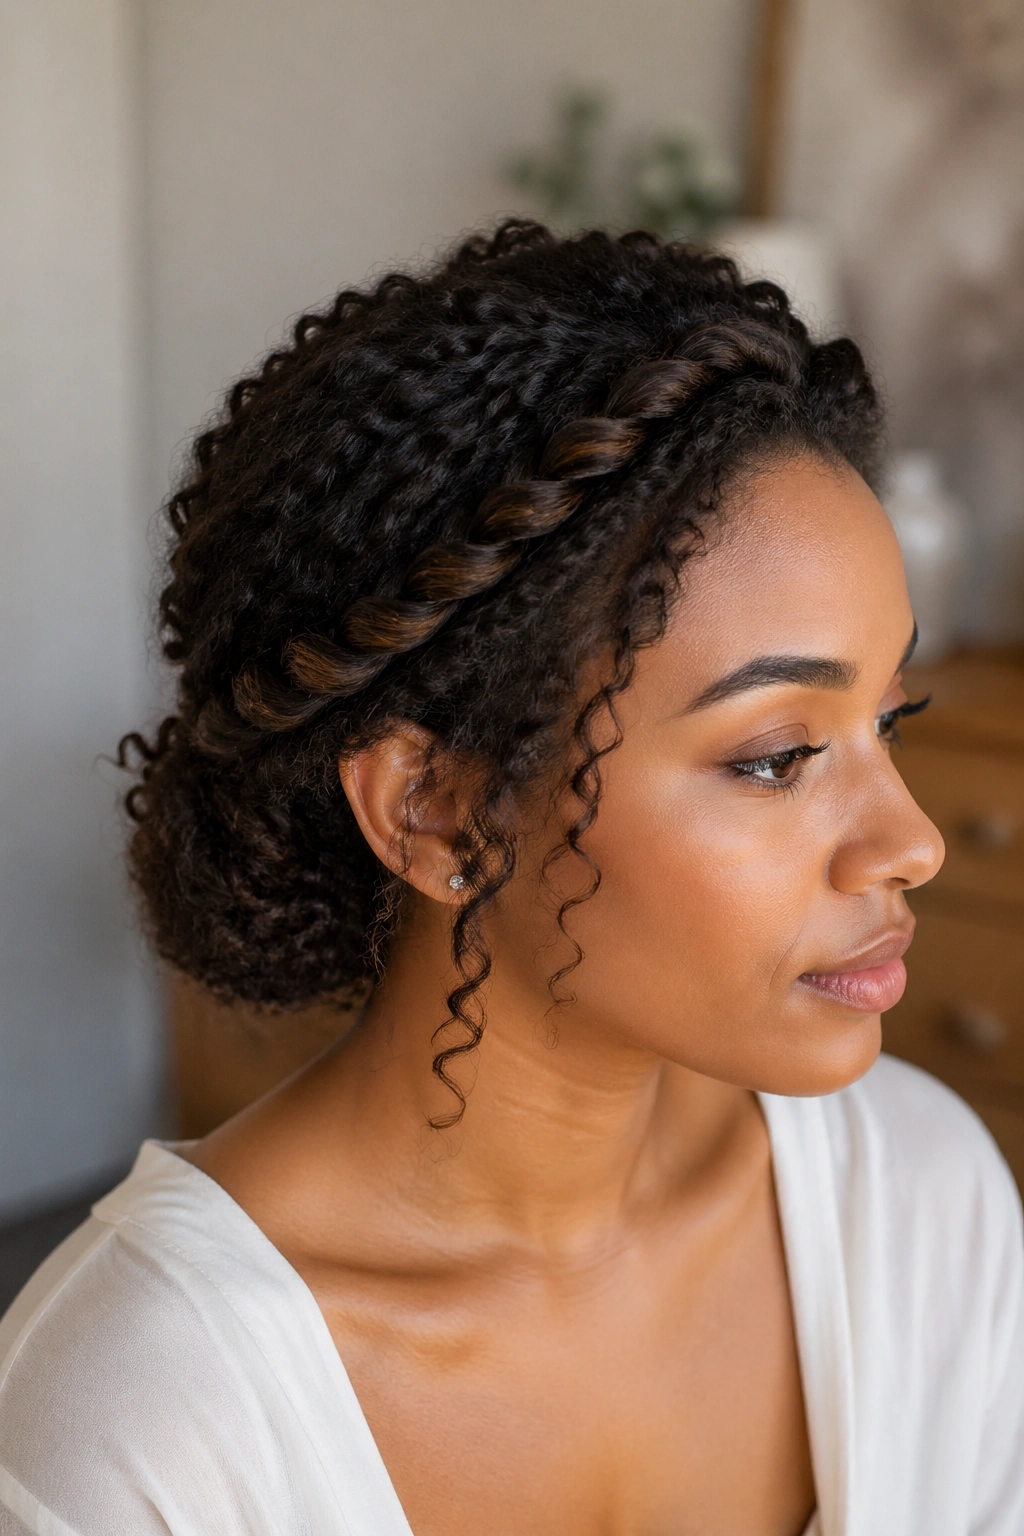
Want something that looks detailed without asking for a full salon appointment? A twisted crown updo does that job nicely. Two twists start near the temples, move along the hairline, and meet at the back where the ends are tucked into a low bun or hidden under pins.
This style is especially good when your curls have a little frizz at the root. The twists control the front, and the back stays soft enough that the whole thing still feels natural. It looks polished, but not stiff. That balance is the reason people keep coming back to it for weddings, church, dinners, and work events.
How to keep it neat
Sectioning matters here. Part the hair first, then mist each side lightly with water or a leave-in spray before twisting. Too much product and the twist gets slippery. Too little and the flyaways come back fast.
Use small, flat twists if your hair is tighter and denser. Use chunkier twists if your curls are looser and you want the style to look fuller. Do not twist too tightly at the temples; the style should sit close to the head, not pull at it.
A few hidden pins at the back make all the difference. So does a light mist of flexible-hold spray once everything is in place.
3. Curly Top Knot with Face-Framing Pieces

A top knot is not lazy when the curls are left soft around the face. In fact, that little bit of looseness is what keeps the style from looking like a gym bun someone made in a hurry.
Pull the hair high, but stop before every strand is slicked back. Leave out two small pieces near the temples, then gather the rest into a loose knot or coiled puff. If your curls are thick, twist the hair once before wrapping it so the knot sits compactly and does not spread into a big lump. The face-framing pieces can stay curly or get lightly twisted for a softer line.
The nicest version of this style has a little movement. Not chaos. Movement.
A few things help:
- Use a mid-size spiral hair tie or satin scrunchie for less tension.
- Pin the knot in two directions so it does not sag.
- Smooth the front with a tiny bit of gel on fingertips, not a heavy layer.
- Keep the face pieces short enough to avoid getting stuck in lip gloss, which sounds minor until it happens all day.
This one works especially well for round faces and for curls that have lost some definition but still have plenty of body. It is quick, forgiving, and better-looking than most people expect.
4. Low Curly Chignon for a Softer, Dressier Finish
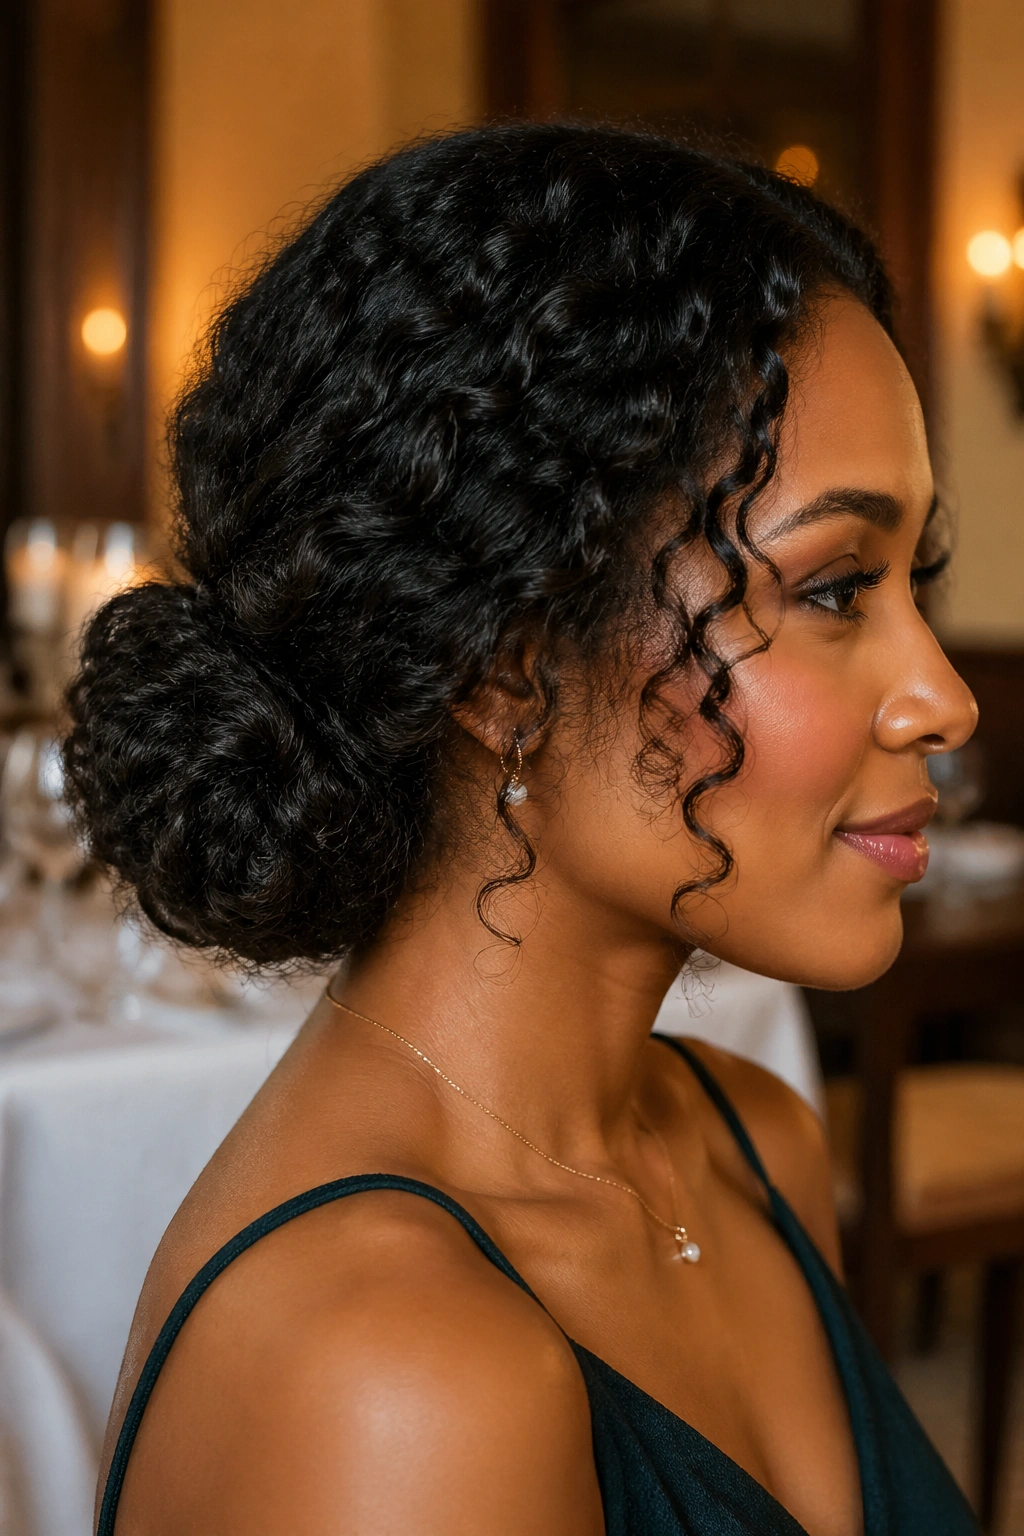
A low chignon has a different mood from a puff or knot. It sits close to the nape, keeps the profile clean, and gives curly hair a more formal shape without sanding off the texture. If you have a dinner, a presentation, or a dress that needs a calmer hairstyle, this is the one I reach for first.
What makes the shape hold
The secret is working with the curls instead of twisting them into obedience. Gather the hair low, separate it into two or three thick sections, and coil each section back toward the center. Then pin the coils in place so they overlap slightly. You want the bun to look soft and layered, not stuffed into a ball.
A chignon on curly hair usually looks best with a little asymmetry. Let one side be a touch fuller. Let one coil peek out more than the others. That small unevenness gives the style life.
Best way to prep it
Hair that is too silky slips out. Hair that is dry and fluffy can puff up around the edges. The sweet spot is hair that has a bit of definition and some grip. A light mousse or curl cream at the lengths helps, especially if your curls are looser and need help staying together.
If your nape hairs are short, pin them first before building the bun. That saves you from chasing tiny pieces for twenty minutes.
5. Side-Swept Curly Bun That Works on Medium-Length Hair
A side-swept bun has a little drama without trying too hard. The whole style starts with a deep side part, then the curls are gathered toward one side of the head and pinned into a low bun that sits near the ear or jawline.
It flatters medium-length curls especially well, because the length is enough to build shape but not so much that the bun turns bulky. The side part gives the whole thing a softer line, and the bun sitting off-center keeps it from looking too formal. That’s why it works for dates, events, and any day when you want the style to say “I made an effort” without shouting it.
A simple way to place it
- Part the hair deeply on the heavier side.
- Smooth the top with fingers or a wide-tooth comb.
- Gather the curls toward the side with one hand.
- Twist the lengths once and coil them into a loose bun.
- Pin from the underside so the pins stay hidden.
One thing to watch: if the bun sits too far forward, it can make the head look crowded. Keep it closer to the back of the ear and slightly below the cheekbone. That little shift makes the whole thing feel balanced.
A few face-framing curls soften it even more.
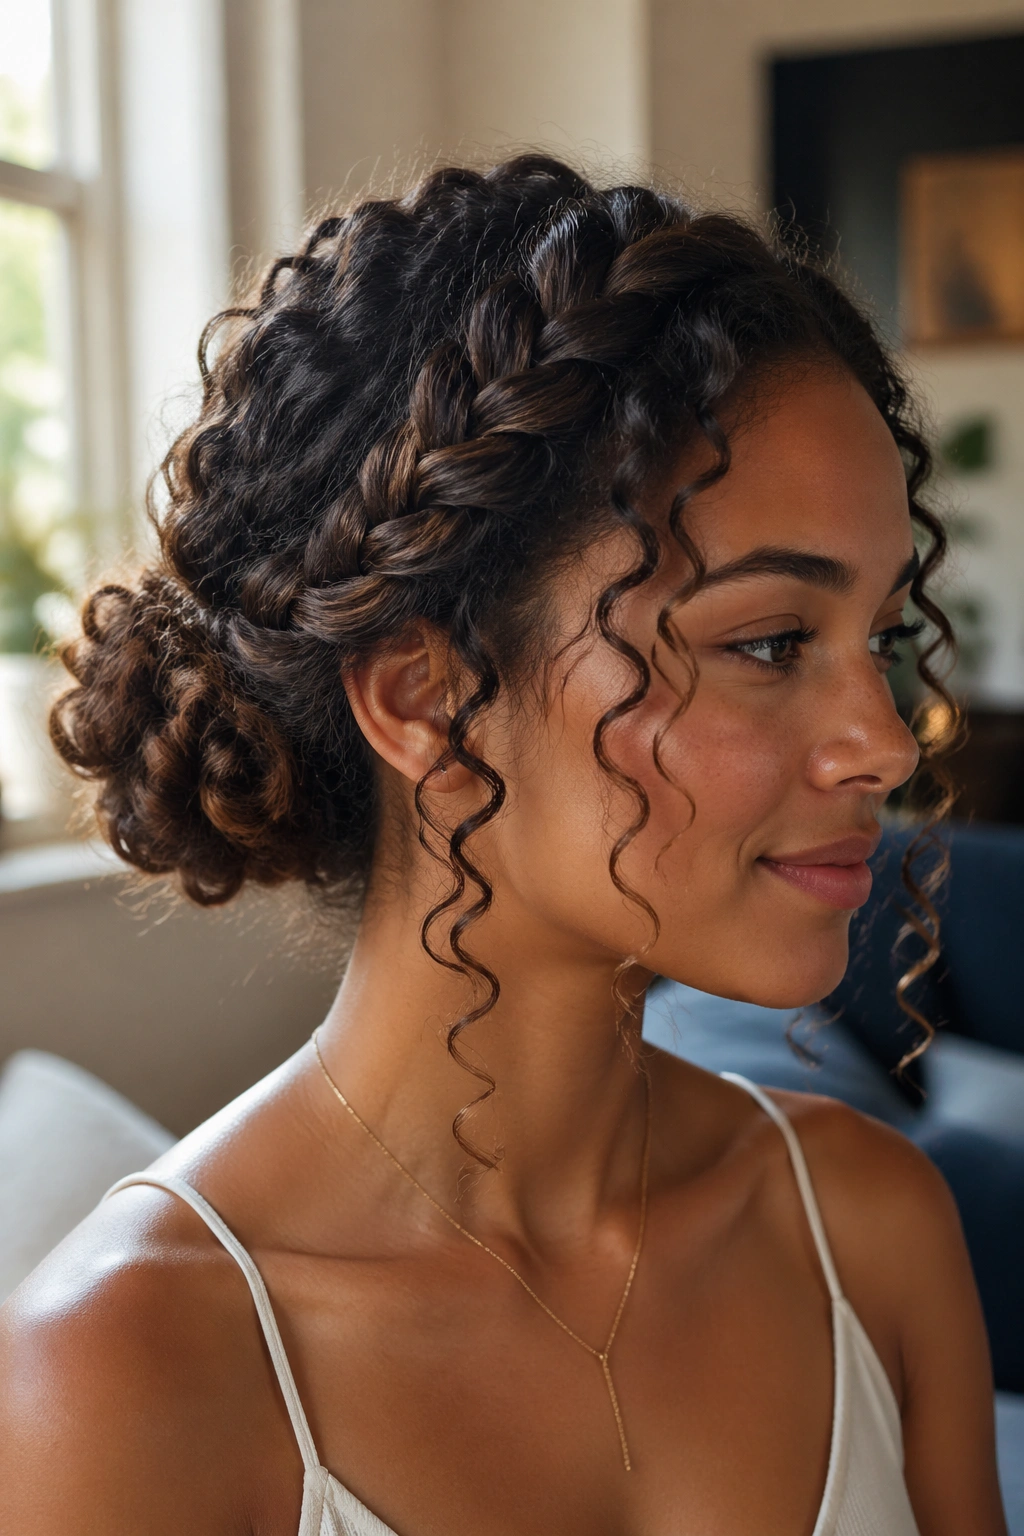
6. Braided Halo Into a Curly Bun
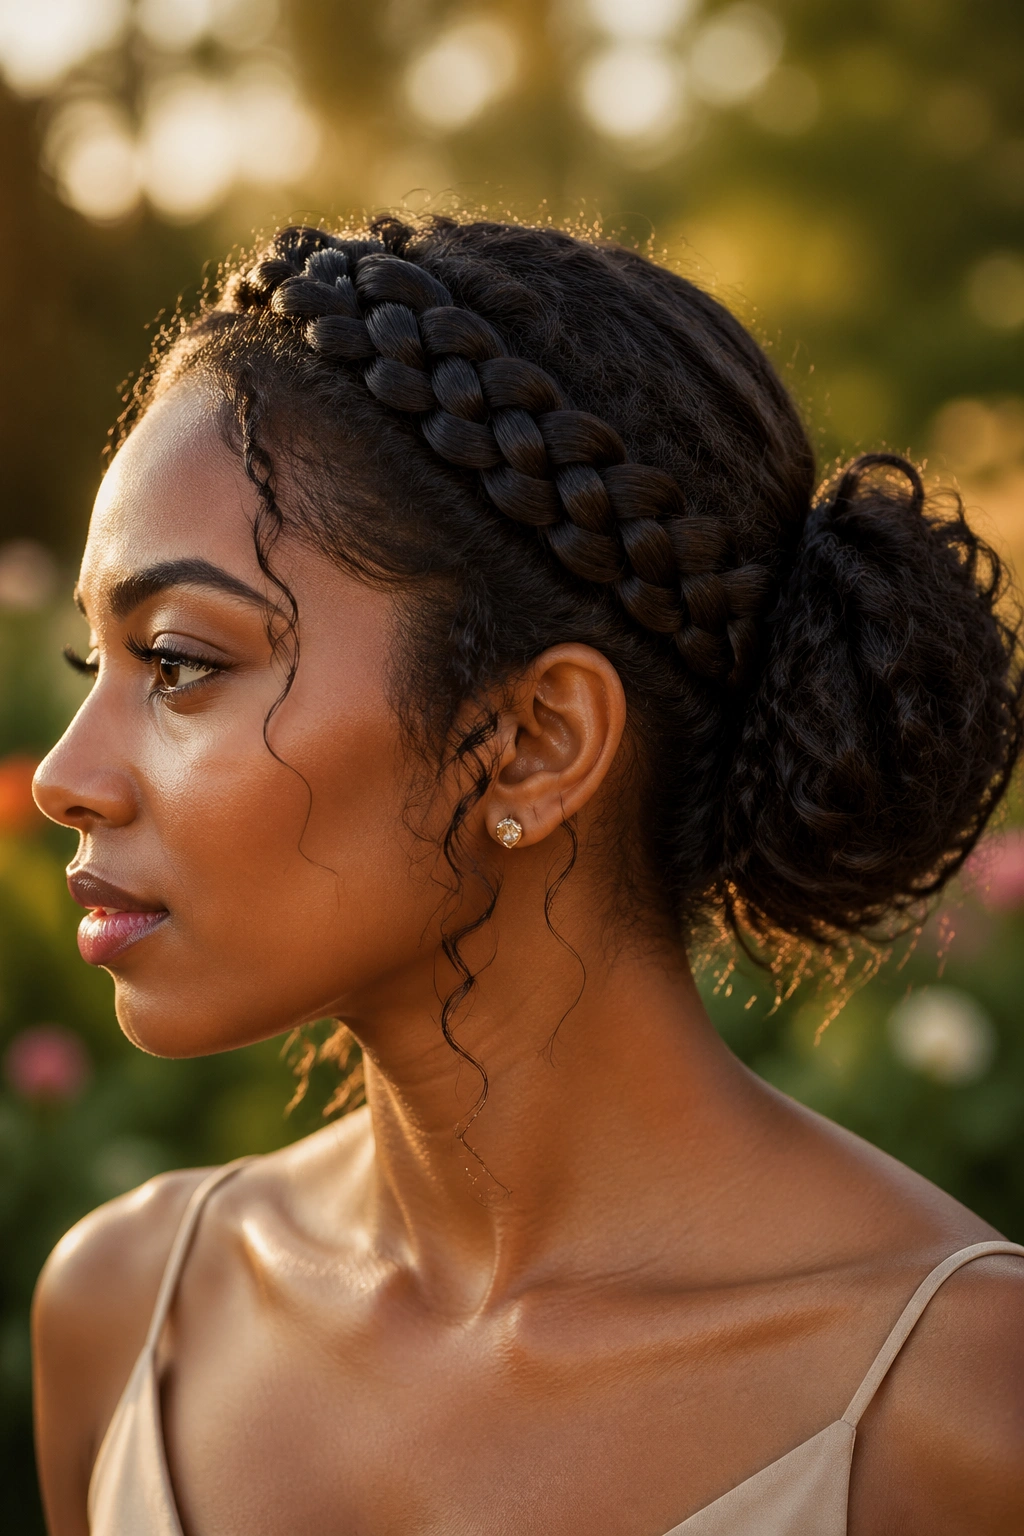
The braided halo updo is one of those styles that looks far more complicated than it is. A braid wraps around the head like a crown, and the remaining curls gather into a bun at the back or low side. It gives shape to the front while leaving enough texture in the back to keep the style from looking severe.
This is a strong choice for thick natural curls because the braid controls volume at the hairline. It also handles second-day hair well. If the roots are a little too fluffy for a slick style, the braid hides that problem fast.
The best version uses a braid that sits snug, not tight. Pull too hard and the temples complain. Pull too loose and the halo slips. The sweet spot is firm enough to stay put, soft enough to breathe.
If your curls are very dense, create the braid with slightly stretched hair. A quick blow-dry on low heat with a diffuser or a twist-out that has been separated gently can give you better control. On finer curls, a little texture spray at the roots helps the braid grip.
Tiny detail, big payoff: pin the bun first, then wrap the braid around it. That order keeps the shape from collapsing while you work.
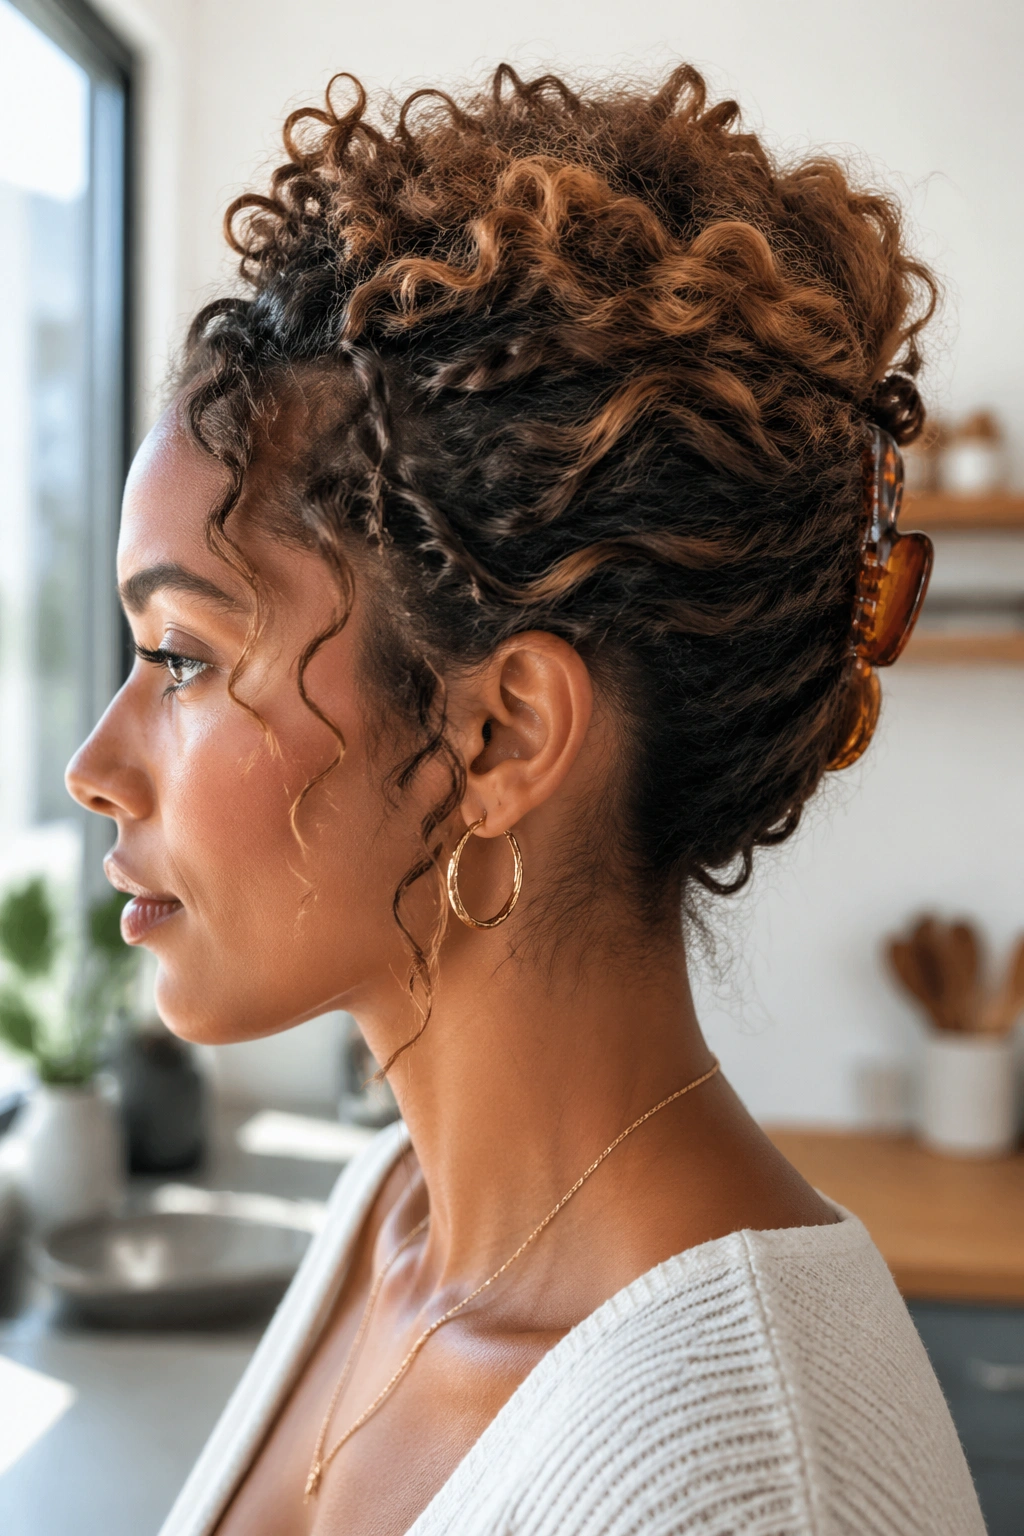
7. Curly Faux Hawk Updo for a Sharper Shape
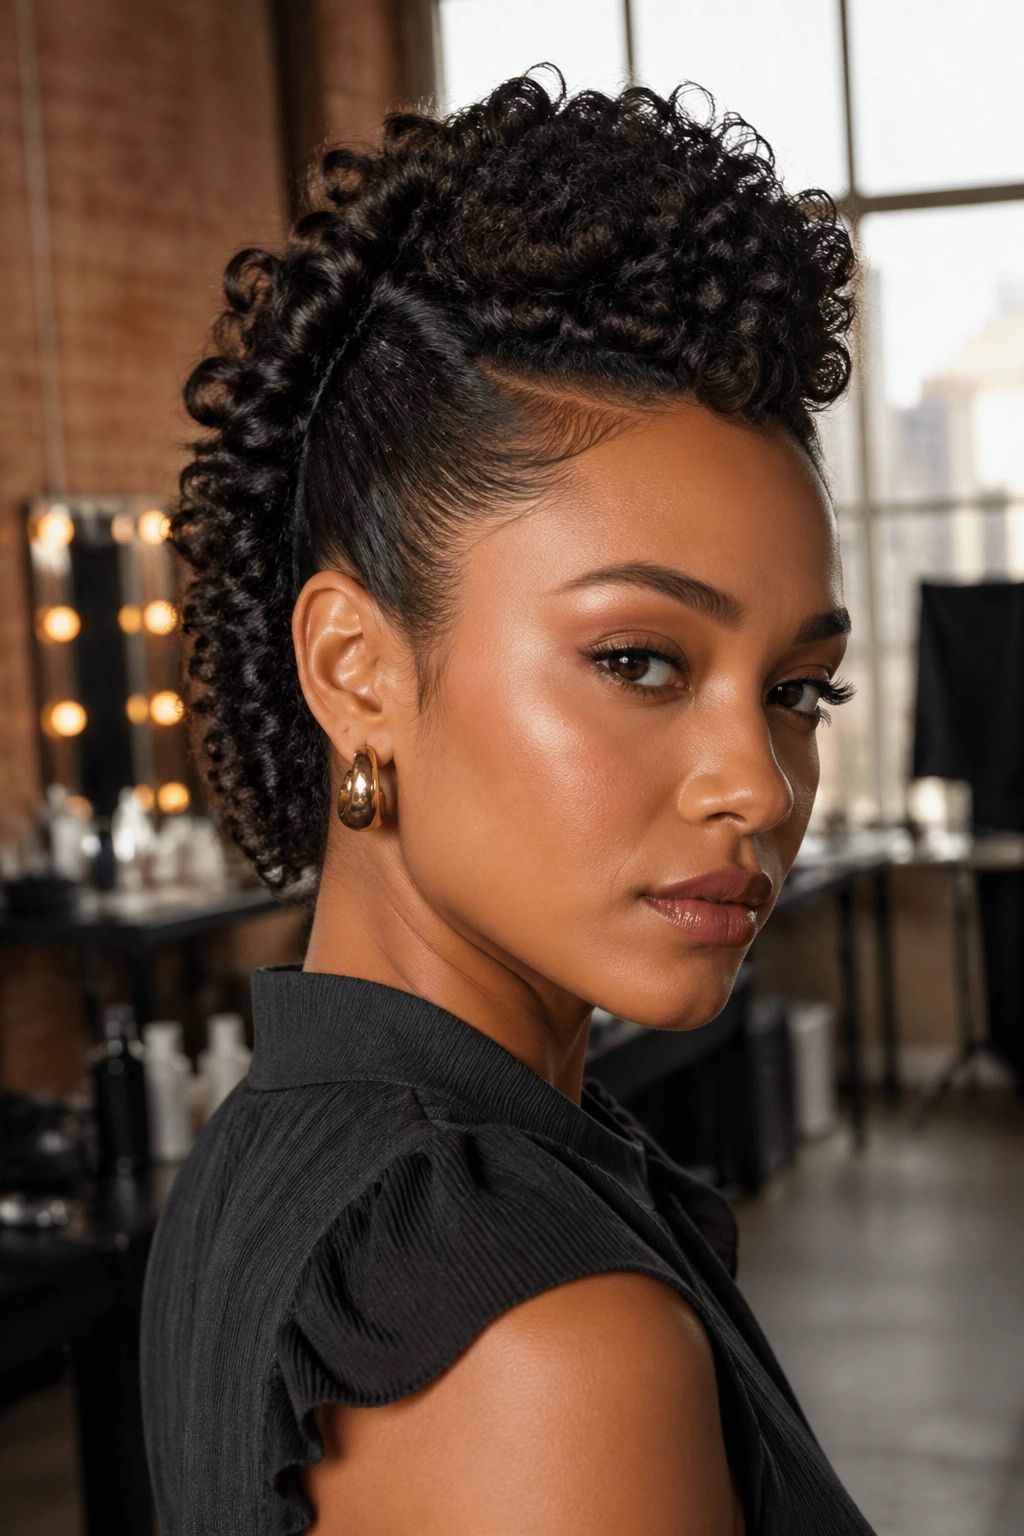
A curly faux hawk is not shy. The sides get pinned flat or twisted back, and the curls are stacked along the center of the head so the whole style rises in a clean line. It has edge, but it still keeps the texture soft.
This is the kind of updo that saves a boring outfit. Plain black dress? Better. White tee and hoop earrings? Better. It adds height, which is useful if your curls tend to sit wide instead of tall.
What to look for
- Strong center volume from the crown down to the nape.
- Flattened or twisted sides.
- Secure pins that hide under the curls.
- A little lift at the front, never a slick helmet.
The style works best when the curl pattern still has shape. If the hair is too stretched and soft, the mohawk line can lose its definition. If it’s too dry, the sides may puff up and undo the sharp look you were going for.
A small amount of edge control at the sideburns can help, but use it sparingly. Thick layers of product tend to flake on curly hair, and the flakes show up fast against dark hair. Better to smooth with a damp brush and stop before it gets tacky.
This one looks strongest on oval, heart, and long faces.
8. Flat-Twist Updo with Curls Left Free at the Ends
Flat twists are a gift for curly hair because they give structure without stealing all the texture. This style uses flat twists along the sides or front, then leaves the ends free in a puff, bun, or tucked coil at the back.
It’s a good middle ground for anyone who wants a protective style that still feels open. The twists protect the roots and hairline. The free ends keep the style from feeling too sealed up. You can wear it casual or dress it up with one hairpin or a set of gold cuffs.
Where people mess it up
The biggest mistake is twisting the hair while it’s too wet. That makes the roots stay damp far too long, and the style can smell sour before the day is over. Slightly damp hair is safer. Another mistake is making the twists too skinny. Tiny twists take forever and can frizz out fast, especially on dense curls.
A better plan is to use medium-width twists and stop them where the bun begins. That gives the style a clean line without making it fragile.
If you want the ends to look neat, finger-coil them first. If you want more looseness, separate them once they’re dry. Do not do both. Pick a lane.
This is one of the better natural curly updo hairstyles for people who want protection and shape in the same style.
9. Banana Clip Curly Updo for Fast Days
A banana clip is one of the few fast styling tools that actually earns its keep. Unlike a claw clip, which can pinch one spot and leave a weird fold, a banana clip spreads the hold across a longer section of hair. That makes it useful for thick curls that need support without getting crushed.
Gather the curls at the back, twist once, then open the clip and snap it over the twist so the hair fans upward and outward. If your hair is long enough, the ends will curl over the top and make a soft roll. If it is shorter, the clip can still hold a lifted half-up or mid-up style.
This one is excellent when you need to move fast. School run, coffee meeting, quick dinner, humid afternoon — it handles those days without much fuss.
A few notes keep it from looking sloppy:
- Use a clip long enough for your hair density.
- Place it slightly above the nape for lift.
- Tuck any loose ends under with a pin.
- If the front is frizzy, smooth only the outer layer, not the whole head.
A banana clip style works best on hair that has a bit of grit. Freshly washed curls can slip. Second-day curls usually stay put better.
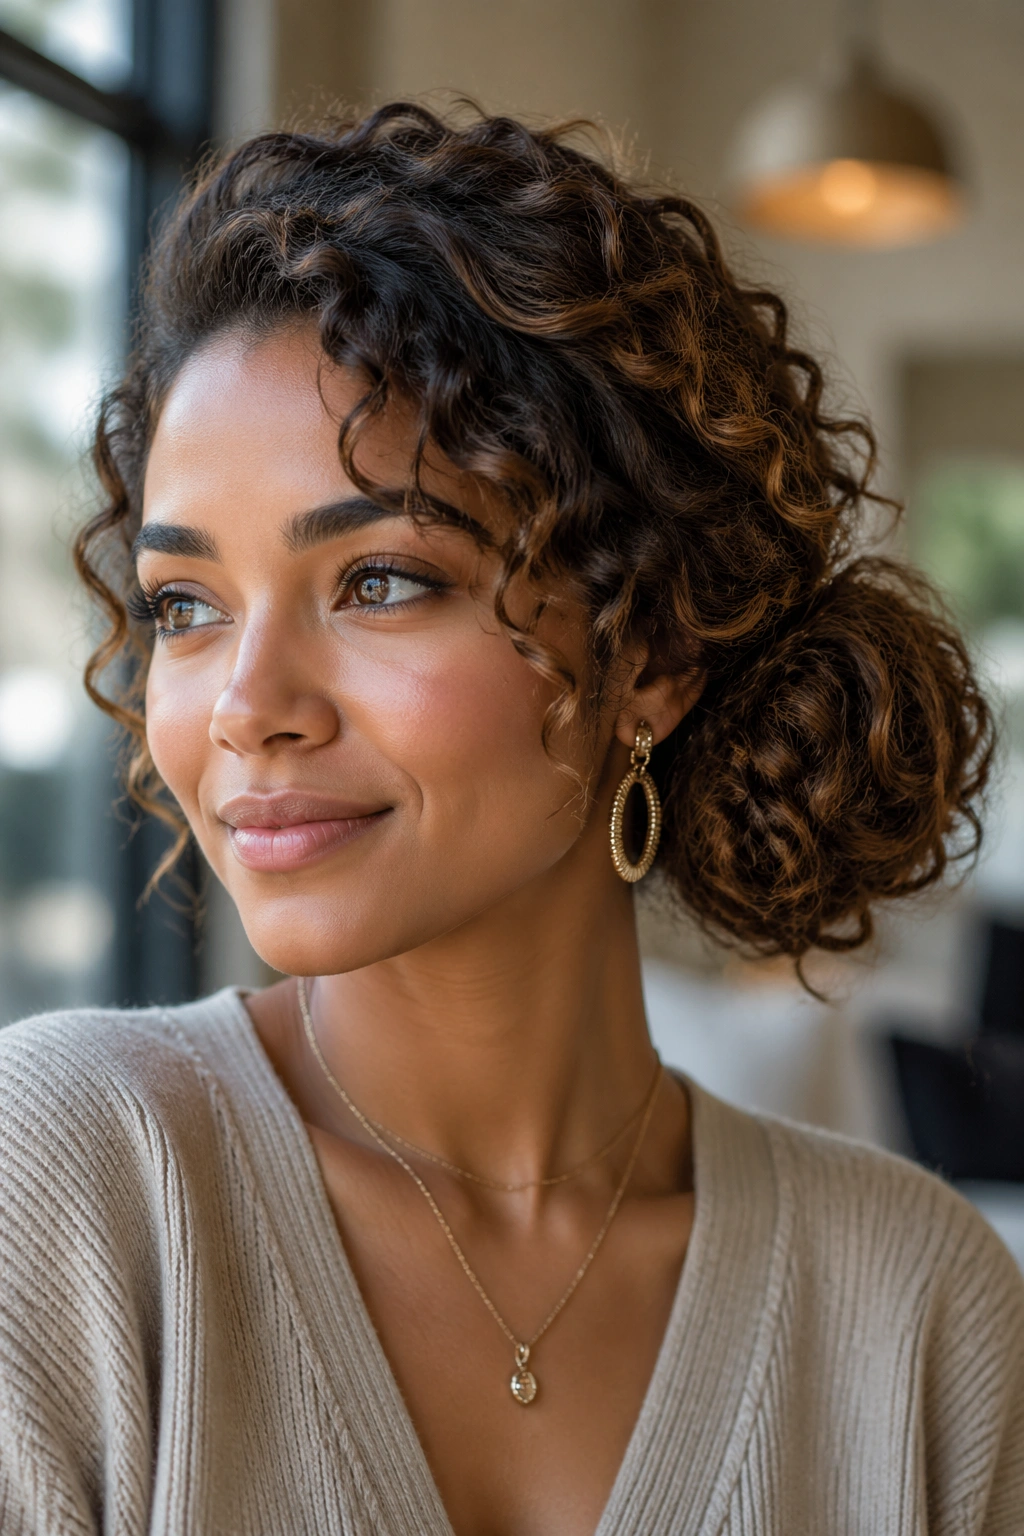
10. Half-Up Curly Puff with Pinned Back Length
Why split the difference? Because a half-up curly puff gives you the best parts of an updo and leaves enough length down to keep the style soft. The crown gets lift, the face gets opened up, and the rest of the hair still shows off pattern and movement.
This is one of the easiest styles to wear when your roots need a refresh but your ends still look good. Pull the top section into a puff, pony, or mini bun, then pin the back length so it cascades underneath. You can keep it neat or leave it loose. Either way works.
The real charm is the contrast. The top stays energetic and high. The lower section stays relaxed. That balance keeps the look from becoming too sweet or too severe.
Best uses
- Daytime events where you want your curls visible.
- Days when the top is frizzier than the ends.
- Shoulder-length to long hair.
- Hair that has enough density to support a lifted crown.
A soft edge line helps here, too. You do not need a crisp finish everywhere. A few loose curls around the face actually make the style better. If you pin every strand back, the whole thing loses the point.
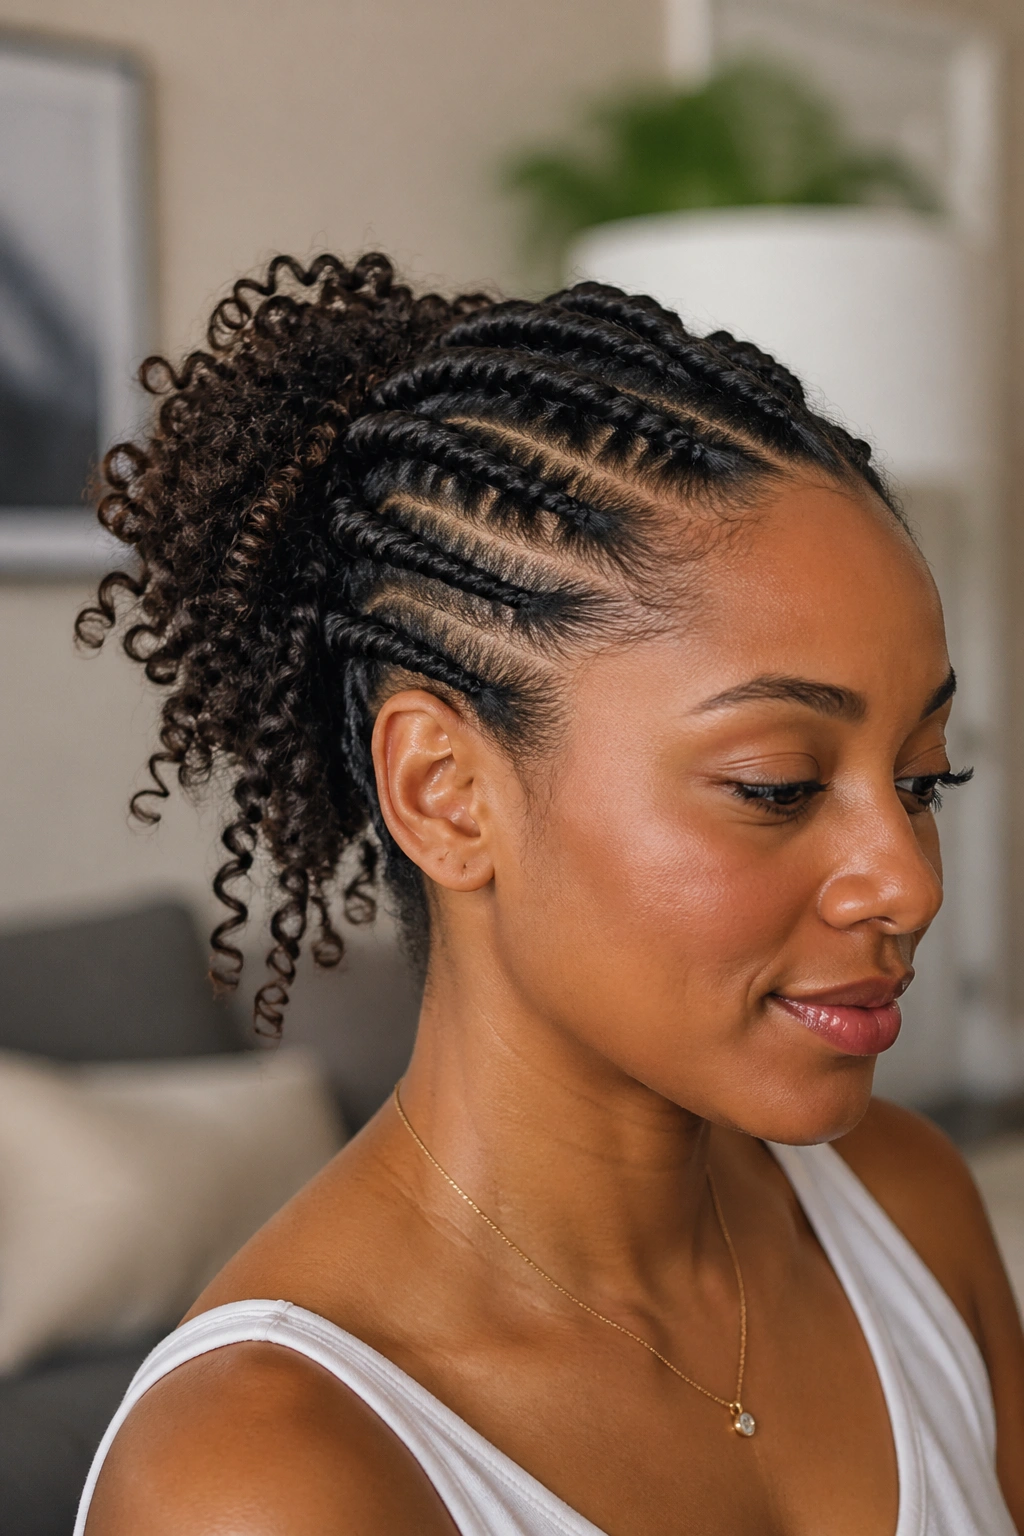
11. Rolled Tuck Low Updo for Shorter Natural Curls
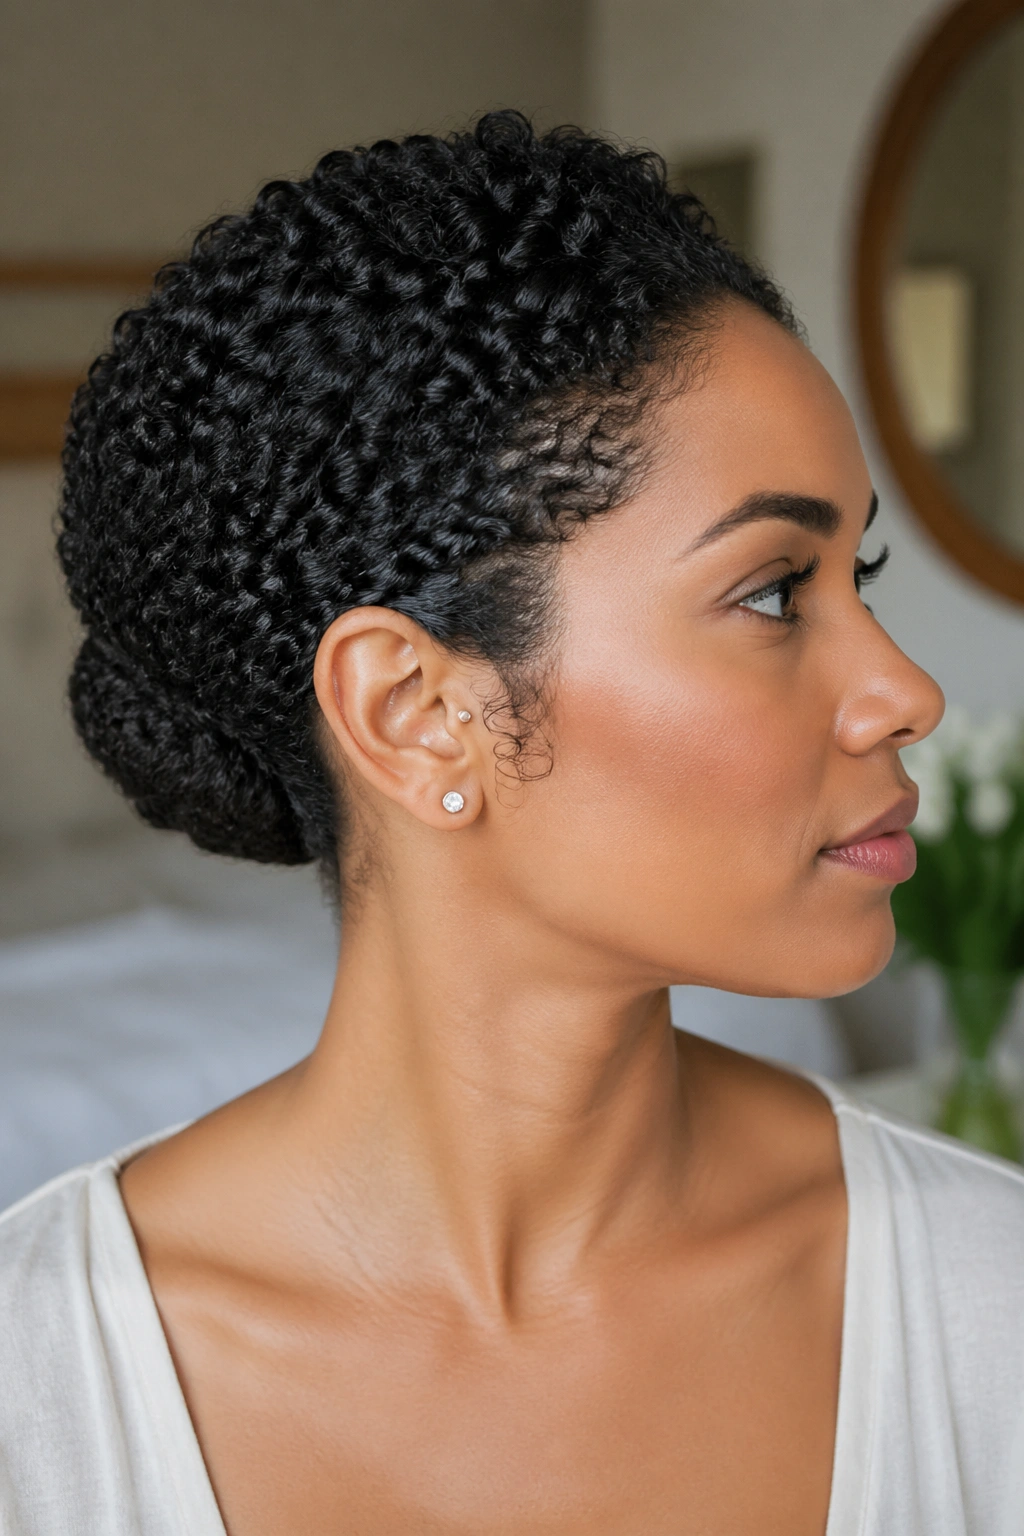
Shorter curls can absolutely do an updo, and the rolled tuck is one of the best ways to prove it. The hair is folded inward at the ends and pinned low against the head, which creates a tidy shape even when there is not much length to work with.
This style is especially useful for curls that hit the jaw, neck, or top of the shoulder. It stops the usual battle where the ends pop loose before you’ve left the house. With the tuck, the tips disappear into the roll, and the hair sits close to the head in a smooth curve.
What helps the roll hold
A little moisture at the ends makes the hair more pliable. Too much, and the roll slips. Too little, and the curls refuse to stay tucked. A light cream or foam works better than a heavy butter here because it gives control without weighing everything down.
Use U-pins or long bobby pins to anchor the fold. Regular pins can work, but they tend to shift when the curl pattern is tight. If your hair is layered, expect the shorter pieces to poke out a little. That is normal. Tuck them under one by one instead of fighting the whole head at once.
The style looks cleanest when the nape is smooth and the roll follows the shape of the skull.
12. Braided Low Bun with Loose Ringlets Around the Face
A braided low bun is the kind of style that feels dressed up without becoming stiff. Start with a braid along one side, or braid both sides into the back, then gather the remaining hair into a low bun. Leave a few ringlets loose around the face, and the whole thing softens immediately.
This works because the braid gives the top section control, while the ringlets keep the face from looking boxed in. It’s a smart choice for curls that already have good definition. You do not need perfect curl clumps. You need enough shape to let the loose pieces hang well.
The style gets better when the braid is not too tight. A braid pulled close to the scalp can make the face look harder than intended. A slightly raised braid looks fuller and more relaxed.
A quick prep tip: spritz the braid with water or a light hold spray before pinning it into the bun. That cuts down on fuzz, especially if the hair is fine or has a soft texture that puffs easily.
This is one of my favorite updo options for curly hair when the outfit is simple and the hairstyle needs to do more of the talking.
13. Curly Gibson Tuck with Vintage Shape
The Gibson tuck has a lovely old-fashioned shape, but on curly hair it does not have to feel dated. Hair is rolled upward and tucked into itself at the back, creating a soft ridge that sits low and neat. The curls add texture to the roll, which keeps it from looking too polished.
It works well on medium-length curls and on hair that has been stretched a little. If the curls are too tight and springy, the tuck can become bulky. If they are too limp, the roll may collapse. That middle ground is where the style shines.
What makes it different
A Gibson tuck does not need a big bun or heavy padding. The shape comes from the fold itself. You pin the roll in place, then gently pull a few curls loose near the crown for softness. That little loosened crown keeps the style from reading as severe.
Use bobby pins that match your hair color if you can. Hidden hardware matters here. The whole point is a smooth shape with texture showing through, not a row of shiny pins telling on you.
This style is a good fit for formal events, but it also looks nice with a button-down shirt and earrings. Strange, maybe, but true. It has enough structure to feel special and enough curl to stay human.
14. Space-Bun Inspired Curly Updo for a Playful Look
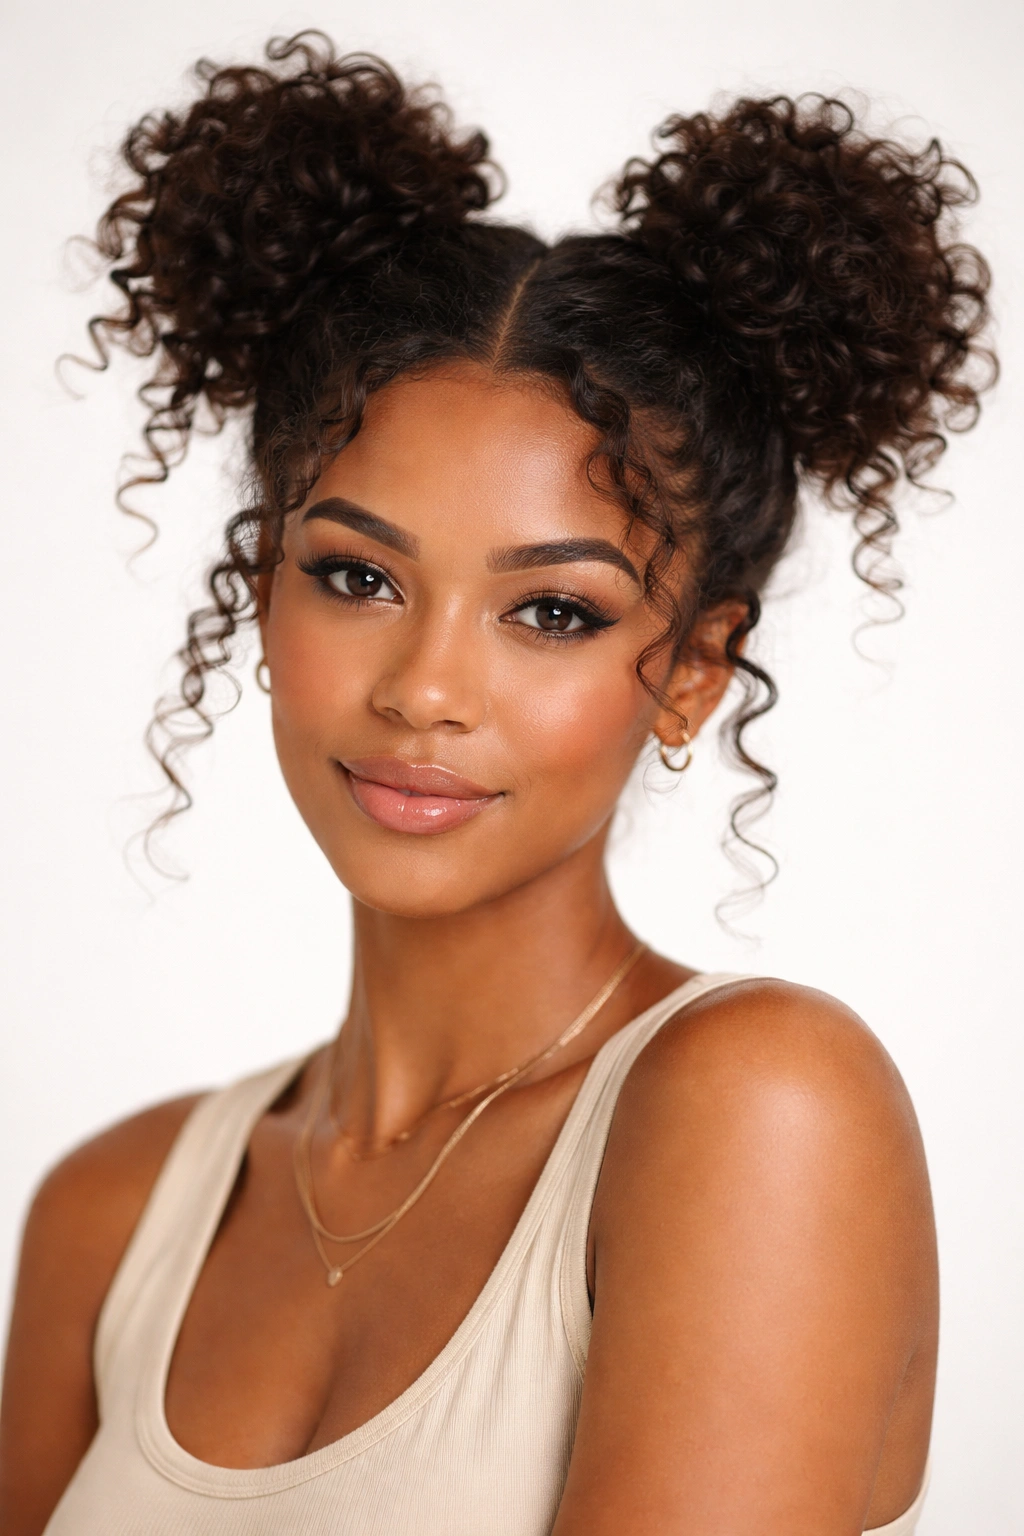
Space buns are not only for festivals or very young hair. On natural curls, a pair of high buns or puffs can look fun, balanced, and surprisingly neat when they are built with the right amount of texture. The style can be symmetrical or slightly uneven, which is part of its charm.
If your hair is thick, split it cleanly down the middle and create two high puffs with soft twists at the base. If your curls are looser, you can make the buns more compact and let a few ends stick out for shape. Either way, the texture keeps the style from looking costume-like.
Ways to wear it
- Two full buns for a bold, lifted shape.
- Two puffs with curly ends left out.
- One high bun and one low bun for a softer take.
- Small braided bases before the buns if you want extra grip.
The part line matters more than people think. A clean center part gives the style structure. A slightly crooked part makes it feel more relaxed. Both can work, depending on the outfit and the mood.
A lot of curls hold this style better on day-two hair because the roots have a little grit. Freshly washed hair can be slippery. A touch of dry shampoo at the roots can help if needed.
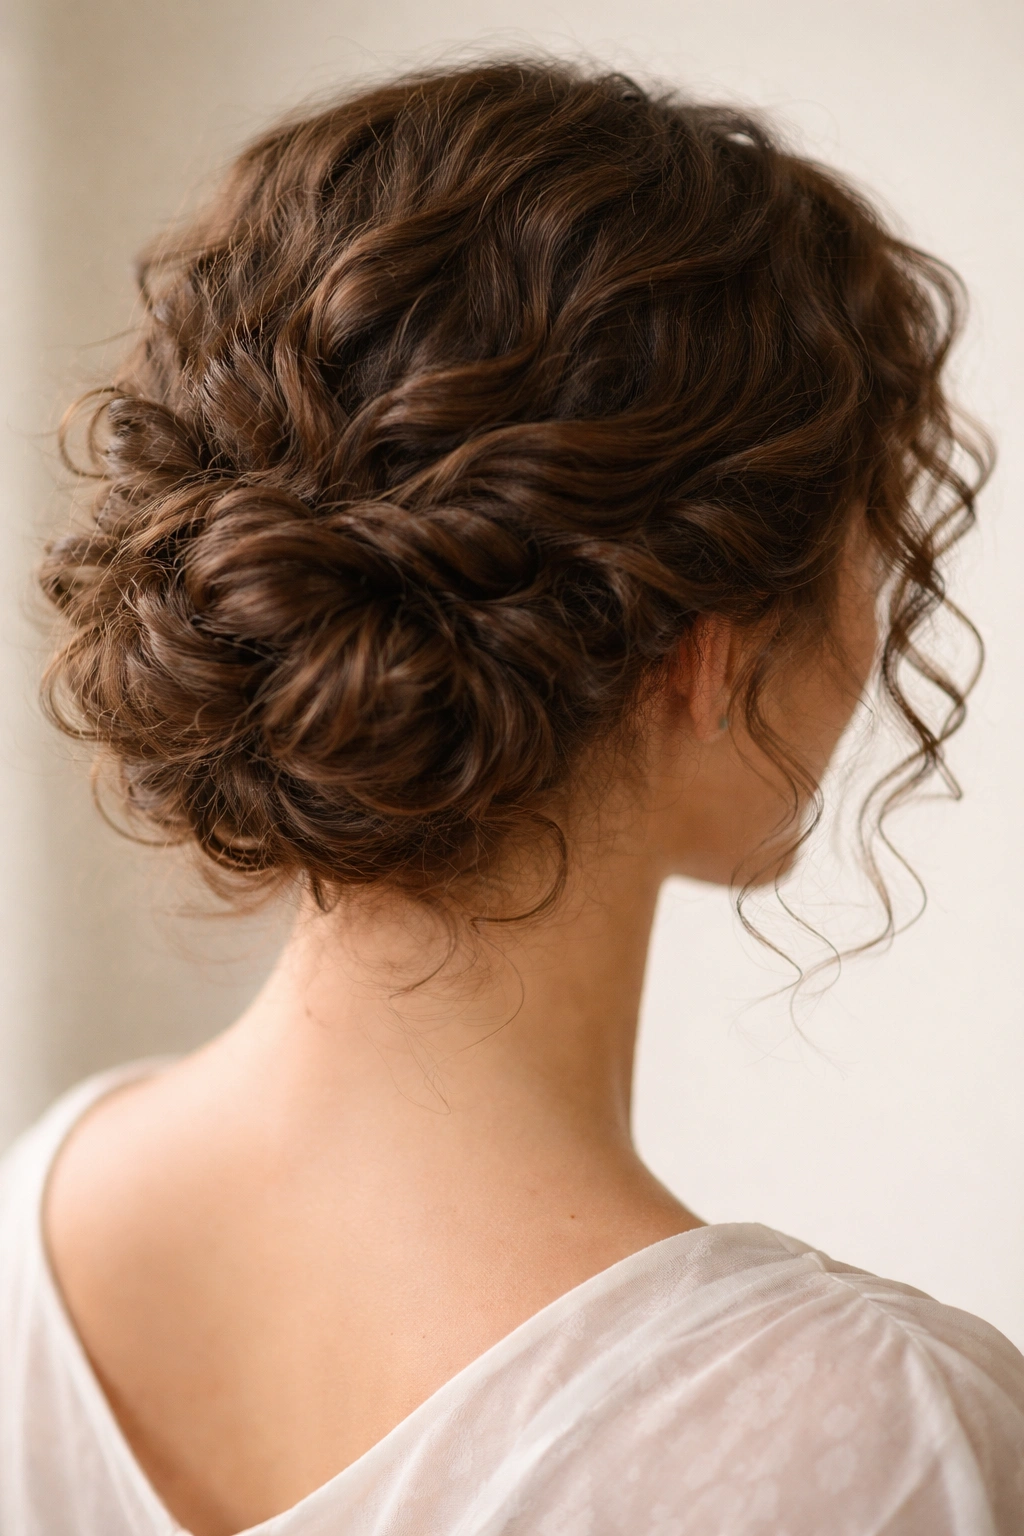
15. Elegant Roll-and-Pin Updo for Formal Curly Hair
A roll-and-pin updo is the style I’d pick when the goal is polished, but not flat. The curls are rolled in sections and pinned along the back of the head, creating a soft, sculpted shape with movement still visible in the texture.
It looks especially good on stretched natural curls, twist-outs, and hair that has enough length to fold over itself. The sections do not have to be perfect. In fact, a slightly uneven roll often looks better because the curl pattern gives the shape some life.
Start by dividing the hair into three or four horizontal sections. Roll the bottom section upward and pin it. Then add the next layer, rolling it over the first one so the layers overlap. Keep going until the top is pinned. The final shape should look secure, rounded, and lightly puffed, not pressed down.
The best part is that this style can be adjusted to the occasion. Leave a few curls loose near the temples for softness. Add a decorative pin if the outfit calls for it. Keep it plain if the dress or earrings are already doing enough.
The strongest curly updos do one thing well: they keep the texture alive while making the shape behave. That is the whole trick.