Butterfly clips have made a major comeback, and honestly, they’re the secret weapon for taking a half up half down hairstyle from basic to absolutely stunning. Whether you’re prepping for a casual day out, a special event, or just want to add some flair to your everyday routine, these delicate hair accessories can transform the way you style this timeless look. The beauty of combining butterfly clips with half up half down styles is the sheer versatility—you can go sophisticated and polished, or playful and romantic, sometimes even both at once. From minimalist single-clip looks to elaborate multi-clip designs, butterfly clips give you endless creative possibilities without requiring any fancy salon skills.
What makes butterfly clips so perfect for half up half down hairstyles is their decorative appeal paired with genuine holding power. Unlike basic bobby pins, butterfly clips add an instant element of design and interest to your hair. They work beautifully on straight hair, curly hair, thick hair, fine hair—the list goes on. The half up half down foundation itself is incredibly flattering for most face shapes, and the addition of a butterfly clip (or multiple clips) elevates the entire look with minimal effort. You can choose clips that match your hair color for a seamless, elegant vibe, or go bold with contrasting colors and metallic finishes for something more dramatic. The styling possibilities are genuinely limitless.
In this guide, we’re exploring 15 distinct butterfly clip hairstyles that all build on the half up half down foundation. Each one showcases a different way to position the clips, combine them with braids or twists, or layer them for impact. Whether you’re looking for inspiration for a specific event or just want to refresh your everyday styling routine, you’ll find multiple ideas that match your hair texture, personal style, and skill level.
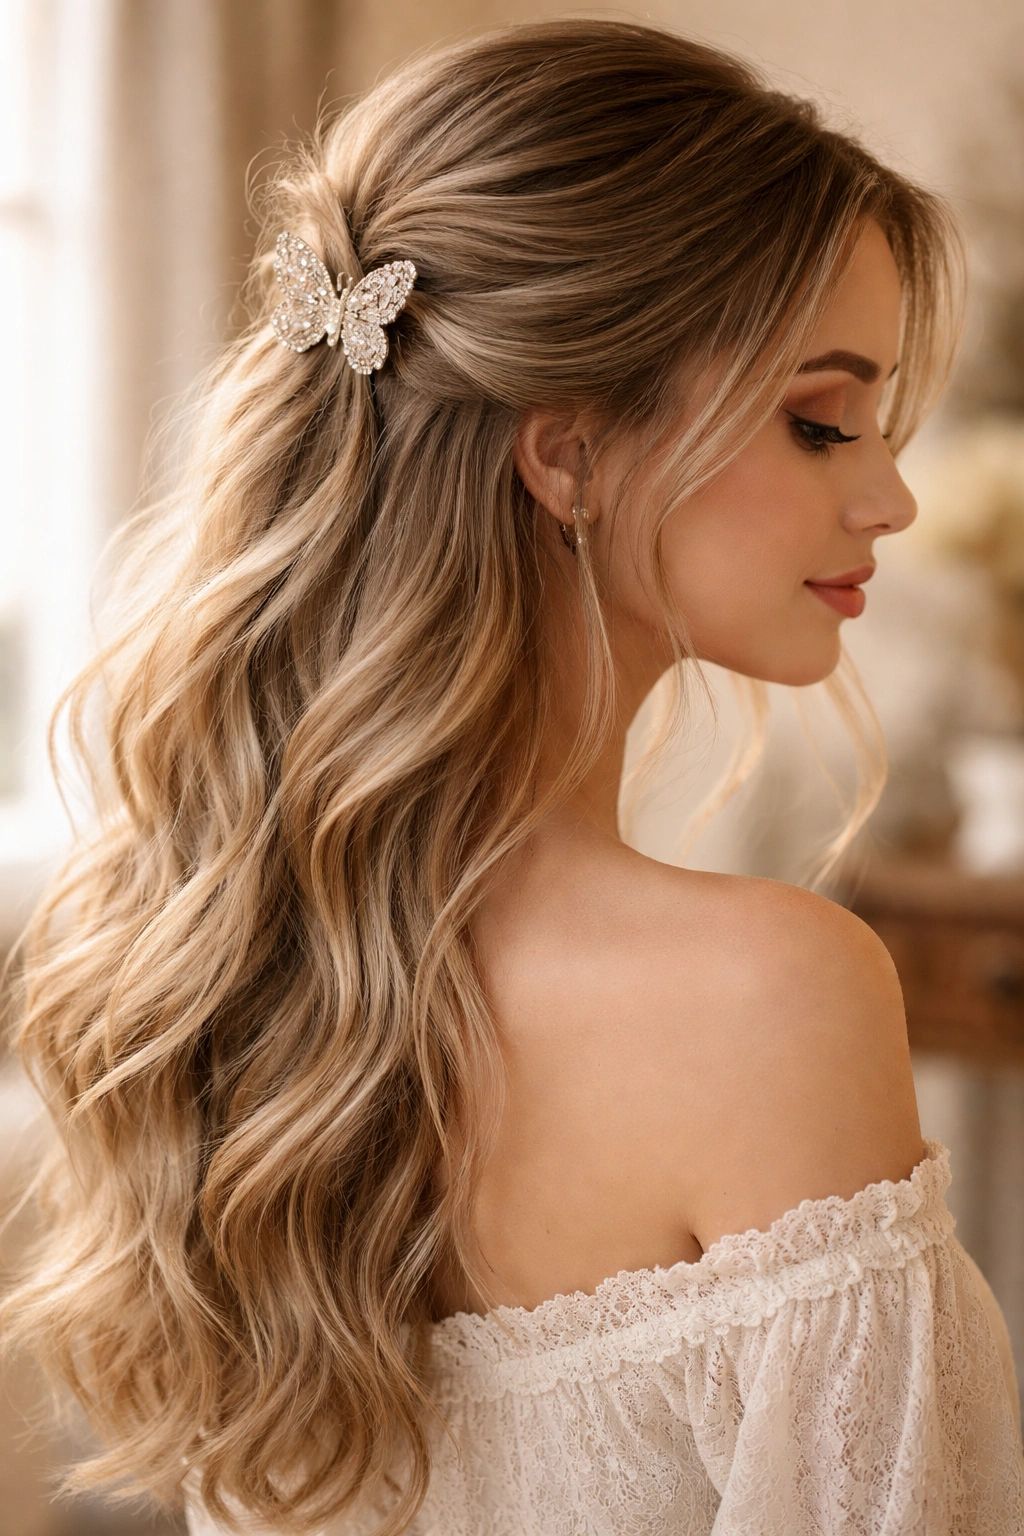
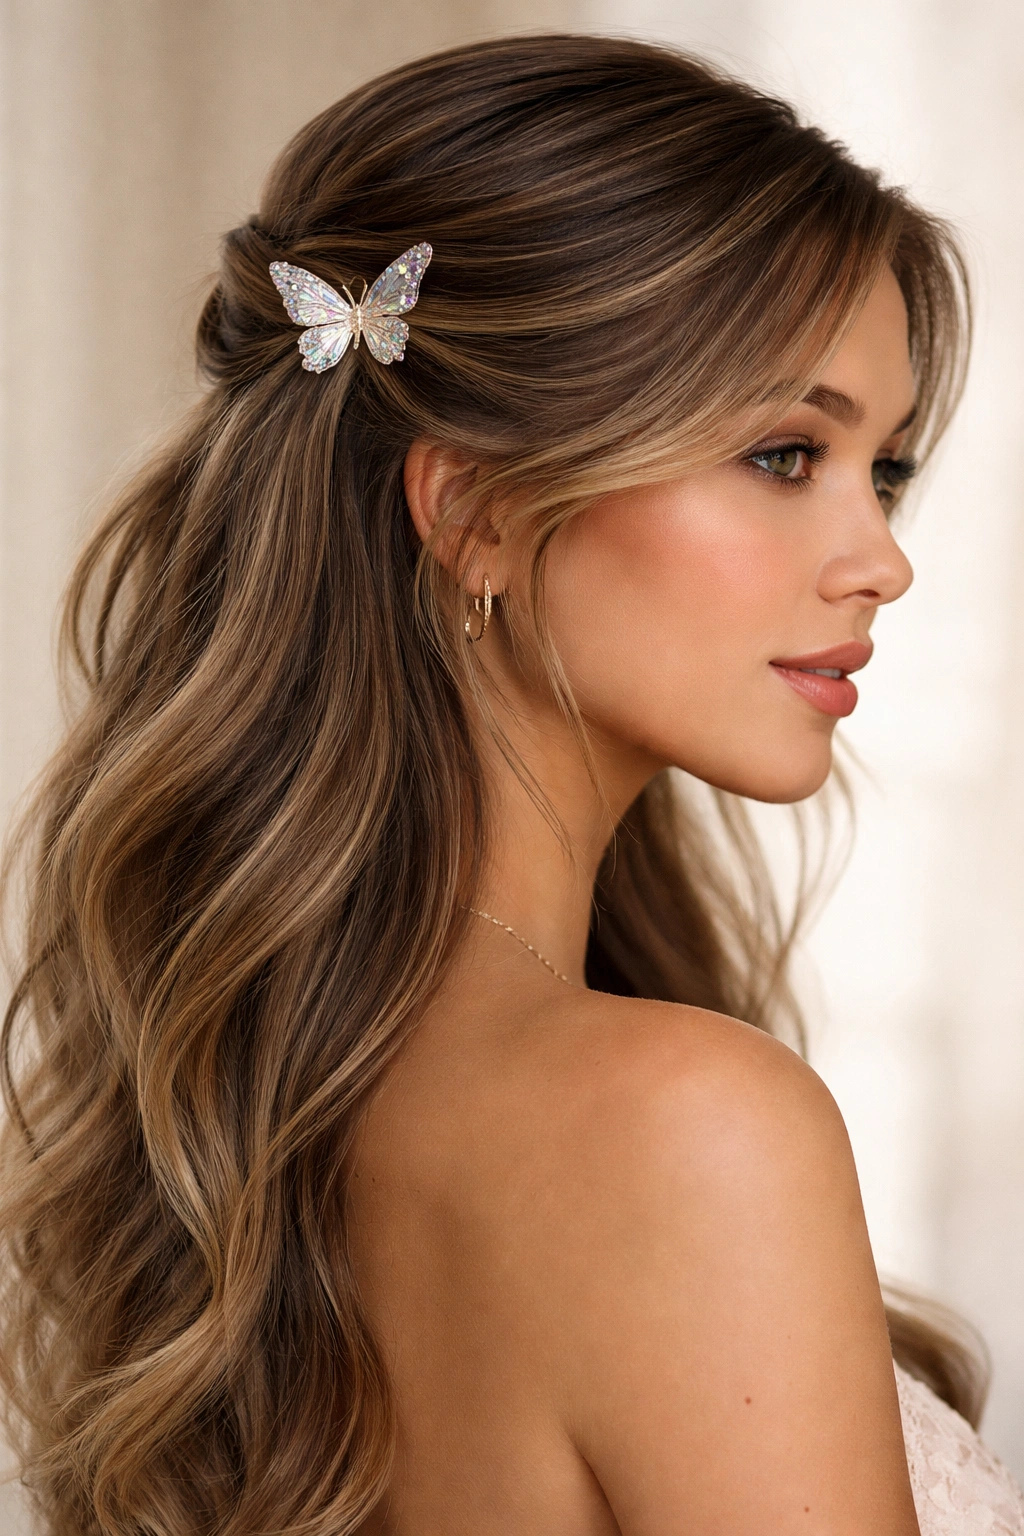
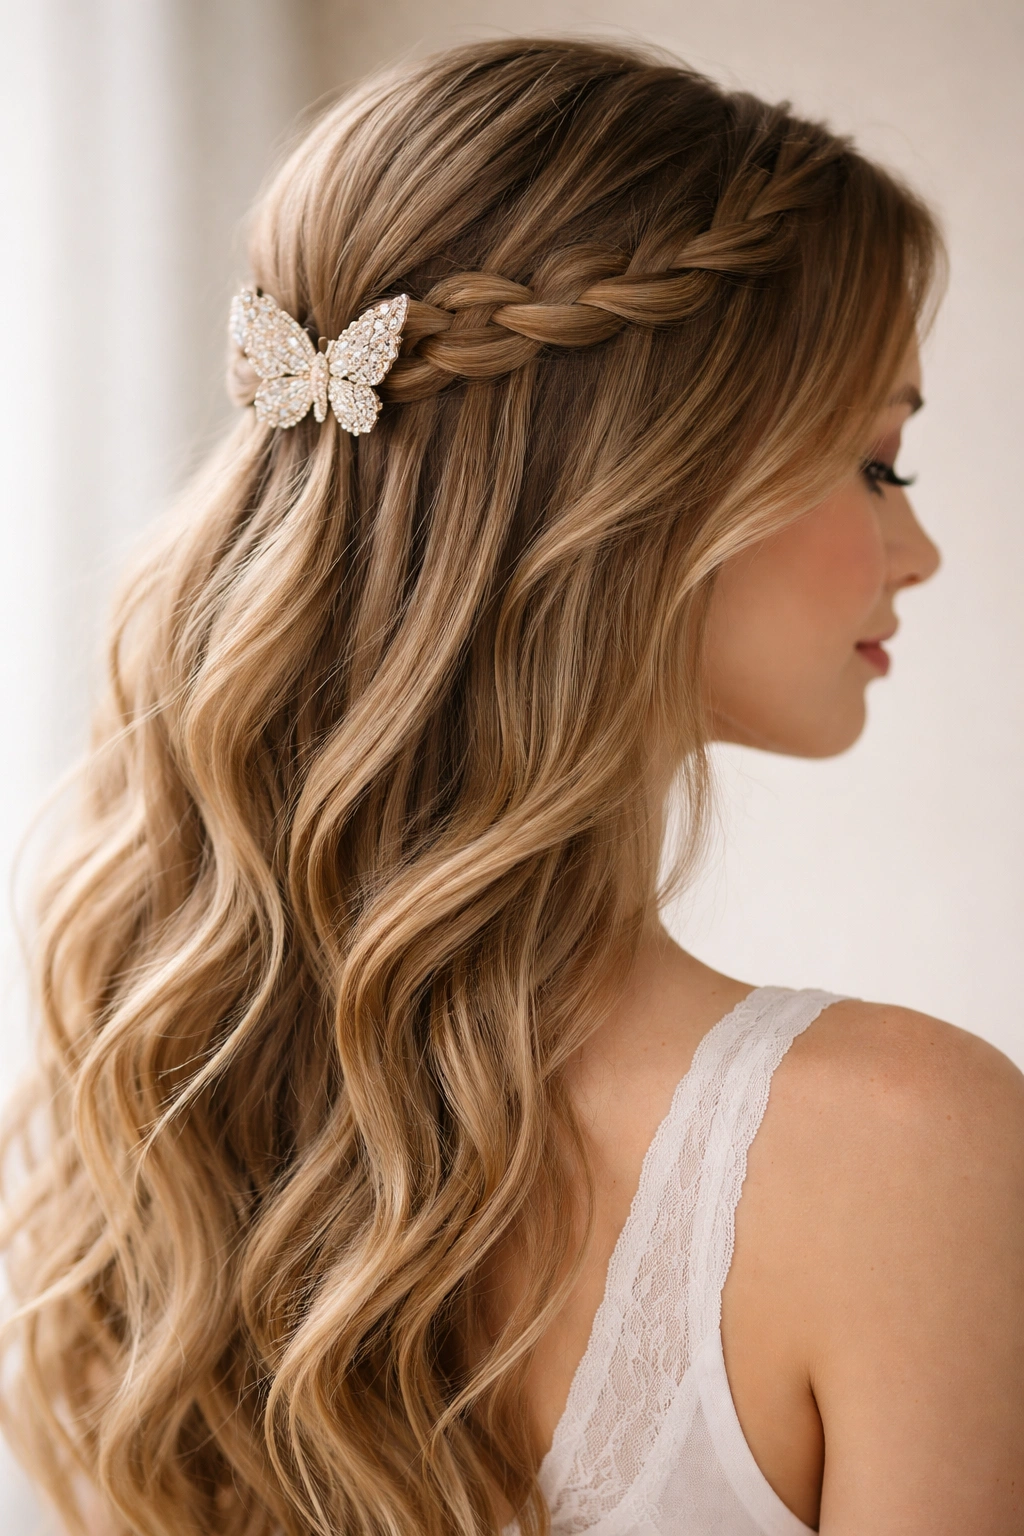
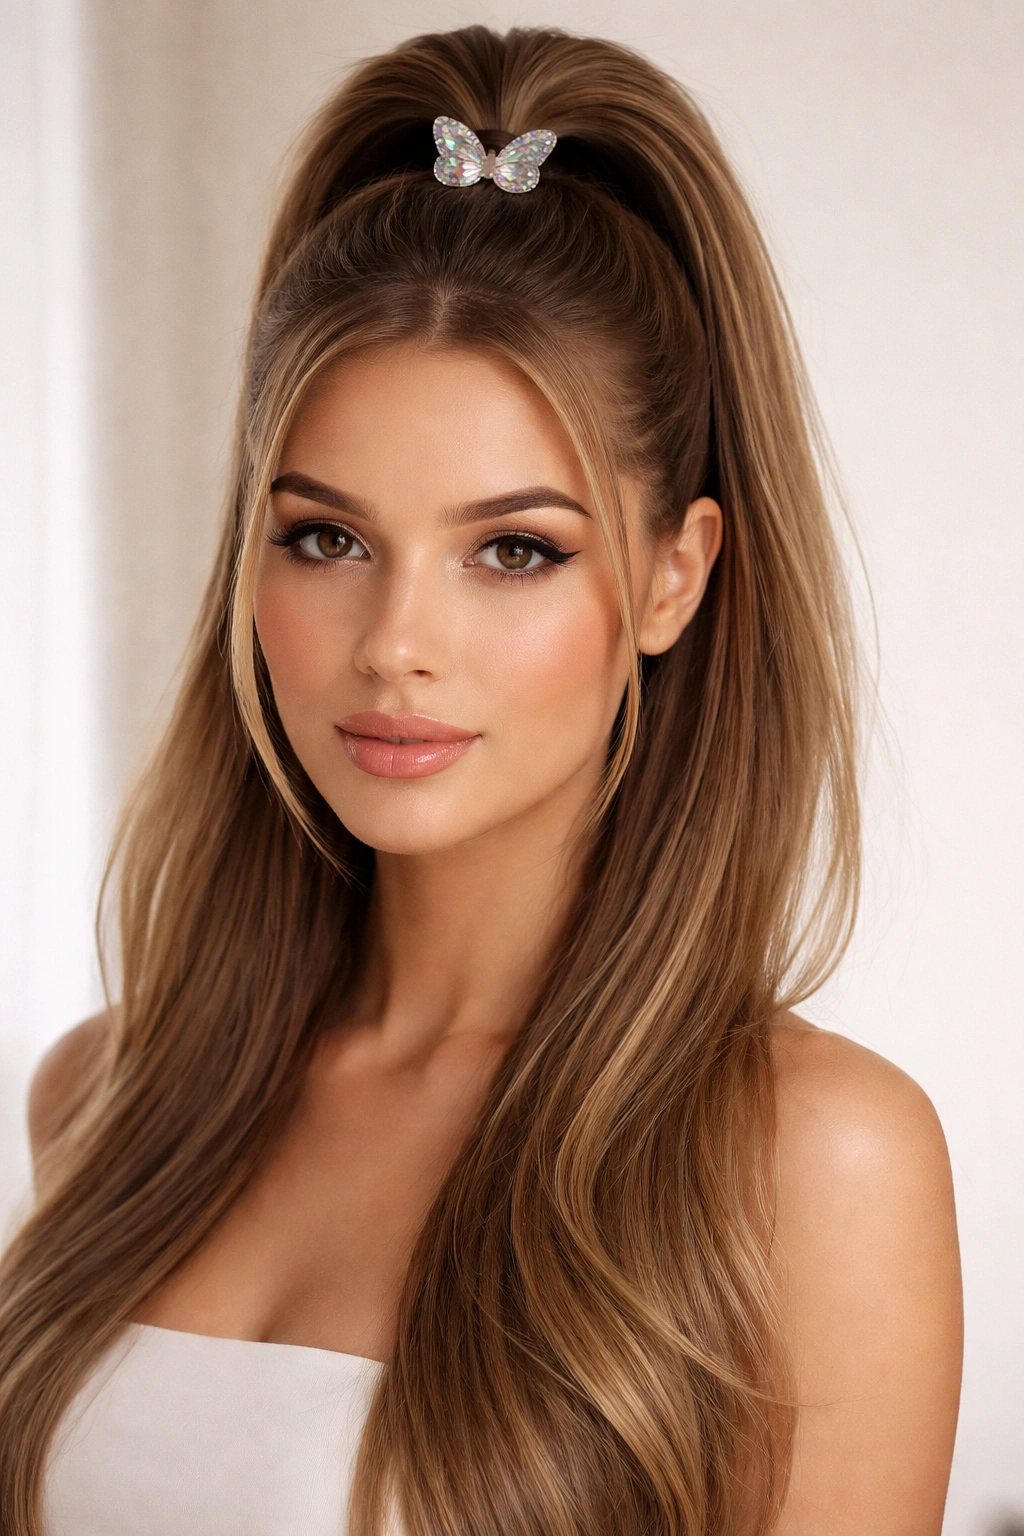
1. Sleek High Butterfly Clip Half-Up
This is the most straightforward butterfly clip look, and it’s a true classic for good reason. You’re gathering the top half of your hair—starting from around ear level and working back toward the crown—into a neat section. The clip sits high on your head, giving the style an instantly polished, put-together appearance. What makes this version so effective is the sleekness of the base; your hair is smoothed back without any texture or wispy pieces escaping. The butterfly clip becomes the focal point, so choose one in a color or finish that feels special to you.
Why This Look Works Best
This style flatters virtually every face shape because the high placement creates a subtle lift that draws attention upward. The sleek finish makes it appropriate for professional settings, date nights, or casual wear depending on the clip you select. It’s the kind of hairstyle that looks effortless but actually communicates that you put thought into your appearance.
Steps to Create This Look
- Brush your hair back smoothly with a fine-tooth comb, creating a slight part if desired
- Gather the top section from ear to ear at the crown, holding it with your hand
- Clip a single butterfly clip at the base of this section, making sure it’s positioned horizontally and centered
- Smooth down any flyaways with a light smoothing serum or hairspray
- Leave the bottom half down in your natural texture or add waves for contrast
Pro tip: Apply a tiny bit of texturizing spray to just the underside of the top section before clipping—this creates subtle grip that helps the clip hold throughout the day without sliding down.
2. Wispy Romantic Half-Up with Butterfly Clip
This version prioritizes softness and movement, with intentional pieces left loose around the face. Instead of sleek and smooth, you’re creating an effortless, romantic aesthetic that’s perfect for date nights, weddings, or any time you want to look undone-but-still-polished. The butterfly clip serves as the decorative anchor, while the wispy framing pieces and waves create the dreamy overall effect. This look works especially well if you have naturally wavy or curly hair, though you can absolutely achieve it on straight hair with a curling iron.
Why This Look Works Best
Wispy pieces are incredibly flattering because they softly frame the face and create dimension. This styling approach feels more relaxed and romantic than a structured style, making it perfect when you want to look feminine without appearing overly formal. The butterfly clip adds just enough intentional detail to keep the look polished rather than simply windswept.
Steps to Create This Look
- Use a curling iron to create loose waves throughout your hair
- Take small sections from around your face and leave them loose (one on each side, one or two in the middle)
- Gather the remaining top section back and secure with a butterfly clip
- Gently tousle the waves with your fingers to enhance the romantic texture
- Let the wispy pieces fall naturally—don’t straighten or overly smooth them
- Finish with a light hold hairspray that won’t make the waves feel stiff
Worth knowing: This style actually looks better when it’s not perfectly neat—embrace the slightly undone quality and let a few pieces be a bit chaotic.
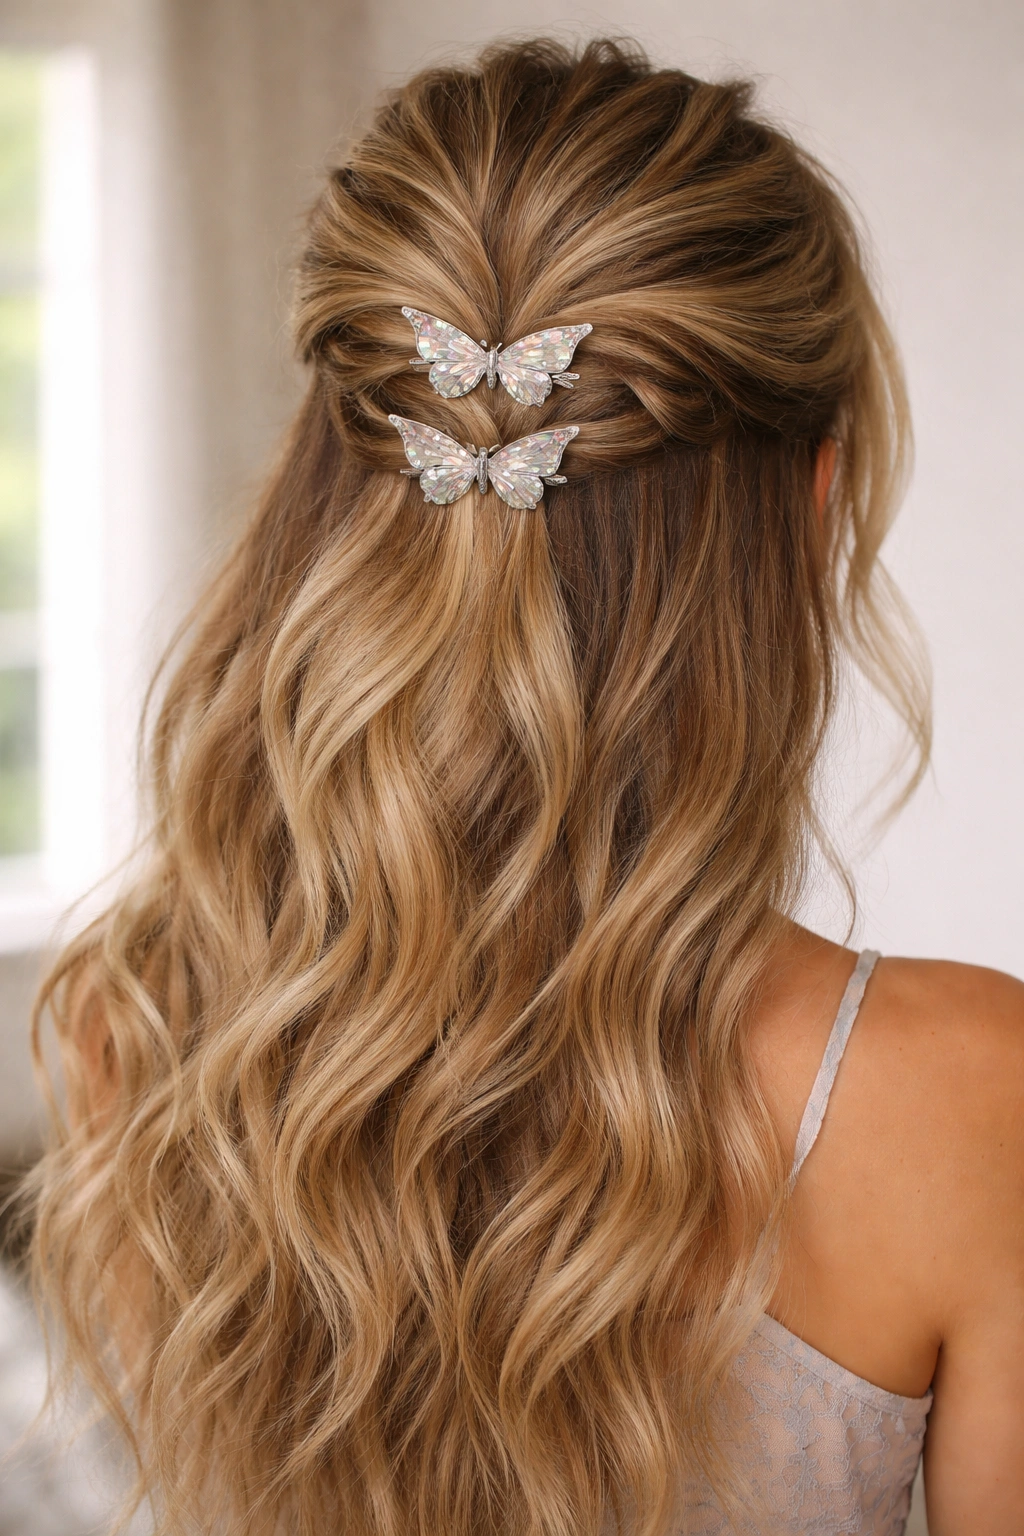
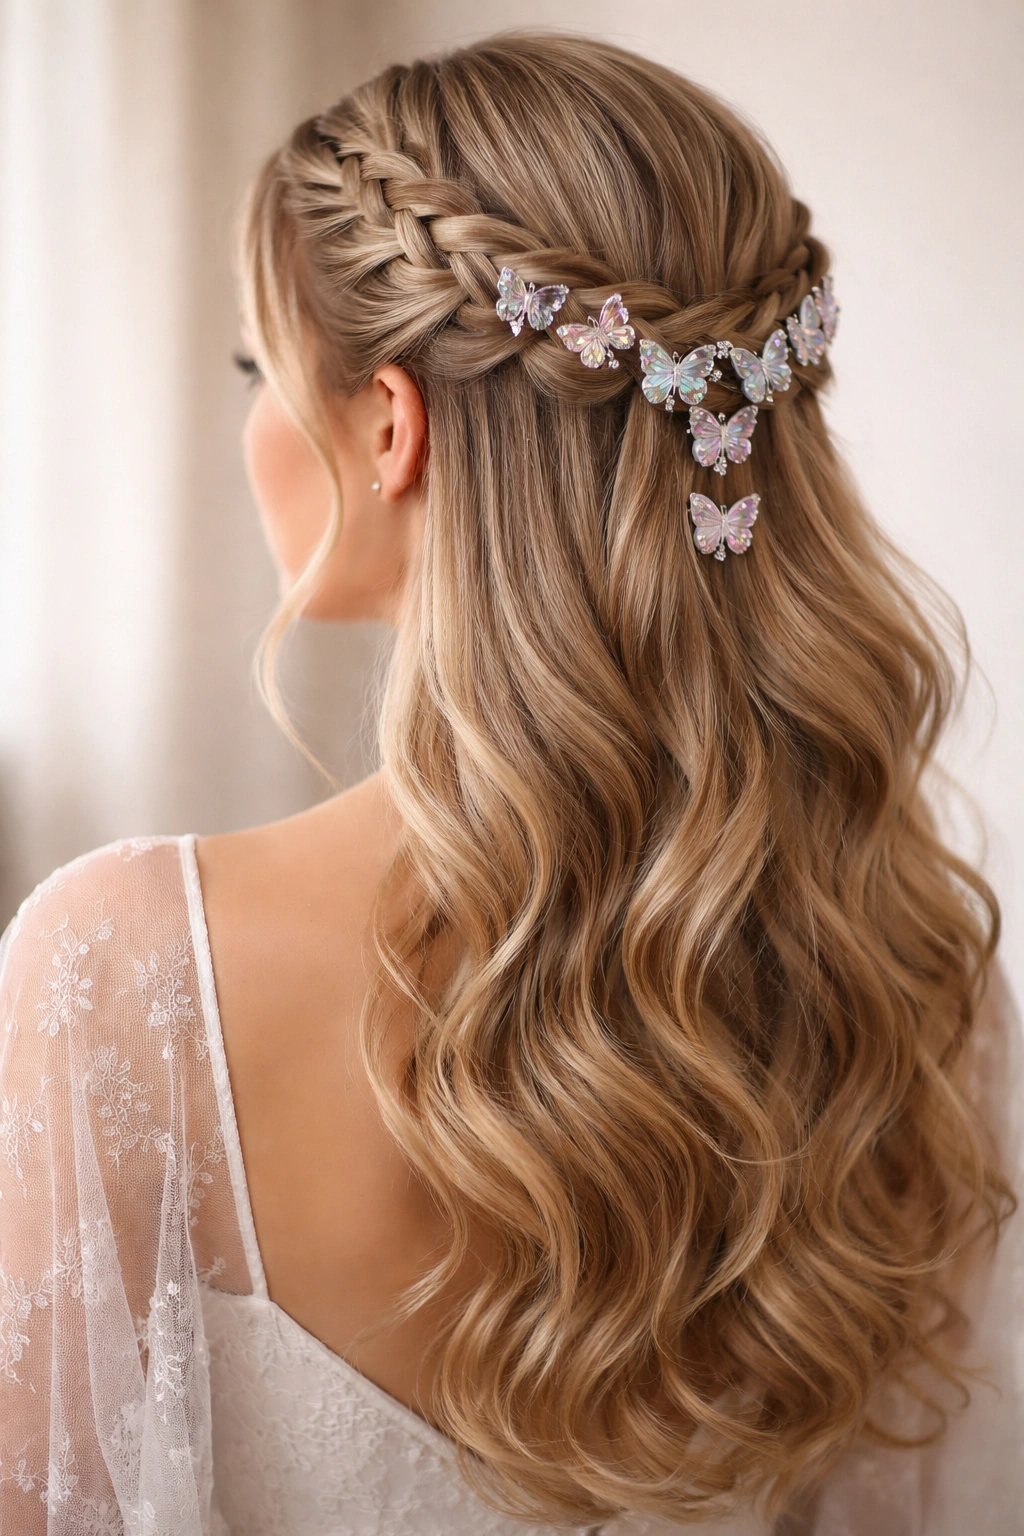
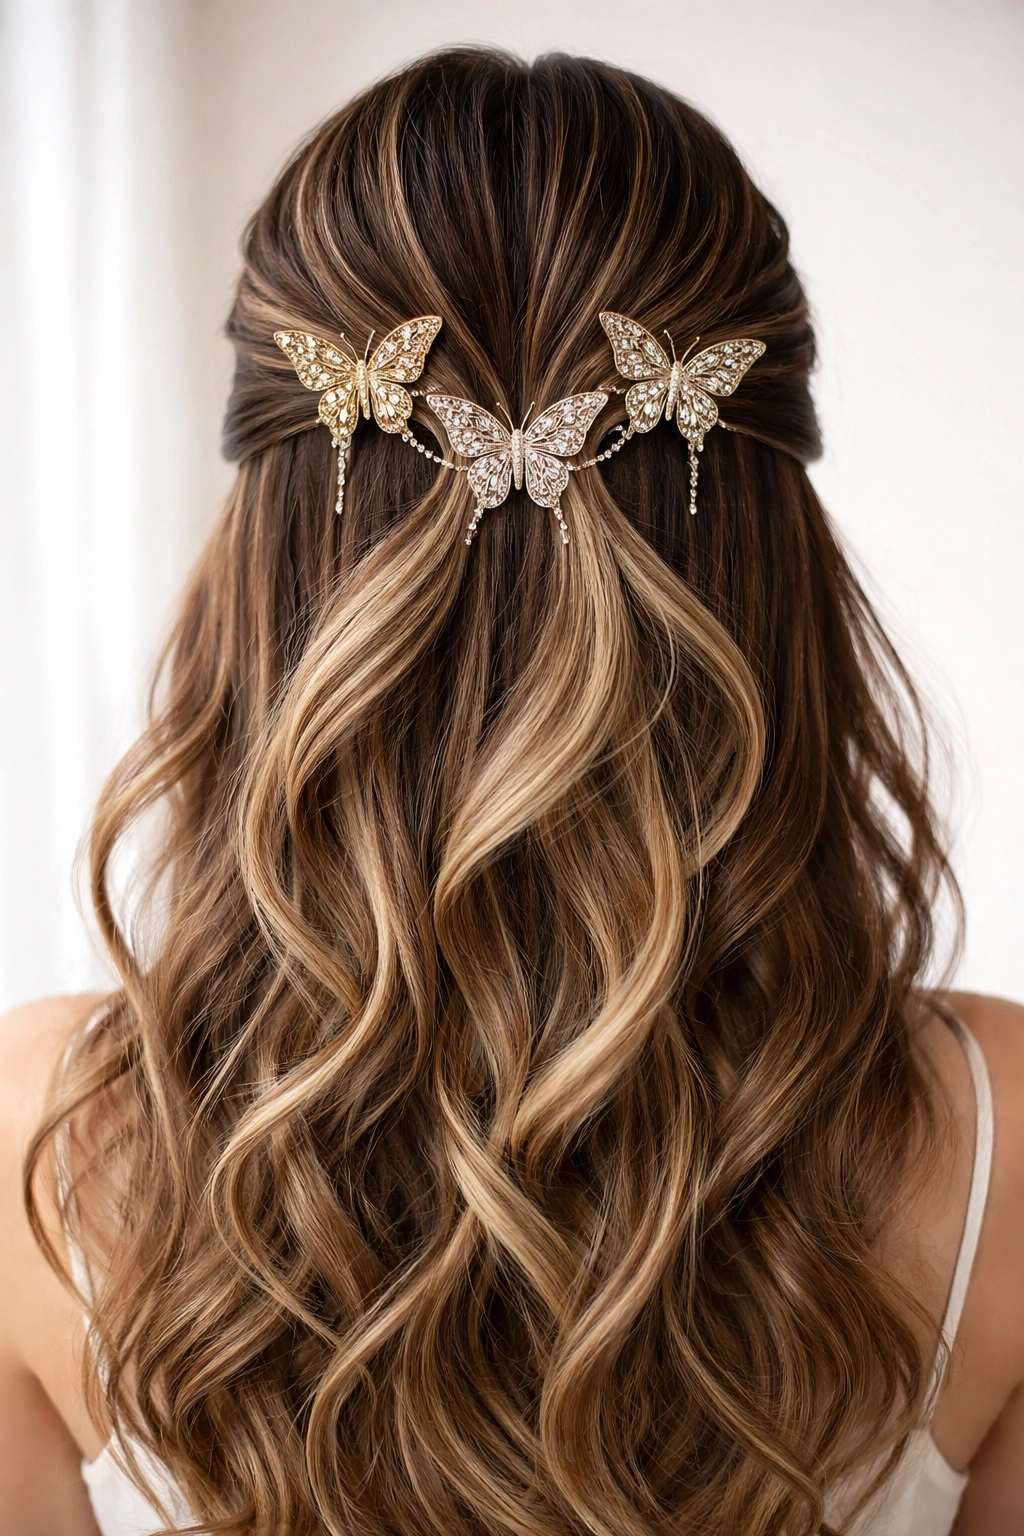
3. Twisted Crown with Multiple Butterfly Clips
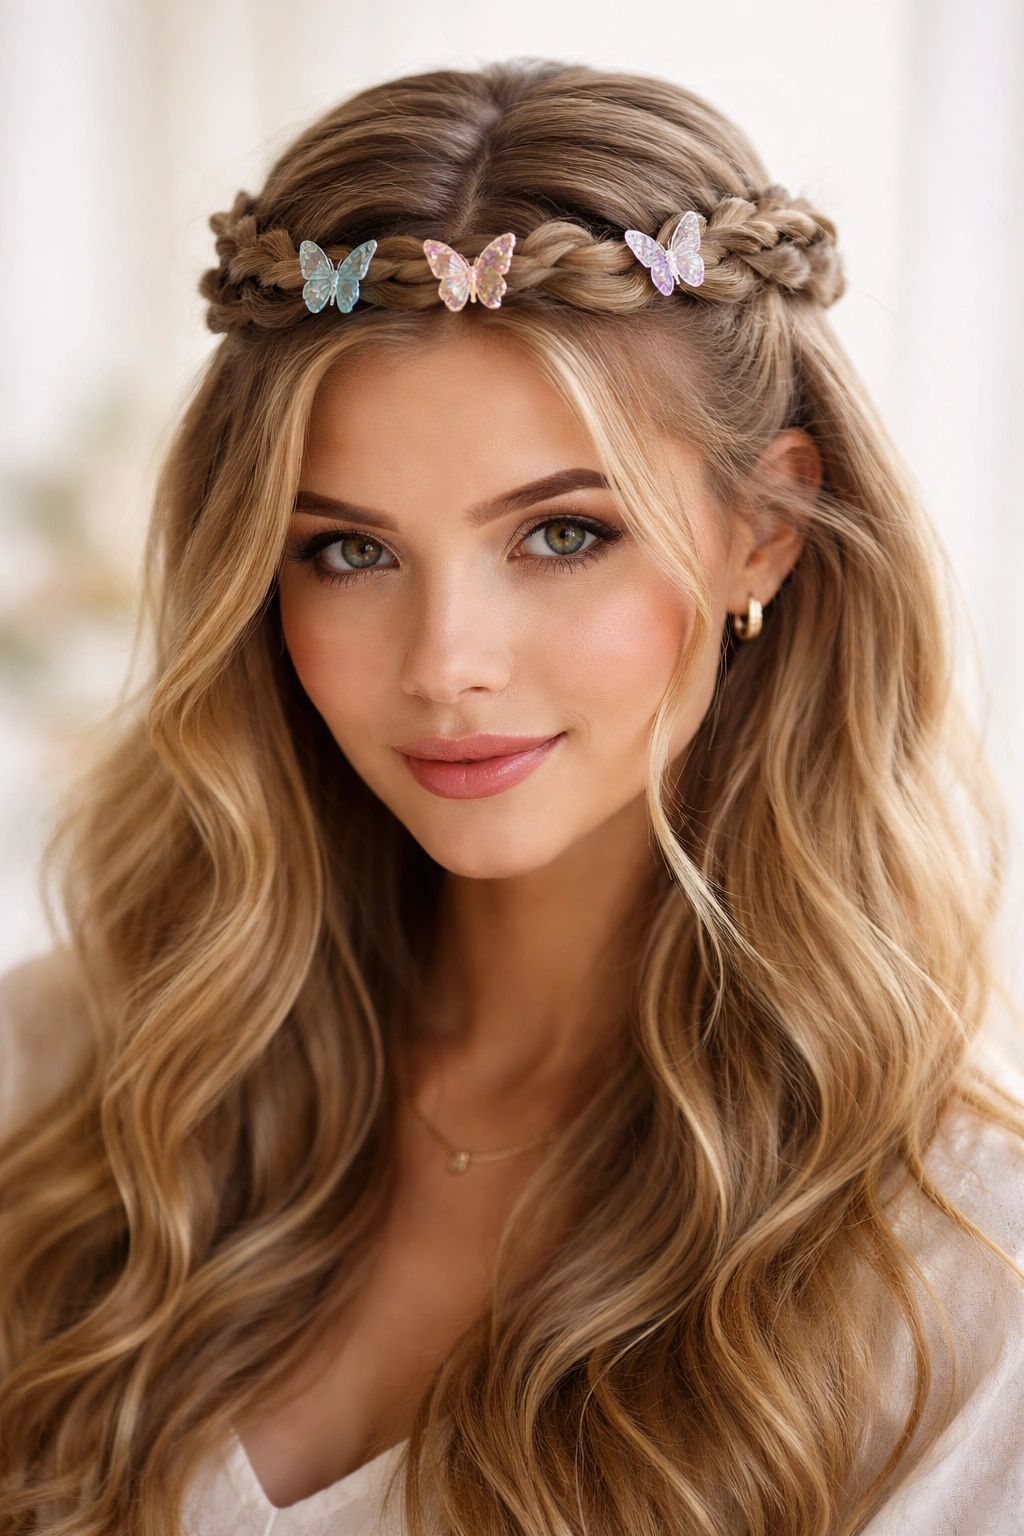
Taking the half up half down concept into multi-clip territory, this look uses two or three clips positioned across the crown area. You’re creating subtle twists with sections of hair and securing each twist with its own clip, which creates a crown-like effect around the head. This approach is far more intricate than a single clip, but still totally achievable with a bit of practice. The multiple clips create visual interest and texture that reads as intentional and polished.
Why This Look Works Best
Multiple clips allow you to add serious visual interest without making the look feel overdone. This style is particularly flattering if you’re trying to add volume or create the illusion of thicker hair. The crown effect draws attention upward and makes for genuinely stunning photos. This is the kind of look that makes people ask where you got your hair done.
Steps to Create This Look
- Divide the top section of your hair into three subsections (left, center, right)
- Take the left subsection and gently twist it back toward the crown
- Secure the twist with a butterfly clip at the end
- Repeat with the center section, positioning this clip just slightly higher or in front of the first one
- Twist the right section and secure with a third clip
- Adjust the twists so they create an even, crown-like appearance around your head
- Use a tail comb to gently pull tiny pieces from each twist for a softer texture
Insider note: Color-coordinate your clips so they blend with your hair tone, or go bold and choose contrasting metallic clips if you want them to be a obvious design element.
4. Half-Up Bubble Braid with Butterfly Clips
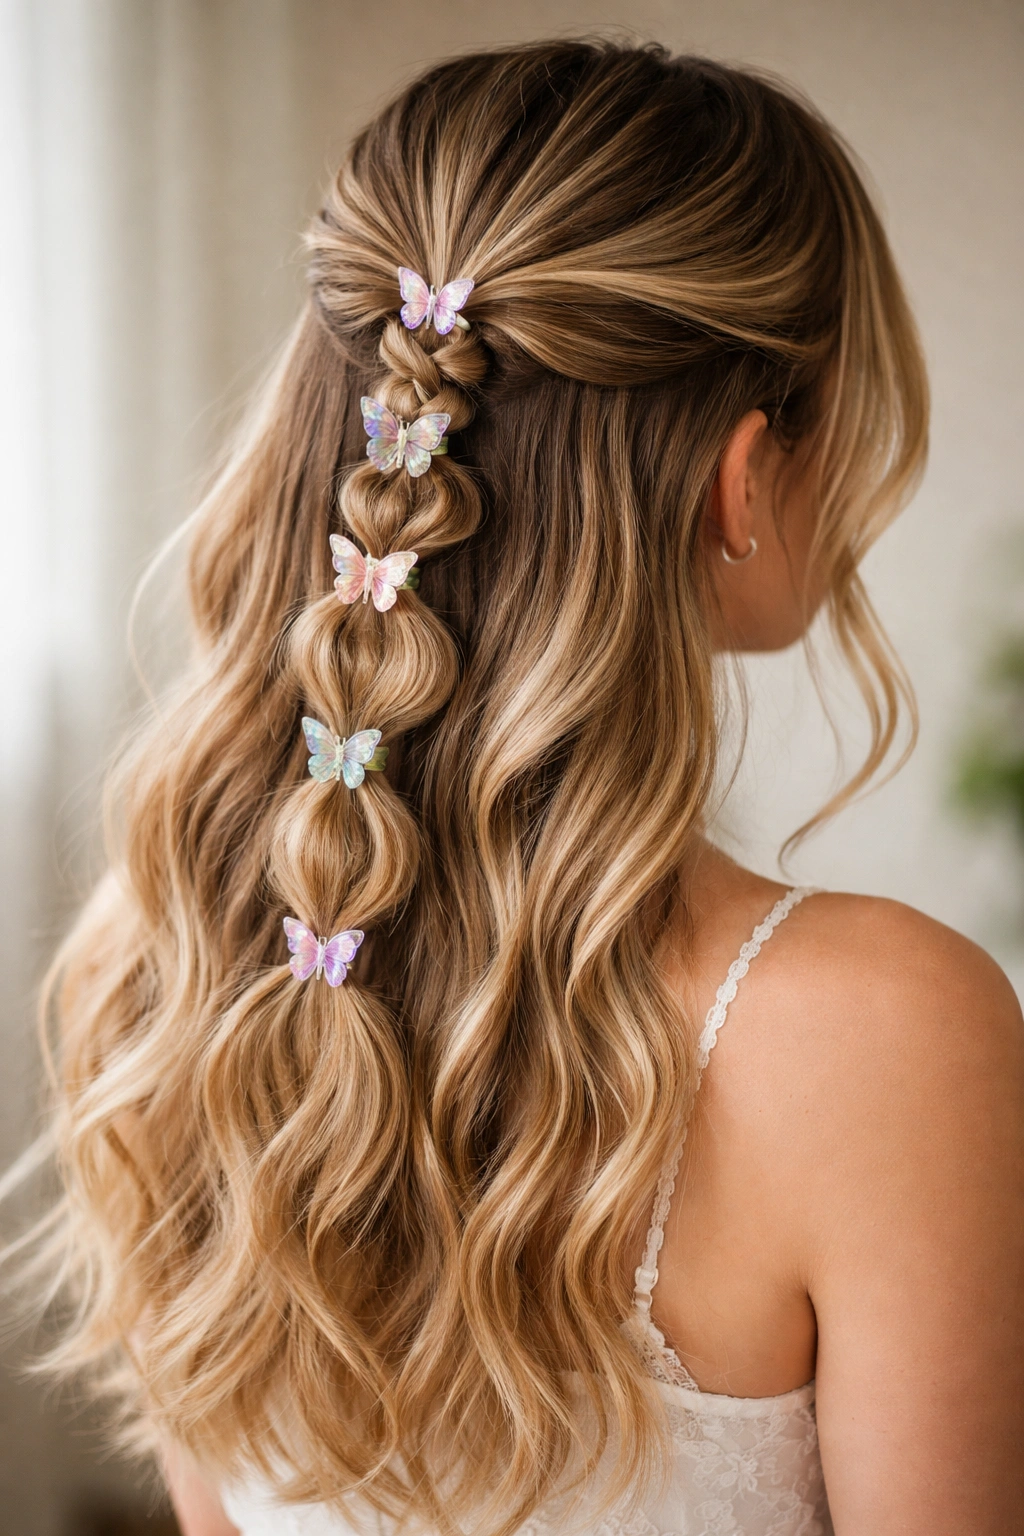
A bubble braid creates that playful, textured effect where sections of a simple braid are gently pulled outward to create puffy “bubbles.” Combine this with butterfly clips, and you’ve got something that’s both trendy and genuinely unique. You’ll create a basic braid in your top section, then clip the braid at two or three points with butterfly clips while simultaneously puffing out the braid sections. This look is incredibly Instagram-worthy and works beautifully on hair that’s not freshly washed.
Why This Look Works Best
Bubble braids are forgiving on all hair types and textures. They add instant visual interest and look way more complicated than they actually are, which is honestly the best kind of hairstyle. The butterfly clips serve both functional and decorative purposes here—they help secure the braid while adding sparkly, intentional detail. This style is perfect for making fine or thin hair look fuller and more textured.
Steps to Create This Look
- Gather the top section of your hair and create a simple three-strand braid
- Secure the base of the braid with a small clear elastic
- Gently pull sections of the braid outward to create the bubble effect
- Position a butterfly clip at the first bubble, securing it so it holds the braid at that point
- Create another bubble further down and secure with a second clip
- Continue until you’ve created the fullness and texture you want
- Mist with texture spray to help keep the bubbles in place
Pro tip: This style actually looks better when you start with day-old hair or spray-treated hair—fresh, freshly-washed hair can be slippery and hard to work with.
5. Curved Side Sweep with Butterfly Clip
Instead of gathering hair straight back from the crown, this version sweeps the top section to one side in a curved, dynamic line. The butterfly clip sits off-center, following the curve of where your hair is gathered. This creates an asymmetrical, modern look that’s particularly flattering on people with round or square face shapes—the angle creates a slimming effect. It’s sophisticated without being fussy, and works for everything from office wear to casual weekend styling.
Why This Look Works Best
Side-swept styles have an inherently elegant, slightly editorial feel. The curved line of this style is more flattering than a straight back-to-center approach for many face shapes. The off-center clip placement becomes a design feature that makes the whole look feel intentional and styled. This is an excellent option if you want your hairstyle to feel polished but not formal.
Steps to Create This Look
- Create a deep side part, starting from one temple and moving back
- Using a smoothing brush, sweep the top section across toward the opposite side
- Gather this section at a point that feels balanced with your face shape (typically just behind the opposite ear)
- Secure with a butterfly clip that’s positioned horizontally
- Leave the bottom section loose, or add waves and texture for more movement
- Smooth the swept section with a light serum or finishing spray for polish
Worth knowing: The deeper your initial side part, the more dramatic the sweep—experiment with different part depths to see what feels best on your face.
6. Double Clip Textured Crown Look
This approach uses two butterfly clips positioned horizontally across the back of the head, creating a stacked effect. The hair between and above the clips is gently backcombed or teased to create volume and texture. This is a more editorial, fashion-forward take on the half up half down style that feels particularly special for events or occasions. The double-clip positioning creates a structured frame for the texture, and the overall effect is far more dramatic than a single clip.
Why This Look Works Best
Texture is incredibly flattering and adds sophistication to any hairstyle. The double-clip approach creates architectural interest—it’s the kind of style that photographs beautifully. This look particularly suits people who want a hairstyle that makes a statement without being over-the-top. The texture also helps distribute the visual weight more evenly across the head.
Steps to Create This Look
- Gather the top section of hair at the crown and hold it with a clip
- Using a teasing brush, gently backcomb the hair at the roots of this section to create volume
- Position your first butterfly clip just below the teased section, securing the gathered hair
- Create another section just below the first clip, tease it lightly, and secure with a second butterfly clip
- Smooth the top layer of the teased sections with a fine-tooth comb (don’t over-smooth—you want texture to show)
- Leave the bottom section completely down and loose
Pro tip: This style holds best when you use a light-hold hairspray on the teased sections—heavy product can actually weigh the texture down.
7. Low Half-Up Messy Bun with Butterfly Clip
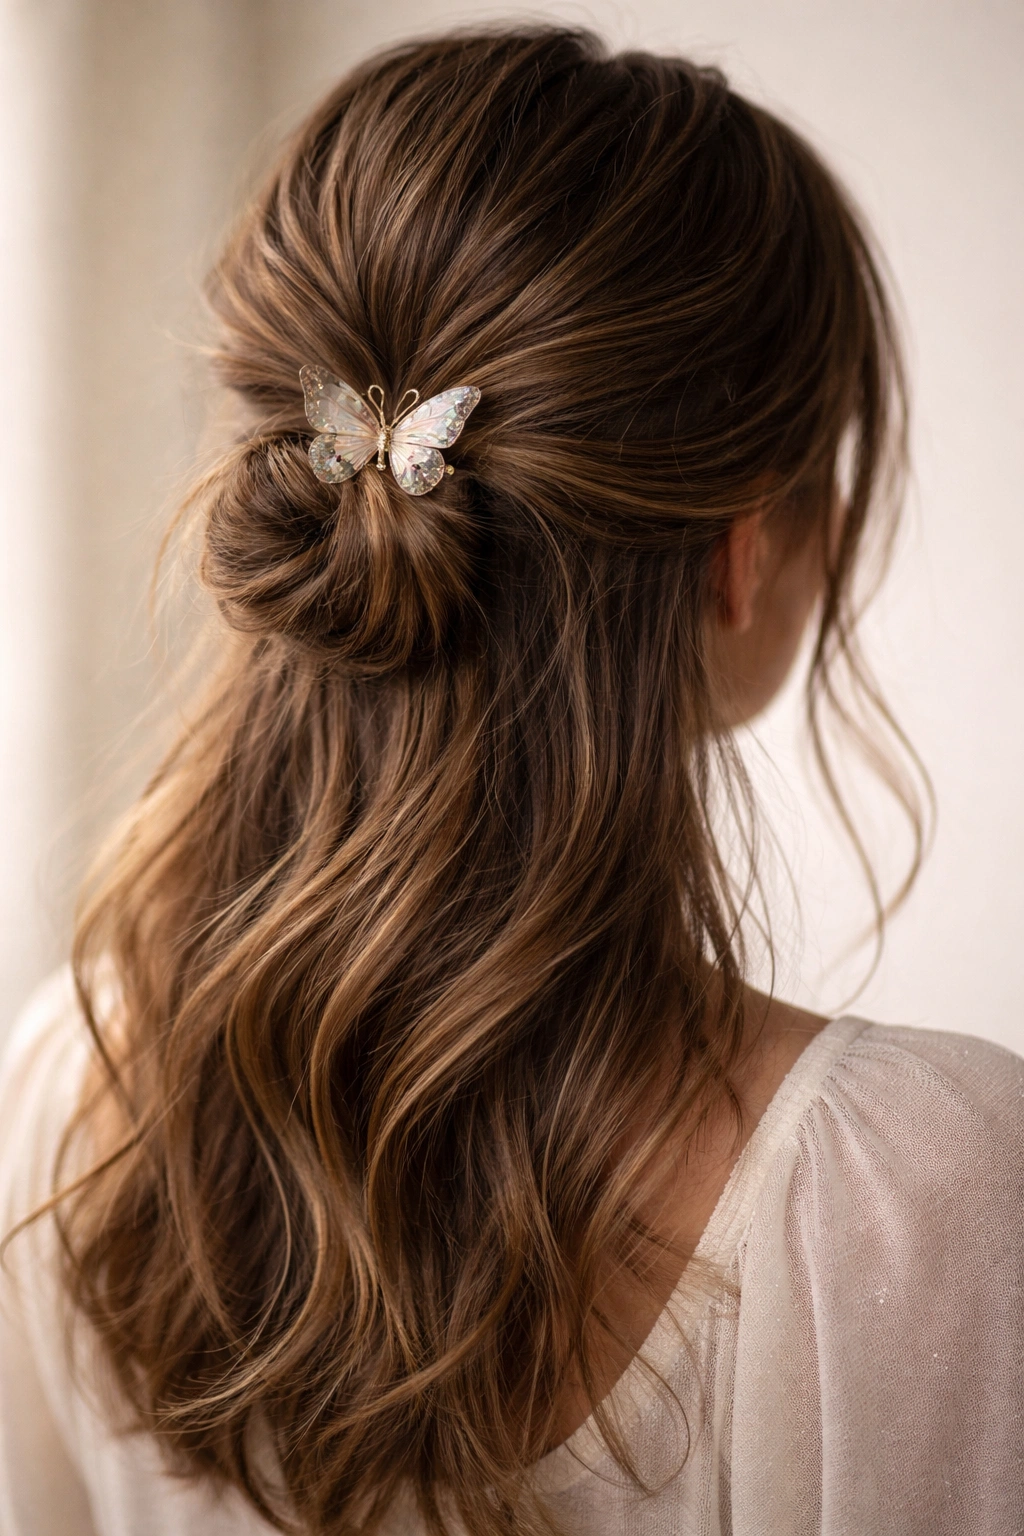
Instead of gathering hair all the way at the crown, this version creates a half-up look that sits lower, around the nape of the neck, with a small bun at the gathering point. The butterfly clip sits at the base of the bun, securing it while adding visual interest. This is far more relaxed and undone-looking than a high half-up, and it’s perfect for days when you want an intentional hairstyle that still reads as effortless. The messiness is key—you’re going for romantic, not neat.
Why This Look Works Best
Low styles are having a major moment because they feel so wearable and modern. A messy bun reads as casual and cool, while the butterfly clip adds just enough intentionality that it doesn’t look like you just rolled out of bed. This is perfect for work, school, or casual outings when you want your hair out of your face but not obviously “styled.”
Steps to Create This Look
- Create a loose middle or side part if desired
- Gather the top section lower than you normally would—start from around your temples and gather just above the nape of your neck
- Twist the gathered section loosely and wrap it around itself to form a small, imperfect bun
- Secure the bun loosely with a small elastic, leaving some wisps loose
- Position a butterfly clip at the base of the bun, securing it in place
- Tug on the bun gently to make it look intentionally messy—slightly unraveled is the goal
- Let pieces frame your face naturally
Worth knowing: This style is perfect for people with shoulder-length or longer hair, and it’s genuinely easier to achieve on second or third-day hair.
8. Sleek Middle Part with Dual Butterfly Clips
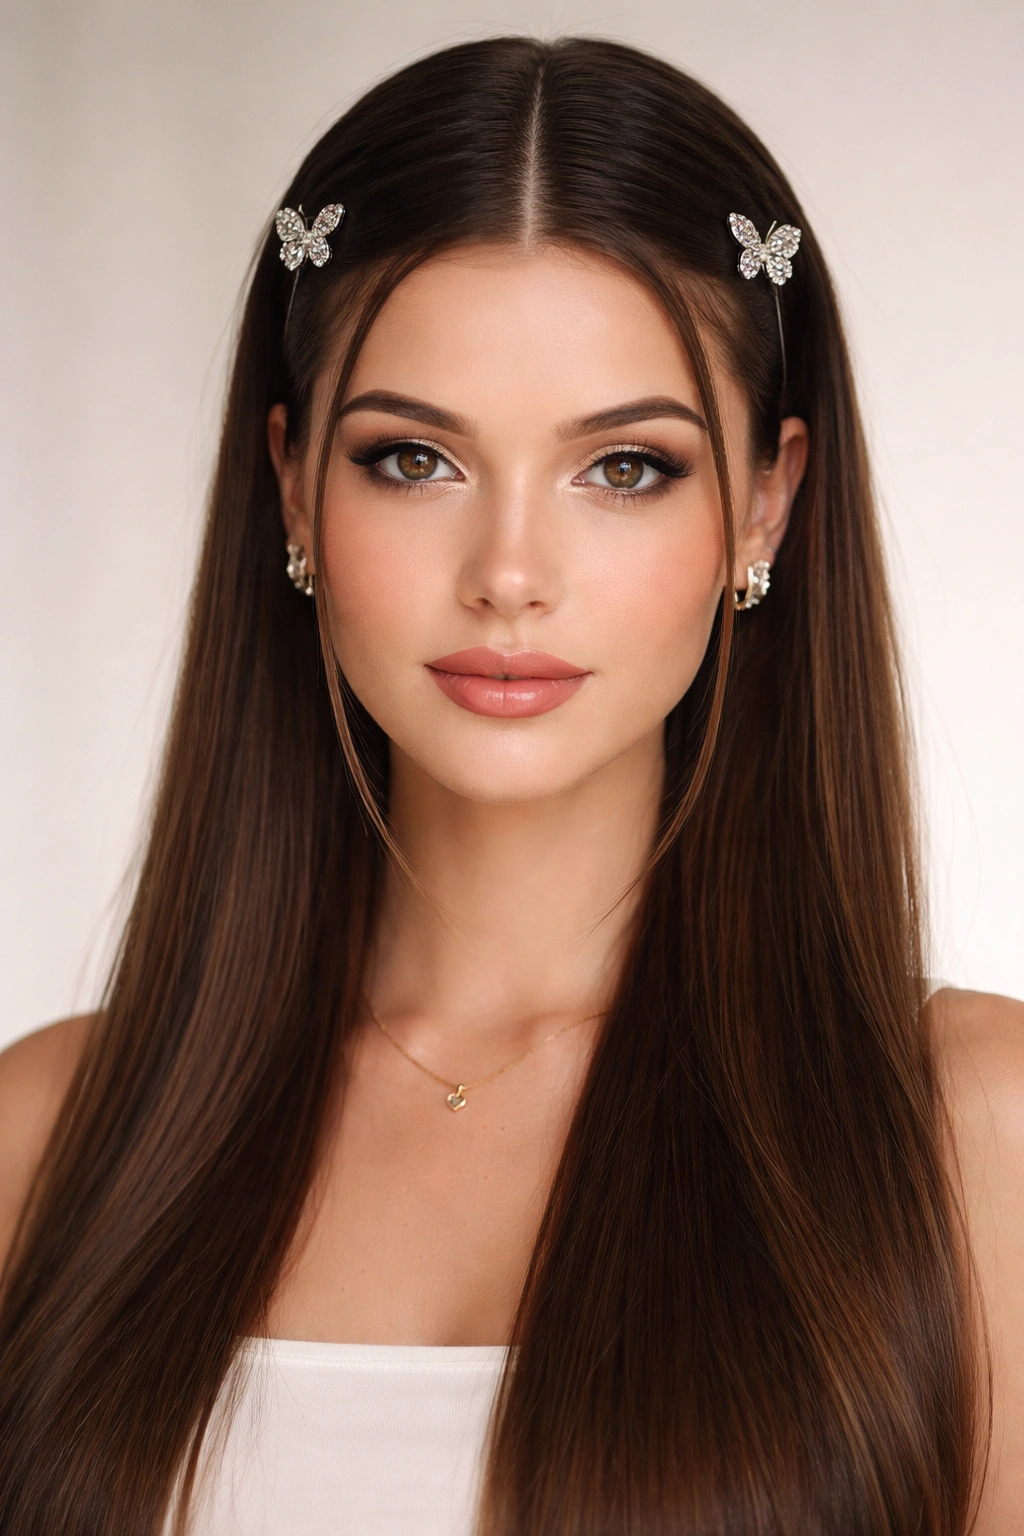
This ultra-modern look starts with a precise middle part that runs from your forehead all the way down your center back. The top section is divided again, and each side is secured with a matching butterfly clip positioned symmetrically. The result is clean, architectural, and very contemporary—it’s the kind of style that looks right at home in a magazine. This works best on straight or straightened hair where the precision of the parts is visible and intentional.
Why This Look Works Best
Symmetrical styling has an inherently modern, editorial quality. The middle part creates a balanced canvas, and the matching clips positioned on each side create order and intention. This style is particularly flattering for oval or oblong face shapes, and it photographs incredibly well. It reads as put-together without being overly formal.
Steps to Create This Look
- Create a precise middle part using a fine-tooth comb, starting from your forehead and moving straight back
- Using a smoothing brush or flat iron, smooth the hair fully straight
- Gather the top right section, bringing it back toward your crown area
- Position the first butterfly clip on the right side, securing this section in place
- Repeat on the left side, positioning the second clip to mirror the first
- Make sure the clips are exactly level with each other for maximum symmetry
- Finish with a lightweight smoothing serum to eliminate any frizz or flyaways
Insider note: This style works best with matching clips—metallic gold or silver on both sides looks intentional and polished.
9. Layered Half-Up with Teased Crown Volume
This technique creates multiple layers of half-up sections, each secured with its own clip or with the others, building upward to create serious crown volume. It’s like creating a sculptural element on top of your head. You’ll create the first clip section, then add additional sections above it, each slightly tighter and higher, creating a stacked, voluminous effect. This is definitely a more advanced technique, but the payoff is a genuinely show-stopping hairstyle.
Why This Look Works Best
Layering creates dimension and makes fine or thin hair appear significantly fuller. This approach transforms a basic half-up into something that feels special and intentional. The multiple clips create a progression that draws the eye upward and makes the style feel architectural. This is perfect for special occasions or any time you want your hair to genuinely stand out.
Steps to Create This Look
- Create the first section of hair about two inches above your ears, gathering it back and securing with a butterfly clip
- Gently tease the hair above this clip to create texture and lift
- Create a second section just above the first, gathering the hair that sits on top of the teased section
- Secure this new section with a second clip, positioned just above the first
- Create a third section at the very crown if you have enough hair, securing it with a third clip
- Gently smooth the very top layer of each section while maintaining the teased texture underneath
- Adjust the clips so they’re stacked vertically and create the layered appearance you want
Pro tip: Use clips in graduated sizes—slightly larger clips at the bottom, smaller ones toward the top—for a more sophisticated, balanced appearance.
10. Waterfall Braid Half-Up with Butterfly Clip
A waterfall braid creates the illusion of hair “cascading” down one side while sections are left to flow loose. When you add a butterfly clip to secure the braid at the half-up point, you create a style that’s both intricate-looking and genuinely romantic. This style is perfect for people with longer hair and works beautifully on wavy or curly hair. The waterfall effect is created by incorporating loose strands into a braid pattern, which sounds complicated but is actually quite intuitive once you understand the technique.
Why This Look Works Best
Waterfall braids are universally flattering because the cascading strands frame the face beautifully. This style has an inherently romantic, fairy-tale quality that photographs absolutely gorgeously. The butterfly clip serves as a lovely focal point where the braid is gathered into the half-up position. This is an excellent choice for weddings, date nights, or any occasion where you want to look genuinely special.
Steps to Create This Look
- Start on one side of your head, at about ear level, with a small three-strand braid
- As you braid, drop the bottom strand after every crossover—let it fall free
- Pick up a new strand from above to replace the dropped one and continue braiding
- This creates the “waterfall” effect as you work toward the back of your head
- Gather the braid at the back of your head where the top section ends
- Secure with a butterfly clip, gathering any stray pieces into the clip
- Let the waterfall strands fall freely down the side of your head
- Finish with a light hairspray to keep everything in place
Worth knowing: This style is easier than it looks—watch a tutorial a couple times and practice once, and you’ll have it down.
11. Curly Half-Up Voluminous with Butterfly Clip
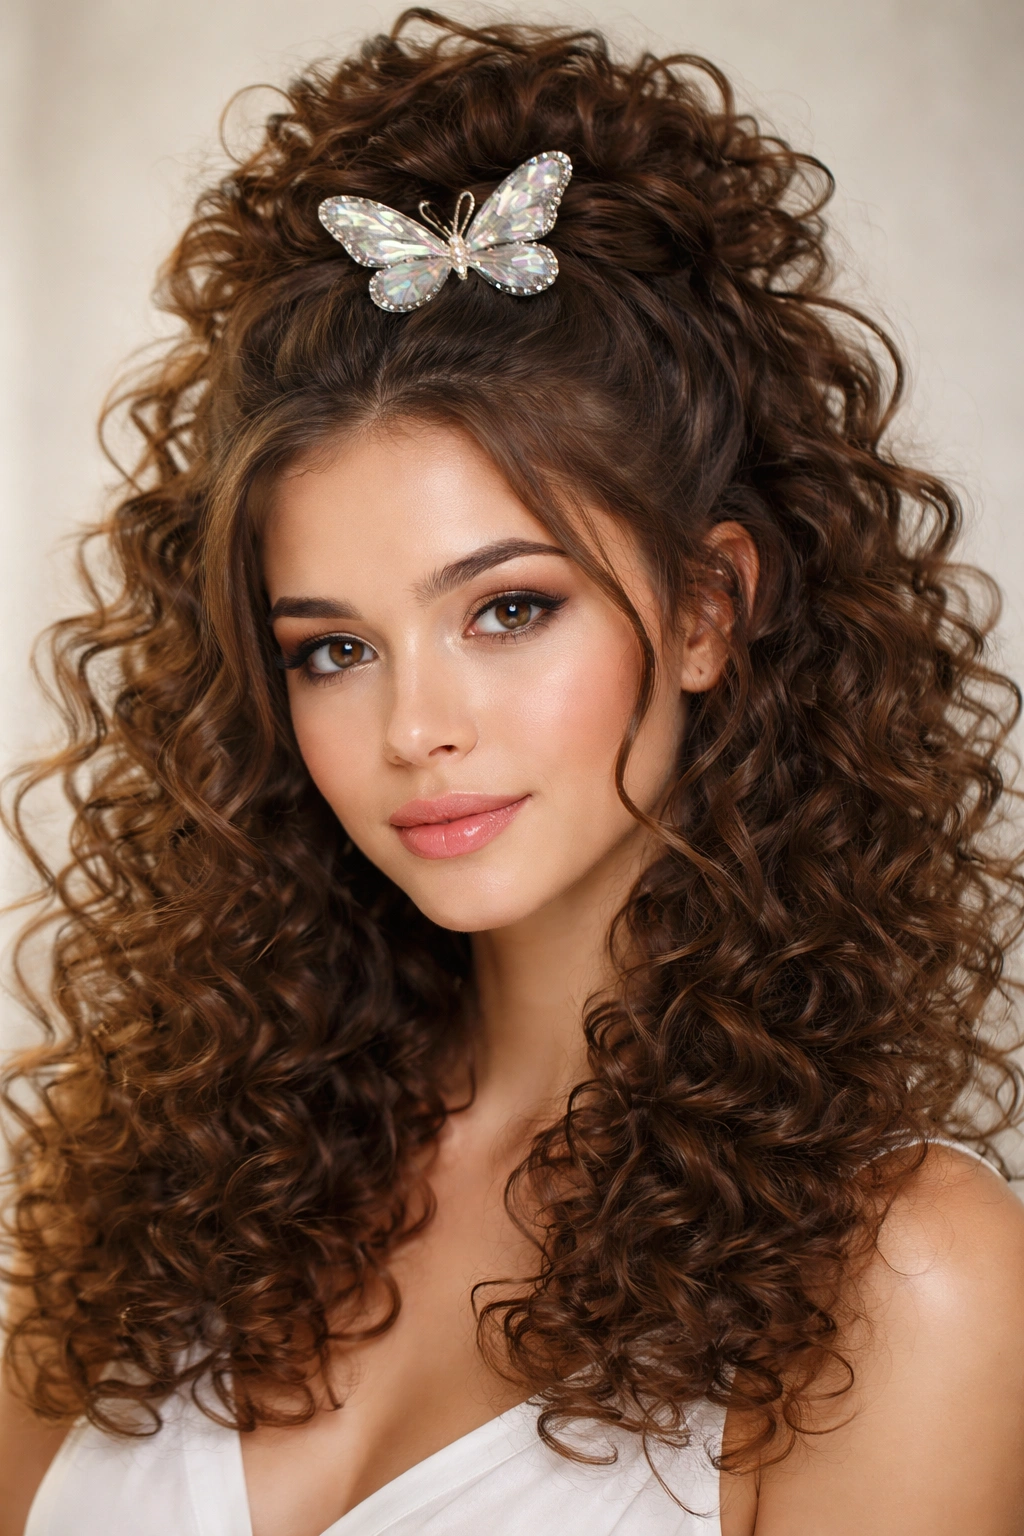
If you have curly or textured hair, this style celebrates your natural texture by creating a half-up look where the top section has serious volume and bounce, and the bottom half flows in all its curly glory. The butterfly clip sits among the curls, visible and decorative. This is one of the most flattering approaches for curly-haired people because it honors and emphasizes your natural texture rather than trying to fight it.
Why This Look Works Best
Curly hair has inherent dimension and movement that’s absolutely stunning when showcased properly. This style removes hair from the face while still celebrating the natural curl pattern. The butterfly clip becomes a beautiful accent piece among the curls, adding intentional shine or color. This hairstyle is effortless in the sense that you’re working with your natural hair texture, not against it.
Steps to Create This Look
- Start with freshly washed or refreshed curly hair
- Apply a curl-defining cream or gel to damp hair and allow curls to dry completely or use a diffuser
- Flip your head upside down gently and lightly fluff the crown area with your fingers to create lift
- Flip back right-side up and gather the top section of curls back from the crown
- Secure with a butterfly clip, positioning it so it’s visible among the curls
- Gently separate curls around your face to frame it softly
- Use a light hairspray designed for curly hair if needed—avoid anything too heavy
Pro tip: Do this style on second or third-day curls rather than freshly-washed curls, as the curls hold better and have more definition.
12. Braided Half-Up Halo Effect with Multiple Clips
This style creates a braid (or braids) that curves around the head like a halo, gathering into a half-up style at the back with butterfly clips securing the style. It’s similar to a crown braid but with the contemporary twist of the half-up foundation. This is definitely an intermediate-to-advanced technique, but it’s absolutely worth learning because the result is genuinely stunning—elegant, romantic, and undeniably special.
Why This Look Works Best
Halo braids are universally flattering because they frame the entire face while creating an ethereal, princess-like quality. The combination of the braid detail with the butterfly clip creates a hairstyle that feels both romantic and intentional. This is the kind of style that works for weddings, fancy dinners, or any occasion where you want to look absolutely stunning.
Steps to Create This Look
- Take a small section from one temple area and create a basic braid that curves around the back of your head
- Secure the braid temporarily with a clip on the opposite side
- Create a second braid starting from the other temple, also curving around the back
- Let the two braids meet at the back and gather with the remaining loose hair in that area
- Secure everything together with a butterfly clip at the nape of your neck
- Gently pull sections of each braid to create a softer, more textured appearance
- Adjust the positioning until the halo effect is balanced and even
Insider note: This style works beautifully with delicate, decorative butterfly clips in gold or silver—let the clips be a visible part of the design.
13. Sleek Back Half-Up for Work or Professional Settings

This is the business-appropriate version of the half-up butterfly clip look. Everything is neat, polished, and professional, with no wispy pieces or intentional texture. The butterfly clip is either matching your hair color for a subtle approach, or it’s a simple metallic design that reads as professional rather than playful. This style keeps your hair off your face while maintaining a polished appearance that’s appropriate for offices, client meetings, or professional events.
Why This Look Works Best
Professional settings often call for hairstyles that look intentional without being trendy or attention-seeking. This approach delivers exactly that—your hair is clearly styled and secured, but the focus remains on your face and your presence, not on an elaborate hairstyle. The butterfly clip adds just enough polish that your look reads as “put together” without being over the top.
Steps to Create This Look
- Brush your hair back smoothly, creating a slight part or no part depending on your preference
- Gather the top section firmly at the crown, making sure there are no wisps or loose pieces
- Secure with a butterfly clip in a color that matches your hair or a simple metallic finish
- Smooth down any flyaways with a smoothing serum and a fine-tooth comb
- Make sure the clip is positioned horizontally and centered
- Keep the bottom section in your natural texture—waves or straight, whatever you prefer
- Finish with a light-hold hairspray that won’t make the style feel stiff or helmet-like
Worth knowing: In professional settings, avoid novelty clips or clips with multiple colors or cutesy designs—opt for solid colors or simple metallics instead.
14. Tousled Beach Wave Half-Up with Butterfly Clip
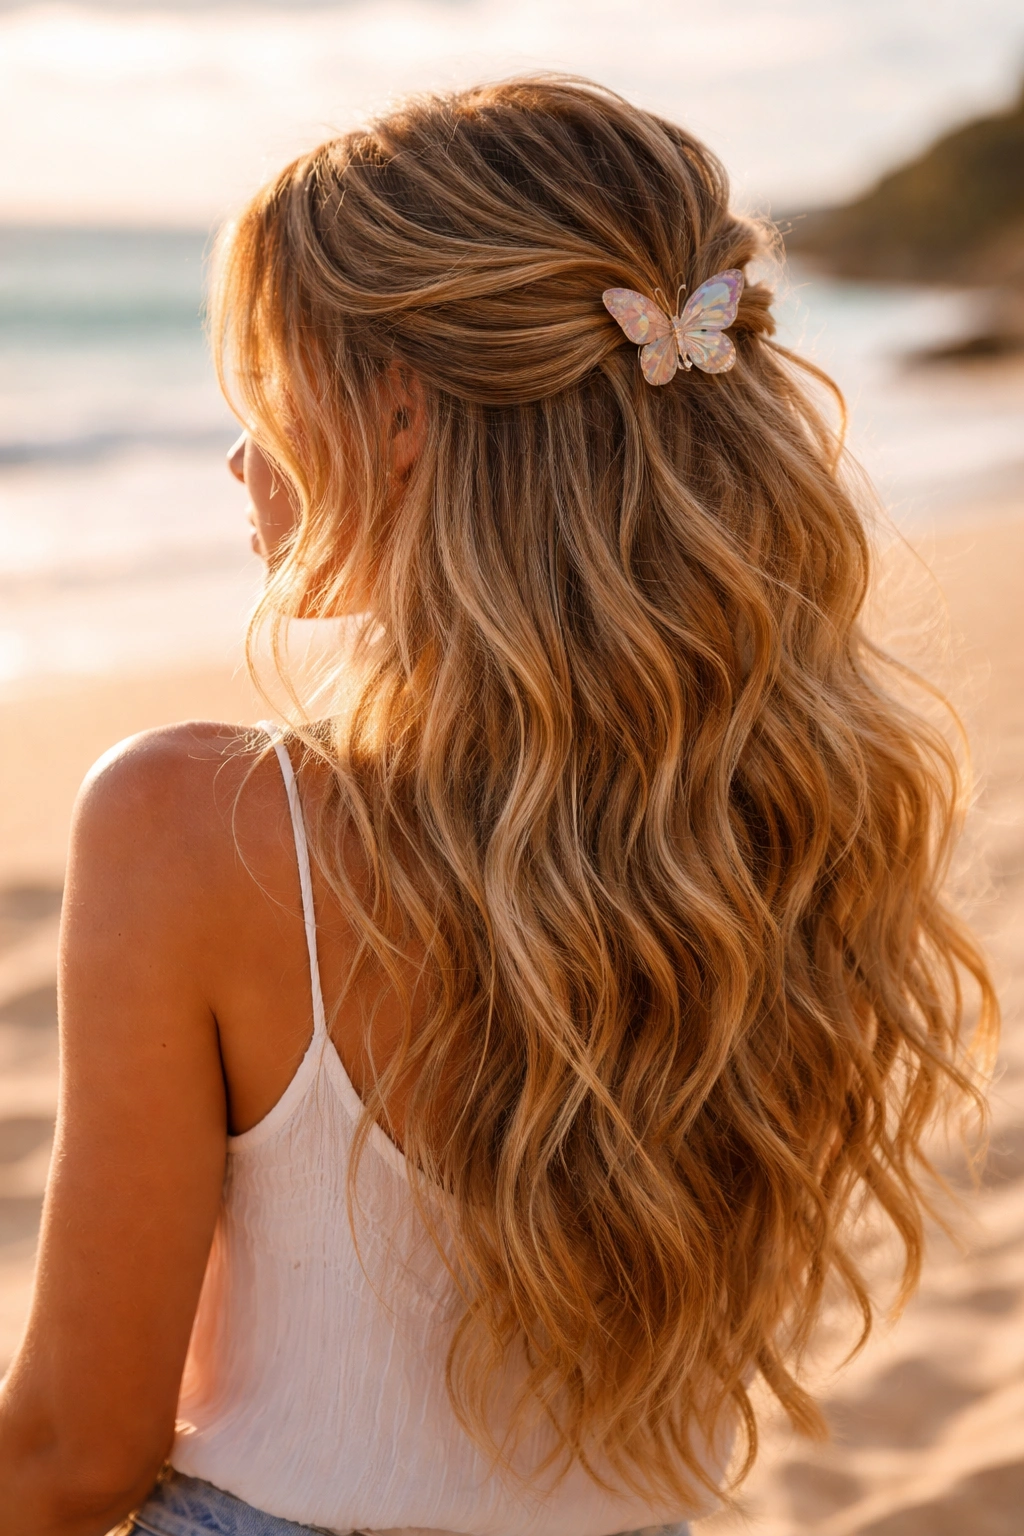
This is the carefree, vacation-ready version of the half-up style. You’re creating loose, undone waves throughout your hair, gathering the top section into a half-up with a butterfly clip, and letting everything read as effortlessly beachy and relaxed. This style celebrates movement and texture rather than precision. It’s perfect for warm weather, casual outings, weekend plans, or any time you want to look like you just came from the beach (or wish you had).
Why This Look Works Best
Beach waves are flattering on nearly everyone because they create movement and softness without being overly styled. The half-up approach keeps hair off your face while still showcasing the wave texture. The butterfly clip adds a touch of intentional detail to what otherwise reads as a completely undone style—it’s the difference between “I woke up like this” and “I woke up like this and added a cute clip.”
Steps to Create This Look
- Use a curling iron, wand, or braiding method to create loose waves throughout your hair
- Gently separate the waves with your fingers to make them look more natural and less uniform
- Gather the top section loosely at the crown—don’t pull too tightly
- Secure with a butterfly clip, allowing some pieces to escape around the clip
- Leave strands hanging loose around your face and throughout the style
- Tousle everything lightly with your fingers and use a texture spray if desired
- The goal is a completely undone, effortless appearance
Pro tip: Apply a texture spray or salt spray throughout your hair before creating the waves—this helps them hold better and creates more of that authentic beach texture.
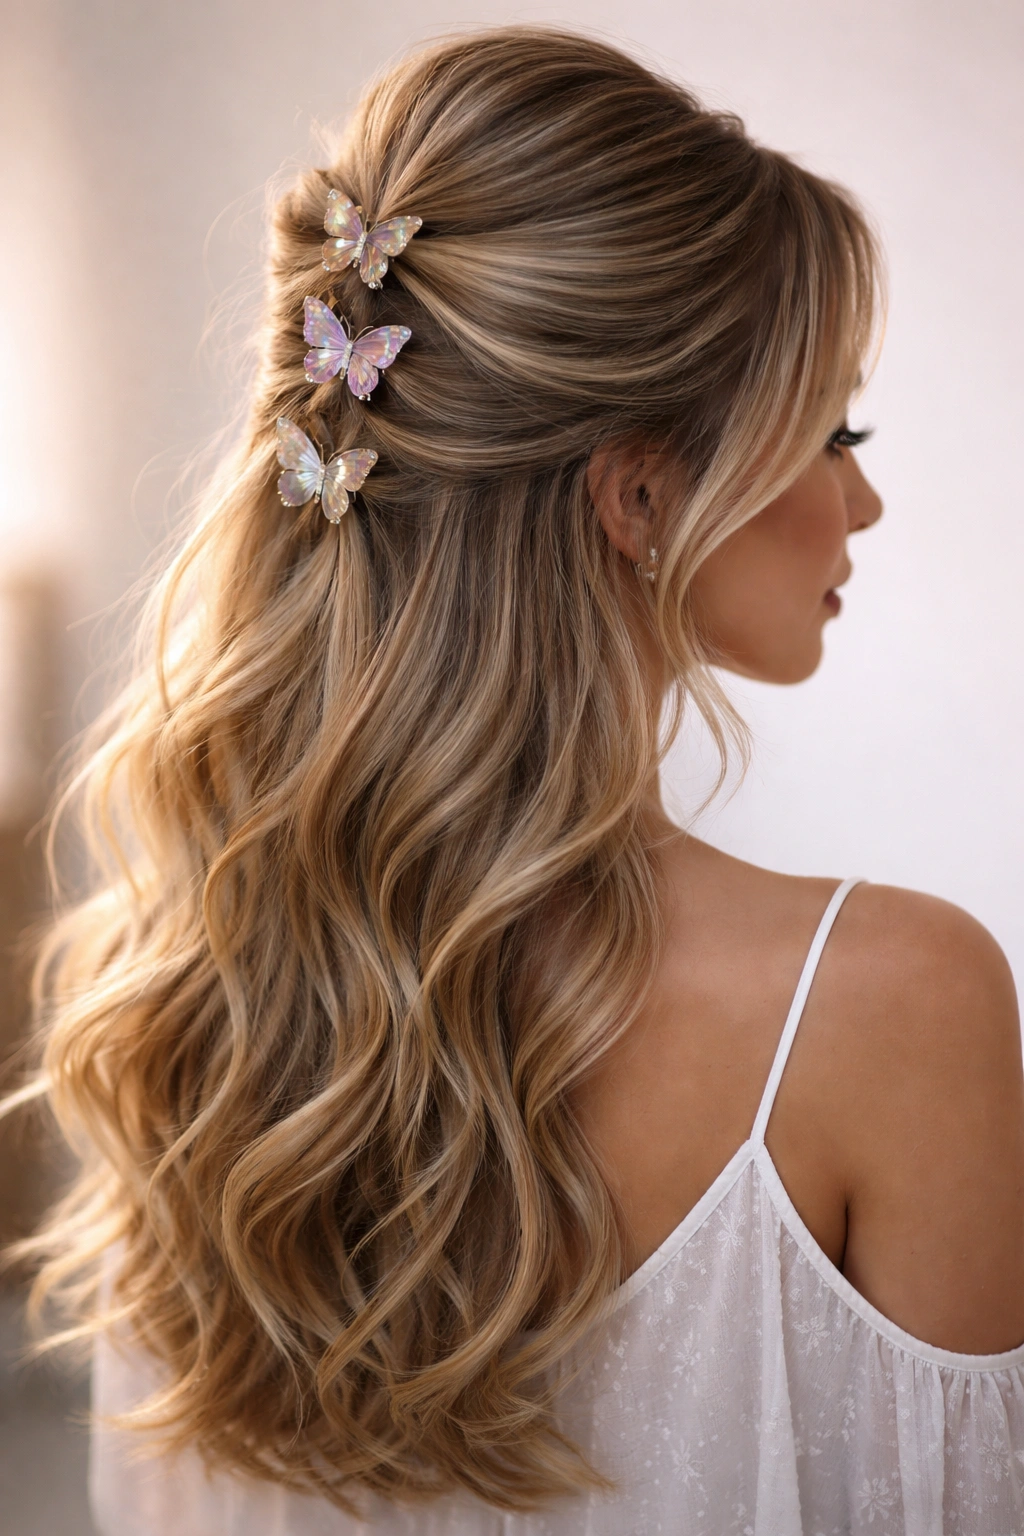
15. Multi-Clip Art Deco Butterfly Arrangement
This is the most fashion-forward, editorial approach—using three or more butterfly clips in a deliberate, geometric arrangement across the crown and upper back. The clips might be positioned in a triangle formation, a straight line, or a curved pattern, creating an intentional design element. This is genuinely bold and artistic, perfect for people who want their hairstyle to be a genuine statement. It’s the kind of look that works for special events, creative professions, or any time you want to push the boundaries of traditional styling.
Why This Look Works Best
Intentional, geometric design creates a modern, artistic aesthetic that feels completely current. Multiple clips in a planned arrangement feel like a deliberate design choice rather than simply functional styling. This approach is perfect if you’re comfortable with drawing attention to your hair—this style doesn’t whisper, it speaks. It photographs beautifully and works wonderfully for people who love fashion and design.
Steps to Create This Look
- Decide on your clip arrangement before you start—sketch it mentally or on paper
- Gather the top section of hair and create two or three subsections
- Create subtle twists or braids within each subsection
- Position your first clip, securing one of the twists or sections
- Position the remaining clips according to your planned design—whether that’s a line, a triangle, or another geometric shape
- Step back and assess the balance—clips should feel intentionally placed, not random
- Adjust the sections and clips until the arrangement feels balanced and purposeful
- Tug gently on the twists or braids to create texture around the clips
Insider note: Choose clips in the same color family or mix metallics (gold and silver together, for example) for a cohesive look—avoid mixing very different colors unless you’re going for a truly eclectic, bohemian vibe.
Final Thoughts
Butterfly clips are one of the easiest ways to elevate a half up half down hairstyle from basic to genuinely beautiful. The style itself is already incredibly flattering and practical, and adding a well-chosen clip transforms it into something with real personality and intention. Whether you’re drawn to the sleek professionalism of a single centered clip, the romantic nostalgia of multiple clips woven into braids, or the bold artistry of a geometric multi-clip arrangement, there’s a butterfly clip half-up style that suits you.
The real magic here is that none of these styles require professional skills or expensive tools. You need a brush, maybe a curling iron depending on the style, and butterfly clips—that’s genuinely it. Start with whichever style speaks to you most strongly, practice it a couple times to get comfortable, and then branch out to the other looks as you gain confidence. Each style teaches you something different about working with butterfly clips and understanding how they interact with your hair texture and face shape.
Your hairstyle should make you feel confident, beautiful, and like yourself—just the elevated, intentional version. Butterfly clips are the perfect accessory for expressing that. They’re affordable, they come in endless colors and finishes, they’re genuinely practical, and they add that touch of polish and intention that makes a hairstyle feel complete. Grab a few clips in different colors, spend an afternoon experimenting with these fifteen styles, and discover which ones become your go-to favorites.