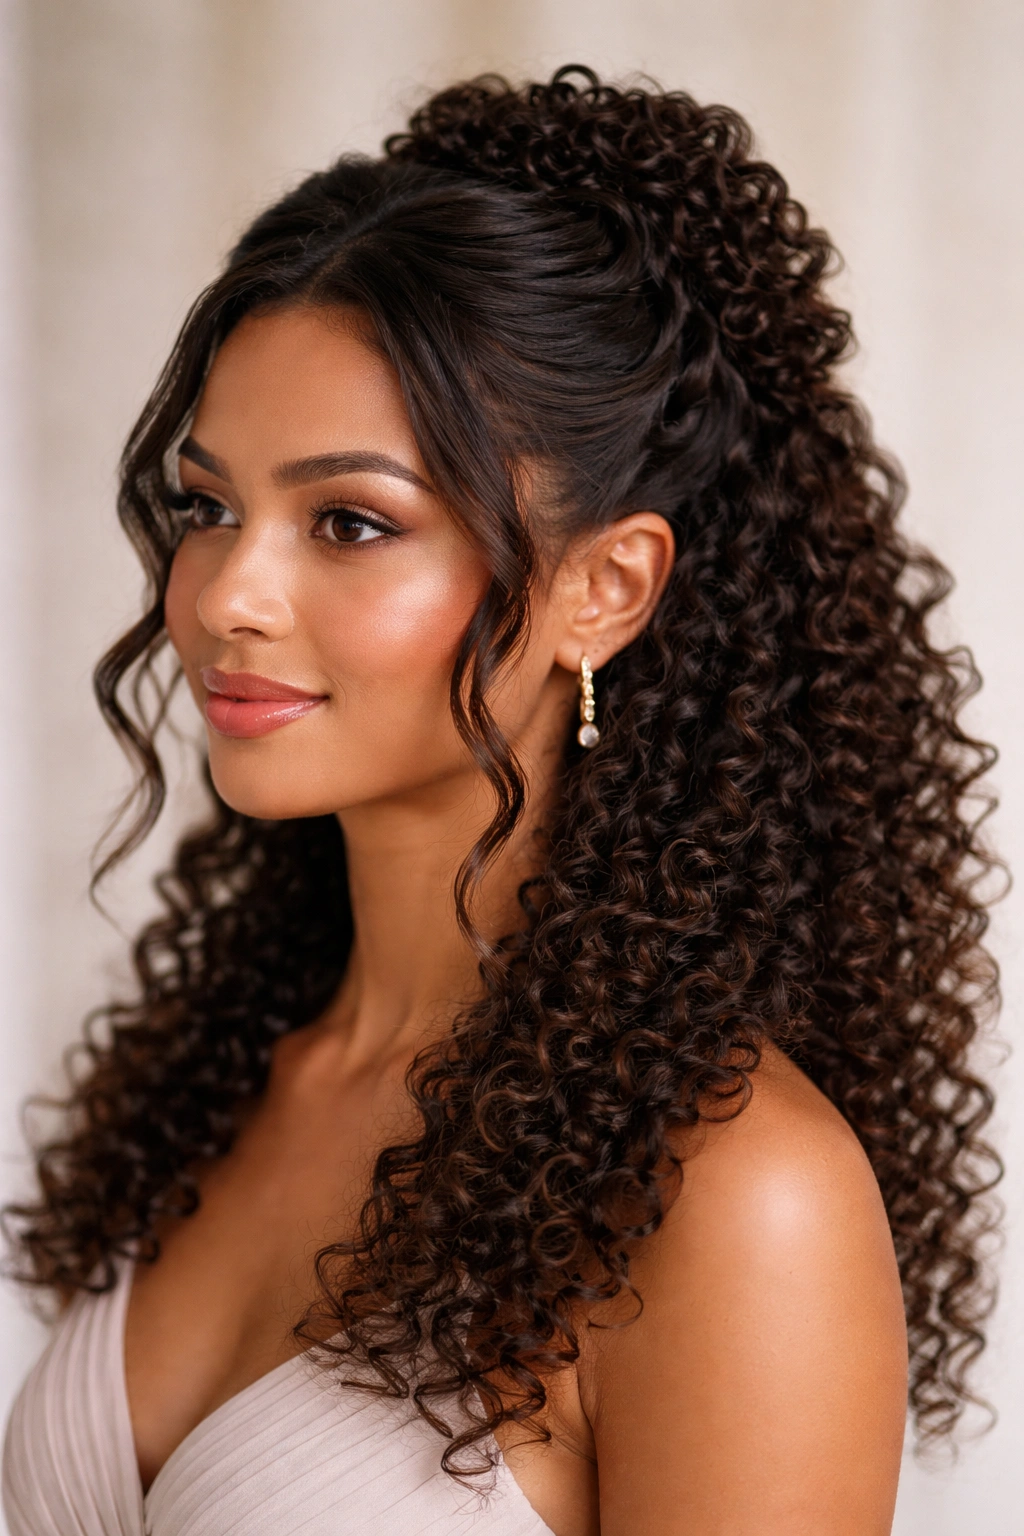
Half-up hairstyles offer the perfect sweet spot for bridesmaids with curly hair — they showcase those gorgeous curls while keeping hair off the face and neck for comfort during a long day of celebration. The challenge, though, is finding styles that actually work with curl patterns rather than fighting against them. Not every half-up look translates well to naturally textured hair, and what works for straight hair often looks completely different (and sometimes worse) when you try to force it onto curls.
The key to successful half-up styling on curly hair isn’t fighting your texture — it’s working with it. Curls have inherent volume, movement, and dimension that you absolutely want to leverage. A half-up style on curls can look effortlessly romantic and infinitely more textured and interesting than the same style would on straight hair. You’re not trying to make curls look sleek or polished in a traditional way; you’re enhancing their natural beauty while achieving an intentional, bridal-party-ready look.
Whether you’re working with tight coils, loose waves, or something in between, the styles below are specifically designed for curly hair and tested for real-world bridal timelines. Each one includes exactly what you need to know about styling, what products will help, and how to adapt it to your specific curl type and hair thickness. Let’s explore the half-up half-down options that’ll make any bridesmaid with curls feel absolutely confident and beautiful.
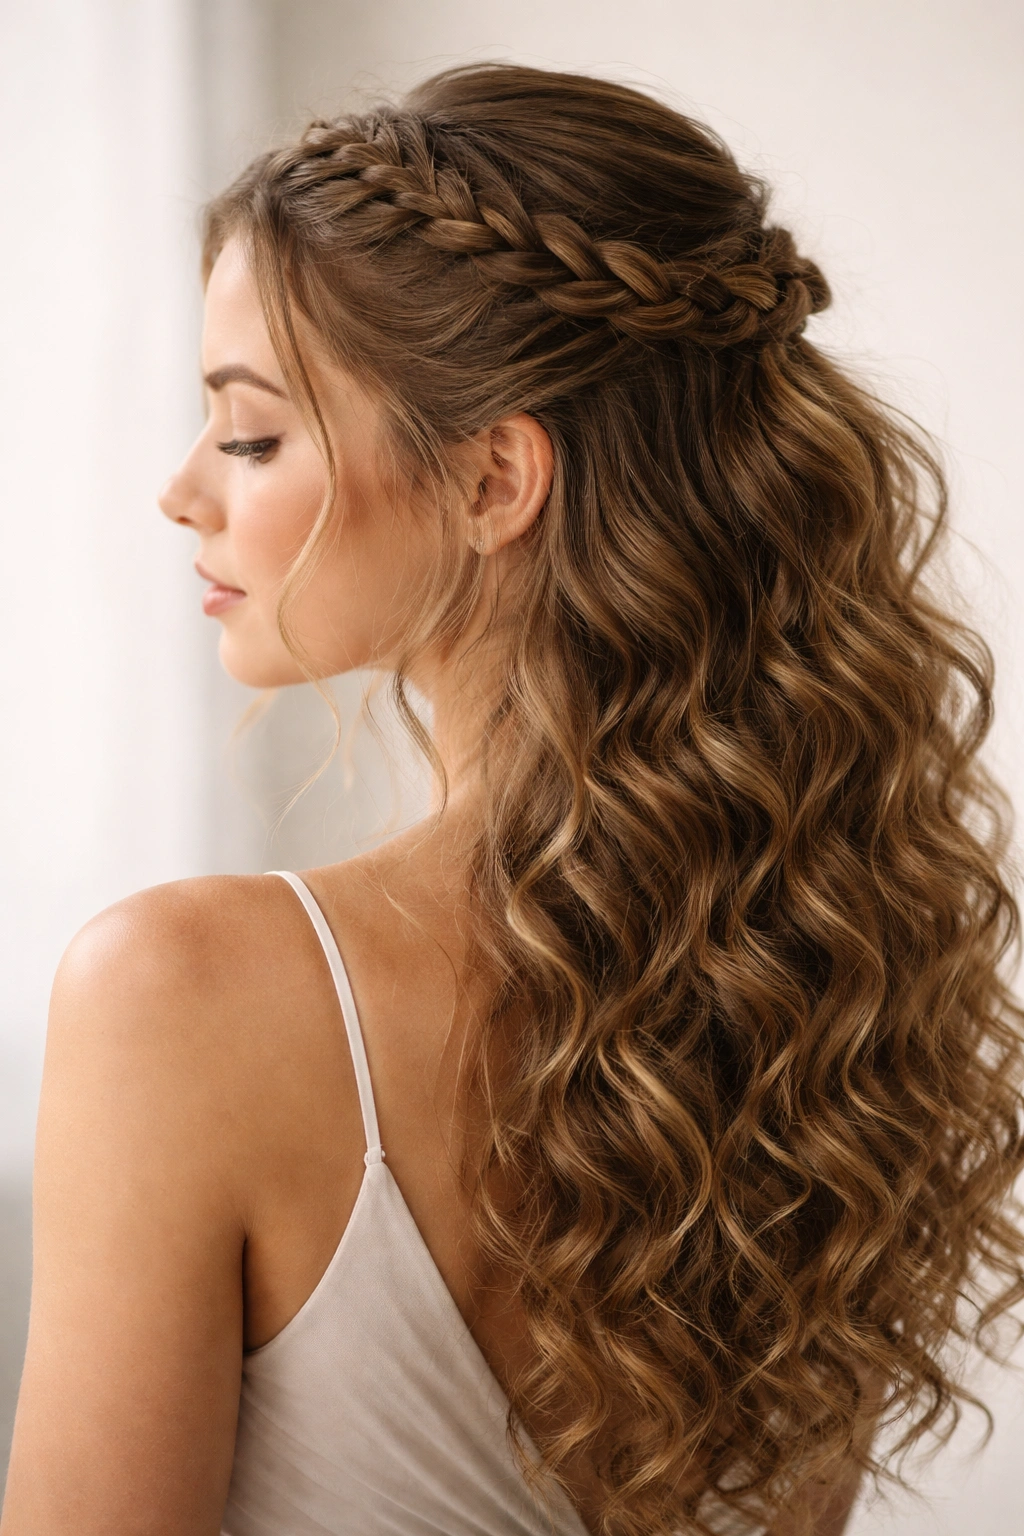
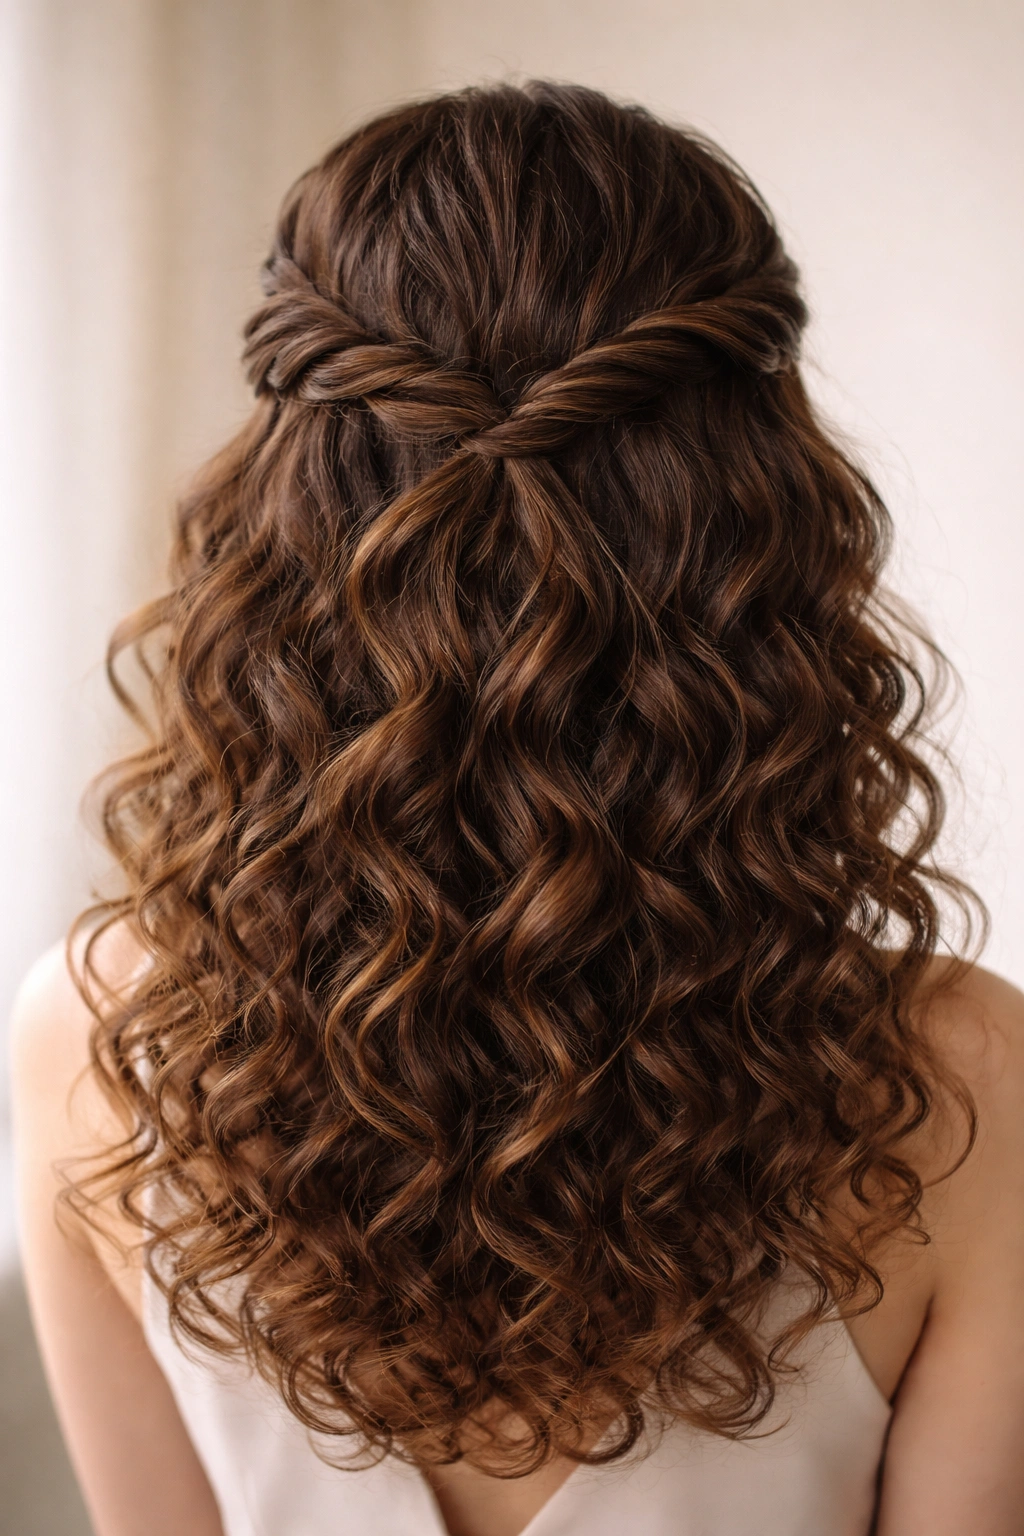
1. The Twisted Crown Half-Up
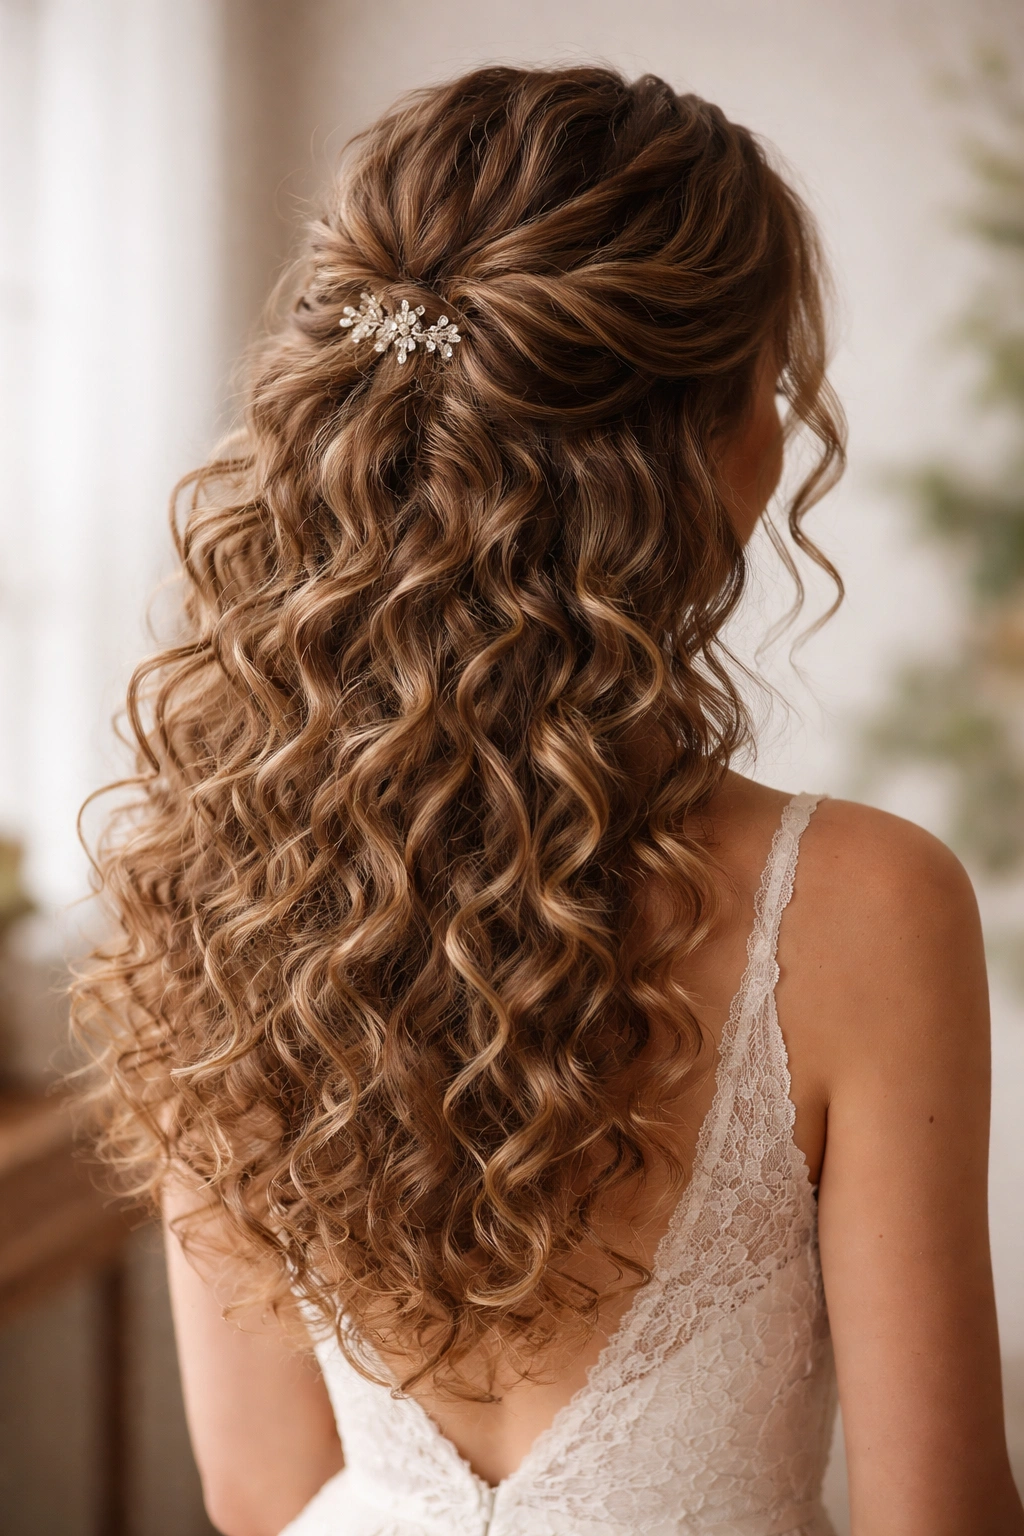
This style creates a romantic frame for the face by taking two sections of hair from each temple and twisting them together across the back of the head, pinning them just below the crown. On curly hair, the twist sits elegantly on top of your curls rather than flattening them, creating this dreamy layered effect that feels intentional and polished without looking over-processed.
Why It Works for Curly Hair
The twisted crown plays beautifully with natural curl texture because the twists themselves become part of the overall visual interest. Your curls peek through and around the twists, adding dimension that actually enhances the hairstyle rather than competing with it. The twists define and frame your face without requiring your curls to be smoothed down or manipulated into an unnatural state.
How to Create the Twisted Crown
Start with damp curls that have been scrunched with product and allowed to air dry or diffused until they’re set but still touchable. Take a 2-inch section from just above your right temple and begin twisting it gently as you move toward the back of your head, following the natural curve of your skull. Do the same on the left side. When both twists reach the center back of your head, pin them together with bobby pins that match your hair color, tucking the ends of the twists underneath for a seamless look. Use a lightweight hairspray to keep flyaways in check without weighing down your curls.
Pro Styling Tips
- Prep your curls with the right base: Apply a curl-defining cream or gel to soaking-wet hair and diffuse until 70% dry before you start styling. This ensures your twists will have grip and your curls will hold their shape throughout the day.
- Make the twists slightly loose: Tight twists on curly hair can look harsh and unnatural. Aim for a gentle, relaxed twist that allows some of your curl texture to show through the spirals.
- Secure with multiple bobby pins: Curly hair is typically thicker and heavier than straight hair, so use at least 3-4 bobby pins to ensure the twists stay put through dancing and movement.
- Finish with flexible hold: Use a flexible-hold or light hairspray rather than a strong hold spray, which can crisp up your curls and make them look stiff.
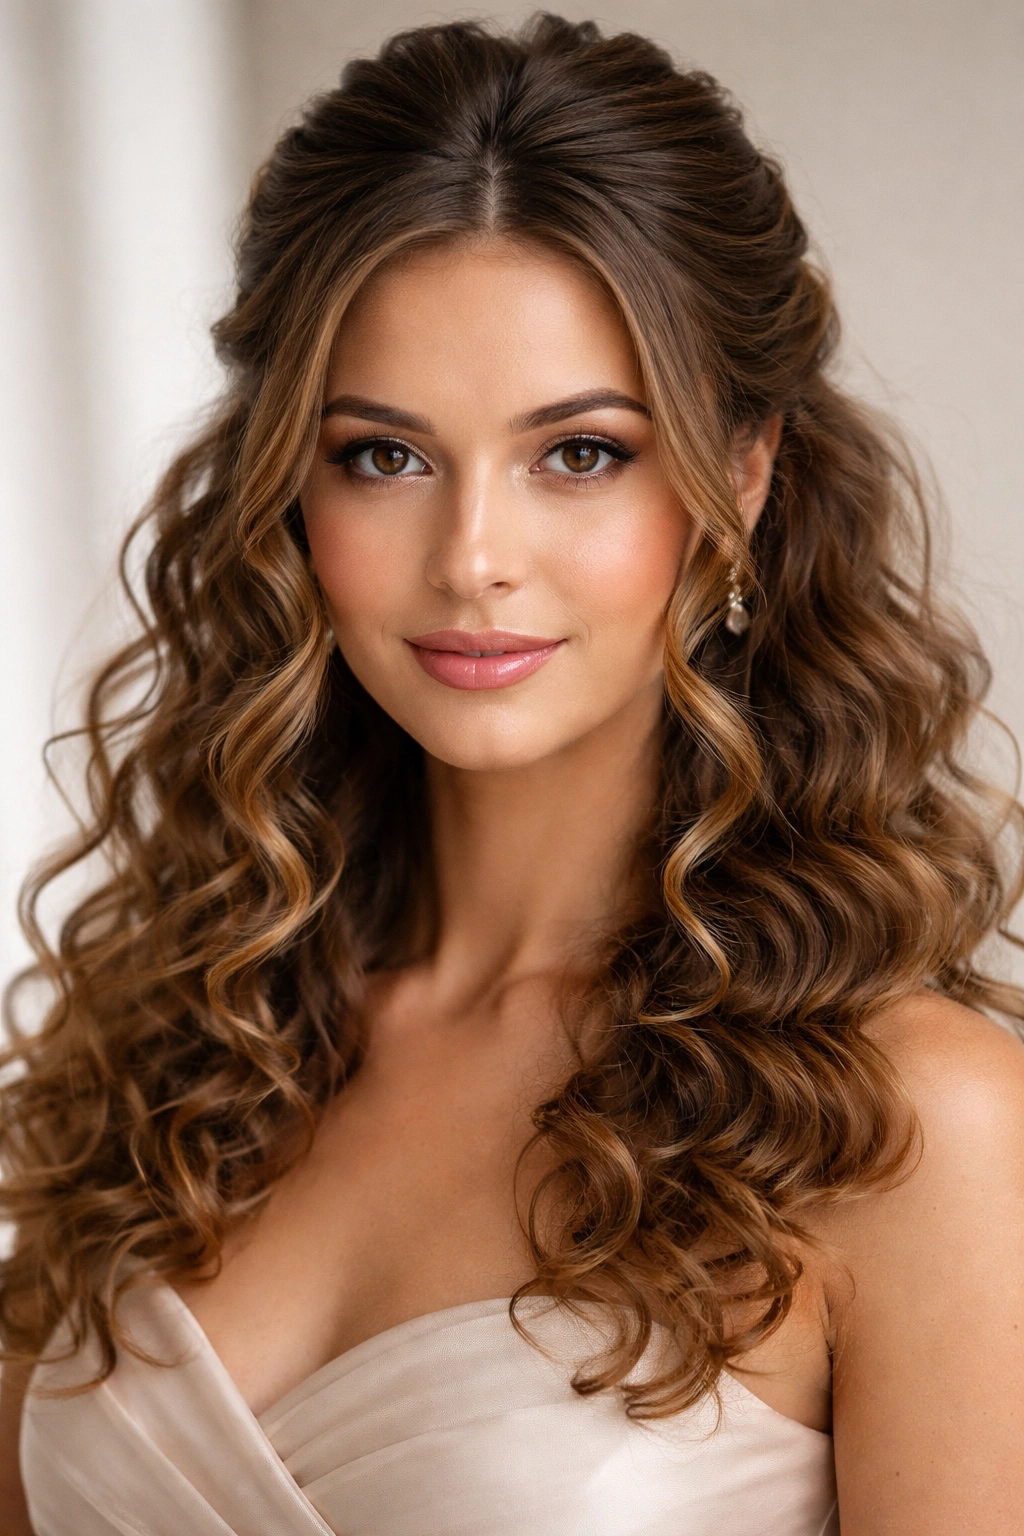
2. The Romantic Curl Cluster Half-Up
This style gathers a section of curls from the crown area and secures them at the back of the head, but instead of a sleek ponytail-style pull, you’re creating a loose, voluminous cluster that lets curls cascade and breathe. It’s sophisticated enough for a wedding but with that “I woke up like this” effortlessness that makes curly hair so stunning.
Why It’s Perfect for Bridesmaids
The beauty of this style is that it actually looks better with fuller, thicker curly hair. The more volume you have, the more impressive the cluster becomes. It’s also incredibly flexible — you can make it tight and structured or loose and romantic depending on your personal style and the formality of the wedding.
How to Achieve the Look
Flip your head upside down and gather about a third of your hair from the crown area using your fingers rather than a brush, which would disrupt your curl pattern. Flip back upright and position this gathered section at the back of your head, roughly where a low ponytail would sit. Instead of securing it tightly into a ponytail, use a claw clip or a decorated hair comb to loosely gather the curls while allowing individual curls to fall naturally around it. The clip should sit more as a decorative anchor than a tight elastic.
Getting the Volume Right
- Don’t smooth the curls up: Let your curls bunch and cluster naturally. Some texture bunching is exactly the point — it creates that romantic, intentional volume.
- Use a textured elastic or claw clip: A smooth elastic will show under all those beautiful curls. Choose something decorative or textured that actually looks pretty when you see it among the curls.
- Separate and fluff after clipping: Once you’ve secured the cluster, use your fingers to gently separate individual curls and encourage them to fall around the clip in a flattering way.
- Consider adding a delicate hairpiece: A thin, flowery hair comb or a beaded accent can turn this cluster into something bridal and elevated without adding weight or changing the look.
3. The Rope Braid Half-Up
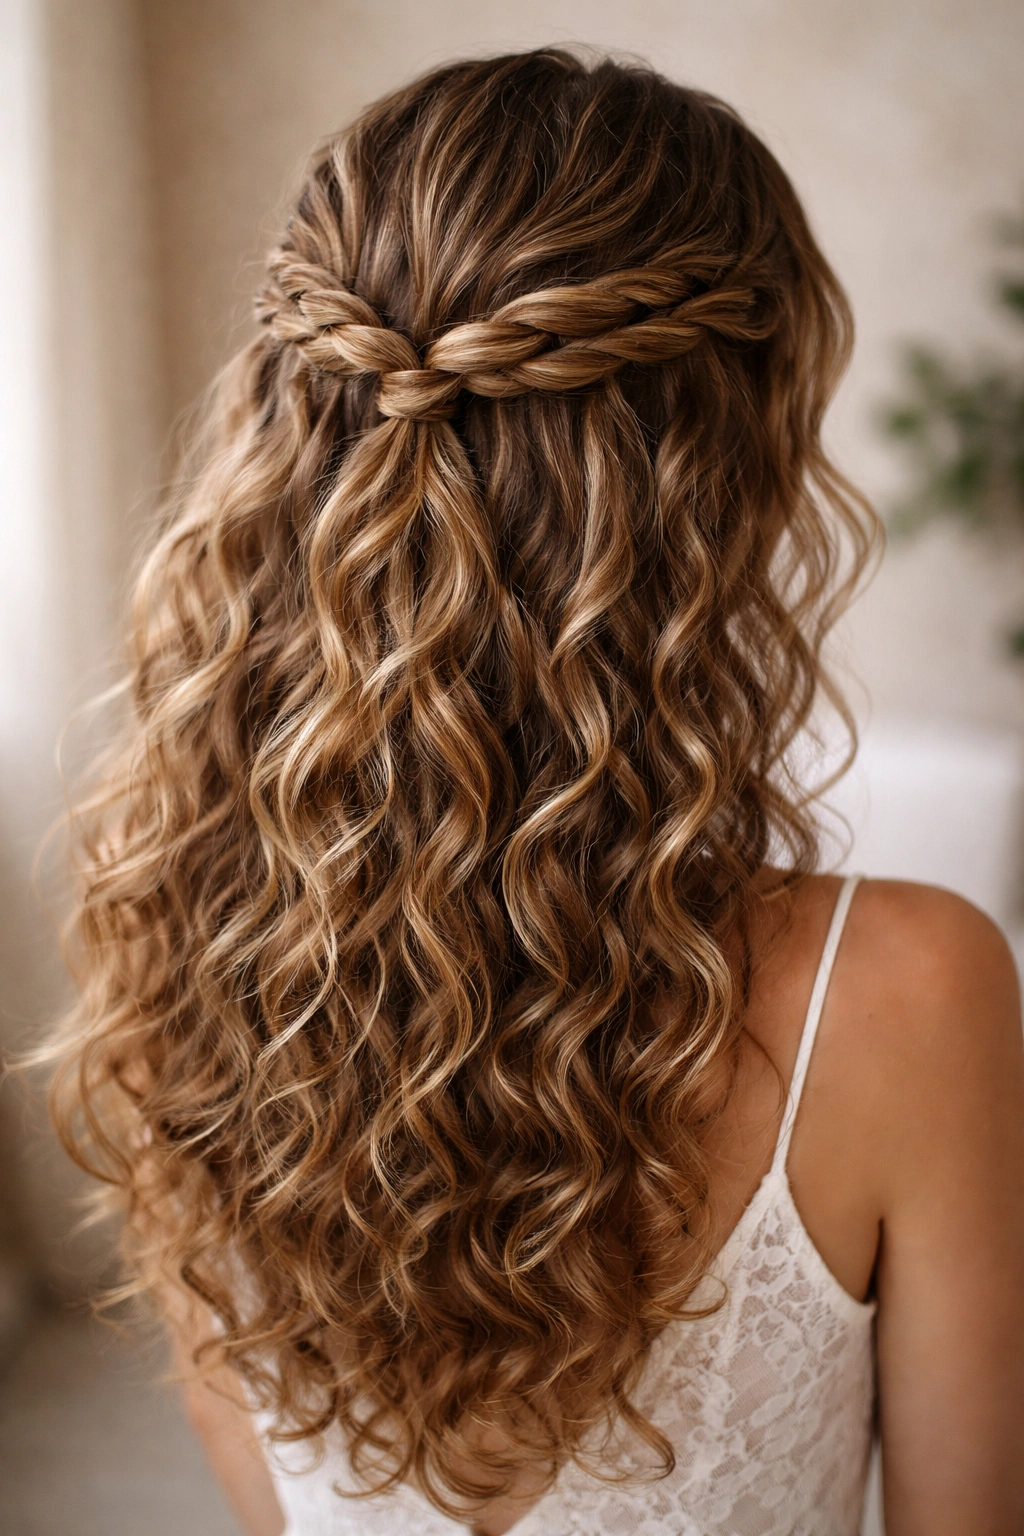
A rope braid is simply two sections of hair twisted together — it’s easier than a traditional braid, creates a more textured look, and works gorgeously with curly hair because the rope itself catches the light and shows off your curl texture. Take two sections from either side of your head, twist them together as you move toward the back, and secure them below the crown.
Why Rope Braids Suit Curly Hair
Traditional three-strand braids can sometimes look too tight or defined on curly hair, but rope braids have a looser, more organic appearance that complements natural curls perfectly. The twisted rope catches and highlights your curl texture instead of flattening it into neat lines.
Styling Steps for the Rope Braid
Begin with curls that have been refreshed with a curl refresher spray or light misting of water and a bit of product. Take a 3-inch section of hair just above your right ear and divide it into two strands. Begin twisting these two strands around each other as you move toward the back of your head, maintaining gentle tension so the rope stays defined but not tight. Repeat on the left side. When both ropes meet at the back of your head, below the crown, secure them together with bobby pins and tuck the ends neatly underneath.
Making It Last All Day
- Tighten rope braids slightly on curly hair: Because curly hair is naturally voluminous, a slightly tighter rope braid will hold its shape better through the day than a super-loose rope would.
- Use bobby pins generously: Secure the rope braids with at least 3-4 bobby pins twisted together so they work as one unit.
- Create dimension with loose curls: Leave curls hanging freely below the rope braids. These loose curls frame the face beautifully and add romance to the structured rope element.
- Hairspray the rope braids specifically: Rather than spraying your whole head, target the braided sections with a light hairspray to help them hold shape without affecting the curls below.
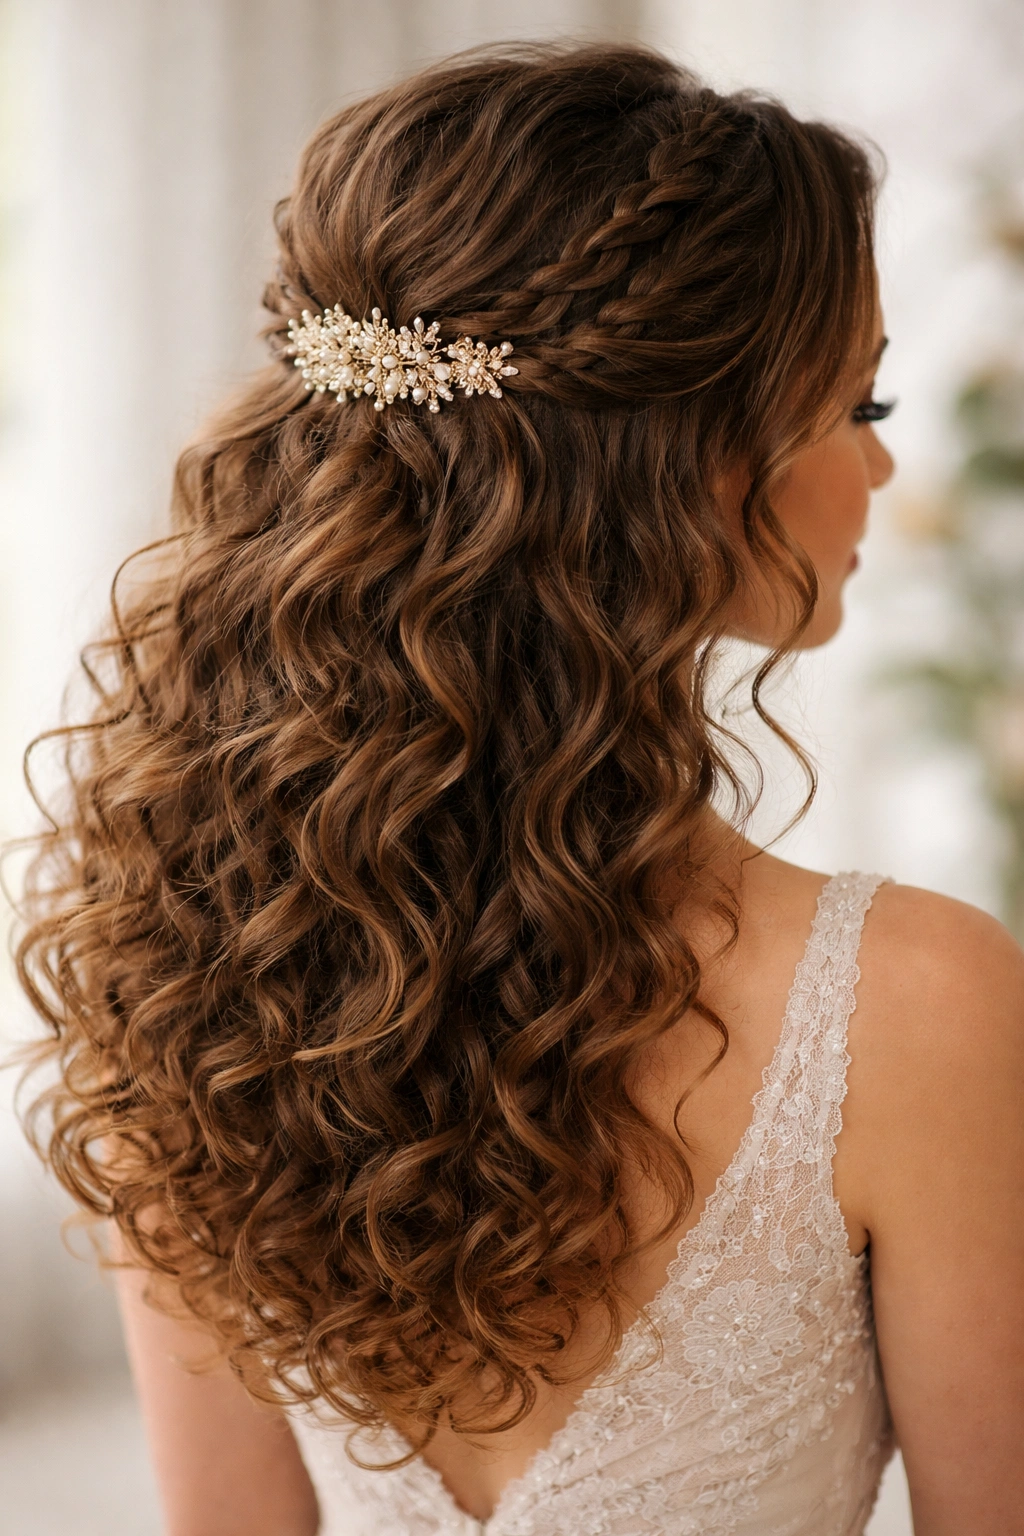
4. The Low Voluminous Knot Half-Up
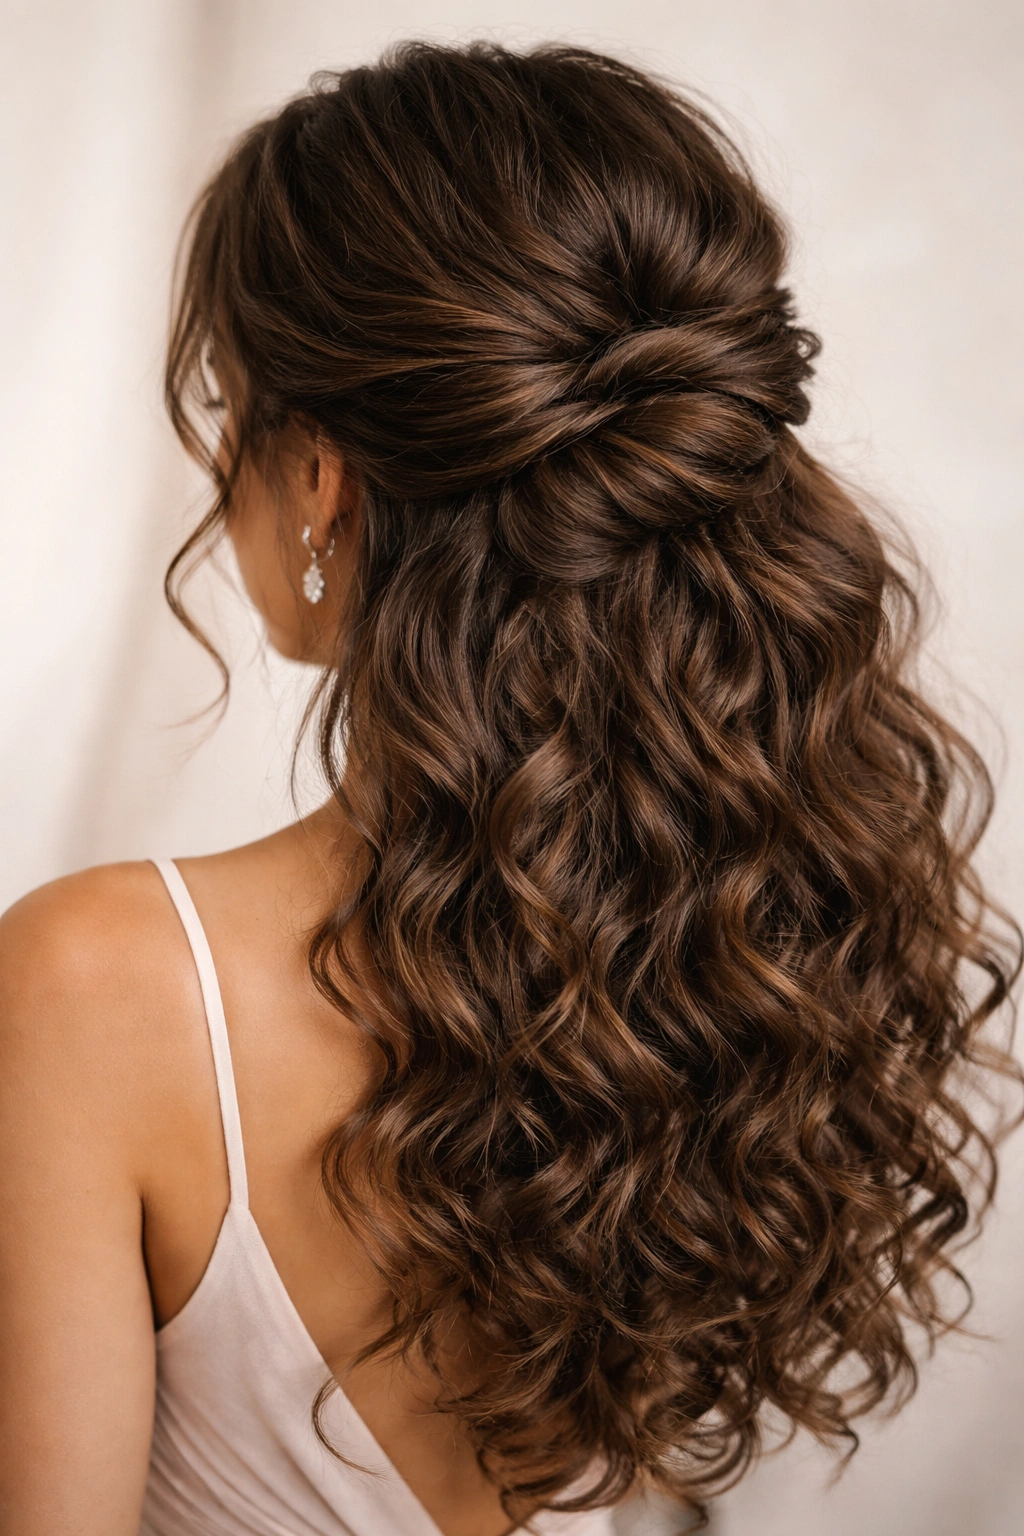
This style takes a substantial section of hair from the top of your head, creates a loose knot with it, and secures it at the nape area of your neck or slightly above. On curly hair, the knot itself becomes a beautiful sculptural element filled with natural texture and dimension.
Why Knots Shine on Curly Hair
A knot made with curly hair looks inherently more interesting and intricate than a knot made with straight hair. Your curls create natural texture within the knot itself, so even if it’s intentionally loose and romantic, it still reads as intentional and polished rather than messy.
Creating the Knot
Flip your head upside down and gather a generous section of hair from the crown and upper back area. Flip back upright and hold this section loosely in one hand. With your other hand, wrap the gathered hair around itself to create a loose knot, then tuck the end of the gathered section underneath the knot. Secure it in place with bobby pins inserted horizontally into the knot itself so they’re completely hidden by your curls. The knot should look full and three-dimensional, not tight and controlled.
Perfecting the Texture
- Leave curls loose around the knot: The most beautiful version of this style has individual curls falling freely around and below the knot. Don’t try to contain everything into the knot itself.
- Use bobby pins horizontally: Horizontal pins grip curly hair more securely than vertical pins do, especially when the hair is three-dimensional and voluminous.
- Adjust the knot position based on your face shape: A knot positioned slightly higher (at the back of the crown) elongates round faces, while a knot positioned lower (at the nape) works beautifully for longer face shapes.
- Add fragrance or flower petals inside: Since this knot is visible, you can tuck tiny flowers, baby’s breath, or a delicate brooch into the knot for extra bridal elegance.
5. The Half-Up Bubble Ponytail
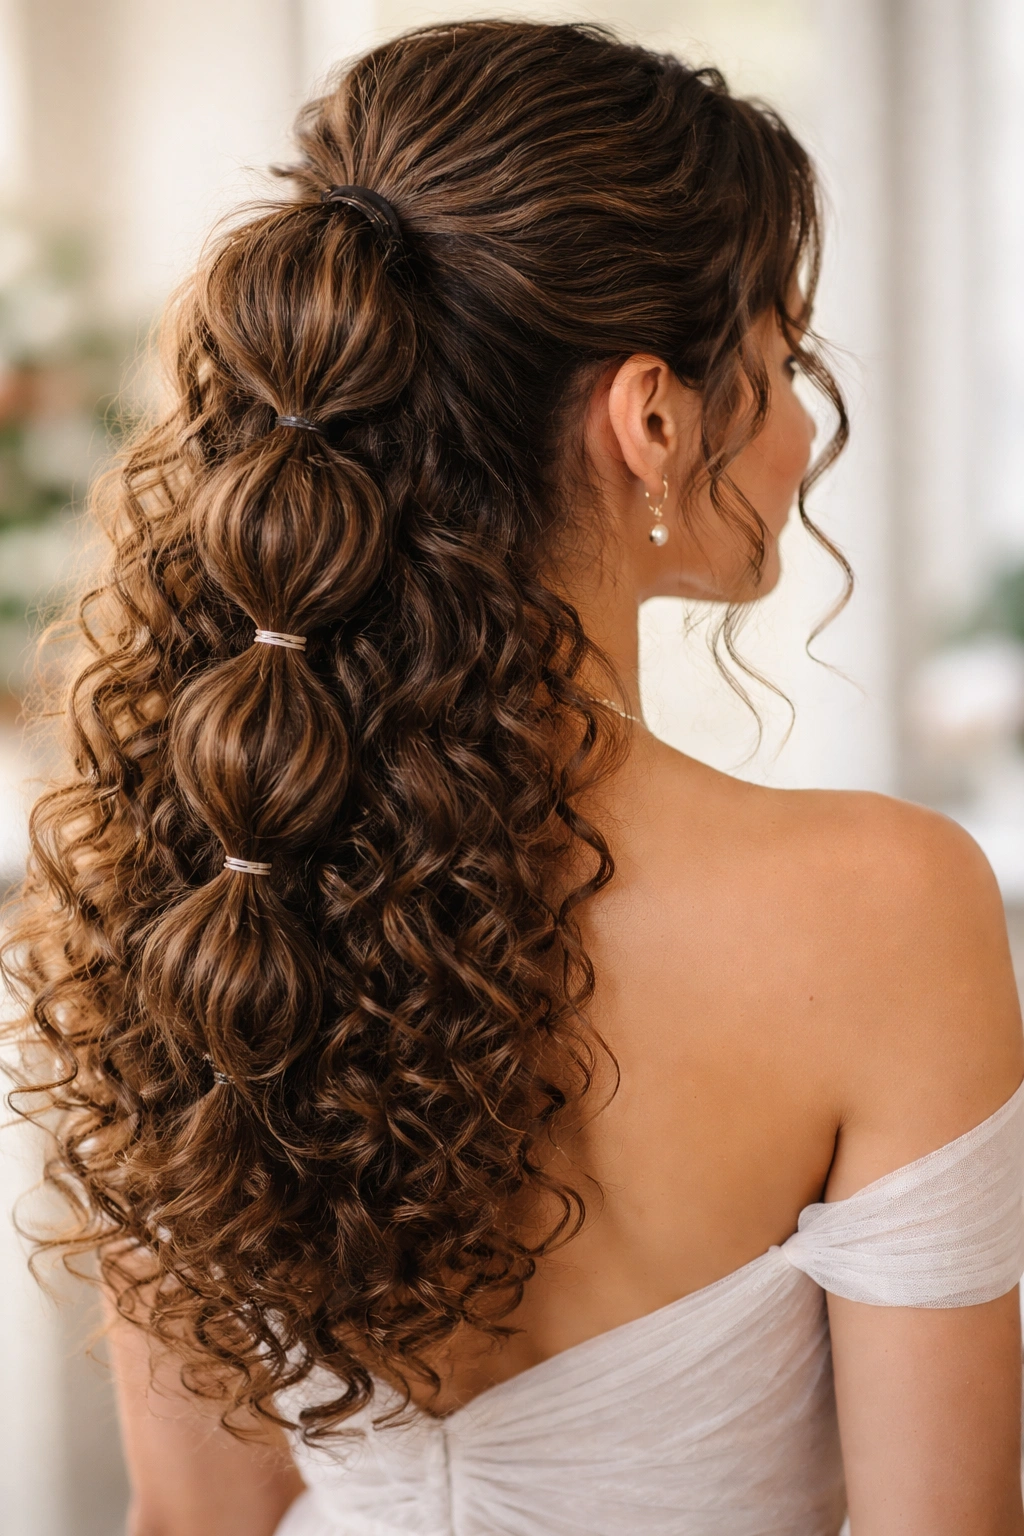
A bubble ponytail is a modern style where you create a half-up section, secure it with an elastic, then add additional elastics every few inches down the length, scrunching the hair between each elastic to create distinct “bubbles” of volume. It’s playful, contemporary, and creates striking visual interest on curly hair.
Why This Works on Curls
The bubble effect on curly hair looks like a series of voluminous clouds rather than tight geometric sections. The natural texture and fluff of your curls automatically create dimension between the bubbles, making the style look fuller and more visually interesting than it would on straight hair.
Step-by-Step Bubble Creation
Gather a half-up section of hair from the crown and secure it with a clear elastic. About 2 inches below that elastic, add a second elastic around the same section of hair, then gently pull the hair above that elastic out and upward, creating a “bubble” of fluff above the second elastic. Repeat this process 2-3 more times down the length of the ponytail, creating bubbles of increasing size as you move down. Each bubble should be intentionally voluminous — use your fingers to fluff and shape them rather than trying to keep them contained.
Making Bubbles Last
- Use clear elastics for a polished look: Clear elastics are less visible in curly hair and let the texture shine through. Use high-quality elastics that won’t leave creases.
- Tease gently before adding elastics: A tiny bit of teasing at each elastic point gives the curls extra grip and helps the bubbles hold their shape longer.
- Don’t pull too tight: Tight bubbles look harsh and unforgiving on curly hair. Your bubbles should look soft and organic, not geometric and controlled.
- Flip your head and mist with hairspray: After creating the bubbles, flip your head upside down and lightly mist the entire style with flexible-hold hairspray to help everything stay voluminous and bouncy.
6. The Goddess Half-Up with Delicate Braids
This ethereal style combines delicate mini braids with a romantic, loose half-up gathering. You create 2-3 thin, loose braids from the sides of your head, integrate them into a soft half-up section, and secure everything with a decorative clip or comb.
Why It’s Bride-Worthy
This style feels elegant and romantic without being overly formal or restrictive. The delicate braids add detail and intentionality, while the loose half-up aspect keeps things soft and romantic — perfect for a bridesmaid who wants to feel special but not completely transformed.
Braiding Technique for Curls
Create loose, three-strand braids from just above your ear toward the back of your head. On curly hair, loose is the operative word — your braids should be visibly textured with curls peeking through the strands rather than looking neat and tight. When both braids reach the back of your head, gather them along with a substantial section of loose curls from your crown, bundle everything together, and secure with a decorative comb or clip.
Balancing Braids and Volume
- Make 2-3 thin braids, not thick ones: Thin braids have more delicate, feminine proportions and showcase your curl texture better than thick braids do.
- Braid loosely on purpose: Pull gently on the edges of each completed braid to make it slightly wider and looser. This helps your curls show through and creates that effortless, romantic feel.
- Integrate braids into the larger gathering: The braids shouldn’t sit separately from the rest of your hair — weave them into the overall half-up section so they feel like part of one cohesive style.
- Choose a decorative clip that complements the theme: Pearls, delicate metals, or floral combs all work beautifully and turn this style into something wedding-day special.
7. The Side-Swept Half-Up with Cascading Curls
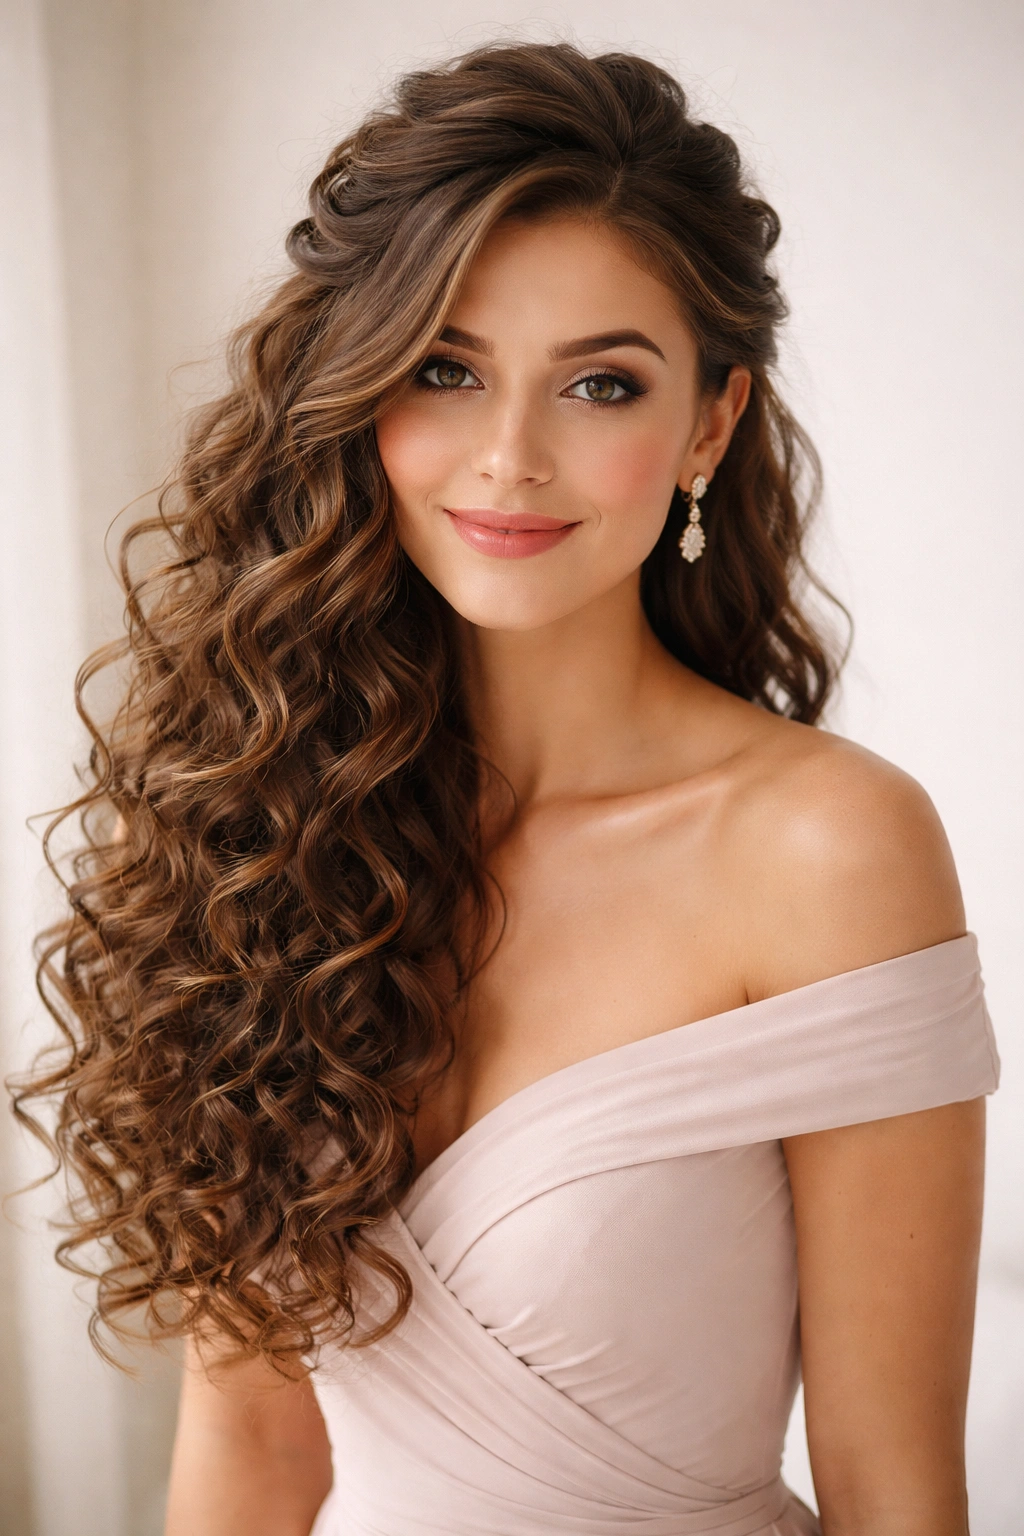
This style sweeps most of your hair to one side while securing a portion on top, creating an asymmetrical, romantic silhouette. Your curls cascade over one shoulder, creating a beautiful frame for the opposite side of your face.
Why Asymmetry Flatters Curly Hair
Side-swept styles actually show off curly hair better than centered styles do because they create visual balance and frame the face in a way that’s both romantic and flattering. The cascading curls on one side become a focal point, and the secured portion on top creates intentional styling without flattening your texture.
Creating the Side Sweep
Take about one-third of your hair from the crown area and sweep it back and slightly to the opposite side, creating a low half-up ponytail slightly off-center at the back of your head. Secure it with bobby pins (not a visible elastic — you want the hair to flow seamlessly from the secured section into the cascading curls). Leave the remaining hair loose, allowing it to cascade over one shoulder in a beautiful wave of curls. The key is that your curls should look naturally voluminous and flowing, not styled into waves.
Styling the Cascade
- Choose which side to sweep based on your face shape: Sweeping toward your best side flatters your features. If you have a wider face, sweeping away from it is usually most flattering.
- Secure with bobby pins rather than an elastic: This creates a seamless transition from the secured section to the cascading curls and looks more intentional and polished.
- Encourage the cascading curls to fall over your shoulder: Use your fingers to arrange the cascading curls so they drape beautifully over one shoulder rather than hanging straight down your back.
- Add volume to the secured section: Gently tease the gathered hair before securing it to add extra dimension and prevent it from looking flat against your head.
8. The Twisted Half-Up with Hidden Bobby Pins

This sleek, modern style involves twisting a section of hair from one side of your head around to the back, hidden under a layer of loose curls so the bobby pins and securing mechanism completely disappear. The result is a half-up style that looks like it’s held up by magic.
The Appeal for Textured Hair
The beauty of this style on curly hair is that your natural texture provides perfect camouflage for the bobby pins and mechanics of the style. What might look slightly messy or visible on straight hair becomes completely hidden within the volume and texture of your curls.
Creating the Hidden Twist
Start with curls that have been refreshed and are holding their shape well. Take a 3-inch section from just above your right ear and begin twisting it firmly as you move toward the back of your head, following the natural contour of your skull. As you twist, make sure you’re twisting underneath — the twist should curve under rather than sitting on top of your head. When the twist reaches the center back of your head, pin it into place with multiple bobby pins, tucking the end neatly underneath. The twist should sit hidden beneath a layer of loose curls so you can’t see any pins or mechanics when someone looks at your head from behind.
Ensuring It Stays Put
- Twist firmly but not painfully: The twist needs to have tension to hold throughout the day, but not so much tension that it pulls on your scalp or breaks your curls.
- Use multiple bobby pins in an X pattern: Cross two or three bobby pins over each other where the twist ends so they work as one secure unit rather than individual pins that can shift.
- Leave plenty of curls on top of the twist: The twist should be completely covered and hidden by loose curls. If you can see the twist, you need more loose curls on top.
- This style benefits from lightweight hairspray: Use a light mist of flexible-hold spray to help keep everything in place without weighing down your curls.
9. The Romantic Braided Crown Half-Up
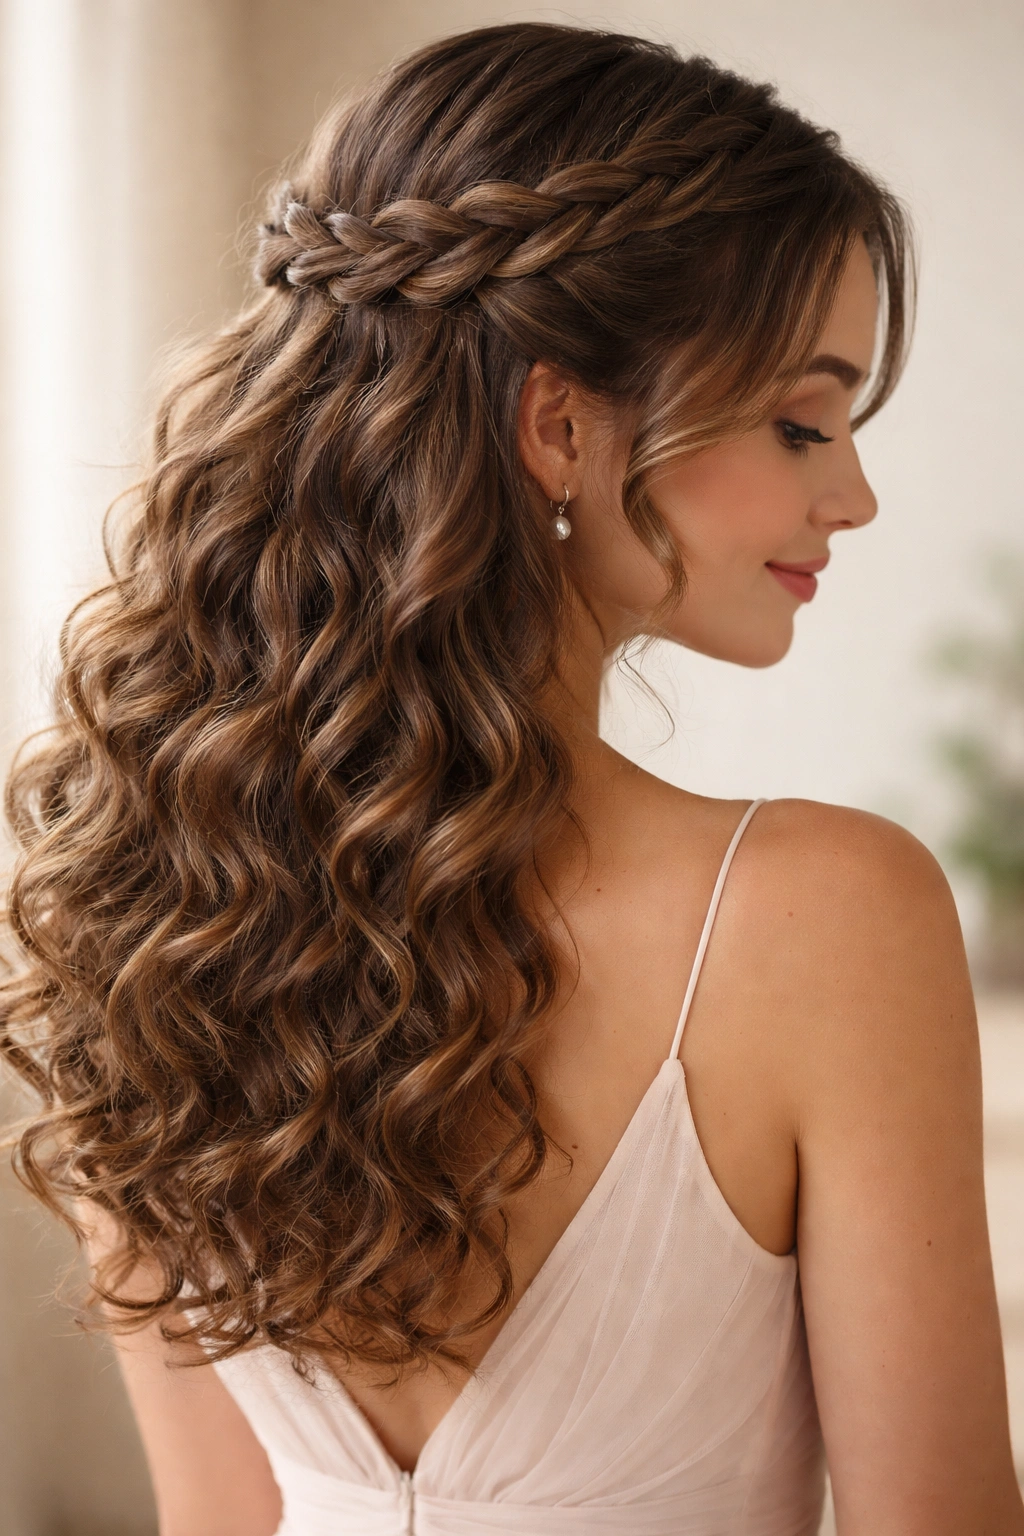
This style creates a gorgeous focal point by running one or two loose braids across the crown of your head like a tiara, then securing them at the back into a soft half-up gathering. It’s inherently romantic and bridal without looking overly formal or restrictive.
Why Braided Crowns Suit Curly Hair
The braids create a beautiful contrast with the loose, flowing curls below, and the crown placement draws attention upward to your face and hair texture. On curly hair, loose braids actually look more romantic and intentional than tight, neat braids would.
Creating the Braided Crown
Take a section of hair from one temple and create a loose, three-strand braid that moves across the crown toward the opposite side of your head. You can create a second braid if your hair is thick enough, positioned slightly below the first. When your braid (or braids) reach the opposite side of your head, allow the remaining hair to fall freely, or gather it loosely at the back into a soft half-up section. Secure the braids with bobby pins hidden under your curls.
Making Braids Look Intentional
- Pull gently on completed braids to widen them: After you finish each braid, gently pull on both edges of the braid to make it slightly wider and looser. This showcases your curl texture beautifully.
- Incorporate curls into the braids as you go: Grab individual curls as you braid so that strands of curly hair weave through the braid itself rather than sitting in neat separated strands.
- Vary braid thickness for visual interest: If you’re doing two braids, make one thicker and one thinner, or position them at different heights on your crown for a more organic, less symmetrical look.
- Skip a perfectly neat crown: The most beautiful version of this style feels slightly undone and romantic, not precisely symmetrical. Allow some curls to escape the braids.
10. The Soft Half-Up with a Delicate Headpiece
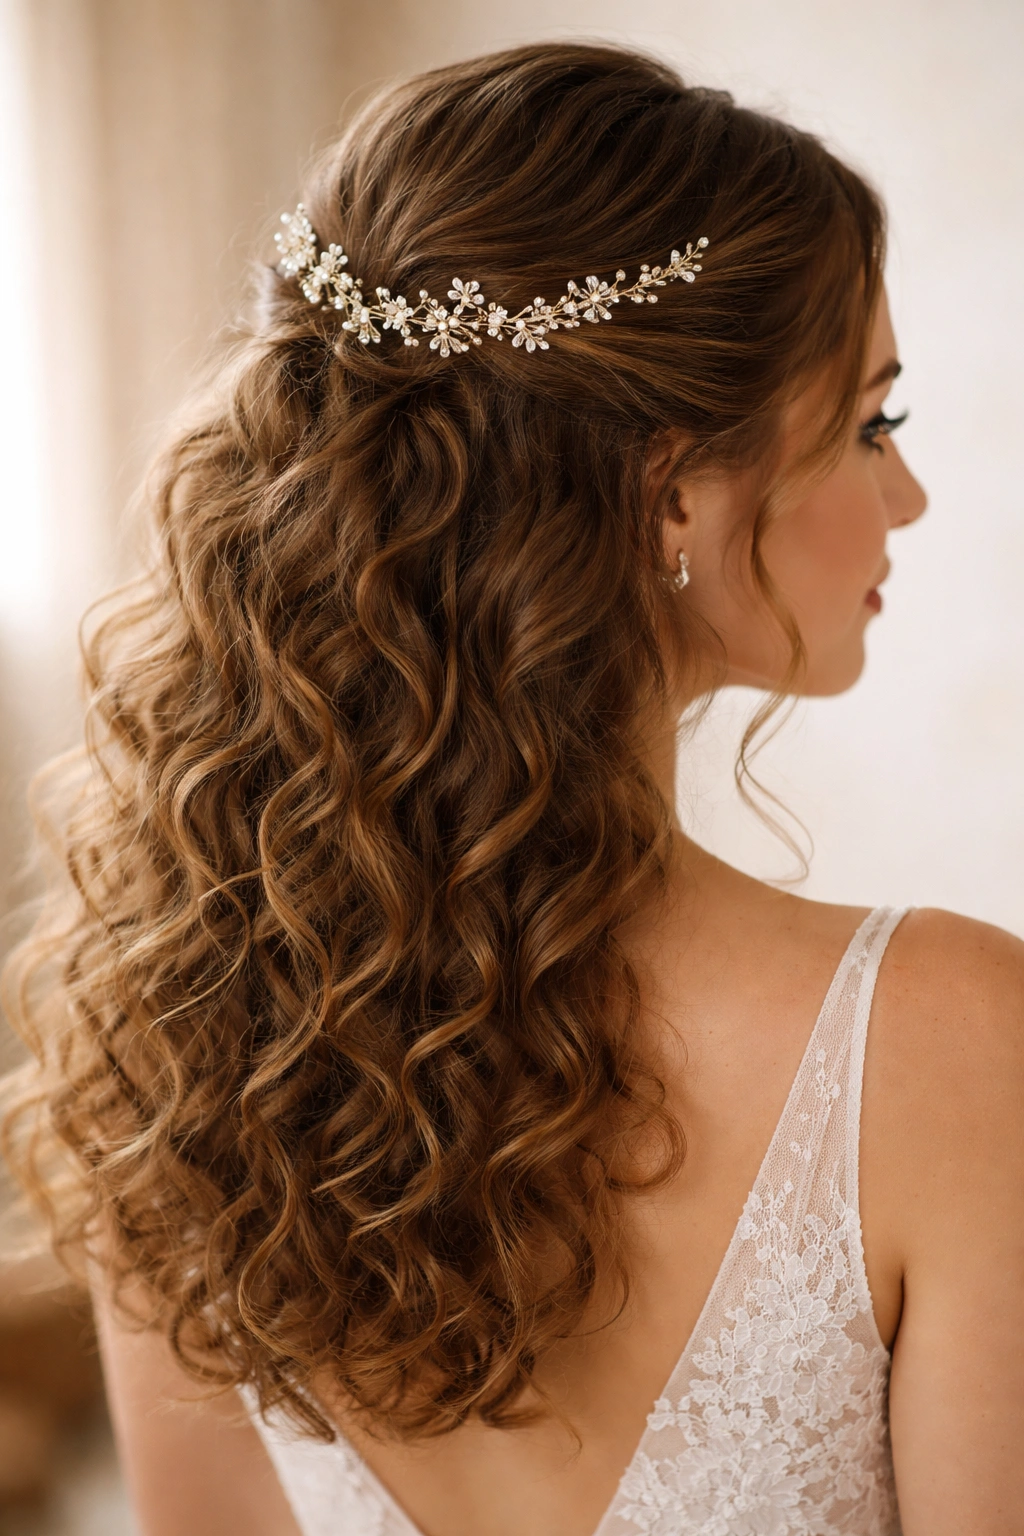
This style is more about what you add than the hairstyling itself — you create a simple, loose half-up section, then elevate it with a delicate headpiece like a tiara, pearl comb, or beaded hair vine. The headpiece becomes the focal point, and your curls provide the perfect textured base.
Why This Works for Weddings
When you’re a bridesmaid, sometimes simplicity is the most elegant choice. This style lets your natural curls shine while a beautiful headpiece adds the bridal element. It’s particularly flattering if you have gorgeous, well-defined curls that deserve to be the star of the show.
Creating the Base Half-Up
Gather a generous section of hair from the crown area and pull it back loosely, securing it with bobby pins hidden beneath the gathered hair. You want the gathered section to feel soft and voluminous, not tight and controlled. The actual mechanics of the half-up should be virtually invisible — all anyone should see is beautiful curls and a stunning headpiece.
Styling with a Headpiece
- Choose a headpiece that complements your curl pattern: Delicate pieces work best on curly hair because they won’t compete with your texture.
- Position the headpiece slightly back on your crown: Rather than wearing it right at the front like a tiara, position it slightly back so it sits among your curls and feels like an integrated part of your hairstyle.
- Ensure the secured section is completely invisible: If you can see bobby pins or the elastic holding up your half-up section, it detracts from the headpiece. Spend time making sure everything is hidden.
- Use bobby pins to secure the headpiece: Don’t rely solely on the headpiece’s combs or clips. Add bobby pins to ensure it stays perfectly in place through a long day of celebration.
11. The Half-Up Dutch Braid
A Dutch braid (an inverted French braid where you braid under rather than over) creates a beautiful, textured effect that works gorgeously with curly hair. Take a Dutch braid from one side of your head toward the back, integrate it into a half-up section, and secure with a decorative element.
Why Dutch Braids Enhance Curls
Dutch braids have more pronounced texture and dimension than regular braids because the strands sit slightly raised and separated. On curly hair, this creates a stunning effect where your braid and your curls create complementary texture and visual interest.
Dutch Braiding Technique
Start a Dutch braid just above one temple by dividing a section of hair into three strands. Begin by crossing the left strand under the center strand (rather than over it, which is what you do in a regular braid). Then cross the right strand under the center. Continue this under-braiding pattern as you move toward the back of your head. As you braid, gently pull on the edges of the completed braid to widen it and create a more textured appearance that works beautifully with curly hair.
Finishing the Dutch Braid Half-Up
- Make the braid loose and textured: Dutch braids on curly hair should look intentionally loose and organic. After completing your braid, gently pull on it to widen the strands and showcase your curl texture.
- Integrate the braid into a larger half-up section: Don’t let the braid sit as a separate element. Gather it along with additional curls at the back of your head so the braid feels like part of one cohesive style.
- Balance the braid with loose curls on the opposite side: Leave the side of your head opposite the braid completely loose, so loose curls balance the structured braid on the other side.
- Secure with a decorative clip: A beautiful clip at the base of the Dutch braid becomes part of the overall design rather than just a functional element.
12. The Half-Up with Curled Face-Framing Pieces
This softer style pulls back the top portion of your hair into a gentle half-up, but instead of tucking all your face-framing curls away, you leave strategically placed curls loose around your face. On curly hair, these face-framing pieces become absolutely stunning because they showcase your curl pattern and create a soft, romantic frame.
Why Face-Framing Pieces Matter on Curly Hair
Curly hair naturally has more volume and movement than straight hair, which means face-framing pieces look more substantial and impactful. Instead of small wispy pieces, you’re working with actual curls that frame your face beautifully and add dimension to your overall look.
Creating the Style with Face-Framing Pieces
Gather a section of hair from the crown area and pull it back loosely, securing it low with bobby pins hidden beneath the gathered hair. Before you finish, pull out two or three curls from just above your ears and leave them hanging freely around your face. These should be substantial, beautiful curls — not tiny wisps. You can gently encourage them to curl around your face by running your fingers through them or by lightly spraying them with hairspray to enhance their curl pattern.
Making Face-Framing Pieces Look Intentional
- Pull curls out strategically: Rather than randomly pulling out curls, specifically choose ones from just above your ears that frame your face nicely.
- Keep curls near your face bouncy: These face-framing pieces should have spring and movement. Don’t flatten them or slick them down — let them bounce and move naturally.
- Balance both sides: Pull out face-framing curls on both sides of your face so the style looks intentional and balanced, not like half your curls randomly escaped.
- Refresh curls before the event: Spray face-framing pieces lightly with a curl refresher spray the morning of the event to enhance their curl pattern and ensure they look their absolute best.
13. The Wrapped Half-Up with a Decorative Hair Stick
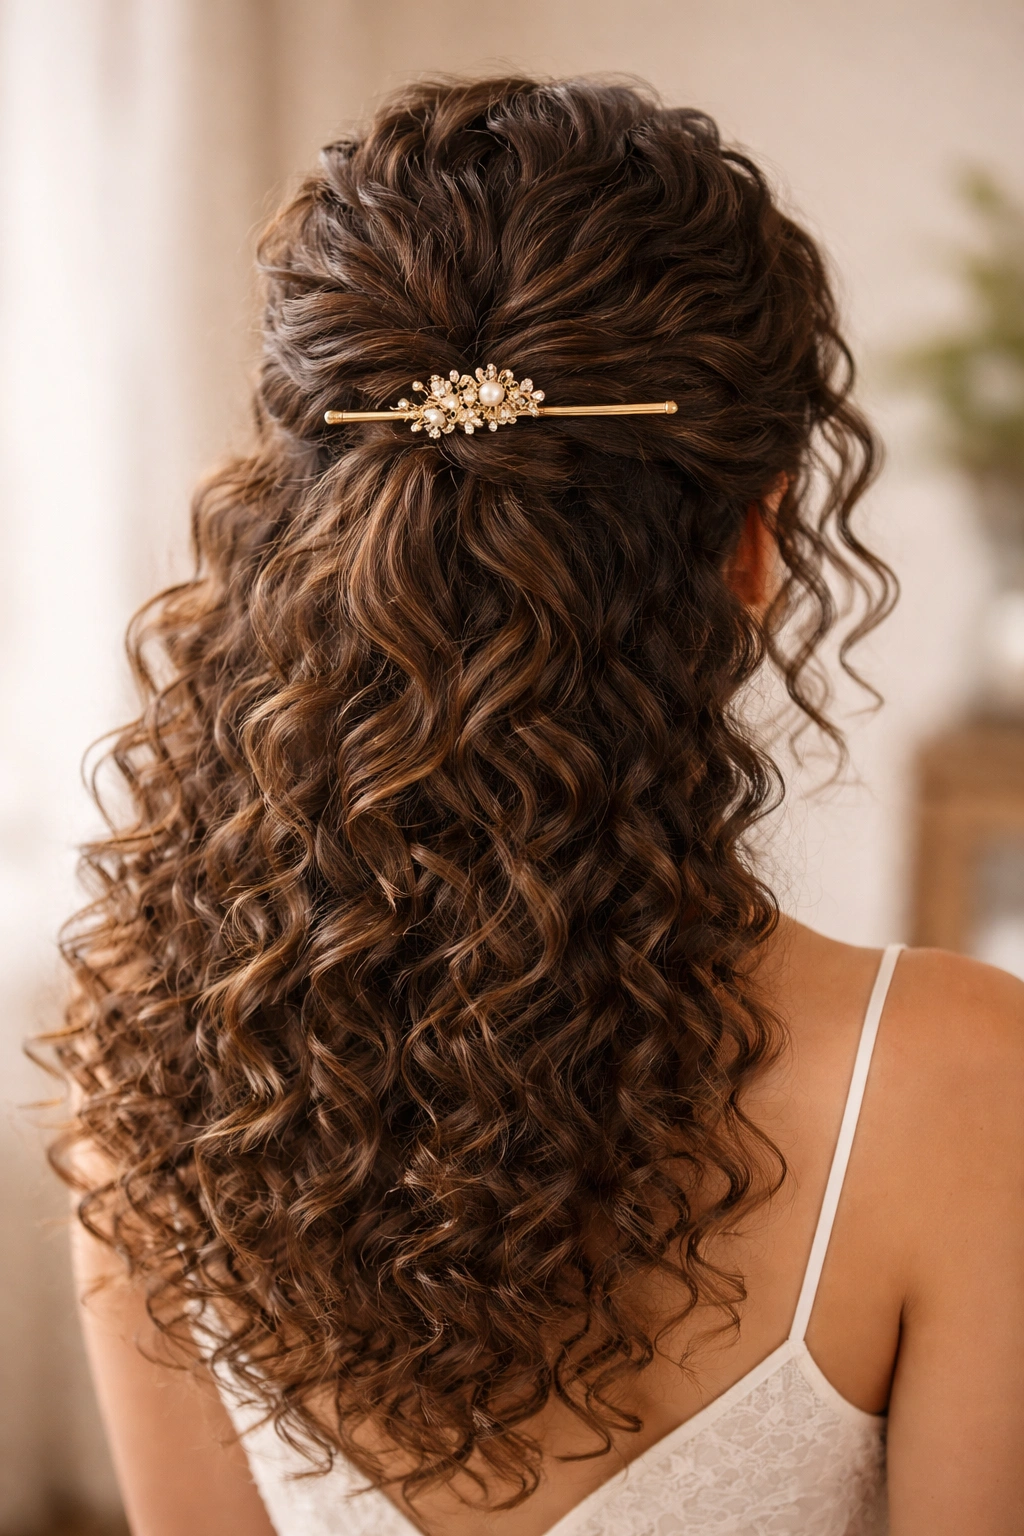
This modern, sophisticated style gathers a half-up section and secures it with a decorative hair stick or wooden pin rather than an elastic or bobby pins. The hair stick becomes a beautiful focal point, and your curls provide gorgeous texture around it.
Why Hair Sticks Work on Curly Hair
Hair sticks grip textured hair beautifully without needing to be inserted all the way through like they do with straight hair. Your curls provide the perfect anchoring texture, and a beautiful decorative stick becomes an intentional accessory rather than a hidden functional element.
Securing with a Hair Stick
Gather a half-up section of hair at the back of your head and hold it loosely in one hand. With your other hand, wrap the gathered hair around the hair stick, creating a simple wrapped knot. The hair stick should sit horizontally or at a slight angle, with the ends visible. You can wrap the hair around the stick multiple times for extra security, or simply wrap it once and tuck the end neatly underneath. The wrapped curls should look full and three-dimensional, with individual curls visible rather than smoothed out.
Styling with a Hair Stick
- Choose a hair stick that complements your wedding theme: Wooden sticks, pearl sticks, or decorative metal sticks all have different vibes. Choose one that matches the formality and style of the wedding.
- Don’t smooth the hair: The beauty of this style is how your curls wrap around the stick and frame it. Keep everything loose and textured.
- Position the stick at a flattering angle: A stick positioned straight across your head looks very geometric. A slightly angled stick looks more romantic and organic.
- Ensure curls frame the stick: The most beautiful version of this style has curls visibly wrapped around and framing the stick, not hidden or contained underneath it.
14. The Half-Up with Spiral Curls and Pearl Pins
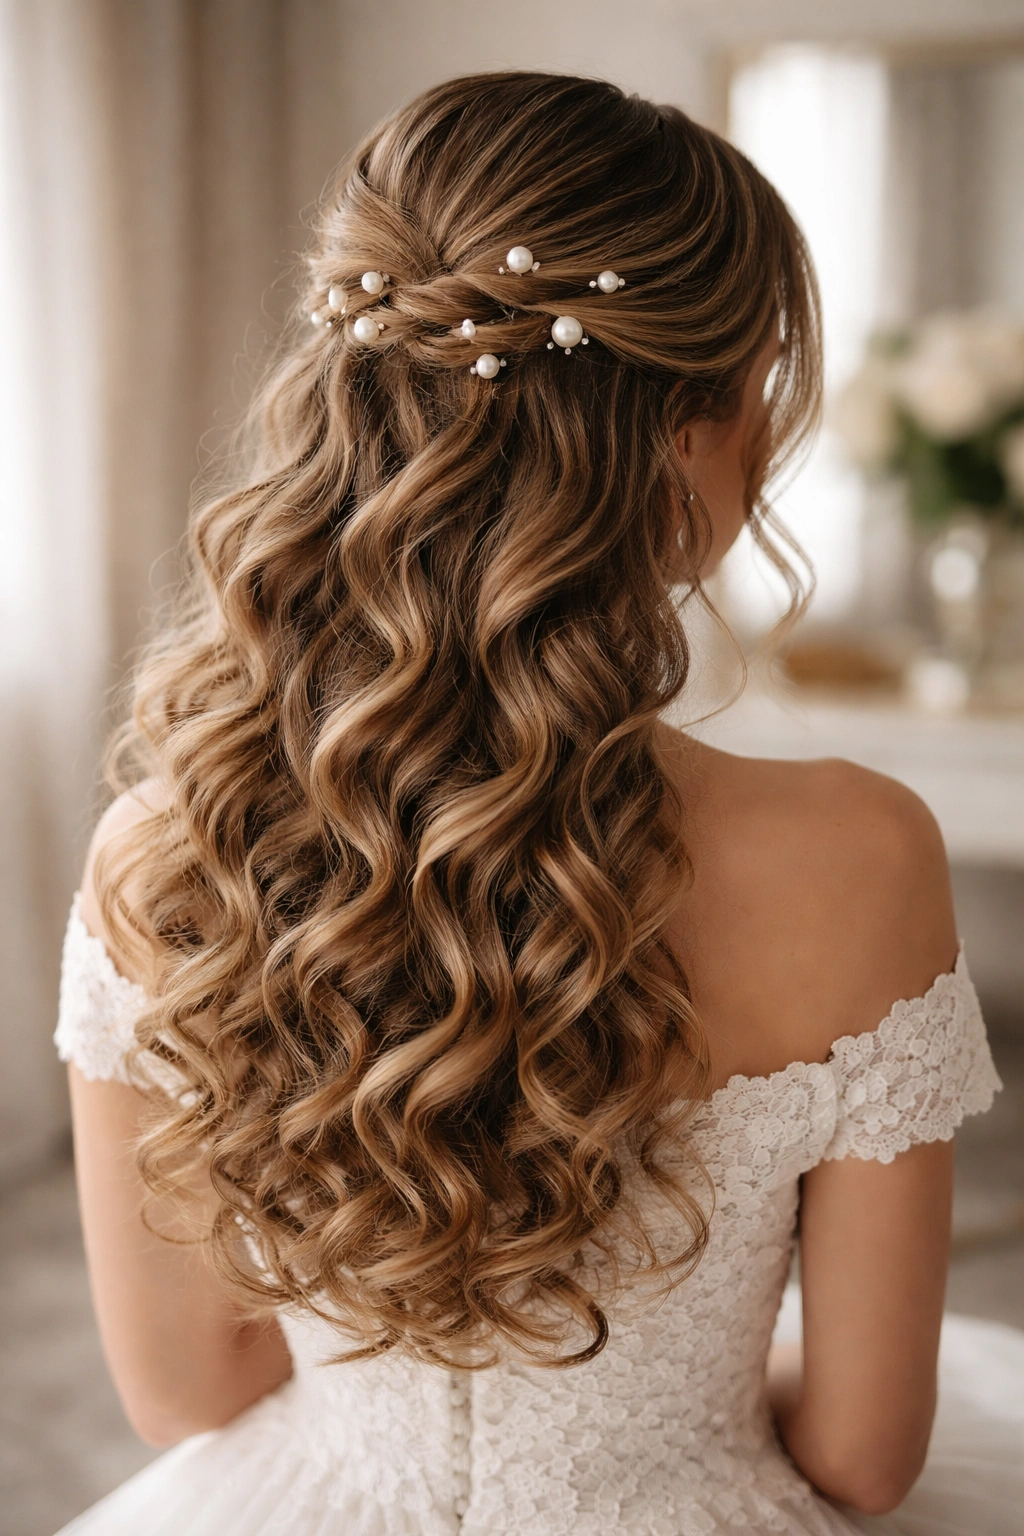
This romantic style gathers a half-up section and secures it with delicate pearl bobby pins that become visible and intentional design elements. Rather than hiding your bobby pins, you embrace them as part of the styling.
Why Visible Pins Look Good on Curls
On straight, smooth hair, visible bobby pins might look messy or unintentional. On curly hair, they look like intentional accessories. The texture and volume of your curls make pins look like they’re meant to be part of the design rather than accidentally showing.
Creating Spiral Curls
If your curls aren’t naturally spiral-shaped, you can enhance or create spirals by using a curling iron or wand to shape some of your curls into perfect spirals before you style. Start with a small section of hair, wrap it around the barrel of the curling iron, hold for a few seconds, then slide the iron out without unraveling the curl. You’ll be left with a beautiful spiral curl. Do this selectively on the curls you’ll be securing in your half-up so they look especially defined and intentional.
Securing with Decorative Pins
- Use pearl or gold bobby pins that match your wedding aesthetic: Visible pins should be beautiful enough to look intentional. Choose pins that coordinate with jewelry or the overall theme.
- Arrange pins in a pattern or cluster: Rather than randomly placing visible pins, arrange them in a small cluster or a subtle pattern so it looks like a design choice rather than an accident.
- Secure curls firmly enough to last the day: While the pins are decorative, they still need to work functionally. Use multiple pins and make sure everything is secure.
- Refresh spiral curls throughout the day: Spiral curls can relax over time. Keep a styling spray handy to refresh them if needed, spraying lightly and gently scrunching to reactivate the curl shape.
15. The Romantic Half-Up with Ribbon or Silk Ties
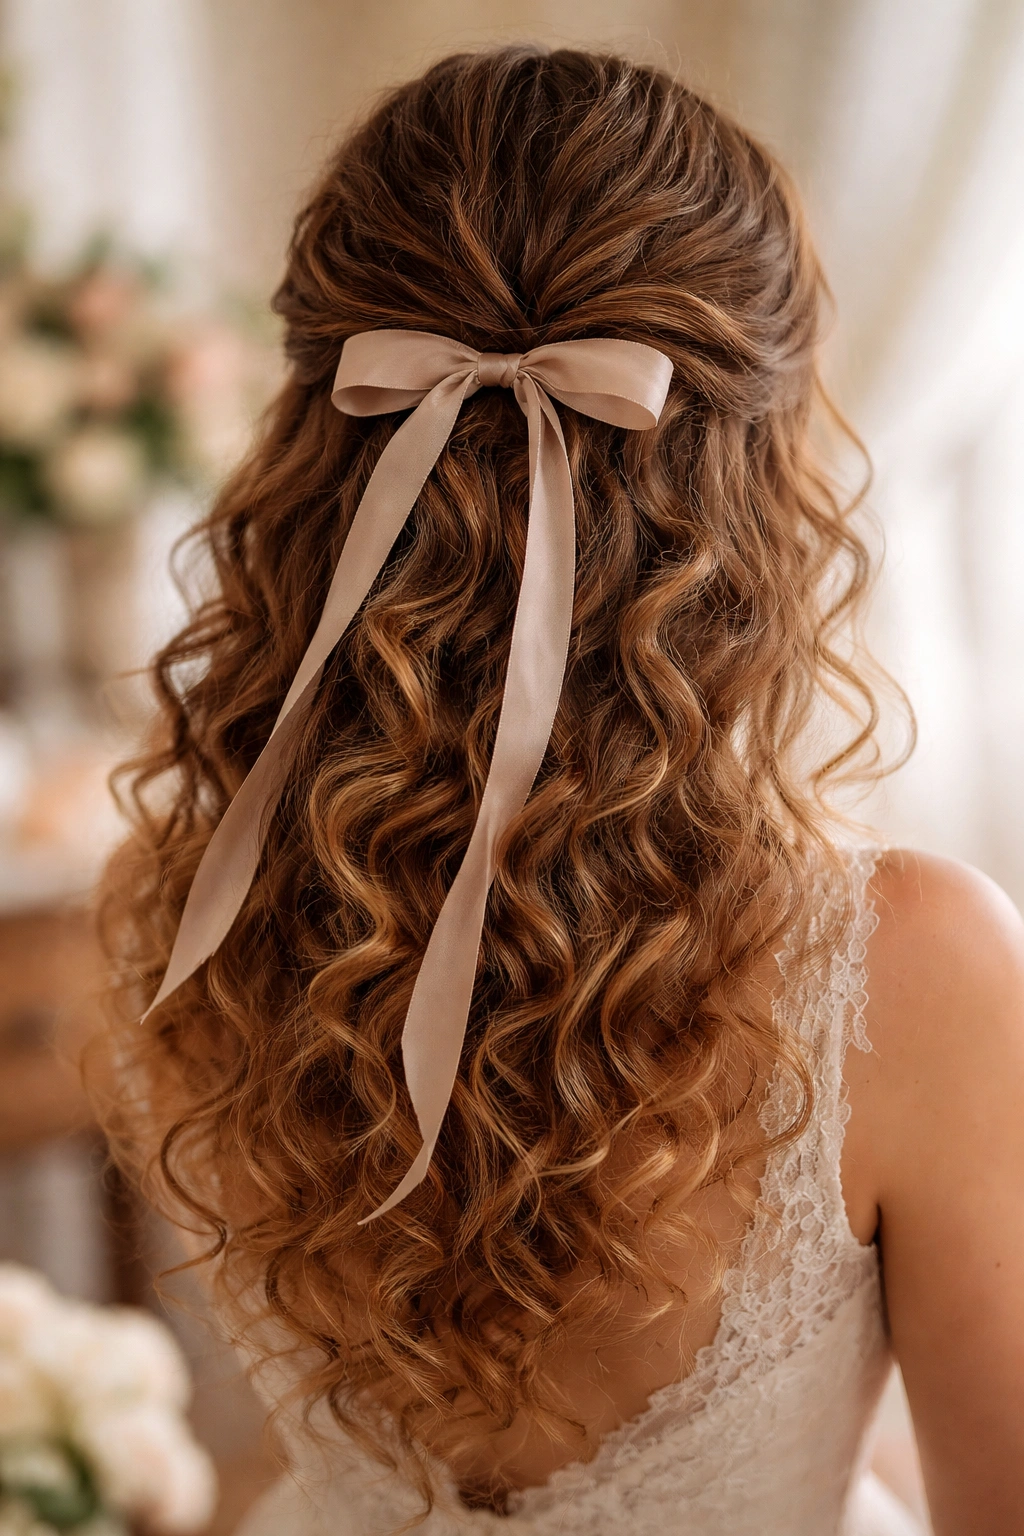
This final style gathers a soft half-up section and secures it with a delicate ribbon, silk hair tie, or thin scarf instead of a typical elastic. The soft material becomes part of the design and adds an extra touch of romance and elegance.
Why Ribbons Complement Curly Hair
Ribbons soften the visual of a secured ponytail and add an intentional, bridal element. On curly hair, a ribbon weaving through or wrapping around a half-up section looks far more romantic and intentional than a standard elastic does.
Securing with Ribbon or Silk
Gather a half-up section of hair at the back of your head and secure it loosely with bobby pins or a soft elastic. Then wrap a ribbon around the base of the gathered section, tying it in a bow or a simple knot. The ribbon should cover the securing mechanism and become the visual focal point. You can use the ribbon ends to create a bow that hangs down into your cascading curls, or tie them and tuck them neatly underneath the gathered section.
Making Ribbons Look Bride-Worthy
- Choose ribbons in colors or materials that coordinate with the wedding: Delicate satin, soft silk, or even tulle ribbons work beautifully. Match them to the bridesmaids’ dresses or the wedding’s color palette.
- Consider multi-ribbon combinations: Layer two or three thin ribbons in coordinating colors for a more textured, interesting look.
- Ensure the ribbon covers the securing mechanism: The ribbon should completely hide whatever you used to secure the half-up (elastic or bobby pins). If you can see the securing mechanism, adjust the ribbon.
- Don’t overtighten anything: Because you’re using a soft, decorative securing method, make sure the hair isn’t pulled too tightly. The style should feel comfortable and look soft and romantic.
Essential Preparation Tips for Styling Curly Hair Half-Ups
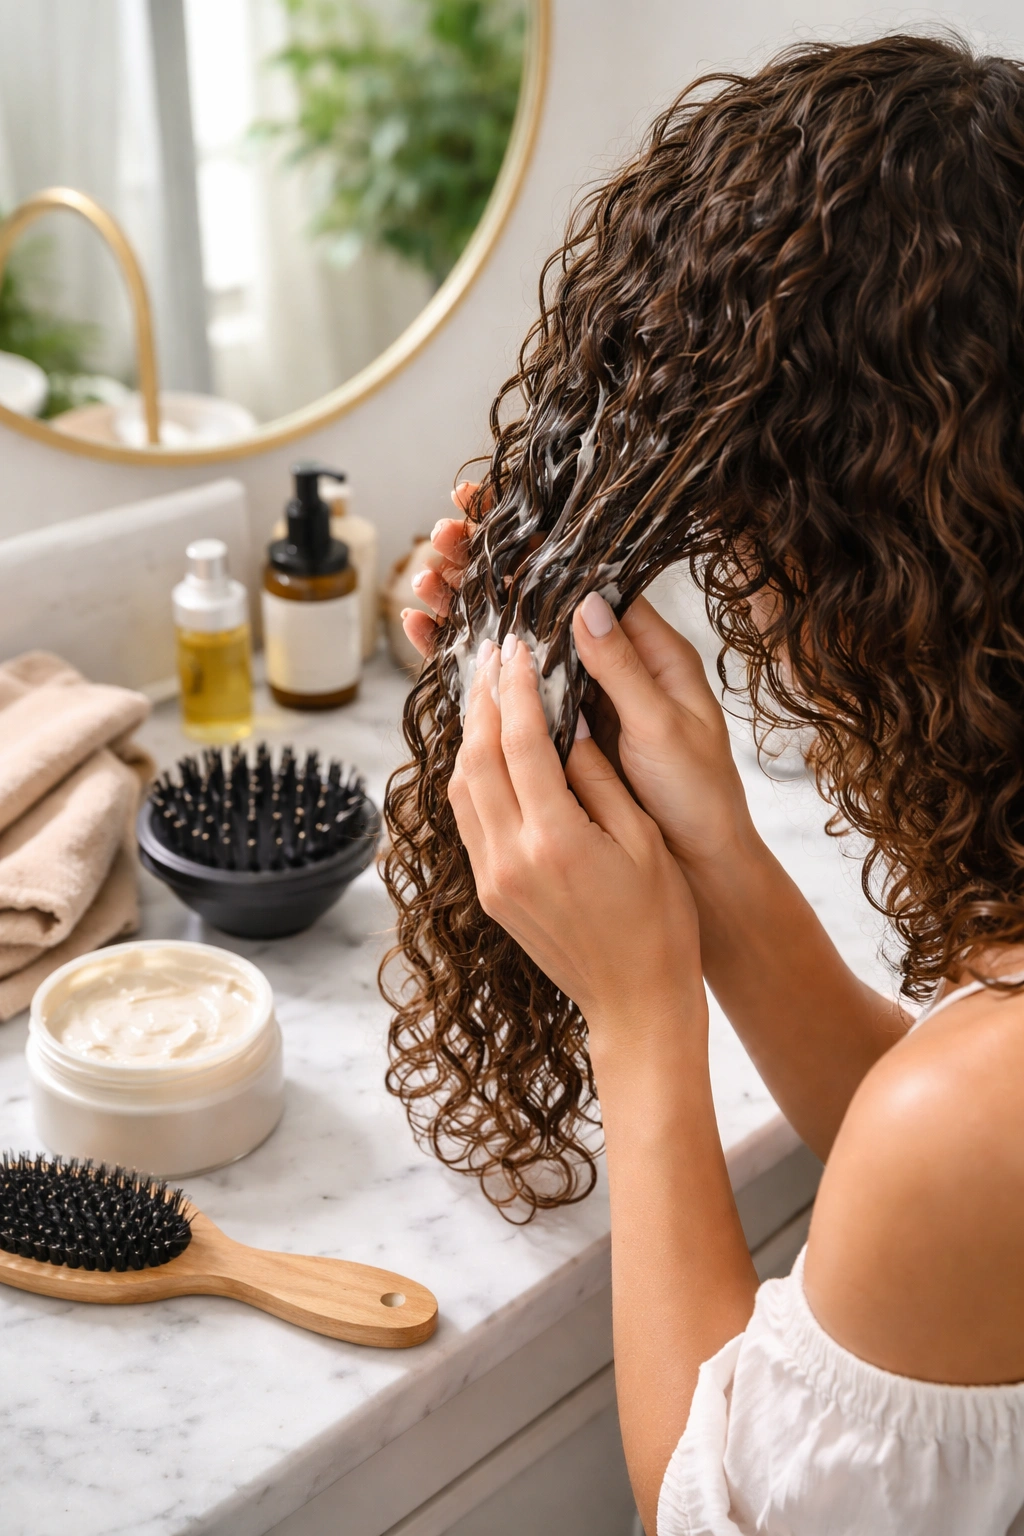
The success of any half-up style on curly hair depends heavily on how well you prepare your curls before you start styling. Starting with the right foundation — curls that are hydrated, defined, and set — makes every single style easier to create and helps everything last longer throughout the wedding day.
Begin with thoroughly moisturized curls. Dry, thirsty curls are more prone to frizz, breakage, and losing their shape as the day progresses. The night before the wedding, do a deep conditioning treatment, making sure your curls are genuinely saturated with moisture. On the day of the event, apply a leave-in conditioner to damp hair before you apply any styling products, and don’t skip this step even if you’re in a hurry — it makes an enormous difference in how your curls behave and how long they hold their shape.
Use a curl-defining cream or gel on soaking-wet hair and allow your curls to dry completely before you start any styling. Whether you air dry, blow dry with a diffuser, or use a combination method, your curls need to be completely set and dry. Styling half-ups on damp or partially dry curls almost always leads to curls falling out or losing their definition as the remaining moisture evaporates throughout the day.
Choosing the Right Products and Tools for Curly Hair Half-Ups
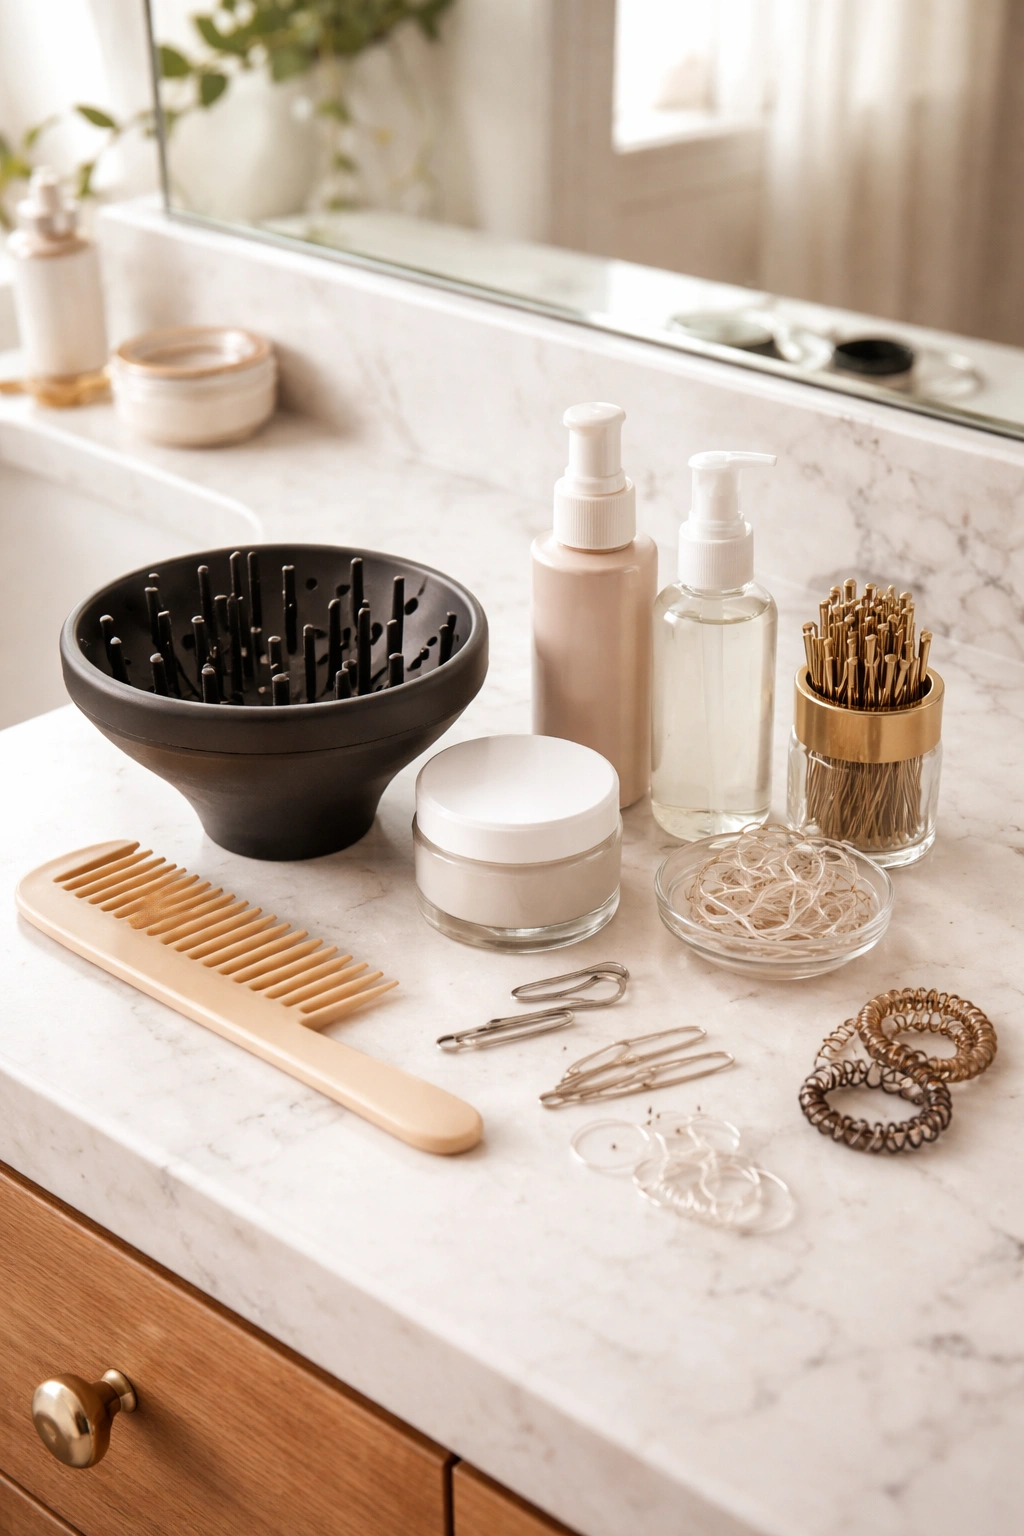
The products and tools you use directly impact how easy it is to create your half-up style and how long it lasts once it’s in place. Having the right tools in your styling kit prevents unnecessary hair breakage and makes the styling process faster and more enjoyable.
Invest in a good quality diffuser attachment for your blow dryer — this disperses air more gently and helps dry your curls without disrupting their natural pattern. If you don’t have a diffuser, you can air dry instead, though this takes significantly longer. Wide-tooth combs or fingers work better than regular brushes for detangling curly hair without causing damage or frizz.
For securing styles, use high-quality bobby pins that match your hair color and won’t slip easily. Curly hair is typically heavier and thicker than straight hair, so regular flimsy bobby pins often aren’t strong enough. Look for bobby pins with ridged surfaces or those specifically designed for thick or textured hair. Similarly, invest in quality hair elastics that won’t create creases or cause breakage. Clear elastics, seamless elastics, and spiral elastics all work well for different styles — choose based on what’s going to be visible versus hidden.
For styling products, less is often more with curly hair. A good curl-defining cream, a lightweight gel, and a flexible-hold hairspray cover most styling needs. Avoid heavy products that weigh down curls or leave them feeling stiff and crunchy. Test any new products on a day that isn’t the wedding to make sure they work well with your specific curl pattern.
Making Half-Up Styles Last Through a Full Wedding Day
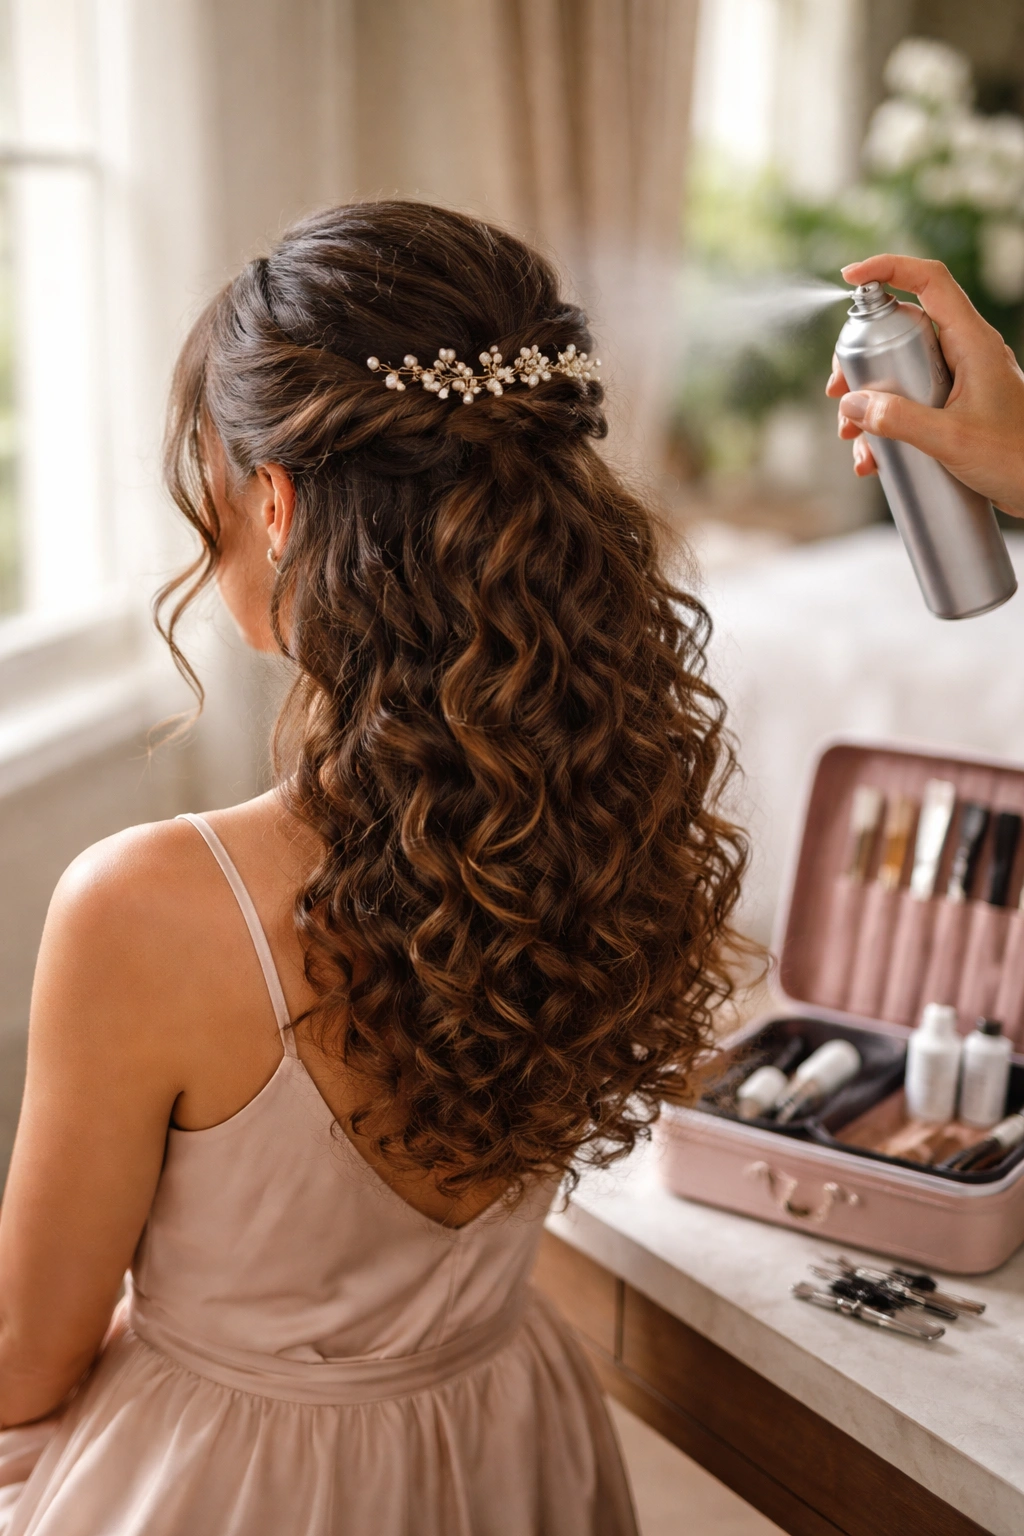
Once you’ve created your beautiful half-up style, you want it to look just as good at the reception as it did in the getting-ready photos. Several strategies help keep your style intact from the morning photos through the evening dancing.
First, use the right amount of hairspray — not too much, which will crisp up your curls, but enough to provide hold and protection. A flexible-hold or light-hold hairspray works better than a strong-hold spray for curly hair. Apply hairspray in light mists rather than drenching your hair, and focus on the secured portions of your style rather than spraying your entire head.
Bring a small styling kit with you to the reception, including bobby pins, a small brush or wide-tooth comb, and a travel-size hairspray. If you notice any sections coming loose or curls losing their definition, you can make quick adjustments without having to fix your entire style. This is particularly helpful after activities like photos, dancing, or eating.
Keep your hair away from moisture as much as possible. Rain, humidity, and sweat can all compromise your curls. If you know the weather will be humid, consider applying an anti-frizz serum before the event and touch it up as needed throughout the day. A small mirror and a hair tie can help you make quick fixes in the restroom if needed.
Adapting Half-Up Styles for Different Curl Patterns
Not all curly hair is created equal, and different curl patterns require slightly different approaches to styling. Understanding your specific curl pattern helps you choose and execute styles that will look their best.
For loose waves or type 2 curls, you can generally wear any of the styles above with great results. These curl patterns hold shape well and don’t require as much product or as many bobby pins as tighter curls. You might find that some styles with visible detail (like braids or twists) show up more beautifully on looser waves.
For medium curls or type 3 curls, focus on styles that showcase dimension and movement. Styles with face-framing pieces, cascading curls, or loose sections work beautifully because your curls have enough volume and bounce to look stunning. You’ll likely need more bobby pins than someone with loose waves to keep everything secure.
For tight coils or type 4 curls, choose styles that celebrate your curl pattern’s natural texture and volume. Styles with gathering points like the romantic curl cluster, the knot half-up, or styles with visible pins tend to look particularly beautiful on very tight curls. You might need to be slightly more conservative with the amount of hair you pull back in your half-up to prevent it from looking too tight or uncomfortable.
Regardless of your curl pattern, always test your chosen style at least once before the wedding day. This gives you practice creating it, helps you identify any adjustments you need to make, and ensures you feel confident and comfortable on the actual day.
Final Thoughts
A well-executed half-up half-down style celebrates curly hair rather than fighting against it. The goal isn’t to make your curls look sleek or controlled — it’s to showcase their natural beauty and movement while creating an intentional, polished look appropriate for a wedding celebration.
Choose a style that resonates with your personal aesthetic and complements the overall vibe of the wedding. Whether you prefer romantic and ethereal (braided crowns, twisted styles), modern and playful (bubble ponytails, visible pins), or classic and elegant (rope braids, ribbon ties), there’s a half-up style that will make you feel absolutely stunning.
The most important thing is that you feel comfortable and confident in whatever style you choose. You’ll be wearing it for many hours, moving around, possibly dancing and celebrating, so your half-up needs to feel good to wear, not just look good in photos. Prepare your curls properly, use the right tools and products, and don’t hesitate to make adjustments throughout the day. Your curls are an asset — show them off.