Natural hair is wonderfully versatile, but styling it on busy mornings can feel like a battle—especially when you’re trying to keep a growing kid’s curls, coils, or waves healthy while also getting them ready for school. Ponytails get unfairly dismissed as a simple solution, but when you understand the techniques and variations that actually work with natural hair texture instead of against it, they become one of your most valuable styling tools. The key isn’t just pulling hair back; it’s protecting the edges, distributing tension evenly, and working with your child’s natural curl pattern rather than fighting it.
The truth is, natural hair kids deserve hairstyles that are practical, beautiful, and protective all at once. A well-executed ponytail keeps hair off the face and neck, reduces manipulation and breakage throughout the day, and honestly, gives you those precious extra minutes in the morning. But it has to be done right—with the understanding that natural hair has different needs than straight hair. The ponytails that work best combine protective principles, technique that respects texture, and finishes that look intentional and polished rather than hastily thrown together.
Whether your child has thick coils, defined curls, loose waves, or something beautifully in-between, there’s a ponytail style that will work. Some are quick enough for a school morning; others are perfect for weekend styling when you have a little more time. Some work best on freshly washed hair, while others are ideal for textured hair that’s had a few days to settle and define. The styles in this guide range from sleek and minimal to textured and dimensional—all of them chosen because they actually work for natural hair and look good while doing it.
What makes these ponytails different from generic tutorials you’ll find elsewhere is the specific guidance on technique, product use, and how to adapt each style to different curl patterns and hair density. You’ll find exact descriptions of how tight to pull, where to position the ponytail for both aesthetics and protection, and honest tips about what tends to go wrong—along with how to fix it. By the end, you’ll have a collection of real, tested styles that will take you from Monday morning to weekend adventures.
1. High Puff Ponytail with Smooth Front
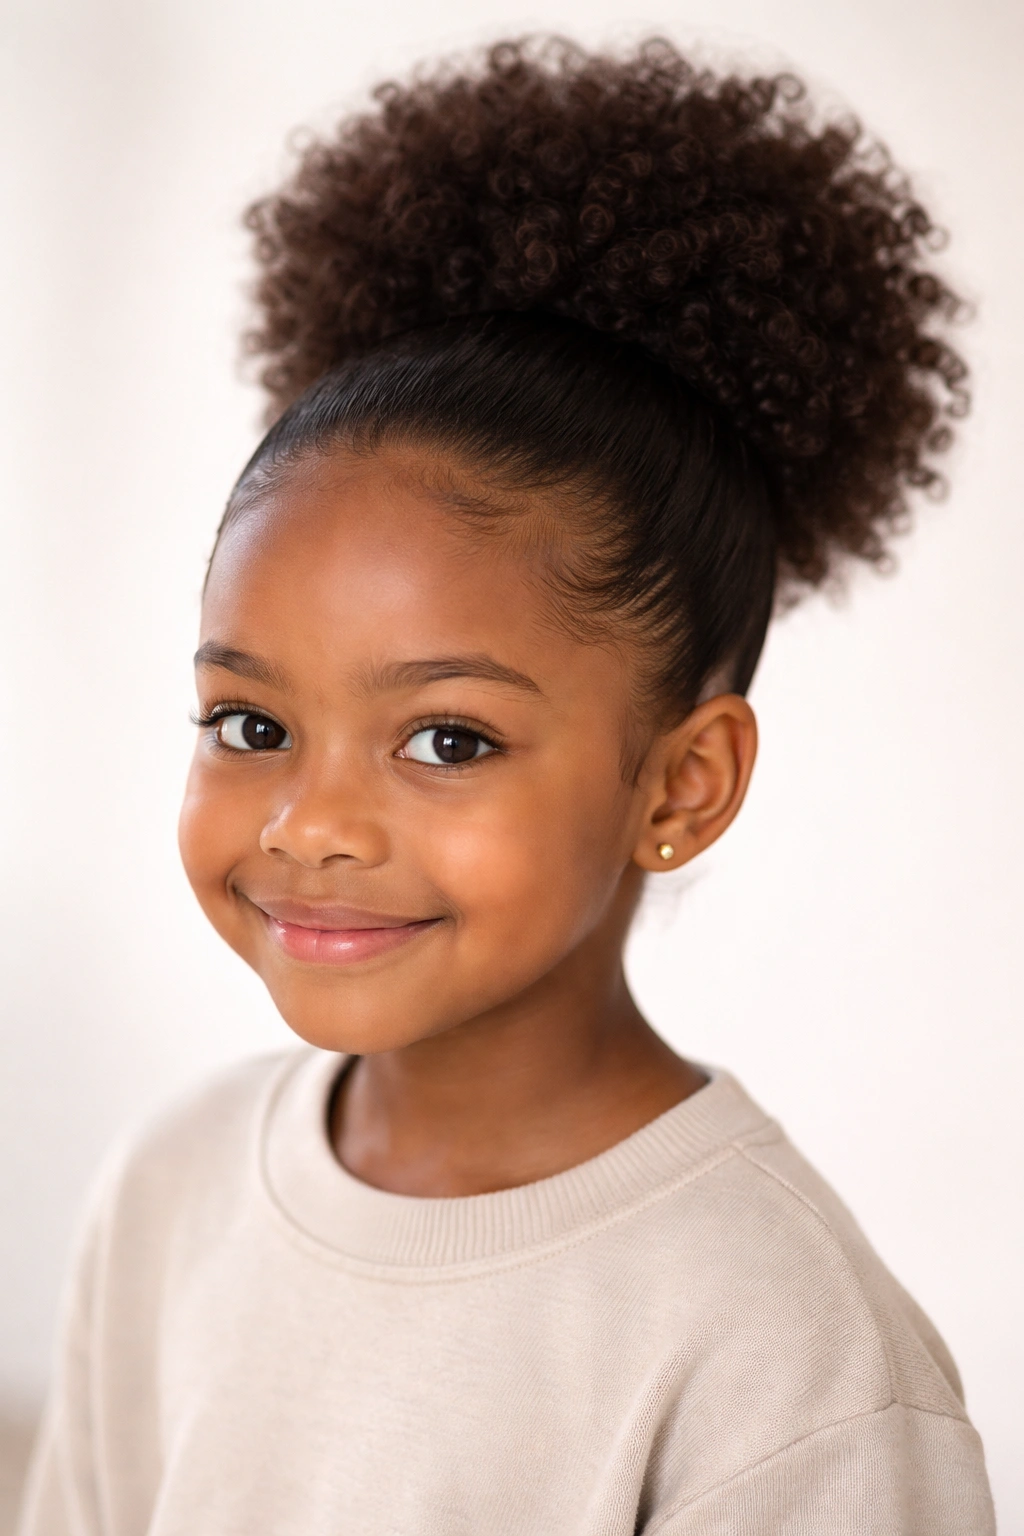
A high puff ponytail combines the best of both worlds: the volume and beauty of a puff at the crown with the neat, pulled-back style of a ponytail. This style works especially well for kids with medium to thick density curls or coils because it showcases texture while keeping hair completely off the face and neck. The “high” positioning makes it flattering on most face shapes and gives the illusion of taller, more lifted hair—which many kids find fun and confident-feeling.
The beauty of this style is that it’s protective without feeling tight, and it actually looks more intentional than a regular ponytail. The front hairline stays smooth and defined, which reads as polished even though the ponytail itself is textured. This works well for school days, sports, or any situation where you need hair secured but want it to look styled rather than hastily gathered.
Why High Puff Ponytails Work for Natural Hair
The high puff takes advantage of your child’s natural texture rather than fighting it. Instead of trying to smooth everything sleek (which can stress edges and requires products that some kids find uncomfortable), you’re gathering curls into their natural state at the crown. The gathered hair keeps its shape and definition, so it actually looks fuller and more intentional than a slicked-back style. The smooth front section can be achieved with just a light styling cream and a brush—no need for heavy gels that build up over time.
How to Create a High Puff Ponytail
Start by sectioning off the front portion of hair—roughly from ear to ear across the front, making a half-moon shape. Smooth this front section gently with a light cream or gel if needed, and set it aside. Gather the remaining hair at the crown (the highest point of the head, directly above where the crown sits naturally) into a ponytail. Use a smooth elastic band, not a hair tie with exposed metal, which can catch and break curls. The ponytail itself should be full and textured, kept in its natural curl pattern without excessive brushing. Once the high section is secured, smooth the front hairline gently and secure the front section smoothly against the head with pins if needed, so it frames the puff nicely.
Pro tip: A tiny bit of edge control gel on the front hairline (not on the hairline itself, but just above it on the scalp) helps the front stay smooth all day without any product buildup at the hairline, which can cause irritation or flaking.
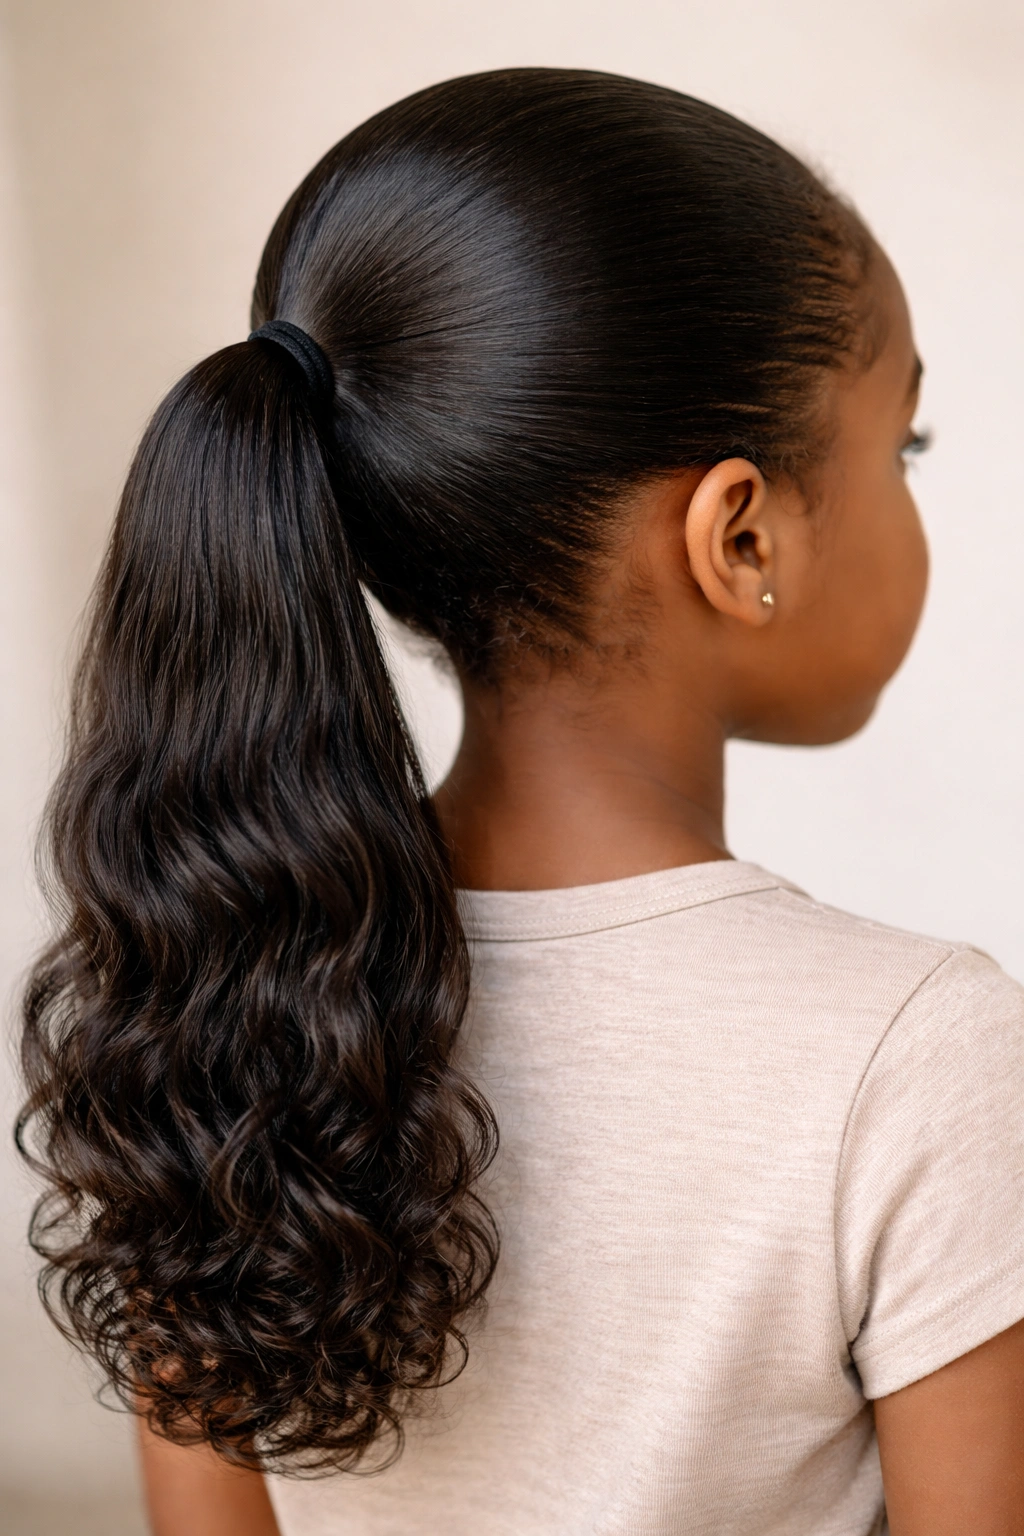
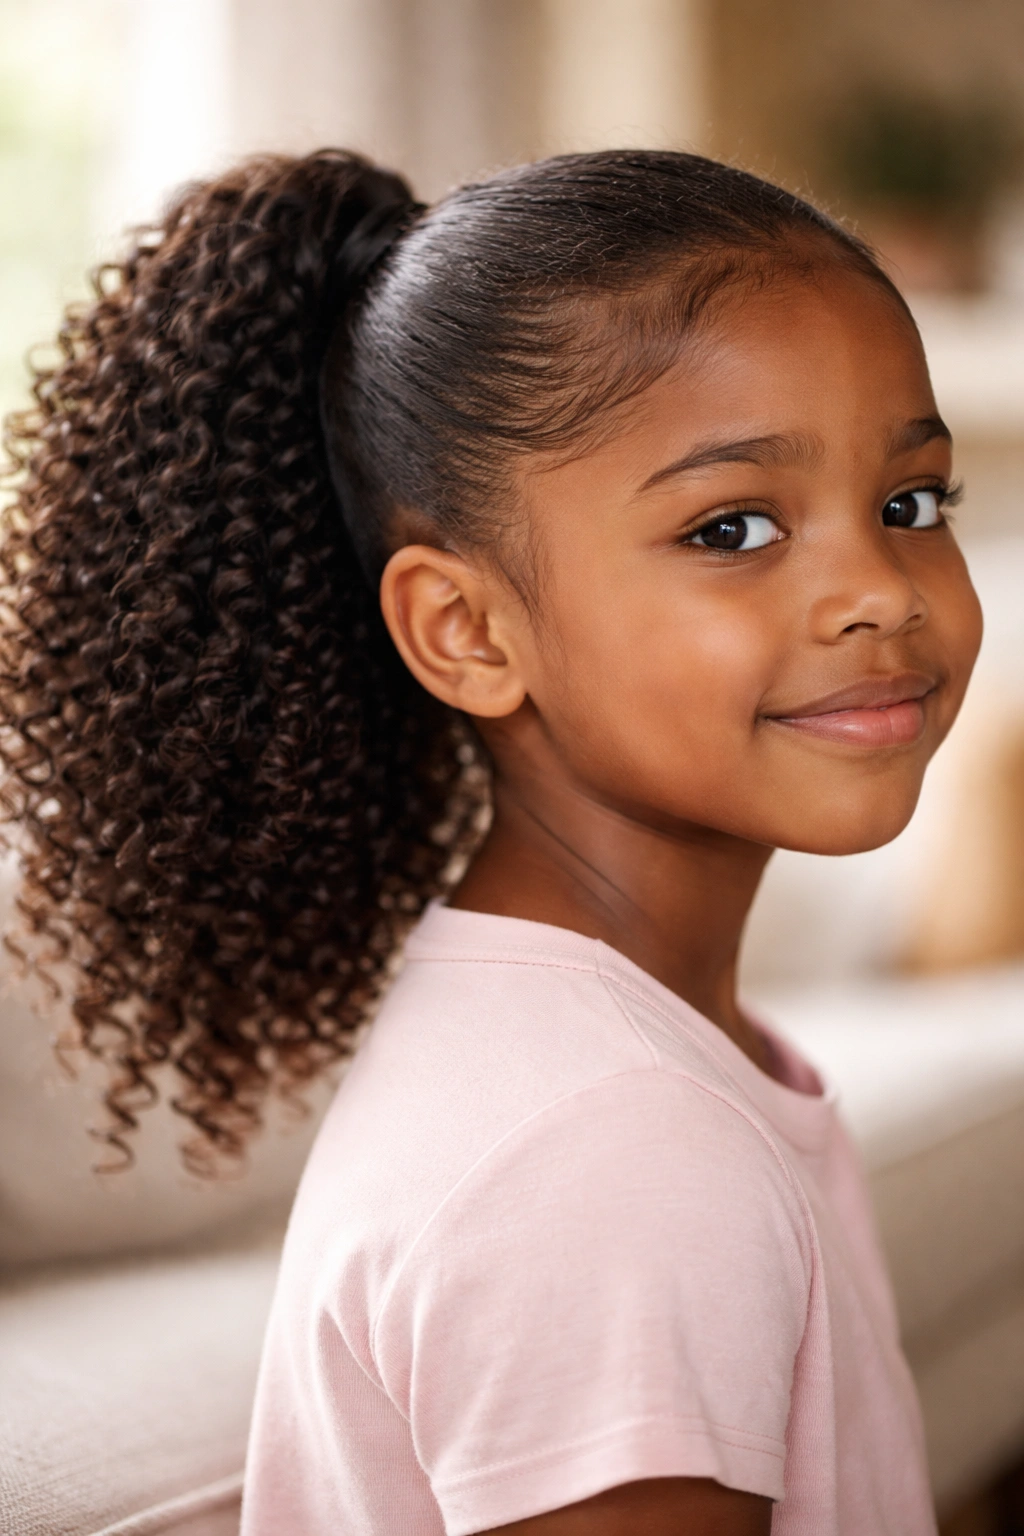
2. Sleek Low Ponytail with Defined Edges
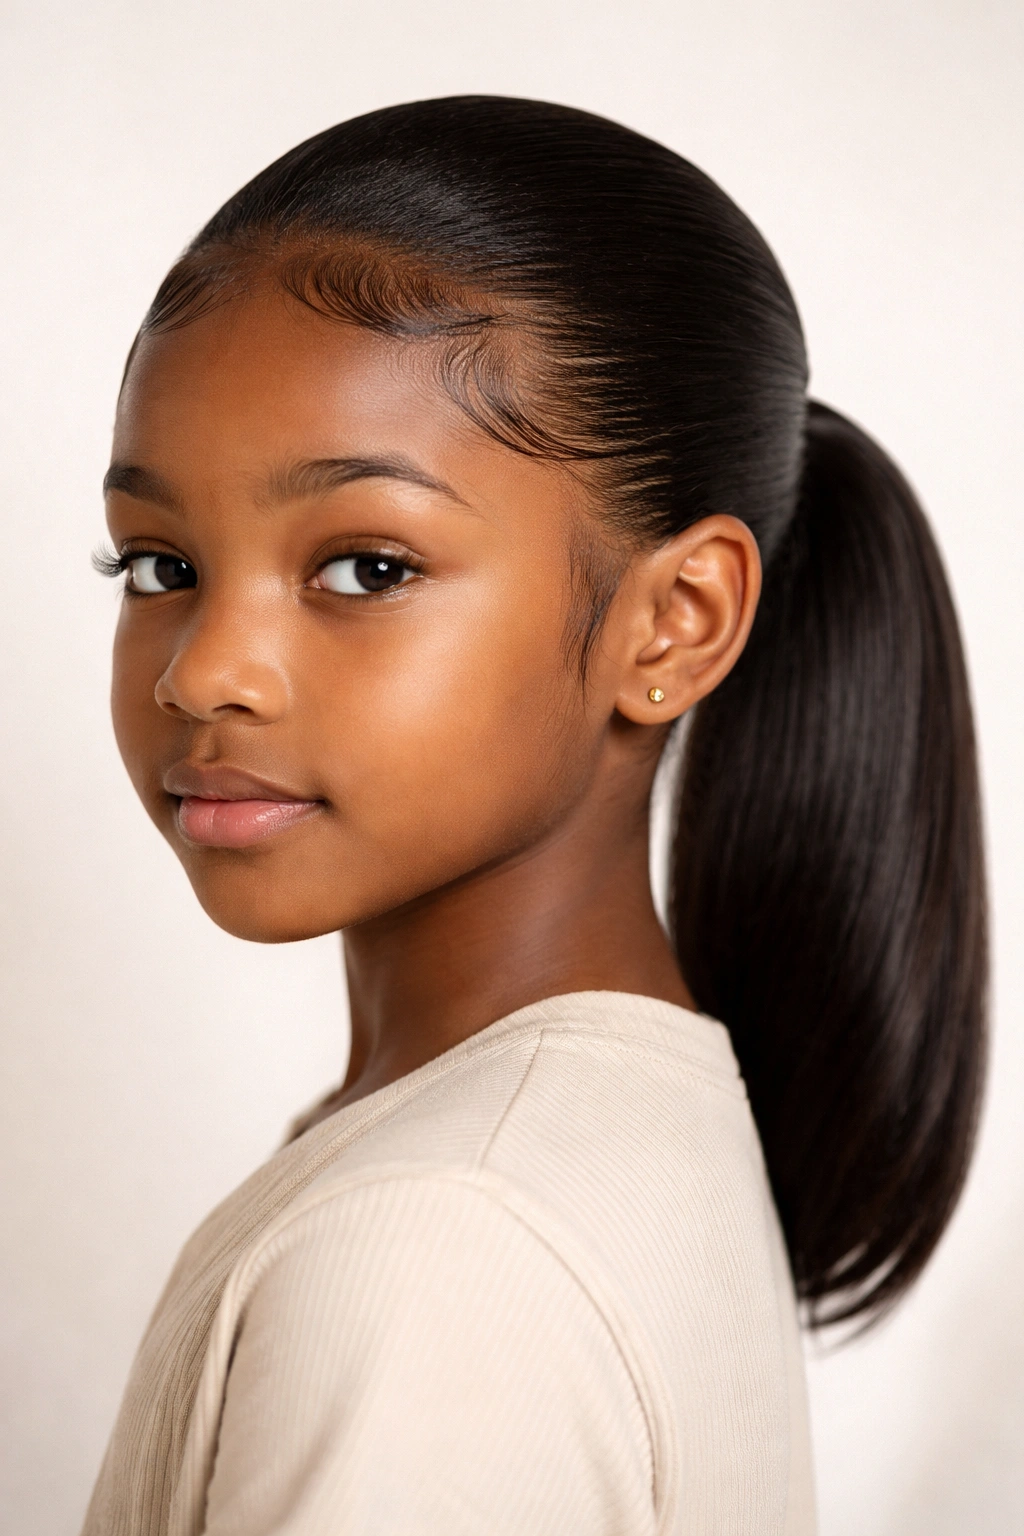
The sleek low ponytail is a classic that works on almost every curl pattern and hair density, and it’s one of the most protective styles you can create for natural hair. By pulling hair smoothly and securing it low on the nape of the neck, you distribute tension evenly across the entire hair structure rather than concentrating it at the crown. It’s the perfect style when you need to quickly get hair off the face without much fussing—and it looks intentional and polished, not accidental.
The “defined edges” part makes all the difference. Instead of just pulling hair back, you’re creating sharp, clean lines around the perimeter, which elevates the entire look. This style works particularly well for kids heading to school, sports, or anywhere they want a neat appearance. It’s also one of the best styles to do on day-old or second-day hair, because the texture has had time to settle and define.
What Makes a Sleek Ponytail Protective
A low ponytail distributes tension more evenly than higher styles because the weight of the hair isn’t all pulling on the crown. The key word here is sleek—which means smooth, not necessarily straight. Your child’s curls can maintain their pattern while still being smoothed into a cohesive style. This combination keeps the hair protected while also working with the natural texture. The smooth pulling technique strengthens the hair you’re pulling back because you’re not creating frizz or disrupting the curl pattern.
Creating Clean, Defined Edges
The edges are what make this style look intentional rather than rushed. Use a firm-hold edge control product (not a heavy gel, but something with structure) and a small brush or toothbrush to create a smooth, defined perimeter around the face and neck. The line should be clean and visible, created by smoothing hair in one direction with control. You can create a very thin, sharp line or a slightly thicker smoothed section—whatever looks best on your child and feels comfortable. The key is consistency and intention: the edges should look deliberate, not like you’re trying to tame flyaways.
Worth knowing: Many natural hair edge products dry clear or matte, which looks more polished than glossy products. Avoid anything too thick or greasy-looking around the edges, which can feel uncomfortable and looks less intentional.
3. Side Ponytail with Textured Volume
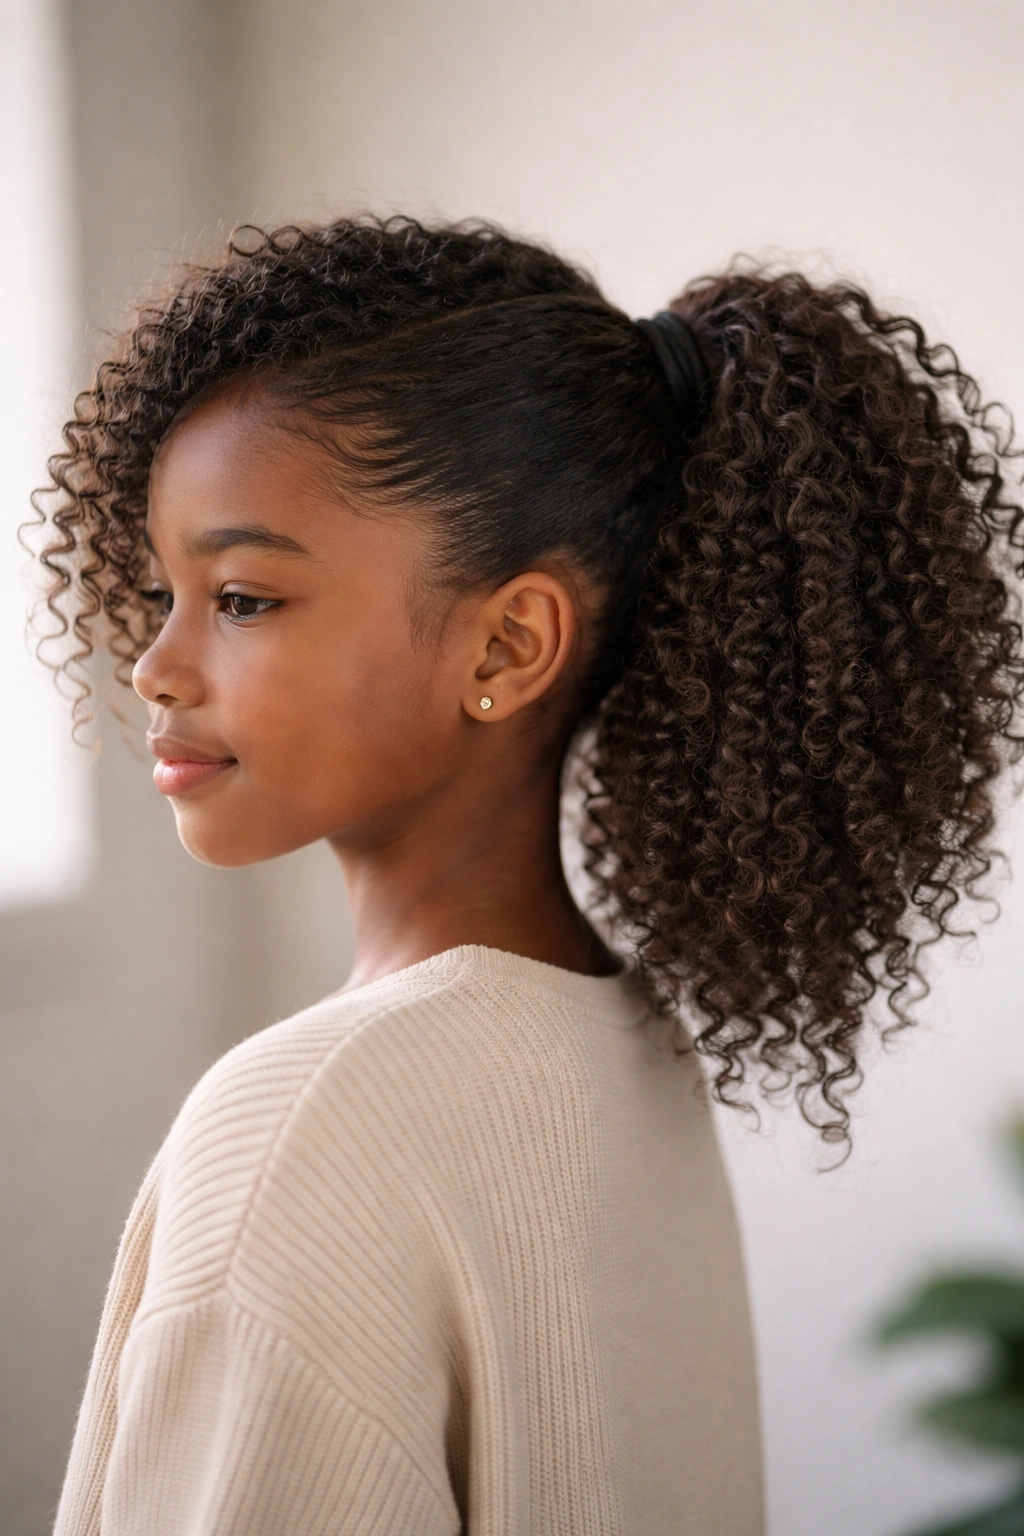
A side ponytail gathered to one side of the head (rather than centered at the back or top) is a beautifully asymmetrical style that’s both protective and visually interesting. By shifting the gathered point to one side—usually about 2 inches behind and below the ear—you create a silhouette that’s different from the expected centered ponytail. This works wonderfully for natural hair because it lets you showcase the texture and dimension of curls on one side while creating a neat, pulled-back look overall.
Side ponytails are particularly flattering for kids with wider face shapes because the asymmetry draws the eye and creates visual balance. They’re also perfect when you want to style one side of the hair while leaving the other side visible and textured. The vibe is more relaxed and intentional than a centered style, which many kids find more personality-forward.
Why Side Ponytails Suit Curly and Coily Hair
When you gather hair to one side, you’re naturally creating depth and visual interest because part of the hair length is visible on one side while the gathered section has weight and fullness on the other. This works perfectly with textured hair, where dimension and movement are already built in. The gathered side ends up looking fuller and more three-dimensional because of the natural texture, and the visible side maintains its curl pattern, so your child gets the best of both worlds: neatness and natural beauty.
Technique for a Polished Side Ponytail
Start by brushing hair gently through to remove tangles—you can do this on dry or slightly damp hair. Then gather the hair to your chosen side (left or right), positioning the ponytail holder about 2 inches behind and slightly below the ear on that side. The gathered section should be smooth and neat, while the rest of the hair—the side that remains down—should fall naturally, maintaining its curl pattern. You can add a small clip or additional elastic band at the base of the ponytail if you want extra security, or leave it simple with just one band.
Quick tip: If the ponytail slides around or feels like it’s not staying secure, try a textured elastic band (like a fabric-covered band) rather than a smooth band, which can slip on natural hair. Or use two thin bands stacked together instead of one thick one—this gives more grip without creating extra tension.
4. Double Puff Ponytails (Pigtail Puffs)
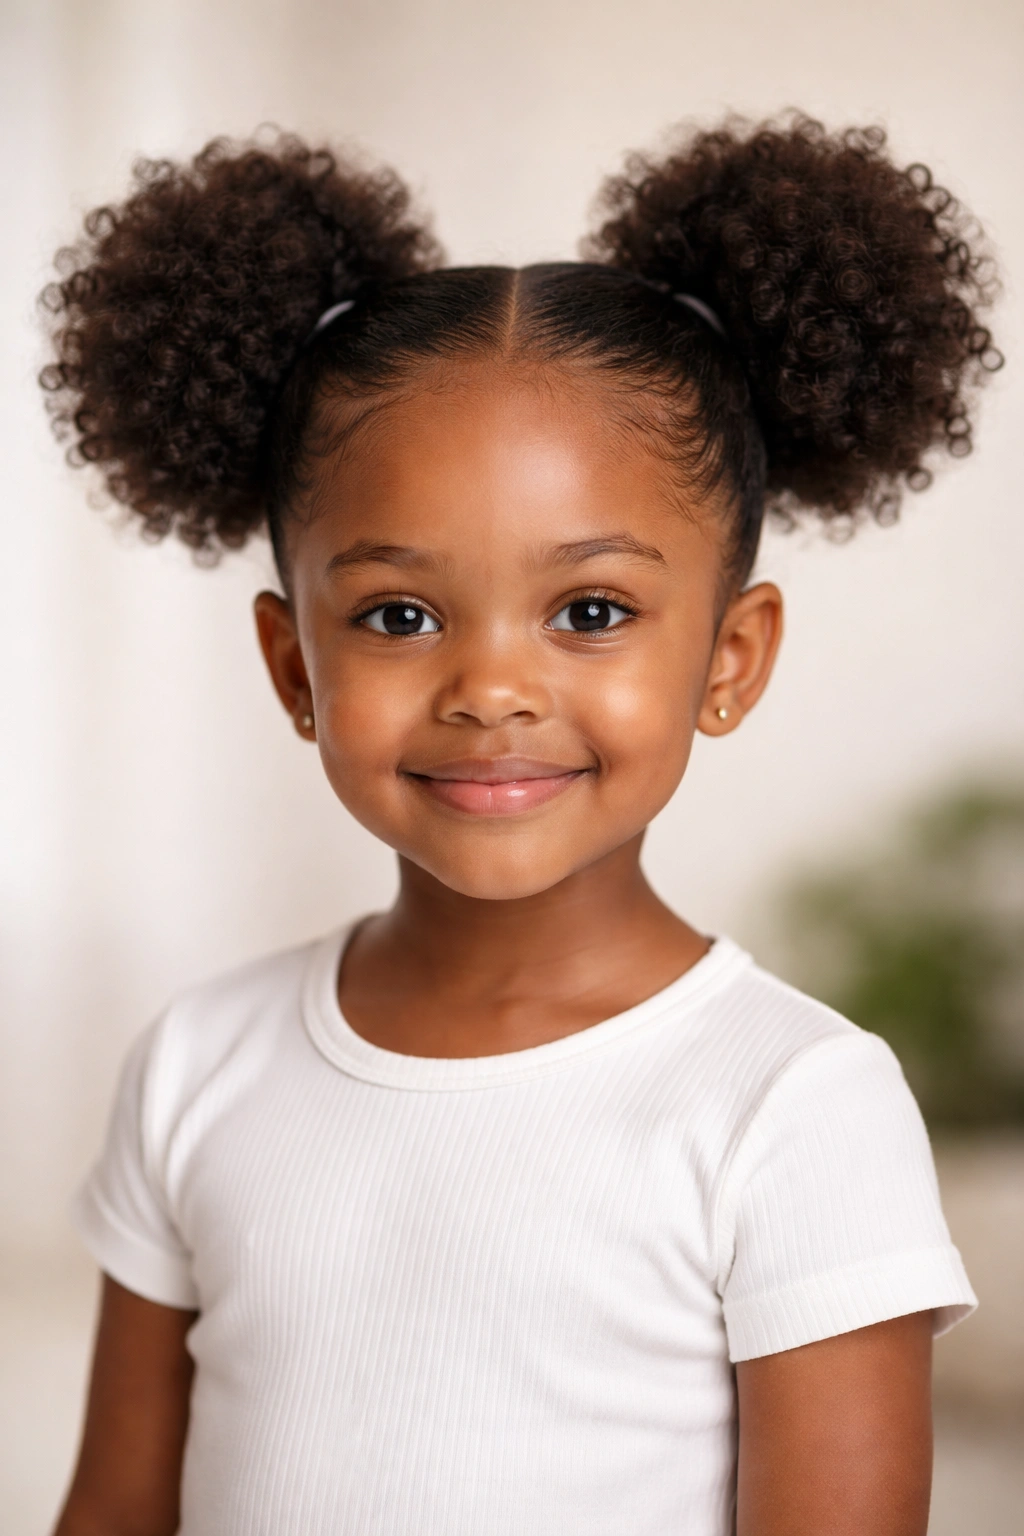
Double puff ponytails, sometimes called pigtail puffs, are two high puffs positioned one on each side of the head, gathered with ponytail bands. This style is wildly popular with kids because it’s playful and fun while still being incredibly protective and practical. Each section carries half the weight of the hair, which means less tension on any single area of the scalp. The style works beautifully on thick, coily, or densely textured hair, and it’s actually easier to maintain throughout the day than a single ponytail.
This is an excellent choice for active kids—whether they’re playing sports, at recess, or dancing around. The doubled structure means less hair movement and fewer instances of hair falling out or needing to be retied. Plus, kids genuinely love how they look with this style, and when a child feels confident about their hair, that matters.
Why Double Puffs Distribute Tension So Well
Instead of pulling all the hair toward a single point on the scalp, double puff ponytails split the load—literally. This is one of the most protective ponytail styles you can create because no single area of the scalp is bearing all the tension. Each puff sits independently, so even if one section moves slightly, the other stays secure. The distributed weight also means you can use lighter elastic bands, which further reduces tension and potential breakage.
How to Section and Create Double Puff Ponytails
The key is creating two equal sections down the middle of the head. Part hair down the center from the forehead all the way to the nape of the neck. On each side, gather the hair at the temple area (about where the ear is positioned from the front), creating a puff on each side of the head. The puffs should be at the same height and roughly the same size for balance. Smooth the part line down the center with edge control if desired, and let the puffs remain full and textured, showing off your child’s natural curl pattern.
Pro tip: If you want the puffs to look extra full and voluminous, gently fluff each puff after securing the elastic band by spreading the gathered curls outward slightly. This gives an airier, more intentional look than a tightly gathered puff.
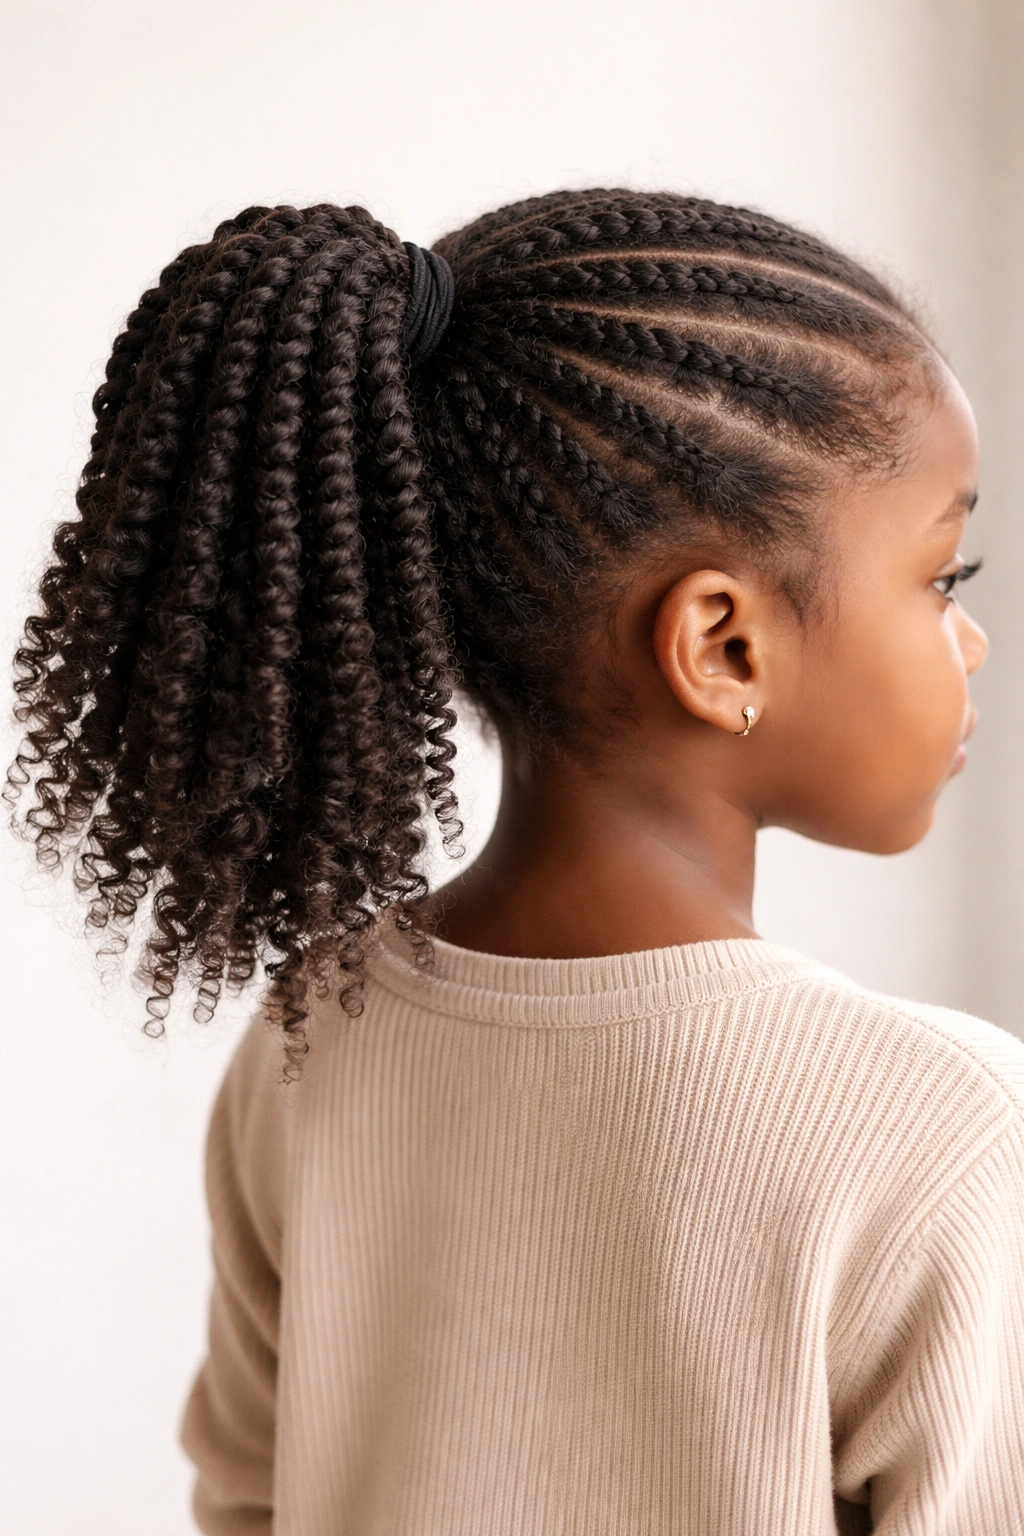
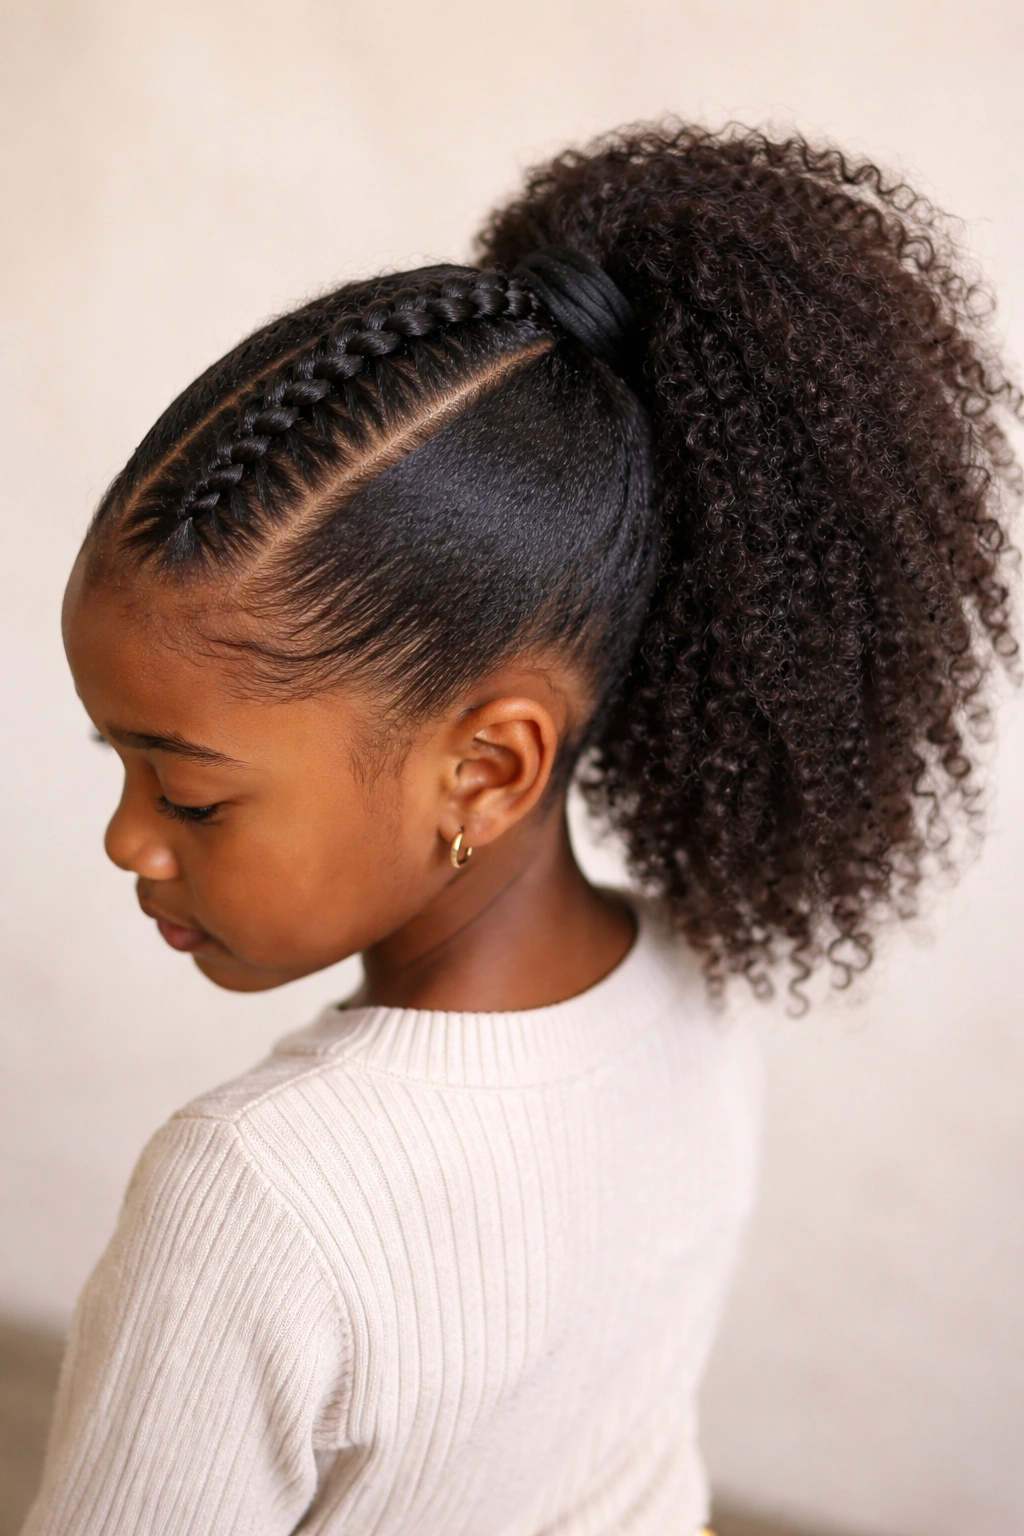
5. Braided Ponytail with Natural Curls
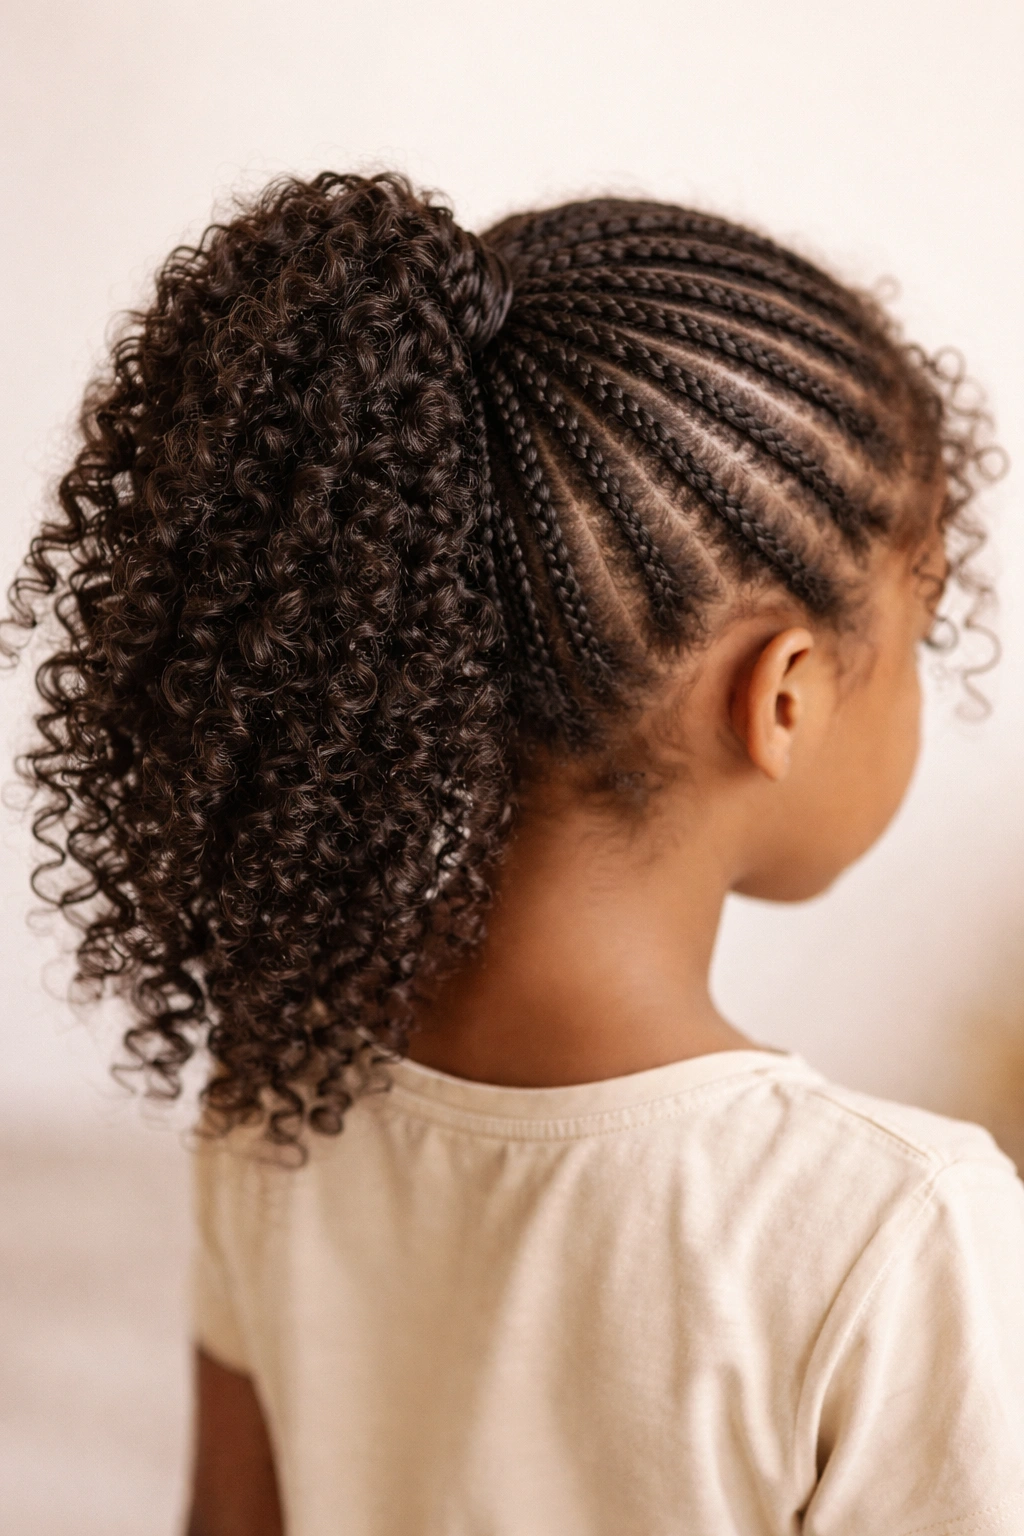
A braided ponytail starts with small braids throughout the hair, which are then gathered together into a single ponytail at the back or top of the head. The braids add structure and texture while keeping everything neat and controlled. This is a more involved style that works best on day-one or freshly washed hair, when your child’s curls are at their most defined. The combination of braids and natural curls creates a beautifully dimensional look that’s both protective and visually striking.
This style is perfect for kids who love texture and visual interest in their hair. It’s also one of the most durable styles—the braids help contain the hair, and even if some sections loosen throughout the day, the overall structure holds. This works on various curl patterns, from loose waves to tight coils, though it’s especially stunning on medium to thick curls.
The Protective Benefits of Braided Ponytails
Braids gently bunch hair together without the tightness required for slicked-back styles. The individual braids mean less tension on any single section of hair, and the braiding process actually helps distribute natural oils from the scalp down through the hair length. When you gather braids into a ponytail, you’re creating a style that’s inherently protective because the braids have already defined and set the hair structure. Throughout the day, braids also minimize friction between hair strands, which reduces frizz and keeps curls looking fresher longer.
Creating a Braided Ponytail
The exact number of braids depends on your child’s hair density. Start with a clean, well-moisturized head of hair. Create 4-6 braids (or more, depending on thickness) throughout the hair—you can do cornrows that go straight back, or looser three-strand braids, depending on the look you’re going for. Once all braids are complete, gather the ends of all the braids together at your chosen ponytail point (high, mid-back, or low) and secure with an elastic band. The individual braid ends will create texture and fullness within the gathered ponytail.
Insider note: This style actually holds better on second-day hair because the braids have had time to settle and compact slightly. If you’re doing this on fresh wash day, the braids might feel a bit fluffy and loose—which is fine, but they’ll look more polished and defined the next day.
6. Twisted Ponytail with Textured Ends
A twisted ponytail uses two-strand twists (instead of full braids) gathered into a ponytail. This creates a refined, elegant look that’s less structured than a braided ponytail but more intentional than a simple gathered ponytail. Two-strand twists intertwine hair without the tightness of traditional braids, making them particularly comfortable for kids with tender scalps or sensitive edges. The twists add visual interest and texture while still maintaining that clean, pulled-back look.
This style works beautifully on curly and coily hair because the twists actually define and enhance the natural curl pattern. The ends of the twists (which become the bulk of the gathered ponytail) stay textured and full, creating a look that’s simultaneously neat and natural-looking. It’s perfect for kids who want something more polished than a simple ponytail but easier to maintain than fully braided styles.
Why Two-Strand Twists Are Gentler Than Braids
Two-strand twists use less tension than three-strand braids because you’re only working with two sections of hair at once. This means reduced strain on the scalp and less pulling on individual strands. The twisting motion also encourages curl definition rather than disrupting it, so your child’s natural texture actually looks better after being twisted than it might after being braided. Twists also dry faster and style more quickly than braids, making them a practical choice for busy mornings.
Executing Two-Strand Twists into a Ponytail
Divide the hair into 4-8 sections (depending on thickness and how intricate you want the look). In each section, create a two-strand twist by dividing the hair in two, then twisting those two sections around each other from root to end. The twists should be neat and even, but not so tight that the scalp is pulled. Once all twists are complete, gather the end of each twist together at your chosen ponytail point and secure with an elastic band. The twisted texture remains visible throughout the ponytail, creating dimension and visual interest.
Worth knowing: Two-strand twists actually look better and feel more refined when done on slightly damp hair (not soaking wet, but with a bit of moisture). The moisture helps the twists hold their shape without requiring heavy products.
7. Gel-Free Sleek Ponytail Using Leave-In Conditioner
If your child’s scalp is sensitive to gels or you simply prefer to minimize product buildup, a sleek ponytail created with just leave-in conditioner and a smooth brush is absolutely possible. This technique uses the moisture and slip from leave-in conditioner to smooth hair without the heaviness or potential irritation of gels or edge controls. The result is a clean, neat ponytail that looks intentional while keeping your child’s scalp healthy and product-light.
This approach works particularly well for kids who’ve had reactions to other styling products, or whose parents prefer minimal product use. The leave-in conditioner provides enough slip to smooth hair into place without the buildup that gels can create over time. It’s also much easier to wash out at the end of the day—a simple rinse gets everything clean, unlike heavier products that sometimes need extra shampooing.
The Science Behind Smoothing Hair with Moisture
Hair smooths most effectively when it’s hydrated. Leave-in conditioner adds moisture and slip, which allows the cuticle to lie flatter. When the cuticle lies flat, light reflects off it more smoothly, creating that sleek appearance. Unlike heavy gels, which create a visible sheen and buildup, leave-in conditioner hydrates from within, so the smoothness looks like it’s part of the hair itself rather than a coating on top. This is why many naturalists prefer leave-in moisture for everyday styling—it works with the hair structure rather than against it.
Creating a Sleek Ponytail with Just Leave-In Conditioner
Start with damp or slightly wet hair. Apply leave-in conditioner throughout, focusing on the sections you’ll be smoothing back. Using a smooth brush (preferably a paddle brush or smoothing brush), gently brush the hair back into your desired ponytail position. The moisture from the conditioner will help hair lay smoothly. Secure the ponytail with a smooth or fabric-covered elastic band. If desired, you can smooth the hairline gently with your fingers or a brush, but you don’t need additional products for definition—the sleek ponytail itself is the defining feature.
Pro tip: This works best on hair that’s roughly 50% dry—damp enough to have slip, but dry enough that you’re not creating frizz. If hair is soaking wet, the ponytail might look slick but won’t dry smoothly; if it’s completely dry, you won’t have enough slip to smooth it easily.
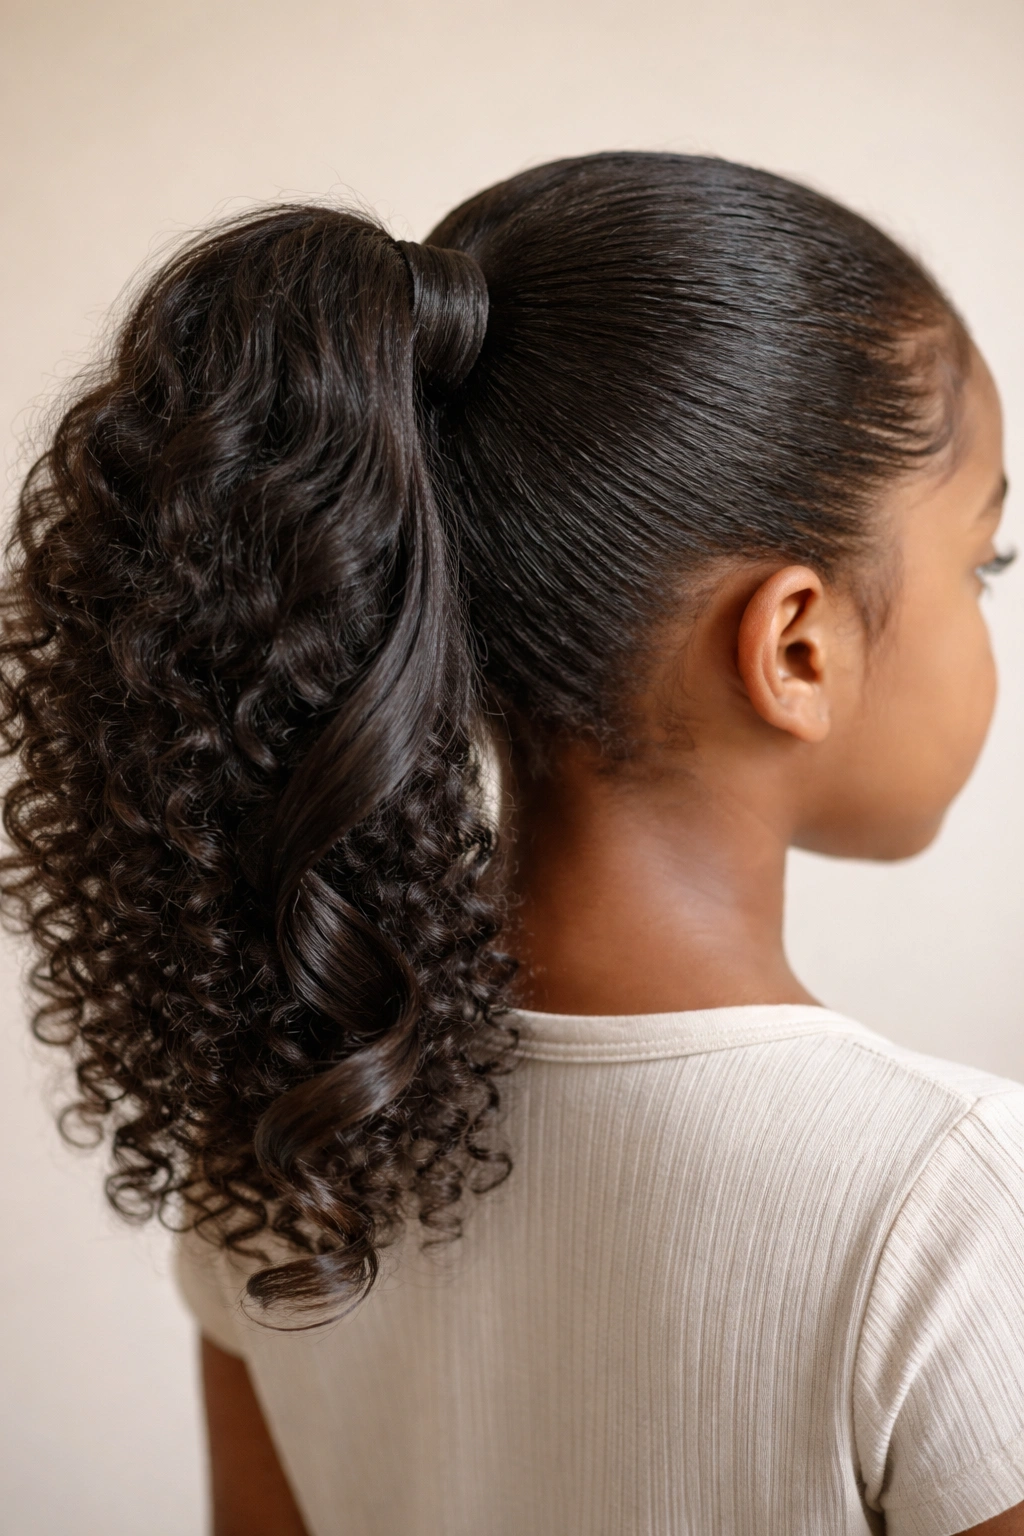
8. Curled Ponytail with Separated Curls

Instead of keeping the gathered ponytail in its natural state, you can enhance it by separating and defining individual curls, which creates a more intentional, styled appearance. A curled ponytail takes regular gathered hair and adds texture and dimension by gently separating each curl and fluffing the ponytail section. The result is a fuller, more three-dimensional look that draws attention to the curl pattern. This works beautifully on kids with well-defined curls and is a great way to make a simple ponytail look extra polished.
This style is perfect for special occasions or anytime you want the ponytail to look particularly full and impressive. The separated curls catch light differently, creating visual interest and dimension that a smooth or tightly gathered ponytail doesn’t have. It’s also surprisingly easy to do—it’s really just about gently separating what’s already there rather than adding complexity.
How to Separate and Define Curls in a Ponytail
After gathering the ponytail and securing it, gently take the gathered section in your hands. Using your fingers (or a wide-tooth comb for tighter curls), gently separate individual curls, pulling them slightly apart and fluffing them outward. You’re not trying to create ringlets or add new curl definition; you’re simply revealing and emphasizing the curls that are already there. Work through the entire ponytail section, separating curls throughout. As you work, the ponytail will naturally expand and look fuller.
The key is gentleness—you’re not disrupting the curl pattern, just revealing it. Each curl should maintain its shape while being visibly separated from the curls around it. The effect is naturally textured and dimensional, not frizzy or chaotic.
Quick fact: This style actually looks better on day-two or day-three hair, when curls have had time to settle and the frizz has minimized. Fresh wash day curls are sometimes too puffy and soft to separate clearly without looking undefined.
9. Wrapped Ponytail with a Curl or Ribbon Section
A wrapped ponytail adds an intentional finishing detail by wrapping a small section of hair (or a ribbon) around the base of the ponytail, covering the elastic band. This transforms an ordinary ponytail into something that looks more polished and finished. You can wrap a small section of the child’s own hair, or for a fancier version, incorporate a ribbon or fabric strip that complements their outfit. This detail completely changes the visual impact—suddenly it’s not just a pulled-back style, it’s an intentional hairstyle.
This works on any ponytail base—high, low, centered, or side—and it’s a simple way to elevate the look for school, events, or anytime you want it to look extra put-together. The wrapped section also serves a practical purpose: it helps keep the elastic band secure and prevents it from slipping.
Creating the Wrapped Section with Hair
Take a small section of hair from the underside of the ponytail (a strand about the thickness of a pencil). Wrap this section tightly around the base of the ponytail, covering the elastic band completely. Tuck the end of the wrapped section underneath itself and secure it with a small bobby pin. The wrapped section should lay flat and look intentional, not lumpy or obvious. When done correctly, it looks like the ponytail is one cohesive style, not a gathered section with a band visible.
Using Ribbon or Fabric for a Finished Look
For a more polished or decorative version, tie a thin ribbon around the base of the ponytail. The ribbon should be knotted or tied securely so it doesn’t slip. You can use a solid color that matches your child’s outfit, or a patterned ribbon for more visual interest. The ribbon creates a finished, intentional look that reads as carefully styled rather than quickly thrown together.
Worth knowing: If you’re wrapping with the child’s own hair, make sure it’s moisturized and smooth before wrapping, so it doesn’t break under the tension of being wrapped tightly. If you notice the hair is dry or brittle, use a small ribbon instead, which won’t stress the hair.
10. Stacked Ponytail (Ponytail on Top of Ponytail)
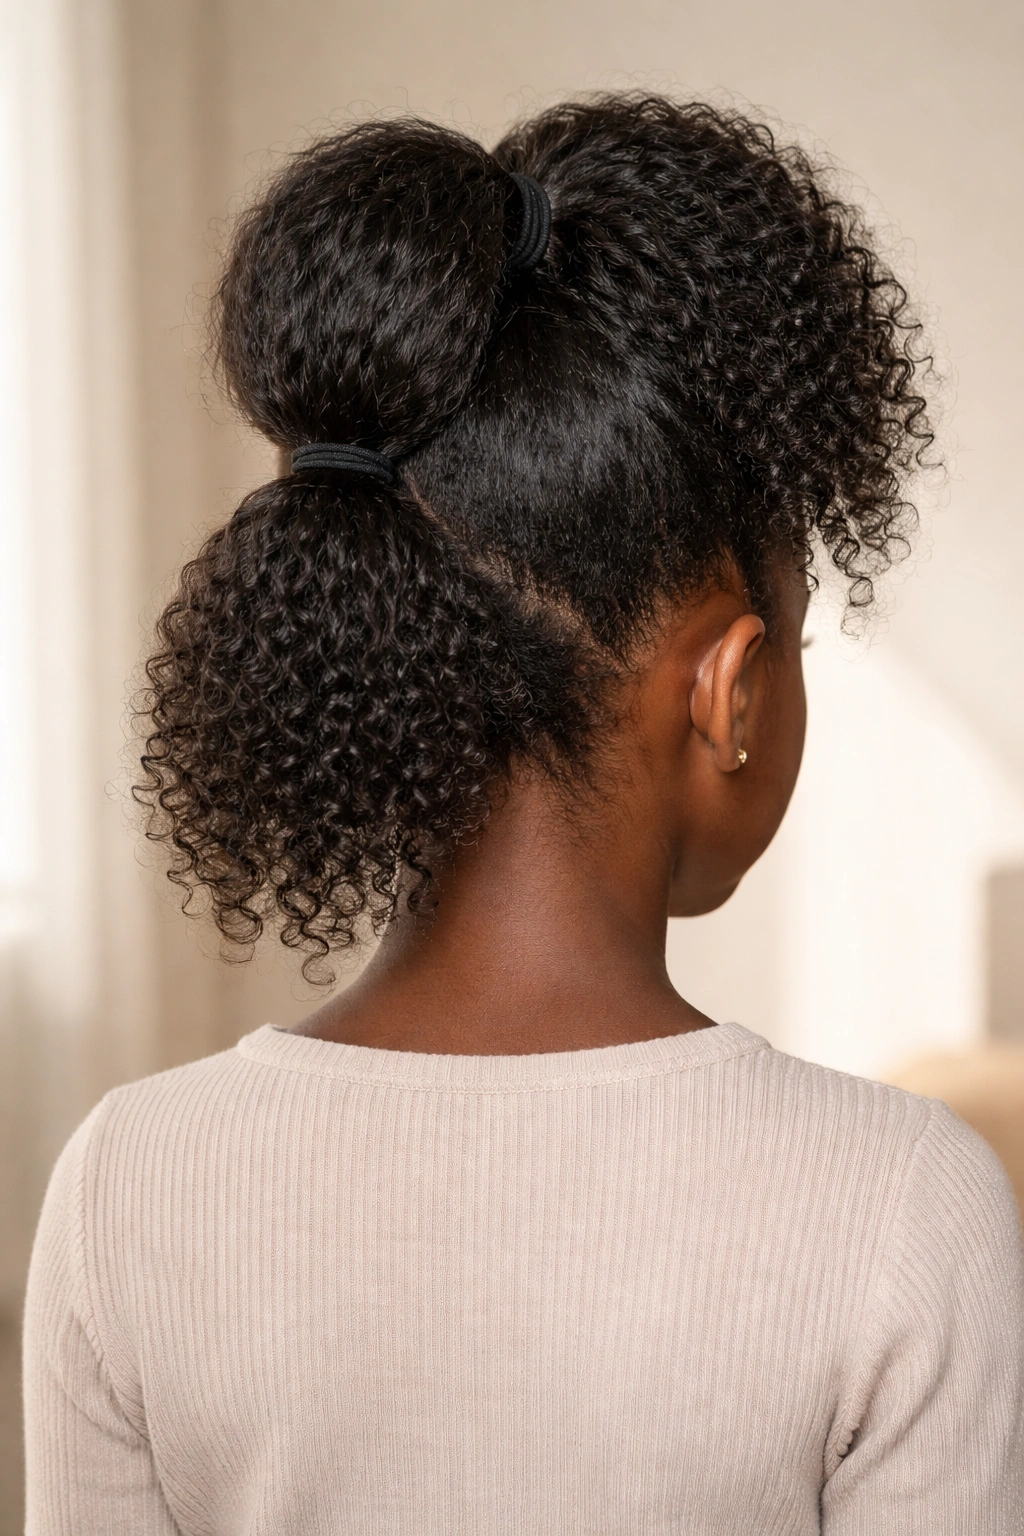
A stacked ponytail is two ponytails created one above the other—typically a lower ponytail at the nape, with a second ponytail created from the hair above it. This creates a visually interesting, textured effect that’s also incredibly protective because the weight of the hair is distributed across two securing points. The style is playful and eye-catching, and it works beautifully on kids with medium to thick hair density. It’s also surprisingly simple to create, even though it looks more complex than a single ponytail.
Stacked ponytails are perfect for kids who want something more interesting than a simple ponytail but simpler than a fully braided style. The doubled structure is also more secure, which makes it ideal for active kids or anyone whose ponytails tend to slip throughout the day.
Why Stacking Distributes Tension and Increases Security
By securing hair at two points instead of one, you’re splitting the total weight and tension. The lower ponytail holds the hair at the nape, and the upper ponytail gathers the hair from above, each taking pressure independently. This means less strain on any single area of the scalp. Additionally, even if one ponytail band loosens slightly, the other is there to keep hair secure. It’s one of the most secure ponytail options available.
Creating a Stacked Ponytail Structure
Start by creating a low ponytail at the nape of the neck and secure it with an elastic band. Make sure this base ponytail is smooth and neat. Then, gather the hair above that lower ponytail (all the remaining loose hair) into a second ponytail positioned above the first. Secure this upper ponytail with another elastic band. The visual effect is two ponytails stacked vertically. You can leave both ponytails smooth and sleek, or separate curls in each section for a textured version. Some versions use a wrap-around technique to connect the two sections visually, making them look like one style rather than two separate ponytails.
Pro tip: If the upper ponytail feels small or sparse, try repositioning the lower ponytail slightly higher on the nape. This leaves more hair available for the upper section, creating better proportion between the two ponytails.
11. Mohawk Ponytail with Braided or Twisted Center
A mohawk ponytail gathers hair along the center of the head into a single ponytail, leaving sections of hair visible on the sides. You can braid or twist the center section before gathering it into the ponytail, or leave it natural and separated into curls. The result is a bold, statement-making style that’s perfect for kids who love adventurous looks. The exposed sides show off curls and texture, while the center section stays neat and controlled.
This style works on various curl patterns and is particularly striking on kids with thick, textured hair. It’s playful enough for everyday wear but statement-making enough for special occasions. Many kids love the confidence boost that comes with a distinctly styled, intentional-looking ponytail like this.
The Visual Impact of a Mohawk Ponytail
By gathering only the center section and leaving the sides visible, you’re creating a style with height and dimension. The sides frame the face while the center draws the eye upward, creating a visually interesting silhouette. The contrast between the neat center and the textured sides is what makes this style work—it’s not trying to be sleek and uniform; it’s intentionally playing with asymmetry and varying texture levels.
Creating the Braided or Twisted Center Section
Create a part on each side of the head, roughly following the edge where you’d part hair if creating a side part—but keep both parts visible. All the hair between these two parts belongs to your center section. You can either braid this center section (a single center braid or multiple parallel braids), twist it, or simply gather it into curls. Once the center section is styled to your preference, gather it (along with the braided or twisted section) into a ponytail at the back or top of the head. The sides remain down and visible, showing off natural curl pattern.
Quick tip: This style needs a strong part on each side to look intentional. Use edge control on those part lines so they stay visible and defined throughout the day, which keeps the whole style looking sharp and intentional.
12. Bubble Ponytail with Separated Sections
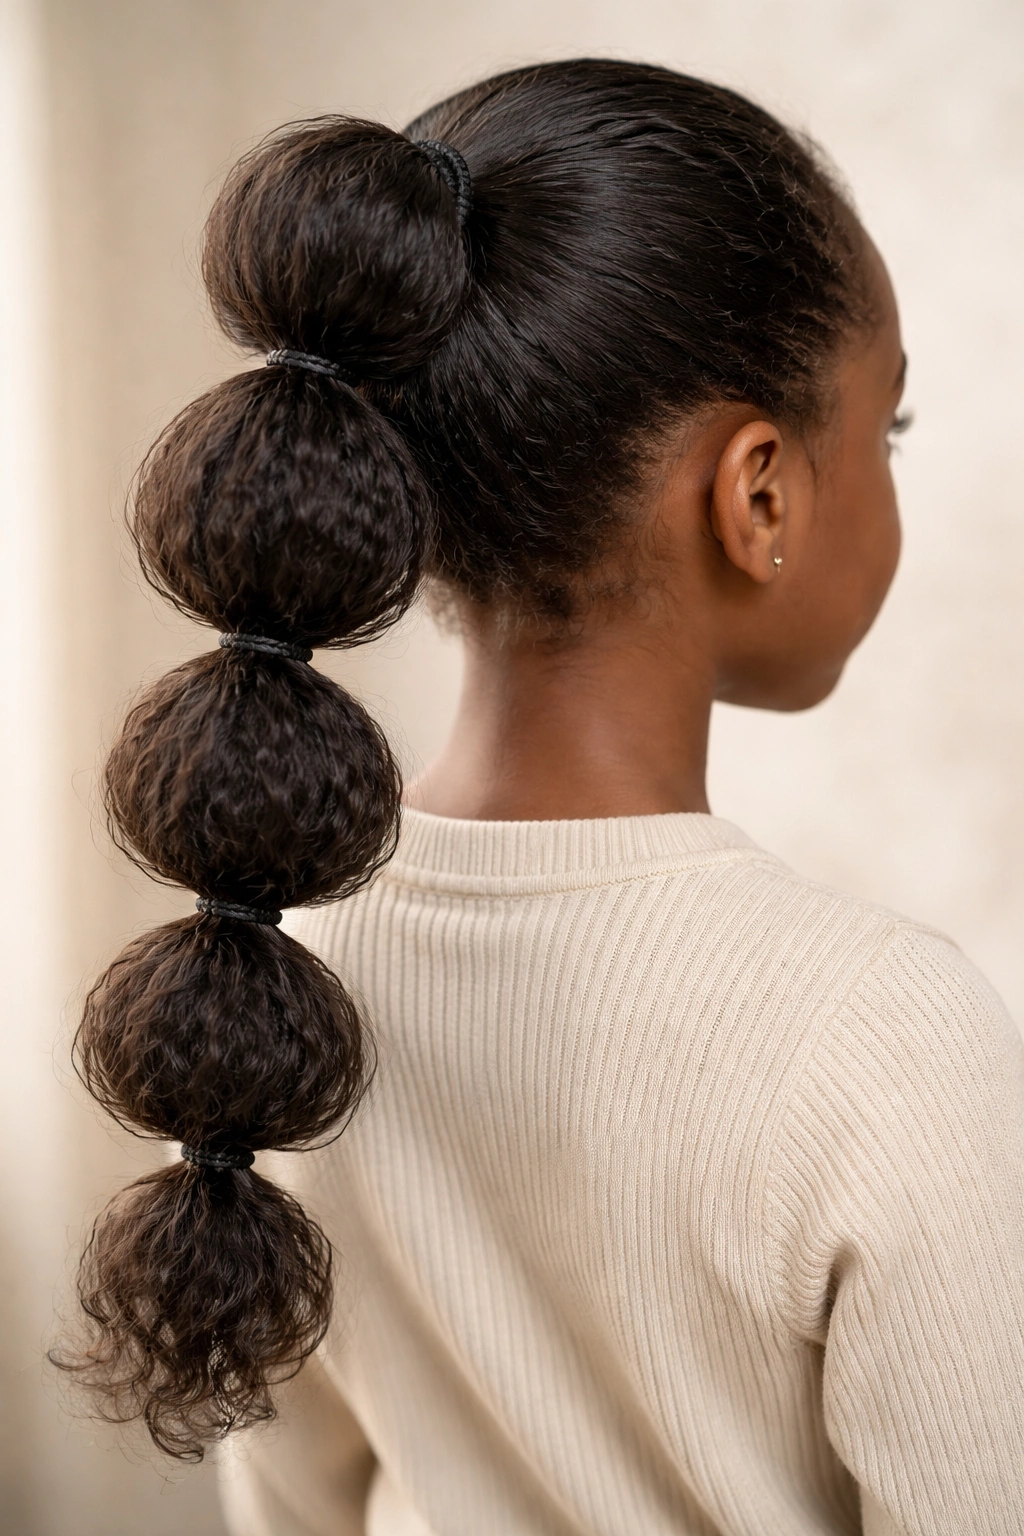
A bubble ponytail uses multiple elastic bands placed at intervals down the length of the ponytail, creating distinct “bubbles” of separated hair between each band. This is a visually playful style that creates dimension and texture along the entire length of the ponytail. It works on all curl patterns and hair densities, and it’s fun for kids because it looks more elaborate than a regular ponytail but is actually quite simple to create. The bubbles can be left with natural curl texture or gently fluffed and separated for extra fullness.
This is an excellent style for kids who want something more interesting than a standard ponytail, and it photographs beautifully. It’s also protective in a different way than other styles—the multiple bands distribute weight more evenly along the ponytail length, and the separated sections actually reduce friction between hair strands.
Why Bubble Ponytails Create Visual Interest and Texture
By dividing the ponytail into multiple sections with elastic bands, you’re creating natural stopping points where the hair can expand outward slightly. Each section between bands becomes a distinct visual element, and if the hair has natural curl, each bubble will have its own texture and shape. The overall effect is more three-dimensional and intentional than a single smooth ponytail, even though you’re not fundamentally changing the hair structure—just sectioning it.
Technique for Creating Even, Beautiful Bubbles
Start with a gathered ponytail secured at your chosen location. Working downward from the base, place an elastic band approximately 1-1.5 inches below the first band, gathering all the ponytail hair into this second band. Continue this process down the entire length of the ponytail, spacing bands evenly. The distance between bands can be consistent or gradually increase toward the ends, depending on the look you’re going for. Once all bands are in place, gently fluff each bubble section outward by gently pulling the hair in each section away from the center line. This creates fuller, more dimensional bubbles.
Insider note: If you use colored elastic bands that match your child’s hair color, the bands become nearly invisible and the style looks like you’ve created dimension purely through texture and sectioning. Alternatively, contrasting colored bands create a bold, intentional look where the bands themselves are a design element.
Final Thoughts
Natural hair ponytails are about so much more than just pulling hair back—they’re about understanding your child’s unique curl pattern, respecting their scalp health, and creating a style that looks intentional and beautiful. Every single style in this guide combines protection (by distributing tension, reducing manipulation, and keeping hair off the face) with genuine aesthetics. Your child should feel confident and comfortable, not like they’re wearing a style that requires constant adjustment or feels tight and uncomfortable.
The key to success with any of these styles is starting with moisturized, healthy hair and using the right technique for your child’s specific curl pattern and hair density. What works beautifully on one child might need adjustment for another—and that’s completely normal. The more you practice these styles, the faster you’ll get at them, and the more you’ll develop an intuition for what works best for your particular child’s hair. Some mornings you’ll have time for braided or twisted styles; other mornings, a quick gel-free sleek ponytail is the winner. Both are wonderful.
Remember that the best hairstyle is one that your child actually likes wearing. If they feel confident and comfortable, that confidence shows. These styles are tools in your toolkit—use the ones that work for your family’s lifestyle and your child’s preferences. And know that you’re not just styling hair; you’re building your child’s relationship with their natural hair in a positive, healthy way. That matters far more than perfection.