The right ponytail can transform your entire look while giving your natural afro hair the protection and style it deserves. Whether you’re heading to work, hitting the gym, or stepping out for a special occasion, a well-executed ponytail offers versatility, functionality, and undeniable elegance when styled for your hair texture. Black women with afro and textured hair have access to an incredible range of ponytail options that celebrate natural texture while keeping hair healthy, secure, and absolutely stunning.
The key to rocking any ponytail with afro hair is understanding your specific curl pattern, choosing the right protective products, and selecting styles that don’t create excessive tension at the roots. From sleek and sophisticated to textured and full of movement, the ponytail styles that follow showcase what’s possible when you work with your natural hair rather than against it.
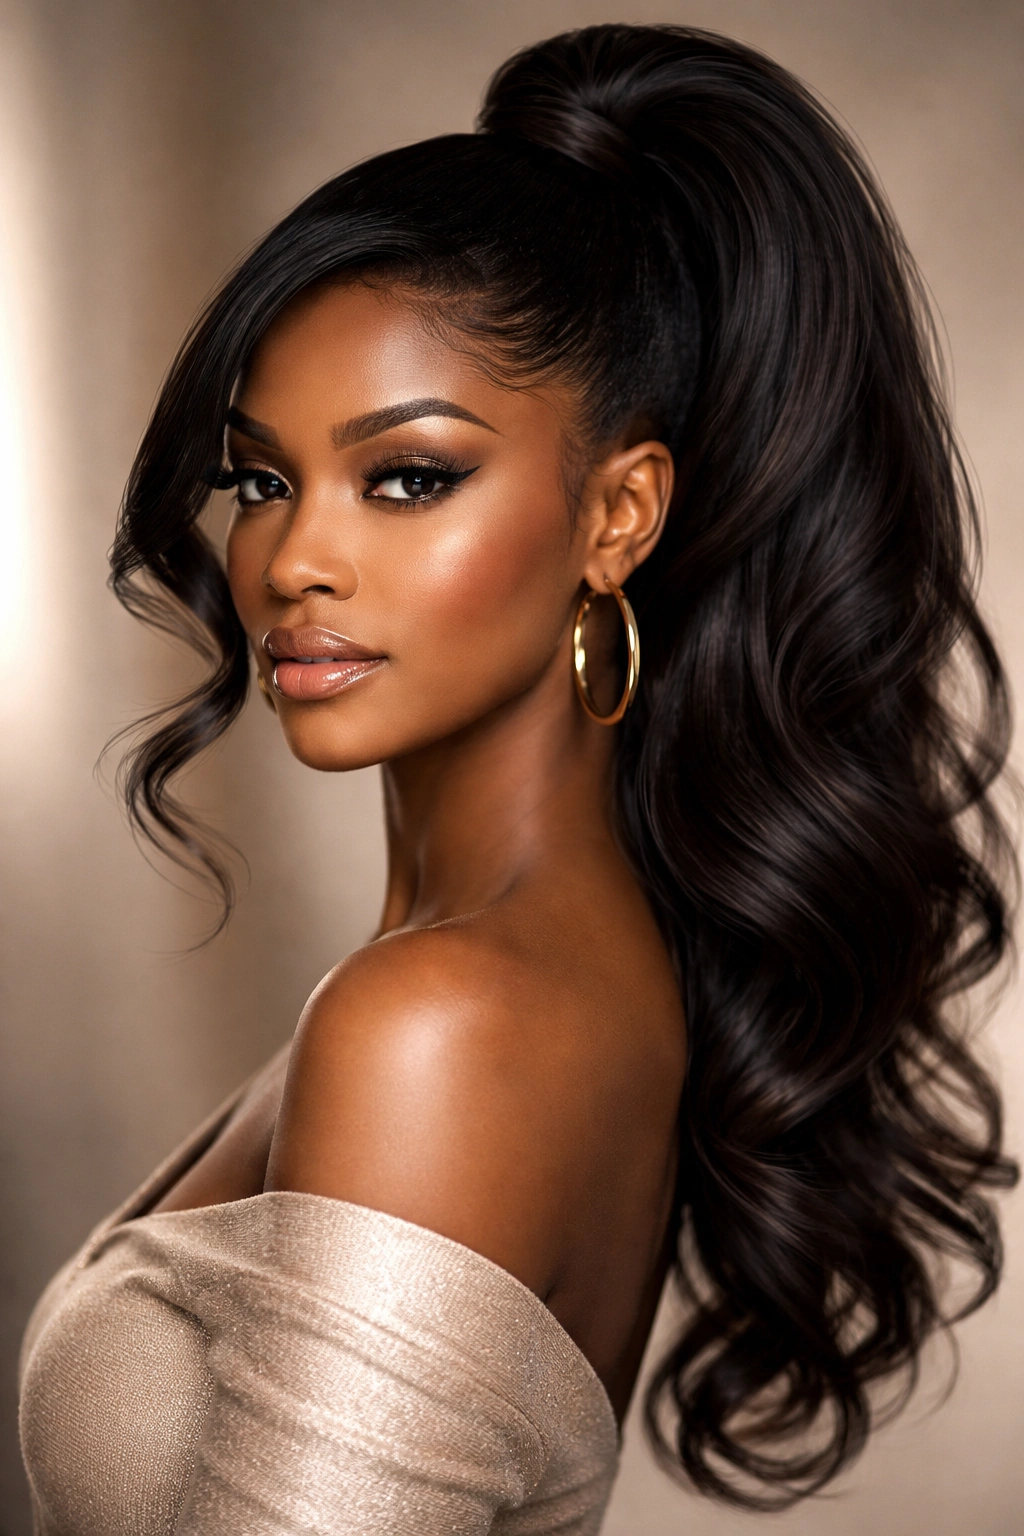
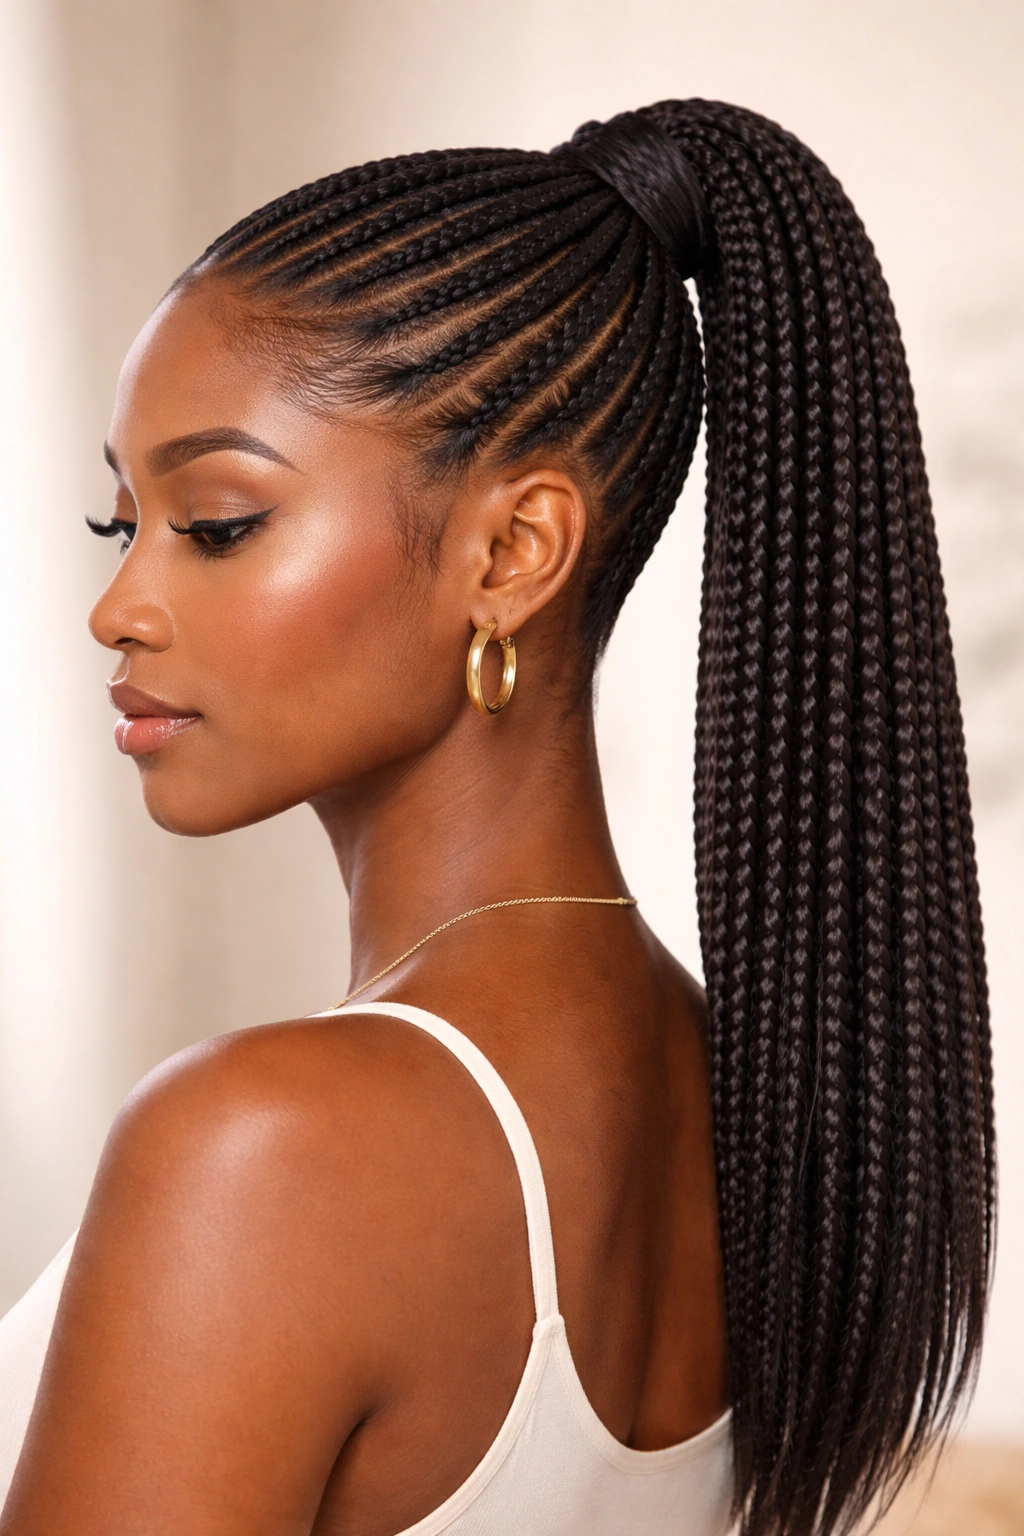
1. High Sleek Ponytail with Wrap
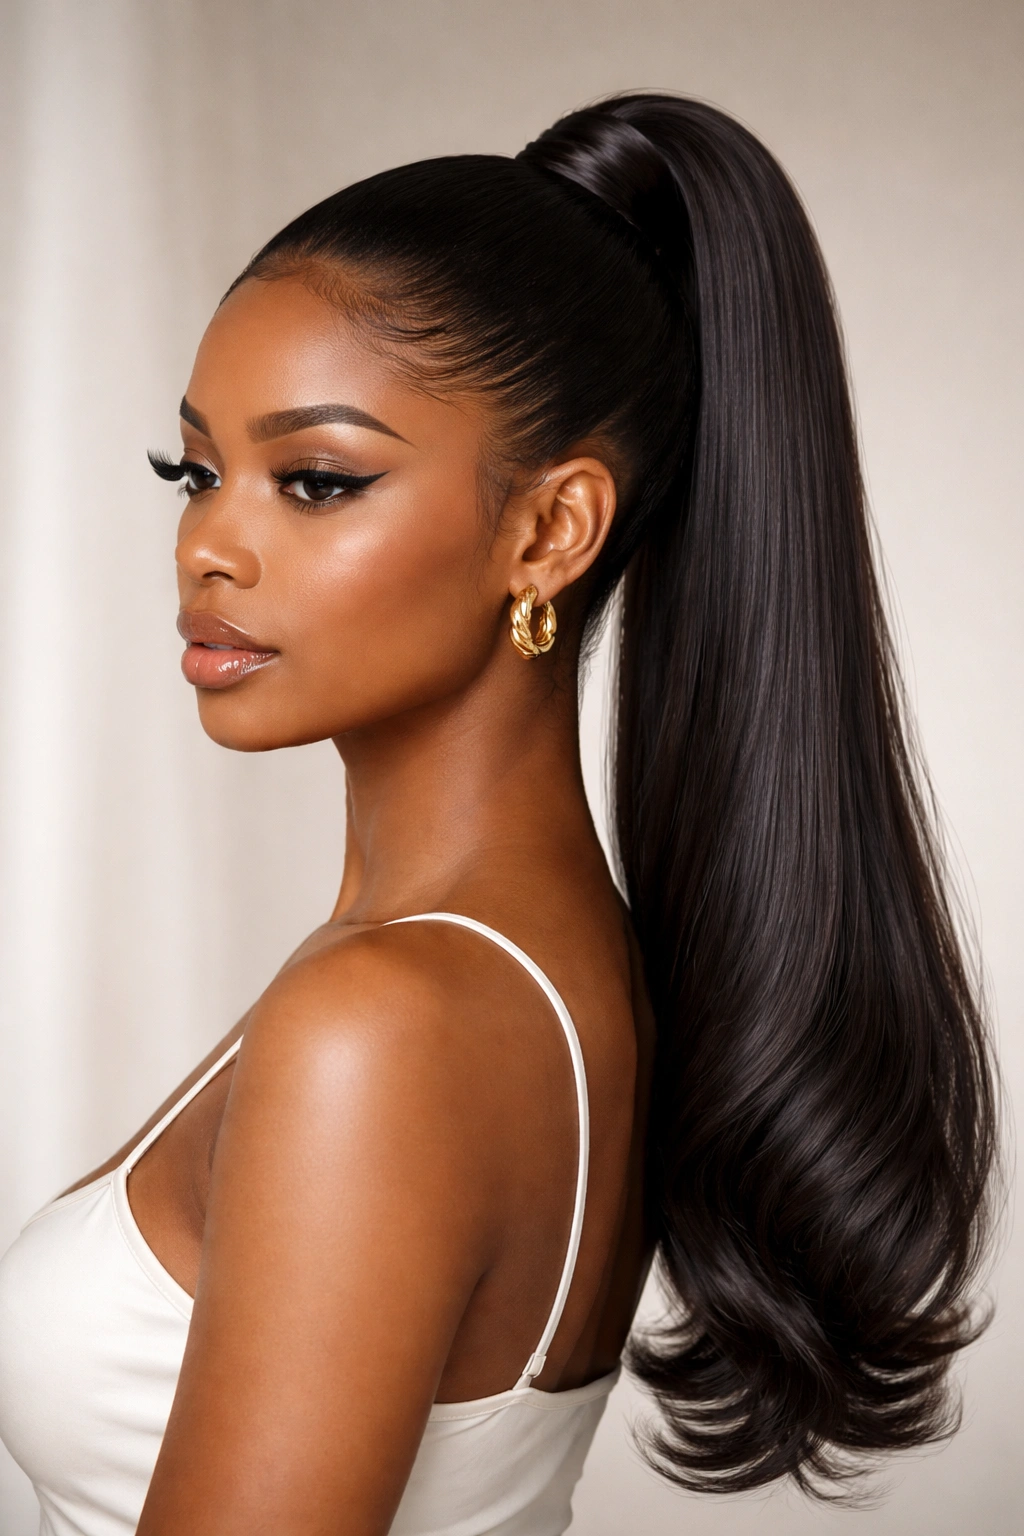
This classic style delivers sophisticated polish for professional settings and special events. A high sleek ponytail pulls your hair straight back into a clean, elevated ponytail at the crown, with each curl smoothed into place without compromising the integrity of your strands. The beauty of this look lies in its simplicity and the way it frames your face while showcasing your features.
The Technique That Creates That Smooth Finish
The secret to achieving a smooth, sleek finish on afro hair without heat damage involves using the right products and technique. Start with hair that’s freshly cleansed and deeply conditioned—this foundation matters tremendously. Apply a lightweight smoothing cream or gel to damp hair, working it through section by section. Using a wide-tooth comb or your fingers, gently smooth the hair back toward the crown, taking care not to pull too tightly at the hairline where breakage risk is highest.
Essential Steps for This Style
- Apply smoothing cream to damp hair, focusing on the hair shaft rather than the scalp
- Use a wide-tooth comb to gently detangle and smooth the hair back section by section
- Secure the ponytail with a silk or satin hair tie positioned at your desired height
- Wrap a small section of hair around the base of the ponytail to conceal the elastic
- Consider adding a metallic cuff, decorative hair stick, or pearl clip for an elevated finish
- Smooth down any flyaways with an edge control product applied with a soft brush
Pro tip: This style holds beautifully for 2-3 days when you sleep on a silk or satin pillowcase, which prevents friction that would disrupt the sleekness overnight. Your ponytail will actually look better on day two when the smoothing cream has fully settled.
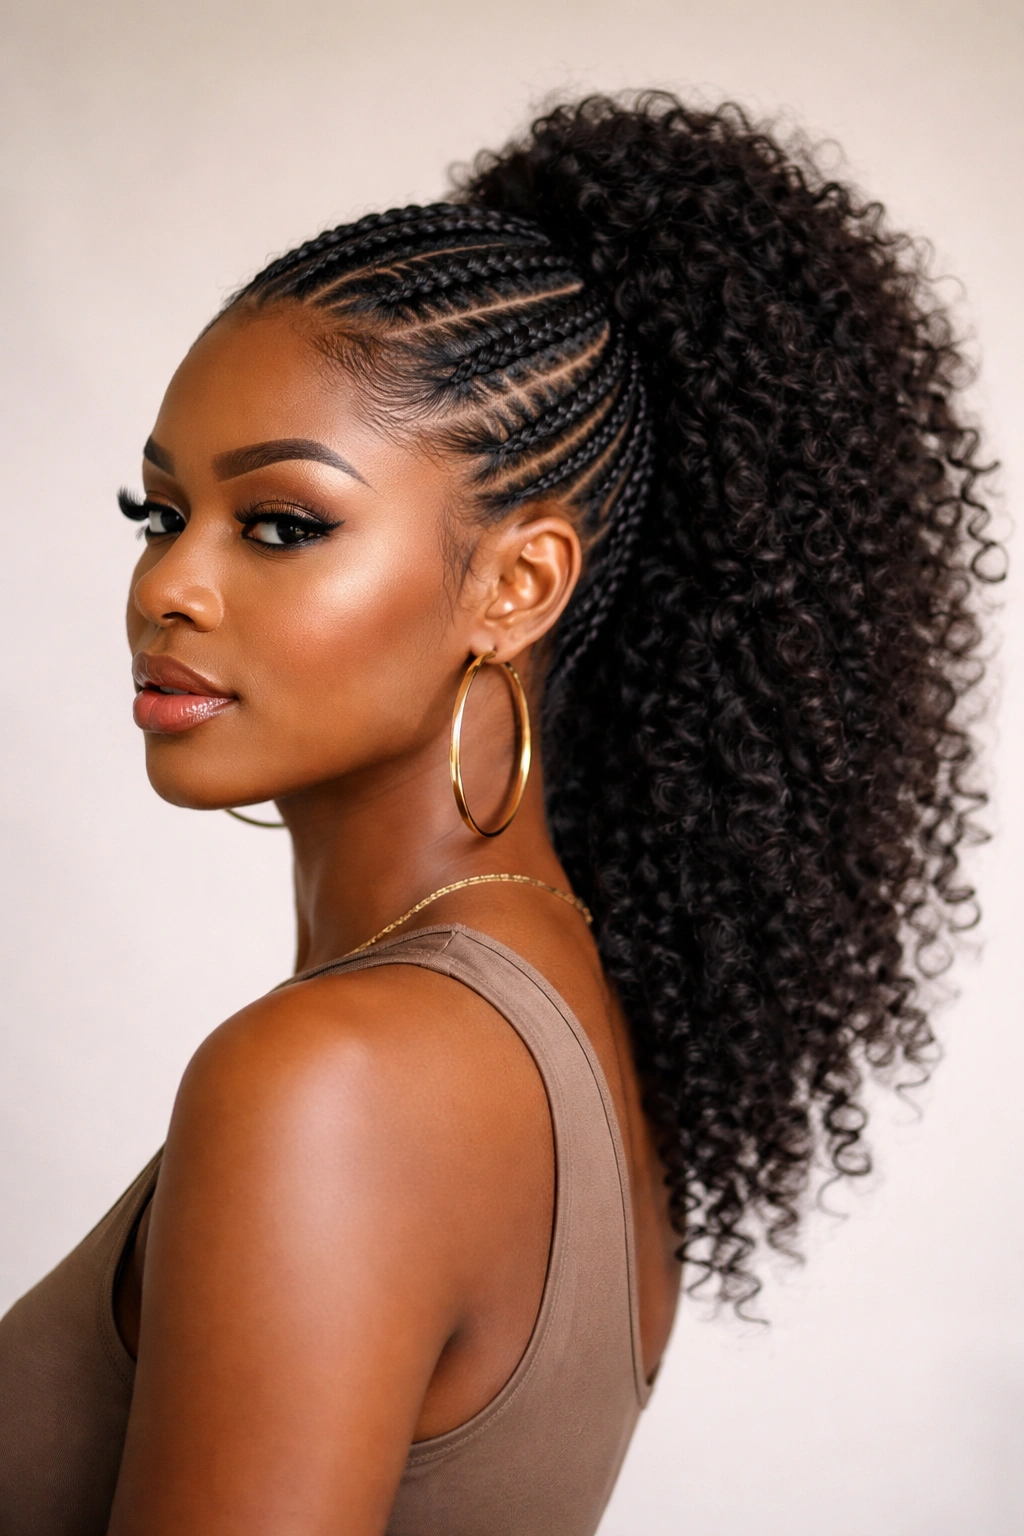
2. Curly Bubble Ponytail
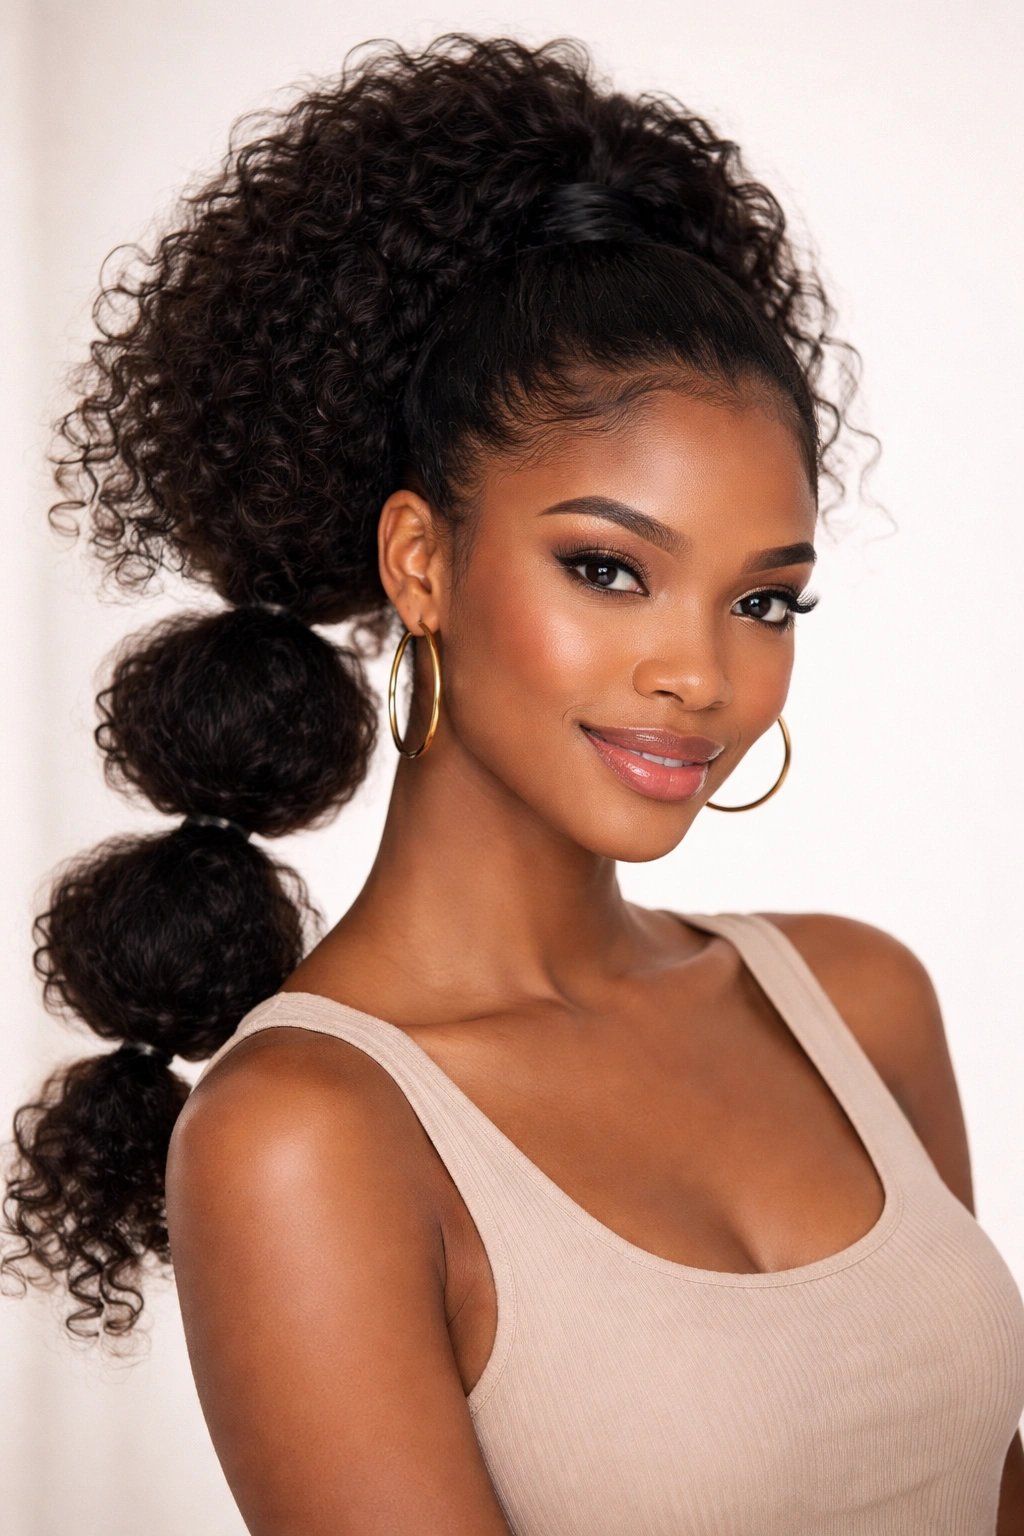
The bubble ponytail celebrates your natural curl pattern while creating a playful, dimensional look that photographs gorgeously. This style involves creating sections within your high ponytail, then securing each section with small elastics to create bubble-like segments that showcase your texture. It’s effortless to achieve, absolutely stunning on camera, and works beautifully for casual outings, creative spaces, and social events.
Why This Style Works So Well for Afro Hair
Bubble ponytails are genuinely designed for textured hair—they don’t require you to fight against your natural curl pattern or spend hours creating smoothness. Instead, you’re amplifying your coils and curls, which means the style actually looks more voluminous and impressive the curlier your hair naturally is. The segmented approach also distributes tension across multiple points rather than concentrating it at the base, making this a genuinely protective option when done correctly.
How to Build Your Bubble Ponytail
- Gather your hair into a high ponytail and secure with a silk elastic
- Create a section about 2-3 inches down from the base and secure with another elastic
- Continue creating sections every 2-3 inches down the length of your ponytail
- Gently fluff each section between the elastics to create the bubble effect
- For maximum volume, gently pull and separate your curls within each bubble
- Add decorative elastics in metallic gold, rose gold, or colors that complement your aesthetic
- Spritz with a light styling spray to hold the shape throughout your day
Worth knowing: The bubble ponytail actually becomes more beautiful as the day goes on because your curls relax and expand slightly, making each bubble fuller and more defined. You can refresh this style by gently fluffing the sections and re-spritzing with water.
3. Braided Crown Ponytail
This style combines two protective techniques—braiding and ponytail gathering—to create a regal, romantic look that’s perfect for date nights, weddings, or anytime you want something a bit more elevated than a standard ponytail. Two or more braids frame your face and head before converging into a voluminous ponytail at the crown, creating a feminine, intricate appearance that actually holds better than you’d expect.
Building the Foundation with Protective Braids
The braided crown ponytail starts with strategic plaits that frame your face and run along your hairline before joining the main ponytail. You can use as few as two braids (one on each side) or create a more complex pattern with three or four smaller braids woven around your head. The advantage of braiding the front sections is that it protects your hairline from tension while creating visual interest and drawing attention to your face.
Step-by-Step Assembly
- Start with moisturized, detangled hair—use a leave-in conditioner for definition
- Create one or more braids starting from your temple or hairline, angling back toward your crown
- Use the braiding method that best suits your texture (three-strand, box braids, or twist braids all work)
- Gather all your hair—both the braids and loose hair—into a high ponytail at the crown
- Secure with a silk elastic and wrap a small section of hair around the base
- Gently fan out and separate the coils in your ponytail for maximum volume
- Allow the braids to slightly loosen throughout the day for a softer, more romantic appearance
Insider note: This style is genuinely protective because the braided sections take tension away from your hairline, and the style naturally looks more polished when braids have loosened slightly, so you don’t need to keep it perfectly tight.
4. Two-Strand Twist Ponytail

Two-strand twists are one of the most versatile protective styles for textured hair, and when gathered into a ponytail, they create a thick, beautiful rope-like texture that’s absolutely striking. This style involves twisting two sections of hair together from root to tip, then gathering all your twists into a cohesive ponytail. The result is a style that’s protective, elegant, and showcases the definition in your natural curl pattern.
The Art of Creating Defined Twists
Two-strand twists are fundamentally about tension and moisture. Damp hair twists more cleanly than completely dry hair, and the twists last longer when you’ve applied a curl-defining product that’s appropriately weighted for your porosity level. Low-porosity hair does better with lighter products that don’t sit on the surface, while high-porosity hair benefits from heavier butters and creams that provide moisture and hold. The key is working with small enough sections that your twists have visual definition without being so tiny that the style takes forever to create.
Creating and Maintaining Your Twist Ponytail
- Apply a curl cream or butter to damp, sectioned hair
- Divide a section into two strands and twist them around each other to the ends
- Repeat for all hair, creating as many twists as you’d like (fuller looks need more twists)
- Gather all finished twists into a ponytail at your desired height
- Secure with a silk elastic and wrap a small section of hair around the base
- Allow twists to set for several hours or overnight for the cleanest definition
- Refresh by spritzing with water and a touch of product if they soften throughout the week
Pro tip: Two-strand twists actually become more beautiful over 3-4 days as they set and the twist pattern becomes more defined. Sleep on them gently using a silk bonnet, and they’ll look even better day three than day one.
5. Pineapple Ponytail for Night Protection
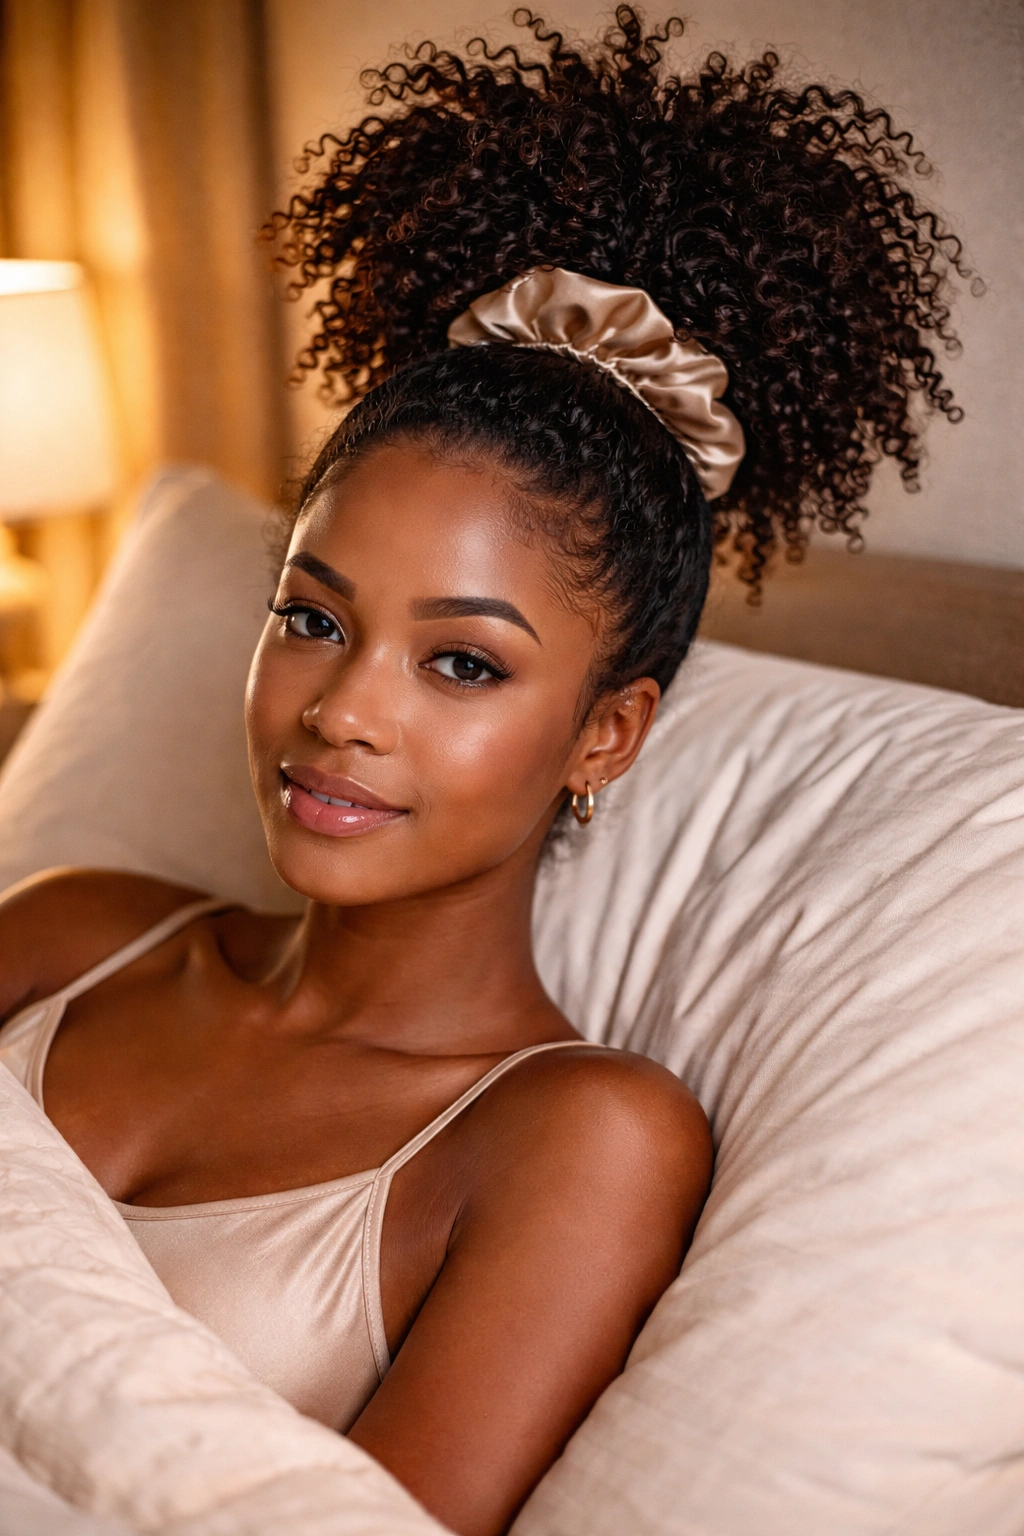
The pineapple ponytail isn’t a style you wear to work—it’s a protective technique you use at night to preserve the shape and definition of your daytime style. This method involves gathering your hair into a loose, high ponytail on the very top of your head (earning the name “pineapple”) and securing it with a silk or satin scrunchie. The positioning keeps your curls and coils from getting crushed against your pillow while you sleep, so you wake up with your style nearly intact.
Why This Sleep Method Actually Works
When you sleep without protecting your hair, your curls get compressed against the pillow, which flattens them and can cause frizz, dryness, and breakage. By gathering your hair into a high ponytail on top of your head, you’re positioning your curls above the pillow surface where they can stay rounded and defined. This is genuinely protective in the long-term sense because it reduces the need for frequent re-styling, which means less manipulation, less heat, and healthier overall hair.
The Proper Pineapple Technique
- Use only soft, silk or satin hair ties—elastic can cause creasing and breakage
- Gather hair into a ponytail positioned on the very crown of your head, quite high
- The ponytail should be loose enough that your finger can slip underneath the elastic easily
- Never go to sleep with your hair in a tight ponytail at this height—the position itself keeps hair secure enough
- Pair with a silk or satin pillowcase for maximum protection (the combination is powerful)
- In the morning, gently release the ponytail and finger-comb or spritz to refresh the style
- The goal is to preserve 80-90% of yesterday’s style, making refresh incredibly quick
Worth knowing: You can genuinely extend your style lifespan from 1 day to 3-4 days when you use the pineapple method nightly, which means fewer wash days and healthier, stronger hair overall.
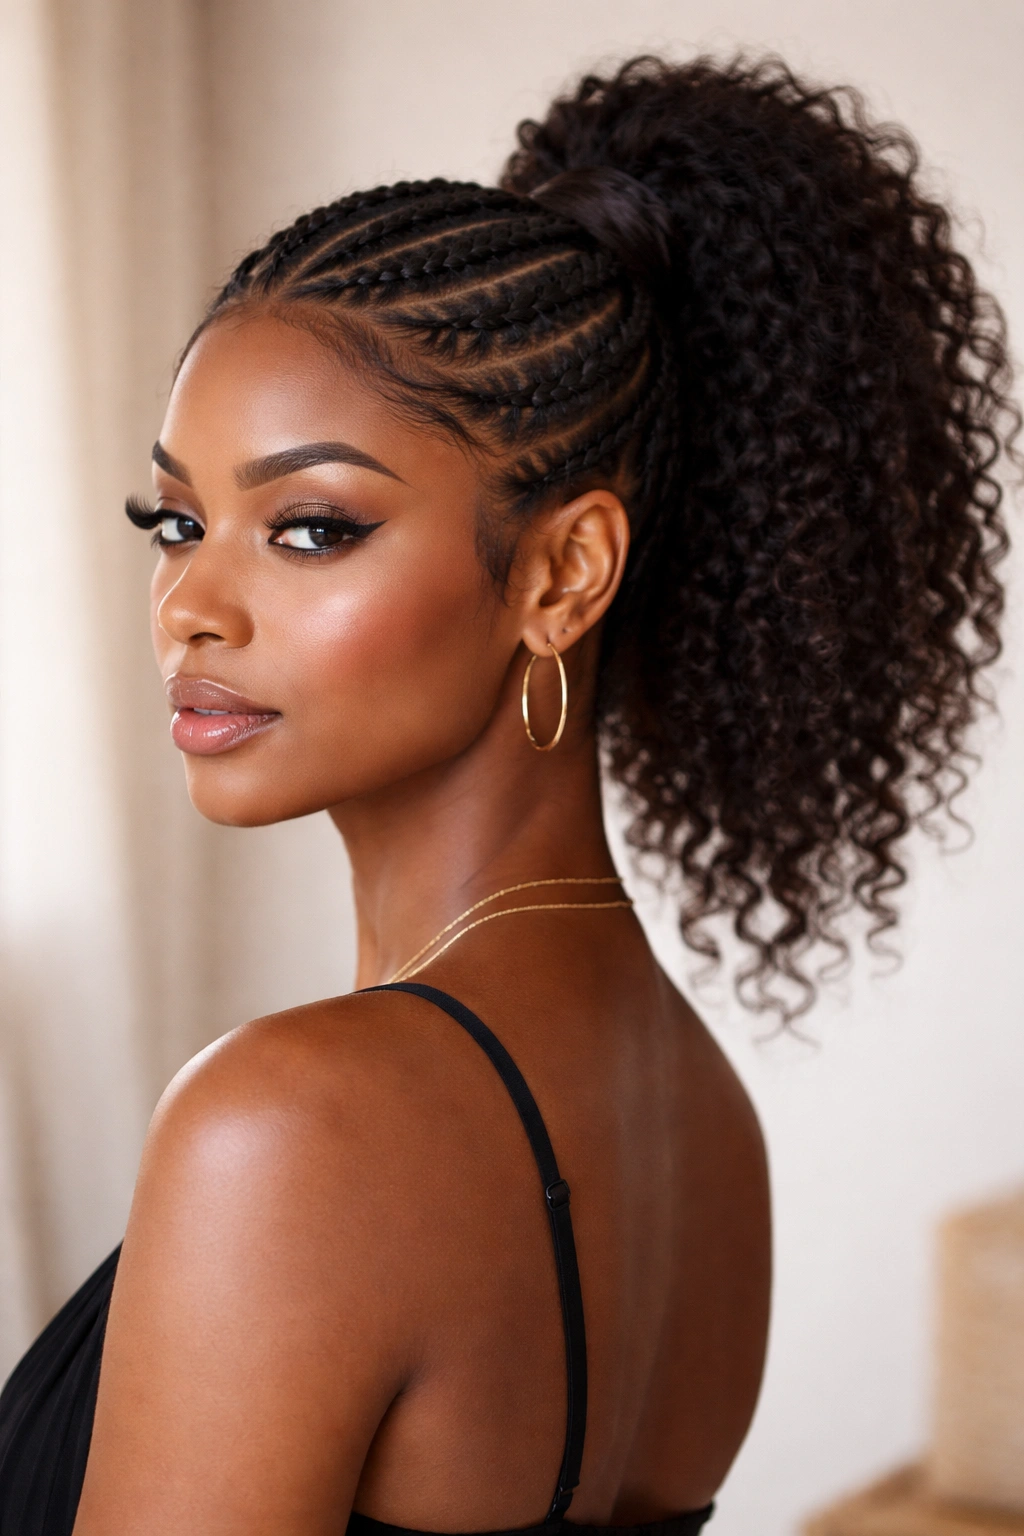
6. Fulani-Inspired Braided Ponytail
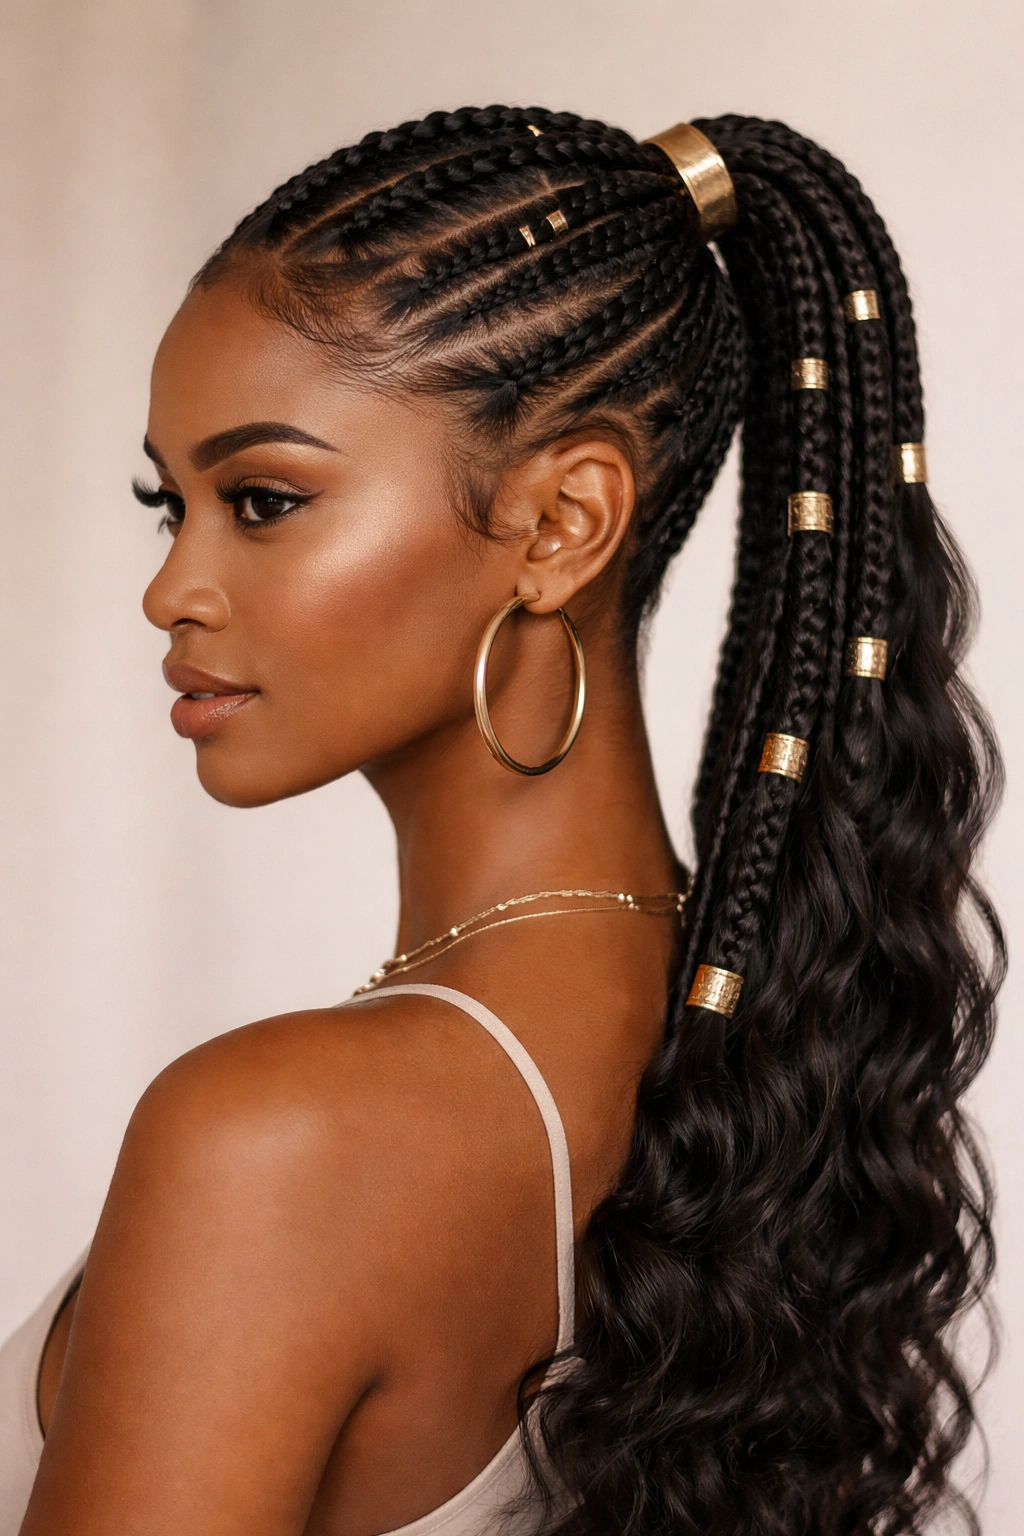
Fulani braids carry cultural significance and stunning visual impact, and when incorporated into a ponytail, they create an authentic, striking hairstyle that honors the tradition while being genuinely practical. This style typically involves cornrows or feed-in braids along the sides and top of the head that converge into a ponytail, often accented with golden cuffs, beads, or shells that reference the original Fulani aesthetic.
Understanding the Cultural Context and Modern Application
Fulani braids originated with the Fulani people of West Africa as both an aesthetic and a practical way to manage hair while indicating social status and cultural identity. When wearing Fulani-inspired braids, it’s important to approach the style with respect for its origins while understanding that modern interpretations can be varied and personal. The key elements are the braids themselves (typically cornrows or feed-in braids), the clean geometric patterns, and often decorative gold or metallic accents that echo traditional adornment.
Creating Your Fulani-Inspired Ponytail
- Braid the sides of your hair in cornrows or feed-in braids, angling toward the back and crown
- Create one or more center braids depending on your desired aesthetic
- Gather all braids and loose hair into a ponytail at the back or crown
- Secure with an elastic and wrap a section of hair around the base for a polished finish
- Add gold cuffs, rings, or beads threaded onto the ponytail for authenticity and elegance
- Space cuffs evenly or cluster them for different visual effects
- Secure beads carefully so they don’t slide and create tension points
Pro tip: This style actually becomes more comfortable as it sets because the braids relax slightly and any initial tension eases significantly by day two or three.
7. Space Buns Ponytail
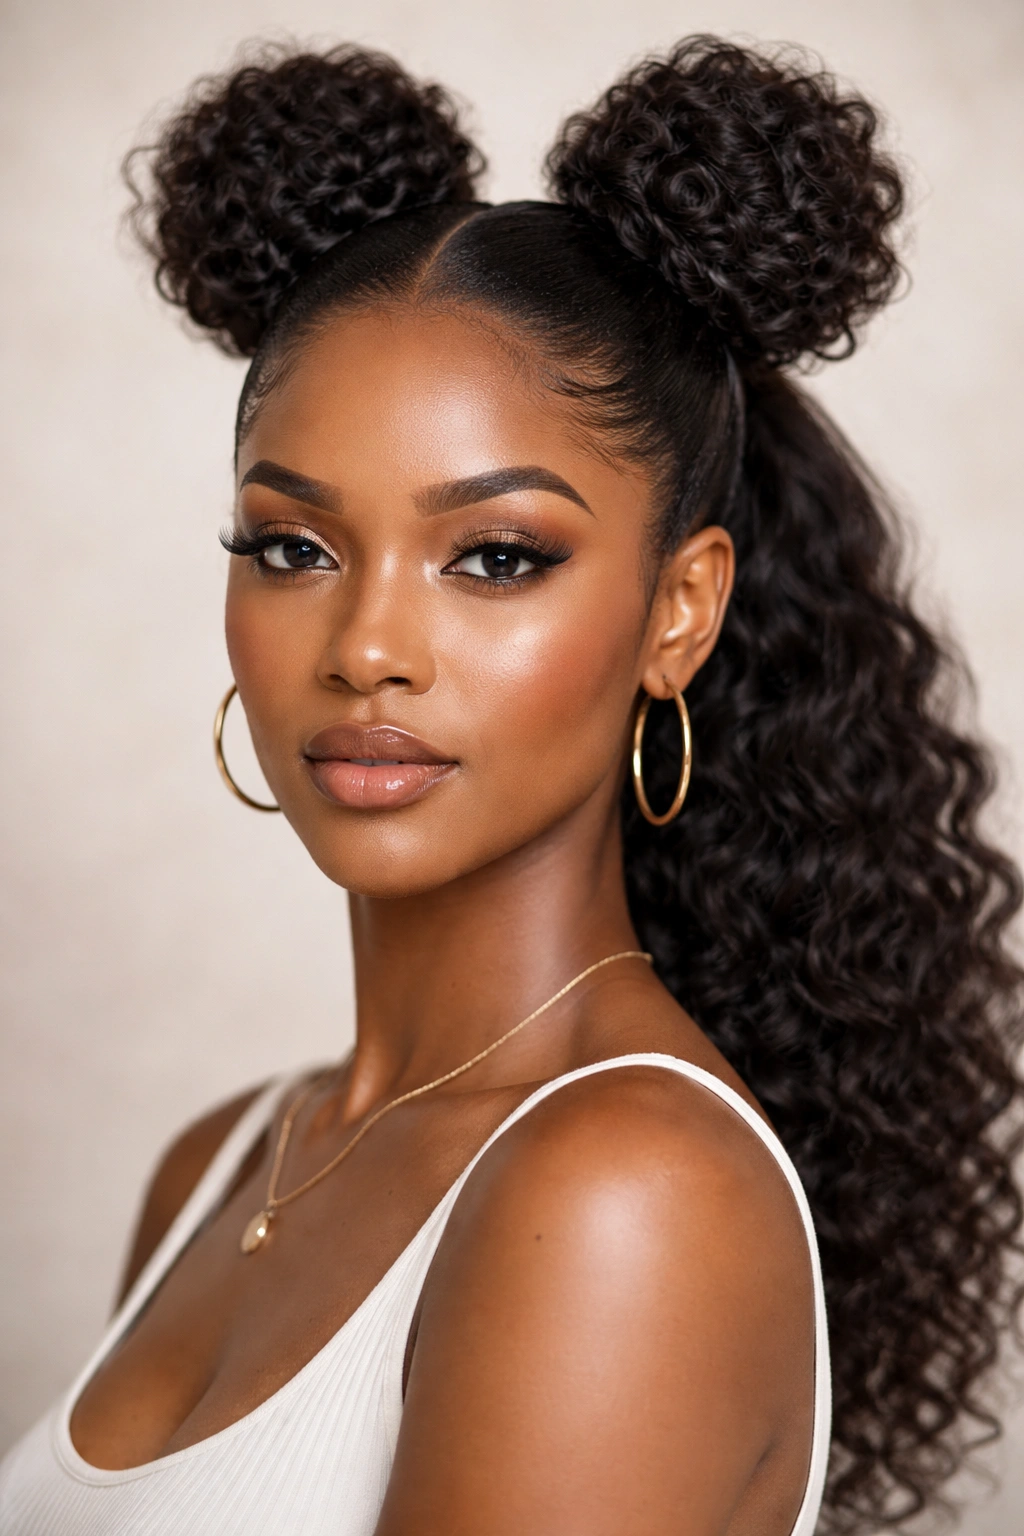
Space buns ponytail is a playful, artistic style that combines multiple buns positioned on your head with gathered curls, creating a fun, bold look that makes a statement. This style is perfect for creative workplaces, music festivals, date nights, or anywhere you want something a bit unexpected and fashion-forward. It’s surprisingly wearable, genuinely flattering on most face shapes, and gives you the chance to showcase your natural texture in a creative way.
Making Space Buns Both Playful and Sophisticated
The key to wearing space buns in an adult-appropriate way is the execution—tightly wound buns look more polished than loose, messy ones, and positioning them strategically can actually flatter your proportions. Space buns naturally draw attention upward, making them a great choice if you want to emphasize your eyes or create height. You can style them for an edgy, creative vibe or a softer, more romantic aesthetic depending on how tightly you wind them and what products you use.
Building Your Space Buns Ponytail
- Section your hair into however many buns you want (two, three, or four are most common)
- Twist or braid each section, then coil it and secure with bobby pins for a tight bun
- Wrap a strand of hair around each bun to secure it and create a polished appearance
- Leave the back section or lower sections loose, or gather them into a secondary ponytail
- Use a curling cream or gel on your loose curls for definition and hold
- Add decorative hair clips, pearls, or metallic accents to each bun for glamour
- Gently separate the twists or braids in your buns for a fuller, more voluminous appearance
Insider note: This style photographs absolutely beautifully because the multiple focal points create visual interest and the height and volume are genuinely flattering on camera.
8. Soft Coil Ponytail with Accessories
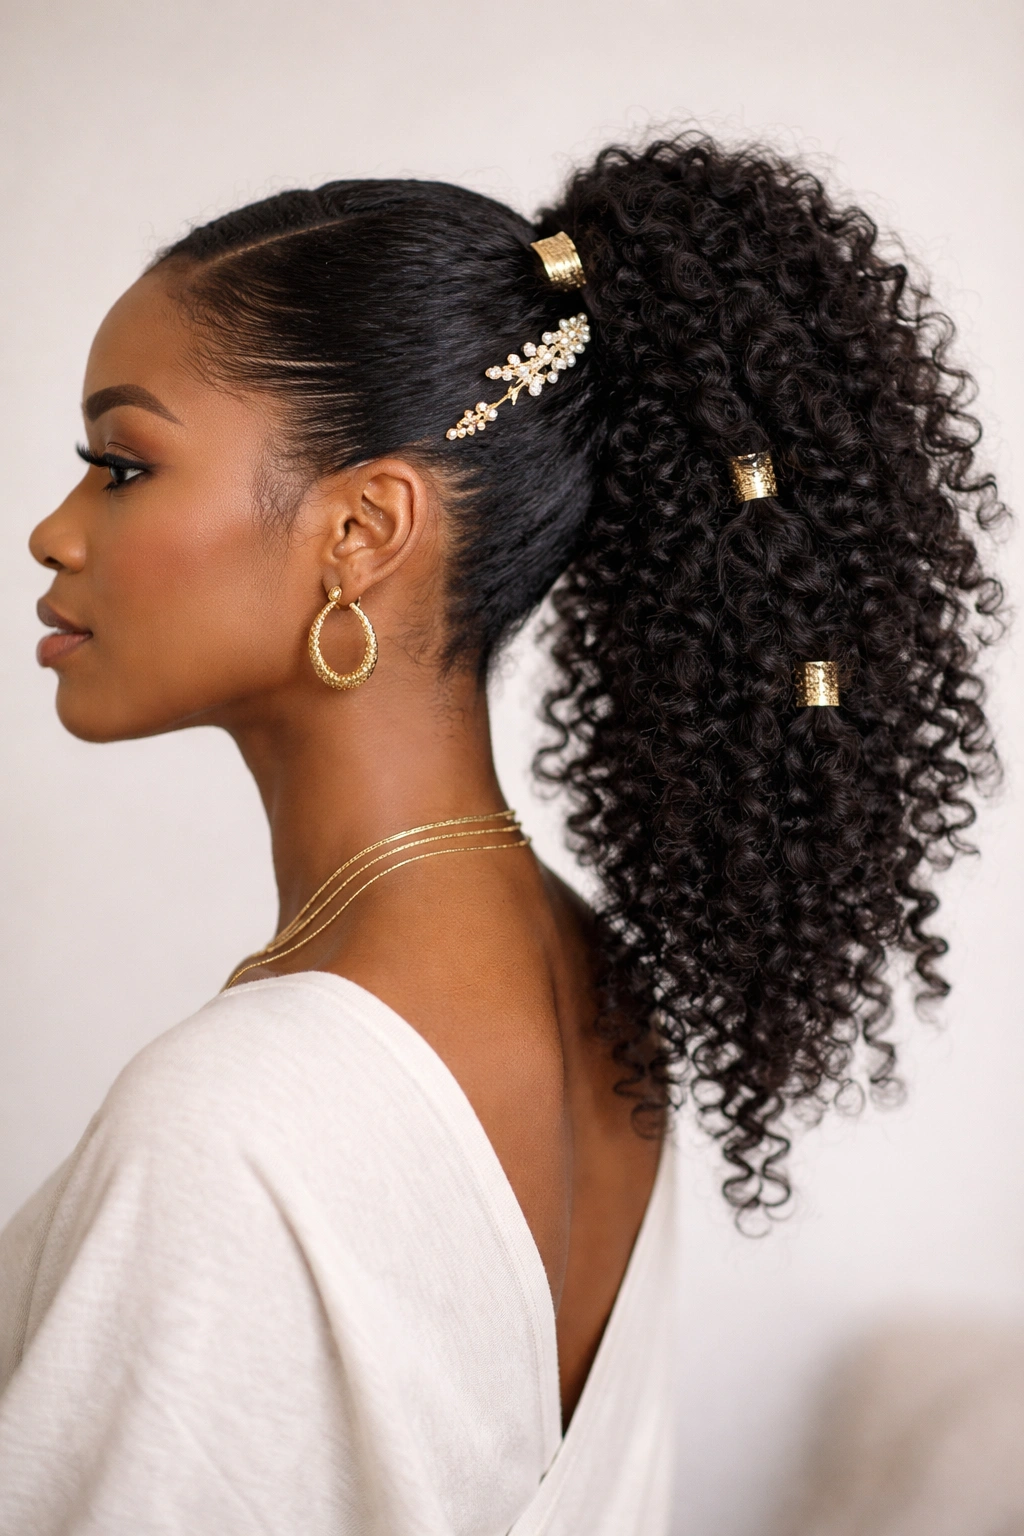
The soft coil ponytail celebrates your natural texture by letting your coils do the work while strategic accessorizing elevates the entire look. This is an effortless style in terms of styling technique, but impactful through intentional accessory choices—think decorative clips, hair sticks, metallic cuffs, or colorful scrunchies that complement your skin tone and personal aesthetic. The appeal of this style is that it requires minimal manipulation of your hair while looking intentional and put-together.
Choosing Accessories That Elevate Your Natural Texture
The right accessories can completely transform a simple style from casual to sophisticated. Metallic cuffs and rings give you an elevated, polished aesthetic that works for professional settings. Colorful scrunchies and clips introduce personality and creativity. Hair sticks or decorative combs add an artistic, intentional quality. The key is selecting pieces that feel authentic to your personal style rather than defaulting to basic black elastics every time.
Creating Your Soft Coil Ponytail
- Apply a lightweight curl cream or gel to damp hair for definition without crunch
- Allow your hair to air dry or diffuse-dry to set your curl pattern
- Gather your hair into a ponytail at your desired height—high, middle, or low
- Secure with your chosen elastic or hair tie
- Wrap a small section of hair around the base if desired for a polished finish
- Slide decorative cuffs or rings onto the ponytail, positioning them where they’re visible
- Add a clip, hair stick, or decorative scarf wrapped around the elastic for extra flair
- Allow your coils to expand and move naturally throughout the day
Worth knowing: This style actually looks better with movement and doesn’t require the tightness that restrictive styles demand, making it a genuinely protective option even for long-term wear.
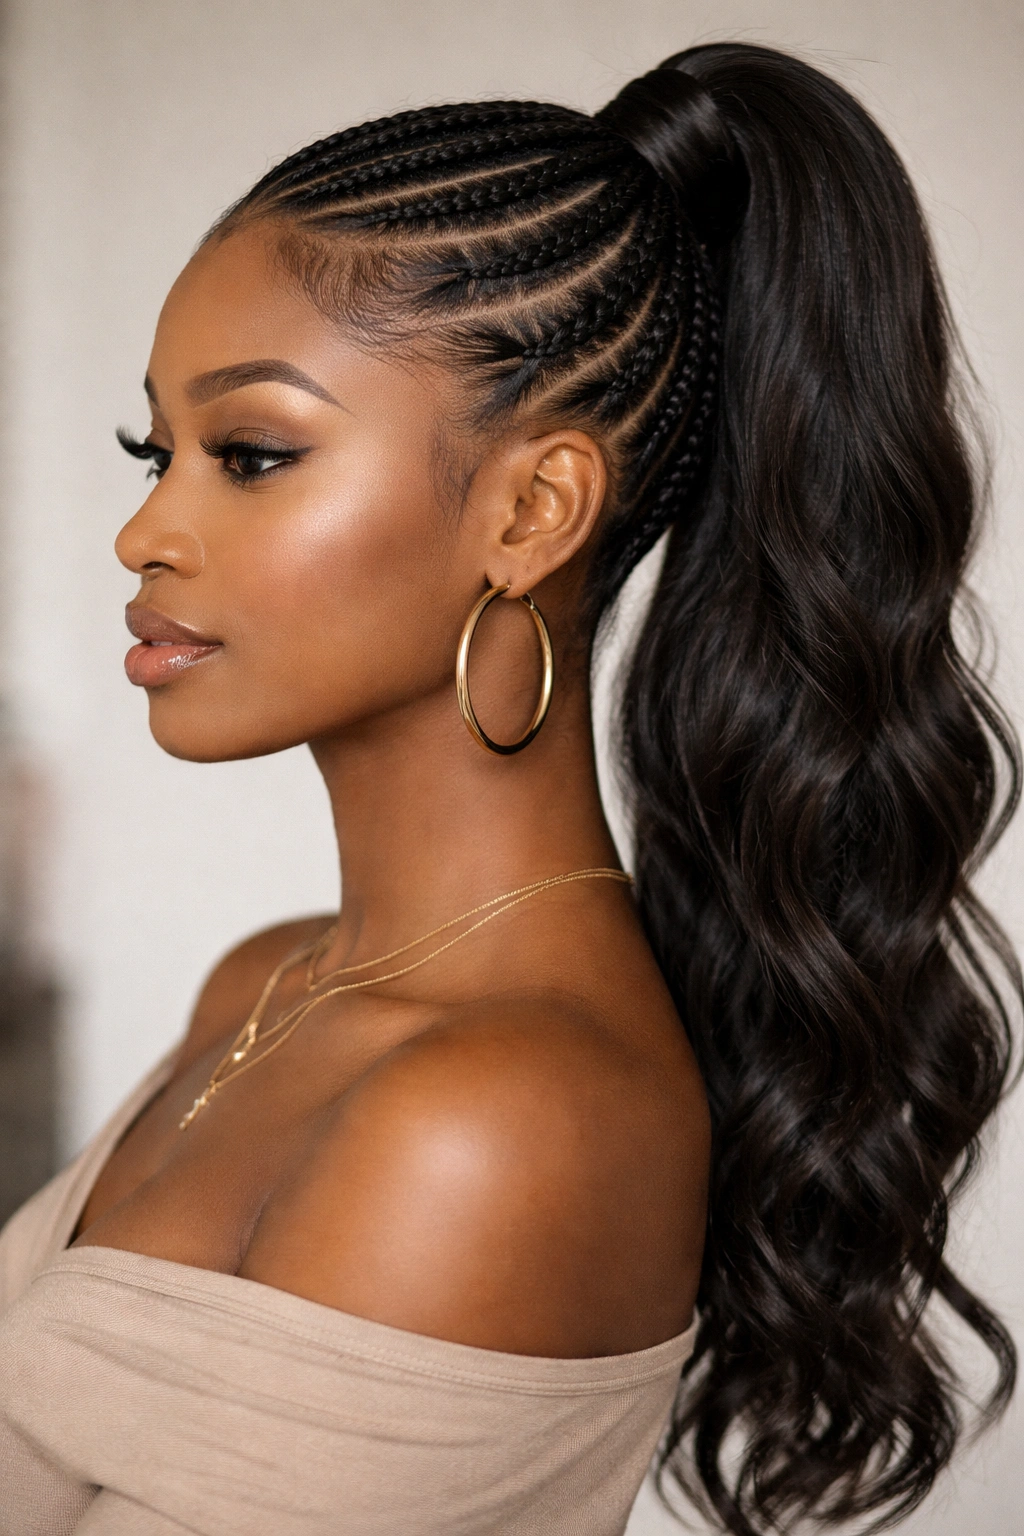
9. Side-Swept High Ponytail
The side-swept high ponytail brings drama and elegance by positioning your ponytail at the crown but angling it dramatically to one side, creating an asymmetrical silhouette that’s flattering and fashion-forward. This style works beautifully for events, date nights, or whenever you want something that feels more intentional and polished than a standard center ponytail. The angled positioning also naturally draws attention toward one side of your face, which can be strategically used to flatter your features.
Positioning for Maximum Impact
A side-swept high ponytail isn’t just about moving your ponytail to the side—the positioning, angle, and how you style the loose sections matter tremendously. You can create a clean, sleek version by smoothing all hair back and positioning the ponytail far to one side. Alternatively, you can leave face-framing pieces loose or loosely braided, creating a softer, more romantic aesthetic while still maintaining the asymmetrical positioning that makes this style distinctive.
Styling Your Side-Swept Ponytail
- Apply smoothing cream or gel to damp hair and work it through gently
- Smooth the hair back at an angle, positioning it toward one side of your head rather than center
- Secure the ponytail with a silk elastic positioned where you want the fullness to gather
- Create a section of loose hair or a small braid on the opposite side for balance
- Wrap hair around the elastic base for a polished finish
- Pin any loose sections gently with bobby pins that match your hair color
- Fluff the ponytail and loose sections for dimension and volume
Pro tip: Position your side-sweep toward the side of your face you want to emphasize—this naturally draws the viewer’s eye in that direction and can be strategically used to balance facial proportions.
10. Knotless Braided Ponytail
Knotless braiding is a protective technique that’s gentler on your hair and scalp compared to traditional box braids, and when gathered into a ponytail, it creates a beautiful, distinctive look. Knotless braids start with minimal hair at the root and gradually thicken as you add more strands, which means significantly less tension at your scalp and hairline. This style is genuinely protective in the long-term sense because the reduced tension means less risk of breakage and traction alopecia.
Why Knotless Braids Are Worth the Time Investment
Knotless braids require more skill and patience than traditional box braids because you’re creating a gradual blend from your natural hair into the braid extension. The investment in time pays dividends through comfort, longevity, and hair health. These braids last longer than regular braids because they’re less likely to unravel at the roots, and they feel more comfortable because there’s no knot pulling at your scalp. For ponytail styles, the softer root creates a more natural, blended appearance where your natural hairline looks intentional rather than braided.
Creating Your Knotless Braided Ponytail
- Section your hair into the size braids you want—smaller sections create more detail
- Start each braid at the hairline with just your natural hair, gripping minimally
- Gradually introduce braid extension hair as you braid down, building thickness
- Braid all sections down to the ends, keeping tension even and consistent
- Gather all finished braids and loose hair into a ponytail at your desired position
- Secure with a silk elastic and wrap a small section of hair around the base
- Smooth any flyaways with an edge control product
- Gently separate the braids for a fuller appearance if desired
Insider note: Knotless braids can last 5-7 weeks when properly maintained, which makes them economical and genuinely protective for long-term wear.
11. Curved Ponytail with Feed-in Braids
The curved ponytail with feed-in braids combines the clean lines of cornrows with the beauty of gathered natural hair. Feed-in braids are created by gradually incorporating small sections of hair as you braid along your scalp, creating clean, dimensional braids that blend seamlessly with your natural hair. When these curved braids converge into a ponytail, they create an intricate, intentional style that’s striking and sophisticated.
The Difference Between Feed-in and Traditional Box Braids
Feed-in braids start with minimal hair and gradually incorporate more as you braid down, creating a tapered, elegant appearance that’s distinctly different from box braids where equal-sized hair sections are added from the beginning. Feed-in braids are faster to create when they’re curved toward a ponytail point because you’re not braiding all the way to the ends—you’re naturally incorporating loose hair as you move toward your gathering point. This technique creates a genuinely protective style that looks intentional and beautiful.
Building Your Curved Feed-in Ponytail
- Create feed-in braids starting from your hairline, feeding in hair as you braid back
- Curve the braids gradually toward where you want your ponytail to gather
- The braids should angle downward and backward, converging at a single point
- Gather all braid strands and loose hair into a ponytail
- Secure with a silk elastic and wrap a small section around the base
- Gently fan out your ponytail for volume and dimension
- Allow braids to relax slightly throughout the day for a softer appearance
Worth knowing: This style distribution of tension across multiple curved braids is genuinely protective because no single point is bearing all the weight of your ponytail.
12. Textured Mohawk Ponytail
The textured mohawk ponytail is for anyone who wants to make a bold statement while keeping their hair up and protected. This style involves creating a central strip of raised, textured hair (achieved through braiding, twisting, or stacked coils) that runs along the crown of your head, converging into a voluminous ponytail. The visual impact is absolutely striking—it’s edgy, artistic, and genuinely wearable when styled with intention.
Creating Statement Hair With Protective Technique
The textured mohawk ponytail works because it combines visual boldness with actual hair health. By braiding or twisting the sections rather than teasing or using heat, you’re creating structure that’s genuinely protective. The raised texture draws attention upward and makes your features appear more elevated. This style works beautifully for creative professionals, music events, artistic spaces, or anywhere you want to showcase your personality and confidence.
Building Your Textured Mohawk Ponytail
- Divide your hair into sections—typically a central section and sections on either side
- Create two-strand twists, braids, or stacked coils down the center of your head
- Keep the side sections separate and loose or create thinner braids along the sides
- Gather all sections into a ponytail at the back of your head
- Secure with a silk elastic and wrap a small section around the base
- Fluff and fan out your ponytail for maximum volume
- Gently pull and separate the twists or braids in your mohawk for definition and visual interest
- Add decorative cuffs or clips to accent the textured sections
Pro tip: This style actually becomes more visually interesting as it sets because the twists or braids relax slightly and the mohawk becomes fuller, so it looks even better on day two or three.
Final Thoughts
The beautiful thing about wearing ponytails with afro and textured hair is that you’re not choosing between protective and stylish—the best styles are both simultaneously. Each of these twelve ponytail variations works with your natural texture rather than against it, which means they’re genuinely protective when executed with appropriate tension and products that support your hair’s health.
The key to success with any of these styles is starting with moisturized, well-conditioned hair and using products appropriate for your specific curl pattern and porosity level. Invest in silk or satin hair ties and pillowcases, which reduce friction and breakage dramatically. Approach each style with the understanding that your hair’s health comes first, and beautiful styling choices follow naturally from that foundation.
Your ponytail shouldn’t feel like a compromise between protection and style—it should be a celebration of your texture, your creativity, and your confidence. These twelve options give you the flexibility to match your mood, your schedule, and your occasions while keeping your hair healthy, strong, and absolutely stunning.