Butterfly braids have taken the hair world by storm, and when you combine them with a ponytail? You’ve got a hairstyle that’s both whimsical and incredibly wearable. The beauty of butterfly braid ponytails lies in their ability to feel fancy and polished without requiring hours in front of a mirror. Whether you’re prepping for a special event, want to elevate your everyday look, or simply crave something more interesting than a standard pony, these styles deliver impact with personality.
The real appeal of butterfly braid ponytails is that they work across different hair types, lengths, and textures. If you’ve got thick hair, thin hair, straight locks, or natural curls, there’s a butterfly braid variation that’ll work beautifully for you. The braid itself—with its distinctive, airy appearance that resembles delicate wings—adds visual interest and texture that makes your ponytail feel intentional and thoughtfully styled rather than thrown-together.
What makes these styles so satisfying is that once you understand the core butterfly braid technique, you can adapt it endlessly. Tuck it into a high pony for a modern edge, wrap it around a sleek low ponytail for timeless elegance, or create a half-up butterfly braid pony for something fresh and slightly less formal. The versatility is genuinely impressive, and honestly, the learning curve isn’t as steep as you might think.
Let’s dive into twelve distinct butterfly braid ponytail styles that’ll give you plenty of inspiration for your next good-hair day.
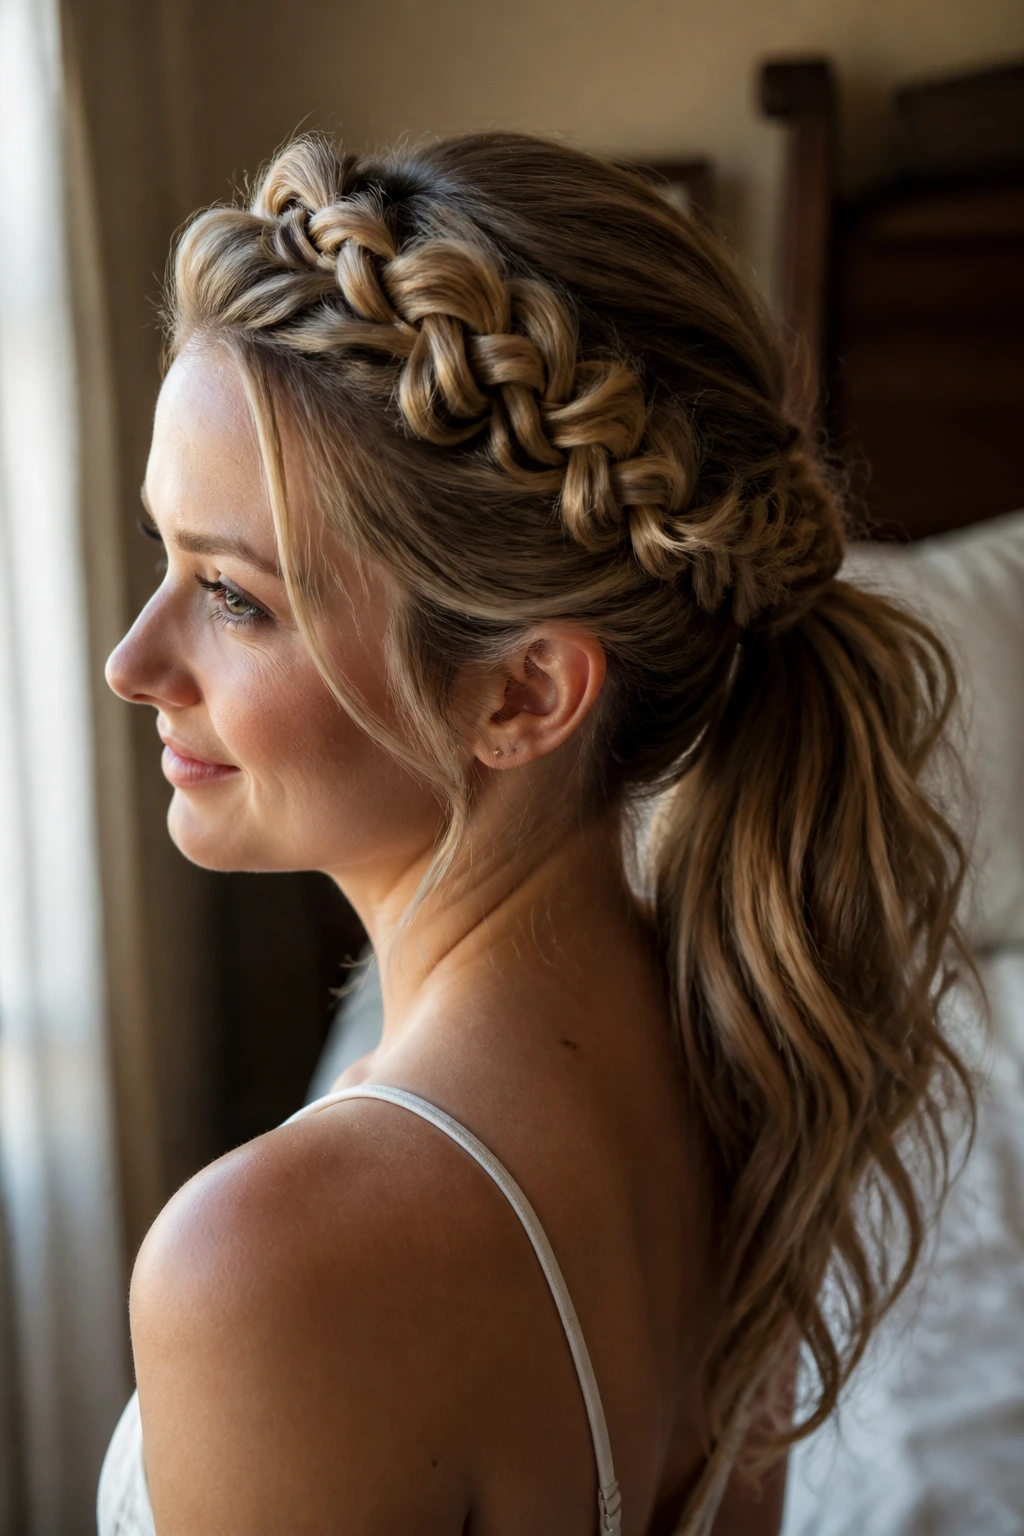
1. Classic High Butterfly Braid Ponytail
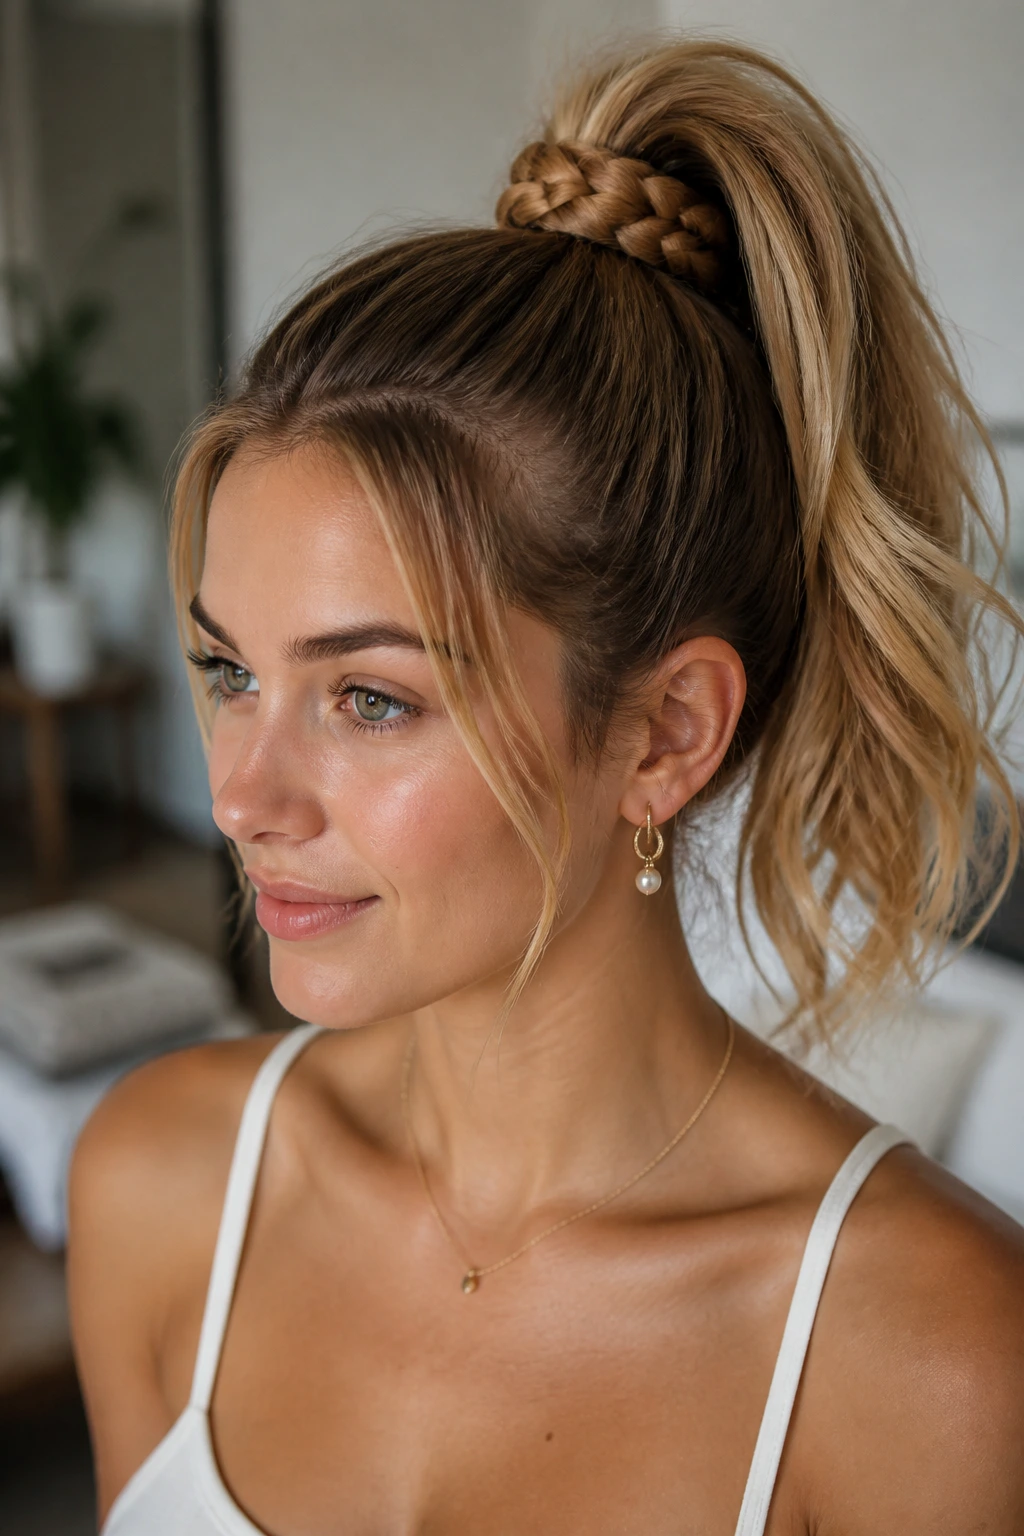
The high butterfly braid ponytail is your everyday superhero—polished enough for the office, cute enough for coffee with friends, and easy enough to pull off on autopilot once you’ve done it twice. This style pairs a traditional butterfly braid with a sleek high ponytail that keeps everything off your face while making a clear visual statement.
How to Execute It
Start by gathering your hair into a high ponytail at the crown, but don’t cinch it tight just yet. Create a butterfly braid starting from one side of the ponytail (your choice of direction), working the braid carefully so it’s visible and not buried. The key is tension—not so tight that it looks harsh, but tight enough that the braid structure holds its shape throughout the day. Once your butterfly braid is complete and wrapped around the base of the ponytail, secure everything with a quality elasticated band. A few face-framing pieces make it feel intentional rather than severe.
Best For and Pro Tips
- Works beautifully with straight, wavy, and gently curled hair
- The high placement elongates your neck and flatters most face shapes
- Add texture beforehand by curling or waving your hair—butterfly braids photograph better with movement
- This style lasts 8-10 hours without needing touch-ups, making it ideal for longer days
- A light texture spray applied before braiding helps the braid hold definition all day
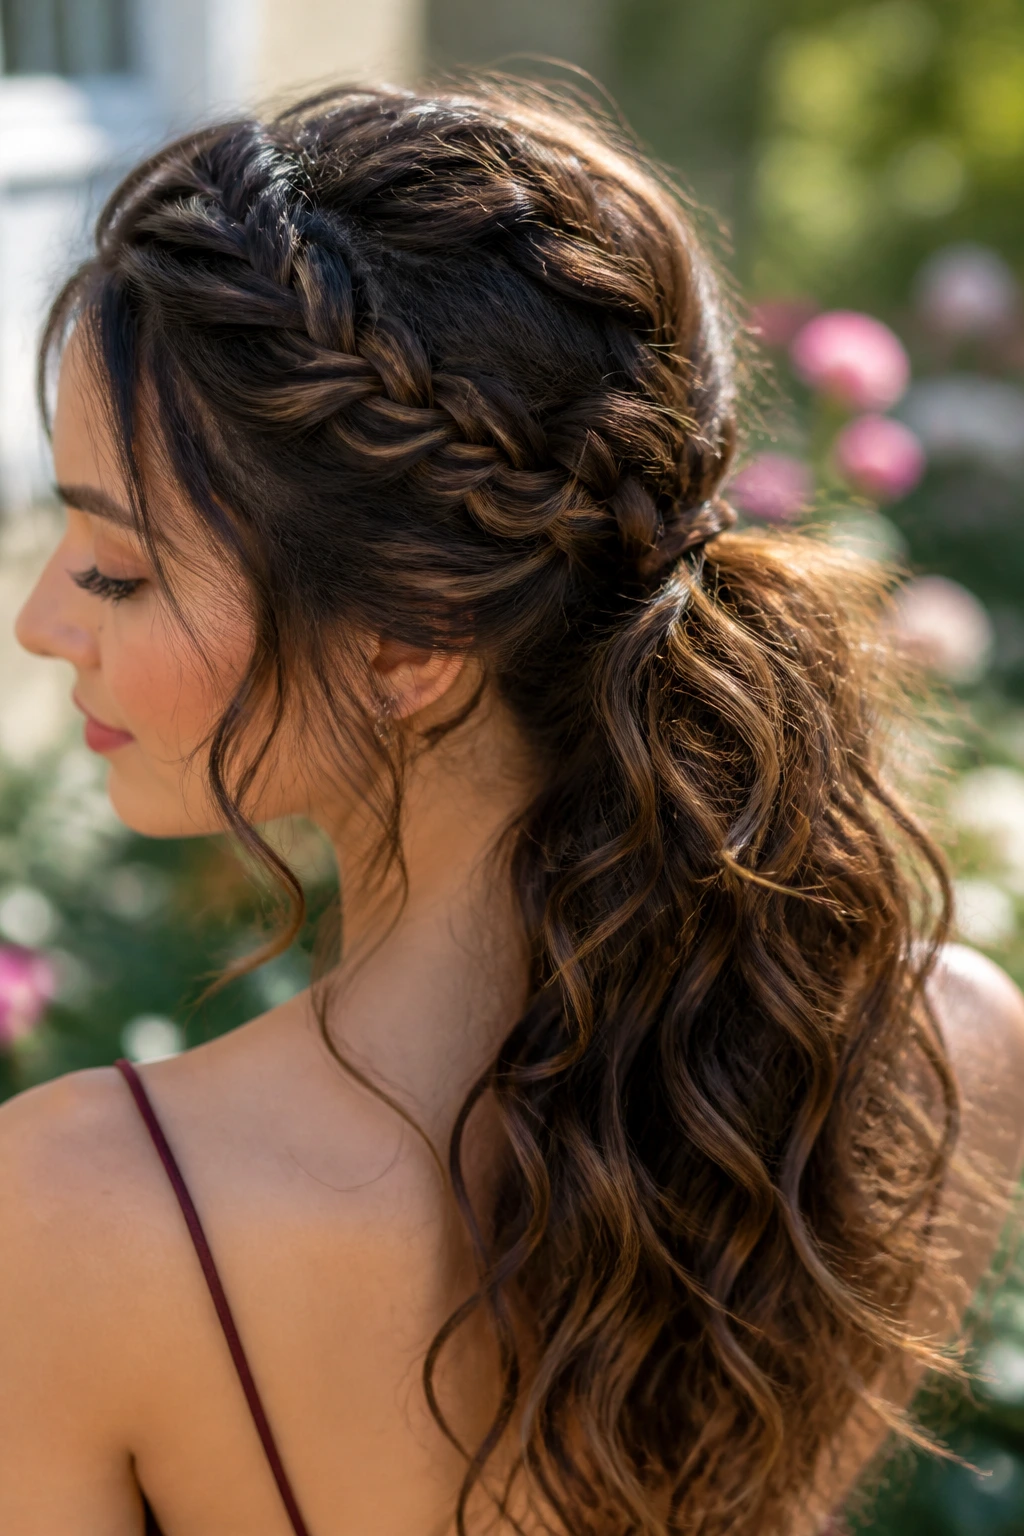
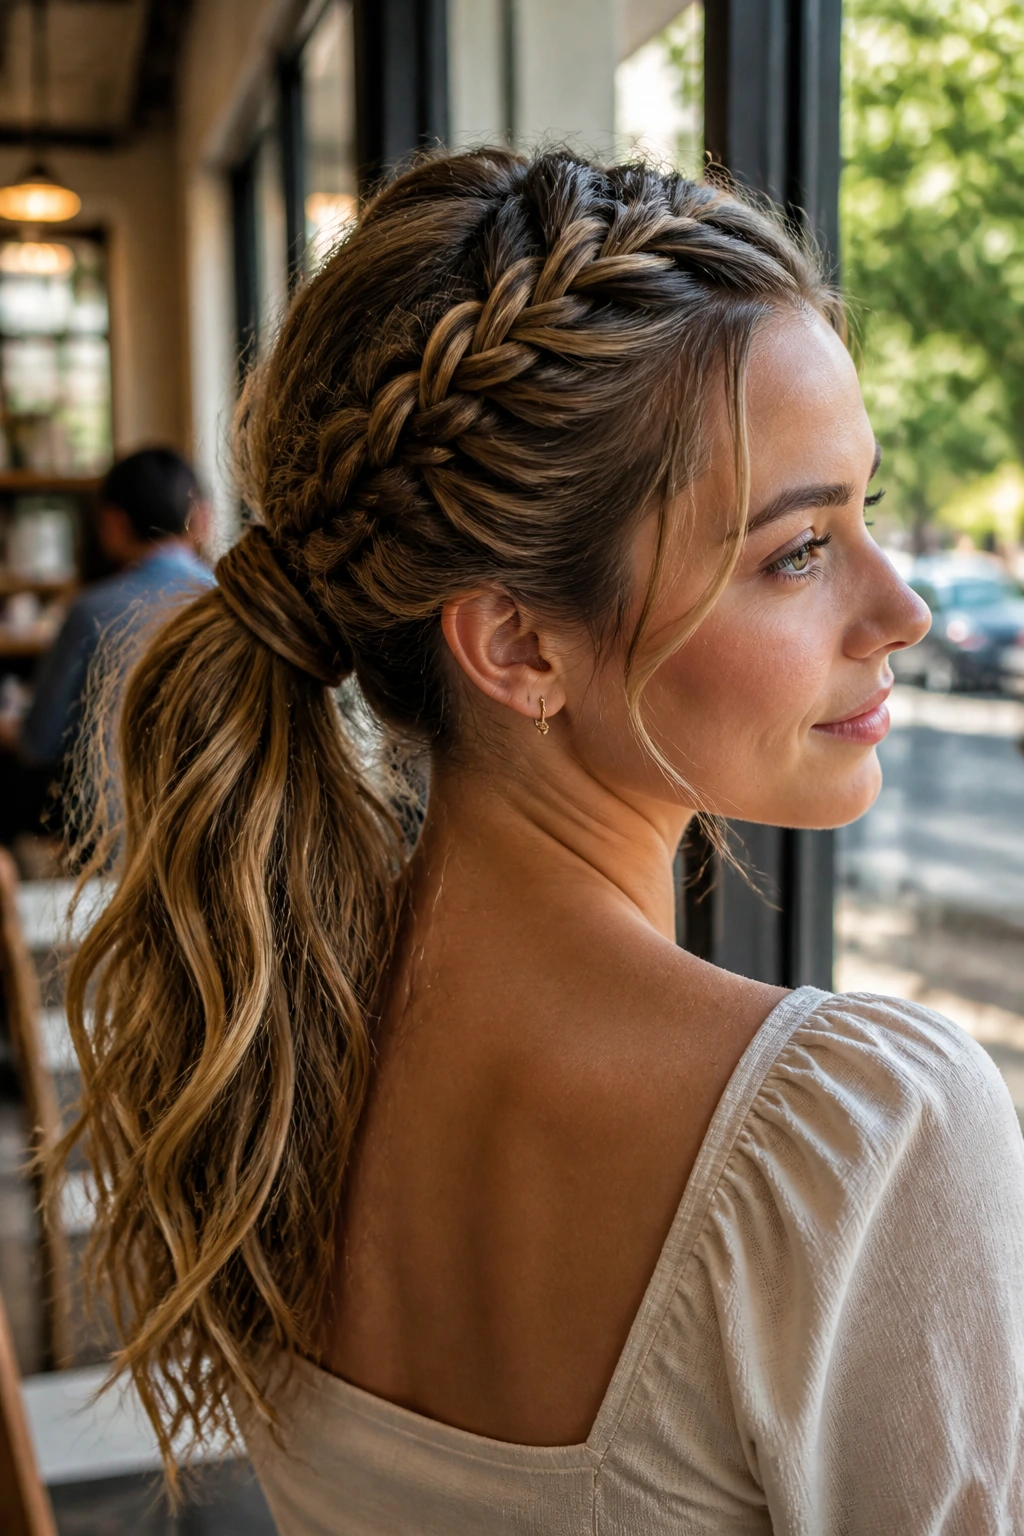
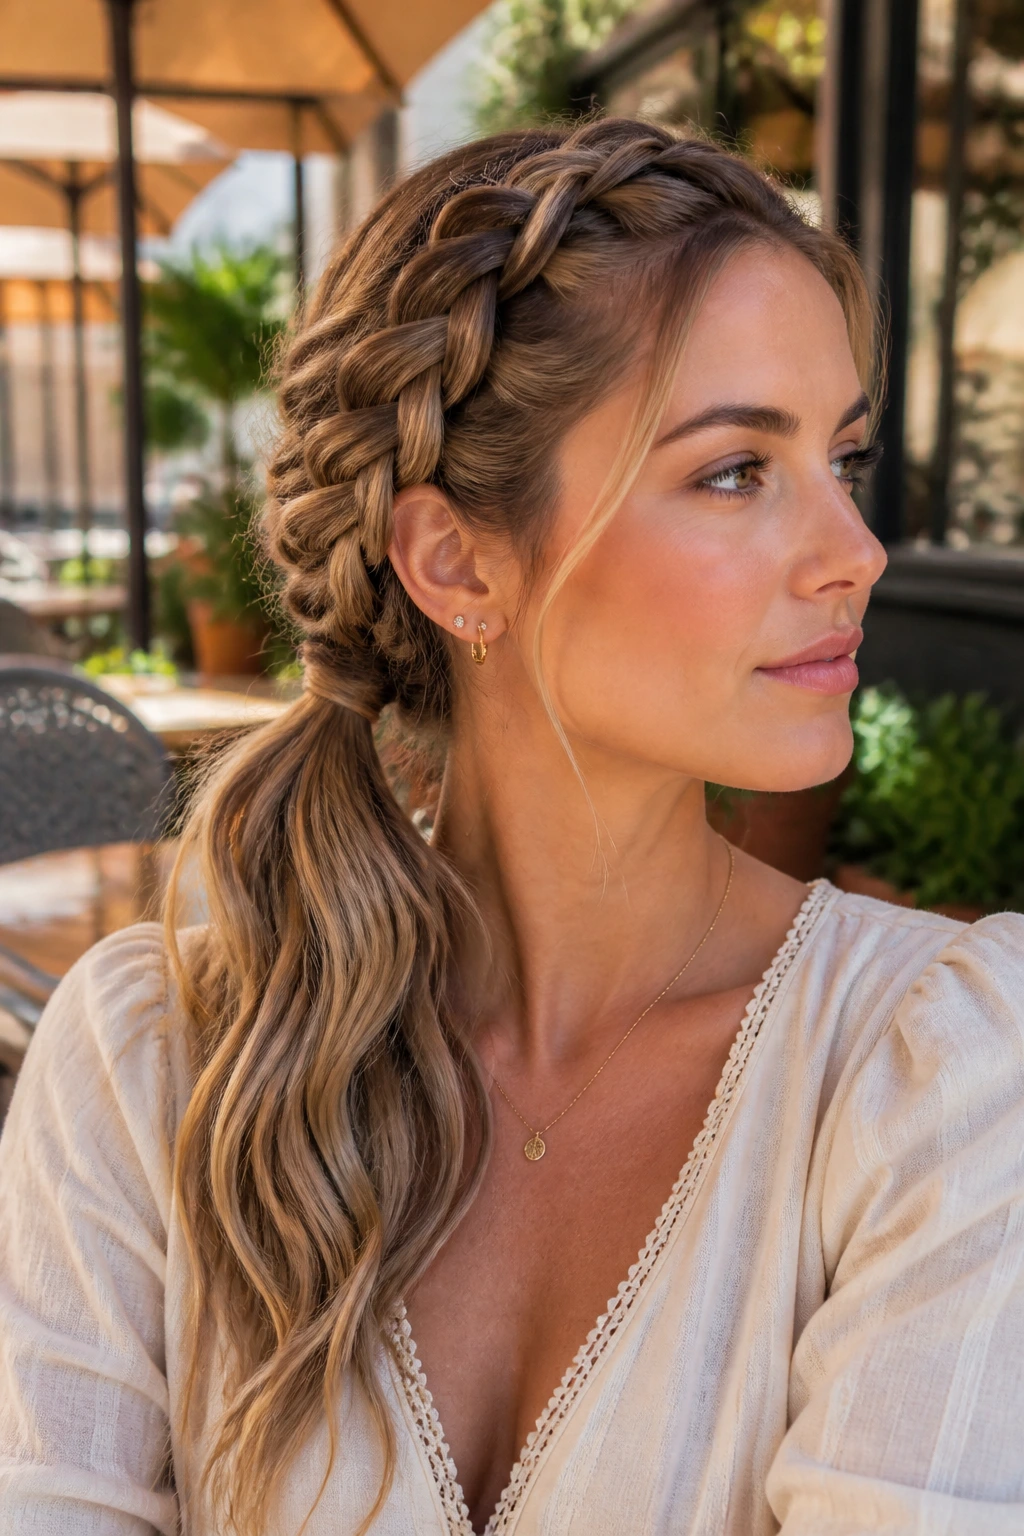
2. Low and Loose Butterfly Braid Ponytail
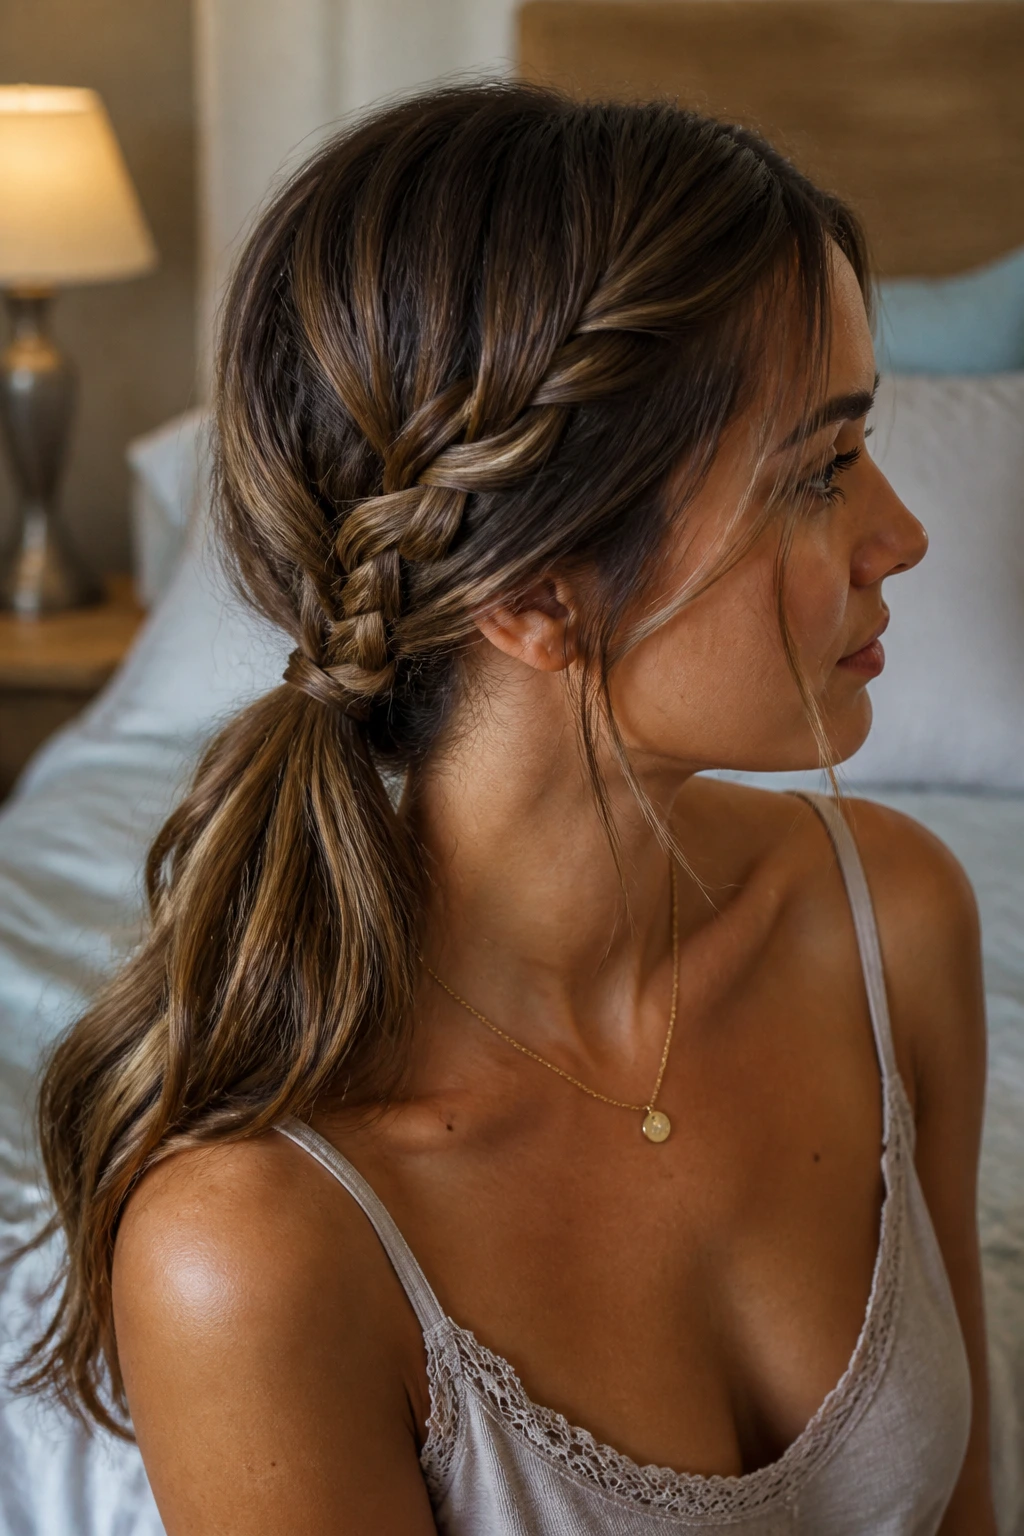
If “high and tight” makes you feel like you’re pulling your hair too much, the low butterfly braid ponytail is your answer. This version sits at the nape of your neck, feels infinitely more relaxed, and somehow manages to look sophisticated while being genuinely comfortable.
Creating the Effortless-But-Intentional Look
Brush your hair back loosely and gather it into a low ponytail—and yes, loose is the operative word here. The magic happens when you create a butterfly braid that wraps around your ponytail base with a soft, undone quality. Pull gently at the braid edges to create that coveted “lived-in” texture that makes it look like you didn’t try too hard (even though you absolutely did, and that’s the whole point).
Why This Works
- Significantly more comfortable for wearing eight-plus hours straight
- The low placement is incredibly flattering on heart-shaped and round face shapes
- Pairs perfectly with both casual and dressier outfits without needing adjustment
- Works with longer hair, but you can absolutely make this work with shoulder-length hair too
- Romantic and elegant without veering into “trying too hard” territory
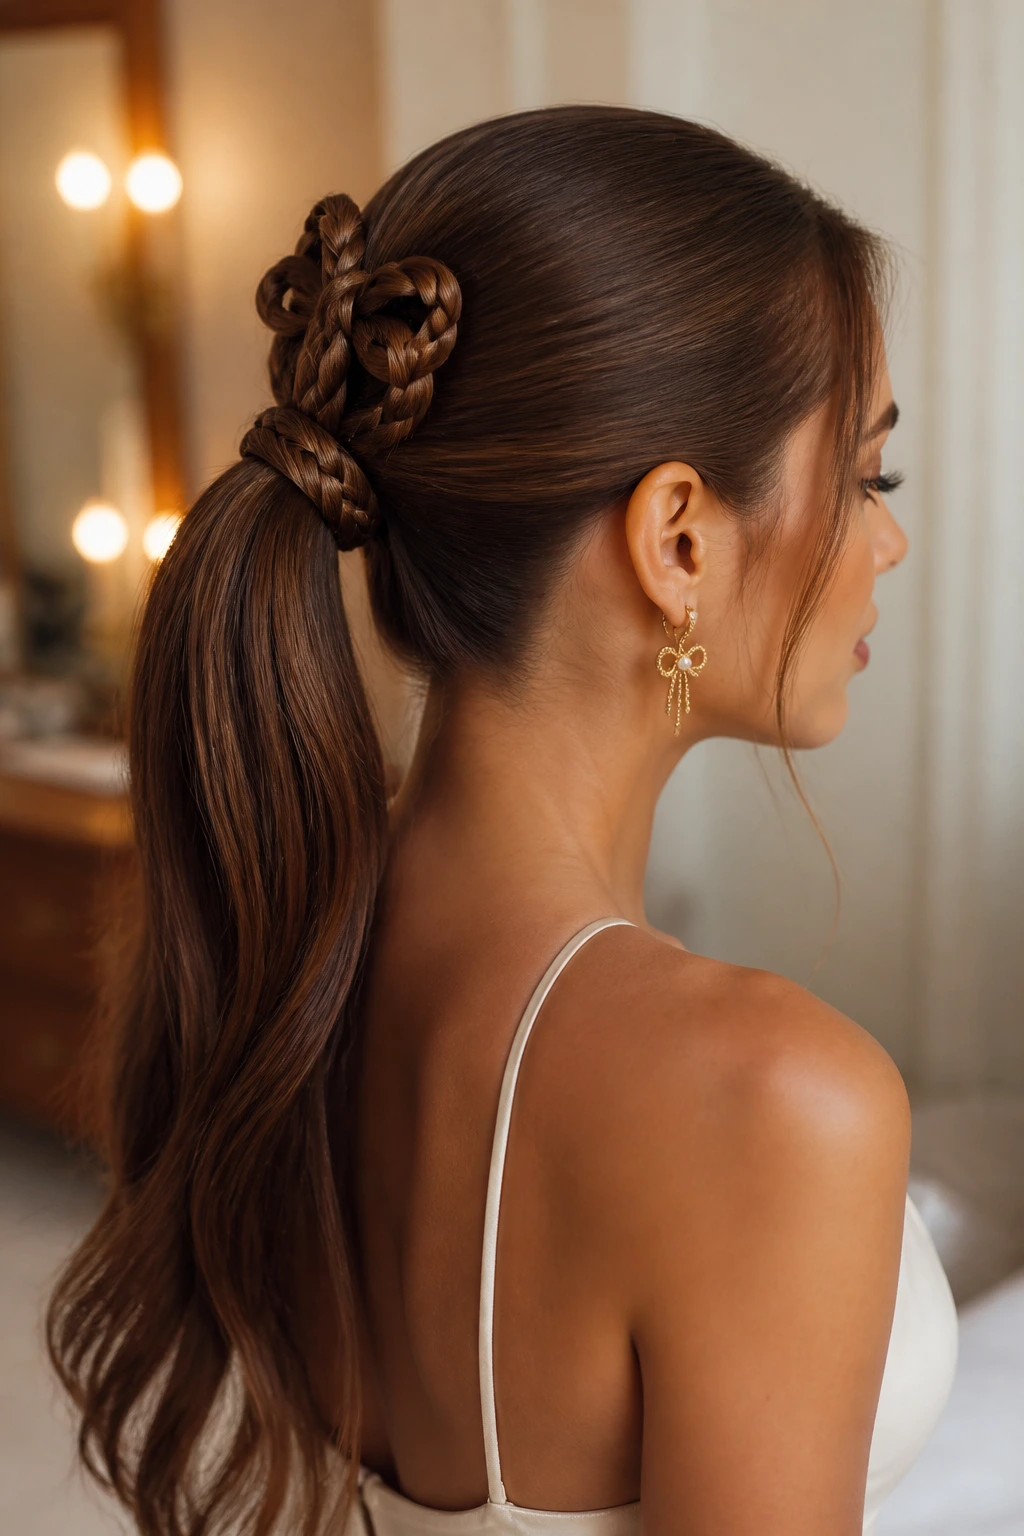
3. Double Butterfly Braid Ponytail

For when one butterfly braid simply isn’t enough, the double butterfly braid ponytail creates symmetry and visual drama that’s genuinely show-stopping. This style requires a bit more time and patience, but the payoff is completely worth it.
The Technical Breakdown
Divide your ponytail into two sections vertically. Create a butterfly braid on each side, working them in toward the center so they frame the ponytail beautifully. The braids should mirror each other—same tension, same placement, same overall approach. Wrap them around the base together, or intertwine them slightly for extra impact. Secure with a hair tie and pull the braids gently to enhance the butterfly shape.
When and Why to Wear It
- Perfect for special events, date nights, or when you want your hair to be the talking point
- Works best with thick or medium-thick hair that can handle the visual weight
- Makes a bold statement without looking overly complicated (even though it is)
- Incredibly striking in side-profile photos
- You can absolutely simplify this by doing a double braid ponytail without the butterfly technique if you’re short on time
4. Butterfly Braid Half-Up Ponytail
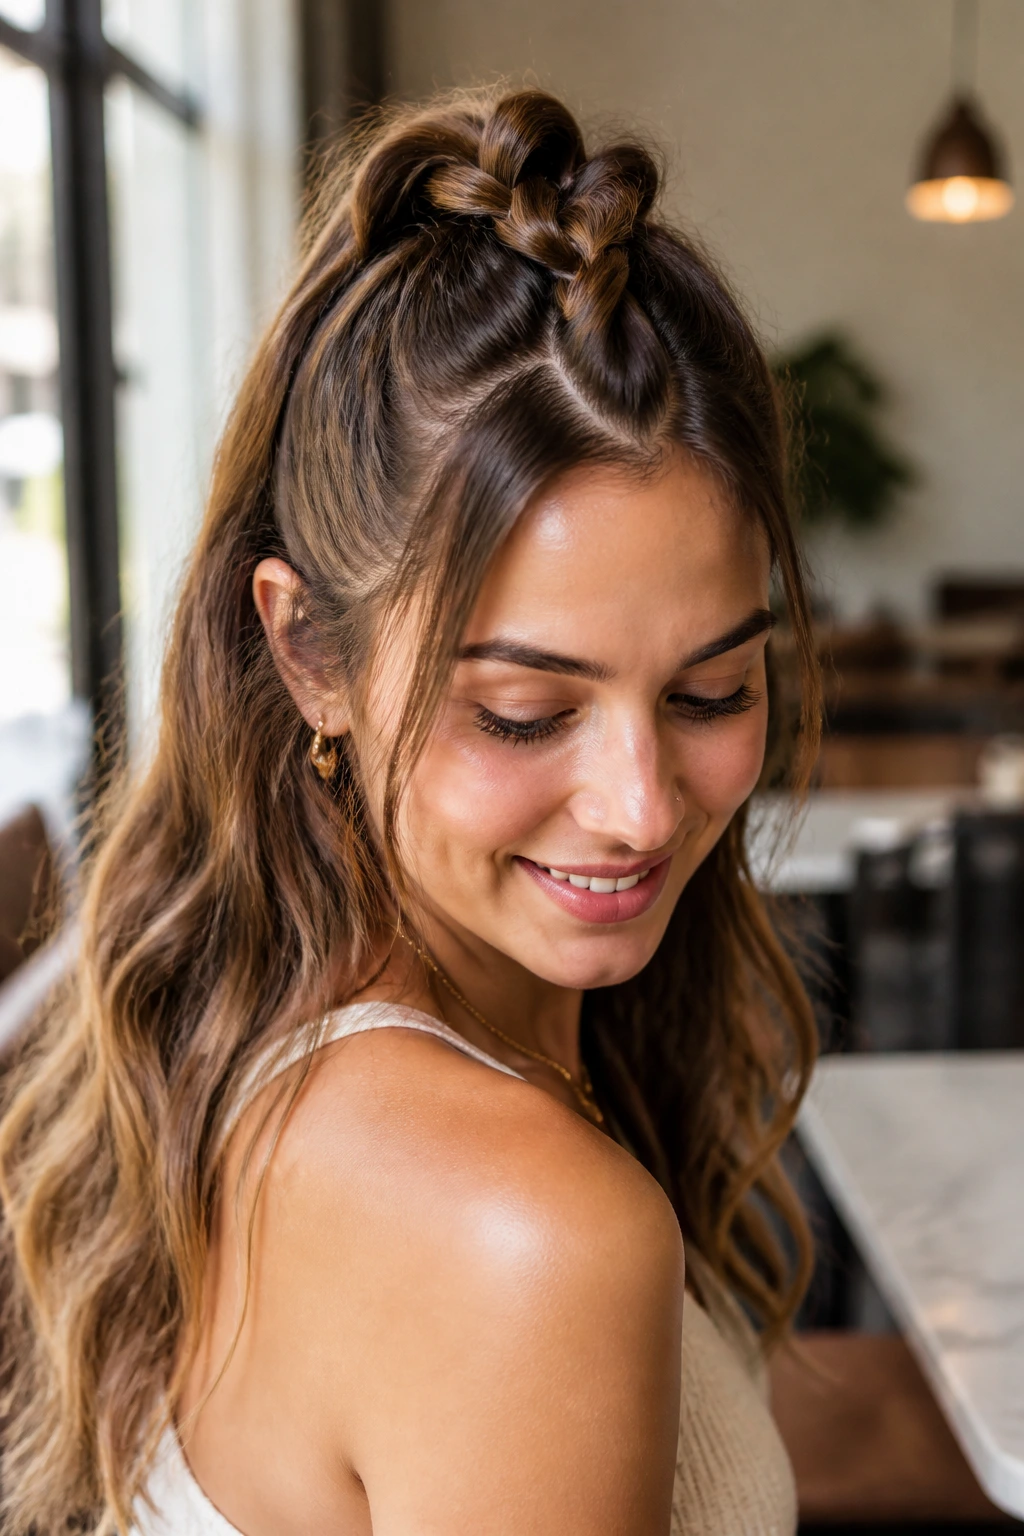
The half-up ponytail already feels less committed and more effortlessly cool than a full pony. Add a butterfly braid and you’ve got a style that works from casual brunches straight through to cocktail hour without a single adjustment.
How to Build This Look
Create your half-up section by brushing the top half of your hair back from your face. Instead of immediately pulling it into a ponytail, create a butterfly braid first using just that top section. Once the braid is complete and shaped, gather it with a hair tie at the back of your head. Let the bottom half of your hair flow freely—this style is all about balance between polished and relaxed.
Styling Tips That Elevate It
- Curl the bottom half of your hair for maximum contrast and movement
- This works beautifully with both fine and thick hair
- It’s comfortable enough for all-day wear but feels fancy enough for evening plans
- The style is forgiving—if your braid isn’t perfect, the loose bottom half actually makes it look more intentional
- Secure the half-up section slightly lower on your head (toward your ears) rather than at the very crown for a more modern feel
5. Butterfly Braid Sleek Pony with Braided Wrap
This style takes the butterfly braid a step further by using a second, thin braid to wrap around the base of your ponytail. The result is a polished, multi-dimensional look that feels editorial but somehow still wearable.
The Step-by-Step Approach
Gather your hair into your preferred ponytail position (high or low, your choice). Create your main butterfly braid along the side or back of the ponytail as usual. Then, create a thin, standard three-strand braid and wrap it around the base of the ponytail horizontally, covering the elastic band entirely. Secure the wrapped braid with bobby pins that match your hair color. The combination of the butterfly braid and the sleek wrap creates serious visual interest.
Who This Suits
- Anyone with thick enough hair to handle multiple braids without looking overwhelming
- This style photographs absolutely beautifully
- It’s elevated enough for weddings, galas, or formal events
- Lasts incredibly long without needing adjustment—the multiple layers provide excellent hold
- Works with straight or gently wavy hair (curly textures can work, but the braids show up more distinctly on straighter hair)
6. Textured Butterfly Braid Pony with Curls
When you add waves or curls throughout the entire style—the butterfly braid and the ponytail itself—you create a romantic, undone version of this hairstyle that feels fresh and modern.
Creating Dimension Through Texture
Start by curling your entire head with a curling iron or wand, creating loose waves that fall in different directions. Then create your butterfly braid within this textured canvas. The waves make the braid feel softer and less structured, which paradoxically makes it more visually interesting because the texture catches light. Gather into a ponytail, and gently pull the braid edges to enhance the butterfly shape against the curled background.
Why Texture Transforms Everything
- Curls add dimension that makes the butterfly braid infinitely more photogenic
- The style feels less formal, even with careful execution
- This works beautifully on wavy or curly hair without needing to straighten first
- The texture hides minor imperfections in the braid itself
- Perfect for outdoor events, date nights, or any situation where you want to look effortlessly polished
- A sea salt spray applied to damp hair before curling helps everything hold beautifully
7. Butterfly Braid Crown Ponytail
The butterfly braid crown ponytail wraps the braid around your head like a halo before gathering everything into a ponytail. It’s maximalist, romantic, and absolutely striking in person and on camera.
The Technique Explained
Instead of creating a butterfly braid that runs straight back, start the braid at one temple and sweep it across the back of your head to the opposite side in a graceful arc. This creates a crown effect that frames your face beautifully. Once the braid reaches the opposite side, gather all your hair—both the braid and the remaining loose sections—into a ponytail at the back. The crown braid sits at the top, while the rest of your hair cascades down.
Making It Work for Your Hair
- This style requires at least shoulder-length hair for the crown effect to register properly
- It’s surprisingly comfortable to wear despite its elaborate appearance
- Works best with medium to thick hair that has enough volume to make the crown feel substantial
- The style holds well for 8+ hours without significant touch-ups
- Incredibly flattering on oval and oblong face shapes; also works beautifully on heart-shaped faces
8. Butterfly Braid Fishtail Hybrid Ponytail
For those who want a more delicate, intricate appearance, this hybrid style combines a butterfly braid with a fishtail braid element. The result is a sophisticated style that looks like it took far longer than it actually did.
Understanding the Hybrid Technique
Create a butterfly braid as your main focal point, but instead of a standard three-strand braid wrap around the base, create a fishtail braid component. A fishtail is achieved by dividing a section into two parts and crossing small segments from each side back and forth—it’s almost as easy as a standard braid once you understand the motion, and it creates an incredibly delicate appearance.
Why Combine These Techniques
- The butterfly shape is bold; the fishtail element is delicate—together they’re perfectly balanced
- This style works beautifully with fine or thin hair because fishtail braids look fuller and more substantial
- It’s detailed enough to feel special but doesn’t require advanced braiding skills once you practice it twice
- The combined texture of two different braid styles creates incredible visual interest
- Absolutely stunning with highlights or balayage that shows movement through the braids
9. Sleek Baby Butterfly Braid Ponytail
Sometimes the most impactful styles are the simplest. A tiny, delicate butterfly braid incorporated into a sleek, polished ponytail reads as intentional and modern without being over-the-top.
Keeping It Minimal and Chic
Use a only small section of hair for your butterfly braid—think a two-inch-wide strand rather than a full section. Keep the braid tight and precise, maintaining sleek tension throughout. Smooth the rest of your hair back into a high or mid-height ponytail with a bit of gel or smoothing serum for that elevated, controlled look. The small butterfly braid acts as an accent rather than the main event.
Where This Shines
- Works beautifully in professional settings where you want polish without being too fashion-forward
- This is the easiest butterfly braid variation to execute quickly in the morning
- Perfect for fine or thin hair—the small braid doesn’t add bulk
- Incredibly versatile, working with everything from gym clothes to business attire to date-night outfits
- The minimalist approach makes this feel current and modern rather than trendy
10. Bubble Ponytail with Embedded Butterfly Braid
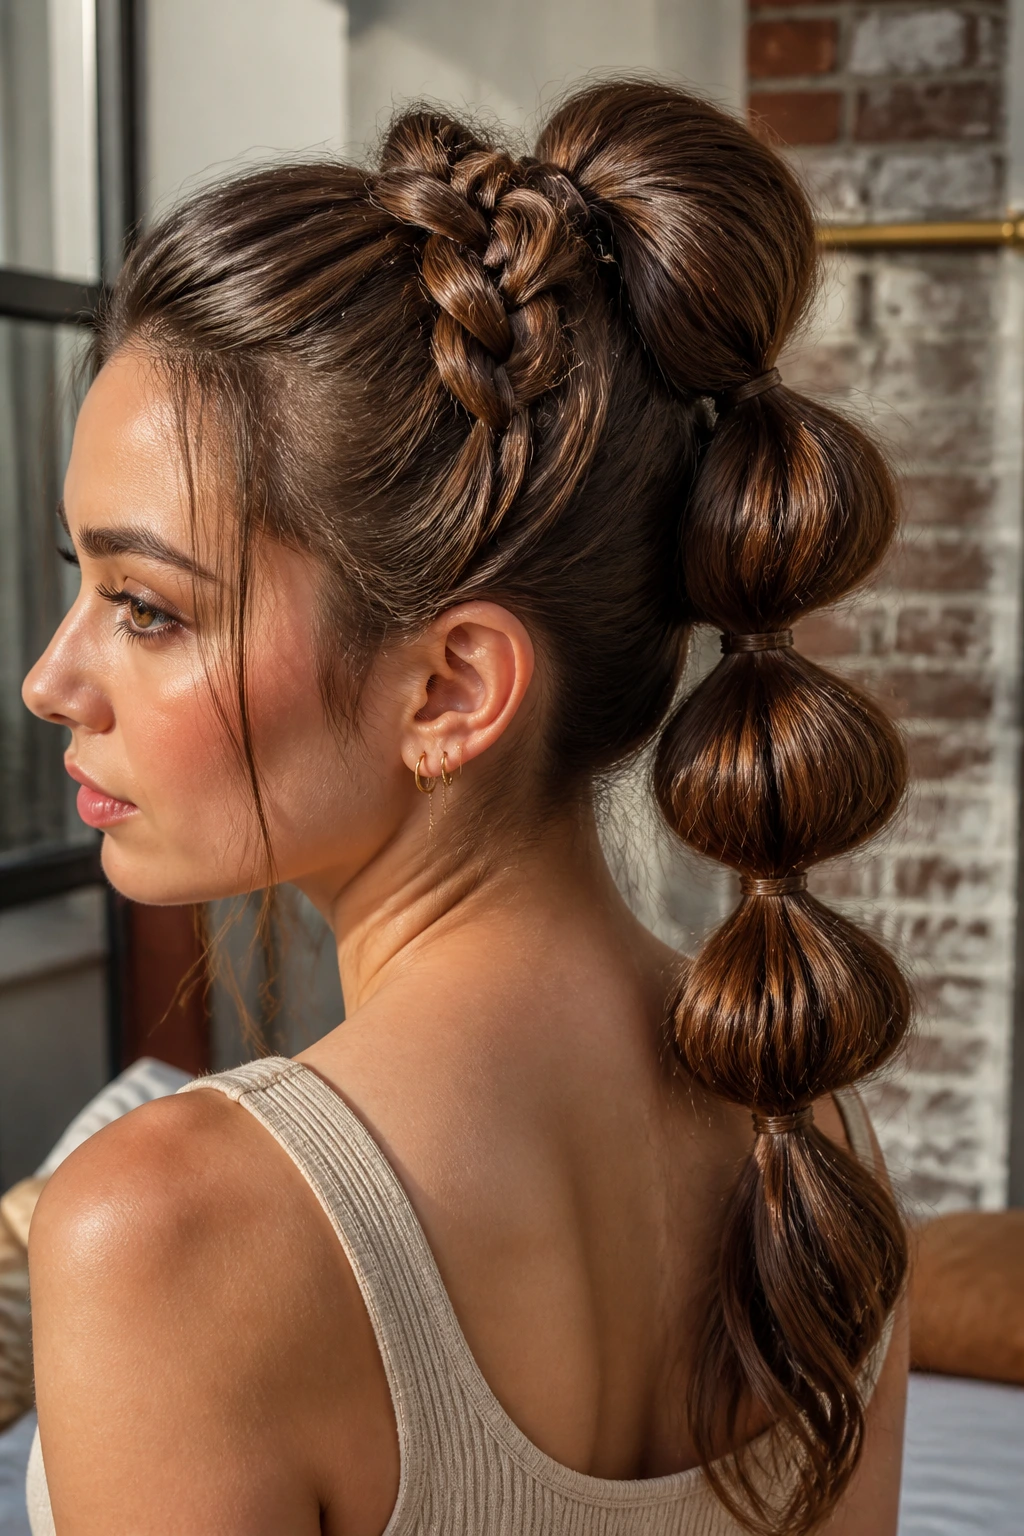
The bubble ponytail—where you create sections along the length of the ponytail and cinch them with small elastics—gets a gorgeous upgrade when you incorporate a butterfly braid at the top. This creates a style that’s playful, modern, and definitely conversation-starting.
Assembling the Bubble Braid Look
Gather your hair into a high or mid ponytail and create a butterfly braid around the base. Once the braid is complete, divide your ponytail into 4-5 sections and secure each with a small elastic band, creating the characteristic “bubble” appearance as you move down. Gently pull at each section to make the bubbles feel full and voluminous.
Best Practices for This Style
- Works best with longer hair (at least mid-back length) so the bubbles register clearly
- This is a more playful, less formal option compared to sleek ponytails
- Incredibly comfortable despite its elaborate appearance
- Lasts beautifully throughout the day without needing adjustments
- The bubble element makes this style feel modern and fun—it’s not your mom’s ponytail
- Works on all hair types, though straighter hair shows the structure most clearly
11. Side Butterfly Braid Ponytail
Instead of centering your butterfly braid, sweep the entire ponytail to one side and position the braid so it’s the main visual focal point. This asymmetrical approach feels modern, flatters nearly everyone, and photographs beautifully.
Creating Asymmetrical Impact
Gather your hair to one side of your head—dramatically to the side, not just slightly off-center. Your butterfly braid should curve or sweep across this side ponytail, creating an almost sculptural effect. The side placement naturally frames one side of your face while creating a clean line on the other side.
Why Side Placement Matters
- This asymmetrical approach is inherently flattering and feels more current than centered styles
- The side positioning works beautifully on all face shapes, but particularly flatters square and rectangular faces
- It’s a great option if you have bangs or layers—the side arrangement accommodates these variations elegantly
- Excellent for events where you’ll be photographed from one particular angle
- The style feels less formal than a centered ponytail, even with the same level of execution
- Pairs beautifully with statement earrings since one ear is fully exposed
12. Butterfly Braid Ponytail with Statement Accessories
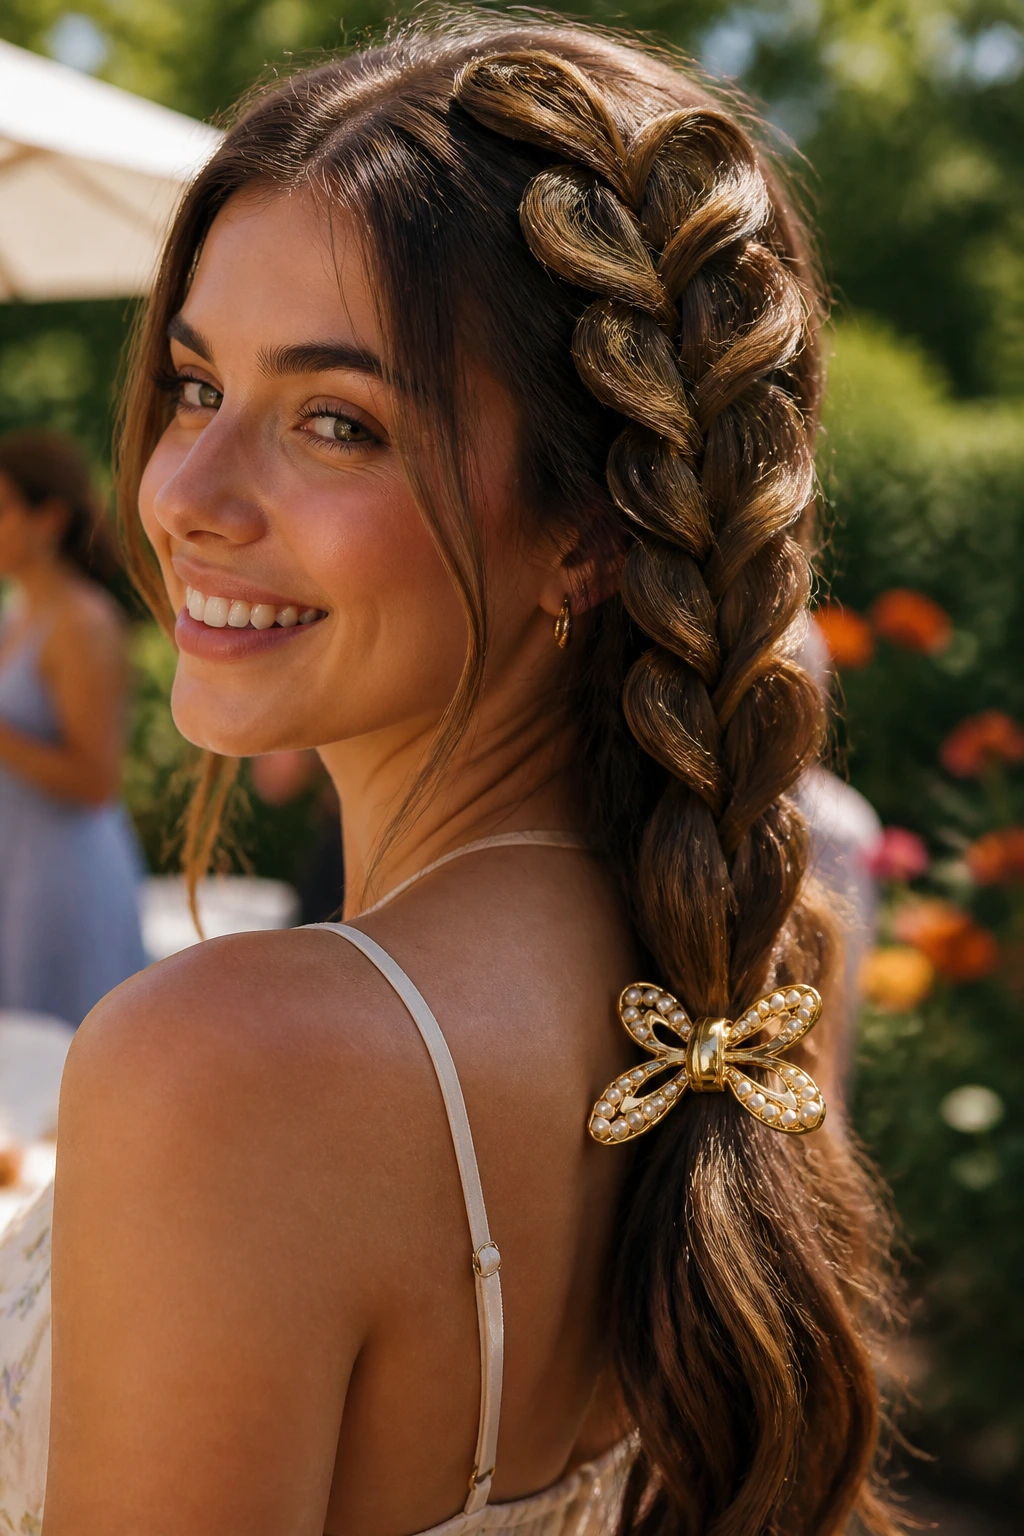
Sometimes the butterfly braid is perfect on its own, but adding a carefully chosen accessory transforms it into something entirely different. A claw clip, decorative hair stick, crystal-adorned elastic, or silk ribbon can take your butterfly braid ponytail from lovely to unforgettable.
Accessory Integration Tips
If you’re using a claw clip, position it at the base of the ponytail to anchor the clip while your butterfly braid remains the main visual focus. Ribbon can be woven through the braid itself for a whimsical touch, or tied around the elastic band for simple elegance. Hair sticks or decorative picks should be positioned horizontally through the base of the ponytail, creating an intentional, artistic look.
Choosing What Works
- Quality matters—a delicate, well-made accessory elevates the entire style, while a cheap one can cheapen it
- Choose accessories that complement your hair color and skin tone
- Metallics (gold, rose gold, silver) work with any hair color; choose based on your natural undertones
- Pastels and jewel tones in accessories work beautifully against textured styles
- This is an easy way to transition one basic butterfly braid ponytail into multiple looks throughout the week
- Accessories also provide extra hold, which means your style lasts even longer without adjustment
Final Thoughts
Butterfly braid ponytails give you the best of both worlds—the polished, intentional feeling of a carefully styled updo with the wearability and comfort of a simple ponytail. The twelve variations above represent just the beginning of what’s possible once you master the basic butterfly braid technique. The real skill lies not in perfecting one single style, but in understanding how to adapt the butterfly braid to work with your hair texture, face shape, and personal style preferences.
The beauty of practicing these styles is that each one teaches you something about tension, placement, and texture. Your first butterfly braid might feel slightly wonky, but by your third or fourth attempt, the motion becomes automatic and your fingers know exactly how tight to pull. That’s when the magic happens—when you stop thinking about the steps and start thinking about the result.
Don’t feel pressure to nail any of these styles perfectly the first time. Hair styling is genuinely a skill that improves with repetition, and a slightly imperfect butterfly braid actually reads as more romantic and intentional than a mathematically perfect one. Embrace the practice, experiment with the variations that appeal to you most, and remember that the best hairstyle is always the one that makes you feel confident and like yourself.