A curly bob can look expensive in five minutes and stubborn in six if you pick the wrong updo.
The trick is not to flatten the curl pattern into obedience. That usually backfires. Natural curly updos work because they lean into shape, volume, and a little bit of controlled mess. You tuck, twist, pin, and leave enough movement that the style still looks like your hair, not a helmet.
Keep a few things nearby before you start: 6 to 10 bobby pins, one small claw clip, one satin scrunchie, and a spray bottle with water. If your curls are dry and springy, a pea-size dab of curl cream or gel on the palms helps. If they’re already soft and defined, you may not need anything at all.
These styles are especially kind to bob cuts, because shorter curls often have enough body to stay put without heavy construction. You’re not building a towering knot here. You’re making fast, wearable shapes that hold for a workday, a dinner, or a rushed morning when the mirror is not your friend.
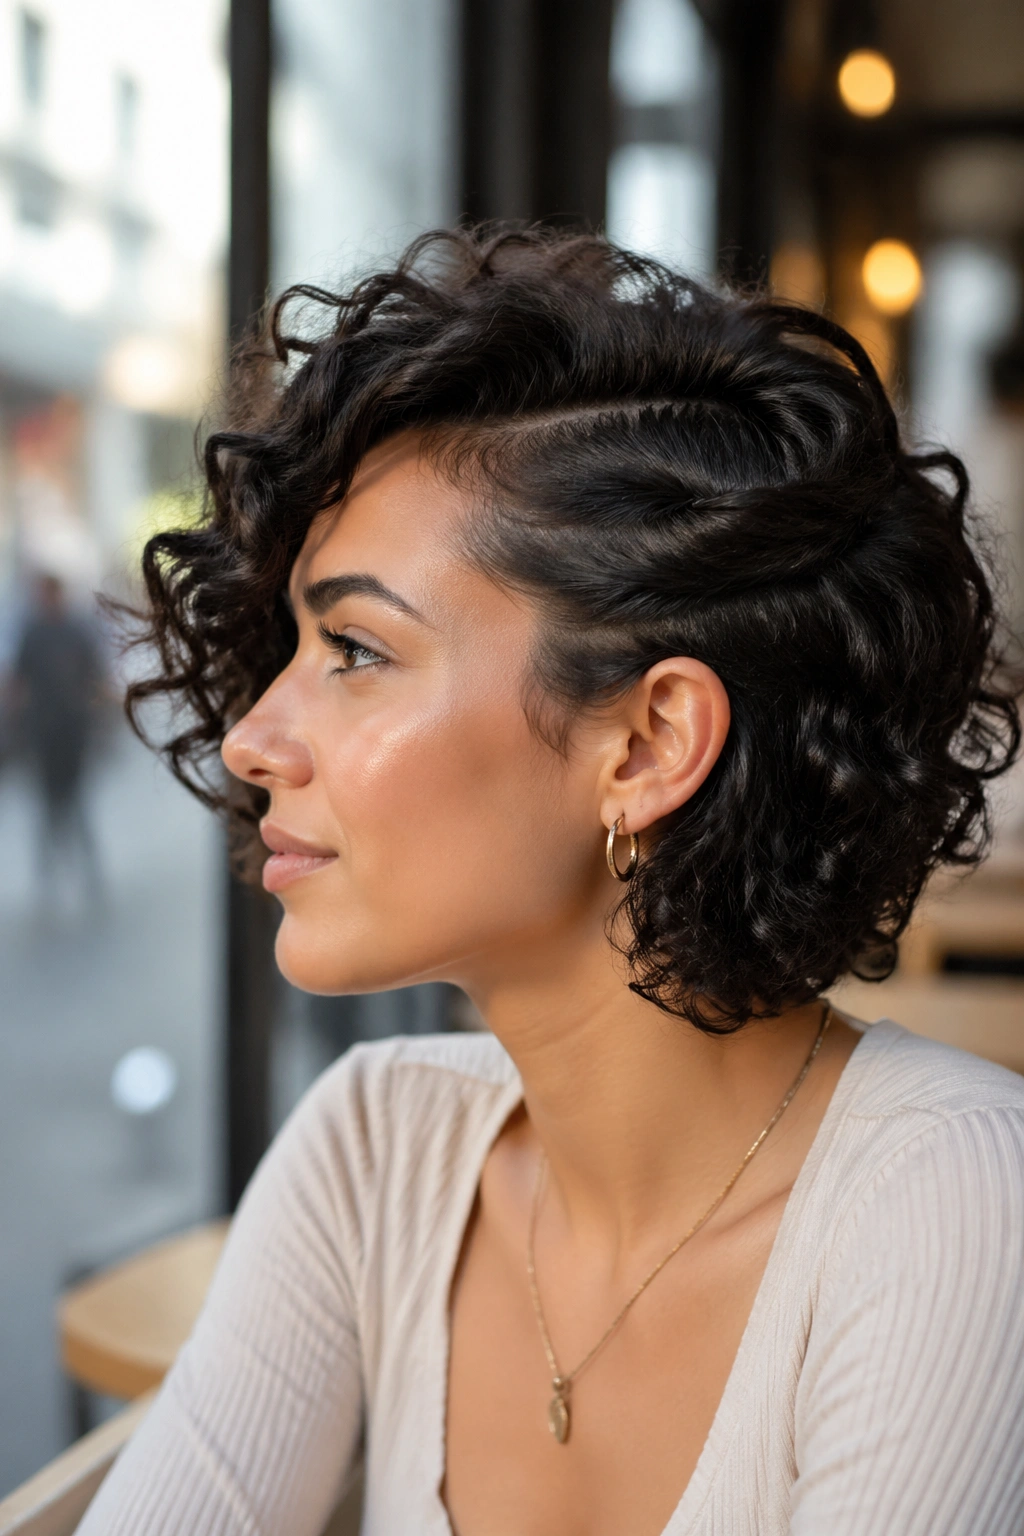
1. The Side Twist That Tucks a Bob Behind One Ear
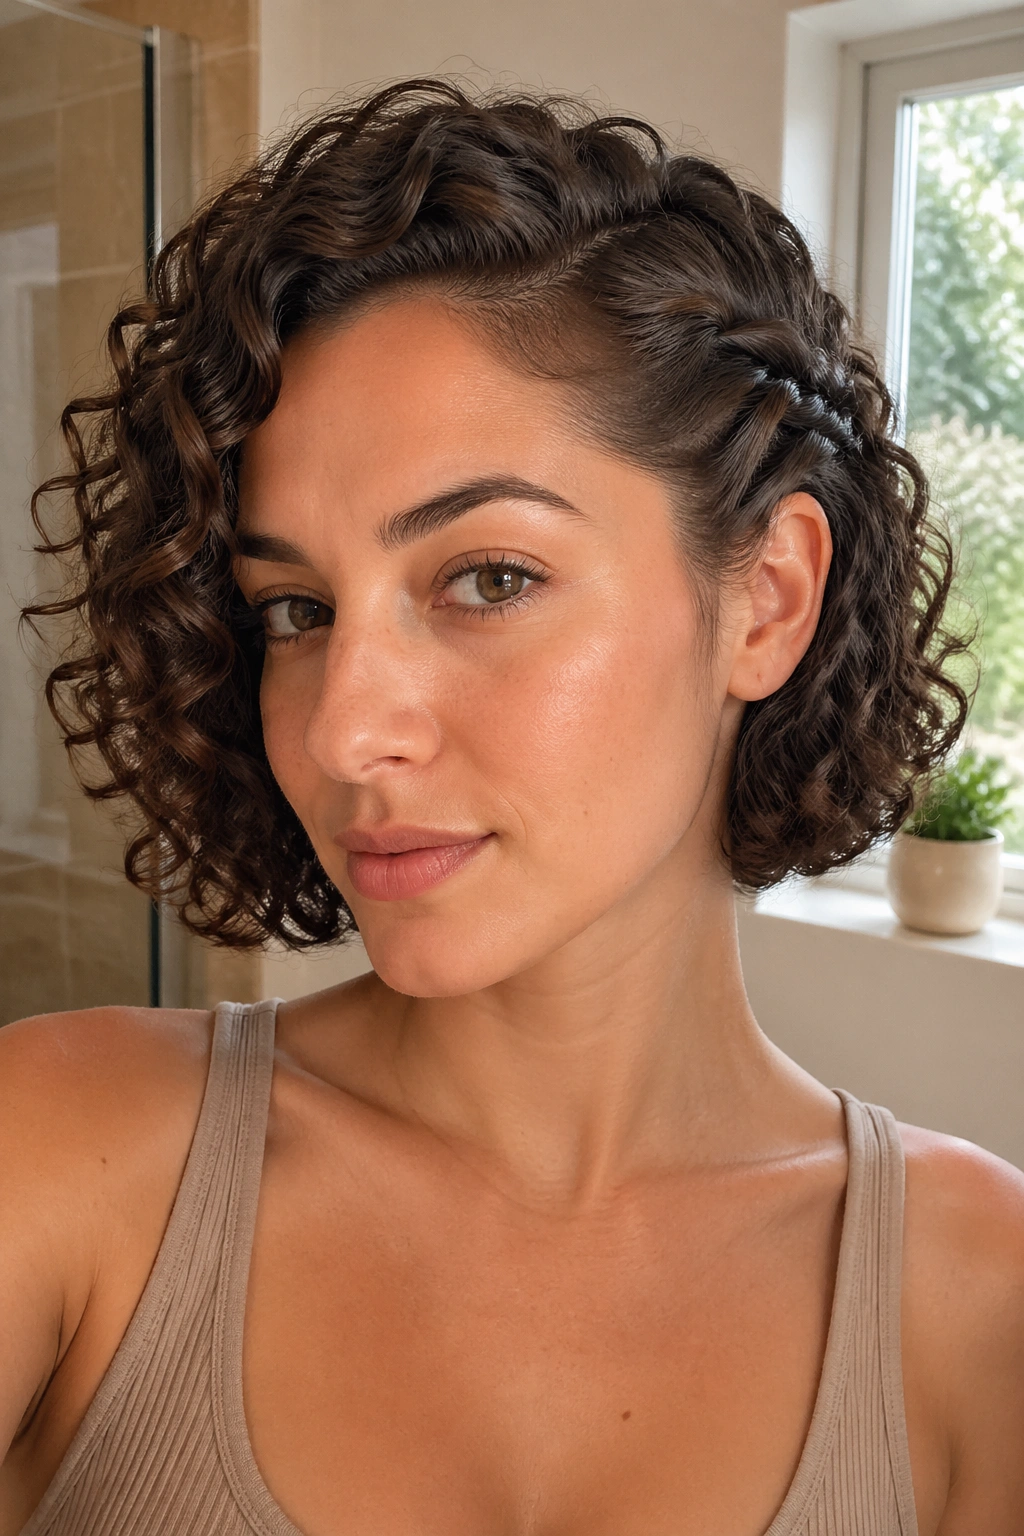
A side twist is the easiest way to make a curly bob look deliberate in under 10 minutes. It works because you only need one small section to behave. The rest can stay loose, springy, and a little wild.
Start by taking a 2-inch section from one temple and twisting it back toward the ear. Keep the twist loose. Too much tension makes curls puff out later, and that puff is not the cute kind. Pin the twist just behind the ear with 2 crossed bobby pins, then tuck the end under the curl mass at the nape.
Why It Works So Fast
The whole style uses your bob’s own shape as the structure. That means less smoothing, less sectioning, and fewer pins fighting each other. If your curls are chin-length or just grazing the jaw, this one sits especially nicely because the loose back half still reads as an updo.
A tiny side part helps. So does letting one front curl fall forward near the cheek. That piece softens the whole look and keeps it from feeling too formal.
- Best for: chin-length to shoulder-length curly bobs
- Time: 3 to 5 minutes
- Tools: 2 bobby pins, optional decorative pin
- Finish: leave 1 curl loose around the face
Pro tip: twist on the side with the least volume. The fuller side should stay free so the shape doesn’t lean too hard in one direction.
2. The Pineapple Puff for Short Curly Layers
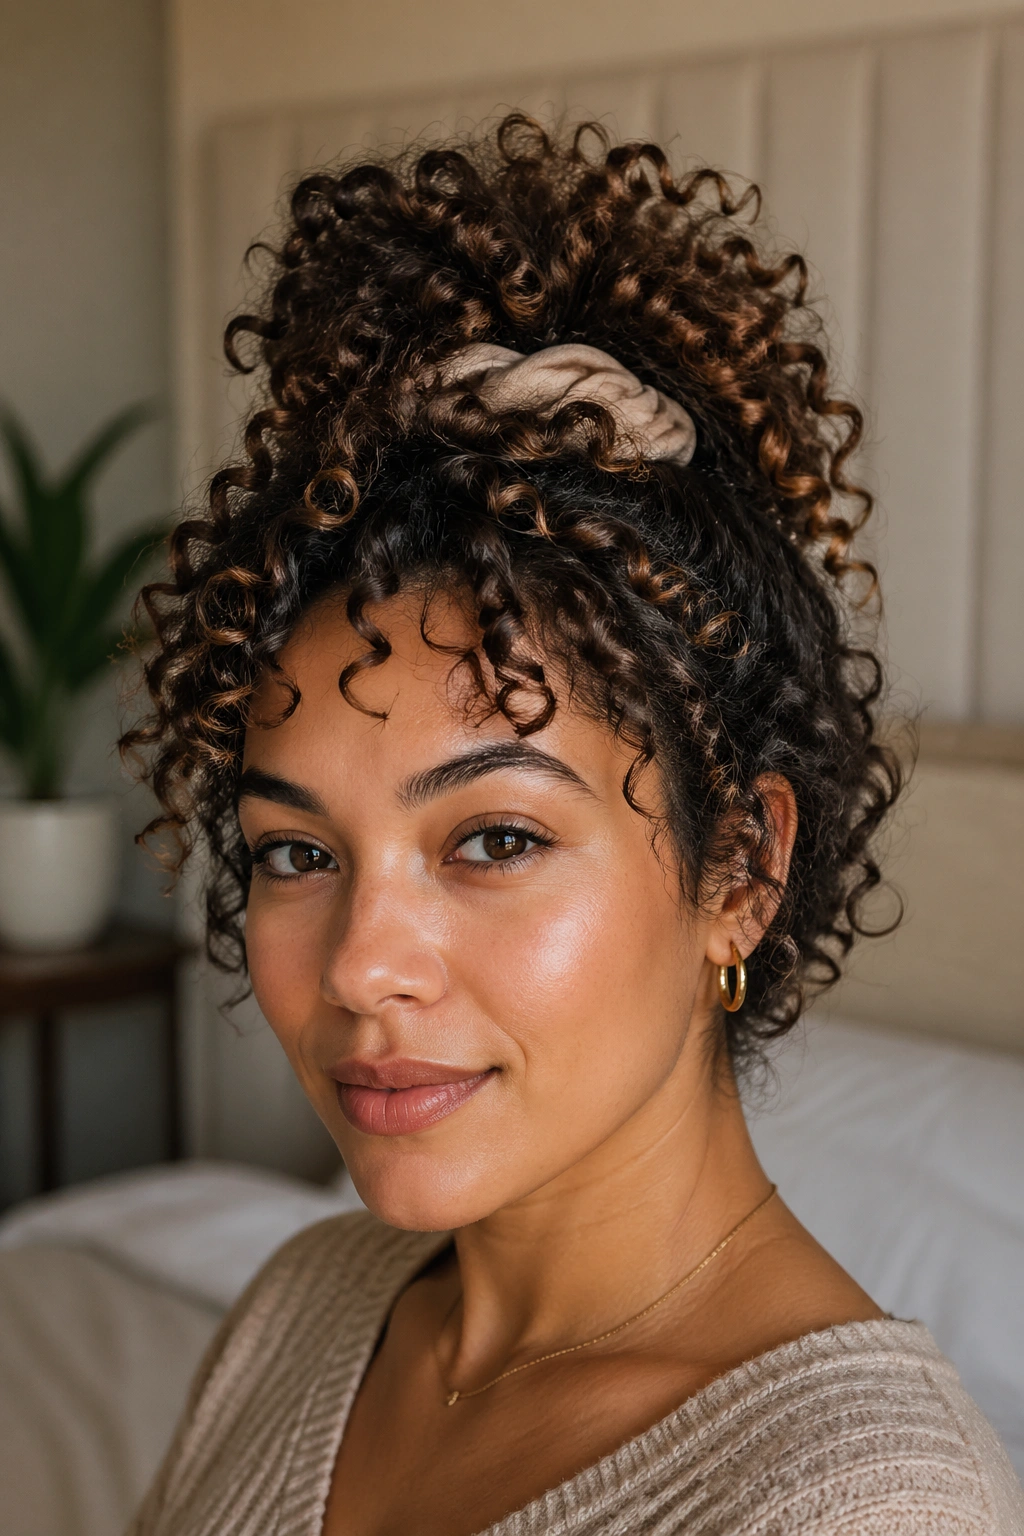
This one looks playful because it is playful. A pineapple puff is basically a mini version of the high curly ponytail people use on longer hair, but on a bob it becomes a little lifted crown of curls instead of a true ponytail. That’s the charm.
Gather the top half of your curls at the crown, then secure them with a soft scrunchie or a tiny clip. Don’t drag the sides tight. You want the top to sit high while the lower layers still brush the nape and ears. If your bob is layered, this is one of the few styles that actually benefits from those shorter pieces escaping.
The beauty here is how forgiving it is. Uneven curls? Fine. A few frizzy bits? Also fine. The style gets better when it has texture, and trying to over-control it usually makes it less interesting.
A mirror check from the side matters. The puff should sit high enough to lift the face, but not so high that it looks like it’s trying to be a full ponytail. That awkward middle zone is the sweet spot.
Wear this when you want volume and zero fuss. It’s one of those curly updos that can survive a humid room, a commute, and an afternoon without demanding constant touch-ups.
3. The Half-Up Knot That Keeps Volume at the Crown
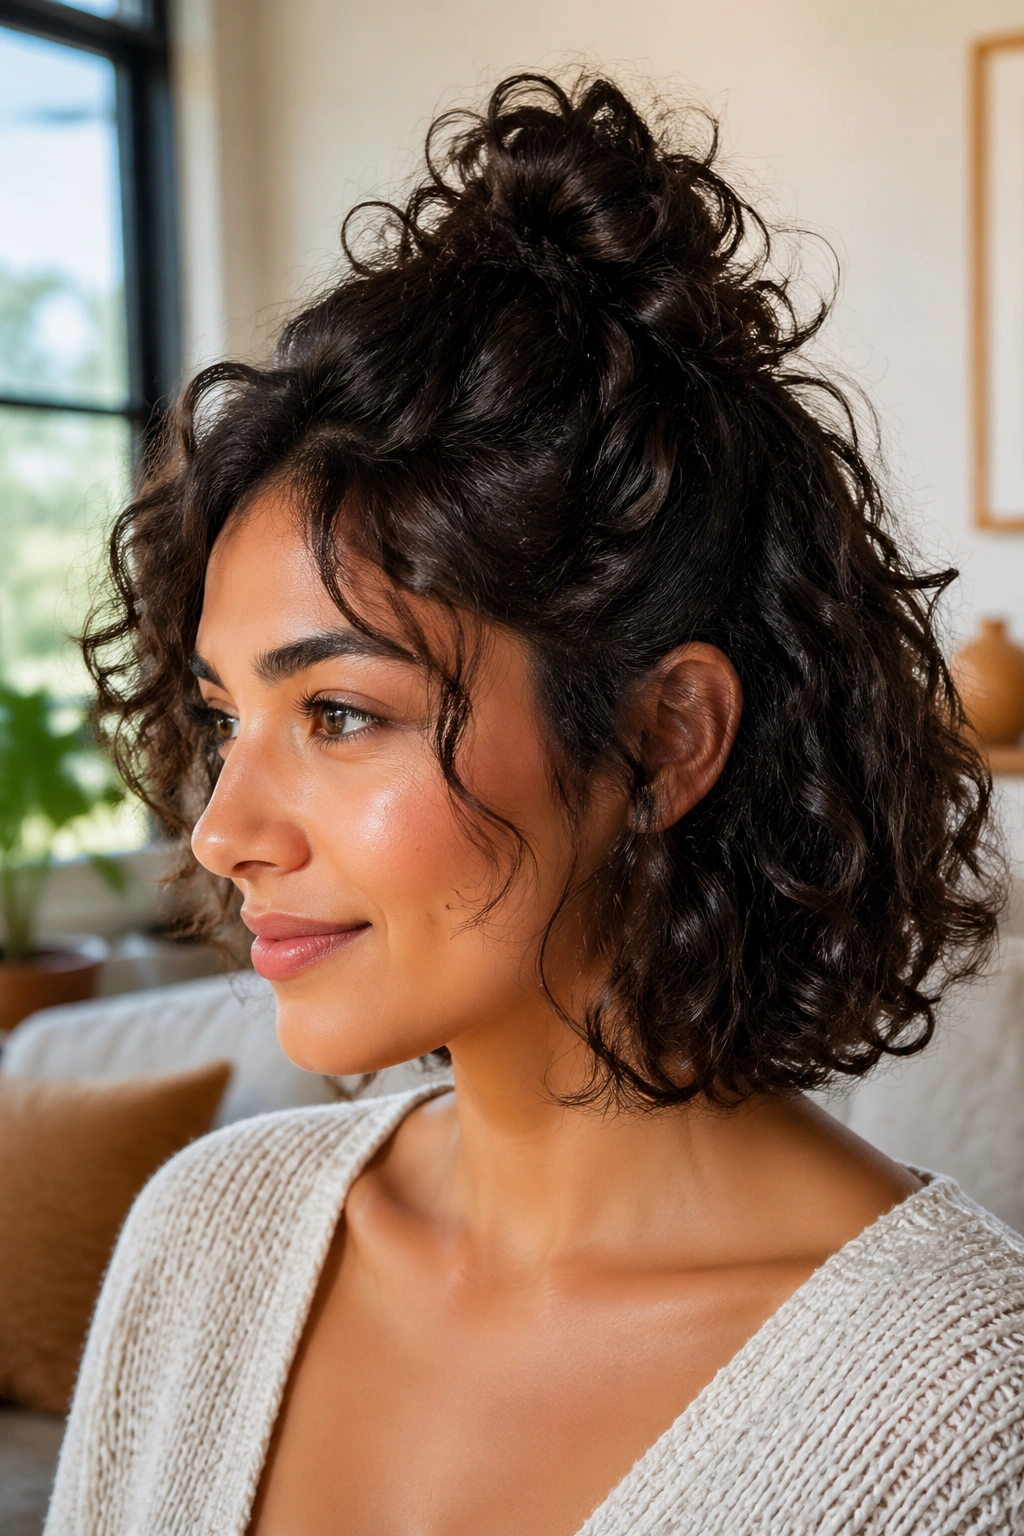
Why does this one work so well on curly bob cuts? Because a half-up knot keeps the crown clean while letting the lower curls do the heavy lifting. You get lift at the top and movement everywhere else. That’s a nice trade.
Take the top third of your hair, gather it loosely, and tie it into a small knot. If the ends are short, tuck them under the knot and pin them flat. If they’re longer, let them peek out a little. That tiny bit of texture makes the knot look softer and less precious.
Fastest Version
If you’re in a hurry, twist the top section once, wrap it over itself, and pin the coil with 2 pins in an X. That’s usually enough for a bob. You do not need a perfect knot. You need a stable one.
A small amount of cream on the palms helps keep the top section from frizzing apart while you twist. Use too much and the knot goes limp. Use too little and the flyaways bloom before you’ve even left the bathroom.
This style is good when your curls are defined but not freshly washed. Day-two hair often holds the knot better because it has a little grit. Fresh curls can work too, but they may need one extra pin at the base.
The best part is how easy it is to dress up later. Add a clip or a slim barrette, and the style shifts from casual to polished without a full redo.
4. The Low Nape Roll for Loose, Polished Curls
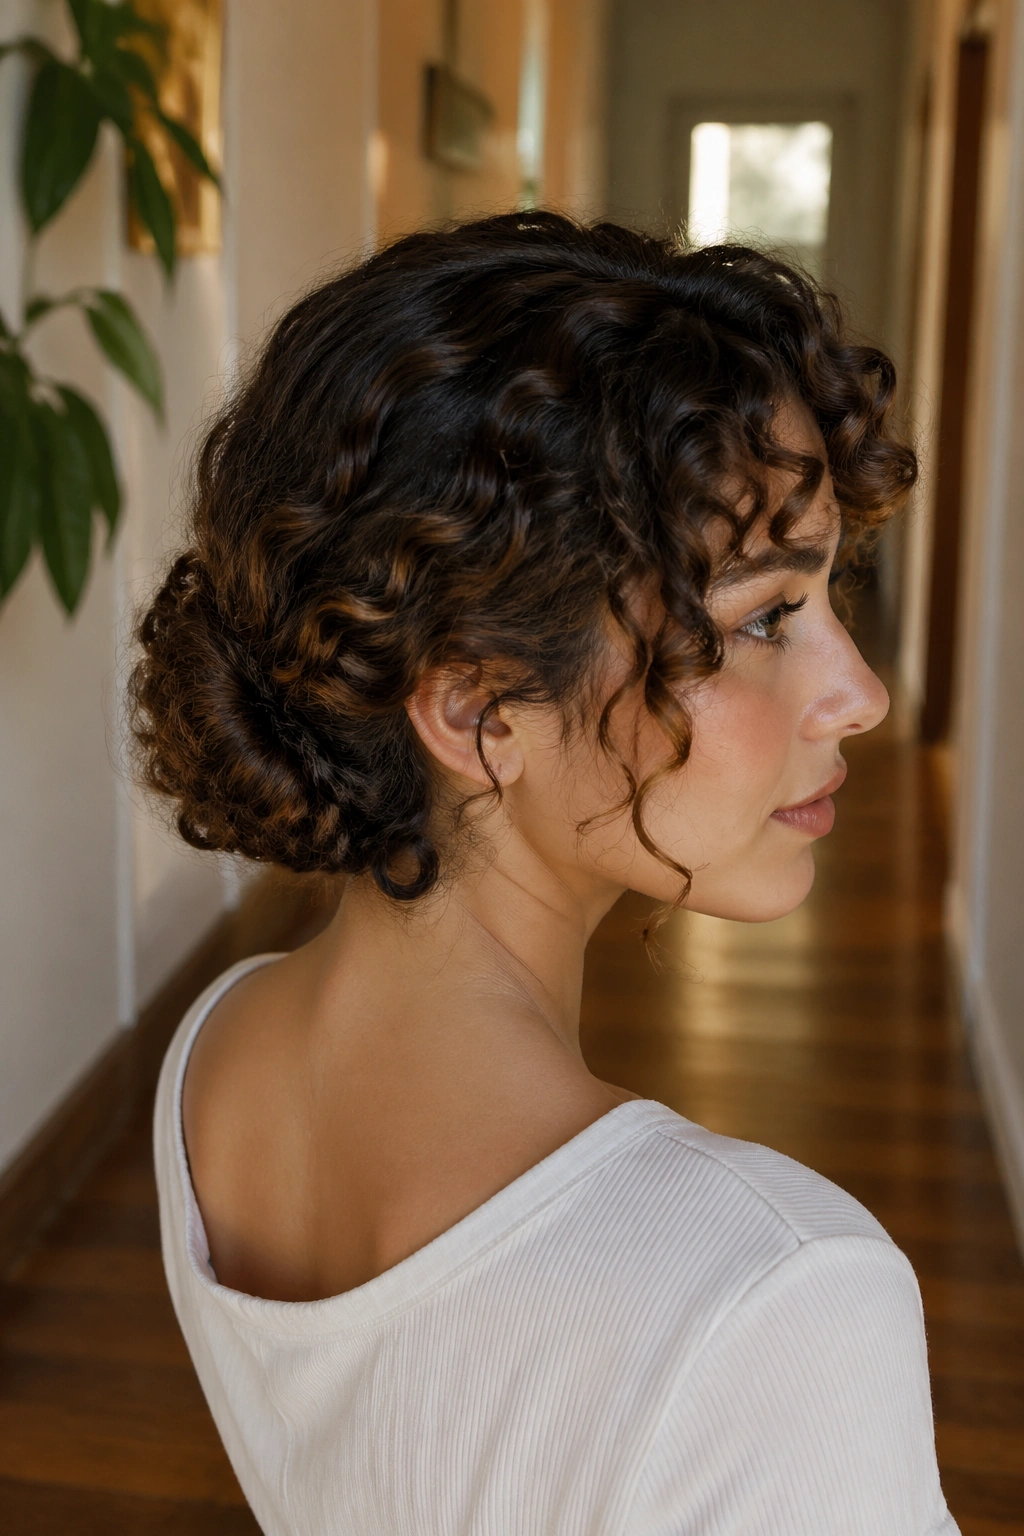
Picture this: you’re halfway out the door, and you need your curly bob to look tidier than “I woke up like this,” but not so slick that it loses personality. The low nape roll sits in that exact lane.
Split the hair into two side sections, then roll each side inward toward the nape. Pin the rolls where they meet, letting the curl ends blend into the lower section. The back should look softly gathered, not tightly trapped. If you pin too high, the style loses the whole point.
For bob-length curls, this works best when the ends are not all the same length. Shorter layers can stay loose around the crown while the longer pieces do the rolling. That unevenness is helpful. It creates shape without making the style heavy.
A side part makes the roll look cleaner. A center part makes it more symmetrical and a little more modern. Either works, but do not overthink it. This is one of those updos where a slightly imperfect finish looks better than an overly neat one.
Use 4 to 6 pins depending on thickness. Thick curls need more anchor points, and the pins should slide in along the curve of the roll, not straight across it. That small detail keeps the twist from sagging by lunchtime.
5. The Side Sweep With Hidden Pins
A side sweep is the updo I reach for when I want curly hair to look styled without losing its softness. It’s also one of the best tricks for a bob that refuses to stay tucked into anything too structured. Good. Let it refuse.
Brush or finger-comb all the hair toward one side, then secure the back with crossed bobby pins at ear level. After that, gather the loose curls on the opposite side and pin them in a shallow curve along the head. The goal is a sweeping shape, not a slick side ponytail.
The hair near the temple should stay plush. If it gets flattened, the style starts looking old-fashioned fast. Leave some lift at the roots, especially if your bob has layers. The hidden pins do the real work; the visible shape should look almost accidental.
This style tends to hold best on curls that have a medium amount of frizz. A little frizz fills out the sweep and keeps it from looking sparse. Perfectly polished curls can work too, but they need more backcombing at the roots to avoid collapse.
A pearl pin or matte barrette can sit where the sweep meets the side. That’s enough. Too much shine or too many accessories makes the whole thing feel dressed up in a way that fights the easy shape.
6. The Double Mini-Bun Pair for Playful Texture

Unlike a single bun, which can swallow a short curly bob, two mini buns work with the length you already have. The style breaks the hair into manageable pieces, so even short layers can be corralled without a fight. That’s why I like it for thick curls that normally puff out when you try to force them into one knot.
Split the hair down the middle, gather each side above the ear, and twist into a tiny bun. Secure each one with 2 pins or a small clip. Leave the ends a little messy. Clean edges are not the point here.
This style looks best when the buns sit slightly off-center and not too high. If they float too far up, they can turn cartoonish. Keep them closer to the crown, and let the back curls remain loose. That gives the style balance.
- Works well on: dense curls, tight coils, or layered bobs
- Hold time: about 4 minutes if you’re not stopping to perfect the shape
- Good tools: 4 to 6 pins, 2 small elastics, a tail comb
- Extra touch: pull out a curl or two near the temples
If one bun ends up bigger than the other, leave it. Honestly, that often looks better than chasing symmetry that your curl pattern was never going to give you anyway.
7. The Headband Tuck That Looks More Complicated Than It Is
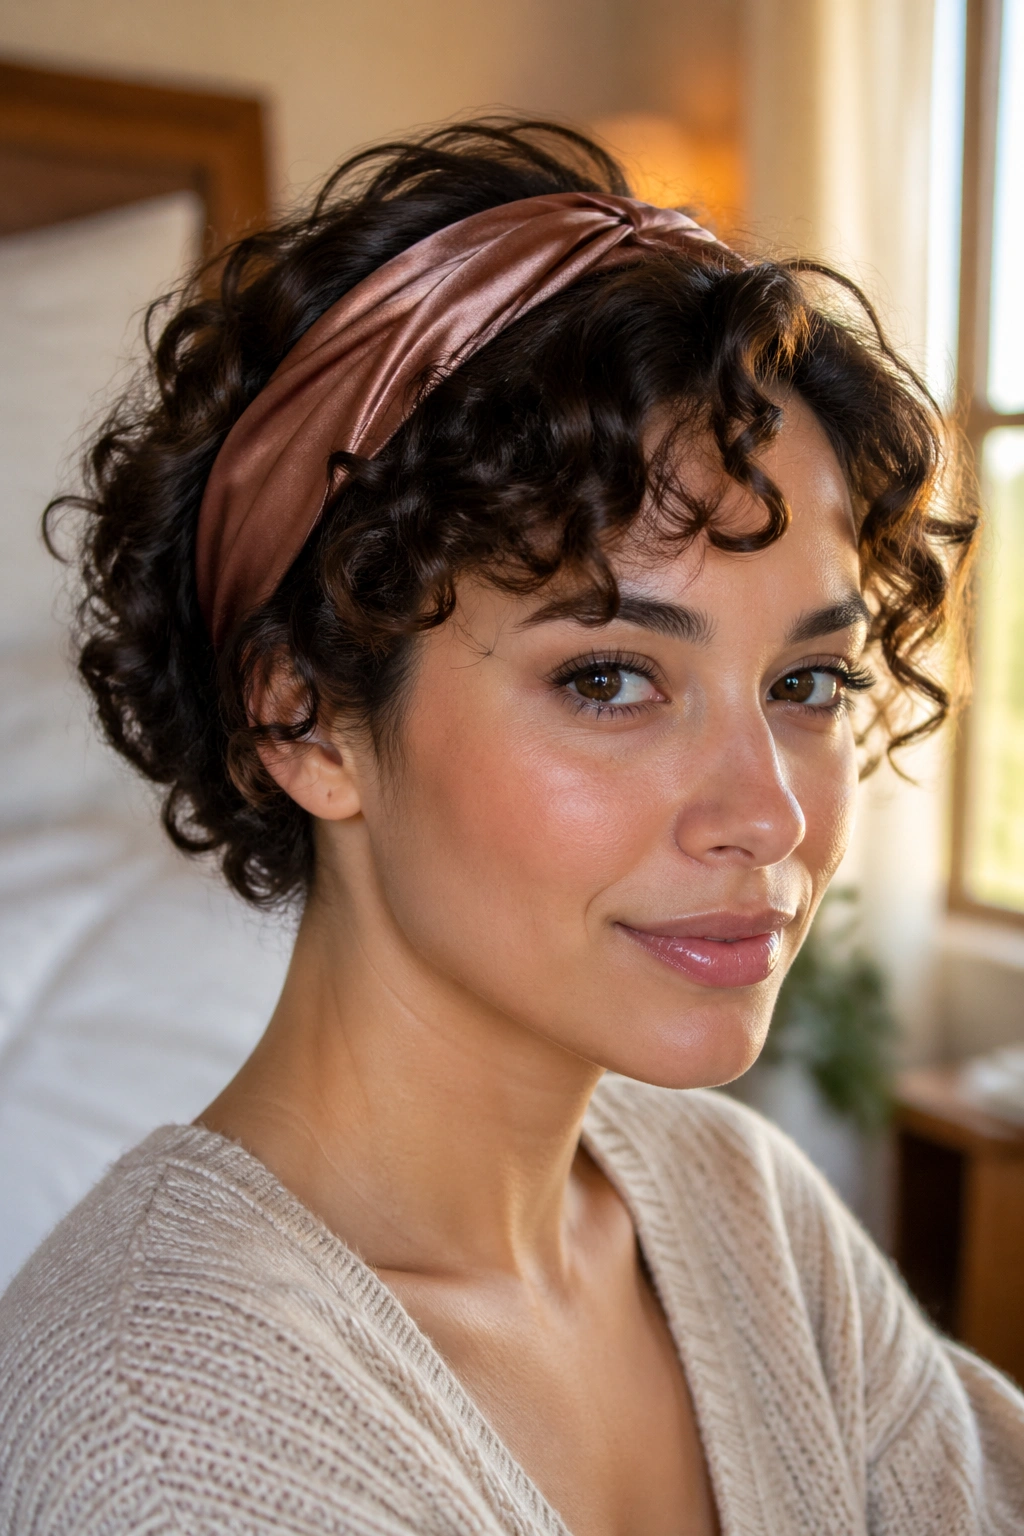
A stretchy headband can save a curly bob on days when the front sections are doing their own thing. Put the band over your hair, leave a little volume at the crown, and tuck the ends of your curls up and under the band until they feel secure. The hair folds into soft rolls, and the bob suddenly looks intentional instead of impatient.
How to Keep It from Puffing Up
Choose a band with a little grip. Satin is pretty, but it can slide on very soft curls. A fabric-covered band with a bit of texture usually stays put better. Place it about an inch behind the hairline, not right on it, or the style can look cramped.
The real trick is tucking in small sections, not a giant handful at once. If you try to shove too much hair under the band, the shape gets bulky and starts poking out in strange places. Small sections lay flatter and hold longer.
This one is especially good if your bob has a mix of curl sizes. Looser curls tuck in easily, while tighter curls can stay out and frame the face. That contrast gives the style some life.
You can wear it with the ends fully hidden, or leave a few at the nape for a softer finish. Both work. The look changes a lot depending on how much curl you allow to escape, so it’s worth playing with once or twice until you know your own sweet spot.
8. The French Pin Twist for Thick, Springy Curls
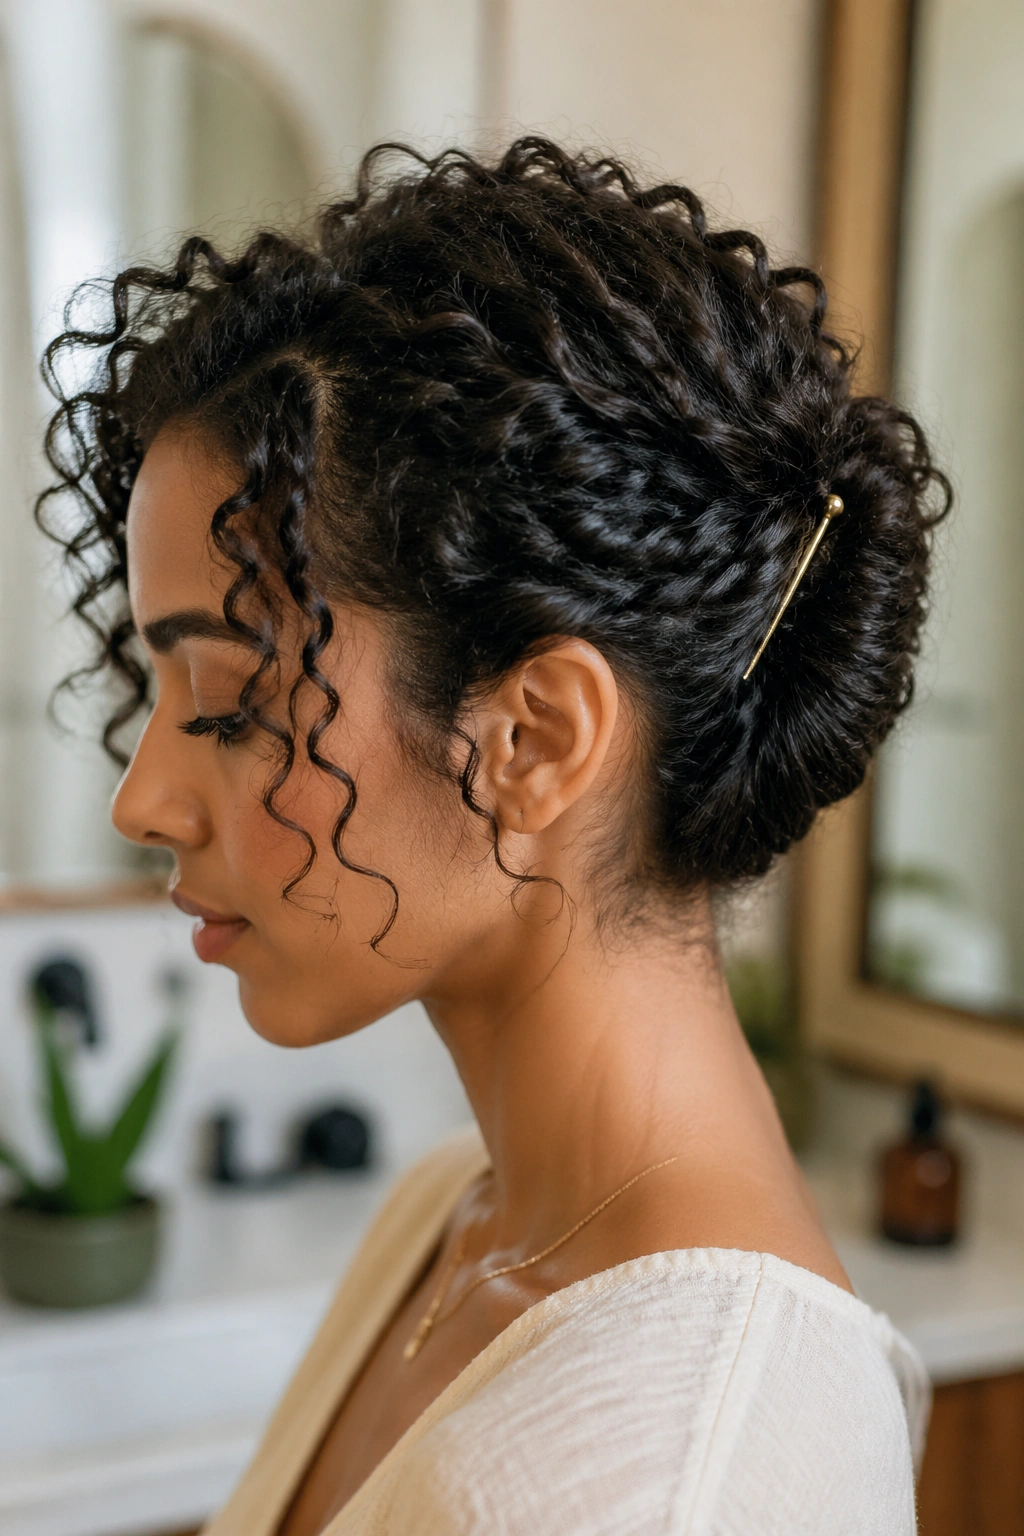
A French pin twist is one of those styles that looks fancy because the pin itself looks fancy. The actual process is fast. If your curly bob has enough density to twist into a compact shape, this can be done in under 10 minutes without a lot of fuss.
Gather the hair at the back like you’re making a low twist. Twist upward, tuck the ends under, then slide a French pin diagonally through the roll so it catches the base and the lifted edge. The pin should feel firm, not strained. If it wobbles, twist the hair a little tighter and try again.
Question: does this work on shorter bob cuts? Yes, if the bob reaches the nape and your curls have some spring. Very short layers may need 2 bobby pins helping the French pin hold. That’s normal. Short hair rarely behaves like a long tutorial video.
The finish should look airy. You still want a few coils at the temples and maybe one curl brushing the neck. That softness is what keeps the twist from feeling severe.
If you have thick hair, this is one of the best fast styles in the whole group. It holds better than a tiny bun and looks cleaner than a loose tuck. The only catch is the pin placement — once you find the right angle, the style stops fighting you.
9. The Curly Faux Hawk With Soft Edges
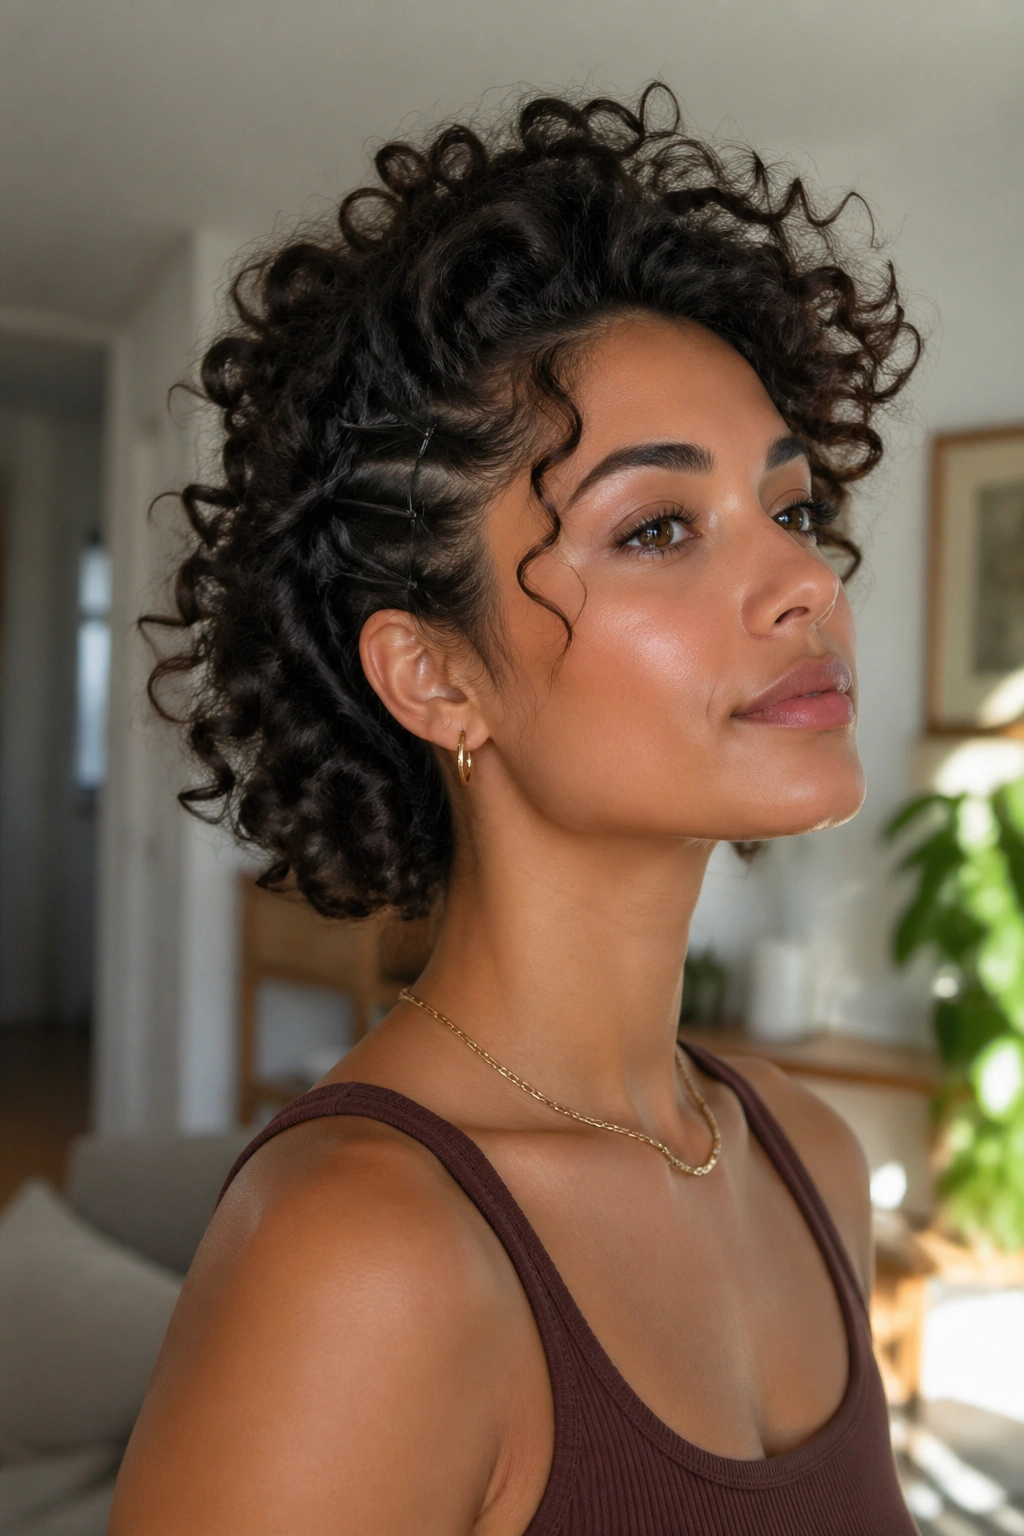
A faux hawk on curly hair sounds dramatic until you actually make it. Then it’s just a central ridge of curls with the sides pinned back. On a bob, that ridge sits low enough to feel wearable and high enough to look interesting. No shaved-side energy required.
Start by pinning the sides back in two or three spots on each side, keeping the center section loose. Then lift the crown slightly with your fingers so the top curls sit higher than the pinned sides. The middle line should be the fullest part of the style.
What makes this fast is that you’re not creating a new shape from scratch. You’re revealing one that’s already there. Curly hair naturally wants height. The pins only tell it where to stay.
- Best for: round faces, dense curls, and bobs with strong curl pattern
- Hold secret: pin the sides low and leave the center slightly lifted
- Watch out for: over-smoothing the sides, which can make the top look too heavy
- Nice touch: a small clip at the back ridge
This style has a bit of attitude. Not in a loud way. In a “I know what my hair does and I’m not apologizing for it” way. That’s a useful energy for days when your curls need structure but you do not want them flattened into politeness.
10. The Bobby-Pin Crown That Lifts the Hairline

Sometimes the fastest curly updo is the one that barely removes hair from your face. The bobby-pin crown does exactly that. It lifts the front and side sections off the hairline, creates a soft halo effect, and keeps the bob’s lower curls free.
Where the Pins Go
Start at one temple and pin a small section back, then repeat on the other side. Add 2 more pins just above the ears if the hairline still feels too loose. Cross the pins in an X when the hair is slippery. Straight pins are fine for dry curls, but the X gives better grip.
This style is a lifesaver for fine curls or looser waves that need help holding shape. Because you are not pulling the hair all the way up, the style stays lightweight. That matters. Fine hair can get overwhelmed fast.
The crown should stay soft, not puffed into a bump. If the top starts swelling, smooth just the root area with your fingers and stop there. The goal is lift, not height for its own sake.
It’s also one of the best styles for wearing earrings. Since the sides are pinned back, hoops and studs get their moment. Small thing, but I notice it every time.
11. The Soft Chignon for Day-to-Night Curly Bob Hair

A soft chignon on a curly bob is not a sleek ballerina bun. Thank goodness. It’s a loose, low knot with ends tucked in just enough to read as an updo while still letting curls spill around the face and neck.
Unlike a tight bun, this version does not demand every curl to behave. Gather the hair low, twist it into a small coil, and pin the base first. Then tuck the ends in one by one until the knot feels anchored. Leave the outer edge a little fuzzy. That fuzz is doing the style a favor.
This works especially well when your bob hits the neck or just below the chin. Shorter layers can frame the face while the longer pieces create the knot shape. If the hair is too short for a full chignon, fake it with a tucked roll and nobody will care. They’ll mostly notice the shape, not the mechanics.
I like this one for dinner or a nicer event because it has enough polish to feel intentional, but it doesn’t erase curl texture. That balance is hard to get with short hair. Most sleek styles on a curly bob end up looking overworked. This does not.
Keep the front loose and avoid pinning every strand back. The style gets better when it breathes a little.
12. The Puff-and-Pin Updo for the “I Need This Done Now” Moment
This is the emergency move. The one you use when your curly bob has about six minutes of patience left in it and you need to leave. Gather the top and side sections into a loose puff at the back, twist the remaining ends upward, and pin them in place with whatever grip you have on hand.
A large claw clip can hold the center. Then bobby pins can catch the edges that stick out. That mix is useful because it lets you build a shape fast without chasing perfection. Curly hair usually looks better when the finish has a little loft anyway.
Keep the nape soft. If the lower curls are short, let them escape. If the front pieces are frizzy, let them escape too. The whole point is speed, and speed has a texture. It’s not flat, and it’s not flawless.
You can make this style look cleaner by misting your palms with water, smoothing the outer layer once, and stopping there. One pass. Not five. Overworking the curls turns a quick updo into a puffball that never settles down.
If you only remember one thing from the whole list, remember this: curly bob updos hold better when you leave a little movement in them. The best ones look like they were arranged with confidence, not wrestled into place.