
The beauty of a messy high ponytail lies in the paradox: it looks casually thrown together, yet takes real intention to pull off properly. Most people either end up with a sloppy, unkempt result that reads as bed-head rather than intentional style, or they go too polished and lose the whole point. The sweet spot is where you find texture, movement, and a sense of “I didn’t try too hard” — while actually investing just enough technique to make it work.
A well-executed messy high ponytail works for nearly every occasion and face shape. It elongates the neck, shows off your features, and keeps hair away from your face without feeling severe. Whether you’re heading to the gym, a casual brunch, or even a more elevated event, the right version of this style bridges the gap between relaxed and refined. The trick is understanding that there are actually many different ways to interpret “messy,” and knowing which texture variation suits your hair type, your face shape, and what you’re trying to accomplish with your look.
What makes these styles so appealing is their flexibility. You can achieve them with straight hair, textured hair, curly hair, and everything in between. Some versions emphasize face-framing strands for softness. Others lean into romantic volume. A few prioritize sleek control with just a touch of texture at the crown. The following styles represent different interpretations of the messy high ponytail — each one achieves that effortless-yet-intentional aesthetic in its own way.
1. The Loose Bubble Ponytail with Undone Texture
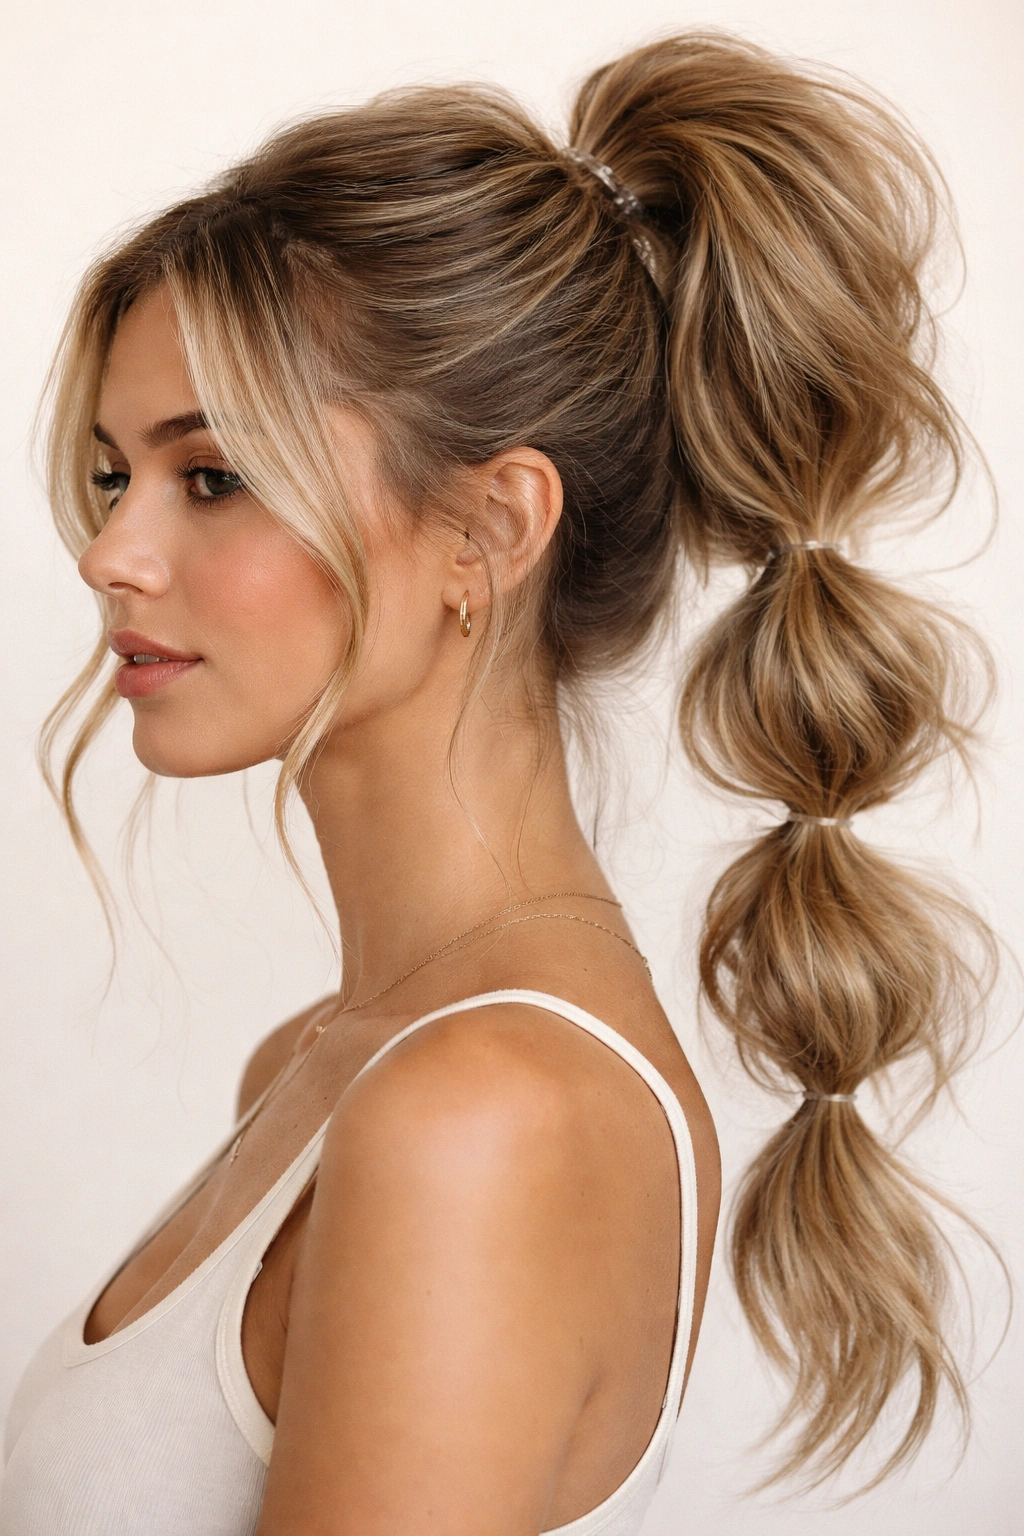
This style takes the classic bubble ponytail concept but softens it significantly with textured, piecey sections that don’t feel structured. Instead of tight, geometric bubbles, you’re creating loose, irregular sections that catch light and create visual movement. The whole effect looks like you gathered your hair up in five seconds, but the deliberate placement of elastics and the strategic texturing tells a different story.
How to Get That Effortless Look
Start by applying a texturizing spray or sea salt spray throughout damp or dry hair to create grip and definition. Blow-dry your hair with your fingers to encourage natural wave and separation — you want pieces, not a sleek foundation. Gather your hair into a high ponytail at the crown, securing it with a clear elastic. The key here is leaving some strands slightly loose around the face and at the base of your ponytail. From there, divide your ponytail into three or four sections and secure each one loosely with small clear elastics, spacing them about two inches apart. Gently tease or pull at the sections between elastics to create that signature poofy, undone appearance.
What Makes This Version Work
- The irregular bubble placement reads as intentional, not messy by accident — spacing doesn’t need to be perfect, just consistent enough to show intention
- Textured hair naturally photographs better and catches light more dynamically than a perfectly smooth ponytail
- The technique works beautifully on second-day hair, which often has more natural texture than freshly washed hair
- This style holds up well throughout the day without becoming completely frizzy because the elastics help control the overall shape
Pro tip: Use a light hairspray on each section after pulling to help hold the poofy texture, but avoid heavily spraying the entire ponytail or it will feel crunchy and stiff.
2. The Face-Framing High Ponytail with Wispy Pieces
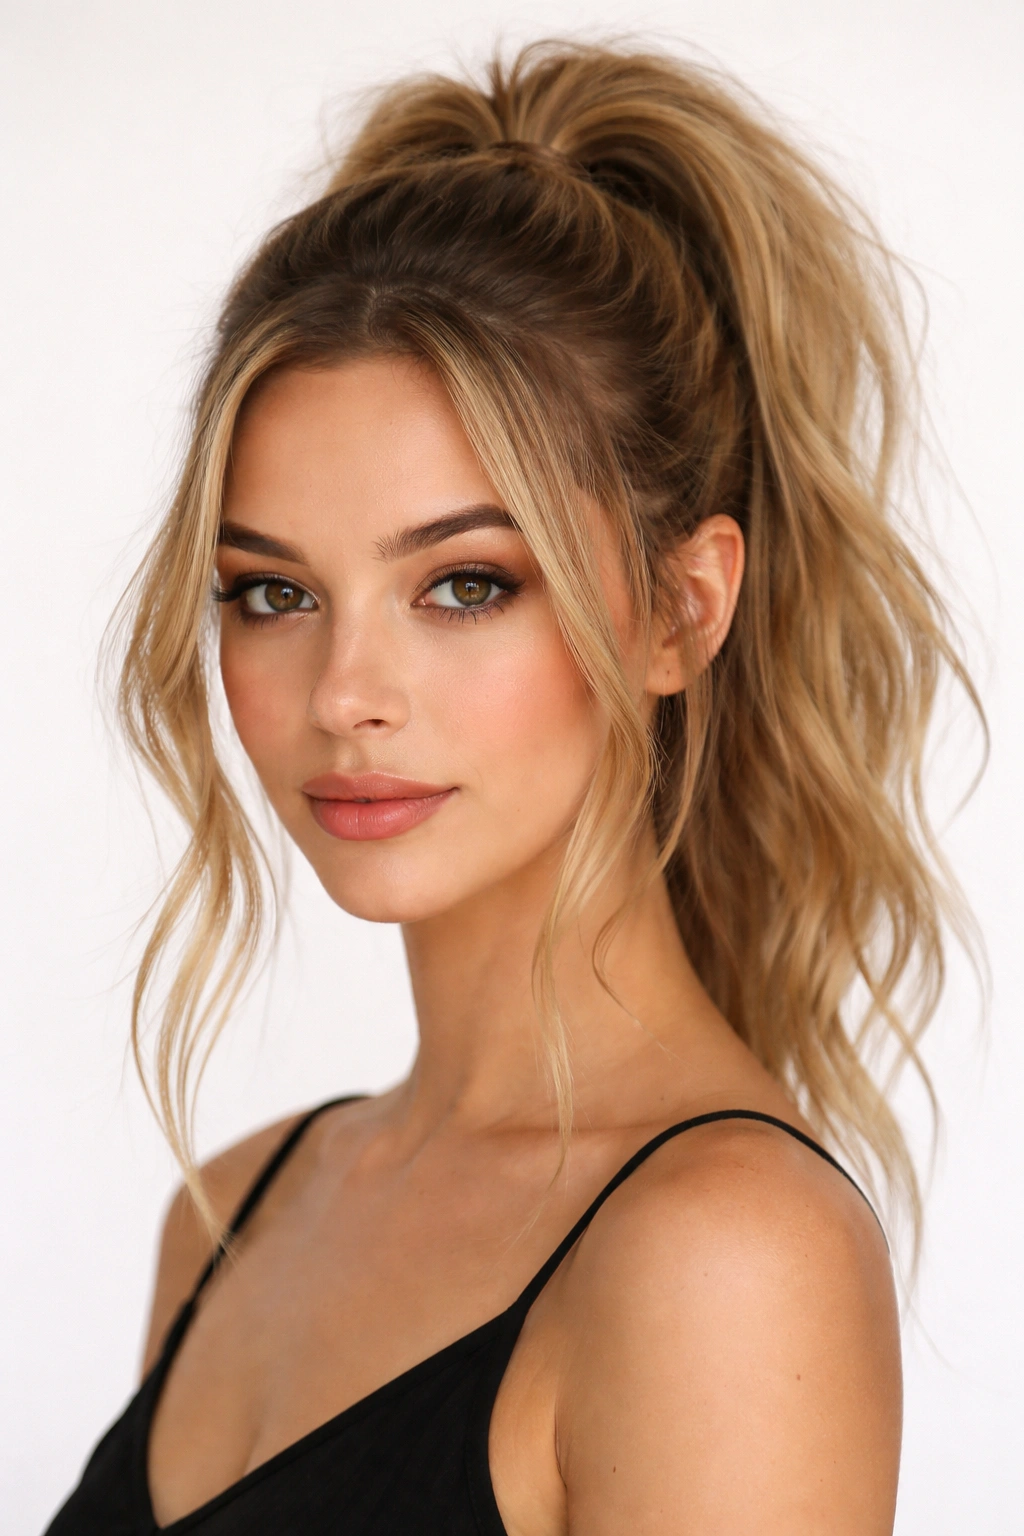
This version prioritizes softness and femininity by deliberately leaving face-framing pieces loose around your cheeks and temples. Rather than pulling everything back tightly, you strategically keep strands out that create a flattering frame and break up the severity of a traditional high ponytail. It’s particularly stunning if you have wispy layers or face-framing cut, but you can create this effect with any hair length by gently pulling strands forward before securing the main ponytail.
The Technical Breakdown
Part your hair as you normally would (or slightly off-center for a softer look). Before creating your ponytail, deliberately pull out two sections — one on each side of your face from your temple area. Twist or wave these sections lightly and pin them to the side with small bobby pins, making sure they’re secure. Now create your high ponytail with the remaining hair, keeping it smooth or textured depending on your preference. Unpin the face-framing sections and let them fall naturally. The beauty of this approach is that the loose pieces actually help anchor the entire style — they draw attention down to your face and prevent the style from looking too severe or pulled.
Why This Style Feels Polished
- Face-framing pieces automatically soften any style, making even a high, tight ponytail feel approachable and elegant
- This version works exceptionally well for interviews, first dates, or professional settings where you want to look refined but not overly formal
- The loose pieces help blend your ponytail with the rest of your face, creating a cohesive look rather than a hard line separating “styled hair” from your face
- If you have any texture, layers, or highlights, the framing pieces showcase them beautifully
Worth knowing: Velcro rollers applied to the face-framing sections while your ponytail is drying will give them a gentle wave that lasts much longer than leaving them completely loose.
3. The Sleek Pony with Teased Crown
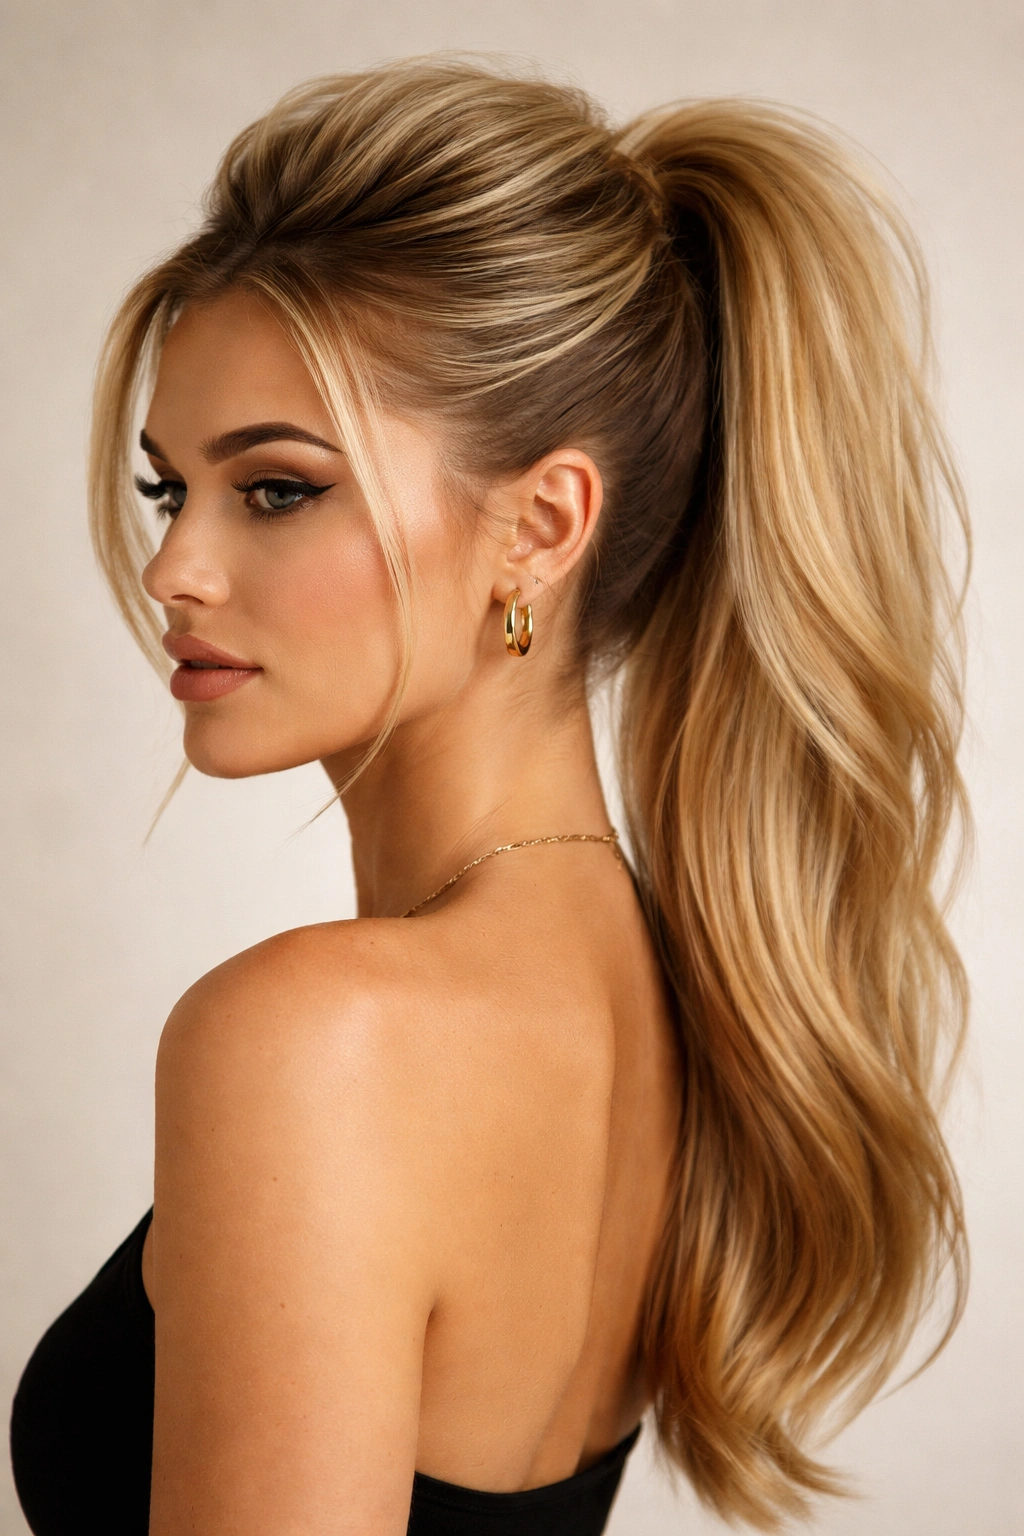
This style proves that messy doesn’t always mean textured throughout. Instead, it combines a sleek, controlled low-to-mid ponytail with strategic volume at the crown. The teased section creates height and visual interest while the smooth ponytail tail keeps the overall effect refined. It’s the perfect hybrid when you want some of that effortless texture but also need the polish of a smoother style.
Building the Volume at the Crown
After blow-drying your hair smooth, tease the crown section aggressively with a fine-tooth teasing brush. Work from the base outward, backcombing small sections to create density and height. Smooth the teased section gently with your brush to blend it — you want visible volume, not visibly matted hair. Gather your hair at the crown into a ponytail, securing it with an elastic. The tease should sit visible above the elastic, creating a rounded, textured crown. Smooth the ponytail tail itself with a paddle brush and a light smoothing serum to create contrast between the volume at top and the sleekness below.
What This Approach Solves
- The teased crown creates the optical illusion of a lifted, more youthful face shape
- This version works especially well if you have fine or thin hair — the tease adds apparent volume without requiring actual thick hair
- The contrast between sleek and textured makes the style feel intentional and editorial rather than accidentally undone
- You can wear this style for a full day without it deteriorating — the tease holds, and the smooth ponytail won’t develop frizz the same way a fully textured one might
Real talk: A light hairspray on the crown (before you tease) and again after smoothing will help the tease maintain its shape throughout the day without making it feel stiff.
4. The Half-Up High Pony with Scattered Strands
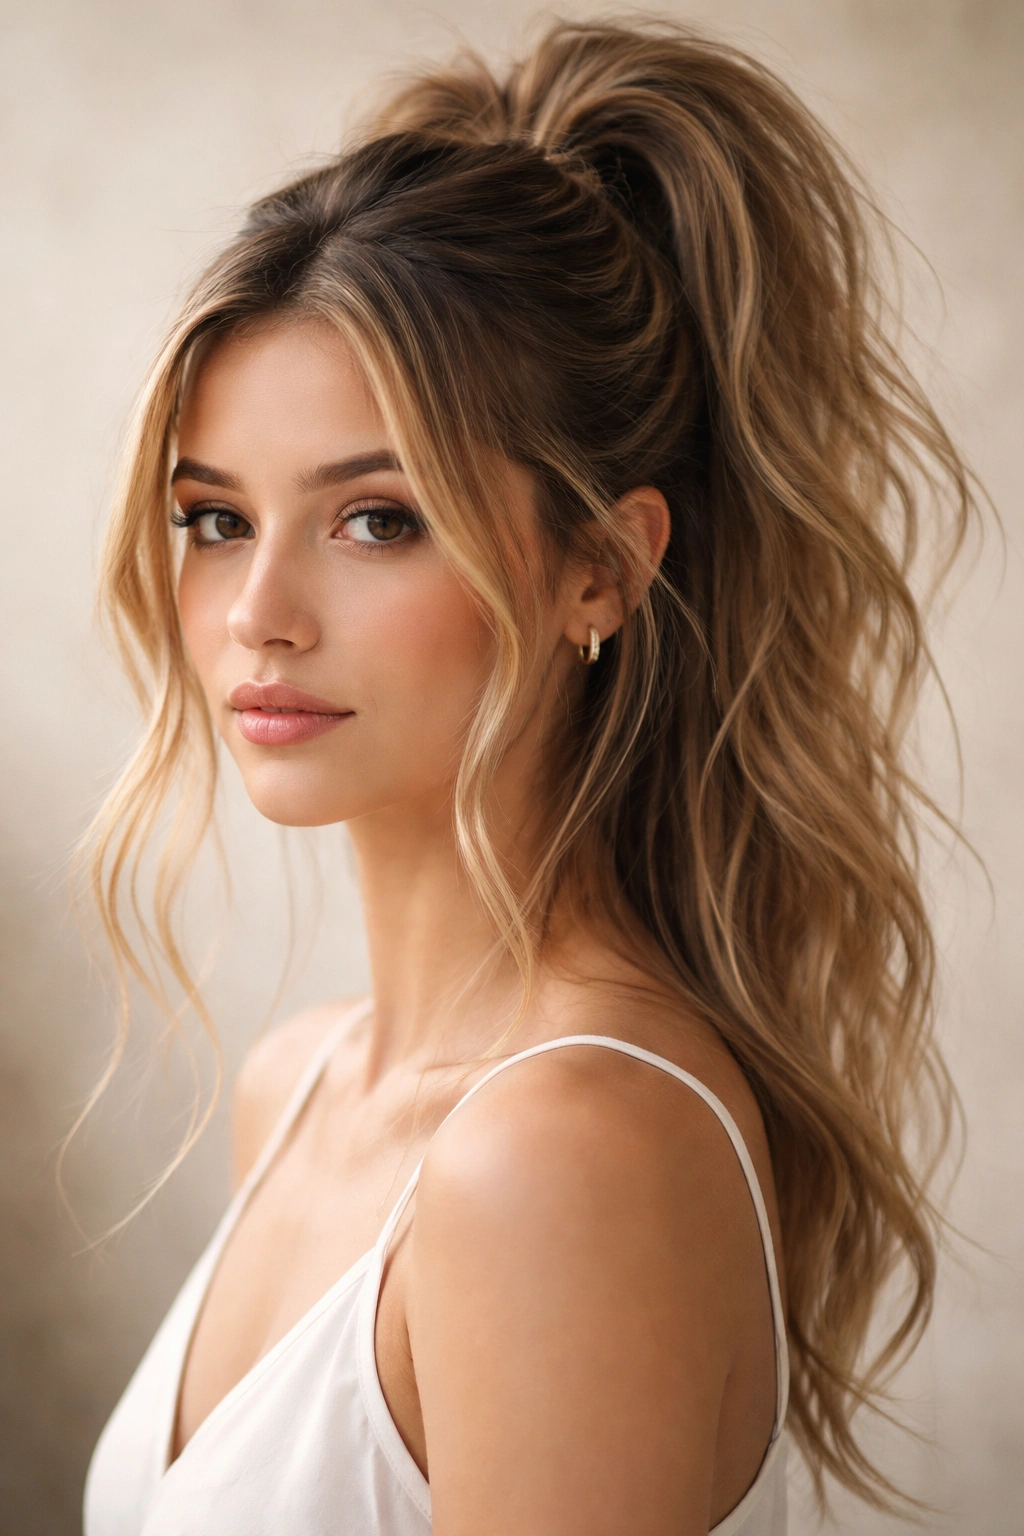
This style walks the line between a half-up, half-down style and a full high ponytail by creating a hybrid that feels both secure and effortlessly textured. You’re gathering the top half of your hair into a ponytail at the crown, but leaving the bottom half loose. The trick is making the loose pieces look intentional rather than like you ran out of time — that’s where scattered, uneven texture comes in.
The Execution
Start with textured, piecey hair (use that sea salt spray again). Take a section from your temple area on each side of your head and twist it loosely, pinning it to the back of your crown with bobby pins. Create a high ponytail with this loosely pinned section plus the hair from your crown, securing it all together. The result is that your ponytail is anchored by the twisted sections, giving it a slightly irregular, intentional appearance. Leave the bottom half of your hair down and around your shoulders, but walk through it with your teasing brush to create separation and texture in the pieces. A few strands falling around your face complete the look.
Why It Looks Both Polished and Relaxed
- The structure of the half-up section prevents the whole style from feeling completely loose or undone
- The texture in the lower section adds movement and visual interest without requiring a full head of elaborate styling
- This style is particularly flattering if you have longer hair or layers that can move freely around your shoulders
- It’s a perfect option when you want your hair up but worry that a full ponytail makes your face feel exposed
Insider note: If your hair is very straight, apply a large-barrel curling iron to the loose bottom section in sections, curling away from your face. Let the curls cool completely before you finish the style — they’ll hold much longer.
5. The Textured High Pony with Ribbon Tie
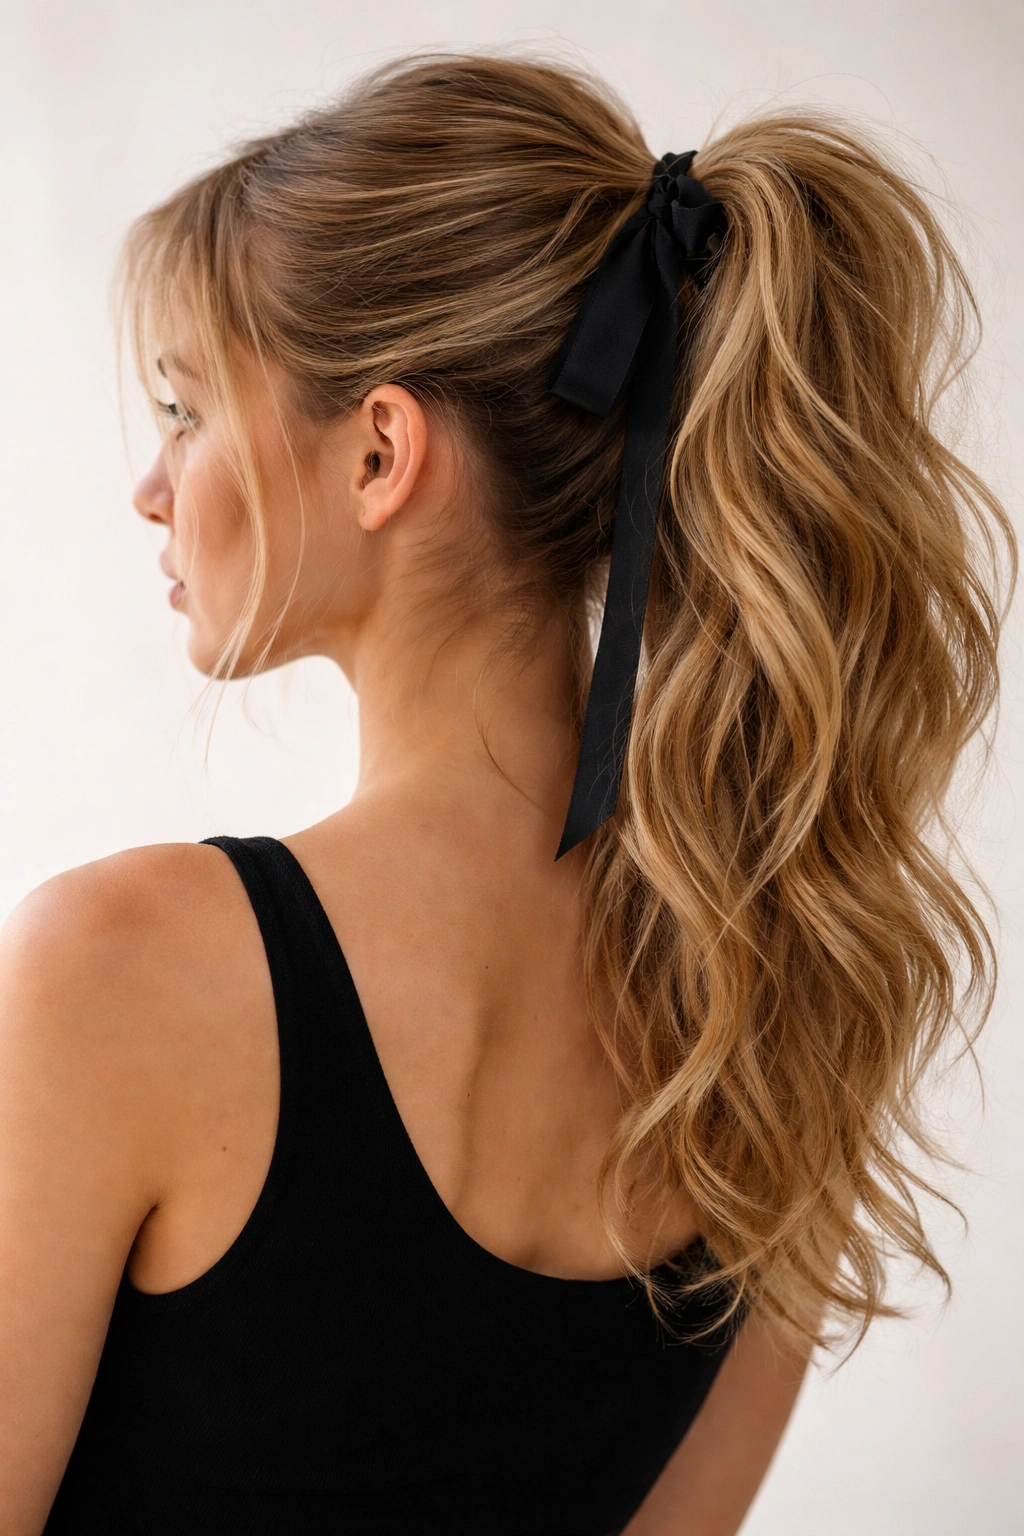
Incorporating a ribbon through or around your ponytail instantly elevates a simple high ponytail from casual to intentional. The ribbon adds visual interest, breaks up a large mass of hair, and gives your ponytail a distinctive silhouette. This version works particularly well with textured or wavy ponytails because the texture provides contrast to the smooth ribbon.
How to Integrate a Ribbon Properly
Create a textured high ponytail using your sea salt spray and teasing brush — aim for visible separation and piece-y texture throughout. Secure it with an elastic. Choose a ribbon in a color that complements your hair or your outfit — satin ribbon, grosgrain, or even a thin silk scarf all work beautifully. Thread the ribbon through your elastic from underneath, creating a loop, then wrap it around the base of your ponytail two or three times, covering the elastic completely. Tie it into a bow at the base or let it trail down the side of your ponytail. If you want a more subtle look, you can also thread the ribbon down the center of your ponytail, splitting your hair sections with it as it descends.
Why This Detail Matters
- A ribbon automatically signals that your style is intentional — it reads as styled rather than haphazard
- The vertical line created by a ribbon running through your ponytail creates an optical illusion of length and sleekness, even in a textured style
- Ribbons work across age ranges and face shapes, making this a versatile styling detail
- You can change ribbons depending on your outfit or mood, which means one base ponytail technique can create multiple distinct looks
Pro tip: Velvet ribbons feel luxurious and have enough grip that they won’t slip down your ponytail the way satin sometimes does.
6. The Twisted Ponytail with Loose Ends
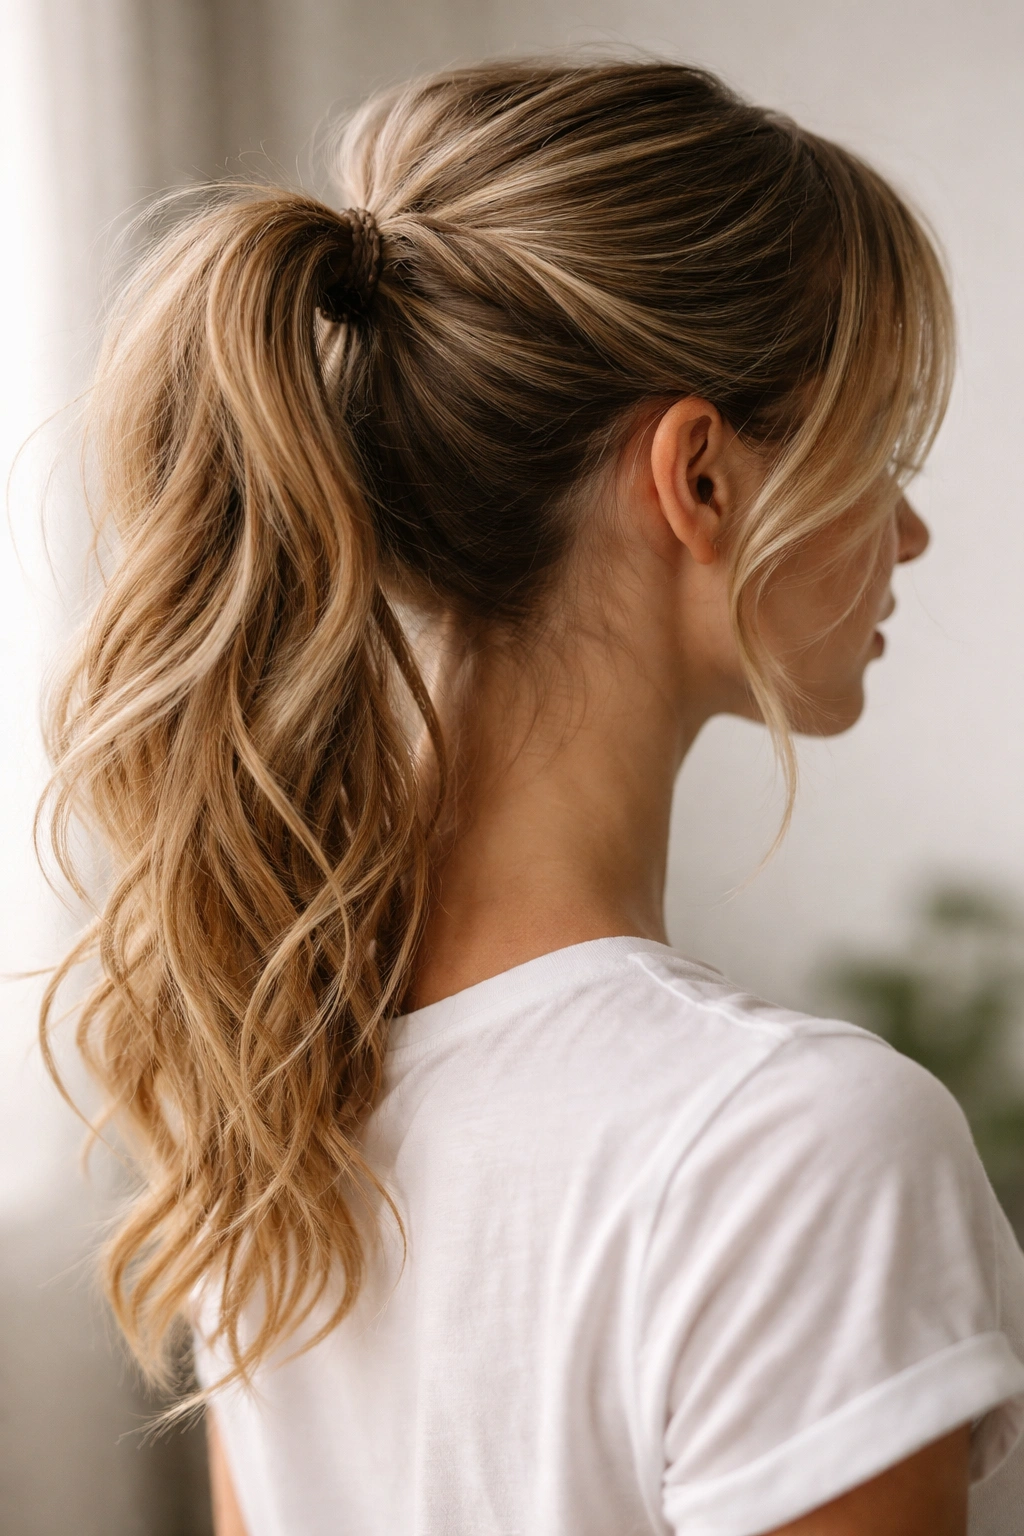
This version takes advantage of a simple twisting technique to add dimension and visual movement to your high ponytail. Instead of a standard gathered ponytail, you’re creating two twisted sections and then loosely releasing part of the twist at the base, creating a textured, almost braided effect without the structural commitment of an actual braid.
The Twisting Technique
Part your hair down the center or slightly off to one side. Take a section from one side of your head at the temple and twist it continuously as you bring it toward the back of your head — incorporate more hair as you twist, gradually working toward the crown. Do the same on the other side, bringing both twisted sections to meet at the back. Secure both twisted sections together with a single elastic at the crown. Here’s the key: very gently unwind the bottom half of each twist, releasing some of the twisted structure so that the base of your ponytail looks intentionally loosened and textured rather than rigidly twisted.
What This Creates Visually
- The twist adds textural contrast to your ponytail without requiring heat styling or product buildup
- This version works beautifully on second or third-day hair because the twist actually holds better on hair with a bit of texture and oils
- The partially released twist at the base creates a romantic, almost braided appearance that reads as more intentional than a simple ponytail
- The technique works on straight hair, wavy hair, and curly hair — it just reads slightly differently depending on your hair texture
Worth knowing: If your twists are slipping, a light mist of hairspray on each section as you twist will help them hold their shape through the day.
7. The Voluminous High Pony with Strategic Tease
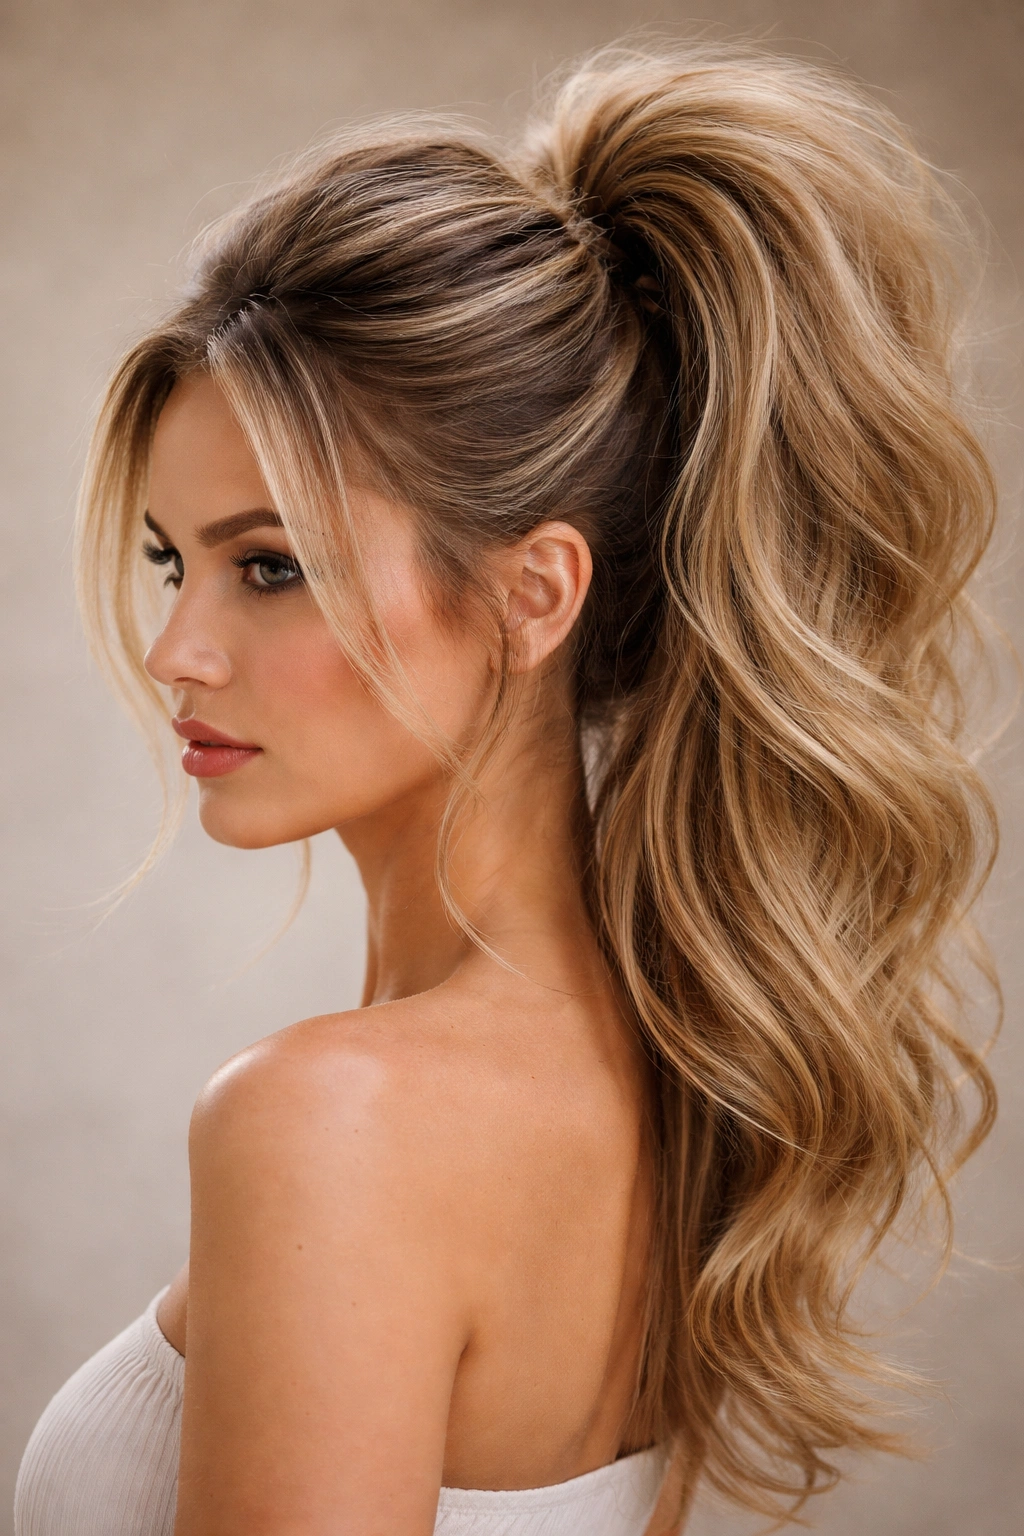
This style prioritizes height and volume throughout the entire ponytail, not just at the crown. You’re teasing sections within the ponytail itself to create a fuller, rounder silhouette that catches light and photographs beautifully. It’s particularly effective if you have fine or thin hair, or if you’re going for a bold, statement-making look.
Building Volume Strategically
After blow-drying your hair, create a high ponytail and secure it with an elastic. Now, gently tease the ponytail itself in sections — divide it into three or four segments and backcomb each segment at the base where it meets your elastic. Smooth the outer layer of each section so you have visible dimension without a matted appearance. You can also gently pull on the outer edge of the teased sections to create a rounder, fuller silhouette. A light hairspray applied as you tease (and again after smoothing) will help the tease hold its shape all day.
Why This Works for Multiple Occasions
- A voluminous high ponytail works beautifully for dressy occasions where you want more impact
- The height and fullness create a flattering frame for most face shapes
- This version holds up better throughout the day than a sleek ponytail — the texture actually prevents it from looking limp as hours pass
- The strategic teasing means your ponytail looks intentionally styled rather than accidentally frizzy
Pro tip: Use a teasing brush with fine teeth — the finer the bristles, the more control you have over where the tease sits and how it blends with the rest of your hair.
8. The Braided Base with Textured Tail
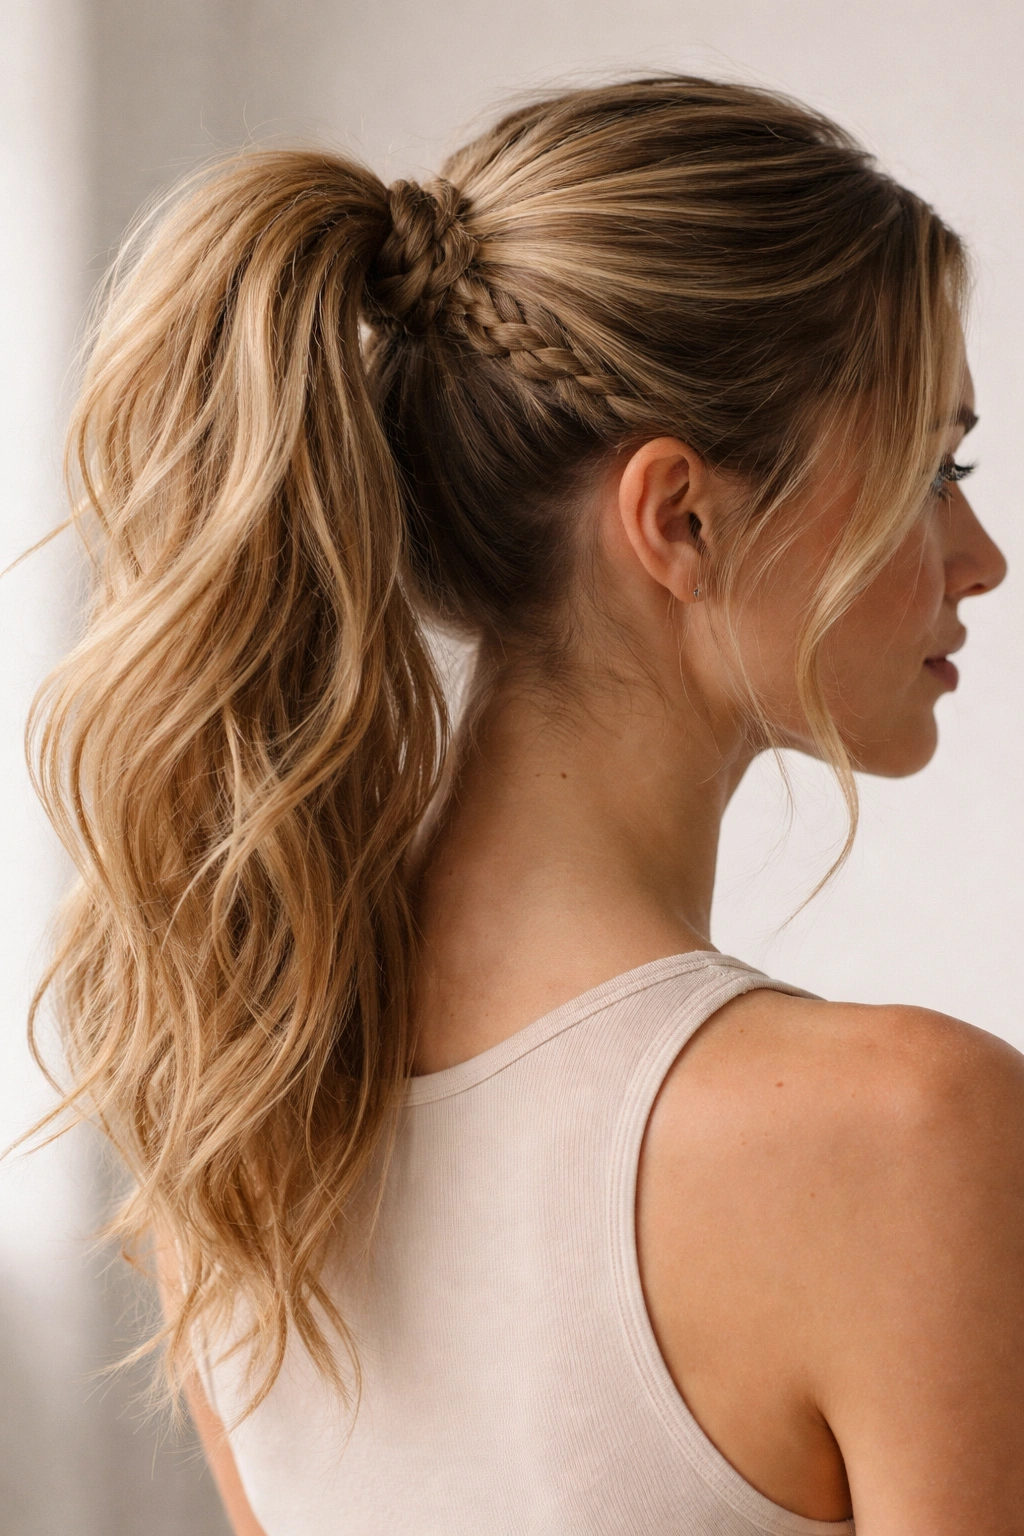
This style combines a small braid at the base of your ponytail with a textured, piece-y tail. The braid adds interest and prevents the style from looking too simple, while keeping the overall effect relaxed through the textured tail. It’s more intentional than a casual ponytail but less commitment than an elaborate braided style.
Creating the Braided Detail
Gather your hair into a high ponytail and secure it loosely with an elastic. Take a thin section from the underside of your ponytail at the base and create a three-strand braid using just that section, braiding downward for about two to three inches. Secure the end of the braid with a tiny clear elastic. Now, gently release and tease the rest of your ponytail below the braid, using your teasing brush to create separation and texture. The effect is that your ponytail has a structured, braided detail at the top that transitions into a looser, textured tail.
Why This Version Feels Effortlessly Elegant
- The small braid reads as a deliberate styling choice, making the entire look feel more intentional
- The contrast between the structured braid and the textured tail creates visual interest and dimension
- This version works well for situations where you want to look put-together but not overly formal
- The braid also helps anchor your ponytail so it feels secure and stable, even though it looks relaxed
Real talk: If you’re not comfortable braiding, you can create a similar effect by twisting a thin section instead of braiding — the visual impact is quite similar.
9. The Sleek High Pony with Undone Base
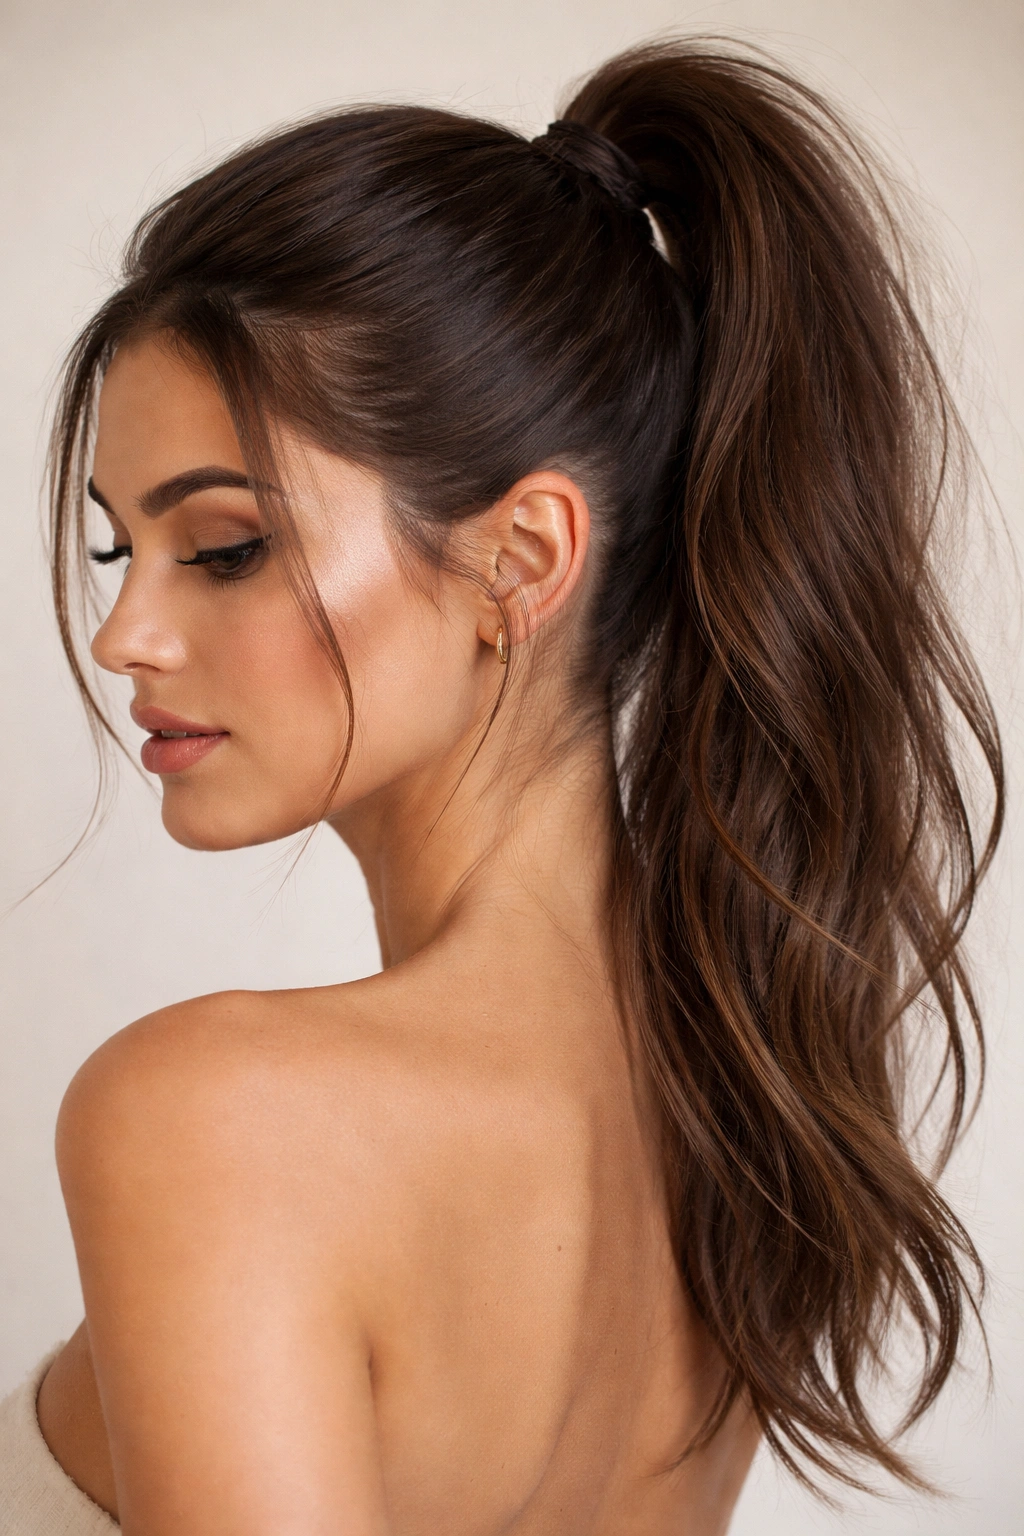
This style flips the usual approach by keeping the ponytail itself smooth and sleek while creating textured interest specifically at the base where your elastic sits. You’re using the contrast between smooth and textured to create a style that looks both polished and relaxed.
The Technique
Blow-dry your hair smooth with a paddle brush and smoothing serum. Create your high ponytail and secure it with an elastic. Now, take very small sections of hair from around the base of your elastic — right where it sits on your head — and gently tease those tiny sections. Don’t tease the entire ponytail, just these small pieces around the elastic. Smooth them slightly so they have dimension without looking matted. You can also gently pull on these teased pieces to create a slight poof around the base. The result is a smooth, sleek ponytail with intentional texture right at the crown.
What This Communicates Visually
- The sleek ponytail reads as polished and controlled, while the texture at the base adds softness and dimension
- This version is particularly effective if you’re going for an editorial or high-fashion aesthetic
- The contrast between sleek and textured makes the style feel intentionally designed rather than accidental
- This approach works especially well if you have thick or long hair — the sleekness prevents the style from feeling heavy
Worth knowing: A smoothing serum applied to the ponytail (but not the base) will help it stay sleek throughout the day and resist frizz.
10. The Romantic High Pony with Soft Waves
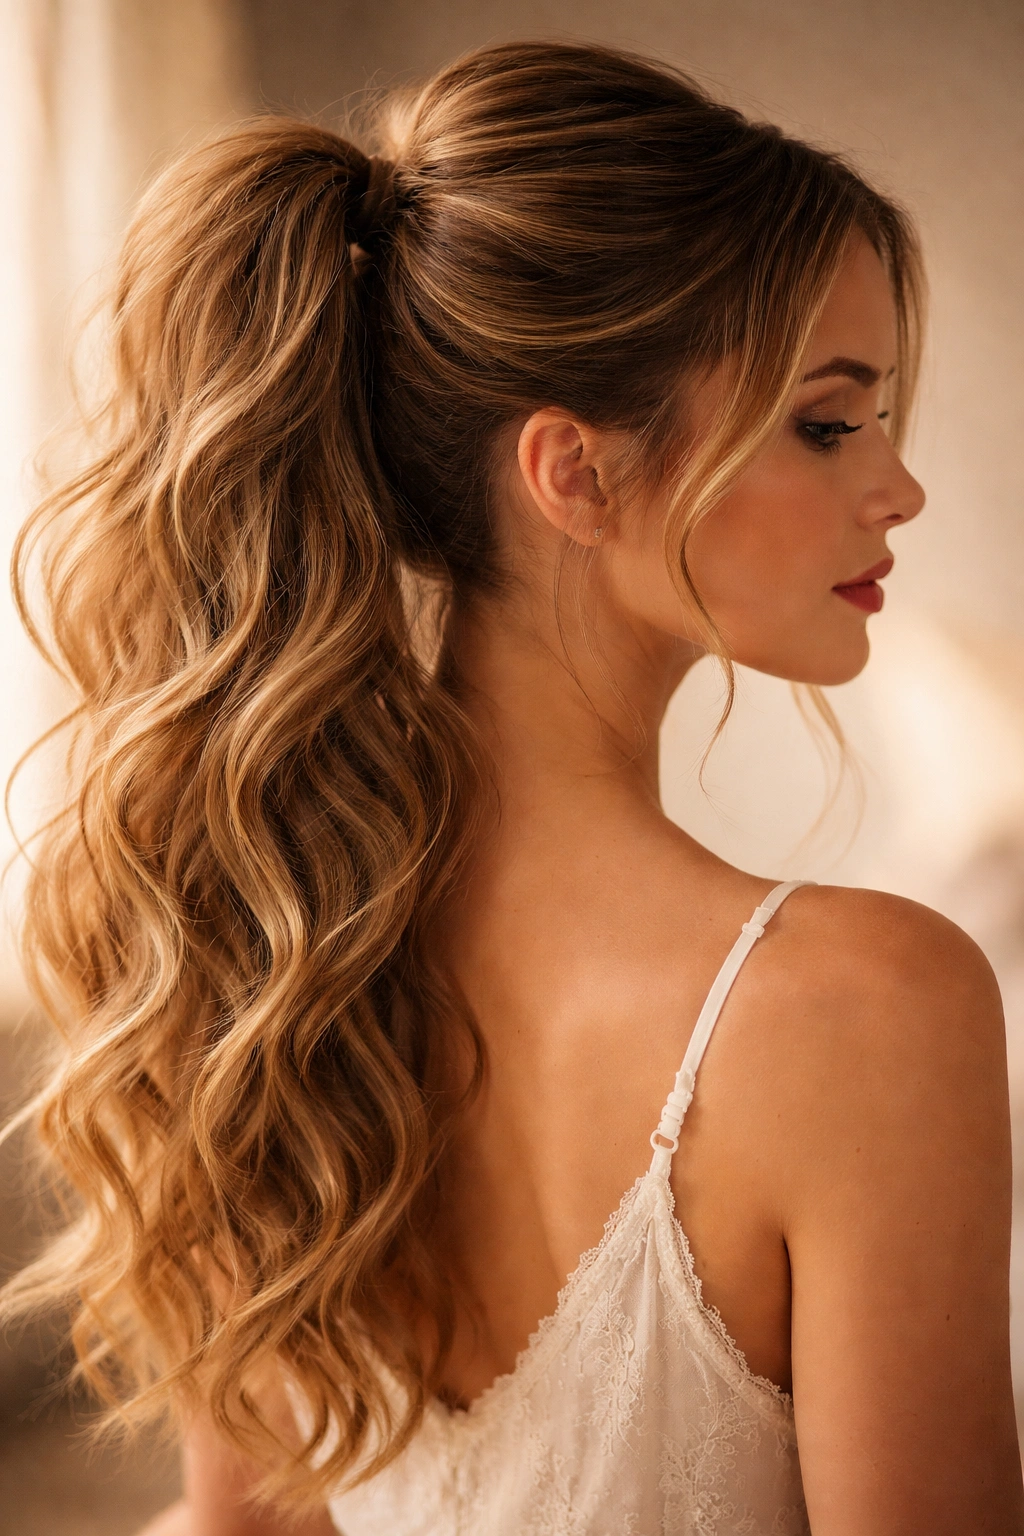
This version emphasizes softness and femininity through the use of gentle waves throughout the ponytail and around your face. It’s the most romantic interpretation of the messy high ponytail — it reads as less casual and more intentionally styled.
Creating the Wave Pattern
Start by creating your high ponytail on dry hair (second-day hair works beautifully here). Use a large-barrel curling iron to create loose waves throughout your ponytail, curling away from your face and working in sections. The waves don’t need to be perfectly uniform — slightly irregular waves actually look more intentional and romantic. Let the curls cool completely before you run your fingers through them to break them up slightly. Gently separate the curls into larger sections of wave rather than individual ringlets. Leave a few pieces loose around your face and tease the crown slightly to add subtle volume.
Why This Version Works for Special Occasions
- The waves add movement and visual interest that’s more elegant than a flat ponytail
- The soft, romantic effect of this style makes it appropriate for events like weddings, dates, or celebrations
- The waves also help the style last longer throughout the day — movement makes frizz less noticeable
- This version is particularly flattering if you have a longer face shape because the waves add width and softness
Pro tip: A light texturizing spray applied before curling will help the waves hold longer, but apply it sparingly so it doesn’t make your hair feel sticky.
11. The High Pony with Ribbon-Woven Braid Detail
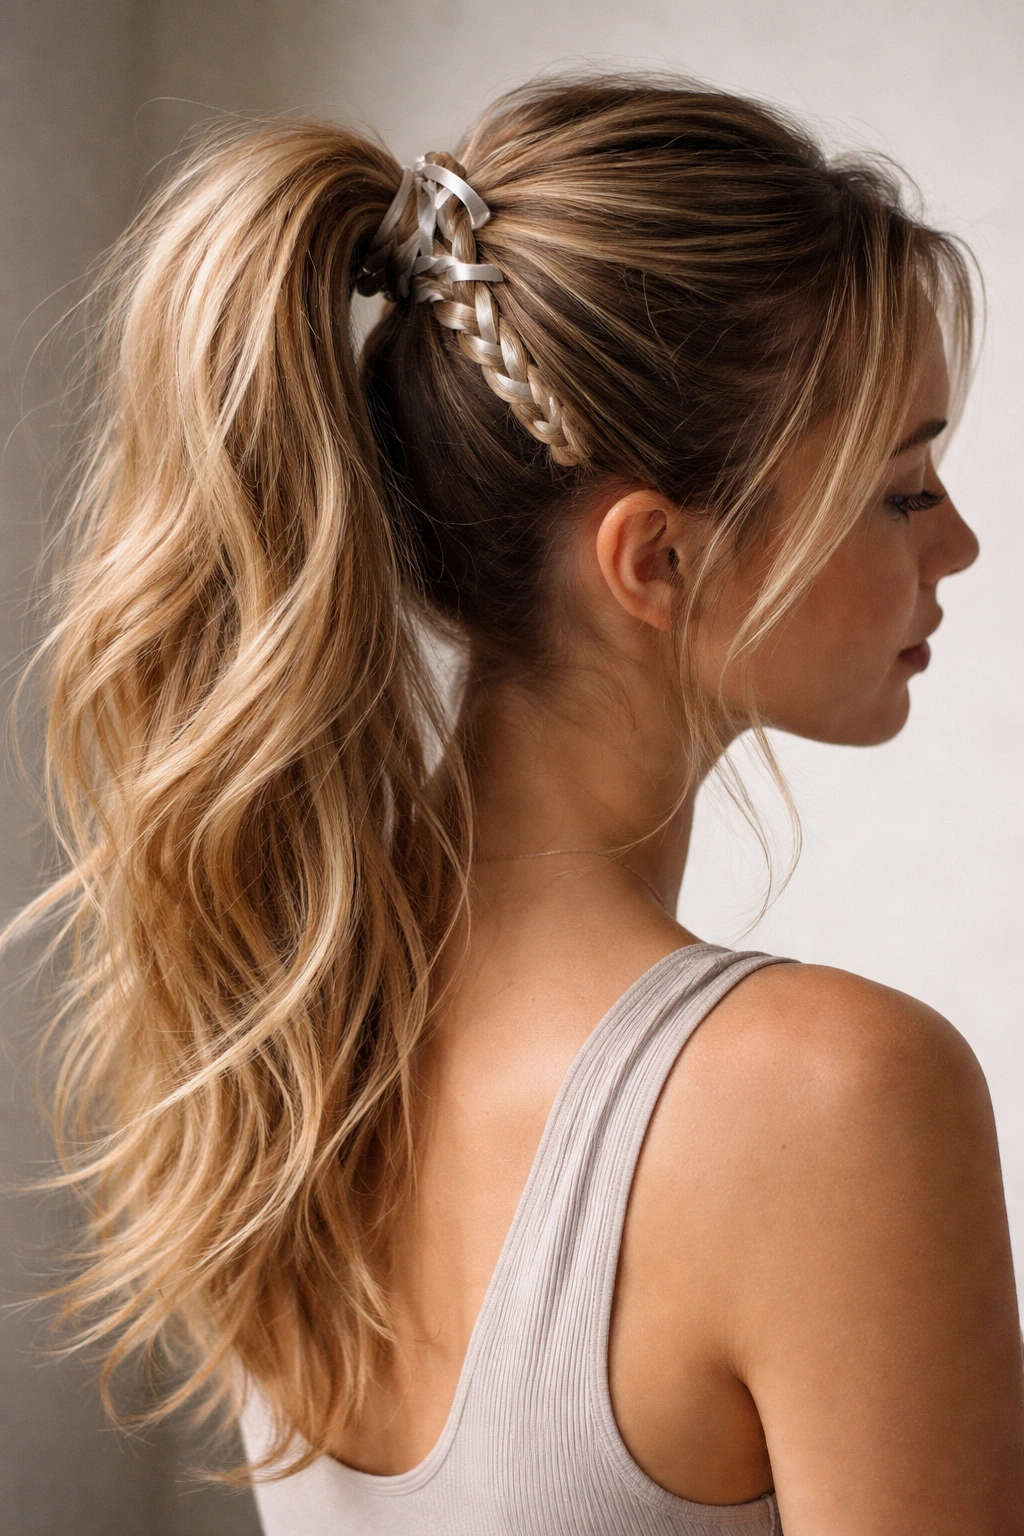
This style takes the braided base concept further by weaving a ribbon directly through a small braid at the base of your ponytail. It’s more elaborate than some of the other options but still reads as effortlessly styled rather than overdone.
The Weaving Process
Create a high ponytail and secure it with an elastic. Select a thin section from the underside of your ponytail at the base. Before you braid, thread a ribbon through this section of hair — you now have four elements to work with: two pieces of hair on the sides and the ribbon in the middle. Create a four-strand braid by alternating which strands cross over the center, incorporating the ribbon as you braid. Secure the end with a tiny elastic and gently release the braid slightly to create texture. The ribbon will naturally weave through your braid, creating an elegant detail.
What Makes This Detail Special
- The ribbon woven through the braid creates a distinctly intentional, designed look
- This version reads as more elevated than a simple ponytail, making it suitable for special occasions
- The ribbon color can coordinate with your outfit or tie the look together visually
- Even though it looks complex, this technique is actually quite simple once you understand the four-strand braiding motion
Worth knowing: Satin ribbon shows the weaving detail more clearly than textured ribbon, but textured ribbon has better grip on your hair.
12. The Undone High Pony with Face-Framing Pieces and Crown Texture
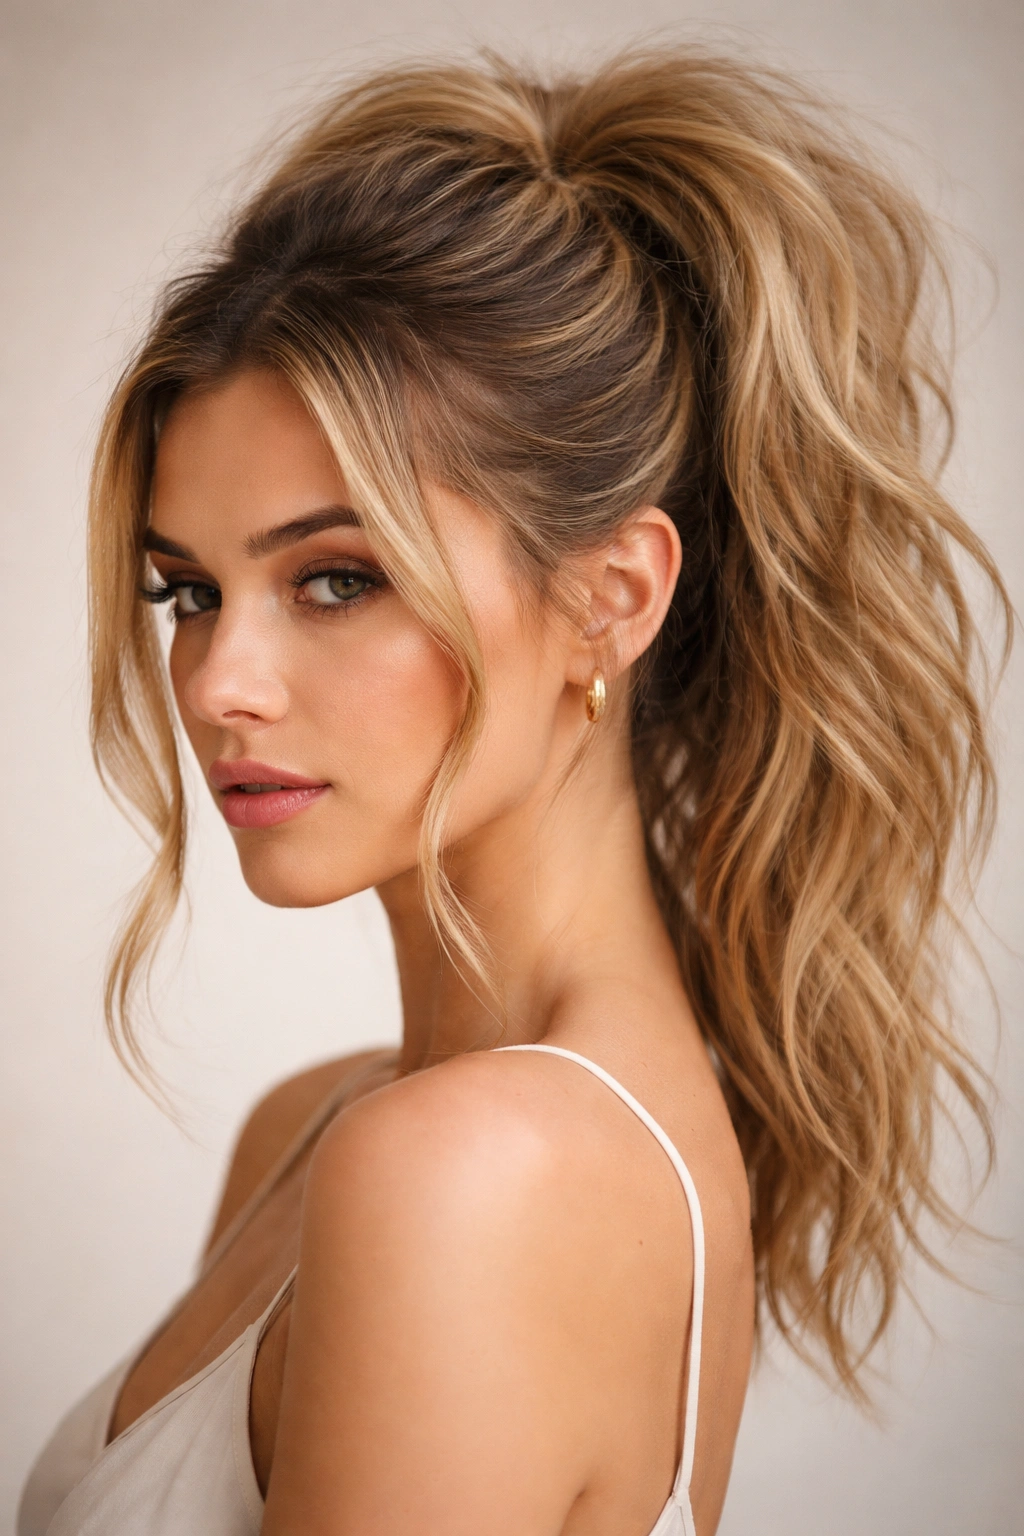
This final style combines multiple elements of the best messy ponytail techniques: strategic teasing at the crown for volume, loose face-framing pieces for softness, and textured separation throughout. It’s the most comprehensive version of the “effortlessly put-together” high ponytail — it requires more technique than some of the others, but the payoff is a style that looks both completely relaxed and deliberately designed.
The Full Approach
Apply sea salt spray to damp or dry hair and blow-dry with your fingers for texture. Tease your crown aggressively, creating significant height and volume. Gently smooth the teased section so it looks textured but intentional. Pull out two small sections from your temples and twist them loosely. Create your high ponytail by gathering the teased crown section and the temple twists together, securing them with an elastic. Let the temple twists unwind slightly at the base so they look loose and romantic. Finally, tease the ponytail itself in sections to add volume and dimension throughout. Use a teasing brush to create visible separation in the ponytail pieces.
Why This Is the Most Versatile Version
- The combination of crown height, face-framing pieces, and textured tail creates a complete, polished look
- This version reads as appropriate for nearly any occasion — casual enough for everyday wear but intentional enough for special events
- The multiple textural elements mean the style holds up well throughout the day without deteriorating
- The technique works on most hair types and textures, and it works beautifully on second or third-day hair
Pro tip: Anchor your loose temple pieces with bobby pins hidden behind the main ponytail so they won’t slip out during the day, even though they’ll appear completely loose and natural.
Final Thoughts
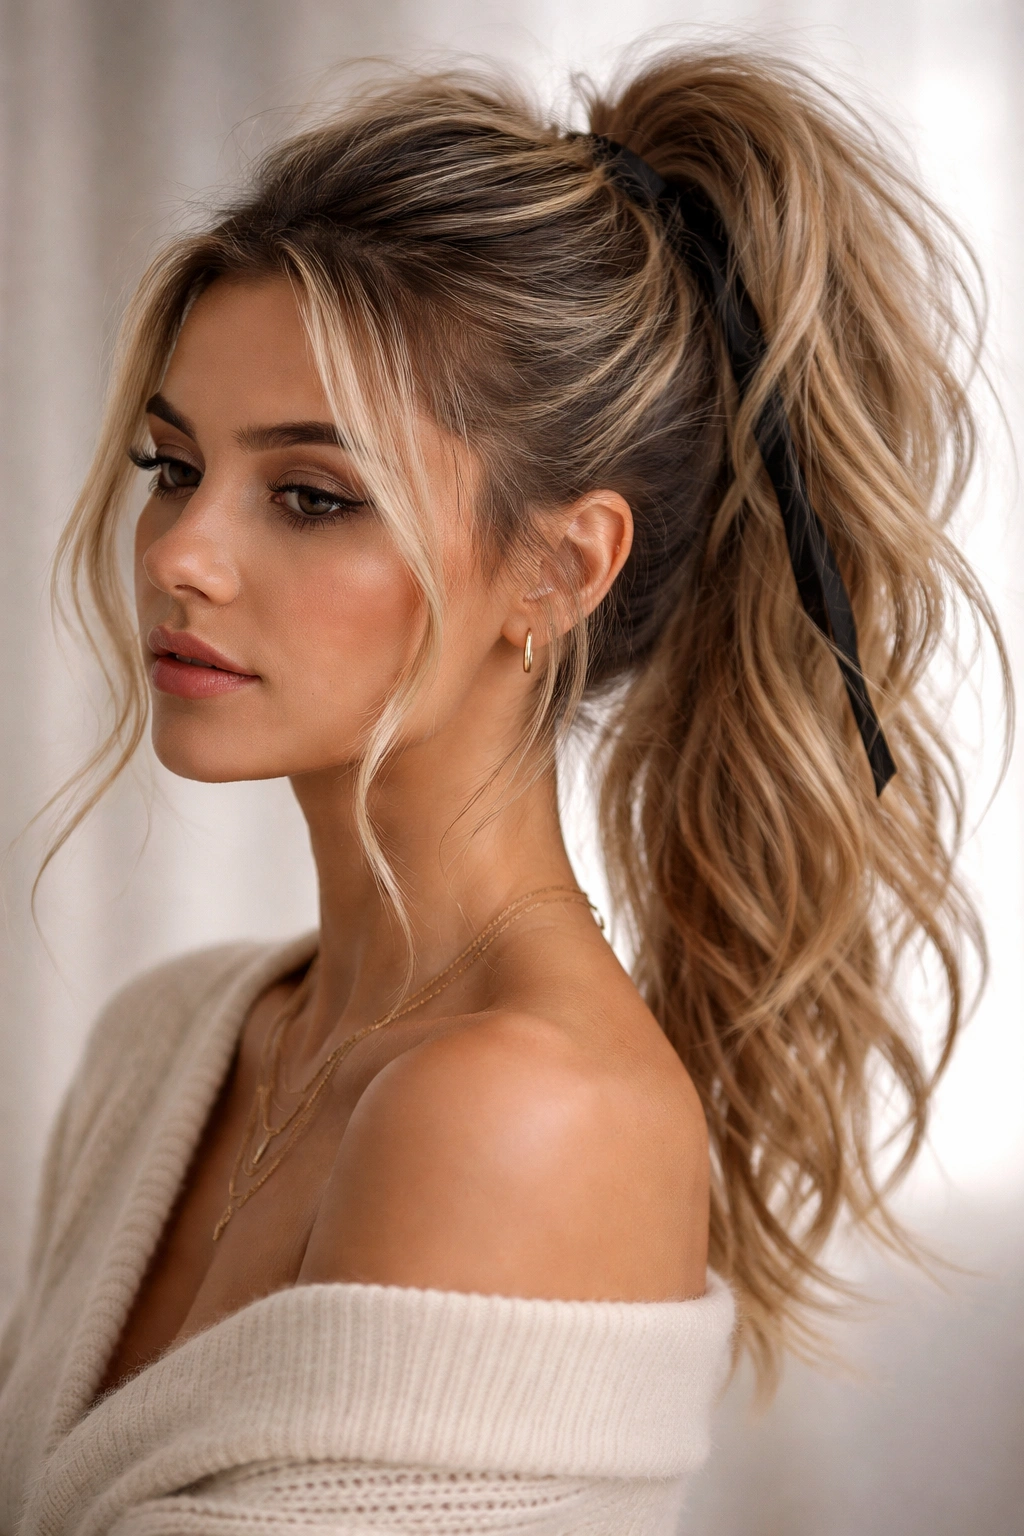
The magic of a messy high ponytail is that it doesn’t require perfect execution to look beautiful — in fact, a bit of intentional imperfection is the entire point. What distinguishes a polished messy ponytail from an actual messy ponytail is the presence of clear technique choices: deliberate teasing in specific areas, strategic face-framing pieces, textured separation that reads as intentional rather than accidental, or small details like ribbons and braids that signal design.
The styles above represent different ways to interpret what “messy” and “put together” mean at the same time. Some prioritize volume and crown height. Others emphasize softness through face-framing pieces. A few use contrast between sleek and textured areas to create visual interest. The key to mastering any of these versions is understanding that you’re not trying to hide your styling — you’re showcasing it in a way that appears relaxed rather than overdone.
Start with one or two of these versions and practice them until they feel natural. Once you’re comfortable with the foundational technique of one style, you’ll find that combining elements from different versions becomes intuitive. The best part about these ponytails is that they improve with practice and look better as your hair gets a bit of texture and texture over time. You’re not fighting for perfection; you’re celebrating intentional style.