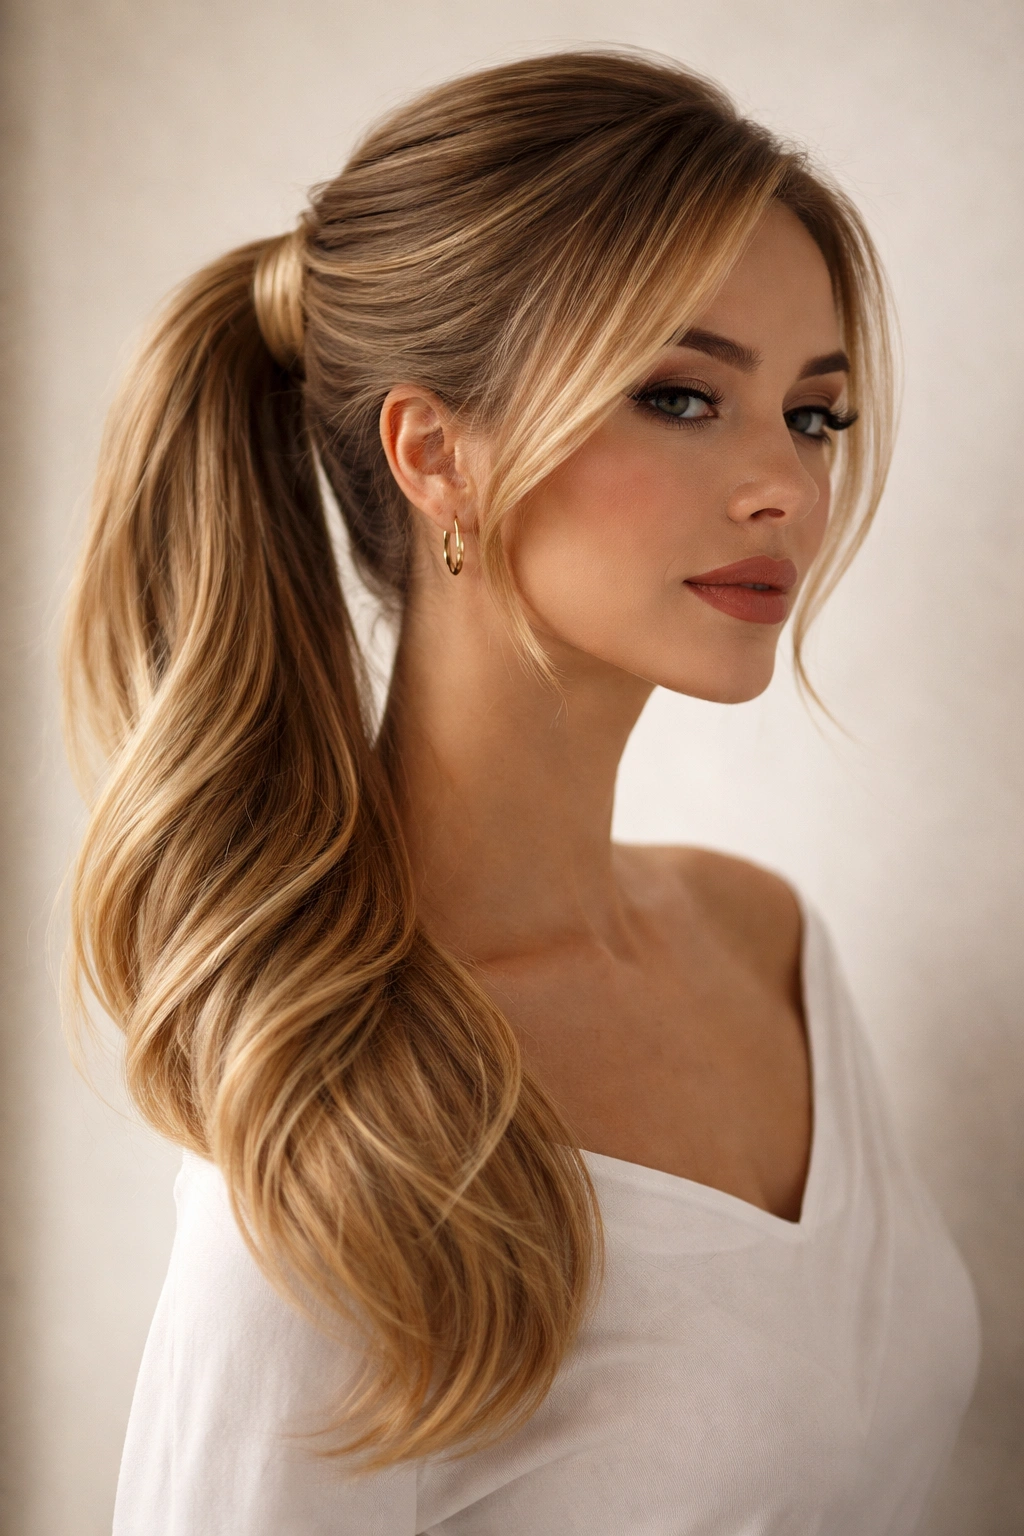
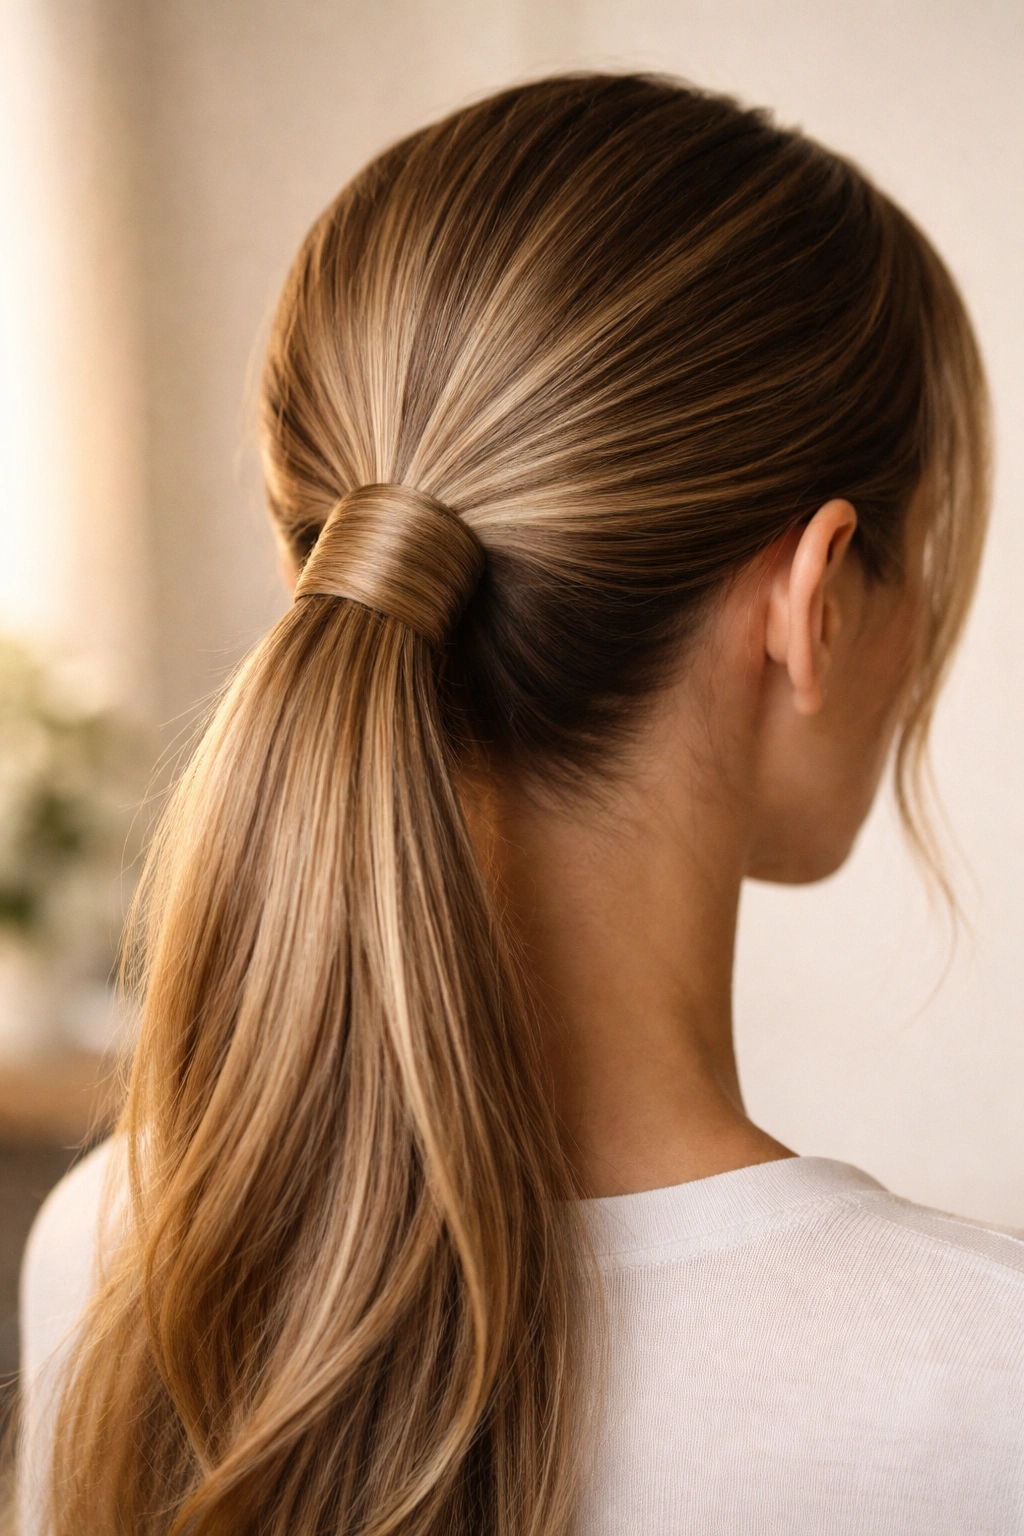
A wrapped ponytail elevates even the simplest hairstyle from ordinary to polished—that neat, finished look where a strand of hair spirals smoothly around the base transforms your entire appearance. Whether you’re heading to the office, a special event, or simply want your everyday style to feel more intentional, the wrapped ponytail delivers effortless sophistication. The wrapping technique serves a dual purpose: it conceals the elastic holding everything together while adding a textural, thoughtful detail that signals you’ve actually styled your hair rather than just pulled it back.
The beauty of wrapped ponytails lies in their versatility. You can wrap with your own hair, with ribbons, with silk strips, or even with decorative elements—each approach creates a distinctly different effect. A high wrapped ponytail feels energetic and polished, perfect for professional settings or workouts, while a low wrapped ponytail exudes elegance and ease. The wrapping itself can be sleek and barely-there, or bold and textural, depending on your mood and the occasion.
What makes wrapped ponytails particularly valuable is that they work across virtually every hair type and texture. Fine, straight hair gets visual fullness from the wrapped detail at the base. Curly and coily hair photographs beautifully with this finish, and the wrap actually helps define the curl pattern. Even thin hair appears thicker when styled this way—the strategically placed wrap creates an optical illusion of density right where it matters most. The technique also protects your hair by keeping the elastic band out of sight, meaning less tension on individual strands and a gentler styling option overall.
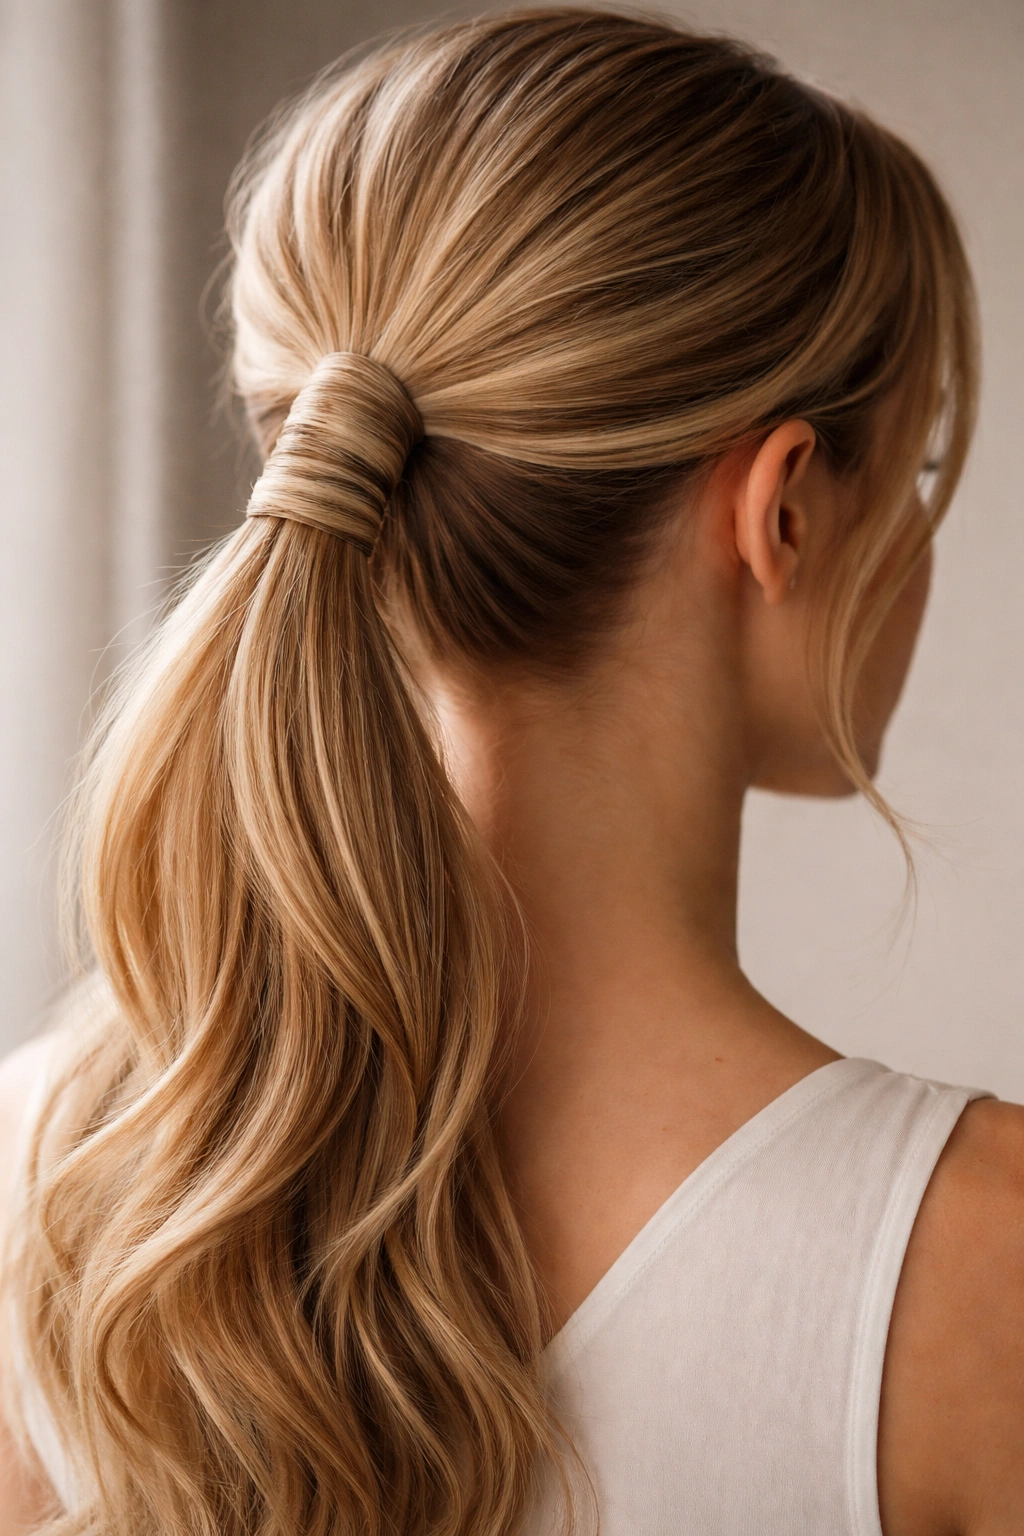
1. Classic Wrapped Ponytail
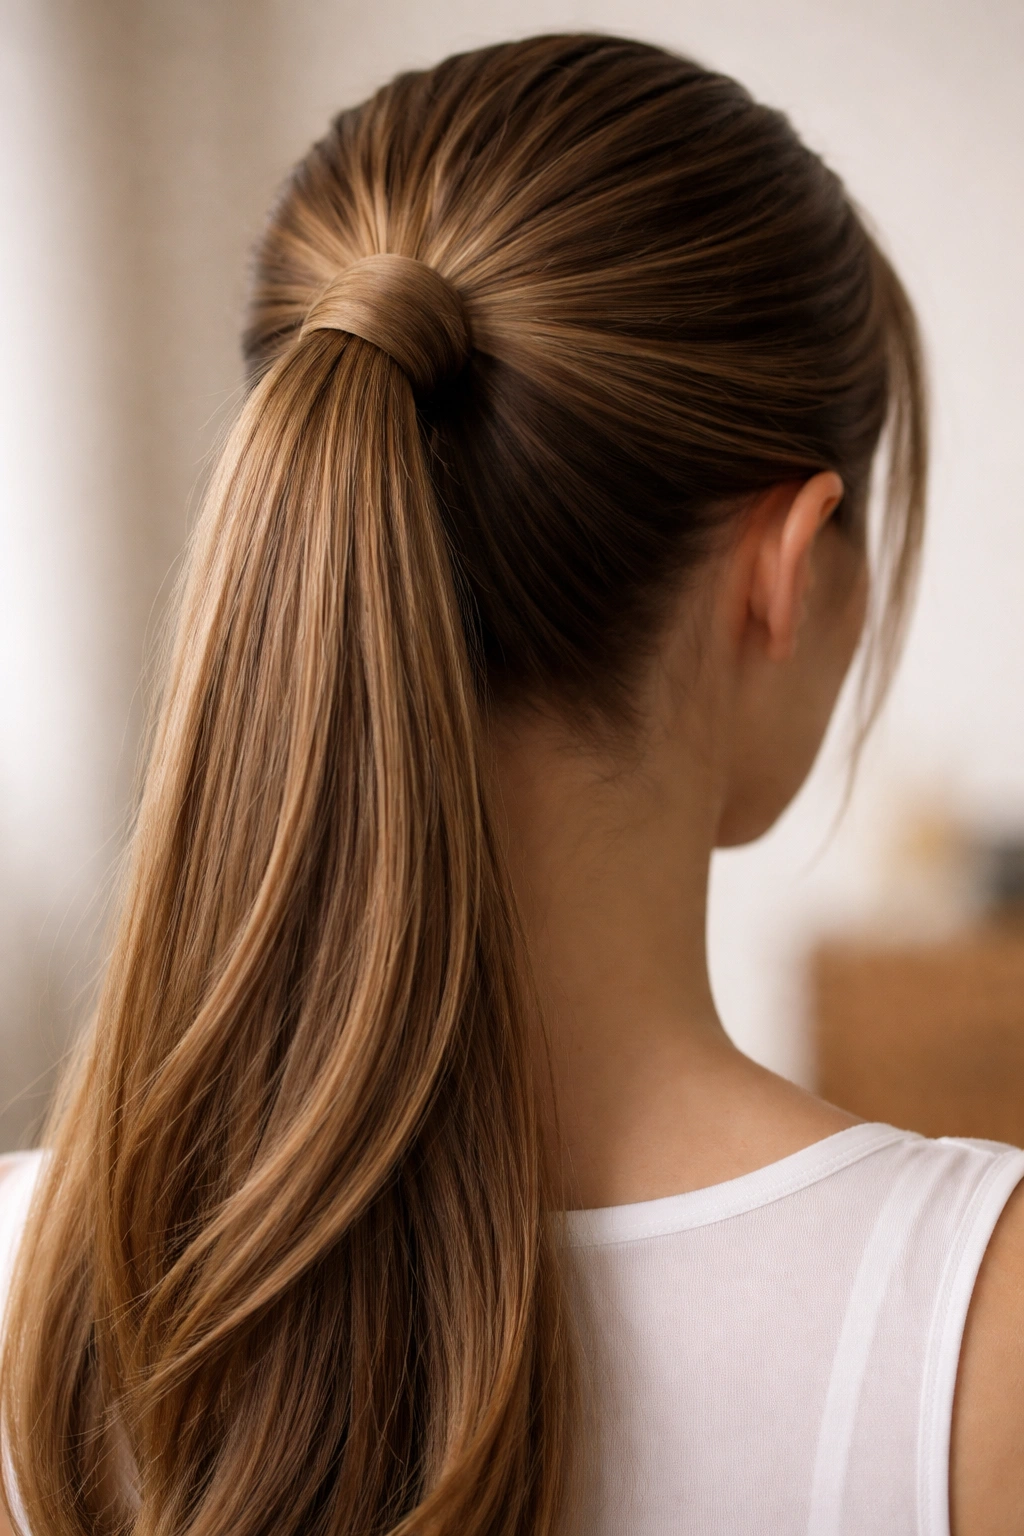
The classic wrapped ponytail is the foundation every hairstylist and confident hair-doer should master. This style starts with a smooth, secure ponytail gathered at the back of the head, and a simple section from the tail itself spirals around the elastic in one or two rotations, creating that signature clean finish. What makes it “classic” is precisely its simplicity—no extra texture, no special materials, just your own hair working to frame and refine the base.
How to Create the Perfect Classic Wrap
Start by brushing your hair straight back and securing it into a tight, high ponytail using a small elastic band. The tightness here matters; a loose base will feel messy even with a flawless wrap. Take a thin 1-inch section from the underside of your ponytail and gently wrap it around the elastic, moving clockwise and covering the band completely. Pin the end of the wrap section underneath using a small bobby pin that matches your hair color. For extra security that lasts through your entire day, mist the finished wrap lightly with hairspray—it locks the section in place without creating crunchiness.
Why This Style Works
- Takes less than 60 seconds once you master the technique, making it perfect for rushed mornings or last-minute events
- Works on all hair textures and densities from baby-fine strands to thick, coarse hair
- Requires zero additional products or accessories beyond an elastic and bobby pin
- Looks equally polished at the gym, in the office, or at a dinner party because the style transcends context
Pro tip: Wrap slightly damp hair rather than completely dry hair—it holds the spiral better and won’t slip as easily throughout the day.
2. Double-Wrapped Ponytail for Extra Sleekness
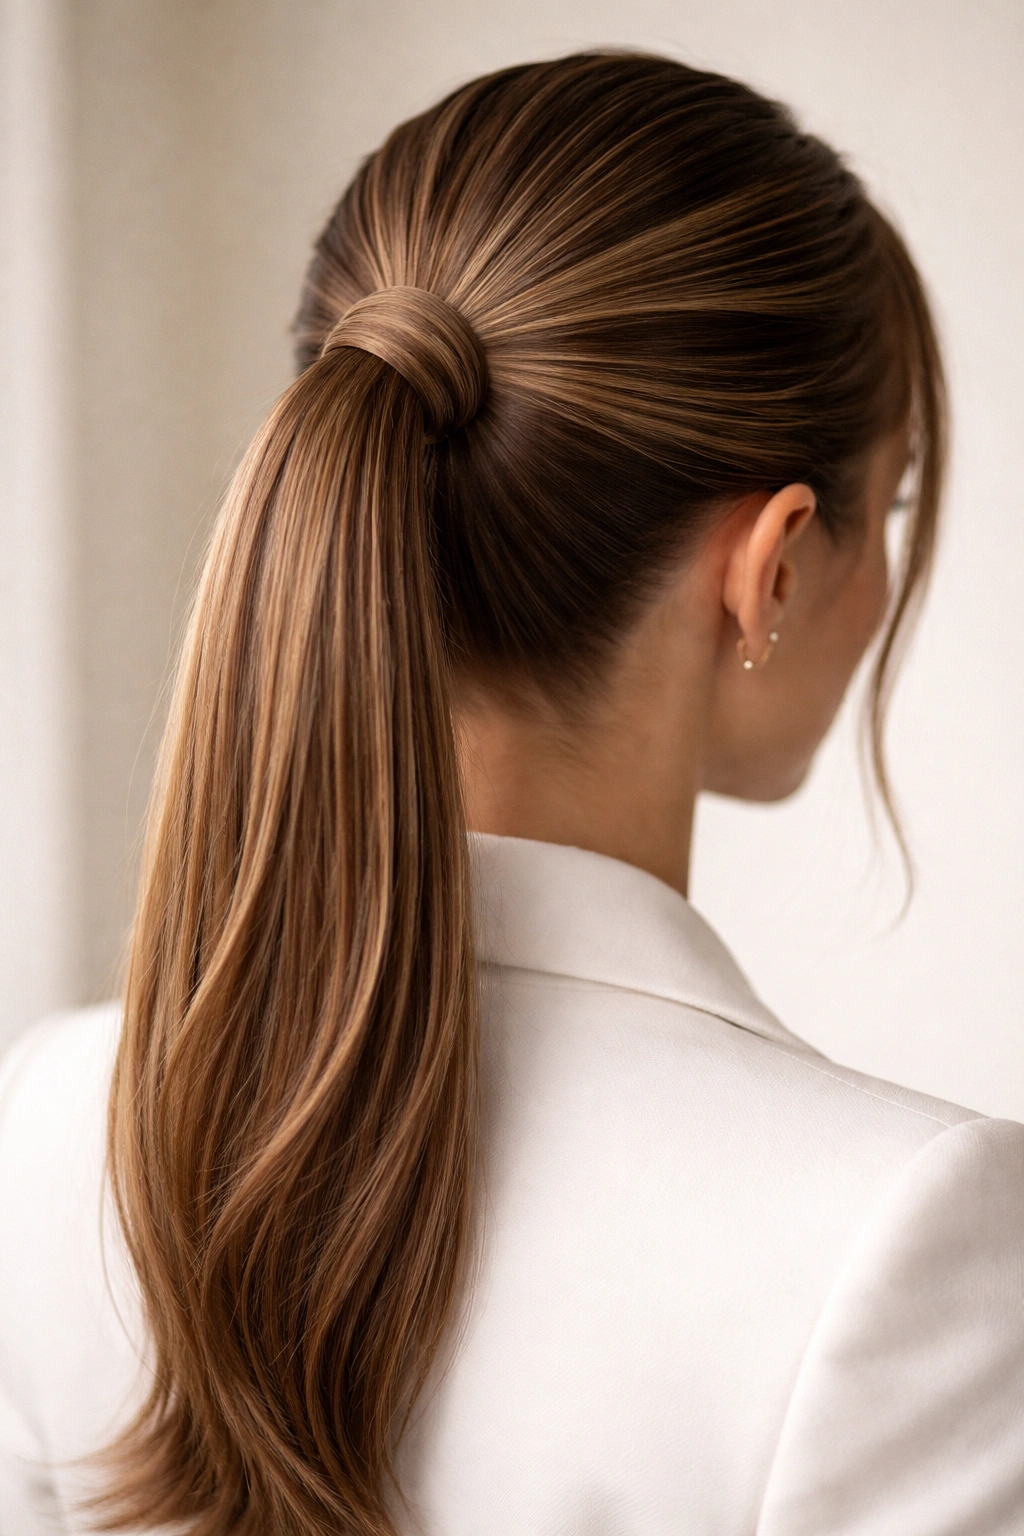
When you want maximum polish and a wrap that truly disappears into the style, the double-wrapped ponytail delivers that next level of refinement. This technique uses two thin sections from your ponytail to wrap around the elastic, layering them so completely that the elastic becomes truly invisible. The result reads as incredibly intentional and controlled, perfect for professional environments or formal occasions where every detail matters.
The Two-Layer Wrapping Technique
Secure your ponytail as usual, then take a first thin section (roughly ¾ inch wide) and wrap it around the elastic one complete rotation. Pin that section underneath with a bobby pin. Now take a second equally thin section from a different area of the ponytail base and wrap it around the elastic overlapping the first wrap slightly, making sure to cover any visible elastic band or bobby pin from the first wrap. Pin this second section underneath as well, tucking both pins flush against the base so they’re completely hidden by the wrap layers.
When to Use This Double-Wrap Approach
- Formal events like weddings, galas, or professional presentations where the back of your head may be visible and scrutinized
- Video calls or photos where the back detail will be clearly visible and you want zero compromise on finish quality
- Hot weather or active situations where you need extra security and don’t want the wrap shifting throughout the day
- Hair styling portfolios or professional shoots where the wrap detail itself is part of what’s being showcased
Worth knowing: The double wrap takes a bit more practice to keep looking clean rather than lumpy, so practice this technique a few times before wearing it to something important.
3. Low Wrapped Ponytail with Silk Wrap
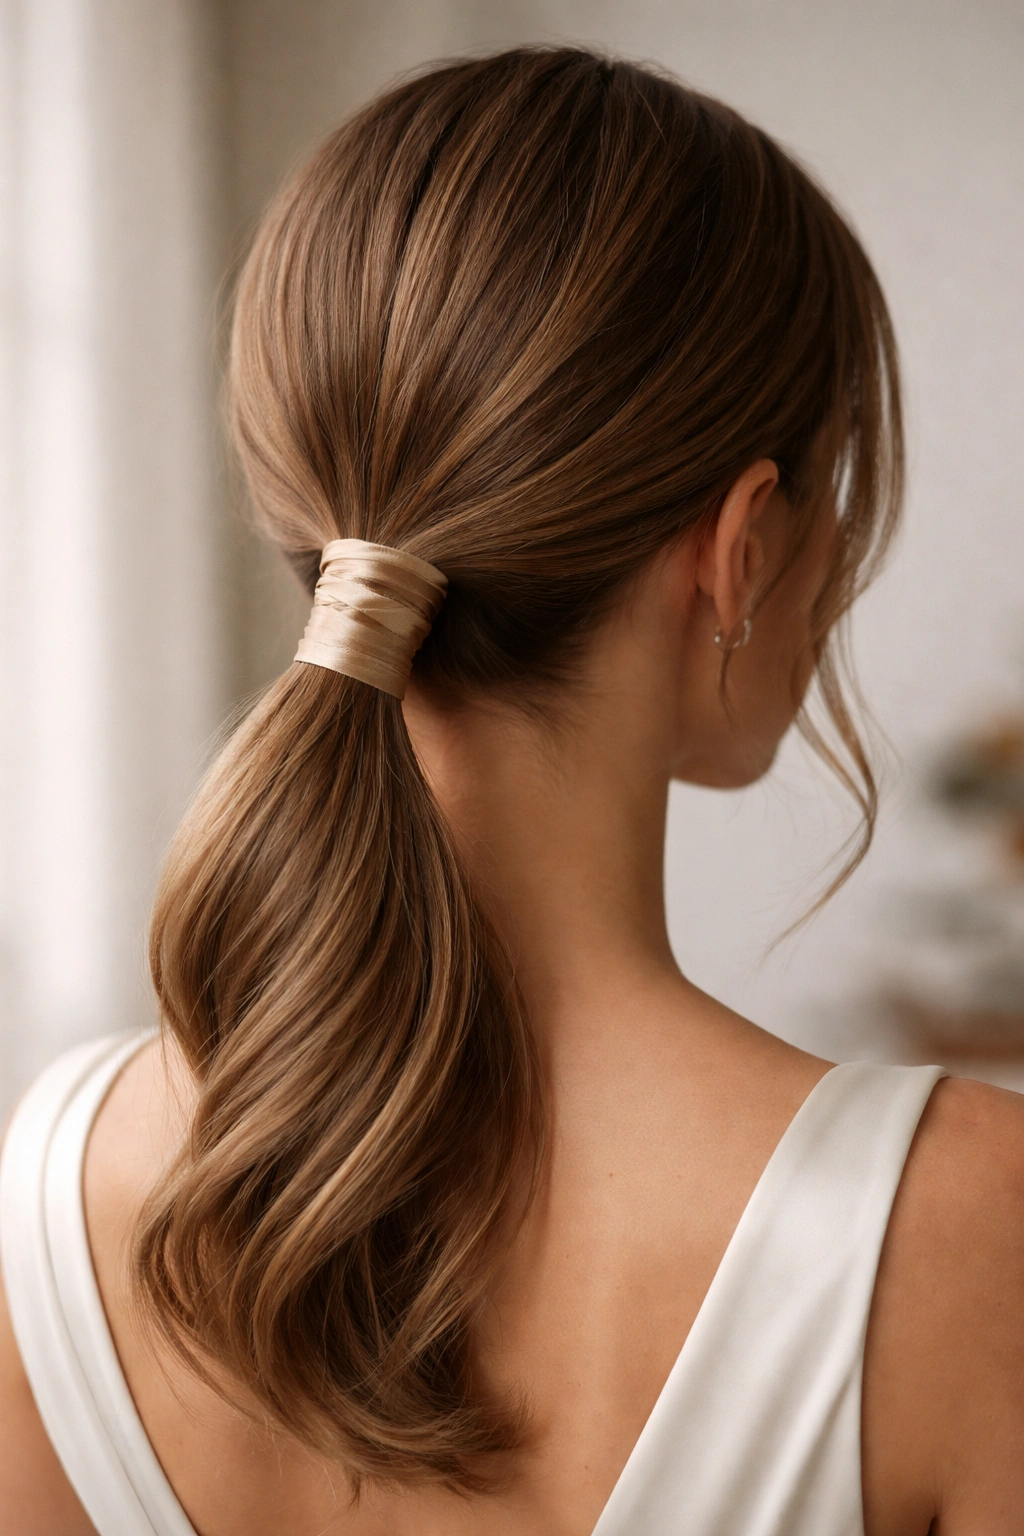
Trading your hair for a silk wrap instantly elevates the style into territory that feels more intentional and luxe. This approach uses a narrow strip of silk or satin ribbon instead of your own hair to spiral around the elastic at the base of a lower ponytail. The silk catch-and-reflect light differently than hair does, creating visual interest and movement even when the ponytail itself is perfectly still. A low placement paired with the soft sheen of silk reads as elegant and effortless rather than severe.
Selecting and Securing the Right Silk Material
Choose a silk or satin ribbon roughly ½ to ¾ inches wide in a color that complements your hair or coordinates with your outfit. Tuck one end of the ribbon underneath the elastic band where it’s secured, leaving a tail to wrap around. Spiral the ribbon around the base of the ponytail in smooth, even rotations, keeping slight tension so it sits flush without bunching. Once you’ve wrapped around one to one-and-a-half times, tuck the remaining end underneath the elastic and secure both ends with a small bobby pin or by stitching them together with coordinating thread for a truly invisible finish.
Advantages of Silk Over Hair-Only Wraps
- Creates a polished, intentional look that signals you’ve thought carefully about your styling choices
- Offers color and texture options that pure hair can’t match—try metallics, jewel tones, or pastels
- Won’t slip or shift as much as a hair wrap, especially if you use satin or silk ribbon that’s slightly textured
- Protects your own hair by shifting tension away from individual strands at the ponytail base
- Lasts longer than a hair wrap and maintains its appearance throughout an entire long day or event
Insider note: Keep several ribbon colors on hand in your desk drawer or bag so you can instantly change your ponytail’s vibe mid-week without re-styling your hair.
4. High Wrapped Ponytail with Texture
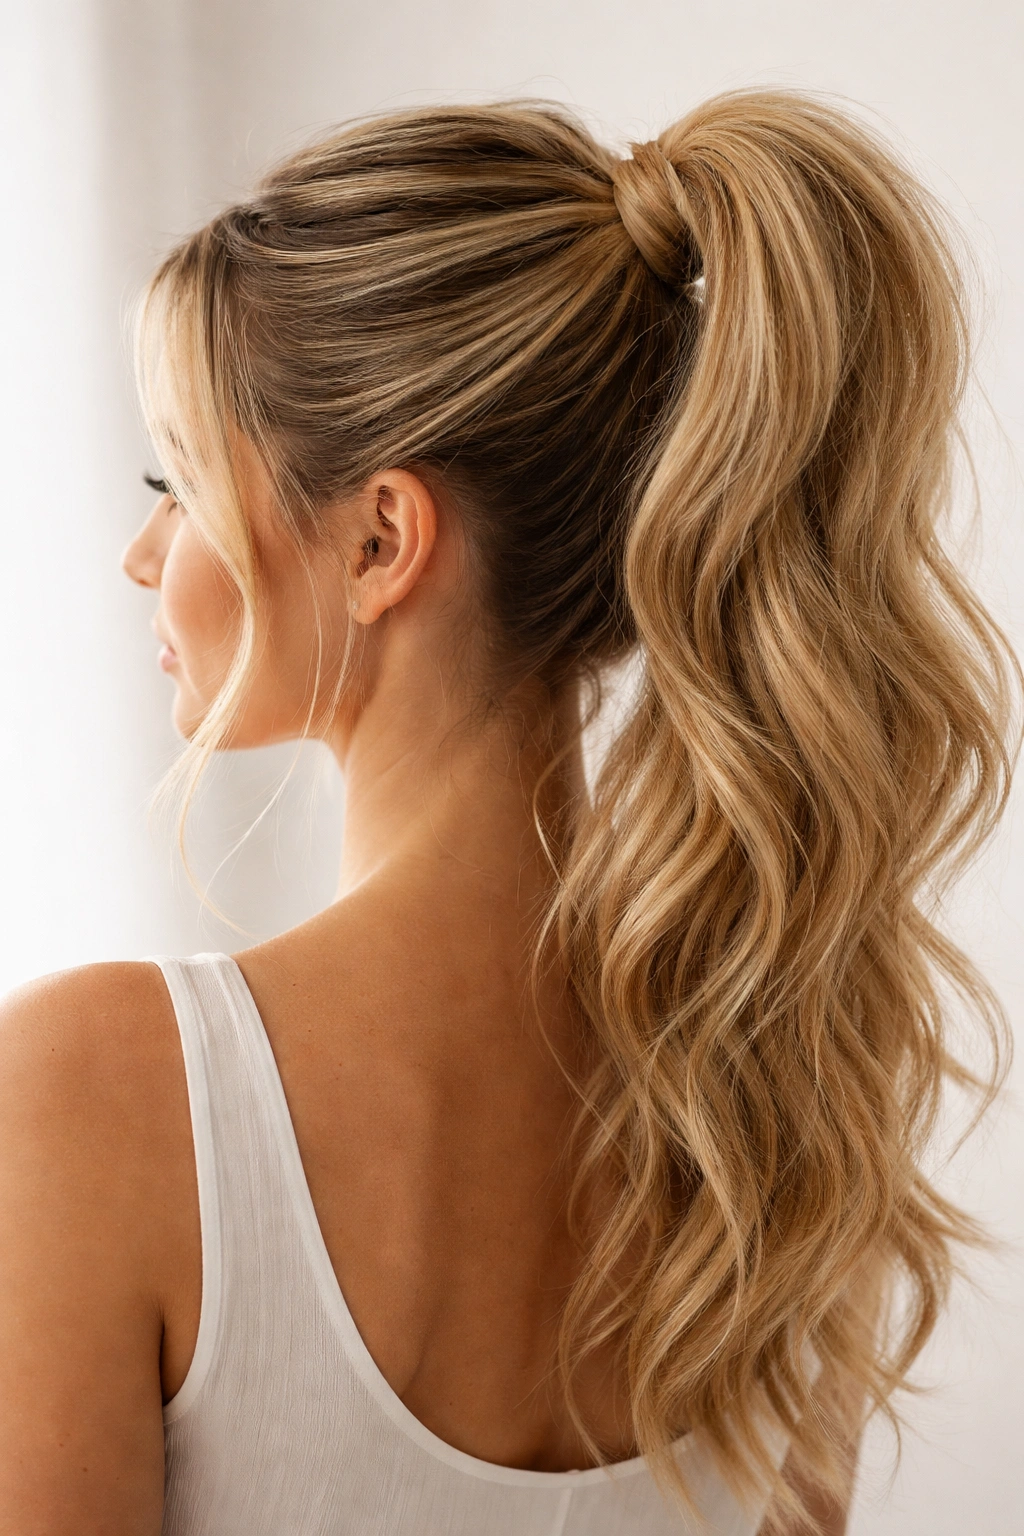
A high wrapped ponytail gains personality and movement when you intentionally incorporate texture into both the base and the wrap itself. Start with curled or waved hair rather than straight hair, or use a texturizing spray to add grip and dimension to each section. The wrap itself can be slightly loosened and “fluffed” rather than pulled tight, allowing wispy pieces of hair to escape in a controlled, romantic way. This approach feels modern and energetic rather than severe, perfect for someone who wants polish without perfection.
Building Texture Before and During Wrapping
If you’re starting with straight hair, blow dry with a round brush for volume at the crown, then use a 1¼-inch curling iron to wave each section of hair away from the face. Flip your head upside down and run your fingers through the waves to break them up and add texture throughout. Gather the textured hair into a high ponytail at the crown, but don’t smooth it too aggressively—let some of those waves remain visible. When you wrap with a section from the ponytail, allow it to maintain that texture rather than pulling it perfectly smooth. The wrapped section should spiral around the base but can have a slightly undone quality that feels intentional rather than accidental.
Creating the Right Balance of Texture and Control
- Textured waves or curls in the main ponytail provide visual interest and fullness that flatters most face shapes
- A slightly loose, textured wrap catches light and creates dimension without reading as messy
- Wispy baby hairs around the face add softness and femininity when styled with intention
- Higher placement at the crown combined with texture reads as more youthful and dynamic than a sleek, tight high ponytail
Pro tip: Use a texture spray or dry shampoo before wrapping—the grip helps both the ponytail and the wrap hold throughout your day, and you get the bonus of volumizing powder at the base.
5. Side-Swept Wrapped Ponytail
The side-swept wrapped ponytail angles everything toward one side of the head, gathering the ponytail just slightly off-center so it sits over the shoulder rather than straight back. This placement is inherently flattering—it softens the face, creates a romantic slant, and works beautifully for both casual and formal occasions. The wrap functions exactly the same way but benefits from the off-center placement, appearing more like an intentional design element rather than just a functional band cover-up.
Perfecting the Off-Center Placement and Angle
Brush your hair back slightly, but before securing, shift everything toward one side of your head—if you prefer a left side sweep, brush everything toward your left shoulder. Secure the ponytail roughly 1 to 2 inches to the left of center, so the tail itself sits over your left shoulder. The wrap should spiral around this off-center base, and because of the angled placement, the wrap naturally creates a diagonal line that complements the swept direction. This works best when you take the wrapping section from the outer (back) side of the ponytail, continuing the directional momentum.
When This Off-Center Style Shines
- Formal events, red-carpet occasions, or high-stakes meetings where a classic centered ponytail feels too everyday
- Asymmetrical clothing, off-shoulder tops, or one-sided hair accessories that pair beautifully with the swept placement
- Photography and video work where the angled lines create more dynamic visual composition than a centered style
- People with longer faces who benefit from the horizontal softening that a side sweep provides
Worth knowing: The side-swept placement looks more intentional if you also sweep your bangs or front-framing pieces to the same side, creating one unified directional flow rather than fighting against itself.
6. Wrapped Bubble Ponytail
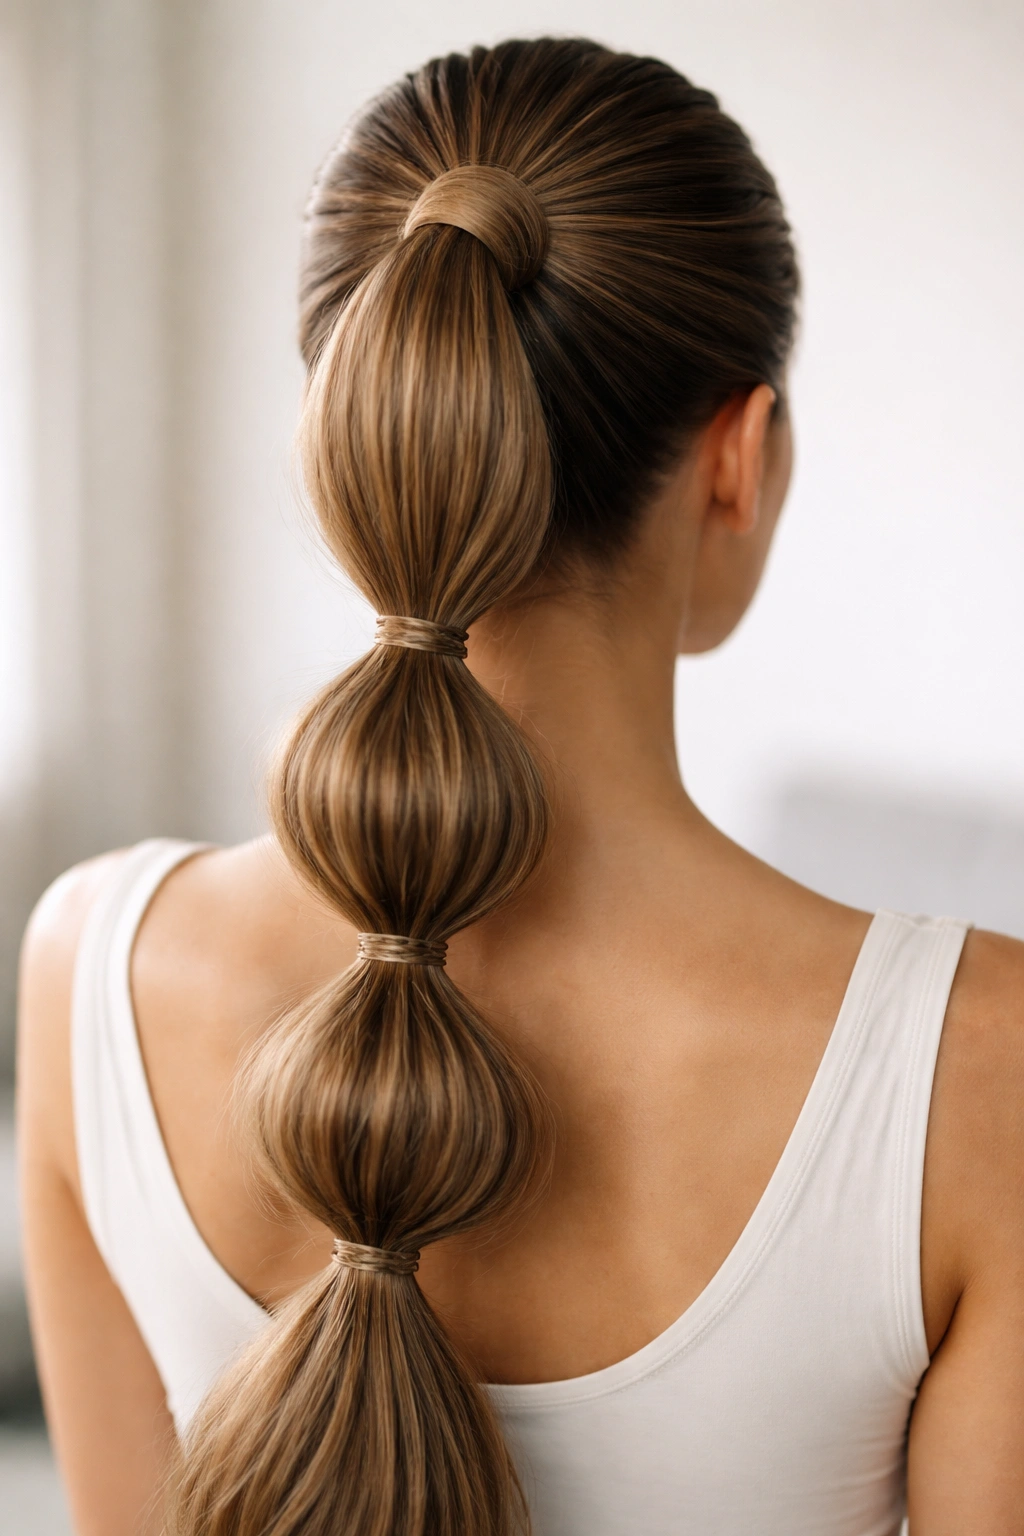
The bubble ponytail has become increasingly popular for its playful, voluminous aesthetic, and wrapping the base elevates it from fun to genuinely polished. This style sections the ponytail into 2-4 distinct “bubbles” or segments, each separated by a small elastic band, creating height and dimension along the entire length. The wrap at the very base is what transforms it from a casual look into something more intentional and styled.
Creating Clean Bubbles With Strategic Wrapping
Start with a secure high ponytail wrapped beautifully at the base using either your own hair or a ribbon. About 2 inches down from the base wrap, place a second small elastic band around the ponytail, creating your first bubble. Gently push up on the ponytail section above this second band, encouraging the hair to fluff and balloon outward. Place a third elastic band another 2 inches down, fluff that bubble, and repeat for one or two more bubbles depending on your hair length. The key is that first wrap at the base—it anchors everything and prevents the base section from looking loose or baggy as the upper bubbles puff out.
Styling Tips for Maximum Bubble Definition
- Use small elastics that match your hair color rather than bright or contrasting bands, so the separation between bubbles shows cleanly without drawing attention to the elastics themselves
- Gently tease each bubble section before banding it to create more volume and shape rather than flat, limp bubbles
- Wrap silk ribbon around each elastic band if you want extra polish, or skip the additional wraps for a younger, more playful vibe
- Adjust bubble size based on your hair length—longer hair can support larger bubbles, while shorter ponytails look better with tighter, more defined sections
Pro tip: The bubble ponytail photographs beautifully and looks particularly stunning when you have some texture or wave in the base hair—straight hair can look a bit limp between bubbles unless you really commit to the fluffing and teasing.
7. Wrapped Braided Ponytail
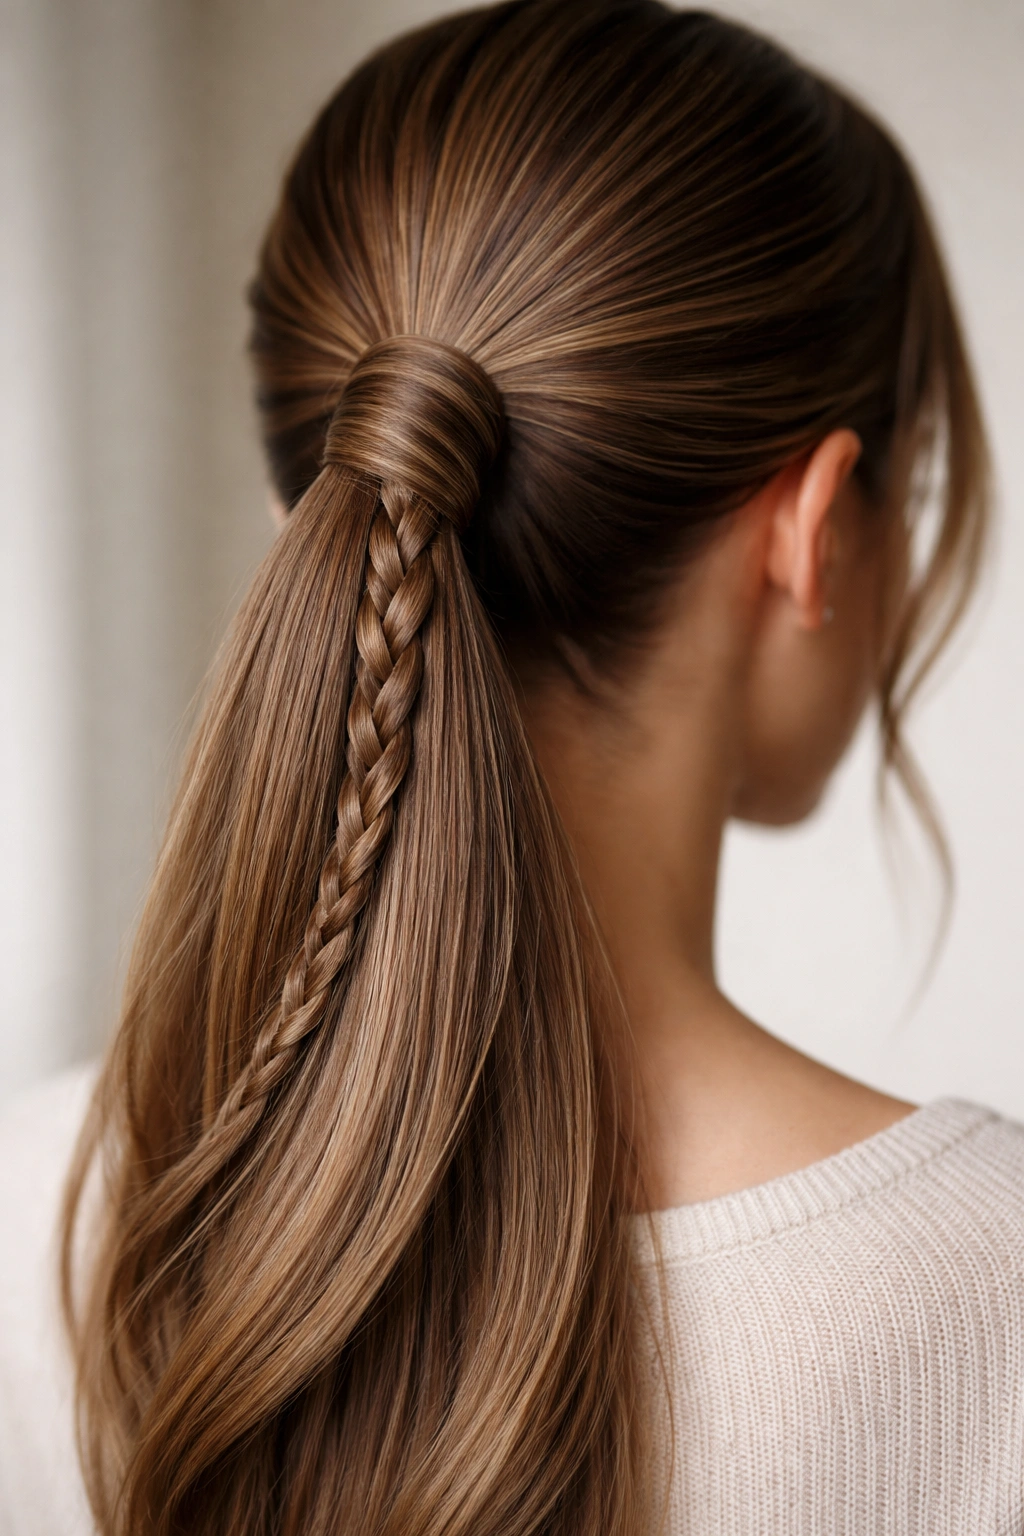
Incorporating a braid into your ponytail wrap adds sophisticated dimension and visual interest that elevates the style beyond a simple spiral. Rather than wrapping with a single strand or ribbon, you create a thin three-strand braid from your ponytail and wrap that braid around the elastic base. The braid catches light differently, creates texture, and makes the wrap itself feel like a featured design element rather than merely functional.
The Three-Strand Braid Wrap Technique
Secure your ponytail as usual, then take a thin section (roughly 1 inch wide) from the underside of the tail and divide it into three equal strands. Create a three-strand braid working downward and also spiraling around the elastic base as you braid—this requires a bit of coordination but becomes intuitive with practice. You’re essentially braiding while rotating, so each rotation around the elastic includes two or three braid crosses. Continue until you’ve made one full rotation around the elastic, then secure the braid end with a bobby pin tucked underneath so it’s completely hidden.
Why a Braided Wrap Stands Out
- Creates movement and visual texture that photographs beautifully and looks compelling from every angle
- Works particularly well on textured or curly hair where the braid blends seamlessly with the overall texture
- Feels more intricate and intentional than a simple wrap, perfect for someone who wants their styling to feel thoughtful and precise
- Can be done with contrasting ribbon woven into the braid for extra visual interest and color play
- Holds security longer than a simple wrap because the braided structure is inherently more stable
Insider note: If three-strand braiding feels complicated while also rotating around a base, practice braiding a simple tail first, then add the rotation component once the braiding motion is muscle memory.
8. Wrapped Sleek Bun Hybrid
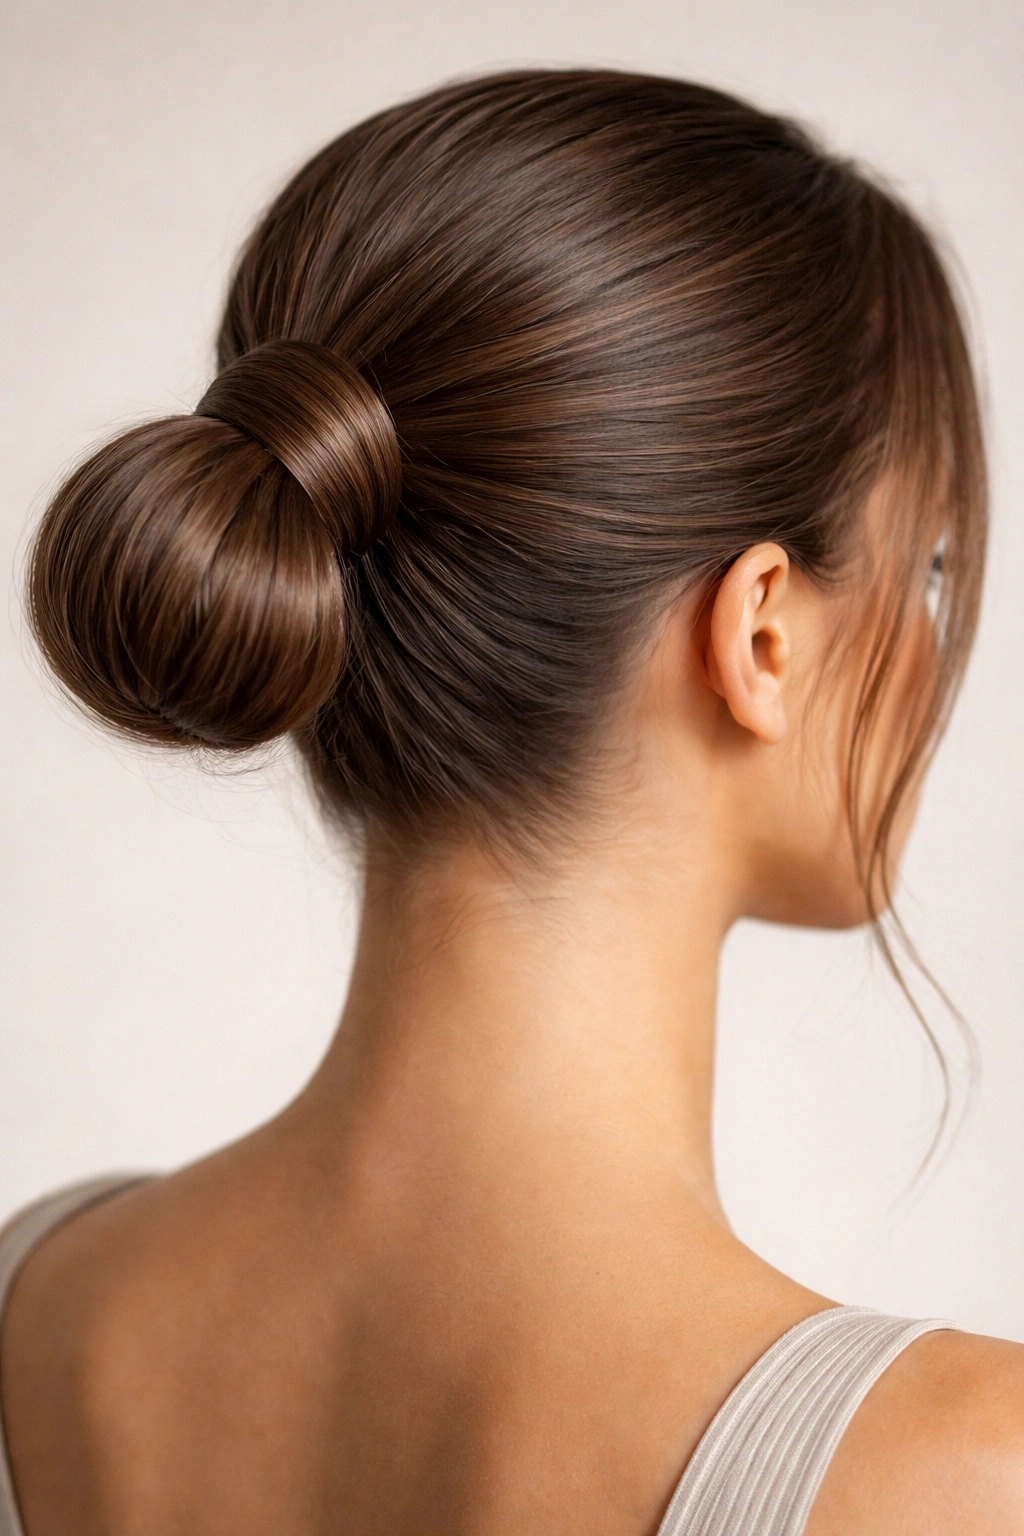
This style takes the polished elegance of a wrapped ponytail and transforms it into a bun by folding the ponytail up and securing it at the base where the wrap already sits. The wrap serves double duty here—it anchors the initial ponytail and also creates a beautiful finished detail on the resulting bun. The effect is more refined than a casual bun because of that intentional wrap work at the foundation.
Converting Your Wrapped Ponytail Into a Bun
Secure your ponytail high on the back of your head and wrap the base beautifully as you would for a standard wrapped ponytail. Rather than leaving the tail to hang, take the ponytail tail and twist it gently, forming a coil. Wrap this coil around the base (right where the wrap sits) and secure it with bobby pins tucked underneath so they’re completely hidden by both the initial wrap and the coiled bun. If you have extra-long hair, you might coil the tail once, then bring the remaining length and coil it again, creating a thicker, fuller bun structure.
When This Hybrid Style Works Best
- Professional environments where you want polish without the “styled” appearance that can sometimes read as less serious
- Long hair that’s thick enough to create a substantial bun without looking thin or wispy
- Situations where you need hair completely off your neck and face but still want refined detail and intentionality
- As a protective style for your ends since they’re secured in the bun rather than hanging loose
- Hot weather or active situations where you need everything secure but want to feel polished
Worth knowing: This style works best if you wrap your initial ponytail with ribbon rather than hair, since the ribbon creates a visual baseline that makes the transition into the bun feel more intentional.
9. Wrapped Ponytail With Faux Wrap Detail
This clever technique creates the appearance of multiple wraps without actually wrapping multiple sections—instead, you use bobby pins and a thin section of hair or ribbon to create visual “breaks” or segments along the elastic at the base. The faux wrap gives the impression of complexity and intentionality while remaining quick and simple to execute. This approach works particularly well if you have thin or delicate hair that doesn’t always hold a traditional wrap securely.
Creating the Illusion of Multiple Wraps
Secure your ponytail and wrap the base with a thin section of hair or a ribbon as you normally would. Once that’s complete, take a second very thin section from the ponytail and place it vertically against the elastic, securing it with bobby pins in two or three places along the elastic. This creates the visual impression of a vertical accent or additional wrap detail. You could do one vertical accent, or create two or three vertical sections that intersect with your main wrap, creating a crosshatch or lattice effect. The key is that everything is pinned rather than actually wrapped around—far less hair manipulation and stress on your strands.
Why This Technique Appeals to Many Hair Types
- Requires far less hair volume than a traditional wrap, making it perfect for fine or thinning hair
- Creates visual interest and intentionality without the extra tension of actually wrapping sections around the elastic
- Allows for creative color and texture play if you use ribbons or contrasting hair colors for the accent sections
- Takes only slightly longer than a standard wrap despite looking more intricate and planned
- Holds securely throughout the day because everything is pinned at multiple points rather than depending on a spiral to stay put
Pro tip: Use bobby pins that match your hair color for the accent sections, and angle the pins slightly so they hide completely against the hair rather than sticking out noticeably.
10. Wrapped Colored Foil Ponytail
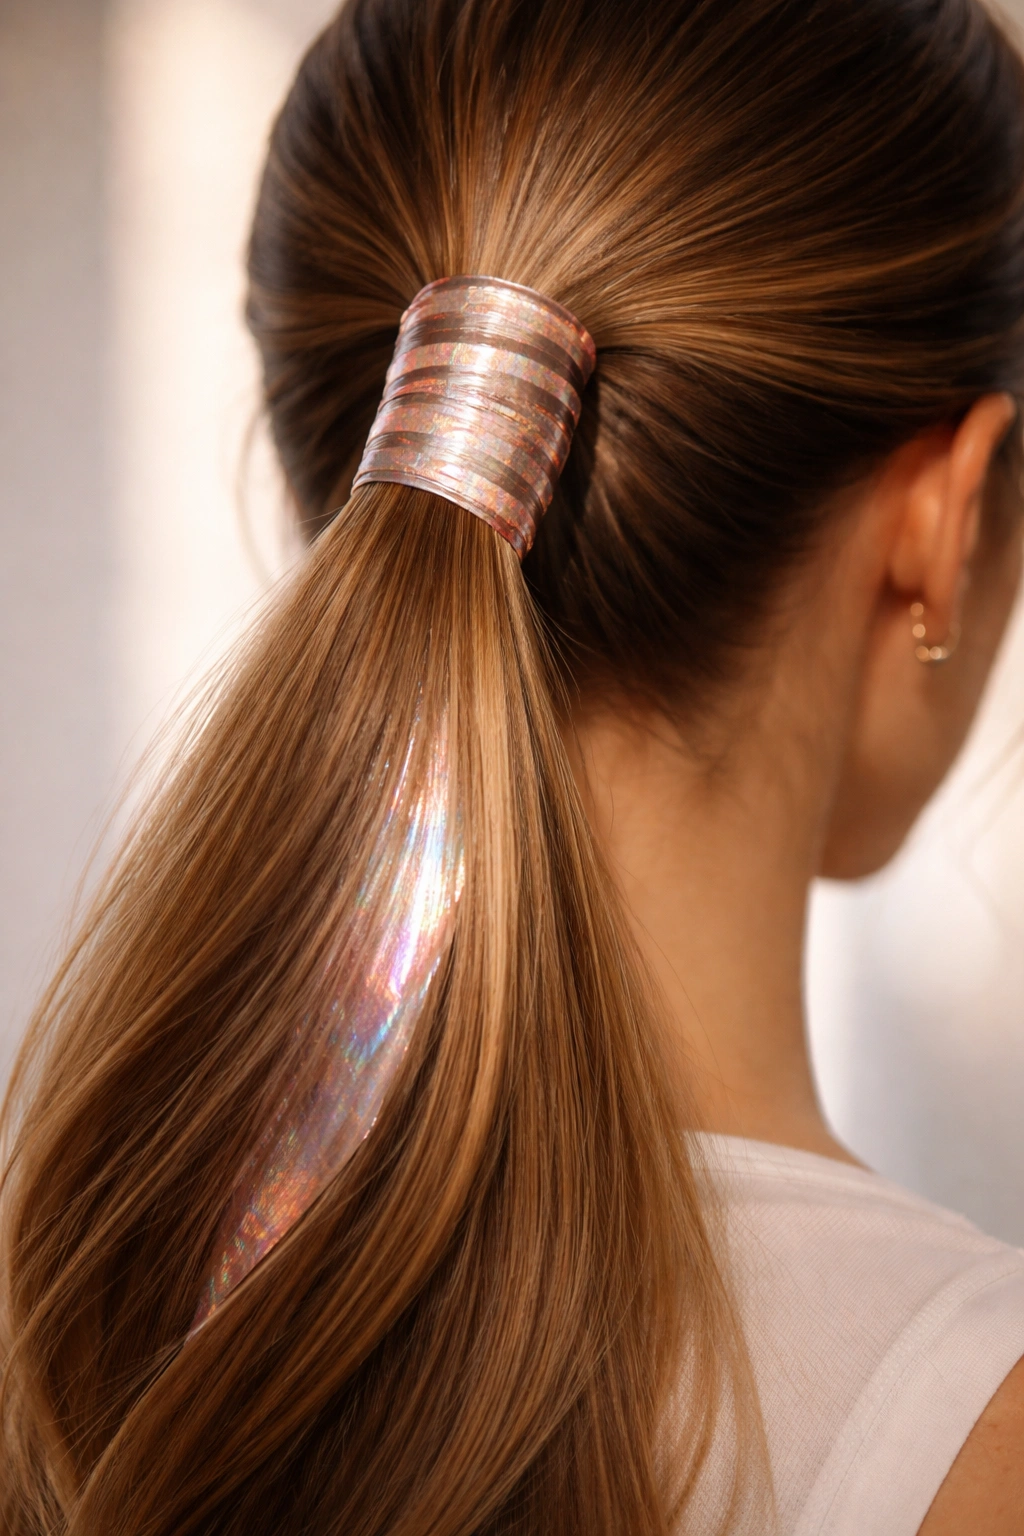
For a moment when you want genuine visual drama and artistry, the wrapped colored foil ponytail takes everything up several notches. This style incorporates thin metallic or iridescent foil strips (the kind used in nail art or decorative crafts) into your ponytail wrap, catching light and creating shimmer and movement with every turn of your head. It’s bold without being costumey, and works beautifully for events, performances, or anytime you want your hair to make a statement.
Selecting and Securing Foil Strips in Your Wrap
Choose thin decorative foil or metallic strips in colors that complement your hair and outfit—rose gold and gold are universally flattering, but iridescent, holographic, and jewel-tone foils create striking effects too. You can use actual craft foils, decorative tape, or even thin metallic ribbons designed for gift wrapping. Secure one end of the foil under your ponytail elastic, then spiral it around the base in one or two rotations, positioning it alongside your hair wrap or replacing the hair wrap entirely. The foil reflects light constantly, so even from far away, it catches attention and creates visual interest.
Making Metallic Details Feel Intentional Rather Than Costume-Like
- Choose foil in one or two colors maximum rather than creating a rainbow effect, which reads as less refined
- Coordinate the foil color with your outfit or with jewelry you’re wearing to feel intentional rather than random
- Pair metallic foil with sleek, polished hair rather than messy texture, so the foil feels like an accessory choice rather than a styling workaround
- Use thinner foil strips rather than wide ribbons so the detail feels delicate and artistic rather than heavy and obvious
- Avoid mixing metallic foil with other wrap materials—let the foil be the statement, not one element in a busy design
Insider note: Metallic foil works particularly well for evening events, performances, weddings where you’re in formal wear, or anytime you want your hair to be part of a cohesive, intentional overall look rather than an afterthought.
Final Thoughts
The wrapped ponytail technique itself is deceptively simple—just a section of hair spiraling around an elastic—but the effect is profound. That small detail transforms a basic ponytail into something that reads as intentional, polished, and thoughtfully executed. Whether you choose a classic hair wrap, a silk ribbon, a braid, or metallic foil, you’re signaling that you’ve invested care into your appearance, and that matters more in everyday life than most people realize.
The beauty of these ten approaches is that they span from genuinely quick (the classic wrap takes under a minute once you have the technique down) to more involved projects that you reserve for special occasions. You don’t need special skills, expensive products, or professional training—just the willingness to spend an extra 30 seconds on that base detail. Start with whichever style speaks to you, practice it until it becomes automatic, then slowly expand your repertoire to other approaches as your confidence grows.
A wrapped ponytail works across virtually every hair type, texture, hair length, face shape, and personal style. Fine hair gains visual volume from the detail at the base. Thick, curly hair looks beautifully controlled and intentional. Straight hair gains texture and interest from a braid wrap or ribbon. Even people with thinning hair can use faux wrap techniques to create the appearance of polish without stressing their delicate strands. There’s truly a wrapped ponytail approach for everyone.