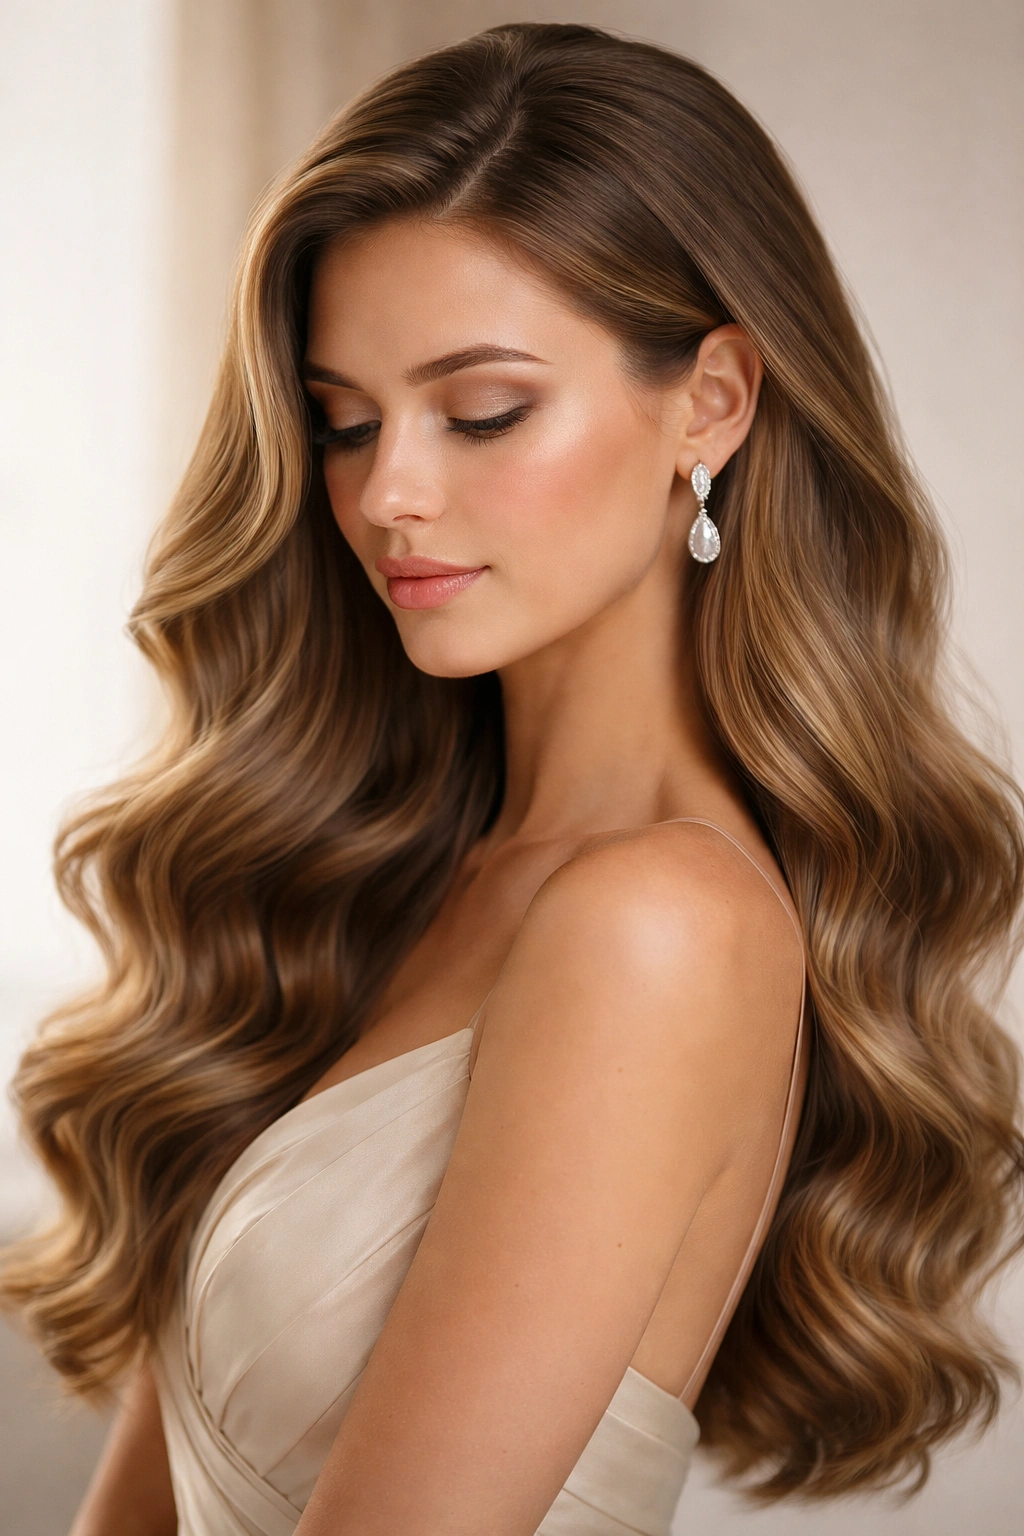
Long wavy hairstyles bring an undeniable elegance to formal occasions — there’s something about that flowing, textured movement that instantly elevates your entire look. Whether you’re attending a wedding, gala, awards ceremony, or upscale dinner event, waves offer the perfect balance between polished sophistication and romantic, effortless beauty.
The real magic of waves for formal settings is their versatility. They work equally well whether you’re going for old-Hollywood glamour, modern minimalism, or bohemian romance. Waves also photograph beautifully in candlelight and flash photography, which matters when you’re looking your best for an evening that you’ll want to remember and capture forever.
What makes a wavy style work for formal occasions is how intentional and refined the waves are. Casual beach waves might work for daytime, but formal events demand waves that feel purposeful — whether that’s through strategic styling, the addition of elegant accessories, or clever integration with updos and half-ups that keep hair polished and controlled while still showcasing that beautiful movement.
The styles below aren’t just suggestions — they’re detailed approaches that account for different hair textures, face shapes, and the specific vibe you’re trying to achieve. Each one includes technique tips, styling tricks, and honest advice about what makes it work for formal settings.
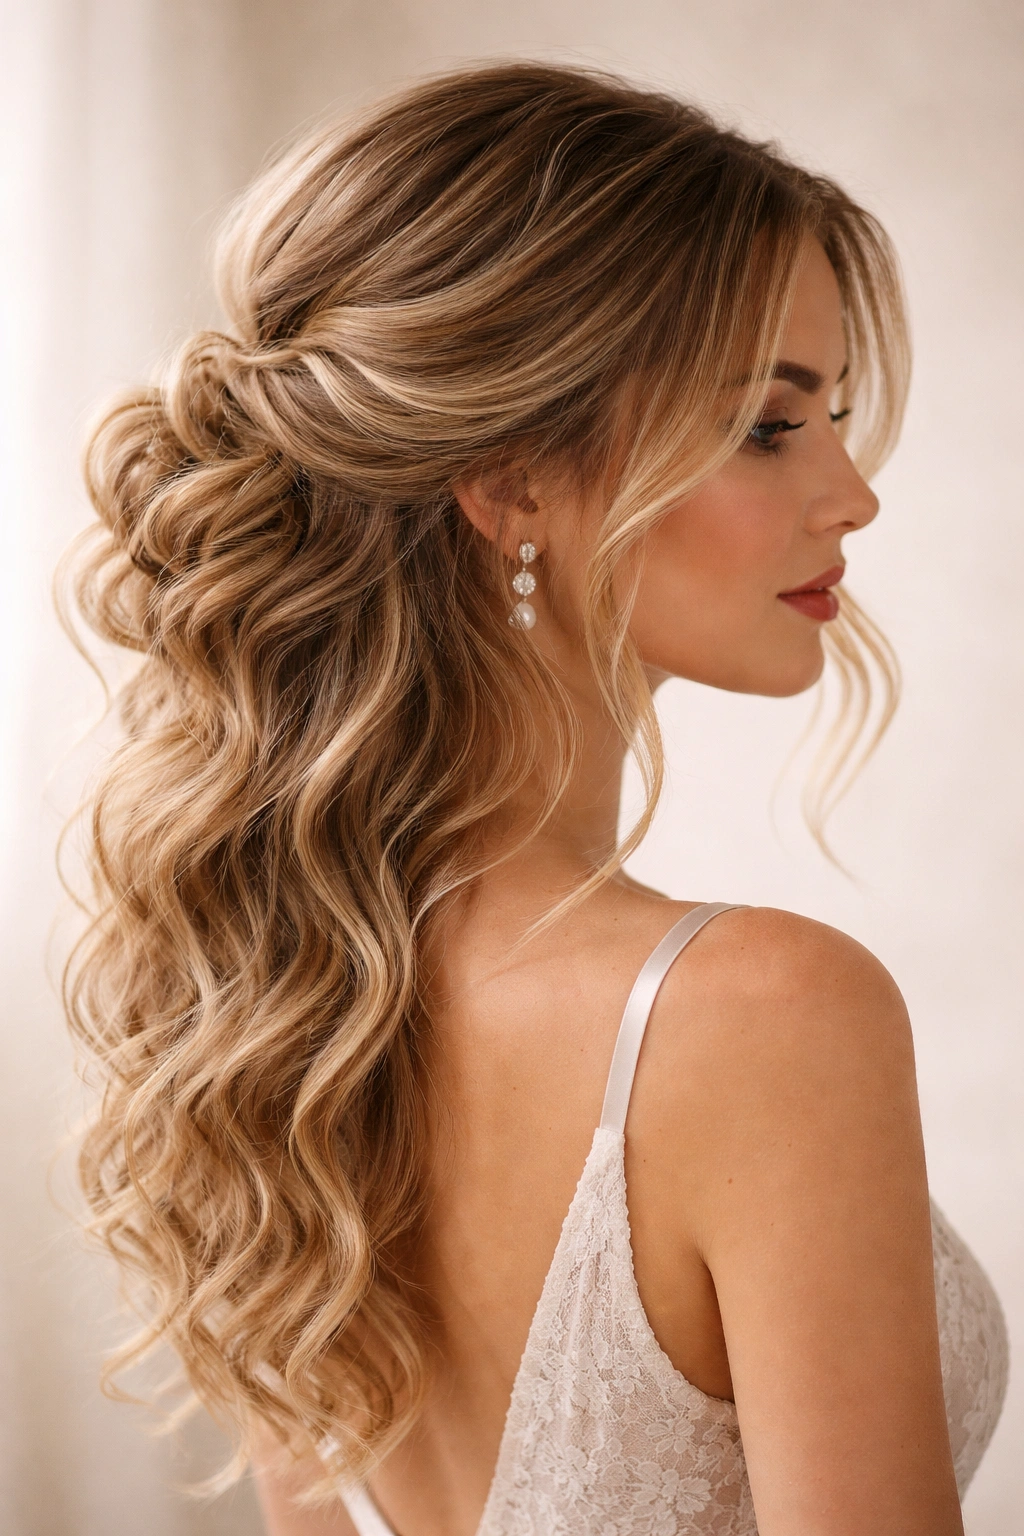
1. Half-Up, Half-Down Waves With Face-Framing Pieces
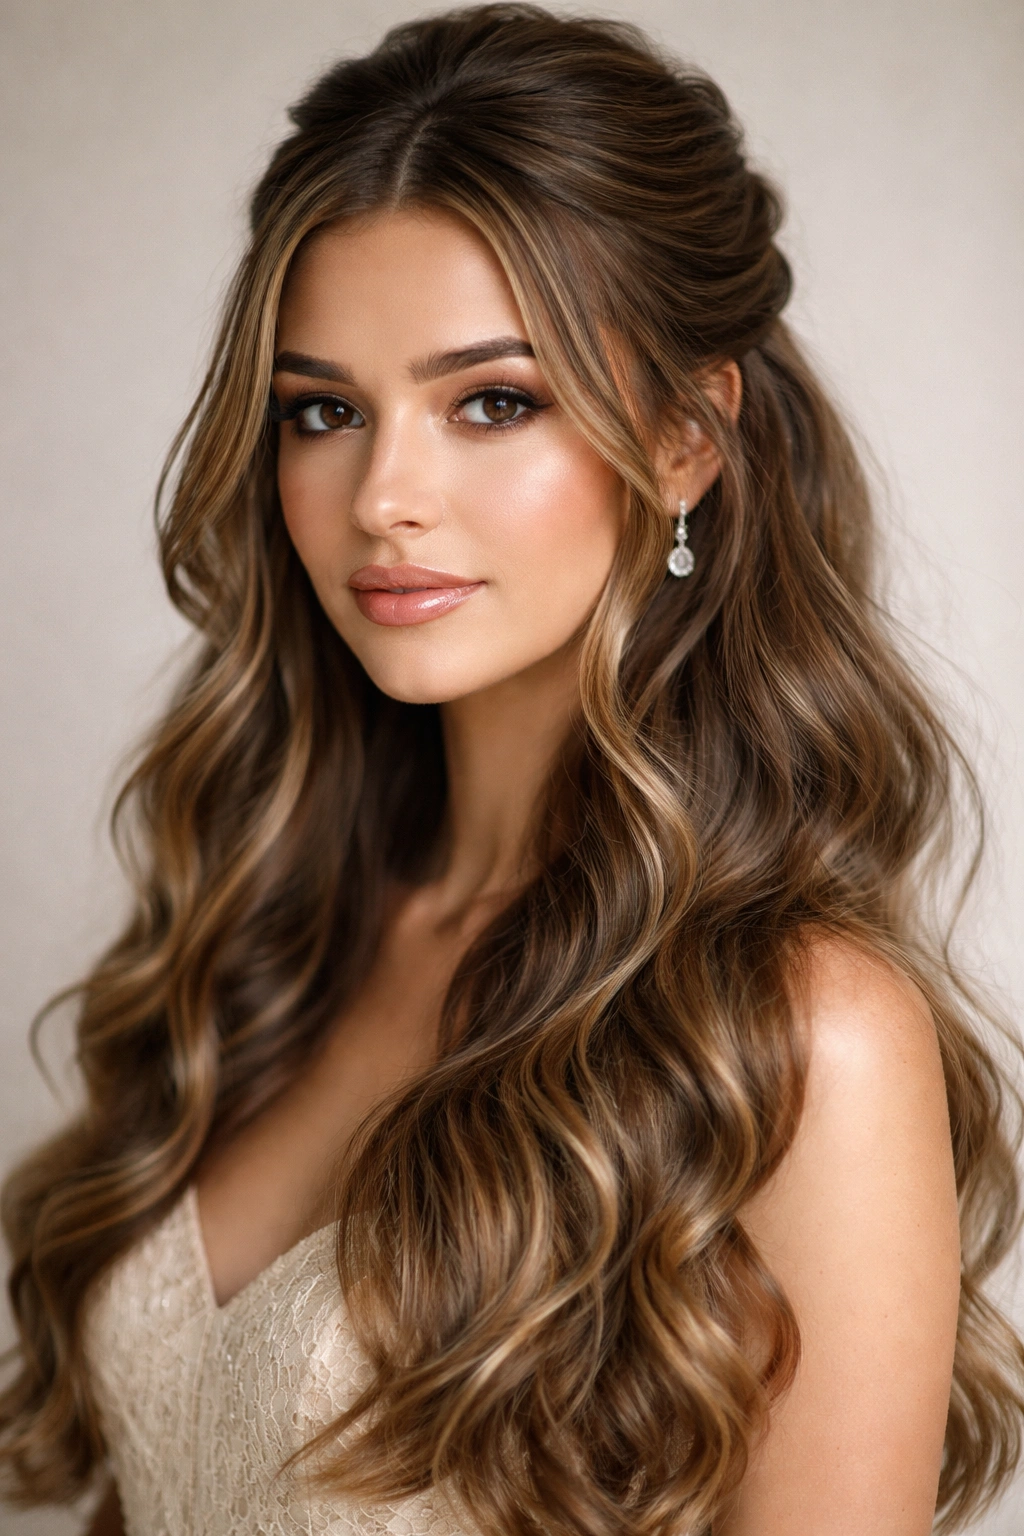
This style balances the sophisticated pulled-back look of a formal updo with the romantic appeal of long waves cascading down. It’s essentially a compromise between “styled” and “effortlessly beautiful,” and it works brilliantly for formal events because it keeps hair off your face and neck while still showcasing waves throughout the length.
Why This Works for Formal Occasions
The half-up style signals intentionality and polish — you didn’t just leave your hair down, you actually styled it. But the cascading lower half keeps that romantic, approachable energy that makes formal wear feel less stiff. This combination is flattering on almost every face shape, and it photographs exceptionally well under the dramatic lighting of formal venues.
How to Create This Look
Start with waves that run through your entire length — use a large-barrel curling iron (2 inches or bigger) or a wave tool to create loose, relaxed waves from roots to ends. Once your waves are set, section off hair from your temples back toward your crown, taking roughly the top third to top half of your hair. Use a fine-tooth comb to gently smooth this section and create a sleek transition at the back of your head. Secure this section with bobby pins that match your hair color, tucking them completely out of sight — they should be invisible. Gently release a few face-framing pieces from the half-up section by pulling them loose with your fingers; these softer pieces instantly make the style feel more intentional and romantic.
Pro Tips for Maximum Impact
Use a light hairspray with flexible hold rather than something super rigid — you want the waves to move naturally and catch light as you move. If you have fine hair and worry about the half-up section slipping, use 2-3 bobby pins in a triangle formation rather than just one, and consider using a small velvet hair elastic in a matching color for extra security. For especially formal events, add a delicate comb or hair clip to the base of the half-up section — a pearl or crystal-studded comb instantly elevates this look from “nice” to “elevated.”
2. Hollywood Glamour Waves With Deep Side Part
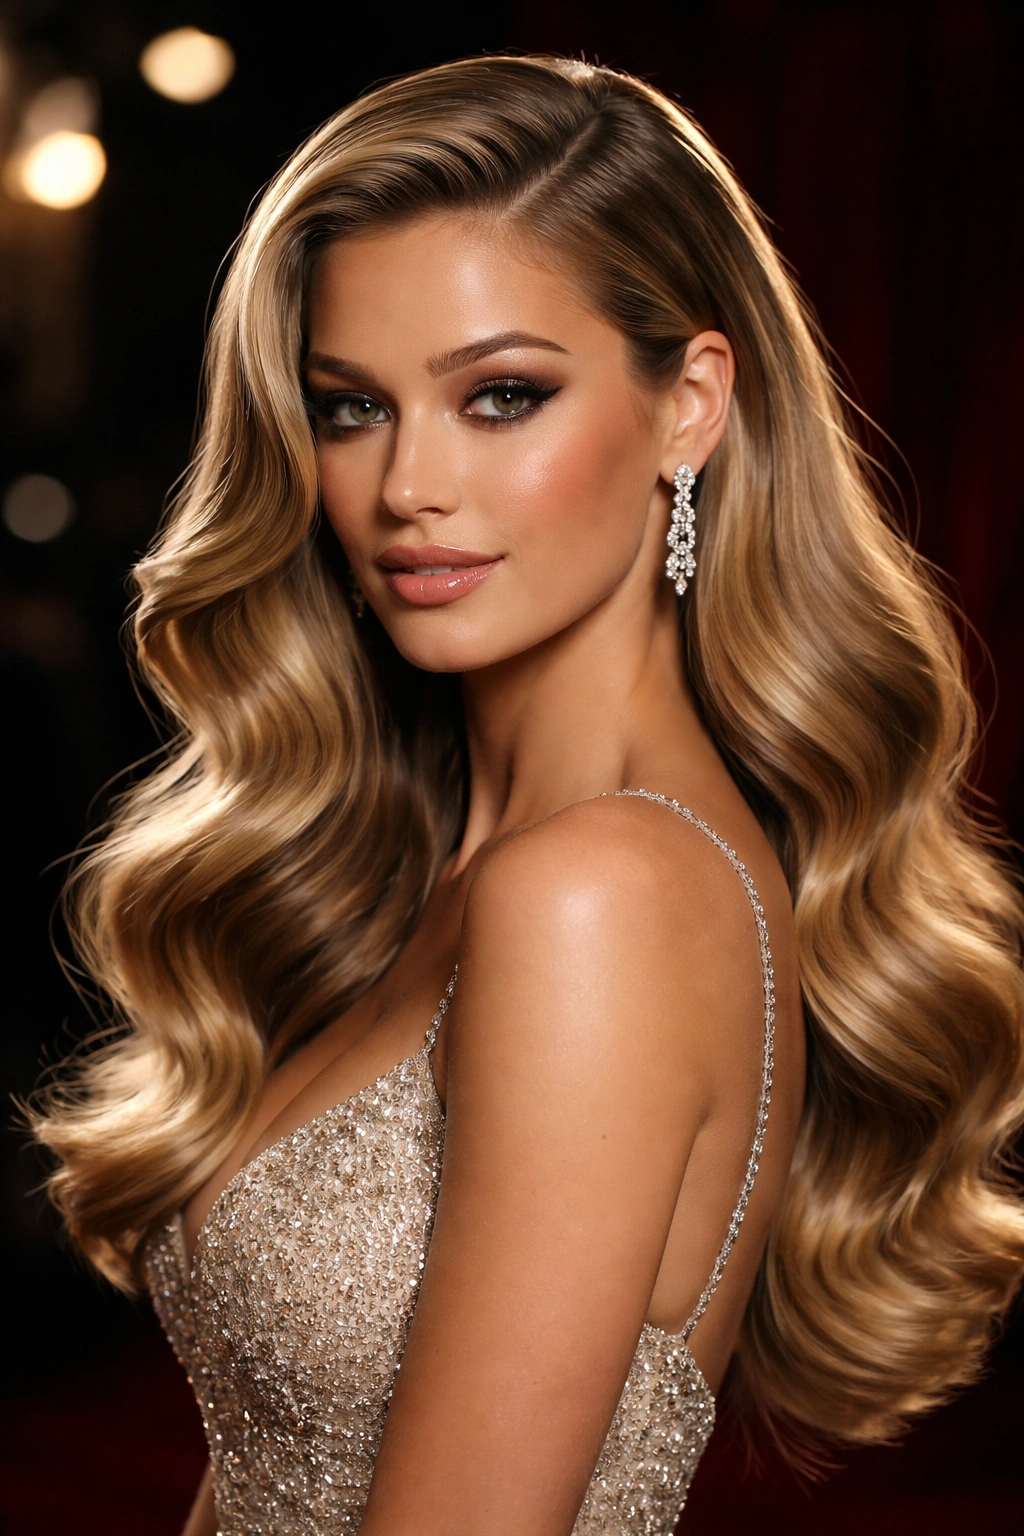
This is the red-carpet classic — deep, symmetrical waves that flow away from a sharp side part, creating that iconic old-Hollywood silhouette. It’s timeless, recognizable, and unmistakably formal because it requires real styling intention and technique to execute properly.
The Specific Appeal of This Approach
Hollywood waves are instantly recognizable as “dressed up” — there’s no ambiguity here about whether you’ve styled your hair or not. This look demands that you’ve invested time and skill, and that dedication to grooming signals respect for the occasion. The waves catch light beautifully, creating dimension and movement, and the deep side part creates a subtle asymmetry that’s more interesting and flattering than a center part.
Technique Breakdown for Perfect Waves
The key to authentic Hollywood waves is the direction and depth of your waves — they should be deeper and tighter than casual waves, with a distinct S-curve pattern. Section your hair down the middle, then move that part line significantly to one side (about 2-3 inches from center). Starting on the fuller side, take 1-inch vertical sections and curl them with a 1.25-inch curling iron, always rolling away from the face. Curl each section for 8-10 seconds and let it cool slightly before releasing. The cool-down time is crucial — it helps the wave set properly. Work your way around the entire head, making sure all waves flow in the same direction away from the part.
Product and Setting Strategy
Use a volumizing mousse at the roots before blow-drying to add foundation for the waves. After curling, immediately pin the waves in place with clip-less pin curls or large claw clips, letting them set for 10-15 minutes. This cooling period is what transforms a basic curl into a defined wave. Use a flexible-hold hairspray — not the ultra-matte ones that look plasticky under formal lighting. A light serum brushed through the waves after they’ve cooled adds shine without making them look greasy.
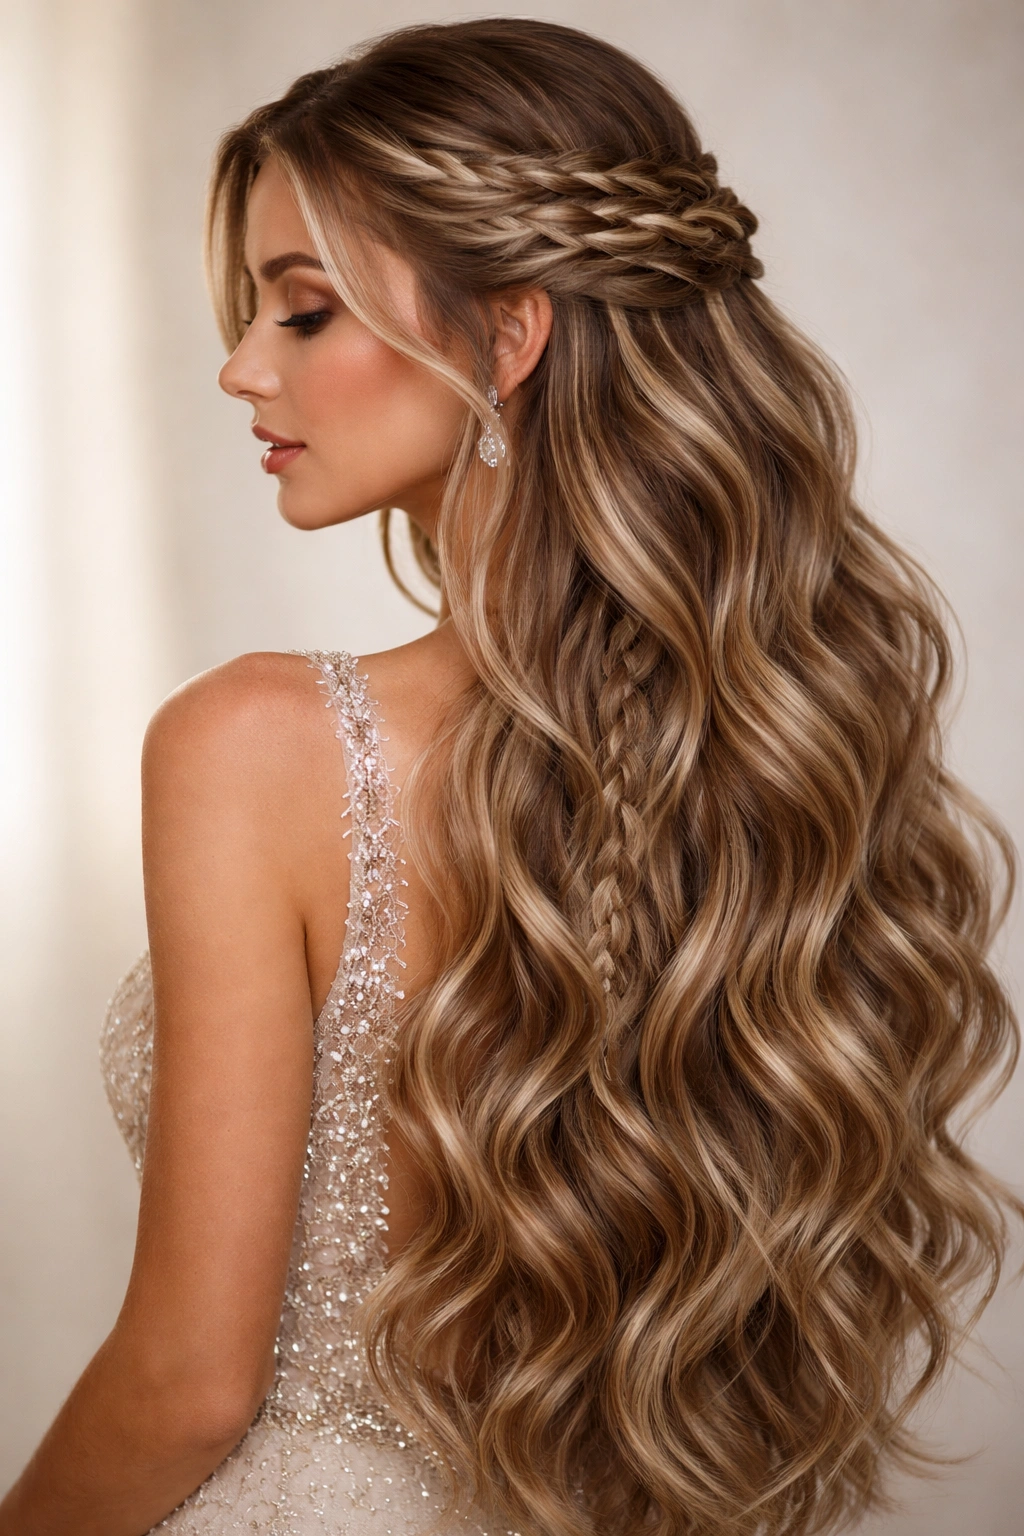
3. Romantic Cascading Waves With Braided Crown
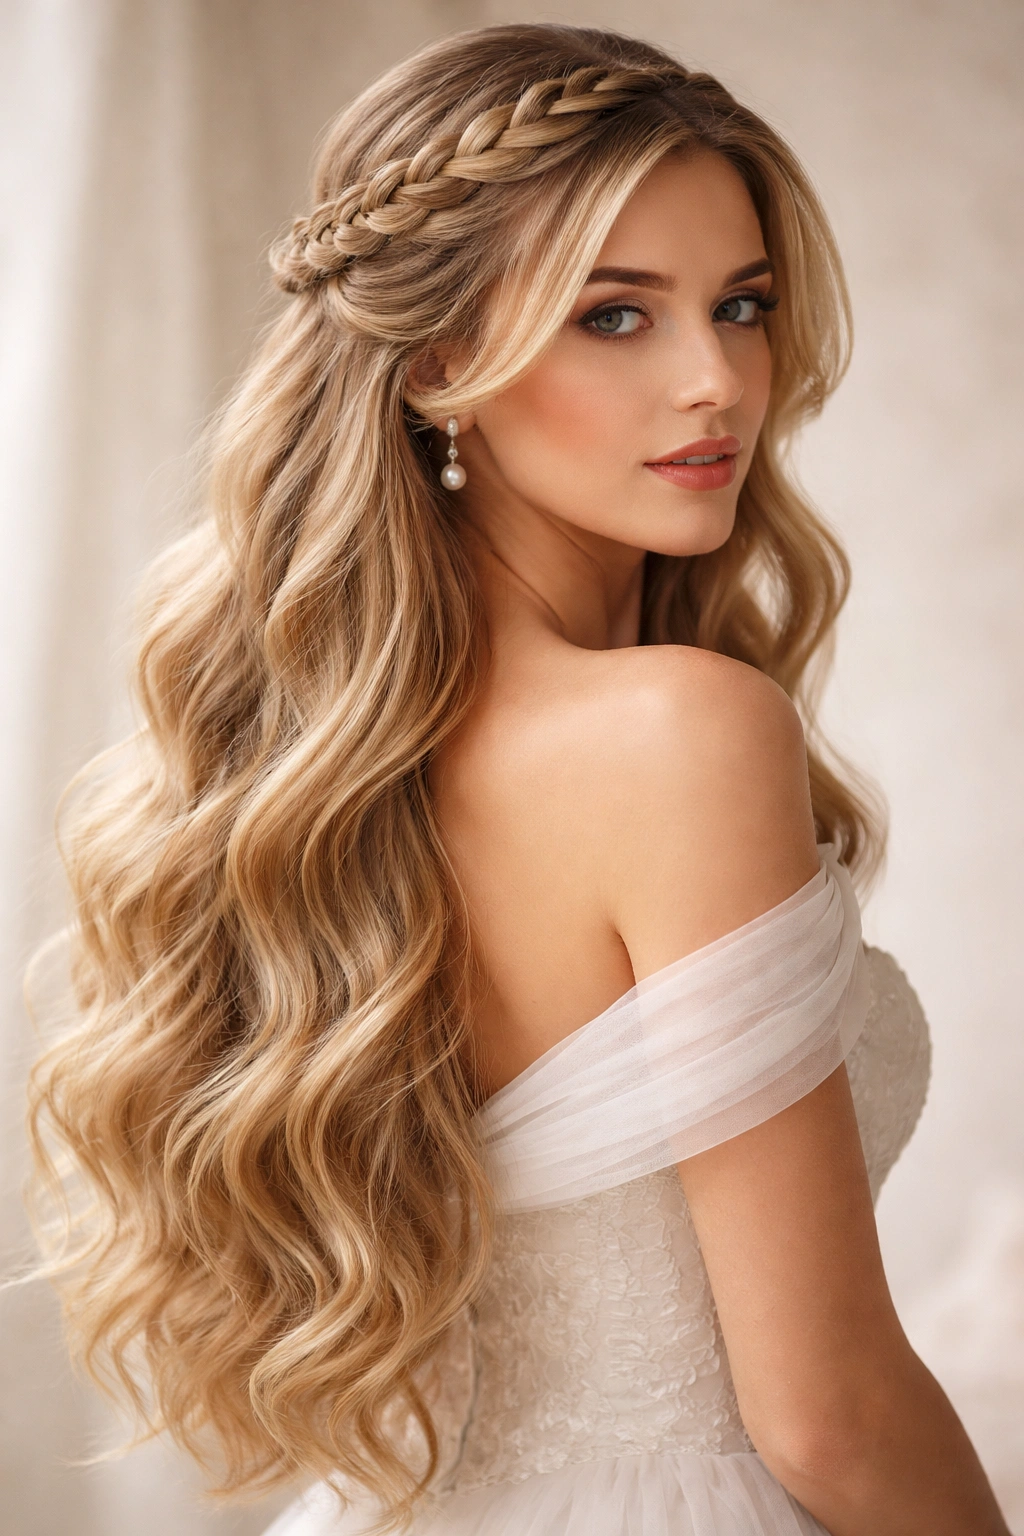
This style combines waves with an intricate braid detail that wraps around the crown, creating a look that feels both contemporary and timeless. It’s especially flattering for formal occasions where you want to feel both polished and romantic.
Why the Braid Detail Elevates Everything
A braid at the crown does something visual that’s hard to achieve otherwise — it draws the eye upward, defines the face, and creates an anchor point for your styling that feels intentional without being severe. The braided detail softens the overall look while simultaneously making it feel more put-together. It’s particularly effective for long, thin, or fine hair because the braid adds texture and the appearance of volume at the crown.
Step-by-Step Execution
Begin with waves running through your entire length — use a large-barrel wave tool or curling iron to create loose, flowing waves. Once waves are complete, create a side part slightly off-center. Starting at one temple (the side with less hair), take a small section of hair and begin a Dutch braid (braiding backward, adding hair from both sides as you go) that travels across the crown toward the other side of the head. The braid should sit about 2-3 inches above your ear and travel across the back of your head, ending somewhere behind your opposite ear. Secure the braid with a small elastic in a matching hair color, then gently pull and loosen the braid to create a softer, more romantic texture.
Styling Tricks for Polish
The looseness of the braid matters — you don’t want it tight and precise, which reads more casual. Pull each section of the braid gently outward to widen it slightly, which makes the whole style read as softer and more intentional. Use small bobby pins to tuck the braid’s end completely out of sight so it disappears into the cascading waves. A delicate hair stick, decorative pin, or small comb placed where the braid ends adds a subtle formal detail that catches light and draws attention to your styling effort.
4. Vintage Finger Waves
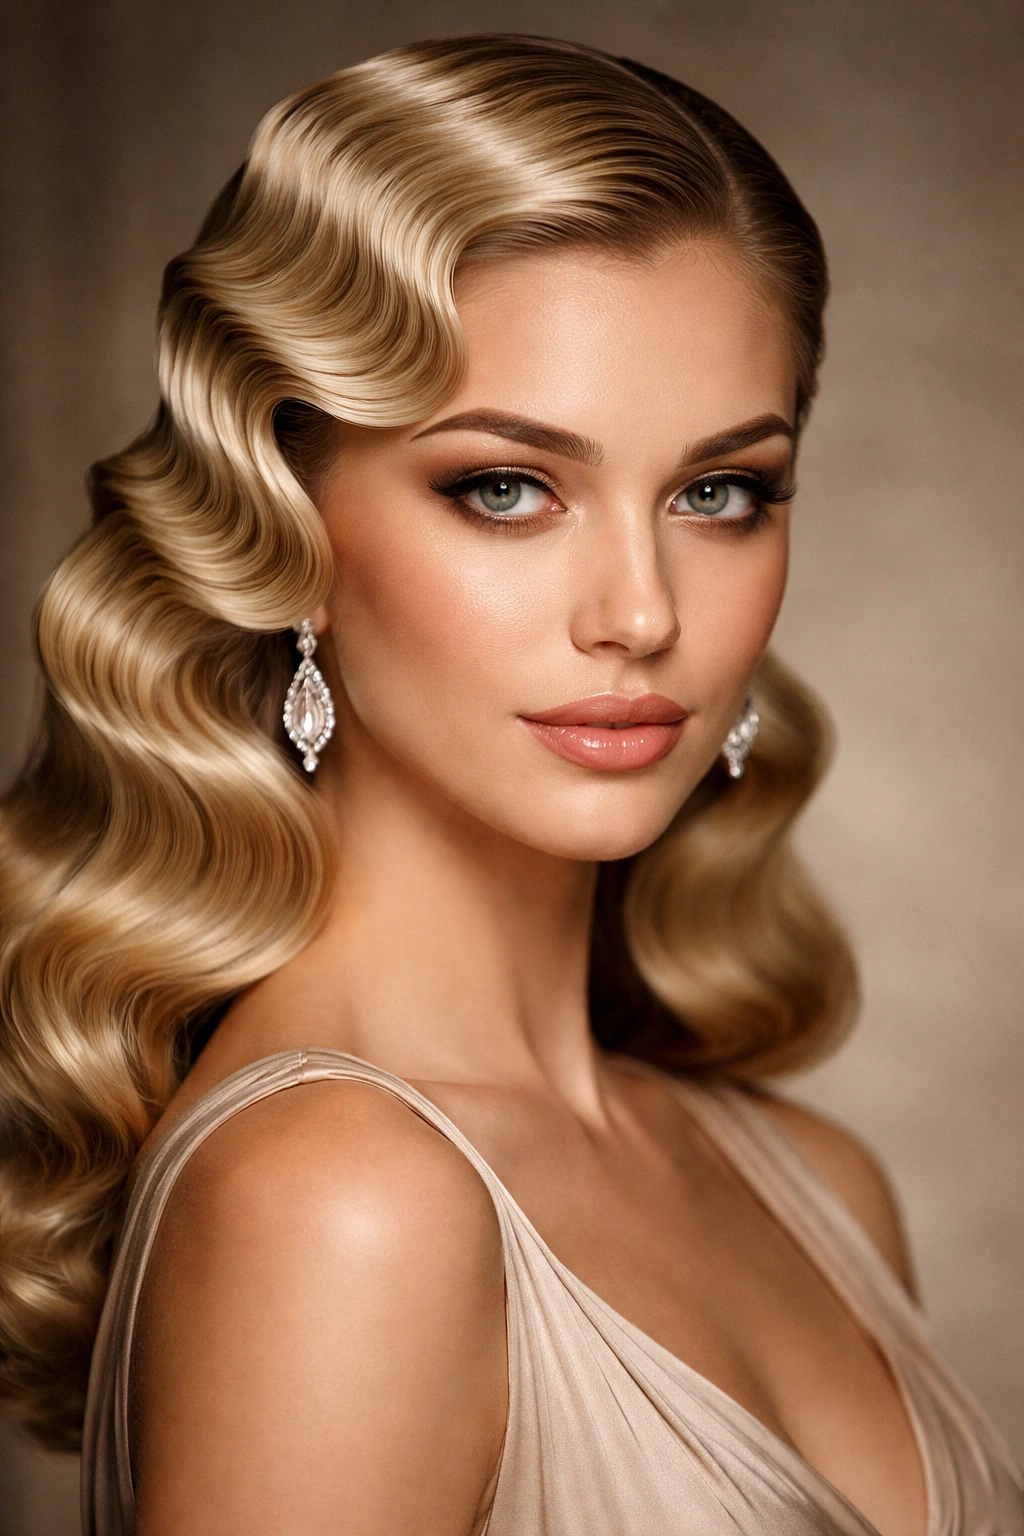
Finger waves are the ultimate formal-hair statement — they’re undeniably styled, wildly photogenic, and instantly read as elegant. These aren’t sloppy beach waves; they’re precise, geometric waves created by hand, and they’ve remained a cornerstone of formal styling for nearly a century for good reason.
The Defining Characteristics
Finger waves are characterized by sharp, defined S-curves that are smooth (not textured or wavy texture, but actual structured waves) and sit close to the head. Unlike barrel-curled waves, finger waves have a more geometric, almost art-deco quality. They’re classic, sophisticated, and create an incredibly elegant frame around the face.
The Authentic Finger Wave Method
Finger waves require patience, but the result is worth it. Start with damp hair and a flexible-hold mousse applied throughout. Take a thin section (about 1 inch) of hair from your part and smooth it down against your head. Using your index and middle fingers, create a shallow wave by lifting the hair gently away from the scalp, then releasing it back down — this creates the first wave ridge. Secure this ridge by placing a bobby pin horizontally across it. Move to the next section and repeat, creating waves that are in the opposite direction to the previous wave. Continue this pattern around the entire head, creating a zigzag pattern of waves. Once all waves are pinned, allow your hair to set completely (at least 2-3 hours, or use a handheld dryer on cool setting if you’re short on time). Remove the pins carefully, and your waves will hold their structure for hours.
The Finishing Details Matter
Use a flexible-hold hairspray that won’t make waves look stiff or plastic. A light serum applied after the pins are removed adds subtle shine. Finger waves work beautifully with or without additional styling — you can wear them down for maximum classic elegance, or add a small decorative clip or comb at the back.
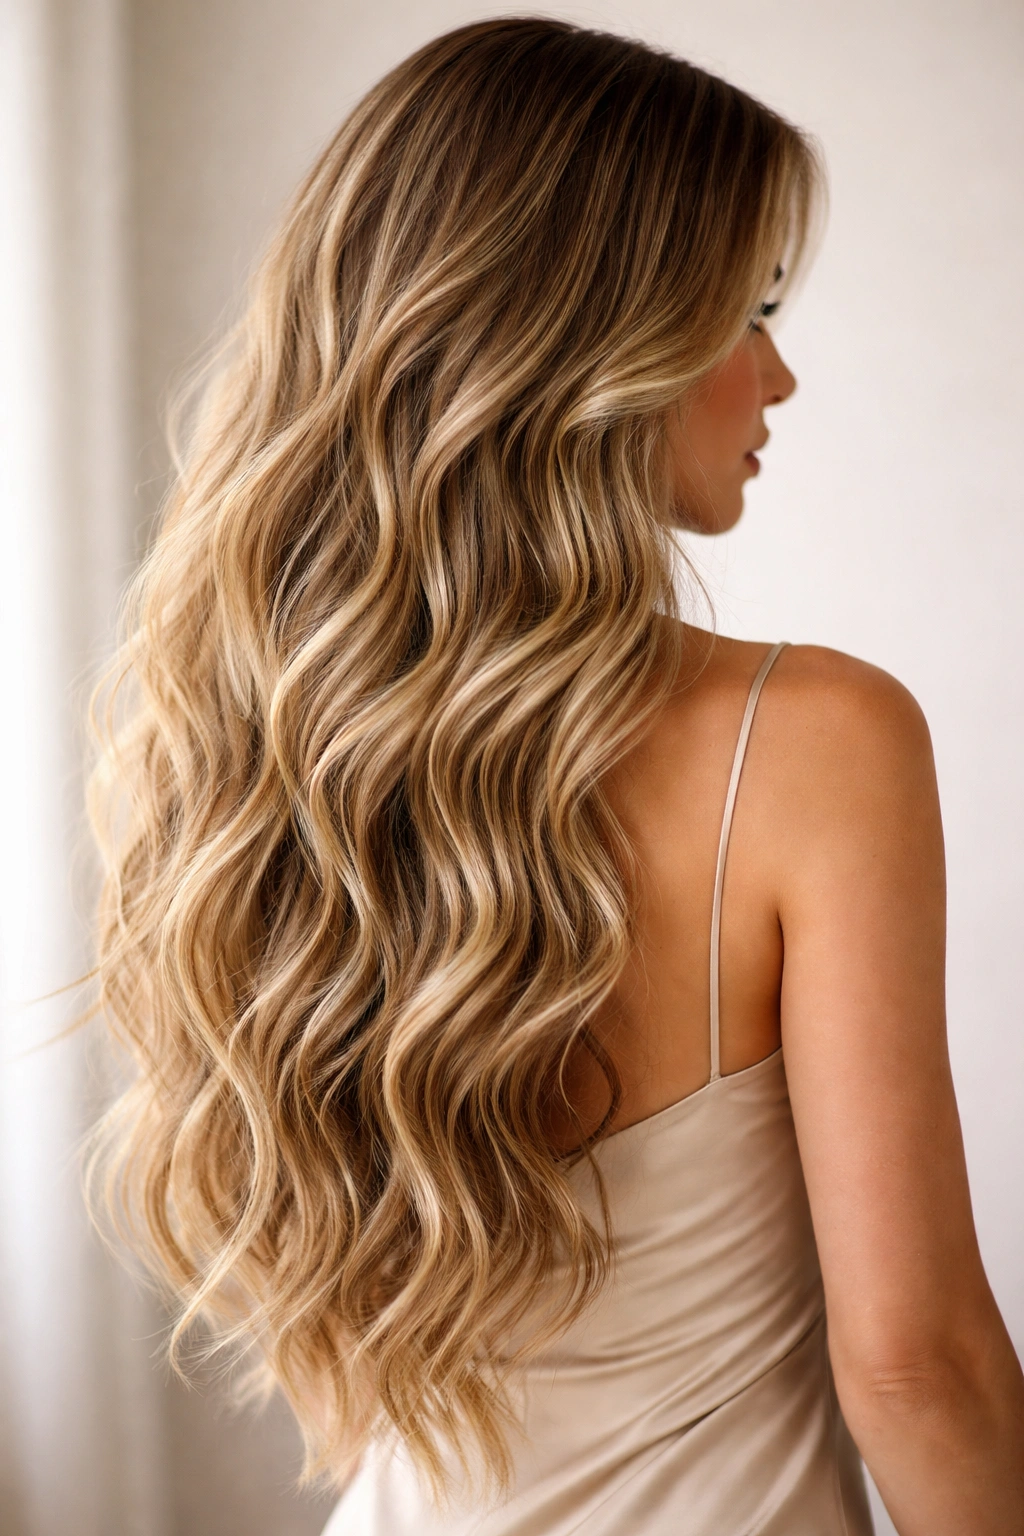
5. Textured Beach Waves With Elegant Updo Hybrid
This style merges the relaxed texture of beach waves with the sophistication of an updo, typically by creating soft waves through the length and gathering them into a loose, romantic knot or twist at the back. It’s the perfect style for someone who wants waves visible but also wants the polished containment of an updo.
Why This Hybrid Approach Works
This style is wonderfully practical for formal events — it keeps hair mostly off your face and neck, which is especially important if you’re going to be active (dancing, mingling, sitting through long events), but it still showcases beautiful waves and moves dynamically with you. It reads as both polished and romantic, which is an ideal balance for most formal occasions.
Creating the Waves and Low Knot
Start with waves throughout your length using your preferred method — a wave tool, large-barrel curling iron, or overnight braiding. You want loose, relaxed waves, not tight curls. Once waves are set, flip your head upside down and flip back — this adds volume at the roots and loosens the wave pattern slightly. Gather your hair loosely at the nape of your neck (lower than a typical ponytail, around the base of your skull). Secure it loosely with an elastic, then twist the gathered hair gently and wrap it around the base of the elastic, tucking the ends in and securing with bobby pins. Pull gently on the looped sections to create a soft, romantic shape — you want it to look undone and effortless, not geometrically perfect.
Styling for Maximum Romance
The secret to making this style feel formal rather than casual is the level of texture and movement in the waves. Make sure your waves are distinct and visible throughout the length of your hair, not smoothed into a sleek texture. Leave a few face-framing pieces slightly loose, either by not gathering them fully or by gently pulling them from the updo once it’s secured. Use a flexible hairspray and allow the style to have natural movement — this isn’t a style that should look frozen in place.
6. Side-Swept Waves With Dramatic Volume at Crown
This style features waves that sweep dramatically to one side, with concentrated volume and height at the crown. It’s inherently formal because of the intentional asymmetry and the visual impact of the volume placement.
The Visual Impact of This Approach
Side-swept styling is inherently more formal than balanced, centered styling — the asymmetry creates visual interest and the dramatic sweep reads as deliberately styled. The crown volume draws the eye upward and is especially flattering for formal photography and events where you’ll be lit from the front. This style works beautifully on all hair types and lengths, and it’s particularly stunning on people with oval or heart-shaped faces.
Building the Volume Foundation
Blow-dry your hair with your head slightly flipped to the side where you want the volume concentrated, using a round brush to lift at the roots. Once your hair is completely dry, apply volumizing mousse or texturizing spray to the crown area to build a foundation. Use large-barrel curling iron or wave tool to create waves throughout your hair, always curling away from the face. For the side-sweep direction, create waves that flow toward your dominant side (whichever side feels more natural when you move your hair).
The Formal Side-Sweep Technique
The key to a formal side-sweep is that it needs to be dramatic — not just a gentle preference to one side, but a noticeable, intentional sweep. Part your hair significantly off-center (3-4 inches from center toward the smaller side). Smooth the smaller side back slightly, either with a small comb or with your fingers and a flexible hold hairspray. The larger side with the waves should cascade across and down, creating that striking asymmetrical silhouette. Use bobby pins on the small side to secure pieces that might slip — these pins should be hidden behind the cascading waves on the other side.
Pro Details for Evening Events
Add a jeweled hair comb, decorative pin, or pearl clip on the side where the smaller section is smoothed back — this draws attention to your styling intention and adds a formal detail. Make sure your waves are defined but still have movement — they shouldn’t look tight or uniform, but rather like flowing, distinct waves that create dimension.
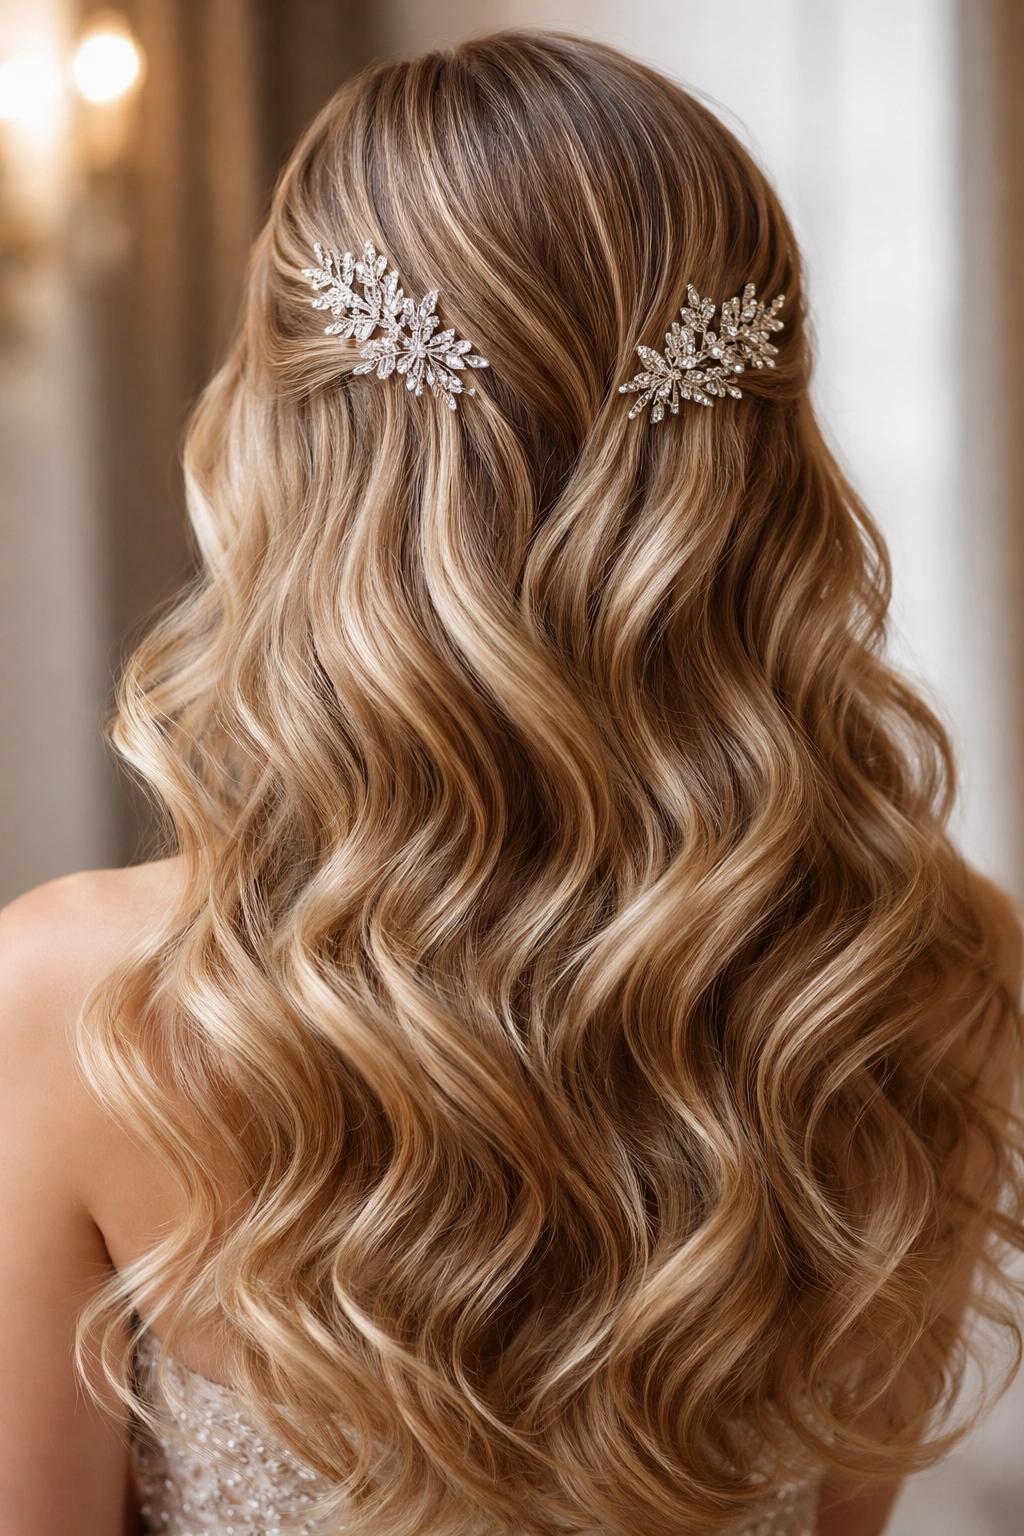
7. Soft Waves With Decorative Hair Clips and Pins
This style features soft, flowing waves throughout the length, with strategic placement of decorative clips, pins, or combs as the focal point. The accessories themselves become the formal styling detail, transforming simple waves into an intentional, polished look.
Why Accessories Elevate Simple Waves
A decorative hair accessory instantly transforms casual waves into formal styling — it signals that you’ve thought about your look and made deliberate choices. The right accessory catches light, draws the eye, and creates an anchor point that makes waves feel intentionally styled rather than just “my hair today.” This approach is especially effective for people who prefer the romantic aesthetic of down hair but want it to feel sufficiently formal for an event.
Creating the Foundation Waves
Use a large-barrel curling iron (1.5 inches or larger) or wave tool to create soft, flowing waves from mid-shaft to ends. Don’t curl the roots — you want natural-looking volume rather than uniform waves from scalp to tip. Once all waves are complete, use a flexible-hold hairspray and gently finger-comb through the waves to soften them and create a more natural, organic wave pattern.
Strategic Accessory Placement
Placement is everything with this approach. Consider adding clips or pins at:
- A low side part, where a decorative comb or clip secures the smaller side
- The nape of the neck, where a small comb or pin cluster can rest where hair naturally collects
- Above one ear, where a delicate clip or pearl pin catches light and frames the face
- Across the back of the crown, where a line of small pins or clips creates a subtle pattern
The key is avoiding the look of clips just holding hair back — instead, position them as intentional, visible styling details. Use pieces made from materials that catch light: pearls, crystals, gold, or silver.
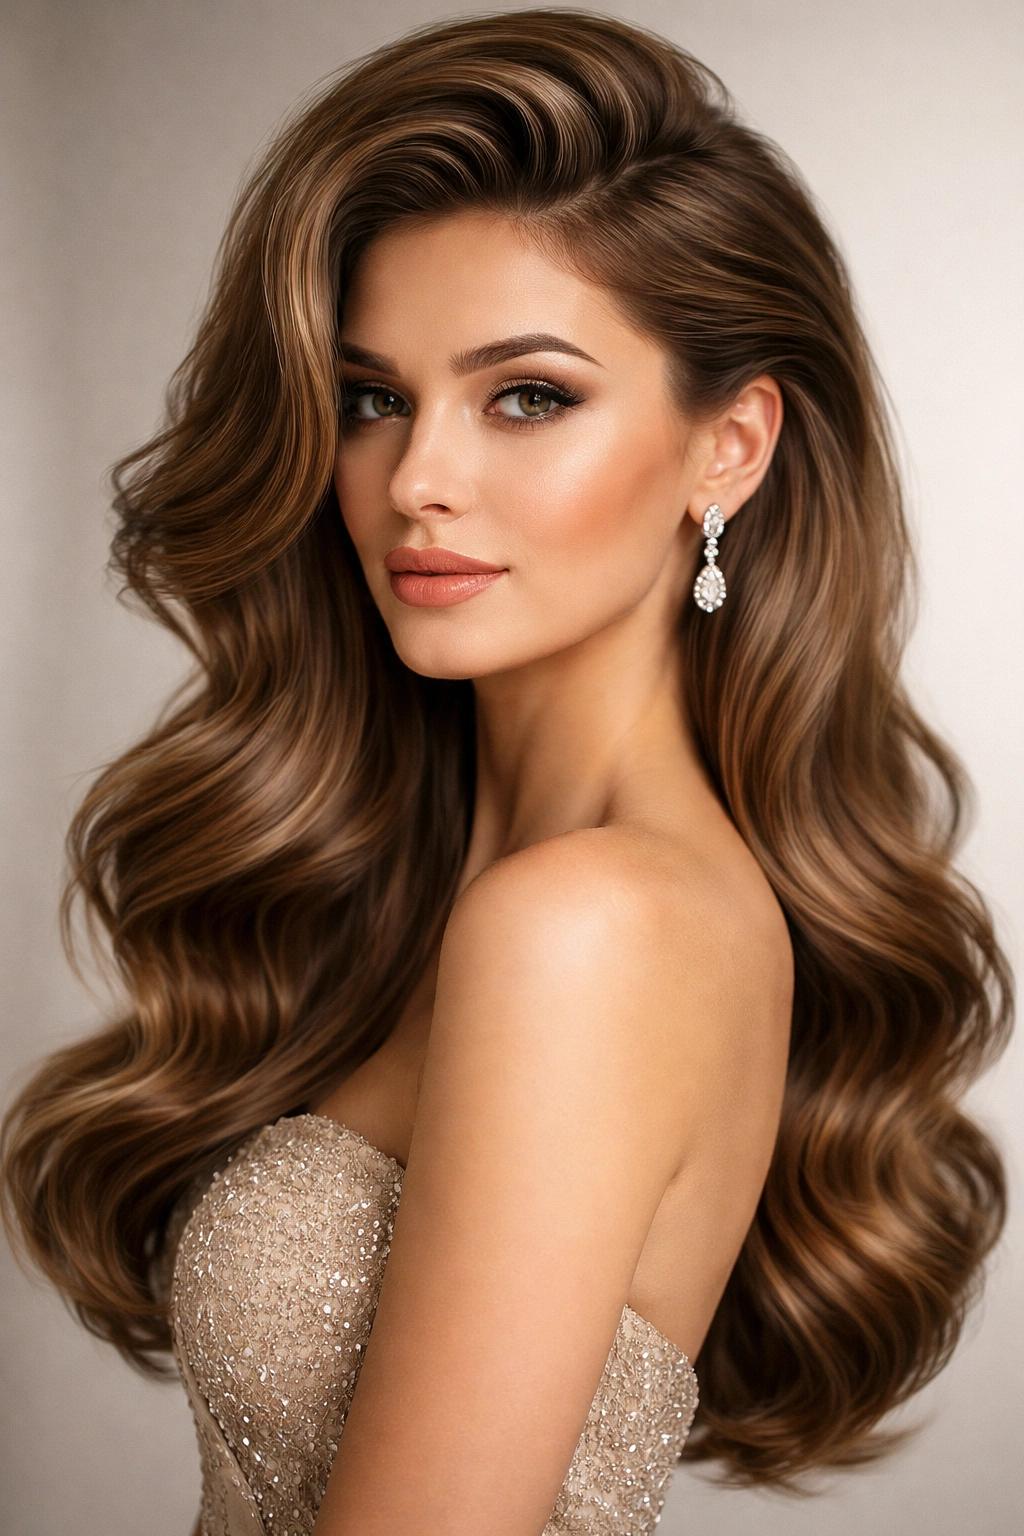
8. Mermaid Waves With Intricate Styling Details
Mermaid waves are exaggerated, defined waves that flow down the entire length of your hair, often combined with braids, twists, or other intricate details that make the style feel both romantic and intricately constructed. It’s a statement look for someone who wants to make an impression.
What Makes Mermaid Waves Different
Mermaid waves are deeper and more textured than simple waves — they’re created with intentional, specific curling techniques and then often enhanced with braiding or twisting. The waves should be distinct and visible, with clear texture throughout the length. This style reads as more formal and more constructed than beach waves because of the obvious effort and technique involved.
Creating Defined Mermaid Waves
Use a 1.25-inch curling iron to create waves, curling 1-inch sections and holding for 10-15 seconds — longer than you would for casual waves. Take time and be intentional with each section. Once all waves are curled, allow them to cool completely (this sets the wave structure), then very gently run your fingers through once to slightly soften them. Do NOT brush them out — that will destroy the wave pattern. You want distinct, visible waves with texture, not smooth hair with a slight wave.
Adding Intricate Details
Combine mermaid waves with a thin braid or two that runs through the back section of your waves, or add a twisted section that spirals down one side. These details interrupt the wave pattern just enough to make the style feel intentionally constructed and formal. Another option: create a small braided section, pull it gently to loosen it, and weave it through the waves as a decorative element rather than a functional styling detail.
Product and Setting for Lasting Hold
Use a medium-hold hairspray that maintains flexibility but gives structure. Sea salt spray can add texture and grip to waves before curling, making them hold better. After styling, avoid touching your waves excessively — the more you handle them, the more they’ll loosen and lose their defined shape.
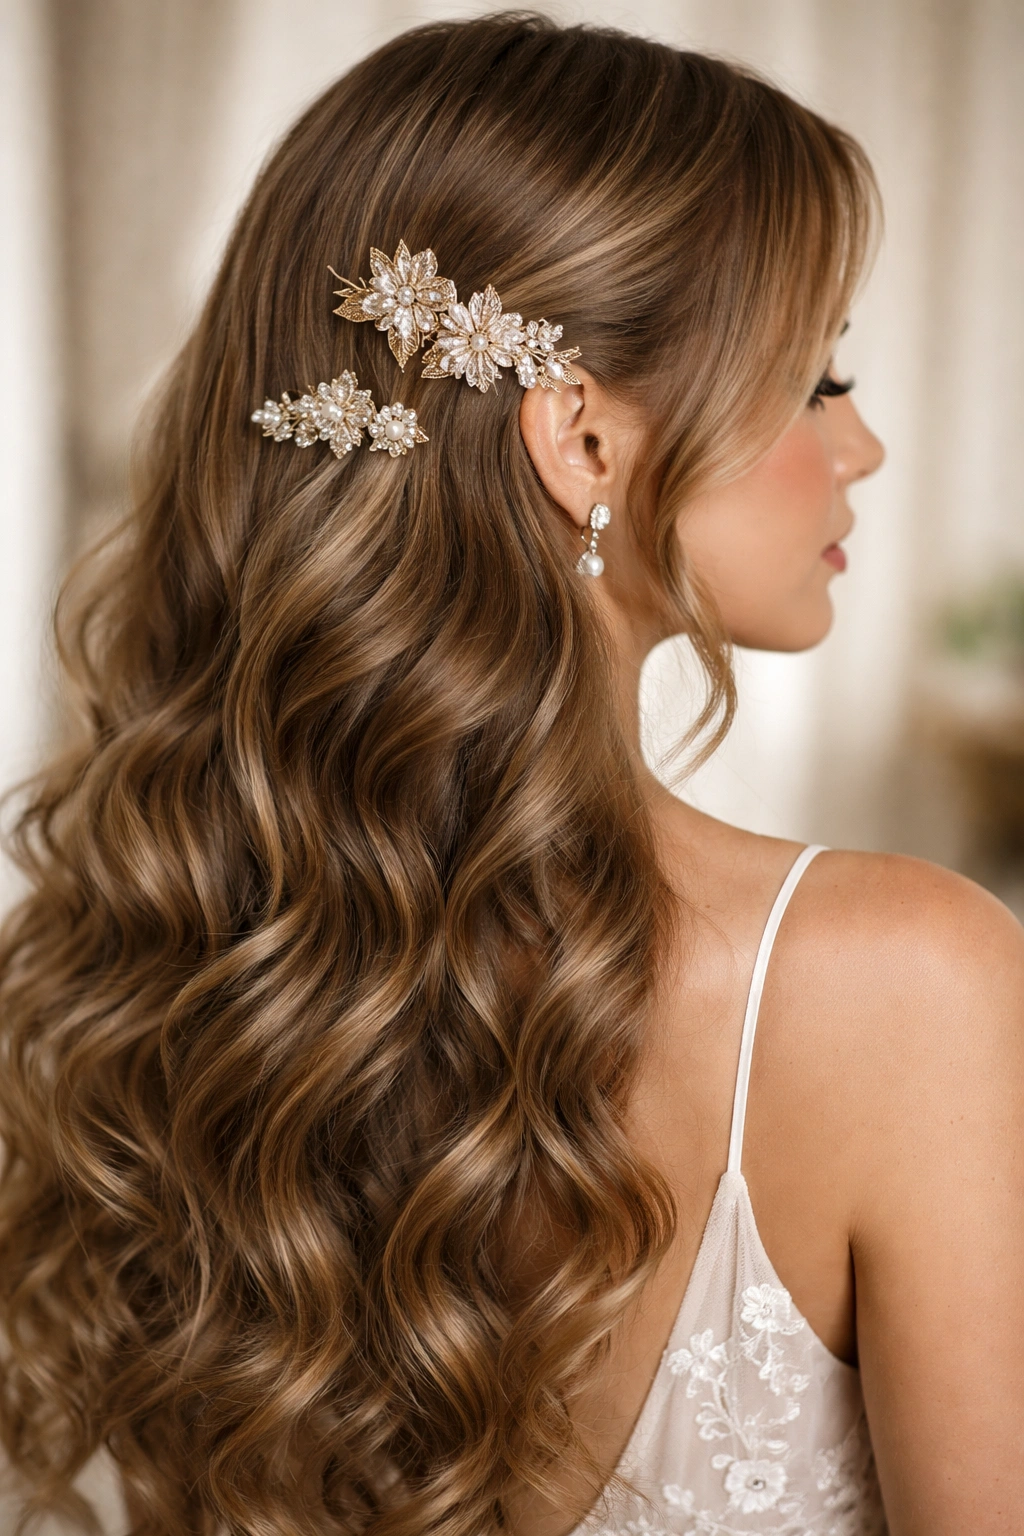
9. Waves With Jeweled Hair Accessories and Delicate Pins
This style features beautiful waves as the foundation, elevated significantly by the strategic use of jeweled combs, pins, hair clips, or decorative sticks that add sparkle, color, or metallic detail. The accessories transform waves from romantic to red-carpet-ready.
The Impact of Quality Hair Jewelry
A beautiful hair accessory is capable of changing the entire energy of a hairstyle. A simple wave style becomes instantly more formal and special with the addition of a crystal-studded comb or a delicate pearl pin. This approach is perfect for formal occasions where you want that extra touch of elegance without completely transforming your hair.
Choosing the Right Accessory
Consider your dress, jewelry, and overall event aesthetic. For a classic, elegant gown, choose pearl, crystal, or gold-tone accessories. For a more contemporary or bohemian formal dress, consider rose gold, mixed metals, or pieces with unique shapes. The scale matters — one larger statement piece is more sophisticated than multiple competing accessories. A single ornate comb, a pair of delicate pins, or one substantial clip is usually more visually appealing than a scattered arrangement.
Placement Strategies
The Crown Detail: Place a jeweled comb or clip at the crown where waves naturally gather, or gently create a small gathering point specifically for placing your accessory. This draws the eye upward and adds height.
The Asymmetrical Accent: Place one decorative pin or clip on just one side, creating intentional asymmetry. This reads as more modern and intentional than symmetrical placement.
The Nape Detail: A small comb or delicate pin cluster at the nape of your neck works if you have hair gathered there, or even with fully down waves — it peeks out when you move and catches light beautifully.
Making It Look Intentional
The accessory should feel like it’s securing something or serving a purpose, not just sitting on top of your hair randomly. If you’re using pins or clips to hold back face-framing waves or a small section, that feels functional and intentional. If you’re adding a comb as a decorative element, place it where hair naturally wants to gather or nest slightly.
10. Tousled Waves With Sleek Extensions or Tape-In Volume
This style combines the casual-looking texture of tousled, slightly undone waves with the perfect, polished length and volume of professional hair extensions or tape-in extensions. It’s the best of both worlds — effortlessly romantic but with clearly intentional, high-impact styling.
Why Extensions Elevate Tousled Waves
Extensions add fullness, length, and the ability to style waves with more impact — there’s simply more hair to work with. When styled well, quality extensions are invisible, but the effect they create is obviously intentional. For a tousled wave style to read as formal rather than bedhead, it needs to have visible volume, length, and texture — extensions make all of this easier to achieve and easier to maintain throughout an evening.
Selecting and Placing Extensions
If you’re using tape-in extensions, have a professional place them before your event — DIY placement often results in visible seams or uneven blending. Good tape-in extensions blend seamlessly and add significant volume without looking artificial. Clip-in extensions can work for events if you have a skilled stylist apply them, but they’re easier to see and potentially less secure through an evening of movement.
Creating Tousled Waves With Extensions
With the added length and volume from extensions, you can create waves with more texture and movement. Use a combination technique: create some waves with a curling iron (focus on mid-length to ends), use a wave tool for other sections to vary the wave pattern, and add texture with texturizing spray. The goal is to create slightly undone-looking waves that have obvious texture but aren’t uniform or symmetrical.
Styling for Evening Longevity
Apply a texturizing spray before creating waves — this adds grip and helps waves hold longer. After curling, gently finger-comb through waves rather than brushing them smooth. Use a flexible-hold hairspray, not a rigid one. Throughout the evening, you can refresh waves slightly with dry shampoo (which also adds texture and grip) or texturizing spray.
The Formal Quality
What keeps this from reading as casual is the obvious perfection of the styling — the extensions ensure your waves are full and voluminous throughout the night, there’s no obvious damage or splitting, and the overall effect is visibly styled even though the waves look tousled. This combination of “looks effortless” with “obviously intentional” is what makes it appropriate for formal occasions.
Final Thoughts
The beauty of waves for formal occasions is that they offer genuine versatility — you can go from timeless Hollywood glamour to modern romantic styles, from intricately detailed braided waves to softly textured tousled waves. What matters is choosing a style that aligns with your face shape, hair texture, and the specific vibe of your event.
The difference between casual waves and formal waves often isn’t the wave pattern itself, but rather the styling intention that surrounds it. A well-executed formal wave style shows that you’ve invested time and skill in your appearance, and that care translates to confidence. Whether you’re drawn to the precision of finger waves, the romantic detail of a braided crown, or the high-impact drama of side-swept volume, there’s absolutely a wave style designed for the look you’re trying to achieve.
Remember that the most successful formal wave styles are the ones you feel genuinely beautiful in. Confidence is the ultimate accessory, and when you’re wearing a style that makes you feel polished, romantic, or powerful — whichever emotion drives your choice — that confidence radiates far more than any specific technique ever could.