Braids have long been celebrated as one of the most protective and versatile styling options for coily hair, but not all braiding techniques work equally well with the unique texture and density of coils. The key difference between braiding coily hair and other hair types comes down to tension management, moisture retention, and how the braid structure actually sits on each individual coil. When done right, braids can be a game-changer—they protect your strands from daily manipulation, retain moisture that helps define your curl pattern, and create stunning visual interest that celebrates rather than fights against your natural texture.
What makes coily hair particularly responsive to braiding is that the coil pattern itself provides grip and hold without needing excessive tension at the roots. This means you can create beautiful, intricate styles that stay put without the damaging pulling that can lead to breakage or traction alopecia. The right braid style also showcases the natural dimension and movement of your coils, allowing them to spring and swell while staying neatly contained.
The styles below aren’t just random braiding patterns—they’ve been chosen specifically because they honor the mechanics of coily hair while being realistic to install and maintain. Whether you’re looking for a protective style that can last weeks, a weekend look you can refresh with water and oil, or something that makes a statement, you’ll find options here that actually work with your hair instead of against it.
1. Box Braids with Coily Texture
Box braids are the classic protective style for a reason, but when you’re styling coily hair, there’s a strategic advantage most people miss. Instead of braiding your hair bone-straight like traditional box braids, you can braid while your coils are in their natural state or partially stretched, which means the final braid has more dimension, volume, and an incredibly organic aesthetic. The coils peek through and around the braid structure, creating texture that’s genuinely beautiful rather than feeling flat.
Why This Style Protects and Defines Coily Hair
Box braids work beautifully on coily hair because the individual coils grip the braid securely, so you don’t need the tension to be cranked tight to keep things in place. This is huge for hair health—you can maintain protection without stress on your roots. The braids also create an ideal moisture environment, trapping hydration around each strand rather than allowing it to evaporate from a stretched, smoothed surface.
Installation and Styling Tips
- Create your braids using the coil pattern as-is, or gently stretch your hair with a light mist of water before braiding for a slightly smoother texture that still reads as natural
- Braid with medium tension, not tight—your coils provide grip without assistance
- Add braiding hair in bundles that complement your hair type; kinky or coily braiding hair blends better visually than straight synthetic textures
- Plan for 8-12 hours of installation time depending on braid size and your sectioning technique
- Refresh your braids every 7-10 days with a lightweight oil or braid cream applied along the braid lines to prevent frizz buildup
Pro tip: If you’re installing box braids yourself, working on damp (not soaking wet) hair makes the coils pliable without being slippery, so you’ll have more control and can work faster.
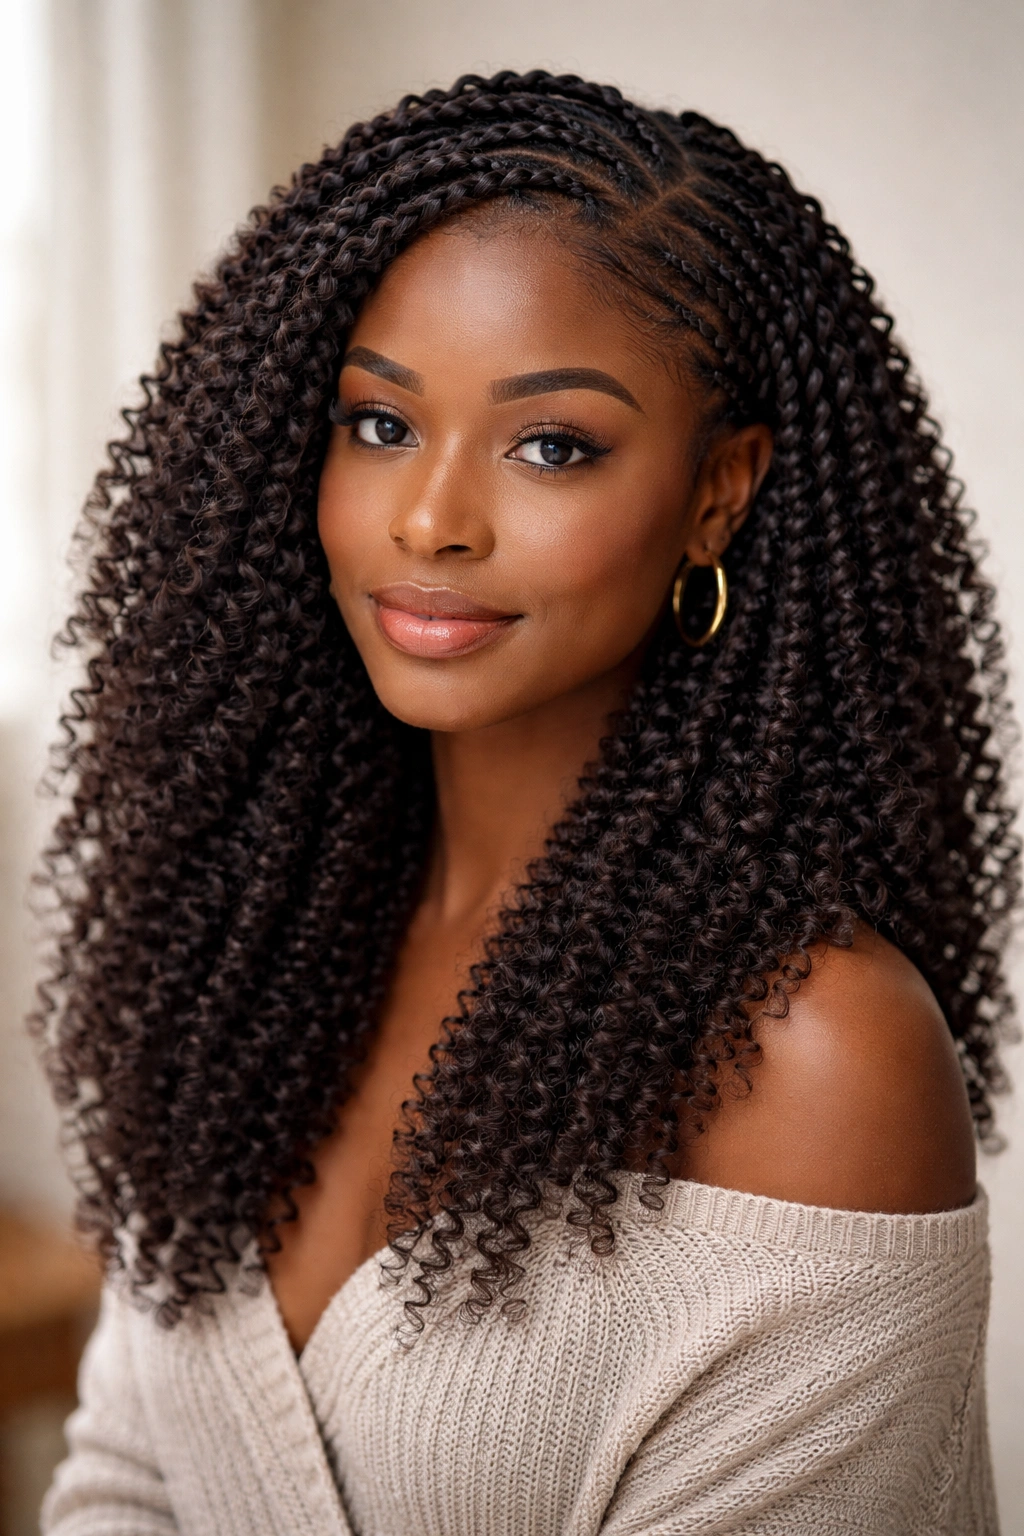
2. Passion Twists with Coily Hair Texture
Passion twists are the softer, more elegant cousin of traditional box braids, and they’re honestly underrated for coily hair specifically. Instead of the structured braid pattern, passion twists wrap braiding hair loosely around your natural strands in a spiral, creating a texture that has more give, bounce, and dimension. They’re lighter, they dry faster if you wash your hair while wearing them, and they have this beautiful organic movement that coily hair naturally wants to have anyway.
The Coil-Specific Advantage
Because passion twists use a looser wrapping technique, there’s less compression of your coils than with traditional braids. Your natural curl pattern stays somewhat activated even while installed, which means when you remove the style, your coils spring right back into formation without that weird stretched-out feeling that sometimes happens after weeks of braids. The visual payoff is also phenomenal—the interplay between your coils and the twisted texture creates something uniquely gorgeous.
How to Create and Maintain Passion Twists
- Section your hair into 8-12 inch sections depending on desired twist thickness
- Work with damp hair to keep coils engaged, not dry and brittle
- Use lightweight synthetic hair or human hair braiding extensions in a texture that complements your coils
- Wrap extensions around your coiled sections loosely—tight wrapping defeats the purpose of this more protective style
- Sleep on a silk or satin pillowcase to prevent frizz and maintain definition; passion twists can look lived-in in a good way, but excessive frizz happens faster than with braids
- Refresh with light oil or braid butter every 5-7 days along the twist lines
Worth knowing: Passion twists typically last 4-6 weeks with good maintenance, slightly shorter than box braids, so factor that into your timing.
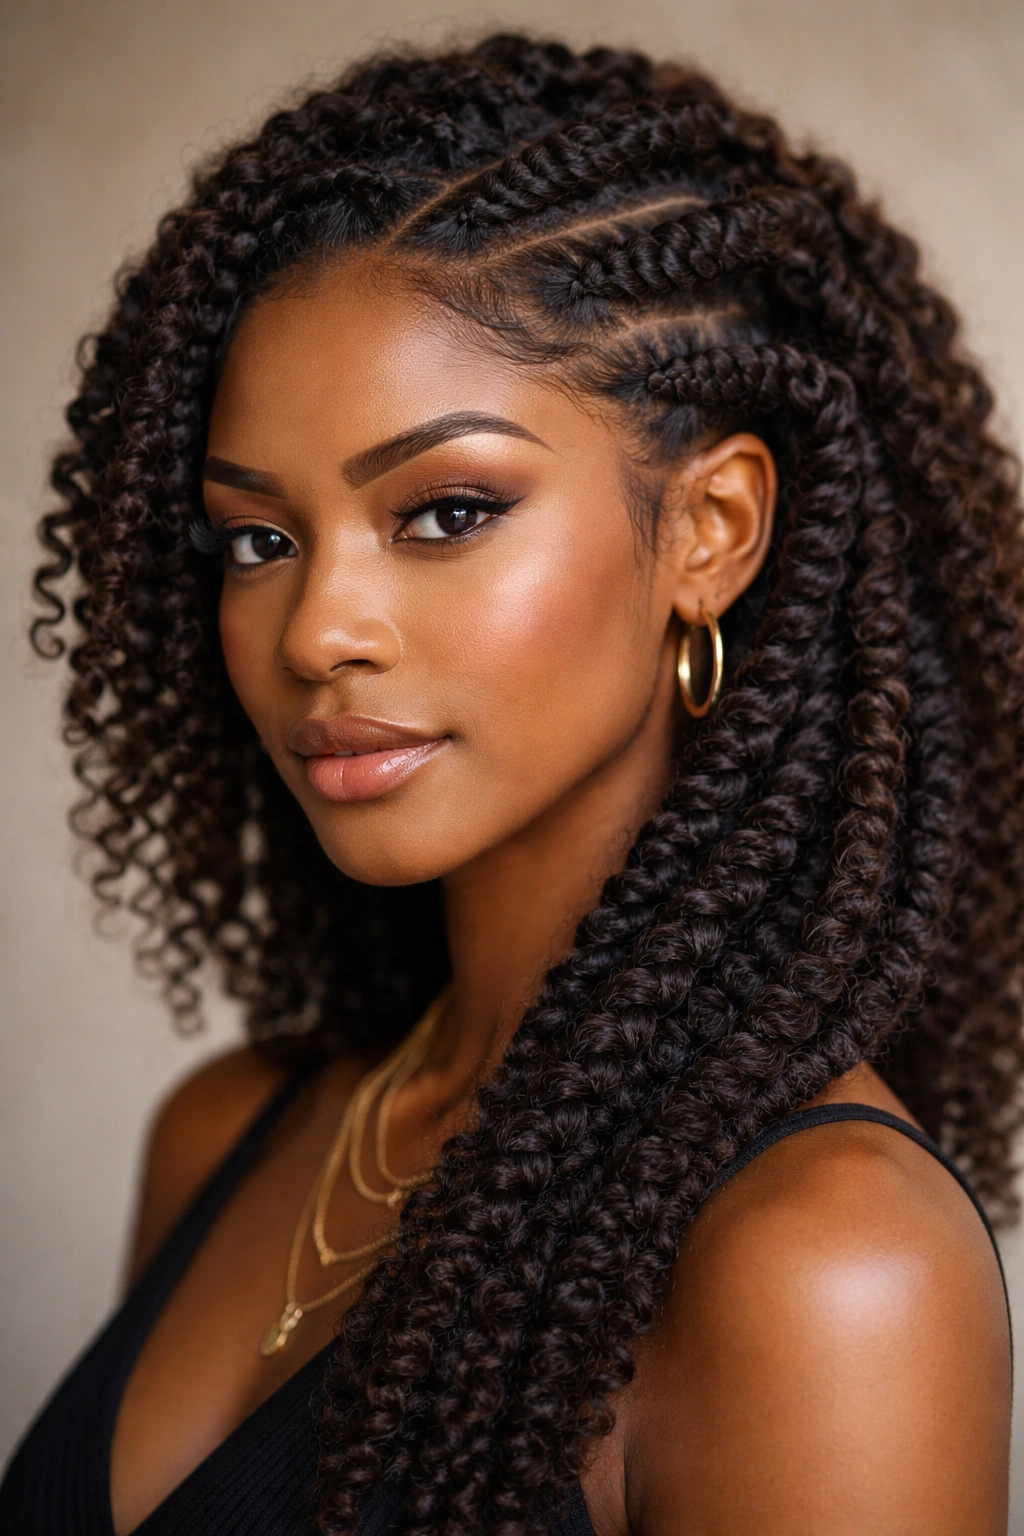
3. Cornrows with Coily Definition
Cornrows are a cultural cornerstone and an incredibly practical protective style, especially when done in a way that honors coily hair’s natural pattern. Instead of braiding the hair completely smooth, you can create cornrows that showcase your coil definition—the braid sits on top of your coils rather than compressing them into submission. This style works particularly well if you have medium to thick coily hair and want something low-key that can go from work to gym to social setting without looking styled.
Why Cornrows and Coily Hair Are a Powerful Combo
The magic happens because your natural coil pattern provides texture and structure without you having to use heat or tension to create it. Cornrows on coily hair require less maintenance than on other hair types, they’re faster to install, and they’re genuinely more comfortable because you’re not fighting against your hair’s natural movement. The braids stay crisp and clean-looking longer because the coil texture itself creates visual interest and definition.
Installation for Coily Hair Specifically
- Cleanse and fully hydrate your hair before braiding; dry, thirsty coils are more prone to breakage when braided
- Work on damp (not wet) hair for optimal handling and coil grip
- Create cornrows that follow your natural curl pattern when possible—fight gravity less, work with your head shape more
- Use scalp-friendly tension; cornrows on coily hair can stay secure with gentle pulling rather than aggressive tension
- Install 4-12 cornrows depending on thickness, hair length, and your personal preference for how covered or open you want the style to feel
- Refresh your edges with a light edge cream or oil every 3-4 days to keep the braid lines crisp without product buildup
Pro tip: Moisturize your scalp with a lightweight oil between braids every few days—this style keeps your scalp more accessible than styles with extensions woven throughout.
4. Two-Strand Twists in Natural Coils
Two-strand twists are one of the most accessible protective styles for coily hair, and they work best when you lean into your coils’ natural texture rather than trying to stretch or smooth them out. Instead of creating tight, rope-like twists, you let your coils do most of the work—twisting two sections of coiled strands together creates this beautiful textured twist that’s got bounce, dimension, and genuine visual interest. You don’t need any extensions for this, which means faster installation, easier removal, and healthier hair because there’s zero added weight.
Why Coily Two-Strand Twists Are Genuinely Protective
The coil pattern itself acts as a protective mechanism here—it keeps individual strands bound together and reduces daily manipulation by about 90%. Because you’re not using any extensions and not creating tension at the roots, there’s virtually no risk of traction damage. The twist structure also naturally locks in moisture, so your coils can remain hydrated and defined for the entire time you’re wearing the style.
Creating and Maintaining Natural Twists
- Section damp hair into 10-20 sections depending on desired twist thickness and your hair density
- Apply a creamy twist cream, butter, or gel to each section to add definition and control
- Divide each section into two subsections and twist them around each other from root to tip, keeping tension consistent and moderate
- Twists should feel snug but never painful at the scalp
- Allow twists to set overnight before styling them up, out, or into additional formations
- Refresh twists every 3-4 days by dampening, re-creaming, and re-twisting the loose sections starting from about an inch below the root
- Sleep on a satin bonnet or pillowcase to prevent frizz and friction breakage
Insider note: If you’re new to maintaining protective styles, two-strand twists are an excellent starting point because you’re only working with your own hair, and the learning curve is much shorter than with other styles.
5. Braided Crown with Coily Texture
A braided crown is pure visual elegance—it’s an updo that wraps around your head like a halo and can be dressed up for special events or worn casually for everyday gorgeousness. For coily hair, this style becomes especially striking because the texture and volume of your coils mean the crown is full, dimensional, and genuinely eye-catching. The braid itself can be a single thick French braid, multiple thinner braids pinned together, or a combination approach depending on how much time you want to spend and what aesthetic you’re going for.
The Coily Hair Advantage for Crown Styles
Because coily hair has natural volume and structure, a braided crown doesn’t look flat or delicate—it looks substantial and powerful. Your coils actually help hold the braids in place and create that crown effect without you needing to hide thinning sections or use tons of styling products. The contrast between the braided structure and the coily texture underneath creates genuinely beautiful dimension.
How to Create a Braided Crown
- Start with damp, moisturized coils to ensure they’re pliable and cooperative
- Create 1-3 braids depending on crown thickness preference; you can do a single French braid from one temple around the back to the other temple, or three separate braids pinned into a crown formation
- Braid with loose to moderate tension—tight tension looks harsh and can feel uncomfortable after a few hours
- Pin braids in place with bobby pins or hair sticks, tucking the ends under and securing them invisibly
- Leave the crown-framing pieces if you want them, or braid all hair into the crown for a completely put-together look
- Use a lightweight hairspray or braid cream around the perimeter to catch any frizz without creating crunchiness
Worth knowing: A braided crown is an ideal style for events because it’s elegant without looking like you tried too hard, and it actually stays secure better on coily hair than on other textures due to the natural grip of your coils.
6. Crochet Braids with Coily Extensions
Crochet braids are a game-changer for anyone who wants protection without spending 8+ hours in the salon chair. The technique uses a crochet hook to pull pre-braided extensions through cornrow braids you’ve installed on your head, which means much faster installation than traditional braids. For coily hair, you can choose coily, kinky, or textured crochet extensions that blend seamlessly with your natural pattern, creating a style that looks entirely natural and intentional rather than obviously installed.
Why Crochet Braids Work So Well for Coily Hair
Your coils actually anchor the crochet extensions better than straighter hair types do, so the finished style is incredibly secure and doesn’t slip around. You get all the protective benefits of a multi-week style without the installation marathon. Plus, crochet braids give you serious length and volume flexibility—you can go subtle or go bold depending on your mood and plans.
Installation and Care
- Create cornrow braids on your head in the pattern you want the crochet extensions to follow (straight back rows are most common, but you can do circles, diagonals, or creative patterns)
- Use a crochet hook to loop pre-made braids through each cornrow, pulling the braids through and looping them for security
- Typically takes 2-4 hours depending on number and thickness of braids; much faster than hand-braiding
- Choose coily or kinky extensions in a texture that matches or complements your natural coil pattern for seamless blending
- Braid extensions end to secure them, or leave them loose and curly depending on the aesthetic you want
- Refresh your edges and cornrow braids underneath every 5-7 days with a lightweight moisturizer or edge cream
- Remove crochet braids gently by unlooping them carefully, without pulling your natural hair
- Plan to wear crochet braids for 6-8 weeks before removal and reinstallation
Pro tip: Crochet braids are perfect if you travel for work or have a busy schedule—the installation is fast enough to do right before a trip, and the style lasts through multiple weeks of wear without needing touch-ups.
7. Goddess Braids with Coily Hair
Goddess braids are thicker, looser braids that wrap around your head in elegant swoops and curves—they’re like cornrows’ sophisticated cousin. For coily hair, goddess braids are stunning because the looser braid pattern doesn’t compress your coils, so you get this beautiful interplay between the braid structure and your natural texture. They’re elegant enough for a night out, protective enough for daily wear, and they photograph incredibly well because the dimension and texture are genuinely gorgeous.
The Coil-Specific Magic of Goddess Braids
Because goddess braids are braided with looser, thicker sections, the grip required at the roots is minimal. Your coils naturally help hold the braid in place, which means you can create beautiful braids without uncomfortable tension. The finished look is dramatically more visually interesting than it would be on straight hair because your coils add movement, dimension, and depth to the braid structure.
Creating Goddess Braids on Coily Hair
- Section hair into 3-6 thick sections depending on desired braid thickness and head size
- Work with damp, moisturized coils to ensure they’re soft and cooperative
- Create loose, thick three-strand or four-strand braids (four-strand creates more dimension), starting at the root and working to the end
- Braid with gentle tension; these braids should feel comfortable and secure without any pulling sensation
- Wrap braids around your head in the pattern you prefer—spiral from center outward, swoops across the crown, or a combination
- Pin braids in place with bobby pins, tucking the ends under and securing them invisibly
- Freshen up your braids every 5-7 days by re-braiding or tightening loose sections with braid cream and a fine-tooth comb
- Sleep on a satin bonnet or use satin pillowcases to prevent frizz and maintain braid definition
Worth knowing: Goddess braids typically last 2-3 weeks without needing major touch-ups, making them a good middle ground between low-maintenance two-strand twists and longer-lasting protective styles.
8. Feed-In Braids with Coily Hair

Feed-in braids (also called feed braids or stacked braids) are traditional box braids but with a technique that creates a smoother, more natural-looking transition from your scalp to the braided section. Instead of starting your braid full-thickness right at the root, you start small and gradually feed more braiding hair into the braid as you move down, creating a tapered effect that looks less obviously installed and creates less tension at the roots.
Why Feed-In Braids Reduce Damage on Coily Hair
Because feed-in braids don’t have that thick, tension-filled bundle of hair right at your scalp, they’re significantly gentler on coily hair, which is typically more fragile at the root and edges. The coils themselves provide grip and hold without needing the crushing pressure of a traditional braid base. This technique is genuinely protective for long-term wear without the damage risk.
Installation and Maintenance
- Cleanse and fully hydrate your hair before installation; feed-in braids require more moisture and flexibility than traditional braids
- Work on damp hair for easier manipulation and coil grip
- Create a grid of sections, keeping them slightly larger than traditional box braids to reduce tension
- Start each braid with a small three-strand braid using only your natural hair, then gradually feed braiding hair into the braid as you move down the section
- Braid with medium, consistent tension throughout—not tight, but secure
- Feed-in braids typically last 8-12 weeks because the foundation is more durable and the tension is distributed more evenly
- Refresh the braid base every 2 weeks if you’re keeping them long-term; this involves re-braiding the first 1-2 inches to prevent breakage and matting around the roots
- Plan for 10-15 hours of installation time depending on braid thickness and how experienced you are with this technique
Pro tip: Feed-in braids are worth the extra installation time because they genuinely last longer and cause less damage, making them ideal if you want to wear braids for several months.
9. Bantu Knots in Coily Hair
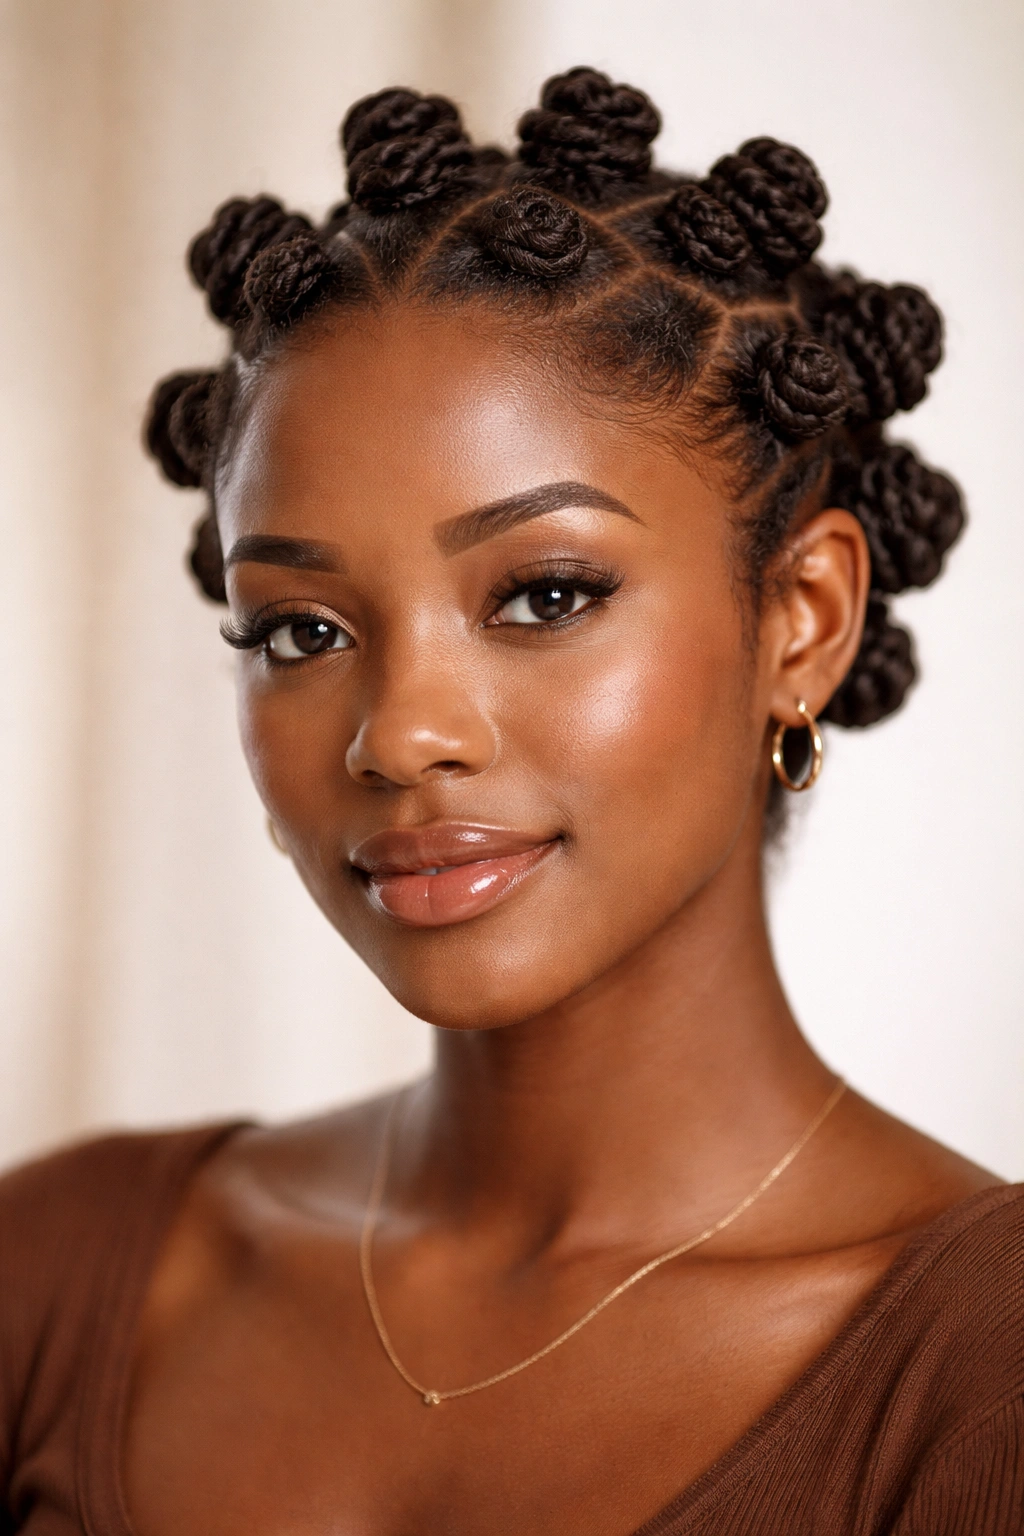
Bantu knots are an absolutely gorgeous protective style that wraps coiled hair into tight knots flat against your head, creating this beautiful textured landscape of knots. They’re quicker to install than many other protective styles, they’re incredibly protective because there’s zero tension and zero manipulation once they’re done, and they’re visually striking enough to wear as an intentional style rather than just a protective foundation. For coily hair, Bantu knots are honestly ideal because your coils’ natural grip and texture mean the knots stay secure without tight tension or extensions.
Why Bantu Knots Work Brilliantly for Coily Hair
Your coils naturally coil back on themselves, which is literally what Bantu knots are—coiled hair twisted into a knot formation. It’s a style that’s designed for textured hair and takes advantage of your coil pattern rather than fighting it. Bantu knots are also incredibly low-manipulation during wear; once they’re installed, you’re not combing, brushing, or handling your hair, which is the whole point of a protective style.
Installation and Wearing Bantu Knots
- Start with damp, moisturized coils and apply a creamy styling cream or butter to each section
- Create a grid of sections on your head—typically 12-20 knots depending on head size and desired knot thickness
- Twist each section around itself starting from the root, coiling the hair up and around until you reach the end and can wrap the end around the base of the knot to secure it
- The knot should sit flat against your scalp, not stick out or create uncomfortable bumps
- Bantu knots can be worn as-is for a gorgeous spiky aesthetic, or you can remove them after a few hours or overnight for bouncy, coily texture (this is called the Bantu knot-out)
- Sleep on a satin bonnet to maintain knot definition and prevent frizz
- Keep knots in place for 2-4 weeks depending on how your coils relax and how much frizz you’re comfortable with
- Remove gently by unraveling each knot slowly, starting from the ends and working toward the roots, to prevent breakage
Insider note: If you create Bantu knots on damp hair in the evening, sleep on them, and remove them the next morning, you get one of the most gorgeous, defined coil patterns possible—it’s like a precision curl set but using a protective style technique.
10. Faux Locs with Coily Texture
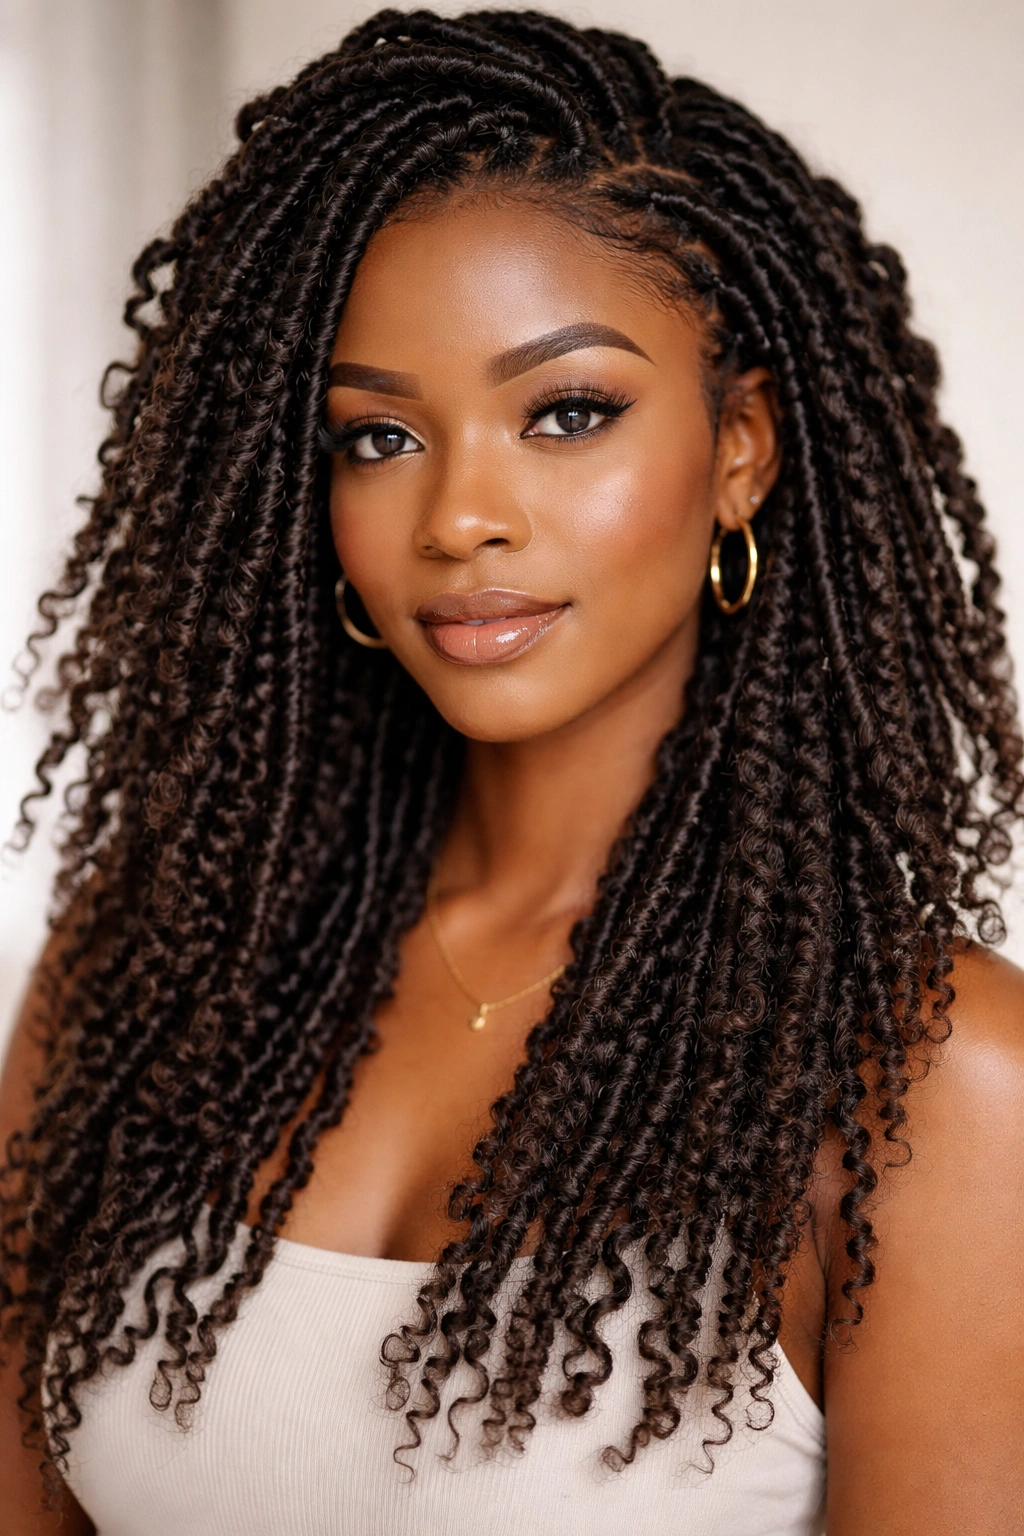
Faux locs are a beautiful protective style option that wraps braiding hair around your natural coiled sections to create the look of locs without the long-term commitment of actual locs. For coily hair, faux locs are especially striking because you can blend coily-textured extensions with your natural coils, creating something that looks entirely natural and genuine. They’re protective, they’re visually gorgeous, and they offer length and style versatility that you can change frequently.
The Coil-Advantage in Faux Locs
Coily hair provides natural grip and hold within faux locs, so the style stays secure and intact much longer than it would on other hair types. Your natural coil texture blends seamlessly with coily-textured braiding hair, making the style look like genuine protective dreads rather than obviously installed extensions. The movement and bounce of your coils within the faux loc structure creates this genuinely beautiful aesthetic.
Creating and Maintaining Faux Locs
- Cleanse and fully hydrate your hair before installation; faux locs require healthy, strong hair at the foundation
- Create cornrow braids on your head in the pattern you want the faux locs to follow
- Use a crochet hook or needle to attach coily-textured braiding hair to each cornrow, wrapping it around your coiled sections to create a loc-like appearance
- Wrap extensions tightly and consistently to create uniform-looking locs that stay durable
- Faux locs typically take 4-6 hours to install and look best when you combine your natural coils with coily extensions in matching or complementary textures
- Wear faux locs for 6-10 weeks depending on how well your coils hold the extensions and how much maintenance you do
- Refresh your roots every 3-4 weeks by rewrapping the new growth around the base of each loc
- Wash faux locs gently with a sulfate-free shampoo every 1-2 weeks, using your fingers or a soft brush rather than rough scrubbing
- Remove faux locs gently by unwrapping the extensions carefully to preserve your natural hair underneath
Worth knowing: Faux locs require more consistent maintenance than some other protective styles, but they’re absolutely stunning and genuinely make coily hair look like it’s in its most powerful, intentional form.
Final Thoughts

The beauty of braiding coily hair is that your natural texture works with these styles rather than against them. Your coils provide grip, definition, and visual interest that make braids look intentional, elegant, and genuinely gorgeous—not like you’re trying to tame unmanageable texture, but like you’re celebrating and protecting something beautiful.
The right braided style depends on your lifestyle, how much time you want to spend installing and maintaining, and what aesthetic you’re going for. If you want minimal daily maintenance, Bantu knots or natural two-strand twists are your answer. If you want something that lasts weeks without touch-ups, feed-in braids or crochet braids are the play. If you want something you can take down and switch up frequently, goddess braids or a braided crown give you flexibility with beautiful results.
Start by experimenting with whichever style speaks to you—your coils will tell you what works. The magic is that whatever you choose, you’re not fighting your hair’s nature. You’re working with it, protecting it while it protects itself, and creating something that’s as functional as it is stunning. That’s what makes coily hair and braids such a perfect match.