When the temperature climbs and humidity soars, coily hair can feel like it’s working against you. The moisture in the air is already trying to shrink your curls, and if your style isn’t structured right, you’ll end up with a frizzy mess by midday. But here’s what most people miss: the same humidity that makes styling tricky can actually work in your favor if you choose the right look. The key is picking styles that contain and define your coils rather than fighting them, while keeping your scalp and neck cool and your edges protected from the elements.
Hot weather calls for a completely different styling approach than your go-to cold-season looks. You need styles that don’t rely on products to stay put, that keep your hair off your shoulders, and that look intentional rather than like you’re battling your texture. The good news is that coily hair is made for hot-weather styles. Your natural curl pattern has the structure and memory to hold intricate, long-lasting looks that looser textures simply can’t achieve. Whether you’re heading to the beach, dealing with swamp-like summer humidity, or just tired of having your hair plastered to your neck, these eight styles will keep you cool, protected, and genuinely gorgeous through even the steamiest weather.
1. High Puff with Edge Control
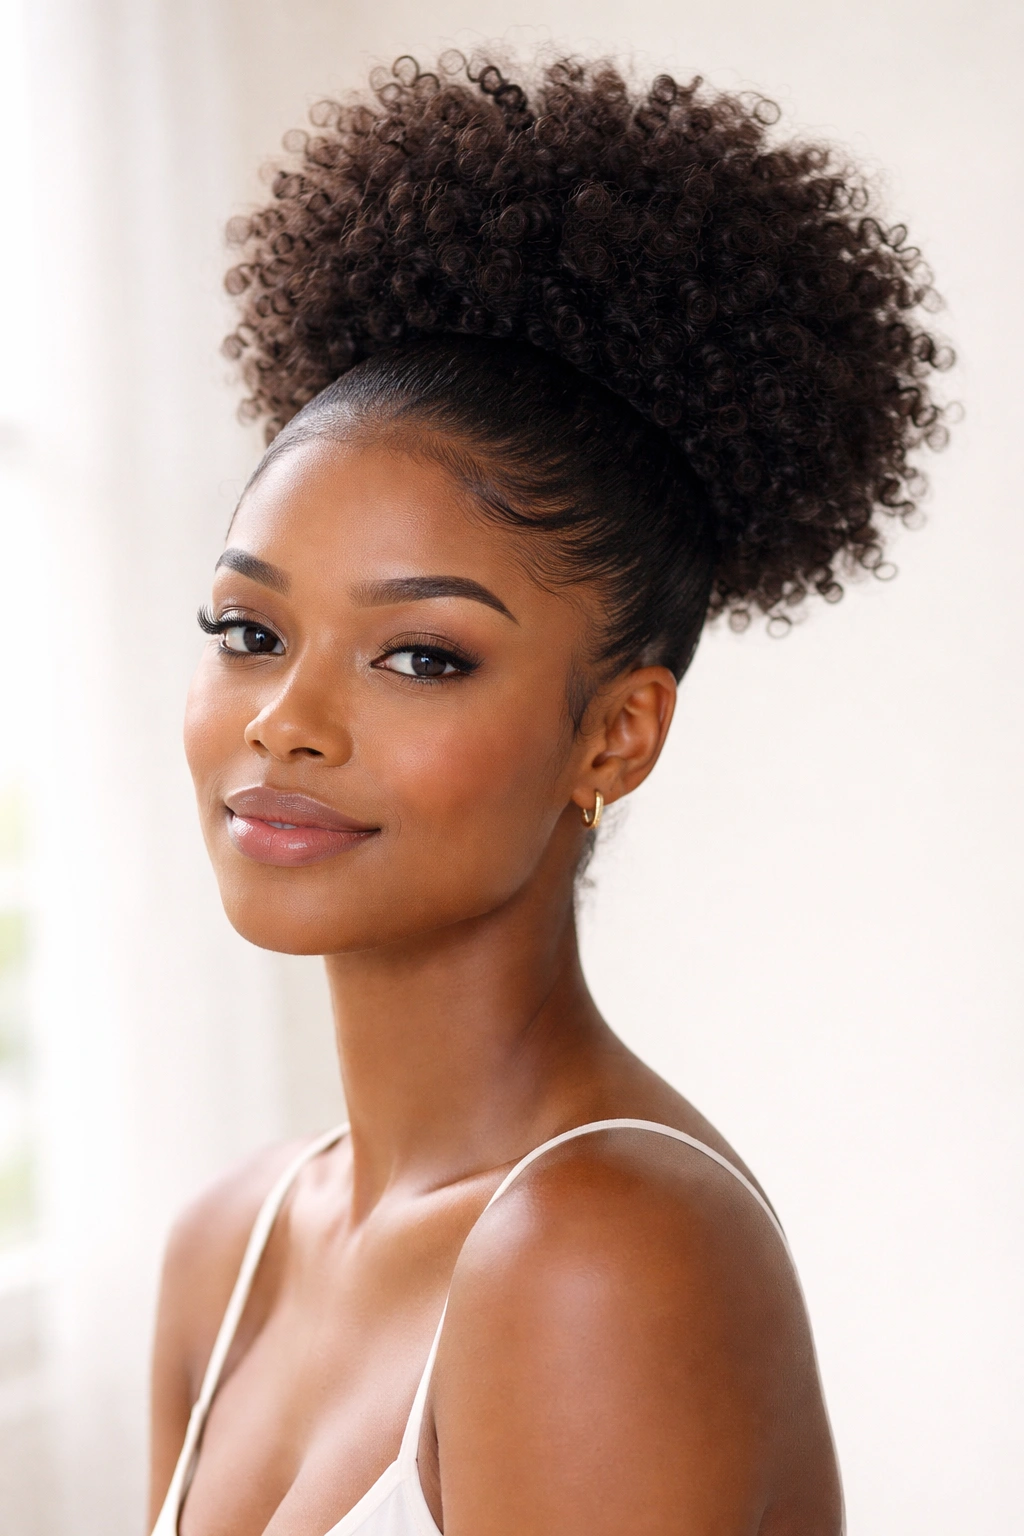
A high puff is the unofficial uniform of coily hair in summer heat, and for good reason—it’s practical, it’s protective, and when done right, it looks intentionally polished. This isn’t a messy bun. A true high puff gathers your coils at the crown, secured in a way that shows off your curl definition while keeping everything off your shoulders and neck entirely. The style works for every coil pattern, from loose waves to tight springs, as long as your coils have enough grip to hold the shape.
Why This Works for Heat and Humidity
The high puff moves all your hair away from your scalp and neck, which means sweat won’t build up where it’s most uncomfortable. Humidity won’t cause the same shrinking effect when your coils aren’t clinging to your skin. The higher you place it on your head, the more air circulation your scalp gets—this is crucial for temperature regulation on sticky days.
How to Build One That Lasts
- Prep your coils the day before or use them at day two or three when they have natural texture and grip from oils redistributing throughout the strands
- Use a light gel or mousse only if you need hold—coily hair often doesn’t require much
- Flip your head upside down and gather hair into a high ponytail positioned at the crown (not behind your ears like a regular puff)
- Use a coil-friendly hair tie or scrunchie—silk or satin won’t snag your coils the way cotton does
- Smooth your edges with a small-tooth comb and a tiny bit of edge cream, then twist them into waves that frame your face
- Pin any loose sections with bobby pins that match your hair color to keep them invisible
- The puff itself should look full and dimensional, not flat—let your coils breathe and don’t compress them down
Pro tip: This style actually improves over the day as your coils relax slightly into a more defined shape. By evening, your puff often looks better than it did in the morning, which is the opposite of most styles in humidity.
2. Twisted Crown or Halo
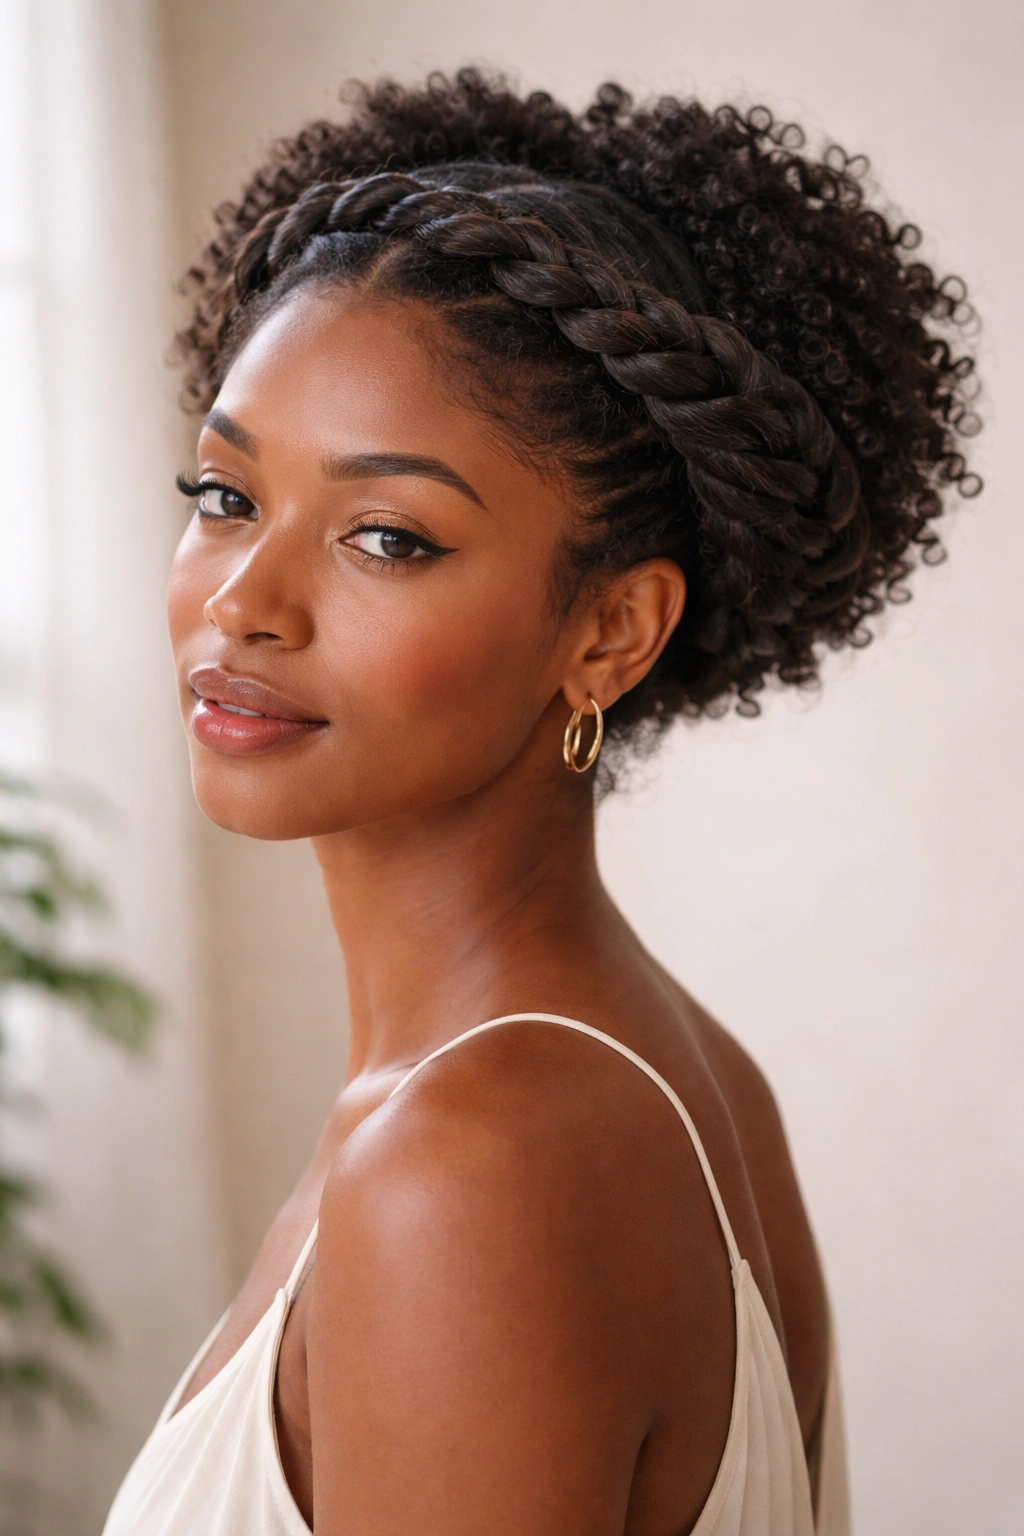
A twisted crown transforms coily hair into a deliberately sculptural style that looks like you spent an hour at a salon—but takes maybe 20 minutes to create. This works by taking two or more twisted sections and wrapping them around your head to create a halo or crown effect. Your coils stay protected under the twists while your neck stays completely exposed to air. It’s elegant enough for work or an event, but casual enough for everyday wear.
The Crown That Stays Put
Twists in coily hair have natural grip and texture, so they hold without needing tons of product. The moisture in humid air actually helps them stay defined longer than they might on a dry day. Each twist creates a rope-like structure that resists frizz and maintains its integrity even when it’s swampy outside.
Building Your Crown, Step by Step
- Part your hair down the middle or along a side part—choose whichever flatters your face shape
- On one side, take a section from your temple and begin twisting two strands of hair around each other, adding more hair as you move backward around your head
- Keep the twist loose enough to move freely but tight enough that it holds without unraveling
- Pin the twisted section into place with bobby pins as you go, anchoring it to the back of your crown
- Repeat on the other side, bringing both twisted sections together at the back
- Leave some face-framing coils loose if you want a softer effect, or smooth everything back for a more polished look
- Mist the twists lightly with water to lock in definition as humidity hits
Worth knowing: If you have shorter coils, you can create a smaller version that sits more like a headband across the back of your head rather than a full crown—same concept, different placement.
3. Braided Half-Updo
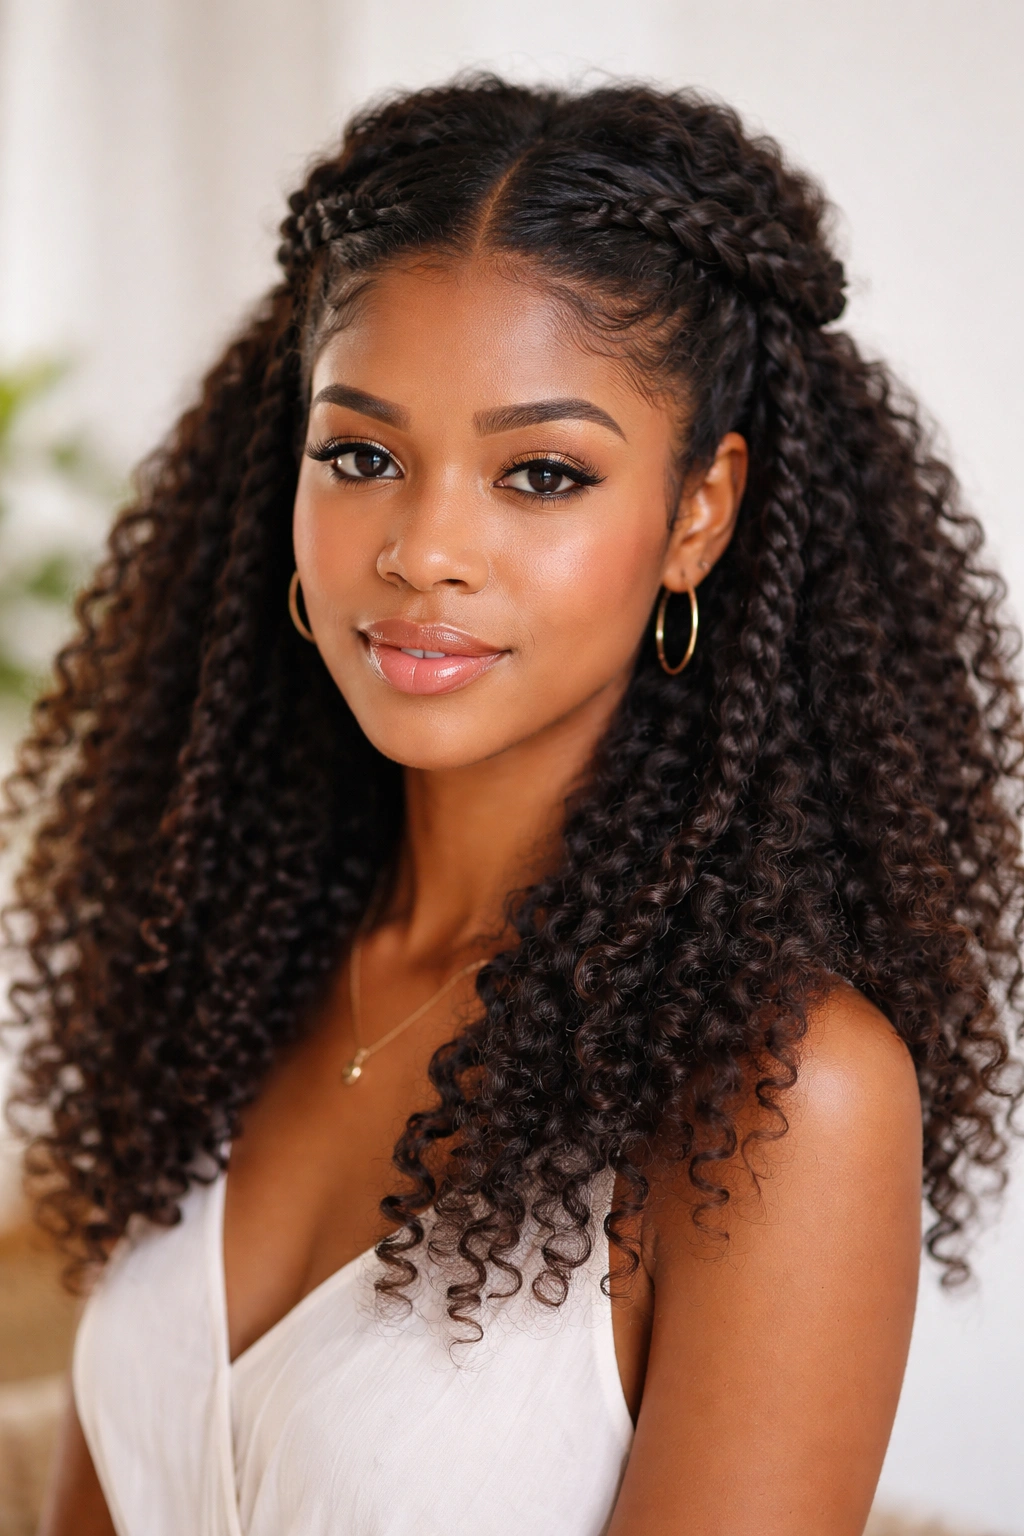
A half-updo that uses braids as the structure hits the sweet spot between practical and styled. It pulls hair off your shoulders and collarbone—the hottest spots in humidity—while still leaving most of your coily hair down to show its texture. Braids are the anchor here; they give the updo its staying power so you’re not fighting gravity all day. This look works whether your coils are loose and springy or tight and compact.
Why Braids Keep Coils in Place
A braid creates interlock within your coils. Each strand is literally woven around the others, which means your coils can’t slip loose even as they swell slightly in humidity. This is why braids are actually better for hot, humid weather than simpler gathered styles—the structure only strengthens as your hair absorbs moisture.
Creating a Braid-Based Half-Updo
- Leave the bottom half of your hair down to frame your face and show off coil definition
- Take a section from each side of your head, roughly temple to ear height
- Braid each side using three-strand braids (standard braids work best; cornrows make it look too formal for a casual half-updo)
- Bring both braids to the back of your head and secure them with a clip or hair tie
- Let the braids sit at the crown of your head rather than at the very top—this balances the weight better
- Gently pull at the braids to widen them and create a softer, less tight appearance
- Leave your bottom coils down and undone for contrast; you want the braids to be the styled element and your natural coils to be secondary
Quick fact: You can do this style with your coils completely dry, partially wet, or even slightly damp—braids work in any coil moisture state, which makes this genuinely low-effort for a styled look.
4. Coily Bun Stacked and Secured
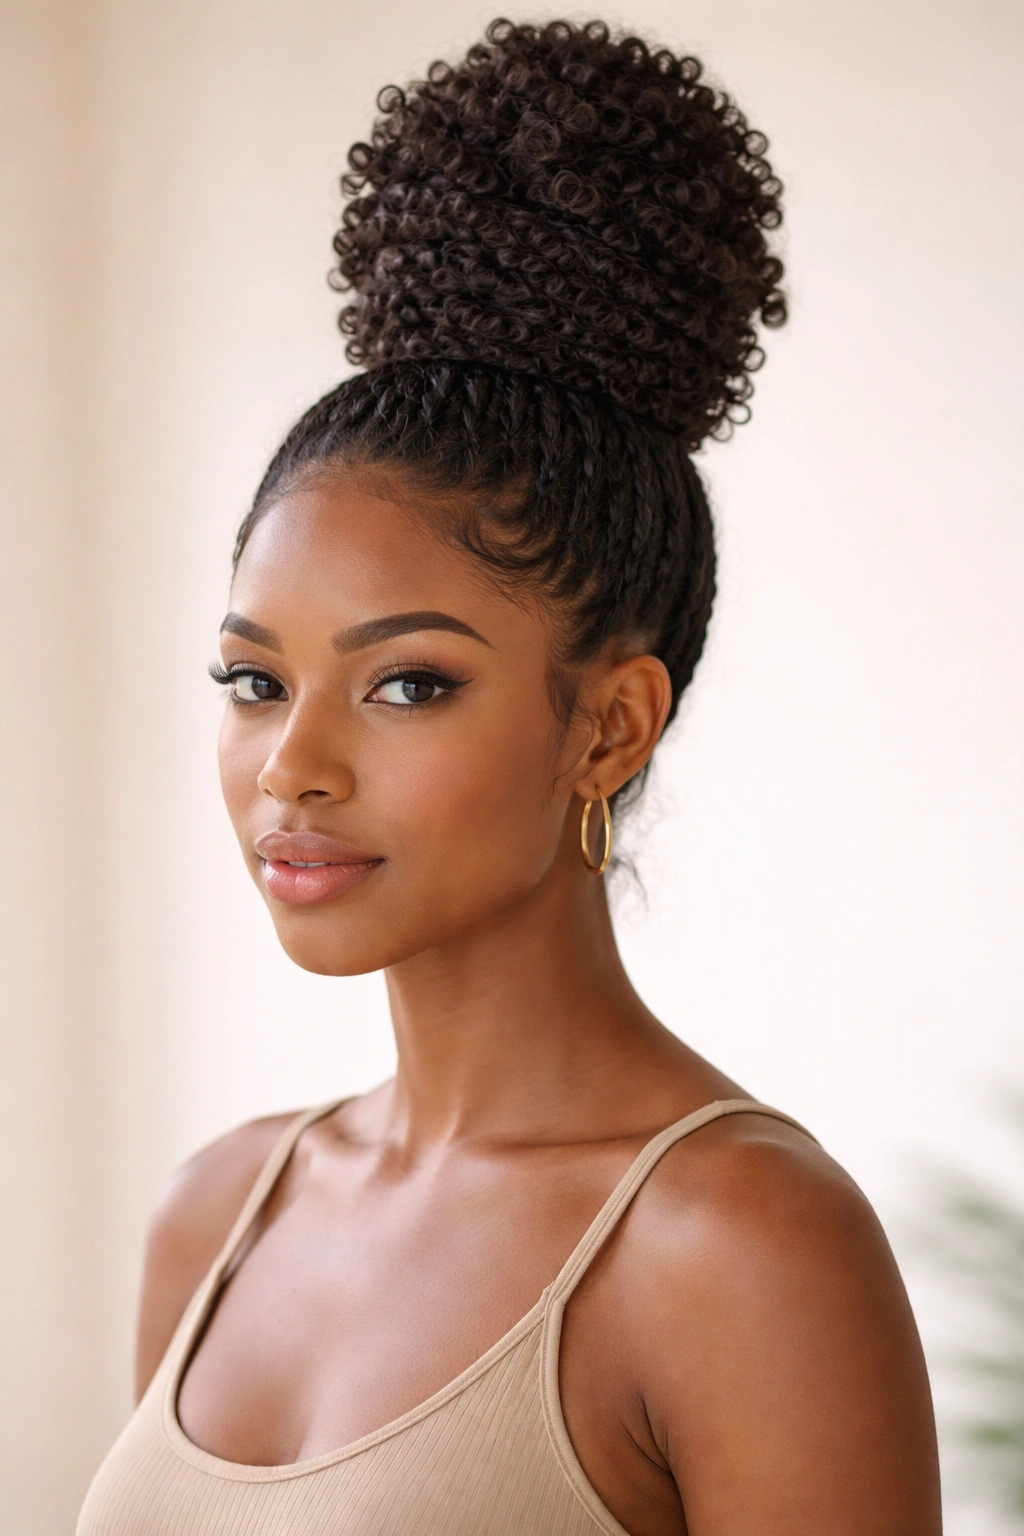
A stacked bun takes all your coily hair and gathers it into a single, tall structure at the crown of your head. The word “stacked” matters here—you’re building height and dimension by stacking coils on top of each other rather than creating a flat, twisted bun. When done right, this style looks full and bouncy while keeping every single strand off your shoulders, neck, and back. It’s the ultimate hot-weather protective look.
The Science of a Stacked Coil Bun
When coils are gathered and secured at the crown, they don’t flatten like straighter hair would. Instead, they naturally stack vertically, creating a sculptural effect that has real visual interest. This is why coily hair buns look so much better than buns in other textures—the curl pattern does much of the work for you.
Building a Stacked Bun That Holds All Day
- Flip your head upside down and gather all your hair into a high ponytail at the crown using a satin scrunchie
- The ponytail base should be tight enough to hold but not so tight it creates tension and breakage
- Separate the ponytail into 2-3 sections vertically
- Twist each section loosely, then wrap it around the base of the ponytail in a circular motion, creating layers that sit on top of each other
- Secure each twist with bobby pins as you wrap, anchoring them deep into the structure
- Flip your head back upright and see how the bun naturally stacks—let gravity and your coil pattern do most of the work
- Tuck any loose ends back into the bun and pin them securely
- Smooth your edges, add a light mist of water to lock everything in place, and you’re done
Insider note: This bun actually gets more defined over the day as humidity and gravity do their thing. What looks good at 8 AM looks even better by 5 PM.
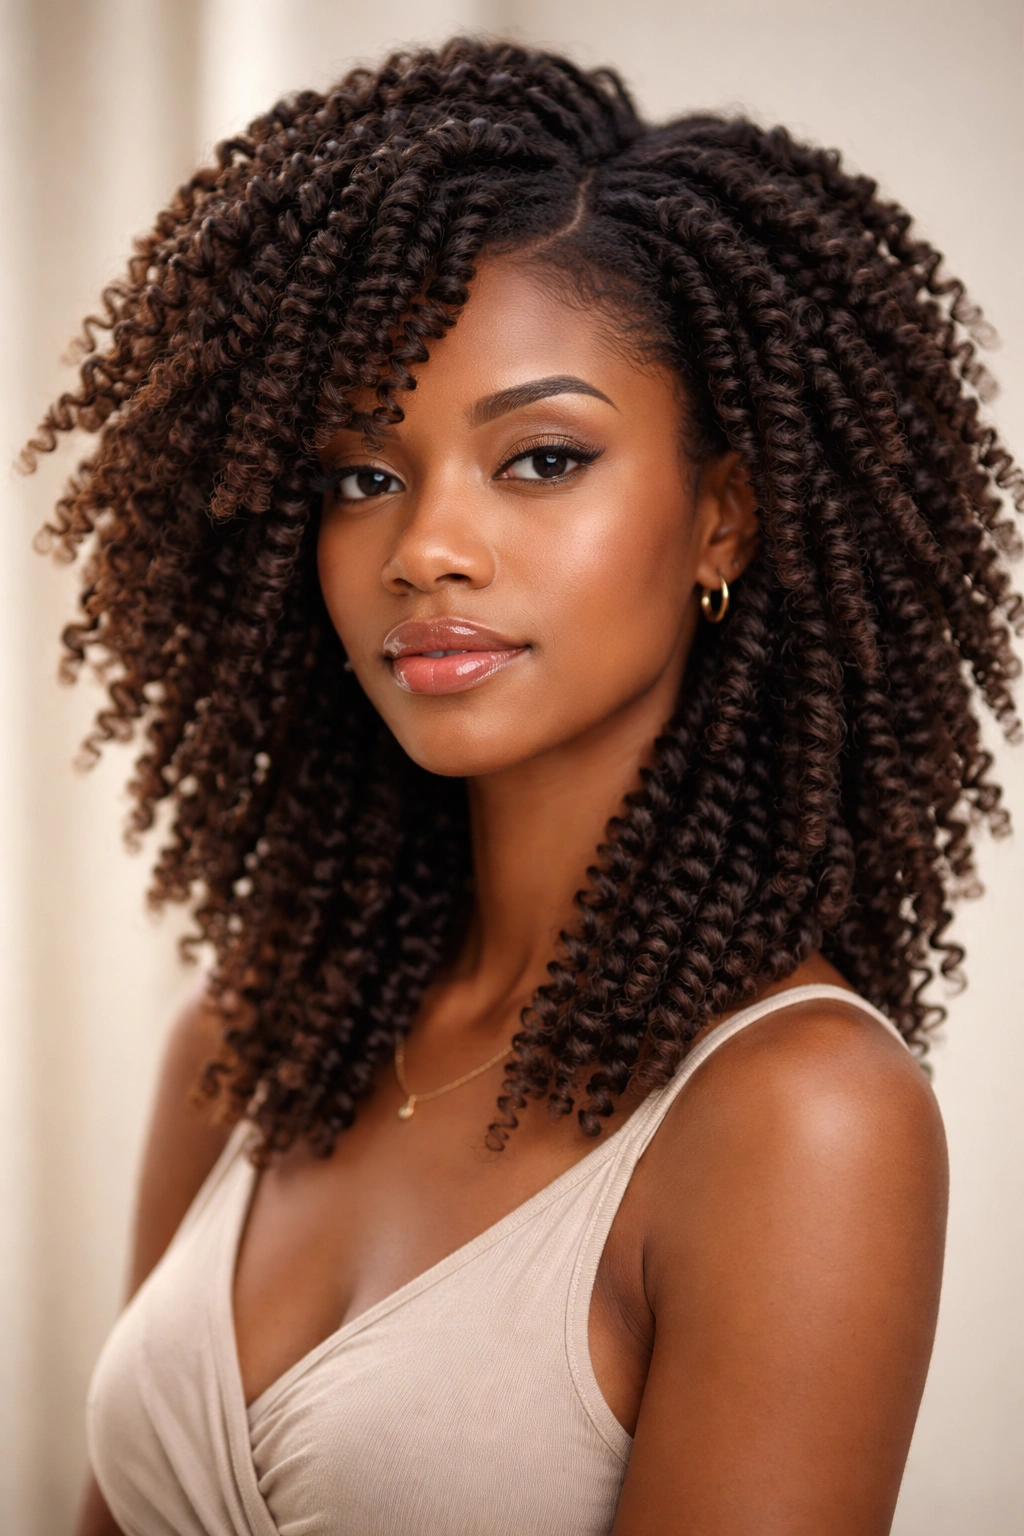
5. Twisted-Out Pigtails
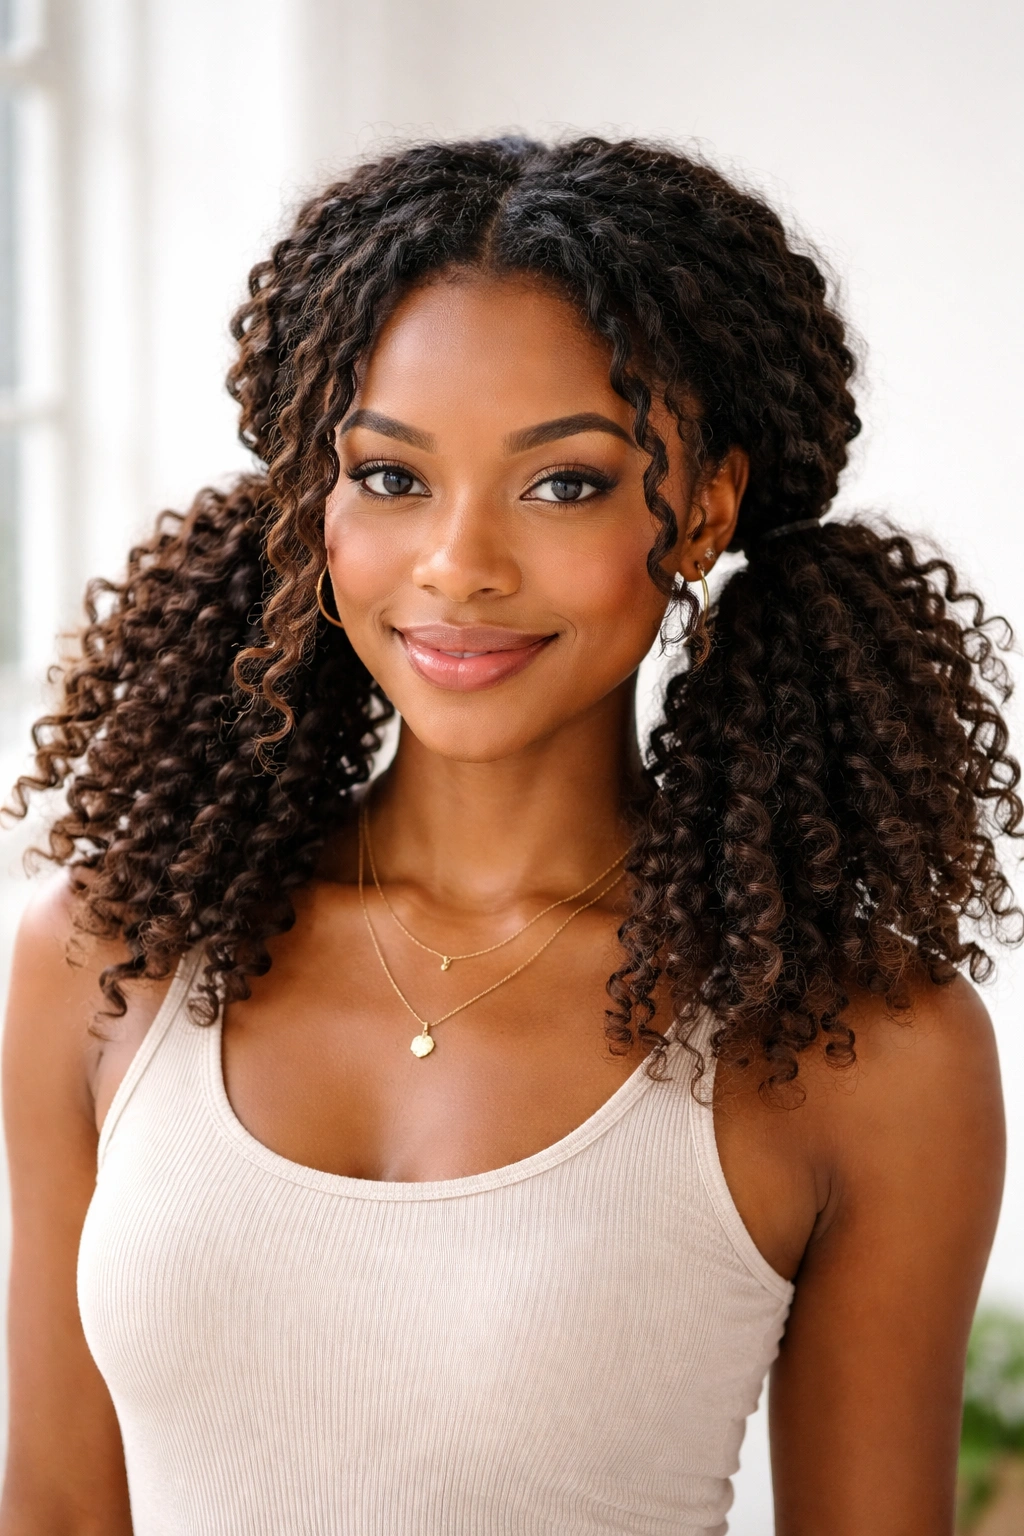
Pigtails might sound childish, but twisted pigtails in coily hair are a completely adult, incredibly stylish choice for hot weather. You’re taking advantage of the fact that twists create texture and definition in coily hair naturally. When you unravel them, you get a piece-y, textured style without having to create each individual curl. Two pigtails keep hair off your shoulders and face while showing off that texture in all its glory.
How Twists Create Definition in Coils
When you twist sections of coily hair tightly and leave them overnight (or for several hours), the twists create a pattern that your coils remember. When you untwist, your coils emerge more defined and separated, with a crinkled texture throughout. This is pure coil magic—the technique works because of how your hair’s natural structure holds shape.
The Twist-Out Pigtail Process
- Section your hair vertically down the middle
- On one side, take a subsection from your temple and begin twisting two strands around each other, gradually adding more hair as you twist
- Continue twisting until you reach the back, then secure with a hair tie positioned low, creating a pigtail
- Repeat on the other side with an identical twist
- Sleep with the twists in (or leave them for 6-8 hours)—the longer you leave them, the more defined your texture becomes
- Untwist gently, starting at the ends and working up toward the roots, letting each coil separate naturally
- Once untwisted, gently separate your coils with your fingers to create dimension and texture
- Fluff each pigtail with your hands to add volume and let the texture shine
What to know: Your twist-outs will be most defined on day one, but they’ll continue looking good for 2-3 more days if you wrap them loosely at night and refresh them with a water-based spray in the morning.
6. Bantu Knots
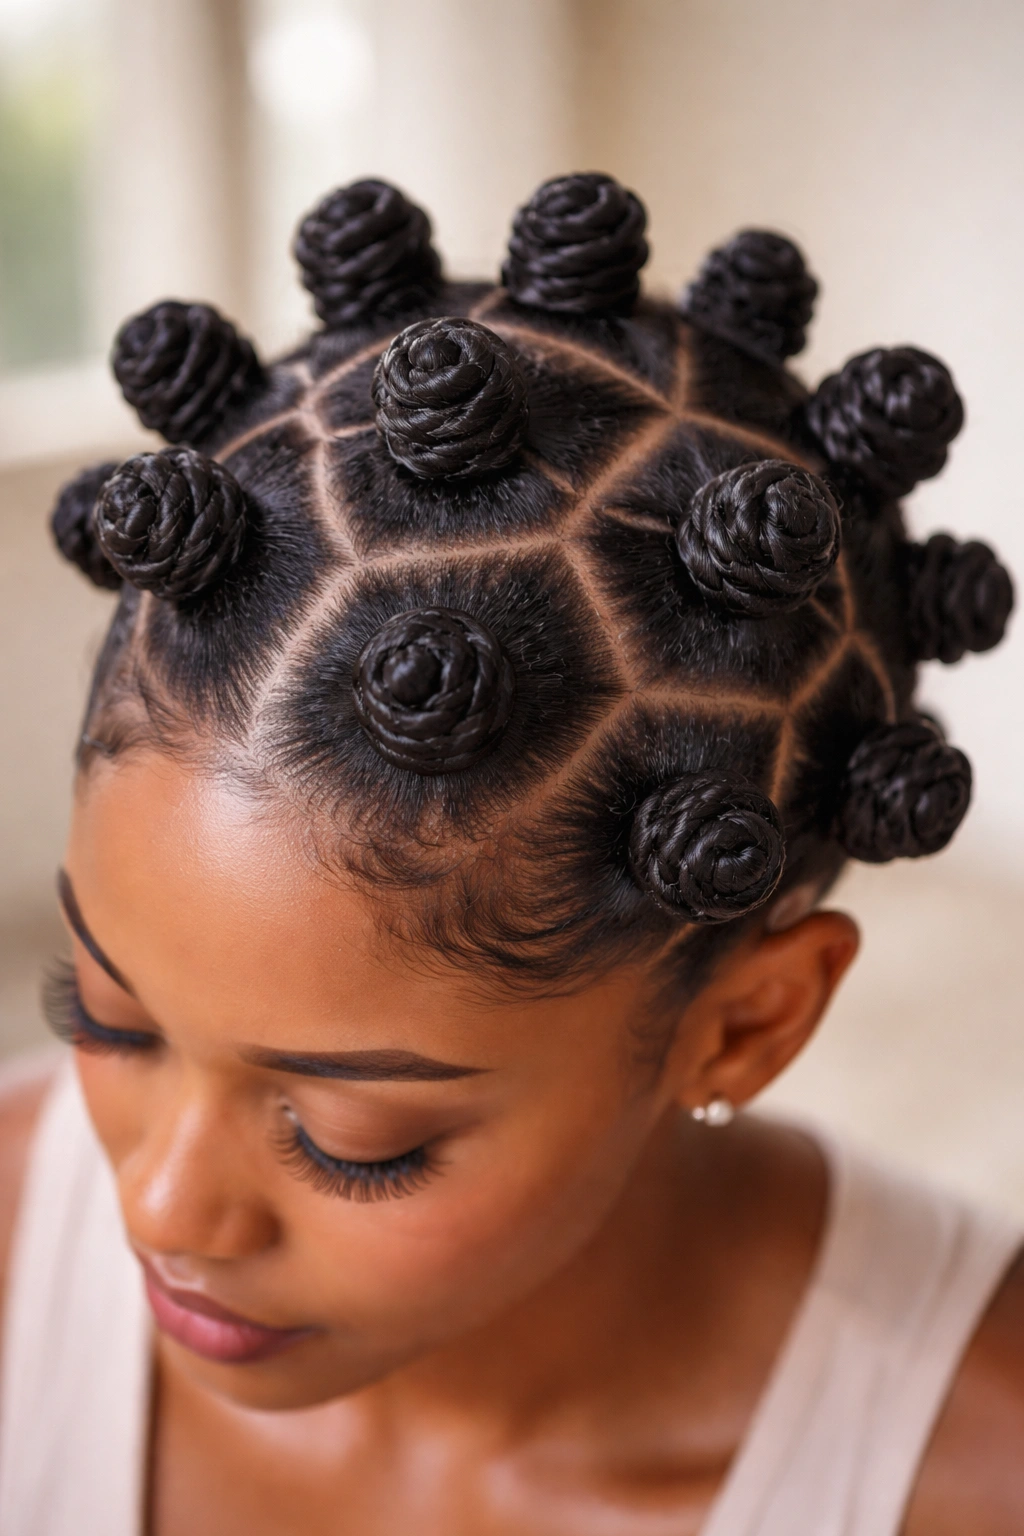
Bantu knots are small, spiral coils created by twisting and wrapping sections of hair into tight, knot-like shapes. This is one of the most protective and heatless styling options for coily hair, and the resulting texture when you unravel them is absolutely stunning. The knots themselves are sculptural and beautiful enough to wear as-is, but when you undo them, you get voluminous, defined curls that’ll last through humidity without frizz because the coil structure has been literally reinforced by the knot.
Why Bantu Knots Thrive in Humidity
Because the knots are so tightly wound, they hold their shape regardless of humidity. Each coil is locked into place by the wrapping, so swelling from moisture doesn’t disrupt the style. This is why Bantu knots are actually ideal for the worst humidity situations—they’re bulletproof.
Creating Bantu Knots That Unravel Beautifully
- Divide your hair into 6-12 sections depending on how many knots you want and the thickness of your coils
- Start with one section and twist it tightly from root to end
- Wrap the twisted section around itself at the end, creating a small spiral knot shape
- Tuck the end of the twist under and pin it in place with bobby pins
- The knot should sit close to your scalp—not hanging loose
- Repeat for every section until your entire head is covered in knots
- You can sleep in the knots or leave them for a full day
- To unravel, gently unwrap and untwist each knot starting at the end, letting coils separate naturally as you go
- The resulting curls will have incredible definition and will last 4-5 days with proper overnight care
Pro tip: On the day you unravel, don’t brush or comb your coils. Instead, separate them with your fingers or a coil-picker to maintain that freshly-defined look. Brushing will disrupt the coil pattern you worked to create.
7. Layered Twist-Out
A layered twist-out takes the basic twist-out concept and adds dimension by creating multiple twisted sections at different depths throughout your head. Some twists are closer to the scalp, some farther away—this variation creates a textured, dimensional effect that looks intentional and sculpted. It keeps hair off your shoulders and displays your coil pattern in its most beautiful, defined state.
The Architecture of a Layered Look
By varying the depth of your twists—some starting at the root, some starting lower down the strand—you create visual layers that give your coily hair real dimension and movement. The surface twists interact with the deeper structure beneath them, creating a more complex, interesting texture than a uniform single-layer twist-out.
Executing a Layered Twist-Out Strategy
- Divide your hair into quadrants (front right, front left, back right, back left)
- In each quadrant, you’ll create 2-3 twists at different “layers”
- Start with a twist that begins at your scalp and extends all the way to the end—this is your deepest layer
- Create a second twist that starts midway down your hair and twists the lower half—this is your middle layer
- Create a final twist in the upper portion that only twists a section of the ends—this is your surface layer
- Secure each twist with a hair tie, stacking them visually so the layers are obvious
- Leave overnight or for 6-8 hours
- Untwist starting with the surface layer, working down to the deepest layer
- Your coils will have a piecey, textured appearance with real dimension
Worth knowing: This style requires a bit more planning than a simple twist-out, but the payoff is a genuinely sculptural look that photographs beautifully and lasts longer because the layers reinforce each other.
8. Curly Ponytail with Definition
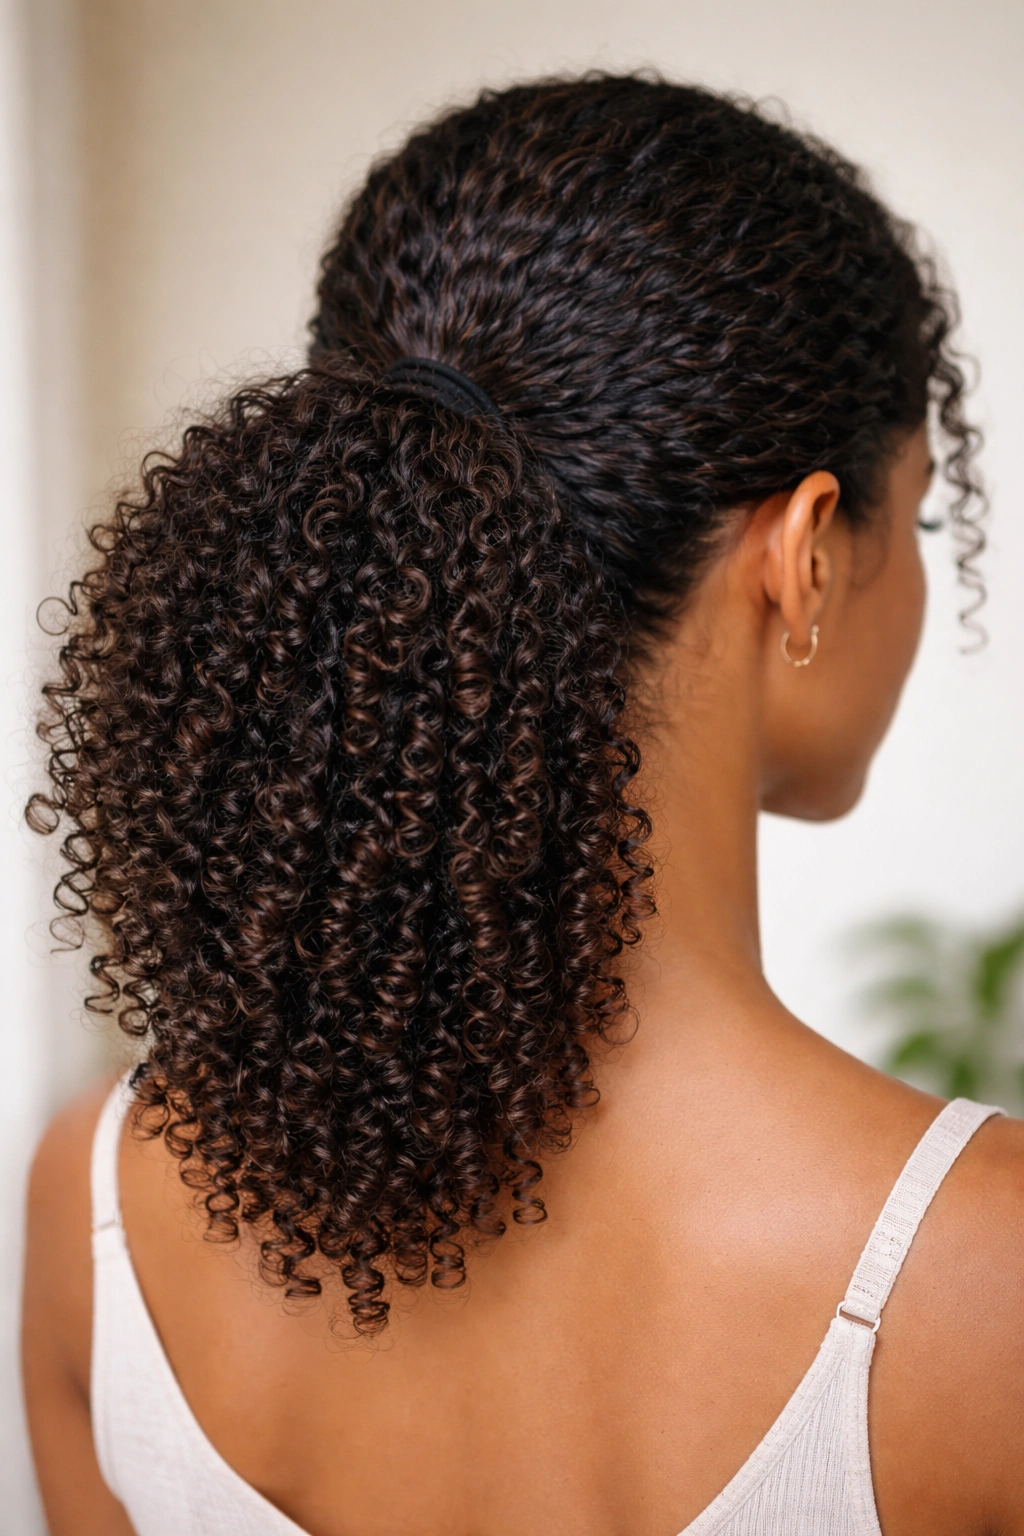
Sometimes you don’t want to do anything fancy—you just want your coils in a ponytail that actually looks intentional and defined rather than scraggly and thin. A curly ponytail with real definition involves strategic placement, proper sectioning, and a method that actually showcases your coil pattern instead of flattening it. This is the easiest style on this list, but it’s also the one most people do wrong, resulting in thin, sad-looking ponytails. Done correctly, it’s chic, practical, and completely appropriate for any setting.
Making a Thin Ponytail into a Full, Defined One
The difference between a weak ponytail and a stunning one is often just about placement and how you secure it. A ponytail placed slightly lower, at the nape of your neck, will look fuller because you’re using your natural hair density better. Securing it with multiple methods—first a hair tie, then bobby pins anchoring coils strategically back into the base—creates structure that lasts all day.
Building a Defined Curly Ponytail
- Brush or comb your coils gently to smooth them but not break up the curl pattern
- Gather your hair into a ponytail positioned at the nape of your neck rather than at the crown—this placement is more flattering and functional for hot weather
- Use a satin scrunchie to secure, pulling tight enough to hold but not so tight you create tension
- Once the basic ponytail is secure, take small sections from around the sides of the ponytail and wrap them around the hair tie base
- Pin these wrapped sections back into the ponytail with bobby pins for a polished, seamless look
- Flip your head and gently flip back up to let gravity reposition your coils in the ponytail
- Use a light mousse or gel on the wrapped sections around the base to keep them smooth if you want a more polished look
- Let your coils in the actual ponytail do their thing—don’t force them to be uniform, let them show their natural pattern
Quick fact: If your ponytail feels thin, try using a hair claw or clip at the base instead of a hair tie. The wider claw can distribute the weight across more hair, making the entire ponytail look fuller because you’re not compressing all the hair into a single point.
Final Thoughts

The best hot-weather coily hairstyle isn’t necessarily the most complicated one. It’s the one that keeps your coils defined, your scalp cool, and your neck exposed to air. Every single style on this list accomplishes those goals in a different way, so the right choice depends on your mood, your schedule, and your coil pattern.
Start experimenting with whichever style appeals to you first. If you’re short on time in the morning, the high puff or ponytail might be your go-to. If you enjoy the ritual of styling your hair and have time before bed, Bantu knots or a twist-out layer offer a more meditative experience that’s also incredibly protective. The beauty of coily hair is that your texture naturally holds these styles without requiring heavy products or constant re-styling throughout the day.
The key to making any of these styles work is understanding that humidity is not your enemy—it actually works in your favor when you choose the right structure. Your coils will expand slightly, but if they’re properly secured in a braid, twist, or knot, that expansion just makes them look fuller and more defined. The more you work with your hair’s nature instead of against it, the easier hot weather becomes. You’ll spend less time fighting frizz and more time enjoying the fact that your coils require almost no maintenance to look genuinely beautiful.