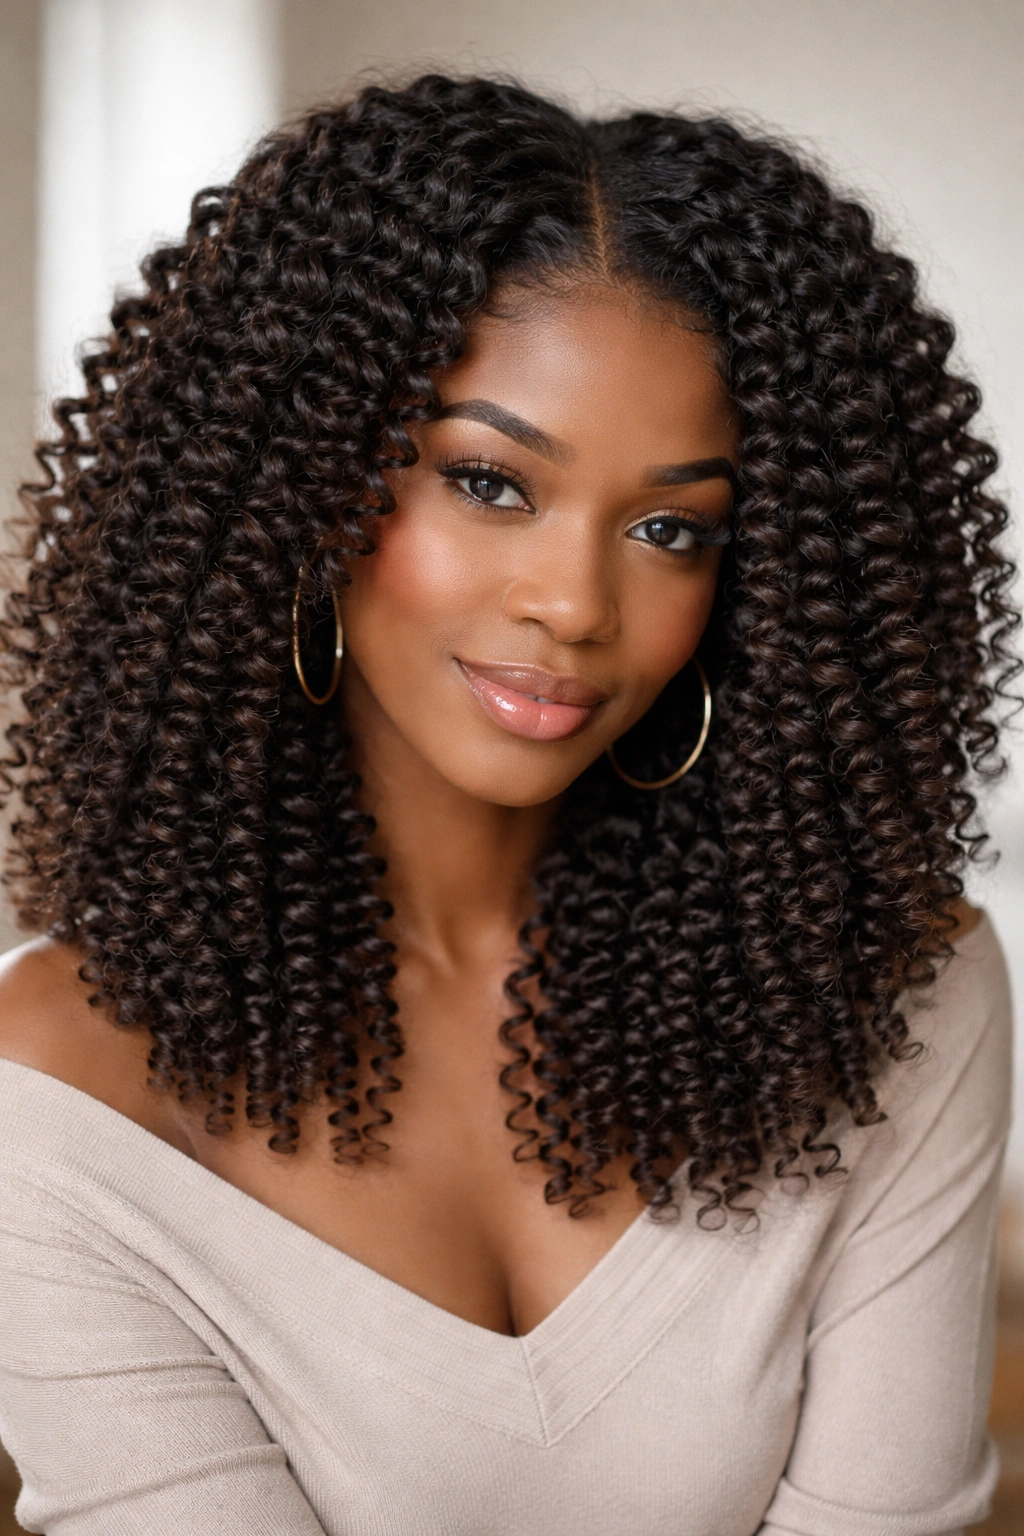
There’s a particular magic that happens when you wear your curls at their most defined—when each coil is crisp, bouncy, and catches the light with its own distinct personality. It’s not just about having curly hair; it’s about styling it in a way that makes every curl pop with shape and dimension. If you’ve been scrolling through curl-focused spaces online, you’ve probably noticed that the most striking coily hairstyles aren’t accidents—they’re the result of intentional styling methods designed specifically to enhance, define, and celebrate the natural texture of your curls.
The truth is, defined curl styles require more than just moisture and product. They demand strategy. Some styles use the twist-and-set method to carve out crisp curl patterns that last for days. Others rely on tension and heat to reshape your curl structure temporarily. A few work with your natural curl pattern while you sleep, transforming your hair without any active styling during the day. The key difference between a limp, undefined curl day and a day where your curls look absolutely stunning often comes down to knowing which styling technique actually works with your specific curl type and lifestyle.
What makes a curl style truly defined is how the technique creates clear separation between individual curls, emphasizes the curl’s shape and bounce, and maintains that definition over multiple days of wear. Some styles lock in definition immediately; others develop definition as they dry or as you wear them. Some are perfect for fine, delicate curls, while others work best on thick, coarse textures. The eight styles below cover the full spectrum—whether you’ve got loose waves, medium coils, or tight spirals, you’ll find methods that work with your hair, not against it.
1. Twist Outs
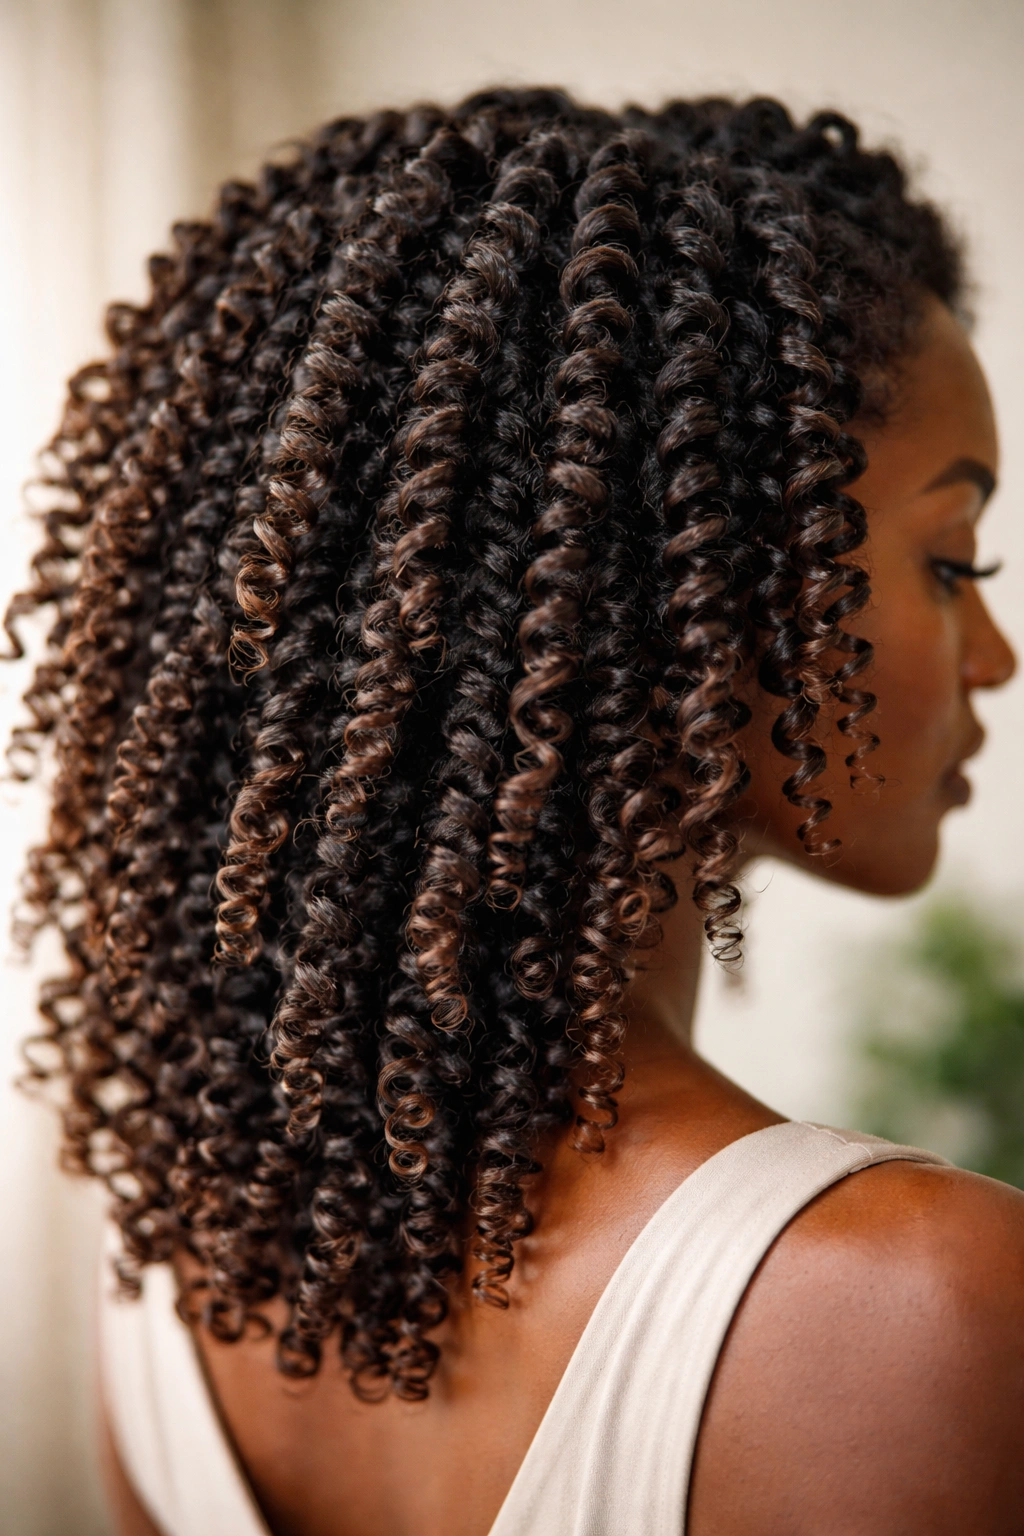
A twist out is one of the most reliable ways to create dramatic definition in coily hair, and it works by using the actual structure of twisted sections to define your curl pattern as they unravel. You’ll divide your hair into sections—anywhere from four to twenty depending on how thick or fine your hair is—twist each section from root to tip using either two strands (a two-strand twist) or three strands (a three-strand twist), and then leave those twists in place while your hair dries completely. Once the twists are fully dry, you unravel them gently to reveal defined, elongated curls that have a beautifully twisted texture running through them.
Why Twist Outs Create Such Striking Definition
The magic of a twist out lies in the tension you create while twisting. When you twist sections of wet or damp hair, you’re essentially reshaping your curl pattern and holding it in place while it dries. The tighter you twist and the longer you leave those twists in, the crisper and more defined your curl pattern becomes. This isn’t just about moisture—it’s about physically training your curls into a specific shape. The twist also creates a unique texture that’s somewhere between a curl and a wave, with subtle ridges running through each strand that catch light beautifully.
How to Get the Best Twist Out Results
- Apply styling products to damp hair first: Use a leave-in conditioner, curl cream, and gel on soaking wet or very damp hair before you begin twisting—this gives you the slip you need to create even tension
- Twist at consistent tension: Twist tightly enough to create definition but not so tightly that you’re causing breakage; your hands should feel like they’re working steadily, not straining
- Leave twists in for at least 24-48 hours: The longer your twists sit, the more the curl pattern sets; many people leave them in for 2-3 days to maximize definition
- Unravel gently from the bottom up: Start at the tip of each twist and carefully unravel while the curl is still slightly damp for the crispest results; unraveling completely dry hair gives softer definition
- Use smaller twists for more curl definition: More twists mean more curl separation; fewer, larger twists create wave-like definition instead
Pro tip: Sleep in a bonnet or pineapple (gathering your twists loosely on top of your head) to protect them and prevent frizz that would blur the definition you’ve created.
2. Bantu Knots
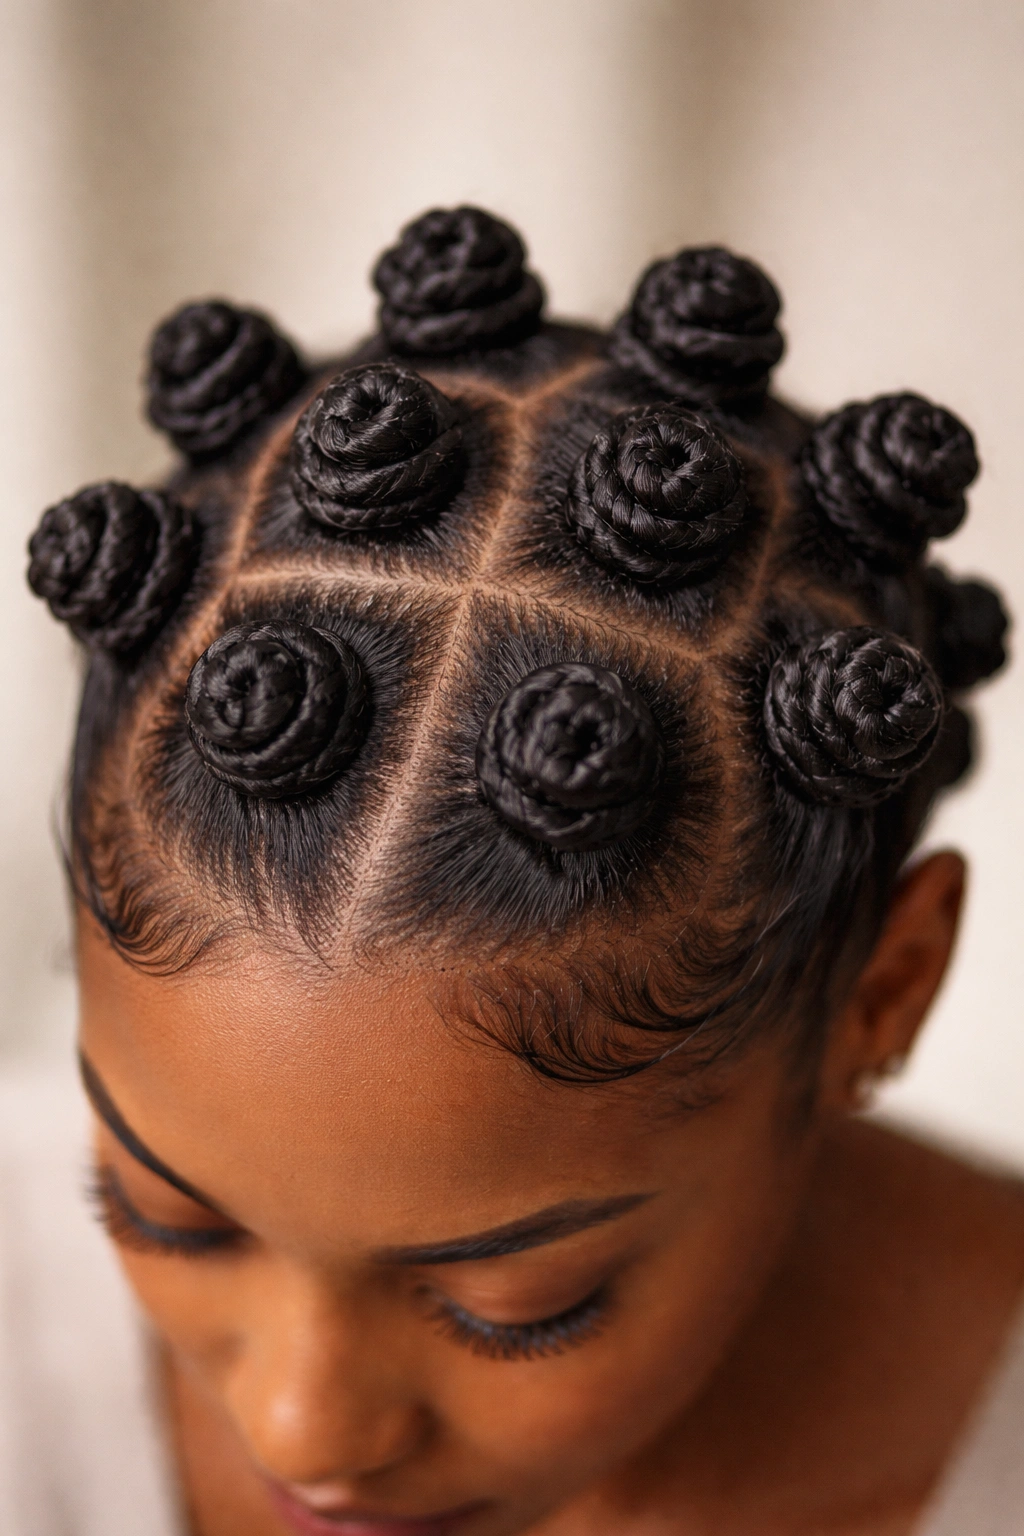
Bantu knots are a protective styling technique that doubles as a curl-defining powerhouse, created by sectioning your hair, twisting each section, and then wrapping it around itself to form a knot at the base. The knot sits flat against your scalp while the twisted section coils around it, and when you remove the knots, you’re left with defined spirals or corkscrew curls that can last for a week or more. These knots are rooted in African styling traditions and have become increasingly popular because they deliver genuine definition while protecting your hair from manipulation and friction.
What Makes Bantu Knots Different From Other Twist Styles
A Bantu knot creates tighter, more sculptural definition than a regular twist out because the knot itself adds an extra layer of tension and structure. The coil that forms around the knot creates a distinctive spiral pattern that’s more pronounced than you’d get from simply twisting your hair. Additionally, because the knot is compact and sits close to the scalp, the style protects your hair ends while you sleep and wear the style, making it genuinely protective rather than just decorative.
Steps to Styling Bantu Knots
- Divide hair into even sections: More sections create more defined knots; fewer sections create larger, looser curls when you unravel them
- Twist each section while damp: Apply your styling products and twist each section from root to tip with consistent, medium-firm tension
- Coil the twist around itself: Once twisted, wrap the twist around its own base to form a knot, then secure it with a bobby pin or by tucking the end under
- Leave knots in for 3-5 days: Longer wear time means better curl definition; many people wear them as their main style rather than just as a set
- Unravel and separate gently: When you remove the knots, separate the curls gently with your fingers or a wide-tooth comb to avoid disrupting the spiral pattern
Insider note: Sleeping in Bantu knots is completely comfortable, unlike some other protective styles that require you to change your sleep position.
3. Braid Outs
A braid out uses the same principle as a twist out but employs braids instead of twists to define your curl pattern. You’ll braid damp hair into tight sections—cornrows, three-strand braids, or Dutch braids all work—leave them in while your hair dries completely (usually 24-48 hours), and then unbraid to reveal dramatically crimped, textured curls with a beautifully uniform wave pattern. The braid out tends to create a slightly looser definition than a twist out and produces a more uniform wave throughout your hair, making it excellent if you want your curls to look cohesive and bouncy.
Why Braids Create Different Definition Than Twists
Braids work differently than twists because the three strands create multiple ridges and intersections in your hair as it dries, resulting in a textured crimp pattern rather than the smoother, more twisted look of a twist out. The braid’s structure actually flattens and shapes your curls into a more compressed wave, so when you unbraid, you get maximum volume and lift at the roots with waves that spring out dramatically from there. Many people find that braid outs give them more elongation and stretch in their curls compared to twist outs.
Getting the Most Definition From a Braid Out
- Use cornrows for maximum definition: Cornrows create tighter, more compressed waves than loose three-strand braids; they also hold their shape better overnight
- Braid with medium tension: Braid tightly enough to hold their shape but not so tightly that you’re pulling on your roots or causing stress on your edges
- Section based on desired curl size: More, smaller braids create smaller, more defined curls; fewer, larger braids create bigger waves with fewer curl sections
- Keep braids in for the full drying time: Wet or damp braids won’t set properly; wait until your hair is completely dry before unbraiding for the crispest definition
- Unbraid from the bottom up: This prevents the compressed pattern from relaxing too early and losing its defined wave structure
Worth knowing: Braid outs often look even better on day two or three once the curl has fully relaxed and settled into its natural shape.
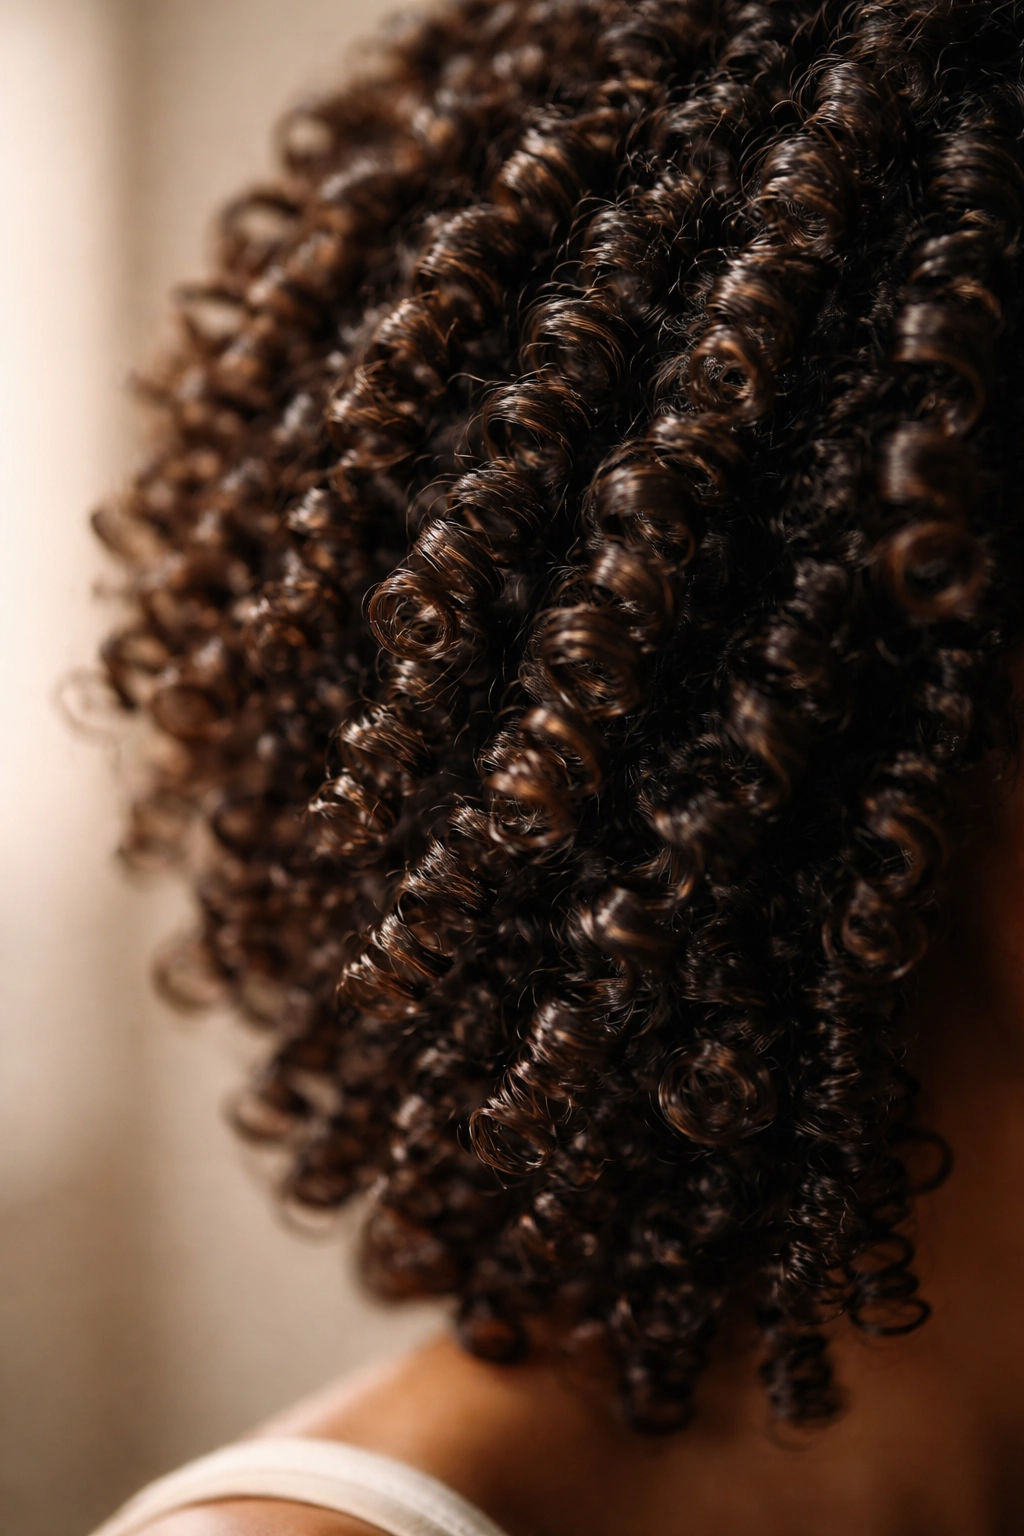
4. Flexi-Rods

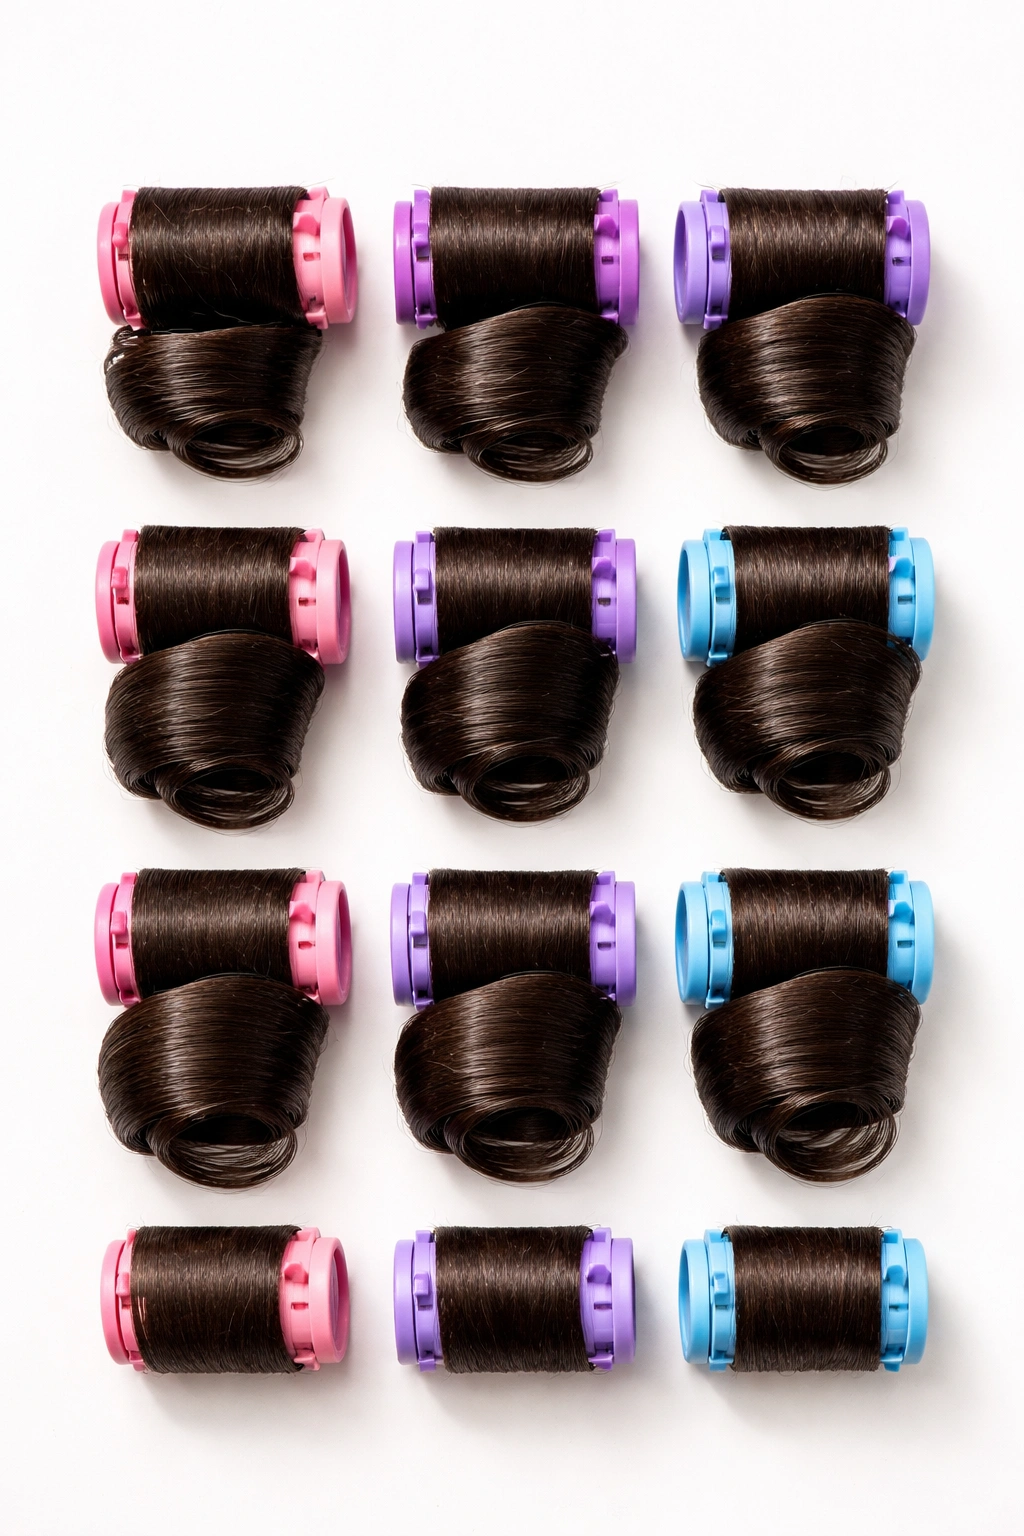
Flexi-rods are foam rollers that wrap your curls around them to create defined spirals and ringlets while your hair dries or sets overnight. These colorful, flexible rods come in various diameters—smaller rods create tighter, bouncier curls while larger rods create looser waves—and you roll damp hair onto them, secure them loosely at the base, and leave them in place while your hair dries either naturally or under a hooded dryer. The result is uniform, springy curls with tons of definition and bounce.
The Unique Advantage of Flexi-Rod Definition
Flexi-rods create a very specific type of definition: vertical, uniform spirals that sit independently from each other. Because your hair is curled around a cylindrical form, every curl has the same shape and size (based on which rod you use), creating a more voluminous, bouncy, and styled look compared to the natural texture you’d get from twist outs or braid outs. The rods also put zero tension on your hair, making this a gentler option for hair that’s prone to breakage or for fine, delicate curls that can’t handle tight twists.
How to Use Flexi-Rods Effectively
- Roll onto damp, not soaking wet hair: Hair that’s too wet takes forever to dry and can develop mildew smell; damp hair (that’s been squeezed of excess water) sets faster
- Apply setting products generously: Use a curl-setting cream or gel to encourage the curl to hold its shape while it dries; don’t rely on the rod alone
- Roll hair toward the scalp: Roll the rod up toward your roots, creating tension as you go, then secure it loosely; loose rods release easier without disturbing the curl
- Leave rods in for 8-12 hours minimum: Overnight is ideal; at minimum, leave them in while your hair dries completely under a hood dryer
- Remove rods carefully from the bottom up: Gently unroll the rod rather than pulling it straight out; this keeps the curl shape intact
Pro tip: Use flexi-rods in varying sizes on the same head for dimensional, varied curl sizes that look more natural and less uniform than using the same size everywhere.
5. Roller Sets
A roller set is a classic salon technique where you roll damp hair onto heated or foam rollers, allow your hair to cool and dry completely (either overnight or under a hooded dryer), and then remove the rollers to reveal voluminous, defined curls with serious bounce and lift. Roller sets have been a staple of curly hair care for decades because they deliver consistently beautiful results regardless of your natural curl pattern, and they create a polished, vintage-inspired look that works for everything from casual to formal occasions.
What Makes Roller Sets Stand Out for Definition
Roller sets deliver a very specific aesthetic: full, round curls that bounce and move independently. Because the rollers are cylindrical, your curls take on a rounded shape with a defined curl at the end, creating an almost sculptural effect. The heat from the dryer (whether from sitting under a hood dryer or from heated rollers) helps set the curl more permanently, which is why roller set curls often last longer than twist outs or braid outs. The tension of rolling the hair also creates lift and volume at the roots.
Achieving the Best Results From a Roller Set
- Use the right size roller for your desired curl: Smaller rollers create tighter ringlets; medium rollers create bouncy, defined curls; larger rollers create loose waves
- Roll hair away from the face: Roll each section upward and away from the face for a flattering curl direction and maximum face-framing lift
- Use heated rollers for faster setting: Heated rollers cut down drying time significantly compared to sitting under a hooded dryer for 2-3 hours
- Allow hair to cool completely before removing: Remove rollers while your hair is still slightly warm (but not hot) for the crispest curl; removing them while hair is warm can cause them to relax
- Gently unfurl rollers downward: Unroll rather than pull downward to keep the curl shape intact and defined
Real talk: Roller sets are time-intensive (2-3 hours under a dryer is a commitment), but the longevity of the curls often makes it worth it if you’re planning to wear the style for multiple days.
6. Finger Coils
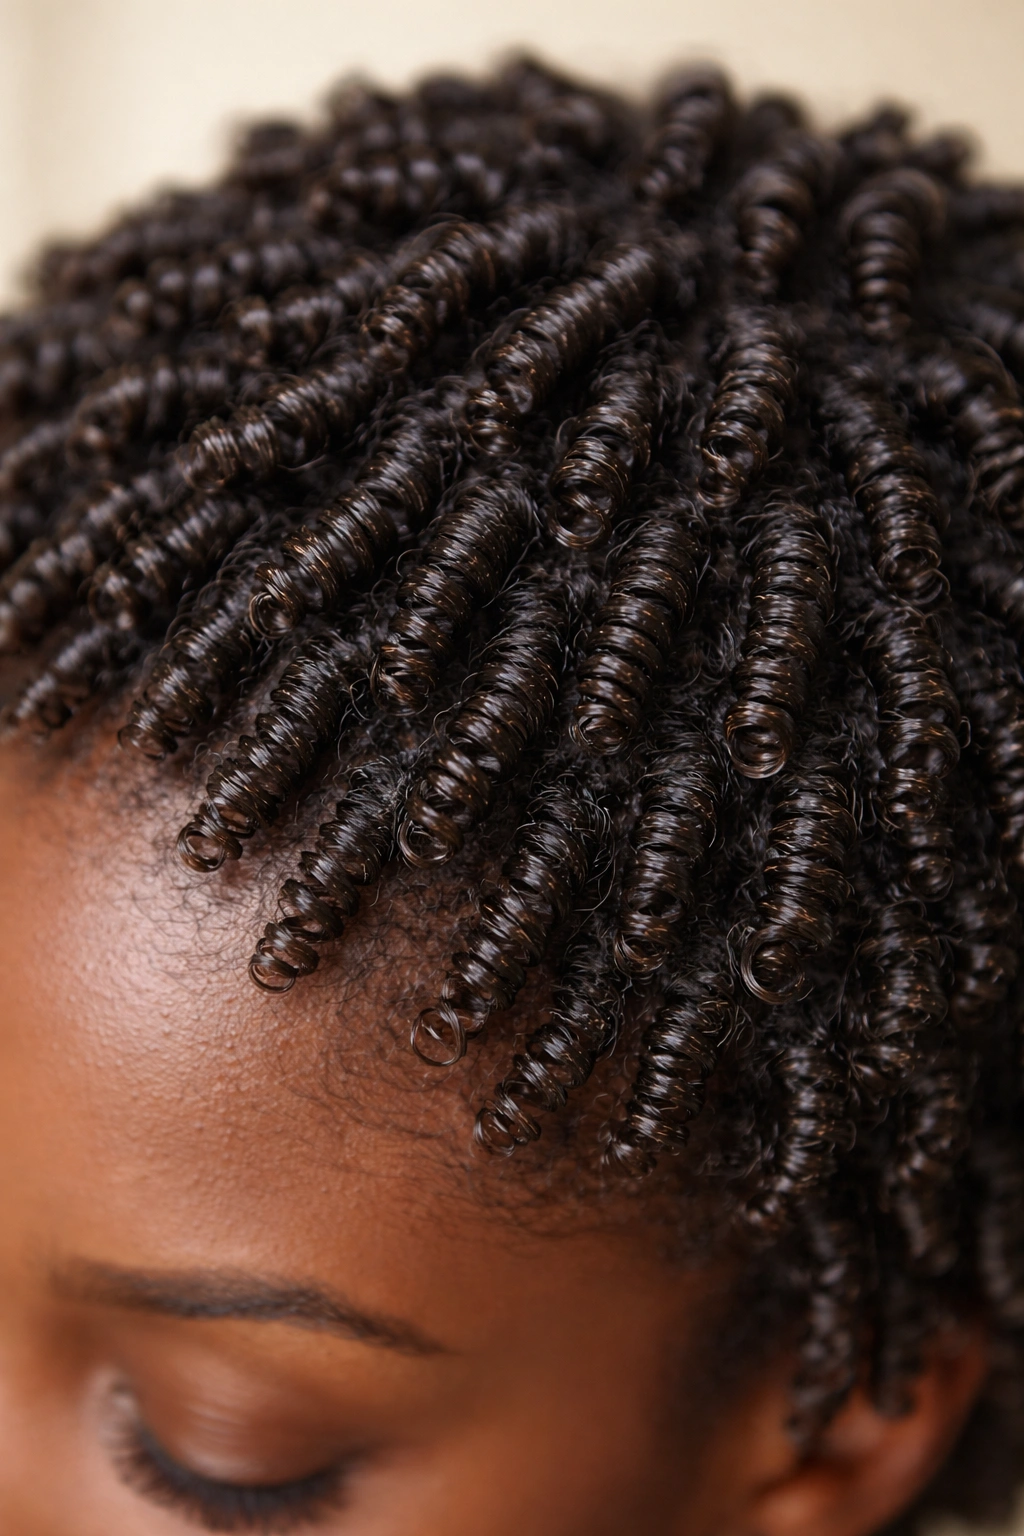
Finger coils are hand-coiled spirals created by wrapping small sections of damp hair around your own finger, creating a defined coil that remains in place as your hair dries. You apply styling product to small sections of damp hair, wrap the section around your index or middle finger to form a tight coil, then carefully slide your finger out while keeping the coil intact, and allow it to dry. The result is individual, sculptural coils that sit perfectly against your scalp with defined spirals running through each coil.
Why Finger Coils Offer Superior Definition
Finger coils create the tightest, most defined coil pattern you can achieve because you’re controlling the exact size and shape of each coil manually. Every coil sits separately from its neighbors, creating a dimensional, textured style with clear visual separation between individual strands. There’s also something uniquely beautiful about finger coils—they show off your curl pattern in its most intentional form, and they photograph beautifully because of how defined and polished they look.
The Process of Creating Finger Coils
- Section hair into small, manageable pieces: Smaller sections create tighter, more defined coils; larger sections create looser, thicker coils
- Apply gel or curl cream generously: Use enough product that your hair has slip and doesn’t stick to itself; you should be able to manipulate the section easily
- Wrap the section tightly around your finger: Start at the roots and spiral the hair around your finger, making sure the coil is even and compact; the tighter you wrap, the tighter the final coil
- Slide your finger out slowly: Remove your finger carefully while keeping tension on the coil so it doesn’t unravel; if it starts to loosen, slide your finger back out of a different angle
- Allow coils to dry completely: Use a hooded dryer for faster drying, or let them air dry overnight; don’t disturb them while they’re drying
Insider note: Finger coils are incredibly time-intensive to create (expect 1-2 hours for a full head), but the definition and longevity often make them worth the investment for special occasions or when you want your curls to look absolutely pristine.
7. Perm Rods
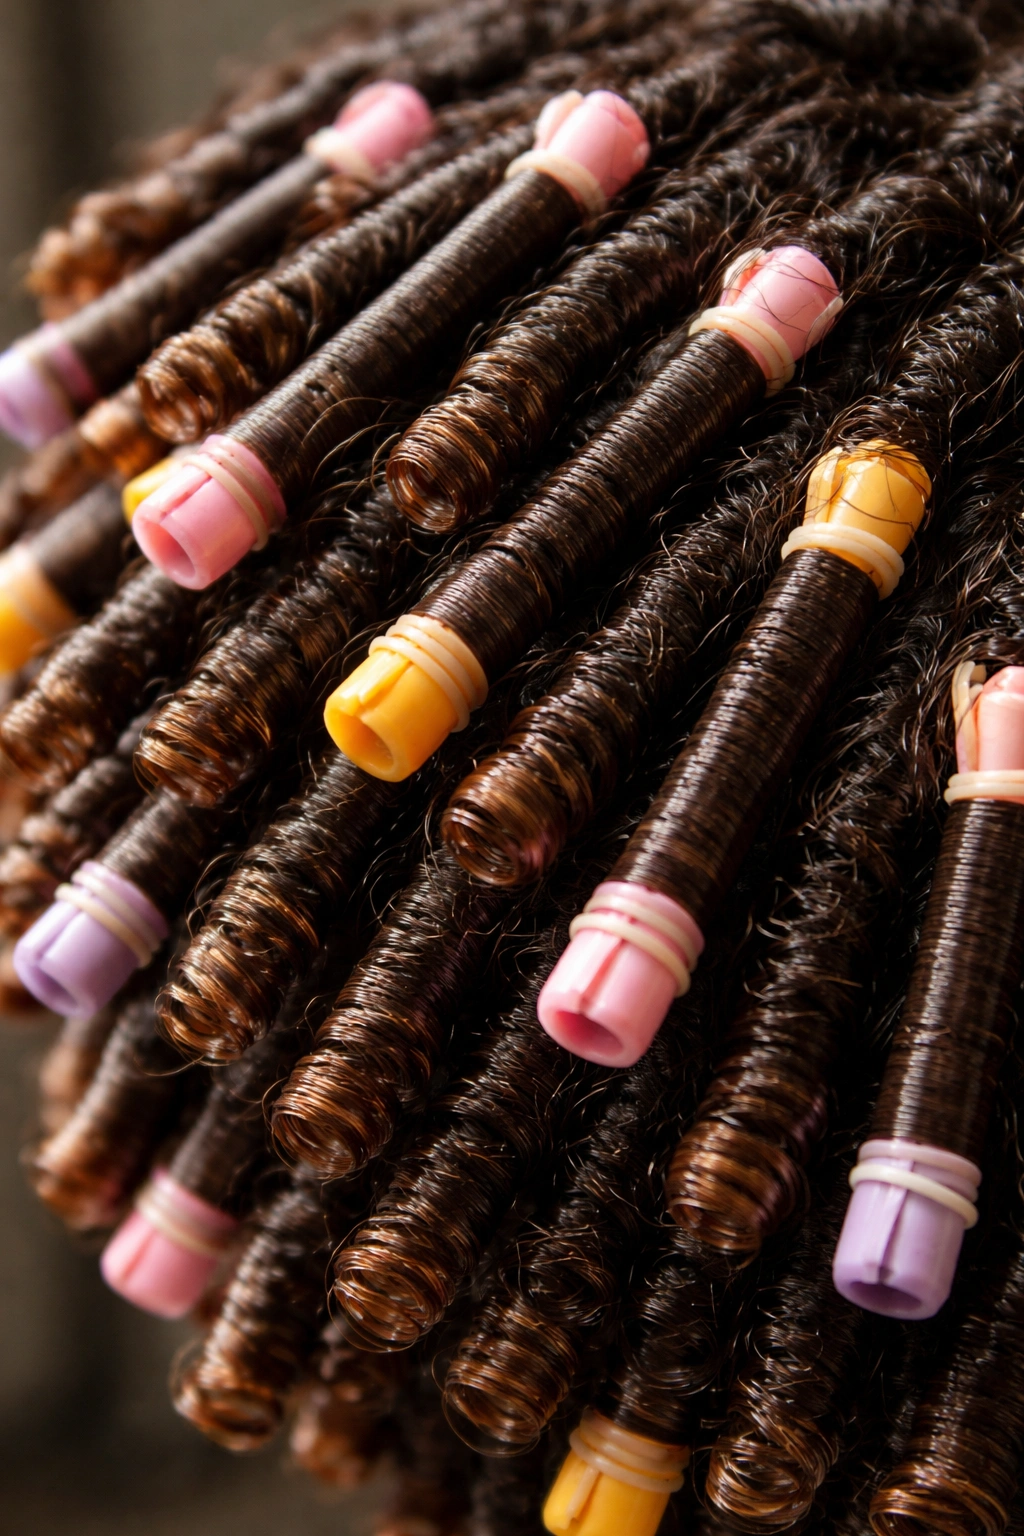
Perm rods are small, thin rods (much smaller than flexi-rods) that you wrap damp hair around to create tiny, tight ringlets or small defined curls. These rods typically stay in place while your hair air dries or dries under a hooded dryer, and once removed, they leave behind uniform, structured curls with maximum definition and bounce. Perm rods create one of the most defined curl patterns available because of their small size and the tension created by wrapping hair tightly around them.
The Specific Benefits of Perm Rod Definition
Perm rods create individually defined ringlets rather than a unified curl pattern. Because the rods are so small, each curl sits as its own distinct entity, creating a voluminous, textured appearance with serious bounce and movement. The tight wrapping also creates crisp, sculpted curls that hold their shape and don’t relax as quickly as larger roller sets. If you want your curls to look intentional, structured, and incredibly defined, perm rods deliver that aesthetic more effectively than most other methods.
Using Perm Rods for Maximum Definition
- Use small sections of damp hair: Smaller sections create tighter curls; use sections roughly the size of your pinky finger for very defined ringlets
- Wrap hair tightly but not painfully: Create tension as you wrap but don’t pull so hard that you’re uncomfortable or risking breakage
- Secure rods at the end with small clips: Some perm rods are self-locking; others require small plastic clips; make sure they’re secure so rods don’t slip while drying
- Use a hooded dryer for faster results: Perm rods take longer to air dry (6-8 hours); a hooded dryer cuts this to 2-3 hours
- Remove rods while hair is still slightly warm: This keeps the curl tight and bouncy; once hair cools completely, the curl relaxes slightly
Pro tip: Perm rods work especially well if you have naturally tight curls that need extra definition, or if you want to create a very polished, glamorous look rather than a more textured, natural appearance.
8. Two-Strand Twists
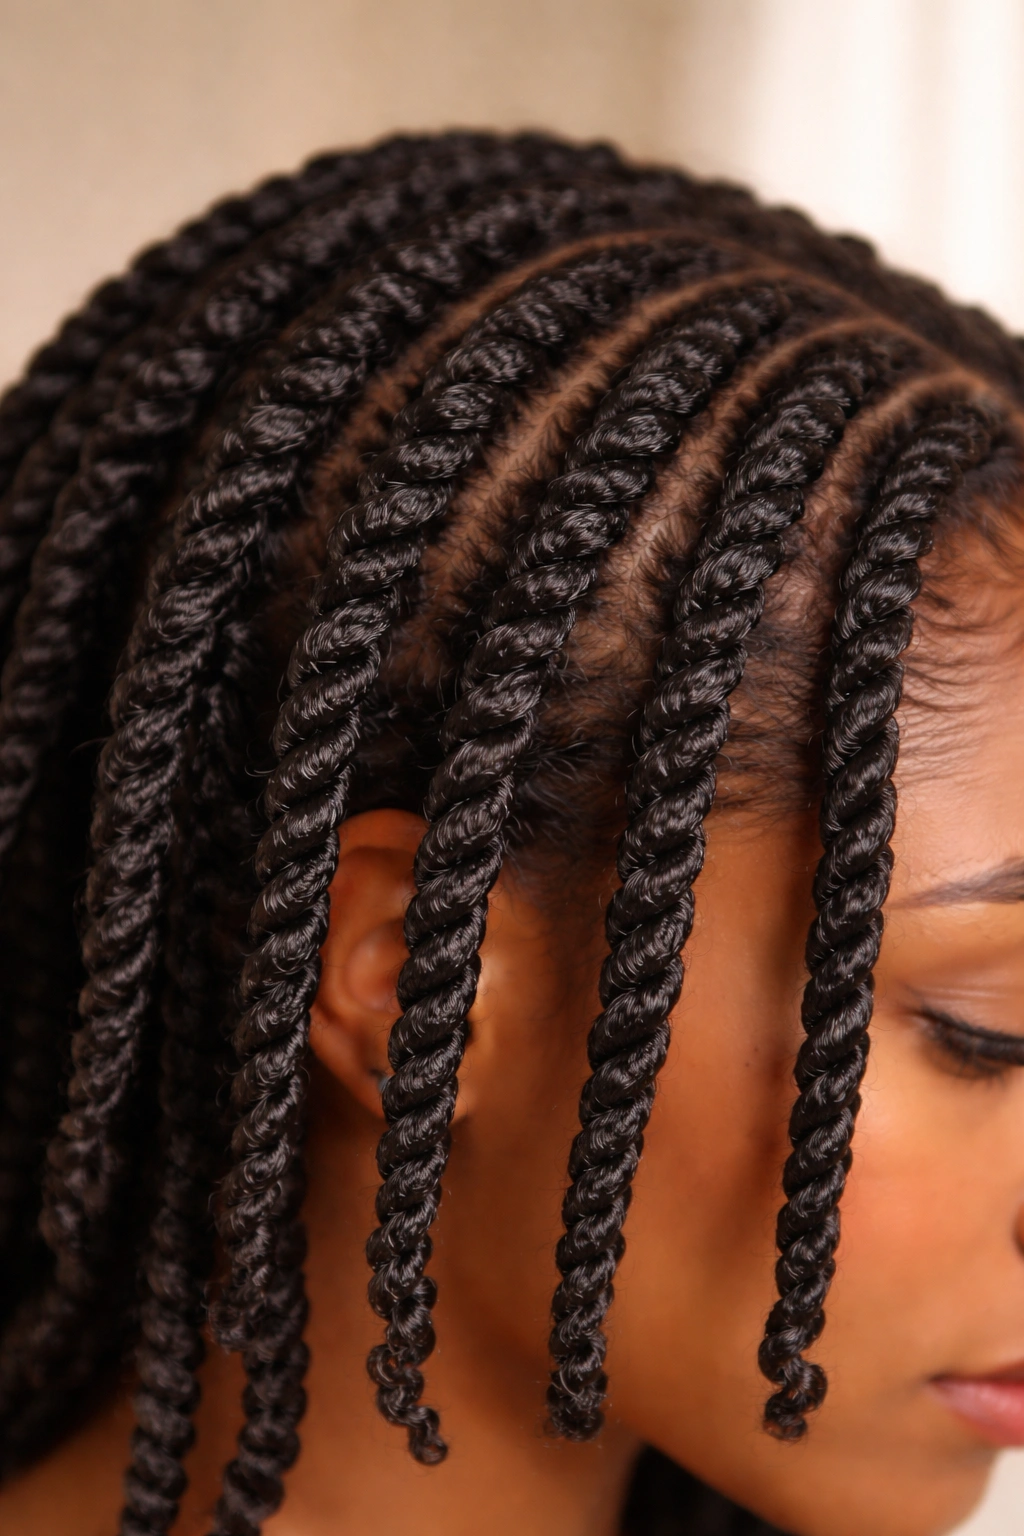
Two-strand twists are one of the most iconic protective styles for curly hair, created by dividing your hair into sections and twisting two strands together from root to tip, creating a rope-like twisted texture that provides definition while protecting your hair from manipulation and environmental stress. Unlike twist outs (where you unravel the twists), two-strand twists are often worn as a finished style for 2-4 weeks, with the twists gradually creating more definition as they sit and compress against your scalp.
Why Two-Strand Twists Define Your Curls Over Time
Two-strand twists create definition through the actual twisted pattern rather than through curl reshaping like twist outs do. The twist itself becomes the style, and as you wear them, the twists compress and set into your hair, creating more pronounced definition with each passing day. By day three or four, your two-strand twists have softened slightly and integrated more with your natural curl pattern, creating a beautiful hybrid of defined twist and natural curl. They’re also incredibly versatile—you can wear them as a style themselves, or unravel them after a few weeks to create a twist-out effect.
Creating Defined Two-Strand Twists
- Section hair strategically: The number of twists determines your style—fewer twists create a more flowing, open look while more twists create a denser, more intricate pattern
- Twist with consistent tension: Maintain even tension throughout each twist so all twists look uniform; inconsistent tension creates some tight twists and some loose ones
- Use styling products for definition: Apply curl cream and gel to damp hair before twisting so the twists hold their shape and don’t unravel
- Ensure twists are tight at the roots: Loose twists at the roots will unravel; the roots should be twisted firmly for at least the first inch or two
- Maintain twists with a nighttime routine: Use a bonnet or pineapple to keep them compressed while you sleep, and lightly mist with water and refresher product every few days
Worth knowing: Two-strand twists work wonderfully as a transition style if you’re taking a break from frequent washing and styling; they protect your hair while still looking intentional and well-styled.
Final Thoughts
The defined curl style you choose depends on what you’re trying to achieve with your hair and how much time you want to invest in the styling process. If you want instant definition with minimal effort, flexi-rods or a roller set gives you beautiful results in one sitting. If you prefer methods that work with your natural curl pattern, twist outs and braid outs deliver stunning definition that feels organic and textured. For maximum versatility and longevity, two-strand twists or Bantu knots keep your hair protected while looking absolutely polished.
The other critical factor is understanding your hair’s specific needs. Fine, delicate curls might struggle with the tension of tight twists but thrive with flexi-rods or roller sets. Thick, coarse hair handles finger coils beautifully but might find flexi-rods too loose to hold shape. Dense, tightly coiled hair gets the most dramatic definition from perm rods or braid outs, while looser curl patterns might prefer the gentler shaping of roller sets.
The beautiful truth is that you don’t have to choose just one method. Many people rotate through several styles depending on their schedule, their hair’s current condition, and what look they’re going for that week. One week you might wear two-strand twists as a protective style, the next you might do a twist out for a night out, and the week after that you might try finger coils for something special. Each method will teach you something new about how your hair likes to be shaped and defined, getting you closer to understanding your curls on a deeper level.