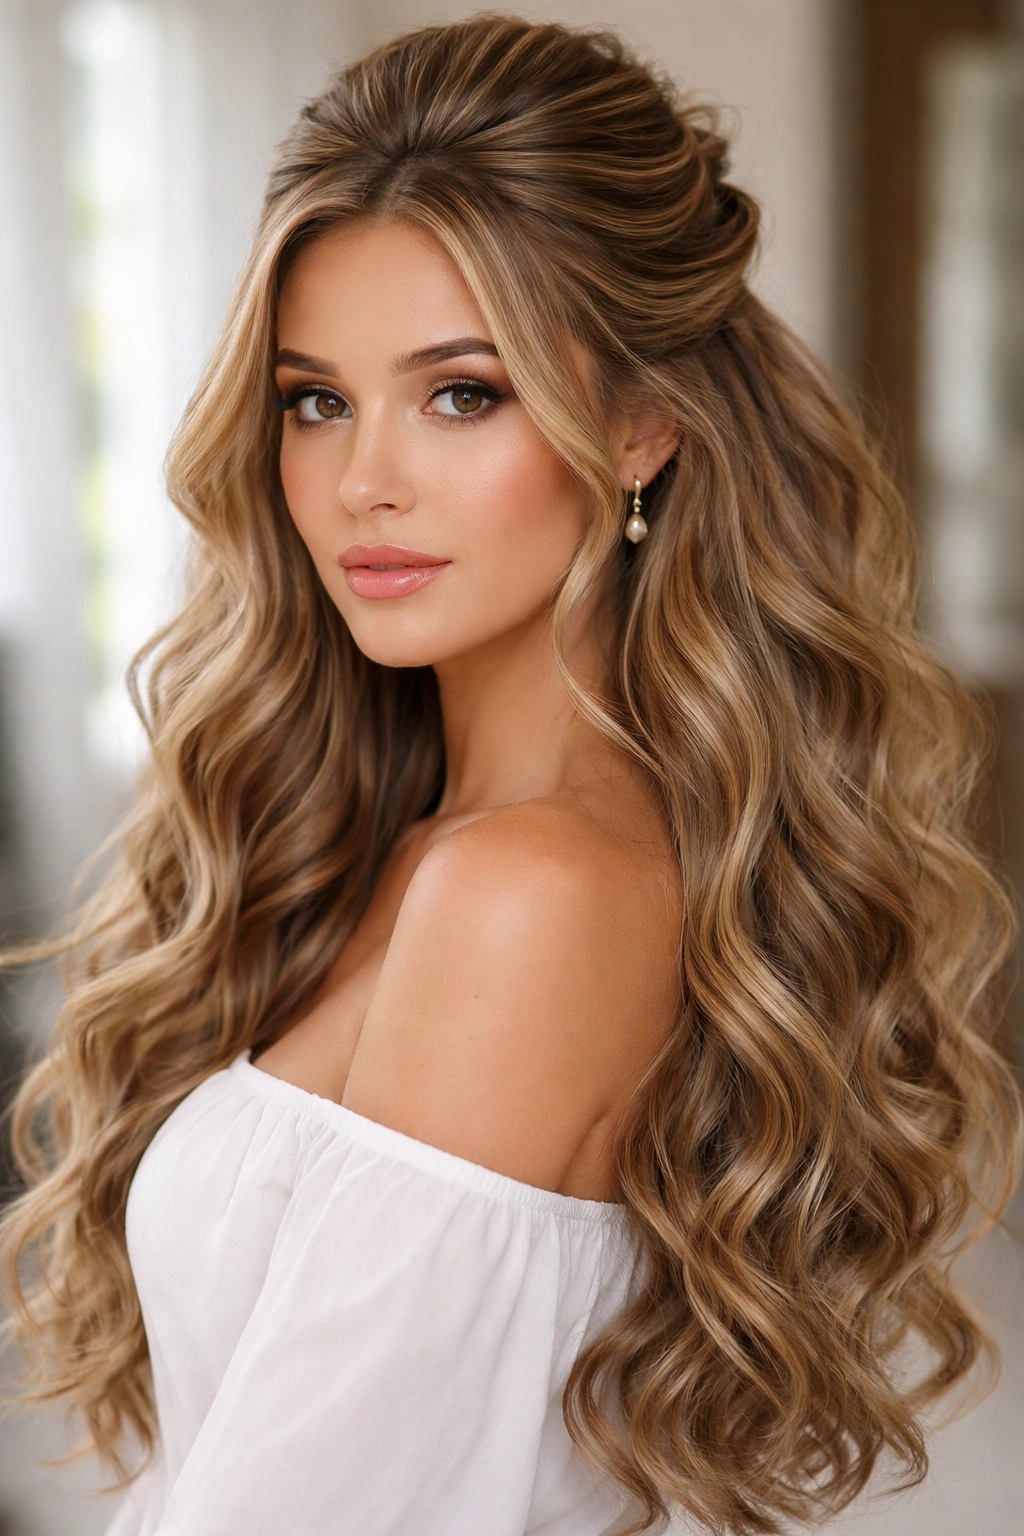
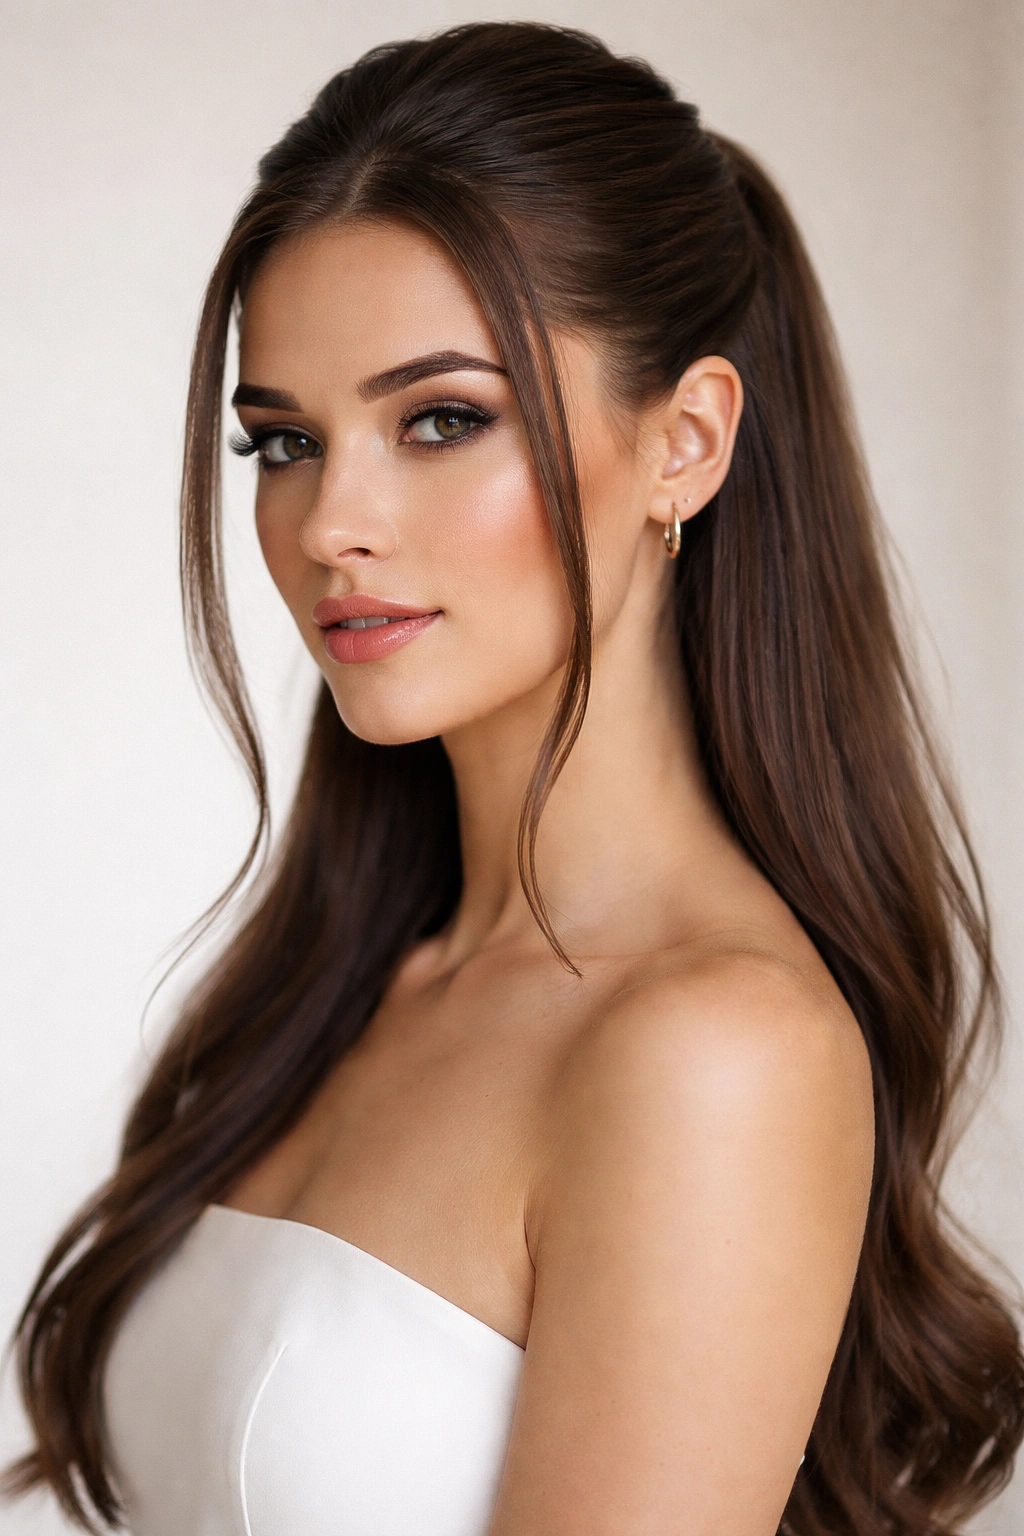
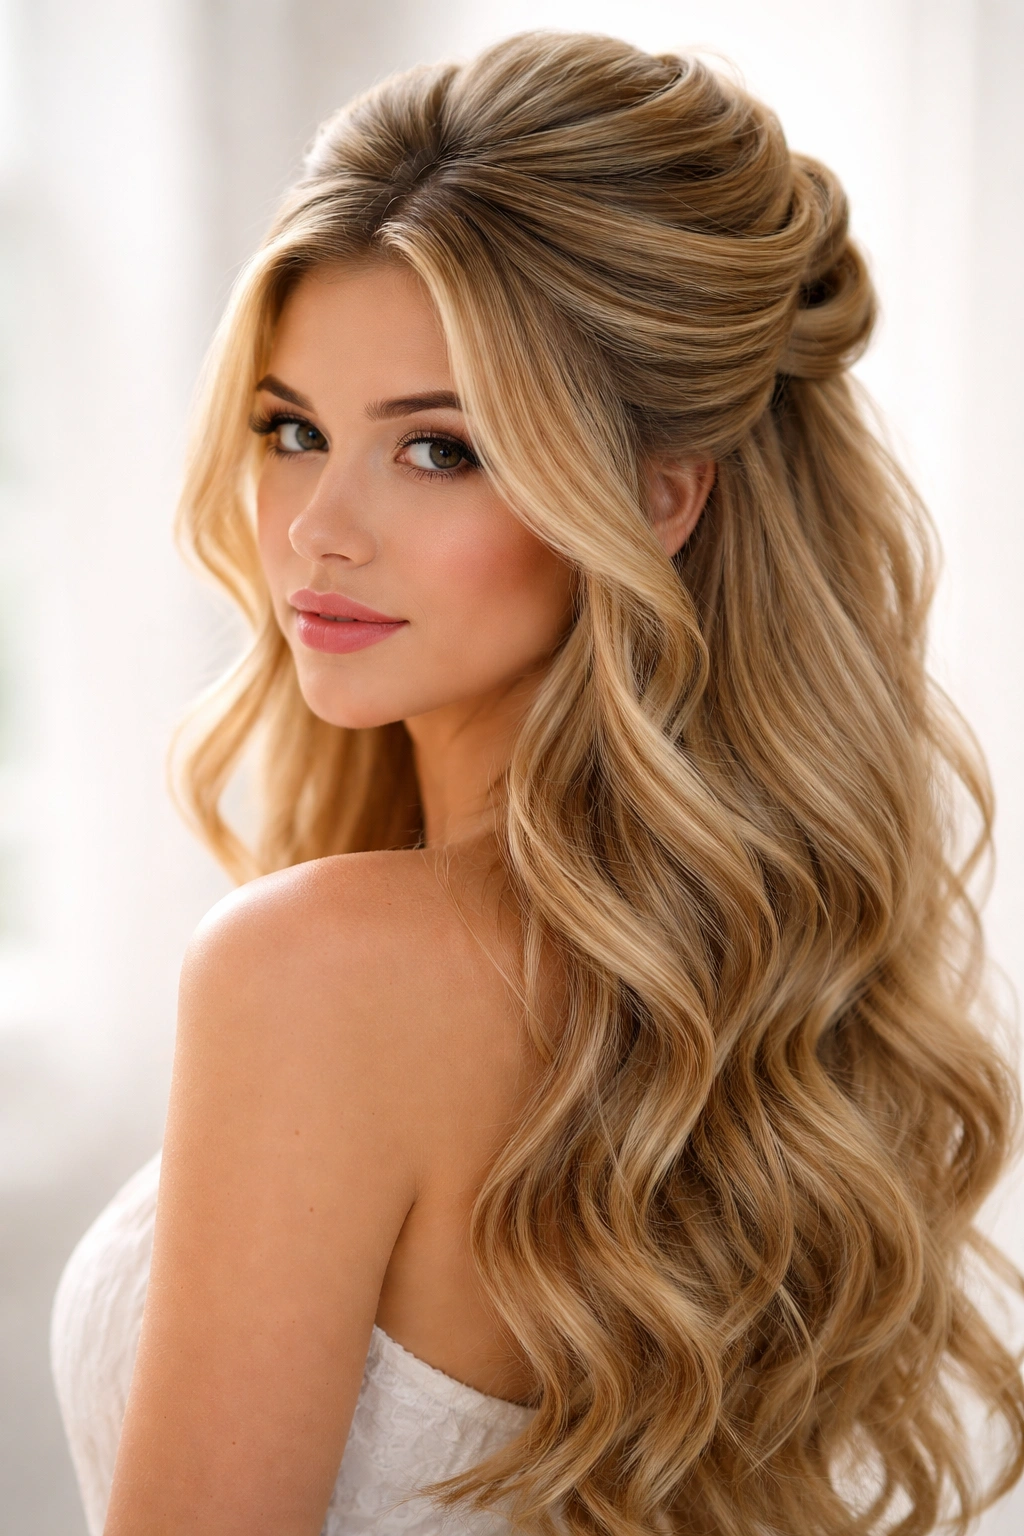
The half-up half-down style occupies a sweet spot in hairstyling—it’s elegant enough for formal occasions yet relaxed enough for everyday wear. For those with long hair, this versatile approach offers endless possibilities to express your personal style while keeping hair partially off your face. Whether you’re heading to a wedding, a dinner date, or simply want to elevate your regular look, mastering a few variations of this timeless silhouette transforms what you can accomplish with just your hands and a few bobby pins.
Long hair gives you a particular advantage here. You have enough length to create dimension, texture, and intricate detail in the pulled-back sections while still maintaining the stunning flow of your full length below. The styling possibilities range from romantic and soft to sleek and modern—and most of them take just ten to fifteen minutes to execute once you understand the technique.
What makes half-up half-down hairstyles so universally flattering is how they frame your face while avoiding the weight or formality of a full updo. The style suits nearly every face shape because you can adjust where the styling sits, which sections you emphasize, and how much texture you add. These eighteen looks showcase the depth possible within this single hairstyle category, giving you options for different moods, occasions, and styling skill levels. Some require advanced braiding techniques, while others are achievable with just a few twists and the right products.
1. Romantic Twisted Crown
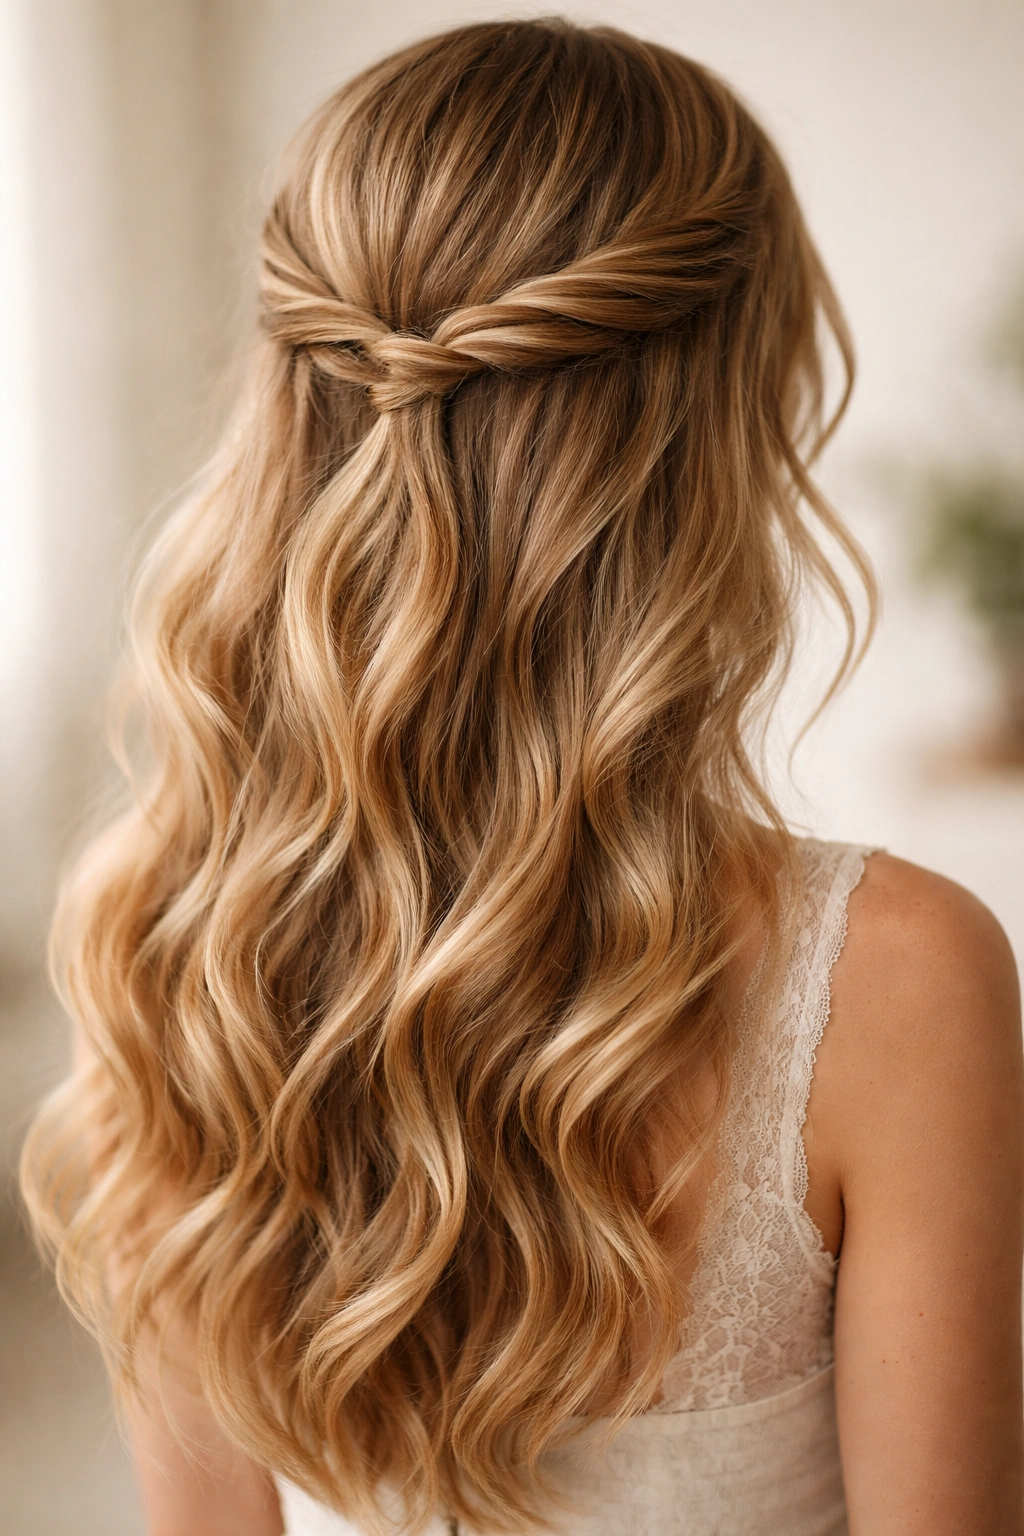
This style creates a soft, ethereal frame that looks complicated but relies on just two simple twists. Begin with smooth hair or gently curled waves, depending on your preferred texture. Take a section of hair from one side at your temple, about two inches from your part, and twist it loosely back toward the crown.
How to Create the Twisted Crown
Bring that first twist to the back of your head and secure it with a bobby pin tucked underneath so it’s invisible. Then take a similar section from the opposite side and twist it back to meet the first twist. You can pin both twists together at the crown, or create a second twist that wraps slightly around the first for a fuller, more luxurious effect. The beauty of this style lies in the softness—keep your twists loose so they feel romantic rather than tight and severe.
Why This Works for Long Hair
The loose texture of the twists contrasts beautifully with the length of hair flowing below, creating natural dimension and movement. This style works equally well with straight hair, waves, or gentle curls. It’s elegant enough for engagement parties or rehearsal dinners, yet casual enough for brunch with friends.
Pro tip: Twist each section slightly looser than feels right during the process—gravity will pull on your twists throughout the day, so starting with a very loose twist keeps the style looking fresh and romantic for hours.
2. Sleek Ponytail Hybrid
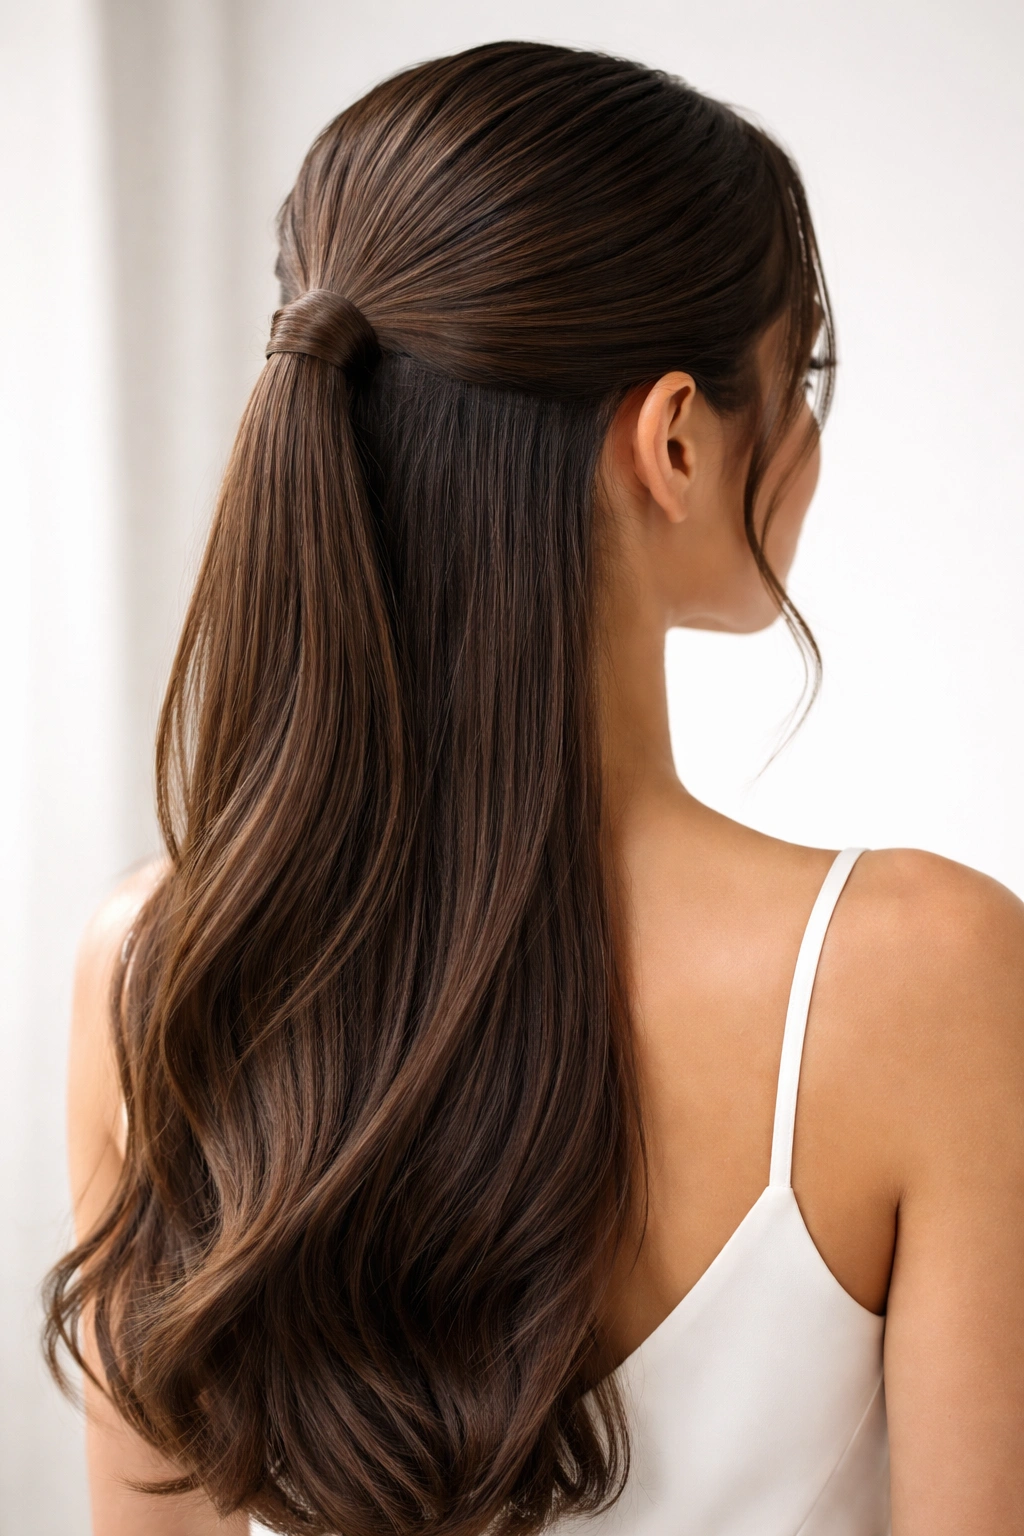
For a more contemporary, polished look, the sleek ponytail hybrid blends clean lines with flowing length. Use a smoothing serum or lightweight cream to sleek your hair, then brush the back section upward from your nape. Create a low ponytail with approximately one-third of your hair, securing it tightly with an elastic.
The Key to a Polished Finish
Leave the remaining two-thirds of your hair down and flowing—the contrast between the slicked-back half-up portion and the loose length below creates a striking, editorial look. You can wrap a small section of hair around the elastic to hide it, or use a decorative hair cuff or claw clip for a more intentional style statement. This approach works beautifully for work settings, minimalist aesthetics, or anyone who prefers clean, structured lines.
Styling Variations
Straighten the ponytail section for an ultra-modern feel, or curl just that portion to create textural contrast. You can also tease the ponytail very slightly at the crown before smoothing the outer layer for a subtle lift that photographs beautifully.
Worth knowing: This style demands smooth, well-conditioned hair. Flyaways will show immediately against the sleek background, so use a lightweight smoothing balm and have a frizz-control spray nearby for touch-ups throughout your day.
3. Braided Half-Up Bun
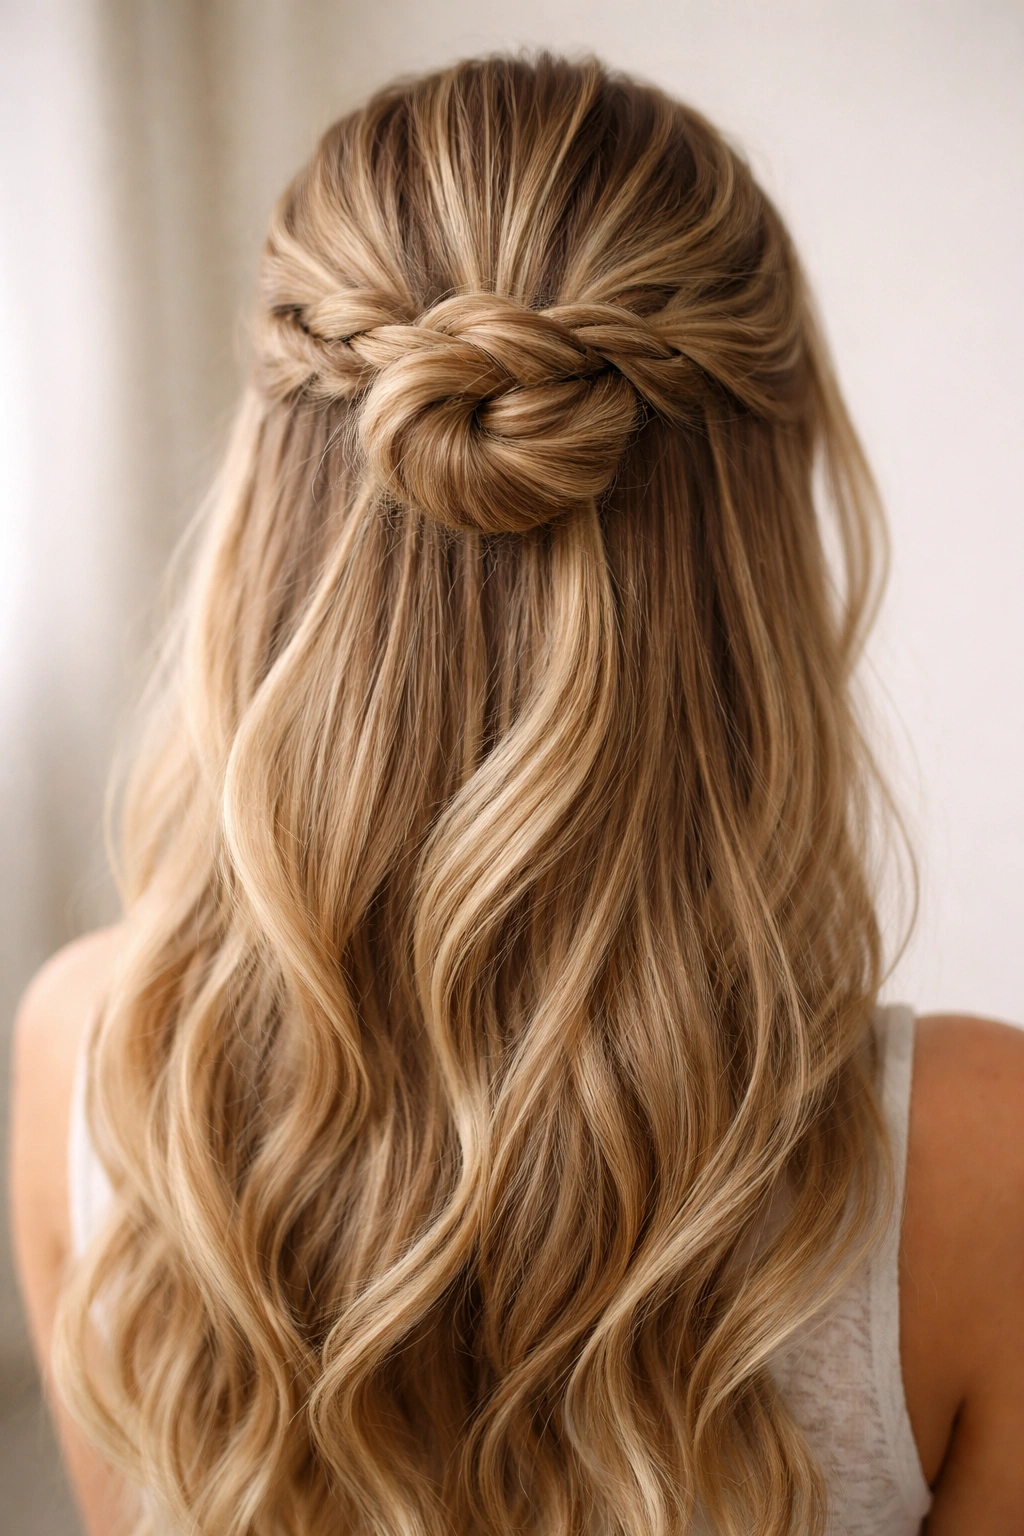
Combining two styles in one, this look starts with a half-up section that you braid rather than twist, then coil that braid into a small bun at the crown. The technique works best with hair that has some grip and texture—either naturally wavy hair or hair that’s been curled or textured beforehand.
Building the Braided Bun
Gather a section from your crown that’s roughly three to four inches wide. French braid, Dutch braid, or even a simple three-strand braid this section down an inch or two, then stop and secure the end with a small elastic. Coil that braid into a small bun shape and pin it securely with bobby pins inserted horizontally through the braid for maximum hold.
When to Wear This Style
This hybrid works beautifully for outdoor weddings, garden parties, or any event where you want obvious styling detail without a full updo. The braid adds personality and visual interest while the length flowing below keeps things romantic and soft. The bun sits elevated enough to draw the eye upward and create an elongated appearance.
Styling note: Soften the braid slightly by gently pulling the outer edges of each braid section—this is called “pancaking” the braid and makes it appear fuller and more romantic than a tight, defined braid.
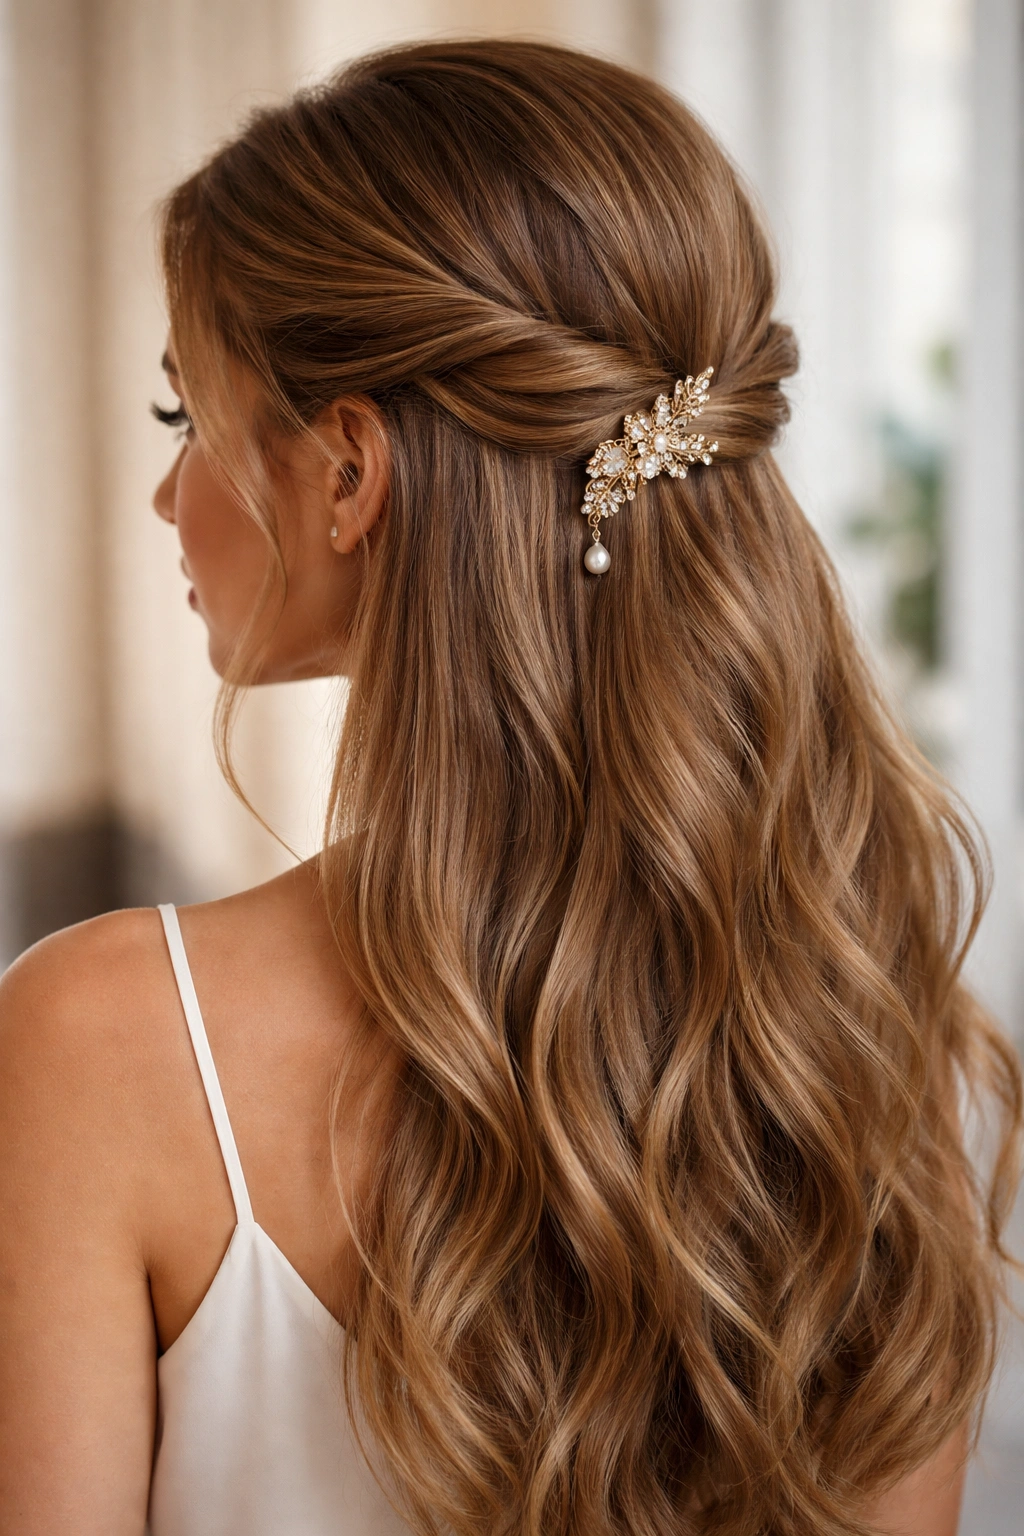
4. Soft Waves with Pearl Pins
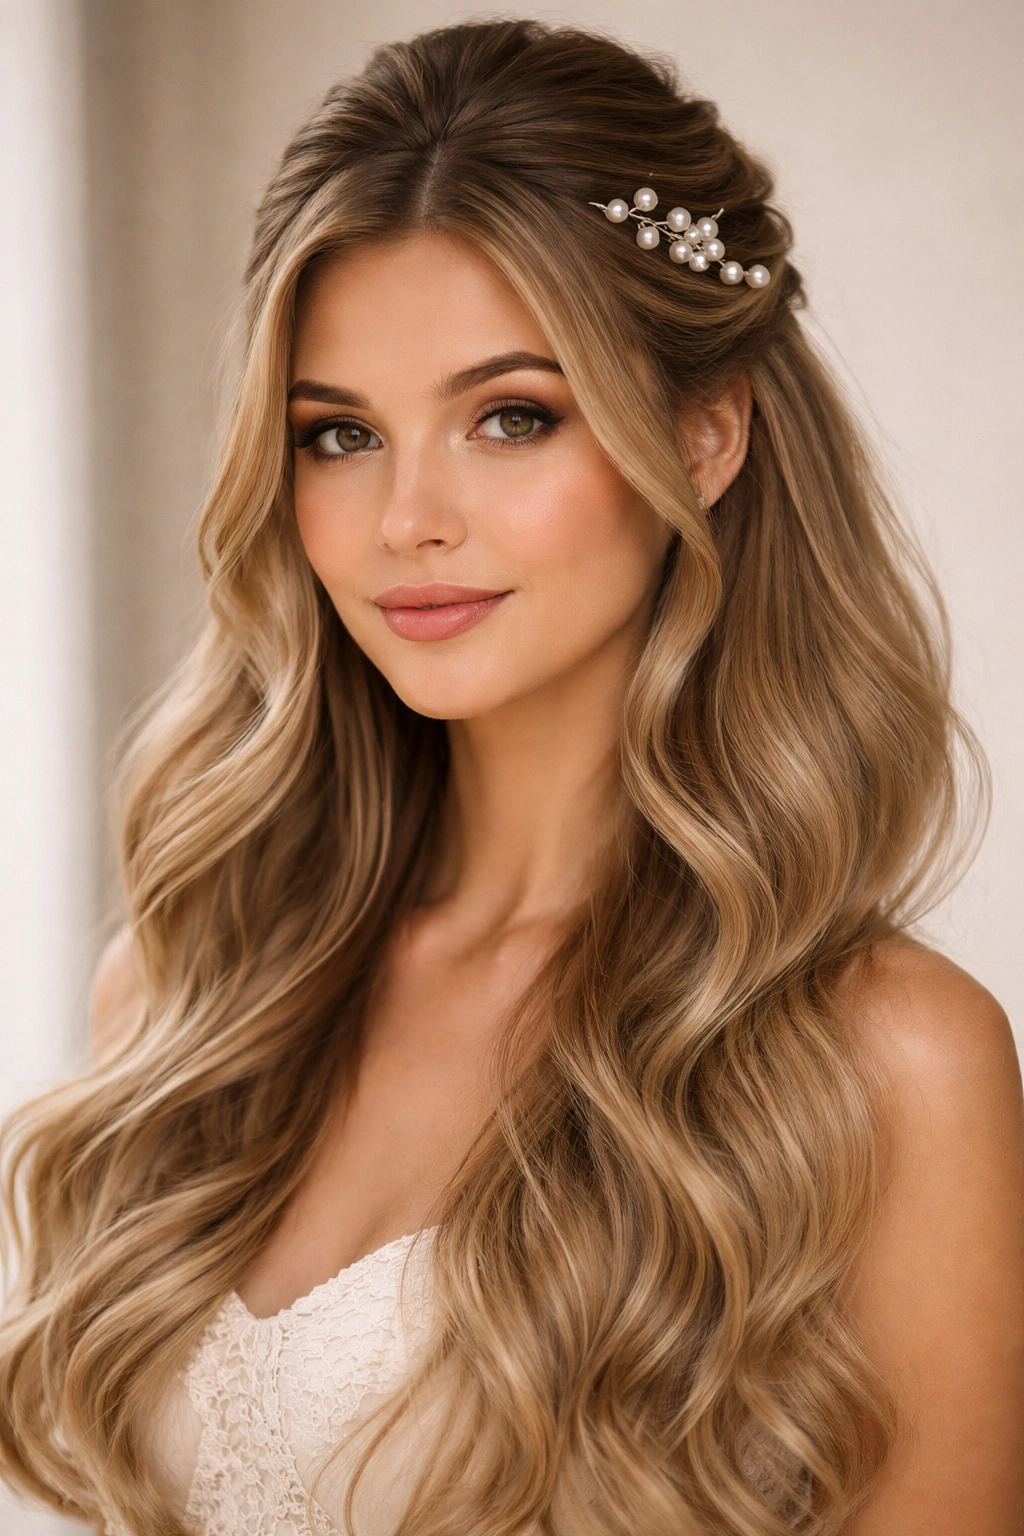
This effortless-looking style relies on beautiful waves or curls as the foundation, elevated by strategic placement of decorative bobby pins or hair sticks. Start with your long hair curled or waved throughout—use a curling iron, wand, or braiding method to create texture. Once your waves are set, gather a small to medium section from the crown.
The Role of Accessories Here
Rather than pinning this section with a standard bobby pin, use decorative pearl bobby pins, ornate clips, or hair sticks to hold your half-up section in place. The accessories become the style statement, so choose pieces that coordinate with your outfit or the formality of the occasion. You might use three to five delicate pins arranged in a pattern, or a single statement clip.
Why This Approach Works
The waves frame your face beautifully, the small half-up section prevents hair from falling in your face during activity, and the decorative elements add elegance and polish without requiring any advanced technique. This style suits nearly any hair type—even fine hair holds waves long enough for this look to work throughout an event.
Quick fact: Decorative bobby pins work best when you secure them horizontally rather than vertically—this distributes the weight of your hair across the pin and prevents slipping.
5. Waterfall Braid Version
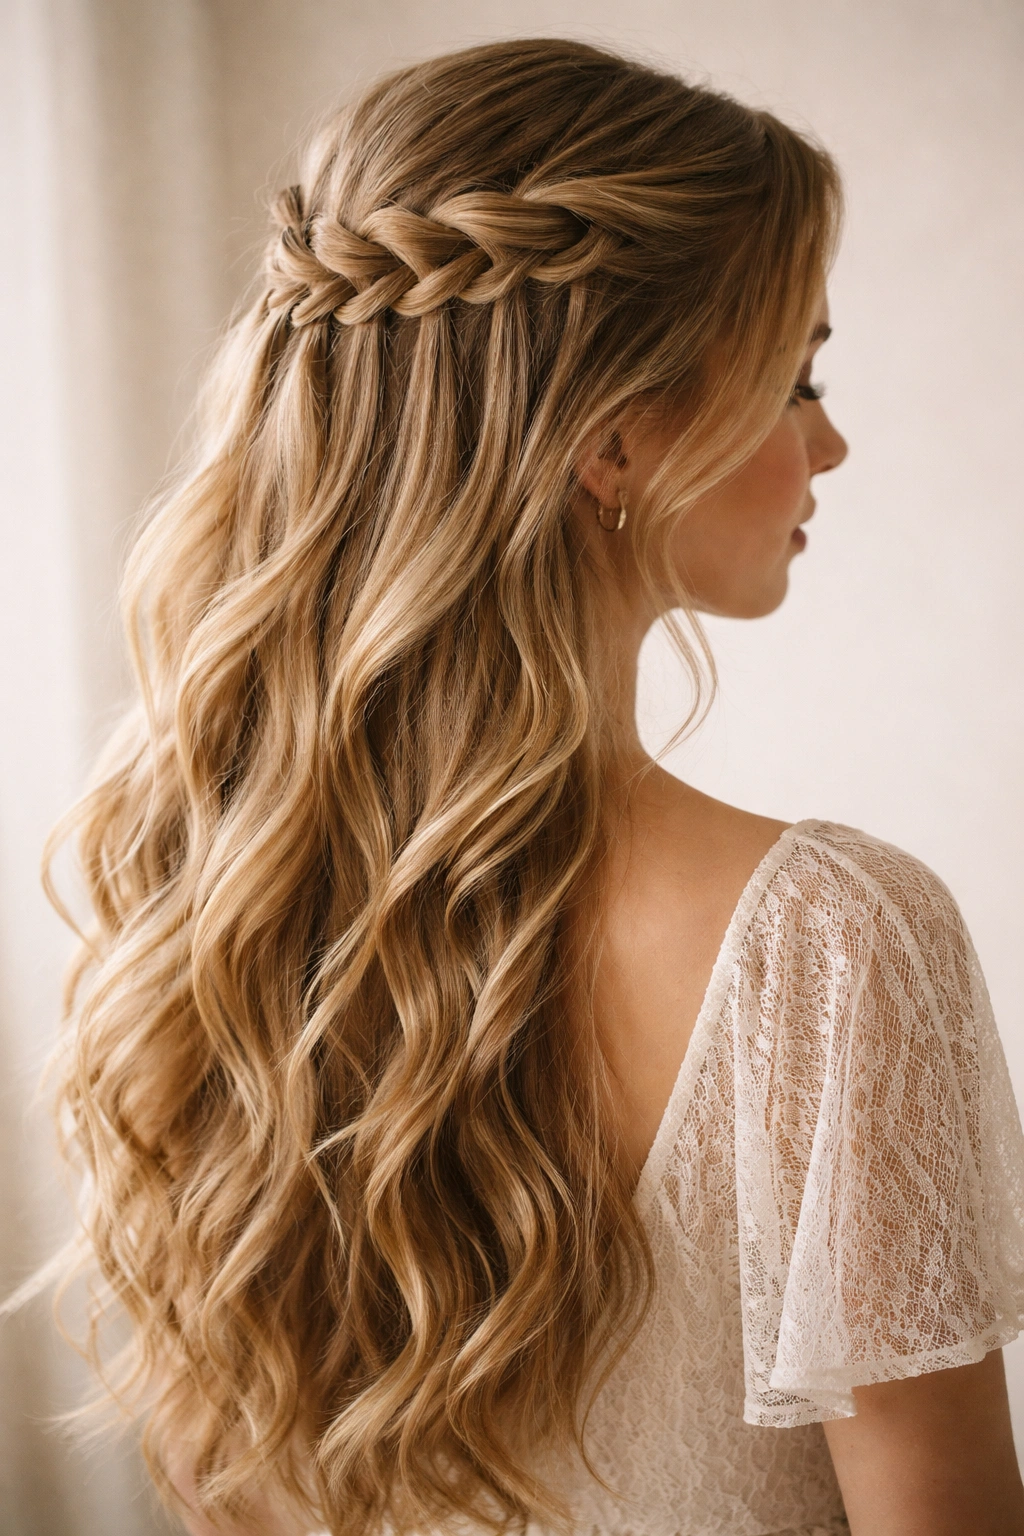
The waterfall braid creates the illusion of hair flowing like water, which pairs stunningly with the half-up half-down silhouette. This style requires some braiding skill, but once you master the technique, it becomes quite natural. Start by taking a small section of hair near your temple on one side.
Executing the Waterfall Technique
Begin a three-strand braid but with a twist—as you braid, drop one strand and pick up a new section from the top of your head at the same time. This creates the “waterfall” effect where hair seems to cascade through your braid. Continue this pattern as you move the braid toward the back of your head, roughly following your crown.
Finishing the Look
Once you’ve braided to the back, secure the braid with a bobby pin and either leave the remaining hair fully down or create a second waterfall braid from the opposite side that meets the first. When both braids meet at the center back, secure them together with a decorative clip or additional bobby pins for a balanced, symmetrical style.
Pro tip: Practice this braid on straightened hair first—it’s much easier to see each section and execute the dropping technique with precision before attempting it on waves or curls.
6. Low Half-Up with Volume

For those who want the half-up half-down style but with height and drama, this approach starts lower on the head and focuses on creating volume in the pulled-back section. Begin with curled hair throughout. Blow-dry your waves with your head flipped upside down to maximize root lift, or use a volumizing mousse and blow-dry from underneath.
Creating Dimensional Volume
Gather your half-up section from a lower point on your head—roughly at ear level or slightly below. Before securing it, tease the section very gently at the roots to create texture and volume. Smooth the outer layer with your brush, then secure the section with an elastic. You can wrap a small piece of hair around the elastic to conceal it, or use a decorative claw clip.
The Visual Impact
This approach suits longer faces particularly well because the volume sits higher on the head and creates the illusion of width. The lower starting point of the half-up section means more hair flows freely below, emphasizing length and creating movement.
Insider note: Teasing requires a light hand—too much and your hair will look matted or messy. Use a fine-tooth tease brush and work in small, gentle sections, brushing against the hair growth direction only three to five times per section.
7. Twisted Sections with Bow
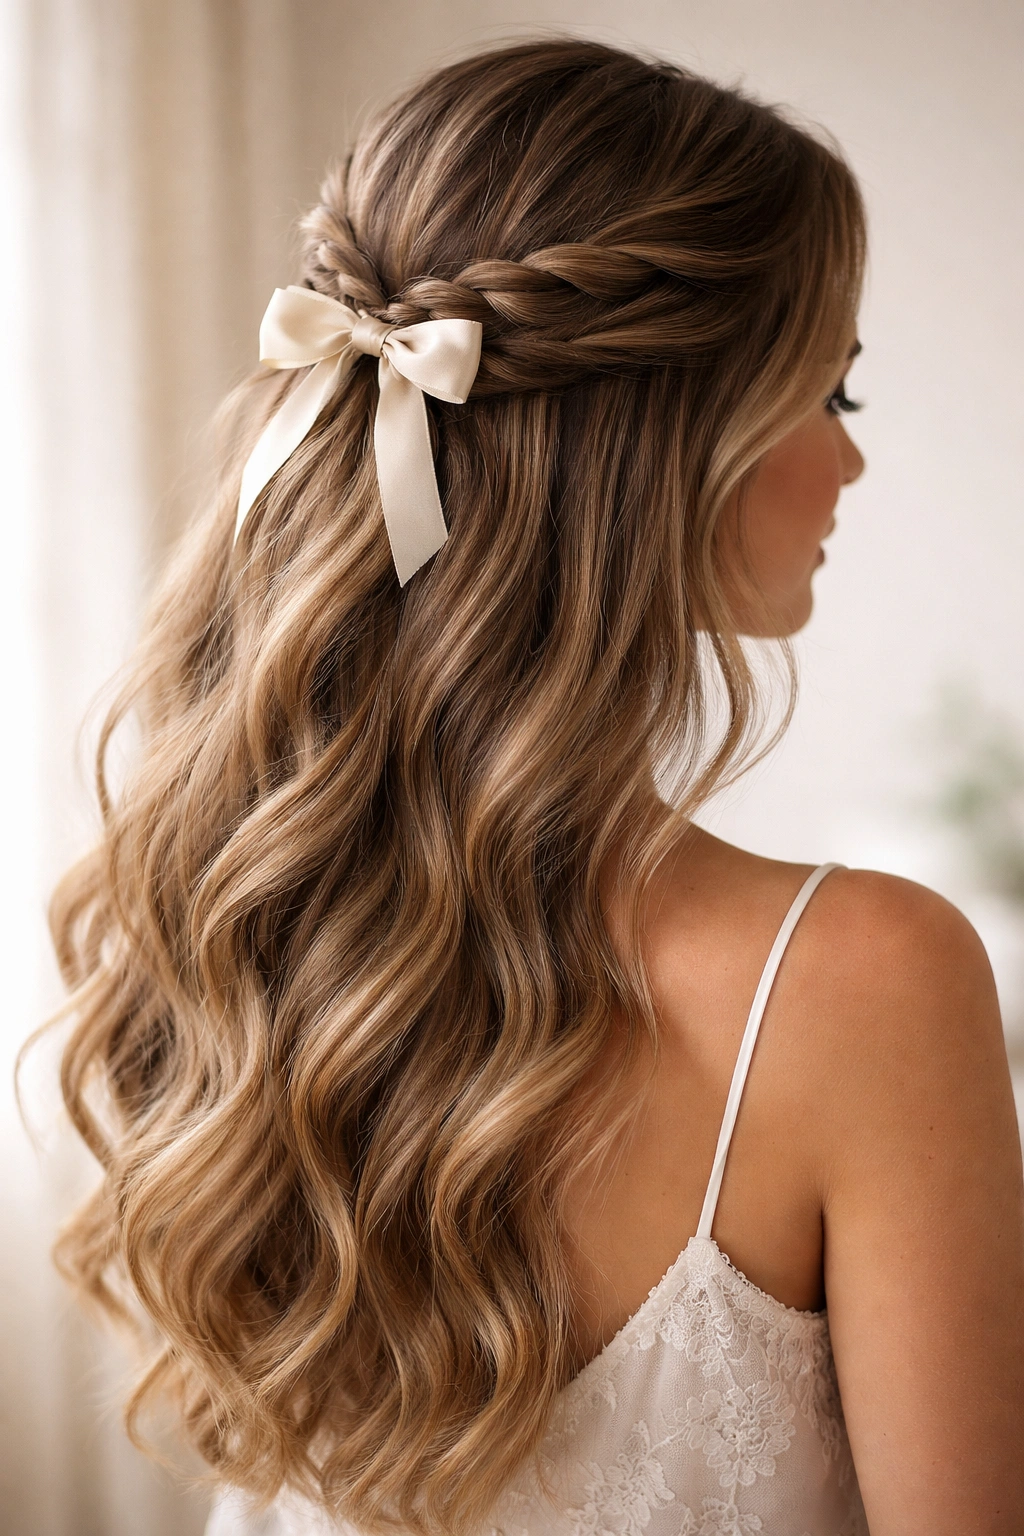
This playful, youthful variation involves creating multiple small twists rather than one large pull-back section. The technique gives you control over how much hair you want to incorporate into the half-up portion, making it customizable for different hair densities and personal preferences.
Building Multiple Twists
Take small sections of hair from each side of your head—roughly one to two inches wide. Twist each section loosely, bringing them back toward the crown. You might create two, three, or even four twists depending on your preference. Secure all the twists together at the crown with a small elastic.
Adding the Bow Accent
Wrap a ribbon, decorative bow, or hair bow around the elastic to create a focal point. This approach works beautifully with velvet bows for formal events, delicate silk ribbons for romantic occasions, or trendy hair bows for a contemporary, fashion-forward look. The multiple twists create visual dimension and texture that reads as more intentional and styled than a single twist.
Quick fact: Smaller twists tend to stay in place longer than one large twist because each individual section bears less weight, making this style practical for all-day wear.
8. Romantic Side-Swept Look

This sophisticated variation incorporates a slight asymmetry that feels modern while maintaining the romantic essence of the half-up half-down style. Begin with soft waves or curls throughout your hair. Create a deep side part, pushing most of your hair to one side.
The Asymmetrical Technique
Take the smaller section from the deeper part side and twist or braid it loosely back toward the opposite side of your head. Secure this section with bobby pins hidden underneath the hair, creating an invisible anchor point. The effect is a half-up style that feels organically asymmetrical rather than perfectly centered, which reads as more effortlessly elegant.
Why Asymmetry Matters Here
Side-swept styling suits heart-shaped and square faces particularly well because it softens the jawline and creates movement across the face. The technique also works beautifully in photography—asymmetrical styling photographs better than perfectly centered styles, creating visual interest and depth in images.
Worth knowing: This style works best when you fully commit to the side part. A hesitant, barely-off-center part will look uncertain. A deep, definitive side part creates the intended asymmetrical effect.
9. Dutch Braid Half-Up
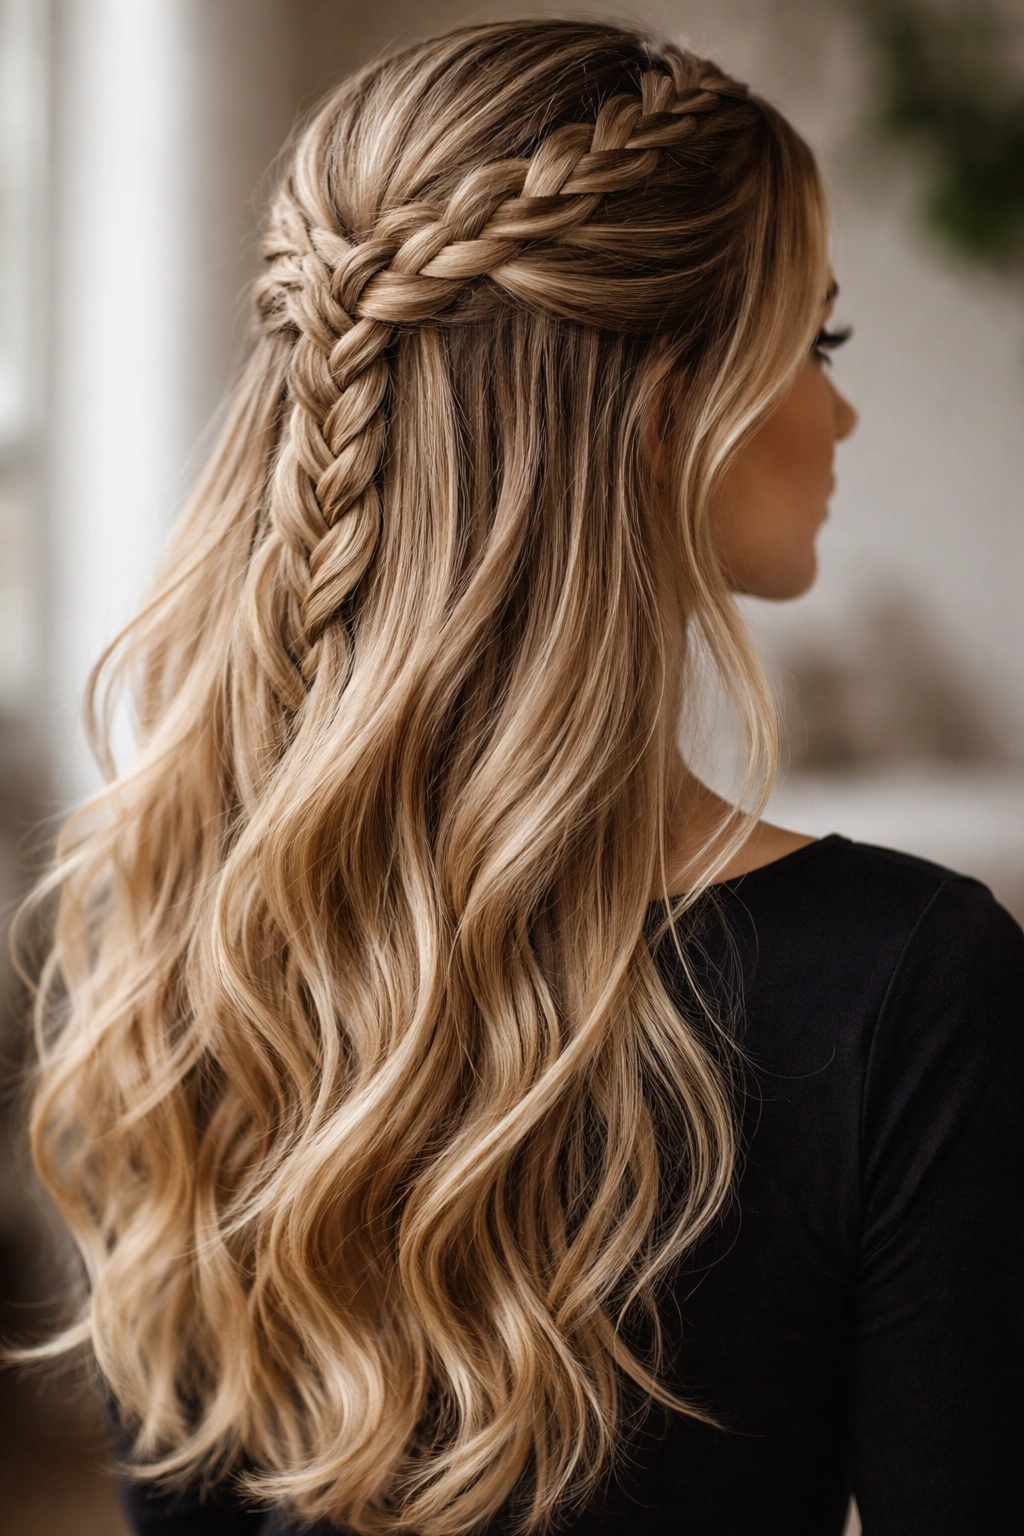
For those seeking a style with obvious structure and technical flair, the Dutch braid half-up showcases braiding skill while keeping hair off your face. Unlike the French braid (which braids under the strand), a Dutch braid braids over the strand, creating a raised, prominent appearance that reads as more intentional and styled.
Executing the Dutch Braid
Start at your crown with a small section of hair divided into three strands. Braid by crossing each outer strand over the middle strand (rather than under), and as you braid downward, pick up new hair from the sides and incorporate it into the braid. Continue until you’ve reached roughly mid-back of your head, then secure the braid with a small elastic.
The Full Picture
Pull the braid slightly loose by gently pancaking the outer edges—this creates a fuller, more romantic appearance. The remaining hair below flows freely, creating a striking contrast between the structured, prominent braid and the soft waves or length below. This style reads as more formal and deliberately styled than looser, softer approaches.
Pro tip: Dutch braids show every imperfection in your braid technique, so practice on straightened hair first. Once you’re comfortable with the pattern, you can execute it on waves or curls more confidently.
10. Twisted with Decorative Clip
Similar to the pearl pins version but slightly different in execution, this approach uses a single, substantial decorative clip as the anchor point for your half-up section. Choose a clip that makes a statement—tortoiseshell, gold metal, decorated with crystals or pearls, or featuring an interesting architectural shape.
Styling the Twist
Create a simple or double twist from your crown, or gather a half-up section and create two to three delicate twists within that section for visual interest. Bring everything back and secure it with your chosen decorative clip. The clip becomes jewelry for your hair—it should be visible and intentional, not hidden beneath other hair.
Clip Placement Matters
Position the clip slightly to one side of center rather than dead center for a more contemporary feel. A centered clip reads as more traditional, while an offset placement feels modern and intentional. You might also position your clip at a slight angle rather than perfectly horizontal for additional visual interest.
Styling note: Decorative clips work best with medium to thick hair—fine hair may slip under the clip’s grip throughout the day. If you have finer hair, use a smaller clip or secure the clip with additional bobby pins for extra hold.
11. Curled Half-Up with Texture
This style prioritizes texture and movement in both the pulled-back section and the flowing length below. Start by curling your entire head with either a curling iron or overnight braiding. Use a curling iron to create waves or curls of varying sizes—mixing one-inch and 1.5-inch barrel sizes creates more natural, dimensional texture than uniformly sized curls.
Building Texture Into the Pull-Back
Gather your half-up section and tease it gently at the roots for volume. You can leave the section as-is for a tousled, undone appearance, or smooth just the outer layer while keeping the internal texture voluminous. Secure with an elastic, then pull a few face-framing pieces gently forward to soften the look.
The Full Effect
The result is effortlessly textured throughout—the curls in the pulled-back section add volume and visual interest, while the flowing curls below create movement and dimension. This approach works beautifully for anyone with naturally wavy or curly hair, or for those willing to spend time creating waves beforehand.
Worth knowing: Texture-heavy styles benefit from a lightweight hair oil or texture spray applied before styling—this adds hold and definition to curls without the weight or crunchiness of stronger products.
12. Half-Up Fishtail Braid
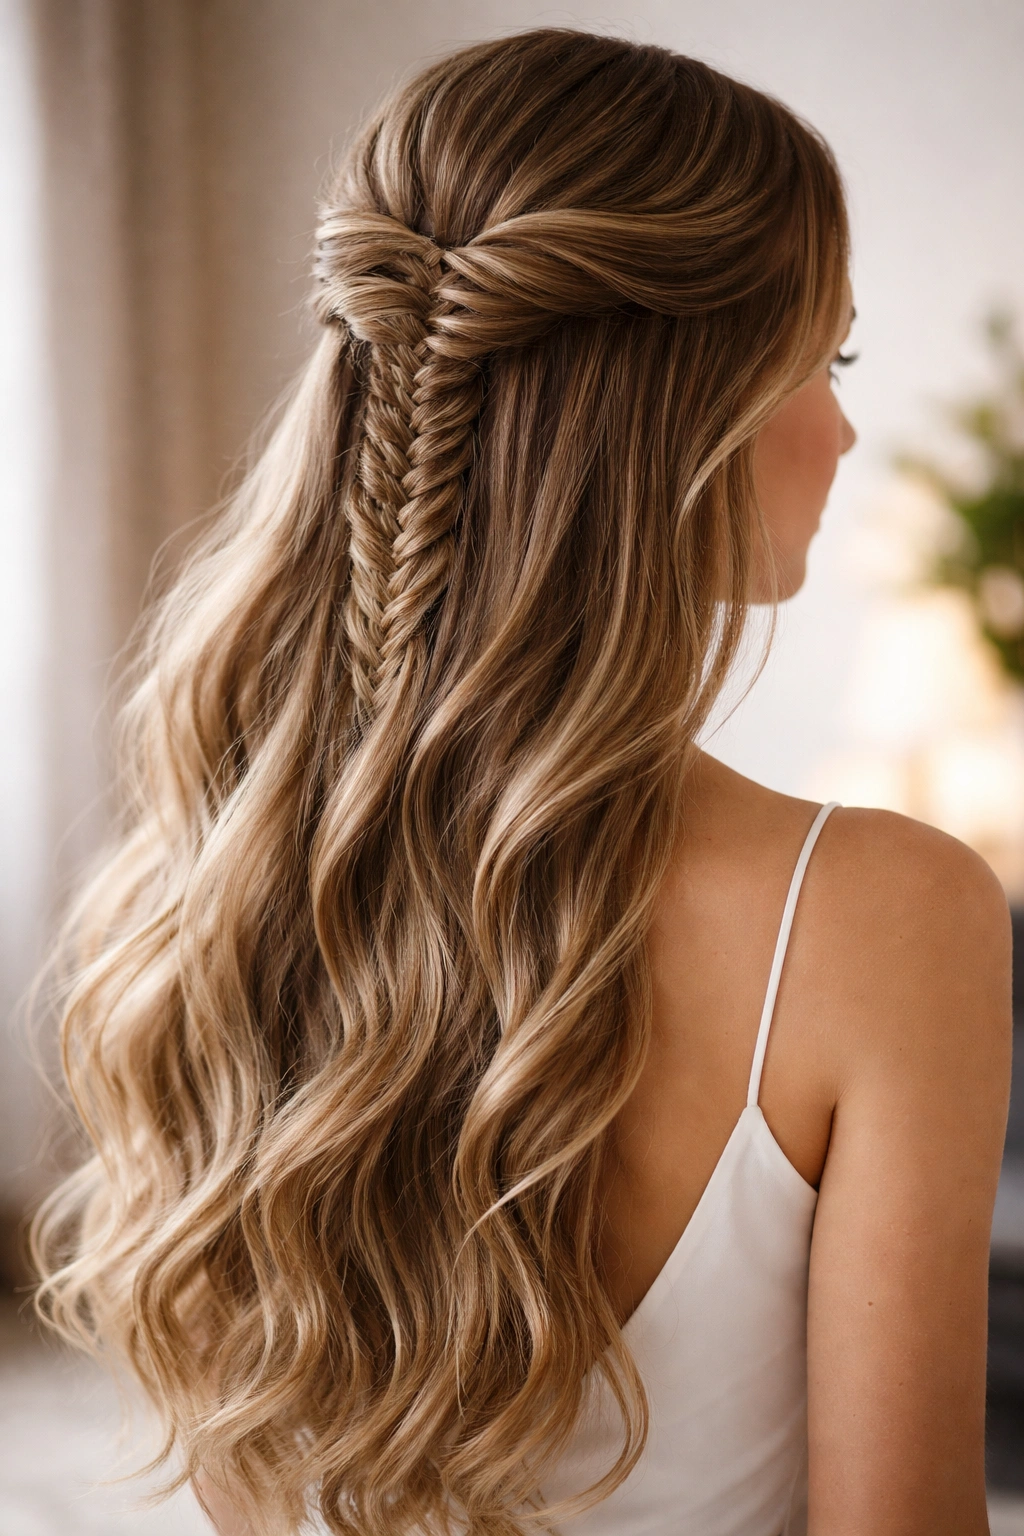
The fishtail braid creates a uniquely textured appearance compared to traditional three-strand braids. This variation looks intricate but actually requires just two strands, making it approachable for most skill levels. The technique creates a delicate, woven appearance that photographs beautifully and feels feminine and detailed.
The Fishtail Technique
Divide your half-up section into two equal strands. From the outside of the left strand, take a thin piece of hair and cross it over to join the right strand. Then from the outside of the right strand, take a thin piece and cross it to join the left strand. Continue this alternating pattern, ensuring each piece you add is consistently thin—this creates the characteristic textured appearance of a fishtail braid.
Why This Braid Stands Out
The fishtail braid appears far more complex than it actually is, making it ideal if you want styling to read as intentional and detailed without requiring advanced technical skill. The braid works beautifully on both straight and wavy hair. On wavy hair, the texture of the braid seems to disappear slightly into the overall waves, creating a subtle, integrated appearance.
Pro tip: Take consistently thin sections when creating your fishtail—thick, inconsistent sections create an uneven, sloppy appearance rather than the desired delicate effect.
13. Sleek Pulled-Back with Face-Framing
For a polished, office-appropriate style that still incorporates the half-up half-down silhouette, this approach focuses on sleek lines and strategic face-framing. Use a smoothing serum and blow-dry your hair straight or with just barely-there waves. Brush your half-up section back smoothly toward the crown and secure it tightly with a clear elastic.
The Face-Framing Element
Rather than pulling all hair back smoothly, release two small sections of hair at your temples and let them frame your face. You can leave these sections straight, curl them loosely, or add a soft wave. This softens the severity of the sleek pulled-back style while maintaining the polished, professional appearance.
When This Works Best
This style suits professional settings, job interviews, presentations, or any situation where you want obviously styled hair that reads as competent and polished rather than casual or creative. The style suits people with straight hair particularly well, though it also works on waves if you smooth the back section sufficiently.
Quick fact: Small face-framing pieces make faces appear slimmer and draw attention to your eyes—this is why the technique works so well across different face shapes.
14. Twisted Half-Up Knot
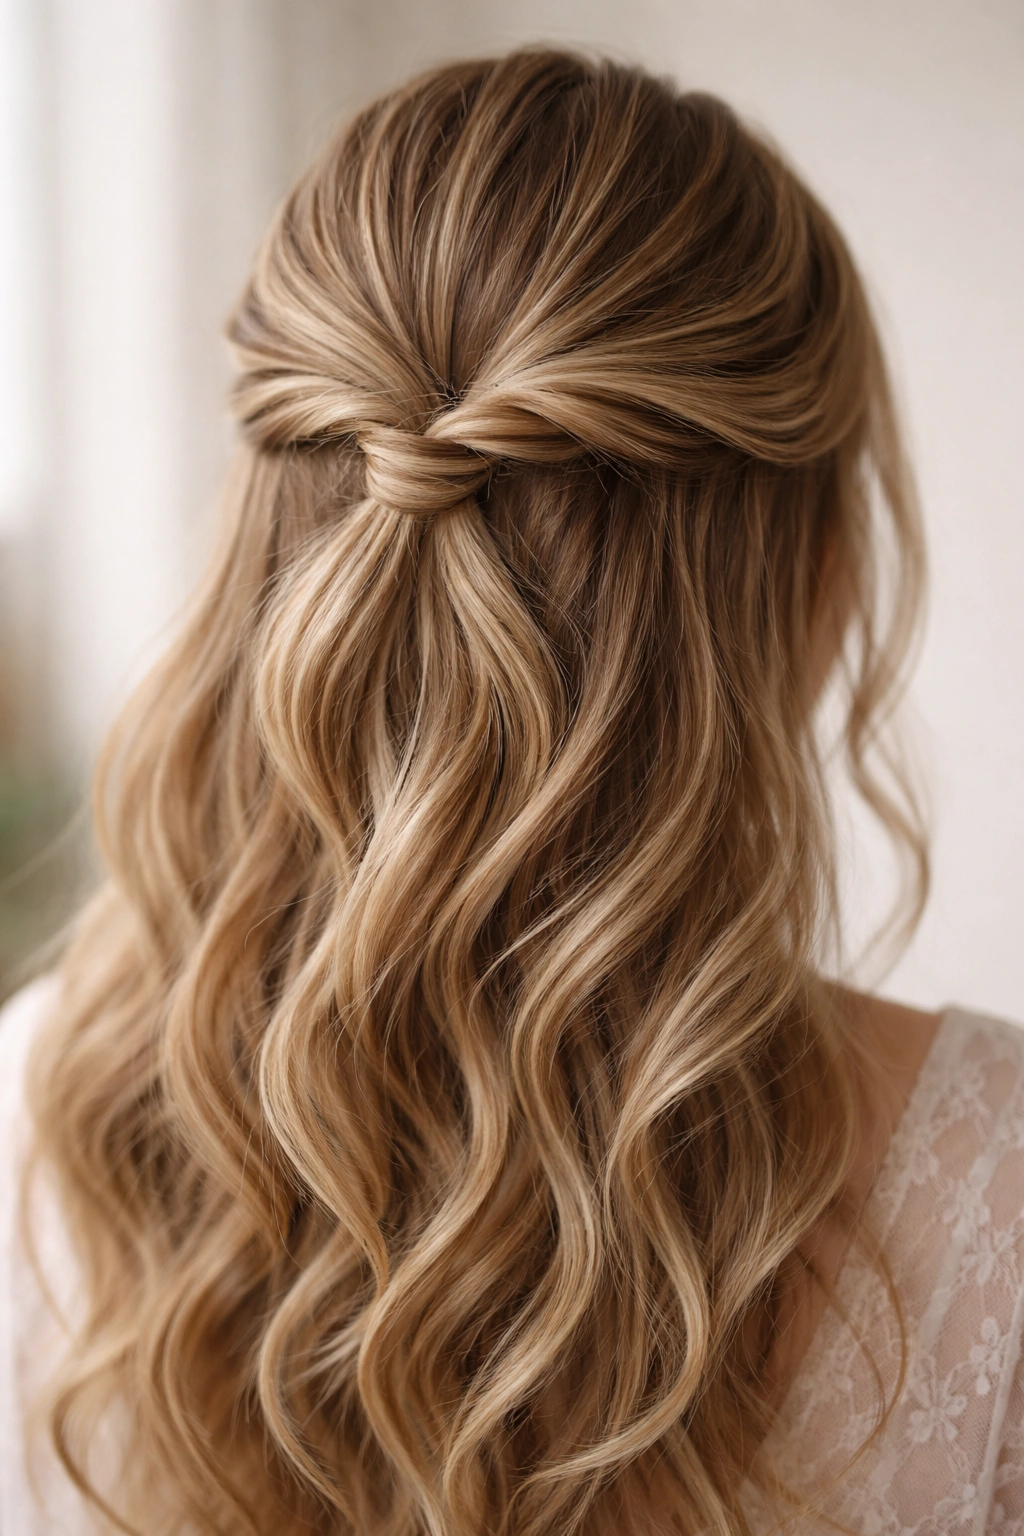
This technique combines elements of twists and knots to create something structurally unique. Rather than securing your twisted sections with a standard elastic, you actually tie the twisted strands together in a knot, creating a three-dimensional focal point at your crown.
Creating the Knot Structure
Create two twists from each side of your head, bringing them toward the center back. At the crown, instead of pinning them separately, actually tie these two twisted sections together in a simple knot—like you’re tying shoelaces. The knot creates visual depth and serves as its own anchor point. Secure the knot structure with bobby pins underneath to ensure it stays in place throughout the day.
The Visual Impact
This approach creates obvious structure and intentional styling detail that reads as more fashion-forward than a simple twist. The knot ties back and forth between the two sides of your head, creating interesting negative space and dimension that photographs beautifully. This style suits someone with confidence and a willingness to try non-traditional styling approaches.
Styling note: Make your knot loose enough to be romantic—a tight knot reads as severe. Gentle, soft knots feel intentional and elegant rather than harsh.
15. Half-Up with Accessory Weave
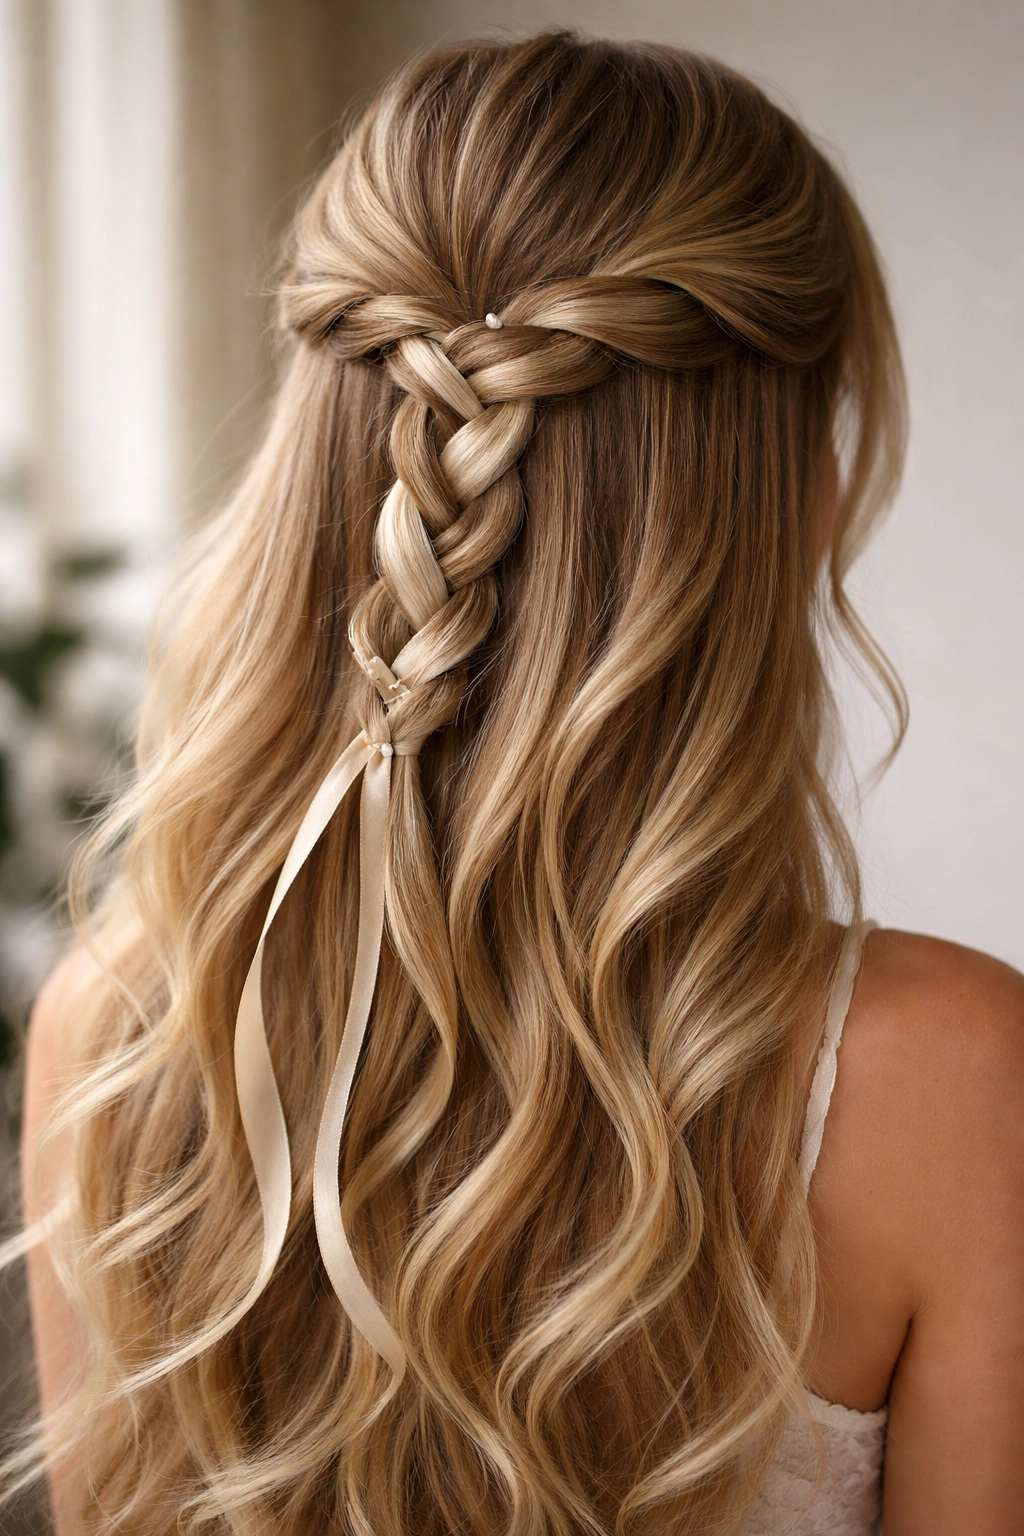
This technique literally weaves an accessory through your hair to create a unique visual effect. Rather than standard bobby pins, you’re using ribbons, leather strips, decorative chains, or strands of pearls woven through the hair itself. The accessory becomes structural and decorative simultaneously.
How the Weave Works
Begin with a basic half-up section, but don’t secure it with an elastic yet. Take your chosen accessory—a ribbon works beautifully—and weave it through the strands of your half-up section as if you’re braiding, but the ribbon itself replaces one of the three braiding strands. Once you’ve woven the accessory through, secure both the hair and the accessory with bobby pins or by tying the ends of the accessory together.
Accessory Selection Matters
Velvet ribbons create a luxe, romantic look perfect for formal events. Leather cords create an edgy, contemporary appearance suitable for concerts or creative settings. Pearl strands or delicate chains read as elegant and bridal. Your accessory choice completely changes the mood and formality of the style.
Worth knowing: Thinner accessories weave more smoothly through hair—thick ribbons or cords can catch and pull. Test your accessory on a small section first to ensure it moves smoothly through your hair without snagging.
16. Romantic Crown Braid
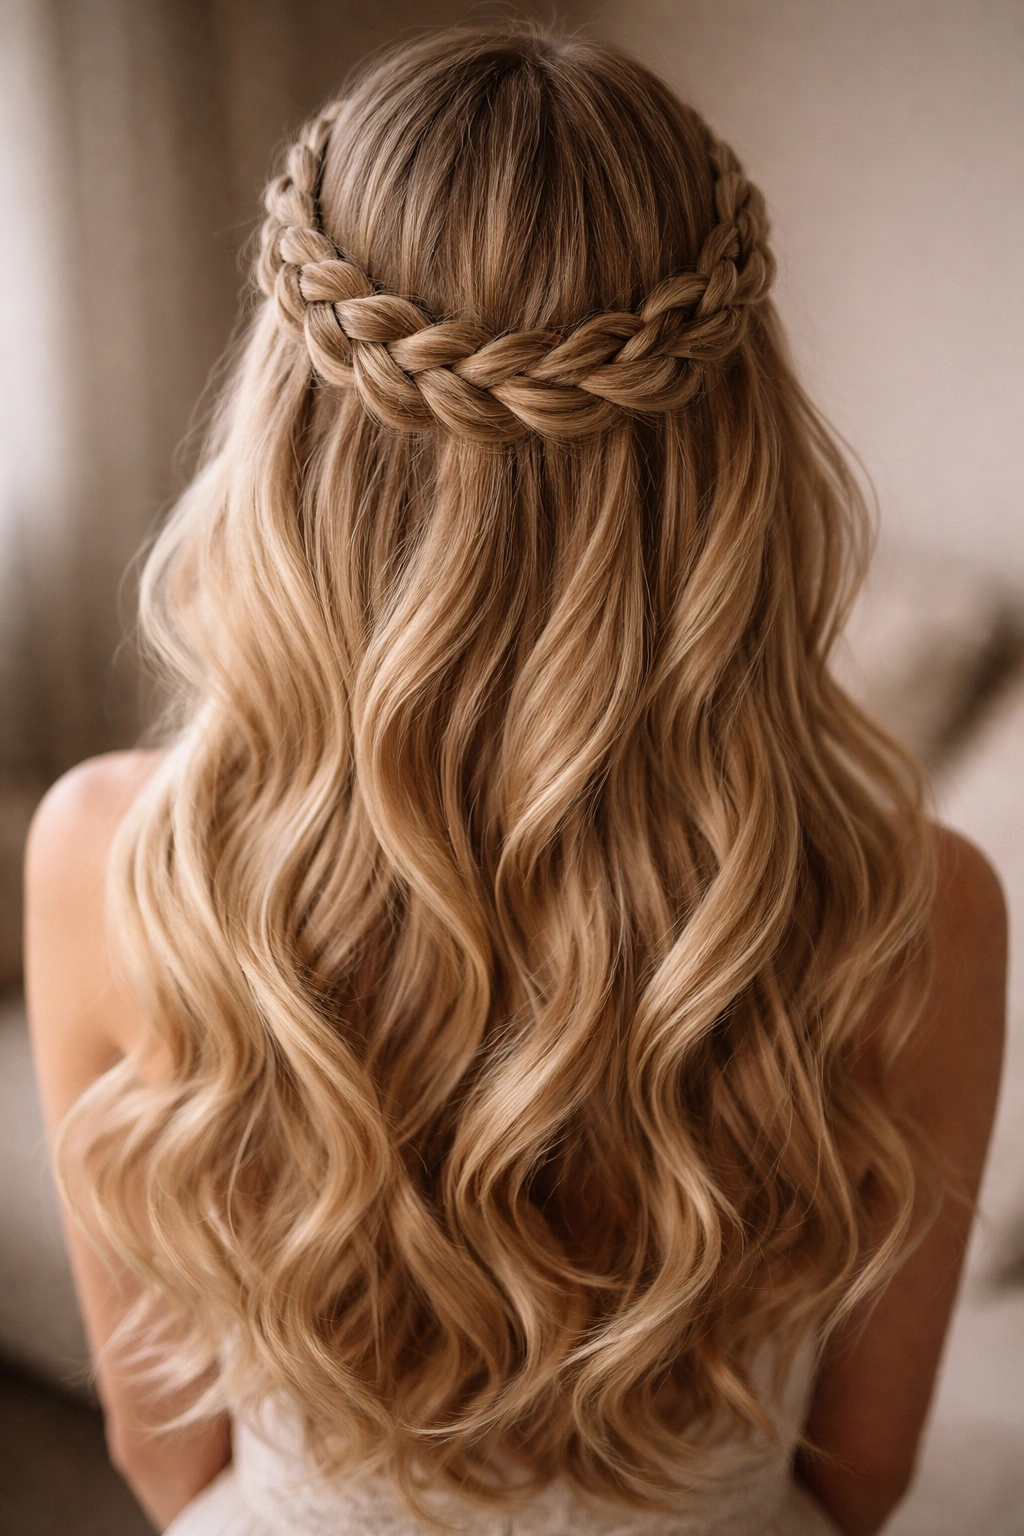
This approach places a full braid around your crown like a headpiece, with the remainder of your hair loose below—a variation that feels almost like a halo hairstyle. The technique suits anyone with enough length that you can braid from one side of your head all the way around to the other side while keeping most of your hair down.
Creating the Crown Braid
Start by taking a small section of hair near one temple. Begin braiding, but unlike a typical Dutch or French braid, you’re not braiding down—you’re braiding horizontally around the circumference of your head. Pick up new hair as you braid around, creating a braid that wraps around your crown like a crown or headband.
The Complete Picture
Once you’ve braided around to the opposite side of where you started, secure the end with a bobby pin tucked underneath the braid. The braid creates a defined, elegant frame around your face and crown, while all your remaining hair flows freely below. This style photographs beautifully and suits nearly every occasion from casual brunch to formal evening events.
Pro tip: Make the braid loose enough to sit comfortably against your head without tension or discomfort. A crown braid that’s braided too tightly will pull on your scalp and feel uncomfortable within an hour.
17. Modern Minimalist Half-Up

For those who prefer understated elegance, this contemporary approach keeps styling to an absolute minimum. Use texturizing spray or dry shampoo on day-two or day-three hair for natural texture without using hot tools. Gather a small section from your crown—just two to three inches wide—and secure it with a sleek, thin elastic in a shade that matches your hair.
The Minimalist Philosophy
The entire point of this style is restraint—barely-there styling that looks almost accidental but is actually intentional. You’re not creating volume, texture, or visual drama. Instead, you’re simply moving a small amount of hair off your crown and letting everything flow naturally below. This approach suits minimalist fashion aesthetics and anyone who prefers their hair to look low-maintenance and effortless.
Who This Style Suits
This style works beautifully for people with naturally textured or wavy hair who don’t need to add texture artificially. It also suits anyone who prefers subtle styling or wants their hair to feel unencumbered. The style reads as confident and intentional because you’re trusting your natural texture and beauty rather than relying on heavy styling.
Quick fact: A thin elastic in your hair color is nearly invisible, making the styling read as even more minimalist and effortless than if you use a visible elastic.
18. Voluminous Twisted Half-Up
This final style brings everything together—volume, texture, and intentional styling detail in one dramatic, statement-making approach. Start by creating maximum volume throughout your entire head. Blow-dry your hair with your head flipped upside down, use a volumizing mousse, or backcomb sections gently for texture and lift.
Building Maximum Volume
Create two substantial twists—thicker than you’d normally make them—by incorporating larger sections of hair from each side of your head. Bring these twists toward the crown and secure them together, but before pinning, tease the twisted sections gently for even more volume. The result is noticeably full, textured, and dimensional.
When to Wear This Look
This style makes a bold statement and suits situations where you want your hair to be visibly styled and impressive—special events, celebrations, nights out, or any occasion where understated elegance isn’t the goal. The voluminous approach suits people with thick or medium-density hair best, though finer hair can achieve this look with proper teasing technique.
Insider note: Volumizing mousse applied to damp hair before blow-drying creates longer-lasting volume than teasing alone. Use mousse on the roots and mid-lengths, then blow-dry from underneath for maximum lift that lasts throughout your event.
Final Thoughts
Half-up half-down hairstyles transcend trends because they balance practicality with elegance in a way few other styles manage. Whether you choose a simple twist that takes five minutes or an intricate fishtail braid that requires patience and practice, you’re working with one of the most universally flattering silhouettes available.
The variations within this single style category are genuinely endless because you’re combining multiple techniques—twists, braids, texture, accessories—and adjusting placement, volume, and proportion. Start by mastering whichever approach calls to you most, then experiment with other techniques to build your styling repertoire. The more comfortable you become with the basic mechanics, the more confidently you can adapt and personalize these looks for your own features, hair type, and lifestyle.
Long hair deserves styling that honors its length while keeping it manageable and practical. Half-up half-down accomplishes exactly that—it’s the hairstyle equivalent of having it all.