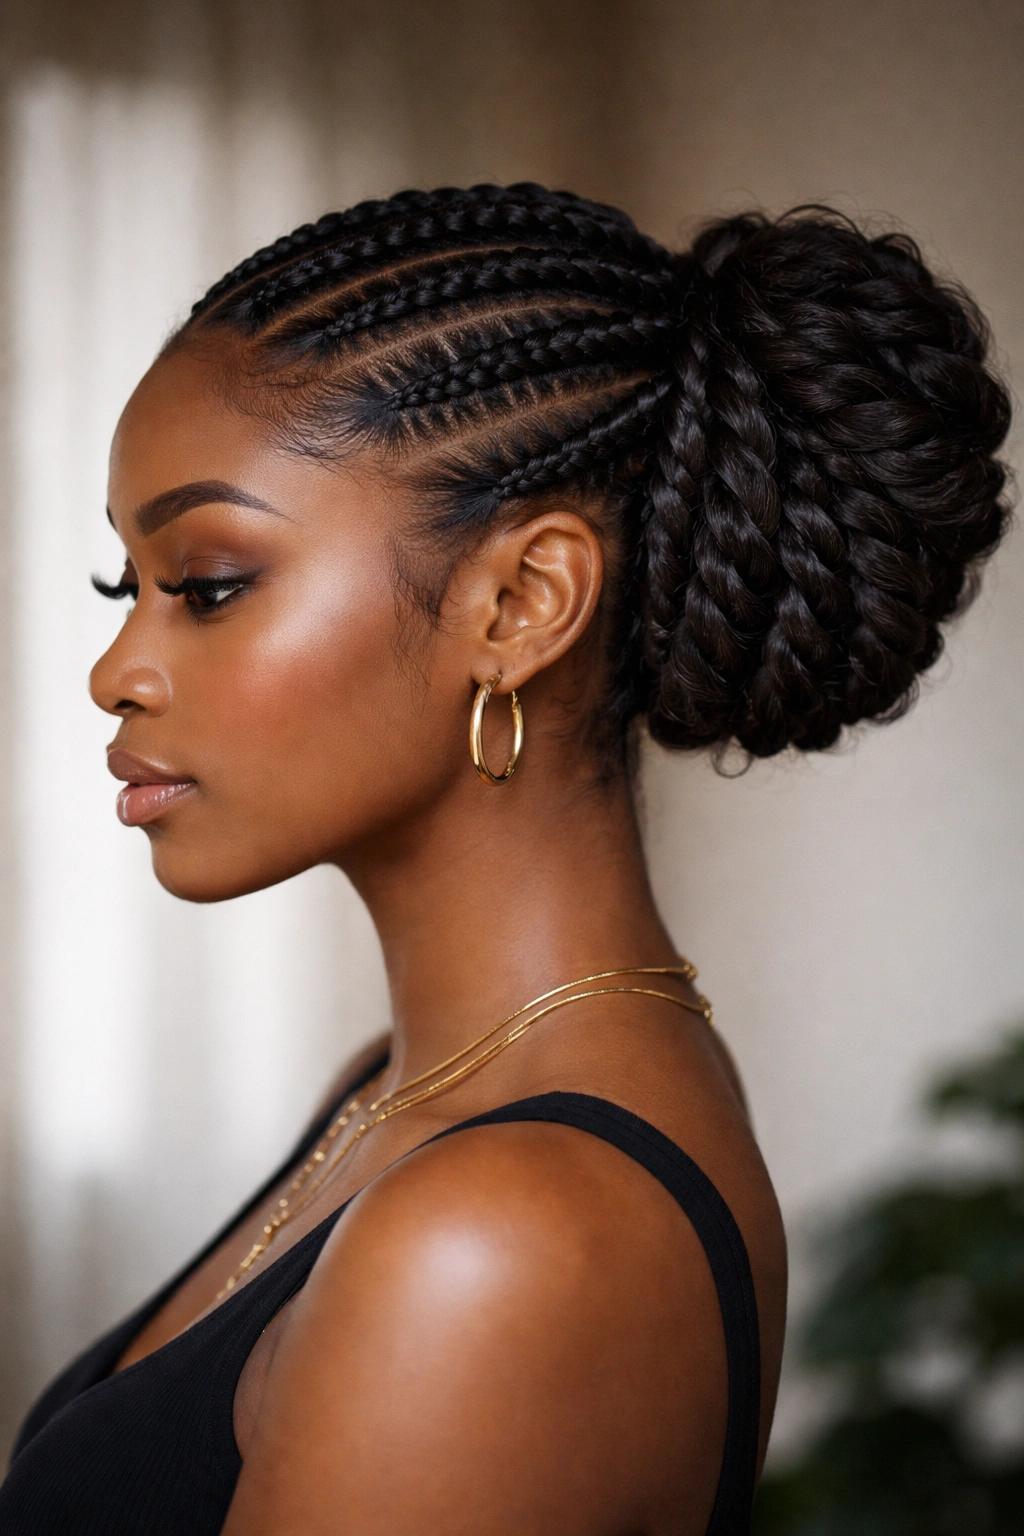
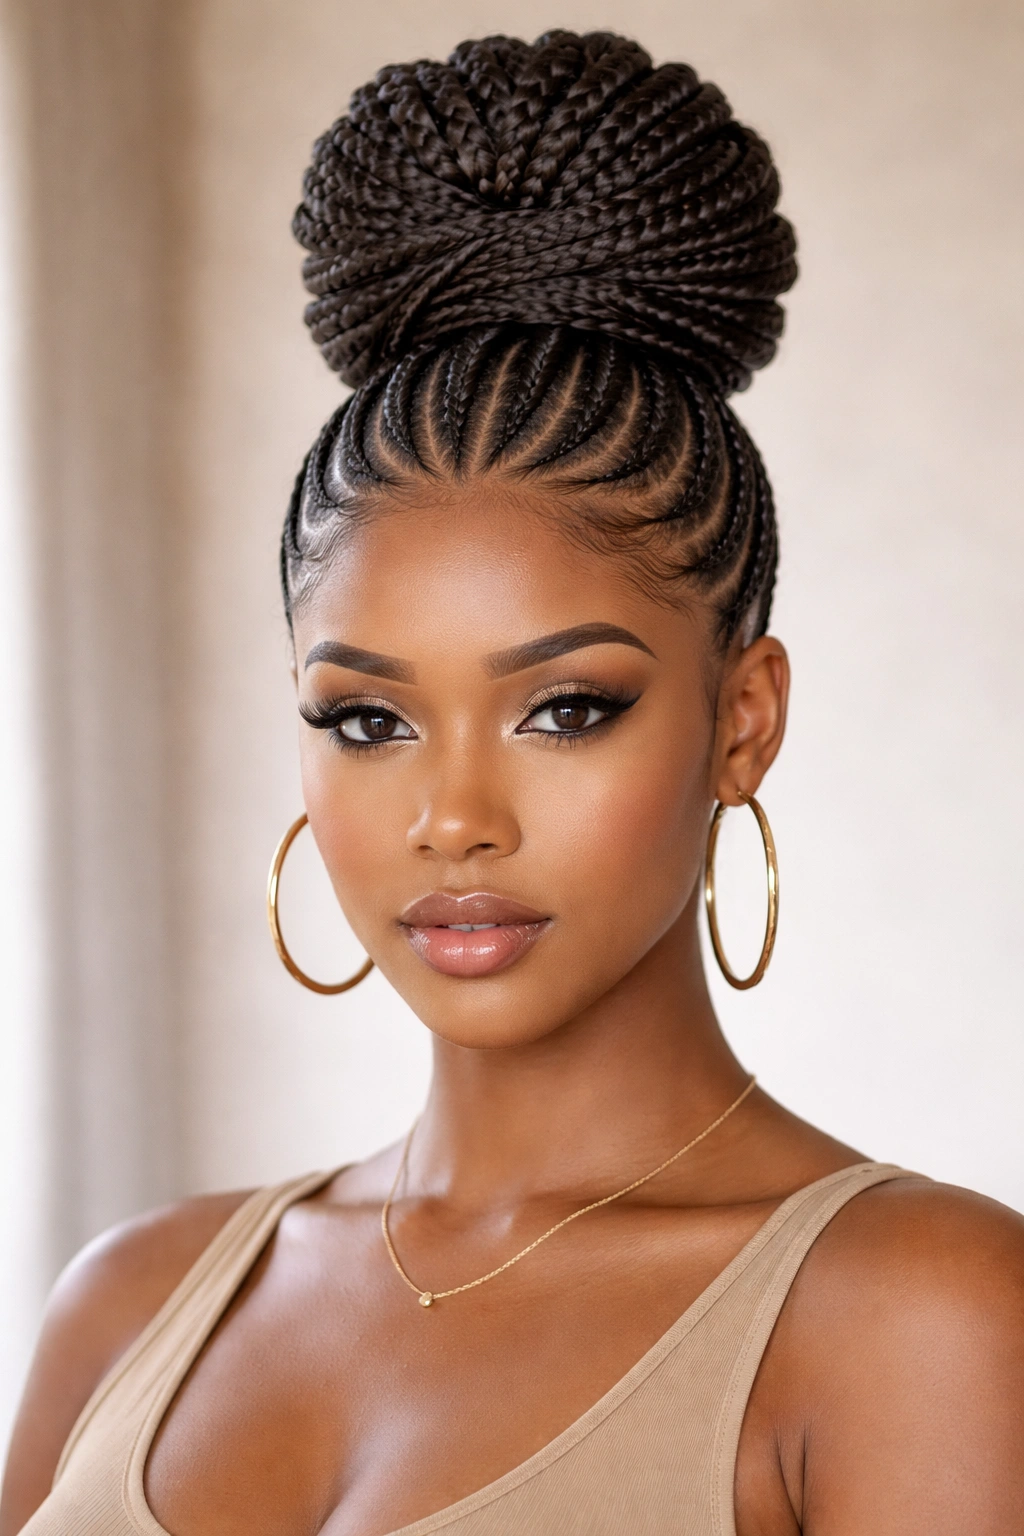
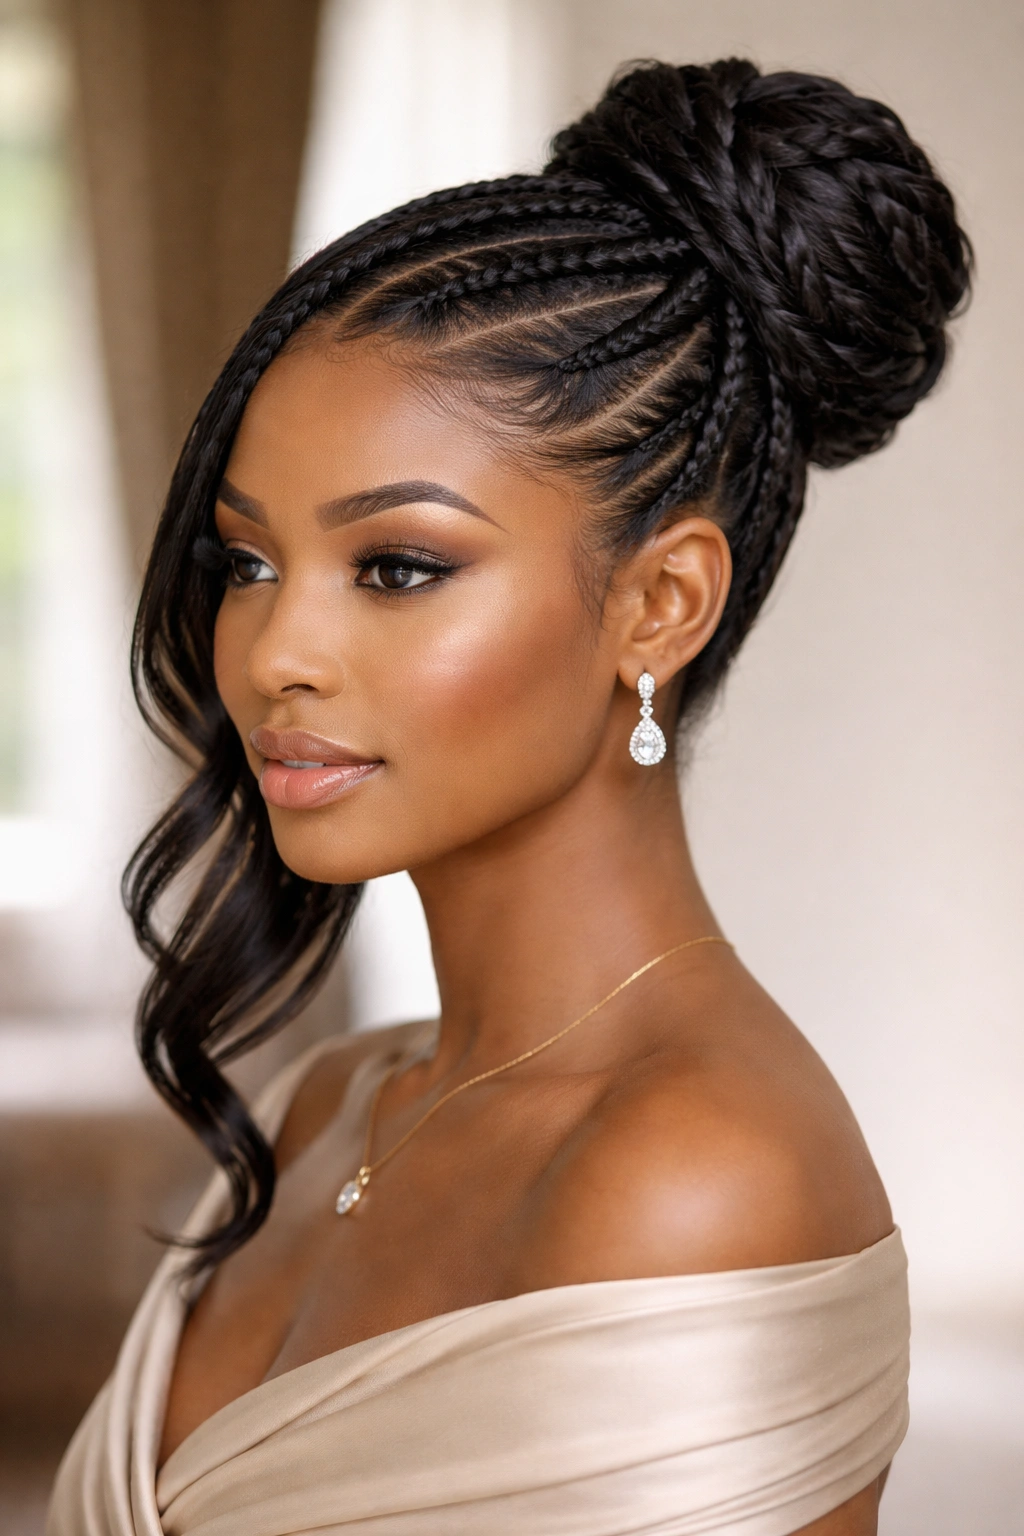
Cornrow bun styles represent one of the most elegant, versatile, and protective ways to wear your natural hair. Unlike traditional single braids that leave strands loose at the ends, cornrow buns sweep all of your hair upward into a structured, polished shape that works for everything from casual outings to formal events. The beauty of cornrow buns lies in their ability to combine intricate braiding work with a finished, intentional silhouette—they’re statements of style that also happen to protect your ends and reduce daily manipulation.
The “big” factor changes the game entirely. Voluminous cornrow buns aren’t delicate or understated; they command attention through their sheer presence and the skill required to execute them. Whether you’re working with shoulder-length hair, waist-length locs, or extension braiding, big cornrow buns showcase the full scope of what’s possible when you combine multiple braiding patterns, strategic sectioning, and clever styling techniques. They work across textures, lengths, and hair types—and they age beautifully over several weeks when properly maintained.
What makes cornrow buns different from other protective styles is the architectural element. You’re not just braiding down to the ends; you’re building toward a focal point. That focal point can be a dramatic high crown, a romantic side placement, a low nape knot, or even split buns that frame the face. Each placement and braiding pattern creates a completely different aesthetic, which is why exploring the full range of options helps you discover which styles suit your face shape, hair volume, and personal aesthetic best.
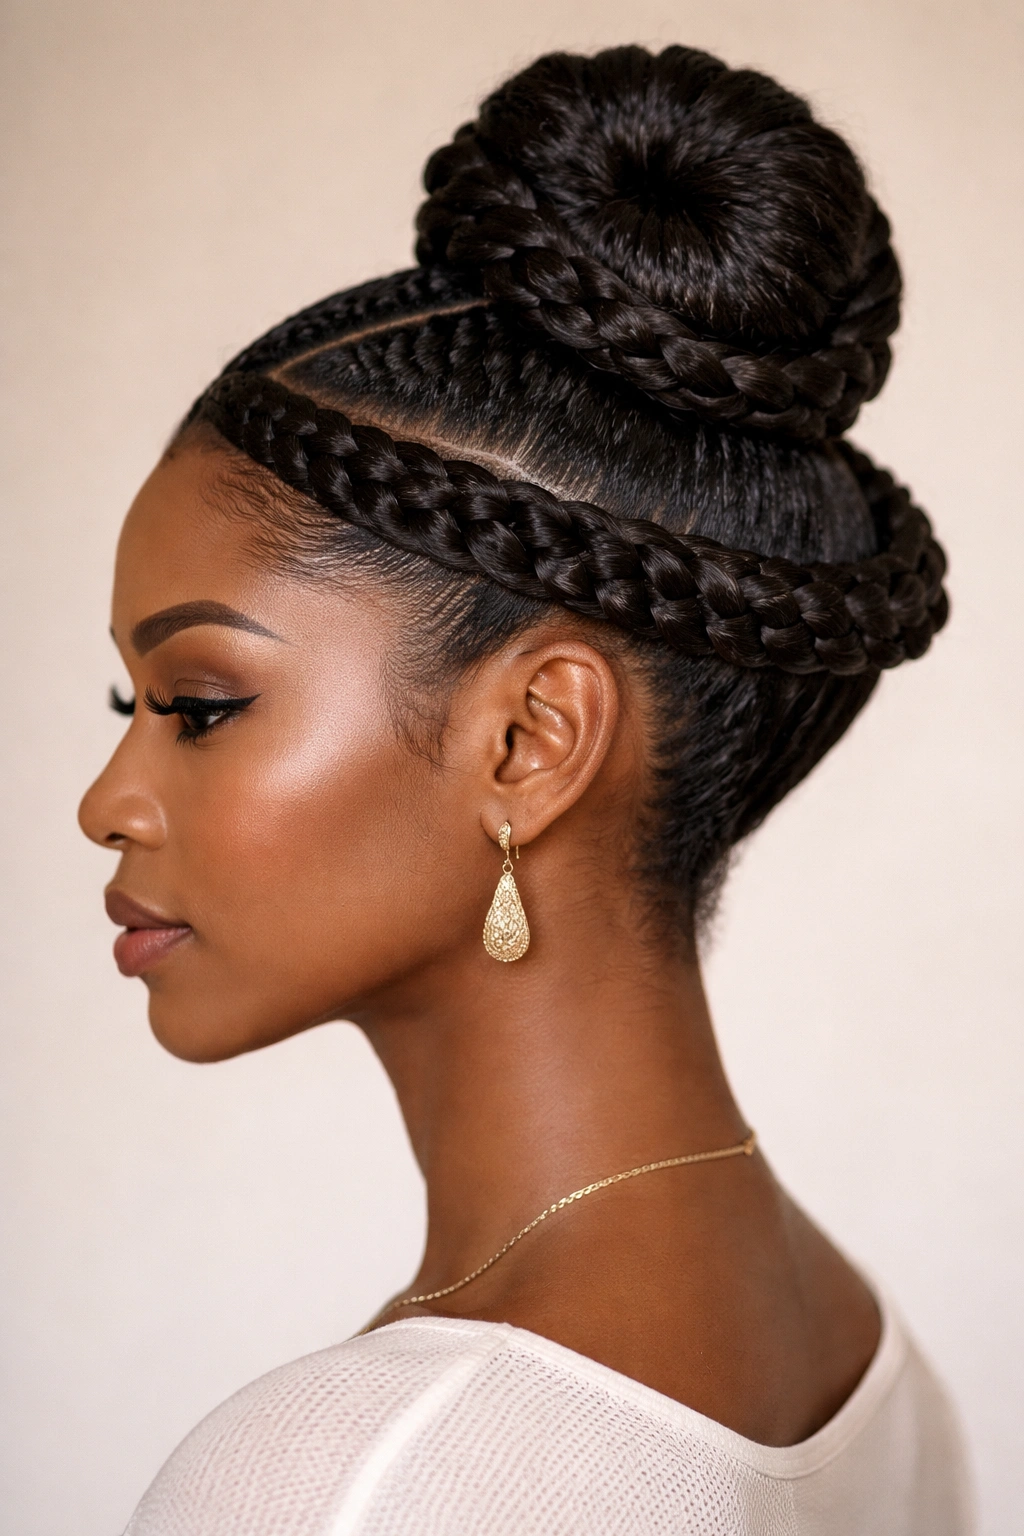
1. The Classic Crown Bun with Three Central Braids
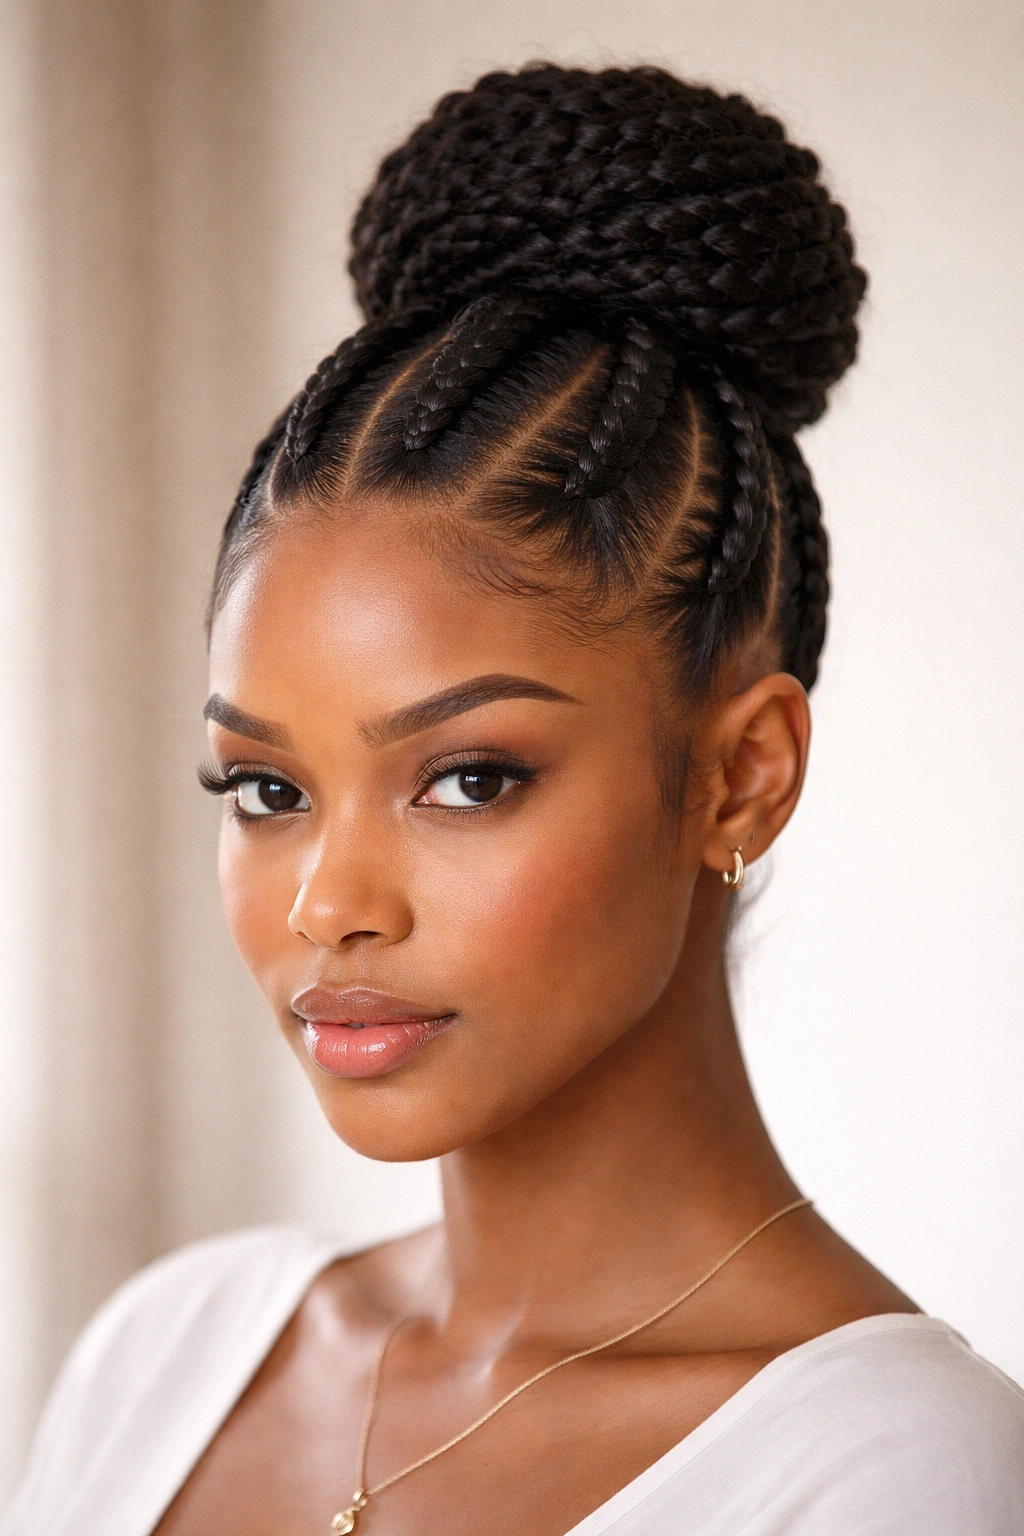
This timeless style features three thick, evenly-spaced cornrows that start at your front hairline and feed directly into a voluminous bun positioned at the crown of your head. The three-braid pattern creates natural symmetry and allows maximum bulk, which translates to that full, rounded bun shape everyone wants.
How to Achieve Maximum Volume
Start by sectioning your hair into three equal parts from your hairline back toward the crown. Each section should be wide enough that you can fit at least three fingers across the base. This thickness is essential—thin, dainty cornrows won’t create the dramatic volume you’re after. Braid each section tightly and evenly as you move backward, keeping consistent tension so the braids sit close to the scalp and look intentional rather than loose or unfinished.
Styling and Maintenance Tips
- Gather all three braids at the crown and wrap them around the base to form the bun, securing with bobby pins tucked deeply underneath so they’re completely hidden
- The bun should sit high and round, not flat against your head—this means leaving enough height in your braids that they have room to coil
- Smooth any flyaways using a soft brush and edge control applied with a toothbrush for precision
- This style lasts 2-3 weeks when you sleep on a silk pillowcase and refresh edges with light oil every few days
The classic crown bun works beautifully for professional settings, special occasions, or whenever you want a polished, put-together look that says you’ve invested real effort into your appearance.
2. The High Goddess Bun with Wrapped Braids

A more dramatic evolution of the crown bun, this style involves thicker cornrows that wrap upward around the sides of your head before converging into one monumental bun at the very top. The wrapping motion creates elegant lines and gives the impression that your braids are traveling through space rather than sitting flat.
The Wrapping Technique That Creates Drama
Begin with a deep side part and braid one thick cornrow from the temple on your shorter side, directing it upward and across your head in a subtle curve. On the other side, braid a cornrow from the temple on the longer side, angling it upward as well. Both braids should meet at the crown, where they merge into a single thick braid that gets coiled into your final bun. This creates a crown-like effect where two braids rise up to meet a peak.
Pro Styling Tips
- Use extensions or hair added at the root to increase braid thickness and bun fullness—even if your natural hair is fine, the extensions create the volume the style demands
- The bun should sit so high that it’s clearly visible from the front when you look straight ahead, not tucked behind the crown of your head where it disappears
- Smooth the wrapped sections with gel for a sleek finish that emphasizes the braiding pattern
- Accessorize with metallic cuffs or wrap the bun base with a complementary ribbon or fabric scrap for extra elegance
This style demands confidence and works best on people who love making an entrance and aren’t interested in blending in.
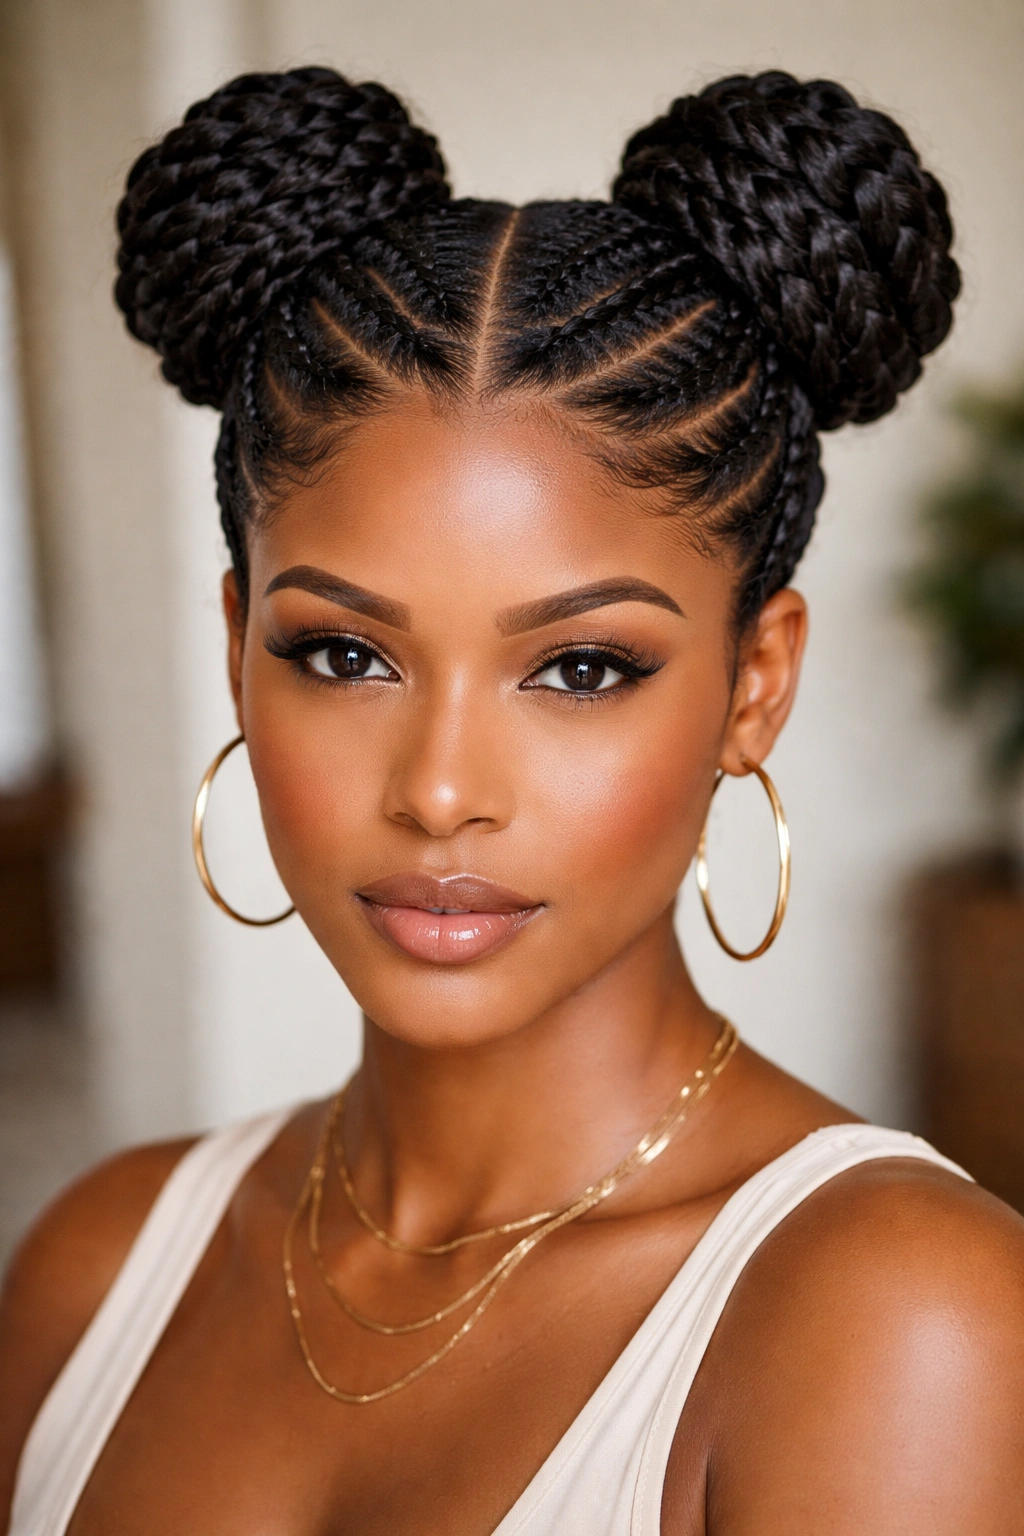
3. The Double Bun Side Sweep
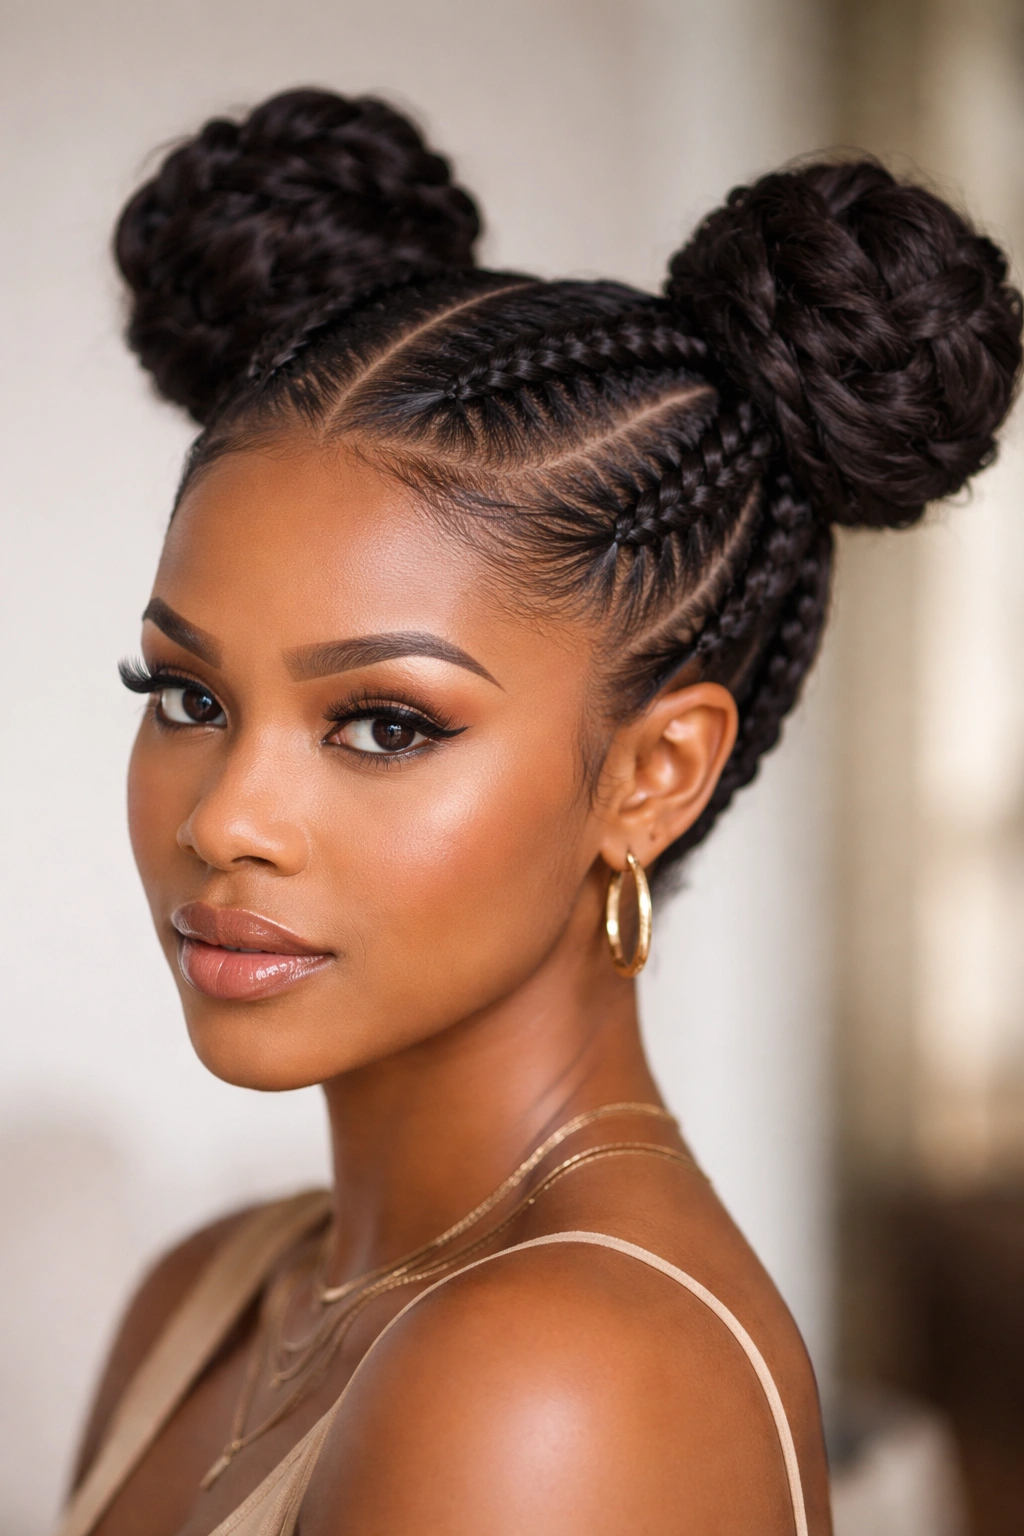
This playful style splits your hair into two thick sections, creating cornrows that braid diagonally from the back of one side to the front of the other, with each side ending in its own voluminous bun positioned high on either side of your head. The effect is youthful and artistic without reading as costume-like.
Creating Perfect Symmetry
The key to this style working is making your two sections mirror images of each other. Part your hair down the very center of your head from front to back, creating two equal halves. On each side, create one thick, dramatic cornrow that starts at the back near your nape and braids forward at an angle, sweeping toward the opposite temple. Each braid should be thick enough that when you coil it into a bun, the final shape is substantial and rounded.
Styling Specifics
- The two buns should sit at approximately the same height, aligned horizontally across your head—this symmetry is what makes the style feel intentional rather than accidental
- You can wear the buns as tight, compact rounds or slightly loose and voluminous, depending on your preferred aesthetic
- Add small accessories like gold cuffs or colorful hair jewelry to draw attention to each bun
- This style suits shoulder-length hair particularly well; with longer hair, the weight can pull the buns slightly lower than intended
The double bun side sweep is perfect for festival looks, creative dates, or whenever you want to project playfulness and artistic confidence.
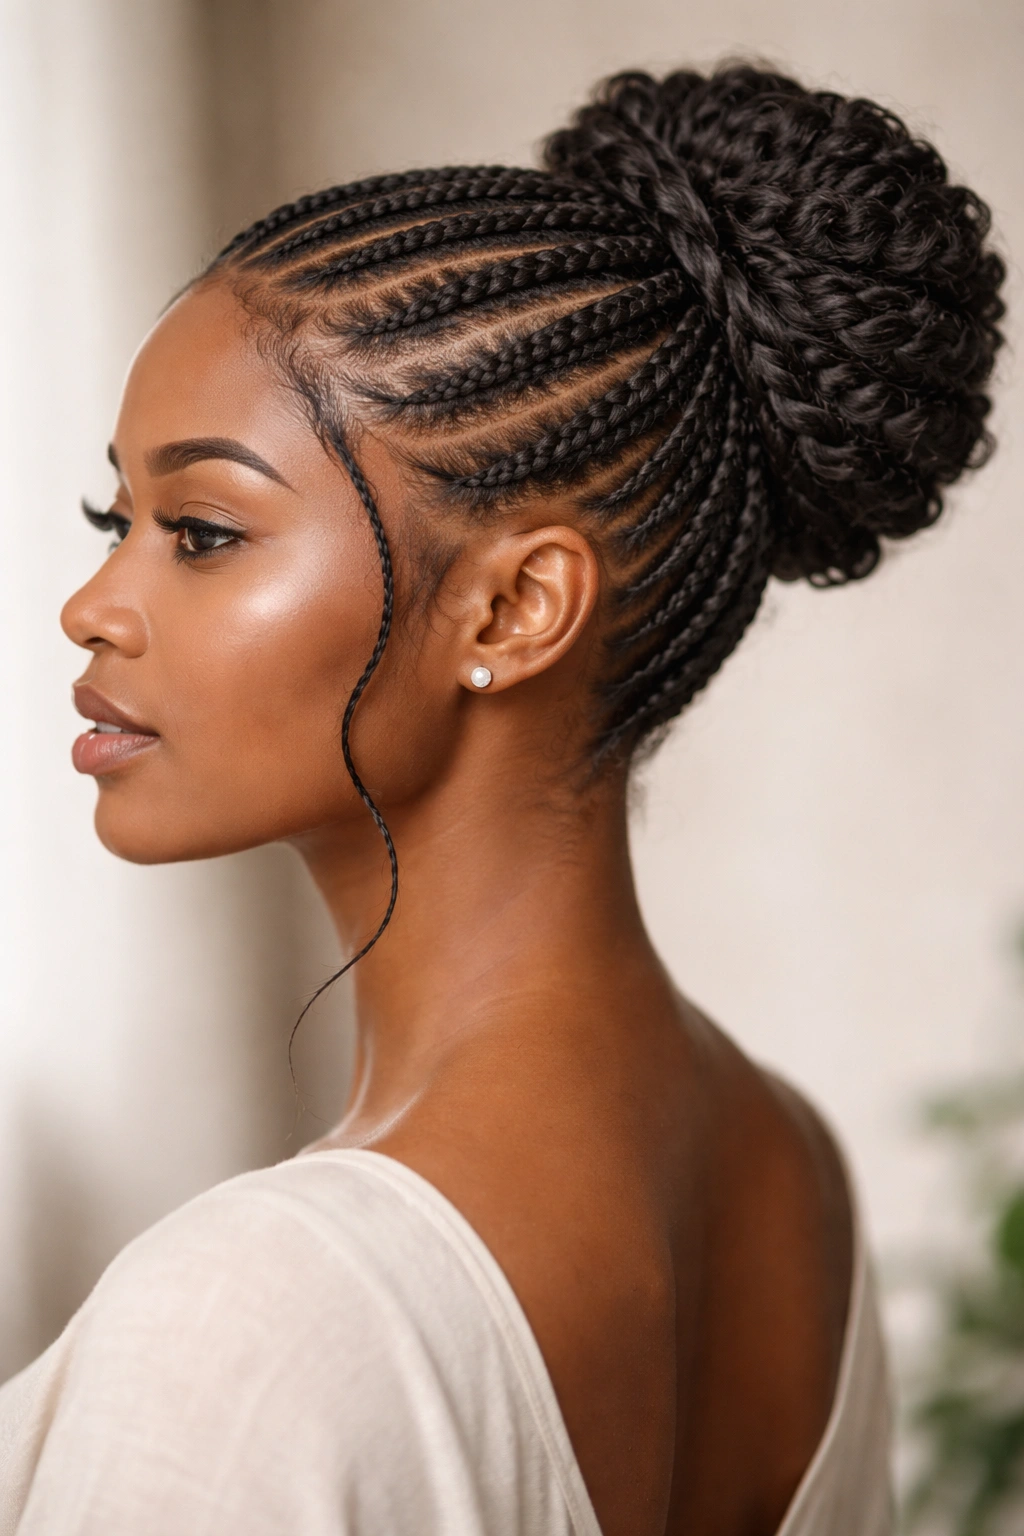
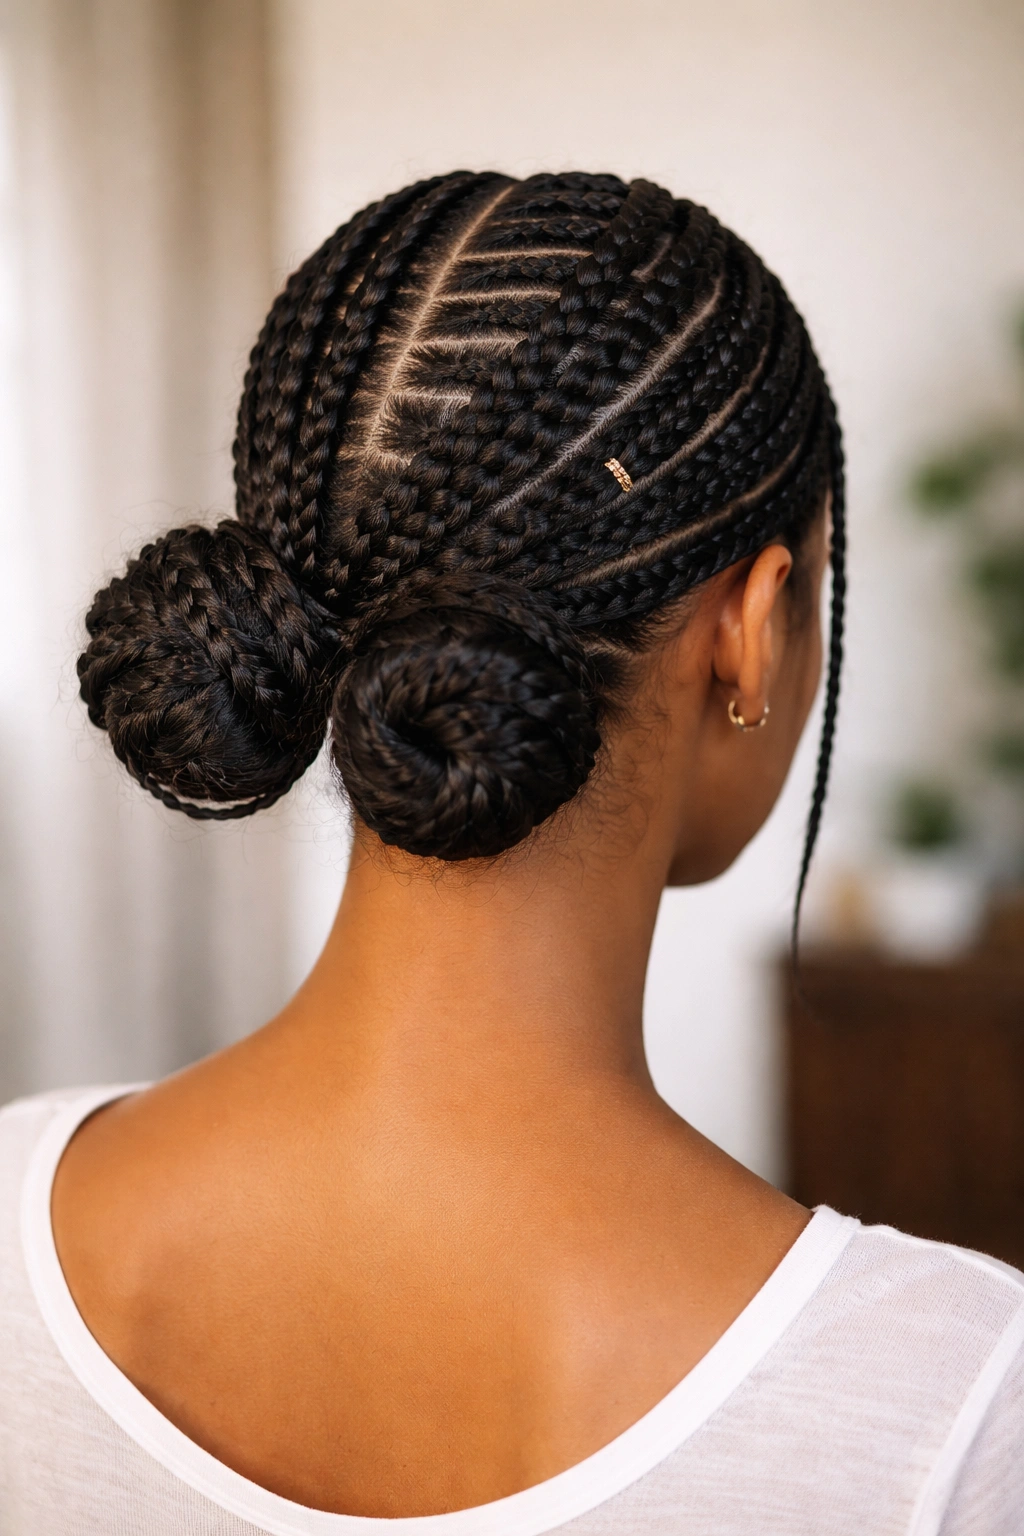
4. The Low Nape Bun with Structured Braids
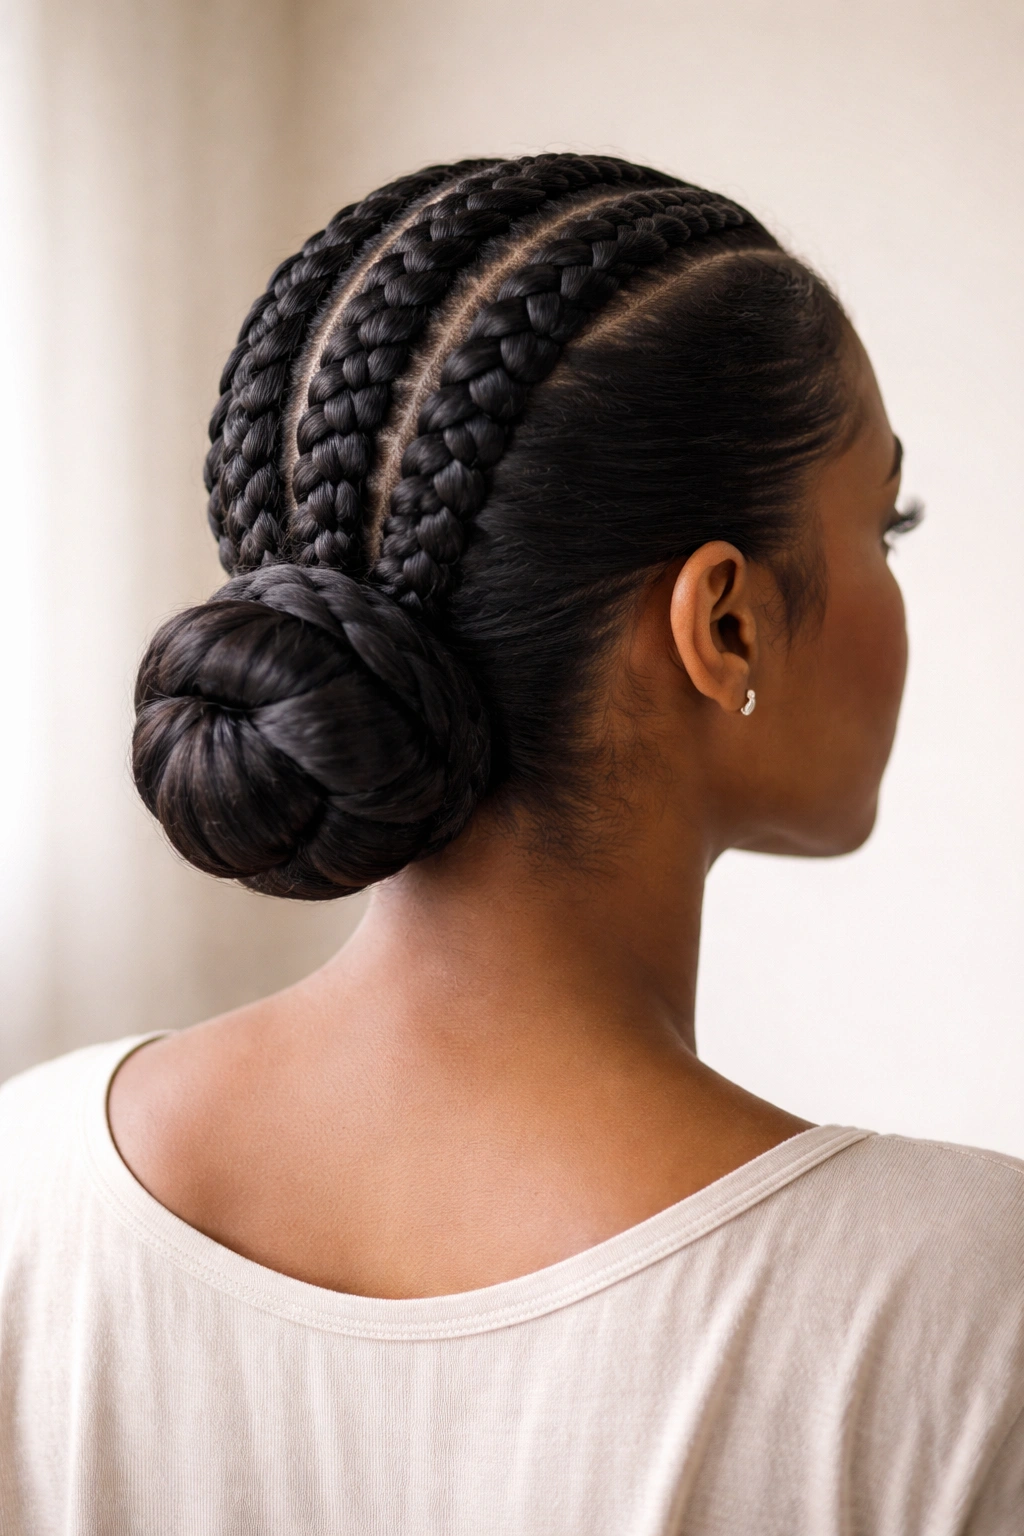
Positioning your bun low on the nape of your neck creates an entirely different aesthetic from crown buns—it’s more sophisticated, elongates your neck, and works beautifully with both professional and casual outfits. This style features two to four thick cornrows that start at your crown and travel downward, merging into a substantial bun at the base of your head.
Building Toward the Low Placement
Start your cornrows at or just behind your hairline, braiding downward in clean, straight lines toward your nape. The number of braids depends on your hair volume—four braids create maximum fullness, while two thick braids offer a simpler, more minimalist aesthetic. Each braid should be substantial, starting at least three fingers wide at the root.
Achieving That Elegant Finished Look
- The bun sits right at the base of your neck, resting above your shoulders—low enough to be dramatic but high enough that it doesn’t look like you’re simply putting your hair in a ponytail
- Smooth the entire style with edge control for a sleek, polished appearance
- This placement naturally shows off your neck and face, making it ideal for situations where you want to appear both professional and intentional
- Secure the bun with several bobby pins inserted at different angles so it holds firm even with the weight hanging low
This style projects understated elegance and works especially well for work settings, formal dinners, and situations where you want to seem capable and refined.
5. The Halo Bun with Braids Across the Crown

Imagine cornrows that start at one temple, travel all the way around your head to the other temple in a circular halo pattern, then feed into a bun at the back of your crown. This is luxury protective styling at its finest—the braided halo showcases technical skill while the bun anchors the entire look.
Creating the Halo Effect
Begin with a thick cornrow at one temple, braiding it horizontally around the back of your head at roughly ear level. The braid should be substantial and sit close to your scalp, creating a clear line that frames your face. Continue the braid all the way to the opposite temple, then gather all of your remaining hair into a bun positioned directly behind where the halo braid ends.
Design Considerations That Elevate This Style
- The bun should nestle right below the circular braid, creating a visual flow where the halo leads downward into the bun
- Keep the halo braid very tight and close to the scalp for maximum definition—loose braids lose the halo effect
- Smooth everything with edge control for a polished, intentional appearance
- This style pairs beautifully with gold jewelry around the neck and face, emphasizing the crown-like quality
The halo bun conveys sophistication and artistic vision. It works for special occasions, photoshoots, and situations where you want people to notice the technical beauty of your hair styling.
6. The Zigzag Feed-In Bun
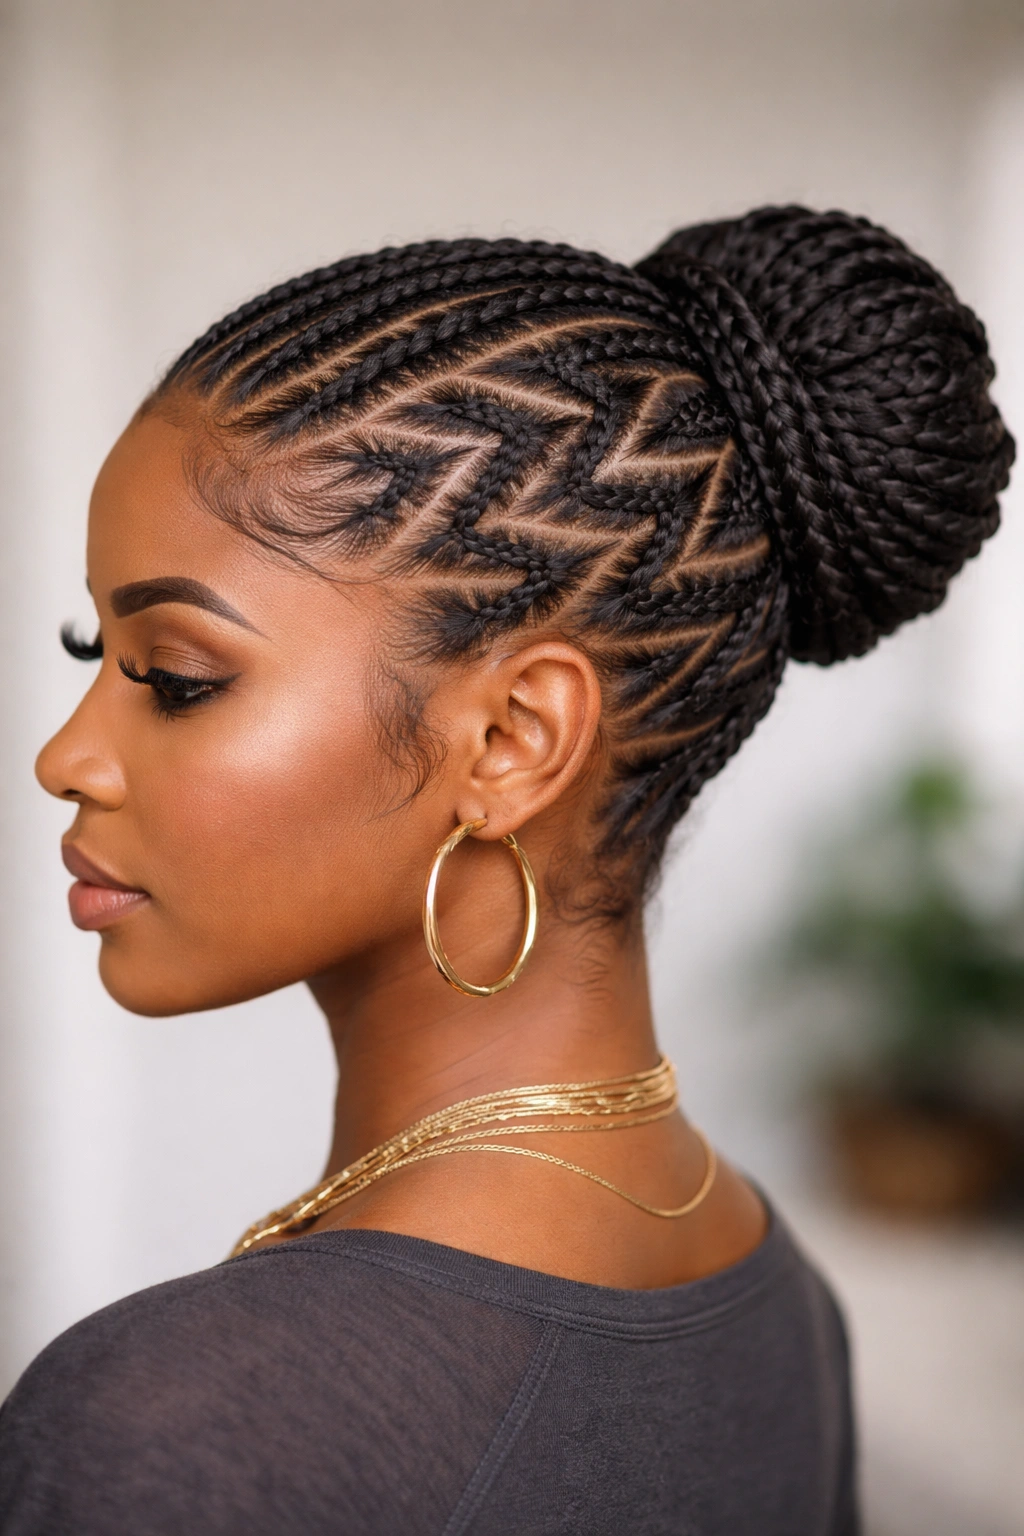
This modern style features cornrows that don’t travel straight back but instead zigzag across your head—one braid angles right, the next angles left, creating a chevron or lightning-bolt pattern that feeds into a side-positioned bun. The zigzag adds visual drama and movement to an otherwise stationary bun.
Executing the Zigzag Braiding Pattern
Section your hair into vertical bands of equal width. Braid the first section at a right angle, the second at a left angle, and continue alternating as you move back across your head. Each braid should be thick and well-defined so the zigzag pattern reads clearly. All of the braids converge at one point—typically one side of your head—where they merge into your final bun.
Why This Pattern Creates Visual Interest
- The zigzag creates an optical illusion of movement and dynamism, making static braids feel alive
- Your eye naturally follows the angles, creating a sense of flow that makes the style feel more artistic than geometric
- The side bun placement adds to the asymmetrical, contemporary feel
- This style photographs beautifully from the side angle, which is worth considering if you enjoy documenting your looks
The zigzag bun works best for creative professionals, artists, and people who aren’t afraid to make a statement with their styling choices.
7. The Braided Crown with Center Bun
Picture a thick, sculptural crown of braids that sits directly across the very top of your head, with a voluminous bun positioned at the very back of your crown—like wearing a tiara made of your own braided hair. This style combines elegance with undeniable drama.
Building the Braided Crown
Create a deep horizontal part that runs from temple to temple across the top of your head. This top section becomes your crown braid. Braid it in one thick, even cornrow from one temple to the other, keeping it high on your head so it truly sits like a crown. The remaining hair gets gathered into the bun at your crown.
Creating the Finished, Formal Look
- Your crown braid should be thick enough that it’s instantly noticeable from the front—this is a statement piece, not subtle
- Use gentle edge control to smooth flyaways without making the style look overly processed
- The center bun should sit high and round, positioned directly behind where your crown braid ends
- This style works beautifully with a simple necklace that draws attention to your collarbone and elongated neck
The braided crown bun is perfect for weddings, formal events, and situations where you want to make a memorable impression. It conveys confidence and artistry.
8. The Twisted Side Bun with Feed-In Braids
This style swaps some cornrows for thick twists—you braid two to three feed-in cornrows on one side of your head, then transition to chunky twists on the other side, bringing everything together into a voluminous side bun. The mixed braid-and-twist texture adds visual complexity and interest.
Mixing Braids and Twists Intentionally
Start with cornrows on one side, braiding from your temple backward at a slight angle. Transition to thick twists on the other side, allowing the twists to curve upward. Both the braids and twists should travel toward the same focal point—your designated bun location on one side of your head.
Styling the Mixed Textures
- The contrast between tight cornrows and fluffier twists creates texture that’s visually engaging
- Position your bun on the side where your braids and twists converge, allowing each element to contribute to the bun’s overall volume
- Use edge control sparingly so the twists maintain their distinct texture
- The asymmetrical placement adds modernity to a protective style that might otherwise feel traditional
This style suits people who like visual complexity and aren’t interested in perfect symmetry. It works especially well for people with naturally fuller hair that can support the volume of both braids and twists.
9. The Multi-Strand Feed-In Bun with Added Extensions
This technique involves thin, feed-in cornrows braided very close together across your entire head, with extensions added to each cornrow to increase volume and fullness. All of these thin, extension-enhanced braids converge into one absolutely massive bun—think the size of a grapefruit or larger.
Creating Maximum Volume Through Feed-Ins
Feed-in cornrows are thinner at the root but gain thickness as you braid, because you’re adding more hair incrementally as you go. Start each cornrow with just your natural hair at the root, then systematically add extension hair section by section. This creates fullness without the weight and tension of super thick braids at the scalp.
Achieving That Oversized Bun Drama
- Create five to seven thin feed-in cornrows across your head, spacing them evenly
- Add quality extensions to each braid—Kanekalon, human hair, or yarn all work depending on your preference and budget
- As each braid reaches the gathering point, don’t cut the extensions short; allow them to contribute to the bun’s volume
- Secure the bun tightly at its base, then allow the excess length to coil and sit loosely, creating that full, rounded shape
This style makes a bold statement and works for people who love high-impact, noticeable protective styling. It requires skill to execute well but the results are undeniably stunning.
10. The Circular Bun with Spiral Braids
Instead of braids that travel straight back, this style features cornrows that spiral around your head before feeding into a centered bun. Imagine concentric circles of braids that move inward, getting closer together as they approach your bun at the crown. The effect is hypnotic and deeply artistic.
Creating the Spiral Pattern
Begin with a thick cornrow at your natural hairline that curves gently around your head, creating the outer circle of your spiral. As you braid, gradually angle inward so your next braid sits slightly closer to center than the previous one. Continue this spiral pattern inward until all of your braids converge at one central point at your crown.
Design Elements That Make This Style Work
- The spiral creates an optical illusion of movement and flow, making your head appear as though it’s gently rotating
- Each braid should sit close to the scalp with tight, even tension—this definition is what makes the spiral pattern readable
- The central bun should sit directly where your spiral converges, anchoring the entire pattern
- This style photographs beautifully from above, showing off the complete spiral effect
The spiral bun requires genuine skill to execute and works best for people who appreciate geometric beauty and artistic hair design.
11. The Side-Swept High Bun with Curved Braids
This romantic style features two thick, curved cornrows that start at one side of your head and sweep dramatically across and upward to the opposite side, where they converge into a high side bun. The curves create an elegant, flowing aesthetic that’s both formal and approachable.
Creating Natural, Elegant Curves
Begin with a thick cornrow at one temple, braiding at a slight upward angle as it travels across your head. The second cornrow should mirror this motion from the other side, and both should meet at a high point on the opposite side of your head from where they started. Think of them as two hands coming together at a point.
Achieving That Effortlessly Elegant Look
- The curves should feel organic, not overly geometric—aim for natural S-curves rather than sharp angles
- Your final bun should sit high on one side of your head, the culmination of both braids’ journey
- Smooth the style with light edge control for a polished but not stiff appearance
- This placement naturally exposes one side of your face and neck, making it work beautifully with makeup or jewelry that emphasizes those features
The side-swept high bun conveys romance and intentionality. It works for date nights, special occasions, and situations where you want to appear thoughtful and aesthetically aware.
12. The Mohawk Bun with Bold Center Braids

This edgy, modern style features one thick central cornrow that starts at your hairline and travels straight back to your crown, with optional additional braids on either side creating a mohawk effect. Everything converges into a bold, statement-making bun at the crown.
Creating the Mohawk Structure
Part your hair down the very center from your hairline to the crown. Create one thick, dominant cornrow directly down this center line, keeping it as straight as possible for maximum impact. This center braid should be noticeably thicker than any secondary braids you add on the sides.
Styling for Maximum Impact
- The center braid is your focal point, so keep it clean, tight, and precisely straight
- If you add side braids, keep them slightly thinner than the center braid to maintain the hierarchy
- Your center bun should sit directly behind where the center braid ends, right at the crown
- Use bold edge control for a sleek, intentional appearance that emphasizes the style’s modern aesthetic
- This style pairs beautifully with statement earrings or face jewelry that draws attention to your central focal point
The mohawk bun works for confident people who love making bold statements with their styling. It’s perfect for creative fields, performances, and situations where standing out is the goal.
13. The Braided Ponytail Bun with Wrapped Base
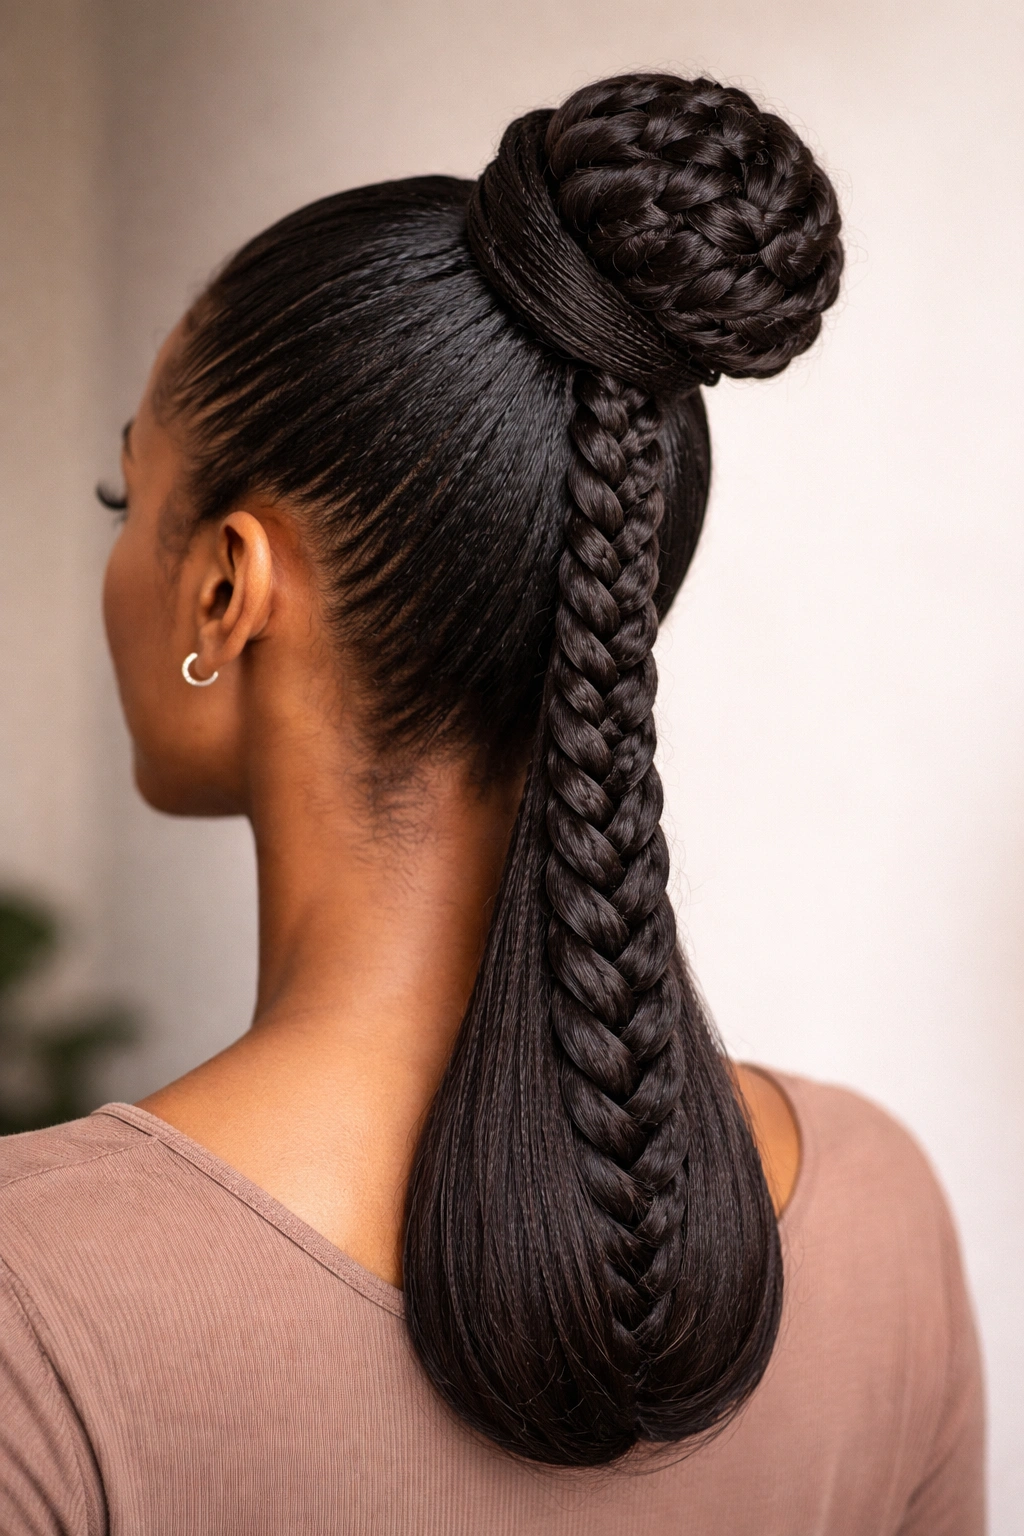
This practical style gathers all of your hair into a high or mid-height ponytail first, then creates a thick cornrow directly down the ponytail, finishing with a bun at the ponytail’s end. The wrapped base where the ponytail starts is secured with a decorative wrap or additional braid, creating a finished, intentional look.
Building the Foundation
Section your hair into a high or mid-height ponytail and secure tightly with elastic. Take a thin section of hair from the ponytail and braid it spirally around the elastic and ponytail base, covering the elastic completely. This wrapped base creates a polished appearance that reads as intentional rather than quick-and-messy.
Creating the Braided Ponytail and Bun
- Create one thick cornrow directly down the center of your ponytail, from the elastic to the ends
- Coil the braided ponytail section into a bun at its end, securing with bobby pins
- The wrapped base should sit where your ponytail begins, creating a clear, defined line
- This style is more forgiving than others—it works with finer, thinner ponytails that couldn’t support standalone cornrow buns
The braided ponytail bun is practical for people with varying hair volumes and works for both casual and dressy occasions. It’s versatile enough for everyday wear but intentional-looking enough for special events.
14. The Crown Ring Bun with Braided Frame
Imagine a bun that sits inside a braided circle—two thick cornrows form a ring around your head at about ear level, creating a frame, and your bun sits centered within that frame, resting at the crown. The braided ring creates a crown-like appearance while the bun anchors the center.
Creating the Braided Frame
Create two thick cornrows that start at one temple, travel around the back of your head at consistent height, and end at the opposite temple. These should be spaced about 2-3 inches apart vertically, creating an oval ring around your head. All remaining hair gathers into the bun positioned directly in the center where the two rings would logically meet.
Design Considerations
- Both frame braids should be equally thick and tight, creating visual balance
- The bun should sit high enough to nestle comfortably within the frame without disrupting it
- Smooth the entire style for a polished, intentional appearance
- This style works beautifully with delicate jewelry worn at the temples or around the neck
The crown ring bun projects sophistication and artistic vision. It’s perfect for people who appreciate geometric beauty and architectural styling.
15. The Back-Gathered Bun with Curved Front Braids
This elegant style features curved, sculptural cornrows that frame your face and travel toward the back of your head, where all of your hair gathers into a voluminous bun. The curved front braids create a flattering frame while the back bun anchors the style.
Creating Flattering Front Braids
Start your cornrows at your temples and braid them at a gentle angle toward the back of your head, allowing them to curve slightly. These braids should be visible and intentional, framing your face from the sides. As they travel backward, they gradually approach the point where they’ll join the gathered bun.
Emphasizing Your Face and Neckline
- The curved braids should follow the contour of your head and face, creating a flattering frame
- Your bun sits at the back, allowing maximum visibility of your face and front profile
- This placement beautifully exposes your neck and décolletage, making it work well with necklaces or dress necklines
- Smooth everything with light edge control for a polished appearance
This style works beautifully for people who want to show off their face and neck while still maintaining a protective style. It’s perfect for date nights, formal events, and professional settings.
16. The Double-Bun Braided Crown with Center Part
This sophisticated style features a deep center part from your hairline to your nape, creating two distinct halves. Each half gets braided into a thick cornrow that curves upward and backward, converging into two substantial buns positioned symmetrically at the crown. The effect is balanced and architecturally interesting.
Creating Perfect Mirror Images
Part your hair deeply down the center from front to back. On each side, create one thick cornrow that starts at your hairline near the part and curves upward and backward toward the crown. Both braids should follow the same curved path, just on opposite sides, creating mirror images. Each braid converges into its own bun.
Achieving Balanced, Symmetrical Beauty
- Both braids should be equally thick and tightly braided—inconsistency disrupts the symmetry
- Your two buns should sit at the same height on either side of your crown, aligned horizontally
- The center part should be clean and precise, extending from your hairline all the way down
- Use consistent edge control across both sides for visual harmony
This style conveys balance, intentionality, and architectural thinking. It works for people who appreciate symmetry and geometric beauty in their styling choices.
17. The Low Double Buns with Asymmetrical Braids
Unlike the symmetrical double bun, this style features asymmetrical braiding—perhaps one side has two braids while the other has one, or the braids angle differently on each side—but the final buns sit symmetrically low on the nape of your neck. The asymmetrical braiding creates visual interest while the symmetrical bun placement feels grounded.
Mixing Symmetry and Asymmetry Intentionally
Create unequal numbers or thicknesses of cornrows on each side of your head, but braid them all toward the same gathered point at your low nape. For example, braid two thin braids on one side and one thick braid on the other. All converge into buns that sit at equal heights on your nape.
Creating Visual Interest Through Contrast
- The asymmetrical braiding creates dynamic visual interest that keeps the eye engaged
- The symmetrical bun placement prevents the style from feeling unbalanced or accidental
- This works beautifully for creative professionals and people who appreciate nuance and sophistication
- The low placement elongates your neck and works well with all outfit styles
This style appeals to people who like subtle sophistication and aren’t interested in obvious, expected symmetry.
18. The Triple-Stacked Buns with Graduated Braids
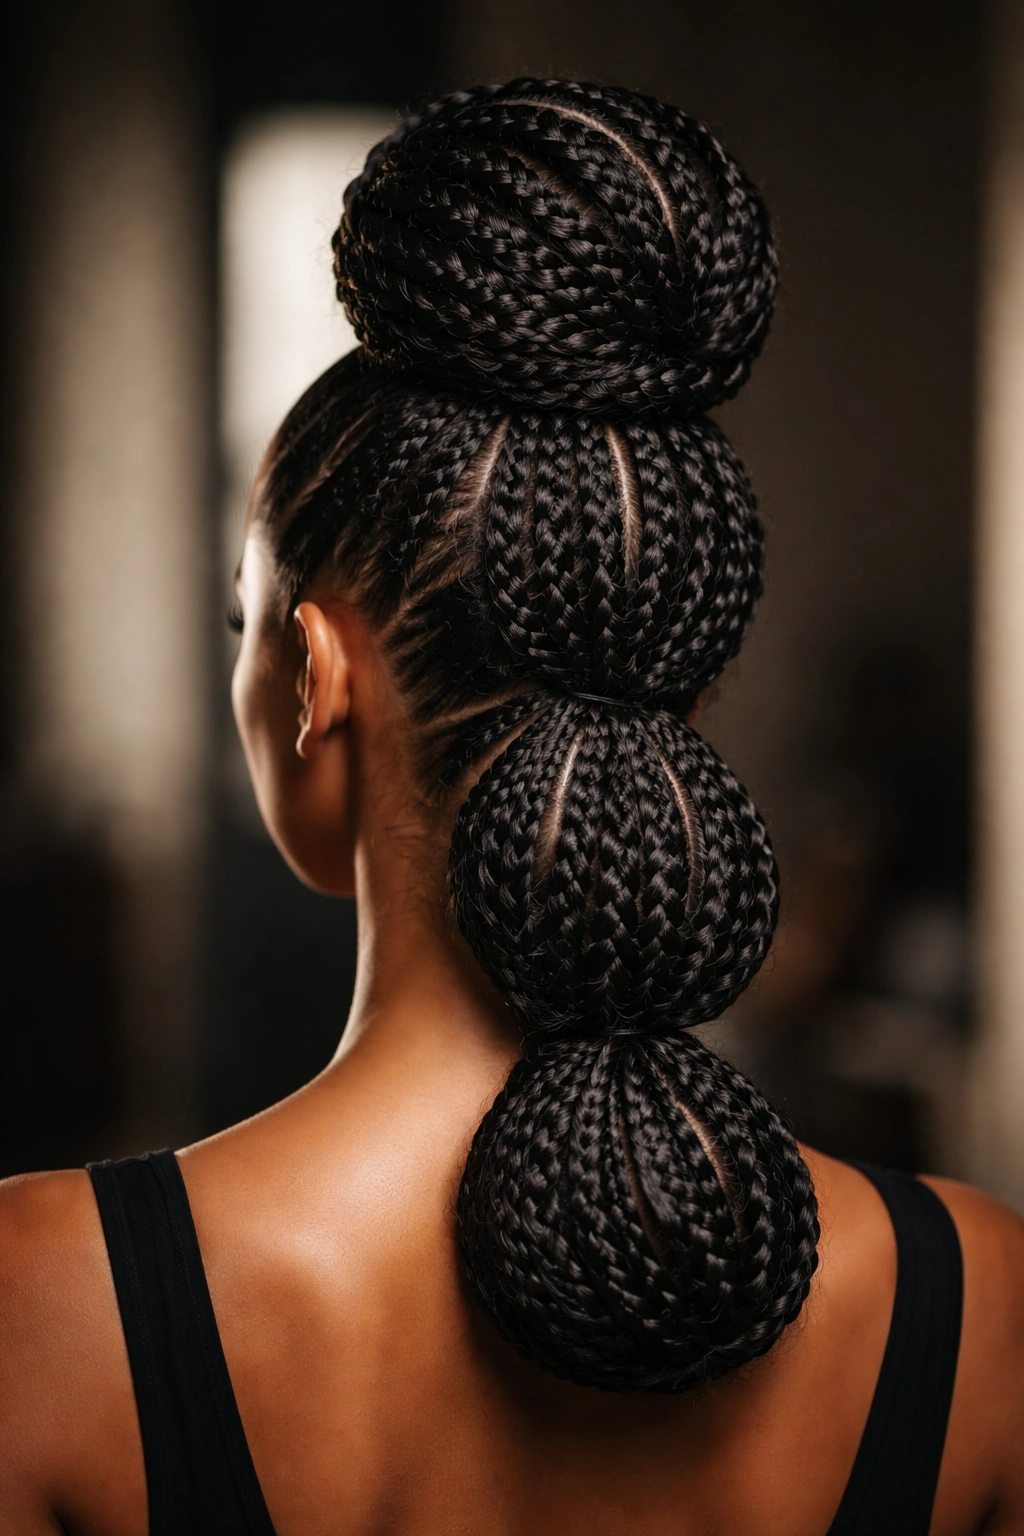
This show-stopping style features three separate buns stacked vertically down the back of your head—one at the crown, one at mid-head, and one at the nape. Cornrows feed into each bun from different angles, creating a graduated, cascading effect that’s bold and undeniably artistic.
Creating the Triple-Stack Structure
Create multiple cornrows across your head, but instead of having them all converge into one bun, strategically divide them so some feed into a bun at the crown, others feed into a mid-head bun, and the remaining feed into a nape bun. This requires careful planning and sectioning to execute cleanly.
Achieving That Architectural Drama
- Each bun should be substantial and properly rounded—thin, skimpy buns undermine the style’s impact
- The three buns should sit at noticeably different heights, creating clear visual separation
- Keep braids tight and clean throughout so the eye can easily follow each braid’s path to its corresponding bun
- This style requires longer hair (at least mid-back length) to have enough volume for three substantial buns
- The triple-stack works beautifully for photoshoots and artistic statements; it’s less practical for everyday wear due to the maintenance required
This style is for fearless people who view their hair as an art form. It’s perfect for creative professionals, performers, and situations where you want people to notice the technical skill and artistic vision behind your styling.
Final Thoughts

Big cornrow bun styles represent the pinnacle of protective styling—they’re functional, they’re beautiful, and they showcase your commitment to healthy hair practices. The range of options means there’s genuinely a style for every occasion, face shape, hair texture, and personal aesthetic. Whether you prefer geometric precision or romantic curves, symmetrical balance or artistic asymmetry, a high crown placement or an elegant nape position, you can find a cornrow bun style that feels authentically you.
The key to rocking any cornrow bun is confidence in the execution. Work with a stylist who understands the vision you’re going for, or practice the techniques yourself until your hands remember the motion. Quality braiding work shows, and it’s worth investing time in getting your cornrows tight, even, and precisely positioned. Sleep on a silk pillowcase, refresh your edges regularly with light oil, and avoid unnecessary pulling or tension that can stress your hairline.
Most importantly, remember that these styles are meant to protect your hair while you live your life. Choose styles that make you feel powerful, beautiful, and authentically yourself—and then wear them with the kind of confidence they deserve.