Coily hair on your wedding day is a canvas for stunning, textured elegance — and there’s honestly nothing more beautiful than celebrating your unique texture in a style that’s both romantic and authentically you. The key to nailing a coily-hair wedding hairstyle isn’t forcing your curls into something they’re not; it’s working with the natural structure, bounce, and volume that makes coily hair so striking in the first place.
The challenge many people with coily hair face is finding wedding styles that feel secure enough to last through a ceremony and reception without looking stiff or feeling uncomfortable. You need a style that honors your hair’s moisture needs, doesn’t cause breakage from tight tension, and actually looks intentional rather than like you’re trying to hide your texture. The good news? Coily hair actually offers incredible versatility for wedding styling — from romantic loose interpretations to sculpted updos, from delicate accessories to bold statement looks.
What makes wedding styling for coily hair different is understanding how your curls respond to products, how much hold you actually need (it’s usually less than you’d think), and how to style in a way that lets your curls breathe rather than flattening them into submission. The most successful coily-hair wedding styles we’ve seen aren’t about fighting the texture — they’re about enhancing it. Whether you’re planning an intimate ceremony or a large celebration, there’s a style here that’ll make you feel absolutely radiant and completely yourself.
1. Twisted Crown with Loose Coils
This is romantic without being overdone, and it works beautifully whether your coils are tighter or looser in pattern. The twisted crown sits like a halo across the crown of your head while the rest of your coils flow freely down your back and over your shoulders, creating a soft, ethereal silhouette.
Why It’s Perfect for Coily Hair Weddings
Twisted crowns celebrate coily texture without demanding that your curls be constrained into a tight updo. The twists add structure and intentionality to your look while keeping the majority of your coils free and mobile. Your hair stays lightweight and comfortable throughout the day, and the twists themselves catch the light beautifully — especially with delicate hairpins or thin metallic wire threaded through them.
How to Style It Beautifully
- Section off a crown area from temple to temple across the back of your head, leaving the rest of your coils loose
- Starting at one temple, take small sections and twist them back toward the center back of your head, pinning as you go with bobby pins that match your hair color
- Let your coils fall naturally below the crown section — don’t try to make them uniform or smooth; the organic texture is what makes this work
- Secure the style with flexible bobby pins and a light-hold styling cream or gel so the twists don’t flatten
- Add pearl pins, delicate flowers, or thin gold wire woven through the crown for wedding-day sparkle
Pro tip: Do this style the night before with slightly damp coils, then sleep on it gently with a silk bonnet or pillowcase. The twists will set beautifully, and your coils underneath will have time to settle into their natural pattern.
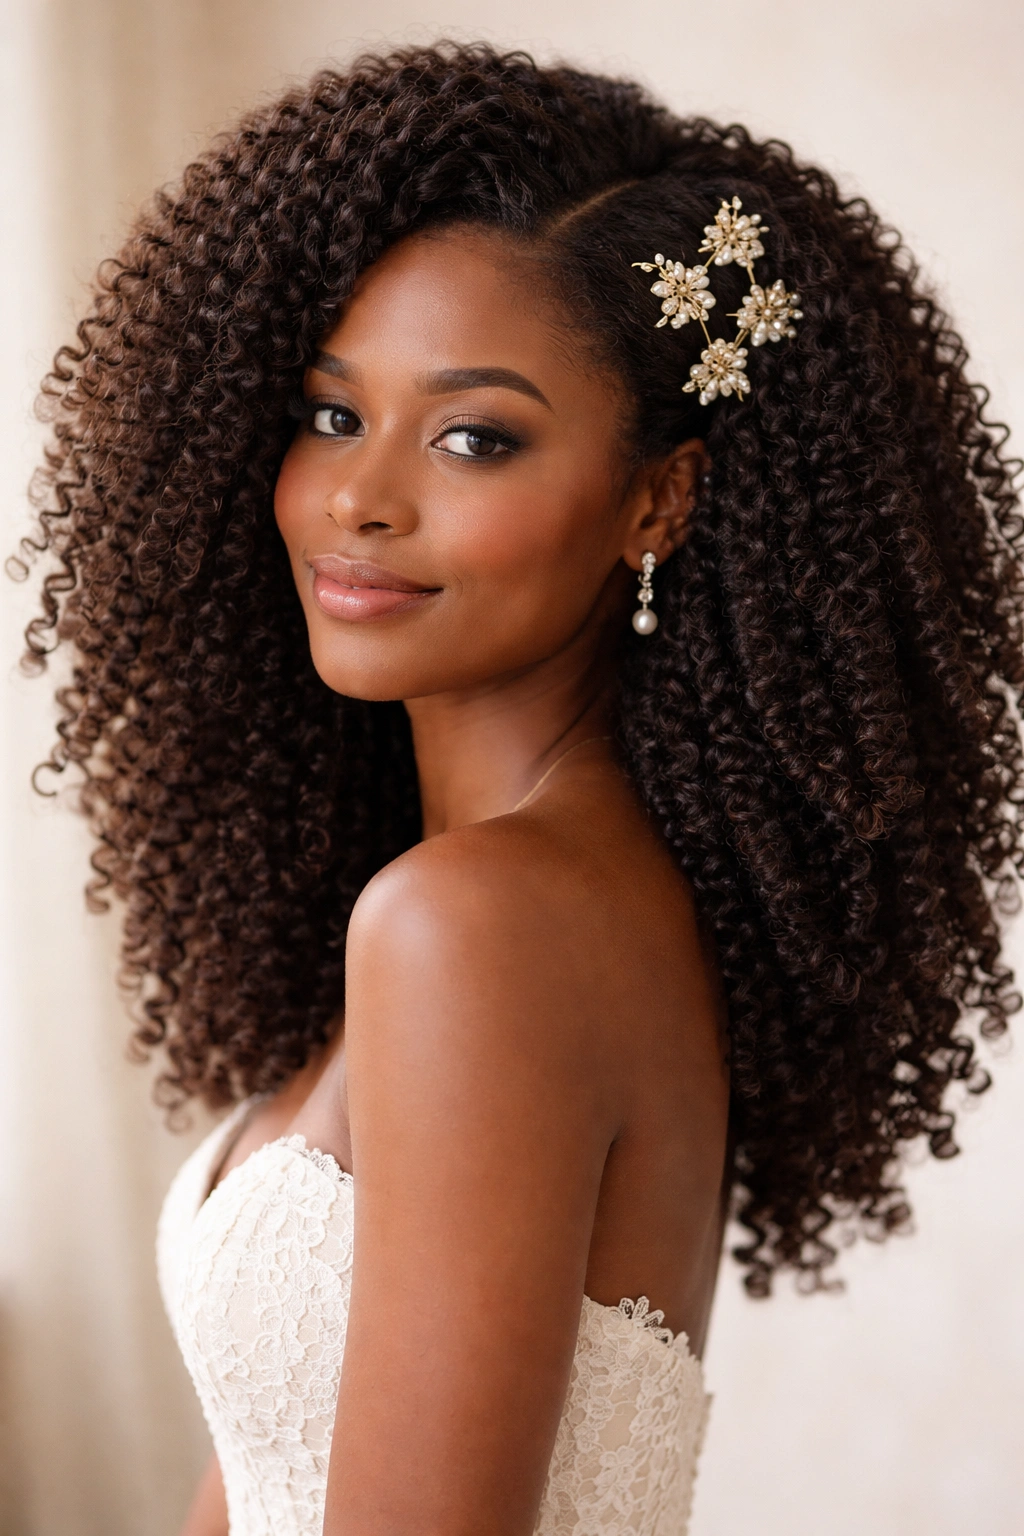
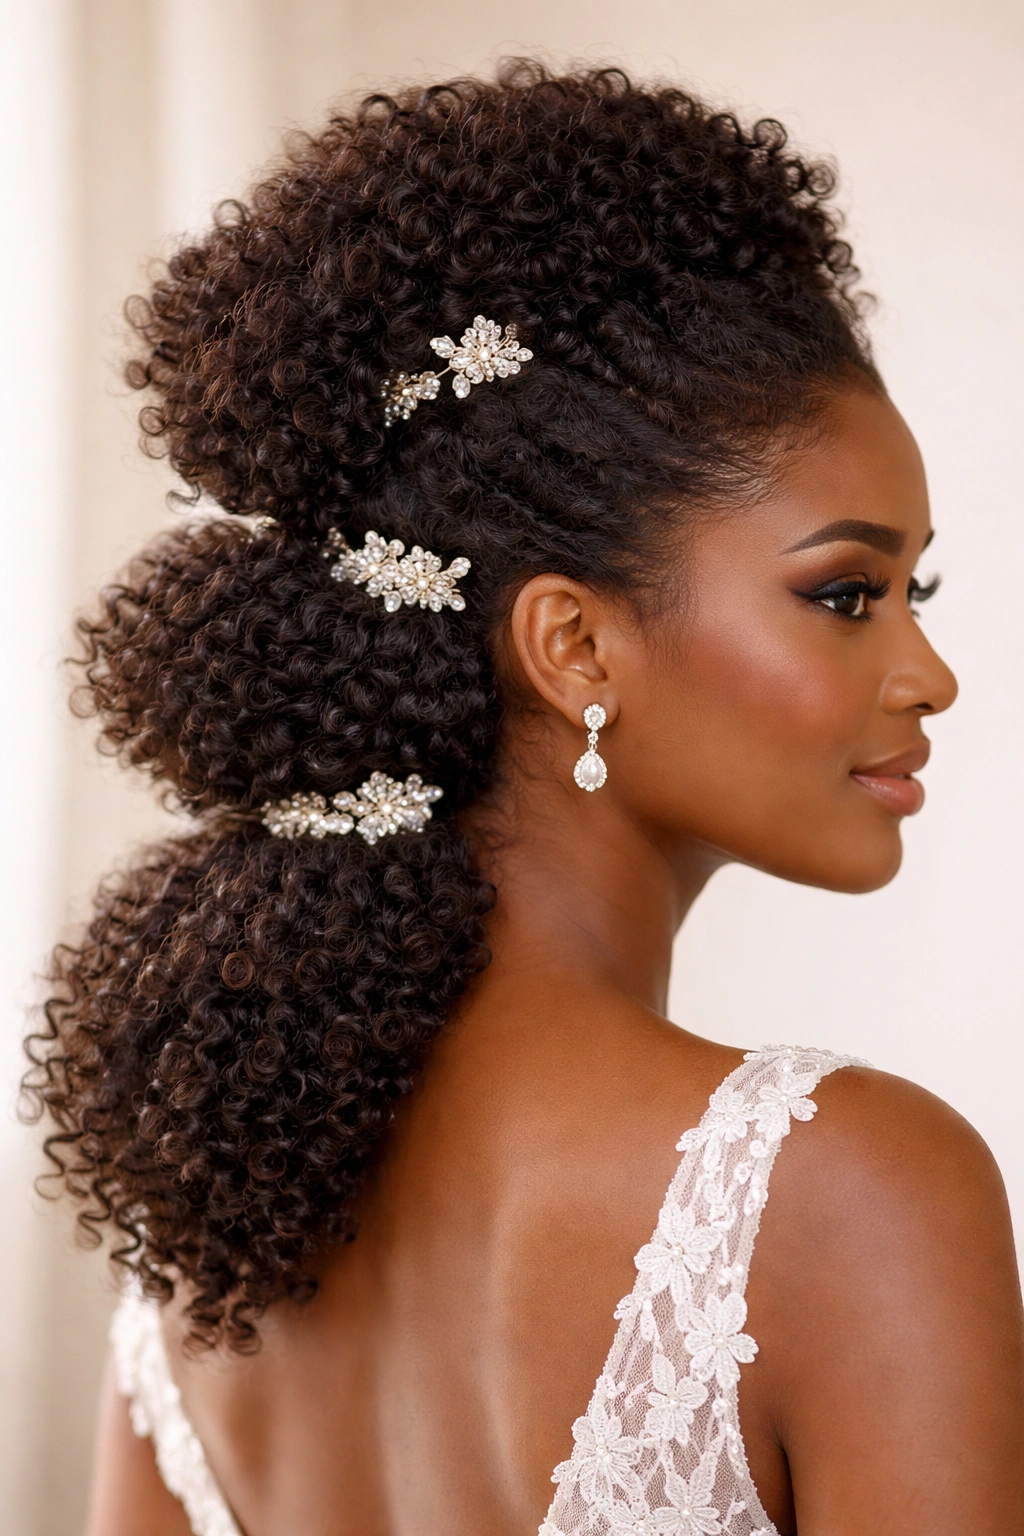
2. High Puff with Pearl Pins

A high puff is inherently celebratory — it’s bold, it’s confident, and it puts your coils front and center as the star of your whole look. A decorated high puff says you’re not playing small on your wedding day, and the strategic placement of pearl pins transforms it from everyday style to bridal-ready elegance.
Why It Works as a Wedding Style
Coily hair naturally creates gorgeous, full volume at the crown, which is exactly what a high puff needs to look stunning. Unlike straight or wavy hair that might need teasing or extensions, your coils are already doing the heavy lifting. A high puff is also incredibly comfortable and lightweight for wearing all day and into the evening — no strain on your scalp, no weight pulling your head forward.
How to Make It Bridal
- Gather your coils high on your head using a soft fabric scrunchie or hair tie — aim for a position that’s slightly forward of the very crown so the puff sits at an angle rather than straight up
- Gently smooth the roots and sides using a light-hold styling cream, leaving the puff itself full and textured
- Secure loose coils around the puff base with bobby pins and flexible styling clips
- Insert pearl-headed pins throughout the puff in a scattered pattern, or create a decorative line across one side
- Add a delicate hair comb, thin braid detail, or small silk flower accent on one side for extra intentionality
Pro tip: Refresh your puff the morning of your wedding by misting it lightly with water or a lightweight styling spray, then using your fingers (never a brush) to fluff and reshape it. This wakes up the texture and makes the whole style look fresher.
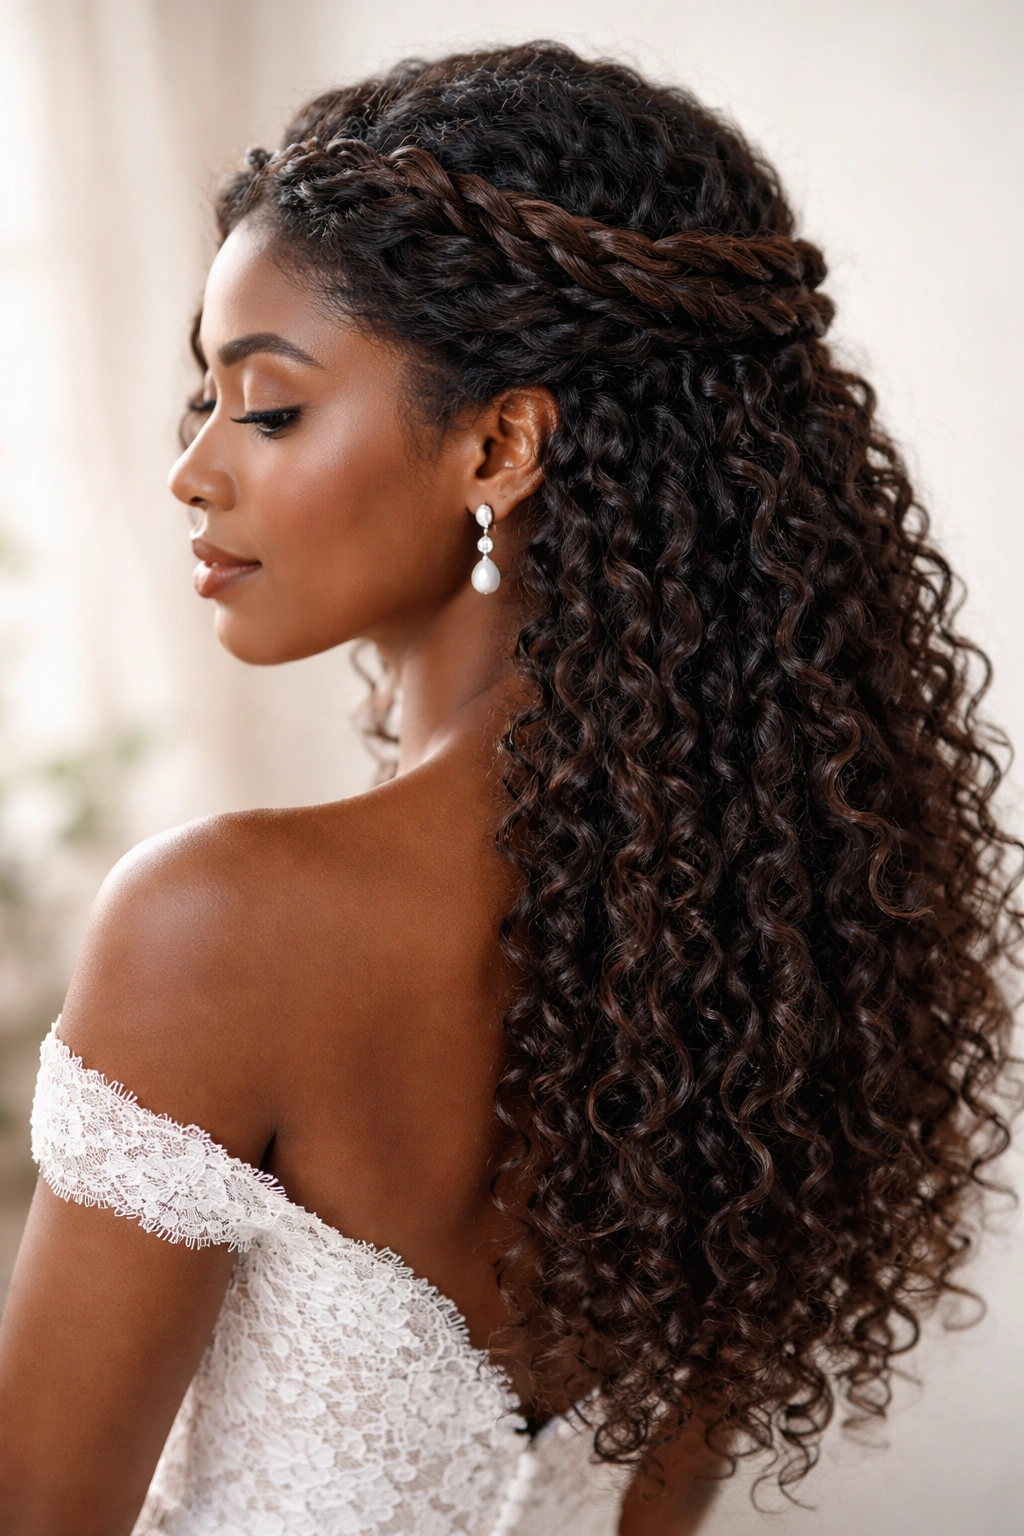
3. Half-Up, Half-Down with Coil Definition
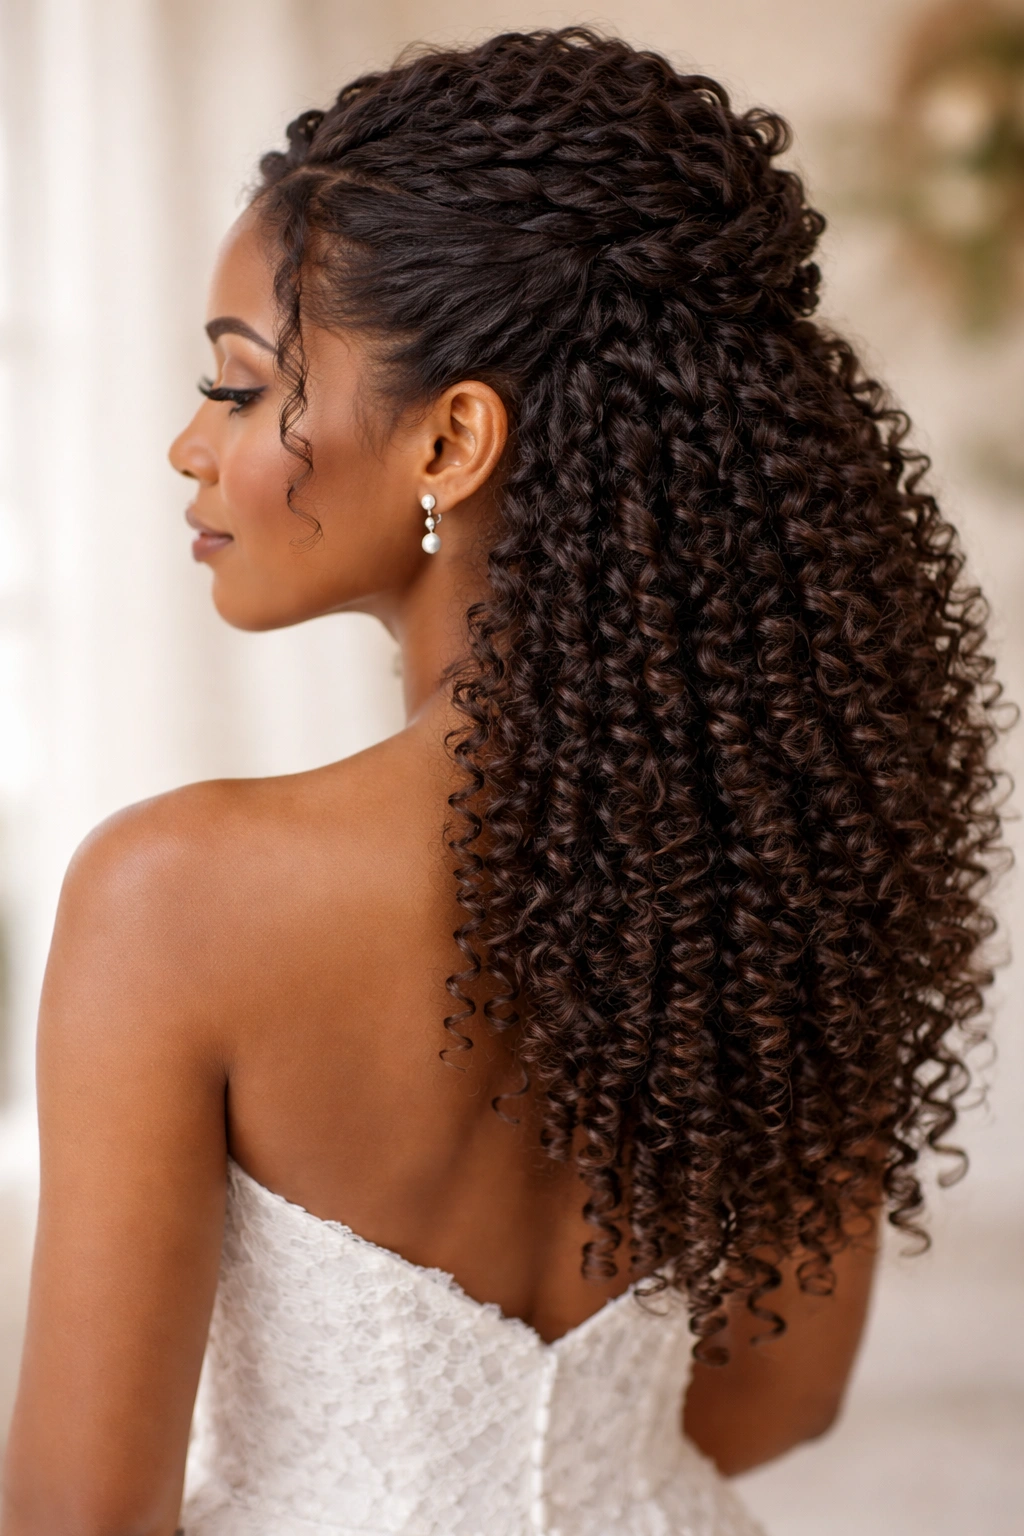
This style gives you the best of both worlds — the polished, intentional look of an updo with the romance and movement of your coils flowing down. It’s the perfect balance for someone who wants structure without feeling constrained, and it photographs beautifully from every angle.
Why This Style Suits Coily Hair
Half-up styles let you showcase the beautiful architecture of coily texture in both the gathered section and the flowing coils below. Your wedding dress will show off the back view of cascading curls, and the structured top half frames your face and keeps hair back from your makeup. The coils you’ve gathered stay secure without being tightly braided or twisted, so there’s less tension on your scalp.
Steps to Create This Look
- Determine your part — a deep side part creates drama, while a center part is more balanced and classic
- Section off hair from one temple, across the crown, to the other temple, leaving the back and lower sides completely loose
- Create a twisted or braided detail with this crown section (a two-strand twist, a Dutch braid, or a simple rope braid all work)
- Secure the gathered portion into a small puff or twist cluster at the back of your crown using bobby pins and a flexible hold product
- Let the lower coils fall completely naturally, using your fingers (not a brush) to separate and define them
- Add pearl clips, delicate gold bobby pins, or a small comb to the gathered section for visual interest
Pro tip: Use a styling cream or lightweight gel only on the gathered section, not on the loose coils, so the lower portion stays defined and bouncy rather than becoming matted or product-heavy.
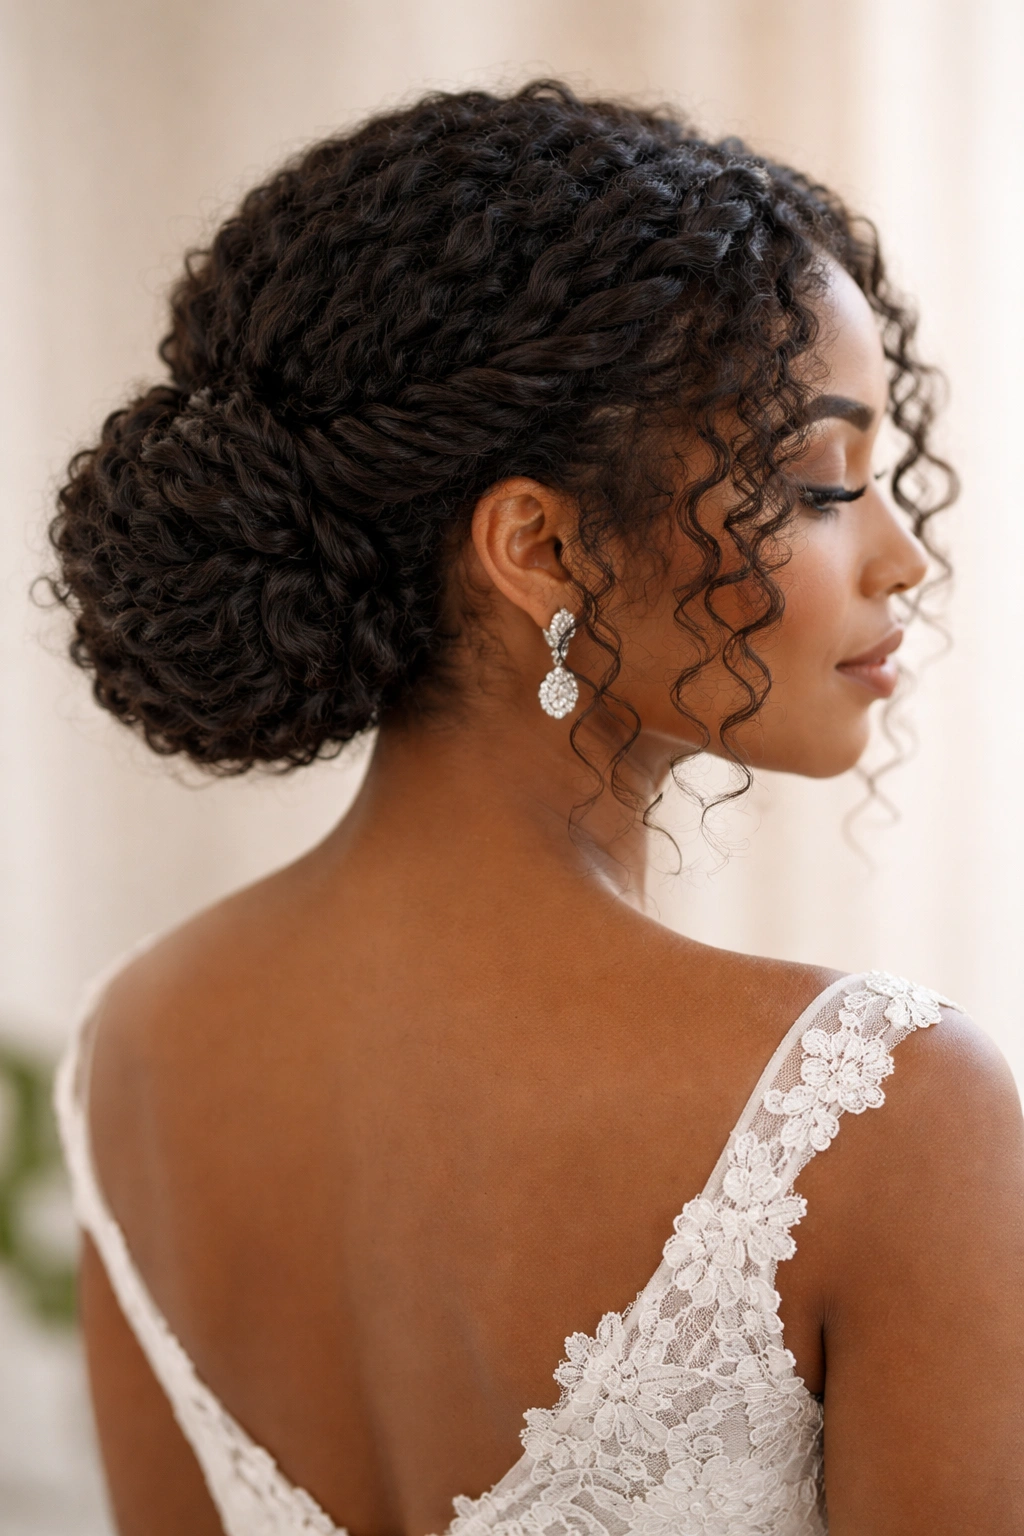
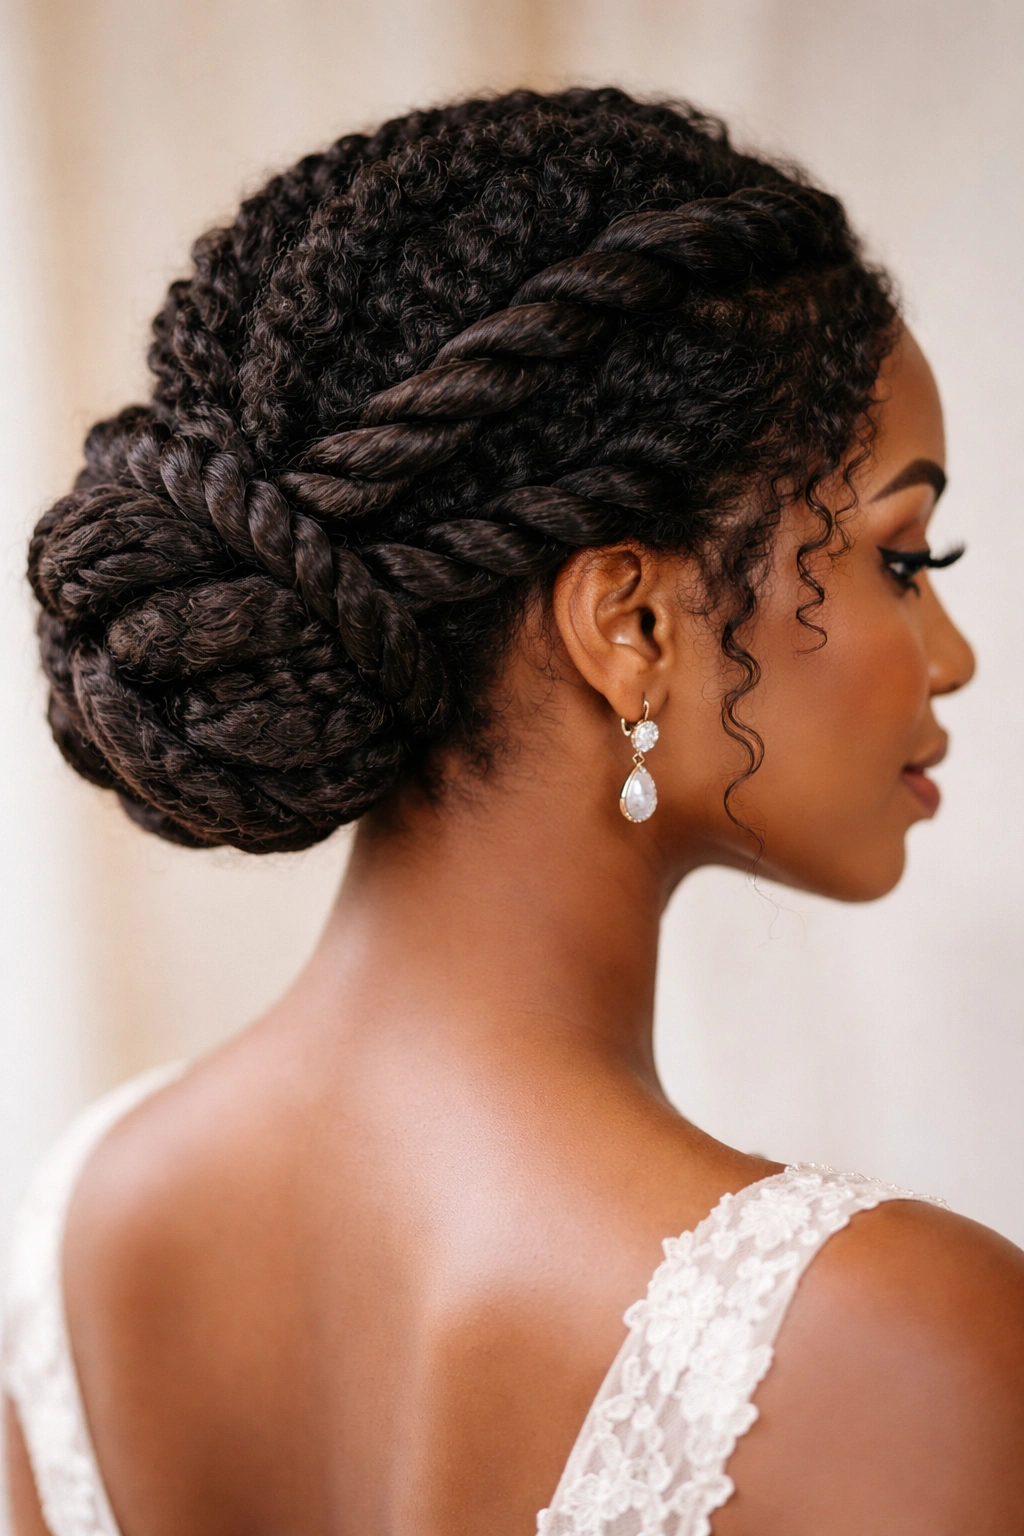
4. Braided Bun with Curly Tendrils

A braided bun traditionally reads as polished and formal, but when you incorporate curly tendrils that frame your face, it becomes something much more interesting — sophisticated but with soul. This style works especially well if you have coils that vary in size or pattern, because the tendrils showcase that beautiful texture.
Why Braided Buns Honor Coily Hair
Coily hair naturally holds braids beautifully because the texture grips the braid and keeps it from slipping out. A braid made from coils also has inherent texture and dimension that a braid made from straight hair doesn’t — it catches light differently and looks more intentional. The tendrils around your face add softness and romance while the gathered bun keeps everything secure and formal enough for a wedding ceremony.
How to Construct This Style
- Brush your coils gently into sections using your fingers or a wide-tooth comb, starting at the nape of your neck
- Create two Dutch braids (or regular three-strand braids) starting at your temples and bringing them back toward the center back of your head
- Gather all your coils — both the braids and any loose hair — into a low or medium bun at the back of your head
- Secure the bun firmly using bobby pins and a flexible-hold styling product
- Pull out 3-4 face-framing coils on each side and gently tousle them to create a softer frame around your face
- Secure the bun with a pearl hair comb, decorative pin, or thin metallic hair fork if you want an extra polish
Pro tip: Create your braids slightly looser than you might naturally; as the day goes on and your coils settle and shift, the braids will tighten. A braid that’s too tight to begin with will become uncomfortably constrictive by evening.
5. Low Side Knot with Coil Swoops

A side knot is inherently elegant and dramatic — it’s asymmetrical in a way that feels intentional and modern, while still being completely wedding-appropriate. The coil swoops around your face and shoulders create movement and romance that makes this style feel less severe than it might sound.
Why This Style Is Ideal for Thick, Coily Hair
Coily hair has natural volume and weight that makes a side knot look substantial and polished without needing to add texture or layers. A knot is also an incredibly secure style that’ll hold through dancing, laughing, and movement. Side knots look particularly stunning on people with coily hair because the coils frame the knot and add dimension to the overall shape.
Steps to Achieve This Look
- Create a deep side part, moving more hair to one side than the other
- Gather the larger side of your hair — at the temple, crown, and back — and twist it loosely as you move toward your opposite shoulder
- Wrap that twisted section into a knot at the base of your neck on your chosen side, securing it firmly with bobby pins
- Pin small sections of coils loosely around the knot to frame it and add visual interest
- Leave the smaller side of your hair completely loose, allowing it to swoop across your face and over your opposite shoulder
- Tuck a few coils behind your ear on the side with the knot to show your face and neckline
Pro tip: Use a lightweight styling cream or mousse rather than a heavy gel for this style, so the swoops of coils stay defined rather than stiffening into one solid shape. You want movement and fluidity, not a sculptural effect.
6. Wrapped Low Bun with Accessories
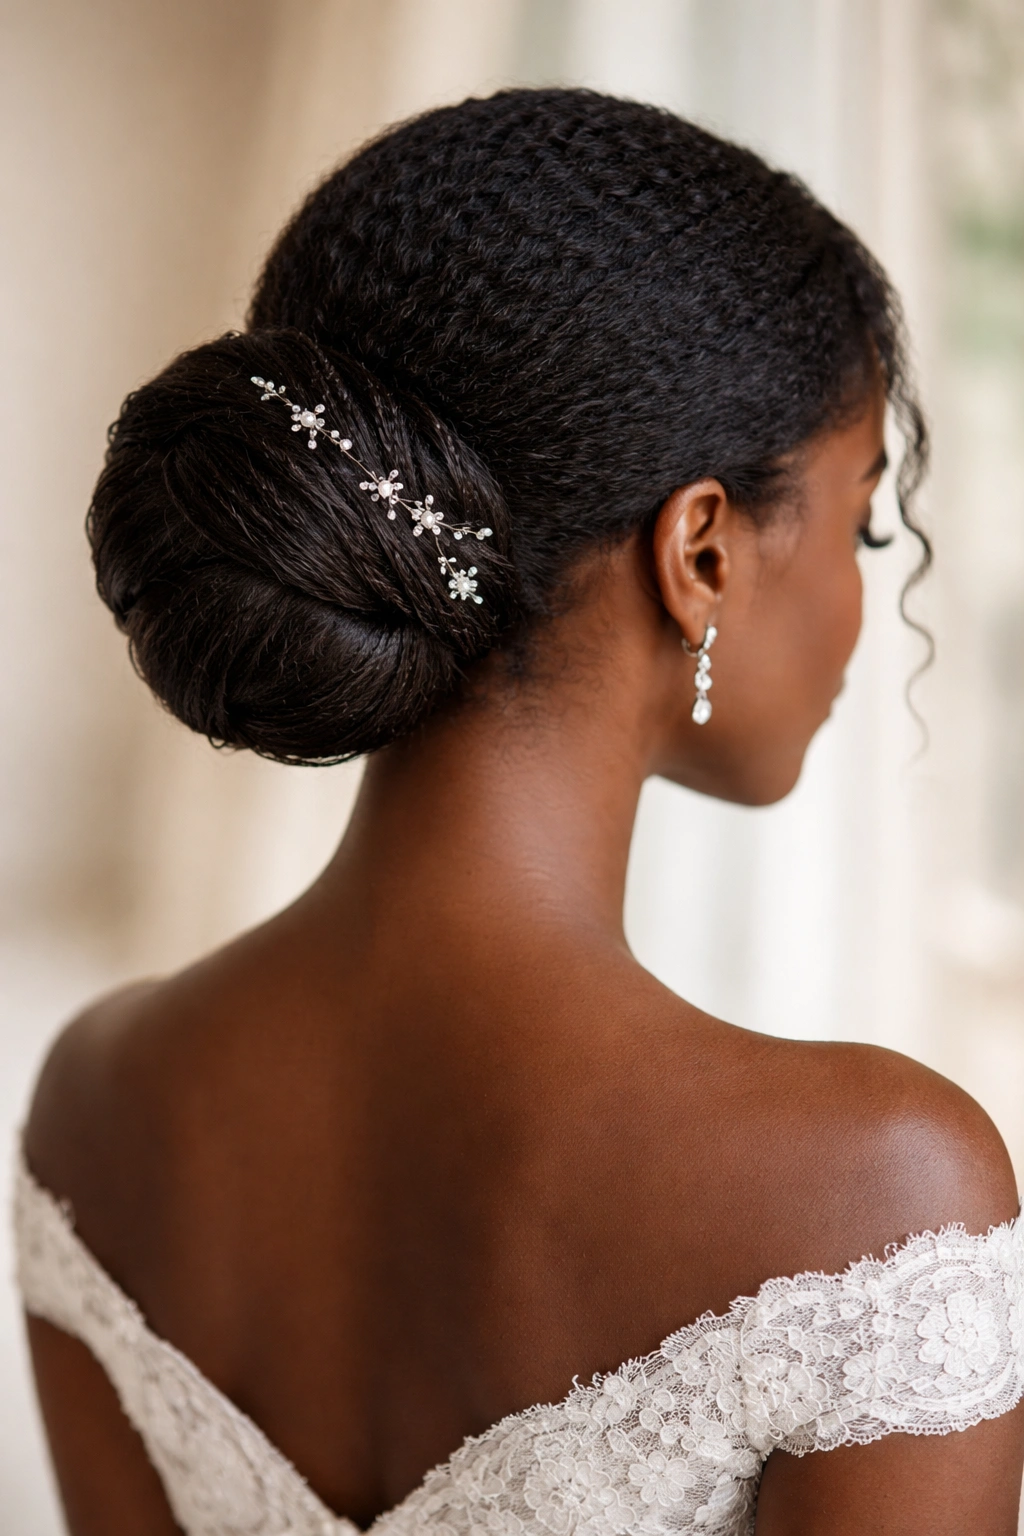
A wrapped bun is understated elegance — your coils are gathered and shaped into a clean, intentional form, then you use accessories to elevate it into something wedding-worthy. This style is particularly stunning if you layer delicate pins, hair forks, or combs in gold, silver, or pearl finishes across the bun.
What Makes This Classic and Romantic
Wrapped buns read as timeless and deeply feminine. Unlike some modern updos, a wrapped bun feels like something your grandmother could have worn, which gives it an inherently romantic, heirloom quality. For coily hair specifically, wrapped buns are a dream because your coils’ natural texture creates beautiful visual interest in the wrapped section without needing to add anything.
How to Create a Polished Wrapped Bun
- Gather your coils into a low ponytail at the nape of your neck using a soft fabric elastic or hair tie
- Wrap the ponytail loosely around itself to form a bun shape, then secure it with bobby pins
- Take a small section of your coils (or a thin braid if you prefer) and wrap it around the base of the bun, covering the elastic and securing the wrapping with more bobby pins
- Strategically place 4-6 decorative pins throughout the bun — not randomly scattered, but in a thoughtful pattern that guides the eye
- Add a delicate hair comb on one side or a thin gold hair fork through the center if you want additional polish
- Leave 1-2 small coils around your neckline gently loose for softness
Pro tip: Secure your wrapped bun with flexible bobby pins and a light hairspray rather than a heavy gel; this keeps the coil texture visible and prevents the bun from looking stiff or overly polished.
7. Twisted Updo with Face-Framing Curls
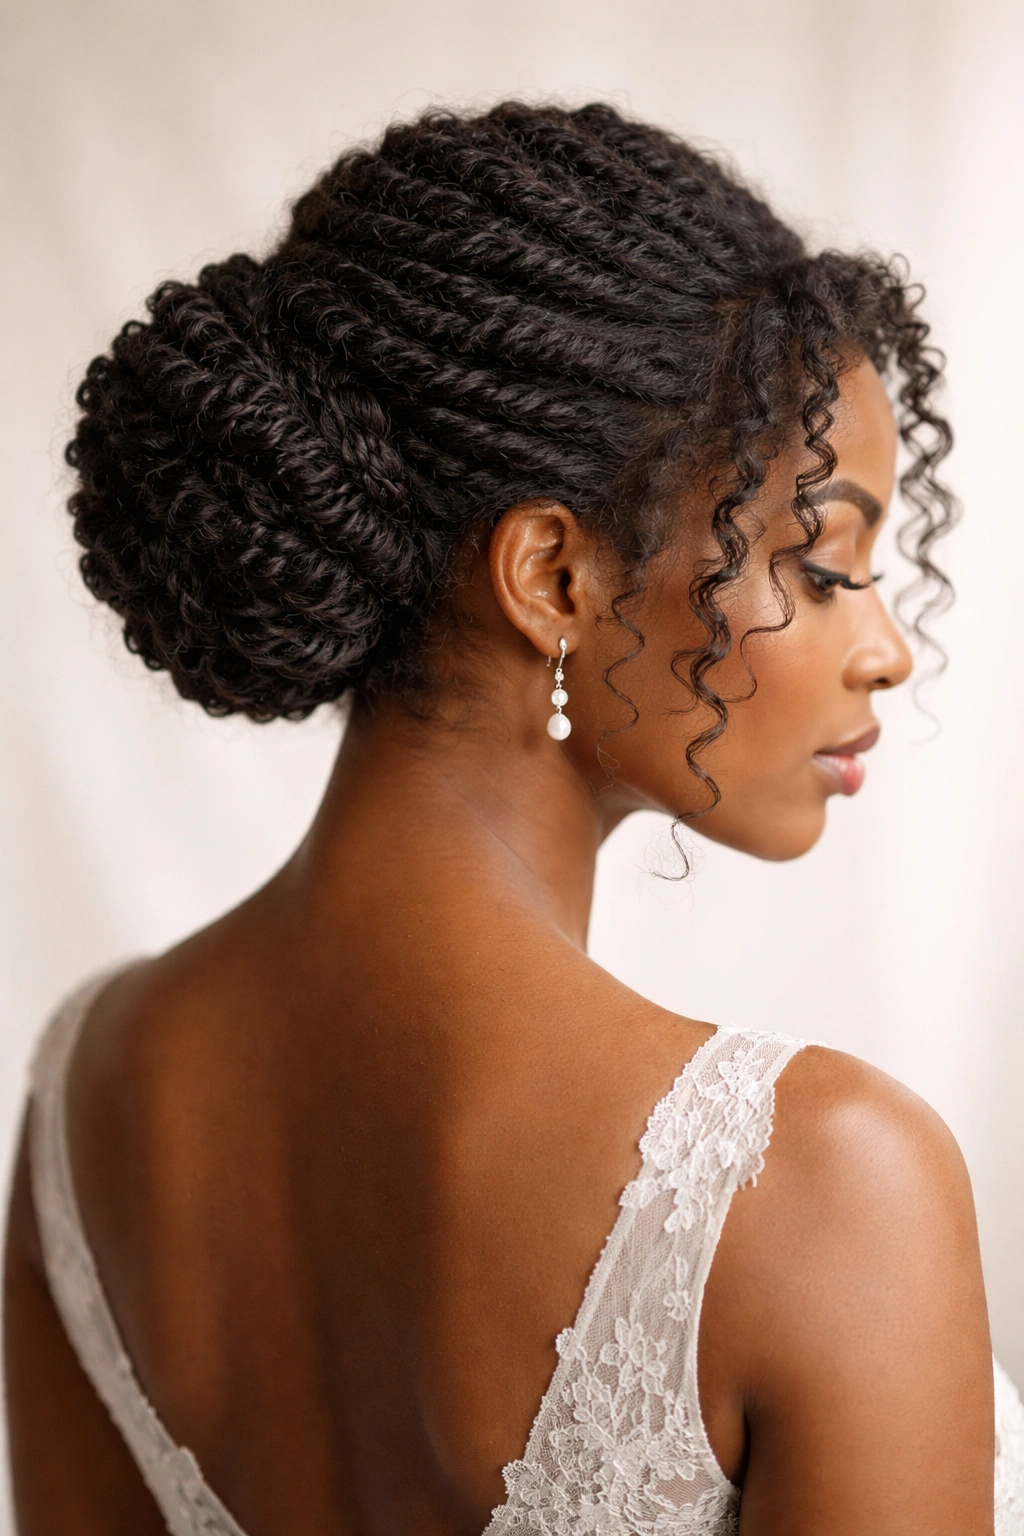
An updo where the coils are twisted rather than braided has a different aesthetic — it looks slightly more relaxed and organic, less “done up,” which can be exactly what you want if you’re aiming for effortless elegance rather than formal structure. The face-framing curls make it feel soft and approachable.
Why Twisted Updos Flatter Coily Hair
Twists made from coily hair have inherent visual texture that twists made from straight hair lack. Your coils are already adding dimension and pattern to each twist, so the finished updo looks more interesting and sophisticated. A twisted updo is also slightly less severe than a braided updo, giving you a softer overall effect while still keeping hair completely off your neck and face.
How to Construct This Updo
- Create a deep side part and brush your coils gently backward on both sides
- Starting at your temple on one side, take a small section and create a two-strand twist as you move back toward your crown
- Do the same on the other side, so both twists meet at the center back of your head
- Gather all your coils into a center-back ponytail, incorporating both twists
- Twist the ponytail loosely around itself to form a bun, then pin it securely
- Pull out 2-3 face-framing coils on each side and gently separate them with your fingers to create softness
- Add a decorative comb, thin braid detail, or cluster of pearl pins to the updo for bridal polish
Pro tip: Use a styling cream with just enough hold to keep the twists and updo intact, but light enough that you can see and appreciate the coil texture throughout. Heavy products will flatten your twists and make them look dull.
8. Coil-Out with Decorative Clips
If you want a completely down style for your wedding — no bun, no twist, no braid — a intentional coil-out with strategic decorative clips is the answer. This style celebrates your coils as the main event and uses minimal styling to let your natural texture shine while adding wedding-day polish through jewelry and clips.
Why This Works as a Wedding Hairstyle
Coily hair worn down on a wedding day feels fresh, bold, and modern. You’re not conforming to traditional bridal styling; you’re creating something that’s authentically you. A coil-out with decorative clips shows confidence and intentionality — you’re not trying to hide your texture or tame it into submission; you’re celebrating it.
How to Style a Bridal Coil-Out
- Start with coils that are well-moisturized and defined, either fresh from a wash or refreshed with a light misting of water and styling cream
- Use your fingers (never a brush) to gently separate and define individual coil clusters, working from bottom to top
- Add a lightweight leave-in conditioner and styling cream to enhance definition and add a slight sheen
- Strategically place decorative clips across one side — a side-swept arrangement looks more intentional than scattered clips
- Consider adding a delicate hair comb on one side or a thin metallic wire threaded through clusters of coils
- Create a subtle side part to frame your face, or leave your part more centered for a balanced look
- Tuck one side of your coils gently behind your ear to show your neckline and face
Pro tip: Refresh your coil-out style about an hour before the ceremony by misting it lightly with water and a bit of styling cream, then using your fingers to re-separate any clusters that have merged. This keeps the style looking fresh and intentional rather than like it’s been sitting all day.
9. Double-Twisted Sides into Centered Bun
This style has visual complexity and movement — two twists that frame your face and meet at a center bun create a polished, deliberate look that feels less matchy-matchy than some traditional updos. The symmetry is intentional without being rigid.
Why Double Twists Suit Coily Hair
When you twist coily hair, each coil contributes texture and pattern to that twist, making it look far more interesting than a smooth two-strand twist made from straight hair. Double twists on someone with coily hair create a natural frame for your face and draw the eye to your features in a really flattering way.
Steps to Create Double-Twisted Sides into Bun
- Start with your hair loose and slightly moisturized with styling cream
- Create a center part that runs from your forehead to the back of your crown
- Starting at your temple on one side, create a two-strand twist using sections of your coils, twisting backward and slightly upward toward the crown
- Repeat on the other side, so both twists angle toward a meeting point at the back center of your head
- Gather both twists and any loose coils into a center-back ponytail
- Twist the ponytail around itself to form a bun, pinning it firmly
- Leave a few delicate coils around your face and neckline slightly loose
- Add thin gold bobby pins, a pearl comb, or delicate flowers woven through the bun
Pro tip: Make your twists slightly looser than feels natural — coily hair textures will tighten them as the day goes on, and you want them to look intentionally twisted, not squeezed into submission.
10. High Braided Bun with Coils
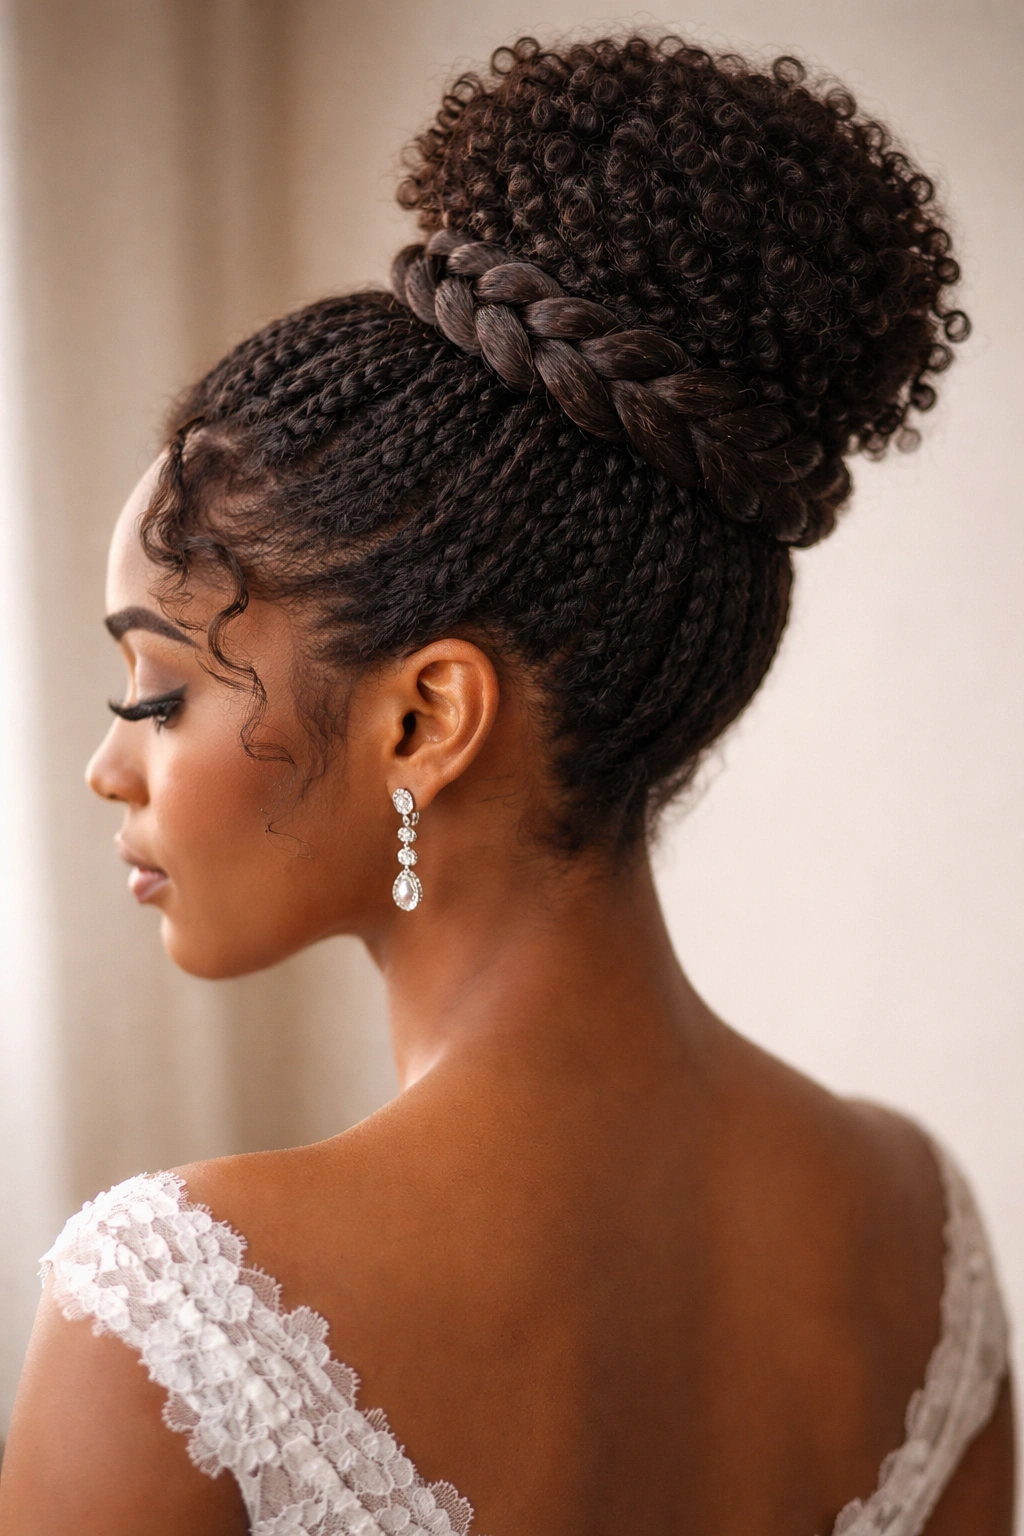
A high bun with a braid woven through or wrapped around it combines formality with texture. This style elevates a simple bun into something more intentional and wedding-worthy, while the braid adds visual interest that celebrates coily hair’s natural grip and hold.
Why High Braided Buns Are Stunning on Coily Hair
High buns draw attention upward to your face, collarbone, and shoulders — all of which look amazing in wedding photos and with typical bridal jewelry. A braid incorporated into a high bun adds dimension and shows off the texture of your coils beautifully. This style is formal enough for any ceremony while still feeling contemporary and personal.
How to Build a High Braided Bun
- Gather your coils into a high ponytail at the crown of your head, positioning it slightly forward so the finished bun sits at a flattering angle
- Secure the ponytail with a soft fabric elastic
- Create a loose braid using all or a large section of the ponytail, keeping it slightly textured rather than slick
- Wrap the braid around itself to form a bun, then pin it securely with multiple bobby pins
- Gently fluff and shape the bun so the braided texture is visible and beautiful
- Leave a few face-framing coils slightly loose around your temples and nape
- Secure the style with flexible bobby pins and a flexible-hold product
- Add a decorative pin, comb, or thin hair fork through the center of the bun
Pro tip: If you have a lot of hair, create the braid a bit looser than usual — high buns can feel heavy if the braid is too tightly woven, which can cause headaches by the end of a long wedding day.
11. Side Sweep with Pinned Coils
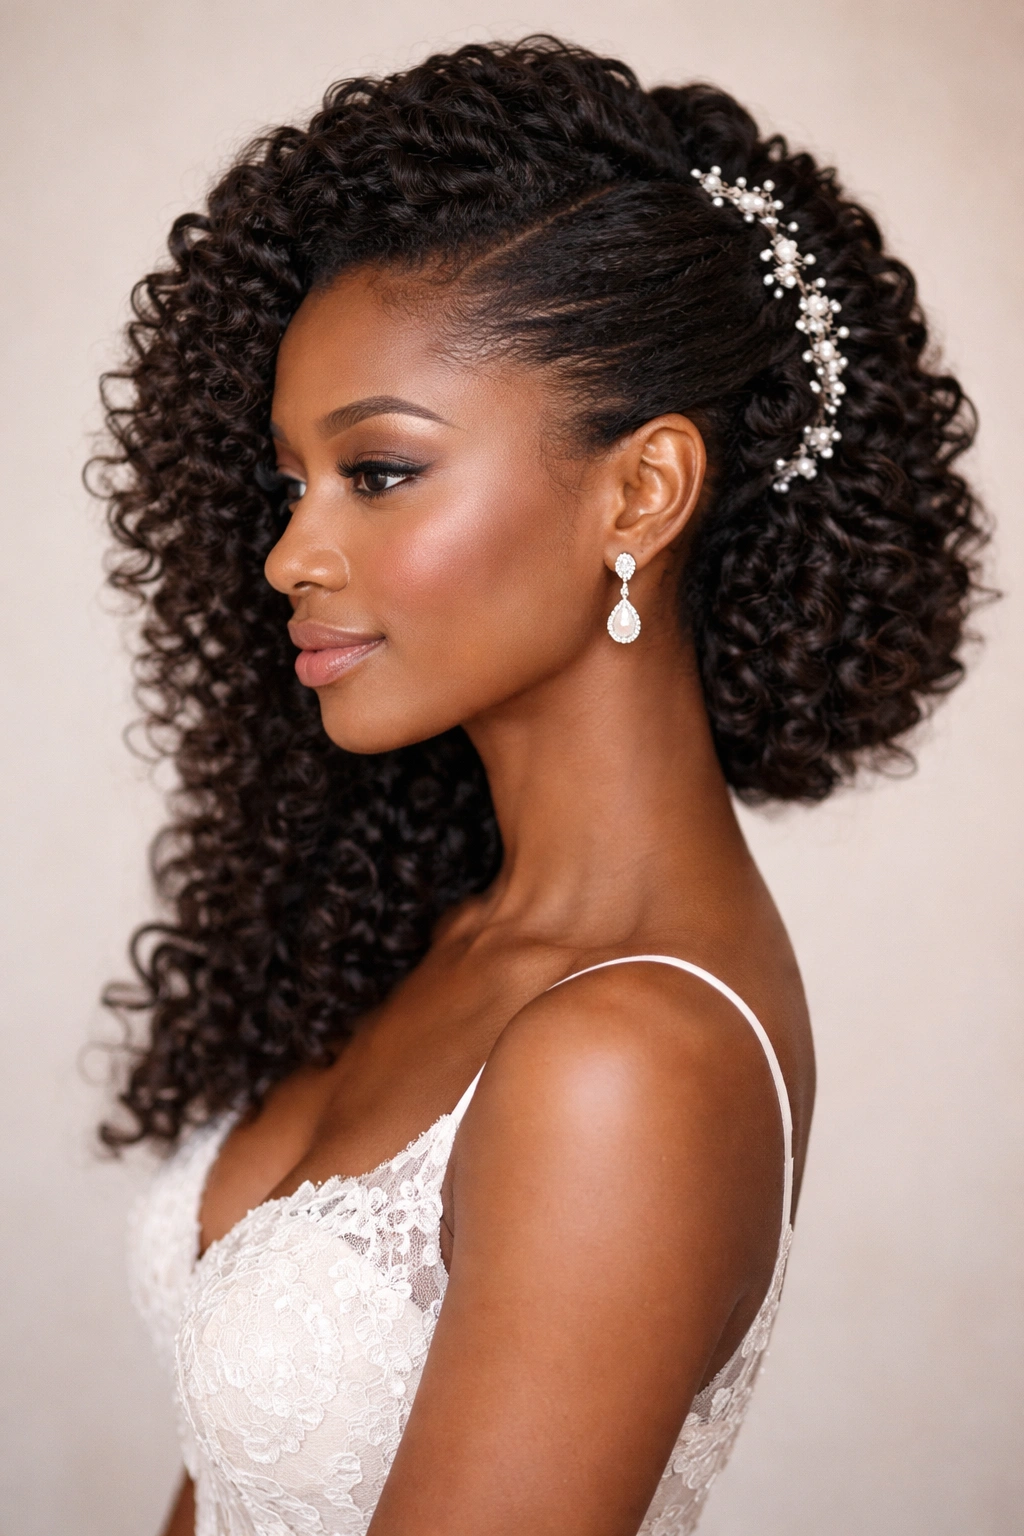
A side sweep is inherently romantic and asymmetrical, perfect if you want a style that’s dressy and intentional but not quite a full updo. All your coils sweep to one side, creating a dramatic line, and then you pin them in place with decorative pins that add sparkle and intentionality.
What Makes Side Sweeps Beautiful on Coily Hair
Coily hair has natural volume and body that makes a side sweep look full and luxurious — you’re not creating a thin, sleek curtain of hair, but rather a substantial, textured cascade. A side sweep also creates a beautiful asymmetrical frame for your face, which photographs incredibly well from side angles.
How to Create a Romantic Side Sweep
- Create a deep side part, with more hair on one side than the other
- Using your fingers, gently guide all your coils toward your desired sweep side, starting from the crown
- Gather the coils loosely at the side of your head (rather than pulling them into a tight cluster), positioning them at about ear level or slightly lower
- Secure the gathered section with bobby pins and a flexible-hold styling product — use enough pins that your coils stay in place but not so many that the gathering becomes visibly rigid
- Strategically place decorative pins throughout the swept section: along the edge where the coils are gathered, down the side of your head, or in a loose line across the back
- Let the coils on the smaller side of your head frame your face softly
- Add one or two coils that fall forward over your shoulder for romantic softness
Pro tip: Practice this style a day or two before the wedding so you know exactly how it’ll feel and look, and so your coils have time to settle into their swept position before the big day.
12. Twisted Back with Free-Flowing Coils
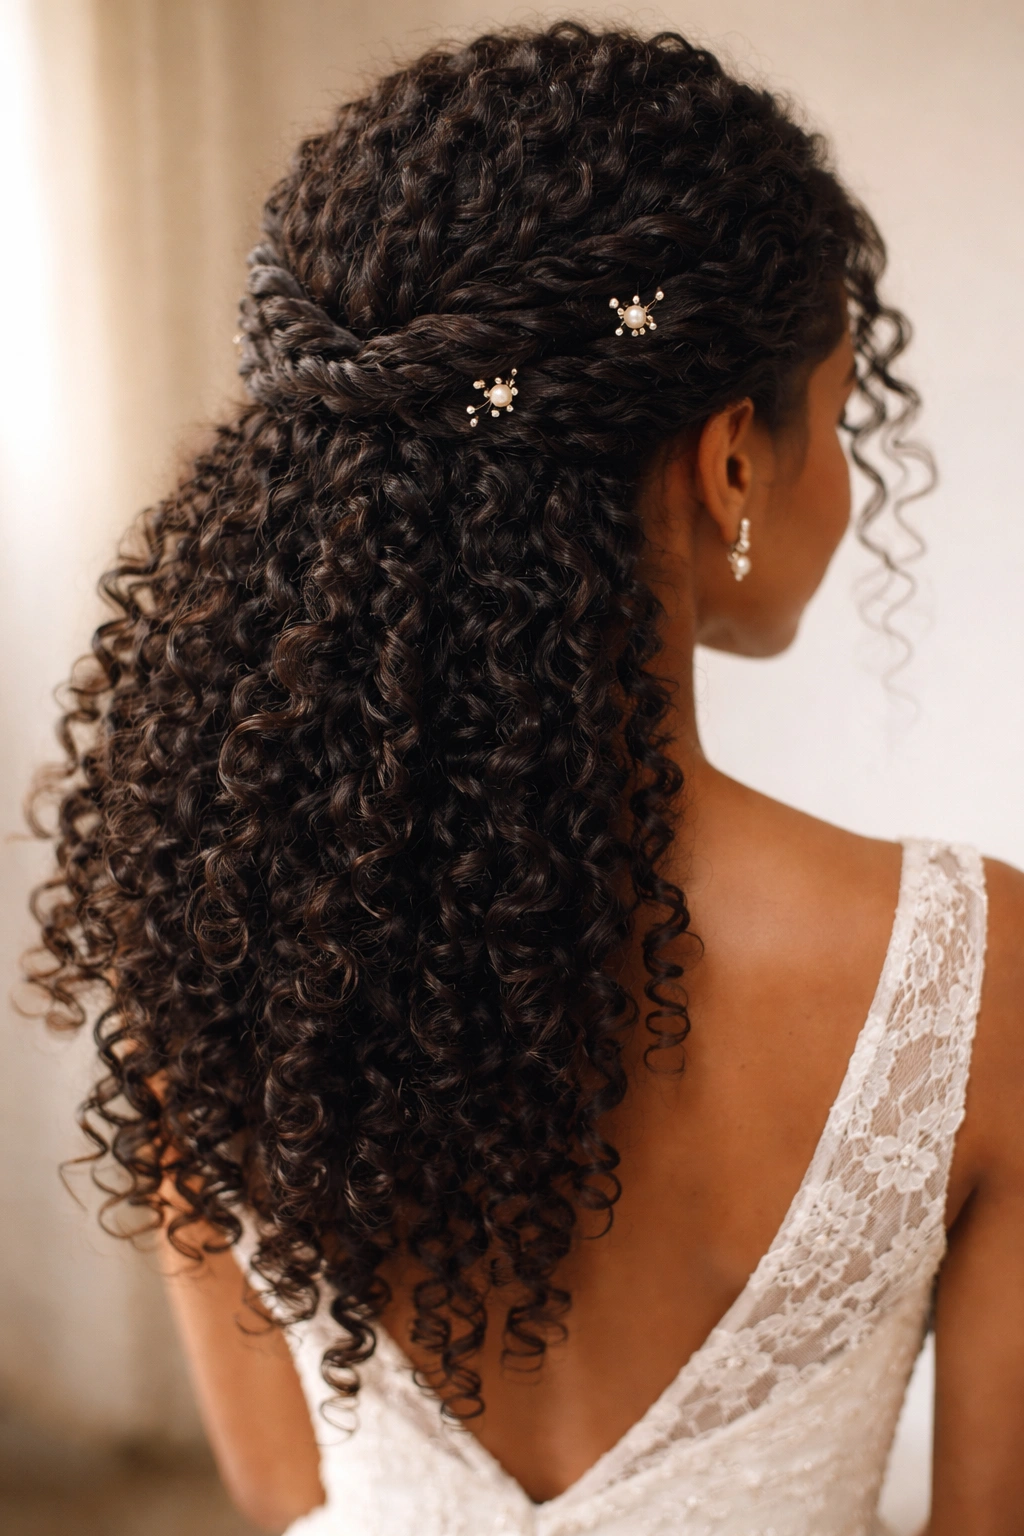
This style gives you the visual polish of a gathered updo while keeping the vast majority of your coils down and free. The twists that gather your hair move horizontally across the back of your head, creating a decorative pattern that’s visible only when viewed from behind.
Why This Style Offers the Best of Both Worlds
You get the intentionality and structure of a styled updo without sacrificing the movement, length, and freedom of your coils. The horizontal twists act as a decorative element and keep your hair secure without making you feel constrained or uncomfortable. From the front, you look like you have your coils down; from the back, the twists show careful styling and intention.
How to Create Twisted Back with Free-Flowing Coils
- Brush your coils gently using your fingers, starting at your nape
- Create two horizontal twists: one across the middle back of your head and one slightly above it, twisting from one side to the other
- Secure each twist with bobby pins that match your hair color
- Leave all your coils free-flowing below and around the twists
- Use a light styling cream only on the twisted sections, leaving the flowing coils product-free for maximum definition and bounce
- Tuck one side of your coils gently behind your ear and secure with a decorative pin, or leave both sides completely free
- Add pearl or metallic pins along the twisted sections for visual interest
Pro tip: These horizontal twists can loosen and shift during the day, especially if you’re moving around and dancing. Use flexible bobby pins and check them periodically, gently re-twisting if needed.
13. Rope Braid into Updo
A rope braid (also called a flat twist or spiral braid) looks incredibly polished and has a completely different aesthetic than a traditional braid. When you use rope braids made from coily hair and gather them into an updo, the visual impact is sophisticated and striking.
Why Rope Braids Suit Coily Texture
Rope braids made from coily hair have a natural spiral quality that’s visually intricate and beautiful. The coils themselves create texture within the braid that makes it look more dimensional and interesting than a smooth rope braid would. A rope braid into an updo is also incredibly secure — the twist nature of the braid means it grips your coils tightly and won’t slip.
Steps to Create Rope Braid into Updo
- Section your hair into 3-4 major sections, depending on how much hair you have
- Starting at your temple on one side, create a rope braid by taking two sections of coils and twisting them around each other as you move backward
- Continue this rope braid back toward your crown, then gather both rope braids at the back center of your head
- Add any remaining loose coils to the gathered section, creating a ponytail of braids and coils
- Twist this gathered section around itself to form a bun, pinning it securely
- Gently fluff and shape the finished updo so the rope braids are visible and beautiful
- Add 3-4 decorative pins or a small comb to the updo for bridal polish
Pro tip: Make rope braids slightly looser than you think they need to be; as the day progresses, your coils will expand slightly and the braids may tighten, and you don’t want them to ever feel uncomfortable or leave marks on your scalp.
14. Tiered Coil Sections with Clips
This style creates visual interest by arranging your coils into distinct tiers or layers, each secured with decorative clips. It’s an artistic approach to wearing your coils down — completely intentional, visually striking, and absolutely wedding-appropriate.
What Makes Tiered Styling Unique
Tiered styling treats your coils as individual sculptural elements rather than trying to blend them into one cohesive style. You’re creating a visual structure that guides the eye, adding interest and polish while celebrating the natural architecture of your coils. This approach works beautifully if you have coils with varying sizes or patterns.
How to Create Tiered Coil Sections
- Start with well-defined coils and brush them gently with your fingers to separate any clusters
- Identify 3-4 distinct tiers from your crown downward
- Using your fingers, group coils in each tier into small clusters or sections
- Secure each tier with a decorative clip: at the crown area, at mid-head height, and at the bottom of your coils if you want
- Position the clips on one side or distributed evenly depending on your preference
- Make sure each tier looks intentional and distinct — this isn’t about tightness but about creating visual layers
- Leave some coils completely free around your face and shoulders
Pro tip: Use clips that coordinate with your accessories or dress, so they feel like intentional jewelry rather than functional hair tools. Thin metal clips, pearl-adorned clips, or crystal clips all read as bridal.
15. Sleek Twisted Knot with Textured Crown
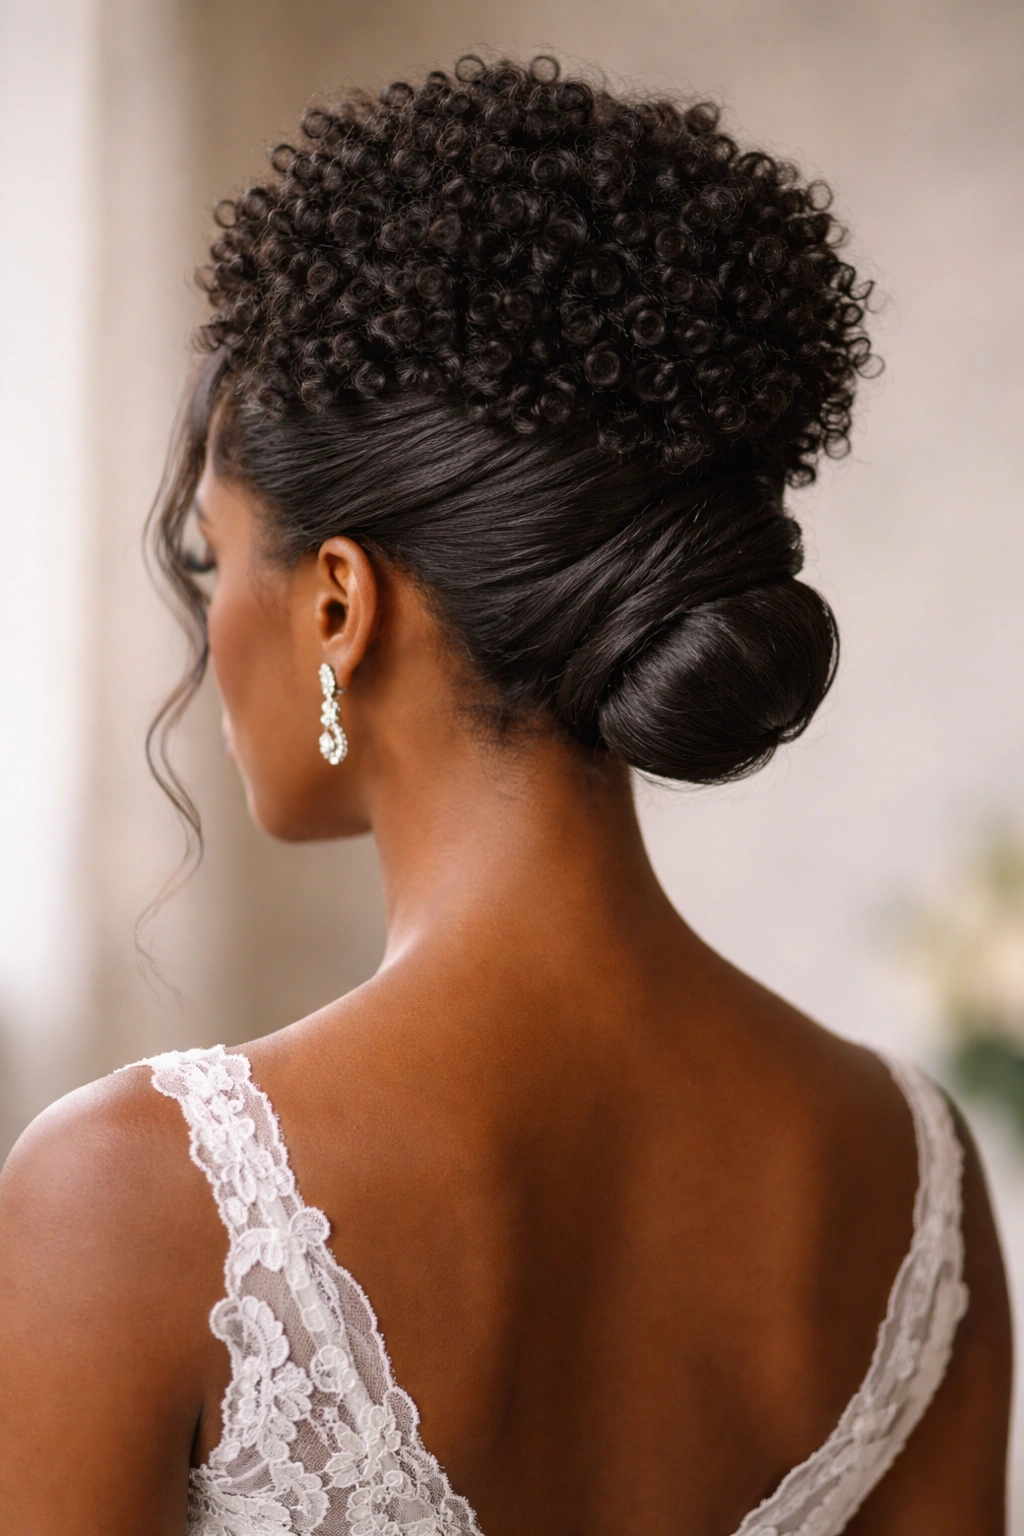
This style pairs a sleek, tight knot at the nape of your neck with a textured, intentionally mussed crown that celebrates your coil pattern. The contrast between the sleek gathered section and the textured top is sophisticated and modern.
Why This Style Is Both Polished and Textured
You get the formality and intentionality of a gathered knot without sacrificing the beautiful texture that makes coily hair special. The crown texture shows that you’re not trying to smooth your coils into submission — you’re intentionally celebrating them as part of your wedding style. This approach works beautifully for minimalist brides or anyone who wants a contemporary bridal look.
How to Create This Balanced Style
- Brush your coils gently backward, creating more volume and texture at the crown
- Gather the lower portion and sides of your hair into a low knot at the nape of your neck, twisting rather than braiding for a sleeker effect
- Secure the knot firmly with bobby pins and a flexible-hold product
- Use your fingers to gently fluff and shape the crown section, emphasizing texture and volume rather than smoothing it
- Leave delicate face-framing coils slightly loose on both sides
- Add 2-3 decorative pins to the knot area, or a comb if you prefer
- Ensure the crown texture is visibly coiled and intentional, not flattened or smoothed
Pro tip: The key to this style is the contrast — the knot should look deliberately sleek while the crown looks deliberately textured. Avoid the temptation to tame the crown; let it be textured and proud.
Final Thoughts
Your coily hair on your wedding day is a feature to celebrate, not a challenge to overcome. Every single one of these styles honors your natural texture while giving you the polished, intentional look that a wedding deserves. The most important thing isn’t which style you choose — it’s that you pick one that makes you feel absolutely like yourself, beautiful and confident and comfortable enough to focus on the joy of the day rather than worrying about your hair.
Schedule a trial run with your stylist at least a week before the wedding, or practice the style yourself if you’re doing your own hair. Bring photos of the exact style you want, specify that you have coily hair and need the styling to reflect that (not fight against it), and be clear about your comfort level with how tight or loose you want everything to feel. Your coils are gorgeous exactly as they are — choose a style that shows them off, and you’ll feel radiant all day long.