2B wavy-curly hair hates a tight grip.
That’s the first thing worth saying, because it explains half the styling mistakes people make with it. A style that looks neat on straight hair can crush the wave pattern, leave the crown flat, and make the ends puff out in the least flattering way.
The sweet spot is tension, not control. Keep the roots loose enough to keep their lift, keep the middle length shaped, and let the ends stay a little lived-in. When a style does that, 2B hair suddenly looks expensive in the good old-fashioned sense — clean lines, soft movement, and texture that still reads as hair, not helmet.
My bias is simple: I’d rather see a style that preserves the bend than one that erases it. A few styles do that better than the rest, and the right ones are usually the ones that let the wave sit where it wants to sit. That’s where the real options start.
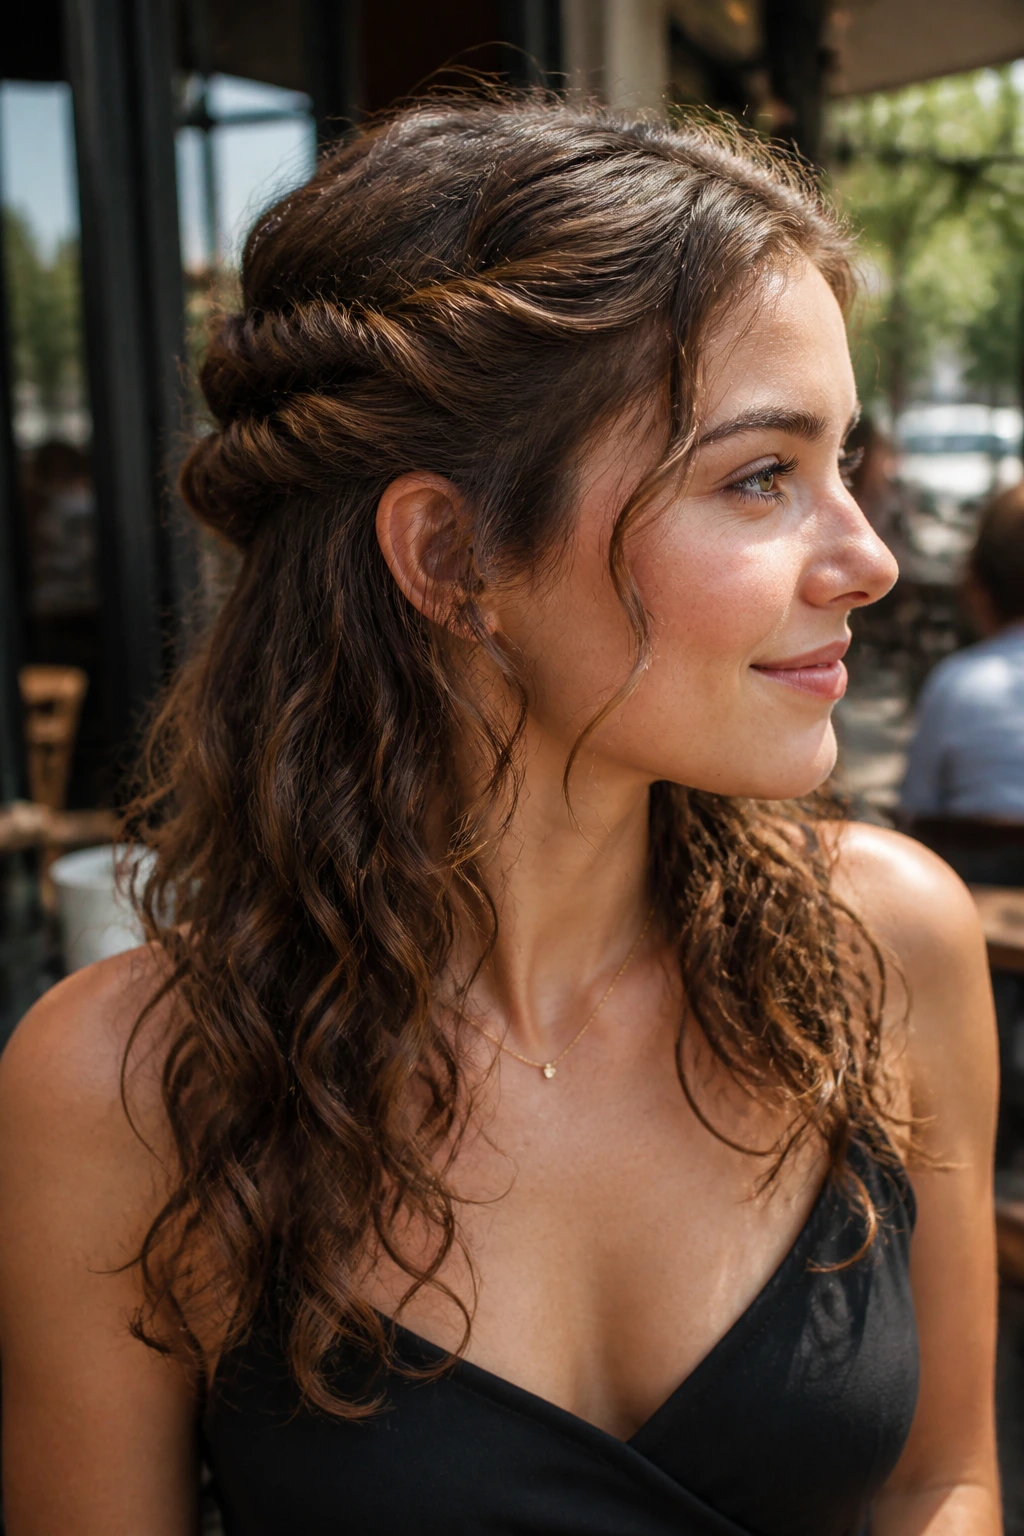
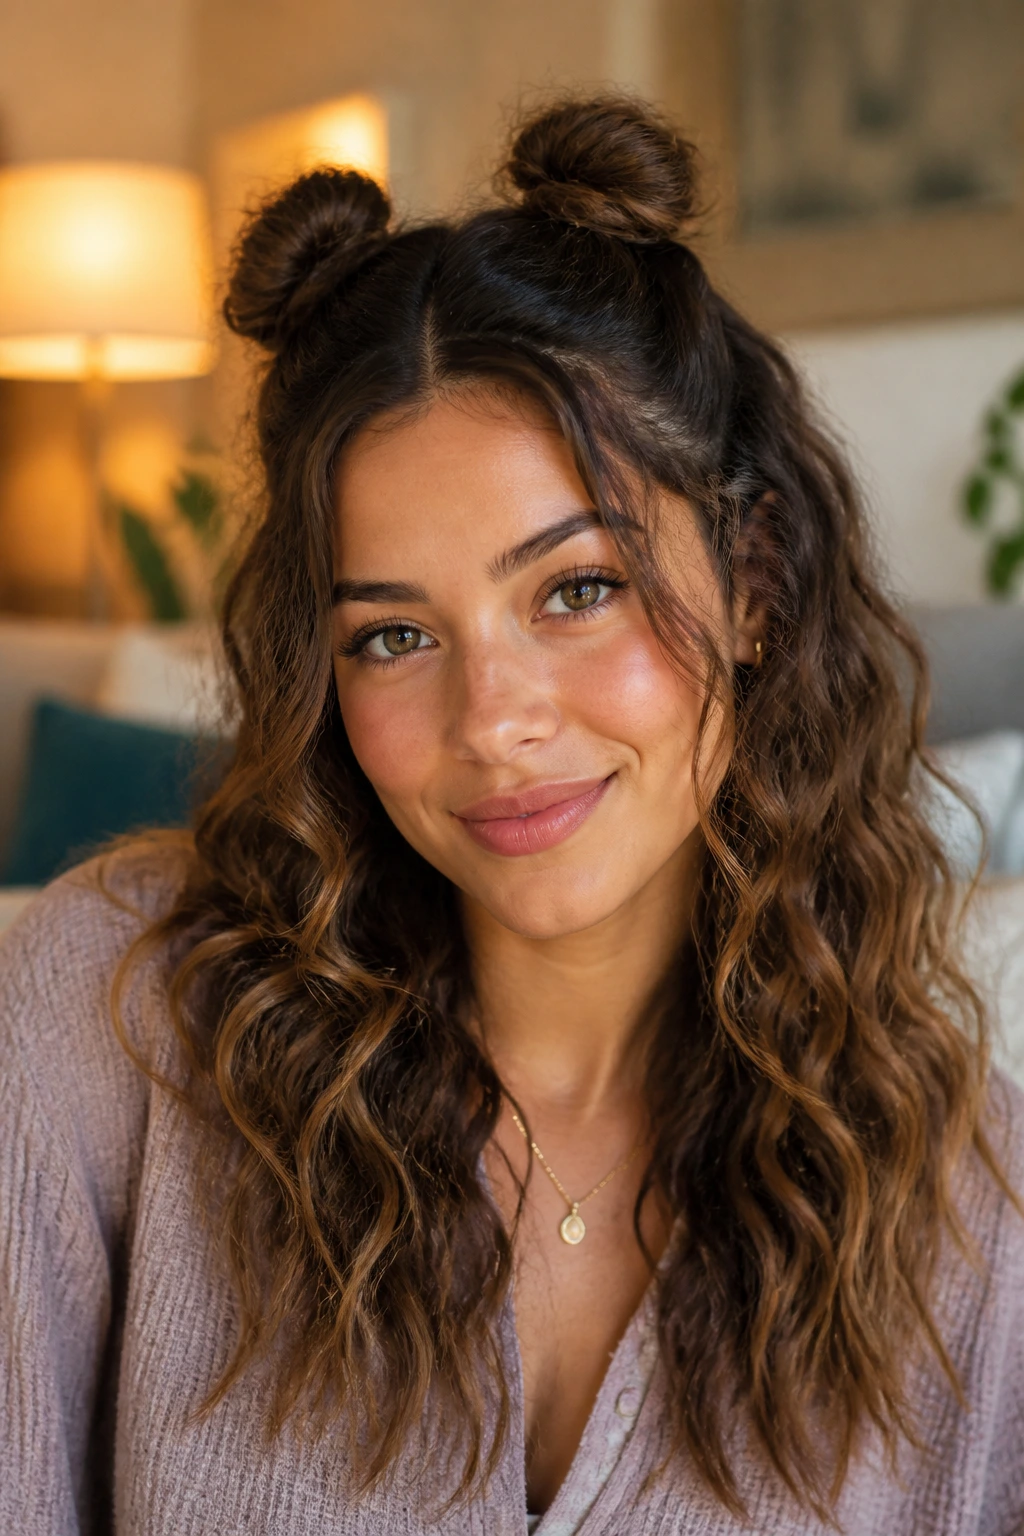
1. Half-Up Claw Clip Twist for 2B Wavy-Curly Hair
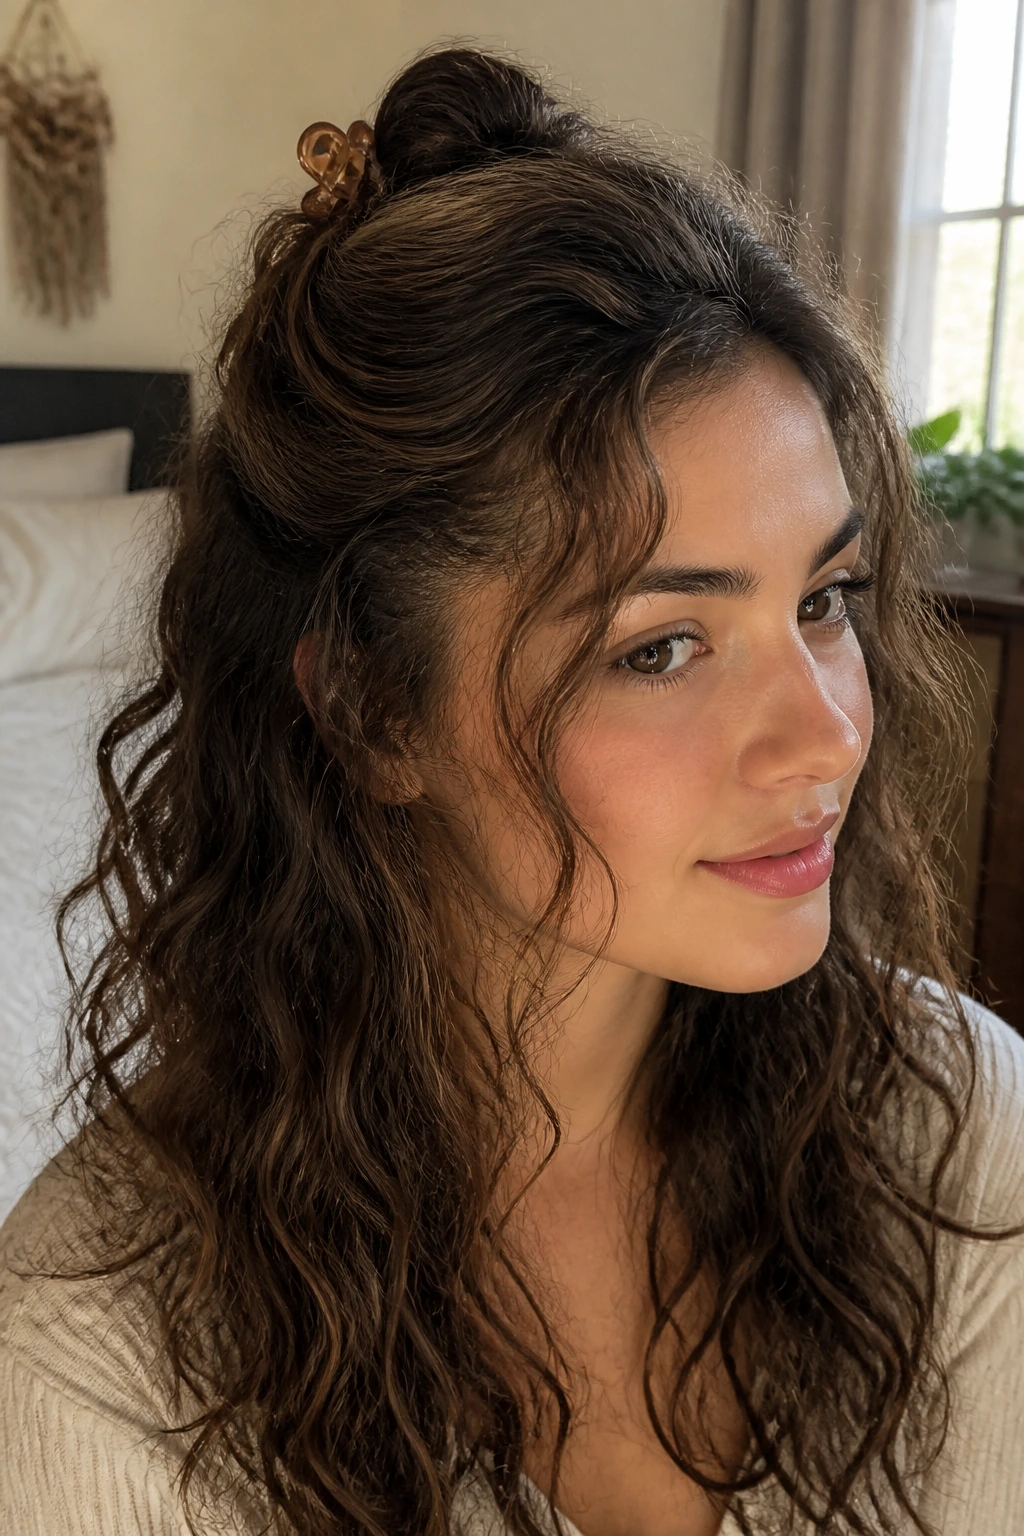
A claw clip and 2B waves get along for one simple reason: both like a little room.
This style pulls the top half back without pinning the whole head down, so the crown stays soft while the lower lengths keep their shape. It works especially well when your waves are starting to separate a little at the ends, because the clip hides the “I need a wash” feeling without flattening everything. That balance matters more than people think.
Why It Works
The twist takes pressure off the roots. If you clamp 2B hair too tightly, the top goes limp and the wave pattern at the back gets squeezed into a weird kink. A medium claw clip — usually around 3 to 4 inches for shoulder-length hair, larger if your hair is thick — keeps the shape loose and lets the texture stay visible.
If the clip has to fight the hair, it is too small.
A neat trick is to twist only once before clipping. Don’t keep twisting until the hair looks ropey and tight. That’s how you lose the soft bend that makes 2B hair look good in the first place. Leave a few face pieces out, pull one or two strands at the temples, and let the rest do its thing.
Small Details That Matter
- Best on hair that reaches the shoulders or collarbone.
- Leave a 1- to 2-inch section out around the face.
- Place the clip slightly higher than the occipital bone so the style doesn’t sag.
- Use a matte or medium-grip clip if your hair slips easily.
This is the style I reach for when I want “done” without looking overworked. It takes about a minute, and it still looks like you meant to wear it that way.
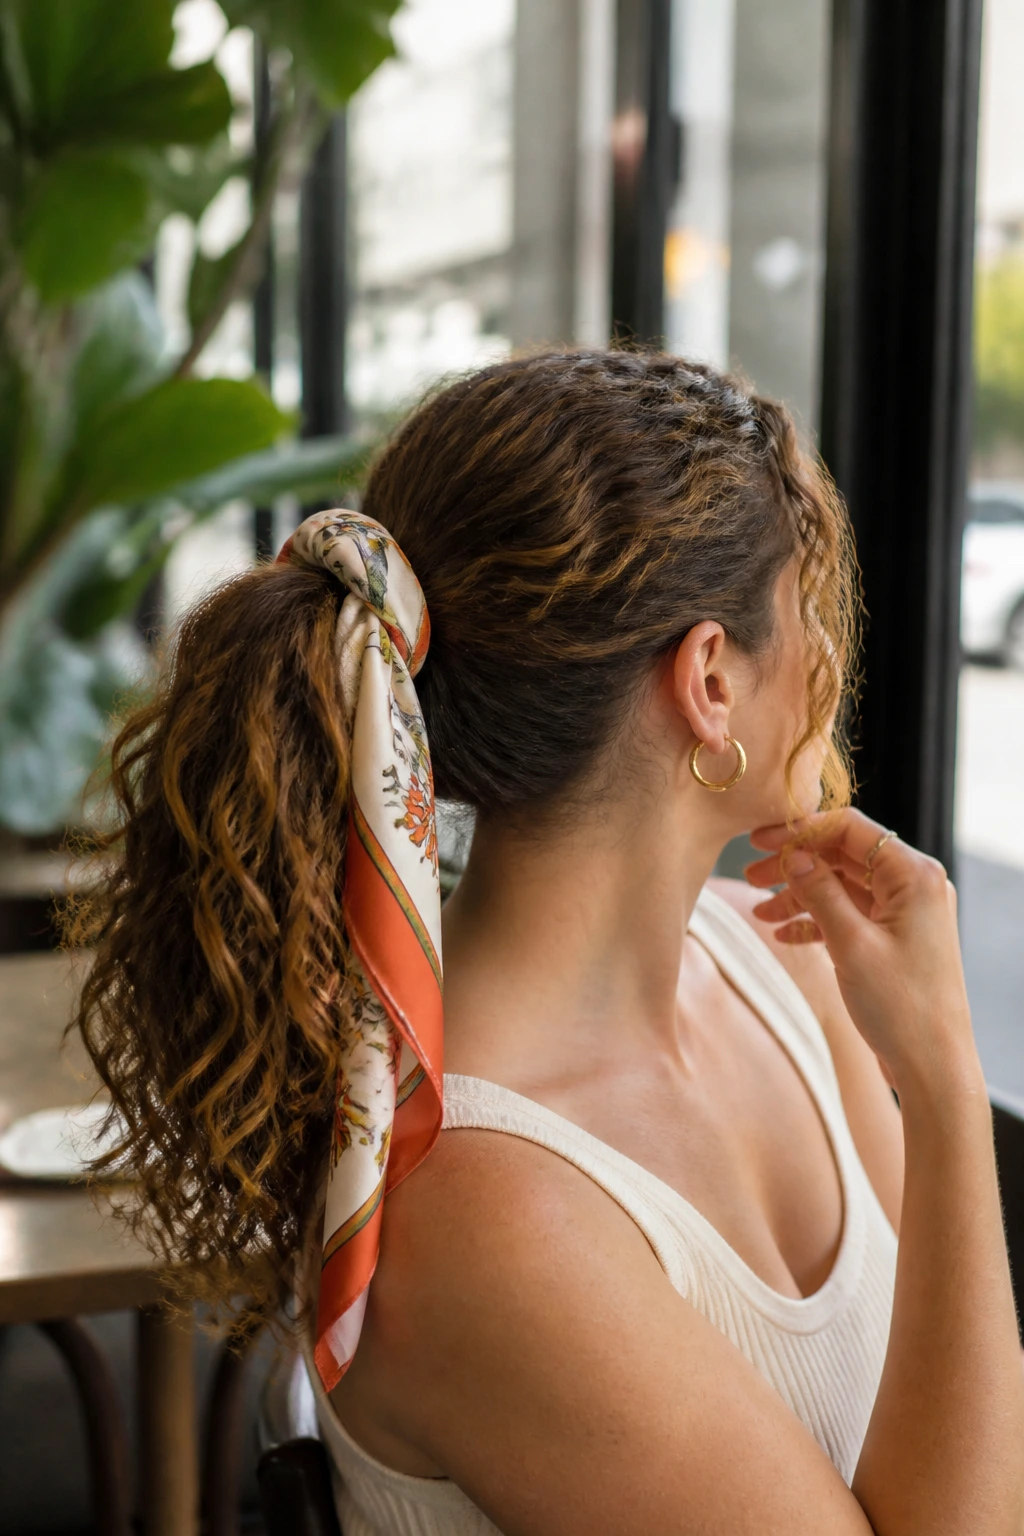
2. Loose Side Braid
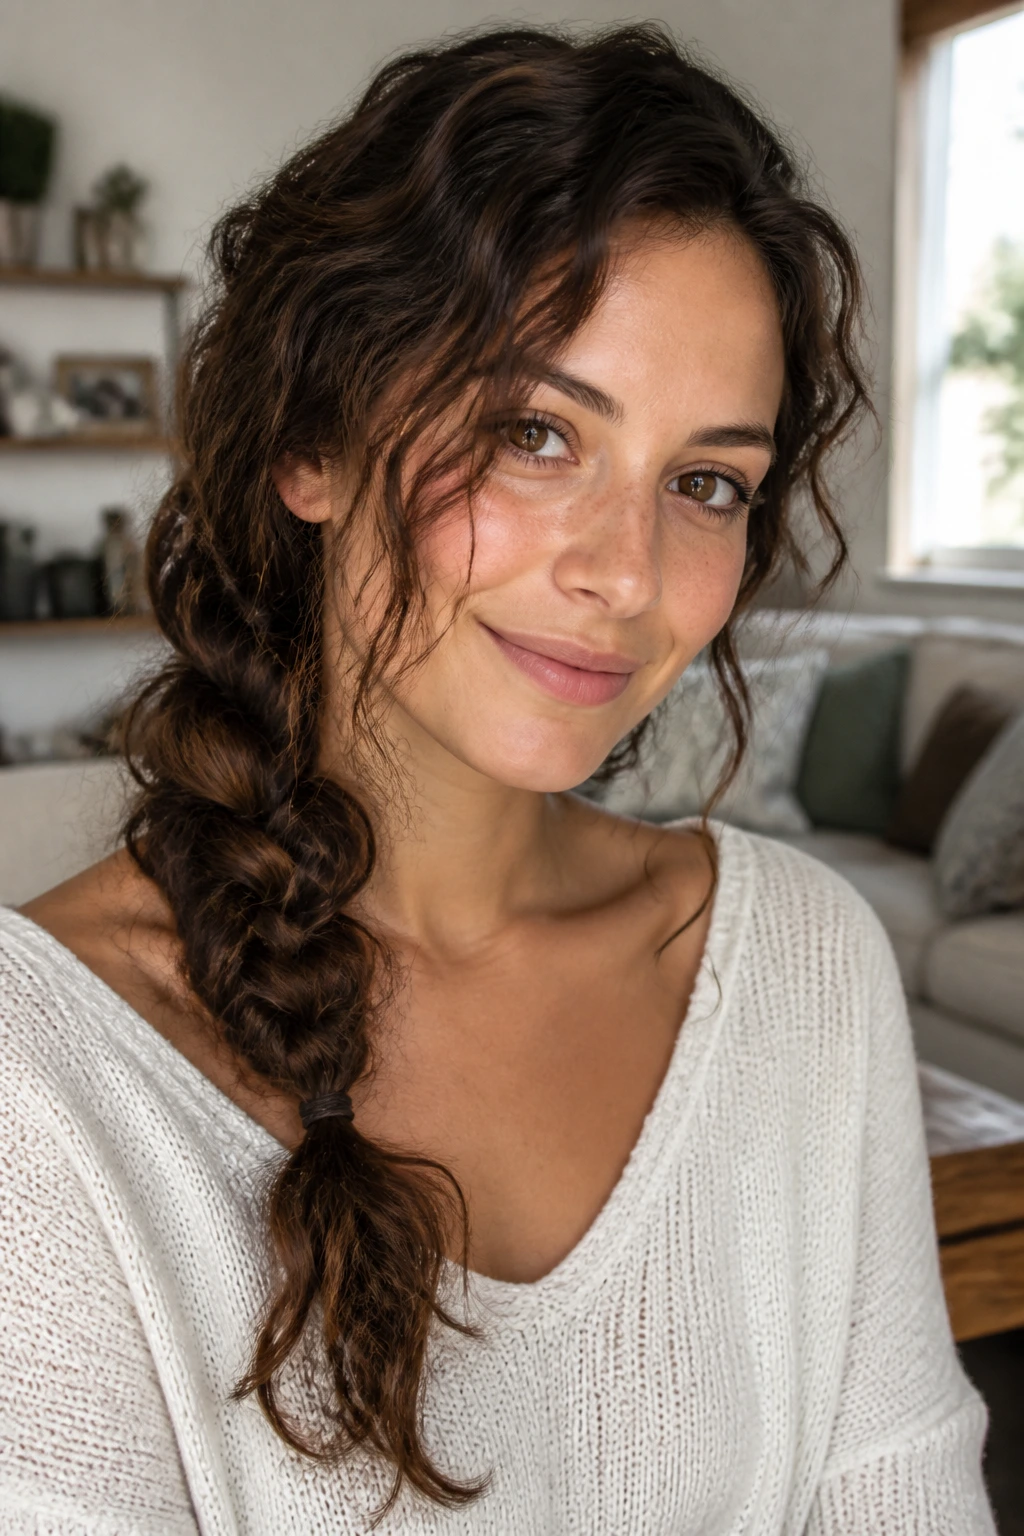
A loose side braid is the closest thing 2B hair has to a cheat code.
It gathers the wave pattern instead of smothering it, which means you keep texture while getting the hair out of the way. Tight braids on this hair type can turn stringy fast, but a side braid with a little slack keeps the overall shape soft. The result feels more relaxed than a standard three-strand braid, and that suits 2B hair better anyway.
Start the braid low, near one ear or just below it, and keep your hands soft. If you pull hard on each cross-over, the braid gets too polished and the wave pattern disappears into the plait. I like to stop braiding about 2 inches before the ends and secure it with a small elastic, then pull the outer edges apart gently with my fingertips. That little bit of looseness makes the braid look fuller without turning it into a frizzy puff.
Skip the tiny schoolgirl version. It is too neat for this texture.
A side braid also holds up well on second-day hair, which is where 2B waves often look best. There’s enough grip in the length to keep the braid in place, and enough softness in the ends to keep it from looking stiff. If your hair is layered, you may need a few bobby pins at the front. Worth it. A braid that falls apart at the temples is annoying, and there is no point pretending otherwise.
3. Low Messy Bun With Face-Framing Pieces
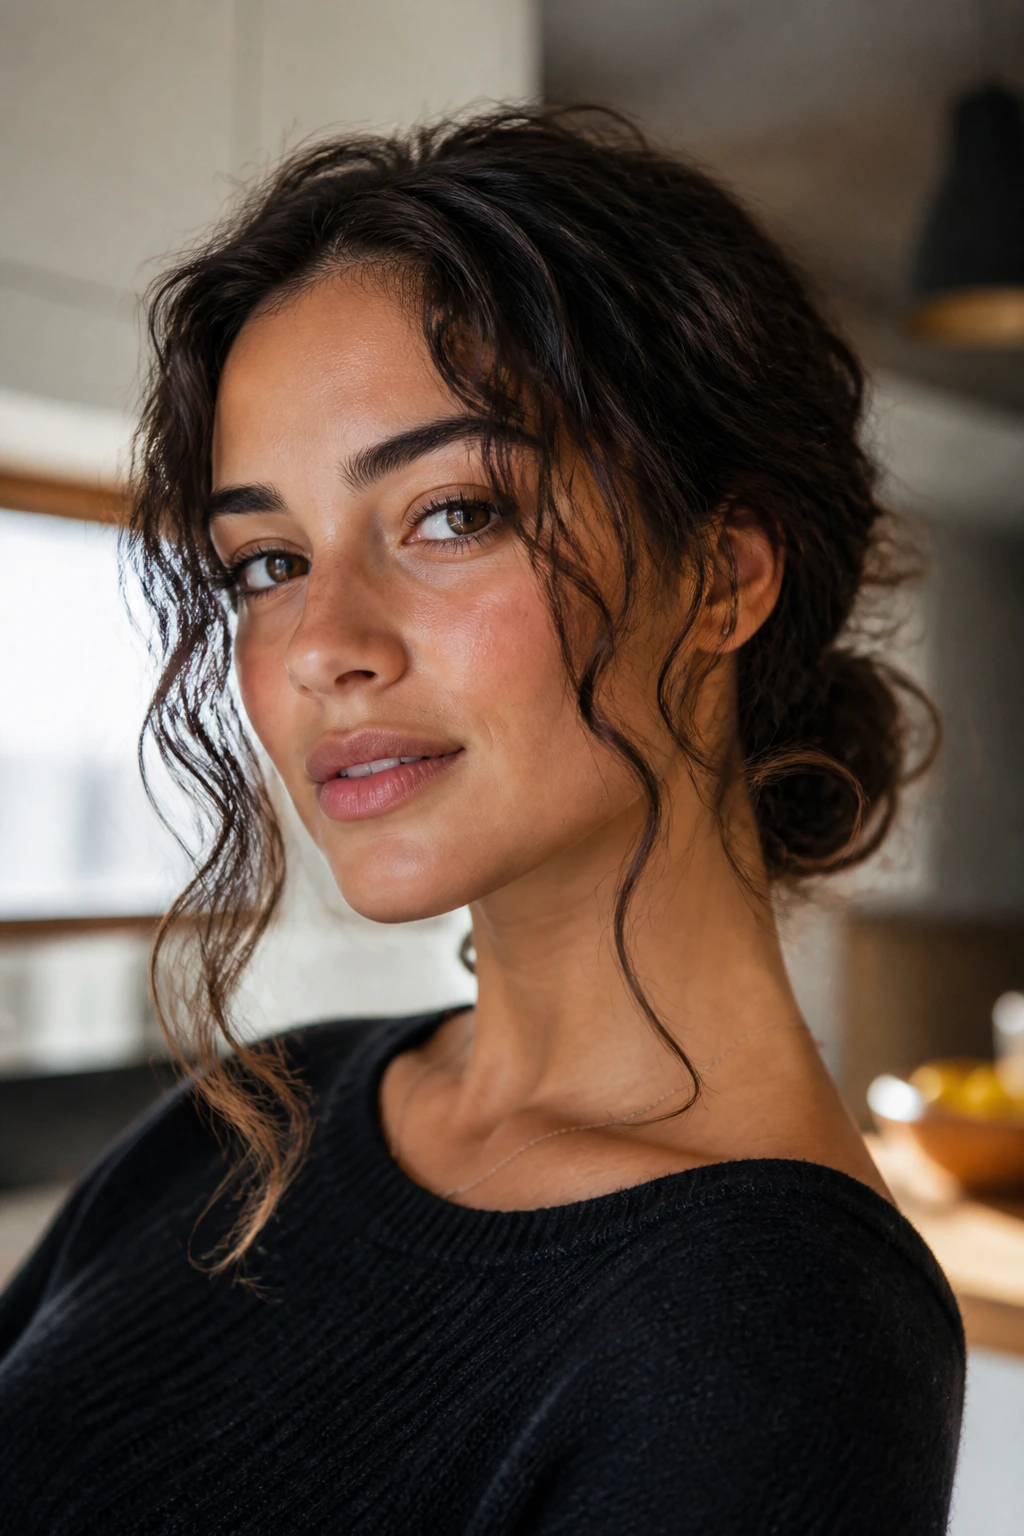
This is the style I’d pick for errands, dinner, or one of those days when your hair is halfway cooperative.
A low messy bun works on 2B hair because the texture already has movement. You are not trying to create shape from nothing. You are giving the hair a place to land, preferably near the nape, where the crown can still keep some lift. Pull it too high and the top goes flat. Pull it too tight and the bun looks older than it should.
The face-framing pieces do a lot of the work here. Two loose strands around the cheeks soften the whole look and keep the bun from feeling severe. I also like to twist the hair once before wrapping it into the bun, not twice or three times. One twist is enough. More than that and the bun starts to look forced.
- Use a coil tie or a soft elastic, not a thin band that digs in.
- Pin the bun in two or three spots instead of wrapping it hard.
- Leave the ends a little uneven; that keeps the style from looking rigid.
- Use one small mist of flexible-hold spray if the front keeps escaping.
The best messy buns look like you stopped at the right moment. Not sloppy. Just relaxed enough that the wave pattern still feels alive.
4. Deep Side Part With Barrettes
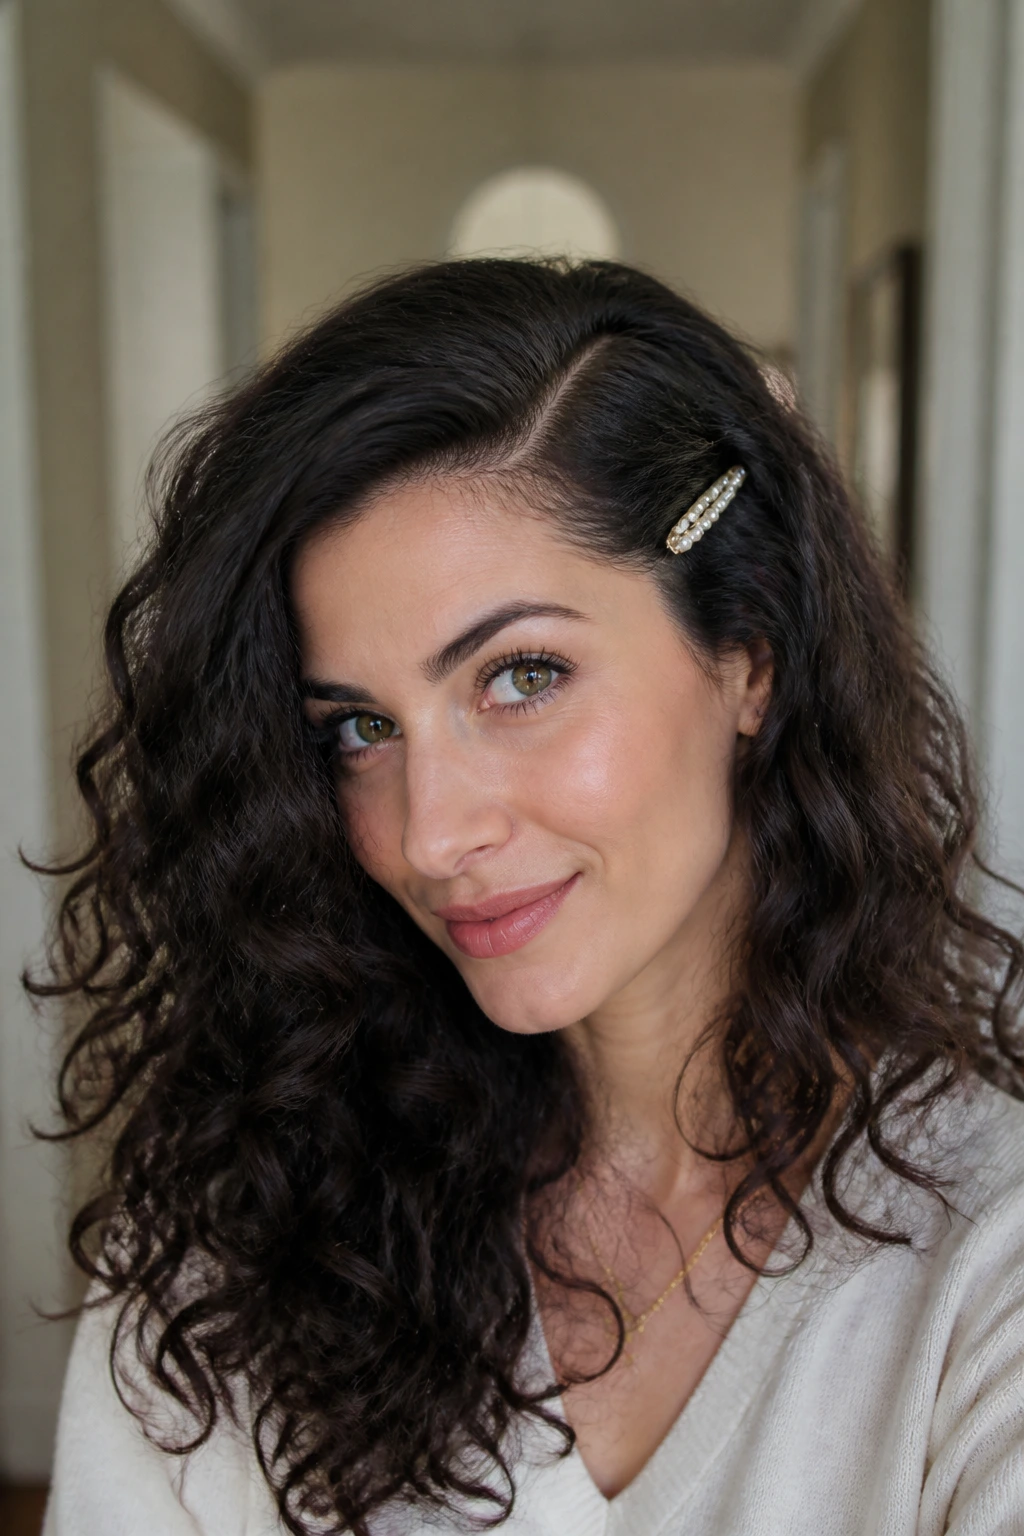
Need a style that looks finished in two minutes?
A deep side part does more than people give it credit for. On 2B hair, it creates shape right at the front, which is where this texture often looks a little plain when it’s parted straight down the middle. Move the part off-center and the whole face changes. The waves fall differently, the root lift looks more intentional, and even a plain down style starts to feel styled.
How to Wear It
Use the end of a tail comb or the tip of a rattail comb to make the part crisp, then press the hair down lightly at the roots with your palm. You do not need to flatten everything. You only need enough control so the part line reads clean. One shiny barrette above the heavier side is enough. Two smaller clips can work too, especially if the hair around your face tends to slip.
A small barrette near the temple keeps the front from falling into your eyes, which is honestly one of the biggest annoyances with 2B hair. The wave pattern wants to move. That is the point. But if movement becomes constant face-whipping, the style stops being useful.
A little root-lift spray at the part line helps if your hair lies down fast. The trick is to keep the rest of the hair soft. No stiff lacquer. No crunchy finish. The whole point is contrast: structured at the front, loose everywhere else.
5. Rope-Braid Half-Up Crown
Unlike a full braid, this style does not ask every strand to behave.
That’s why it works so well on 2B waves. A rope-braid half-up crown gives you the look of a braided detail without pulling the entire head into one heavy shape. You twist two sections instead of weaving three, which keeps the line cleaner and usually produces less frizz around the sides. The texture still shows through underneath, and that matters.
I like this one for hair that has layers. A traditional braid can spit out shorter pieces at the temples, which gets messy in a bad way. The rope version is more forgiving. Take two sections from each side of the head, twist them back toward the crown, and pin them together with two bobby pins crossed in an X. If the hair slips, mist the mids with a little water before twisting. Not soaking wet. Just enough grip.
This style sits between casual and polished, which makes it useful for a lot of places. Brunch. Work. A dinner where you do not want to look overdressed. It also holds a soft wave pattern underneath, so when you take it down later, the hair usually still has some shape left in it. That is a nice bonus, not a tiny one.
6. Pineapple Ponytail
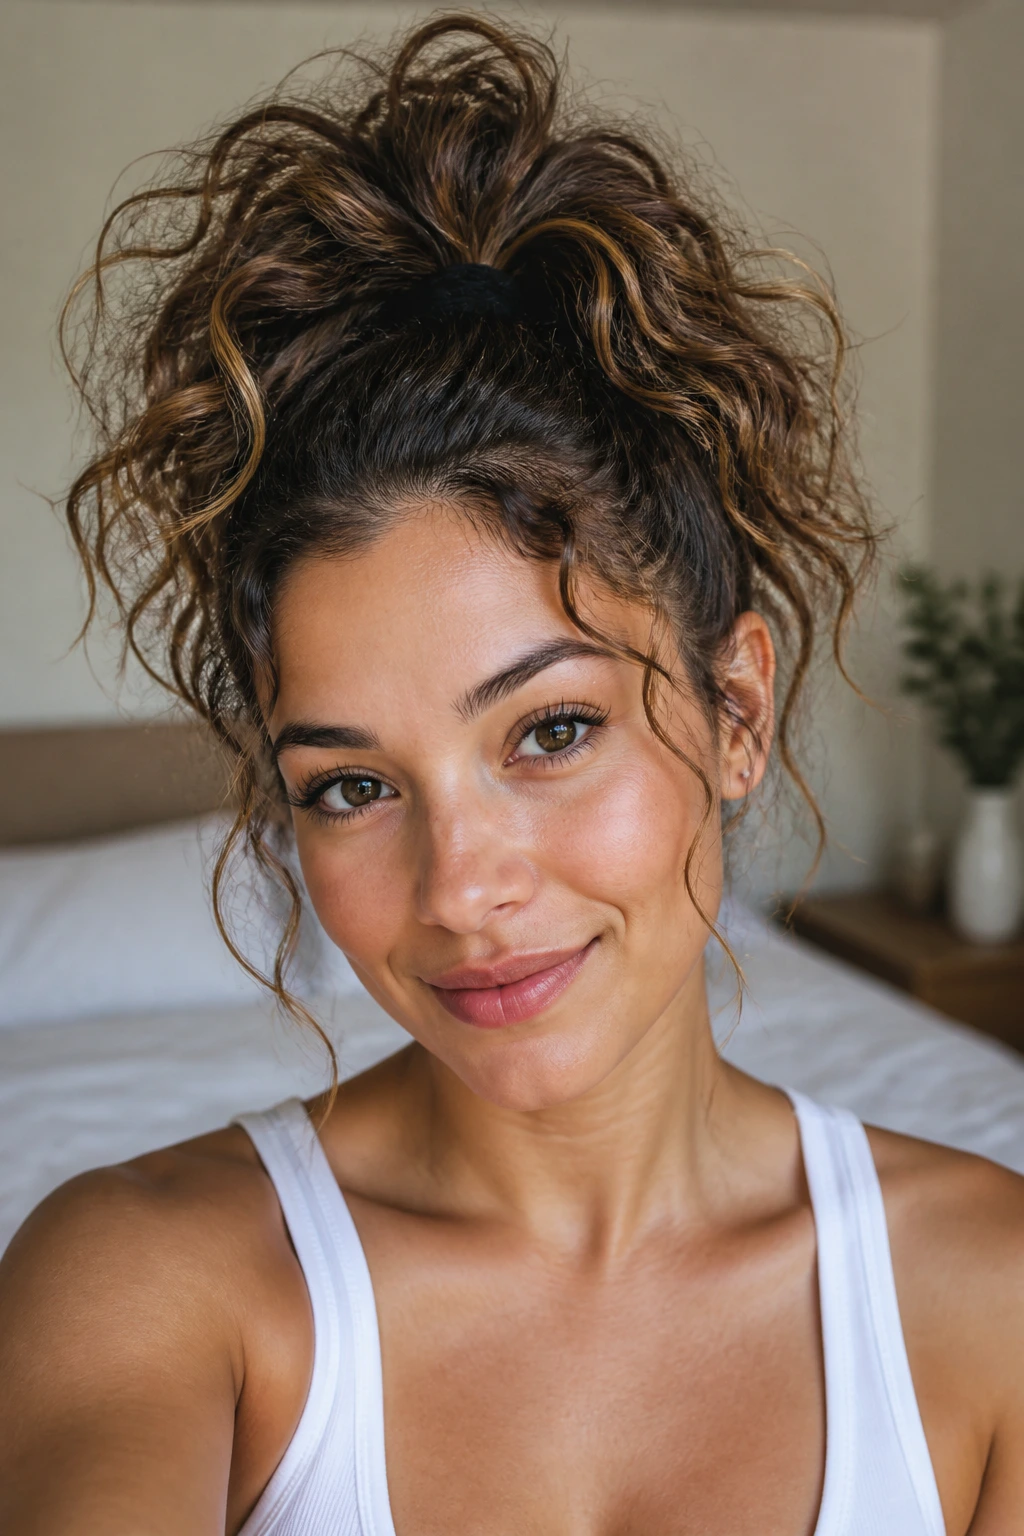
The pineapple ponytail has a reputation for being a sleep style, and sure, that is one of its best uses. But on 2B hair it also works as a daytime style when you want volume and don’t want to crush the wave pattern.
Put the ponytail high, but not painfully high. The base should sit near the crown, where the hair can fan out instead of hanging limp. Use a silk or satin scrunchie if you have one. A tight elastic leaves a dent, and 2B hair shows dents fast. The point here is lift, not compression.
I like this style on hair that has a little natural grit from day two or day three. Clean hair can be too slippery and the ponytail can slide down. A little texture gives the base something to hold onto. Leave the ends loose and slightly spread out — do not try to make them look controlled. That is the wrong instinct.
The pineapple works because it keeps the hair up without forcing the wave to disappear.
If you have layers, let a few shorter pieces fall around the face. They keep the style from looking like a high school gym shortcut. It reads more intentional when there’s a bit of softness at the edges.
7. Bubble Ponytail
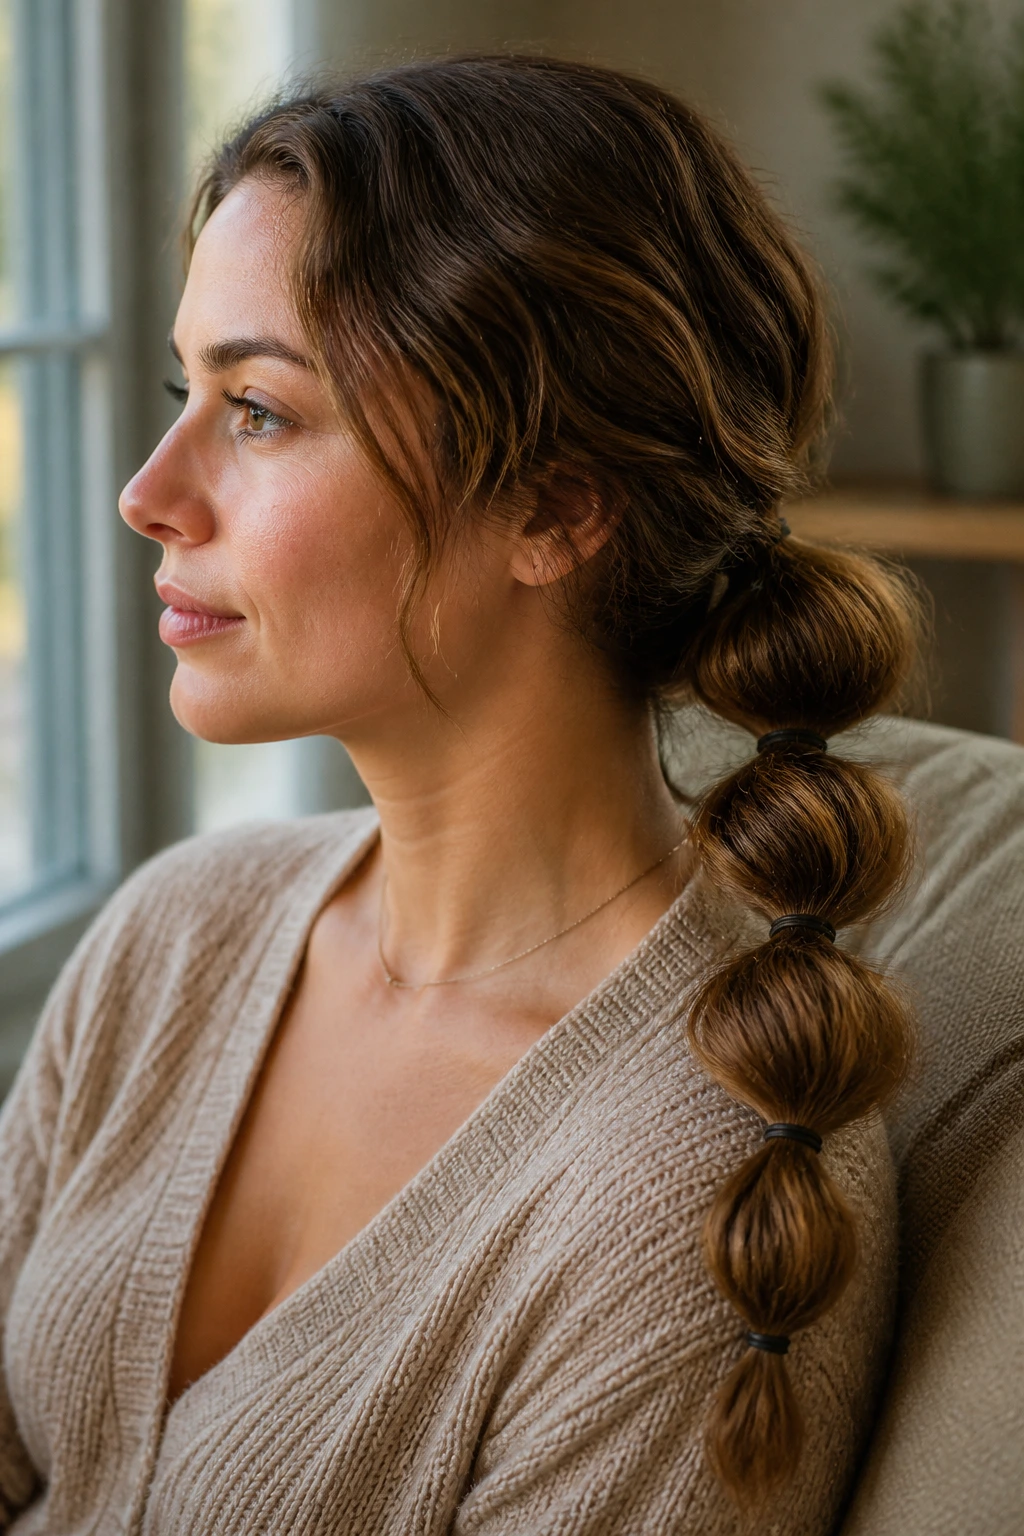
When you want a ponytail but not a plain one, bubble sections do the job fast.
This style is especially good for 2B hair because the hair already has body. You are not inventing fullness from nothing. You’re dividing the length into small, rounded sections that make the ponytail look fuller and a little more playful. It’s one of those styles that looks more complicated than it really is.
Start with a low or mid ponytail. Secure it with one elastic, then add more elastics every 2 to 3 inches down the length. After each elastic goes in, tug the section between bands outward gently with your fingertips until it forms a rounded bubble. Don’t yank. You want shape, not frizz. A clear band works well, but matching elastics can disappear better if you care about the finish.
- Space the elastics evenly for a clean look.
- Keep the top smooth only where it needs to be smooth.
- Use a light mist of spray on the crown, not the length.
- Tug each bubble from the sides, not the center.
This is one of my favorite styles for thick 2B hair because it keeps the ponytail from collapsing into itself. Fine 2B hair can wear it too, but the bubbles should be closer together so the sectioning doesn’t look sparse.
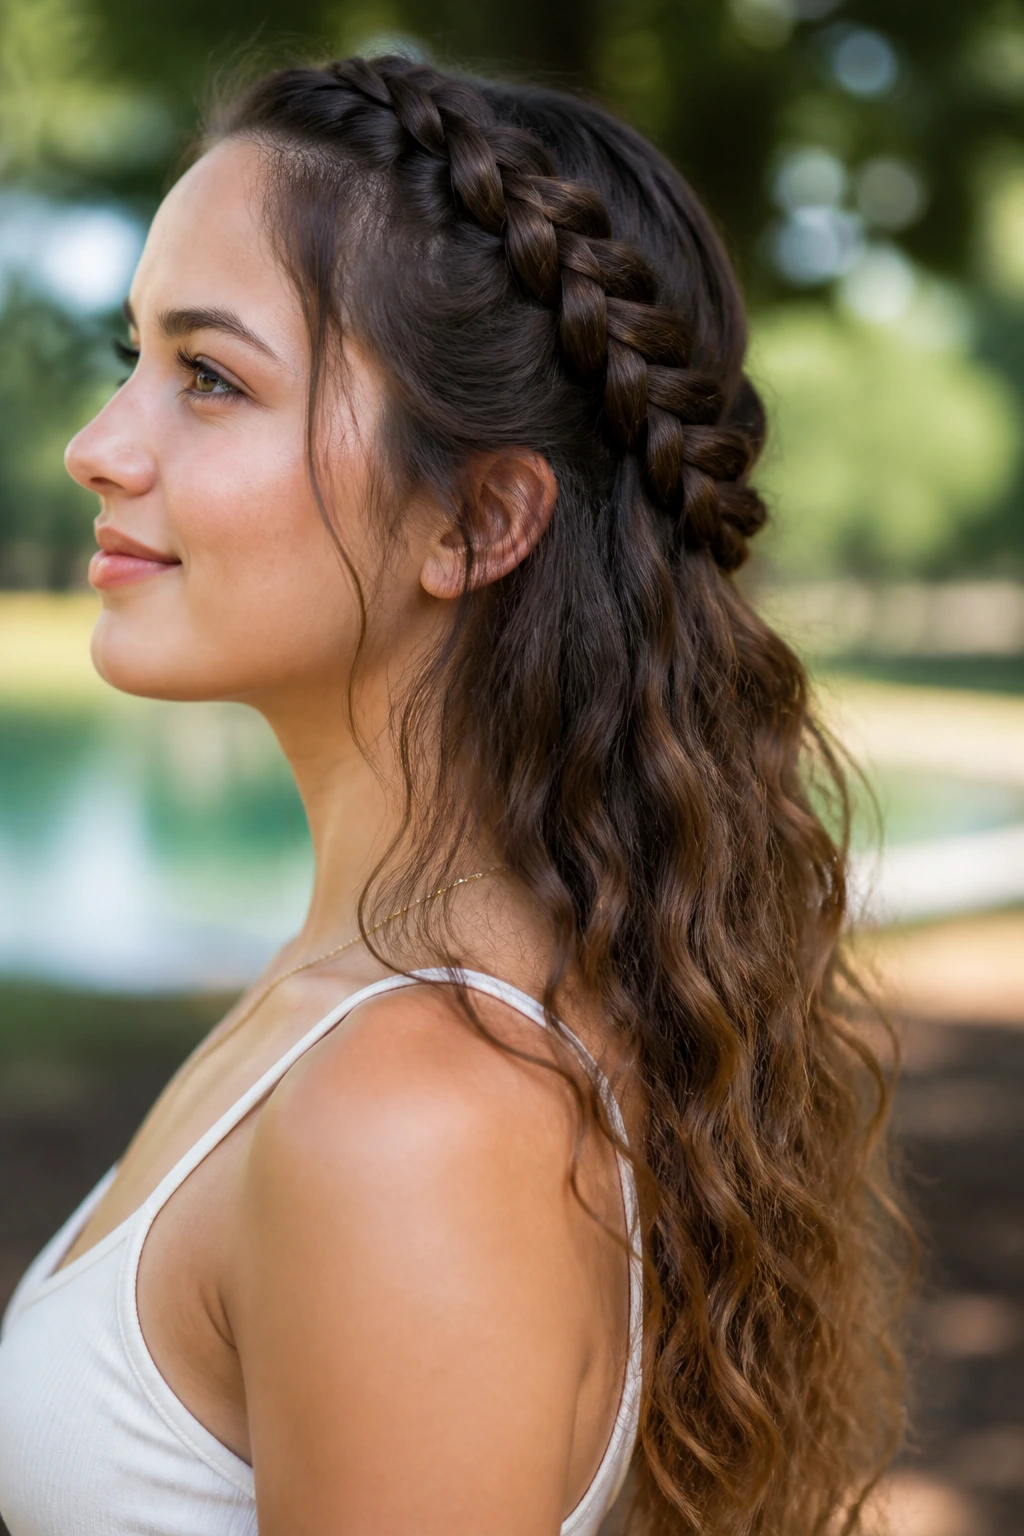
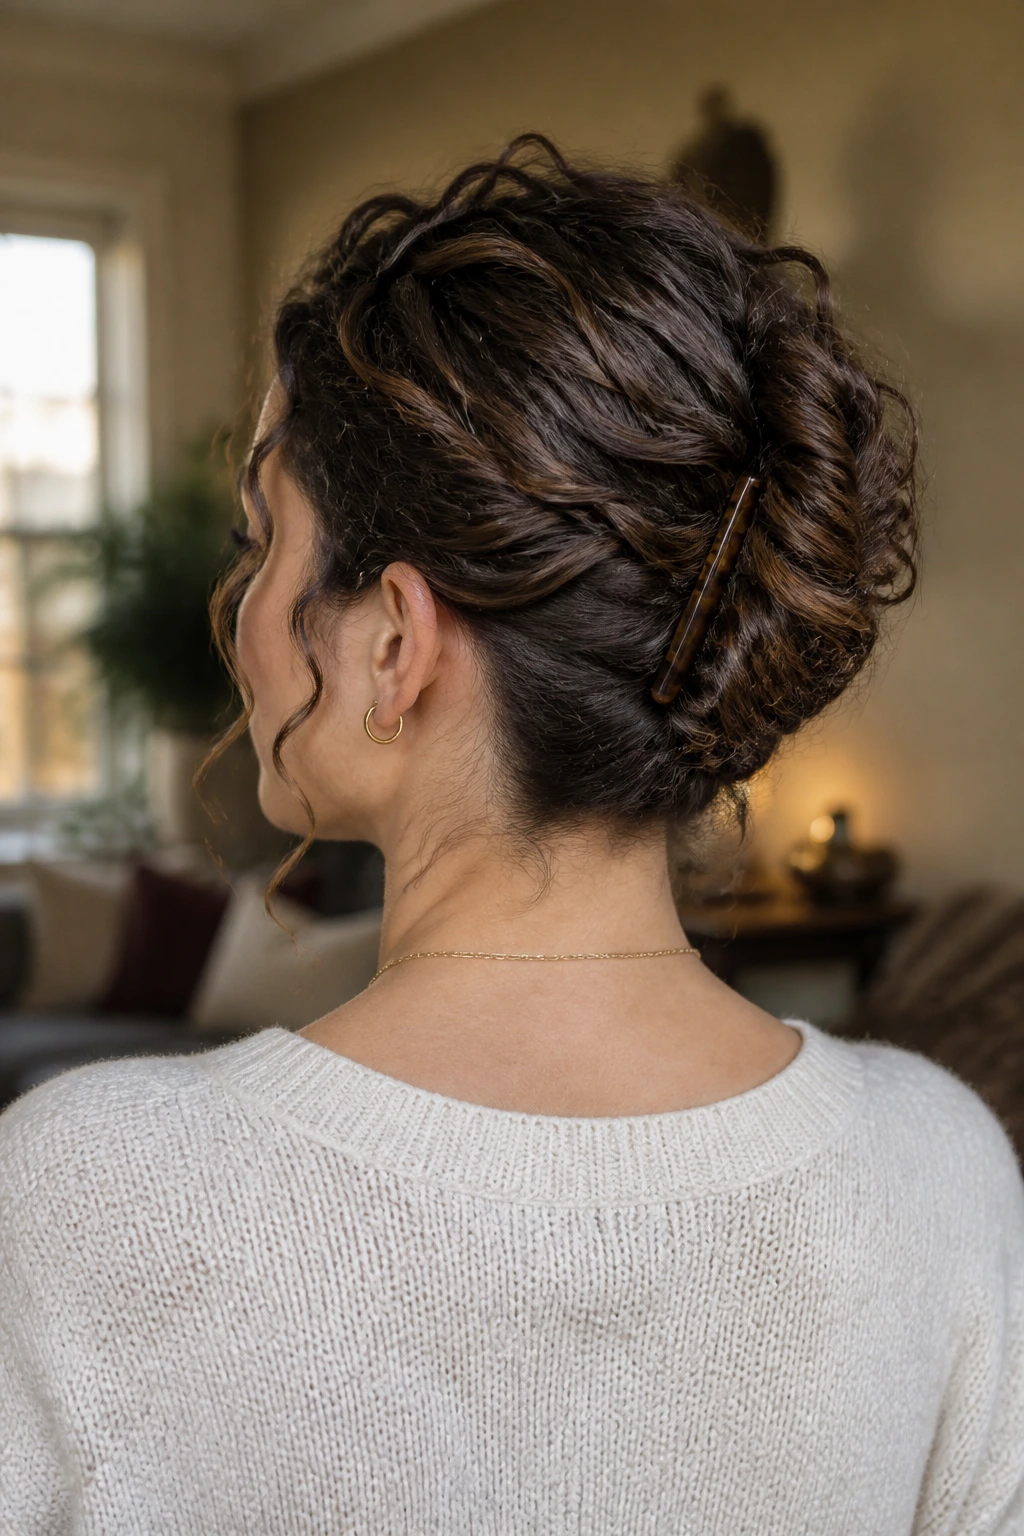
8. Braided Crown for 2B Wavy-Curly Hair

A braided crown can look fussy on the wrong texture. On 2B waves, it often lands in the right place because the wave pattern fills in the braid instead of disappearing under it.
That is the whole trick. The braid should not be tiny and tight. It should be broad enough that the texture can sit inside it. If you braid too close to the scalp and pull every section hard, the crown starts to look stiff. If you braid with a little slack and pin it with hidden bobby pins along the back, the style feels softer and more wearable. It also keeps the front of the hair off your face, which is useful on warm days or any day when the front pieces insist on misbehaving.
What Makes It Different
A crown braid on 2B hair looks better when it is a little imperfect. That sounds like a dodge, but it is not. The hair’s own bend gives the braid some softness, so you do not need to chase neatness. In fact, the neatest versions can look too formal. A bit of looseness around the ears makes a real difference.
- Best for collarbone-length hair and longer.
- Works well on hair that has some texture already, not freshly blown straight.
- Holds up better with a touch of texture spray than with heavy cream.
- Needs a few bobby pins hidden under the braid to stay put.
If you want a style that photographs well and still feels comfortable after a few hours, this is one of the better picks. Not the easiest. But one of the better ones.
9. Sleek Low Ponytail With a Center Part
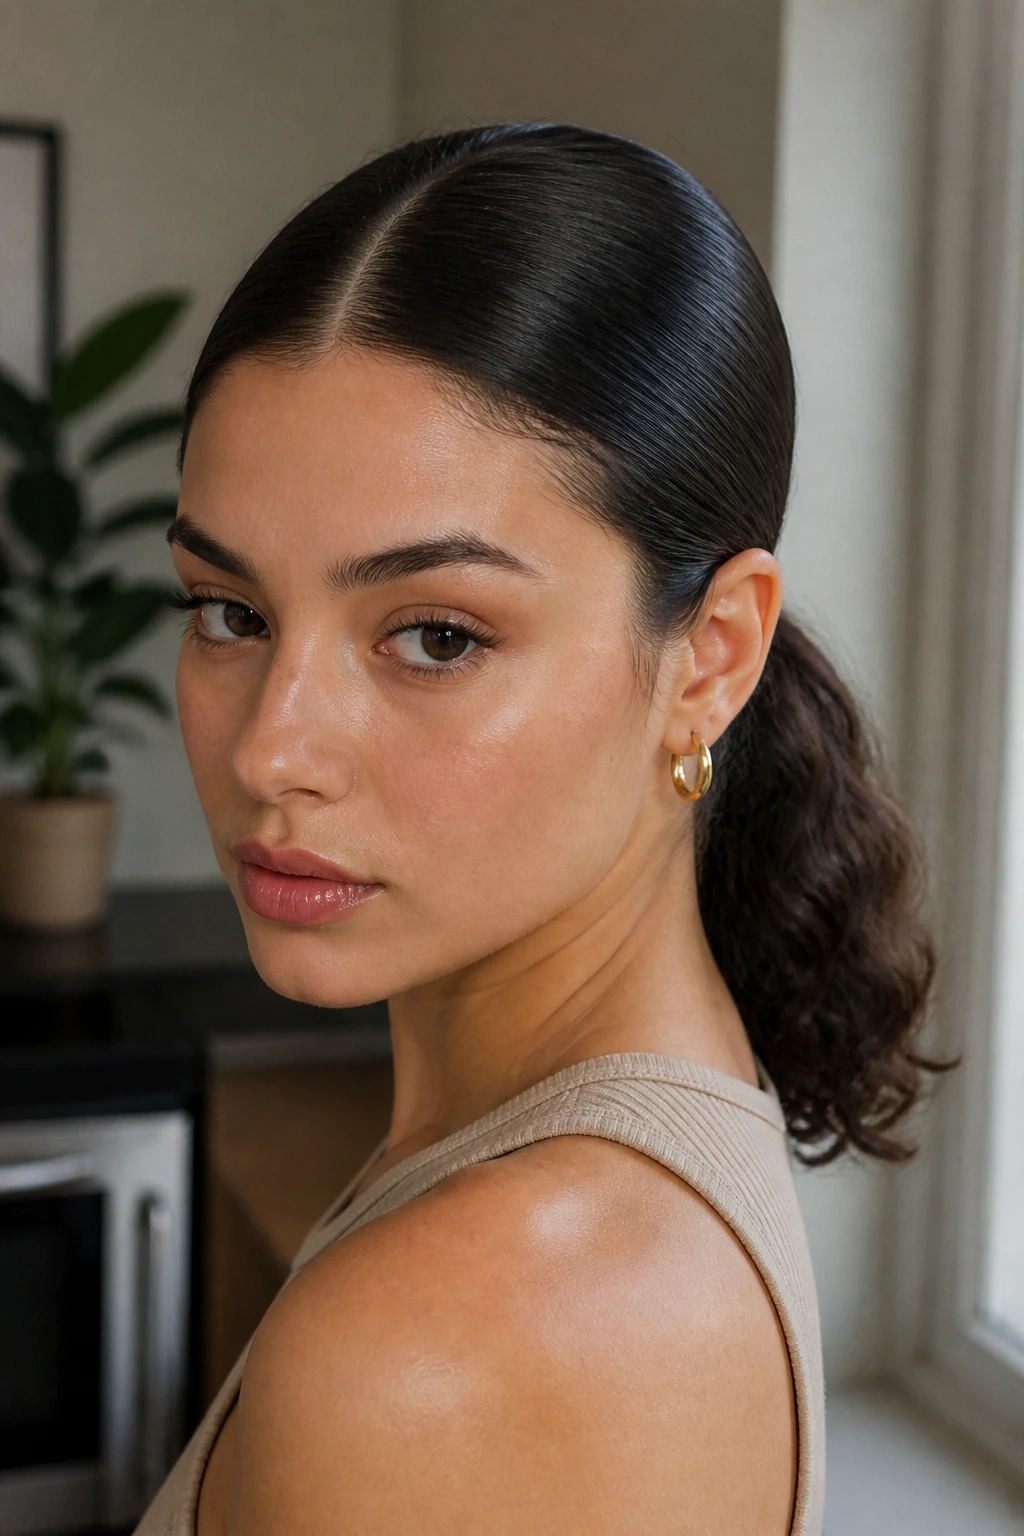
Can 2B hair go sleek?
Yes, but only if you leave the lengths alone. That is where people go wrong. They overbrush the whole ponytail and turn the waves into a thin rope, which looks flat instead of polished. A better version keeps the top smooth, the ponytail low, and the ends with a little bend.
The center part gives the style structure, which helps a lot if your waves are looser near the roots. Brush the crown gently with a boar-bristle brush or a soft paddle brush, add a light gel or smoothing cream only to the top section, then gather the ponytail at the nape. Secure it with a covered elastic. If your hair is slippery, wrap a small strand around the base and pin it underneath.
How to Keep It from Looking Stiff
Keep the finish on the top half neat and the lower half relaxed. That contrast is what saves the style. A bone-straight ponytail can look severe on 2B hair, and that is not the point. You want the roots to look controlled and the length to keep some life.
This style works well for interviews, clean outfits, or nights when you want your hair out of the way without pretending you have straight hair. That last part matters more than it sounds. Good styling respects the texture in front of it.
10. Half-Up Mini Buns
Half-up mini buns are louder than they look.
They give you shape up top and leave the rest of the waves visible, which is a smart trade for 2B hair. The style is especially good when the crown has gone a little flat and the lower lengths still look decent. Instead of fighting for a perfect down style, you use the top section to create interest and let the rest breathe.
I like this look with two small buns rather than one big one. Part the top half from temple to temple, twist each side once or twice, and loop it into a tiny bun secured with a mini claw clip or two bobby pins. Keep the buns small. If they get bulky, the style starts to feel childish in a way that is hard to fix.
The lower half should stay soft and brushed only with your fingers. A little separation at the ends is fine. More than fine, actually. 2B hair often looks best when it still has a little lived-in movement.
- Best for thick or medium-density hair.
- Works well when layers need help staying out of your face.
- Faster than a full updo.
- Looks cleaner if the buns sit close to the crown, not far back.
This is a good “I need something fun but not precious” hairstyle. There is a place for that.
11. Twisted Low Chignon
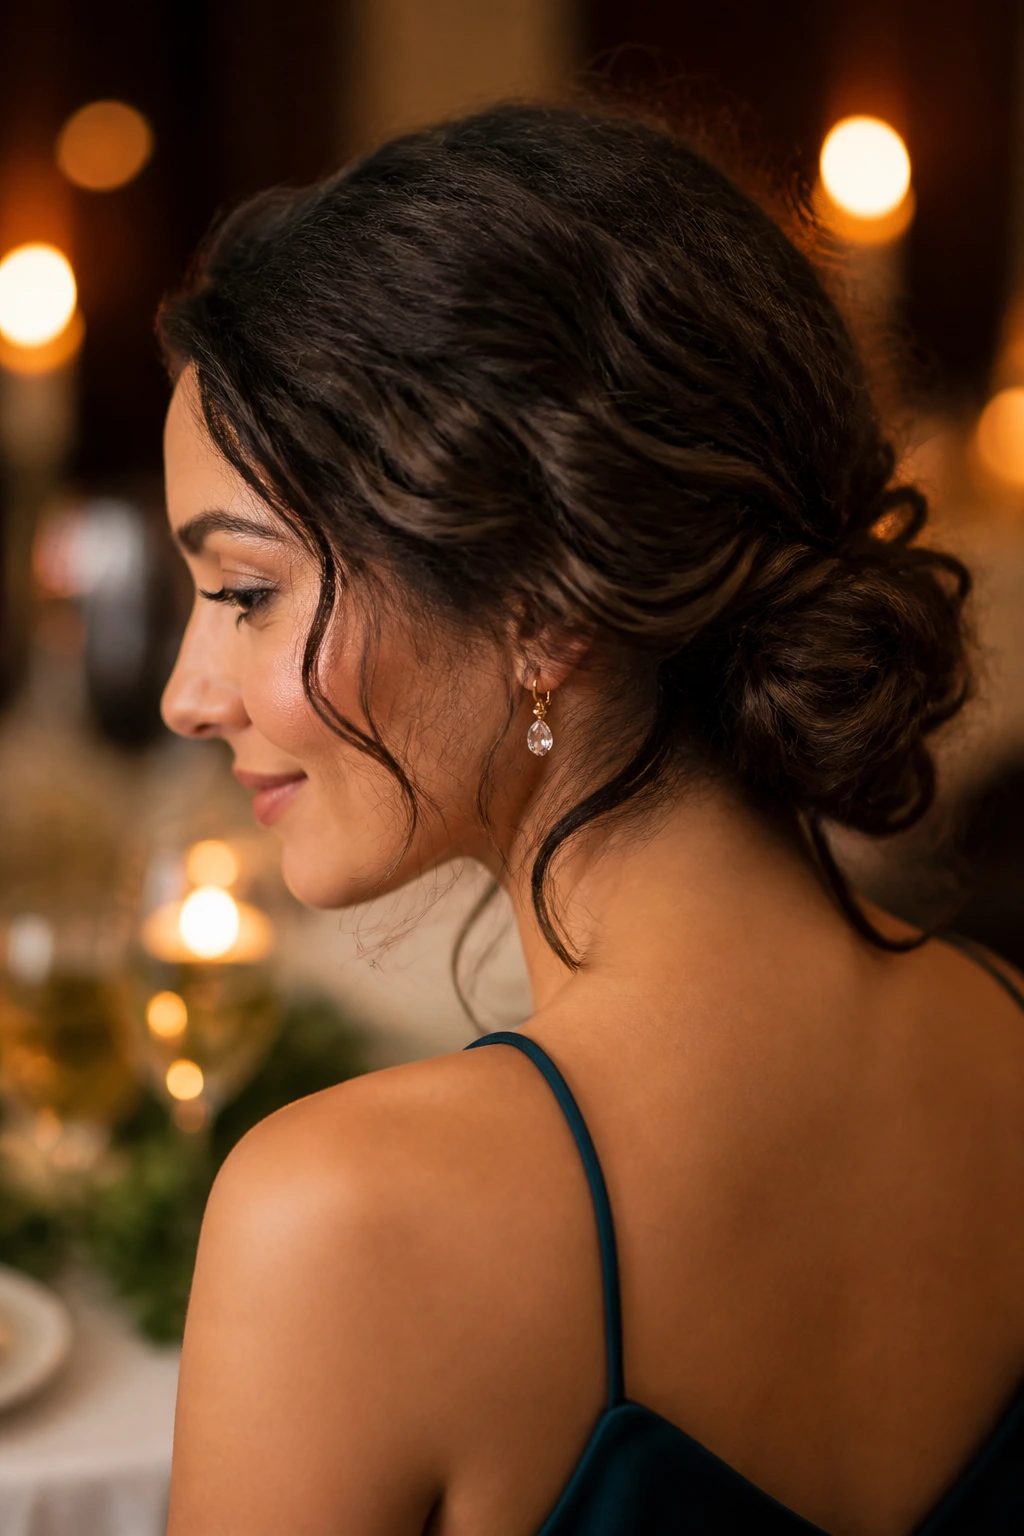
A twisted low chignon is what I’d choose for a dinner, a wedding, or any event where the collar matters.
2B hair has enough natural bend to hold the twist without a mountain of product, which is one reason this style is easier than it looks. Start by dividing the hair into two sections, twist them together loosely, then coil the length into a low knot at the nape. Pin it with U-pins or bobby pins in a crisscross pattern so the weight spreads out. A few loose side pieces are fine. They soften the shape and keep the style from feeling too severe.
The important thing is not to over-smooth the hair before you twist it. Some texture gives the chignon grip. If the hair is too sleek, the pins slide around and the knot droops. A light mist of flexible-hold spray after pinning helps, but do not drown the style in lacquer. You want the twist to stay touchable.
This style is more forgiving than it looks, especially on layered hair. The layers help fill the knot, which means you do not need to build a huge bun to get the same visual weight. Small win. A useful one.
12. Accent Face-Framing Braids
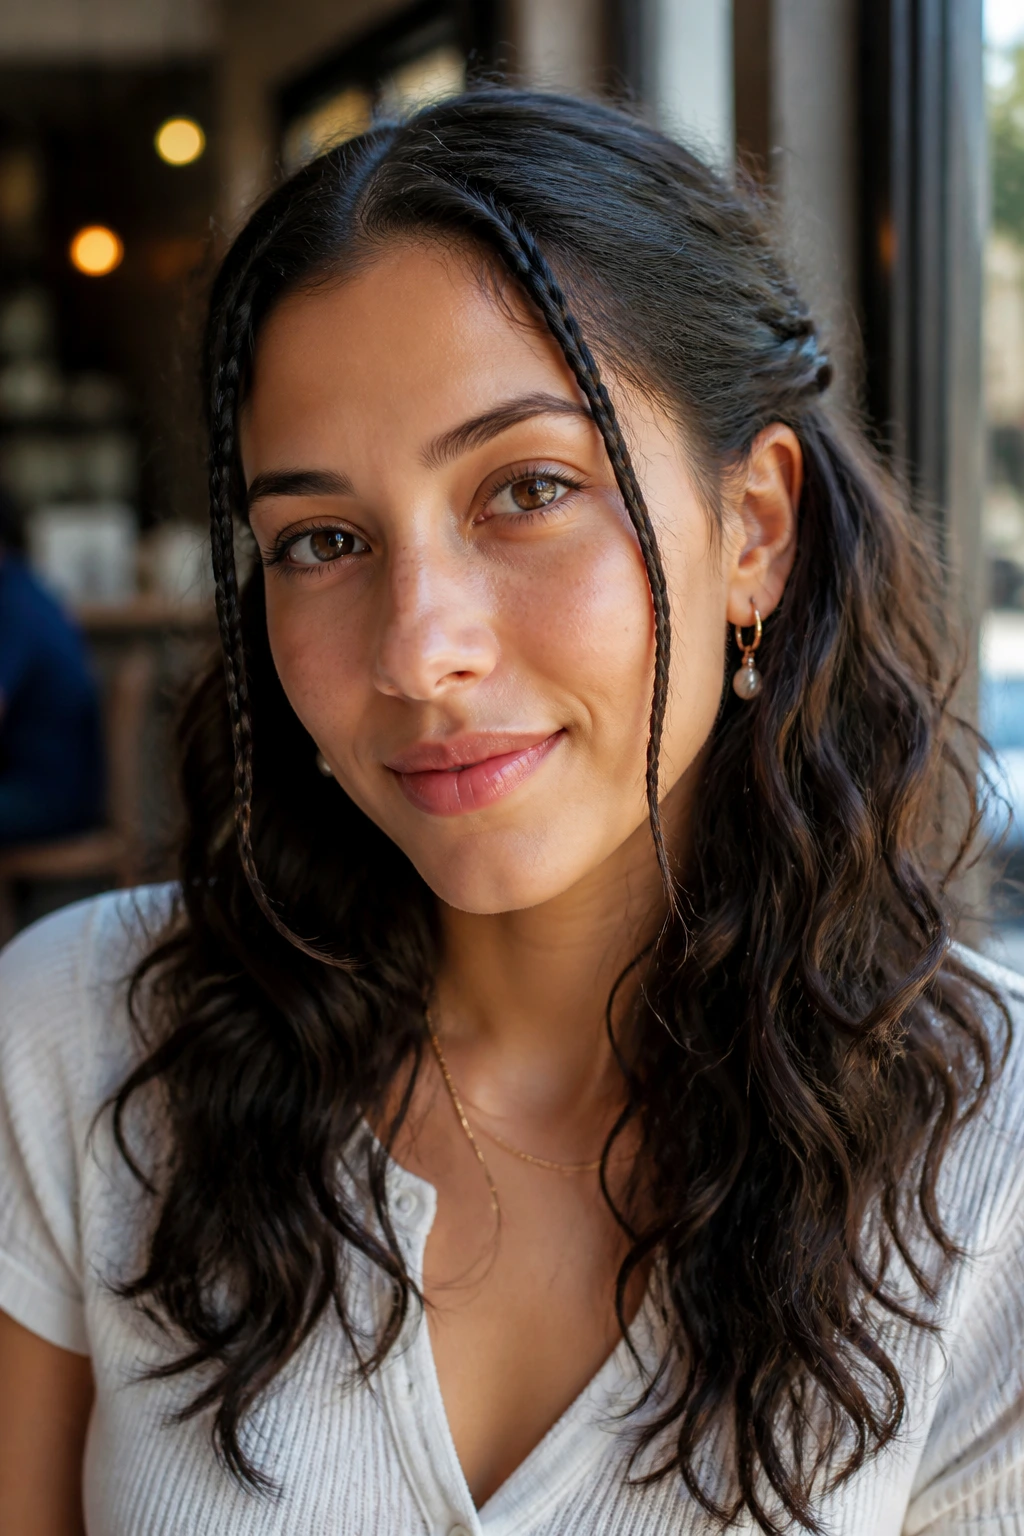
Tiny braids near the temples can fix a lot of bad hair days.
They keep loose front pieces from sliding into your face, add structure near the cheeks, and let the rest of the hair keep its wave pattern. On 2B hair, that mix matters because the hair usually wants to move, but not always in a tidy way. Accent braids give the movement somewhere to go.
Where to Place Them
You can braid just one side for an asymmetrical look, or do two small braids for a more balanced finish. I prefer pencil-thin braids rather than chunky ones. Thick braids can overpower the softness of 2B waves and start to look heavy. A small braid at the hairline, pinned behind the ear or left to blend into the rest of the hair, reads cleaner.
These braids are also useful on days when your roots are fine but your lengths still look good. You get detail without committing to a full updo. That is why they are better than they sound on paper.
A tiny braid can look a little unexpected in the best way. Not flashy. Just enough. If you want the style to last through a long day, secure the end with a clear elastic and tuck it under a layer of hair so it does not poke out like an afterthought.
13. Dutch Braid Into Wavy Ends
A Dutch braid is the stronger cousin of the French braid.
Instead of disappearing into the hair, it sits on top of it, which gives 2B hair a more visible pattern and a little extra structure. That makes it a good choice when the weather is humid, when the hair feels too soft to hold a regular braid, or when you want the front and crown under control but still want the ends to show off the wave.
The best version stops at the nape or mid-back and leaves the rest loose. That way the braid does the heavy lifting, and the lower lengths still keep their shape. If you braid all the way down, the style can start to feel weighed down, especially on lighter 2B texture. A medium tension braid works better than a hard, slick one. Pull the outer loops gently after you finish if you want the braid to look wider.
This style is a solid pick for travel days and long walks. It stays put, and the loose ends mean you can still wear the hair down-ish without dealing with total collapse. If your hair is very fine, a little texturizing spray on the mids before braiding can help the braid hold. Keep it light. Heavy spray makes the braid crunchy, and that is a bad trade.
14. Scarf-Tied Ponytail
A scarf does half the work here.
Tie it around a ponytail, and the whole style suddenly looks more finished without asking the hair to do anything hard. That is good news for 2B waves, which usually look better when they are not overhandled. The scarf also hides the elastic and softens the base, which makes a plain ponytail look less like a backup plan.
I like a silk or cotton scarf that is about 2 inches wide when folded, or a small square scarf tied in a clean knot. Keep the ponytail low or mid-height. If it sits too high, the scarf pulls attention upward and the style can start to look fussy. A lower placement feels calmer and gives the waves a chance to swing.
- Choose a scarf that slides easily instead of snagging.
- Tie the knot off to one side if you want a looser look.
- Leave the ponytail itself a little textured.
- Don’t wrap the scarf so tightly that the crown goes flat.
This is one of those styles that looks intentional even when the rest of the day is not. Good scarves do that. They give the hair a focal point and save you from pretending the ponytail was the entire plan.
15. French Pin Twist for 2B Wavy-Curly Hair
A French pin twist is one of the smartest styles for 2B hair, and it still does not get enough attention.
It holds the hair up without crushing the texture the way a tight bun can. You twist the length upward, slide the pin through the base, and let the hair anchor itself in place. The result sits somewhere between polished and relaxed. That is a useful middle ground, and 2B hair lives there more naturally than people admit.
How to Make It Stay
Gather the hair at the nape, twist it upward in one direction, then fold the length over itself and tuck the ends inward. Slide the French pin in from one side and angle it through the twist so it catches the hair against the scalp. If your hair is thick, use a second pin to lock the bottom edge. If your hair is fine, a single pin often does the job better than a bulky clip.
This style works best on medium to long 2B hair with some natural texture. It is also one of the few updos that can look elegant without trying hard. That matters. A lot of hairstyles on wavy hair either look too casual or too stiff. This one avoids both problems.
For me, the French pin twist is the style I choose when I want the hair up and still want it to look like the texture belongs there. No drama. No hard shell. Just a clean twist that stays in place.
Final Thoughts
The best hairstyles for 2B wavy-curly hair do not fight the wave pattern. They leave enough softness at the crown, enough movement in the length, and enough slack around the face that the texture still reads as texture.
That is why the simplest styles often win. A claw clip twist, a loose braid, a low bun, a pin twist — none of them ask the hair to pretend it is something else. They work because they respect the bend instead of flattening it.
If I had to keep only two tools on hand, it would be a soft scrunchie and a few good pins. That covers most of the useful styles here. The rest is timing, tension, and not getting greedy with the brush.