A braid can rescue a rough wash day, but braided Afro styles do something better: they let texture stay visible while giving the hair a shape that lasts. The sweet spot is choosing a style that fits your length, your density, and how much tension your scalp can tolerate. That last part matters more than people admit.
Short Afros can hold neat rows and tiny accents without extensions. Medium lengths open the door to halos, feed-ins, and puff combinations. Longer hair can handle fuller braids, buns, and side sweeps that move when you walk. Coily hair also shrinks, which means a chin-length braid style may look shorter on day one and settle into a softer shape after the roots relax.
The best braided Afro styles don’t fight the texture. They work with the fluff, the density, and the parting lines, then use braid placement to shape the whole look. And if a style hurts, it is the wrong style. Full stop.
I’ve grouped these 15 looks by what they actually do on the head — frame the face, lift the crown, smooth the sides, or tuck the ends away — because that’s how you end up with something wearable, not just pretty in a mirror. Start with the hair you have, not the braid you wish you had, and the right match shows itself fast.
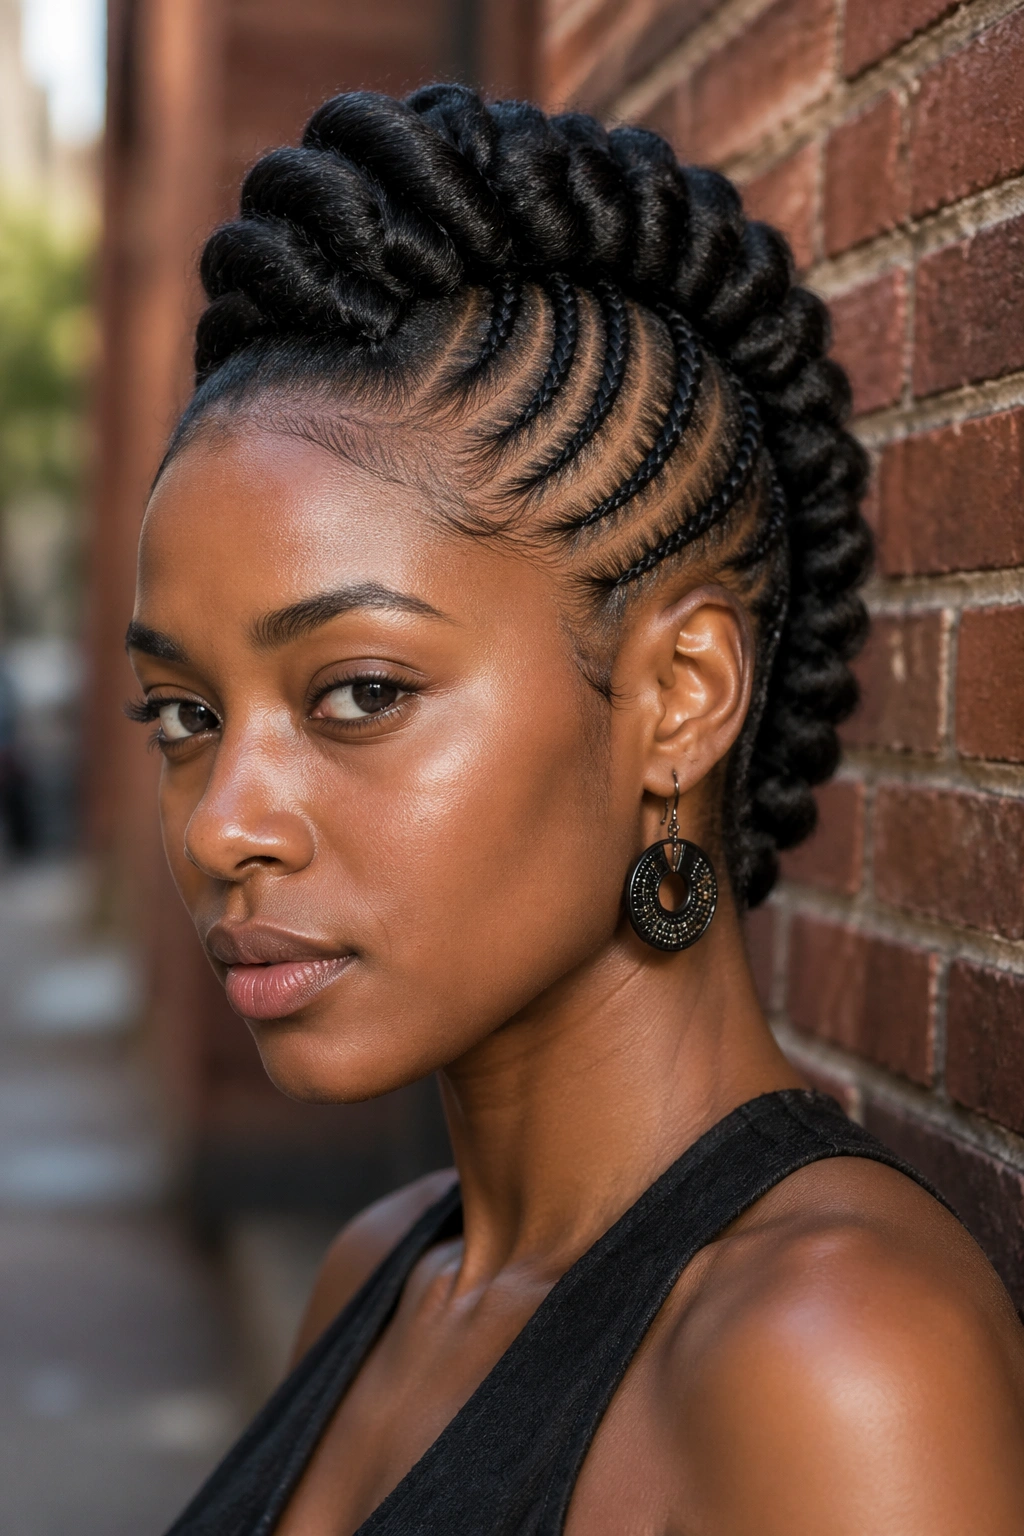
1. Braided Afro Crown Cornrows
Short hair can look sharper in braids than long hair ever could. A tiny Afro with 2 to 4 clean cornrows around the front or crown gets a real shape without flattening the whole head, and that balance is the charm. The hair still reads as textured and soft, but the braid lines give it a frame.
This style works best when the top has at least 1.5 to 3 inches of length. Use a rat-tail comb to make narrow parts, then smooth each section with a little gel or edge control before you braid. If the hair is extra short, smaller braids hold better than chunky ones, because they grip the scalp more evenly and don’t puff apart by lunchtime.
Why It Works on a TWA
The crown braid pulls the eye upward, which makes a short Afro feel deliberate instead of in-between. It also keeps the front neat, so the style holds up on days when the rest of your hair wants to live its own life.
- Best for: tiny Afros, TWA haircuts, and short tapered cuts
- Section size: about ¼ to ½ inch per braid
- Tools: rat-tail comb, styling gel, small clips, satin scarf
- Finish: gold cuffs or one or two tiny beads at the ends
Pro tip: press the roots with a silk scarf for 10 to 15 minutes after braiding. The parts stay cleaner, and the front won’t fuzz out as fast.
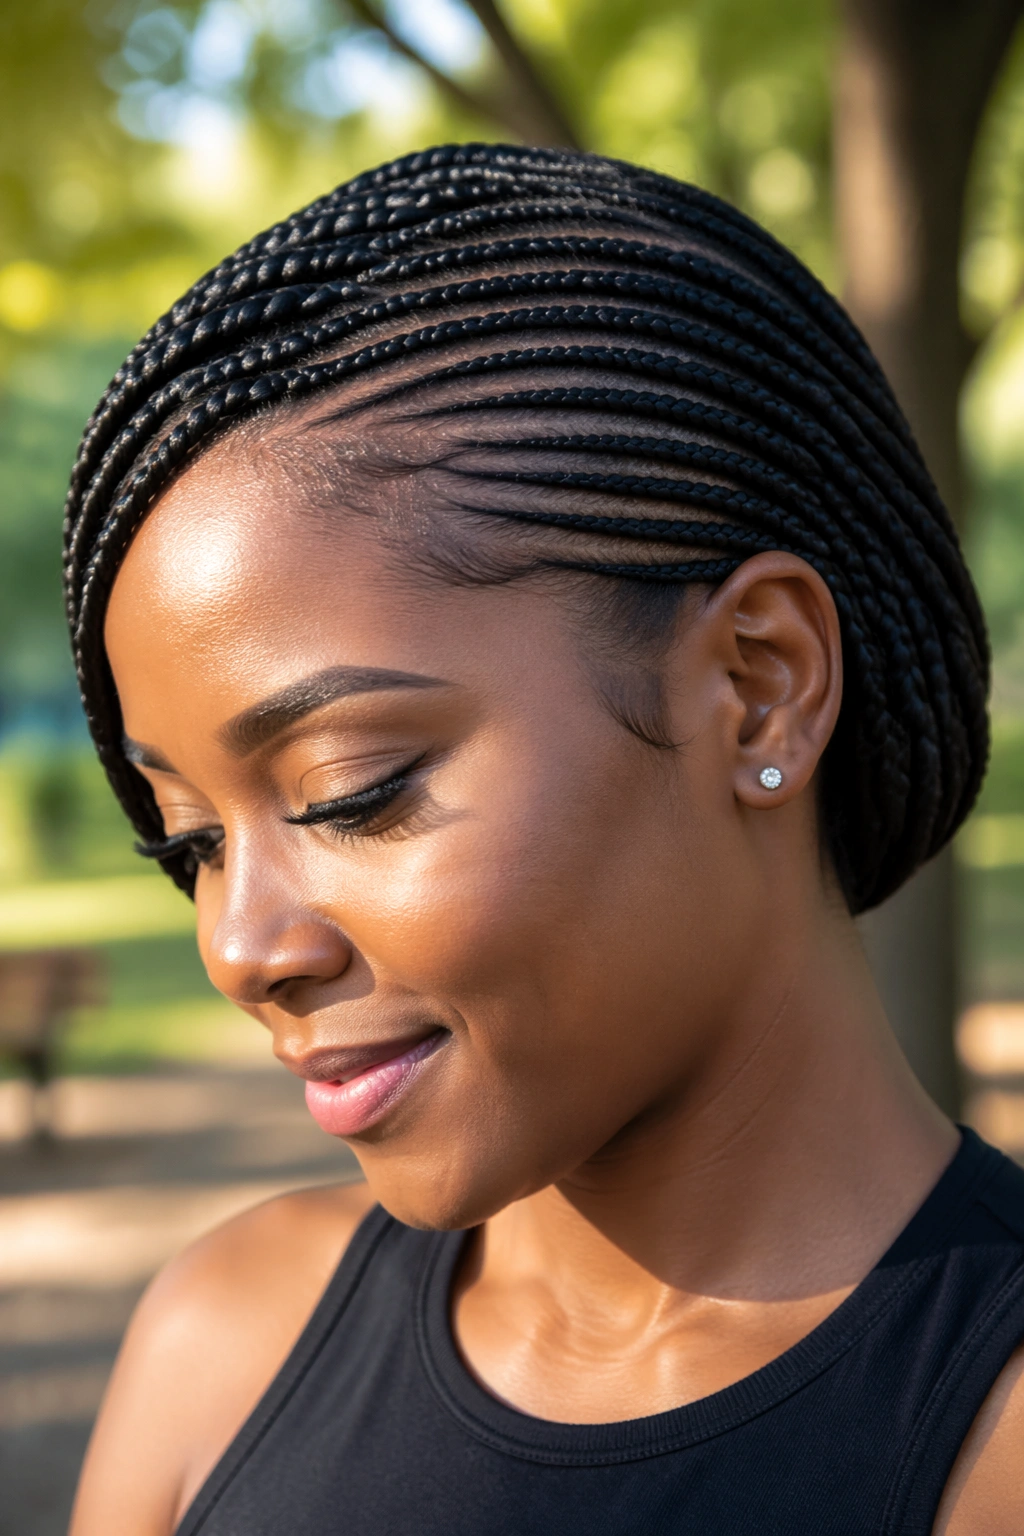
2. Temple Braids on a Tapered Afro
Can you braid hair that barely brushes the ear? Yes, and this is one of the prettiest ways to do it. Temple braids on a tapered Afro keep the sides neat while leaving the top fluffy, so you get definition without losing the natural shape of the cut.
The trick is to braid only the front and side sections, usually one slim braid on each temple or two on each side if the hair is dense enough. The rest of the Afro stays free. That contrast is the whole point. You see the braid line first, then the texture behind it, and the style feels sharp without looking stiff.
A tapered cut makes this even easier because the shorter sides give the braids a clean landing zone. Ask for parts that follow the curve of your hairline instead of forcing straight lines where they do not belong. Straight parts can look crisp, sure, but curved parts often sit better on natural texture and grow out more gracefully.
What to Ask for at the Hairline
- Keep the braids narrow enough to lie flat.
- Stop the braid before the tension starts to pull at the temples.
- Leave the top full and airy.
- Avoid overloading the front with heavy beads if your edges are fine.
One small braid can change the whole silhouette. Sometimes that is all you need.
3. Front Braids into a Puff
If the front of your hair keeps falling into your eyes, this style solves the problem without hiding the Afro. A few front braids lead straight back into a puff, so the shape stays lifted at the crown and soft everywhere else. It’s one of those styles that looks simple in theory and smart in real life.
The parting usually starts at the hairline and stops somewhere around the crown, where the rest of the hair gets gathered with a satin scrunchie or a snag-free band. You can do two braids, three braids, or even four slim rows depending on how busy you want the front to look. On chin-length and shoulder-length hair, the puff sits high and full. On shorter hair, it settles lower and still works.
- Best length: chin to shoulder length
- Braid count: 2 to 4 front braids
- Good add-ons: a wrap-around scarf, cuffs, or a single color thread
- Best use: busy days, gym days, and low-fuss weekends
The nice thing here is the balance. The braids control the front, the puff keeps the style from feeling severe, and the whole look takes well to natural density instead of fighting it.
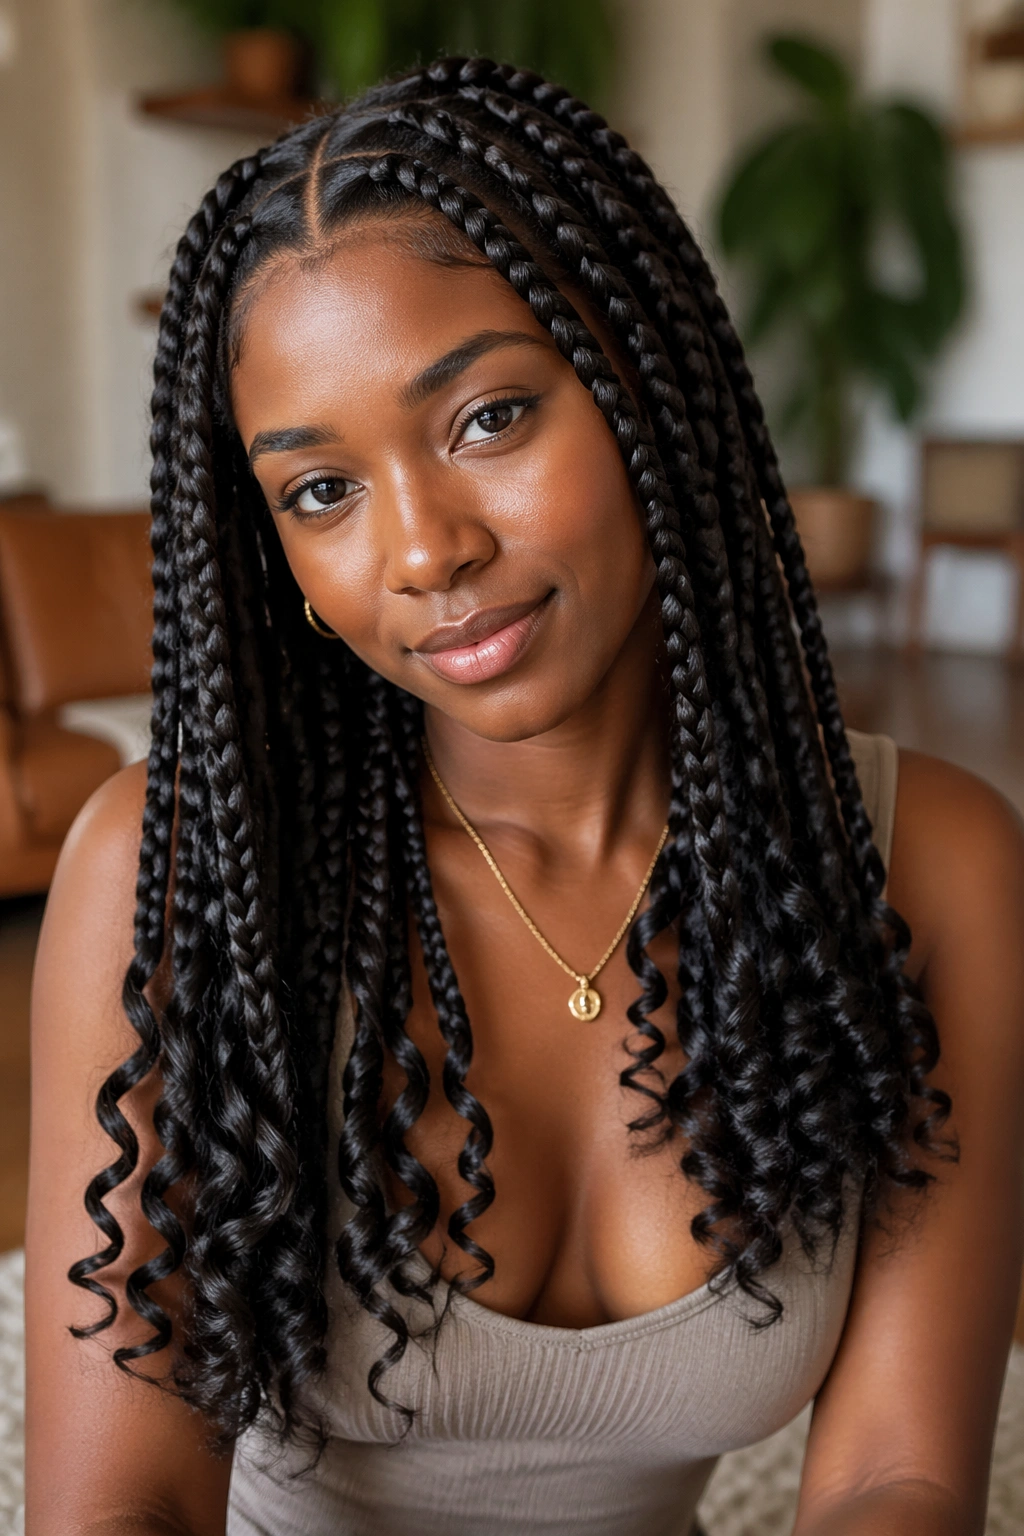
4. Two Statement Braids with Curly Ends
You do not need a head full of braids to look polished. Two thick braids can carry the whole style, especially when the ends are left curly instead of sealed into a hard finish. That mix of strong braid lines and soft ends gives the look a little movement, which matters more than people think.
This style sits nicely on medium-length hair, but it can also be built with added braiding hair if the natural length is shorter. The braids usually start at the front or just behind the hairline, then travel back or down to the shoulders. I like this one because it feels finished without being heavy. The curls at the ends soften the face and keep the braid from looking too severe.
A good version needs clean parts and even tension. Not tight. Even. That’s the difference between a style that lasts and a style that gives you a headache before dinner. If your hair is natural at the ends, flexi rods can set the curls after braiding. If you use extension hair, ask for a curly finish that matches the thickness of the braid, not a random spiral hanging off the end.
Bold tip: keep the braids a little fuller at the root and lighter at the ends. The style sits better and does not drag on the scalp.
5. Braided Afro Halo on Shoulder-Length Hair
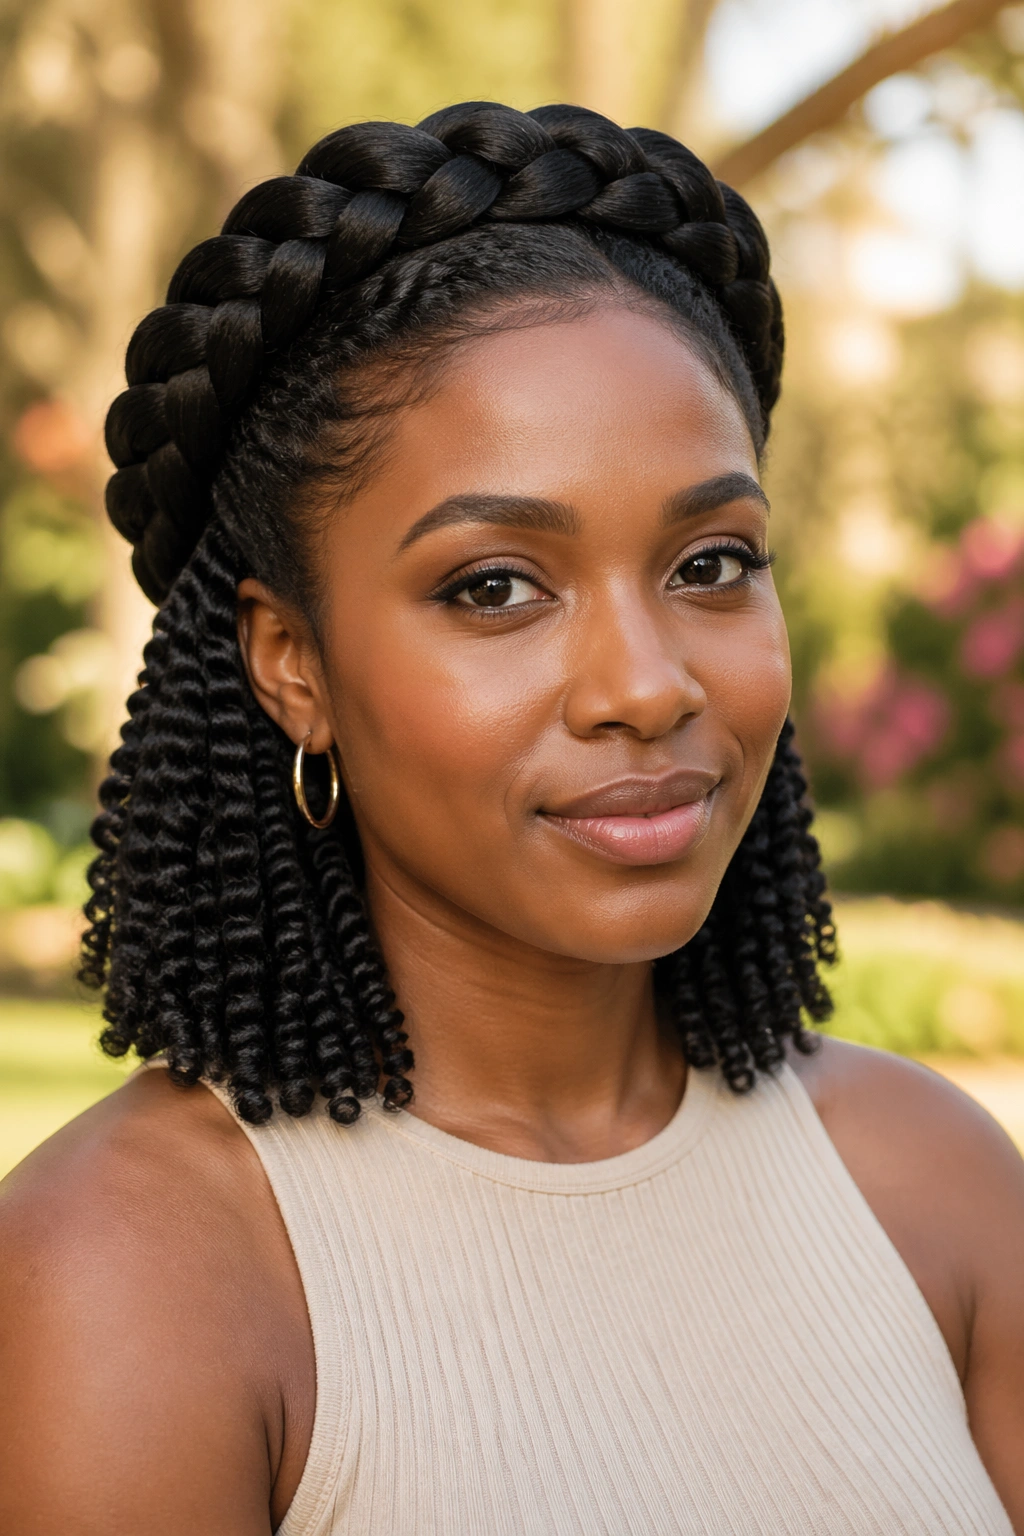
Soft, rounded, and a little romantic in the best way, the braided Afro halo is one of those braided Afro styles that makes shoulder-length hair look instantly finished. A braid wraps around the crown like a ring, while the rest of the hair stays tucked, loose, or folded beneath the braid depending on how much length you have.
The style works especially well on hair that lands somewhere between the jaw and the shoulders. Too short, and the braid may not reach all the way around without help. Too long, and the halo gets bulkier unless the braid is tucked in carefully. With the right length, though, it sits beautifully close to the head and keeps the shape clean from every angle.
How to Keep the Halo from Slipping
Use a few hidden bobby pins where the braid crosses behind the ears and at the nape. The pins should grab the braid base, not just the outer fluff. A light mist of setting foam before braiding helps the roots stay smoother, and a satin scarf for 15 minutes after styling keeps the crown from lifting too fast.
This is the style I reach for when the goal is neat but not severe. It has a little grace to it. Not fussiness.
6. Braided Bob with Triangle Parts
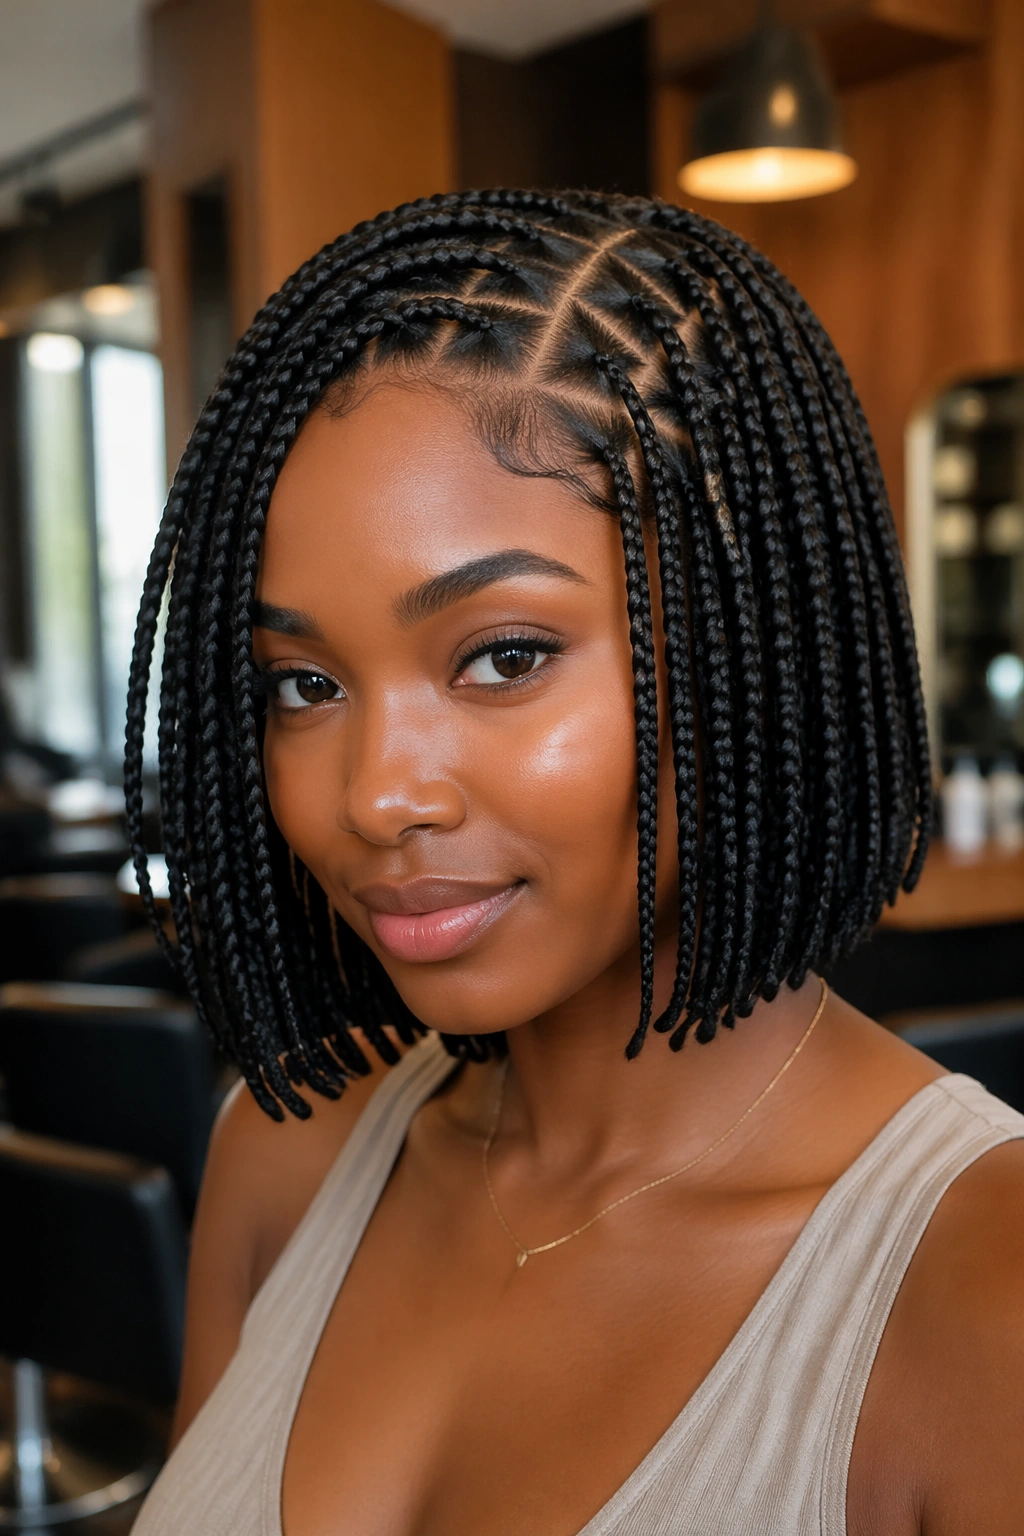
A braided bob changes the whole mood of a style because the neck stays open and the hair never feels trapped around the shoulders. Triangle parts make it better. They break up the grid, catch the light differently, and stop the bob from looking too boxy or too predictable.
This look works on chin-length to collarbone-length hair, especially when the ends are braided to hover right around the jaw or just below it. If your hair is dense, the triangle sections help distribute weight more evenly than square parts. That matters more with a bob, because the shorter length means every braid sits closer to the scalp.
The first thing people notice in real life is how light the whole style feels. The second is movement. A bob with triangle parts sways a little when you turn your head, and that motion keeps the look from becoming too strict. Keep the braids fairly uniform in width — around ½ to ¾ inch is enough for most heads — and avoid packing too many rows into the nape, or the bottom edge gets bulky fast.
What to watch for: if the temple area is fragile, ask for looser braids around the face and let the shape come from the parting, not from tension.
7. Fulani Braids with Beads

Beads are not a small detail here. They’re part of the shape. A good Fulani braid setup uses a center braid or center strip, side braids that frame the face, and bead placement that feels deliberate instead of piled on. The sound is half the fun. A few beads click softly when you move, which is oddly satisfying.
This style usually needs medium to long hair, or medium hair with added braiding hair. The key is keeping the center clean and the sides balanced. If one side is heavier than the other, the whole look starts leaning. I like beads placed a couple of inches from the ends so they settle at different points and do not clump together. Metal cuffs, wooden beads, and shell accents all work, but they should never fight the braid itself.
Respect the weight. That matters with this style. Heavy beads on fine hair can tug too hard at the ends, and too many charms on the front can make the hairline feel tired by the end of the day. Lighter pieces usually look better anyway.
Keep the Weight Under Control
- Use fewer beads on fragile ends.
- Choose smooth bead holes so they do not snag.
- Spread decoration across the style instead of stacking it all at the front.
- Sleep with a scarf so the beads do not grind against the pillow.
Done well, Fulani braids look balanced, clear, and full of rhythm.
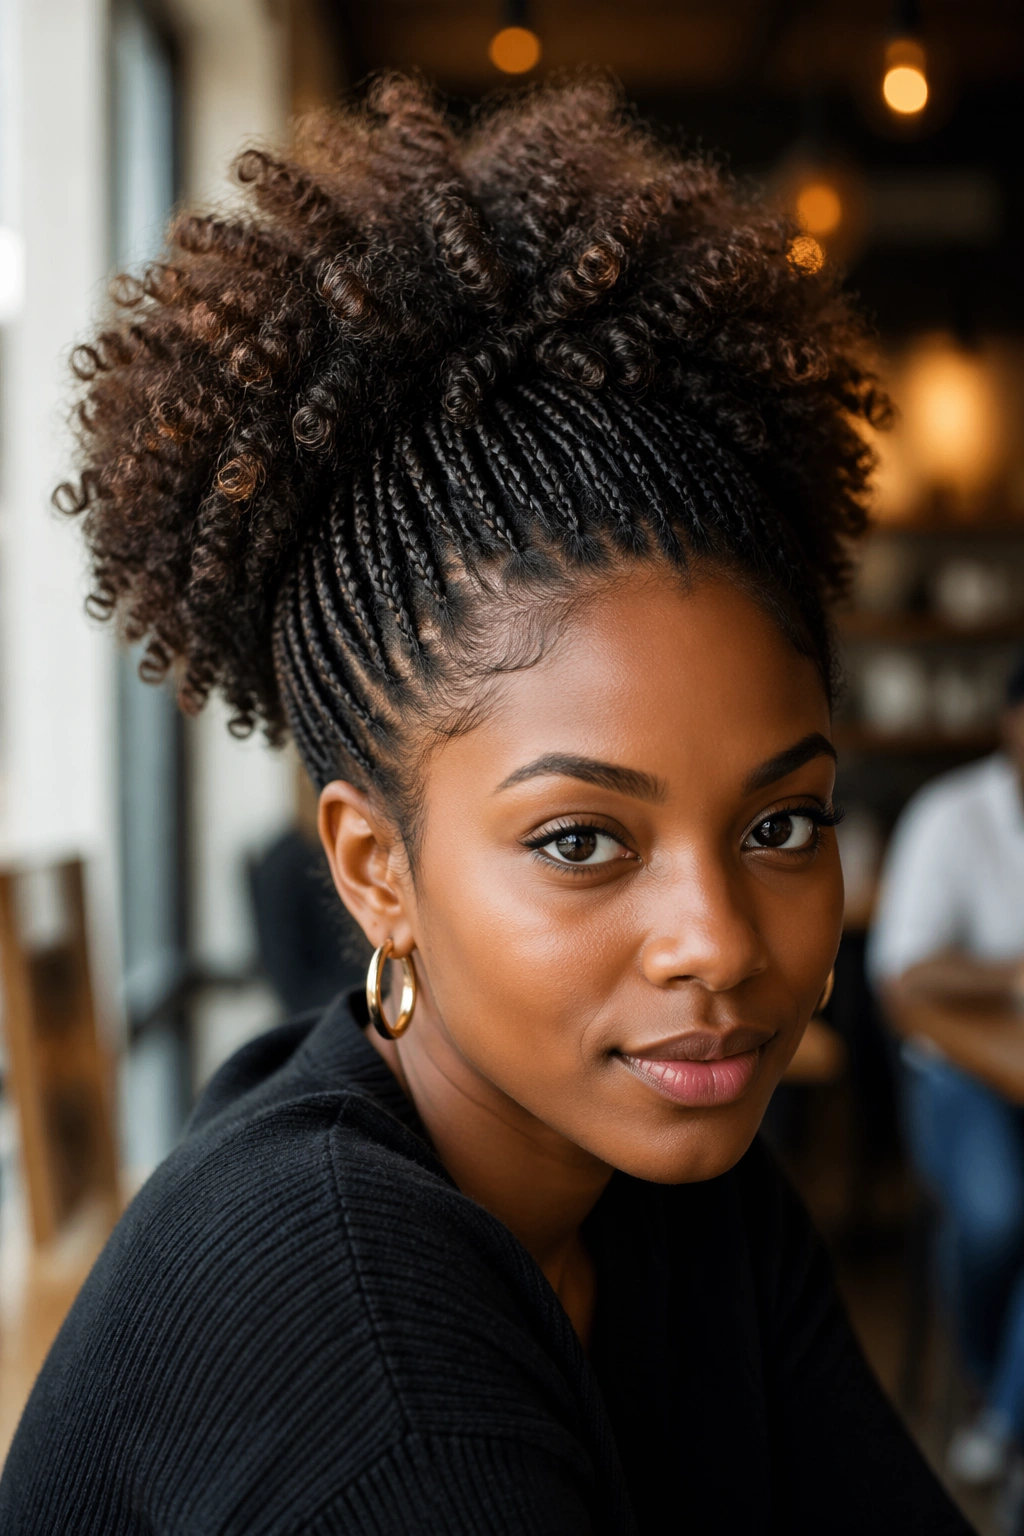
8. Feed-In Braided Ponytail
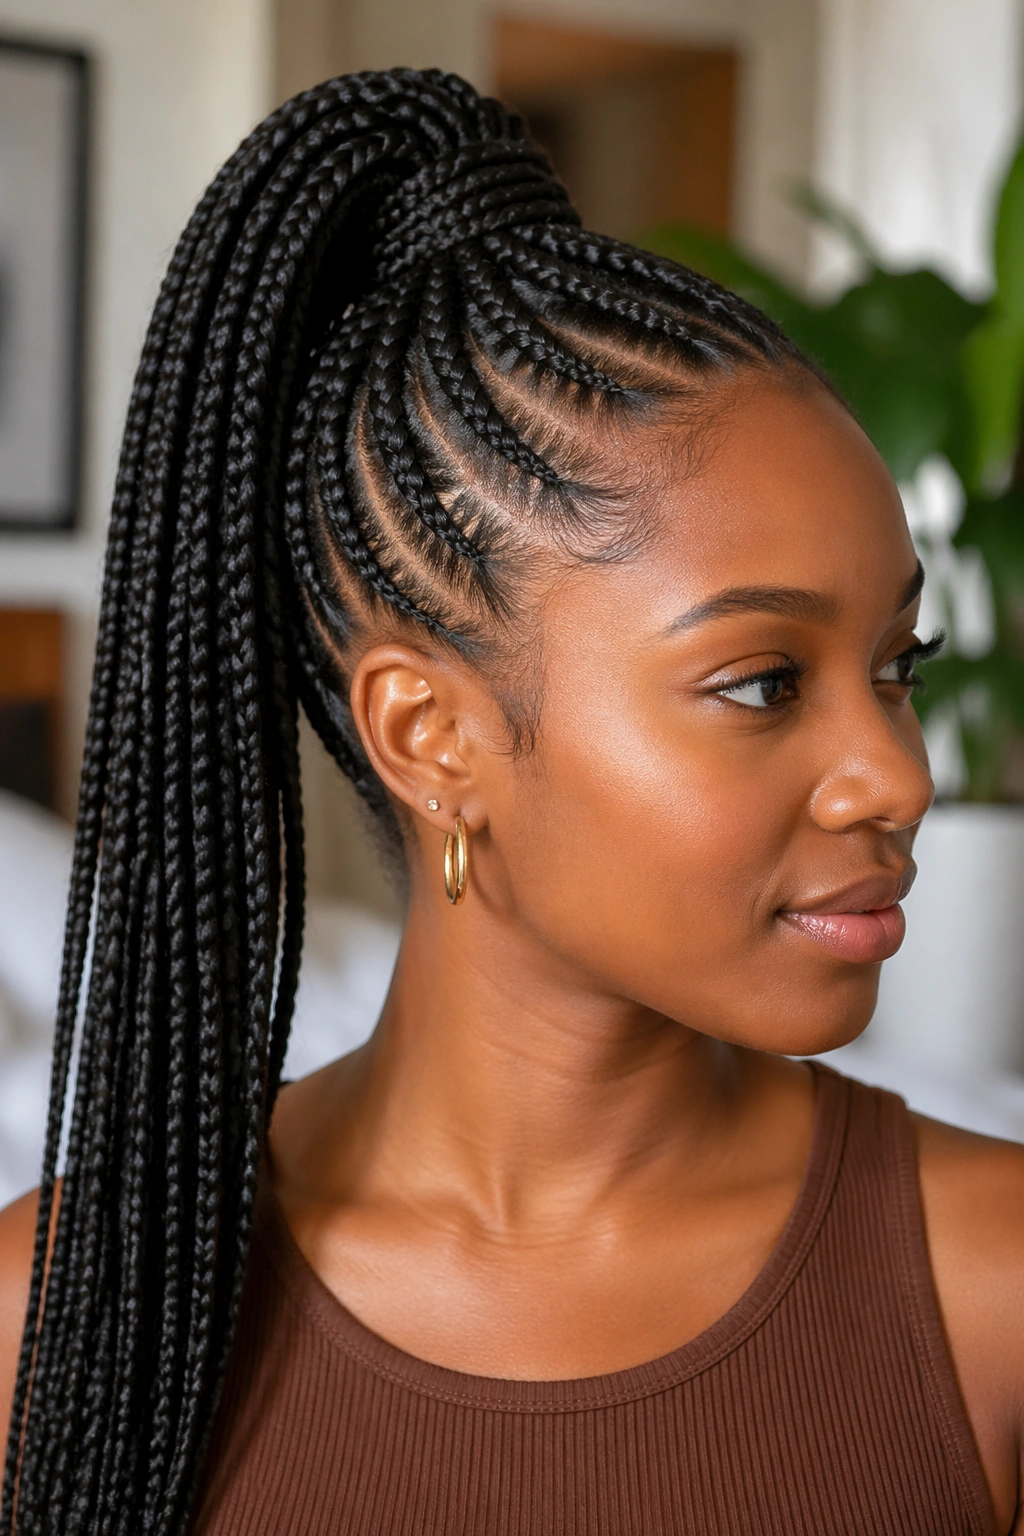
Three things make a feed-in braided ponytail work: clean parting, steady tension, and a ponytail that doesn’t sag. The feed-in method is what gives the style that smooth, gradual build from scalp to braid, instead of a sudden hump where extension hair starts. On Afro-textured hair, that smoothness matters.
This look fits medium to long hair especially well, though shorter hair can take it with added hair and a skilled braider. The front usually starts with 4 to 8 cornrow-style feed-ins that travel toward the crown or nape, then gather into one ponytail. You can wear it high for drama or mid-height for something a little calmer. High usually reads more playful. Mid-height feels steadier.
The ponytail itself can be one thick braid, several attached braids, or a mix of braids and curls. Keep the base snug enough to hold, but not so tight that the scalp feels pinched when you smile. If you can feel the pull when you chew, it is too much.
A little mousse before wrapping helps the flyaways settle. A strip of scarf over the roots for 10 minutes can make the lines look almost painted on, which is the whole appeal of this style. Clean, strong, and no nonsense.
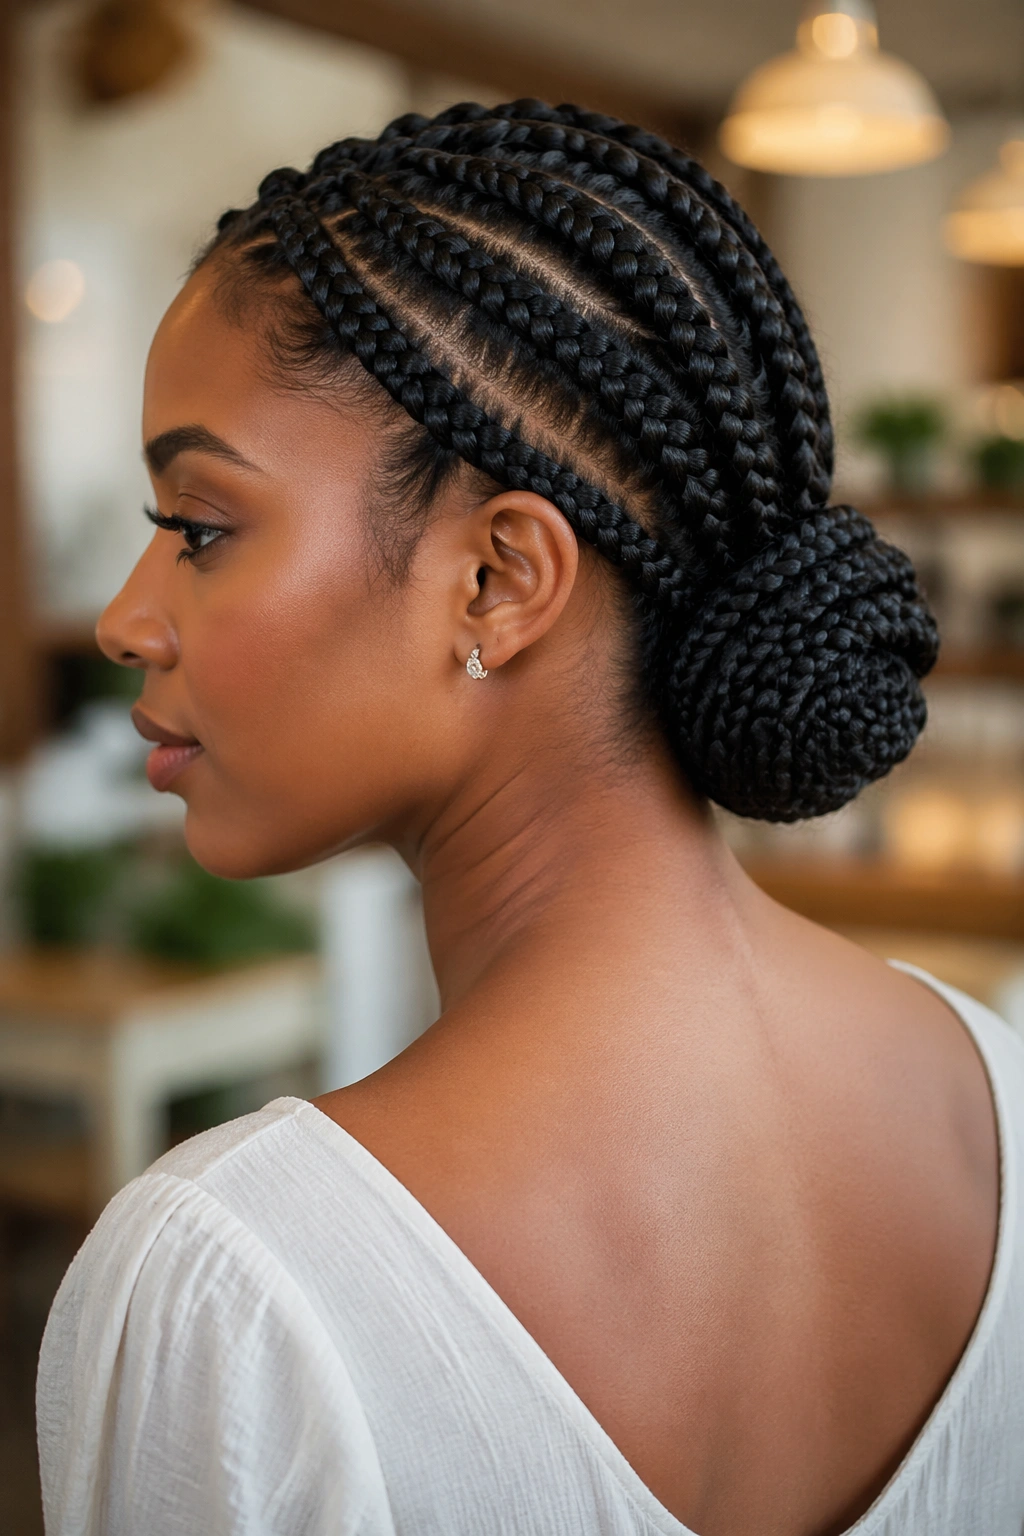
9. Cornrow Bun Updo
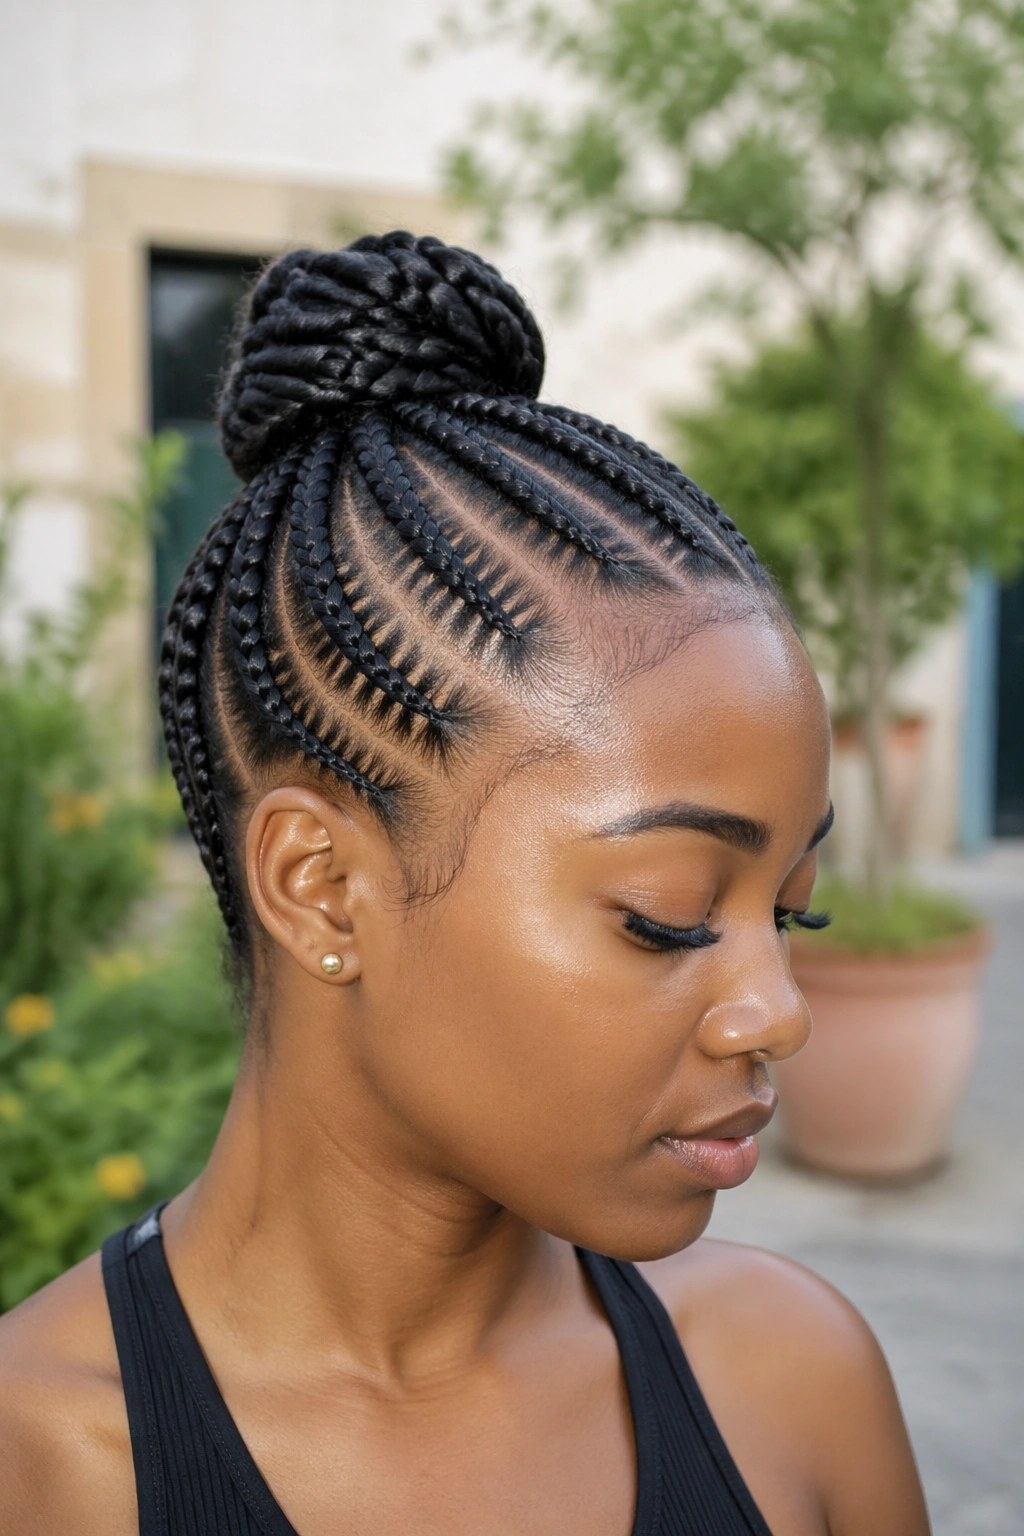
A bun sounds basic until the braids are stacked in a clean grid. Then it turns into one of the most useful braided Afro styles out there. Cornrows lead the eye upward, the bun keeps the ends protected, and the whole shape stays tidy under jackets, scarves, and humidity.
This style works on medium to long hair, though shorter hair can still pull it off with extension hair added into the bun. The cornrows can be straight back, curved, or angled toward the crown. Straight back gives a sharper look. Curved parting softens the edges. If the bun sits low, it tends to feel more relaxed. If it sits high, the whole style gets a little more formal.
One thing I love here is the way the bun changes the profile. It can make the neck look longer and the face a little more open, especially when the braids are narrow near the temples. That effect disappears if the bun is overstuffed, though. Too much bulk at the top makes the style wobble.
Where It Can Go Wrong
- Braids that are too tight around the edges
- A bun that is pinned with too few bobby pins
- Heavy extensions that drag the braid base down
- Parts that are neat at the front but messy at the nape
A tidy nape makes the whole style feel finished.
10. Goddess Braids with Loose Curl Ends
Want structure without stiffness? Goddess braids give you that balance. They are thicker than standard cornrows, usually fewer in number, and often finished with loose curls or soft spiral ends that keep the look from feeling hard. The blend of braid and curl is what makes this style so wearable.
I like goddess braids on long hair or medium hair with added length because the thickness needs room to breathe. Four to six braids are usually enough for a full head. More than that, and the style can start to crowd the scalp unless the sections are very clean and the braids are kept slim. The loose ends can be curled with flexi rods, wand curls, or left in a pre-curled extension texture if the braid hair already has movement.
This is one of the best options when a regular box braid feels too heavy around the face. The curls soften the line of the jaw and keep the whole style from landing too firmly. Sleep matters here. Wrap the braids, then tuck the curls into a satin bonnet or use a large scarf that does not crush the ends flat.
One quiet win: goddess braids grow out more gracefully than many tighter styles. The softness works in your favor.
11. Side-Swept Lemonade Braids
If your face likes a little asymmetry, side-swept lemonades do the job without shouting about it. The braids angle in one direction, usually from a deep side part, and the whole style leans across the head in a smooth sweep. It’s a strong shape. Not loud. Just strong.
This look fits long hair best, though medium hair can manage it with extensions. The front sections should be narrow enough to lie flat along the hairline, then widen as they travel back. That gradual shift keeps the style from looking lumpy at the front and skinny at the back. The sweep itself is what gives the style its personality, so the direction matters more than decoration.
What Helps the Sweep Hold
- Start with a very clean side part.
- Braid the front rows a little flatter than the back rows.
- Pin the heavier side behind the ear if it starts drifting.
- Keep the ends the same length so the whole sweep lands evenly.
The best version has a little flow to it. You should see the angle before you notice the individual braids. That’s the real trick.
12. Micro Braids with a Full Afro Finish
Micro braids are not the lazy option. They take time, patience, and a head that is ready for a long sit. But if you want a braided style with a lot of movement and a softer finish, they’re hard to beat. Each braid is thin enough to move like a strand, which means the final look behaves more like hair than like a set of ropes.
This style works best on long hair or very dense medium-length hair with added extension hair. Because the braids are tiny, the installation can take a while, and the sectioning has to be neat from root to end. If the parts are crooked, the whole style starts to look fuzzy in a bad way. If the scalp is not detangled first, the braid base can feel bumpy and hold tension where it should not.
The payoff is flexibility. You can wear micro braids down, tucked, half-up, or swept to one side without the bulk that larger braids create. They also let the Afro texture show through more subtly at the roots, which gives the style a softer edge.
- Best for: long, dense, well-detangled hair
- Maintenance: light oil on the scalp, not heavy grease
- Sleep setup: bonnet or scarf every night
- Watch out for: tiny ends that snag on sweaters and zippers
If you want movement, this is the style that gives it.
13. Braided Space Buns
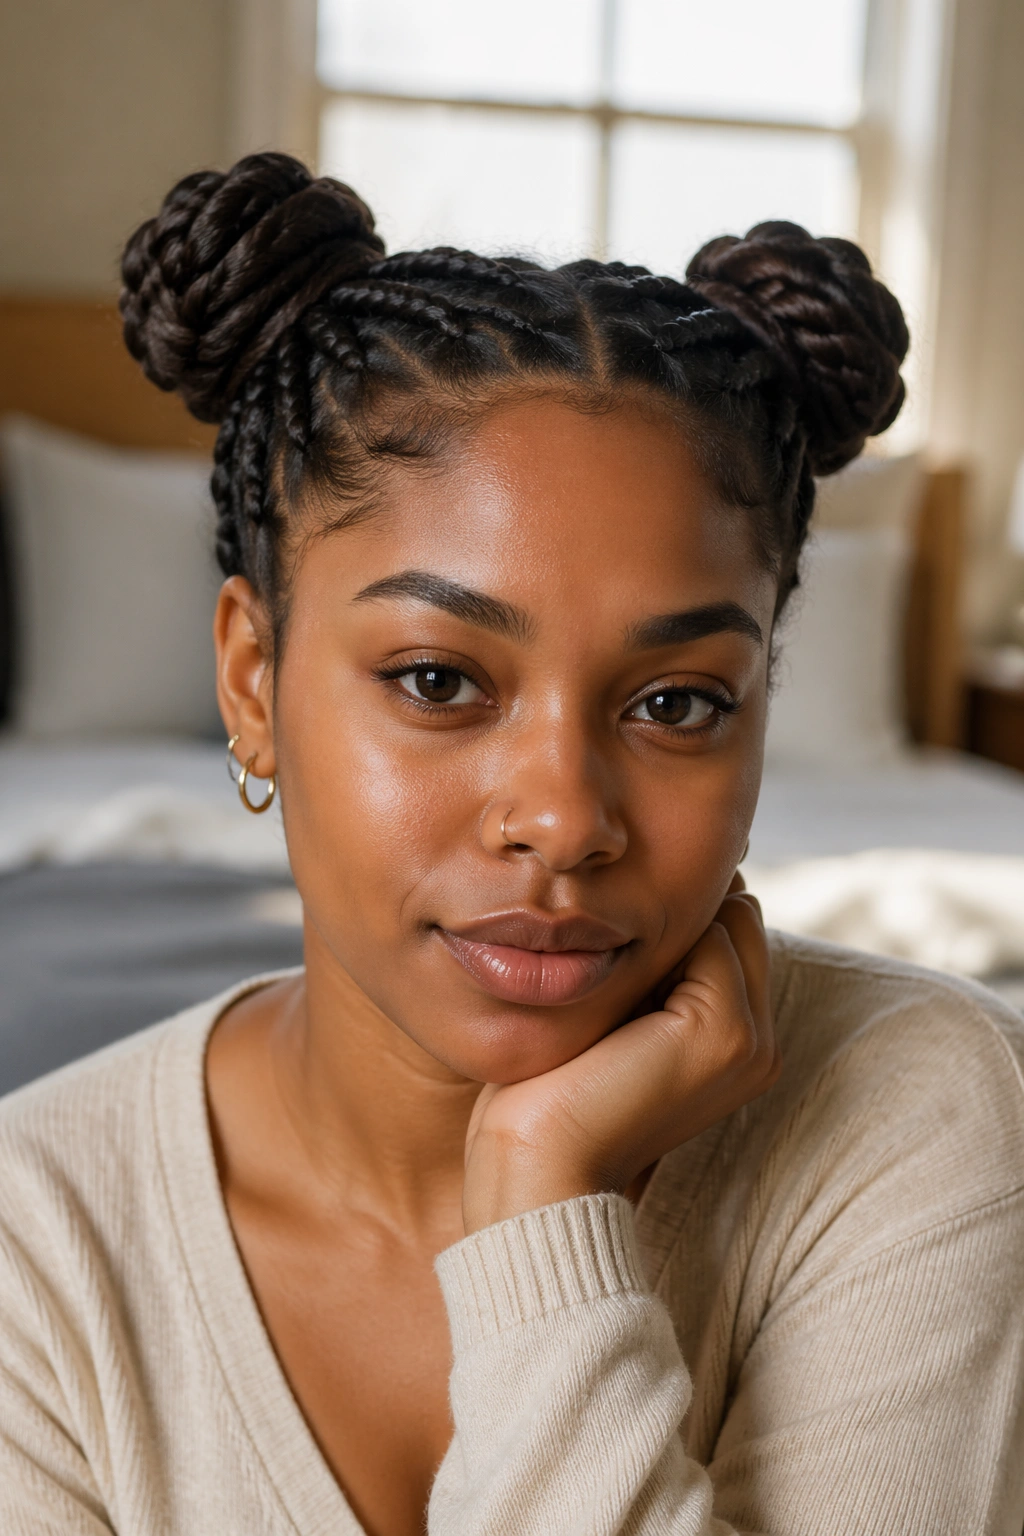
Two buns can feel playful without looking childish if the braids are done with care. Braided space buns take the shape of a standard updo and split it into two lifted sections, one on each side of the head. The result is neat, a little cheeky, and surprisingly practical when you want the hair off your neck.
This style suits medium to long hair, especially hair with enough density to build two buns that do not collapse by noon. The braids can start as straight-back rows, middle parts, or even a diagonal pattern if you want more movement across the scalp. Once the braids reach the crown, they are wrapped into buns and pinned down with U-pins or hairpins that can handle weight. A little mousse at the roots helps the top stay smooth.
The size of the buns changes the mood. Small buns look tidy and almost minimal. Bigger buns feel more relaxed and a bit bolder. If your hair is very thick, keep the buns slightly smaller than your first instinct. Oversized buns can pull at the base and tilt to one side.
Sizing the Buns
A good test is simple: the buns should sit evenly when you shake your head once. If they wobble or tilt, the base needs more support.
14. Braided Faux Hawk
You do not need shaved sides to get a faux hawk. That is the whole point of this style, and it’s why so many people reach for it when they want something sharp without making a permanent change. Braids on the sides pull upward toward a center ridge, which leaves the middle section standing taller and fuller.
This works on short, medium, and long hair, with or without extensions. The sides can be in narrow cornrows, feed-ins, or small flat braids that curve toward the center. The top can be left fluffy, braided loosely, or turned into a raised row of its own. A lot depends on the vibe you want. More height looks dramatic. More fullness looks softer.
What matters most is the line that runs up the middle. If the center strip is too narrow, the style can feel pinched. If it’s too wide, you lose the hawk shape. A strong faux hawk has a clear ridge and clean sides, and the braids should guide the eye upward instead of scattering it.
Good Signs You Got the Shape Right
- The sides lie flat without feeling strained.
- The center ridge stands on its own.
- The nape feels secure, not overloaded.
- The style still looks balanced from the front and the side.
It’s a bold shape, yes. But it is also practical, and that counts.
15. Braided Afro Low Chignon
A low chignon is where braided Afro styles turn calm. The braids lead back to the nape, then get tucked into a smooth knot or folded bun that sits low and close to the head. It’s neat without being stiff, which is a harder balance to pull off than it sounds.
This style works beautifully on medium to long hair, and it gets especially good when the braid pattern at the top is clean enough to act like a frame for the bun. Stitch braids make it look sleek. Regular cornrows make it feel softer. Either way, the shape stays flatter than a high bun, which is useful if you wear scarves, collared shirts, or anything that rubs the back of the head.
I like this style when the goal is to keep the neck free and the ends protected at the same time. It also photographs well from the side, though that is not really the point. The point is that it sits in place and doesn’t demand much once it’s done.
Best Way to Finish It
Use a few U-pins to anchor the knot from the inside, then wrap the base with a small strip of hair or a braid tail so the bun doesn’t look chopped off. If the bun feels too bulky, split it into two tucked loops instead of forcing one big coil.
The style has a quiet confidence to it. That’s what makes it work.
Final Thoughts
The best braided Afro style is the one that fits your hair before it fits the photo in your head. Short hair looks strongest in tight crowns, temple braids, and front pieces that leave room for the natural puff. Longer hair opens the door to halos, ponytails, buns, and side sweeps that carry more movement.
Parting and tension matter more than the braid name. A clean braid on a comfortable scalp will always beat a gorgeous style that pulls by day two. If the edges feel sore, the style is too tight. If the parts are neat but the shape feels wrong, the length or braid size is probably off.
Pick the version that gives you shape without a fight. That’s usually the one you’ll wear twice.