Ten minutes can change the whole mood of your hair. That’s the honest appeal of Afro bandana styles for quick hair days: they don’t ask for a full wash, a perfect twist-out, or a calm morning with endless mirror time. They just ask for a bandana, a little shape awareness, and enough confidence to stop chasing every curl into submission.
A good bandana style does more than hide a rough patch. It can hold a puff in place, keep your edges from getting tugged by a bulky scarf, and make a stretched fro look intentional when the roots are doing their own thing. The trick is not slapping fabric on top and hoping for the best. Placement matters. So does fold width, knot position, and whether the cloth is fighting your texture or working with it.
Cotton bandanas grip better than slick fabric, which is useful when you want the style to stay put. A satin-lined layer underneath can help if your hair is dry, fragile, or freshly moisturized. And no, the knot does not have to sit dead center every time. Sometimes the most flattering version is a little crooked. A little looser. A little more alive.
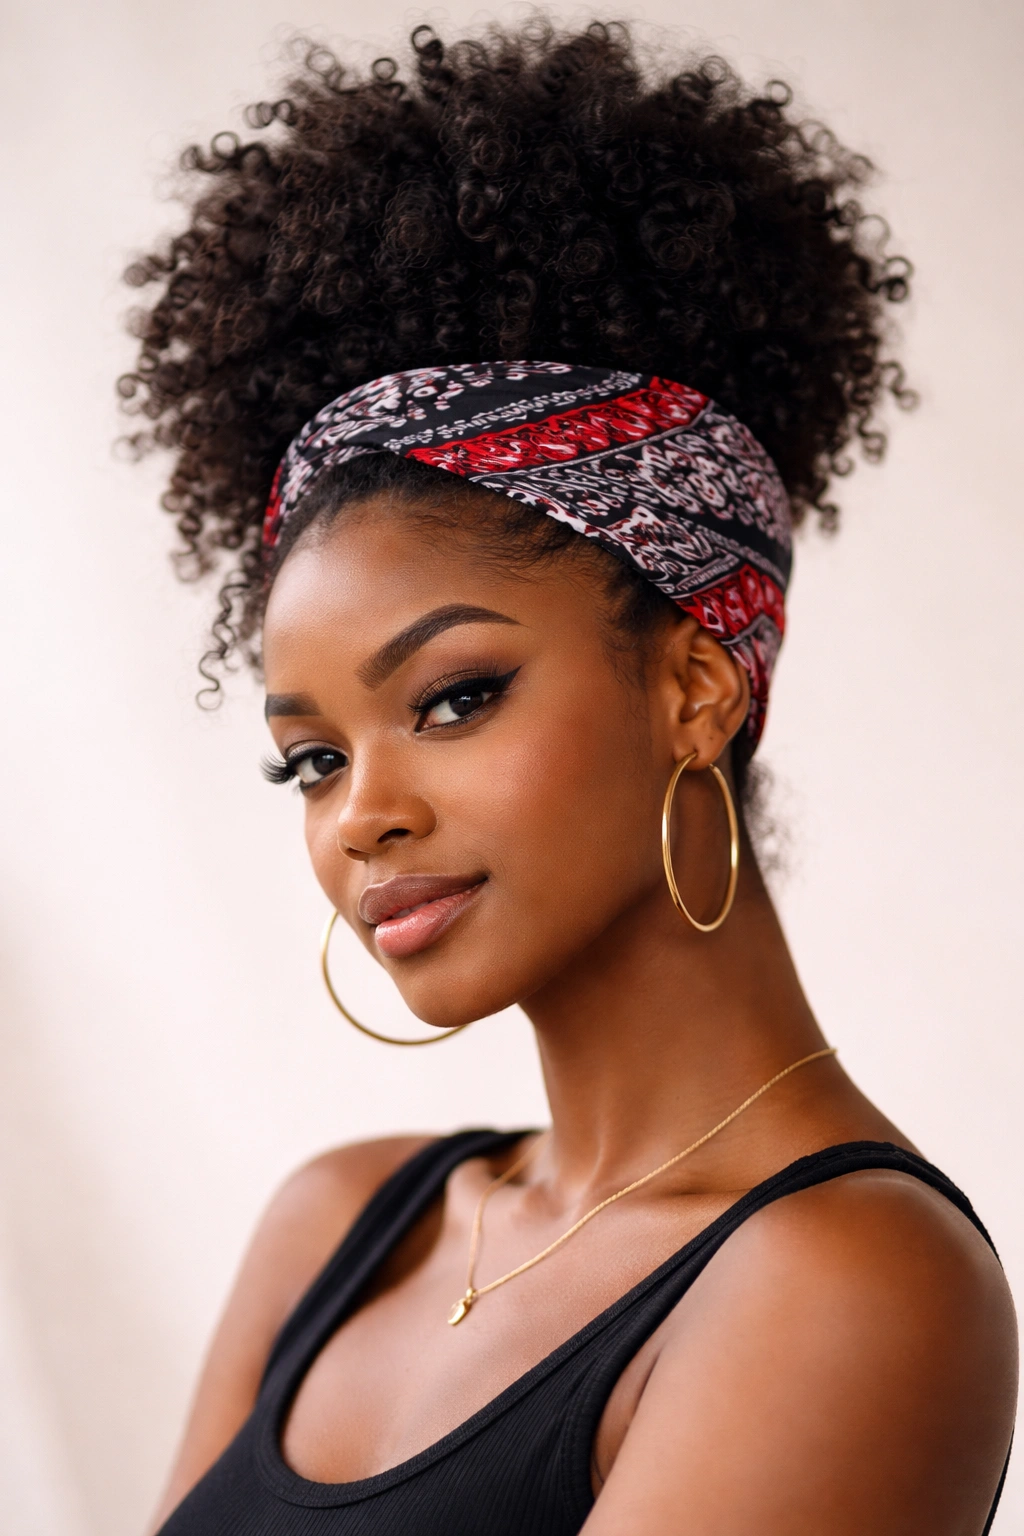
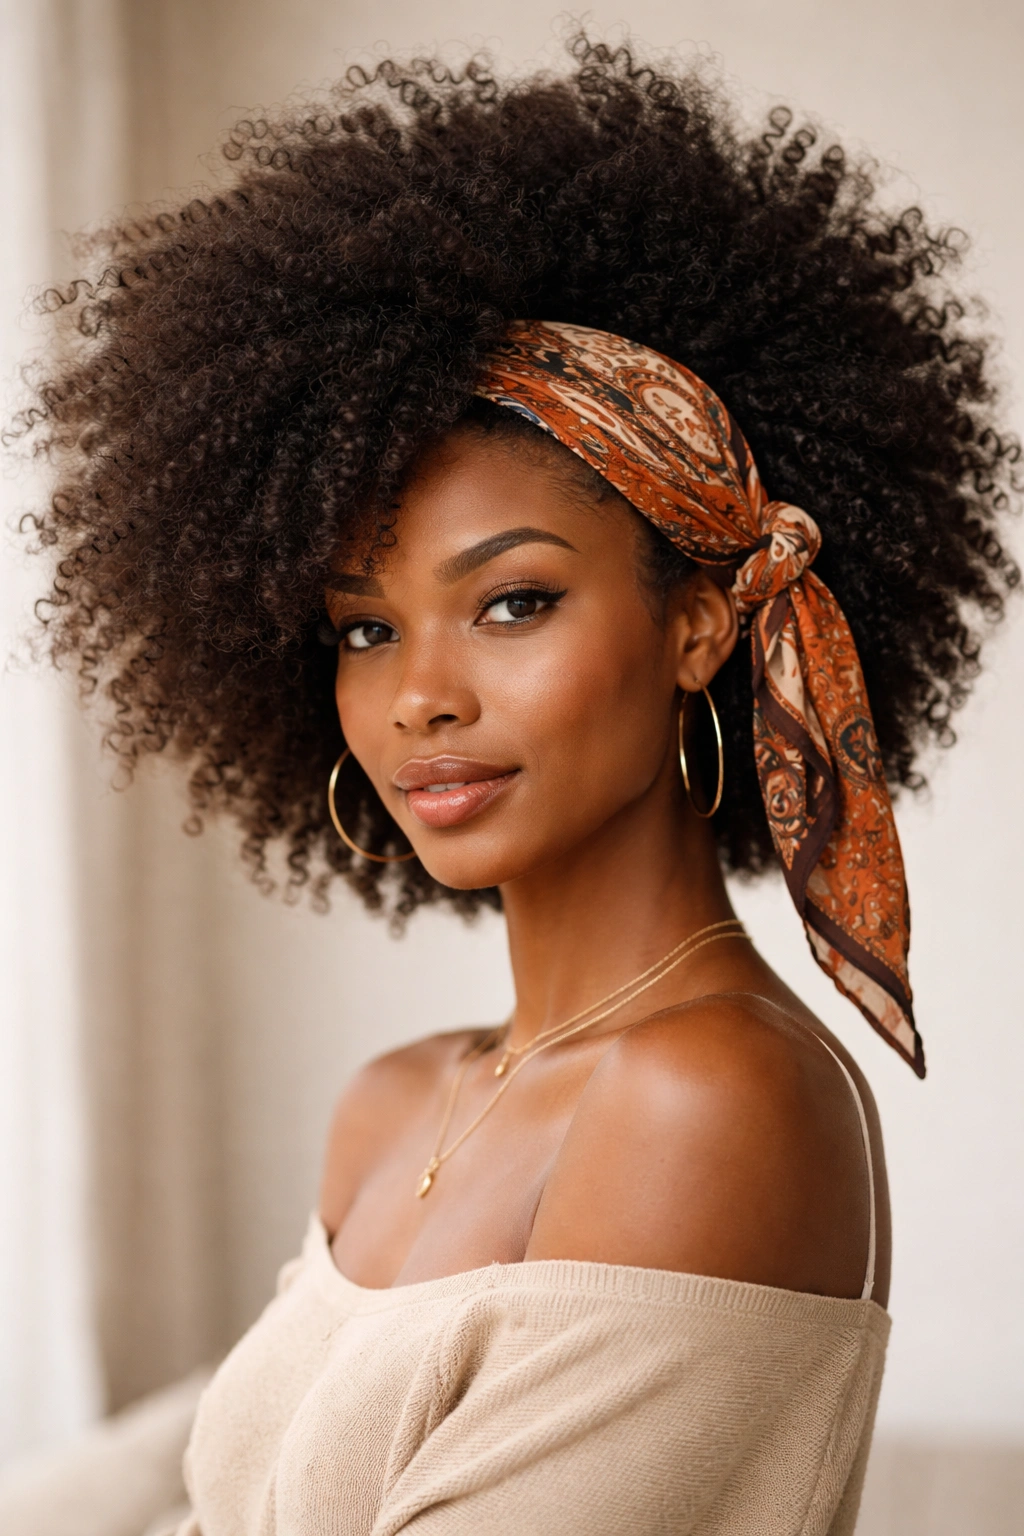
1. Afro Bandana Style: The Low Puff With a Folded Front Knot

The low puff is the cleanest rescue style when your roots have volume but your lengths need a break. It keeps the silhouette soft and rounded, which matters on hair that shrinks up the moment you breathe on it. The bandana sits low across the hairline, then ties just above the nape so the front reads neat and the puff stays the main event.
Why the shape works
A low puff gives the bandana something to frame. That’s the whole trick. The fabric draws the eye to the crown and hairline, while the puff keeps the style from looking flat or pinned down.
If your hair is stretched from braids, a twist-out, or a blowout, this one moves fast. If your hair is fresh and springy, it still works — just don’t over-smooth the front. You want enough softness around the edges so the puff doesn’t feel stuck to your head.
Quick details that matter:
- Fold a 20- to 22-inch square bandana into a strip about 2 to 3 inches wide.
- Place it just above the eyebrows, then angle it slightly upward at the temples.
- Gather the puff low and secure it with a coil tie or soft elastic.
- Tie the knot at the back, not the top, so the front stays clean.
One small thing: leave a little texture at the hairline. Too much gel makes the style look stiff.
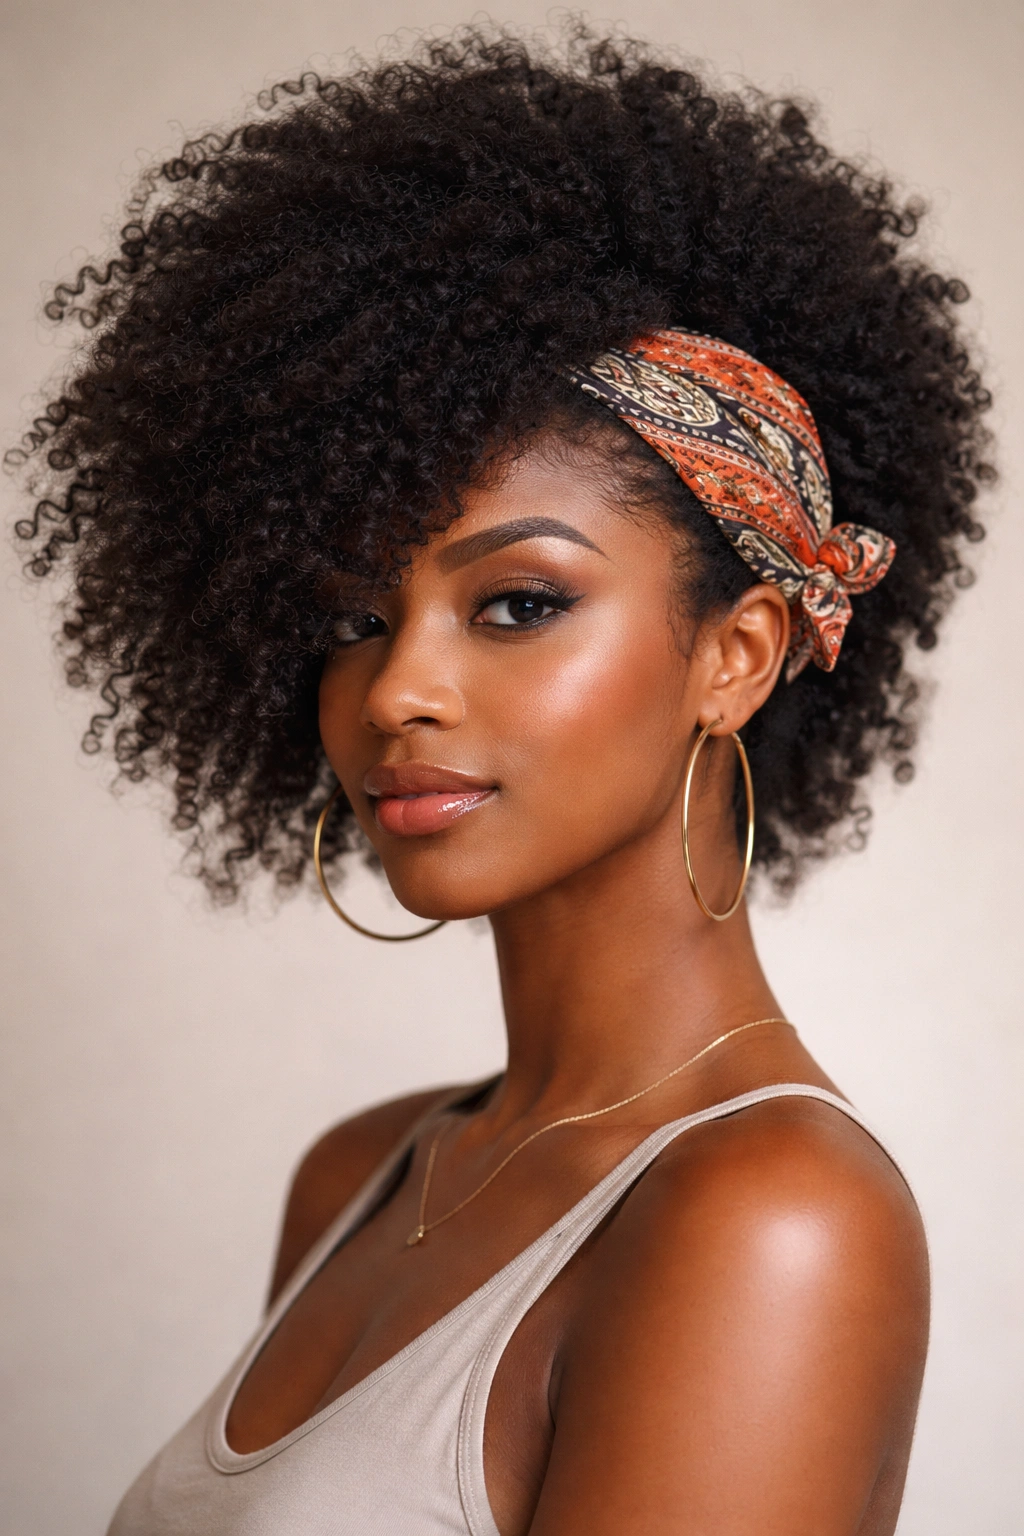
2. The High Puff Tilt With a Bandana Band
A high puff and a tilted bandana make rushed hair look deliberate. That’s why this one works so well on days when you want height, but you do not want a full styling session. The bandana acts like a bold headband, and the puff gives you lift without needing a brush, edge gel marathon, or a bunch of pins.
The best part is how little precision it asks for. Pull the hair up, let the puff sit at the crown, then angle the bandana across the forehead so one side sits a touch higher than the other. That slight tilt keeps the look from feeling stiff. Dead-center can work, sure, but it often reads more school-photo than style choice.
I like this one for thick coils that shrink fast. It also helps when the front has gone a little frizzy and you want to keep the shape while hiding the fact that your roots have been busy all day. Use a bandana with enough body to hold its line; a flimsy one rolls and slips, and that gets annoying fast.
Keep the puff loose. Don’t yank the elastic until your head aches. The style should sit above the bandana, not fight it.
3. The Side-Swept Fro and Temple Knot
Need your fro out of your face without flattening the shape? Go side-swept. This is the bandana style I’d hand to someone who likes their natural hair big but wants one side controlled for errands, work, or a quick coffee run. It frames the face, shows off texture, and leaves enough volume to feel like your hair is still the star.
How to tie it
Fold the bandana into a long strip and place the middle just above one temple. Bring both ends around the back, then tie the knot low and off-center on the opposite side. The front section should sweep across the forehead at a shallow angle, not cut straight across like a rigid line.
That angle matters. It softens the shape and makes the style feel easier on the eyes. It also gives the fro room to expand on the open side without looking lopsided in a bad way. If you’ve got bangs or shorter coils in the front, let a few pieces escape. The style gets better when it doesn’t look over-controlled.
- Keep the bandana fold narrow if you want the forehead to stay open.
- Push the knot slightly behind the ear so it doesn’t poke your cheek.
- Fluff the free side with your fingers instead of a brush.
- Skip heavy edge control if your hairline is already laid down.
That last part saves time. And nerves.
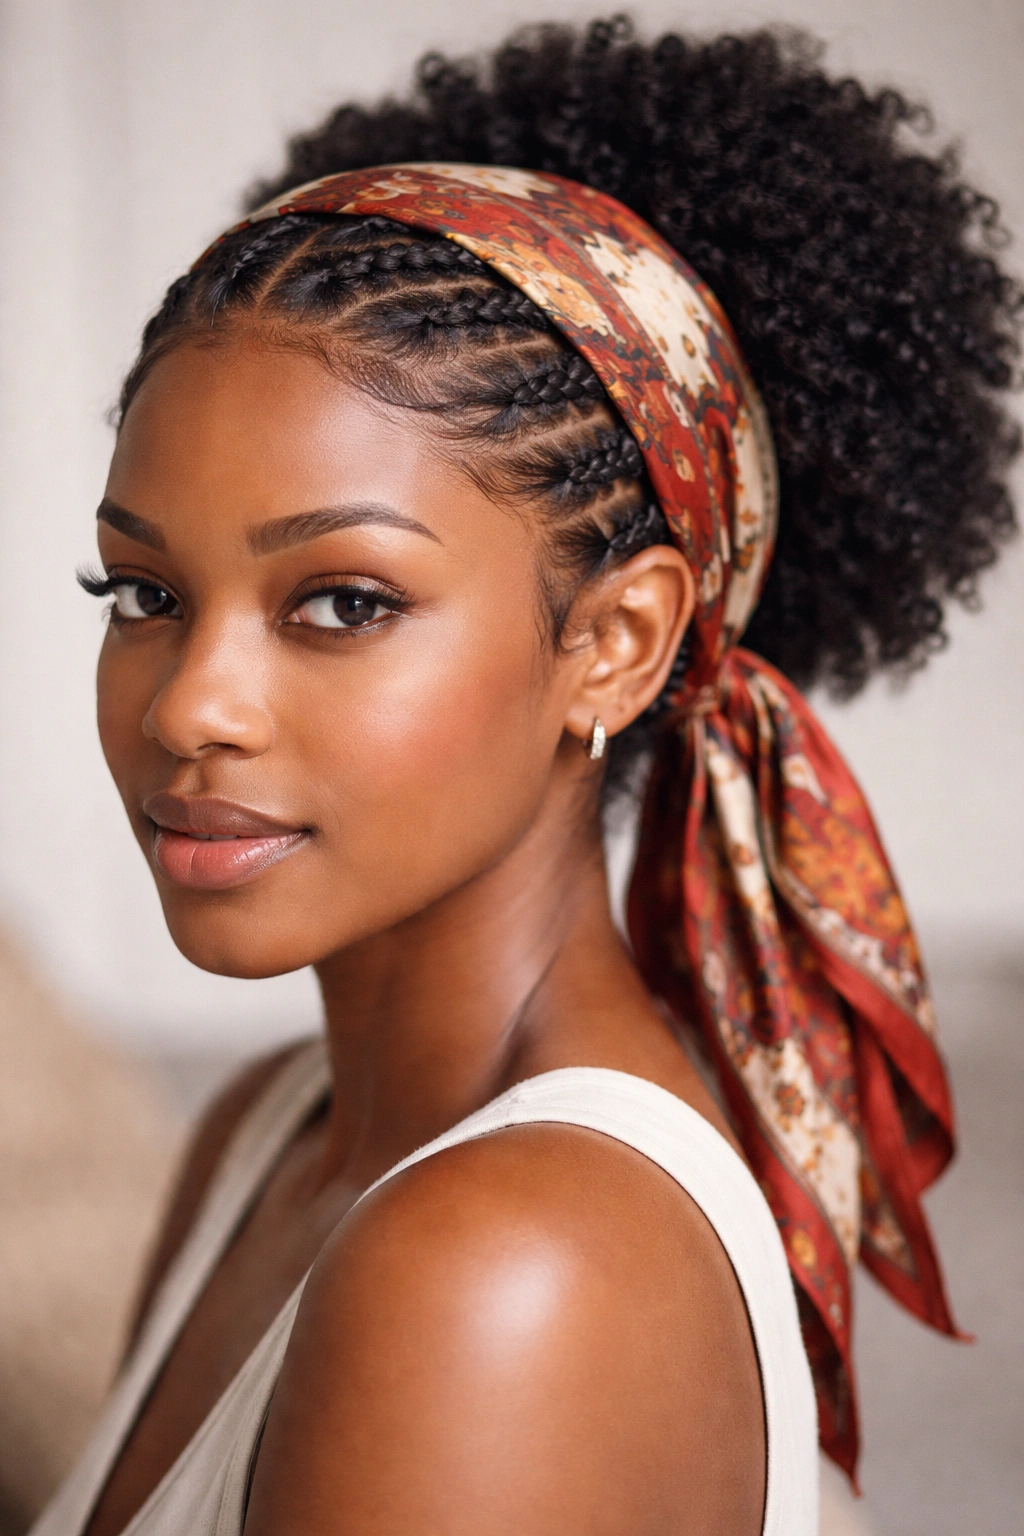
4. Afro Bandana Style: The Pineapple Puff With a Back Tie
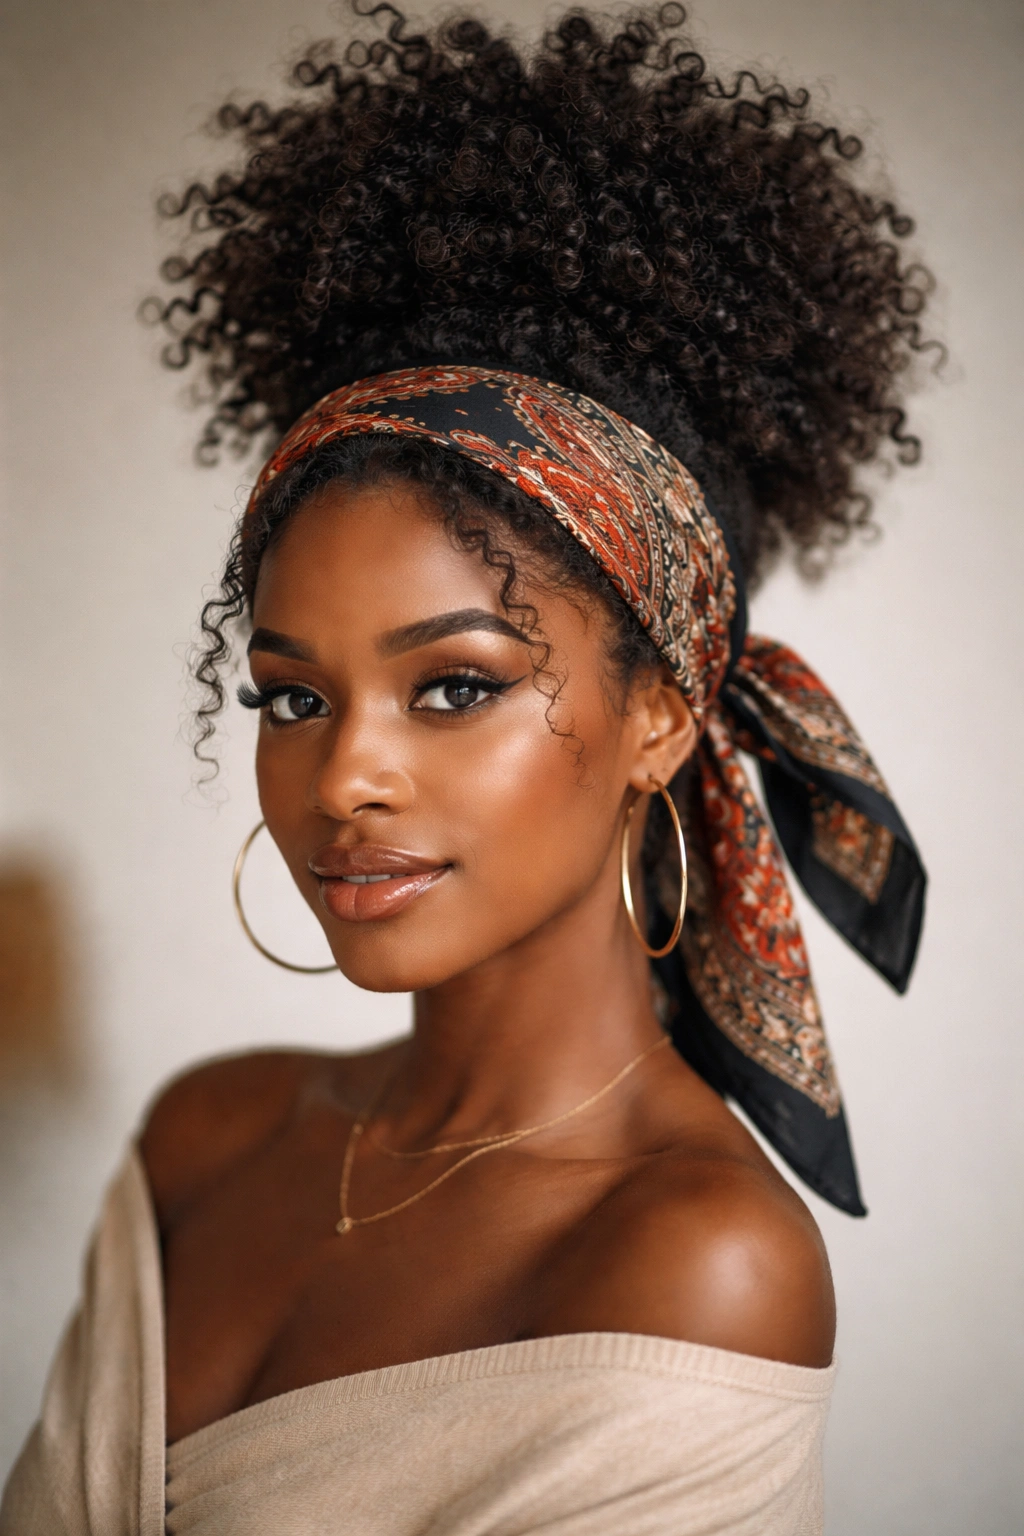
You know the style that saves a day-two twist-out when you overslept by about forty minutes? This is it. The pineapple puff keeps curls high and loose, while the bandana sits low in front and ties at the back, almost like a frame around the face. It’s quick, it’s forgiving, and it hides the exact kind of frizz that shows up when you barely had time to find your shoes.
The reason it works is simple: your curls stay piled on top, so they keep their shape instead of getting crushed against your neck or collar. The bandana keeps the front polished, which is often the only part people notice first. That balance matters more than perfect edges or a flawless part.
Use this when your twist-out has lost a little definition but still has enough body to look good pulled up. It’s also a smart move for gym days, because the puff stays lifted and the scarf catches sweat before it makes the front frizzier. If your hair is dense, use a slightly larger bandana so the back knot doesn’t dig in.
A tiny tip that helps: don’t wrap the bandana too low on the ears. Keep it above them a bit. The whole style looks lighter when it isn’t crowding your face.
5. The Flat Twist Crown With a Narrow Bandana Border
The best part of this style is that it looks more finished than it really is. Flat twists already make a strong shape, so the bandana only needs to act like a border. A narrow fold across the forehead or just behind the hairline gives the whole look structure without stealing attention from the twists themselves.
I like this style for hair that has a little stretch but not much time. Flat twists hold shape better than loose coils, and the bandana keeps the front from puffing up too fast. If the twists are chunky, even better. You’ll get texture at the back and a neat frame up front, which is a nice combination when you want your hair to read as styled without spending an hour on it.
The bandana should stay narrow here. Wide folds can swallow the crown and make the twist pattern disappear. Keep the knot small, too. Big knots make the front look top-heavy, and that kills the line.
A satin bonnet under the bandana is sometimes smarter if your hair is dry or fragile. The bandana gives the shape. The satin protects the moisture. That pairing sounds fussy, but it takes maybe thirty extra seconds and can keep the style from looking rough halfway through the day.
One more thing: let a few twists peek out near the temples. It gives the style movement.
6. The Sleek Low Bun With a Center Knot
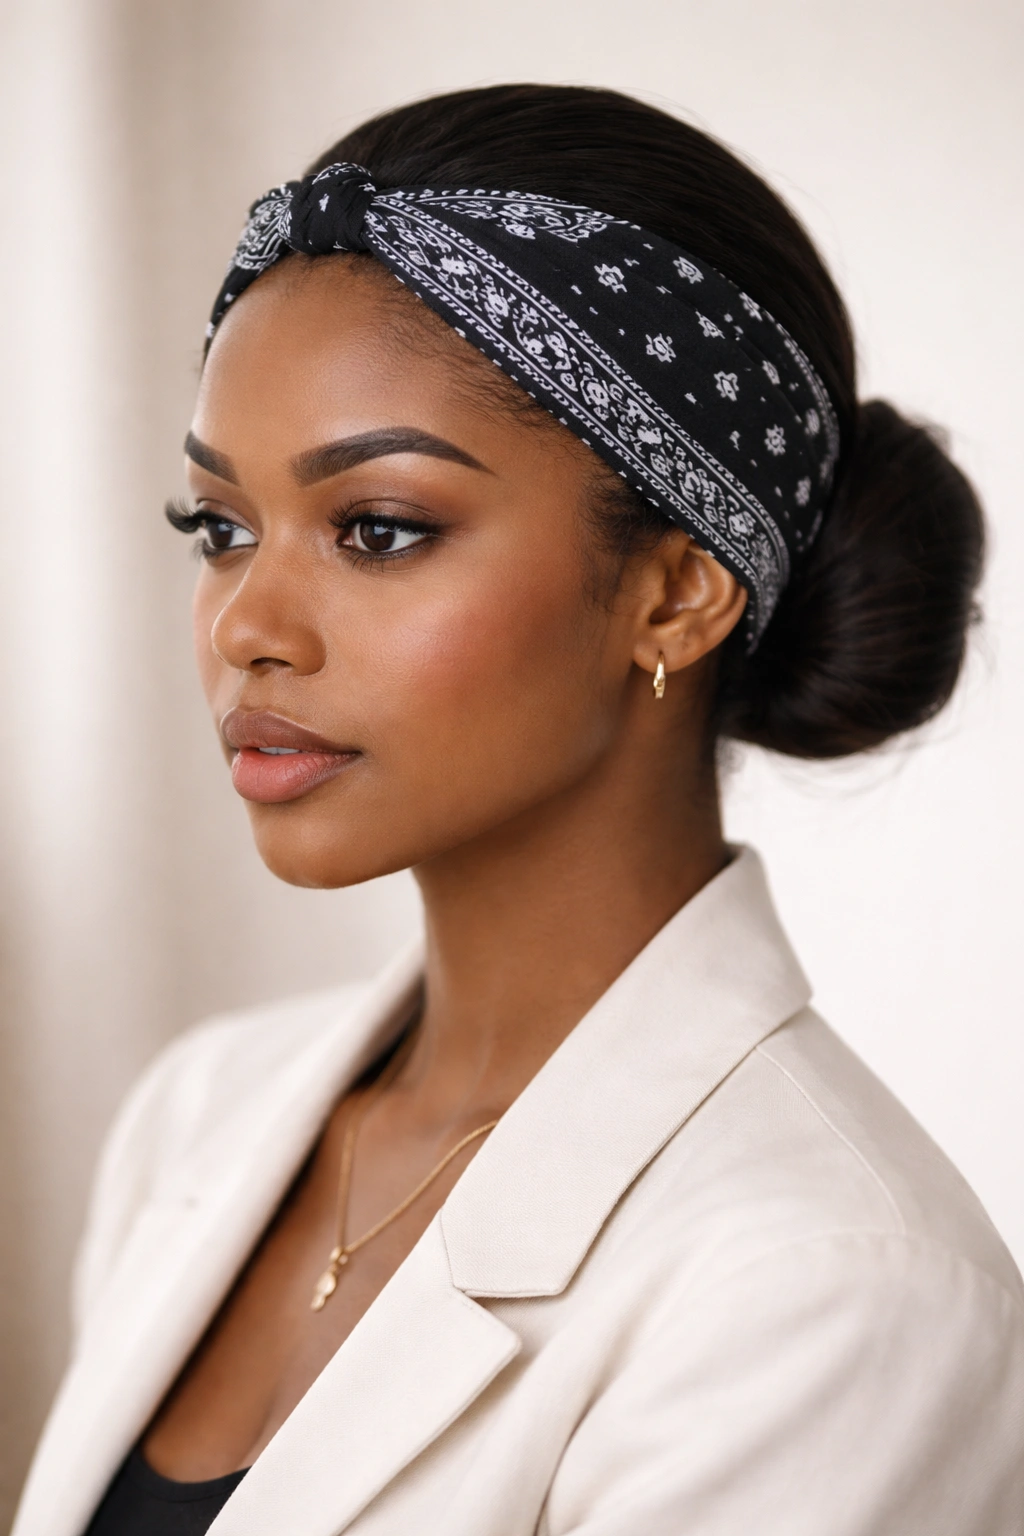
This is the grown-up bandana style, the one you reach for when you want your hair to look calm and clean with almost no fuss. Unlike a full wrap that hides everything, the sleek low bun keeps the shape polished and low, while the bandana adds a sharp line across the front. It reads tidy. It also travels well, which is worth something on busy mornings.
Start with a low bun or coiled knot at the nape. Smooth the front only as much as needed, then place the bandana over the hairline and tie the knot dead center or just a hair off-center if you want it softer. The bun should sit low enough that the bandana can rest above it without bunching.
This look is especially good for stretched natural hair, coily buns, and blowout hair that needs a break from heat tools. A little shine cream along the front can help, but don’t overdo it. Too much product makes the bandana slide, and then you spend the whole day retying it.
Best use cases:
- Workdays when you need a neat face frame
- Short errands when you want less volume around the neck
- Days after a twist-out when the front has gone fuzzy
- Events where you want something clean but not severe
It’s a quiet style. Not boring. Quiet.
7. The Half-Up, Half-Down With a Soft Tie
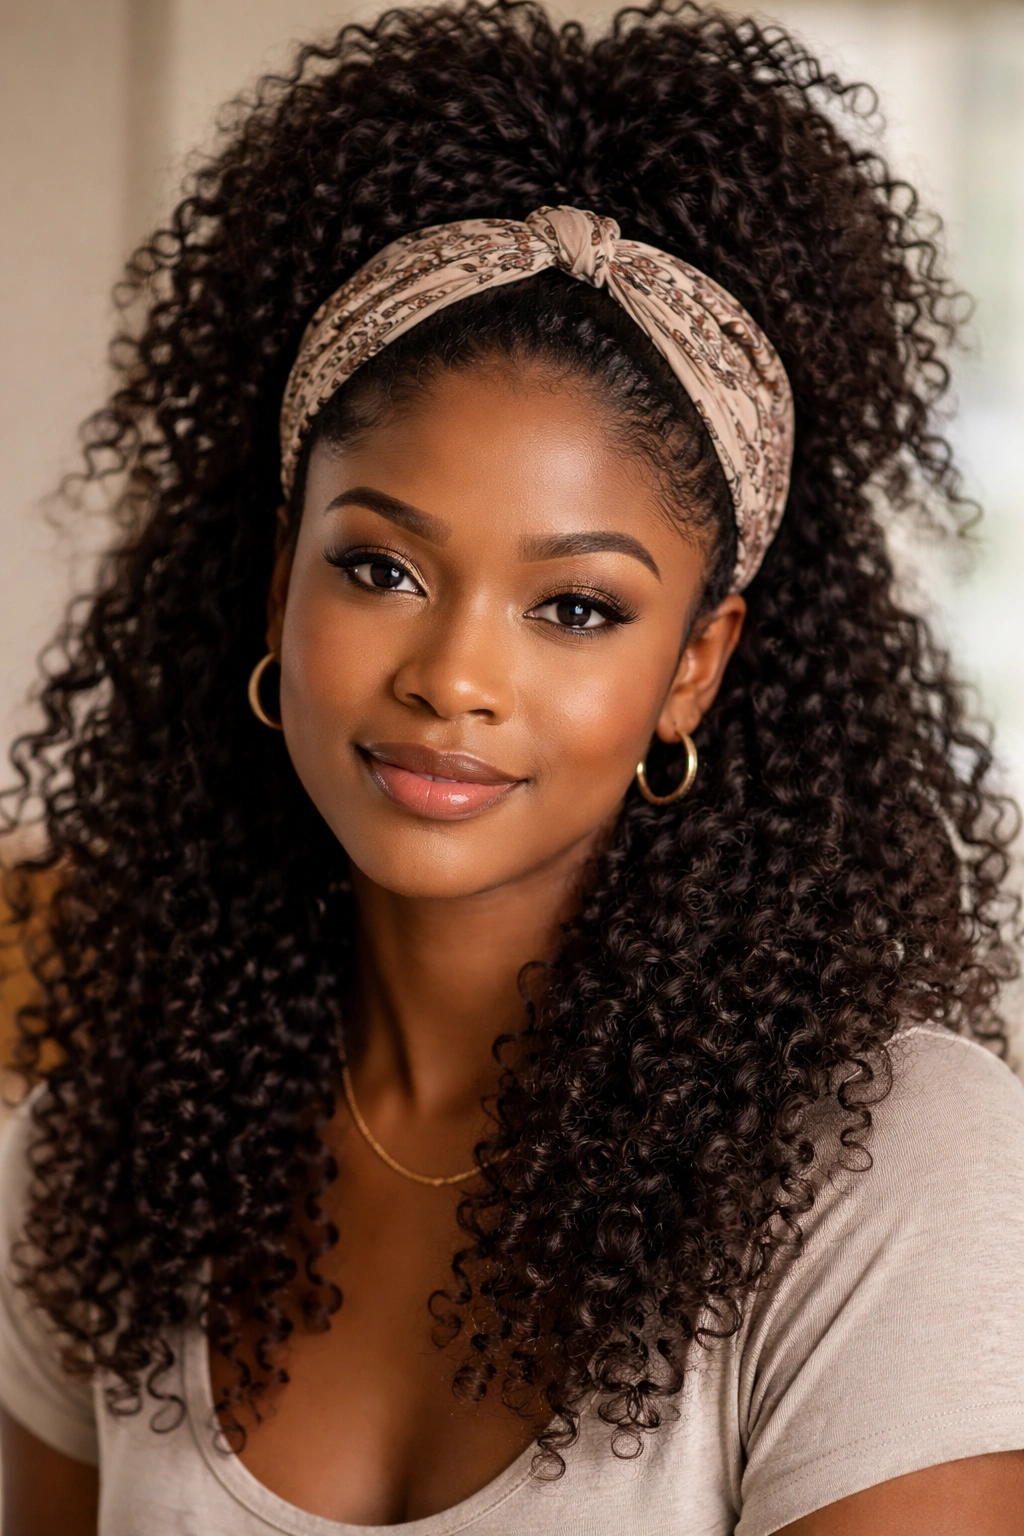
A half-up, half-down bandana style gives you the easiest kind of balance: control at the front and freedom at the back. The top section gets lifted just enough to keep hair off your face, while the lower section stays loose and textured. That means you still get length, shape, and movement without dealing with hair falling into your eyes every ten seconds.
Best for curls that need face-framing control
This one shines on thick curls, layered twist-outs, and hair that looks best when it’s not fully contained. Pull the top half into a small puff, clip, or loose ponytail. Then fold the bandana into a wide strip and place it across the hairline, letting the knot sit near the crown or slightly to one side.
The softness matters. A hard, tight tie makes the style feel rigid. A softer fold keeps the hairline gentle and lets the lower section breathe. If your hair has a lot of shrinkage, leave a little extra room at the crown so the bandana doesn’t collapse the shape.
A few useful details
- Use a wide fold if your forehead feels too bare with narrow bands.
- Keep the knot above the top half, not under it.
- Let the bottom section stay fluffy; don’t comb it down.
- If your curls are very tight, mist the ends lightly before fluffing.
This is a strong choice when you want a quick style that still looks like you planned it.
8. The Mini Twists and Frizz-Softening Wrap
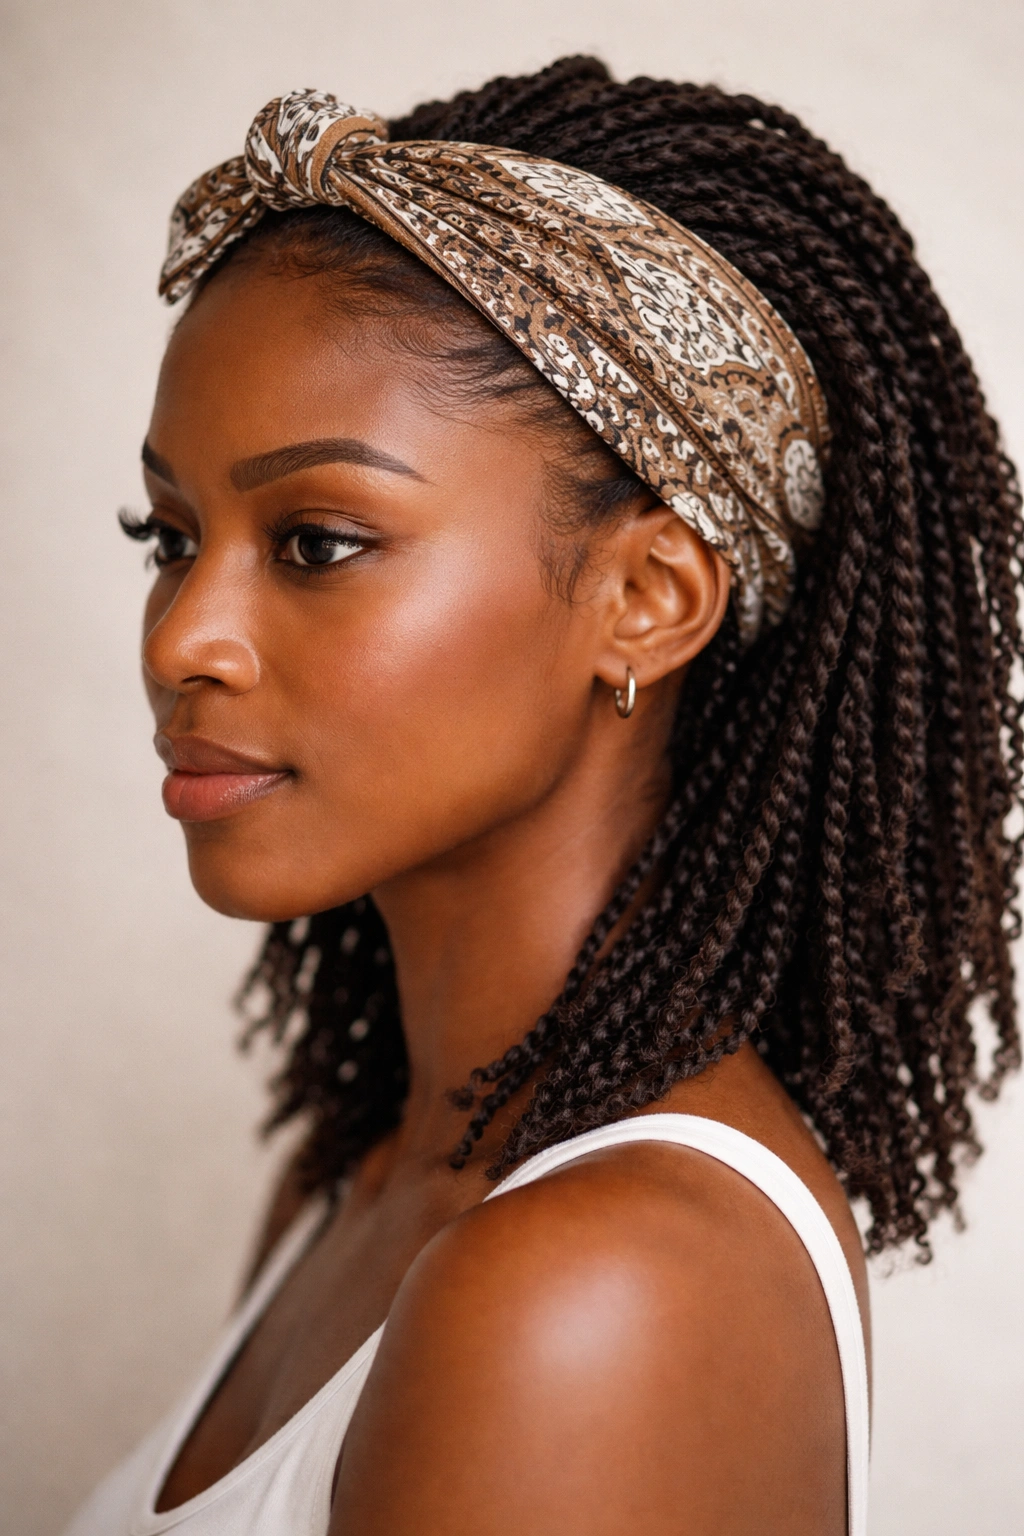
Mini twists and bandanas get along because neither one needs perfect parts to work. That’s the charm. The twists handle the texture, while the bandana smooths the front and keeps the whole style from looking too busy. If you’ve got a fresh set, this combo can carry you through several easy days without making your hair feel neglected.
What I like here is the texture contrast. The twists give structure, and the bandana acts like a clean line across the top. You can wear the knot in the front for a more playful look, or tuck it back if you want the twists to do all the talking. Either way, the style feels settled fast.
This is also a solid choice for locs in the early or mid length stage. The bandana keeps roots from looking too wild on low-effort days, and it keeps your face open. Just don’t wrap too tightly around the temples. Mini twists and locs both need breathing room, or the style starts to feel cramped.
A good habit here is to oil your scalp lightly before tying the bandana. Not a soak. Just enough to keep dryness from showing at the part lines. The wrap will hide the scalp a bit, but if the roots are dull or flaky, the style loses its polish.
Honestly, this one is underrated.
9. Afro Bandana Style: The Tucked Turban Wrap
What if you want almost all the hair covered, but you still want it to look intentional? The tucked turban wrap is the answer. It works on rough hair days, protective rest days, and those mornings when your coils want privacy more than presentation. The bandana becomes the whole shape instead of just an accent, which is useful when the hair itself needs a break.
Fold the bandana into a long strip, place the center at the back of the head, and bring both ends forward. Cross them over the forehead, then bring them back and tuck the tails securely. The wrap should feel snug, not tight. Tight is the enemy here. You want the fabric to sit close enough to stay in place, but loose enough that your temples don’t ache by lunch.
This style is strongest on hair that’s stretched, braided, or pinched into a low base underneath. A full afro can sit under it too, but you may need a larger scarf or a wider cloth. If the bandana keeps slipping, the problem is usually the fabric size, not your skill. Go bigger before you blame your hands.
Keep the front smooth and the crown rounded. A lumpy wrap looks accidental. A clean tuck looks finished.
10. The Asymmetrical Front Tie With a Free Fro
Some mornings you want the fro to do the talking, but not every strand needs to be free. An asymmetrical front tie gives you that middle ground. One side of the bandana sits low across the hairline, the knot lands off to one side, and the rest of the hair stays open and big. It has a little swagger to it. Not too much. Just enough.
This style works well when your fro has height and shape but the front needs a small bit of control. It’s also a nice choice if you wear hoops, bold lipstick, or glasses, because the off-center tie keeps the face from feeling crowded. The hair gets volume, the bandana gives structure, and the whole thing feels easy.
Keep the fold moderately wide so it actually holds its place. Too narrow, and it turns into a flimsy ribbon. Too wide, and it swallows the forehead. Somewhere in the middle is the sweet spot. If your fro is dense, don’t fight it down. Let it sit proud and wide around the bandana line.
A small styling move that helps:
- Push the knot down toward the temple, not behind the ear.
- Lift the fro with your fingers after tying.
- Leave a little unevenness near the front on purpose.
- Use a textured cotton bandana if your hair is slippery.
That last part matters more than people admit.
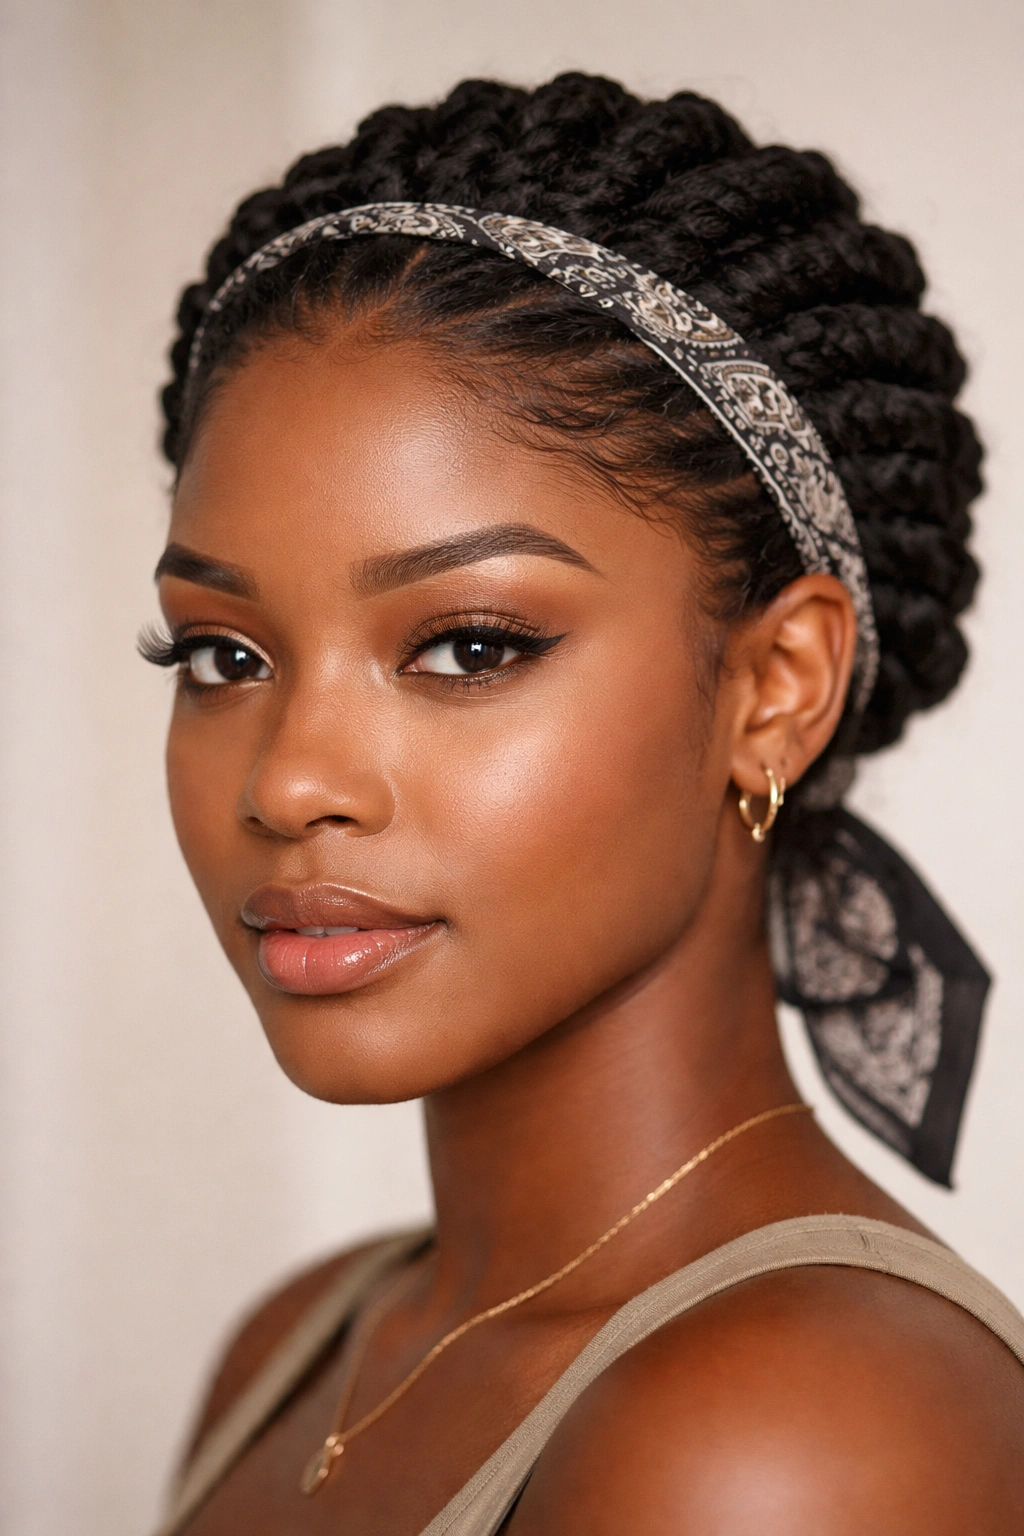
11. The Braided Front Accent With a Scarf Edge
Unlike a full wrap, this style leaves the braid pattern visible. That’s why it works so well for box braids, cornrows, knotless braids, or braid-outs that need a little framing instead of a full cover-up. The bandana sits like a border at the front, which keeps the style from looking unfinished on days when you want to leave the house fast.
The best versions use a narrow fold placed right along the front hairline or just behind it. That keeps the braids visible while still softening the edge where the hair meets the face. A knot in the back keeps the front clean, but a side knot can work too if you want a more casual feel.
If your braids are fresh, this style is neat with almost no work. If they’ve started to frizz a little, the bandana hides the roots without making you redo everything. That is the kind of practical styling I can get behind. It buys time. Real time.
What it’s best for
- Fresh braids you don’t want to flatten
- Older braid styles that need a quick refresh
- Medium to long lengths that need face framing
- Days when you want your parting to stay visible
Don’t pick a bandana with a busy print if the braids already have a lot going on. Sometimes a plain color keeps the whole look from turning loud.
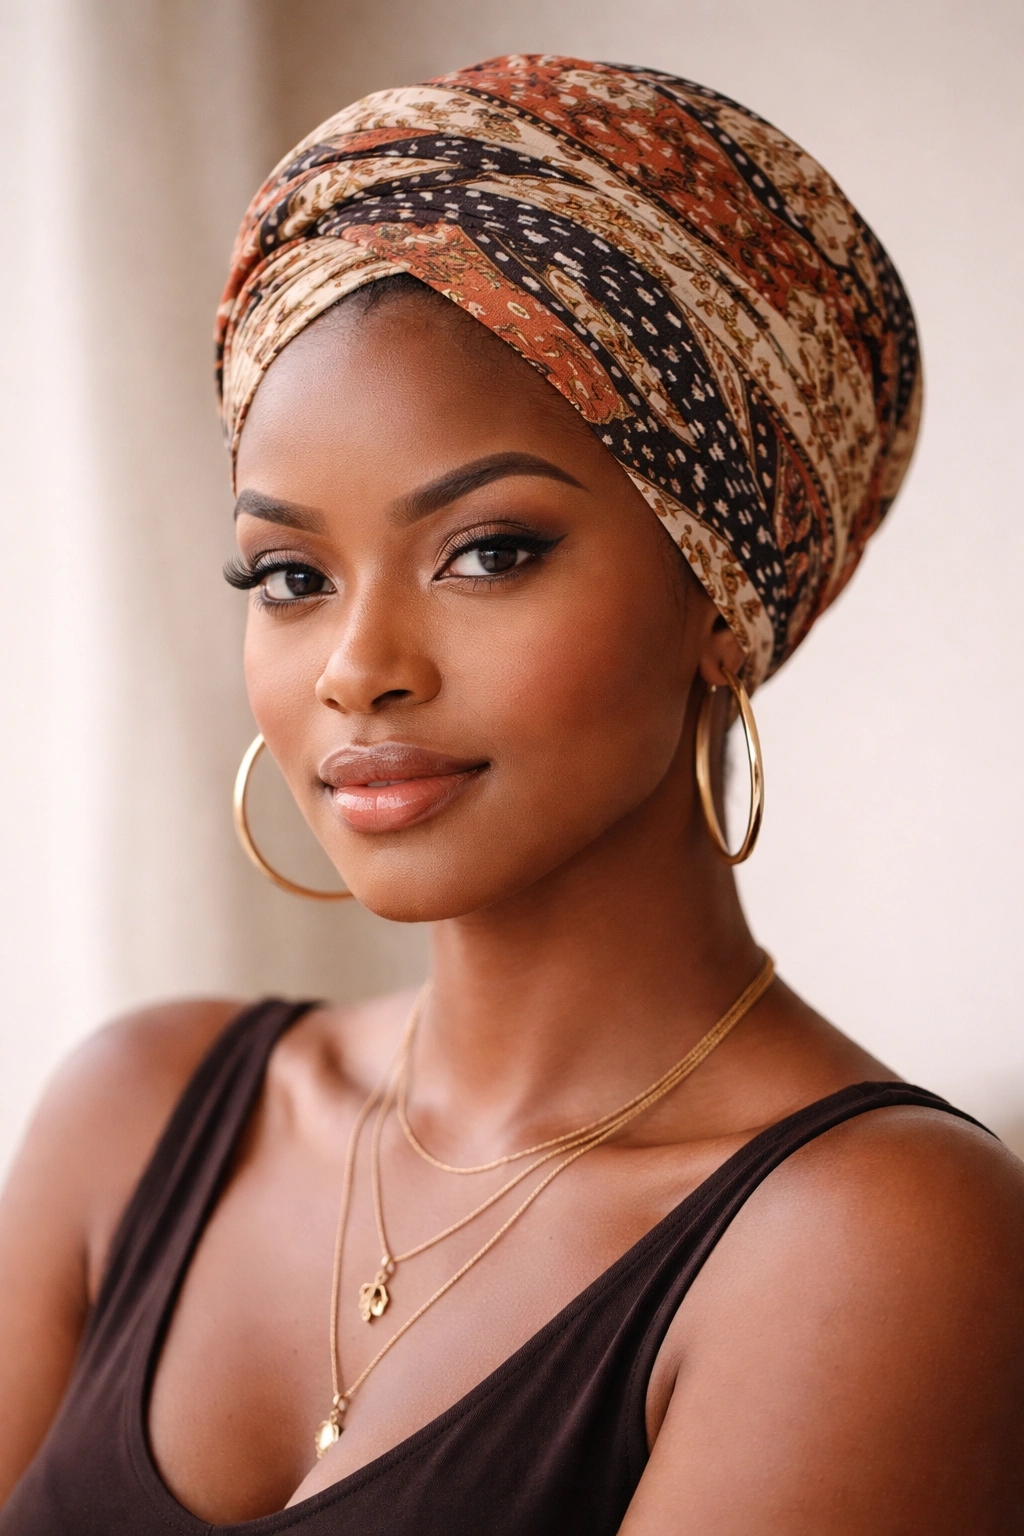
12. Afro Bandana Style: The Full-Cover Quick Wrap
This is the no-nonsense option for the days when you need to be out the door fast and your hair is not in the mood for compromise. The full-cover quick wrap hides most of the hair, protects the front, and gives you a neat shape in under a minute once you know the fold. It’s the style I’d reach for on a tired morning, after a long workout, or anytime I want my hair to stop being the main task of the day.
Use a large bandana or, better yet, a scarf with enough width to cover the crown without pulling. Start at the back of the head, bring the ends forward, cross them above the forehead, then wrap them back and tuck. If the wrap feels too tight at the temples, loosen it. A headache is not part of the look.
This style works best when the hair underneath is either protected in braids, twists, or a low base, but it can also sit over a loose fro if the cloth is large enough. A satin underlayer helps when the goal is to keep moisture in and friction out. That’s not glamorous, but it is practical, and practical wins on quick hair days.
Keep one thing in mind: the wrap should sit on your head, not squeeze it. There’s a difference, and your scalp knows the difference immediately.
A good bandana style doesn’t have to be complicated to feel like you. The best ones respect your hair’s texture, save time, and leave you looking like you chose the style on purpose, which is half the battle on rushed mornings. Some days call for a puff, some for a wrap, and some for a side knot that just happens to look better than the plan you had five minutes ago.